reSpeaker Clip Getting Started
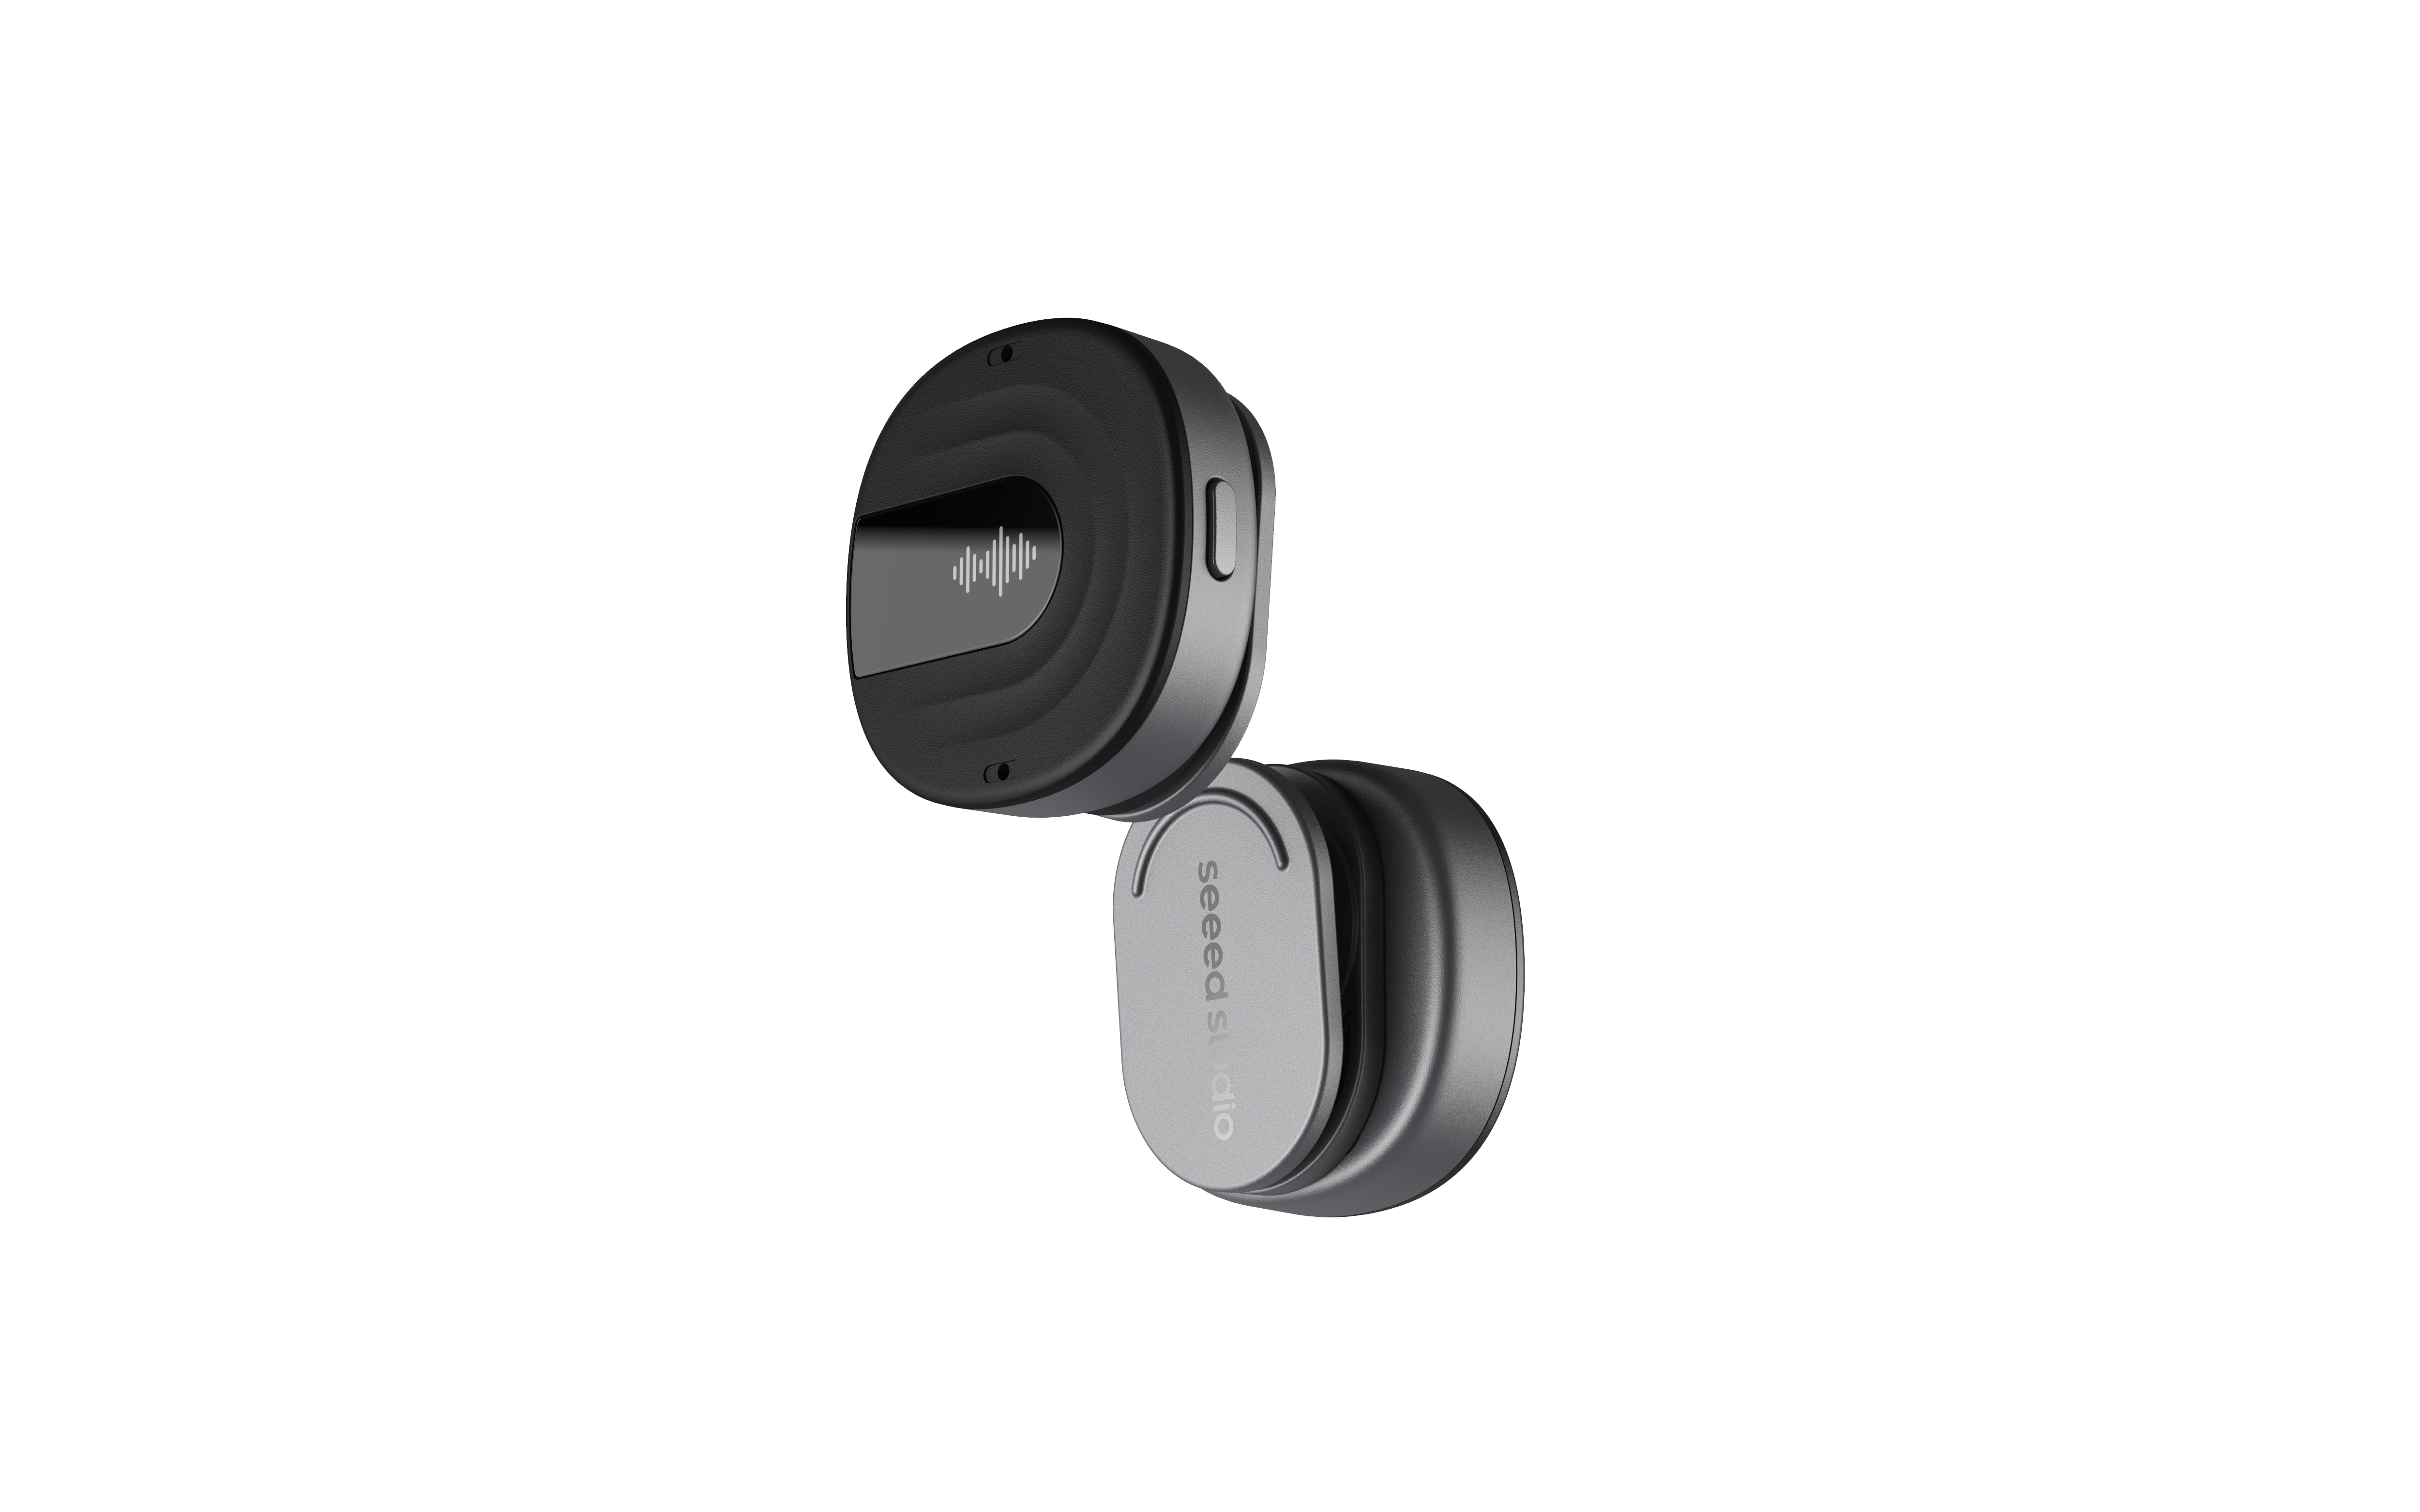
reSpeaker Clip is an open wearable AI recorder designed for retail, meetings, interviews, classrooms, service training, and other scenarios that require high-quality voice recording and follow-up content organization. It integrates dual PDM microphones for 360-degree omnidirectional pickup up to 3 meters, independent recording, mobile file management, AI transcription, and AI summarization, helping users complete the full workflow from on-site recording to structured content.
reSpeaker Clip is also designed as an open hardware and developer-friendly product. It provides open-source firmware, a demo app, and SDK support, allowing developers to customize device behavior and application workflows. Enterprises can also integrate it with internal office systems, privately deployed LLMs, or voice analytics pipelines to build AI voice applications that meet their data security requirements.
reSpeaker Clip works with the SenseCraft Voice App and cloud services, and can also be integrated with local or cloud AI models. Through the app, users can pair the device, manage recordings, export files, transcribe audio, generate AI summaries, customize templates, and perform Q&A retrieval.
This document is an initial Wiki draft for reSpeaker Clip. Some SDK URLs, protocol documents, and resource package links will be added after the product materials are confirmed.
Product Overview
reSpeaker Clip is positioned as an open wearable AI recorder. It can be used not only as a portable recording device, but also as a voice data entry point for enterprise service training, interview records, meeting minutes, and on-site communication review.
The device uses a compact wearable form factor and includes 2GB of internal storage, allowing it to record independently without relying on a phone. It also features a programmable 0.5-inch OLED display and vibration feedback, helping users quickly check recording status, mark important segments, and switch between recording workflows through the screen, button, and haptic feedback.
Key Features
- 360-degree pickup, up to 3 meters: Dual high-performance PDM microphones support omnidirectional pickup for meetings, interviews, retail conversations, and other multi-speaker scenarios.
- Dual recording workflows: Select the appropriate recording behavior based on the environment, from daily wearable notes to multi-person meetings.
- Independent recording and local storage: Built-in 2GB storage lets the device work as a standalone recorder even when the phone is not nearby.
- OLED display and vibration feedback: The 0.5-inch OLED display shows device status, while vibration feedback makes recording control more intuitive.
- Open firmware and SDK: Developers can customize device behavior, button logic, display content, and application-side workflows.
- AI transcription and summarization: Use cloud or local AI models for speech-to-text, AI notes, meeting minutes, and voice Q&A.
- Enterprise integration ready: Connect to internal enterprise systems or privately deployed LLMs for workflows that require data security and customization.
Specifications
This section summarizes the hardware, audio, physical, and battery-related specifications of reSpeaker Clip.
Hardware Specifications
| Specification | Details |
|---|---|
| Main Control | nRF5340+nRF7002 |
| Display | 0.5-inch 88*48 OLED |
| Microphone | Dual PDM, up to 16 kHz sampling rate |
| Audio Output | Noise-reduced audio |
| Connectivity | Bluetooth (BLE 5.3), Wi-Fi (for high-speed audio export) |
| Internal Storage | 2GB (stores approx. 250+ hours of compressed audio) |
| Battery Life | 14-18 hours of continuous recording |
| Interaction | Action Button, vibration motor |
| Charging Interface | 4-pin Magnetic |
Audio Parameters
| Item | Parameter |
|---|---|
| Microphone | Dual PDM microphones |
| Sampling Rate | Up to 16 kHz |
| Pickup Direction | 360-degree omnidirectional pickup |
| Pickup Range | Up to 3 meters |
| Audio Output | Noise-reduced mono audio |
| Compressed Audio Format | Opus mono, 32 kbps |
| Audio Storage | 2GB stores approx. 250+ hours of compressed audio |
| Continuous Recording Time | 14-18 hours |
Physical Parameters
| Item | Parameter |
|---|---|
| Display | 0.5-inch 88*48 OLED |
| Internal Storage | 2GB |
| Interaction | Action Button, vibration motor |
| Charging Method | Magnetic charging base |
| Charging Interface | 4-pin Magnetic |
| Charging Base Power Input | USB-C |
| Wearing Methods | Magnetic attachment, lapel clip, neck lanyard |
| Temperature Note | Avoid use in extreme temperatures from -20°C to 60°C |
Target Scenarios
- Retail service recording and training review
- Long-form audio recording for meetings, interviews, and classes
- Customer communication, sales visits, service quality inspection, and other business scenarios
- Workflows that need to convert voice content into structured text and summaries
Core Capabilities
- Dual PDM microphones with 360-degree pickup
- Independent recording
- 2GB internal storage
- 0.5-inch OLED status display
- Vibration feedback
- BLE and Wi-Fi connectivity
- AI audio transcription
- AI summarization and structured extraction
- Multiple wearing methods
- Mobile file management
- SenseCraft Voice App and cloud service support
- Open-source firmware, demo app, and SDK support
Hardware Overview
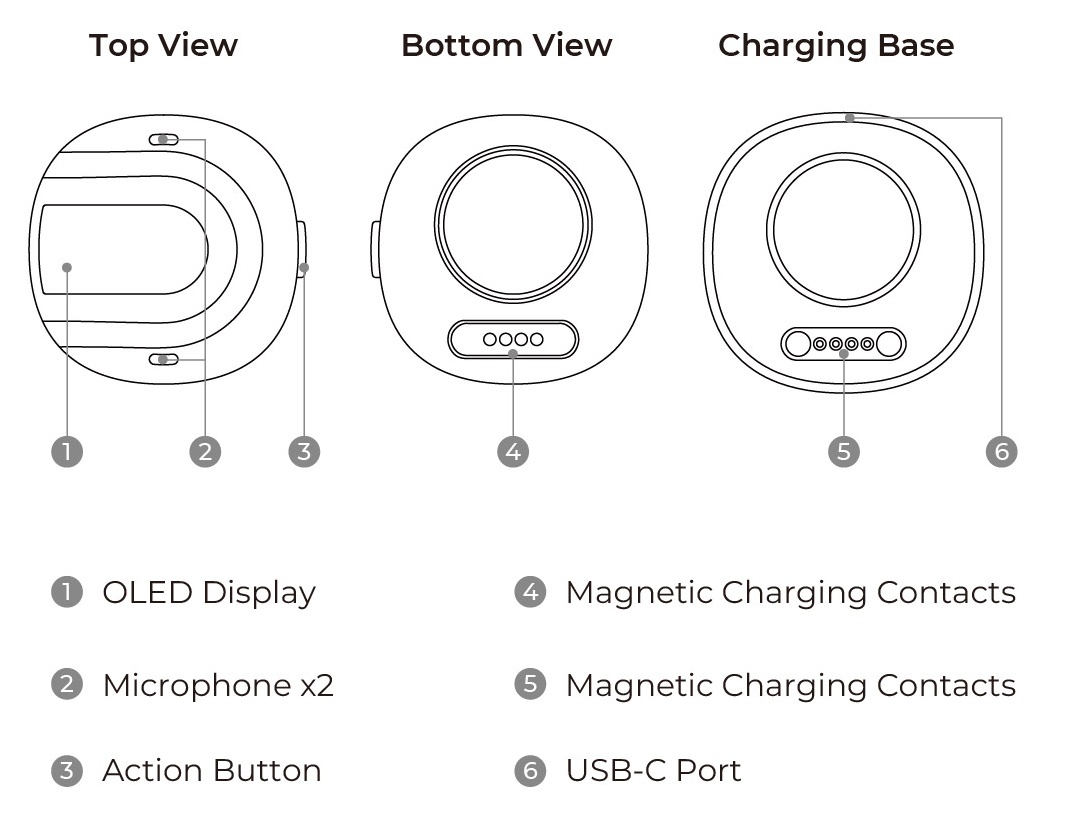
reSpeaker Clip uses a portable clip-style form factor. The top side integrates an OLED display, dual microphones, and an Action Button. The bottom side and the charging base both include magnetic charging contacts. The charging base is powered through USB-C, making it easy to switch between desktop charging and wearable recording.
What's in the Box
| Item | Quantity | Description |
|---|---|---|
| reSpeaker Clip device | 1 | Portable recording device |
| Magnetic lapel clip | 1 | For attaching the device to clothing |
| Magnetic patch | 1 | For magnetic attachment |
| Charging base | 1 | For charging the device |
| 0.5 m Type-C cable | 1 | For powering the charging base |
| Neck lanyard | 1 | For neck hanging |
Quick Start
This section introduces the basic workflow from device preparation and app connection to recording and AI summarization. For first-time use, follow the steps in order.
Device Preparation
- Place reSpeaker Clip into the charging base.
- Use a Type-C cable to connect the charging base to a power adapter or a computer USB port.
- Wait for the device to charge.
- Press and hold the power button to turn on the device.
- Select the wearing method based on your use case.
Wearing Methods
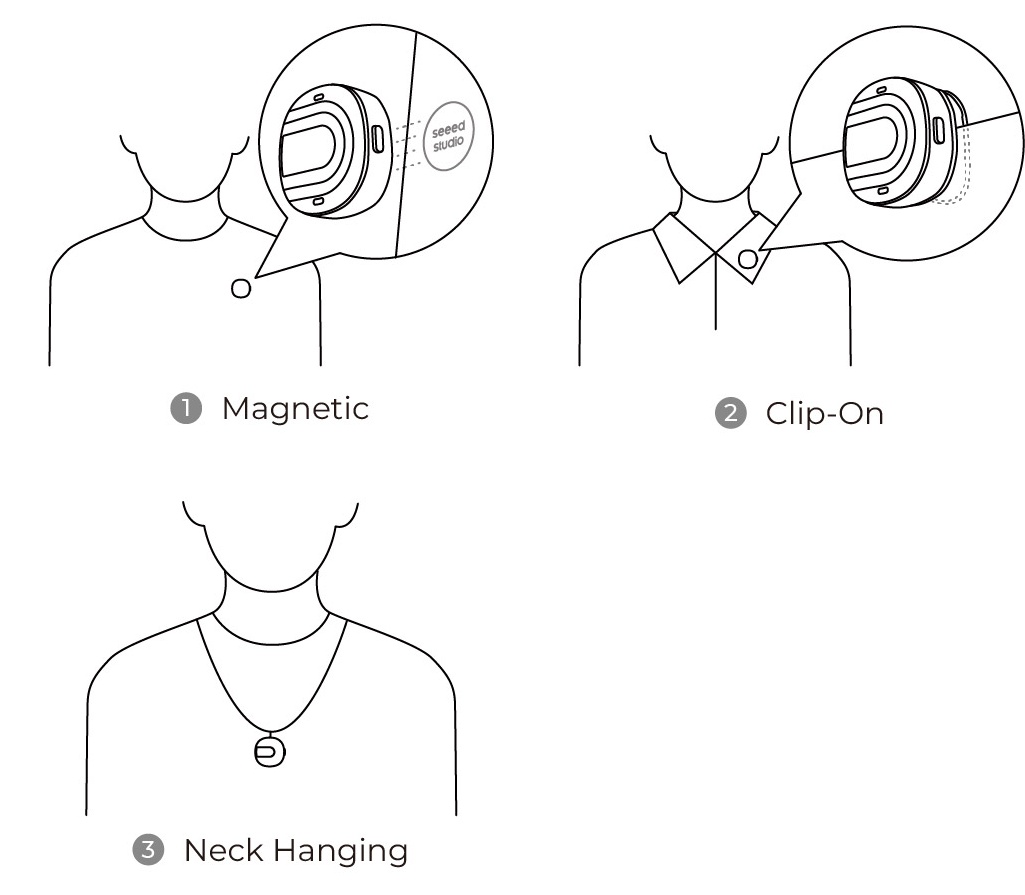
reSpeaker Clip supports three wearing methods: magnetic attachment, lapel clip, and neck lanyard. Choose the most suitable method for meetings, interviews, service training, or mobile recording.
SenseCraft Voice App
Download the App
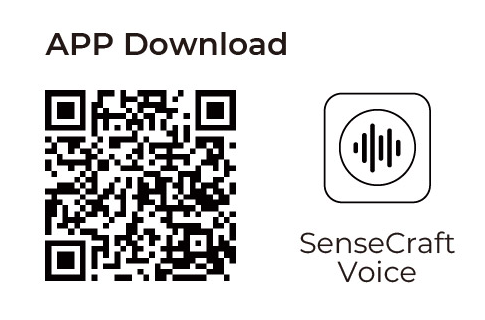
Scan the QR code below with your phone, or open the SenseCraft Voice App download page to download and install the app.
Connect the Device
- Open the SenseCraft Voice App and sign in.
- Press and hold the side button on the device to power it on, then wait until the device is ready to connect.
- Tap Add Device on the app home page.
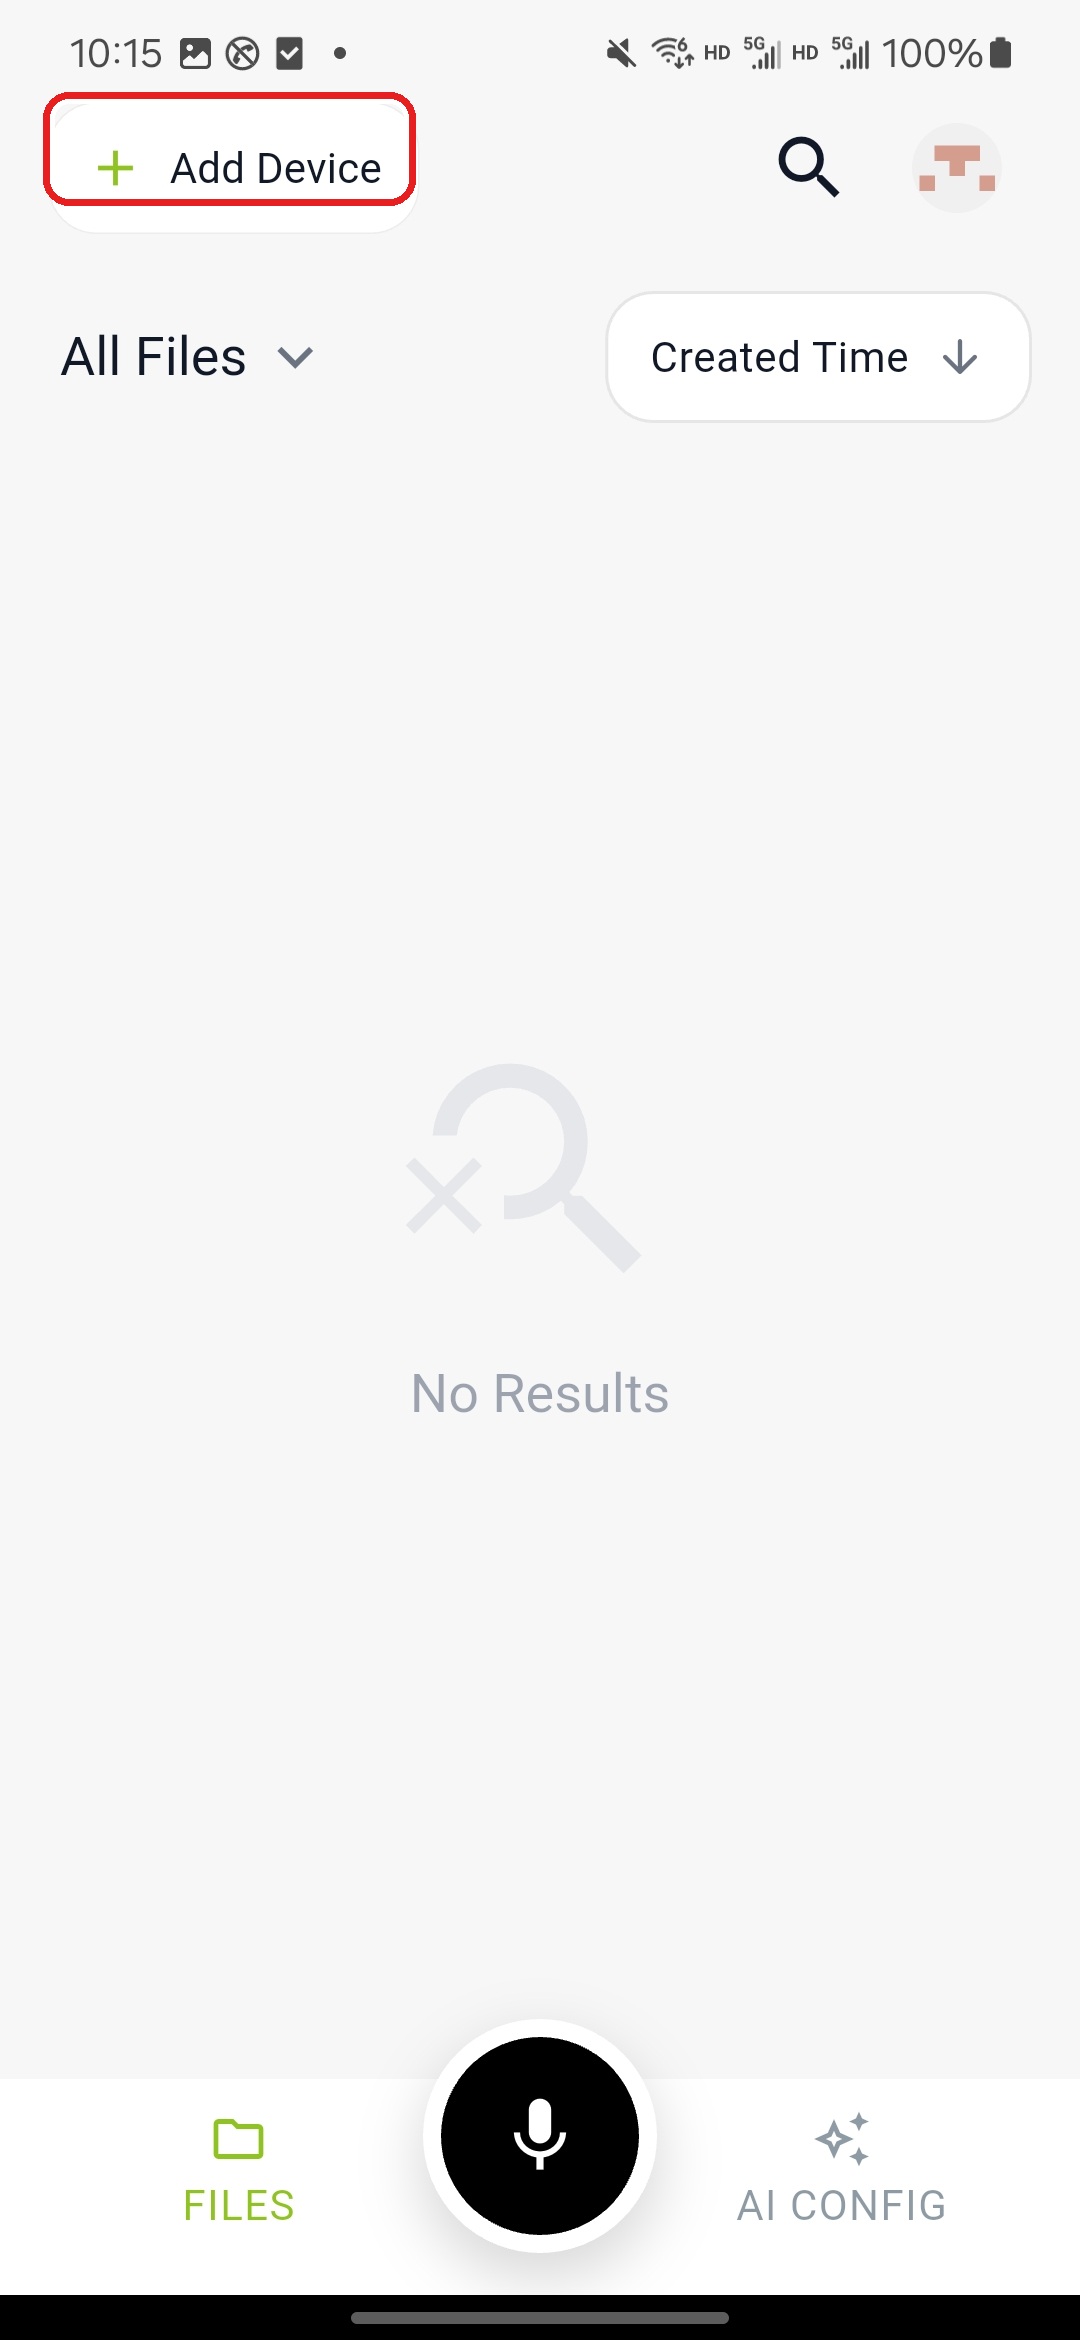
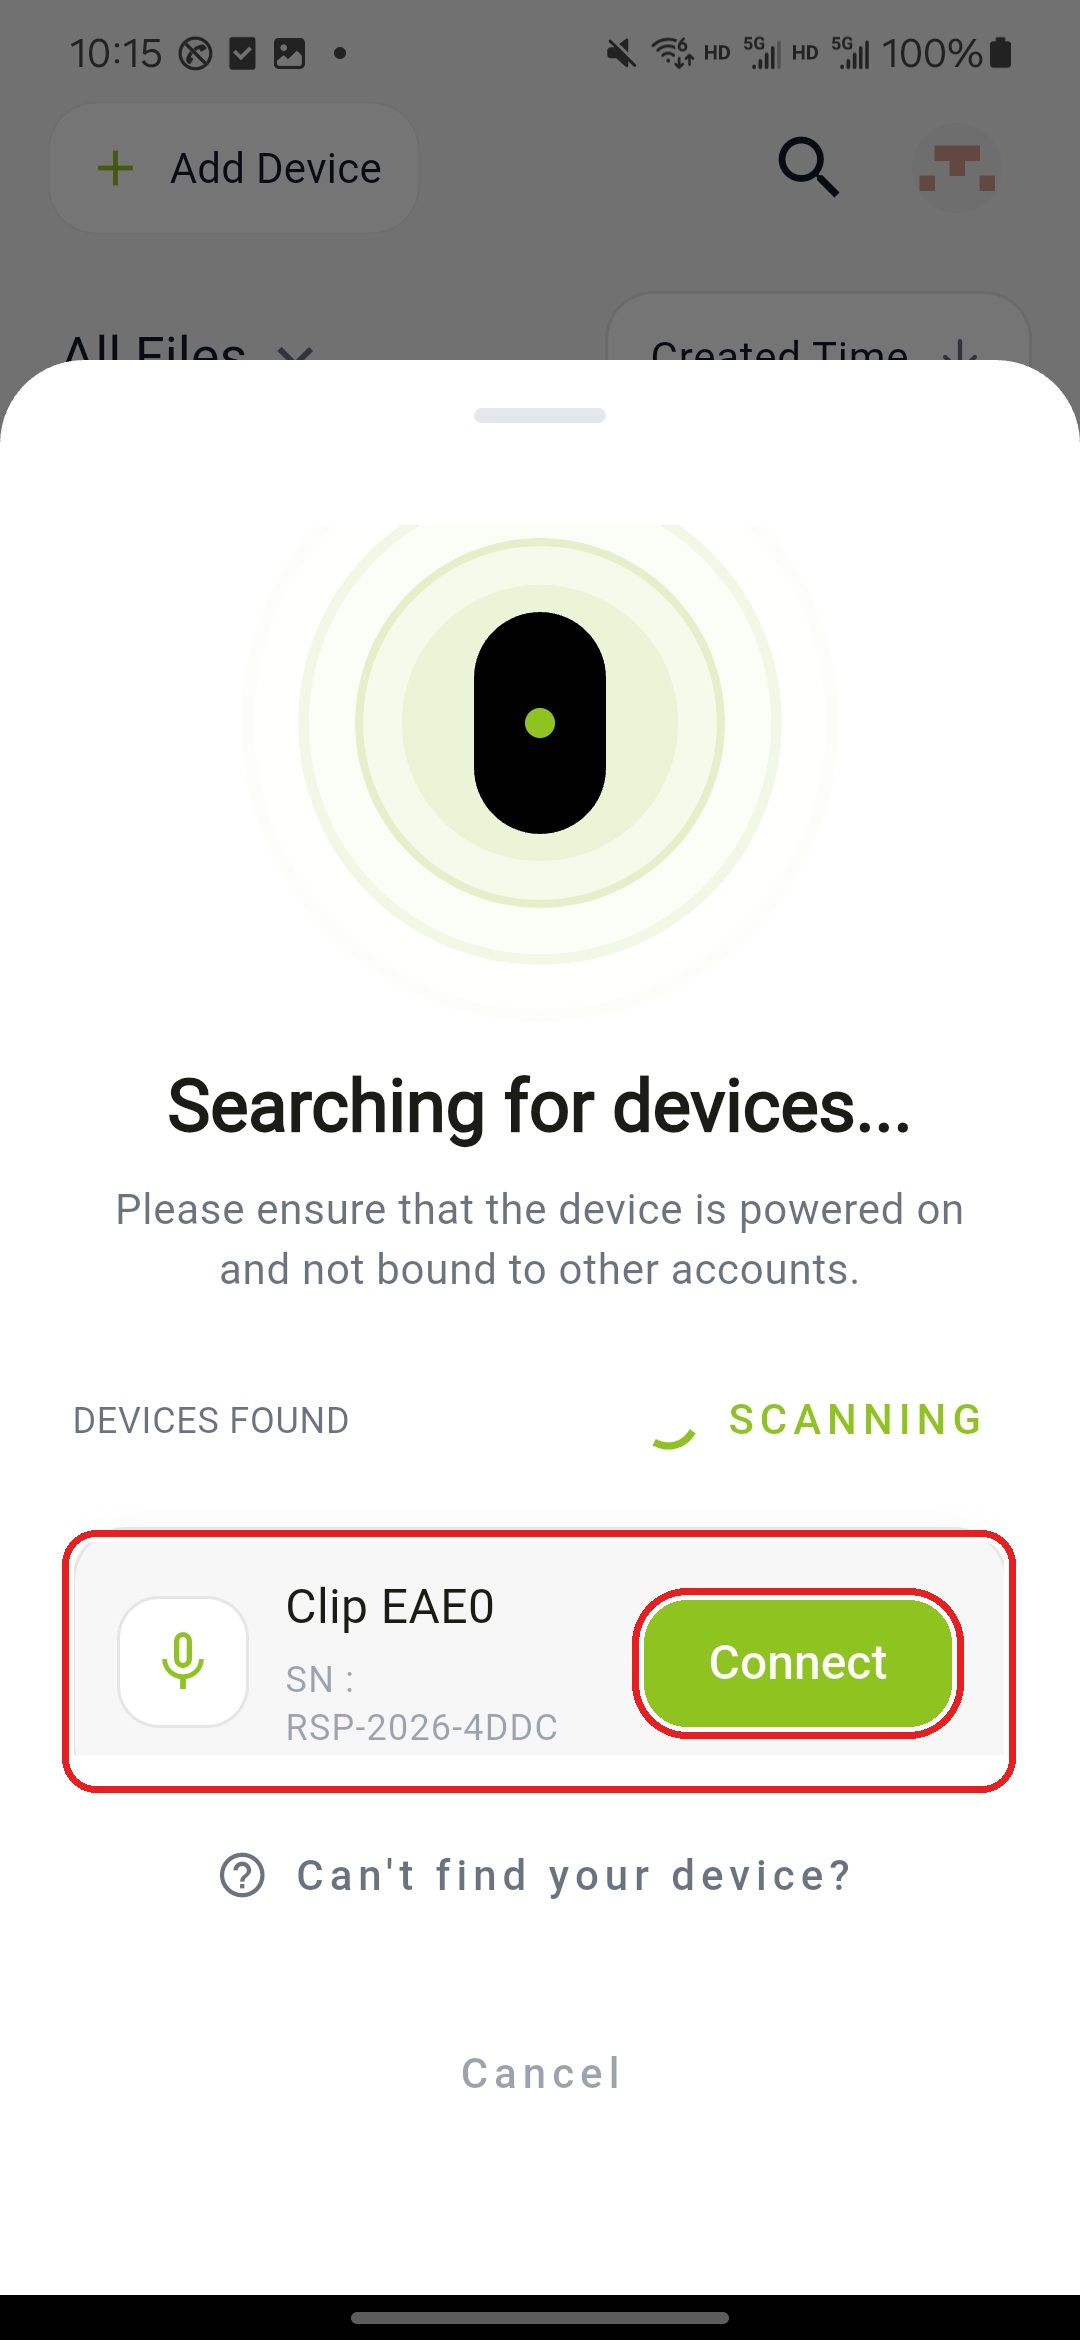
- The app automatically searches for nearby devices. Match the identifier shown on the device with the device name shown in the app, such as
Clip EAE0. After confirming that the names match, tap Connect for the corresponding device.
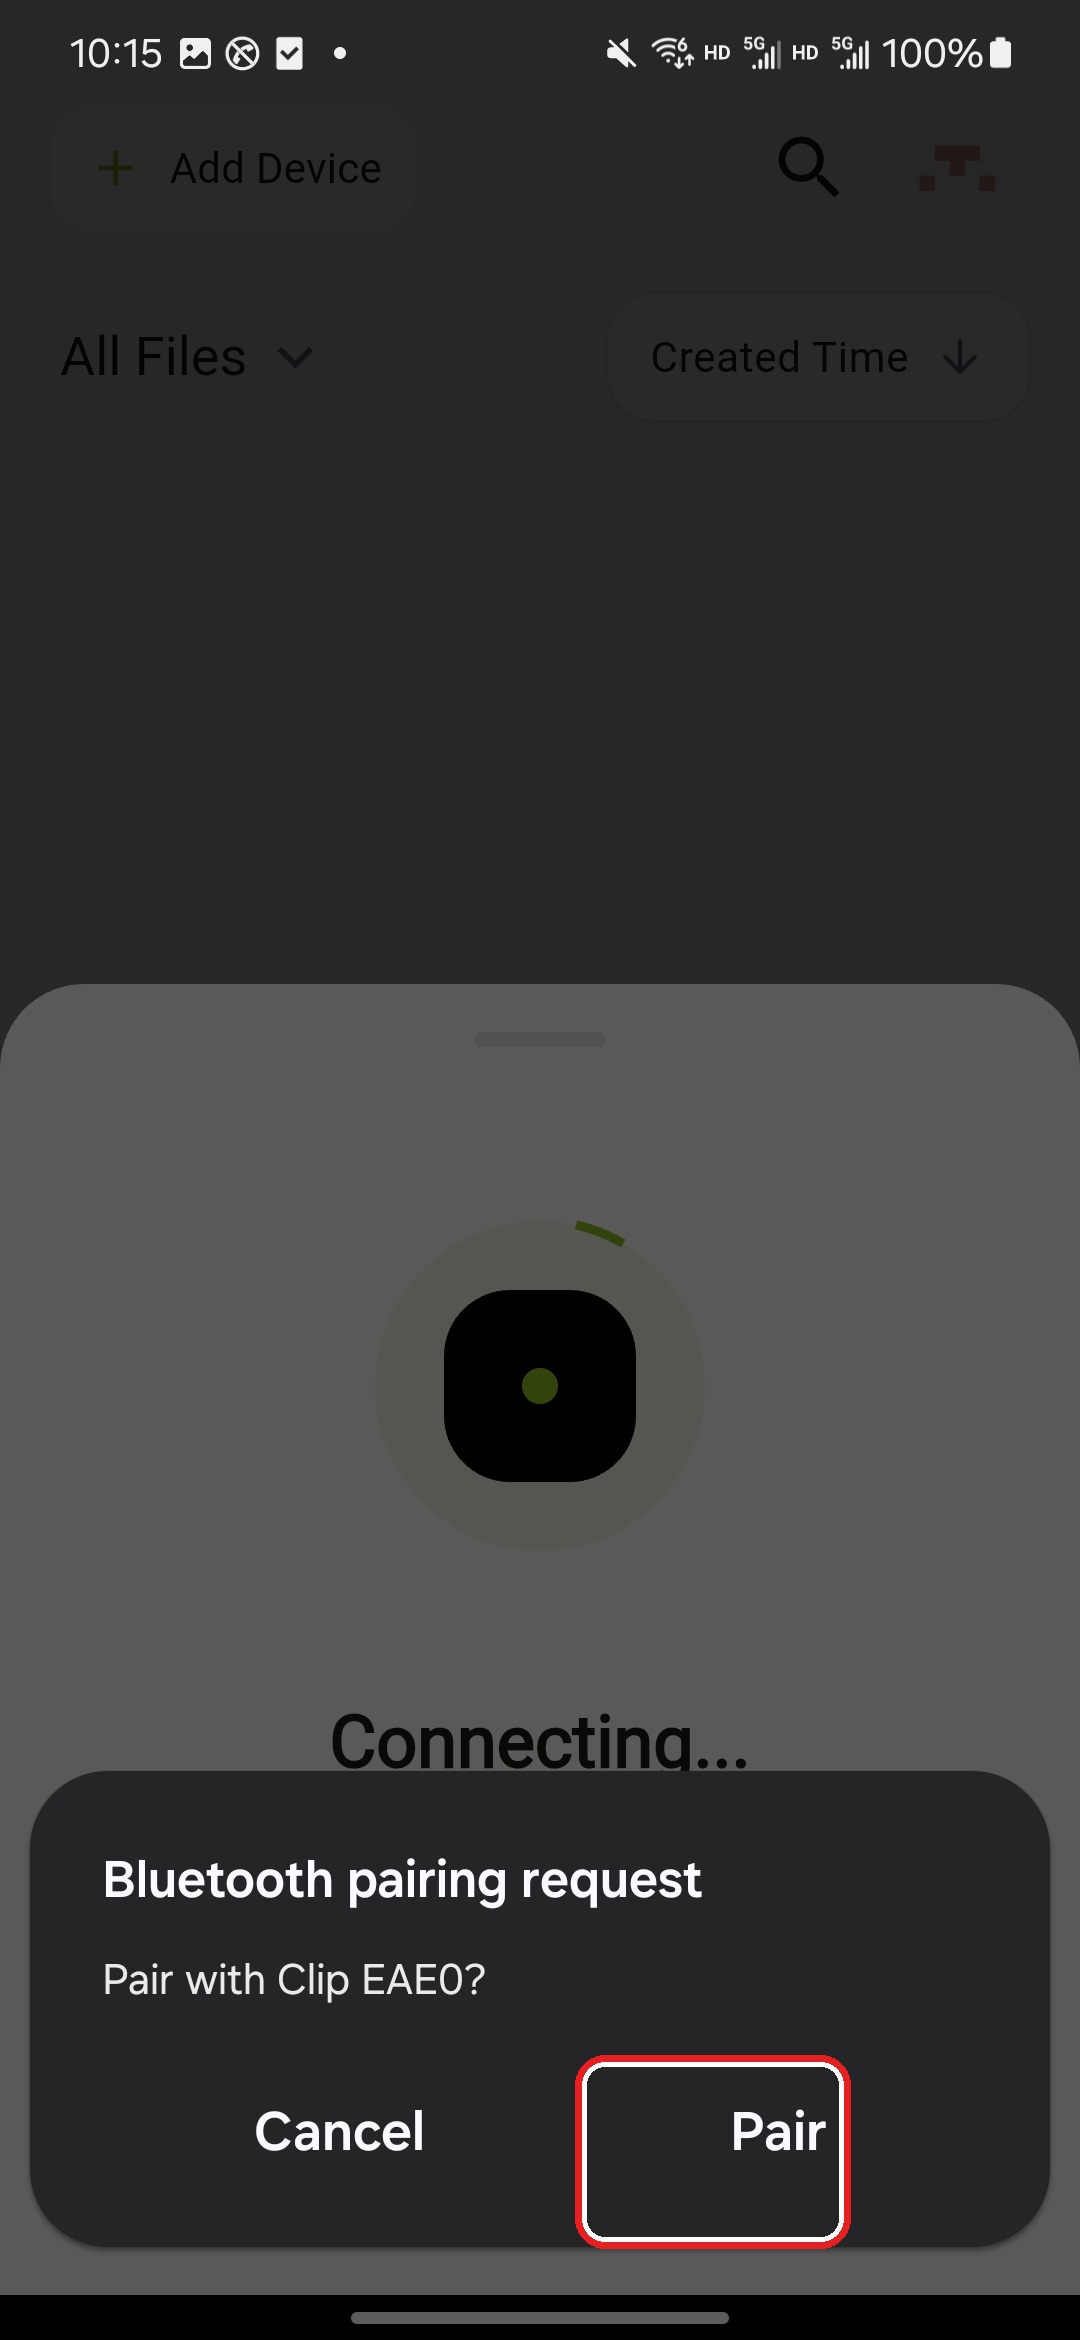
- When the Bluetooth pairing request appears on your phone, confirm the name again and tap Pair.
- After pairing is complete, follow the app instructions to finish the remaining setup.
If the app cannot find the device, first confirm that the device is powered on and has sufficient battery. If the battery is low, charge the device before pairing again. Also make sure the device is in Bluetooth pairing state, move the phone close to the device, and scan again.
Recording Operations
reSpeaker Clip can quickly control recording through the side button.
- Press and hold the button to start or stop recording.
- During recording, short press the button once to mark the current segment as important.
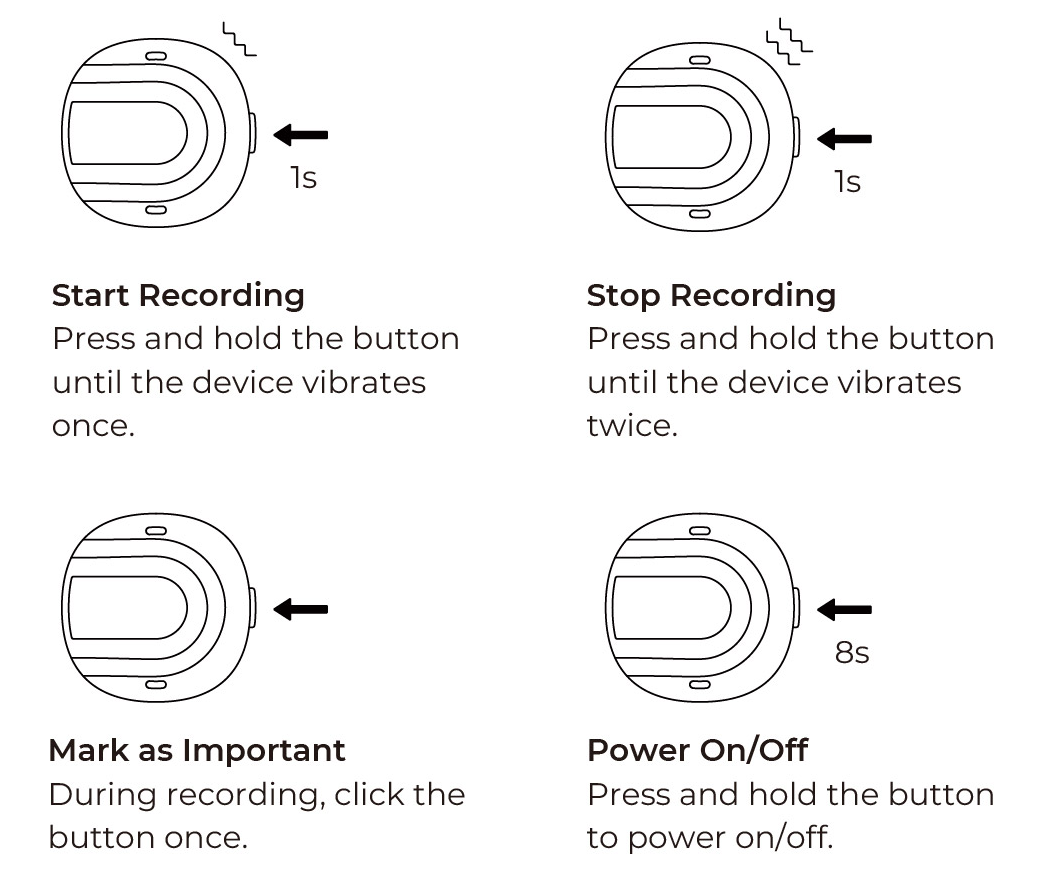
During recording, the device uses the screen display and vibration feedback to indicate the current status.
File Management
After recording, you can manage audio files in the SenseCraft Voice App.
- Play back recordings
- Trim audio
- Transfer files through Wi-Fi or BLE
- Export audio or text results
- View marked important segments
AI Features
reSpeaker Clip can work with the SenseCraft Voice App and cloud services for intelligent audio processing.
Confirm STT / LLM Service Configuration
Before using audio transcription, AI summarization, or Q&A retrieval, open the AI CONFIG page at the bottom of the app and confirm that both STT Service and LLM Service are configured. The STT service is used for audio transcription, while the LLM service is used for summary generation and Q&A processing.
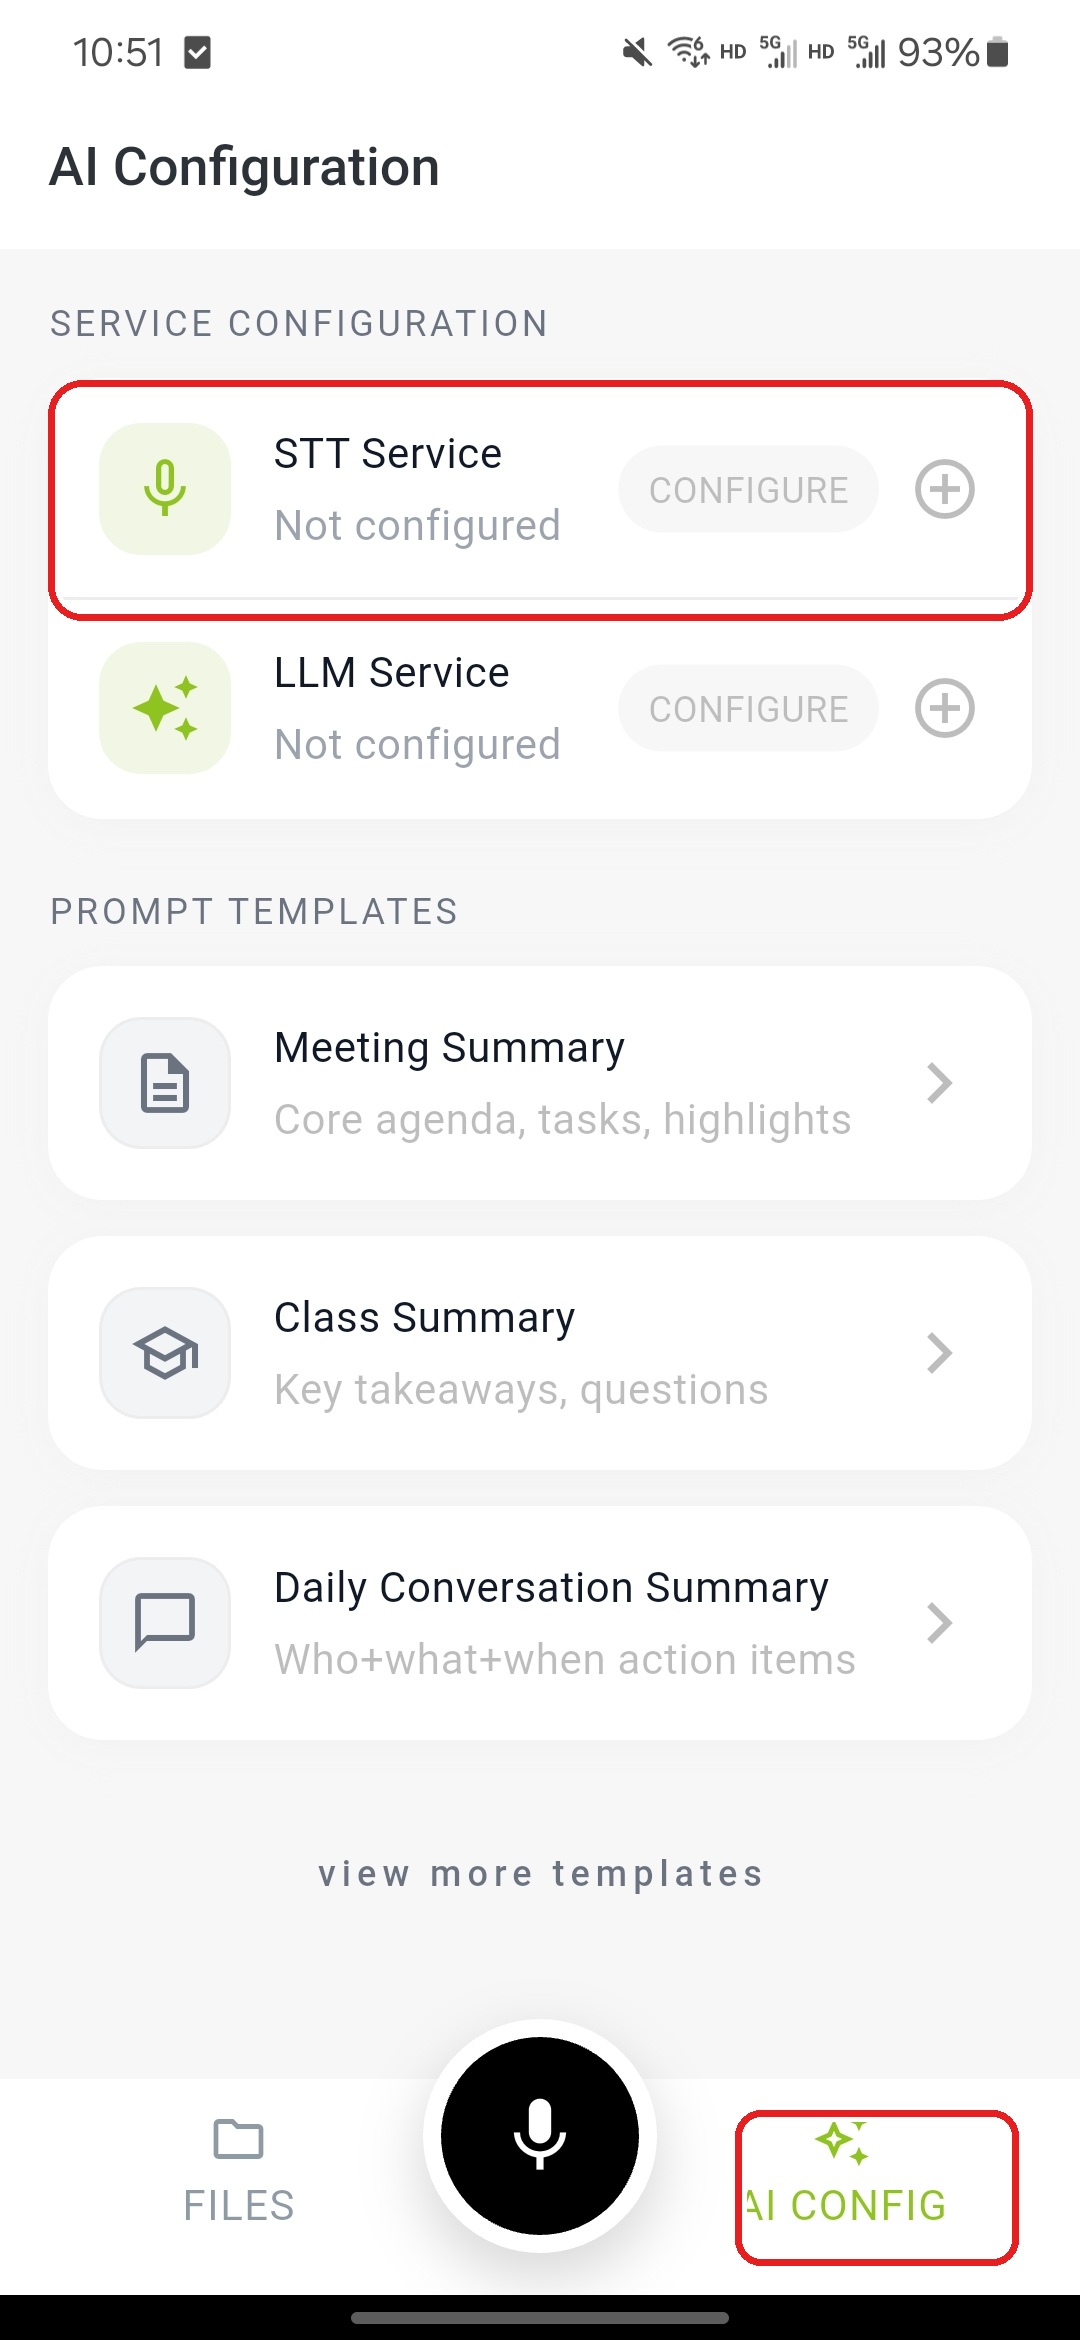
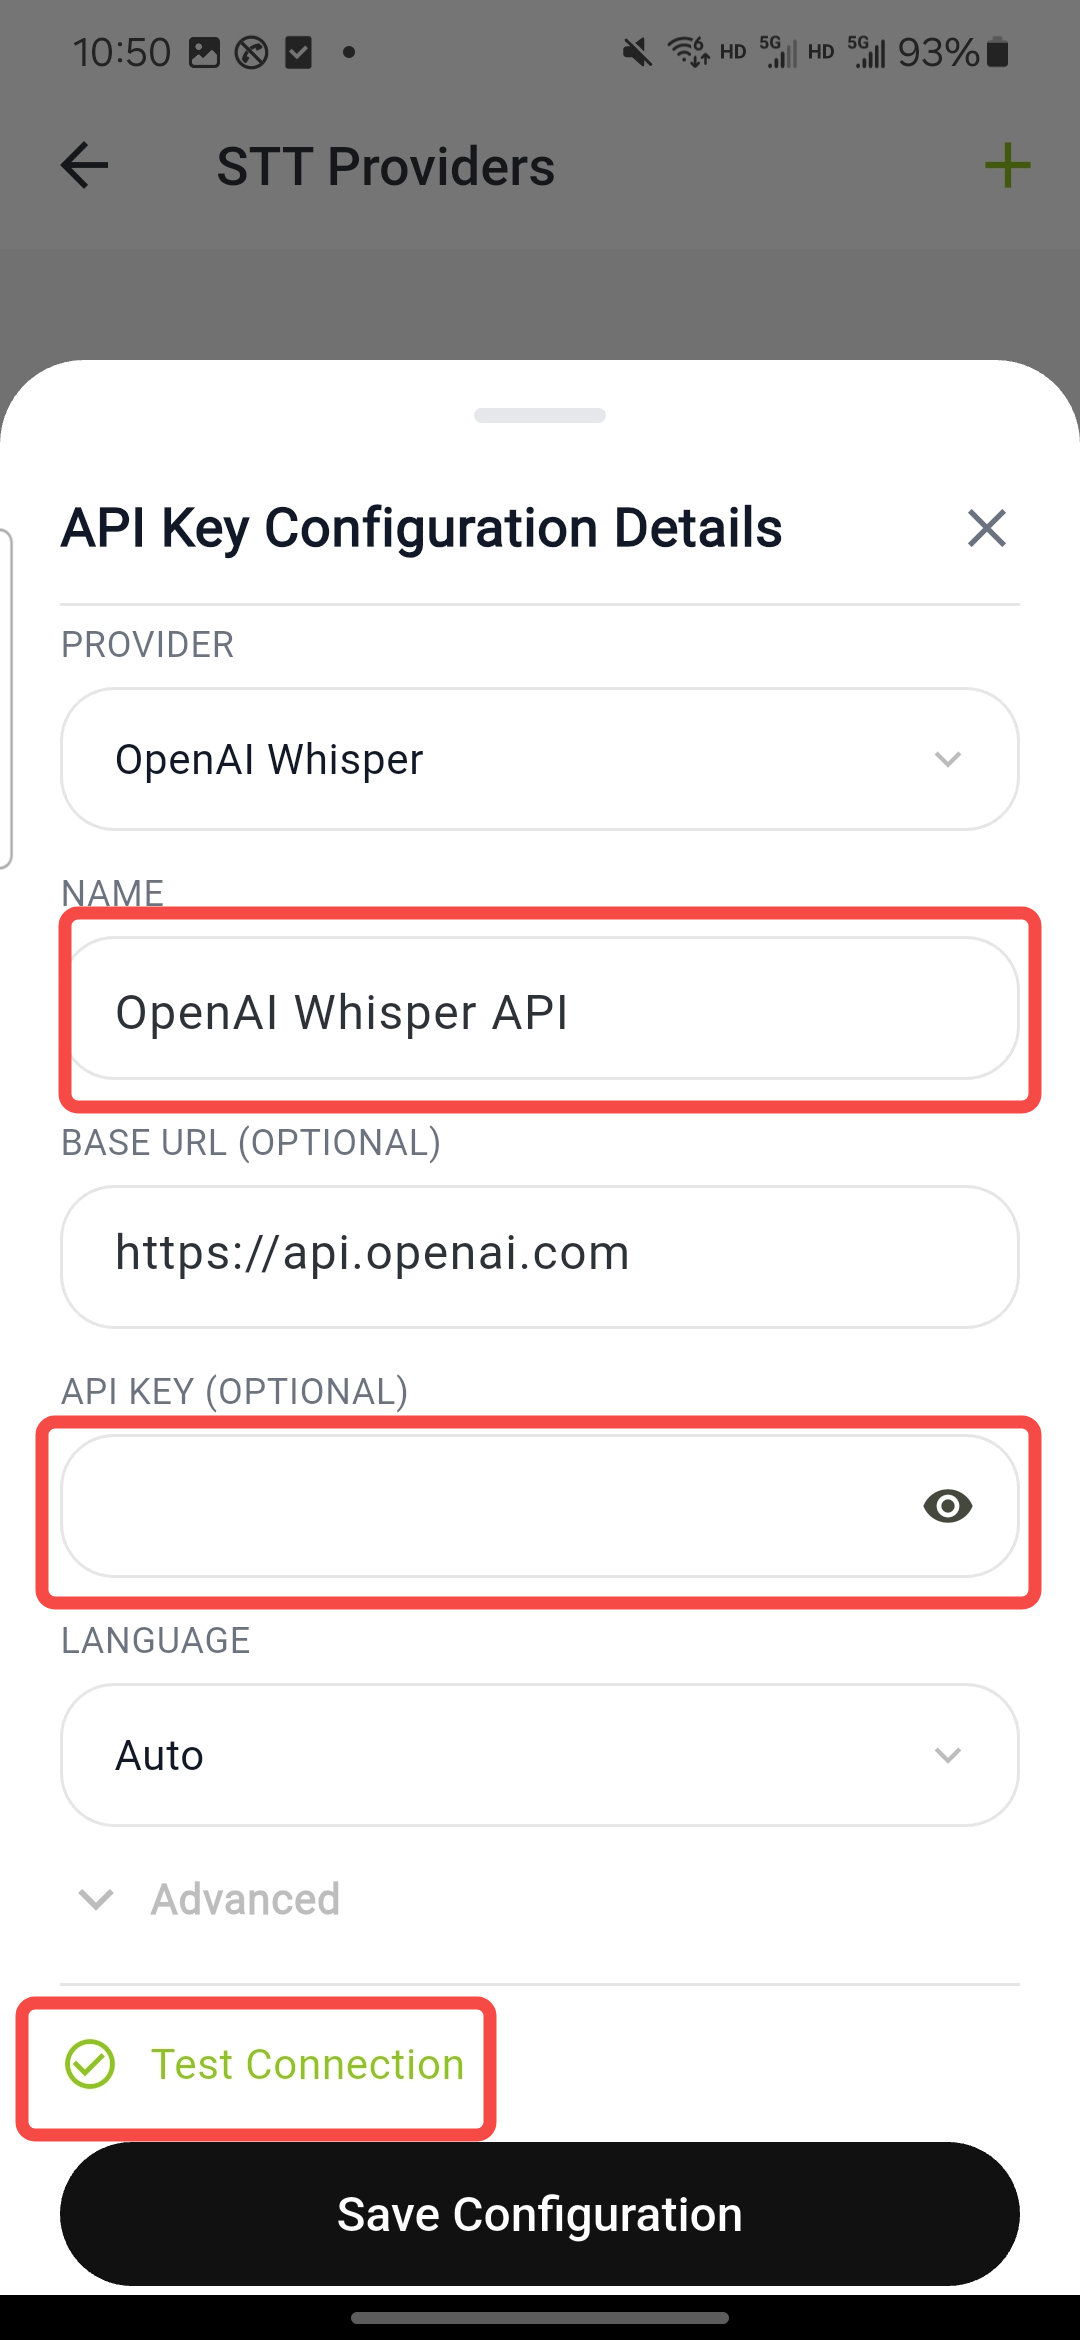
If STT Service shows Not configured, tap the configuration entry on the right side of STT Service to enter the STT Providers page. Fill in Provider, Base URL, API Key, and Language according to the transcription service you use. Tap Test Connection, and after the test passes, tap Save Configuration.
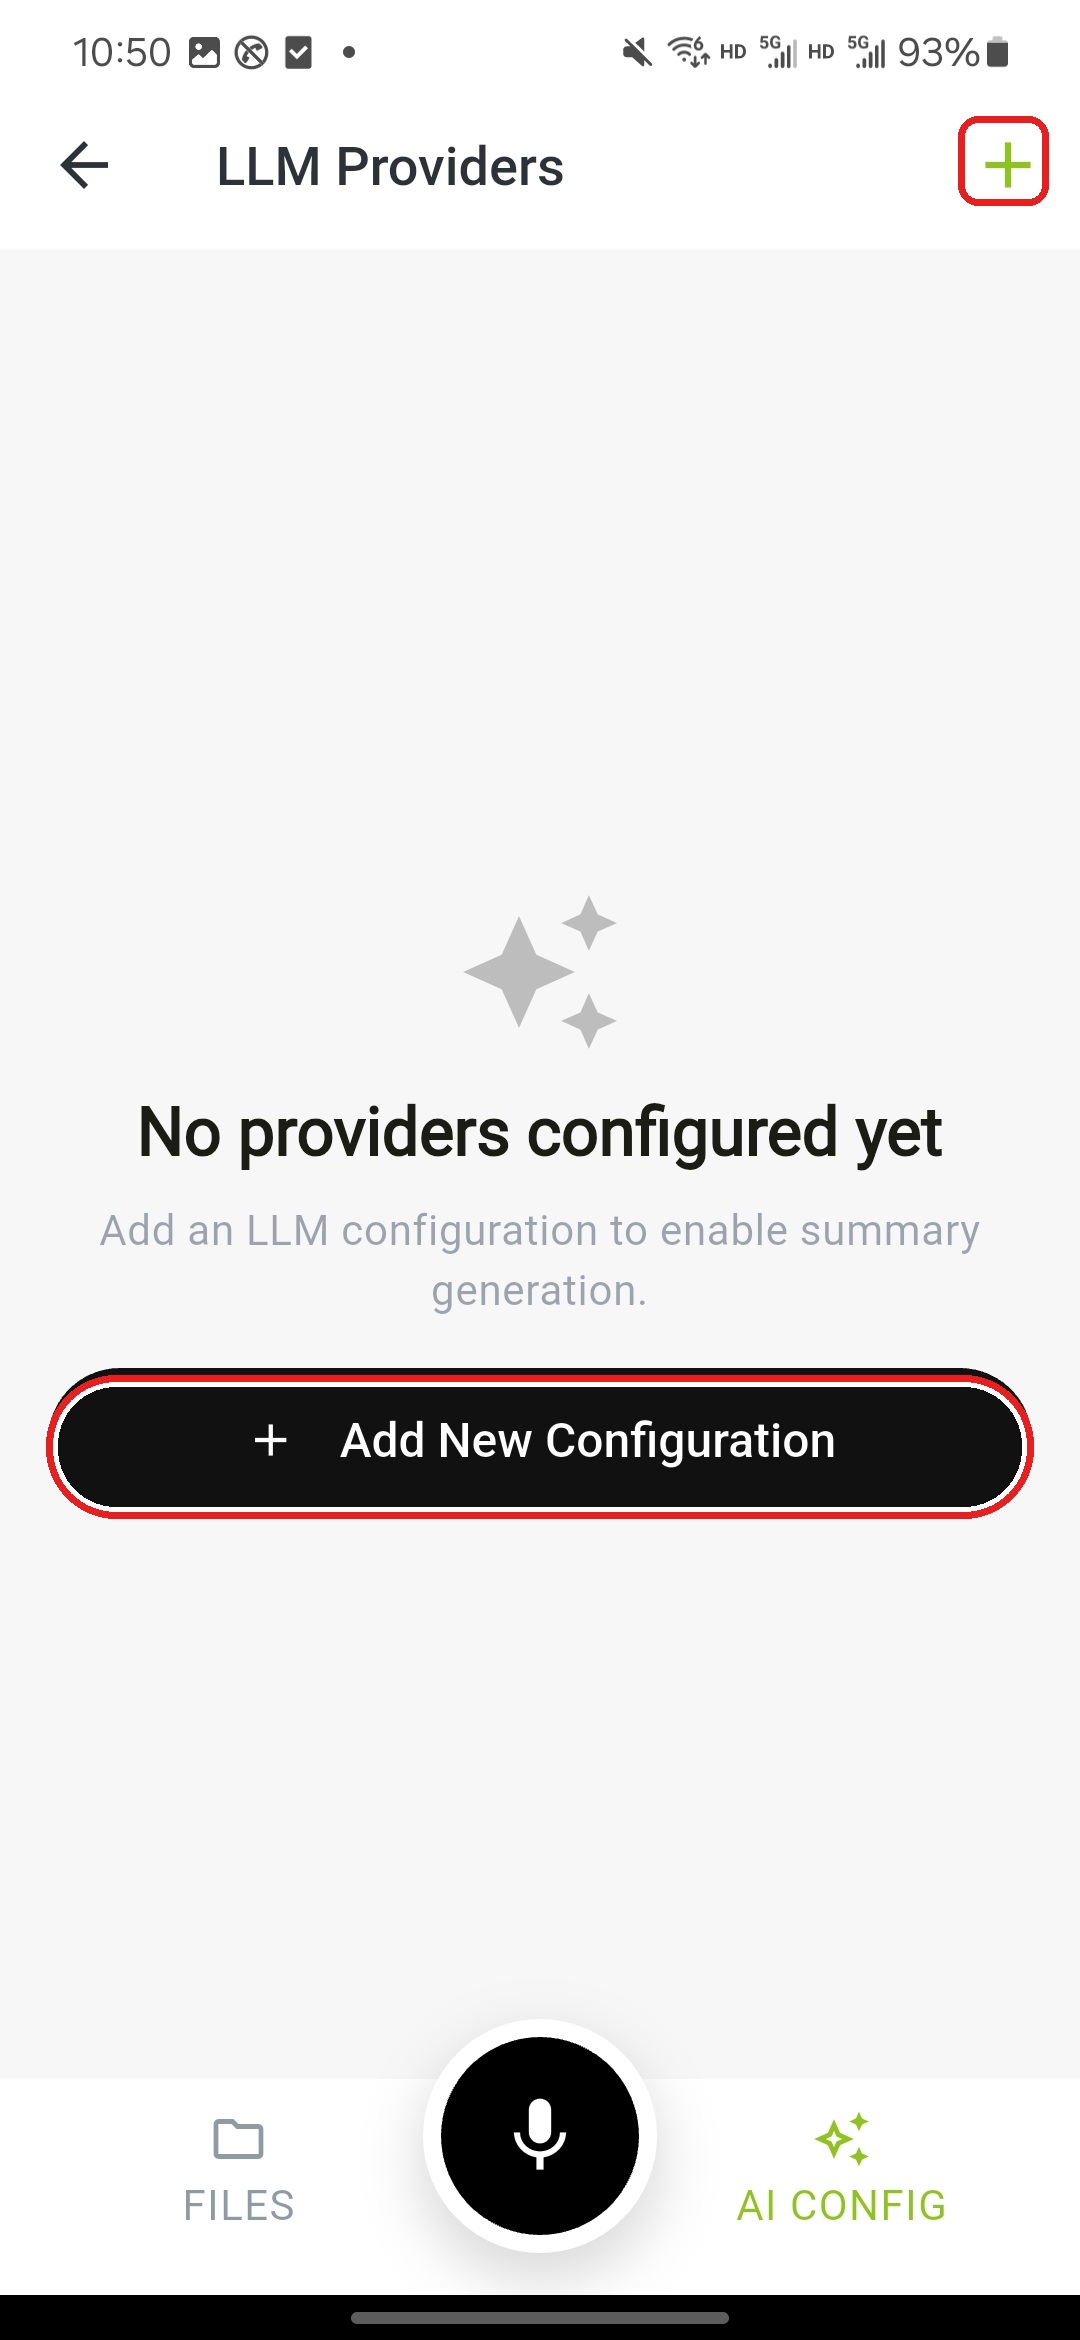
If LLM Service shows Not configured, continue to the LLM Providers page and tap Add New Configuration or the + button in the upper-right corner to add a new service configuration.
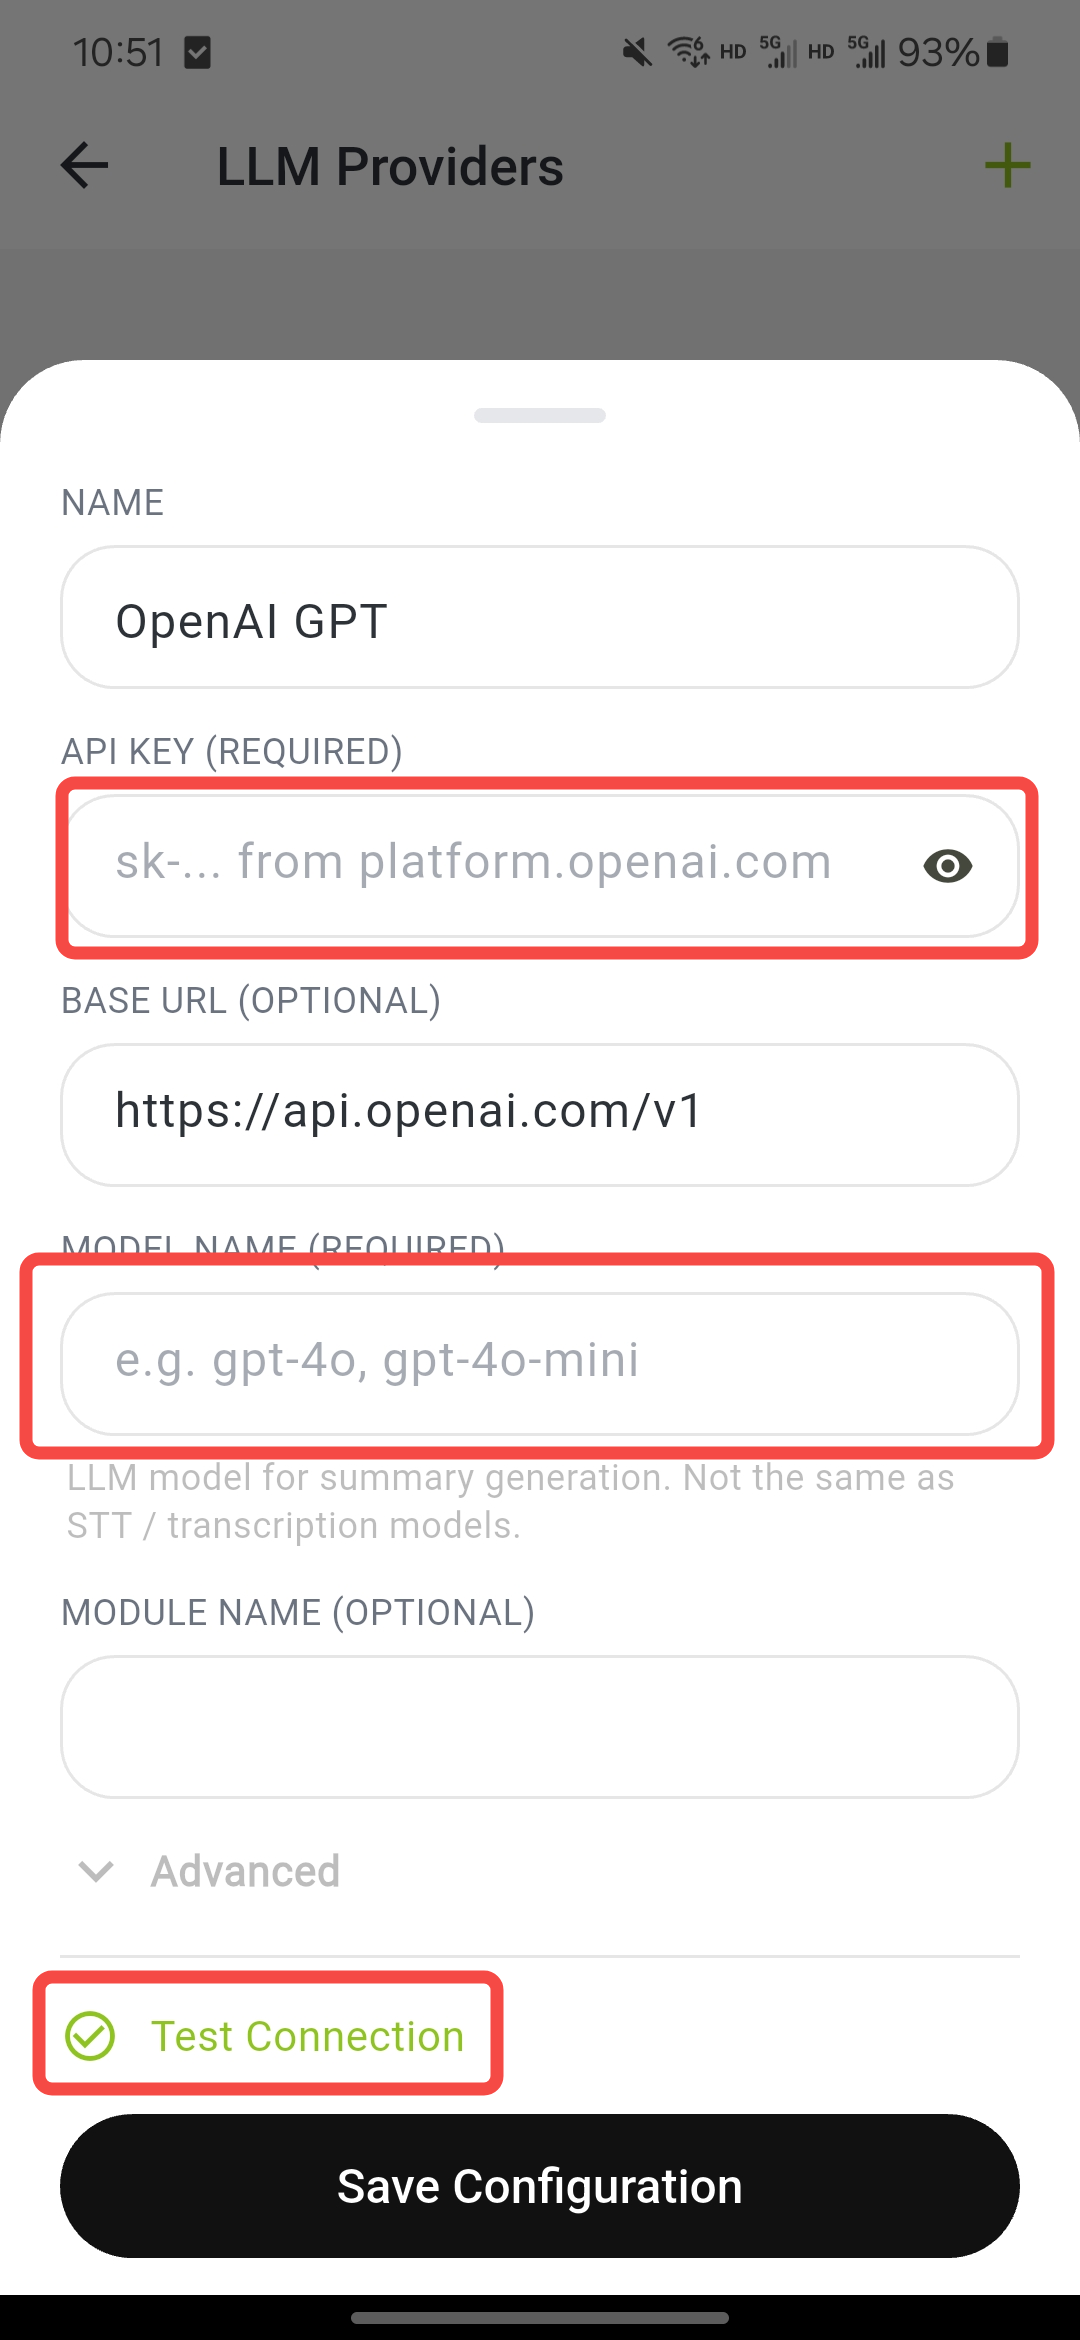
After filling in API Key, Base URL, and Model Name, tap Test Connection. After the test passes, tap Save Configuration.
Audio Transcription
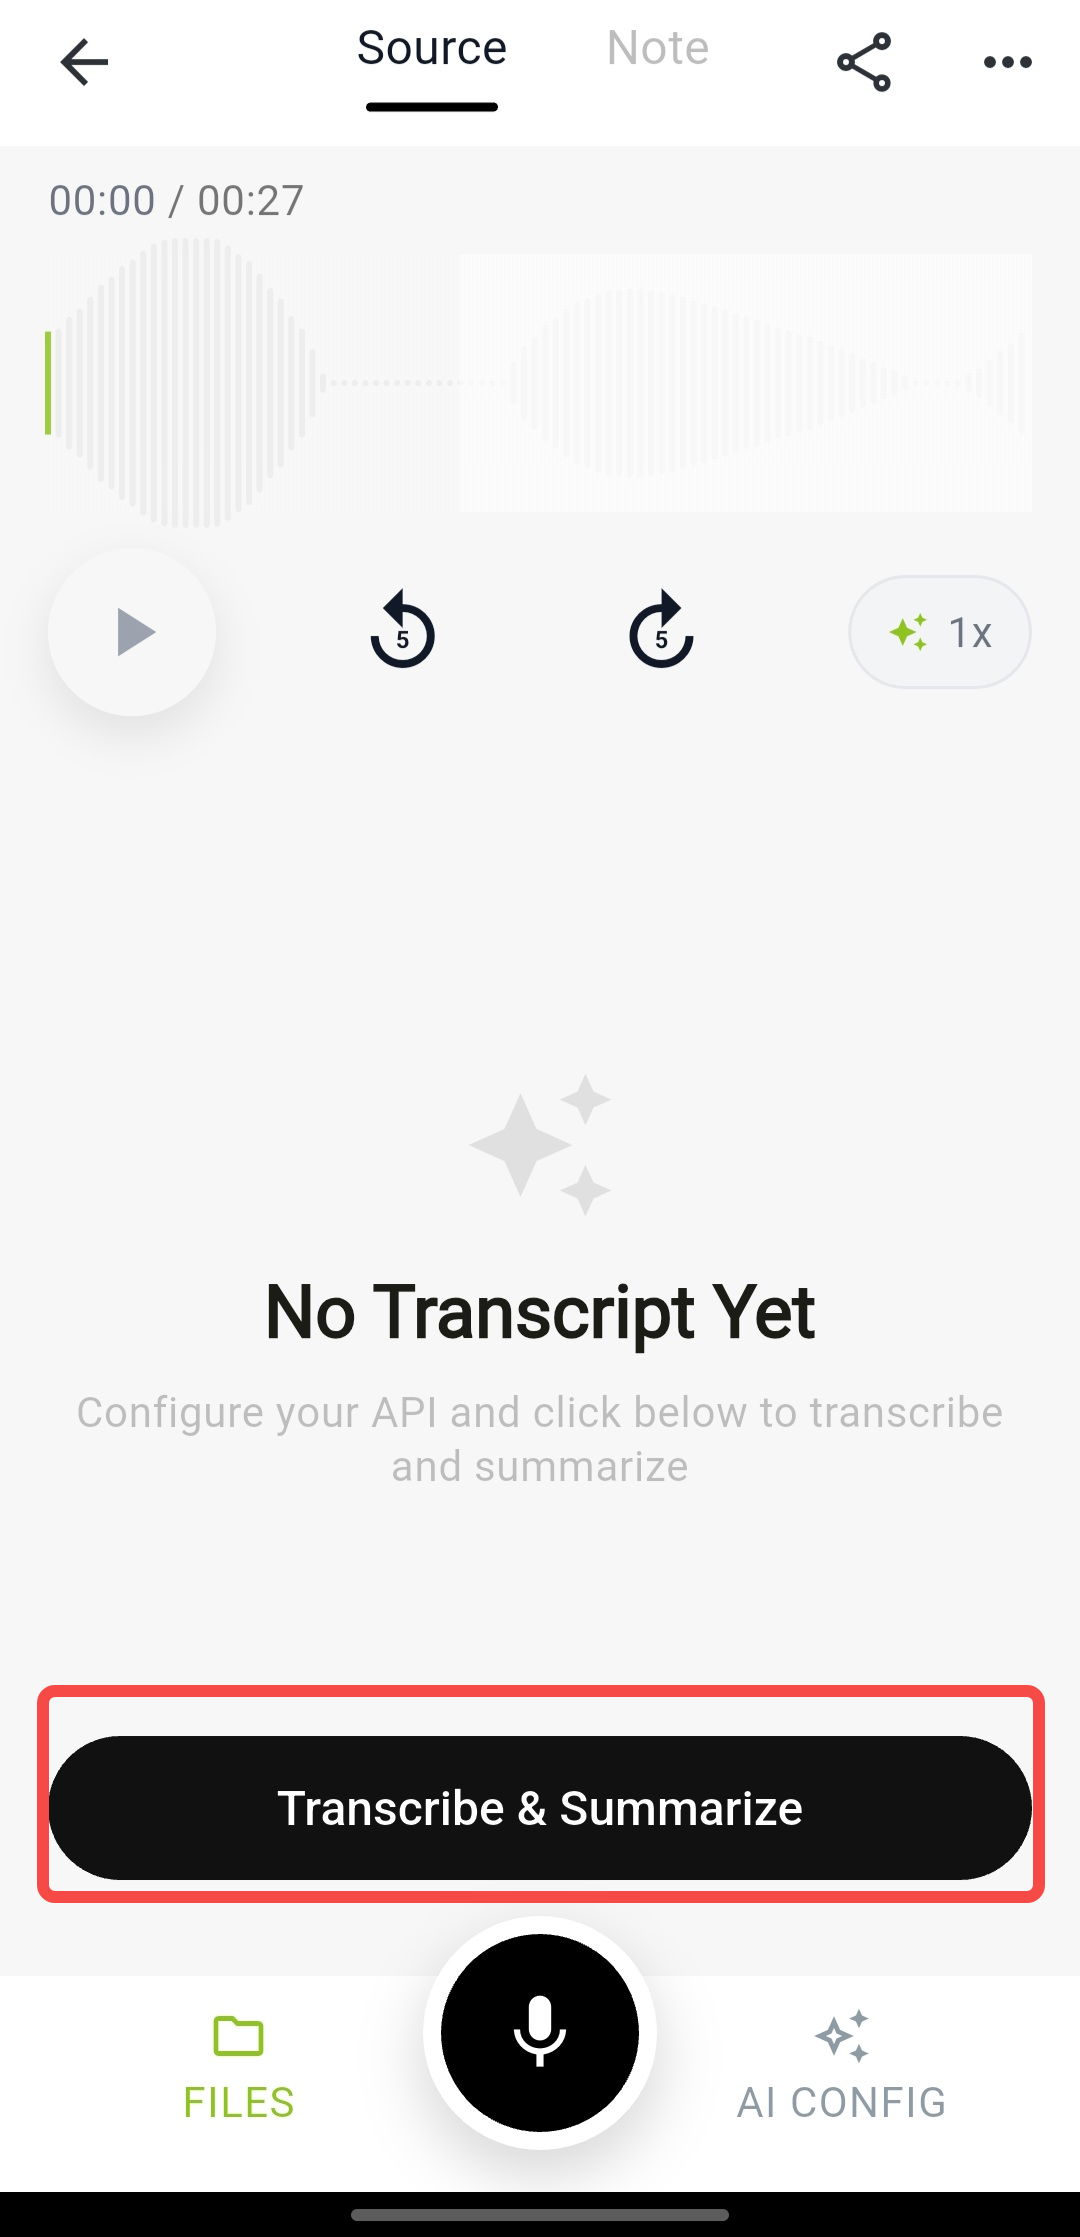
After uploading or syncing a recording, tap the recording you want to process in the file list to enter the recording detail page. If the recording has no transcript yet, the page displays a Transcribe & Summarize button. Tap it to enter the transcription and summarization settings page.
AI Summary
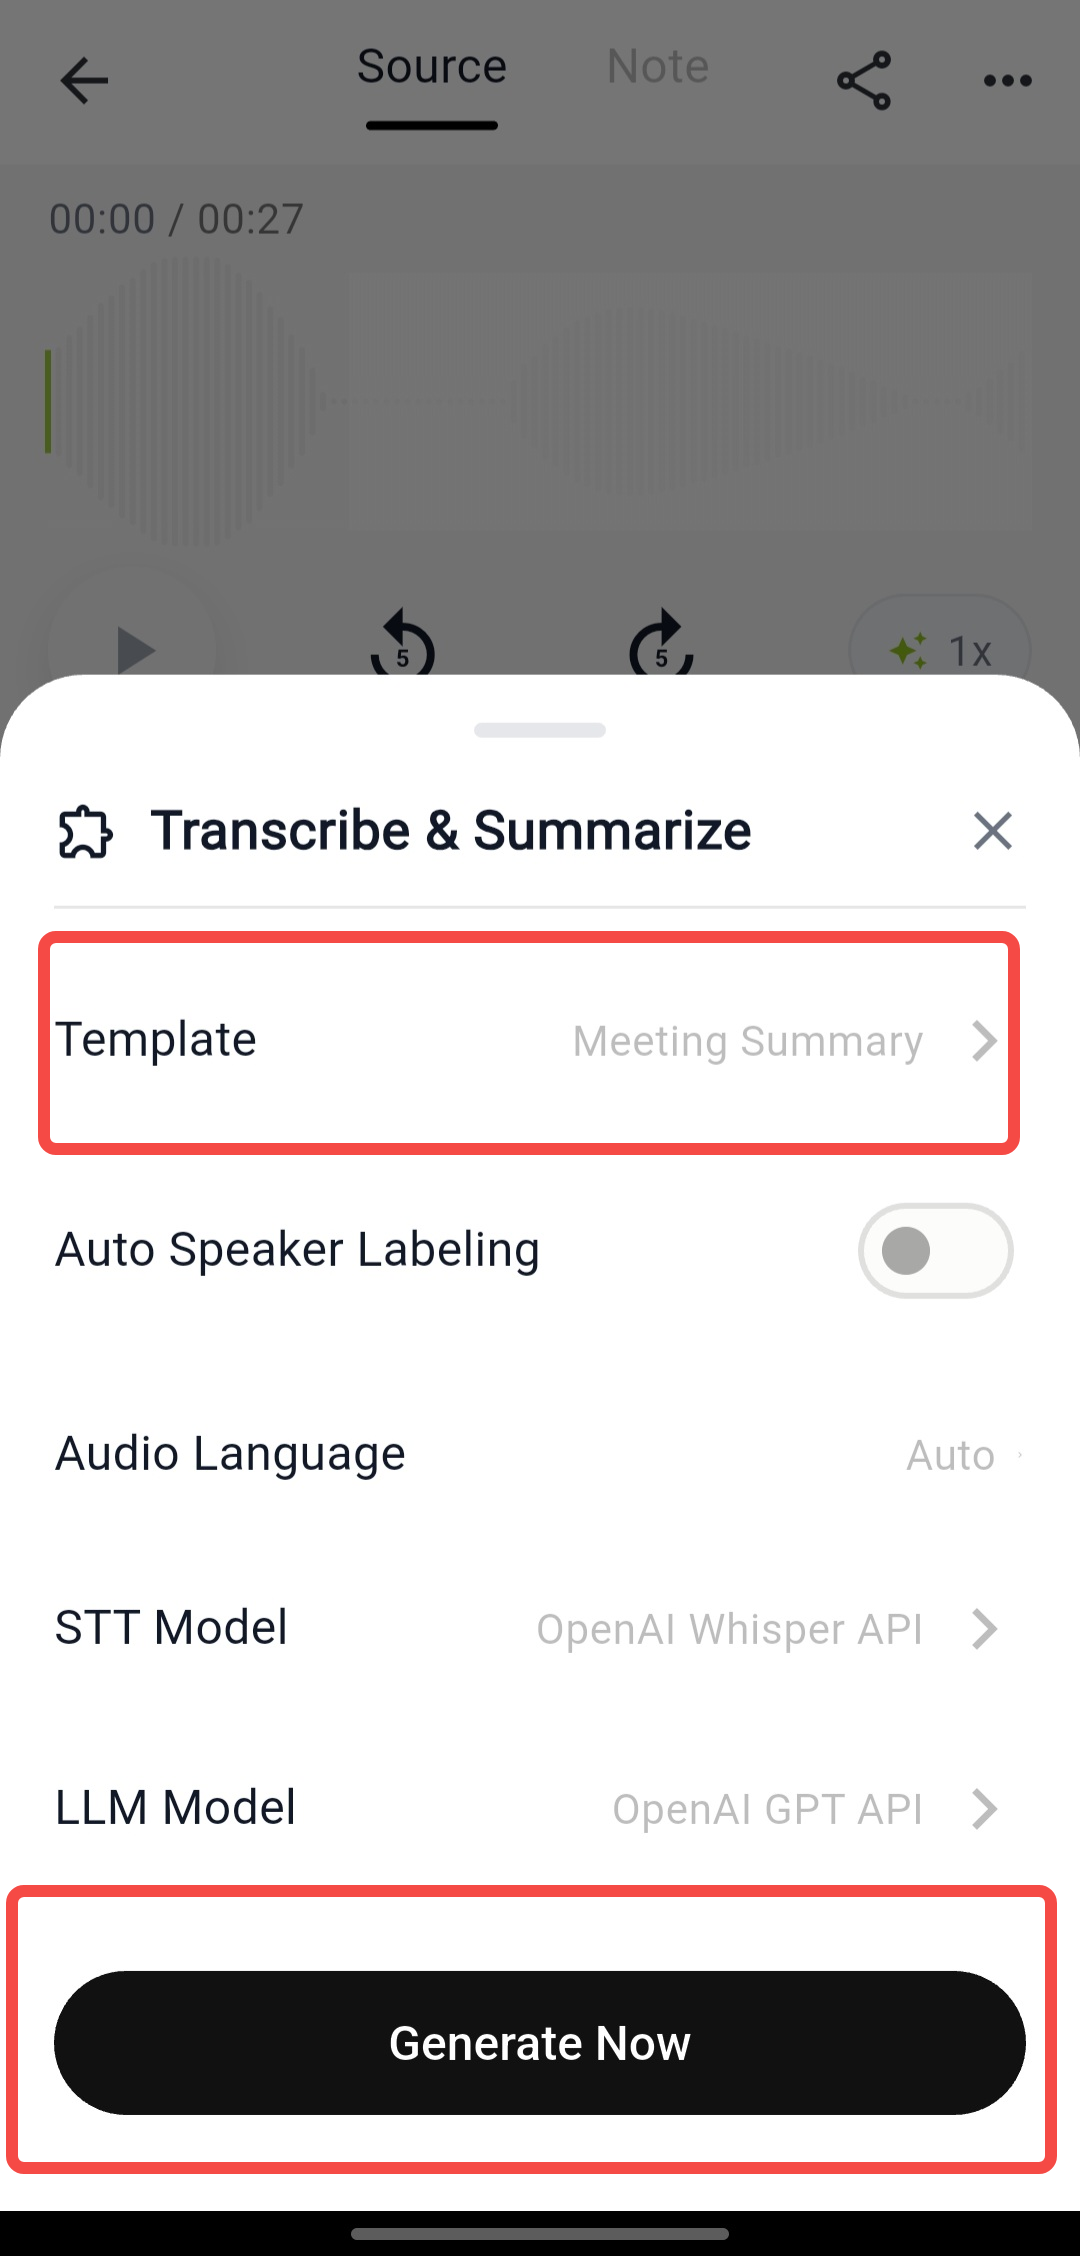
On the Transcribe & Summarize page, you can select a summary template and confirm Audio Language, STT Model, and LLM Model. The template controls the structure of the summary output, such as meeting summary, class summary, or daily conversation summary. After confirming the configuration, tap Generate Now to start transcription and summarization.
AI Q&A Retrieval
Users can perform Q&A retrieval based on the recording transcript, such as querying tasks, time points, product issues, or customer feedback mentioned in a meeting.
Device Management
In the app, you can view and manage device status.
- Battery monitoring
- Firmware version check
- OTA upgrade
- Device unbinding
- Factory reset
Firmware Update Guide
reSpeaker Clip supports two firmware update methods that do not require a debug probe:
- Bluetooth OTA: Send the firmware package to the device through BLE. This is suitable for daily updates.
- Recovery mode flashing: Put the device into USB serial recovery mode and transfer the firmware package through a USB serial port.
Both methods use MCUboot's mcumgr Simple Management Protocol (SMP). Bluetooth OTA uses BLE transport, while Recovery mode flashing uses USB CDC-ACM serial transport. reSpeaker Clip does not use native USB DFU flows such as dfu-util.
Firmware File Types
Firmware releases may include the following files:
| File Type | Description | Usage |
|---|---|---|
clip-<version>-*-single.* | Single application partition update package, suitable for updating only the Clip SDK / app partition | USB serial DFU |
clip-<version>-*-signed.bin | Signed application firmware image | USB serial DFU, BLE OTA |
clip-<version>-*-ota.zip | Multi-image update package, usually including app and network core | USB serial DFU, BLE OTA |
clip-<version>-*-merged.hex | Full image including MCUboot, app, and network core | Requires a debugger such as J-Link |
clip-<version>-*-merged_CPUNET.hex | Network core image only | Requires a debugger such as J-Link |
For regular Bluetooth OTA updates, use -ota.zip first. For developer flashing through Recovery mode, prefer firmware packages with the single suffix. Typical Clip SDK changes only affect the application partition and do not require updating the network core. -merged.hex and -merged_CPUNET.hex are mainly used for development, production, or debugger-based flashing.
Method 1: Bluetooth OTA
Bluetooth OTA is suitable when the device can boot normally and can be discovered by a phone through BLE. It is recommended to use the mobile nRF Connect app for OTA. The BLE tool in nRF Connect for Desktop usually requires an additional Nordic BLE adapter.
Basic workflow:
- Prepare the
clip-<version>-*-ota.zipfirmware package. - Send the firmware package to your phone.
- Open nRF Connect on your phone.
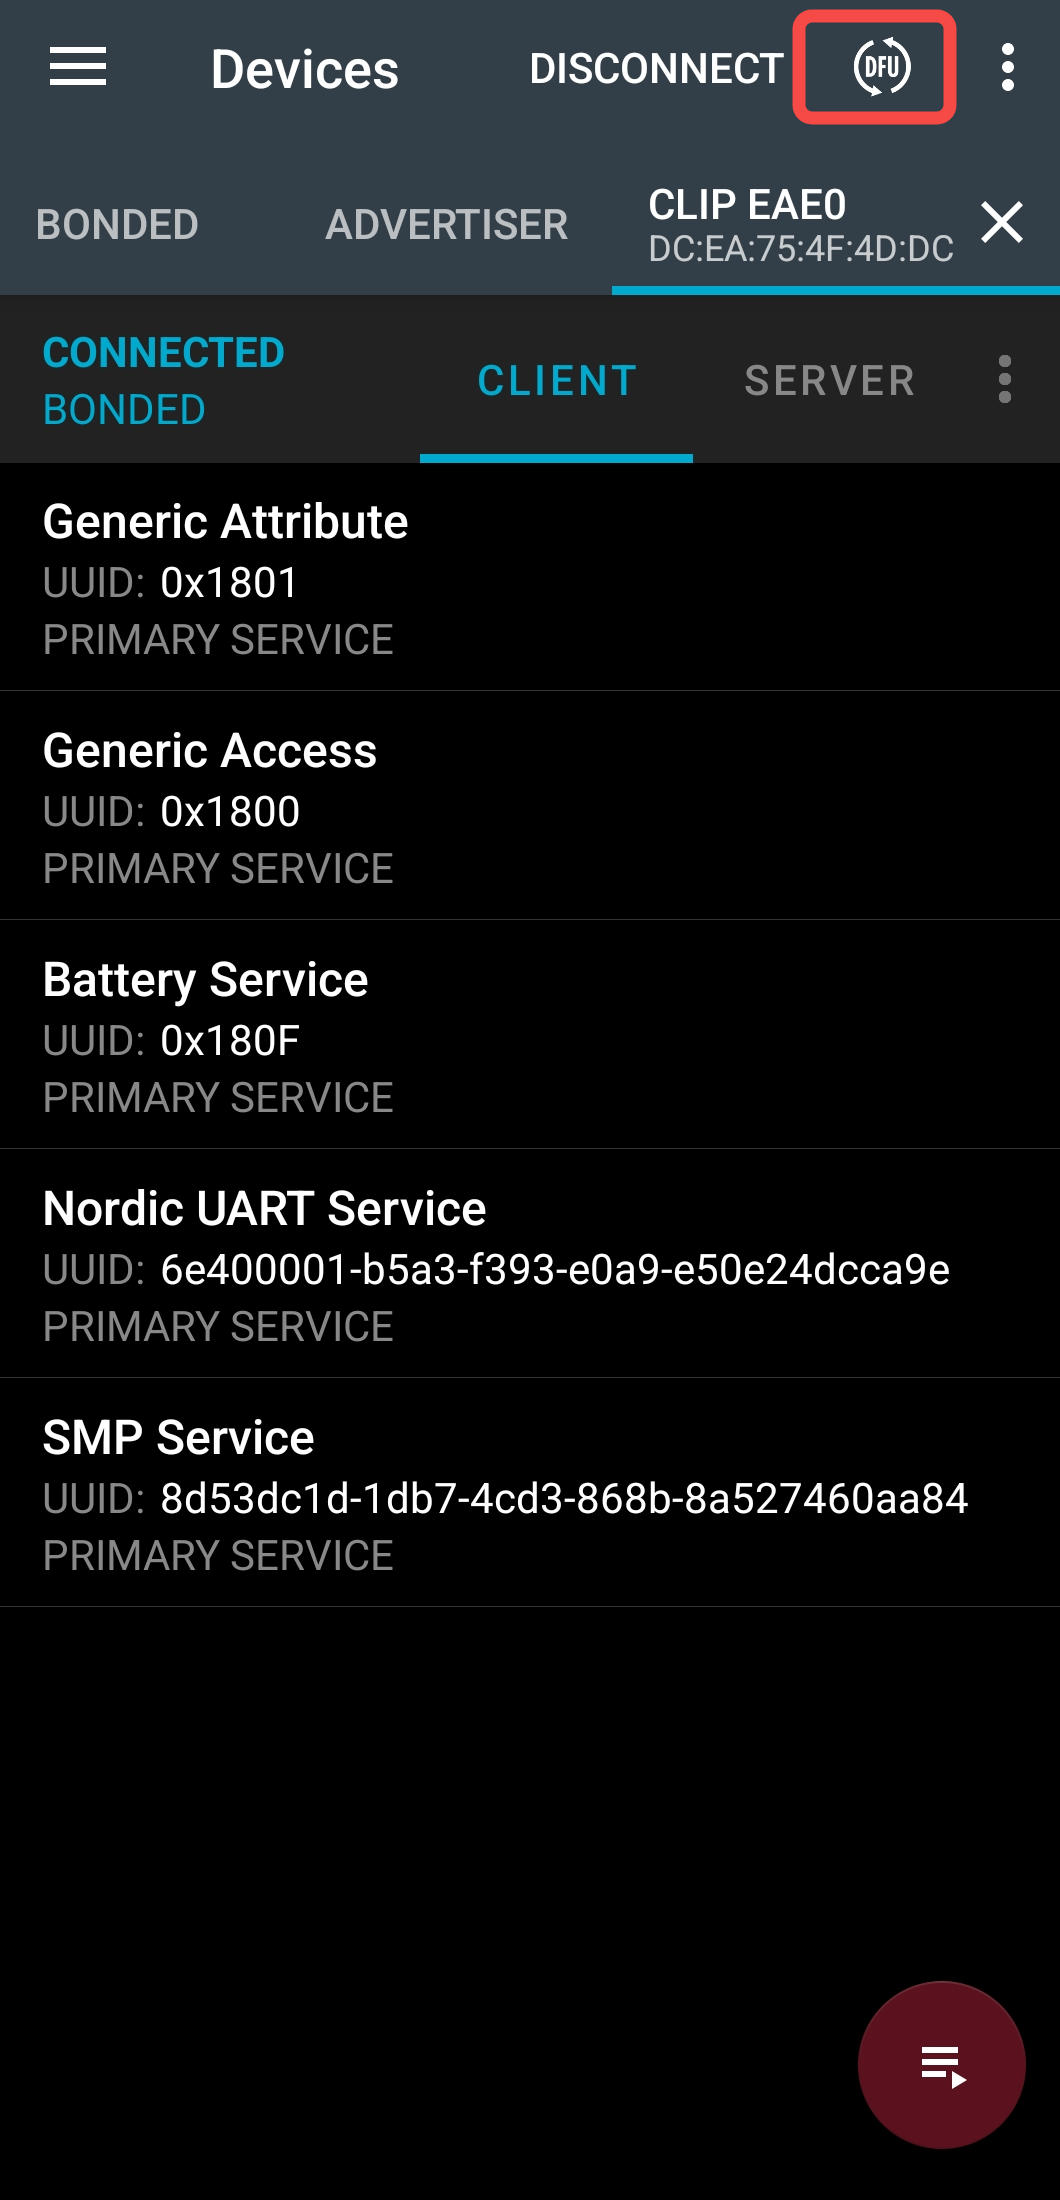
- Search for and connect to reSpeaker Clip through BLE.
- After connection, confirm that SMP Service is visible.
- Tap the DFU icon in the upper-right corner and select the
-ota.zipor-signed.binfirmware package.
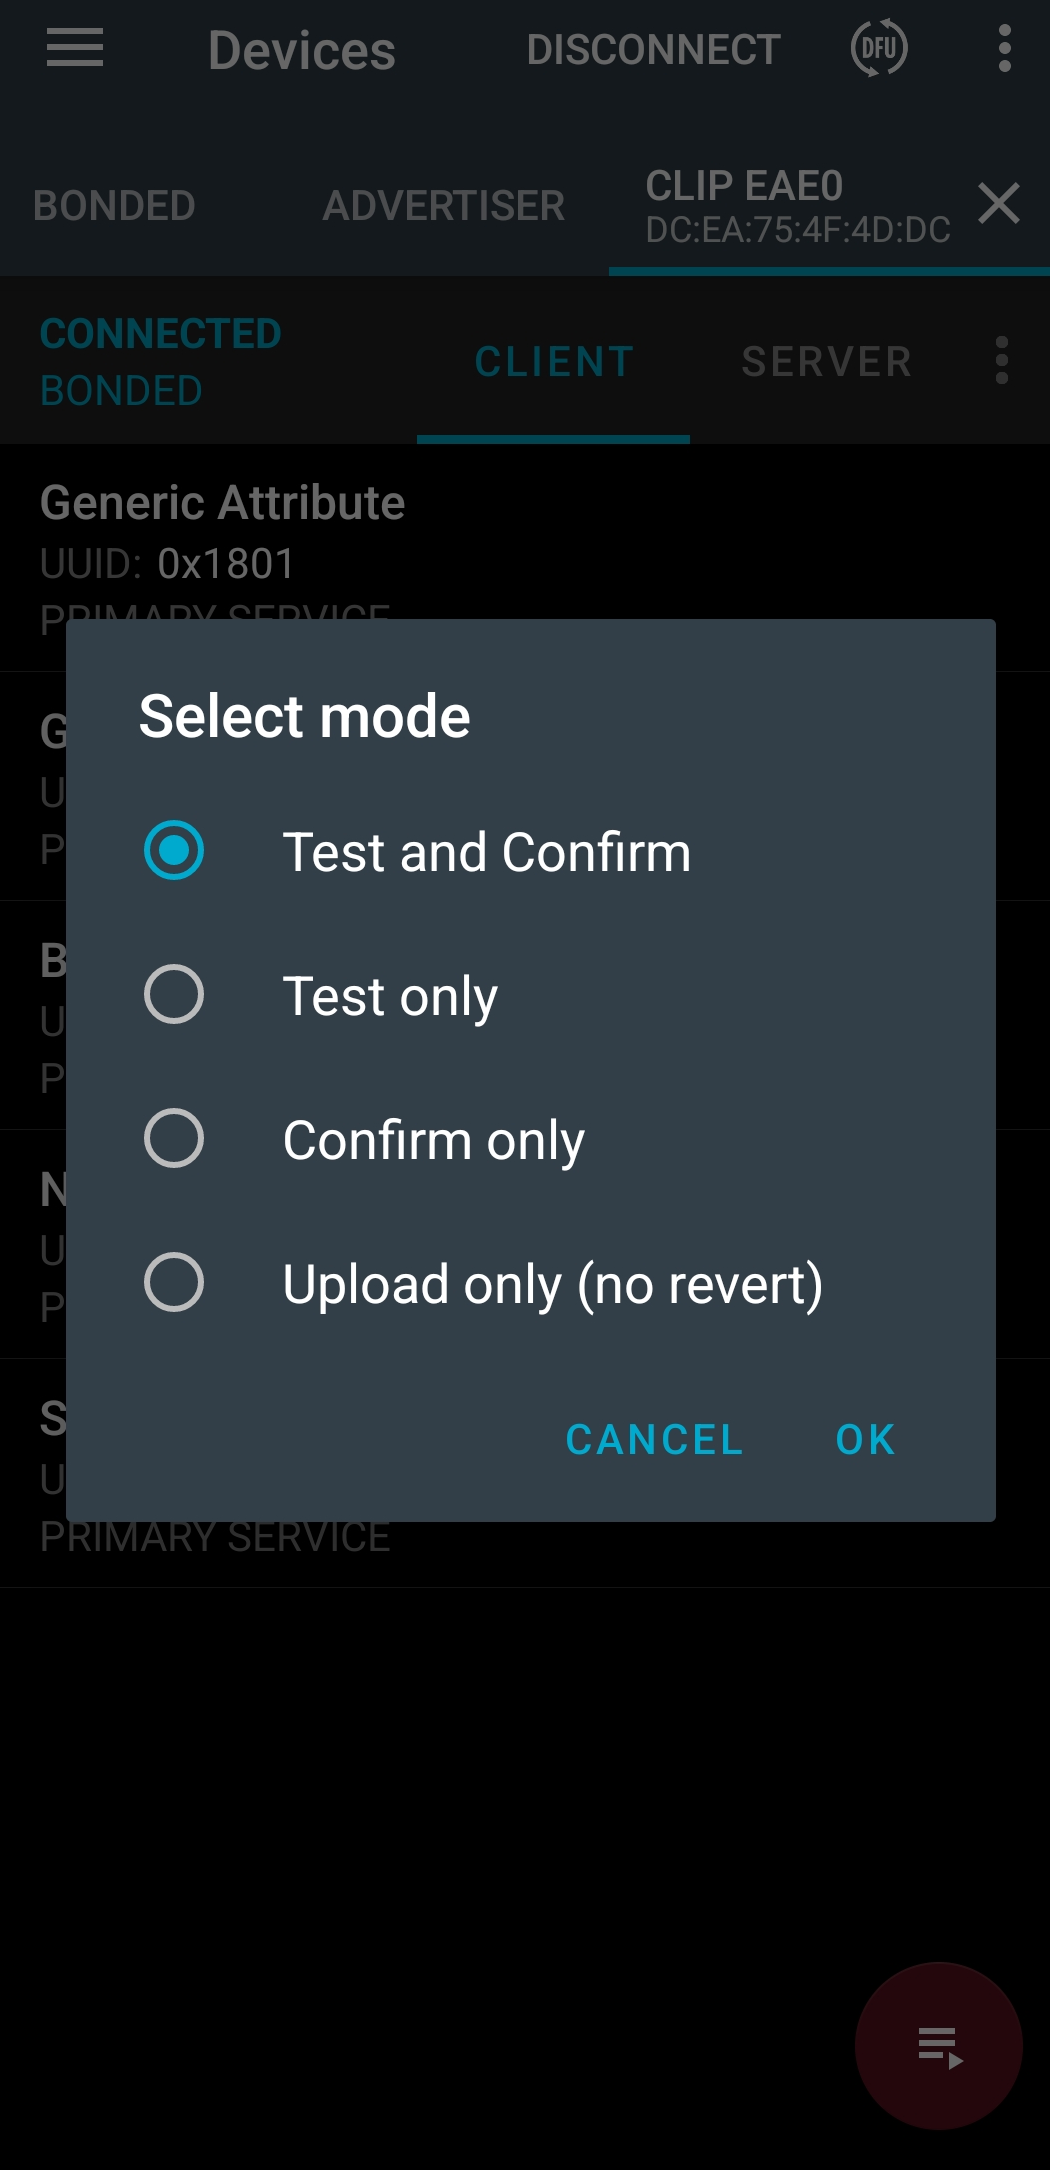
- Keep the default Test and Confirm mode and tap OK to start the update.
- Wait for transfer, verification, and automatic device reboot to complete.
- Reconnect to the device and check the firmware version.
During OTA, keep the phone close to the device, do not send nRF Connect to the background, and make sure the device is not connected to the SenseCraft Voice App at the same time.
Method 2: Recovery Mode Flashing
Recovery mode is a developer-oriented USB flashing mode. It transfers firmware through a USB CDC-ACM serial port using the MCUboot / mcumgr SMP protocol. It is recommended to use the nrfutil mcu-manager command line workflow.
Enter Recovery Mode
Recovery mode provides flashing capability through MCUboot USB serial recovery. To enter it:
- Confirm that the USB cable supports data transfer.
- Plug the USB cable into the charging base.
- Place reSpeaker Clip onto the charging base and gently twist the device so that the charging contacts are firmly connected.
- After the screen shows the USB / charging icon, press and hold the Action Button until the screen shows Recovery Mode.
- When Recovery Mode is displayed, the device has successfully entered USB serial recovery mode and should enumerate as a serial port:
- Windows:
COMx - macOS:
/dev/cu.usbmodem* - Linux:
/dev/ttyACM0
- Windows:
On Windows, the device may enumerate multiple virtual serial ports, for example:
Product         reSpeaker Clip DFU
Ports           COM10, vcom: 0
                COM11, vcom: 1
Traits          serialPorts, usb
For flashing, try the serial port corresponding to vcom: 1 first, such as COM11 in the example above. If connection or upload fails, try the other serial port.
Recovery mode requires USB/VBUS detection. Before entering this mode, make sure the charging base contacts are firmly connected. If the screen does not show a USB / charging icon, the device may be physically placed on the base but not actually connected to USB.
Flash with nrfutil mcu-manager
nrfutil is Nordic's command line tool. Use version 8.x or later and install the mcu-manager plugin.
Newer versions of nrfutil use a subcommand plugin mechanism. For first-time use, install the device and mcu-manager subcommands:
nrfutil install device
nrfutil install mcu-manager
If nrfutil device list reports nrfutil command device not found, the device subcommand has not been installed. Run nrfutil install device first.
List current serial devices:
nrfutil device list
Upload the application partition firmware. Prefer the firmware package with the single suffix:
nrfutil mcu-manager serial image-upload \
    --firmware clip-<version>-production-single.zip \
    --serial-port COMx
If the release package provides a signed application image, you can also upload -signed.bin:
nrfutil mcu-manager serial image-upload \
    --firmware clip-<version>-production-signed.bin \
    --serial-port COMx
For a full app + network core update, upload -ota.zip:
nrfutil mcu-manager serial image-upload \
    --firmware clip-<version>-production-ota.zip \
    --serial-port COMx
After upload, reset the device to apply the new firmware:
nrfutil mcu-manager serial reset --serial-port COMx
Replace COMx with the actual serial port shown in Windows Device Manager or nrfutil device list. If the device shows multiple vcom ports, try the port corresponding to vcom: 1 first. If connection or upload fails, switch to the other port and try again. On macOS / Linux, use /dev/cu.usbmodem* or /dev/ttyACM0.
If the flashing progress stays at 100% and the tool does not exit automatically, do not repeatedly unplug and replug the device. Run:
nrfutil mcu-manager serial reset --serial-port COMx
Then check the firmware version after the device restarts.
More Firmware Update Methods
For debugger-based flashing or more Recovery mode troubleshooting methods, refer to the reSpeaker Clip Advanced Firmware Update Guide (coming soon).
Development Guide
For developer and enterprise integration scenarios, reSpeaker Clip can be extended through the firmware SDK, application SDK, and communication protocols.
Firmware SDK
The reSpeaker Clip firmware is built on nRF Connect SDK / Zephyr RTOS and runs on the nRF5340 + nRF7002 platform. It is not a single driver example, but a device-side framework organized around audio capture, state machine, BLE / Wi-Fi communication, file management, firmware update, and low-power management.
Firmware system architecture:
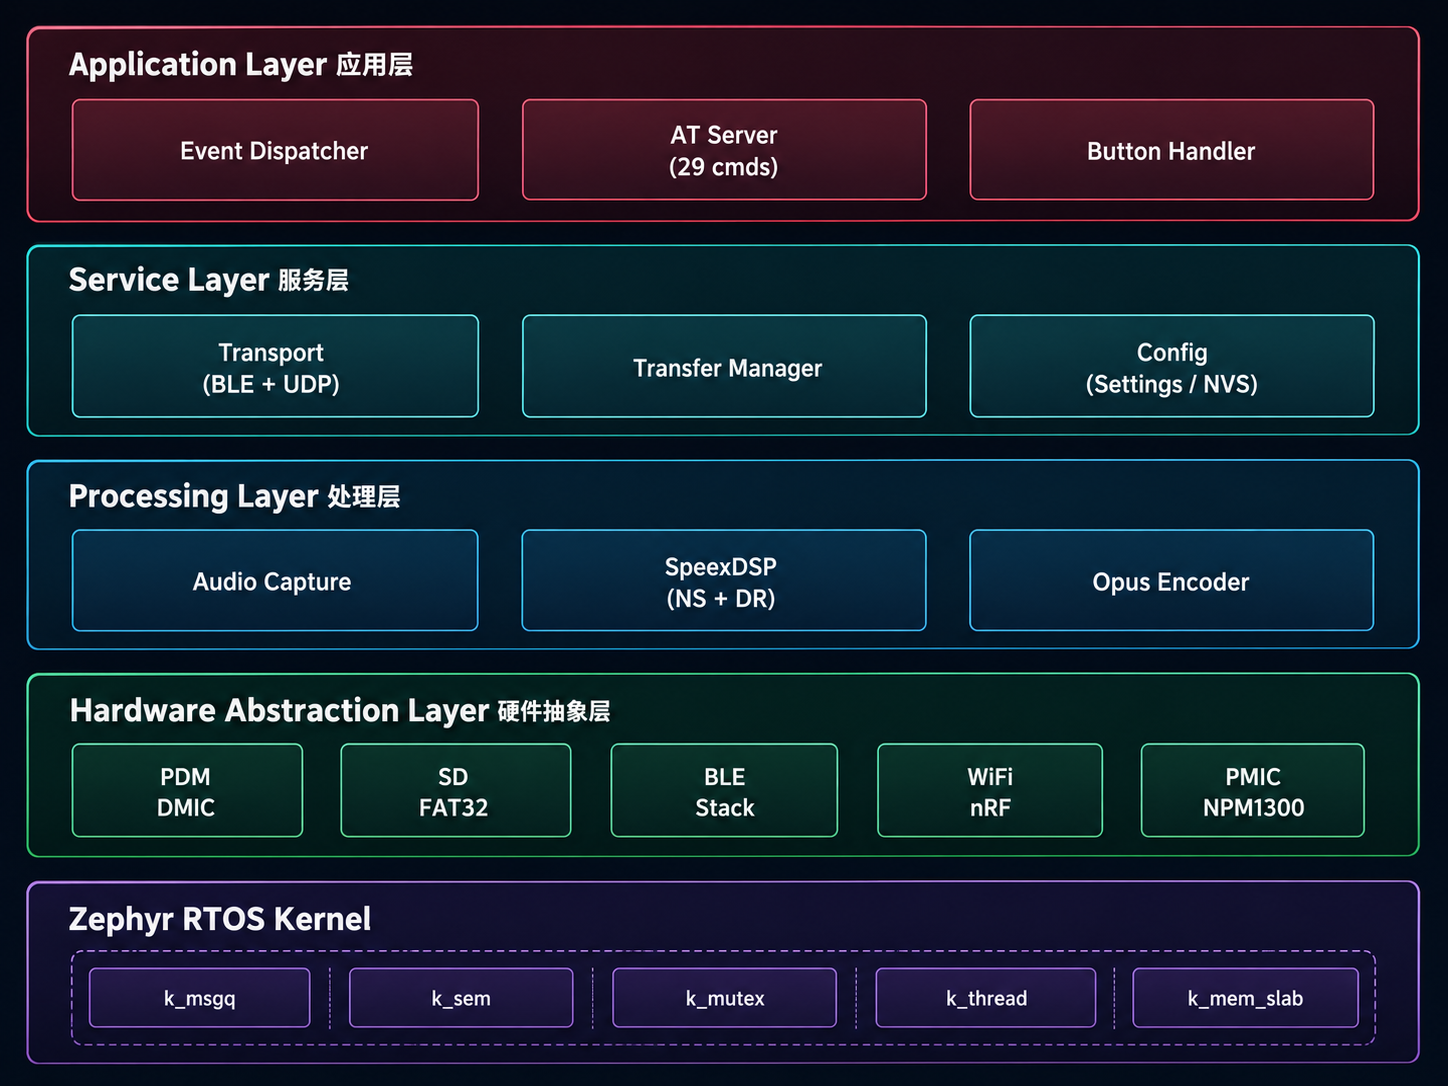
From a development perspective, the firmware is mainly divided into the following layers:
- Application Layer: Handles event dispatching, AT Server, button processing, and user interaction states.
- Service Layer: Handles BLE / UDP transport abstraction, file transfer, configuration management, and NVS storage.
- Processing Layer: Handles audio capture, SpeexDSP noise reduction / dynamic range processing, and Opus encoding.
- Hardware Abstraction Layer: Encapsulates PDM microphone, SD FAT32, BLE, Wi-Fi, PMIC, and other hardware capabilities.
- Zephyr RTOS Kernel: Provides kernel primitives such as
k_msgq,k_sem,k_mutex,k_thread, andk_mem_slab.
A typical development workflow is: set up the Zephyr / nRF Connect SDK environment, obtain the reSpeaker Clip firmware project, confirm the board target and configuration files, build and flash the firmware, check serial logs, and finally verify recording, file sync, and firmware update through the SenseCraft Voice App or BLE / Wi-Fi protocols.
For more firmware architecture, environment setup, build, flashing, and secondary development details, refer to the reSpeaker Clip Firmware Development Guide (coming soon).
Application SDK
The application SDK can be used for mobile app or host-side application integration.
| Platform | Language | Status |
|---|---|---|
| iOS | Swift | Coming soon |
| Android | Kotlin | Coming soon |
| Desktop / Server | Python | Coming soon |
Applications
reSpeaker Clip can be used in To B business scenarios and integrated with enterprise toolchains, forming a complete workflow from audio capture and transcription to intelligent summarization and business system archiving.
Retail Service Training
Retail sales and service staff can wear reSpeaker Clip to record customer conversations. After the conversation, AI can generate customer requirement summaries and actionable to-do lists from the recording, helping teams improve service quality, follow-up efficiency, and conversion rates.
Meeting Minutes
In meeting scenarios, reSpeaker Clip's 360-degree omnidirectional pickup can cover multi-person discussions. Users can mark important moments with the button during recording, and automatically generate structured minutes, highlights, and action items after the meeting.
Interviews and Research
For user interviews, market research, and customer visits, reSpeaker Clip helps capture raw voice data and organize recordings into searchable and reviewable text materials.
Enterprise Customization
Enterprises can use the open SDK to integrate reSpeaker Clip with internal office systems, CRM, knowledge bases, project management tools, or privately deployed LLMs. Organizations with data compliance requirements can also build dedicated AI voice assistants and private voice analytics workflows.
Q&A
Cannot Power On / Charge
If the device cannot power on or charge, check the following:
- Confirm that the device is correctly placed in the charging base and that the magnetic contacts are not misaligned.
- Check whether the USB-C cable and power adapter work properly.
- Clean the magnetic charging contacts on the bottom of the device and on the charging base to avoid dust or foreign objects affecting contact.
- Charge for 10 minutes, then press and hold the power button again.
- If the device still does not respond, record the device status and contact technical support.
Bluetooth Pairing Failed
If the phone cannot pair with reSpeaker Clip, try the following:
- Confirm that the device is powered on and is not connected to another phone.
- Enable Bluetooth permissions on your phone and allow the SenseCraft Voice App to use Bluetooth.
- Move the phone closer to the device and scan again.
- Delete old reSpeaker Clip pairing records from the phone system Bluetooth list, then pair again.
- Restart the device and the app, then try again.
Recording File Transfer Interrupted
If a recording file transfer is interrupted, check the following:
- Keep the phone and device close to each other.
- Confirm that the device has sufficient battery.
- Check whether Wi-Fi or BLE connectivity is stable.
- Keep the app running in the foreground.
- Reconnect the device and transfer the file again. For large files, use a stable Wi-Fi environment.
Wi-Fi Provisioning Failed
If the device cannot complete Wi-Fi provisioning, confirm the following:
- The Wi-Fi name and password are correct.
- The router does not block new devices.
- The phone and device are close to the router.
- The current network can access the internet normally.
- If you are using an enterprise network or a public network that requires web authentication, switch to a normal home network or phone hotspot for testing.
App Cannot Find the Device
If the SenseCraft Voice App cannot find the device, try the following:
- Confirm that the device is powered on and ready to connect.
- Confirm that Bluetooth, location, or nearby device permissions have been granted to the app.
- Move the phone closer to the device and scan again.
- Exit and reopen the app.
- Restart reSpeaker Clip and add the device again.
Firmware Update Failed
If OTA or firmware update fails, try the following:
- Make sure the device has sufficient battery and do not power it off during the update.
- Keep the phone, device, and network connection stable.
- Do not close the app or switch networks during the update.
- If the device can still boot normally after the failed update, open the app and start the update again.
- If the device cannot boot normally, follow the later recovery mode or firmware flashing documentation and contact technical support.
Resources
| Resource | Link |
|---|---|
| Product Page | reSpeaker Clip Wearable AI Recorder |
| SenseCraft Voice App Download | Download Page |
| Firmware Download | Coming soon |
| SDK Repository | Coming soon |
| User Manual | reSpeaker Clip User Manual |
| Datasheet | Coming soon |
| Mechanical Drawing | Coming soon |
Tech Support & Product Discussion
Thank you for choosing our products! We are here to provide you with different support to ensure that your experience with our products is as smooth as possible. We offer several communication channels to cater to different preferences and needs.