Build Real-Time Audio Streaming with reSpeaker Clip RTC SDK
This tutorial teaches you how to receive live audio from a reSpeaker Clip while it is being captured, instead of recording first and downloading later. You will run a real-time FFT spectrum demo, understand how an RTC session is established, write a minimal streaming application yourself, and learn what the audio data actually looks like on the host.
RTC here refers to reSpeaker Clip real-time audio streaming, not WebRTC. There is no browser, no SDP, no ICE — just a Clip producing Opus frames and a Python application consuming them over BLE.
1. Introduction
1.1 What is RTC Streaming on reSpeaker Clip?
Normal recording writes audio to the SD card and you download it afterwards. RTC streaming skips the SD card entirely: the encoded audio is sent to your host as it is produced.
Recording:
Mic -> DSP -> Opus -> SD Card -> Download

RTC:
Mic -> DSP -> Opus -> BLE -> Host Application
The difference matters whenever "now" matters: live spectrum displays, streaming ASR, voice activity detection, wake-word pipelines, or a voice assistant that must react while the user is still speaking.
1.2 What You Will Learn
After completing this tutorial you will be able to:
- connect to a reSpeaker Clip with the Python SDK;
- create an RTC session and receive live Opus packets;
- explain the full RTC stream lifecycle;
- run the FFT demo and read its output;
- build your own real-time application on top of the RTC SDK.
2. How RTC Streaming Works
2.1 RTC Streaming Architecture
The audio path in RTC mode is a straight pipeline from the microphone to your application:
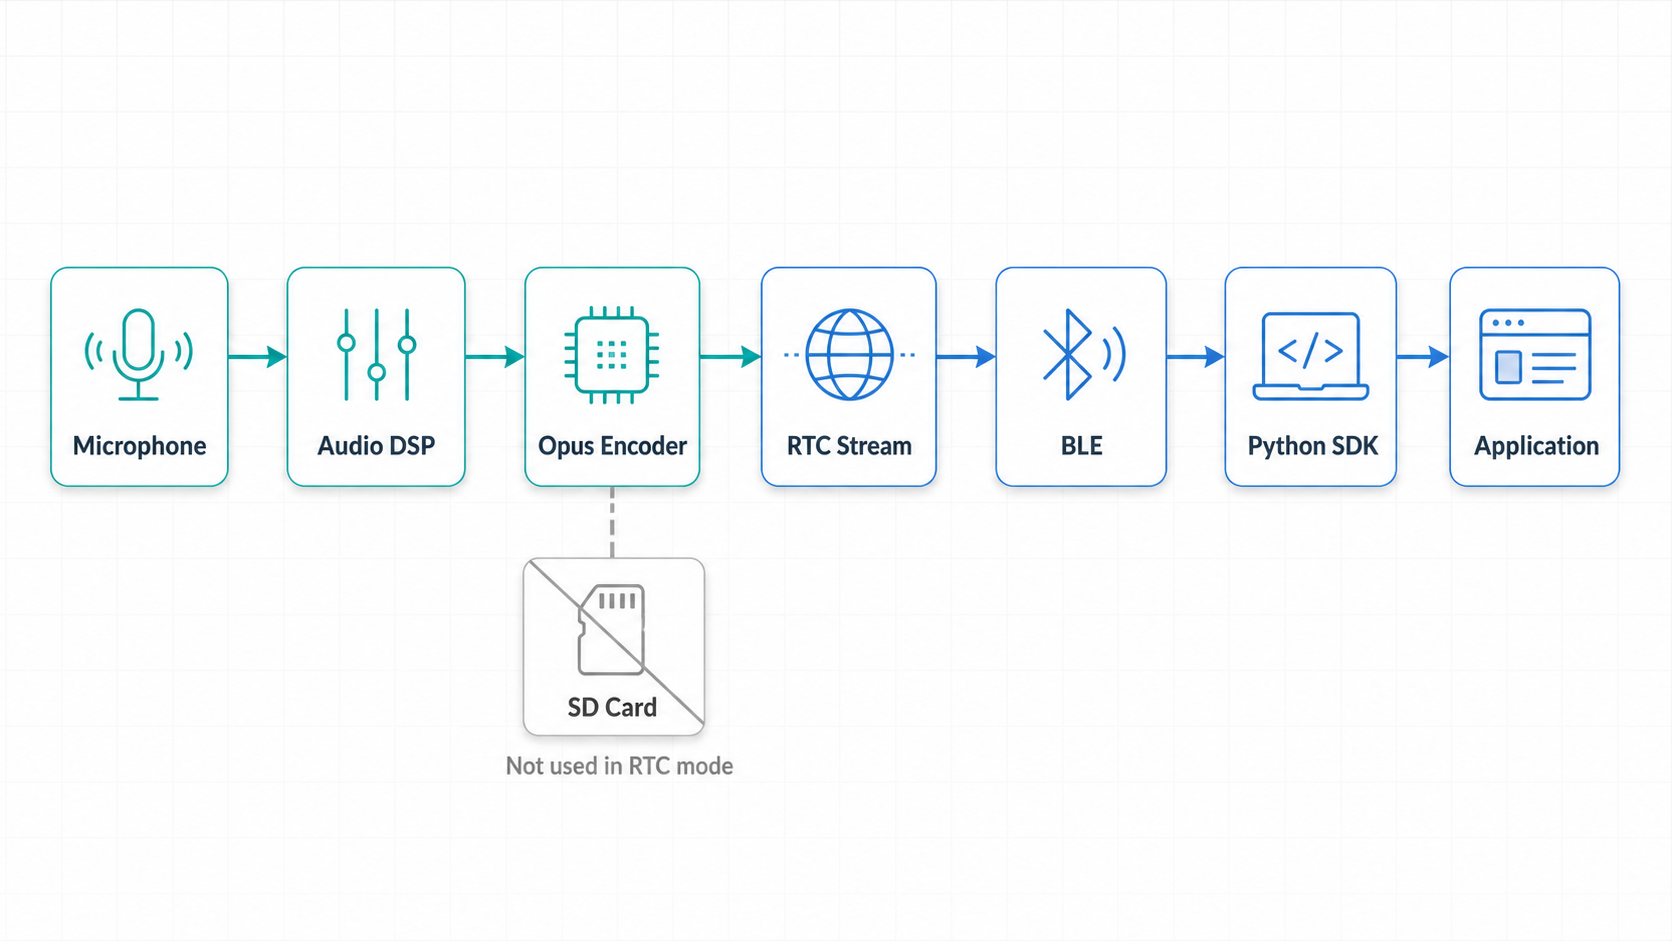
In RTC mode the audio is produced in real time, never touches the SD card, and the host can process it while it arrives. Nothing waits for a recording to finish, because there is no recording file.
2.2 RTC Session Lifecycle
An RTC stream is established in two steps, then flows until you stop it:
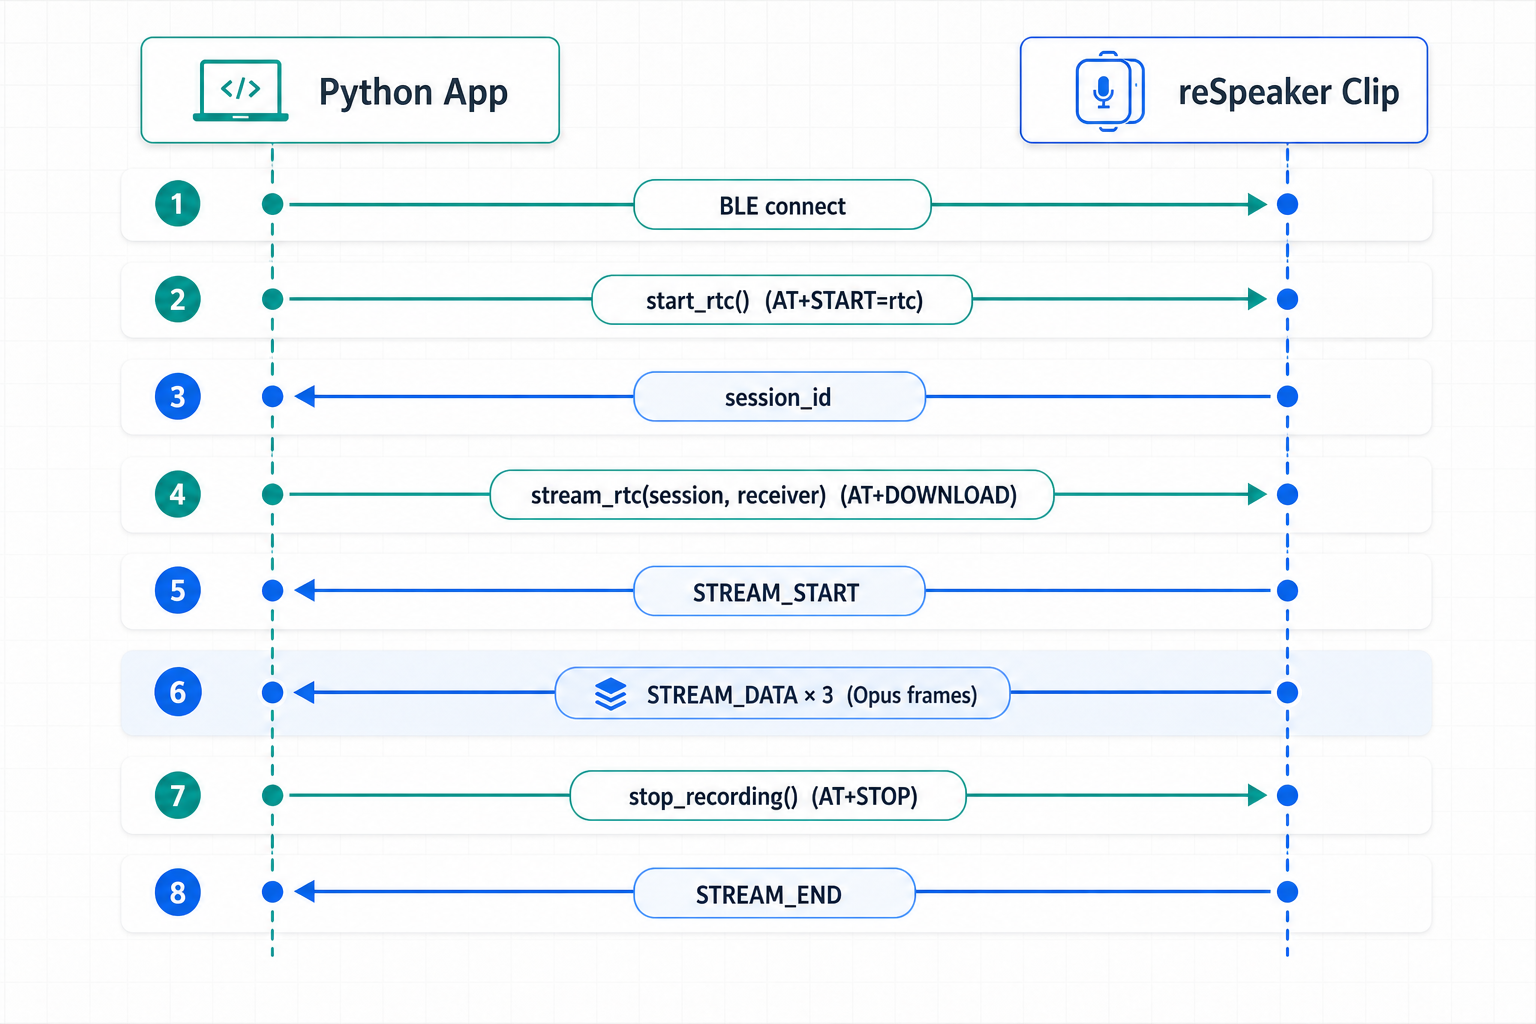
The two calls map to a simple mental model:
start_rtc()   =  start producing audio
stream_rtc()  =  start receiving audio
After start_rtc() the device runs the microphone pipeline but sends nothing to you yet. After stream_rtc() the device starts pushing STREAM_DATA frames — one Opus packet per frame — until stop_recording() ends the session with STREAM_END.
2.3 Why Does RTC Use a Session?
start_rtc() creates a real-time audio session and returns its session ID. stream_rtc(session, receiver) then tells the device: the host now wants to consume the live audio of this session. Concretely it issues AT+DOWNLOAD=<session>, and the firmware discards whatever was queued before that moment — RTC delivers "now", so audio produced before you subscribed is never sent.
This is the key difference from file download: do not think of an RTC session as a file that grows on the device. It is a live source you attach to, and anything you miss before attaching is gone by design.
3. Prepare the RTC SDK
3.1 Requirements
- a reSpeaker Clip;
- firmware that supports RTC streaming (the
feat/rtc-live-streamingdevelopment line); - Python 3.10+;
- a working BLE environment on the host;
- the reSpeaker Clip Python SDK checked out from source.
3.2 Install the SDK
RTC streaming ships on the development branch, so check it out and install the SDK with the BLE and examples extras:
git clone https://github.com/rayheto/reSpeaker_Clip.git
cd reSpeaker_Clip
git checkout feat/rtc-live-streaming

cd sdk
python -m pip install -e '.[ble,examples]'
The two extras matter for this tutorial:
bleinstalls the BLE transport (Bleak);examplesinstalls the dependencies the FFT demo needs (Opus decoder and NumPy).
The Wi-Fi/UDP transport needs no extra dependency, but RTC streaming in this tutorial runs over BLE.
4. Run the RTC FFT Demo
This section is your real entry point: run the demo first, understand it last.
4.1 Start the Demo
From the repository root, run the example against your device address:
python sdk/examples/demo_stream_fft_display.py \
  --address AA:BB:CC:DD:EE:FF \
  --duration 30
Omit --address to scan for a BLE device named "Clip" automatically, and omit --duration to stream until Ctrl-C:
python sdk/examples/demo_stream_fft_display.py
4.2 What Happens When the Demo Starts?
Speak toward the Clip while the demo runs. The terminal shows a live Unicode spectrum that moves with your voice, built from this host-side pipeline:
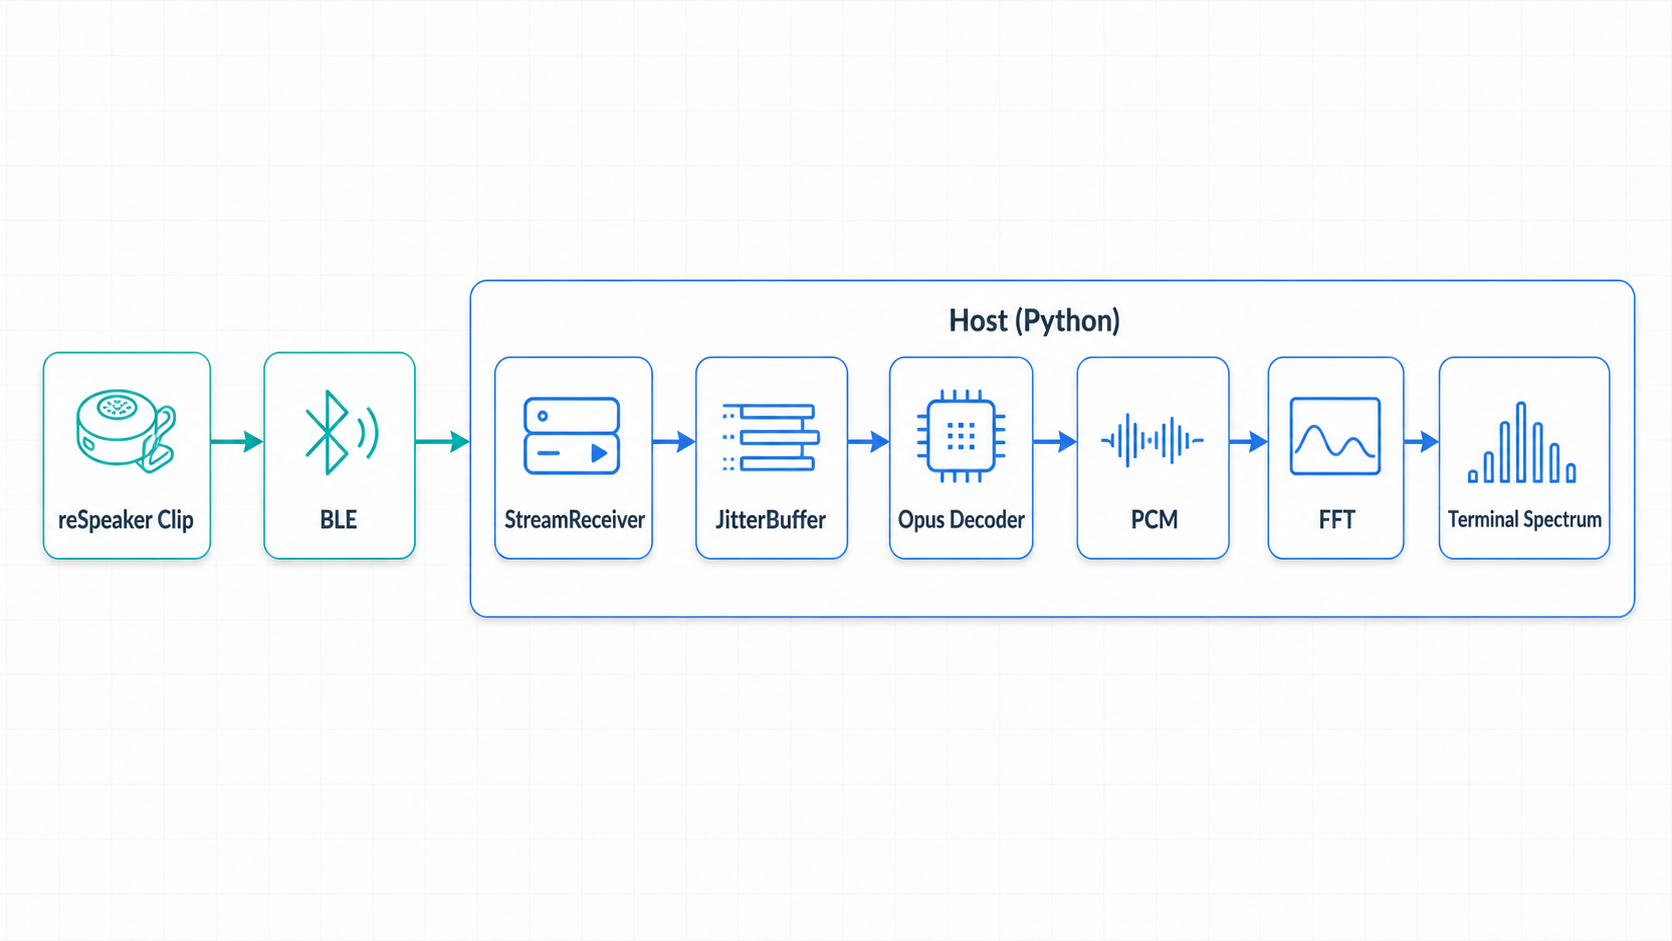
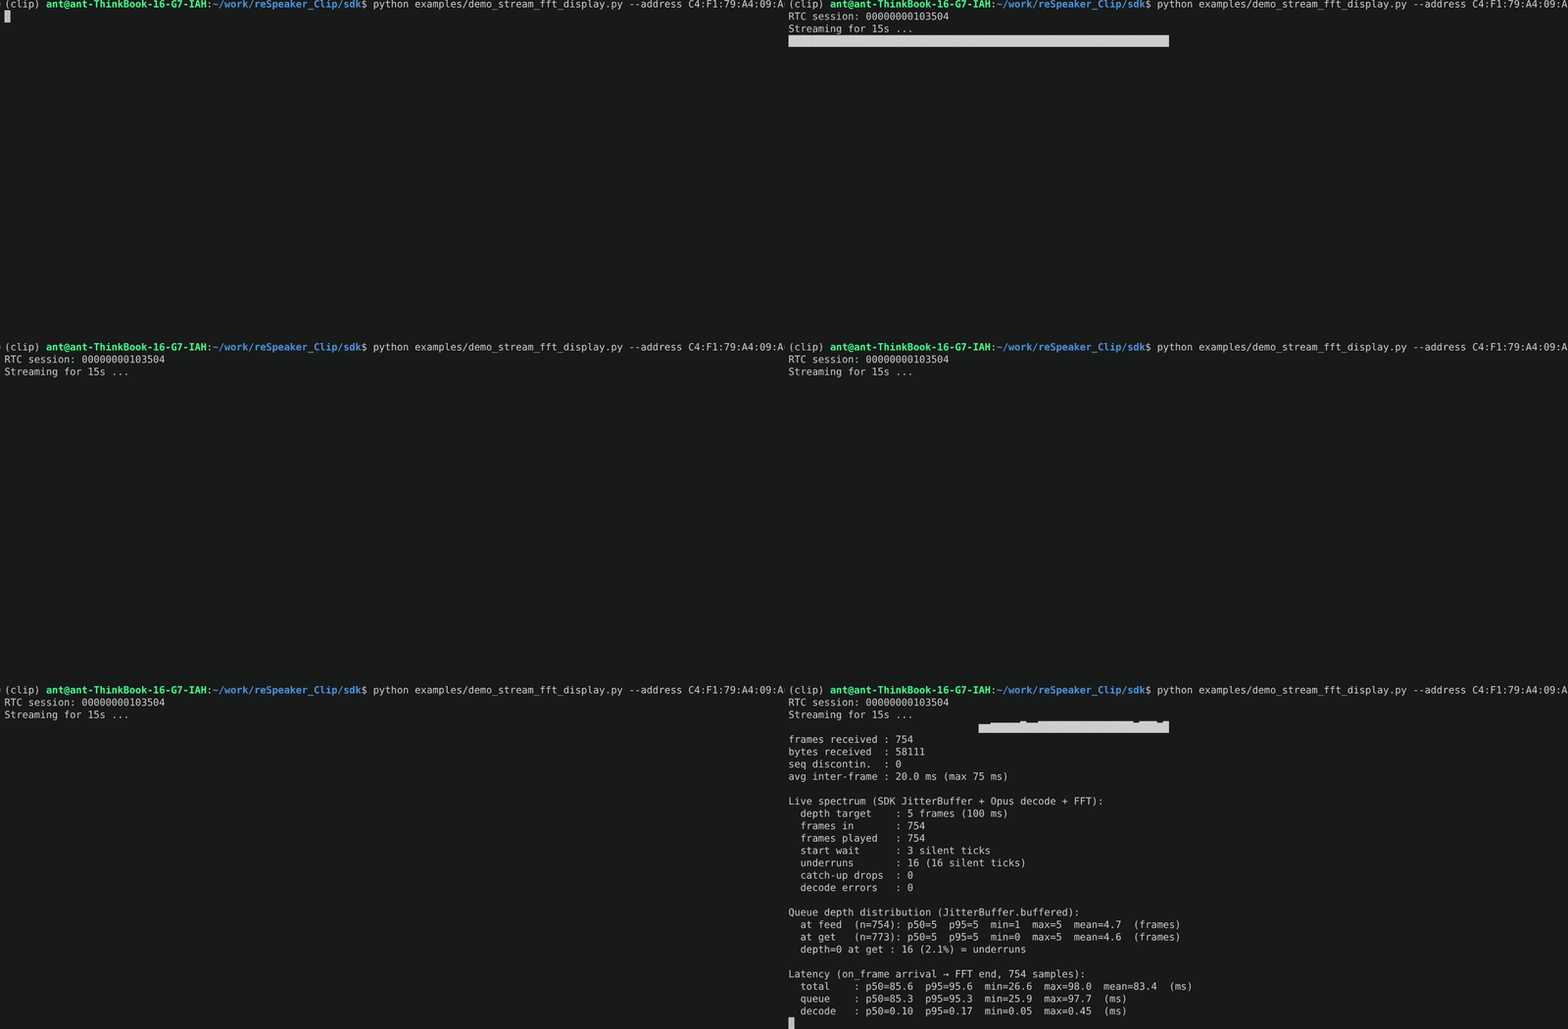
The spectrum you see comes from audio that is being transmitted over BLE right now, not from a recording stored on the device. Wave your hand into the mic and the bars react within a fraction of a second.
4.3 Understanding the Demo Output
When the stream ends, the demo prints statistics. The most meaningful ones are:
RTC session: 00000000082552
Streaming for 50s ...

frames received : 2503
bytes received  : 191846
seq discontin.  : 0
avg inter-frame : 20.0 ms (max 35 ms)
- frames received / bytes received — how many Opus packets arrived and their total size.
- avg inter-frame — the average gap between packet arrivals. RTC produces one Opus frame about every 20 ms, so while the stream runs you should see roughly 50 packets per second and an average near 20 ms.
- seq discontin. — observed sequence discontinuities; on a healthy BLE link this stays 0.
Below these, the demo also prints JitterBuffer statistics (underruns, catch-up drops, queue depth distribution) and a latency breakdown (queue / decode / FFT). Section 7 explains what they mean.
5. Build a Minimal RTC Streaming Application
This section is the core of the tutorial: the same RTC establishment the demo performs, stripped to its essence so you can build on it.
5.1 Connect to reSpeaker Clip
Everything starts with the transport and the client, exactly as in the Basic SDK Guide:
import asyncio

from clip import BleTransport, ClipClient


async def main() -> None:
    transport = BleTransport(name="Clip")   # or BleTransport(address="AA:BB:CC:DD:EE:FF")

    async with ClipClient(transport) as clip:
        ...  # the rest of this tutorial goes here


asyncio.run(main())
BleTransport owns the BLE communication; ClipClient gives you the high-level Clip APIs on top of it.
5.2 Create a StreamReceiver
The receiver turns incoming stream frames into callback invocations. The simplest possible consumer prints each packet length:
from clip.stream import StreamReceiver


def on_frame(opus_packet: bytes) -> None:
    print(len(opus_packet))


receiver = StreamReceiver(on_frame=on_frame)
One callback invocation equals one Opus packet. on_frame runs inline on the receive path, so keep it non-blocking — hand the bytes to a queue, a thread, or another task, and do heavy work elsewhere.
5.3 Start an RTC Session
session = await clip.start_rtc()
print("RTC session:", session)
This sends AT+START=rtc; the device starts its RTC audio pipeline and returns the session ID. At this point the device is only producing audio — the host has not subscribed yet, and nothing is flowing to you.
5.4 Start Receiving RTC Audio
token = await clip.stream_rtc(session, receiver)
await receiver.wait_start(timeout=10)
stream_rtc() attaches your receiver to the transport's frame path and issues AT+DOWNLOAD=<session>; from now on the device pushes STREAM_START, then STREAM_DATA frames, into receiver. wait_start() returns once STREAM_START has arrived — that is the moment the live data channel is truly established.
The returned token is a lease on the transport's frame handler slot; you will release it when the stream is over (Section 5.6).
5.5 Receive Opus Packets
Back to your callback:
def on_frame(opus_packet: bytes) -> None:
    print(len(opus_packet))
This is your application's entry point. Whatever you build — FFT, VAD, streaming ASR, a WebSocket relay — starts from these bytes. The next section explains exactly what they contain.
5.6 Stop the RTC Stream
Stopping mirrors the recording API: stop_recording() sends AT+STOP, the device answers with STREAM_END, and you release the handler lease:
await clip.stop_recording()
await receiver.wait_end(timeout=5)
transport.detach_file_frame_handler(token)
The complete minimal application, assembled:
import asyncio

from clip import BleTransport, ClipClient
from clip.stream import StreamReceiver


async def main() -> None:
    transport = BleTransport(name="Clip")
    async with ClipClient(transport) as clip:
        receiver = StreamReceiver(on_frame=lambda p: print(len(p)))

        session = await clip.start_rtc()
        token = await clip.stream_rtc(session, receiver)
        await receiver.wait_start(timeout=10)

        await asyncio.sleep(10)          # consume the live stream for 10 s

        await clip.stop_recording()
        await receiver.wait_end(timeout=5)
        transport.detach_file_frame_handler(token)

        print("frames:", receiver.frames_received, "bytes:", receiver.bytes_received)


asyncio.run(main())
The full lifecycle is therefore:
BLE connect -> start_rtc() -> stream_rtc() -> STREAM_START
-> STREAM_DATA x N -> stop_recording() -> STREAM_END -> detach handler
6. Understanding the RTC Audio Data
6.1 What Does StreamReceiver Return?
Your callback receives plain bytes — one Opus-encoded audio packet per call. Not WAV, not PCM, and not raw BLE notifications: the SDK has already parsed the RTC transport frames (STREAM_START / STREAM_DATA / STREAM_END) and hands you only the payload.
BLE STREAM_DATA -> SDK parses the frame -> StreamReceiver -> Opus payload (bytes)
The receiver also keeps live statistics you can read at any time: frames_received, bytes_received, sequence_gaps, avg_inter_frame_ms, max_inter_frame_ms, and first_frame_delay_s. After STREAM_END, receiver.end_reason tells you why the stream ended (stopped, timed out, or disconnected).
6.2 RTC Audio Format
The current RTC stream is:
Codec: Opus
Sample rate: 16 kHz
Channels: mono
Frame duration: ~20 ms (320 samples)
Hence one frame about every 20 ms, i.e. about 50 frames per second while the stream runs — the same figure you saw in the demo's avg inter-frame output.
6.3 From Opus to PCM
Because the payload is compressed Opus, you must not reinterpret it as samples:
# WRONG — the packet is compressed Opus, not samples
import numpy as np
samples = np.frombuffer(opus_packet, dtype=np.int16)
Decode first, then treat the result as PCM:
import opuslib

decoder = opuslib.Decoder(16000, 1)          # 16 kHz, mono
pcm = decoder.decode(opus_packet, 320)       # 320 samples = 20 ms
samples = np.frombuffer(pcm, dtype=np.int16)
That decode step is the only thing standing between your callback and real audio samples — and it is exactly what the FFT demo adds on top of the minimal application you just wrote.
7. Understanding demo_stream_fft_display.py
This section maps the demo back onto what you have learned, so the demo stops being "magic script" and becomes "my minimal program, plus a decoder, plus an FFT".
7.1 Demo Structure
The demo is the minimal application's structure with a processing chain attached to on_frame:
on_frame feeds each Opus packet into a LiveSpectrum object; a background thread paces consumption at 20 ms per frame, decodes, runs the FFT, and redraws one line of the terminal.
7.2 RTC Establishment in the Demo
The demo's run() function performs the exact sequence from Section 5:
BleTransport / ClipClient          (5.1)
receiver = StreamReceiver(on_frame)  (5.2)
session = await clip.start_rtc()     (5.3)
token = await clip.stream_rtc(...)   (5.4)
await receiver.wait_start(timeout=10)
... frames flow ...
await clip.stop_recording()          (5.6)
await receiver.wait_end(timeout=5)
transport.detach_file_frame_handler(token)
If you understood Section 5, you already understand the heart of the demo — everything else is audio processing.
7.3 Decode RTC Audio
The demo decodes exactly as in Section 6.3: an opuslib.Decoder(16000, 1) turns each packet into 320 int16 samples. You do not need to know how the Opus codec works internally; the boundary that matters is "callback gives Opus bytes, decoder gives PCM samples".
7.4 Why Does the Demo Use a Jitter Buffer?
BLE deliveries do not arrive perfectly evenly. You might see inter-frame gaps like:
20 ms, 20 ms, 35 ms, 5 ms, 20 ms, ...
The SDK's clip.jitter.JitterBuffer smooths this into a steady consumption rhythm:
BLE packets -> JitterBuffer -> steady 20 ms audio frames
The demo creates JitterBuffer(depth_frames) (default 5 frames, i.e. 100 ms of initial fill), put()s every arriving packet from on_frame, and get()s one frame per 20 ms tick from the processing thread. get() returns None on underrun (no FFT is drawn for silence), and if the host falls behind the buffer drops the oldest frames to catch up toward the live edge. That is all a jitter buffer is: a small shock absorber between an uneven producer and a steady consumer.
7.5 From PCM to FFT
Each decoded 20 ms frame is windowed (Hann), transformed with np.fft.rfft, binned into 64 display bands, and drawn as Unicode block characters. The terminal spectrum is therefore proof that the whole pipeline works end to end:
Mic -> Clip -> BLE -> SDK -> Opus decode -> PCM -> FFT -> your eyes
When the bars move as you speak, every stage of that chain — including the RTC establishment you built yourself in Section 5 — is working.
8. Next Steps
The RTC SDK hands your application live, decoded-ready audio. Everything downstream is yours:
RTC SDK -> Opus decode -> PCM
    ├── FFT spectrum (this tutorial)
    ├── VAD / wake word
    ├── Streaming ASR
    ├── WebSocket relay
    └── Voice assistant
For device control, recording, and file download, see the reSpeaker Clip Basic SDK Guide; for product setup, see Getting Started.
Tech Support & Product Discussion
Thank you for choosing our products! We are here to provide you with different support to ensure that your experience with our products is as smooth as possible. We offer several communication channels to cater to different preferences and needs.