Getting Started with reSpeaker Flex
The reSpeaker Flex is a modular, split-architecture voice processing system built around the XMOS XVF3800 processor, designed specifically for robots and intelligent interaction terminals. Unlike conventional all-in-one mic arrays, the Flex separates the core processing board from the microphone array board the two connected via a flexible FPC ribbon cable allowing the array to be embedded at any physical position within a product enclosure while keeping the processing electronics elsewhere. The system supports two interchangeable microphone array configurations: a circular 4-mic array for omnidirectional 360° capture, and a linear 4-mic array for directional front-facing pickup with rear suppression. Both boards connect to the same core board through a standardized 24-pin FPC interface, and the system operates in either USB (UAC 2.0 plug-and-play) or I2S mode for embedded integration. An optional XIAO ESP32S3 module can be soldered onto the core board for wireless connectivity and expanded control.
Circular mic Series
| reSpeaker Flex XVF3800 | reSpeaker Flex XVF3800 Circular with XIAO ESP32S3 | |
|---|---|---|
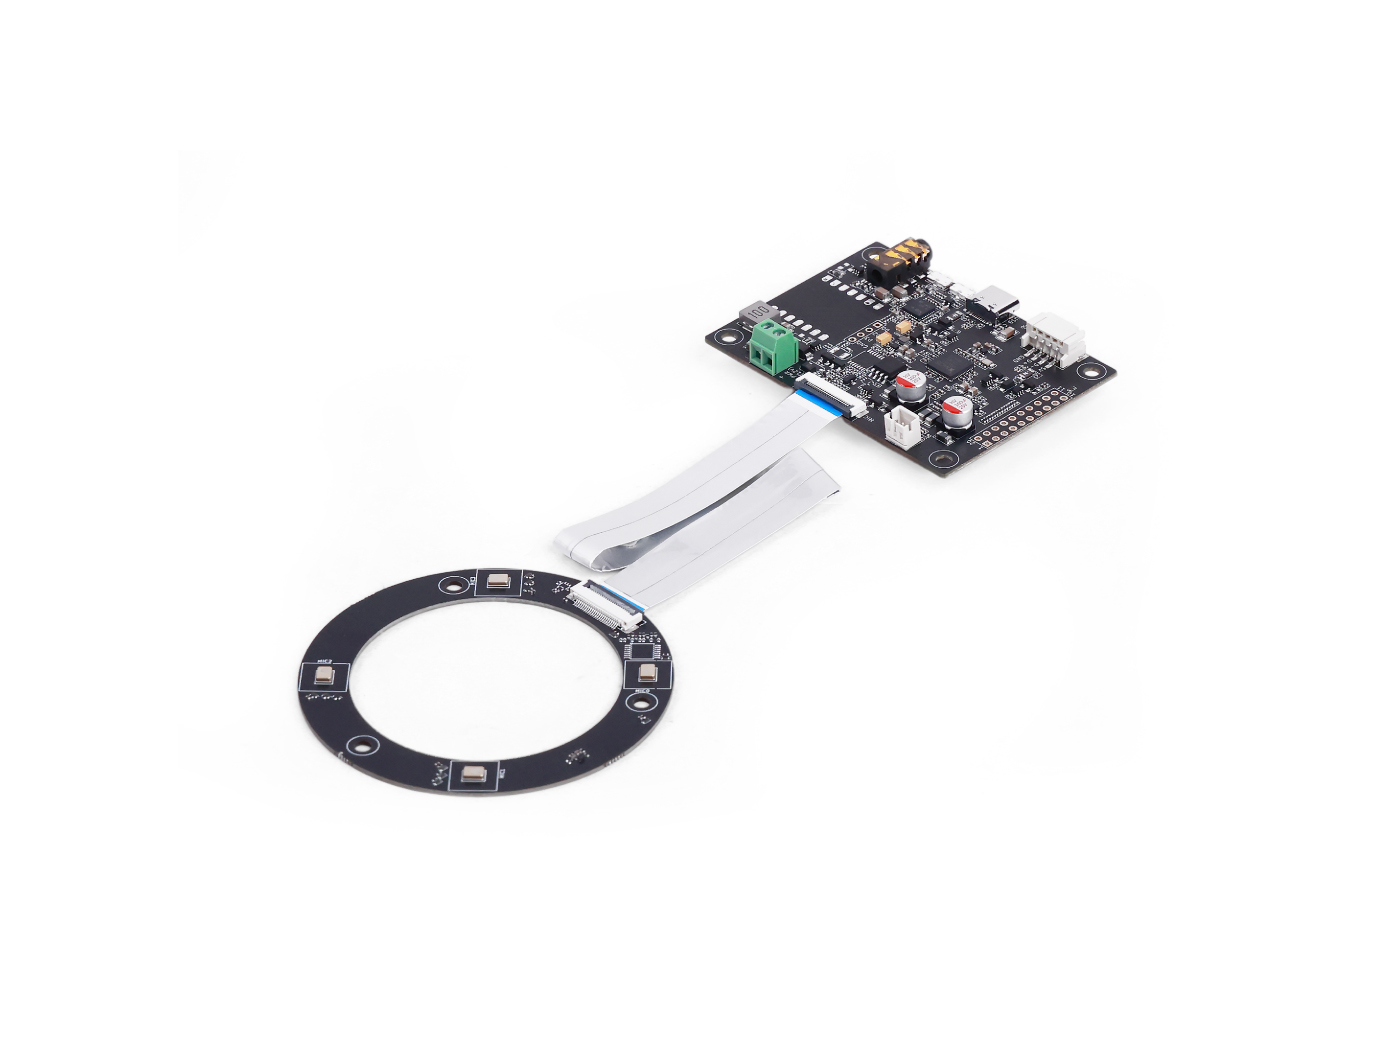 | 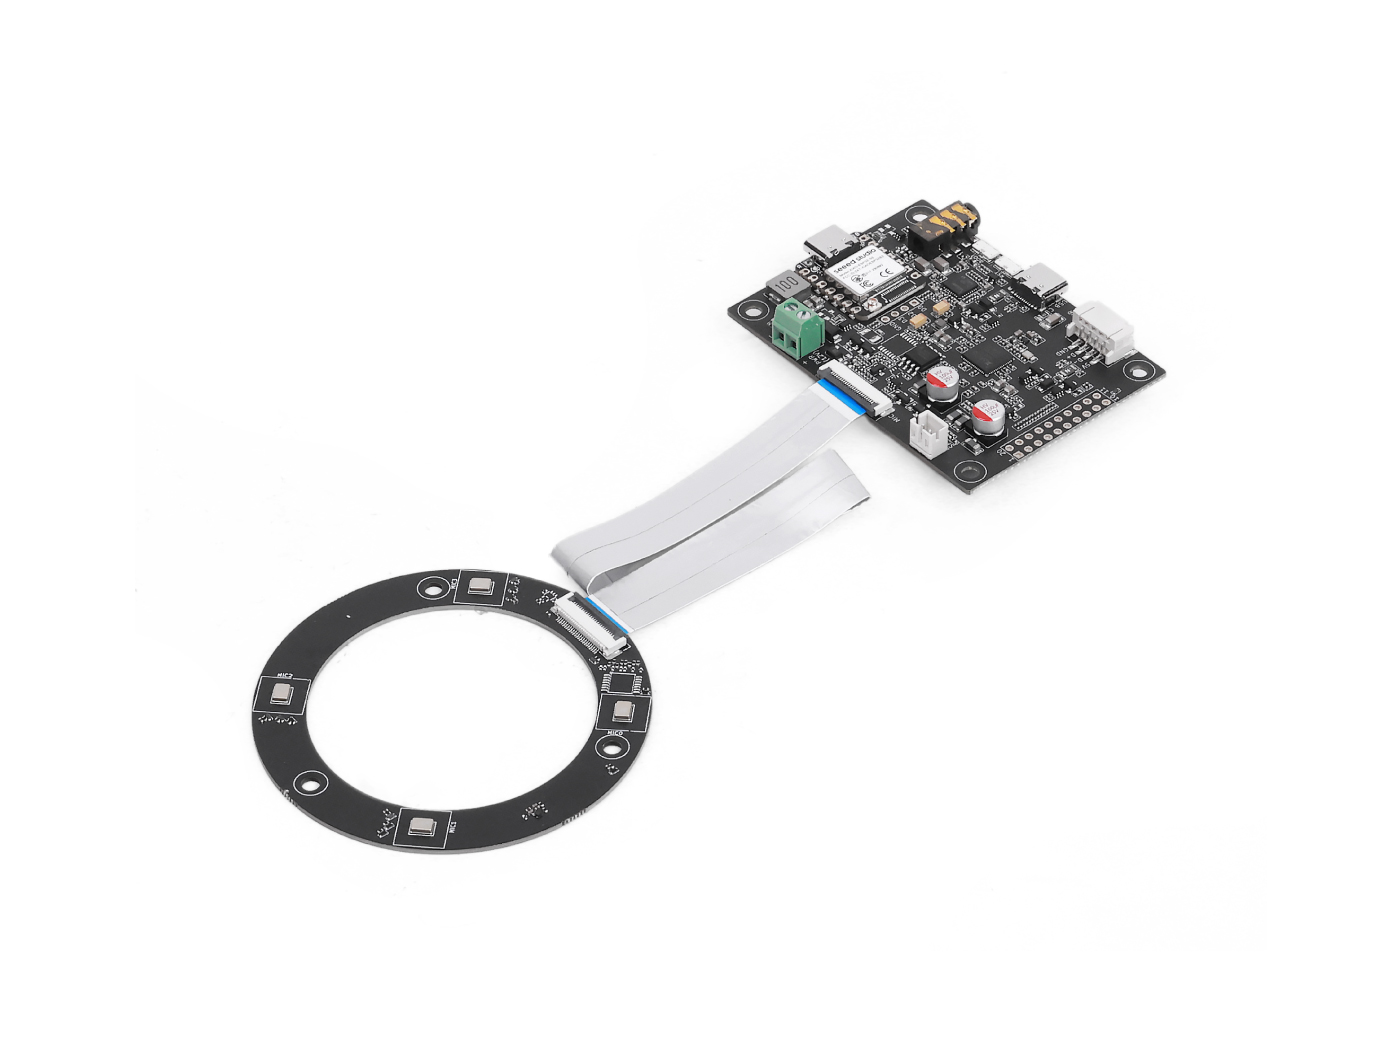 | |
Linear mic Series
| reSpeaker Flex XVF3800 | reSpeaker Flex XVF3800 Linear with XIAO ESP32S3 | |
|---|---|---|
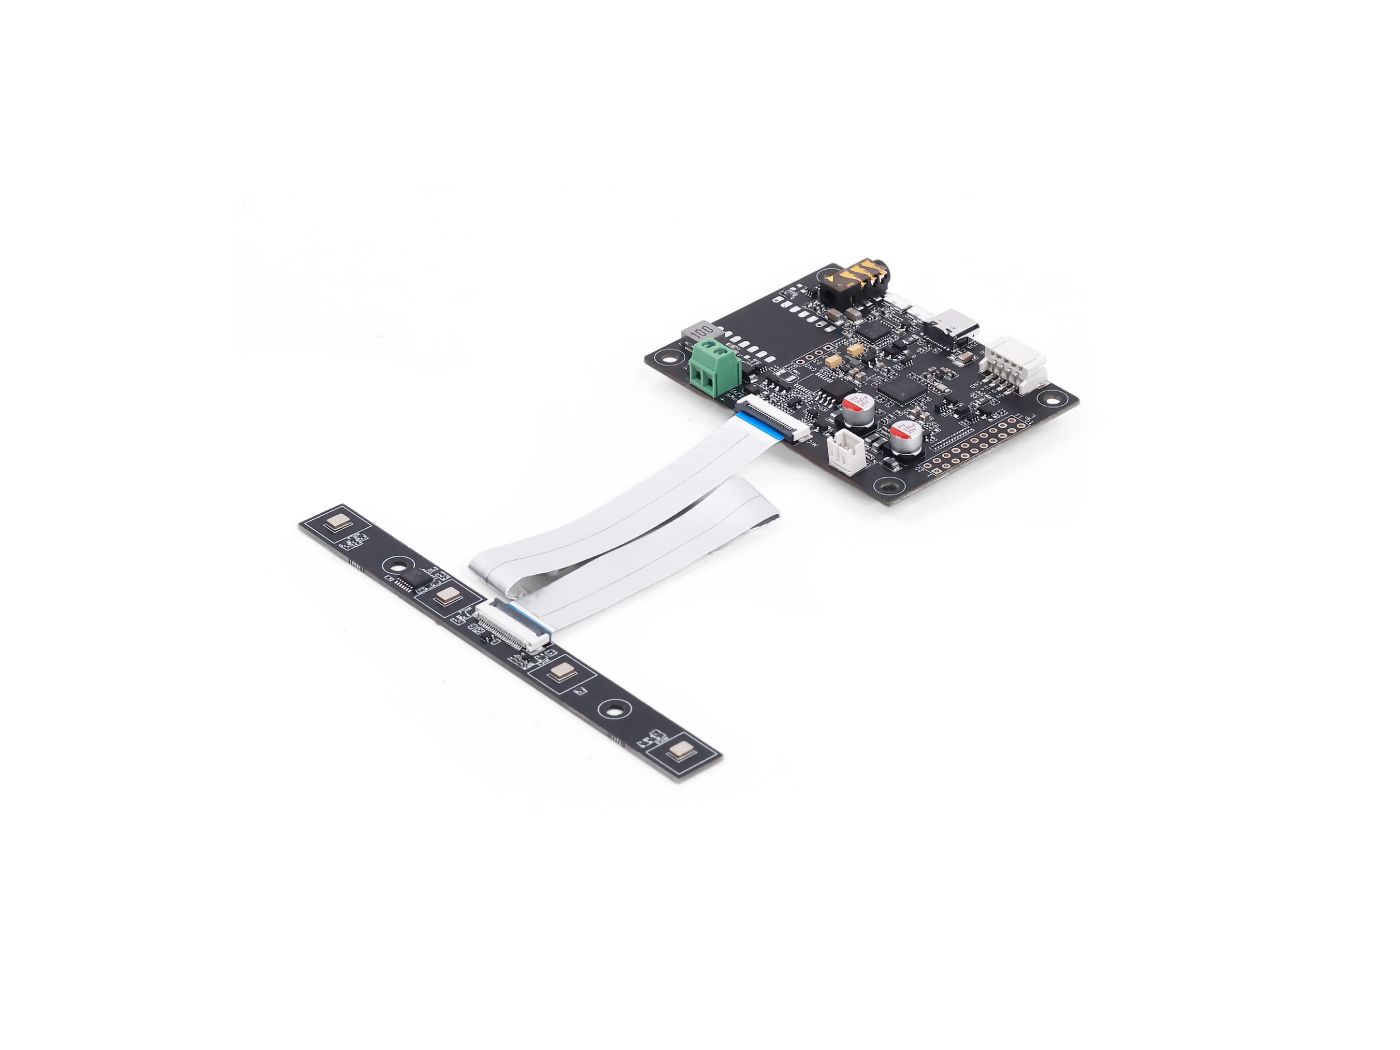 | 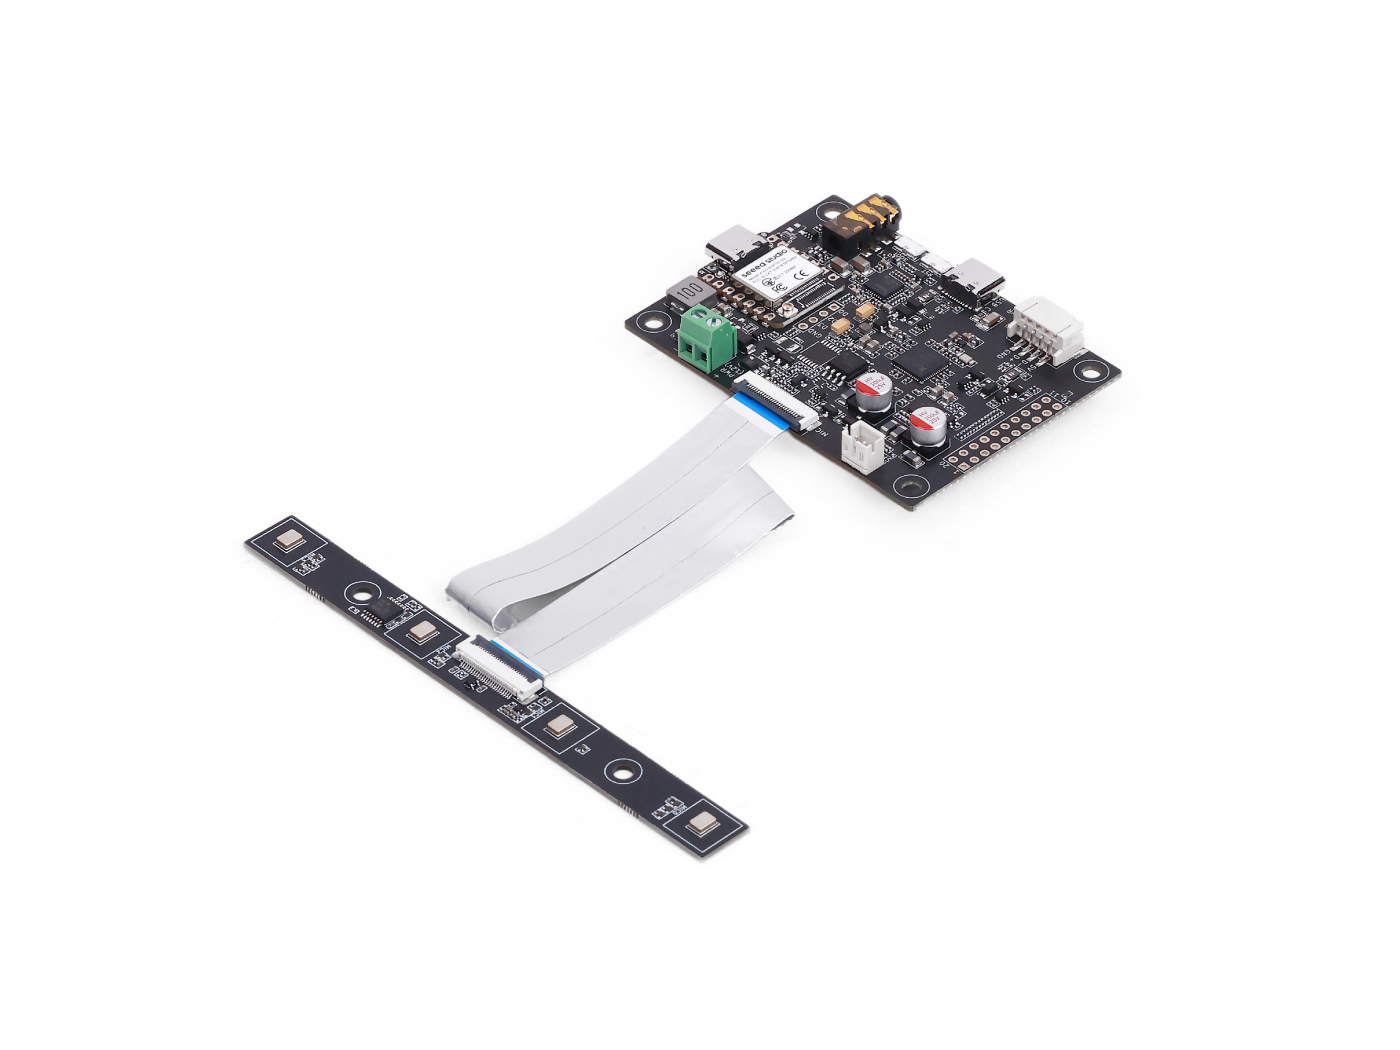 | |
Features
-
Split modular design: Core board and microphone array board are physically separate, connected via FPC ribbon cable for flexible placement in any product chassis
-
Choice of microphone configurations: Swap between circular 4-mic array (360° pickup, 44mm spacing) or linear 4-mic array (180° front directivity, 33mm spacing) using the same core board
-
XMOS XVF3800 audio processing: Full suite of AEC, AGC, DoA, multi-channel beamforming, VAD, noise suppression, and de-reverberation
-
Dual operation modes: USB UAC 2.0 for plug-and-play with PCs and SBCs; I2S mode for direct embedded integration
-
Dual USB connectivity: USB-C port and PH2.0 locking port both support UAC 2.0 audio and DFU firmware upgrade
-
On-board speaker amplifier: Supports driving 10W 4 Ohms speakers via JST connector, with 3.5mm AUX headphone output
-
XIAO ESP32S3 support (optional): Solder-on module adds Wi-Fi/Bluetooth, with I2S and I2C buses wired directly to XVF3800 for wireless control and audio forwarding
-
Firmware flexibility: Dual USB firmware variants (2-channel and 6-channel), I2S firmware, DFU upgrade via dfu-util, and configuration persistence across power cycles
-
Python SDK: Adjustable recording format, volume, algorithm parameters, and channel routing via Python
Main Components
Core Board
| Component / Feature | Description |
|---|---|
| Main Audio Processor | XMOS XVF3800 (firmware v3.2.1), handles all audio DSP including AEC, beamforming, DoA, and noise suppression |
| Audio Codec | TLV320AIC3104, handles audio conversion and DAC output |
| FPC Mic Array Interface | 24-pin FPC connector with locking latch, supports up to 8-mic arrays with 2 GPIO lines |
| USB-C Port | UAC 2.0 audio, DFU firmware upgrade, and power |
| PH2.0 Port | Locking latch connector; provides the same UAC 2.0 audio and DFU support as the USB-C port |
| 3.5 mm AUX Jack | Side-exit headphone output driven from the on-board DAC |
| Speaker JST Connector | Upright-mount connector that drives speakers up to 10W at 4Ω; solder pad preserved for hard-wired speaker connection |
| External Power Terminal | Supplies 12V to the whole system and supports 10W speaker loads (P1 priority) |
| RST Button | Hardware reset for the XVF3800 |
| SafeMode (Boot) Button | Hold during power-on to enter safe mode for firmware recovery |
| PWR LED | Green power-on indicator |
| Debug Pad | Reserved pad for XMOS XTAG4 (not soldered at the factory) |
| XMOS 3800 IO Headers | Exposed pin headers/pads for I2C, I2S, 5V/GND, speaker pins, and remaining XVF3800 IO |
| Mounting Holes | 4 × M3 mounting holes |
| XIAO ESP32S3 | Supports soldering XIAO ESP32S3 when used as the host device |
| XIAO ESP32S3 GPIO | Remaining GPIO can be used for IO and peripheral expansion |
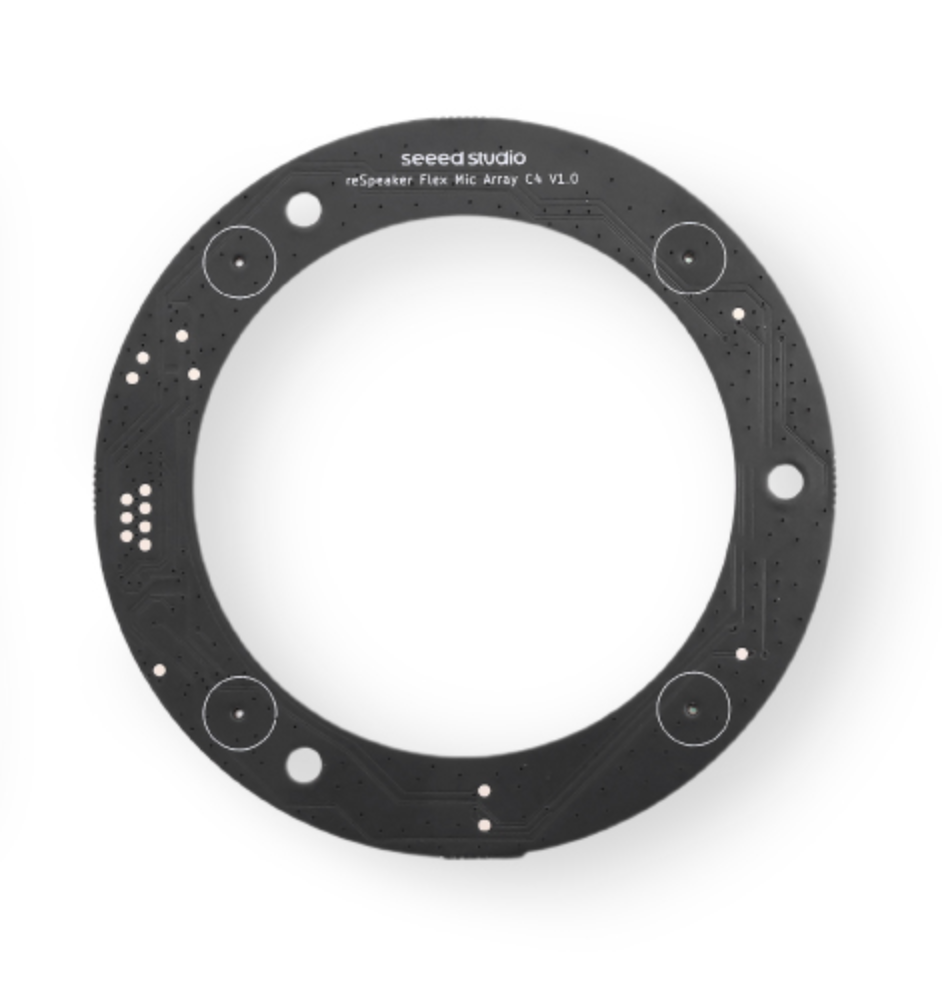
Circular Array Board
| Component / Feature | Description |
|---|---|
| Microphones | 4× PDM MEMS microphones with 44 mm spacing arranged in a circular layout |
| Pickup Pattern | 360° omnidirectional audio capture |
| Interface | FPC connector to the core board |
| Mounting | 3 × M3 mounting holes for enclosure or housing attachment |
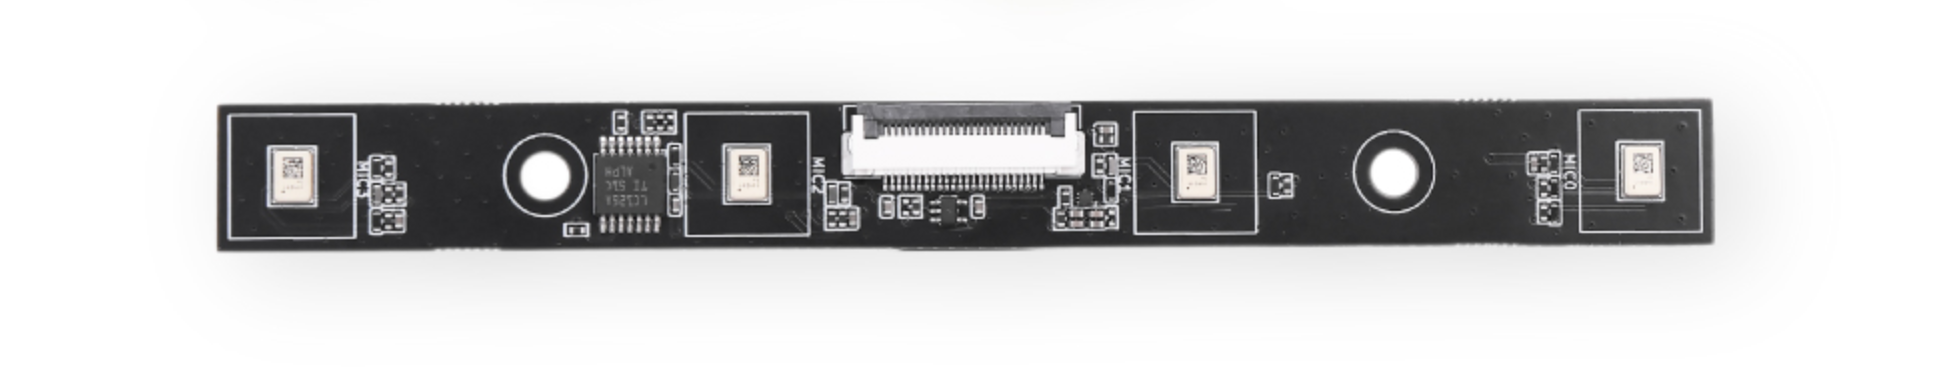
Linear Array Board
| Component / Feature | Description |
|---|---|
| Microphones | 4× PDM MEMS microphones with 33 mm spacing arranged in a linear layout |
| Pickup Pattern | Front-facing pickup pattern of approximately 180°, with rear sound suppressed |
| Interface | FPC connector; cable can be routed from the side or rear |
| Mounting | 2 × M3 mounting holes |
XIAO ESP32S3 Support
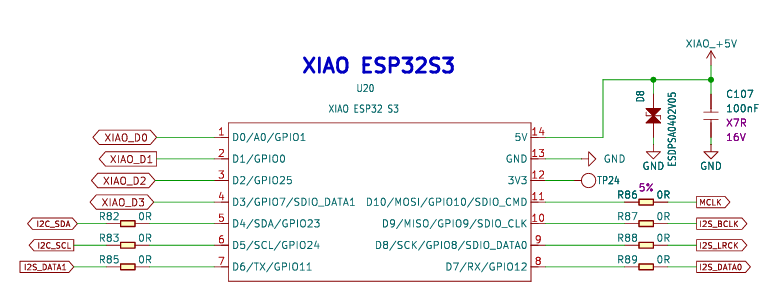
The reSpeaker Flex core board includes a dedicated footprint for soldering a Seeed Studio XIAO ESP32S3 module, enabling Wi-Fi and Bluetooth connectivity on top of the XVF3800's audio processing pipeline. The SKUs including XIAO (-C4-1 and -L4-1) ship with this module pre-populated; the base SKUs (-C4-0 and -L4-0) leave the footprint unpopulated. When the XIAO is fitted, the following connections are wired between it and the XVF3800:
- I2S bus — dual-bus (playback and record) with shared BCLK, MCLK, and LRCLK for audio streaming in both directions
- I2C bus — for reading and writing XVF3800 configuration parameters from the XIAO
- RST line — XIAO can assert a hardware reset on the XVF3800 via a dedicated IO pin
- Remaining XIAO IO — brought out to labelled pin headers/pads for user expansion
An FPC Wi-Fi antenna (for the on-board antenna-free XIAO ESP32S3) is included as an accessory with all XIAO-equipped variants.
Pin Header
24 FPC cable
The FPC mic array interface is a 24-pin, 0.5mm pitch connector with a locking latch, and the 20cm FPC ribbon cable included in the box is keyed to this connector.
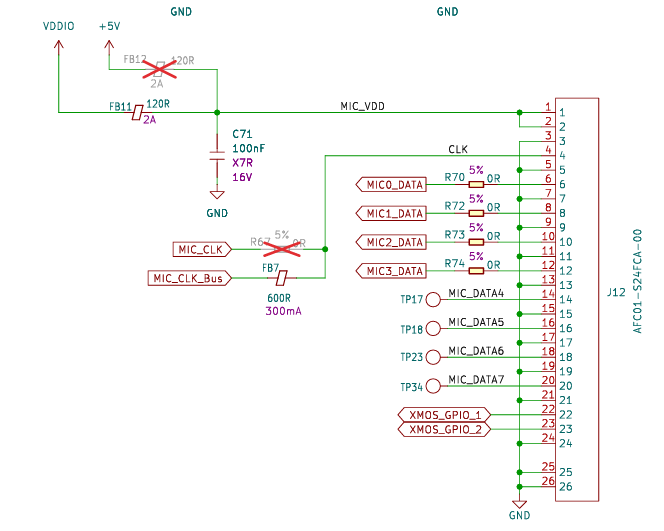
| Pin | Signal Name | Type | Function Description | Notes |
|---|---|---|---|---|
| 1 | MIC_VDD | Power | Microphone power supply | 3.3V supply |
| 2 | MIC_VDD | Power | Microphone power supply | Dual pin for enhanced power stability |
| 3 | GND | GND | Power return ground | Power GND |
| 4 | MIC_CLK | Out | Global clock signal | Core signal, 2–4 MHz |
| 5 | GND | GND | Clock shielding ground | Dedicated ground for clock |
| 6 | MIC_D1 | In | Data line 1 | CH1 microphone |
| 7 | GND | GND | D1 isolation ground | |
| 8 | MIC_D2 | In | Data line 2 | CH2 microphone |
| 9 | GND | GND | D2 isolation ground | |
| 10 | MIC_D3 | In | Data line 3 | CH3 microphone |
| 11 | GND | GND | D3 isolation ground | |
| 12 | MIC_D4 | In | Data line 4 | CH4 microphone |
| 13 | GND | GND | D4 isolation ground | |
| 14 | MIC_D5 | In | Data line 5 | CH5 microphone |
| 15 | GND | GND | D5 isolation ground | |
| 16 | MIC_D6 | In | Data line 6 | CH6 microphone |
| 17 | GND | GND | D6 isolation ground | |
| 18 | MIC_D7 | In | Data line 7 | CH7 microphone |
| 19 | GND | GND | D7 isolation ground | |
| 20 | MIC_D8 | In | Data line 8 | CH8 microphone |
| 21 | GND | GND | D8 isolation ground | |
| 22 | GPIO_1 | I/O | General-purpose input/output | Expansion function |
| 23 | GPIO_2 | I/O | General-purpose input/output | Expansion function |
| 24 | GND | GND | GPIO shielding ground | Absorbs GPIO noise |
Getting Started
Hardware Preparation
- USB Type-c Cable
- Host Computer or Raspberry Pi
Software Preparation
Out of Box Usage
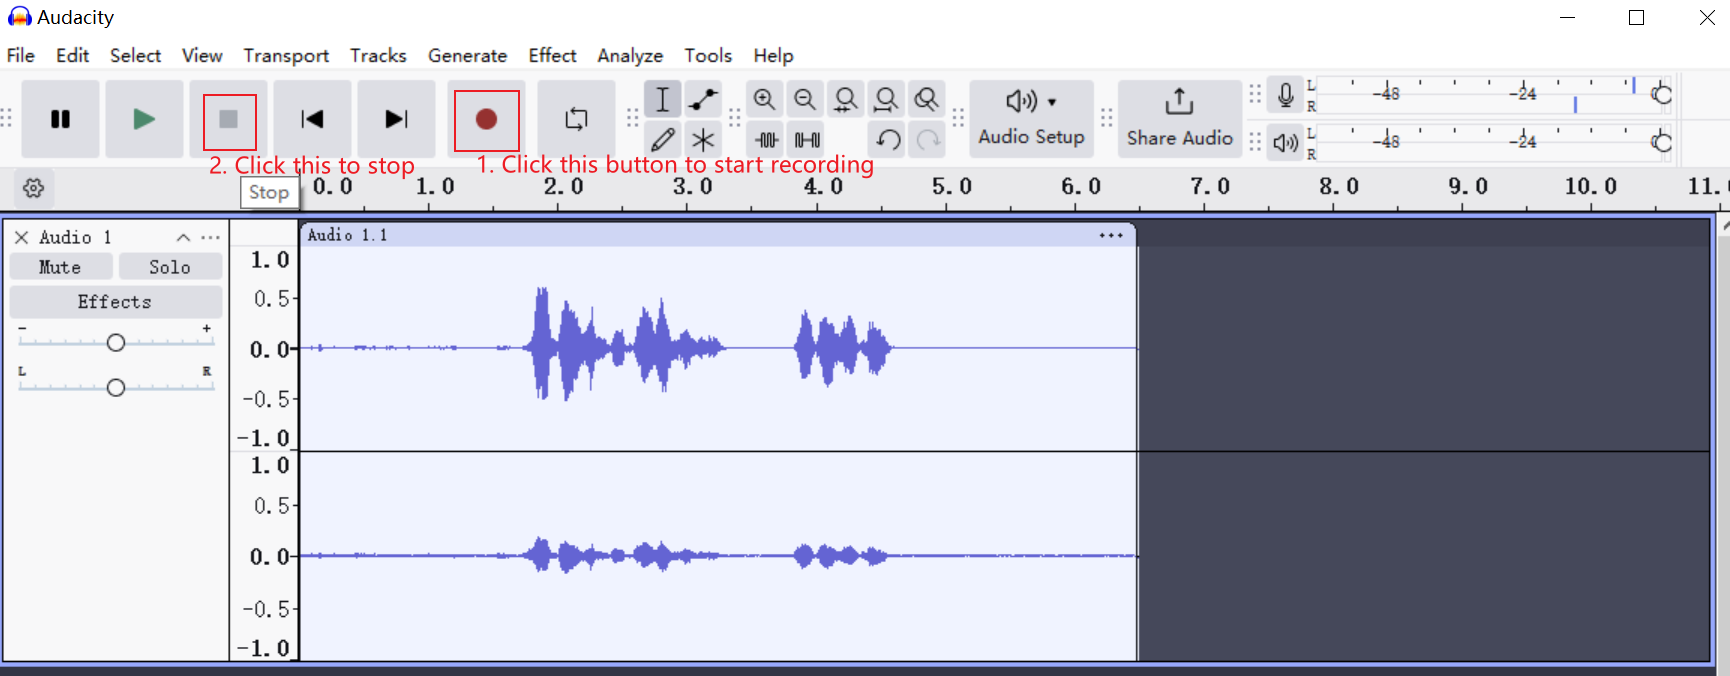
Reset
The reset (RST) button provides a hardware reset for the reSpeaker Flex when pressed, it restarts the chip and reinitializes the system from the very beginning, just like a full power cycle.
Speaker connection
Here you can see how to connect speakers using either the 3.5mm AUX headphone jack or the onboard JST speaker interface, depending on your audio output preference.
Safe Mode
Safe Mode is a special recovery mode on the reSpeaker Flex that allows you to flash firmware via USB DFU or I2C for devices like the Raspberry Pi and ESP32.
If you've previously flashed the I2S firmware and want to switch back to the USB firmware, you can enter Safe Mode and reflash the USB firmware using USB DFU.
- USB firmware
- Supports USB DFU only.
- You can update the device through a USB connection.
- It does not support I2C DFU.
- I2S firmware
- Supports I2C DFU.
- Allows firmware updates through the I2C interface.
- It does not support USB DFU.
- Safe Mode firmware
- Stored in the Factory partition.
- Supports both USB DFU and I2C DFU.
- This is the most flexible recovery firmware.
Use Safe Mode in the following situations
- Your firmware is not working properly (for example, USB is not detected).
- You need to re-flash new firmware, but the current firmware is not responding.
- You accidentally flashed the wrong firmware and want to recover the device.
How to Enter Safe Mode
- Power off the device completely.
- Press and hold the Boot button.
- While holding the Boot button, reconnect the power.
- The red LED will start blinking, confirming that the device has entered Safe Mode. Now the device is running the Safe Mode firmware stored in the Factory partition.
Update firmware
Three firmware versions are available in the official GitHub repository. You can choose and flash the appropriate firmware depending on your application requirements. For more details and downloads, please refer to the Github Link:
Please make sure that you will need to download whole repository.
- USB
- I2S
The USB firmware is designed for use with host operating systems such as Windows, Linux, and macOS when communicating through the USB hardware interface. Two firmware variants are available: respeaker_xvf3800_usb_dfu_firmware_v2.0.x.bin, which provides 2-channel audio, and respeaker_xvf3800_usb_dfu_firmware_6chl_v2.0.x.bin, which provides 6-channel audio. Both firmware versions operate at a 16 kHz sampling rate with 32-bit depth.
You can explore these firmware files in this link
| Firmware | Channels | Notes |
|---|---|---|
| XXXXXXXXXX | XXXXXX | XXXXXXX |
Connect the reSpeaker Flex to your PC via the USB cable. Note that you need to use the XMOS USB-C port(close to RST Button) to flash XMOS’s firmware.
The I2S firmware is intended for use when the device is connected to a microcontroller host such as the XIAO ESP32S3. In this configuration, voice data is transmitted using the I2S protocol. The firmware file respeaker_xvf3800_i2s_dfu_firmware_v1.0.x.bin is available in here. This firmware supports 2-channel audio with a 32-bit depth at a 16 kHz sampling rate.
| Firmware | Channels | Notes |
|---|---|---|
| XXXXXXXXXX | XXXXXX | XXXXXXX |
Connect the reSpeaker Flex to your PC via the USB cable. Note that you need to use the XMOS USB-C port(close to RST Button) to flash XMOS’s firmware.
Install DFU Util
dfu-util is a command line tool for Device Firmware Upgrade via USB.
- Windows
- macOS
- Linux
-
Download
dfu-util-0.11-binaries.tar.xzand extract it, e.g.,D:\dfu-util-0.11-binaries\win64\
Download Link -
Add the path to
dfu-util.exeto your systemPathvariable:
My Computer > Properties > Advanced > Environment Variables > Path -
Open Command Prompt (
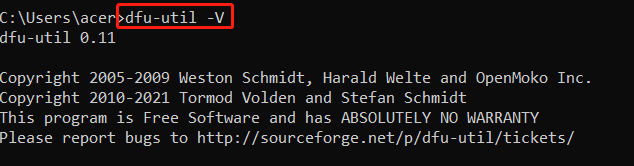
cmd) and verify installation:
dfu-util -V
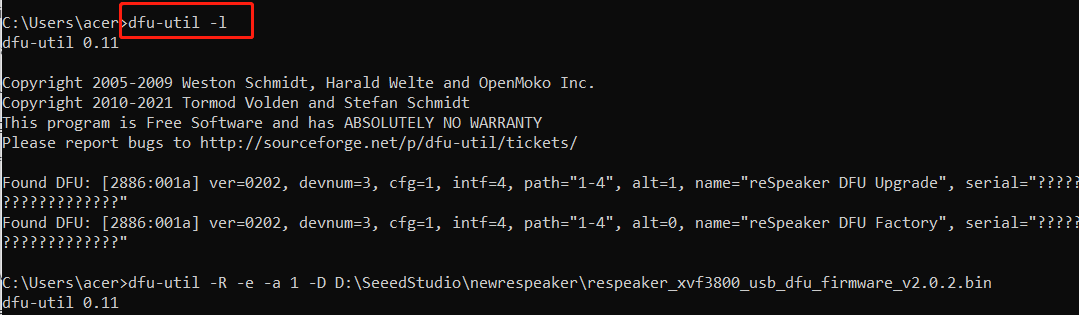
- Connect the reSpeaker Flex and check device detection:
dfu-util -l
If you get:
Cannot open DFU device 2886:001a ... (LIBUSB_ERROR_NOT_SUPPORTED)
Proceed with the driver installation step below.
- Install Zadig
- Open Zadig →
Options > List All Devices - Select
reSpeaker XVF3800 Flex - Install WinUSB driver
- Power-cycle the device
- Run
dfu-util -lagain to confirm detection.
- Open Zadig →
- Install dfu-util with Homebrew:
brew install dfu-util
- Check if the device is detected:
dfu-util -l
Expected Output:
dfu-util -l
dfu-util 0.11

Copyright 2005-2009 Weston Schmidt, Harald Welte and OpenMoko Inc.
Copyright 2010-2021 Tormod Volden and Stefan Schmidt
This program is Free Software and has ABSOLUTELY NO WARRANTY
Please report bugs to http://sourceforge.net/p/dfu-util/tickets/

Found DFU: [2886:001a] ver=0202, devnum=3, cfg=1, intf=4, path="2-1.1.4", alt=1, name="reSpeaker DFU Upgrade", serial="101991441000000001"
Found DFU: [2886:001a] ver=0202, devnum=3, cfg=1, intf=4, path="2-1.1.4", alt=0, name="reSpeaker DFU Factory", serial="101991441000000001"
- Install dfu-util:
sudo apt install dfu-util
- Connect the XVF3800 and check detection:
sudo dfu-util -l
Expected Output:
pi@raspberrypi:~ $ sudo dfu-util -l
dfu-util 0.9

Copyright 2005-2009 Weston Schmidt, Harald Welte and OpenMoko Inc.
Copyright 2010-2016 Tormod Volden and Stefan Schmidt
This program is Free Software and has ABSOLUTELY NO WARRANTY
Please report bugs to http://sourceforge.net/p/dfu-util/tickets/

Found DFU: [2886:001a] ver=0202, devnum=5, cfg=1, intf=3, path="1-1.1", alt=1, name="reSpeaker DFU Upgrade", serial="101991441000000001"
Found DFU: [2886:001a] ver=0202, devnum=5, cfg=1, intf=3, path="1-1.1", alt=0, name="reSpeaker DFU Factory", serial="101991441000000001"
Flash Firmware
Download the complete firmware repository from GitHub here reSpeaker Flex XVF 3800
-
Run the following command to flash the firmware
- dfu-util -R -e -a 1 -D /path/to/dfu_firmware.bin
-
On Linux, run it with sudo
- sudo dfu-util -R -e -a 1 -D /path/to/dfu_firmware.bin
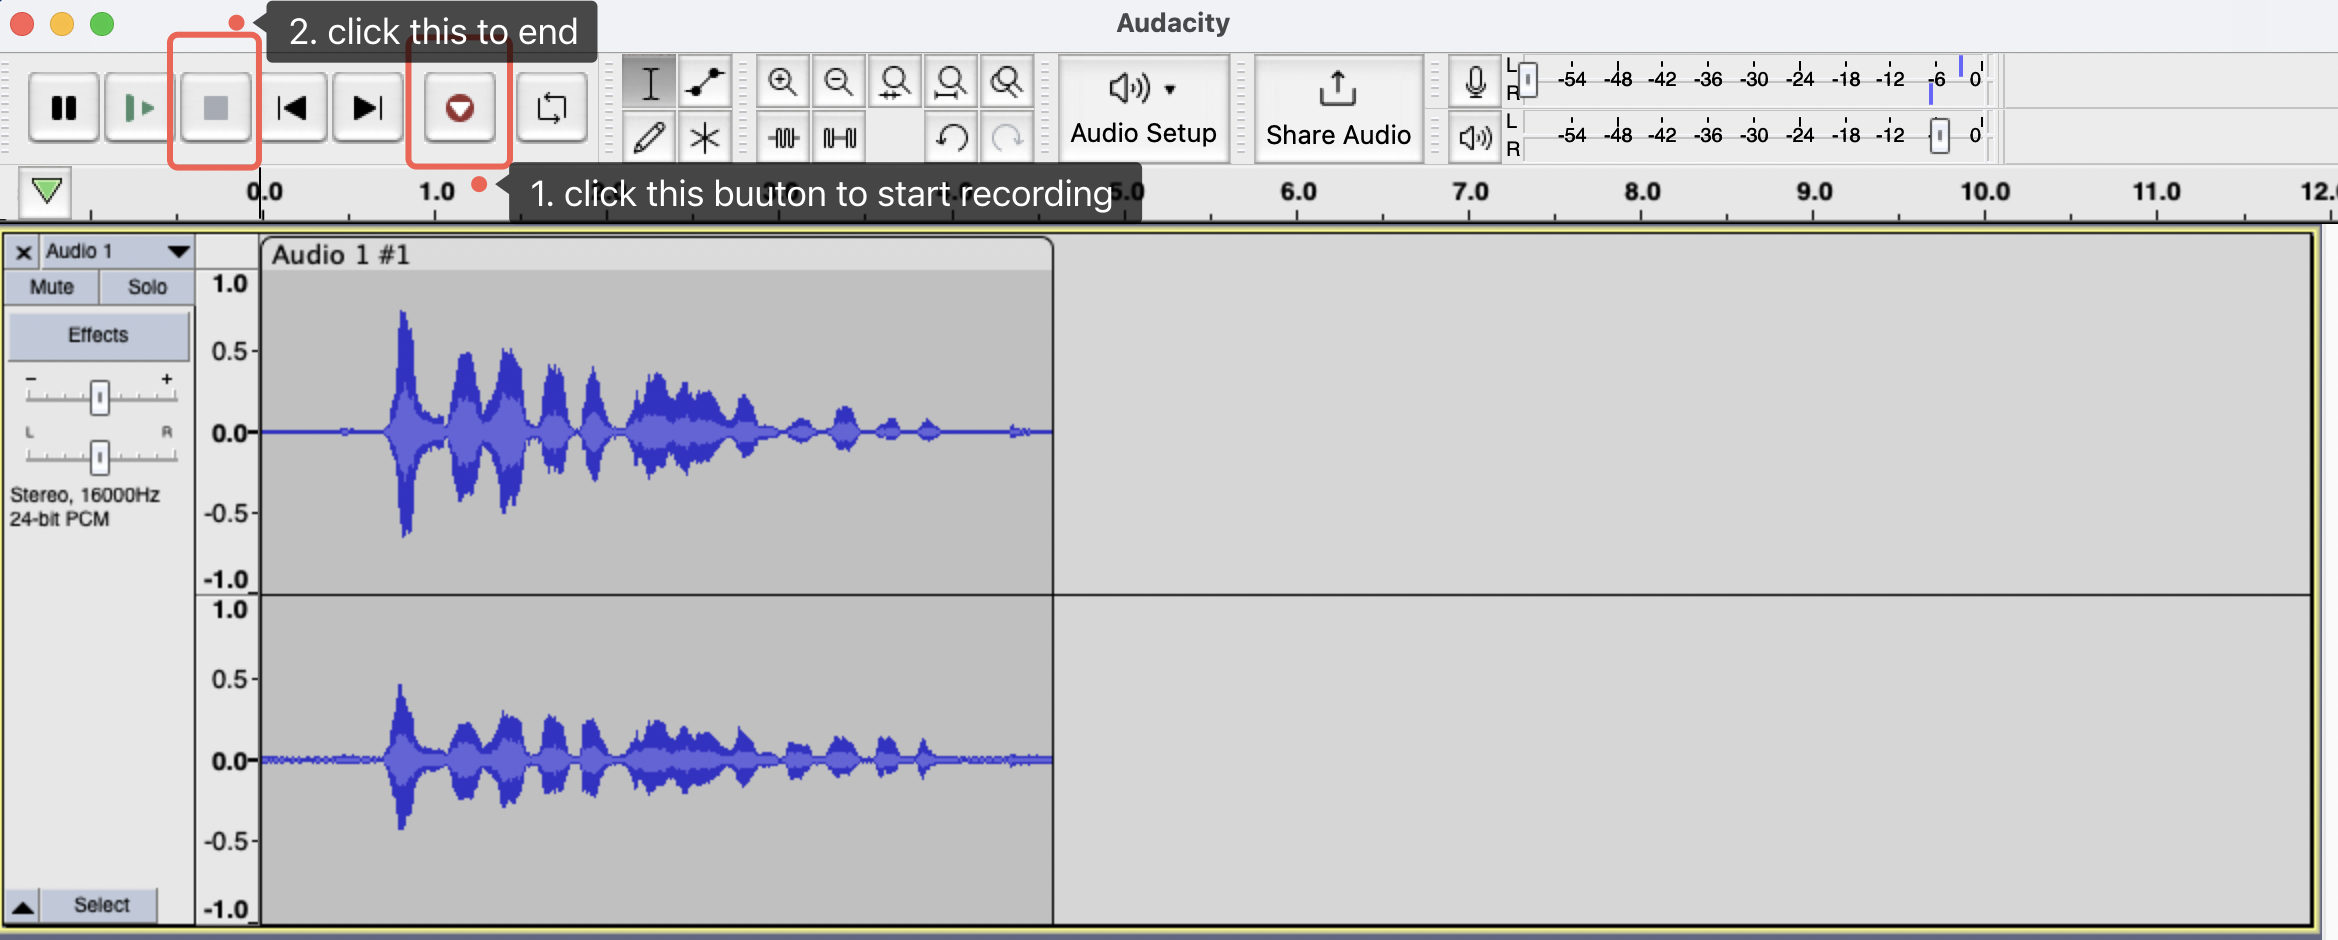
Record and playback with USB Firmware
- Windows
- macOS
- Raspberry Pi / Linux
Setup Audacity (Windows)
- Open Audacity
- Go to Audio Setup > Audio Settings
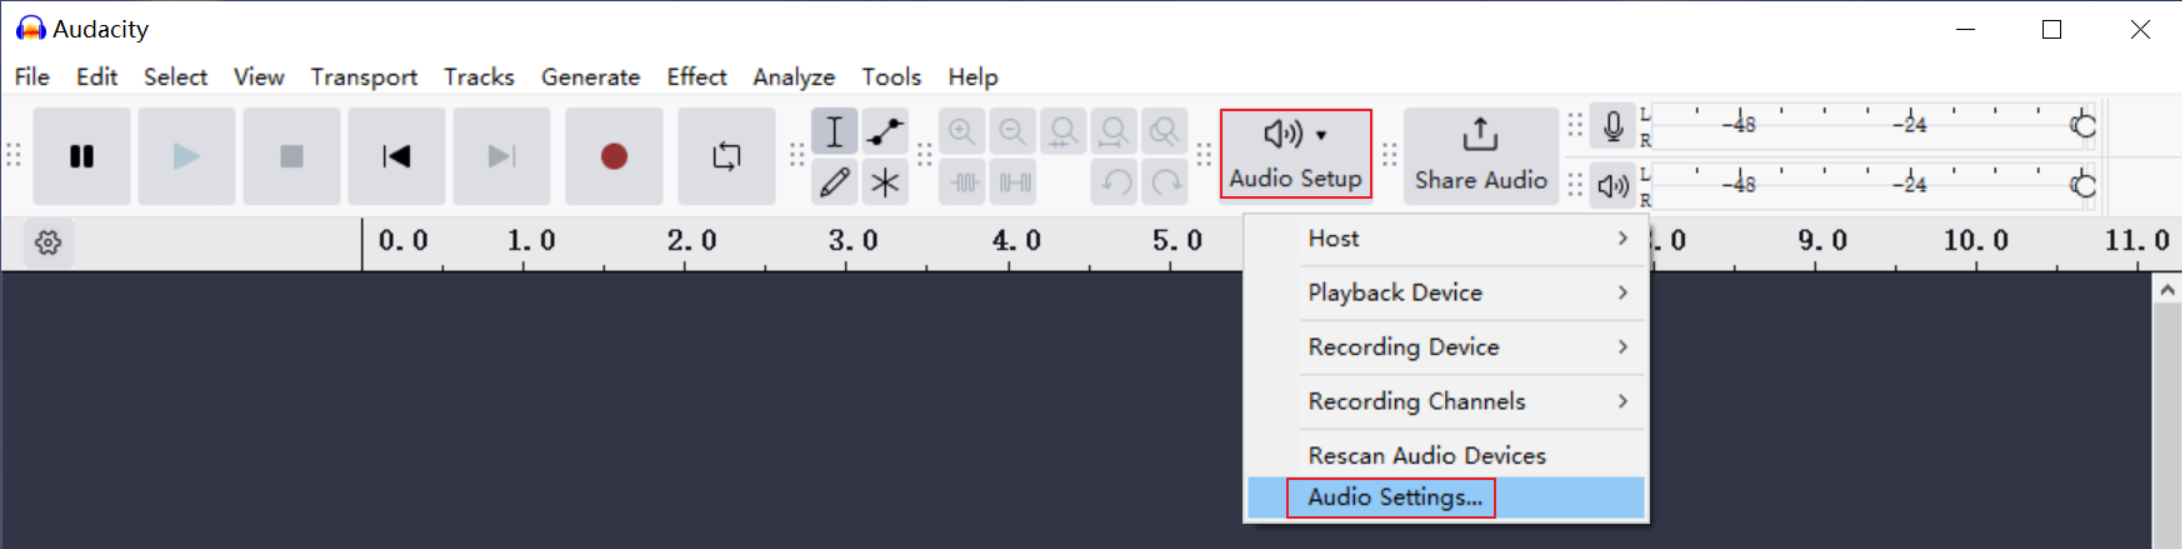
- Set:
- Host:
Windows WASAPI - Recording Device:
reSpeaker XVF3800 Flex - Channels:
2 (Stereo) - Sample Rate:
16000 Hz(for both Project and Default Sample Rate) - Sample Format:
16-bit
- Host:

- Click OK
- You’re ready — start recording!
Setup Audacity (macOS)
- Open Audacity
- Go to Audio Setup and select Recording Device as reSpeaker 3800 Flex
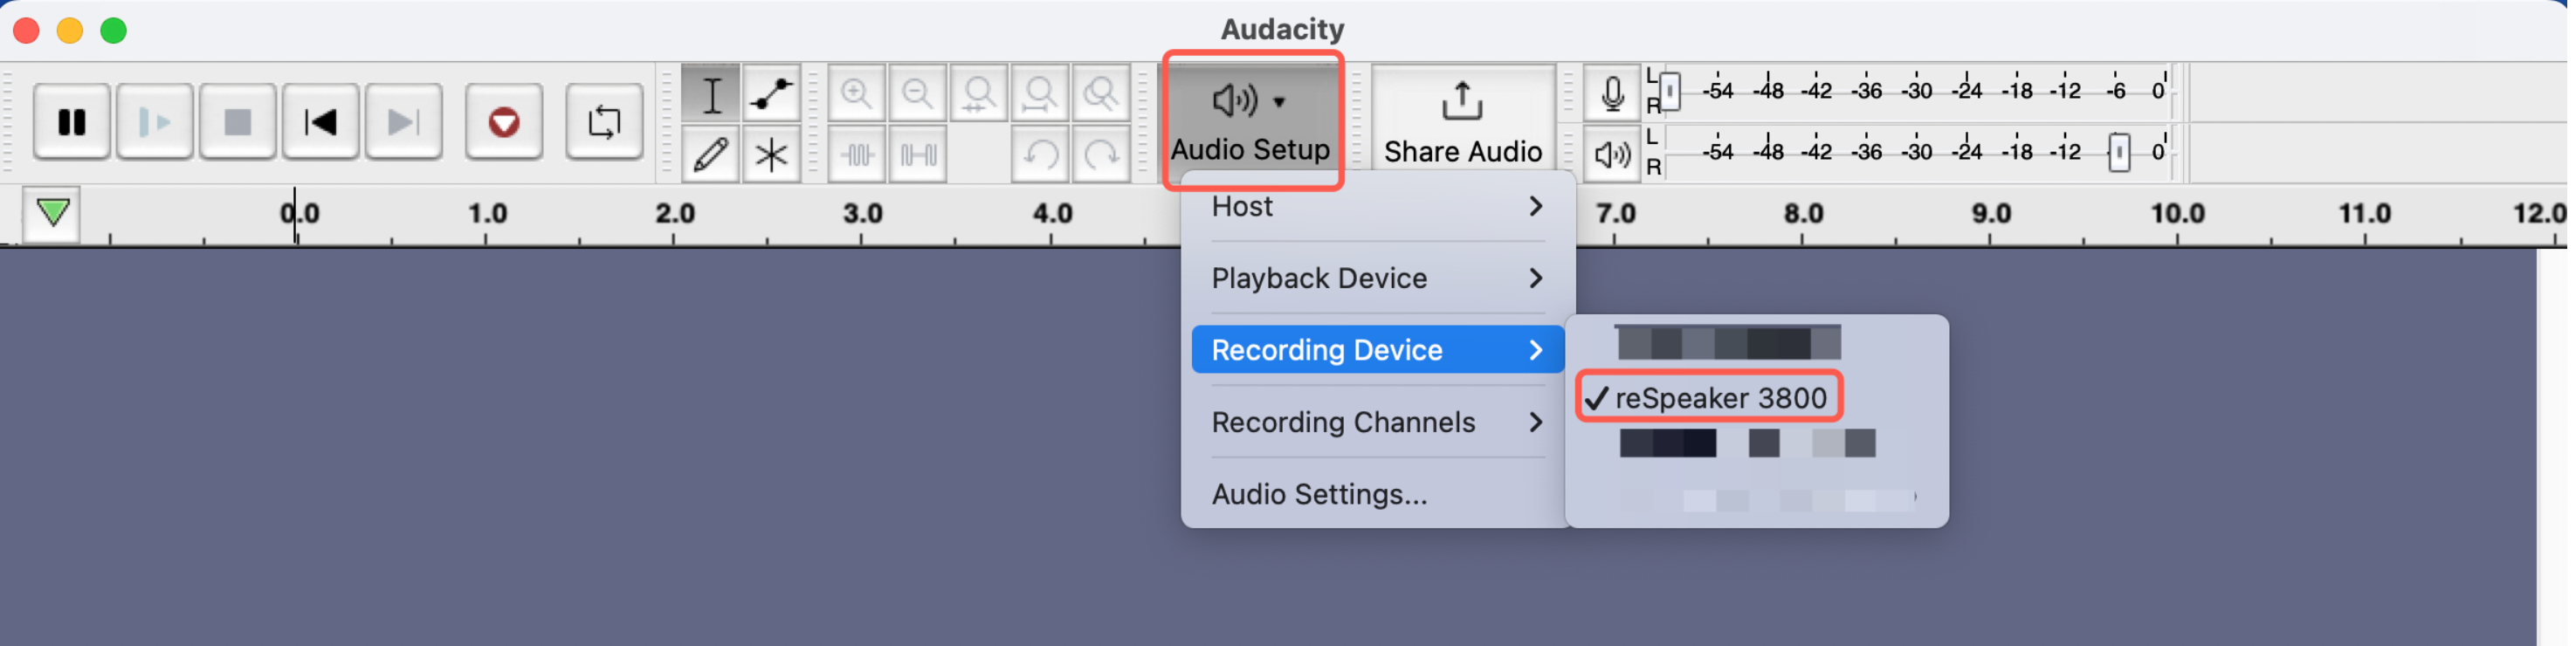
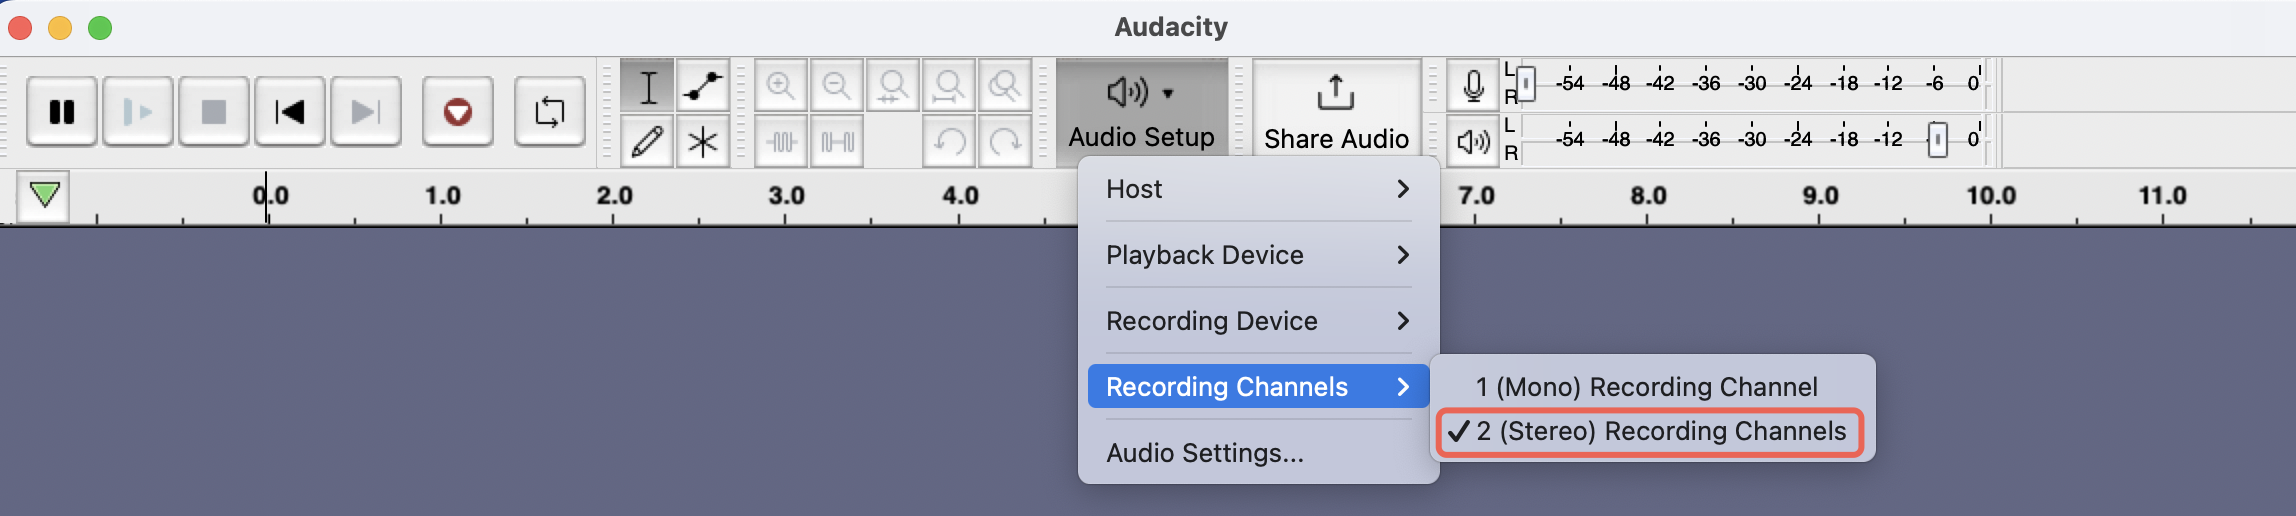
- Go to Audio Setting Set:
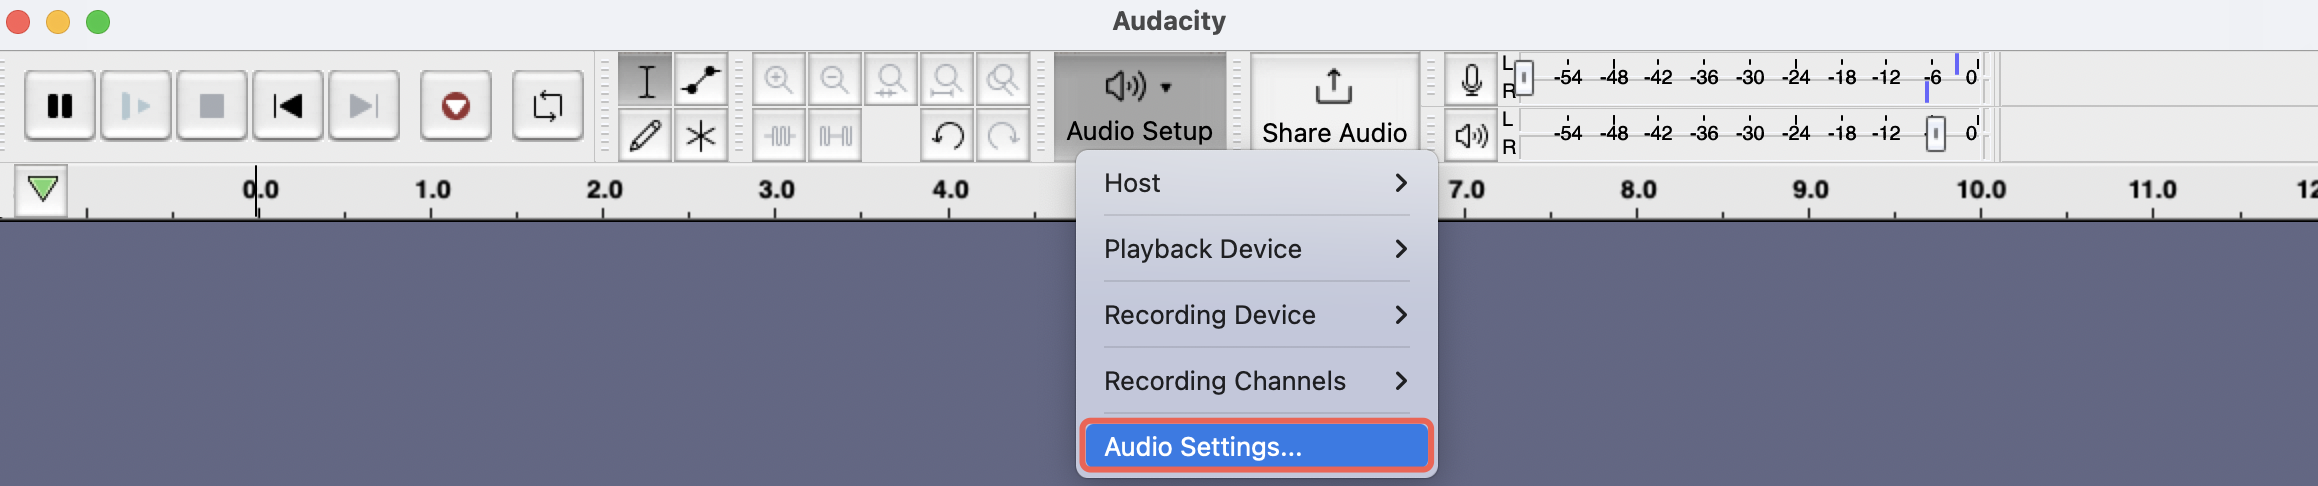
- Recording Device:
reSpeaker 3800 Flex - Channels:
2 (Stereo) - Sample Rate:
16000 Hz(for both Project and Default Sample Rate) - Sample Format:
16-bit
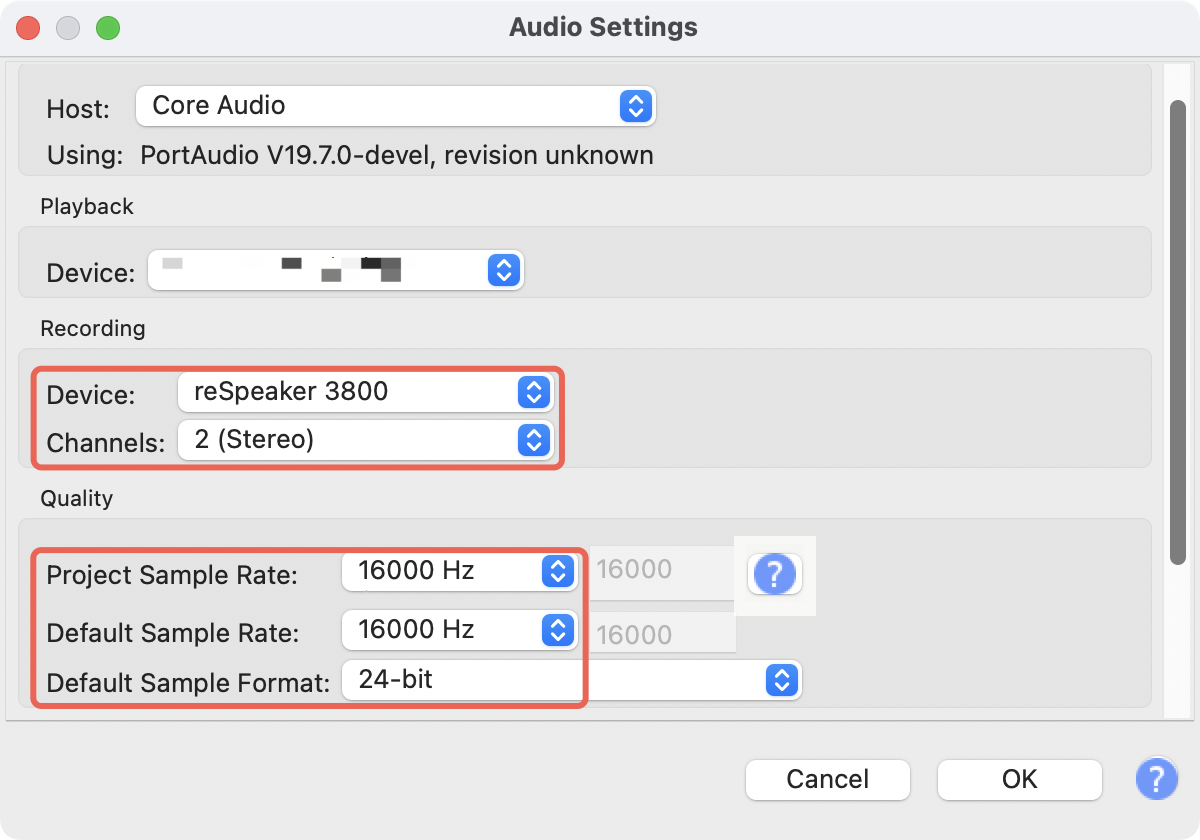
- Click OK
- Ready to record!
Recording on Raspberry Pi (Command Line)
- Find sound card number:
arecord -l
Example output:
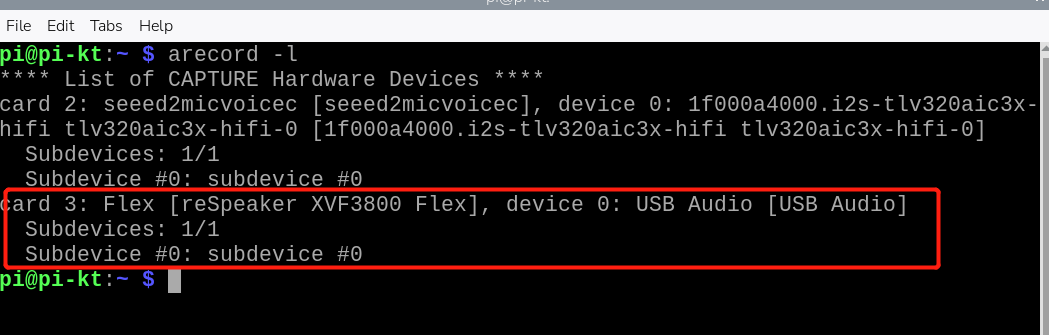
In this case, card number is 3
- Record audio (5 seconds):
arecord -D plughw:3,0 -c 2 -r 16000 -f S16_LE -d 5 output.wav
Replace 3 with your actual sound card number
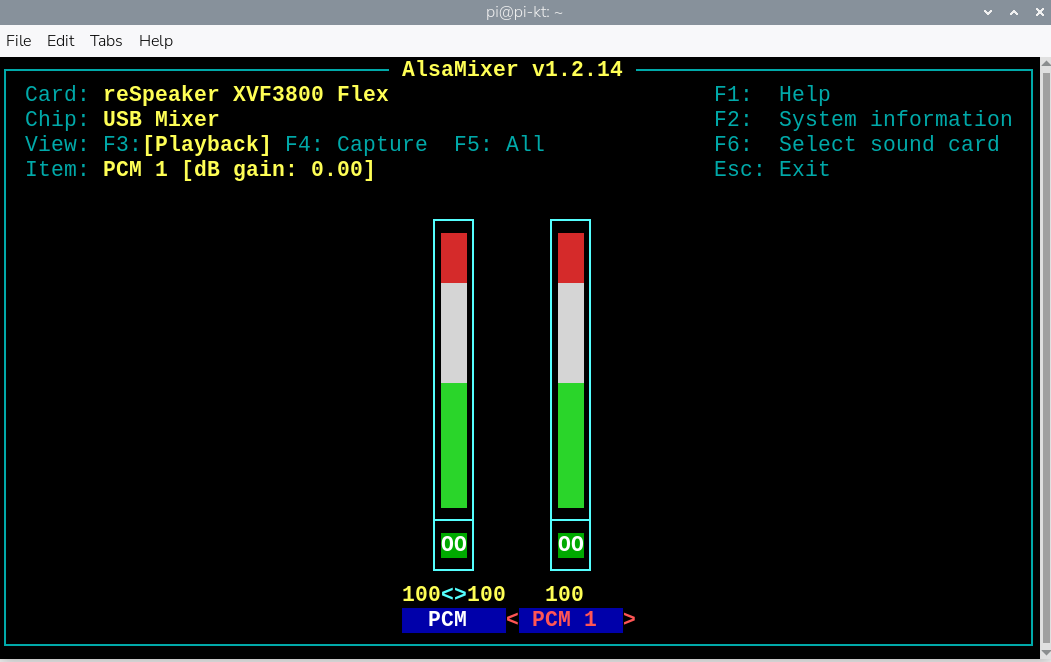
- Adjusting Volume for reSpeaker XVF3800 on ALSA
alsamixer
In alsamixer, use the left/right arrow keys to navigate to the correct sound device.Use the up arrow key to increase the volume.
- Playback:
aplay -D plughw:3,0 output.wav
Recording on Raspberry Pi (Audacity)
- Install Pi-Apps (if not already installed)
Open a terminal on your Raspberry Pi.Run the following command to install Pi-Apps
wget -qO- https://raw.githubusercontent.com/Botspot/pi-apps/master/install | bash
Wait for the installation to complete. A new Pi-Apps icon will appear in your menu.
-
Install Audacity via Pi-Apps
-
Set Up Audio Input and Output
- Click on "Audio Setup" in the toolbar.
- Select "Audio Settings" from the dropdown menu.
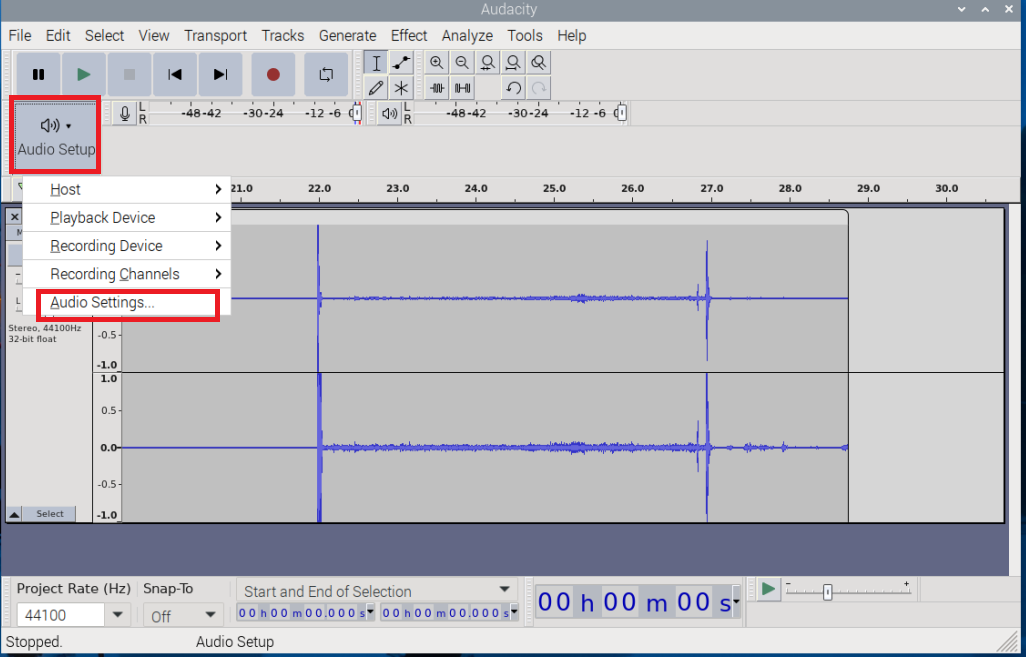
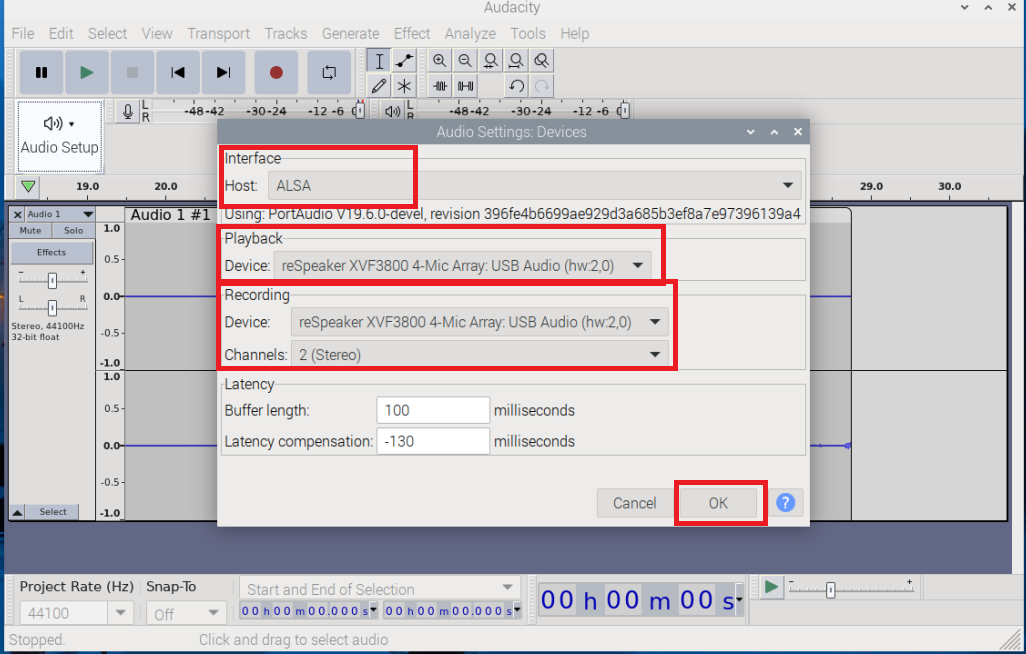
- In the Audio Settings window:
- Choose the correct Recording Device (e.g., reSpeaker XVF3800 Flex).
- Choose the appropriate Playback Device (e.g., reSpeaker XVF3800 Flex).
- Make sure Host is set to ALSA for best compatibility on Raspberry Pi.
- Click OK to apply the settings.
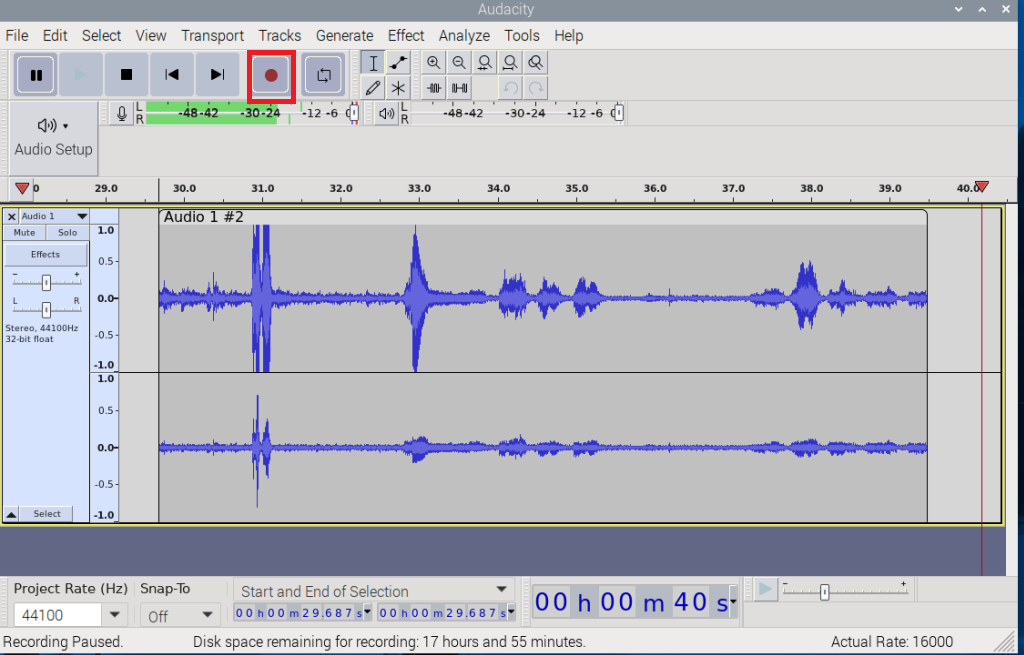
- Record and Playback Audio
Tech Support & Product Discussion
Thank you for choosing our products! We are here to provide you with different support to ensure that your experience with our products is as smooth as possible. We offer several communication channels to cater to different preferences and needs.