Add Voice Interaction to Your LeKiwi Robot with reSpeaker
Overview

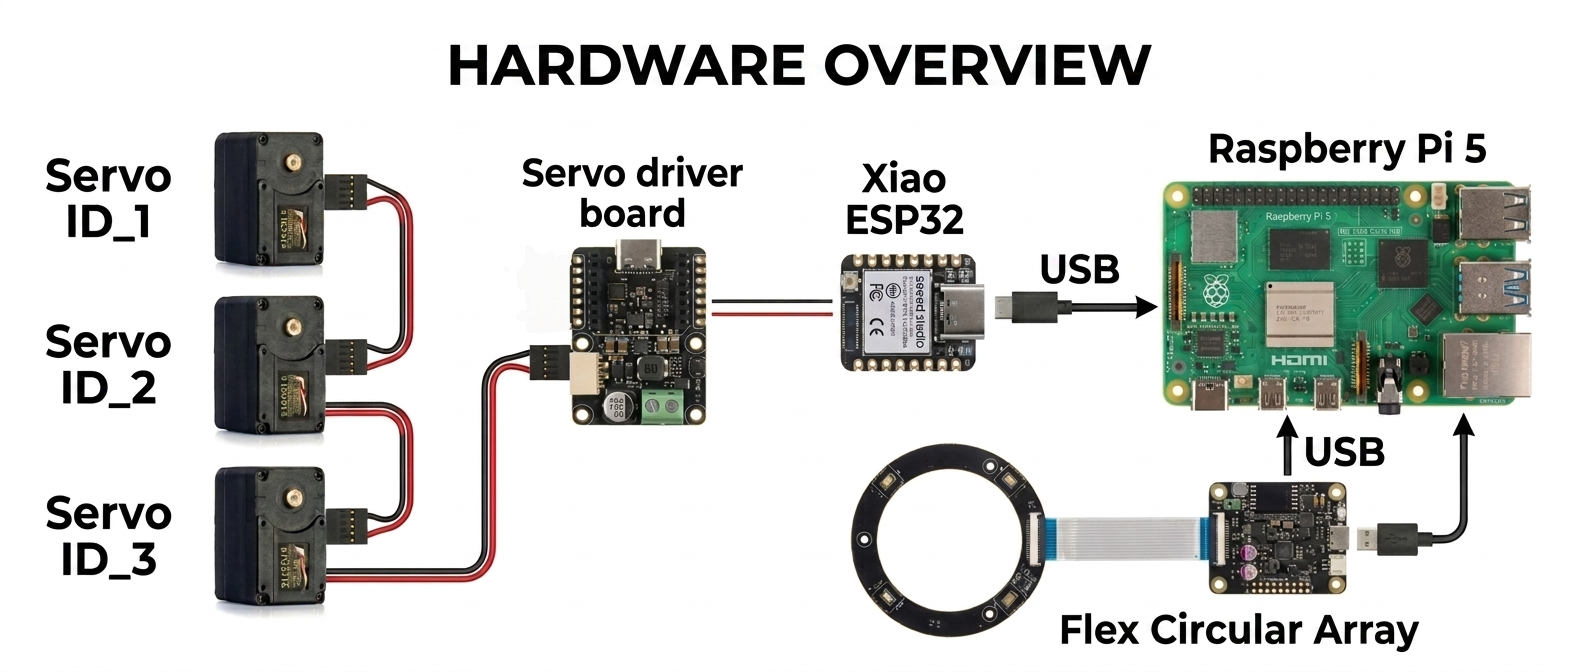
Control a 3-wheeled Kiwi-drive robot with your voice! This project combines a Seeed Studio XIAO ESP32 (motor controller) with a Raspberry Pi (voice processing brain), enhanced by the reSpeaker for high-quality audio capture and Voice Embeddings for smarter, more personalized voice interaction. Using natural language commands, you can drive, steer, and control the robot completely hands-free with improved accuracy and responsiveness.
Hardware Required
| LeKiwi Kit | XIAO ESP32S3 | Raaspberry pi 5 |
|---|---|---|
 |  |  |
| reSpeaker Flex XVF3800 Circular | reSpeaker XVF3800 | |
|---|---|---|
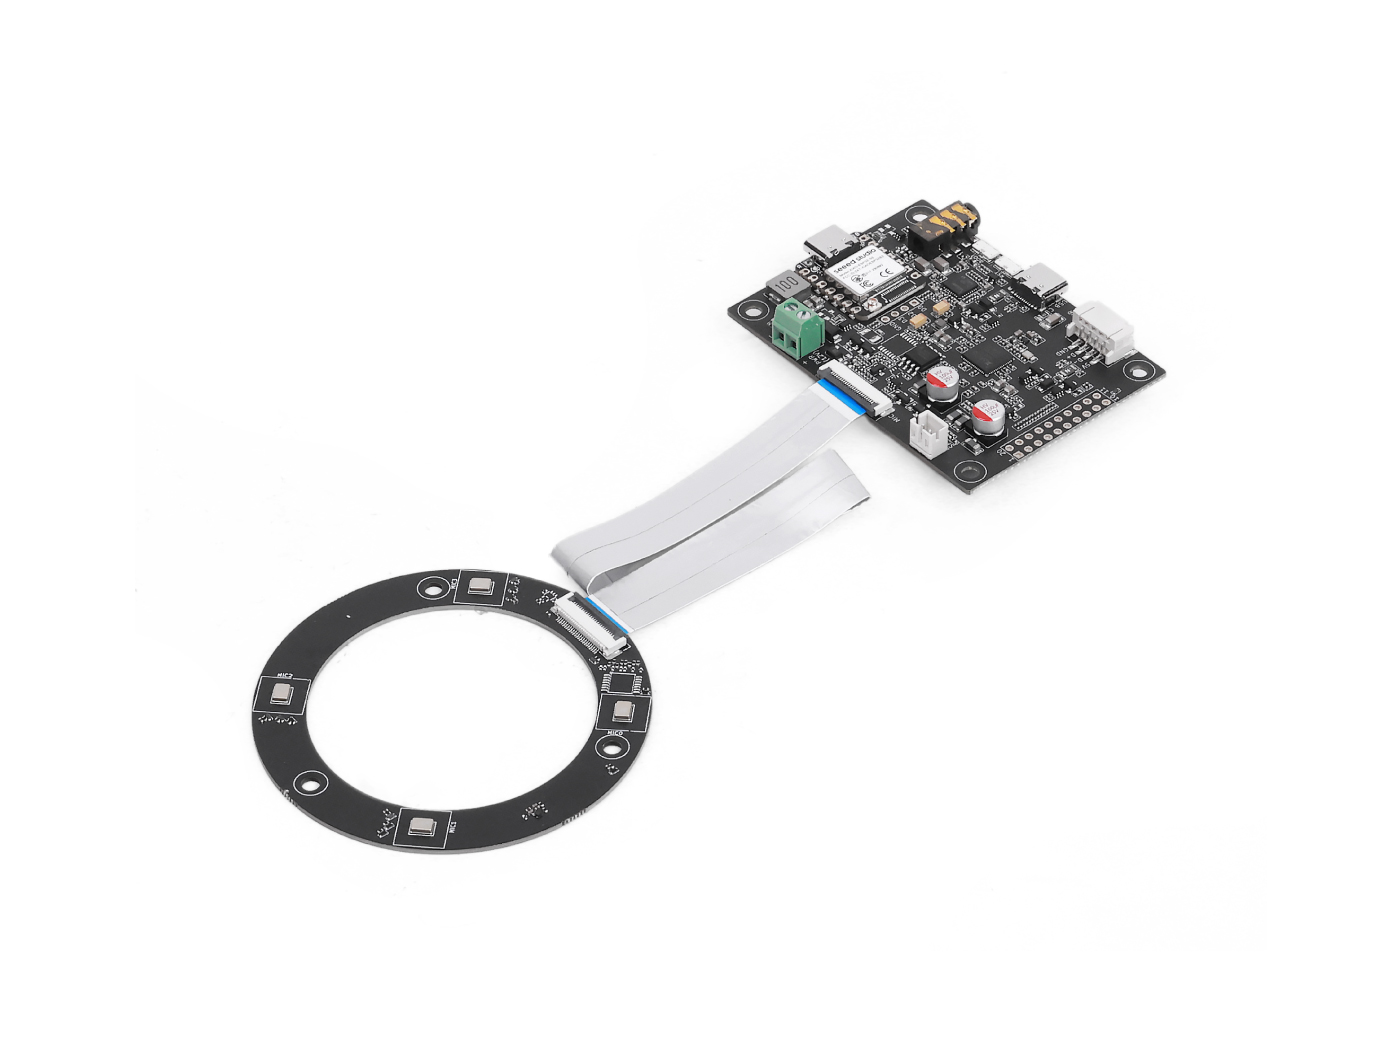 | OR | 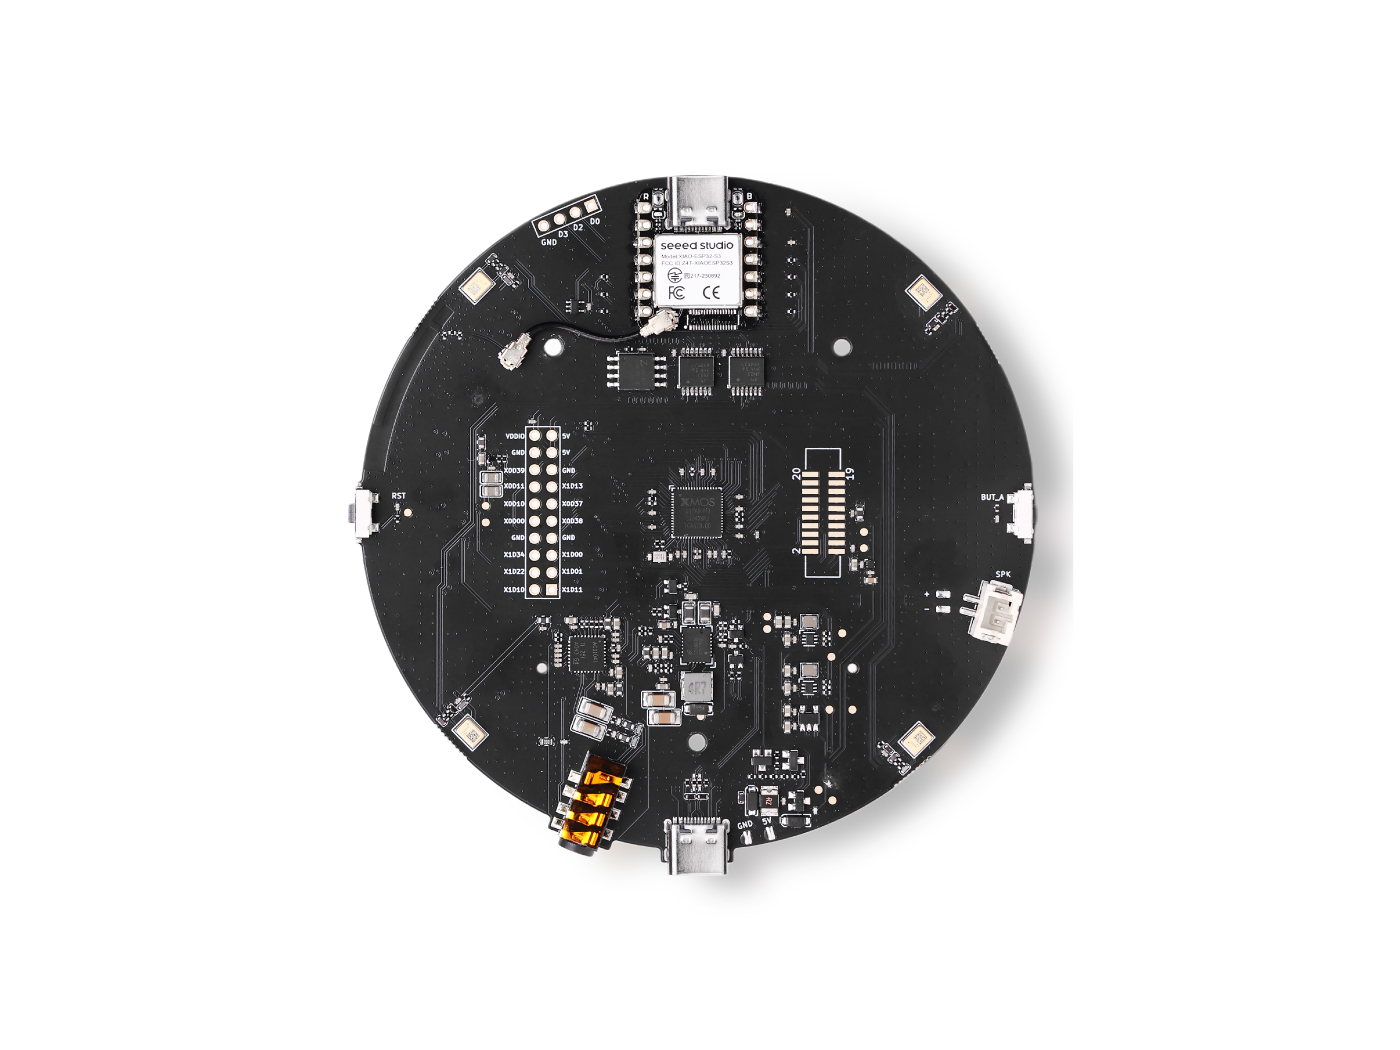 |
Services
- Groq account : free tier is enough to get started
How It Works
You speak → Wake word detected → Audio recorded → Whisper STT → LLaMA LLM → Orpheus TTS speaks back → ESP32 moves the robot
- You say the wake word (default: "Hey Jarvis")
- The Raspberry Pi records your command
- Groq Whisper transcribes your speech to text
- LLaMA 3 decides what action the robot should take
- Groq Orpheus TTS speaks a reply out loud
- A serial command is sent to the ESP32, which drives the motors
Prepare the XIAO ESP32 (Motor Controller)
The ESP32 runs the Arduino sketch that physically drives the three wheels using Kiwi-drive kinematics. It receives single-character serial commands (w, s, a, d, etc.) from the Raspberry Pi and translates them into coordinated motor speeds.
Step 1 — Set Motor IDs
The sketch expects servo IDs 1, 2, 3. Before assembling your robot, connect each servo individually and assign the correct ID using the Feetech configuration tool.
Step 2 — Assemble the LeKiwi
Follow the official Seeed Studio video tutorial to assemble the chassis, mount the wheels, and wire the servos:
You only need to complete the physical assembly skip any steps about cloning the LeRobot GitHub repository, as this project uses a different setup.
Step 3 — Upload the Arduino Sketch
The sketch (lekiwi_motor_control.ino) does the following:
- Initialises all three servos in position mode, centres them, then switches to wheel (continuous rotation) mode
- Listens on the USB serial port for single-character commands
- Uses Kiwi-drive kinematics to calculate the correct speed for each wheel
- Supports only nudge mode (short burst, then auto-stop) Serial command reference:
| Key | Action |
|---|---|
w | Forward nudge |
s | Backward nudge |
a | Turn left nudge |
d | Turn right nudge |
q | Strafe left nudge |
e | Strafe right nudge |
x / Space | Emergency stop |
+ / - | Increase / decrease nudge duration |
* / / | Increase / decrease nudge speed |
Upload the sketch via the Arduino IDE with the SCServo library installed. Open the Serial Monitor at 115200 baud to verify all three servos respond with OK.
Arduino Code
#include <SCServo.h>
#include <math.h>

// Serial port selection
#if defined(CONFIG_IDF_TARGET_ESP32C3) || \
    defined(CONFIG_IDF_TARGET_ESP32C6) || \
    defined(CONFIG_IDF_TARGET_ESP32S3)
  #define COMSerial Serial0
#else
  #define COMSerial Serial1
#endif

#define S_RXD D7
#define S_TXD D6

SMS_STS st;
#define SERVO_NUM 3
byte ID[SERVO_NUM] = {1, 2, 3};

// Kiwi drive wheel angles (90°, 210°, 330°)
const float WHEEL_ANGLE_DEG[SERVO_NUM] = {90.0f, 210.0f, 330.0f};

// Base speed (0-3000 for STS3215 in wheel mode)
int BASE_SPEED = 1000;

// Nudge parameters
int NUDGE_DURATION = 1500;  // milliseconds to move
int NUDGE_SPEED = 800;     // speed during nudge

#define REG_OPERATING_MODE 33

void enableWheelMode(byte servoID) {
  // Unlock EEPROM
  st.unLockEprom(servoID);
  delay(10);

  // Set wheel mode (value 1 for continuous rotation mode)
  st.writeByte(servoID, REG_OPERATING_MODE, 1);
  delay(10);

  // Lock EEPROM
  st.LockEprom(servoID);
  delay(10);

  // IMPORTANT: Enable torque after mode change
  st.EnableTorque(servoID, 1);
  delay(10);

  Serial.print("Servo "); Serial.print(servoID);
  Serial.println(" configured for wheel mode with torque enabled");
}

void setWheelSpeeds(float vx, float vy, float omega) {
  for (int i = 0; i < SERVO_NUM; i++) {
    float rad = WHEEL_ANGLE_DEG[i] * (PI / 180.0f);

    // Kiwi kinematics formula
    float speed = -sin(rad) * vx + cos(rad) * vy + omega;

    // Scale to servo speed range (-3000 to +3000)
    int spdInt = (int)(speed * BASE_SPEED);

    // Clamp to valid range
    if (spdInt > 3000) spdInt = 3000;
    if (spdInt < -3000) spdInt = -3000;

    // WriteSpe expects (id, speed) - only 2 parameters!
    st.WriteSpe(ID[i], spdInt);
  }
}

void nudgeRobot(float vx, float vy, float omega) {
  // Calculate temporary speeds using nudge speed instead of base speed
  int originalBaseSpeed = BASE_SPEED;
  BASE_SPEED = NUDGE_SPEED;

  // Apply movement
  setWheelSpeeds(vx, vy, omega);

  // Wait for nudge duration
  delay(NUDGE_DURATION);

  // Stop all motors
  stopAll();

  // Restore original base speed
  BASE_SPEED = originalBaseSpeed;
}

void stopAll() {
  for (int i = 0; i < SERVO_NUM; i++) {
    st.WriteSpe(ID[i], 0);
  }
  Serial.println("Motors stopped");
}

void initializeServosToPositionMode() {
  Serial.println(F("Setting servos to position mode for initial positioning..."));

  for (int i = 0; i < SERVO_NUM; i++) {
    // Unlock EEPROM
    st.unLockEprom(ID[i]);
    delay(10);

    // Set position mode (value 0)
    st.writeByte(ID[i], REG_OPERATING_MODE, 0);
    delay(10);

    // Lock EEPROM
    st.LockEprom(ID[i]);
    delay(10);

    // Enable torque
    st.EnableTorque(ID[i], 1);
    delay(10);
  }

  delay(500);

  Serial.println(F("Moving all servos to center position (2048)..."));

  // Move all servos to center position
  u16 Speed[SERVO_NUM] = {1500, 1500, 1500};
  byte ACC[SERVO_NUM] = {50, 50, 50};
  s16 Pos[SERVO_NUM] = {2048, 2048, 2048};

  st.SyncWritePosEx(ID, SERVO_NUM, Pos, Speed, ACC);
  delay(2000); // Wait for movement to complete

  Serial.println(F("Servos positioned. Switching to wheel mode..."));

  // Now switch to wheel mode
  for (int i = 0; i < SERVO_NUM; i++) {
    enableWheelMode(ID[i]);
    delay(50);
  }
}

void printHelp() {
  Serial.println(F("\n====== LeKiwi Nudge Control ======"));
  Serial.println(F("Each key press gives a short 'nudge' movement"));
  Serial.println(F(" w = Forward nudge"));
  Serial.println(F(" s = Backward nudge"));
  Serial.println(F(" a = Turn LEFT nudge"));
  Serial.println(F(" d = Turn RIGHT nudge"));
  Serial.println(F(" q = Strafe LEFT nudge"));
  Serial.println(F(" e = Strafe RIGHT nudge"));
  Serial.println(F(" x = STOP (emergency)"));
  Serial.println(F(""));
  Serial.println(F("Continuous movement mode:"));
  Serial.println(F(" SHIFT + key = Continuous movement"));
  Serial.println(F(" Example: Press 'W' (uppercase) = continuous forward"));
  Serial.println(F(""));
  Serial.println(F("Settings:"));
  Serial.println(F(" + = Increase nudge duration"));
  Serial.println(F(" - = Decrease nudge duration"));
  Serial.println(F(" * = Increase nudge speed"));
  Serial.println(F(" / = Decrease nudge speed"));
  Serial.println(F(" ? = Show this help"));
  Serial.println(F(""));
  Serial.print(F("Current nudge duration: "));
  Serial.print(NUDGE_DURATION);
  Serial.println(F(" ms"));
  Serial.print(F("Current nudge speed: "));
  Serial.println(NUDGE_SPEED);
  Serial.println(F("==================================="));
}

void setup() {
  Serial.begin(115200);
  delay(1500);
  Serial.println(F("LeKiwi Nudge Control boot..."));

  // Start servo bus with explicit pins
  COMSerial.begin(1000000, SERIAL_8N1, S_RXD, S_TXD);
  st.pSerial = &COMSerial;
  delay(500);

  Serial.println(F("Checking servos..."));
  bool allServosFound = true;

  for (int i = 0; i < SERVO_NUM; i++) {
    if (st.Ping(ID[i]) != -1) {
      Serial.print(F("Servo "));
      Serial.print(ID[i]);
      Serial.println(F(" OK"));
    } else {
      Serial.print(F("ERROR: Servo "));
      Serial.print(ID[i]);
      Serial.println(F(" not found!"));
      allServosFound = false;
    }
    delay(100);
  }

  if (!allServosFound) {
    Serial.println(F("Some servos not found. Check connections and power!"));
    while(1) { delay(1000); } // Halt if servos not found
  }

  // Initialize servos to center position, then switch to wheel mode
  initializeServosToPositionMode();

  Serial.println(F("\nSystem ready! Press keys for nudge movement."));
  Serial.println(F("(Each key press moves the robot a short distance)\n"));

  printHelp();
}

void loop() {
  if (!Serial.available()) return;

  char cmd = (char)Serial.read();
  bool isShifted = false;

  // Check for uppercase (SHIFT key in terminal)
  if (cmd >= 'A' && cmd <= 'Z') {
    isShifted = true;
  }

  // Flush any trailing characters
  while (Serial.available() && (Serial.peek() == '\n' || Serial.peek() == '\r')) {
    Serial.read();
  }

  // Process movement commands
  switch (cmd) {
    case 'w':
      if (isShifted) {
        setWheelSpeeds(0, 1, 0);
        Serial.println(F("Continuous Forward"));
      } else {
        Serial.println(F("Nudge Forward"));
        nudgeRobot(0, 1, 0);
      }
      break;

    case 's':
      if (isShifted) {
        setWheelSpeeds(0, -1, 0);
        Serial.println(F("Continuous Backward"));
      } else {
        Serial.println(F("Nudge Backward"));
        nudgeRobot(0, -1, 0);
      }
      break;

    case 'q':
      if (isShifted) {
        setWheelSpeeds(-1, 0, 0);
        Serial.println(F("Continuous Strafe Left"));
      } else {
        Serial.println(F("Nudge Strafe Left"));
        nudgeRobot(-1, 0, 0);
      }
      break;

    case 'e':
      if (isShifted) {
        setWheelSpeeds(1, 0, 0);
        Serial.println(F("Continuous Strafe Right"));
      } else {
        Serial.println(F("Nudge Strafe Right"));
        nudgeRobot(1, 0, 0);
      }
      break;

    case 'a':
      if (isShifted) {
        setWheelSpeeds(0, 0, 1);
        Serial.println(F("Continuous Turn Left"));
      } else {
        Serial.println(F("Nudge Turn Left"));
        nudgeRobot(0, 0, 1);
      }
      break;

    case 'd':
      if (isShifted) {
        setWheelSpeeds(0, 0, -1);
        Serial.println(F("Continuous Turn Right"));
      } else {
        Serial.println(F("Nudge Turn Right"));
        nudgeRobot(0, 0, -1);
      }
      break;

    case 'x': case 'X': case ' ':
      stopAll();
      Serial.println(F("Emergency Stop"));
      break;

    case '+':
      NUDGE_DURATION = min(NUDGE_DURATION + 50, 1000);
      Serial.print(F("Nudge duration: "));
      Serial.print(NUDGE_DURATION);
      Serial.println(F(" ms"));
      break;

    case '-':
      NUDGE_DURATION = max(NUDGE_DURATION - 50, 50);
      Serial.print(F("Nudge duration: "));
      Serial.print(NUDGE_DURATION);
      Serial.println(F(" ms"));
      break;

    case '*':
      NUDGE_SPEED = min(NUDGE_SPEED + 100, 2000);
      Serial.print(F("Nudge speed: "));
      Serial.println(NUDGE_SPEED);
      break;

    case '/':
      NUDGE_SPEED = max(NUDGE_SPEED - 100, 200);
      Serial.print(F("Nudge speed: "));
      Serial.println(NUDGE_SPEED);
      break;

    case '?':
      printHelp();
      break;
  }
}
Prepare the Raspberry Pi (Voice Brain)
Step 1 — Get a Groq API Key
- Register at console.groq.com
- Create a new API key and copy it — you'll need it in Step 4
Step 2 — Clone This Repository
git clone https://github.com/KasunThushara/Lekiwi-voice
cd Lekiwi-voice
Step 3 — Create a Virtual Environment
python3 -m venv venv
source venv/bin/activate
Run
source venv/bin/activateevery time you open a new terminal before using this project.
Step 4 — Install Dependencies
pip install -r requirements.txt
Then download the wake word model:
python3 download_model.py
This downloads the pre-trained "Hey Jarvis" model (and others) from openwakeword into ~/.openwakeword/.
Step 5 — Find Your Microphone Index
Plug in your reSpeaker via USB, then run:
python3 list_mics.py
You'll see a list like:
Available audio INPUT devices:

  [0] bcm2835 Headphones  (rate=44100Hz)
  [1] ReSpeaker 4 Mic Array  (rate=16000Hz)
  [2] USB PnP Sound Device  (rate=16000Hz)
Note the number in brackets next to your ReSpeaker — that's your MIC_INDEX.
Step 6 — Find Your ESP32 Serial Port
Plug the XIAO ESP32 into the Pi via USB, then run:
python3 list_ports.py
Example output:
Available serial ports:

  /dev/ttyACM0         USB Serial Device
  /dev/ttyUSB0         CP2102 USB to UART Bridge
Note the device path (usually /dev/ttyACM0 for XIAO).
Step 7 — Configure the Project
Copy the example config and fill in your values:
cp config.env.example config.env
nano config.env
The key settings to update:
# Your Groq API key (required)
GROQ_API_KEY=gsk_xxxxxxxxxxxxxxxxxxxxxxxx

# The number from list_mics.py
MIC_INDEX=1

# The port from list_ports.py
SERIAL_PORT=/dev/ttyACM0
Everything else can be left at its default to get started.
Run the Robot
Make sure your virtual environment is active, then:
python3 pipeline.py
You should see:
======================================================
  LeKiwi Voice Controller — Ready
  Wake word  : hey jarvis
  LLM model  : llama-3.1-8b-instant
  STT model  : whisper-large-v3-turbo
  TTS voice  : autumn
  Serial     : /dev/ttyACM0 @ 115200
======================================================
[WakeWord] Listening for 'hey jarvis' ...
Now say "Hey Jarvis" and give a movement command!
Example Commands
"Hey Jarvis, move forward"
"Hey Jarvis, turn left"
"Hey Jarvis, strafe right"
"Hey Jarvis, stop"
"Hey Jarvis, what can you do?"
Tech Support & Product Discussion
Thank you for choosing our products! We are here to provide you with different support to ensure that your experience with our products is as smooth as possible. We offer several communication channels to cater to different preferences and needs.