Voice Assistant System for Home Assitant
In this tutorial, you will learn how to configure your ReSpeaker Lite to work with Home Assistant.You will learn how to flash the required firmware and how to compile and upload the YAML file.After that, you will be able to control and automate your home appliances using your voice.Just say “Okay Nabu” and start talking to your home.
Hardware Required

XMOS Firmware update
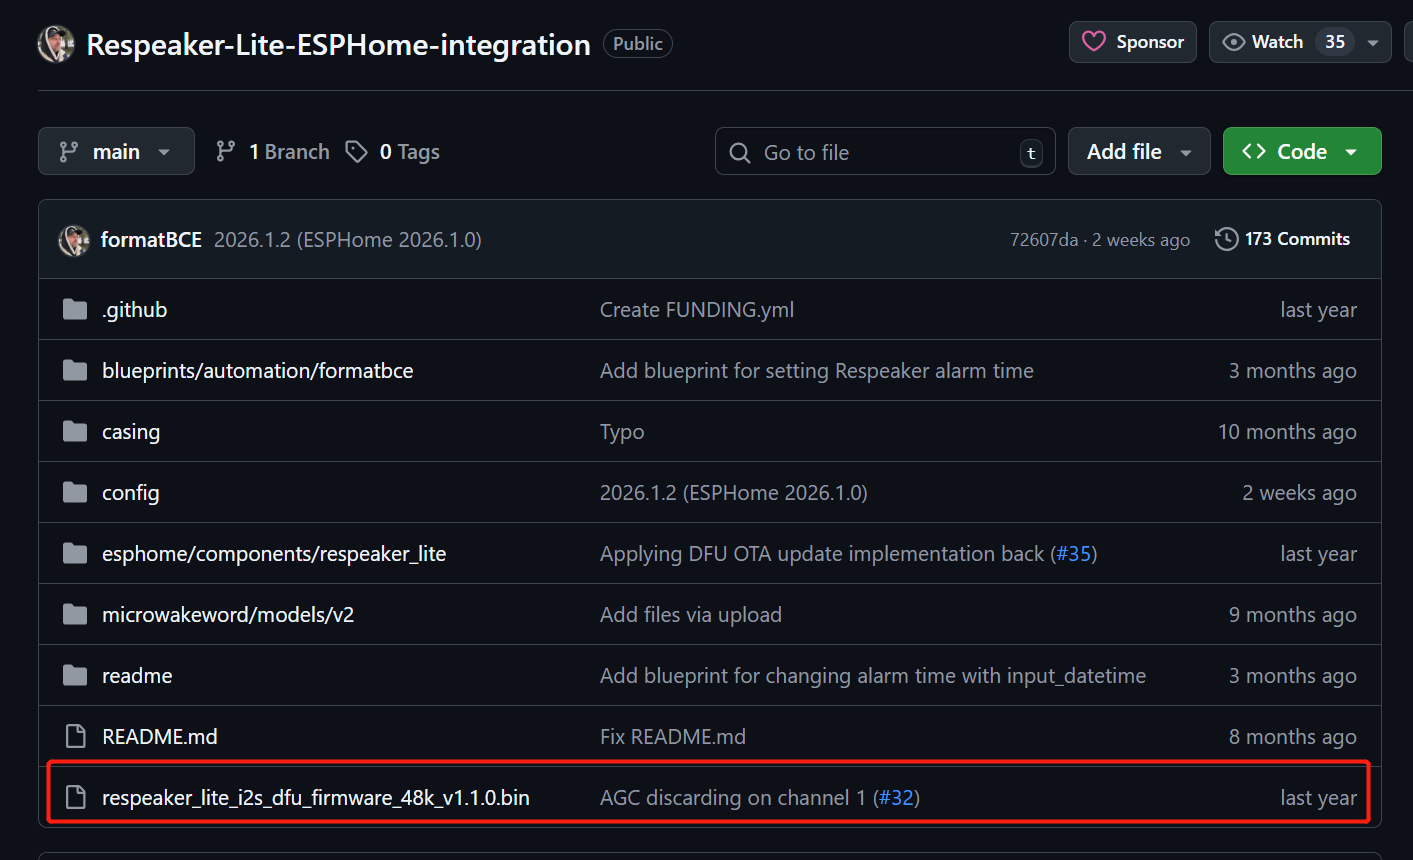
To get the best playback experience, we need to update XMOS firmware to respeaker_lite_i2s_dfu_firmware_48k_v1.1.0.bin.
Download the firmware as complete repository from here.
On your computer, plug in the ReSpeaker Lite on USB interface (near to 3.5mm jack) and run the following command:
if you are using Linux host machine
sudo apt install dfu-util -y
sudo dfu-util -R -e -a 1 -D /path/to/dfu_firmware.bin
if you are using Windows host Machine
dfu-util -R -e -a 1 -D /path/to/dfu_firmware.bin
for more information please refer this link
In order to use the user button and mute button, you need to solder the user button to D2 and the mute button to D3.

Getting Started
We are using Home Assistant version 2026.1.3 and ESPHome version 2026.1.3. on raspberry pi 5.
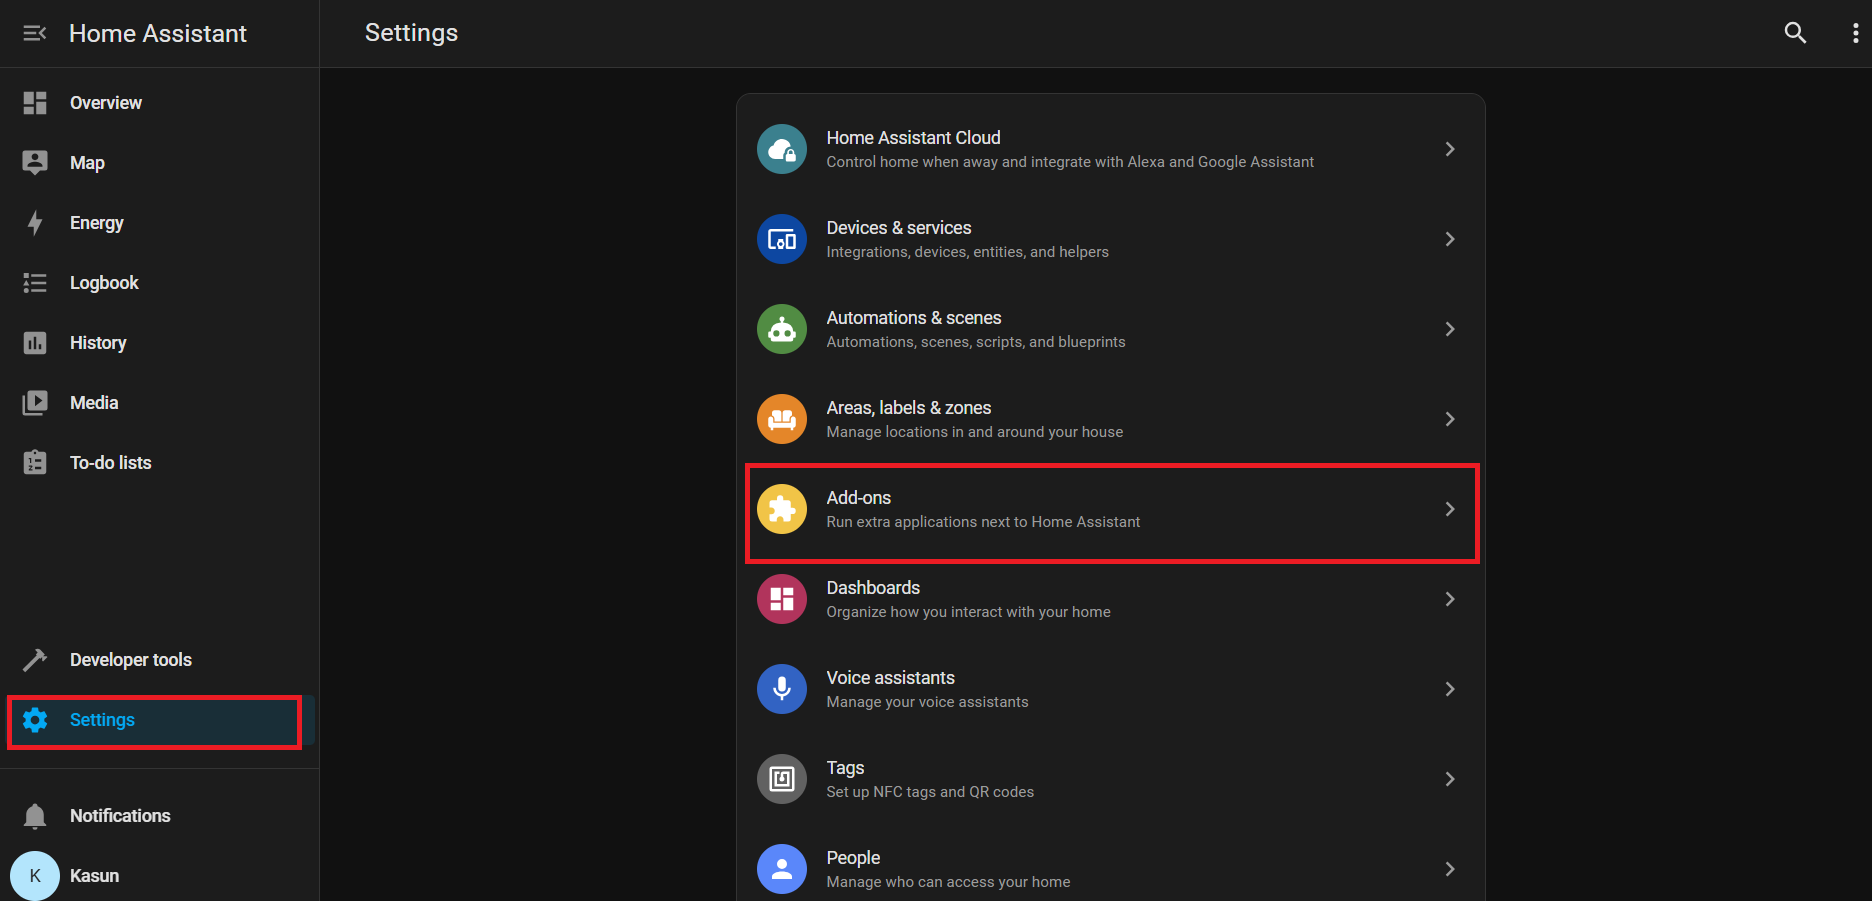
Install ESPHome Builder
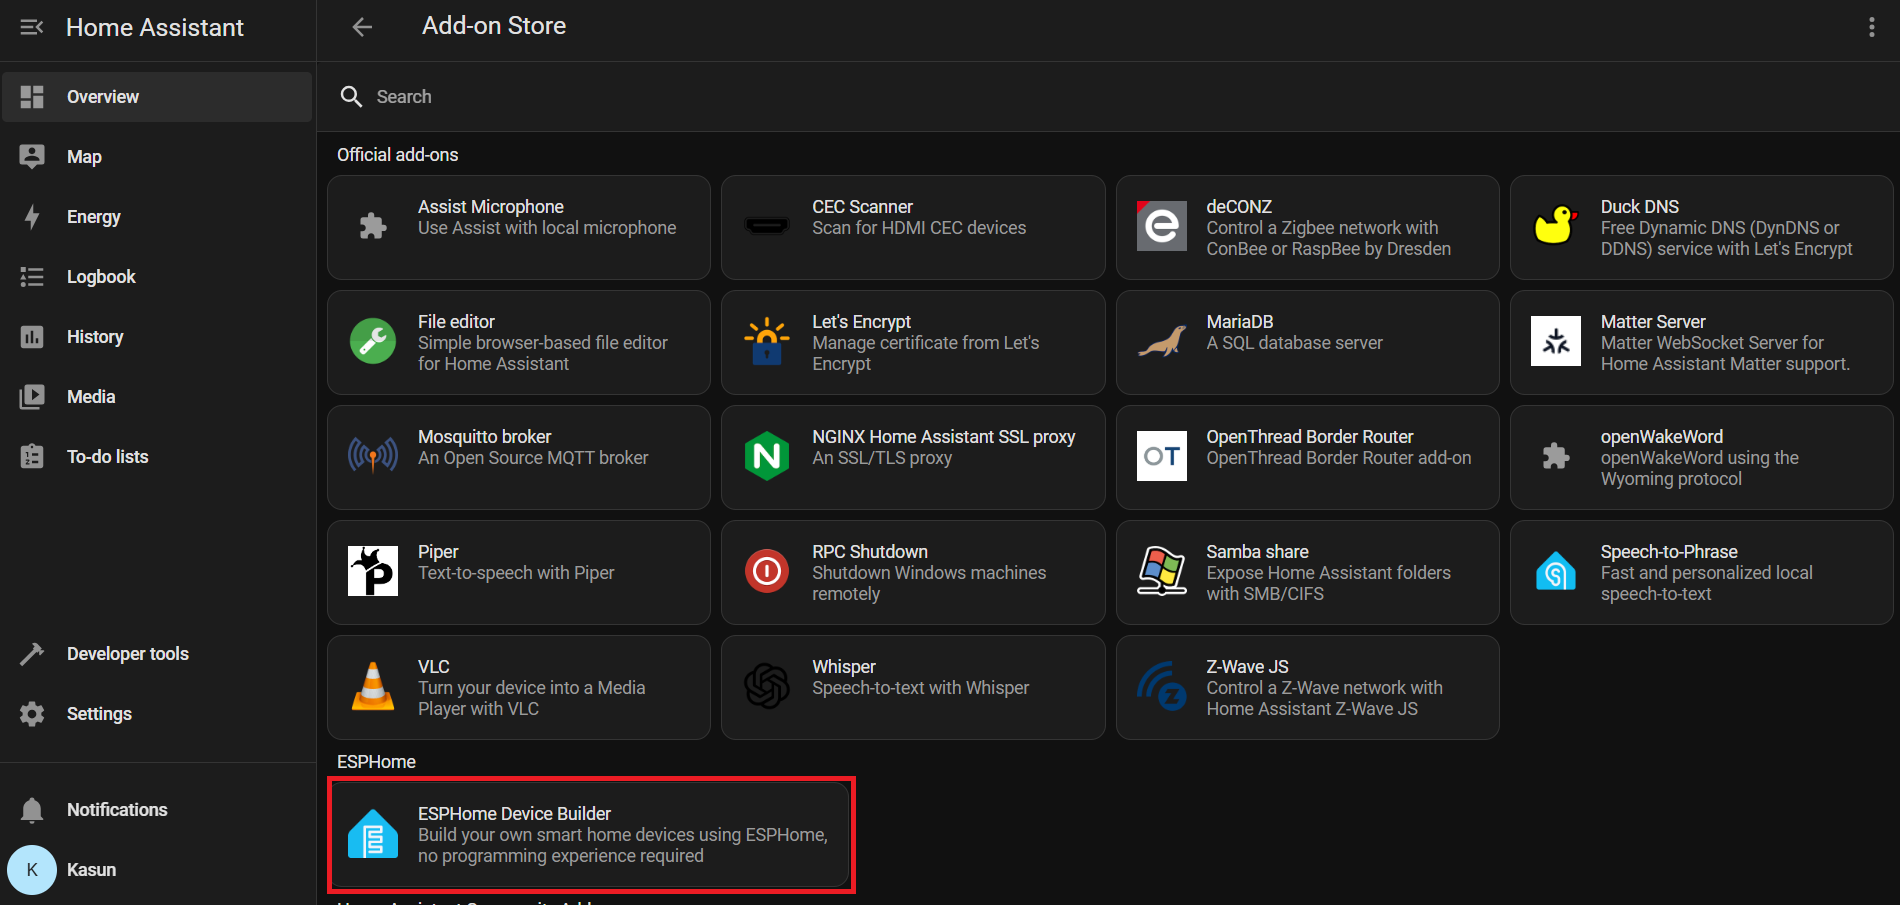
Settings → Add-ons → Click on Add-on Store → Install ESPHome Device Builder add-on.
Go to Home Assistant > Settings > Add-ons.
Click Add-on Store (usually at the bottom right)
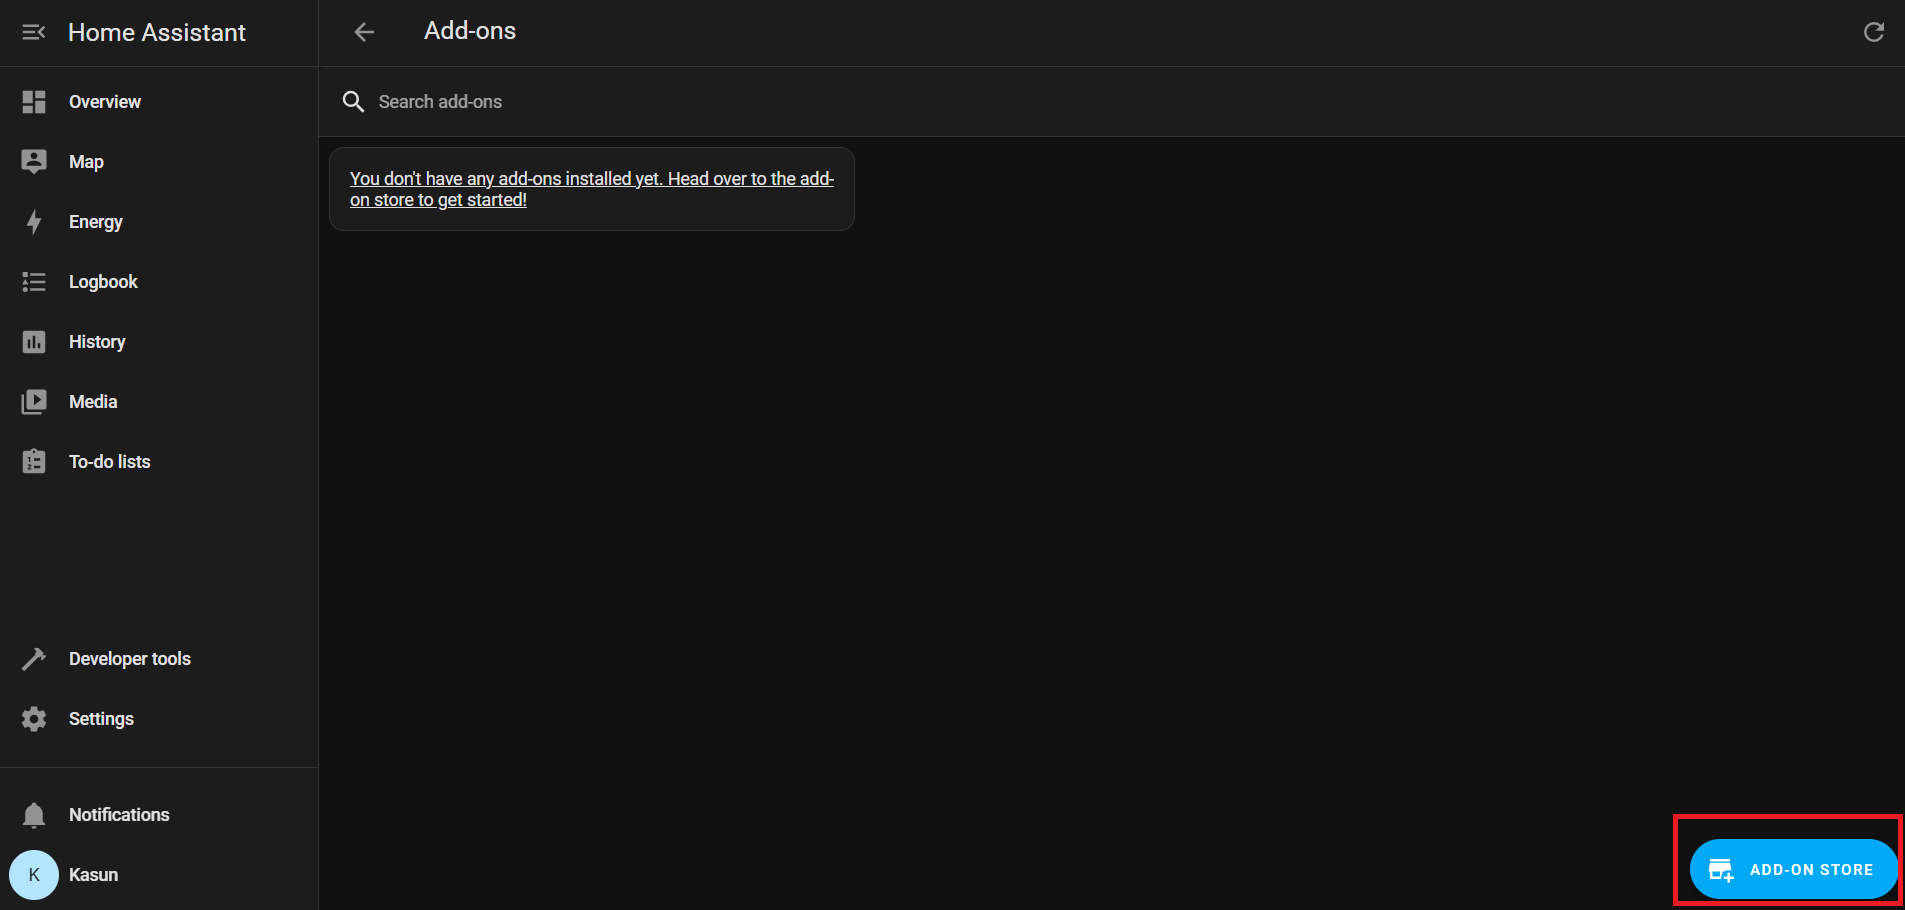
Under Official add-ons, search for and install ESPHome Device Builder.
After installation, click Start to run the ESPHome add-on.
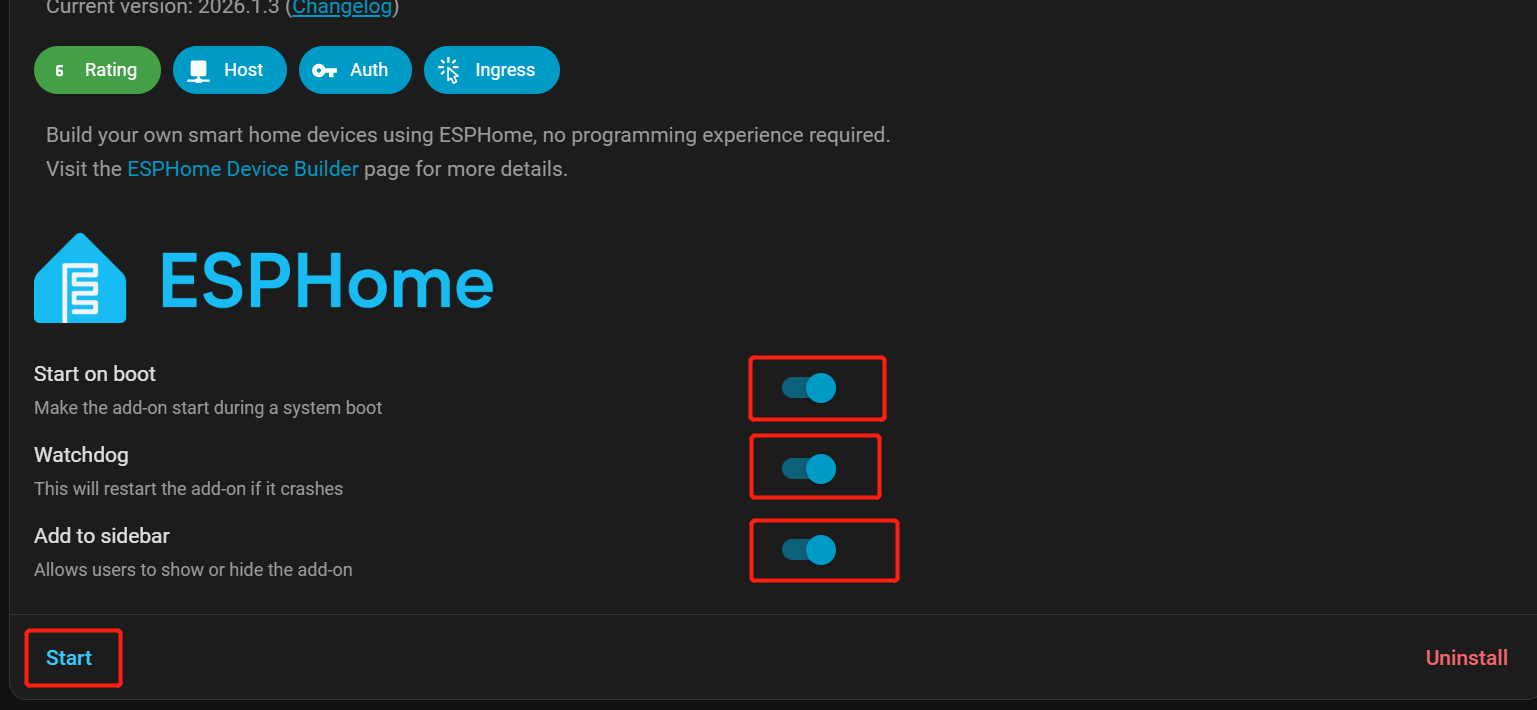
Enable Start on Boot, Watchdog, and Show in Sidebar for easier access.
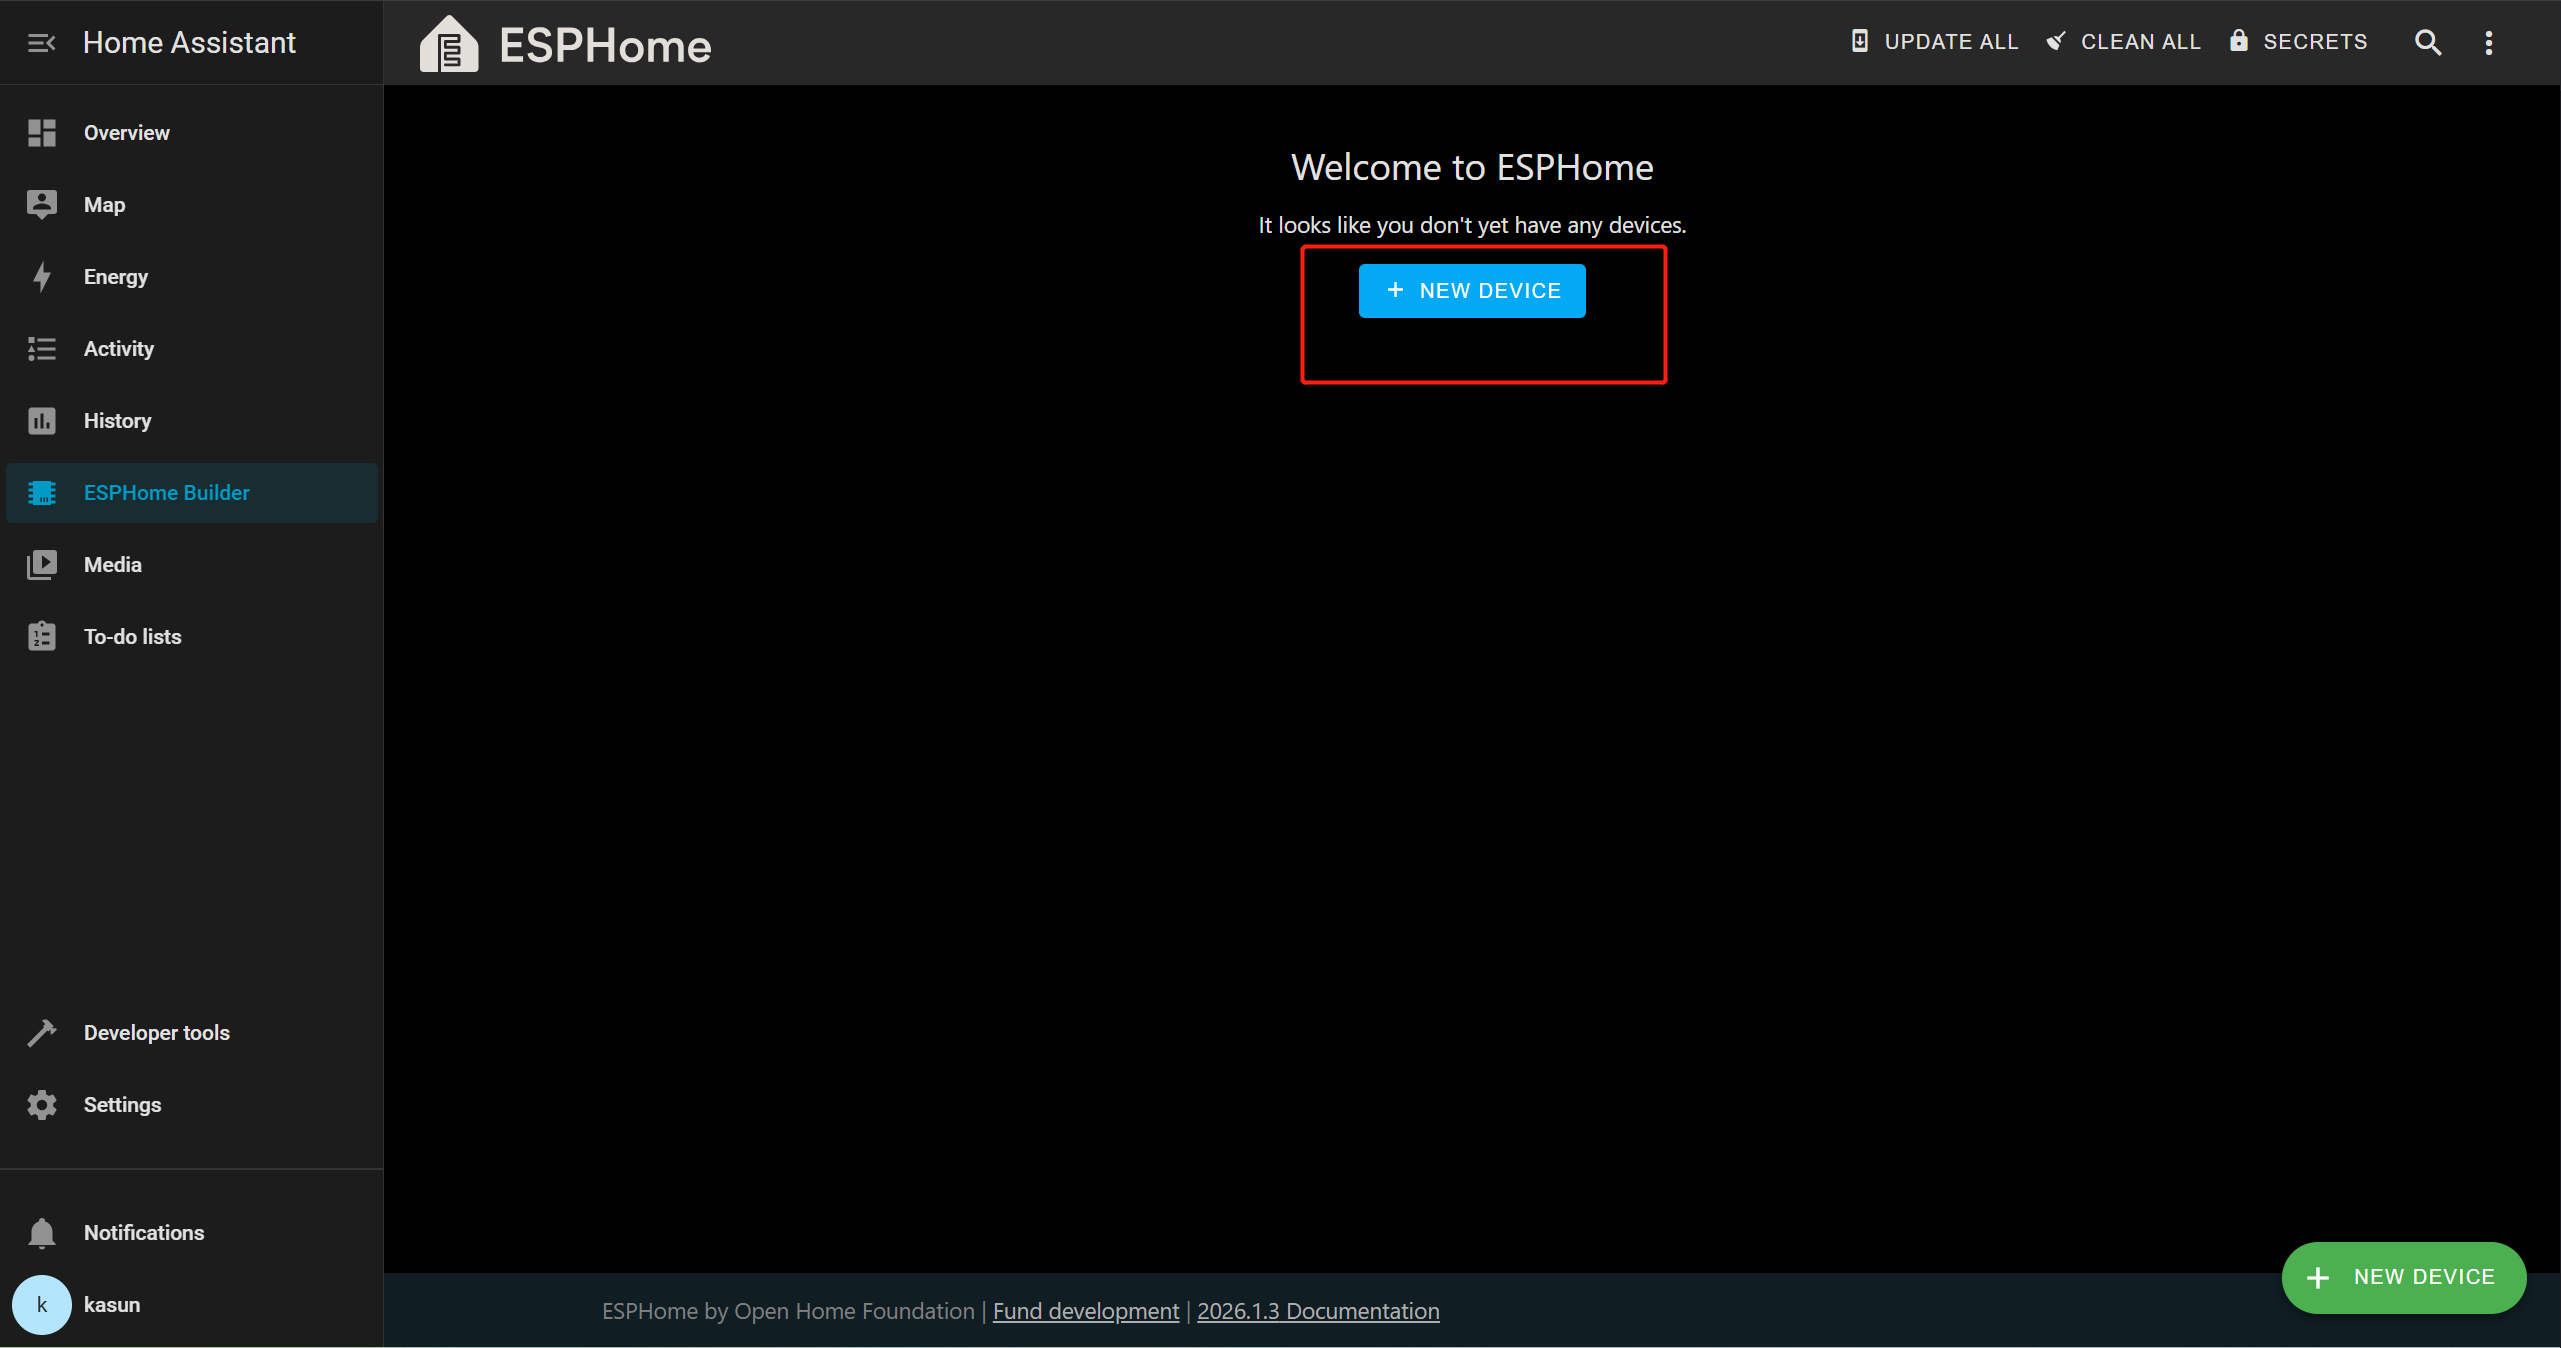
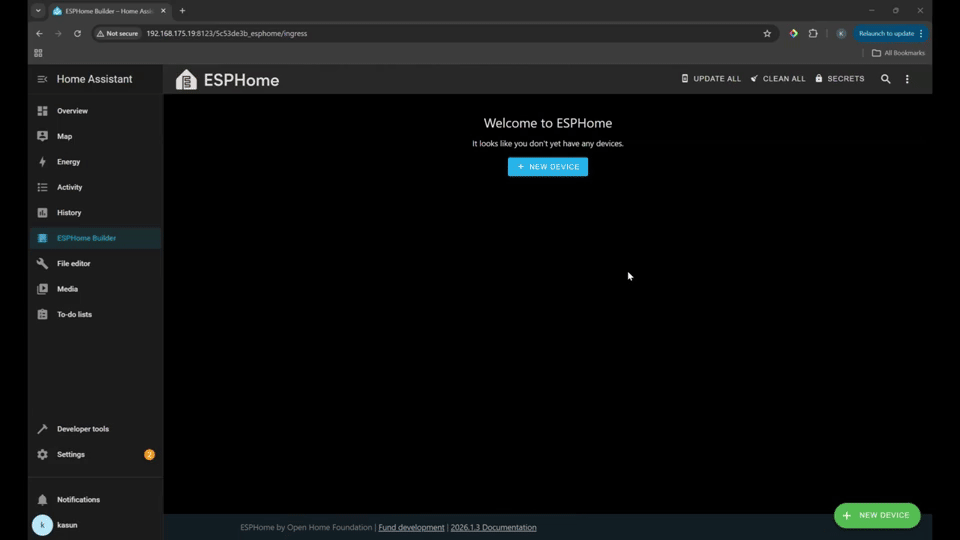
From the Home Assistant sidebar, go to ESPHome Builder.
Add reSpeaker Device
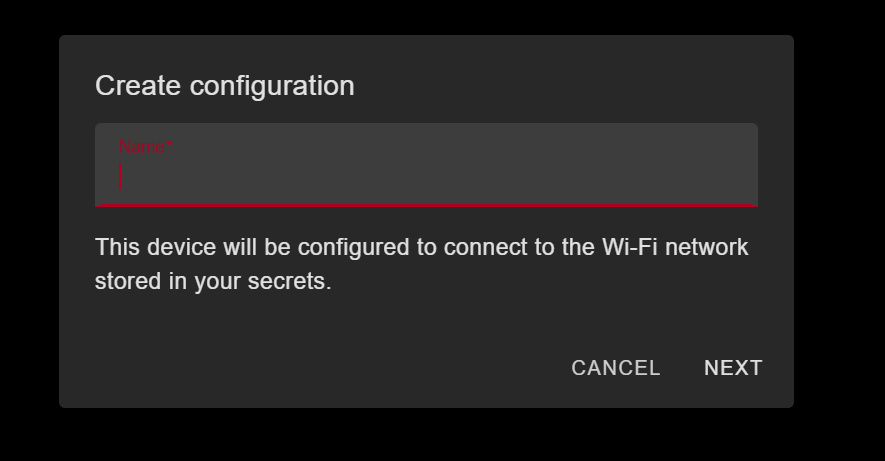
Click + NEW DEVICE.
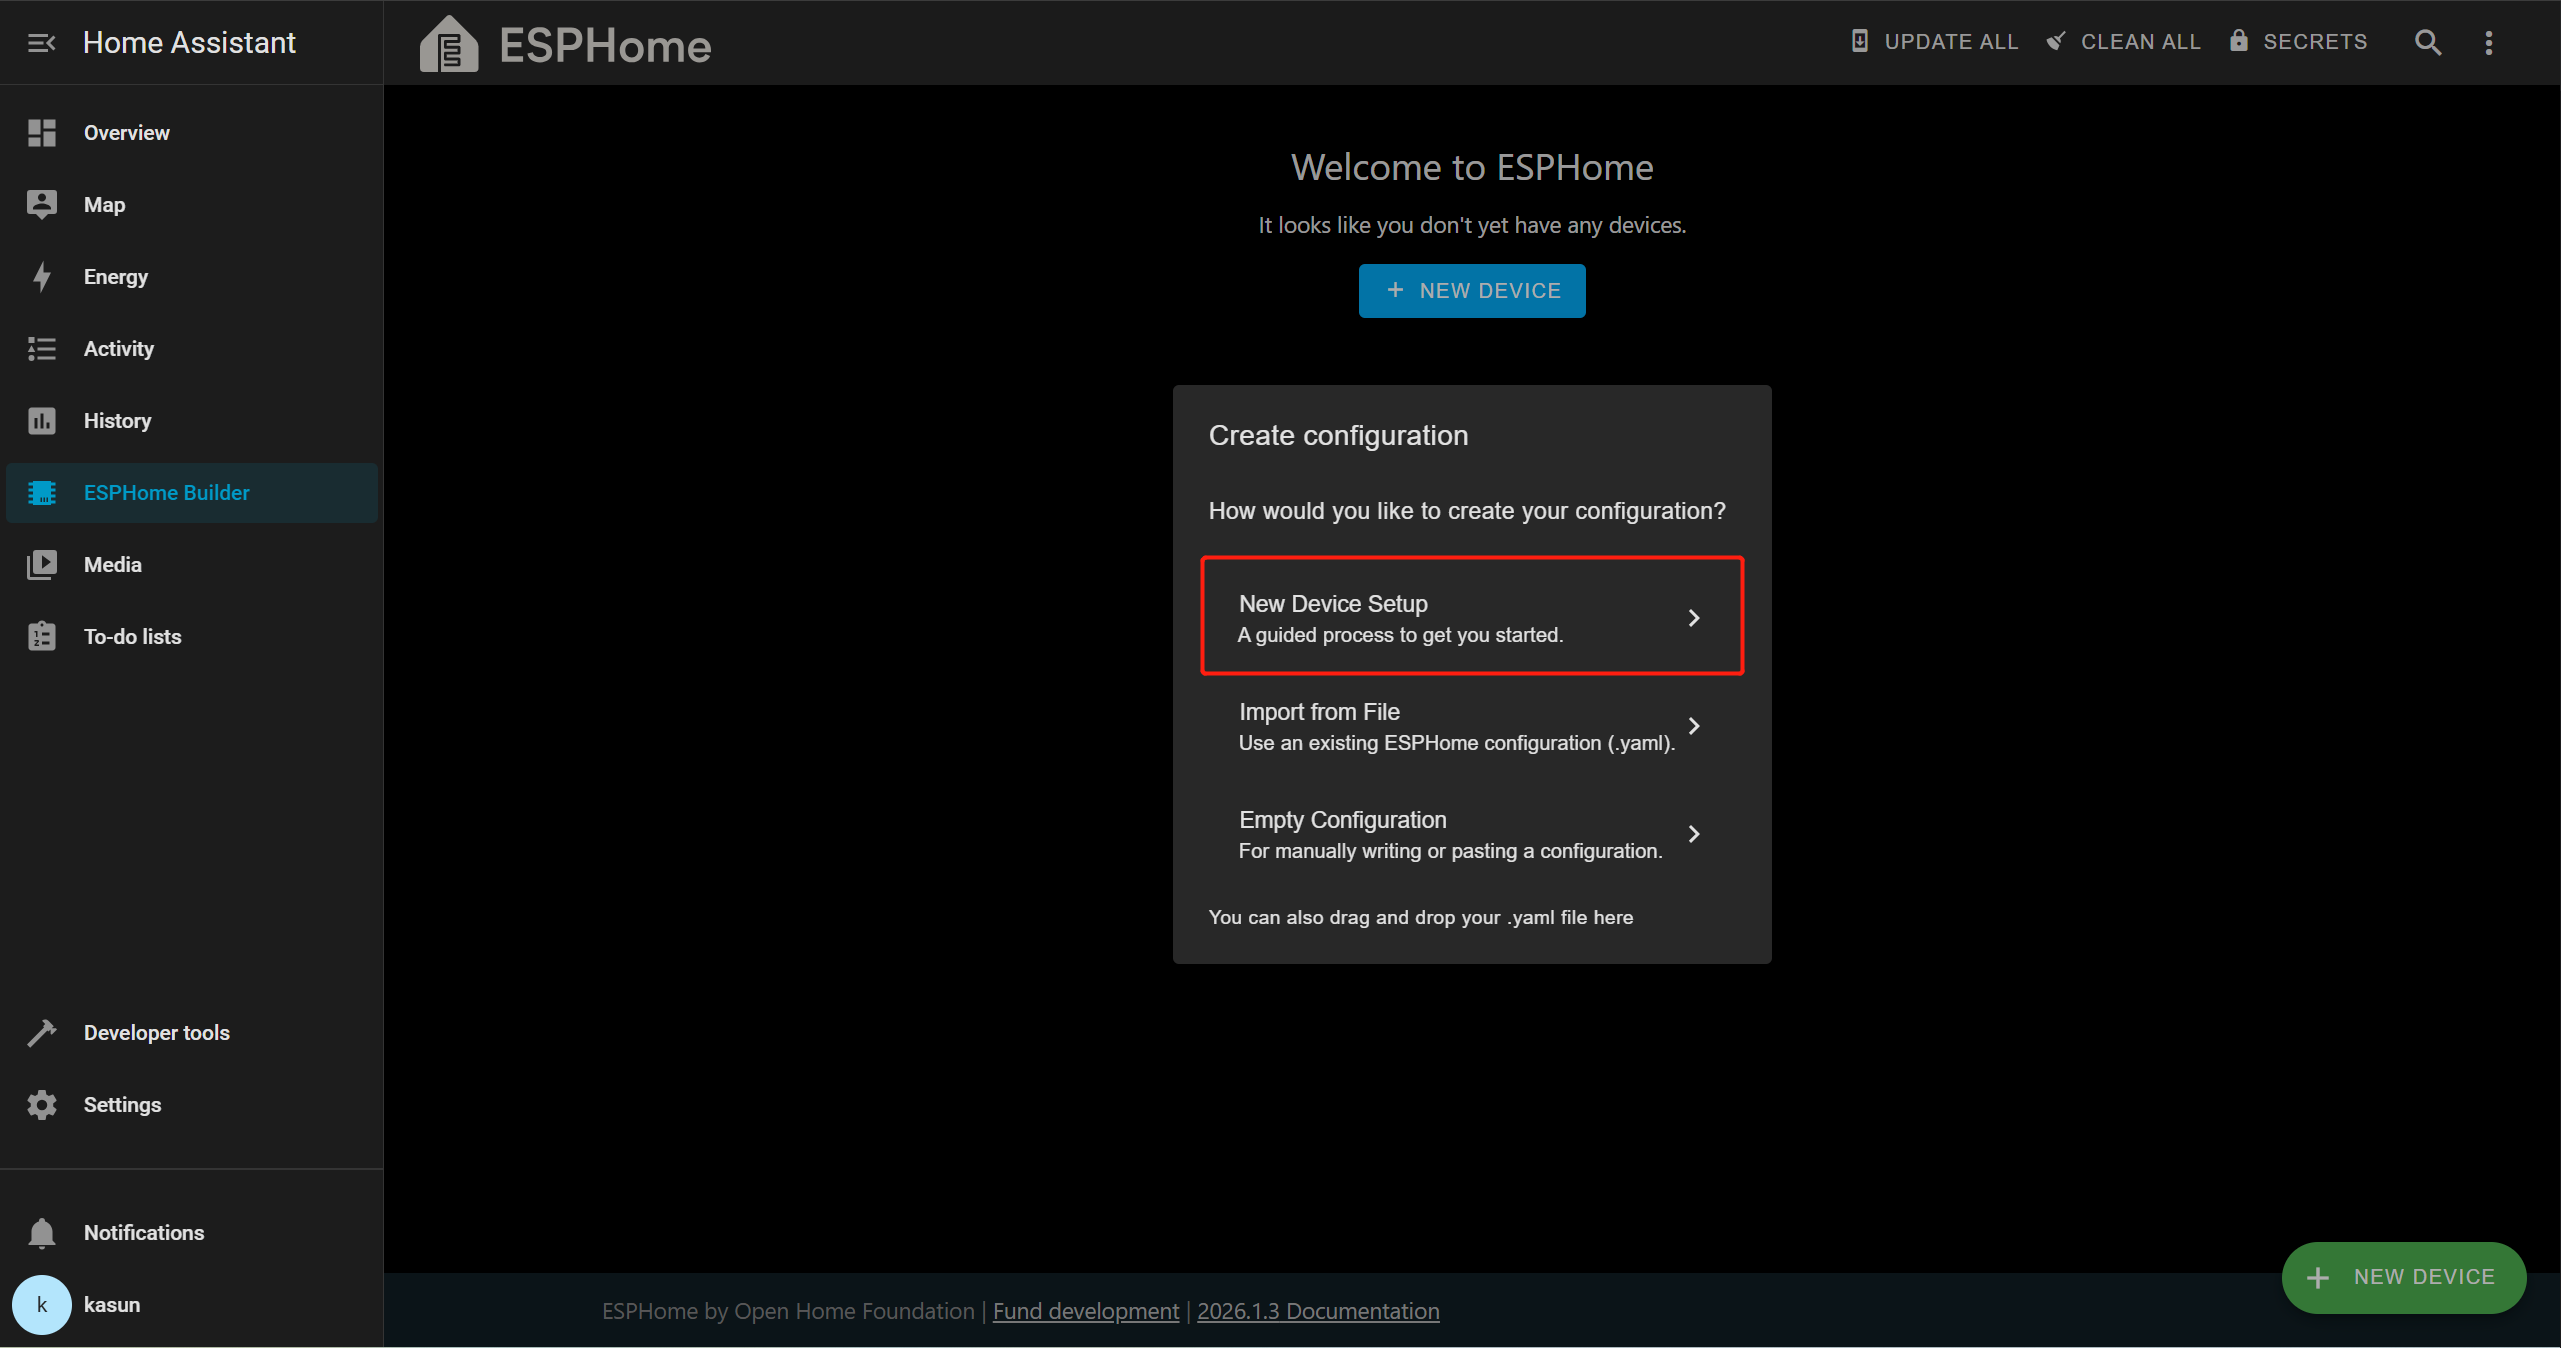
Click Continue → New Device Setup, then provide an appropriate name for the device.
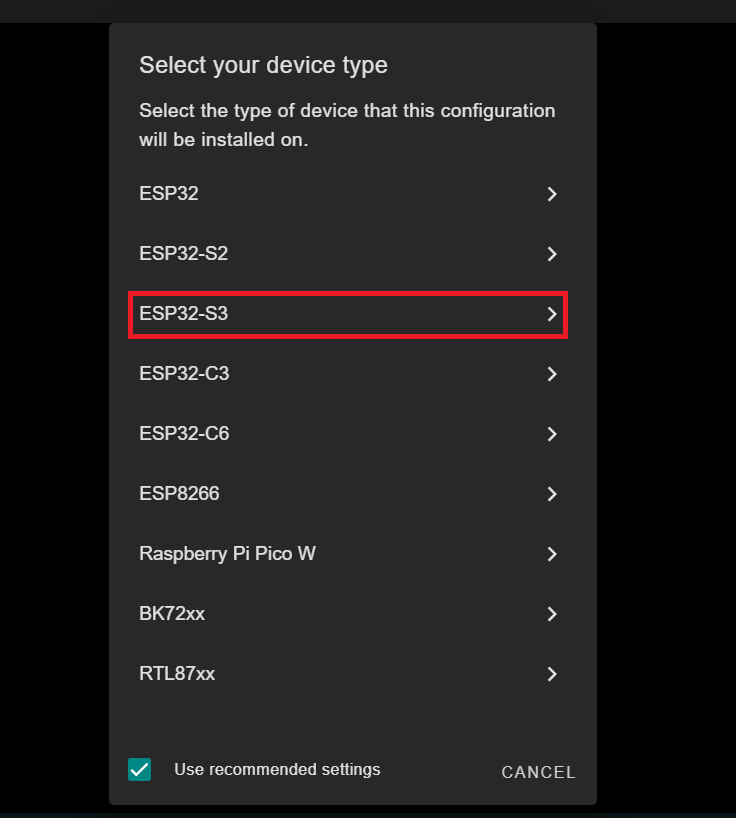
Select ESP32-S3
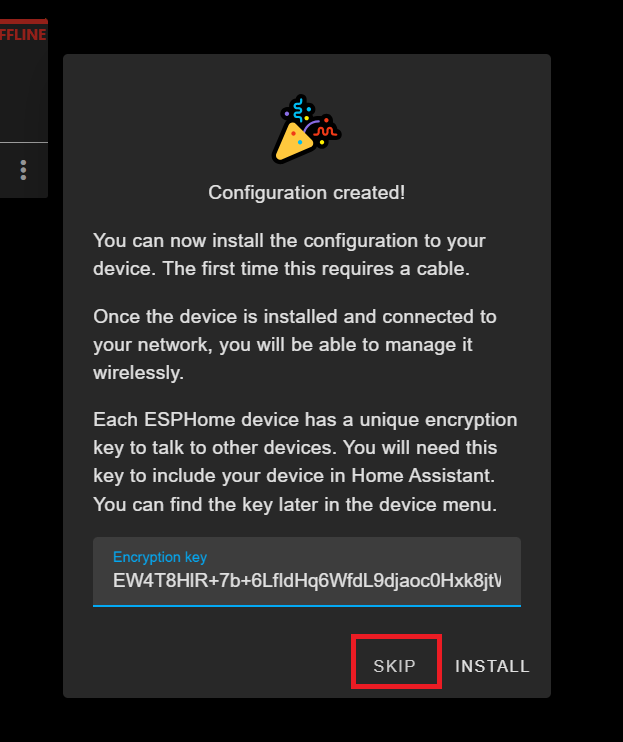
When prompted, click SKIP – we’ll create the configuration manually.
How To Add a device in GIF illustration
Select your new device entry and click EDIT.
The updated YAML file can be found there. In some cases, the latest ESPHome version may cause compatibility issues. Please refer to the original repository
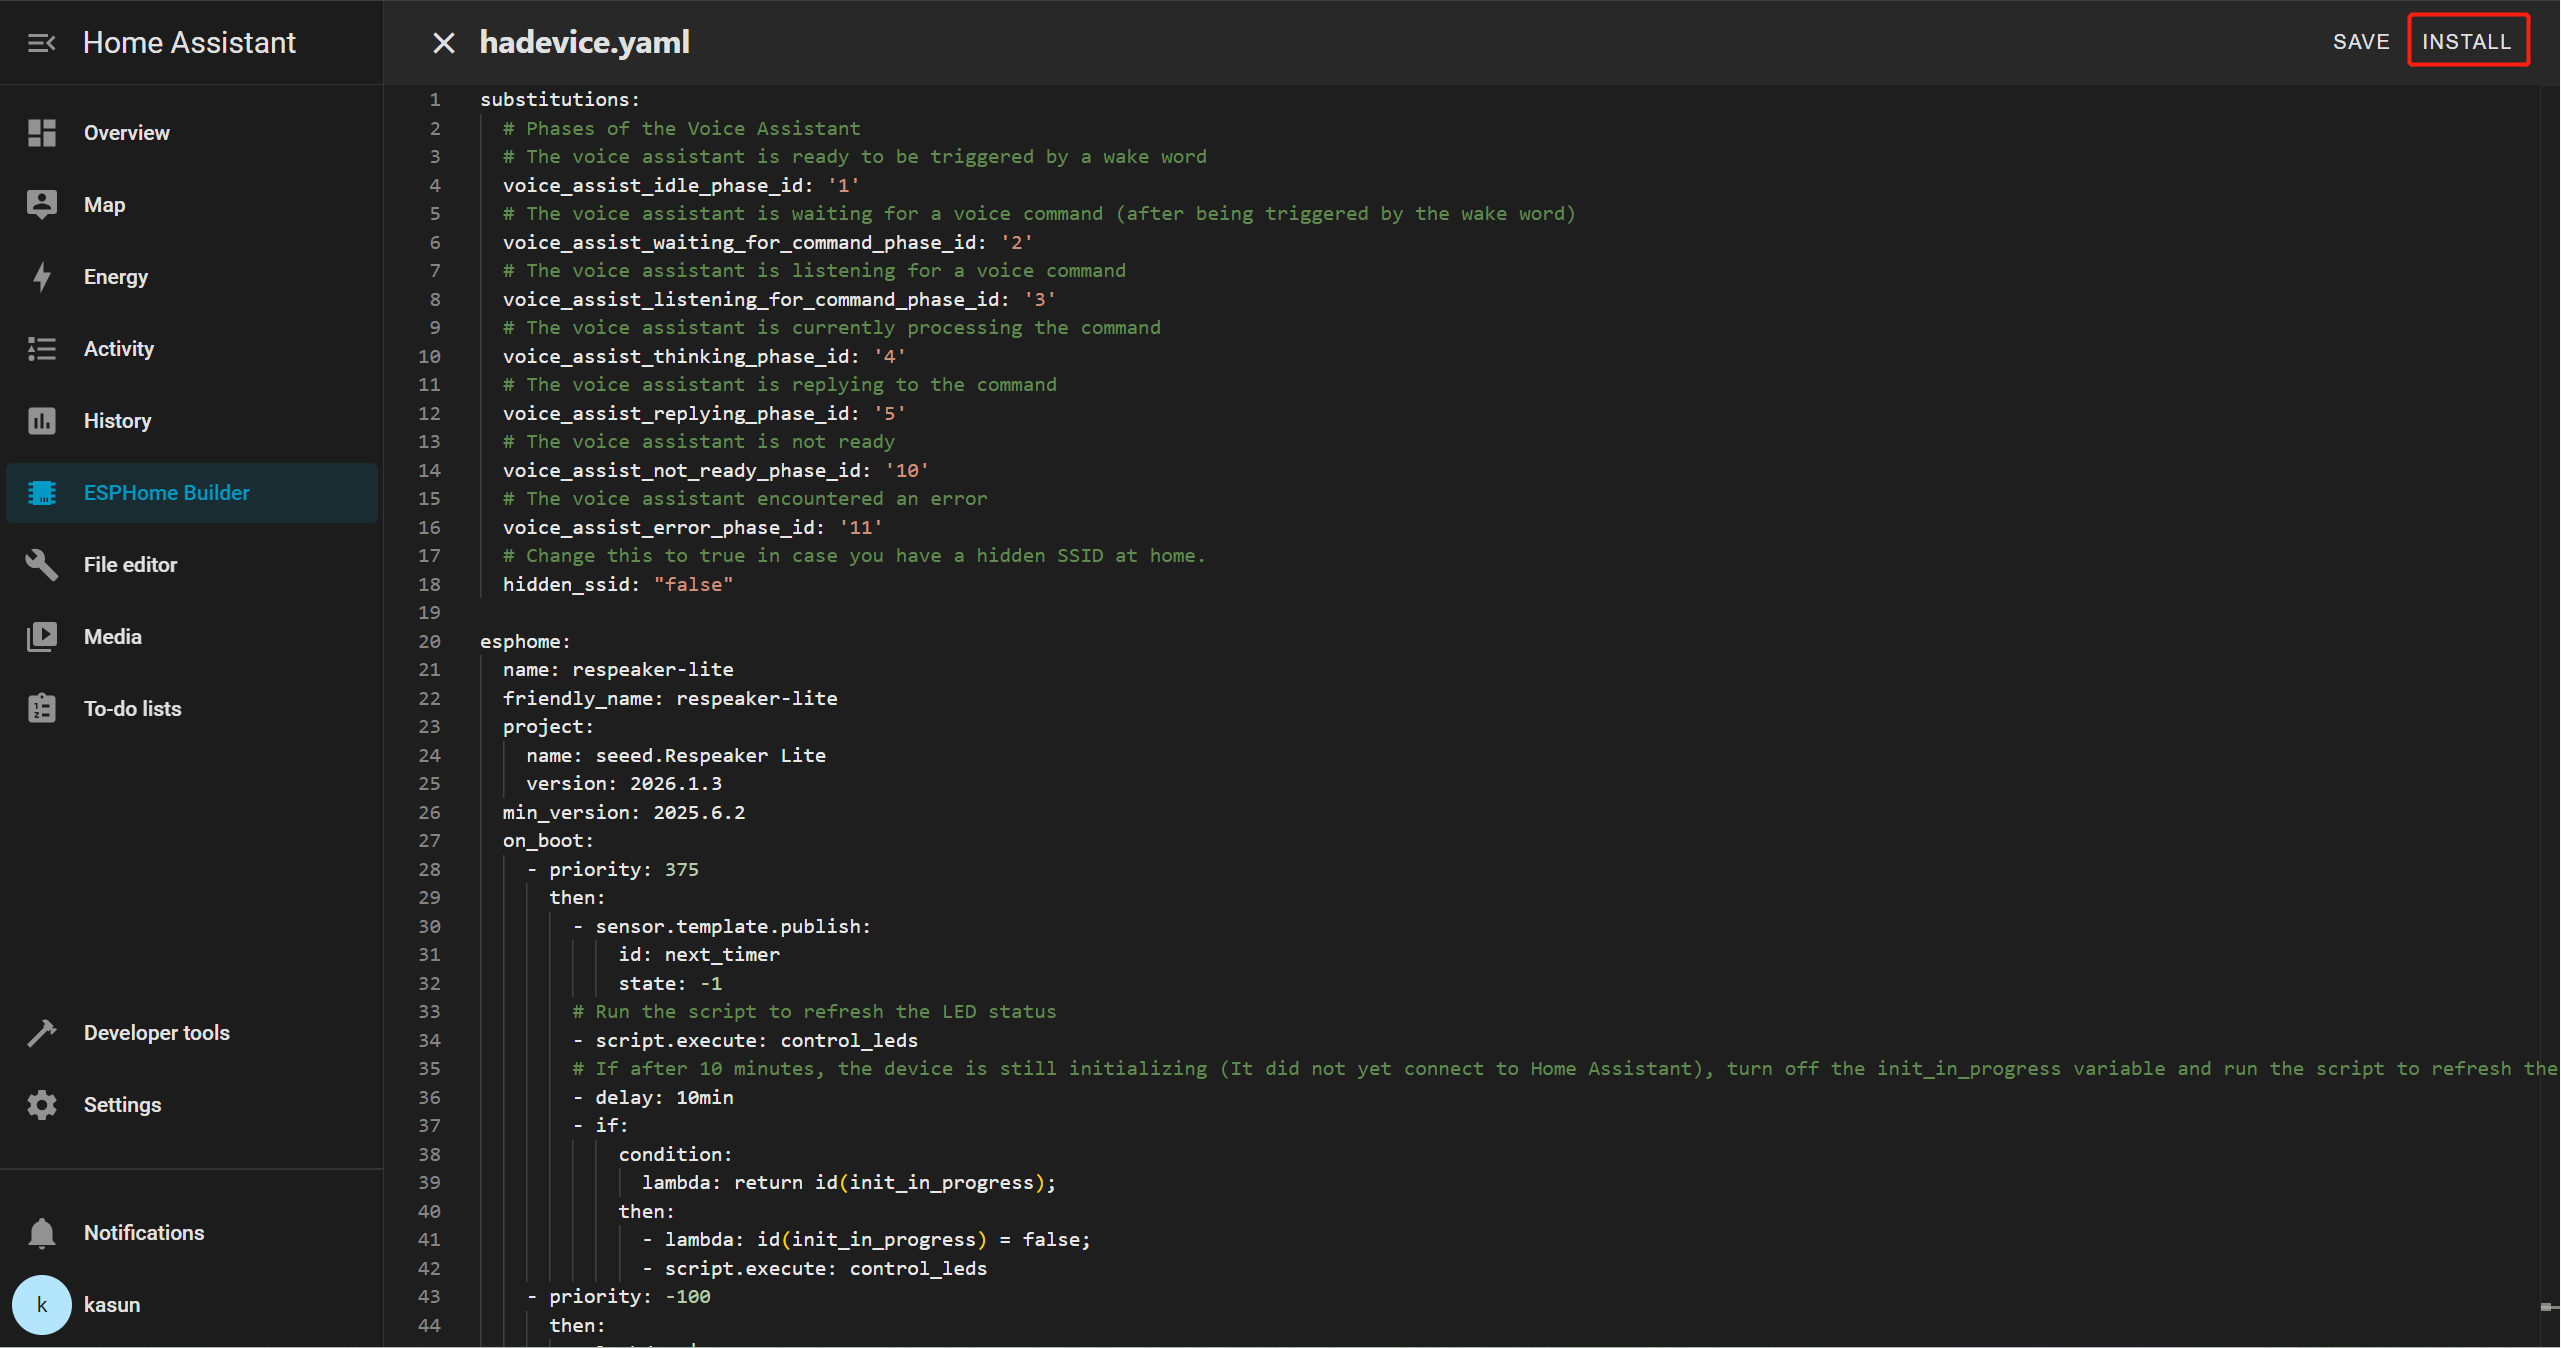
Yaml file
substitutions:
# Phases of the Voice Assistant
# The voice assistant is ready to be triggered by a wake word
voice_assist_idle_phase_id: '1'
# The voice assistant is waiting for a voice command (after being triggered by the wake word)
voice_assist_waiting_for_command_phase_id: '2'
# The voice assistant is listening for a voice command
voice_assist_listening_for_command_phase_id: '3'
# The voice assistant is currently processing the command
voice_assist_thinking_phase_id: '4'
# The voice assistant is replying to the command
voice_assist_replying_phase_id: '5'
# The voice assistant is not ready
voice_assist_not_ready_phase_id: '10'
# The voice assistant encountered an error
voice_assist_error_phase_id: '11'
# Change this to true in case you have a hidden SSID at home.
hidden_ssid: "false"
esphome:
name: respeaker-lite
friendly_name: respeaker-lite
project:
name: seeed.Respeaker Lite
version: 2026.1.3
min_version: 2025.6.2
on_boot:
- priority: 375
then:
- sensor.template.publish:
id: next_timer
state: -1
# Run the script to refresh the LED status
- script.execute: control_leds
# If after 10 minutes, the device is still initializing (It did not yet connect to Home Assistant), turn off the init_in_progress variable and run the script to refresh the LED status
- delay: 10min
- if:
condition:
lambda: return id(init_in_progress);
then:
- lambda: id(init_in_progress) = false;
- script.execute: control_leds
- priority: -100
then:
- lambda: |-
id(alarm_time).publish_state(id(saved_alarm_time));
- lambda: |-
auto call = id(alarm_action).make_call();
call.set_option(id(saved_alarm_action));
call.perform();
- lambda: |-
setenv("TZ", id(saved_time_zone).c_str(), 1);
tzset();
on_shutdown:
then:
# Prevent loud noise on software restart
- lambda: id(respeaker).mute_speaker();
esp32:
board: esp32-s3-devkitc-1
variant: esp32s3
flash_size: 8MB
framework:
type: esp-idf
version: recommended
sdkconfig_options:
CONFIG_ESP32S3_DEFAULT_CPU_FREQ_240: "y"
CONFIG_ESP32S3_DATA_CACHE_64KB: "y"
CONFIG_ESP32S3_DATA_CACHE_LINE_64B: "y"
CONFIG_ESP32S3_INSTRUCTION_CACHE_32KB: "y"
CONFIG_BT_ALLOCATION_FROM_SPIRAM_FIRST: "y"
CONFIG_BT_BLE_DYNAMIC_ENV_MEMORY: "y"
CONFIG_MBEDTLS_EXTERNAL_MEM_ALLOC: "y"
CONFIG_MBEDTLS_SSL_PROTO_TLS1_3: "y" # TLS1.3 support isn't enabled by default in IDF 5.1.5
wifi:
id: wifi_id
fast_connect: ${hidden_ssid}
on_connect:
- lambda: id(improv_ble_in_progress) = false;
- script.execute: control_leds
on_disconnect:
- script.execute: control_leds
ssid: !secret wifi_ssid
password: !secret wifi_password
logger:
level: debug
initial_level: debug
logs:
sensor: WARN # avoids logging debug sensor updates
# hardware_uart: uart0 #Uncomment to see serial logs via USB connection. Comment out after debufgging - this line introduces noise on speaker...
api:
id: api_id
actions:
- action: start_va
then:
- voice_assistant.start
- action: stop_va
then:
- voice_assistant.stop
- action: set_alarm_time
variables:
alarm_time_hh_mm: string
then:
- lambda: |-
if (alarm_time_hh_mm.length() == 5 &&
isdigit(alarm_time_hh_mm[0]) && isdigit(alarm_time_hh_mm[1]) &&
isdigit(alarm_time_hh_mm[3]) && isdigit(alarm_time_hh_mm[4])) {
id(alarm_time).publish_state(alarm_time_hh_mm);
id(saved_alarm_time) = alarm_time_hh_mm;
}
- action: set_time_zone
variables:
posix_time_zone: string
then:
- lambda: |-
setenv("TZ", posix_time_zone.c_str(), 1);
tzset();
id(saved_time_zone) = posix_time_zone;
id(publish_current_time).execute();
on_client_connected:
- script.execute: control_leds
on_client_disconnected:
- script.execute: control_leds
# Uncomment this, if you have problems with text-to-speech because of Home Assistant HTTPS internal URL
# http_request:
# verify_ssl: false
i2c:
- id: internal_i2c
sda: GPIO5
scl: GPIO6
frequency: 400kHz
psram:
mode: octal
speed: 80MHz
globals:
- id: init_in_progress
type: bool
restore_value: no
initial_value: 'true'
# Global variable storing the state of ImprovBLE. Used to draw different LED animations
- id: improv_ble_in_progress
type: bool
restore_value: no
initial_value: 'false'
# Global variable tracking the phase of the voice assistant (defined above). Initialized to not_ready
- id: voice_assistant_phase
type: int
restore_value: no
initial_value: ${voice_assist_not_ready_phase_id}
- id: saved_alarm_time
type: std::string
restore_value: yes
initial_value: '"Unknown"'
- id: saved_time_zone
type: std::string
restore_value: yes
initial_value: '"UTC0"'
- id: saved_alarm_action
type: std::string
restore_value: yes
initial_value: '"Play sound"'
# Global variable storing the first active timer
- id: first_active_timer
type: voice_assistant::Timer
restore_value: no
# Global variable storing if a timer is active
- id: is_timer_active
type: bool
restore_value: no
# Global variable storing if a factory reset was requested. If it is set to true, the device will factory reset once the center button is released
- id: factory_reset_requested
type: bool
restore_value: no
initial_value: 'false'
# Time sync from Home Assistant
time:
- platform: homeassistant
id: homeassistant_time
on_time:
# Every 1 minute
- seconds: 0
minutes: /1
then:
- script.execute: check_alarm
on_time_sync:
- script.execute: publish_current_time
switch:
# Hardware speaker mute
- platform: template
id: speaker_mute_switch
name: Speaker mute
icon: mdi:volume-mute
internal: true
optimistic: true
# turn_on_action:
# - lambda: id(respeaker).mute_speaker();
# turn_off_action:
# - lambda: id(respeaker).unmute_speaker();
# stateless momentary mic mute switch
- platform: gpio
internal: true
pin:
number: GPIO4 # D3
inverted: true
id: mute_toggle
on_turn_on:
- delay: 300ms
- switch.turn_off: mute_toggle
# stateful user facing mic mute switch
- platform: template
id: mic_mute_switch
name: Mic mute
icon: mdi:microphone-off
# lambda: |-
# if (id(mute_state).state) {
# return true;
# } else {
# return false;
# }
on_turn_on:
- if:
condition:
and:
- lambda: return !id(init_in_progress);
- switch.is_on: mute_sound
then:
- script.execute:
id: play_sound
priority: false
sound_file: !lambda return id(mute_switch_on_sound);
on_turn_off:
- if:
condition:
and:
- lambda: return !id(init_in_progress);
- switch.is_on: mute_sound
then:
- script.execute:
id: play_sound
priority: false
sound_file: !lambda return id(mute_switch_off_sound);
turn_on_action:
- switch.turn_on: mute_toggle
turn_off_action:
- switch.turn_on: mute_toggle
# Button click Sounds Switch.
- platform: template
id: button_sound
name: Button click sounds
icon: "mdi:bullhorn"
entity_category: config
optimistic: true
restore_mode: RESTORE_DEFAULT_ON
# Mute Sound Switch.
- platform: template
id: mute_sound
name: Mute/unmute sound
icon: "mdi:bullhorn"
entity_category: config
optimistic: true
restore_mode: RESTORE_DEFAULT_ON
# Wake Word Sound Switch.
- platform: template
id: wake_sound
name: Wake sound
icon: "mdi:bullhorn"
entity_category: config
optimistic: true
restore_mode: RESTORE_DEFAULT_ON
# Internal switch to track when a timer is ringing on the device.
- platform: template
id: timer_ringing
optimistic: true
internal: true
restore_mode: ALWAYS_OFF
on_turn_off:
# Disable stop wake word
- micro_wake_word.disable_model: stop
- script.execute: disable_repeat
# Stop any current annoucement (ie: stop the timer ring mid playback)
- if:
condition:
media_player.is_announcing:
then:
media_player.stop:
announcement: true
# Set back ducking ratio to zero
- mixer_speaker.apply_ducking:
id: media_mixing_input
decibel_reduction: 0
duration: 1.0s
# Refresh the LED ring
- script.execute: control_leds
on_turn_on:
# Duck audio
- mixer_speaker.apply_ducking:
id: media_mixing_input
decibel_reduction: 20
duration: 0.0s
# Enable stop wake word
- micro_wake_word.enable_model: stop
# Ring timer
- script.execute: ring_timer
# Refresh LED
- script.execute: control_leds
# If 15 minutes have passed and the timer is still ringing, stop it.
- delay: 15min
- switch.turn_off: timer_ringing
# Defines if alarm is active
- platform: template
optimistic: true
restore_mode: RESTORE_DEFAULT_OFF
id: alarm_on
icon: mdi:bell-badge
name: "Alarm on"
on_turn_on:
- script.execute: control_leds
on_turn_off:
- script.execute: control_leds
binary_sensor:
# User Button. Used for many things (See on_multi_click)
- platform: gpio
id: user_button
pin:
number: GPIO3 # D2
inverted: true
name: "User button"
light:
- platform: esp32_rmt_led_strip
id: led_internal
internal: true
rgb_order: GRB
pin: GPIO1
num_leds: 1
rmt_symbols: 192
chipset: ws2812
default_transition_length: 0s
effects:
- addressable_lambda:
name: "Fast Pulse"
update_interval: 10ms
lambda: |-
static float fraction = 0.0;
static float step = 0.05;
static bool increasing = true;
auto values = id(led_internal)->current_values;
Color color(values.get_red() * 255, values.get_green() * 255, values.get_blue() * 255);
it[0].set_rgb(color.red * fraction,
color.green * fraction,
color.blue * fraction);
fraction += (step * (increasing ? 1 : -1));
if (fraction > 1.0) {
fraction = 1.0;
increasing = !increasing;
} else if (fraction < 0.0) {
fraction = 0.0;
increasing = !increasing;
}
- addressable_lambda:
name: "Slow Pulse"
update_interval: 30ms
lambda: |-
static float fraction = 0.0;
static float step = 0.05;
static bool increasing = true;
auto values = id(led_internal)->current_values;
Color color(values.get_red() * 255, values.get_green() * 255, values.get_blue() * 255);
it[0].set_rgb(color.red * fraction,
color.green * fraction,
color.blue * fraction);
fraction += (step * (increasing ? 1 : -1));
if (fraction > 1.0) {
fraction = 1.0;
increasing = !increasing;
} else if (fraction < 0.0) {
fraction = 0.0;
increasing = !increasing;
}
# User facing LED.
# Exposed to be used by the user.
- platform: partition
id: led_respeaker_onboard
name: LED Respeaker onboard
entity_category: config
icon: "mdi:circle-outline"
default_transition_length: 0ms
restore_mode: RESTORE_DEFAULT_OFF
on_turn_off:
- script.execute: control_leds
initial_state:
color_mode: rgb
brightness: 100%
red: 9.4%
green: 73.3%
blue: 94.9%
segments:
- id: led_internal
from: 0
to: 0
effects:
- addressable_lambda:
name: "Fast Pulse"
update_interval: 10ms
lambda: |-
static float fraction = 0.0;
static float step = 0.05;
static bool increasing = true;
auto values = id(led_respeaker_onboard)->current_values;
Color color(values.get_red() * 255, values.get_green() * 255, values.get_blue() * 255);
it[0].set_rgb(color.red * fraction,
color.green * fraction,
color.blue * fraction);
fraction += (step * (increasing ? 1 : -1));
if (fraction > 1.0) {
fraction = 1.0;
increasing = !increasing;
} else if (fraction < 0.0) {
fraction = 0.0;
increasing = !increasing;
}
- addressable_lambda:
name: "Slow Pulse"
update_interval: 30ms
lambda: |-
static float fraction = 0.0;
static float step = 0.05;
static bool increasing = true;
auto values = id(led_respeaker_onboard)->current_values;
Color color(values.get_red() * 255, values.get_green() * 255, values.get_blue() * 255);
it[0].set_rgb(color.red * fraction,
color.green * fraction,
color.blue * fraction);
fraction += (step * (increasing ? 1 : -1));
if (fraction > 1.0) {
fraction = 1.0;
increasing = !increasing;
} else if (fraction < 0.0) {
fraction = 0.0;
increasing = !increasing;
}
sensor:
- platform: template
id: next_timer
name: "Next timer"
update_interval: never
disabled_by_default: true
device_class: duration
unit_of_measurement: s
icon: "mdi:timer"
text_sensor:
- platform: template
id: next_timer_name
name: "Next timer name"
icon: "mdi:timer"
disabled_by_default: true
- platform: template
name: "Alarm time"
id: alarm_time
icon: mdi:bell-ring
- platform: template
name: "Current device time"
id: current_time
icon: mdi:clock
event:
# Event entity exposed to the user to automate on complex center button presses.
# The simple press is not exposed as it is used to control the device itself.
- platform: template
id: button_press_event
name: "Button press"
icon: mdi:button-pointer
device_class: button
event_types:
- double_press
- triple_press
- long_press
script:
# Master script controlling the LEDs, based on different conditions : initialization in progress, wifi and api connected and voice assistant phase.
# For the sake of simplicity and re-usability, the script calls child scripts defined below.
# This script will be called every time one of these conditions is changing.
- id: control_leds
then:
- lambda: |
id(check_if_timers_active).execute();
if (id(is_timer_active)){
id(fetch_first_active_timer).execute();
}
if (id(improv_ble_in_progress)) {
id(control_leds_improv_ble_state).execute();
} else if (id(init_in_progress)) {
id(control_leds_init_state).execute();
} else if (!id(wifi_id).is_connected() || !id(api_id).is_connected()){
id(control_leds_no_ha_connection_state).execute();
} else if (id(user_button).state) {
id(control_leds_center_button_touched).execute();
} else if (id(timer_ringing).state) {
id(control_leds_timer_ringing).execute();
} else if (id(voice_assistant_phase) == ${voice_assist_waiting_for_command_phase_id}) {
id(control_leds_voice_assistant_waiting_for_command_phase).execute();
} else if (id(voice_assistant_phase) == ${voice_assist_listening_for_command_phase_id}) {
id(control_leds_voice_assistant_listening_for_command_phase).execute();
} else if (id(voice_assistant_phase) == ${voice_assist_thinking_phase_id}) {
id(control_leds_voice_assistant_thinking_phase).execute();
} else if (id(voice_assistant_phase) == ${voice_assist_replying_phase_id}) {
id(control_leds_voice_assistant_replying_phase).execute();
} else if (id(voice_assistant_phase) == ${voice_assist_error_phase_id}) {
id(control_leds_voice_assistant_error_phase).execute();
} else if (id(voice_assistant_phase) == ${voice_assist_not_ready_phase_id}) {
id(control_leds_voice_assistant_not_ready_phase).execute();
} else if (id(is_timer_active)) {
id(control_leds_timer_ticking).execute();
} else if (id(alarm_on).state && !id(led_respeaker_onboard).remote_values.is_on()) {
id(control_leds_alarm_active).execute();
} else if (id(voice_assistant_phase) == ${voice_assist_idle_phase_id}) {
id(control_leds_voice_assistant_idle_phase).execute();
}
# Script executed during Improv BLE
# Warm White slow pulse
- id: control_leds_improv_ble_state
then:
- light.turn_on:
brightness: !lambda return max( id(led_respeaker_onboard).current_values.get_brightness() , 0.2f );
red: 100%
green: 89%
blue: 71%
id: led_internal
effect: "Slow Pulse"
# Script executed during initialization
# Fast Blue pulse if Wifi is connected, Else slow blue pulse
- id: control_leds_init_state
then:
- if:
condition:
wifi.connected:
then:
- light.turn_on:
brightness: !lambda return max( id(led_respeaker_onboard).current_values.get_brightness() , 0.2f );
red: 9%
green: 73%
blue: 95%
id: led_internal
effect: "Fast Pulse"
else:
- light.turn_on:
brightness: !lambda return max( id(led_respeaker_onboard).current_values.get_brightness() , 0.2f );
red: 9%
green: 73%
blue: 95%
id: led_internal
effect: "Slow Pulse"
# Script executed when the device has no connection to Home Assistant
# Red slow pulse (This will be visible during HA updates for example)
- id: control_leds_no_ha_connection_state
then:
- light.turn_on:
brightness: !lambda return max( id(led_respeaker_onboard).current_values.get_brightness() , 0.2f );
red: 1
green: 0
blue: 0
id: led_internal
effect: "Slow Pulse"
# Script executed when the voice assistant is idle (waiting for a wake word)
# Nothing
- id: control_leds_voice_assistant_idle_phase
then:
- light.turn_off: led_internal
- if:
condition:
light.is_on: led_respeaker_onboard
then:
light.turn_on: led_respeaker_onboard
# Script executed when the voice assistant is waiting for a command (After the wake word)
# Slow purple pulse
- id: control_leds_voice_assistant_waiting_for_command_phase
then:
- light.turn_on:
brightness: !lambda return max( id(led_respeaker_onboard).current_values.get_brightness() , 0.2f );
red: 1
green: 0.2
blue: 1
id: led_internal
effect: "Slow Pulse"
# Script executed when the voice assistant is listening to a command
# Slow purple pulse
- id: control_leds_voice_assistant_listening_for_command_phase
then:
- light.turn_on:
brightness: !lambda return max( id(led_respeaker_onboard).current_values.get_brightness() , 0.2f );
red: 1
green: 0.2
blue: 1
id: led_internal
effect: "Slow Pulse"
# Script executed when the voice assistant is thinking to a command
# Fast purple pulse
- id: control_leds_voice_assistant_thinking_phase
then:
- light.turn_on:
brightness: !lambda return max( id(led_respeaker_onboard).current_values.get_brightness() , 0.2f );
red: 1
green: 0.2
blue: 1
id: led_internal
effect: "Fast Pulse"
# Script executed when the voice assistant is replying to a command
# Slow cyan pulse
- id: control_leds_voice_assistant_replying_phase
then:
- light.turn_on:
brightness: !lambda return max( id(led_respeaker_onboard).current_values.get_brightness() , 0.2f );
red: 0.2
green: 1
blue: 1
id: led_internal
effect: "Slow Pulse"
# Script executed when the voice assistant is in error
# Fast Red Pulse
- id: control_leds_voice_assistant_error_phase
then:
- light.turn_on:
brightness: !lambda return max( id(led_respeaker_onboard).current_values.get_brightness() , 0.2f );
red: 1
green: 0
blue: 0
id: led_internal
effect: "Fast Pulse"
# Script executed when the voice assistant is not ready
- id: control_leds_voice_assistant_not_ready_phase
then:
- light.turn_on:
brightness: !lambda return max( id(led_respeaker_onboard).current_values.get_brightness() , 0.2f );
red: 1
green: 0
blue: 0
id: led_internal
effect: "Slow Pulse"
# Script executed when the center button is touched
# The LED turns on blue
- id: control_leds_center_button_touched
then:
- light.turn_on:
brightness: !lambda return min ( max( id(led_respeaker_onboard).current_values.get_brightness() , 0.2f ) + 0.1f , 1.0f );
red: 0
green: 0
blue: 1
id: led_internal
effect: "None"
# Script executed when the timer is ringing, to control the LEDs
# The LED blinks green.
- id: control_leds_timer_ringing
then:
- light.turn_on:
brightness: !lambda return min ( max( id(led_respeaker_onboard).current_values.get_brightness() , 0.2f ) + 0.1f , 1.0f );
red: 0
green: 1
blue: 0
id: led_internal
effect: "Fast Pulse"
# Script executed when the timer is ticking, to control the LEDs
# Slow dim while pulse.
- id: control_leds_timer_ticking
then:
- light.turn_on:
brightness: !lambda return max( id(led_respeaker_onboard).current_values.get_brightness() , 0.2f );
red: 0.3
green: 0.3
blue: 0.3
id: led_internal
effect: "Slow Pulse"
# Script executed when the alarm is active
# The LED turns on dim green
- id: control_leds_alarm_active
then:
- light.turn_on:
brightness: !lambda return 0.3f;
red: 0
green: 1
blue: 0
id: led_internal
effect: "None"
# Script executed when the timer is ringing, to playback sounds.
- id: ring_timer
then:
- script.execute: enable_repeat_one
- script.execute:
id: play_sound
priority: true
sound_file: !lambda return id(timer_finished_sound);
# Script executed when the timer is ringing, to repeat the timer finished sound.
- id: enable_repeat_one
then:
# Turn on the repeat mode and pause for 500 ms between playlist items/repeats
- lambda: |-
id(external_media_player)
->make_call()
.set_command(media_player::MediaPlayerCommand::MEDIA_PLAYER_COMMAND_REPEAT_ONE)
.set_announcement(true)
.perform();
id(external_media_player)->set_playlist_delay_ms(speaker::AudioPipelineType::ANNOUNCEMENT, 500);
# Script execute when the timer is done ringing, to disable repeat mode.
- id: disable_repeat
then:
# Turn off the repeat mode and pause for 0 ms between playlist items/repeats
- lambda: |-
id(external_media_player)
->make_call()
.set_command(media_player::MediaPlayerCommand::MEDIA_PLAYER_COMMAND_REPEAT_OFF)
.set_announcement(true)
.perform();
id(external_media_player)->set_playlist_delay_ms(speaker::AudioPipelineType::ANNOUNCEMENT, 0);
# Script executed when we want to play sounds on the device.
- id: play_sound
parameters:
priority: bool
sound_file: "audio::AudioFile*"
then:
- lambda: |-
if (priority) {
id(external_media_player)
->make_call()
.set_command(media_player::MediaPlayerCommand::MEDIA_PLAYER_COMMAND_STOP)
.set_announcement(true)
.perform();
}
if ( (id(external_media_player).state != media_player::MediaPlayerState::MEDIA_PLAYER_STATE_ANNOUNCING ) || priority) {
id(external_media_player)
->play_file(sound_file, true, false);
}
# Script used to fetch the first active timer (Stored in global first_active_timer)
- id: fetch_first_active_timer
then:
- lambda: |
const auto timers = id(va).get_timers();
auto output_timer = timers.begin()->second;
for (auto &iterable_timer : timers) {
if (iterable_timer.second.is_active && iterable_timer.second.seconds_left <= output_timer.seconds_left) {
output_timer = iterable_timer.second;
}
}
id(first_active_timer) = output_timer;
# Script used to check if a timer is active (Stored in global is_timer_active)
- id: check_if_timers_active
then:
- lambda: |
const auto timers = id(va).get_timers();
bool output = false;
if (timers.size() > 0) {
for (auto &iterable_timer : timers) {
if(iterable_timer.second.is_active) {
output = true;
}
}
}
id(is_timer_active) = output;
# Script used activate the stop word if the TTS step is long.
# Why is this wrapped on a script?
# Becasue we want to stop the sequence if the TTS step is faster than that.
# This allows us to prevent having the deactivation of the stop word before its own activation.
- id: activate_stop_word_once
then:
- delay: 1s
# Enable stop wake word
- if:
condition:
switch.is_off: timer_ringing
then:
- micro_wake_word.enable_model: stop
- wait_until:
not:
media_player.is_announcing:
- if:
condition:
switch.is_off: timer_ringing
then:
- micro_wake_word.disable_model: stop
- id: check_alarm
then:
- lambda: |-
id(publish_current_time).execute();
// Check alarm
if (id(alarm_on).state && id(alarm_time).has_state()) {
// Get the stored alarm time from the sensor
auto set_alarm_time = id(alarm_time).state;
if (set_alarm_time.length() == 5 &&
isdigit(set_alarm_time[0]) && isdigit(set_alarm_time[1]) &&
isdigit(set_alarm_time[3]) && isdigit(set_alarm_time[4])) {
auto alarm_hour = std::stoi(set_alarm_time.substr(0, 2));
auto alarm_minute = std::stoi(set_alarm_time.substr(3, 2));
// Trigger action if current time matches alarm time
auto time_now = id(homeassistant_time).now();
if (time_now.hour == alarm_hour && time_now.minute == alarm_minute) {
auto action = id(alarm_action).state;
if (action == "Play sound") {
id(timer_ringing).turn_on();
} else if (action == "Send event") {
id(send_alarm_event).execute();
} else if (action == "Sound and event") {
id(timer_ringing).turn_on();
id(send_alarm_event).execute();
}
}
} else {
ESP_LOGW("alarm", "Incorrect alarm time setting");
}
}
- id: send_alarm_event
then:
- homeassistant.event:
event: esphome.alarm_ringing
- id: send_tts_uri_event
parameters:
tts_uri: string
then:
- homeassistant.event:
event: esphome.tts_uri
data:
uri: !lambda return tts_uri;
- id: send_stt_text_event
parameters:
stt_text: string
then:
- homeassistant.event:
event: esphome.stt_text
data:
text: !lambda return stt_text;
- id: publish_current_time
then:
- lambda: |-
// Publish current time
auto time_now = id(homeassistant_time).now();
id(current_time).publish_state(time_now.strftime("%H:%M"));
i2s_audio:
- id: i2s_output
i2s_lrclk_pin:
number: GPIO7
allow_other_uses: true
i2s_bclk_pin:
number: GPIO8
allow_other_uses: true
i2s_mclk_pin:
number: GPIO9
allow_other_uses: true
- id: i2s_input
i2s_lrclk_pin:
number: GPIO7
allow_other_uses: true
i2s_bclk_pin:
number: GPIO8
allow_other_uses: true
i2s_mclk_pin:
number: GPIO9
allow_other_uses: true
microphone:
- platform: i2s_audio
id: i2s_mics
i2s_din_pin: GPIO44
adc_type: external
pdm: false
sample_rate: 48000
bits_per_sample: 32bit
i2s_mode: secondary
i2s_audio_id: i2s_input
channel: stereo
speaker:
# Hardware speaker output
- platform: i2s_audio
id: i2s_audio_speaker
sample_rate: 48000
i2s_mode: secondary
i2s_dout_pin: GPIO43
bits_per_sample: 32bit
i2s_audio_id: i2s_output
dac_type: external
channel: stereo
timeout: never
buffer_duration: 100ms
audio_dac: aic3204_dac
# Virtual speakers to combine the announcement and media streams together into one output
- platform: mixer
id: mixing_speaker
output_speaker: i2s_audio_speaker
num_channels: 2
source_speakers:
- id: announcement_mixing_input
timeout: never
- id: media_mixing_input
timeout: never
# Vritual speakers to resample each pipelines' audio, if necessary, as the mixer speaker requires the same sample rate
- platform: resampler
id: announcement_resampling_speaker
output_speaker: announcement_mixing_input
sample_rate: 48000
bits_per_sample: 16
- platform: resampler
id: media_resampling_speaker
output_speaker: media_mixing_input
sample_rate: 48000
bits_per_sample: 16
media_player:
- platform: speaker
id: external_media_player
name: Media Player
internal: False
volume_increment: 0.05
volume_min: 0.4
volume_max: 0.85
announcement_pipeline:
speaker: announcement_resampling_speaker
format: FLAC # FLAC is the least processor intensive codec
num_channels: 1 # Stereo audio is unnecessary for announcements
sample_rate: 48000
media_pipeline:
speaker: media_resampling_speaker
format: FLAC # FLAC is the least processor intensive codec
num_channels: 2
sample_rate: 48000
on_announcement:
- mixer_speaker.apply_ducking:
id: media_mixing_input
decibel_reduction: 20
duration: 0.0s
on_state:
if:
condition:
and:
- switch.is_off: timer_ringing
- not:
voice_assistant.is_running:
- not:
media_player.is_announcing:
then:
- mixer_speaker.apply_ducking:
id: media_mixing_input
decibel_reduction: 0
duration: 1.0s
files:
- id: center_button_press_sound
file: https://github.com/esphome/home-assistant-voice-pe/raw/dev/sounds/center_button_press.flac
- id: center_button_double_press_sound
file: https://github.com/esphome/home-assistant-voice-pe/raw/dev/sounds/center_button_double_press.flac
- id: center_button_triple_press_sound
file: https://github.com/esphome/home-assistant-voice-pe/raw/dev/sounds/center_button_triple_press.flac
- id: center_button_long_press_sound
file: https://github.com/esphome/home-assistant-voice-pe/raw/dev/sounds/center_button_long_press.flac
- id: factory_reset_initiated_sound
file: https://github.com/esphome/home-assistant-voice-pe/raw/dev/sounds/factory_reset_initiated.mp3
- id: factory_reset_cancelled_sound
file: https://github.com/esphome/home-assistant-voice-pe/raw/dev/sounds/factory_reset_cancelled.mp3
- id: factory_reset_confirmed_sound
file: https://github.com/esphome/home-assistant-voice-pe/raw/dev/sounds/factory_reset_confirmed.mp3
- id: mute_switch_on_sound
file: https://github.com/esphome/home-assistant-voice-pe/raw/dev/sounds/mute_switch_on.flac
- id: mute_switch_off_sound
file: https://github.com/esphome/home-assistant-voice-pe/raw/dev/sounds/mute_switch_off.flac
- id: timer_finished_sound
file: https://github.com/esphome/home-assistant-voice-pe/raw/dev/sounds/timer_finished.flac
- id: wake_word_triggered_sound
file: https://github.com/esphome/home-assistant-voice-pe/raw/dev/sounds/wake_word_triggered.flac
- id: error_cloud_expired
file: https://github.com/esphome/home-assistant-voice-pe/raw/dev/sounds/error_cloud_expired.mp3
respeaker_lite:
id: respeaker
reset_pin: GPIO2
mute_state:
internal: true
id: mute_state
firmware_version:
icon: mdi:application-cog
name: XMOS firmware version
internal: false
id: firmware_version
firmware:
url: https://github.com/KasunThushara/Respeaker-Lite-ESPHome-integration/raw/refs/heads/main/respeaker_lite_i2s_dfu_firmware_48k_v1.1.0.bin
version: "1.1.0"
md5: 9297155d1bf3eb21a9d4db52a89ea0c6
on_begin:
- light.turn_on:
brightness: !lambda return max( id(led_respeaker_onboard).current_values.get_brightness() , 0.2f );
red: 50%
green: 50%
blue: 50%
id: led_internal
effect: "Slow Pulse"
on_end:
- light.turn_on:
brightness: !lambda return max( id(led_respeaker_onboard).current_values.get_brightness() , 0.2f );
red: 0%
green: 100%
blue: 0%
id: led_internal
effect: "Fast Pulse"
- delay: 3s
- light.turn_off:
id: led_internal
on_error:
- light.turn_on:
brightness: !lambda return max( id(led_respeaker_onboard).current_values.get_brightness() , 0.2f );
red: 100%
green: 0%
blue: 0%
id: led_internal
effect: "Fast Pulse"
- delay: 3s
- light.turn_off:
id: led_internal
external_components:
- source:
type: git
url: https://github.com/KasunThushara/esphome
ref: respeaker_microphone
components:
- i2s_audio
refresh: 0s
- source:
type: git
url: https://github.com/KasunThushara/Respeaker-Lite-ESPHome-integration
ref: main
components:
- respeaker_lite
refresh: 0s
audio_dac:
- platform: aic3204
id: aic3204_dac
i2c_id: internal_i2c
micro_wake_word:
id: mww
microphone:
microphone: i2s_mics
channels: 1
gain_factor: 4
stop_after_detection: false
models:
- model: https://github.com/kahrendt/microWakeWord/releases/download/okay_nabu_20241226.3/okay_nabu.json
# probability_cutoff: 0.8
id: okay_nabu
- model: https://raw.githubusercontent.com/KasunThushara/Respeaker-Lite-ESPHome-integration/refs/heads/main/microwakeword/models/v2/kenobi.json
id: kenobi
- model: hey_jarvis
id: hey_jarvis
- model: hey_mycroft
id: hey_mycroft
- model: https://github.com/kahrendt/microWakeWord/releases/download/stop/stop.json
id: stop
internal: true
vad:
probability_cutoff: 0.05
on_wake_word_detected:
# If the wake word is detected when the device is muted (Possible with the software mute switch): Do nothing
- if:
condition:
switch.is_off: mic_mute_switch
then:
# If a timer is ringing: Stop it, do not start the voice assistant (We can stop timer from voice!)
- if:
condition:
switch.is_on: timer_ringing
then:
- switch.turn_off: timer_ringing
# Stop voice assistant if running
else:
- if:
condition:
voice_assistant.is_running:
then:
voice_assistant.stop:
# Stop any other media player announcement
else:
- if:
condition:
media_player.is_announcing:
then:
- media_player.stop:
announcement: true
# Start the voice assistant and play the wake sound, if enabled
else:
- if:
condition:
switch.is_on: wake_sound
then:
- script.execute:
id: play_sound
priority: true
sound_file: !lambda return id(wake_word_triggered_sound);
- delay: 300ms
- voice_assistant.start:
wake_word: !lambda return wake_word;
select:
- platform: template
name: "Wake word sensitivity"
optimistic: true
initial_option: Slightly sensitive
restore_value: true
entity_category: config
options:
- Slightly sensitive
- Moderately sensitive
- Very sensitive
on_value:
# Sets specific wake word probabilities computed for each particular model
# Note probability cutoffs are set as a quantized uint8 value, each comment has the corresponding floating point cutoff
# False Accepts per Hour values are tested against all units and channels from the Dinner Party Corpus.
# These cutoffs apply only to the specific models included in the firmware: [email protected], hey_jarvis@v2, hey_mycroft@v2
lambda: |-
if (x == "Slightly sensitive") {
id(okay_nabu).set_probability_cutoff(217); // 0.85 -> 0.000 FAPH on DipCo (Manifest's default)
id(hey_jarvis).set_probability_cutoff(247); // 0.97 -> 0.563 FAPH on DipCo (Manifest's default)
id(hey_mycroft).set_probability_cutoff(253); // 0.99 -> 0.567 FAPH on DipCo
} else if (x == "Moderately sensitive") {
id(okay_nabu).set_probability_cutoff(176); // 0.69 -> 0.376 FAPH on DipCo
id(hey_jarvis).set_probability_cutoff(235); // 0.92 -> 0.939 FAPH on DipCo
id(hey_mycroft).set_probability_cutoff(242); // 0.95 -> 1.502 FAPH on DipCo (Manifest's default)
} else if (x == "Very sensitive") {
id(okay_nabu).set_probability_cutoff(143); // 0.56 -> 0.751 FAPH on DipCo
id(hey_jarvis).set_probability_cutoff(212); // 0.83 -> 1.502 FAPH on DipCo
id(hey_mycroft).set_probability_cutoff(237); // 0.93 -> 1.878 FAPH on DipCo
}
- platform: logger
id: logger_select
name: Logger Level
disabled_by_default: true
- platform: template
optimistic: true
name: "Alarm action"
id: alarm_action
icon: mdi:bell-plus
options:
- "Play sound"
- "Send event"
- "Sound and event"
initial_option: "Play sound"
on_value:
then:
- lambda: |-
id(saved_alarm_action) = x;
voice_assistant:
id: va
microphone:
microphone: i2s_mics
channels: 0
media_player: external_media_player
micro_wake_word: mww
use_wake_word: false
noise_suppression_level: 0
auto_gain: 0 dbfs
volume_multiplier: 1
on_client_connected:
- if:
condition:
- lambda: return id(init_in_progress);
- switch.is_on: mic_mute_switch
then:
- switch.turn_off: mic_mute_switch
- lambda: id(init_in_progress) = false;
- micro_wake_word.start:
- lambda: id(voice_assistant_phase) = ${voice_assist_idle_phase_id};
- script.execute: control_leds
on_client_disconnected:
- voice_assistant.stop:
- lambda: id(voice_assistant_phase) = ${voice_assist_not_ready_phase_id};
- script.execute: control_leds
on_error:
# Only set the error phase if the error code is different than duplicate_wake_up_detected or stt-no-text-recognized
# These two are ignored for a better user experience
- if:
condition:
and:
- lambda: return !id(init_in_progress);
- lambda: return code != "duplicate_wake_up_detected";
- lambda: return code != "stt-no-text-recognized";
then:
- lambda: id(voice_assistant_phase) = ${voice_assist_error_phase_id};
- script.execute: control_leds
# If the error code is cloud-auth-failed, serve a local audio file guiding the user.
- if:
condition:
- lambda: return code == "cloud-auth-failed";
then:
- script.execute:
id: play_sound
priority: true
sound_file: !lambda return id(error_cloud_expired);
# When the voice assistant starts: Play a wake up sound, duck audio.
on_start:
- mixer_speaker.apply_ducking:
id: media_mixing_input
decibel_reduction: 20 # Number of dB quieter; higher implies more quiet, 0 implies full volume
duration: 0.0s # The duration of the transition (default is no transition)
on_listening:
- lambda: id(voice_assistant_phase) = ${voice_assist_waiting_for_command_phase_id};
- script.execute: control_leds
on_stt_vad_start:
- lambda: id(voice_assistant_phase) = ${voice_assist_listening_for_command_phase_id};
- script.execute: control_leds
on_stt_vad_end:
- lambda: id(voice_assistant_phase) = ${voice_assist_thinking_phase_id};
- script.execute: control_leds
on_intent_progress:
- if:
condition:
# A nonempty x variable means a streaming TTS url was sent to the media player
lambda: 'return !x.empty();'
then:
- lambda: id(voice_assistant_phase) = ${voice_assist_replying_phase_id};
- script.execute: control_leds
# Start a script that would potentially enable the stop word if the response is longer than a second
- script.execute: activate_stop_word_once
on_tts_start:
- if:
condition:
# The intent_progress trigger didn't start the TTS Reponse
lambda: 'return id(voice_assistant_phase) != ${voice_assist_replying_phase_id};'
then:
- lambda: id(voice_assistant_phase) = ${voice_assist_replying_phase_id};
- script.execute: control_leds
# Start a script that would potentially enable the stop word if the response is longer than a second
- script.execute: activate_stop_word_once
on_tts_end:
- script.execute:
id: send_tts_uri_event
tts_uri: !lambda 'return x;'
on_stt_end:
- script.execute:
id: send_stt_text_event
stt_text: !lambda 'return x;'
# When the voice assistant ends ...
on_end:
- wait_until:
not:
voice_assistant.is_running:
# Stop ducking audio.
- mixer_speaker.apply_ducking:
id: media_mixing_input
decibel_reduction: 0
duration: 1.0s
# If the end happened because of an error, let the error phase on for a second
- if:
condition:
lambda: return id(voice_assistant_phase) == ${voice_assist_error_phase_id};
then:
- delay: 1s
# Reset the voice assistant phase id and reset the LED animations.
- lambda: id(voice_assistant_phase) = ${voice_assist_idle_phase_id};
- script.execute: control_leds
on_timer_finished:
- switch.turn_on: timer_ringing
- lambda: |
id(next_timer).publish_state(-1);
id(next_timer_name).publish_state("-");
on_timer_started:
- script.execute: control_leds
- lambda: |
id(next_timer).publish_state(id(first_active_timer).seconds_left);
id(next_timer_name).publish_state(id(first_active_timer).name);
on_timer_cancelled:
- script.execute: control_leds
- lambda: |
id(next_timer).publish_state(id(first_active_timer).seconds_left);
id(next_timer_name).publish_state(id(first_active_timer).name);
on_timer_updated:
- script.execute: control_leds
- lambda: |
id(next_timer).publish_state(id(first_active_timer).seconds_left);
id(next_timer_name).publish_state(id(first_active_timer).name);
on_timer_tick:
- script.execute: control_leds
- lambda: |
int seconds_left = id(first_active_timer).seconds_left;
if (std::abs(seconds_left) % 5 == 0) {
id(next_timer).publish_state(seconds_left);
}
button:
- platform: factory_reset
id: factory_reset_button
name: "Factory Reset"
entity_category: diagnostic
internal: true
- platform: restart
id: restart_button
name: "Restart"
entity_category: config
disabled_by_default: true
icon: "mdi:restart"
debug:
update_interval: 5s
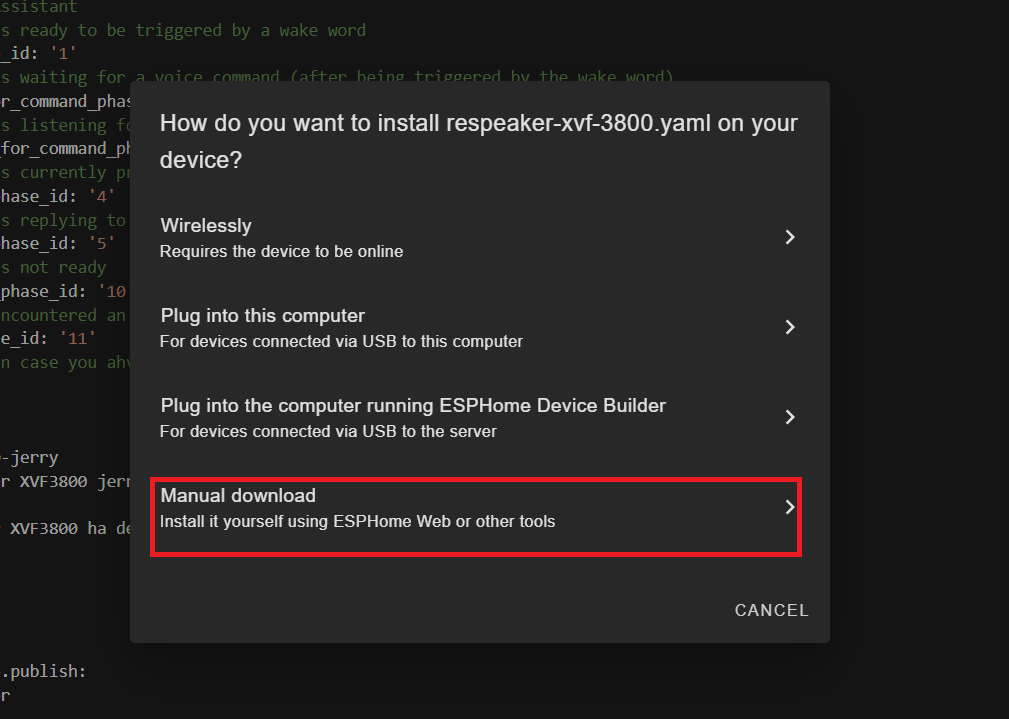
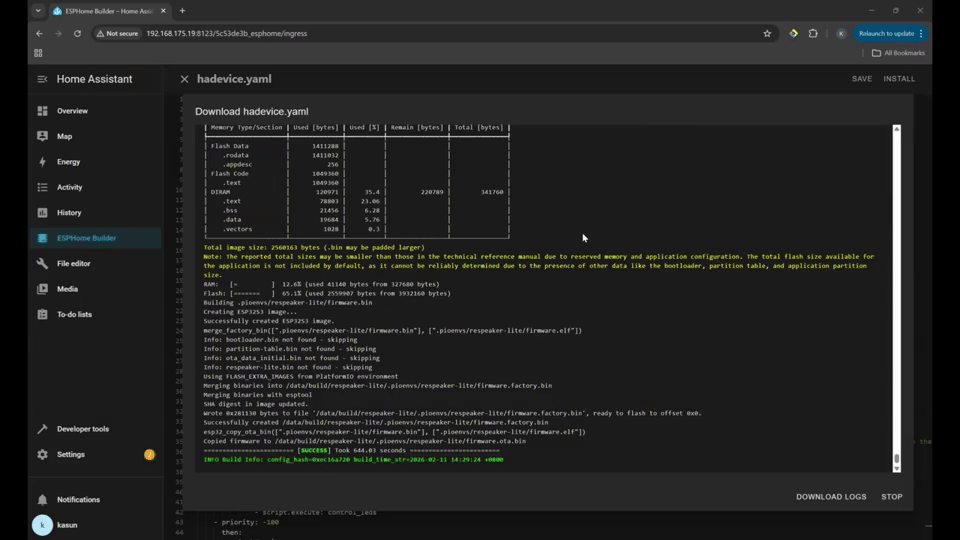
Once your YAML is saved, click INSTALL.
Choose Manual Download
Compiling YAML file : GIF Illustration
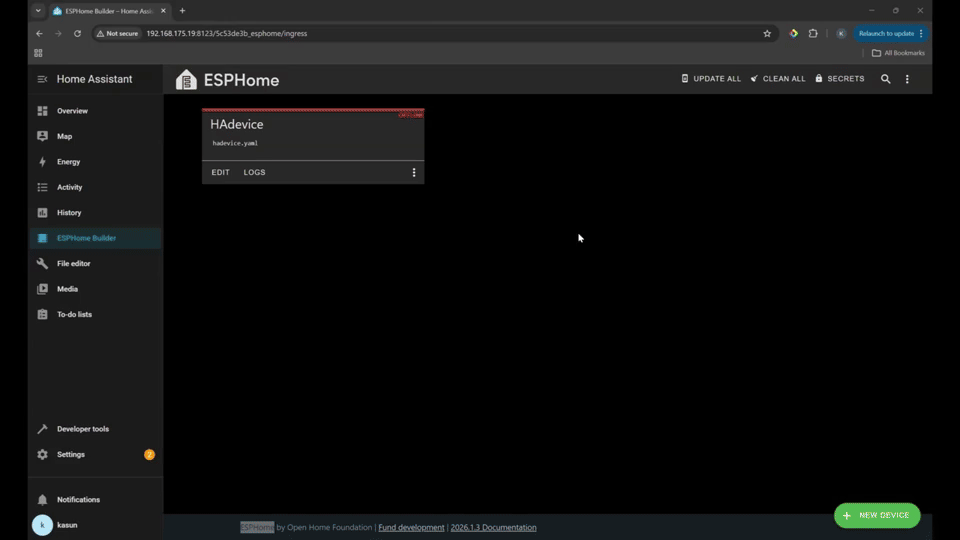
Wait for the firmware to compile.
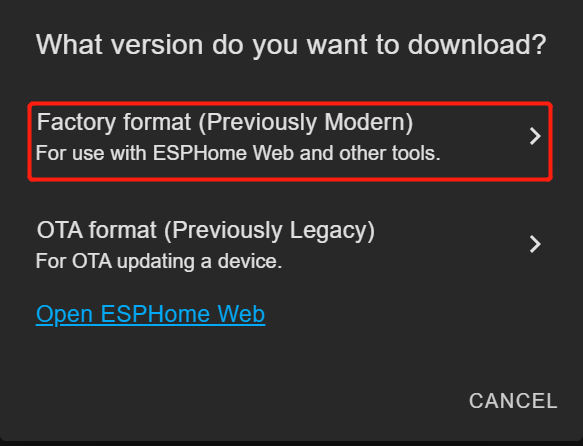
Download the generated .bin firmware file to your computer from Factory Format.
Downloading compiled Bin file : GIF Illustration
Connect the ESP32-S3 board's USB Type-C port to your PC using a USB Type-C cable.
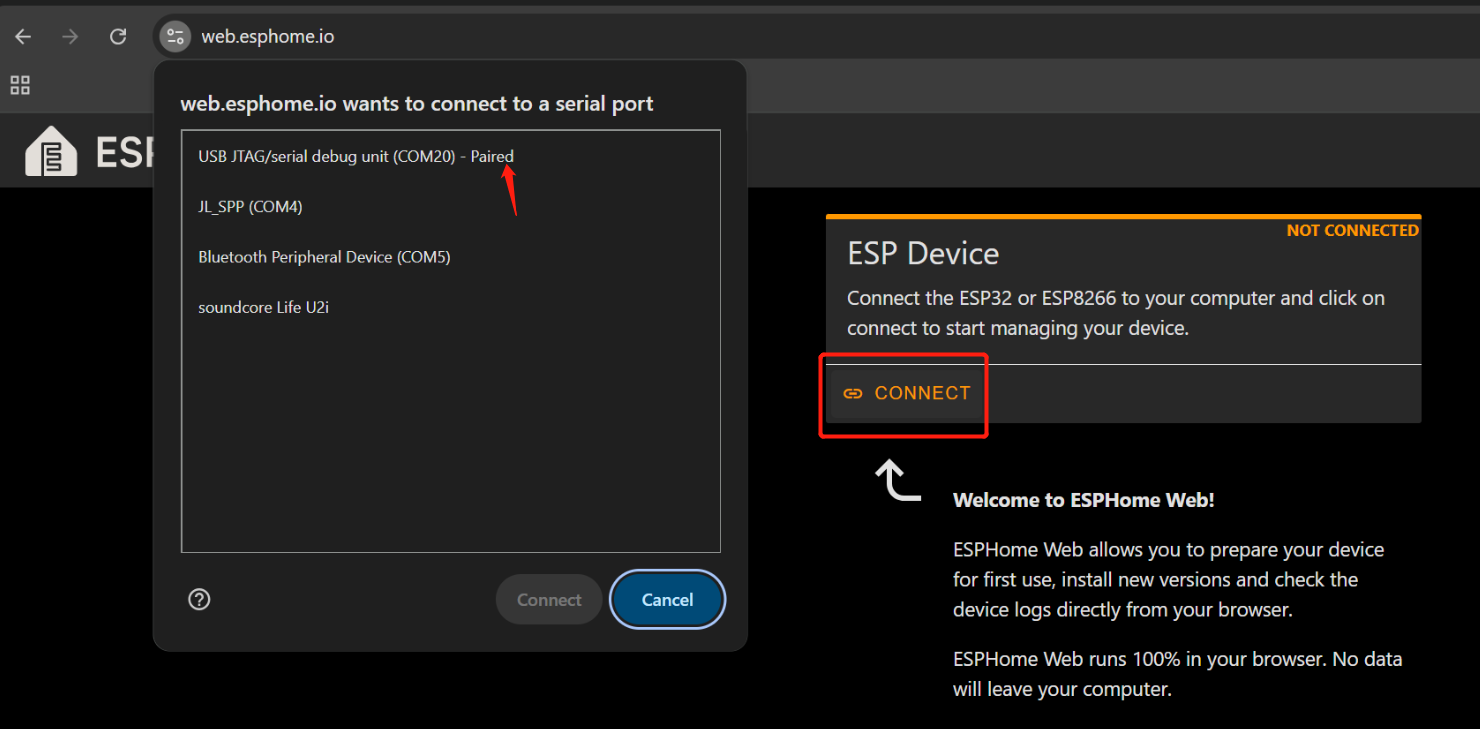
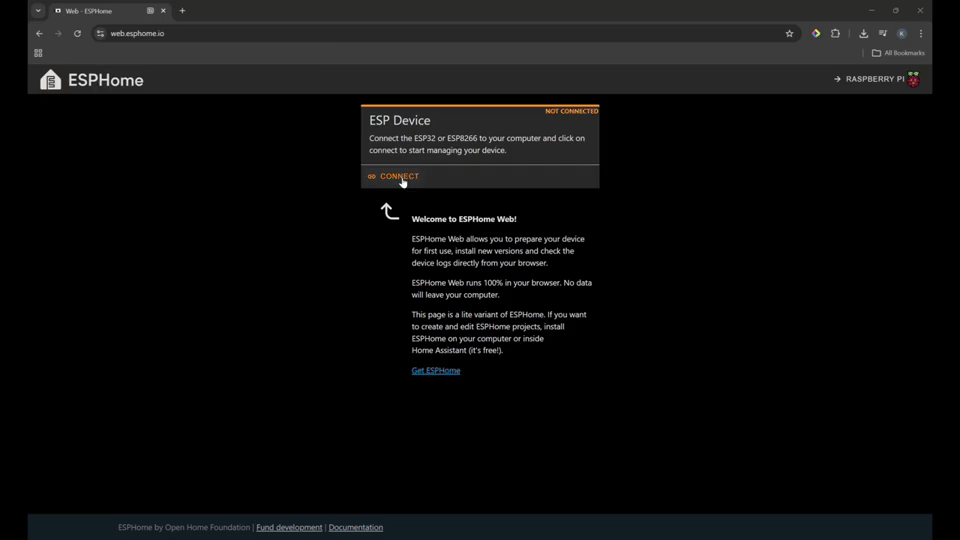
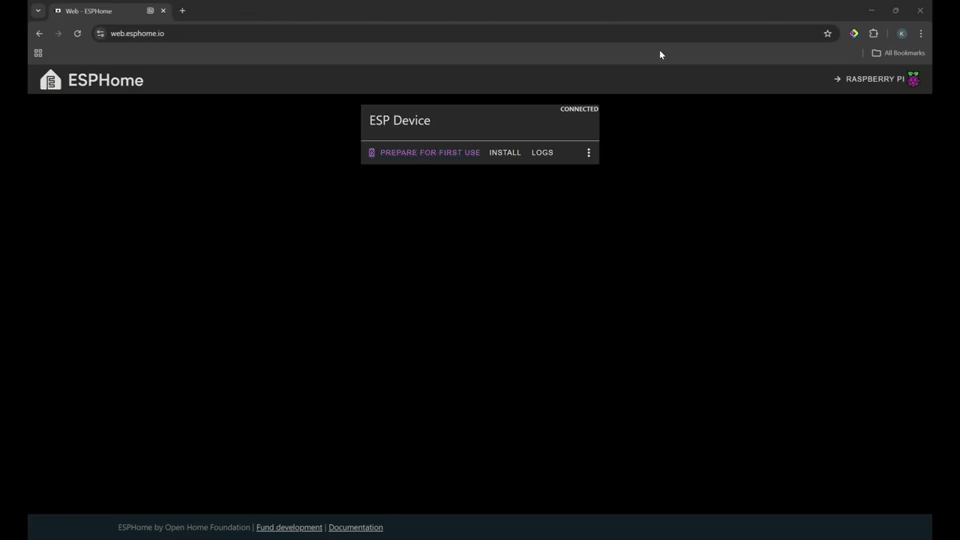
Open Web ESPHome in Google Chrome.
Click Connect and choose the correct serial port from the list.
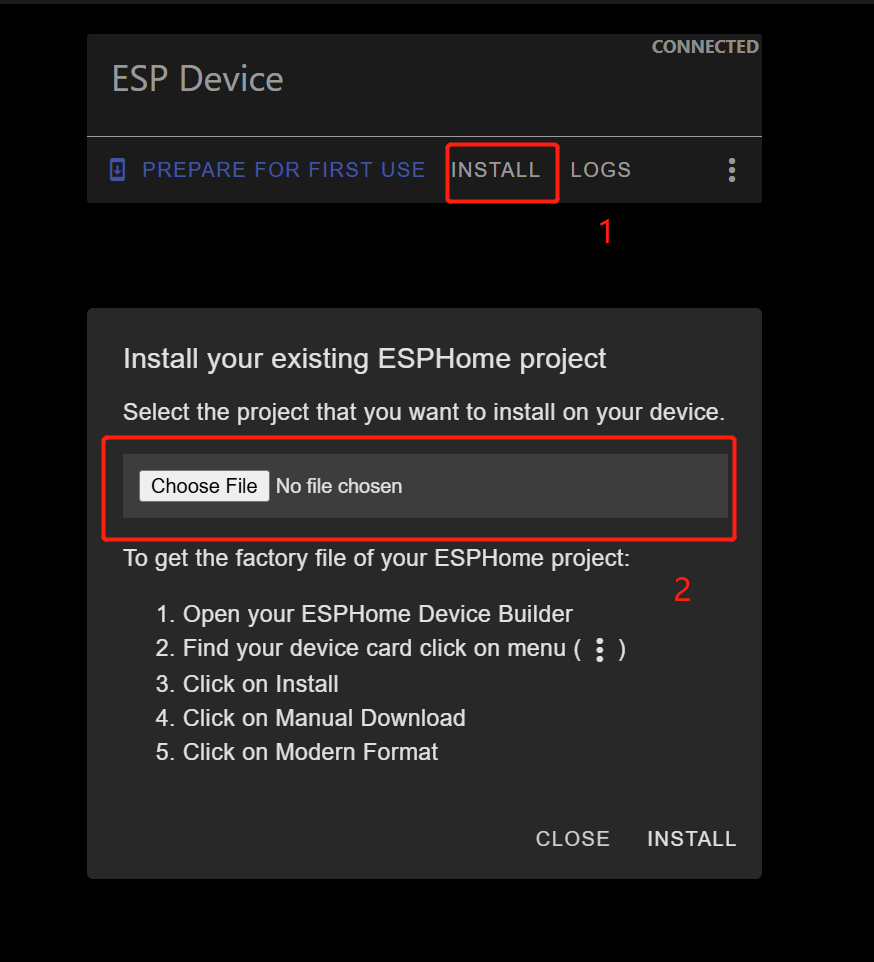
Once connected, click INSTALL
Select the .bin file you just downloaded.
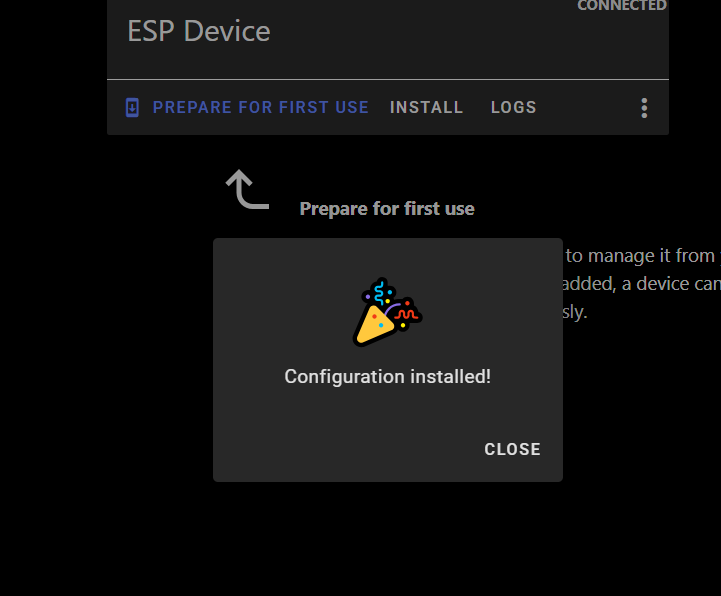
Wait for the installation to complete (may take a few minutes).
After success, you’ll see a confirmation message.
Return to Home Assistant > Settings > Devices & Services.
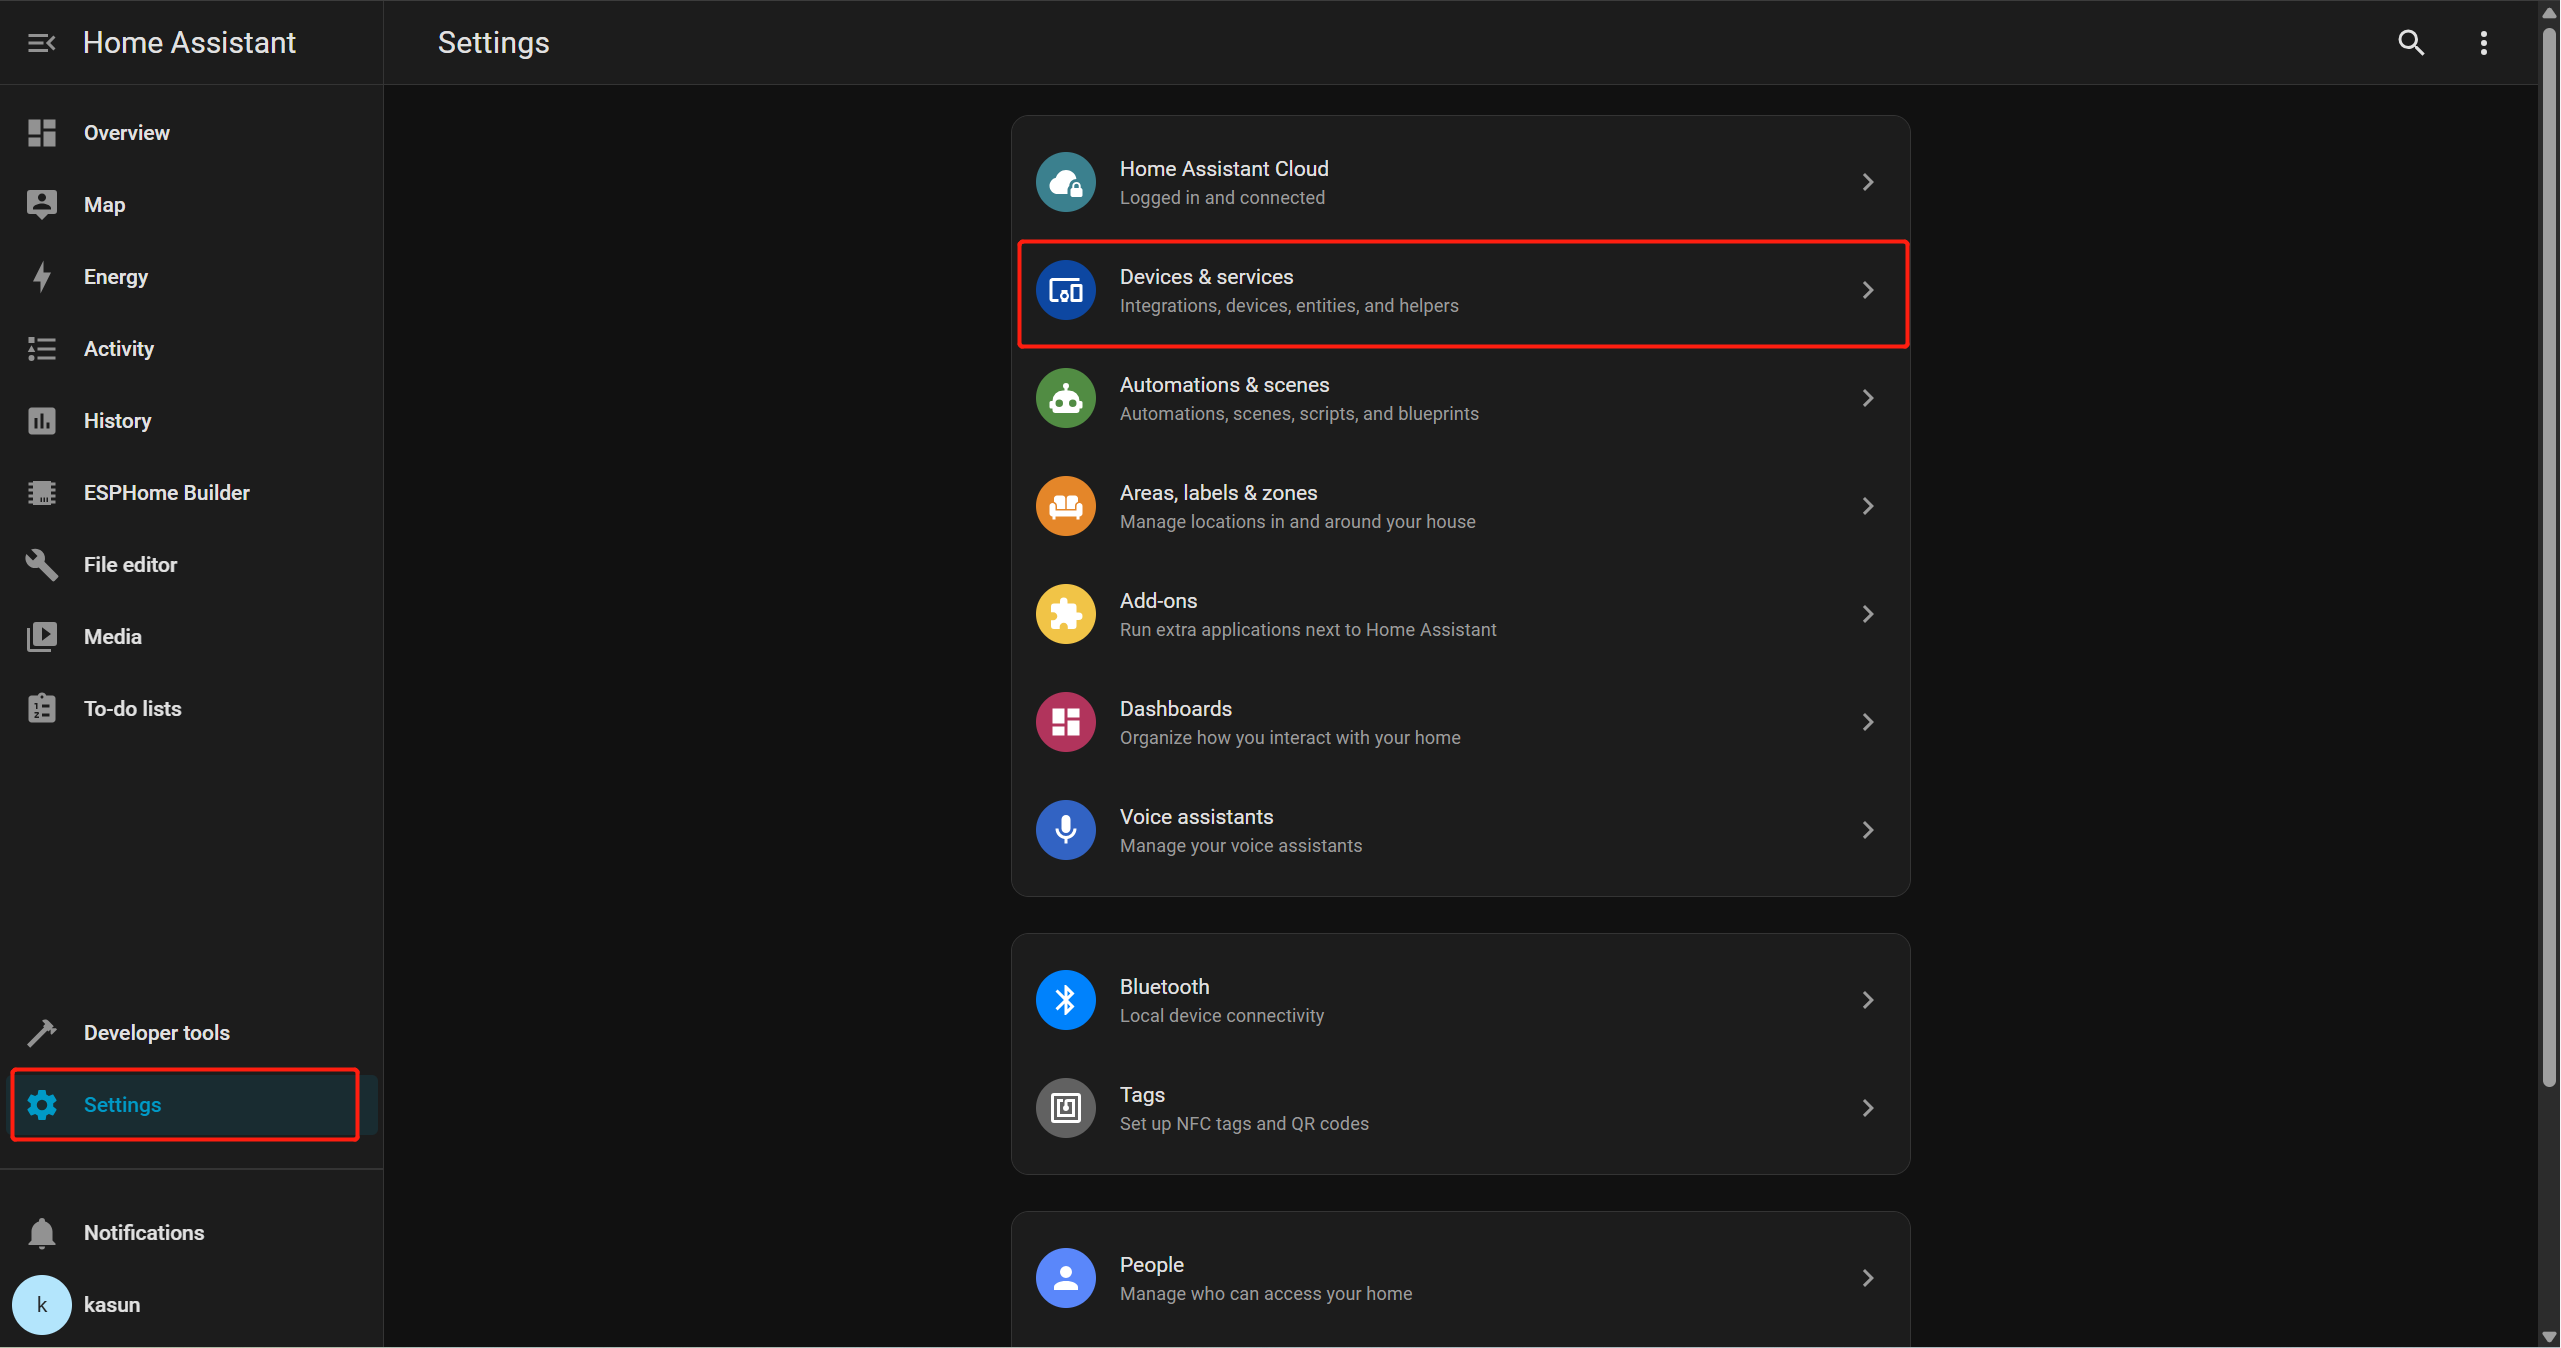
You should see ESPHome listed as a discovered integration.
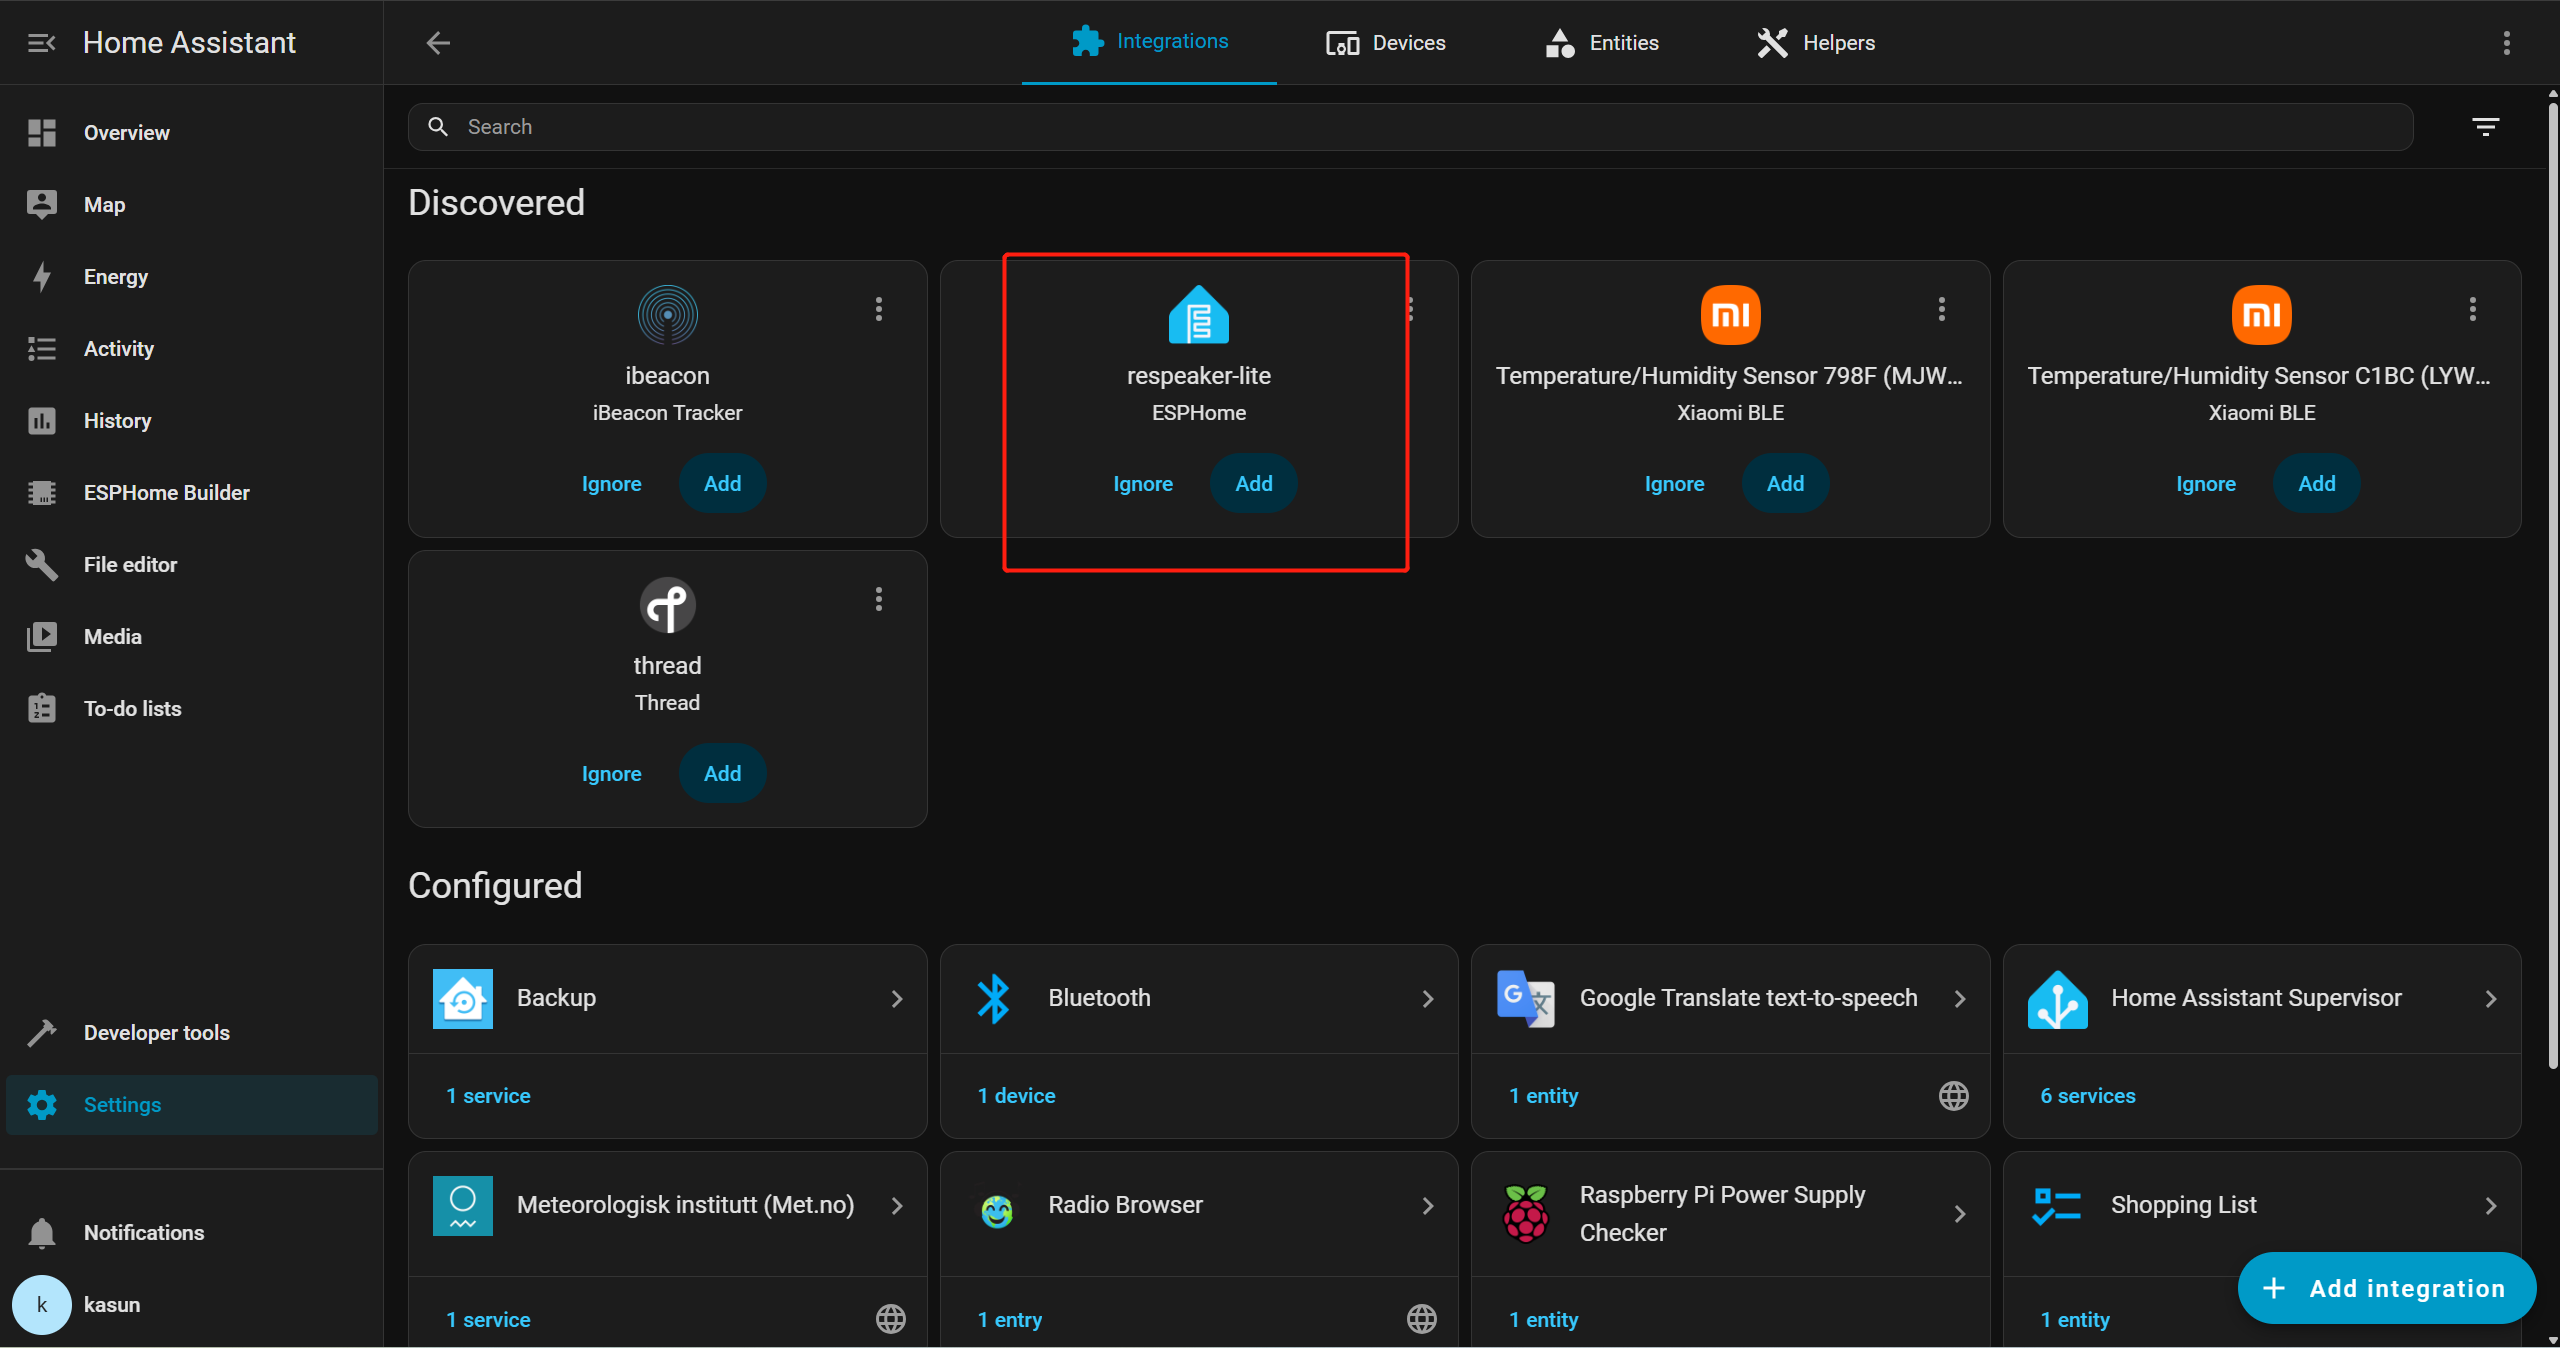
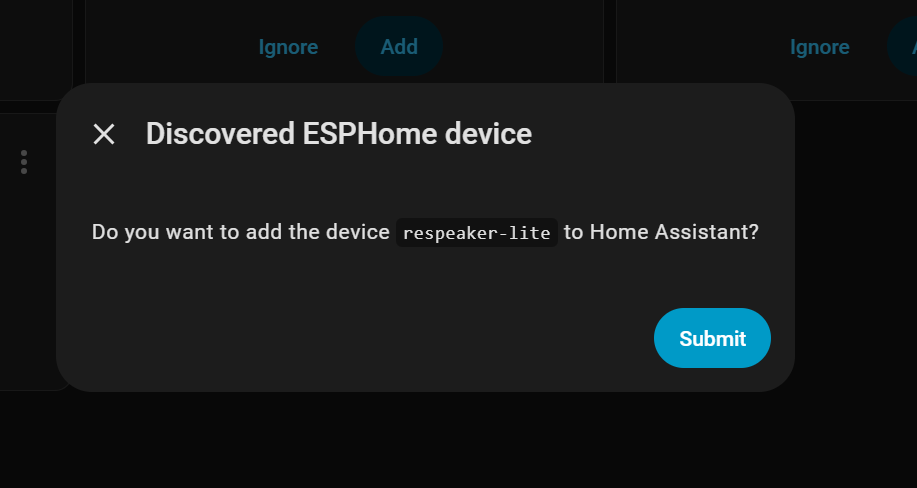
Click CONFIGURE, then Submit to finish setup.
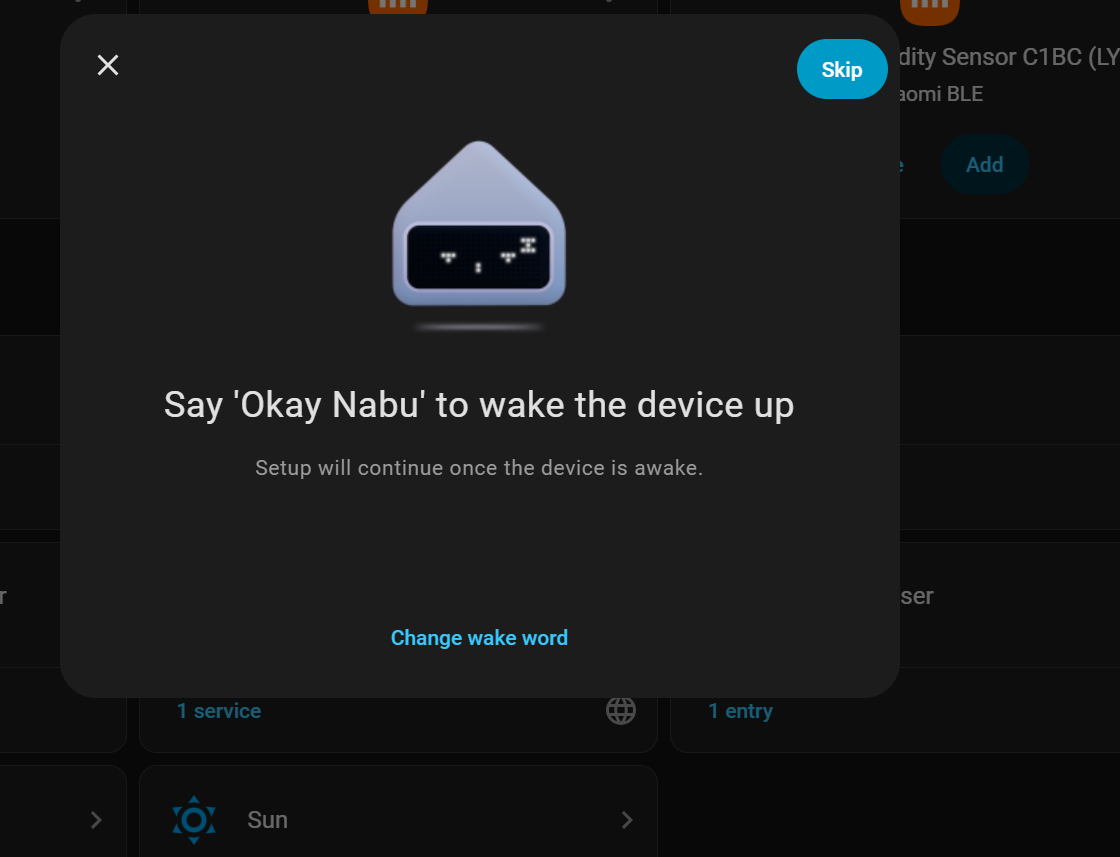
Voice Assistant Configuration
Now you will be directed to the Voice Assistant configuration page. You can say “Okay Nabu”, and it will respond with a confirmation sound (whoop sound).
Next, you will be guided to configure your voice pipeline.In this demo, we are going to use Nabu Cloud.
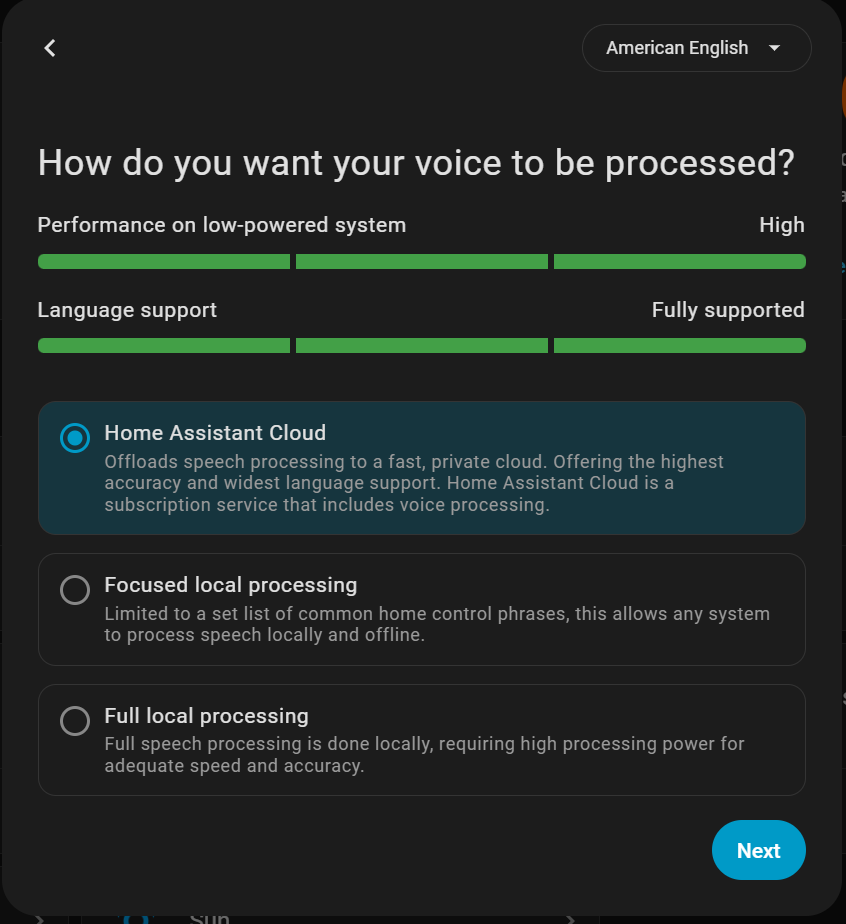
The setup is simple, and you can take advantage of the one-month free trial to explore its full capabilities.
You can sign in with Nabu Cloud and configure the Voice Assistant because it is relatively easy to set up and provides fast performance.
FAQ
How to view reSpeaker Logs?
To view log files and debug procedures—such as verifying wake word detection and STT functionality—you can use the ESP web application mentioned earlier.
Special Thanks
We would like to thank FormatBCE for creating this awesome YAML file for the Seeed Studio reSpeaker Lite. Support him on his Github
Project Sharing
- From Smart Home Circle : Create Local Voice Assistant
Tech Support & Product Discussion
Thank you for choosing our products! We are here to provide you with different support to ensure that your experience with our products is as smooth as possible. We offer several communication channels to cater to different preferences and needs.