Getting Started with ReSpeaker XVF3800
Overview
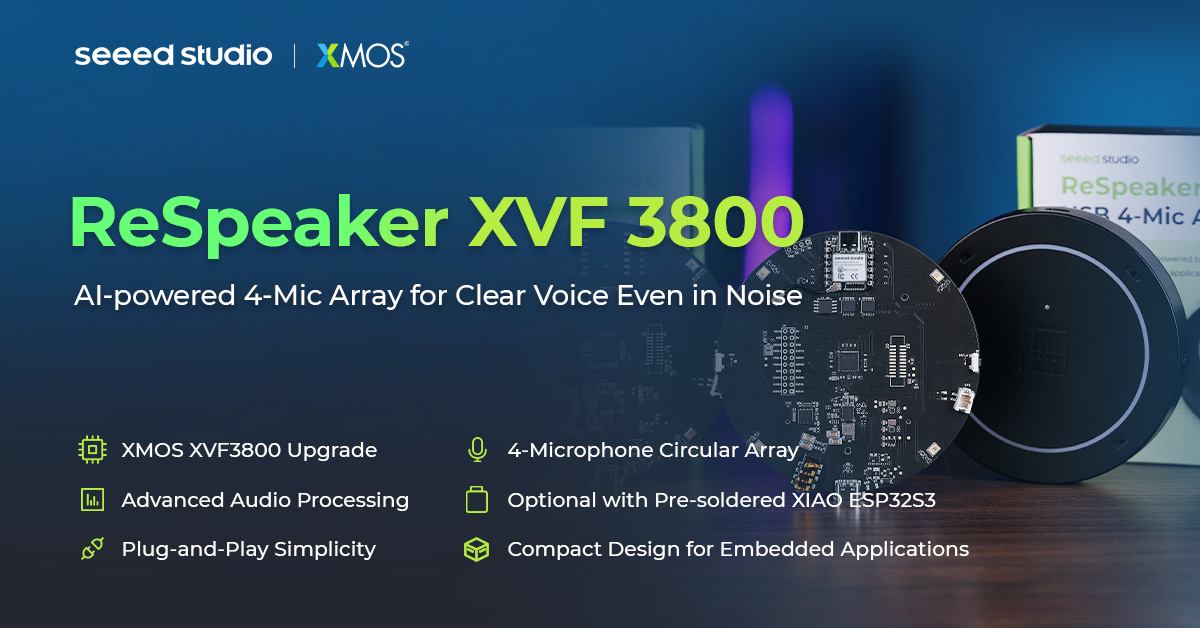
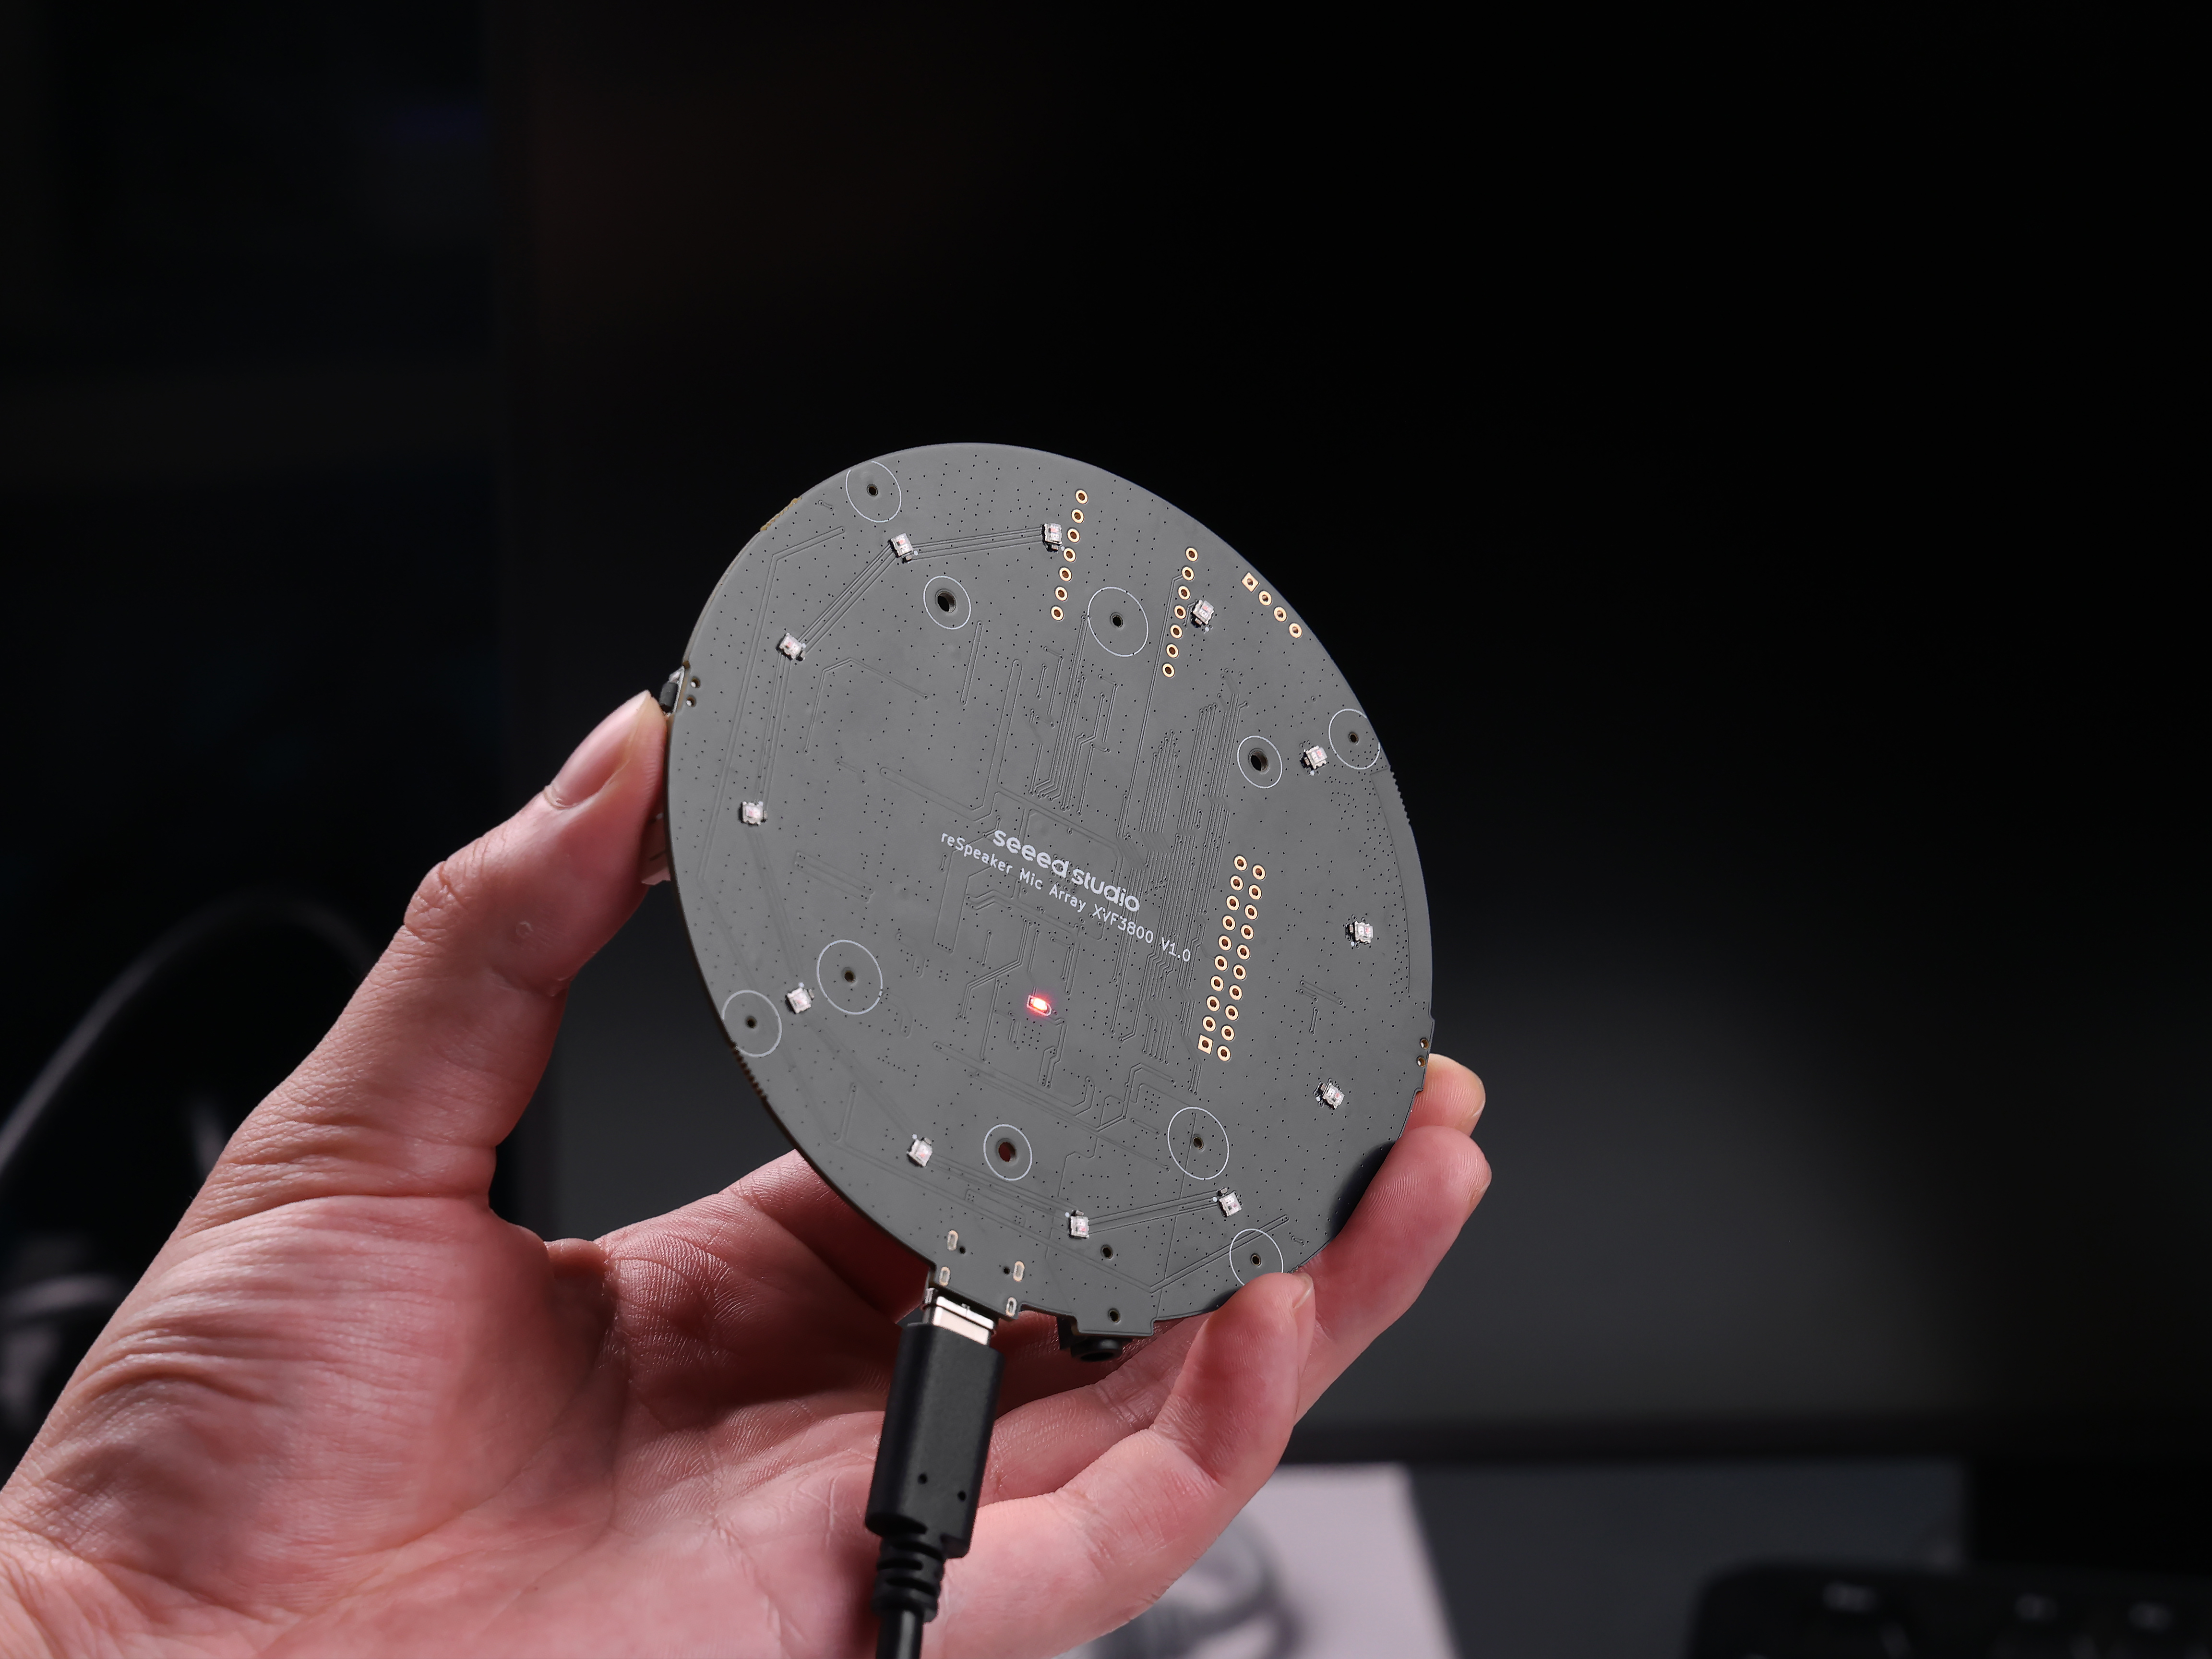
The ReSpeaker XVF3800 USB 4-Mic Array is a professional 4-mic circular array with XMOS XVF3800, featuring AEC, AGC, DoA, beamforming, VAD, noise suppression, de-reverberation, 360° voice capture (up to 5m), and dual operation modes for advanced voice applications.
Features
-
Chip upgrade :From XVF3000 to XVF3800
-
Quad Microphone Array :4 high-performance mics in circular pattern for 360° far-field voice capture up to 5 meters
-
Advanced Audio Processing :Powered by XVF3800 with AEC, multi-beamforming, de-reverberation, DoA detection, dynamic noise suppression, 60dB AGC range
-
Unique Device Serial Number :Built-in SN enables multi-device deployments and advanced device management
-
Dual Operation Modes :USB plug-and-play mode for instant PC connectivity and INT-Device (I2S) mode for integration with embedded systems—configurable via USB or I2C commands by switching the firmware accordingly
-
Open Source Compatible :Works with USB hosts (Windows, macOS, Raspberry Pi OS) and I2S hosts (XIAO Series, ESP32, Arduino).
-
Visual Feedback :Programmable RGB LEDs and status indicators show device states and voice activity
-
Equal or better audio quality :compared to previous model
Hardware Overview
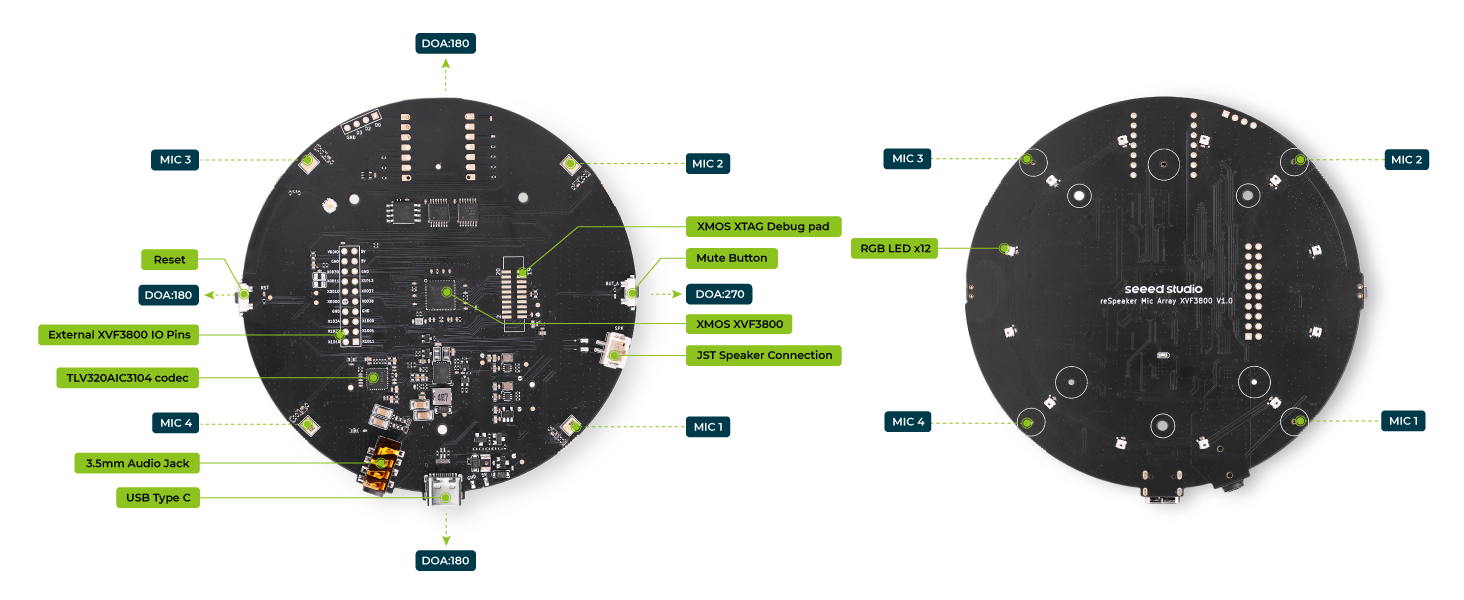
Main Components
| Component / Feature | Description |
|---|---|
| Main Audio Processor | XMOS XVF3800, handles audio processing including AEC, beamforming, noise suppression, etc. |
| Microphone Array | Quad PDM MEMS microphones in circular pattern, supporting 360° far-field voice capture (5m). |
| Audio Codec | TLV320AIC3104, handles audio conversion and output. |
| RGB LEDs | 12x WS2812 individually-addressable RGB LEDs for visual feedback (e.g., status, voice activity). |
| Mute Button | Press to mute/unmute the microphone input. |
| Mute Indicator LED | Lights up (typically red) to show that audio is muted. |
| Reset Button | Hardware reset for the board/system. |
| USB Type-C Port | Used for both power and data (USB Audio Class 2.0 compliant). |
| 3.5mm AUX Headphone Jack | Audio output for headphones or active speakers. |
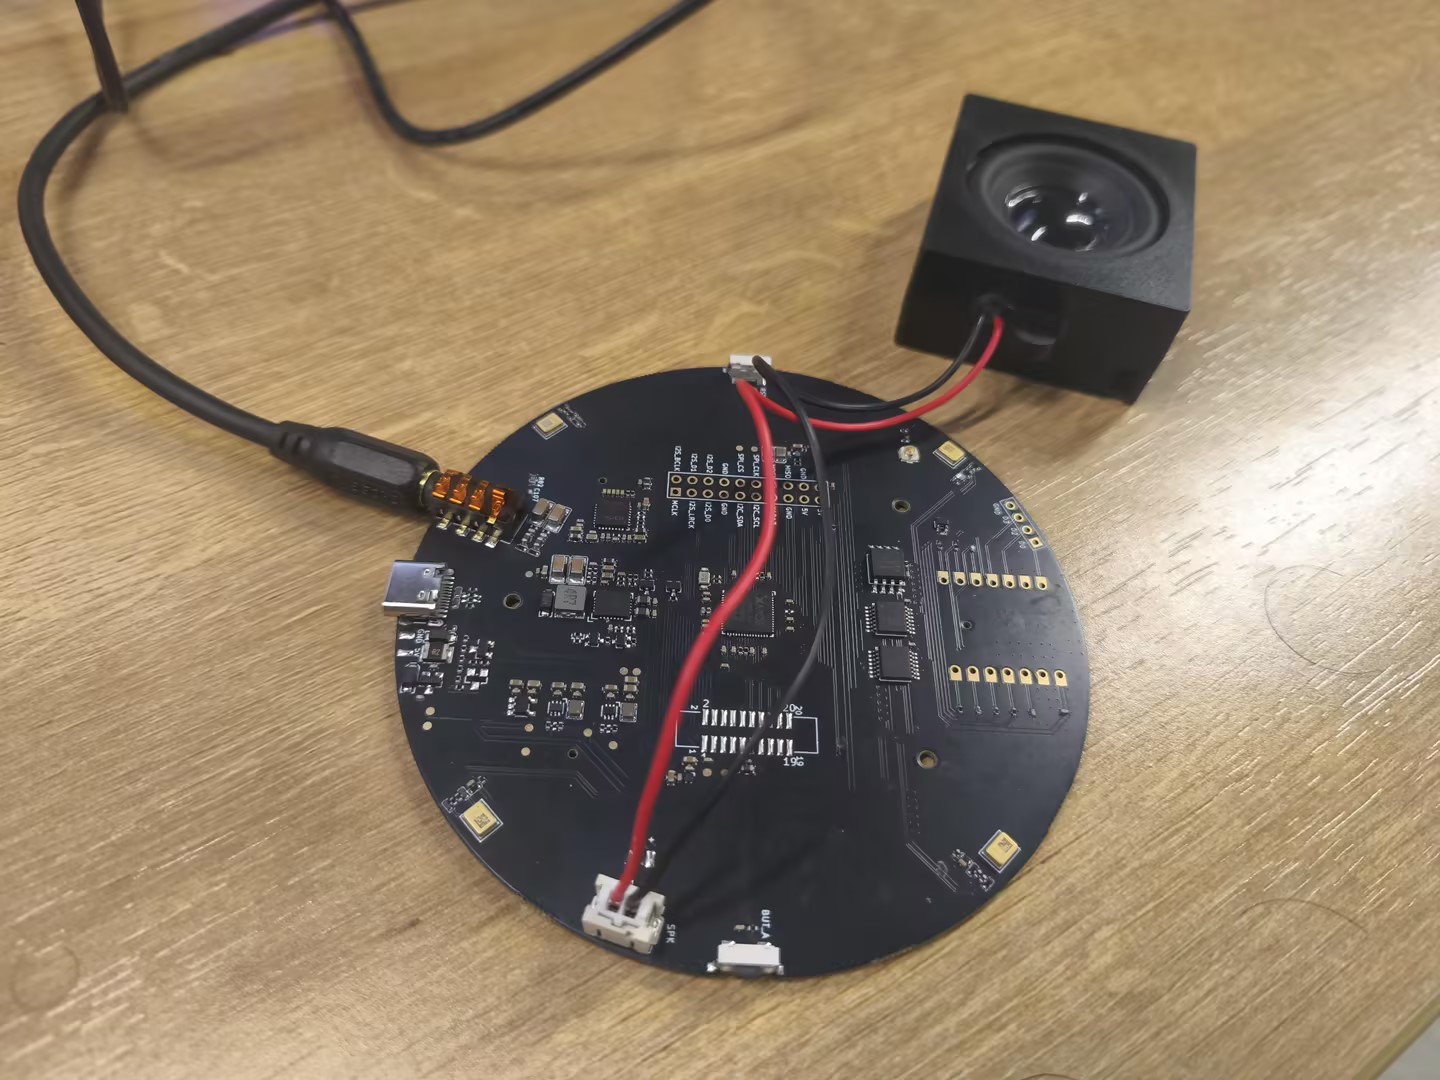
| Speaker Connector | JST speaker interface, supports 5W amplified speakers. |
| Debug Pads | Debug access for XTAG4 or other programmers. |
| I2C & I2S Headers | Exposed headers for I2C and I2S communication with external devices. |
| Unused IO Pads (XIAO) | Additional I/O solder pads connected to XIAO module. |
| I2S & I2C Communication | Supports connection to external hosts like Raspberry Pi, PC, etc. using these protocols. |
| USB & INT-Device Modes | Dual-mode operation: plug-and-play USB or internal INT device mode via I2S. |
| Unique Serial Number | Built-in device SN for identification and multi-device management. |
| Open Source Compatibility | Works with Arduino, Raspberry Pi, PC/Mac, and compatible with XIAO Series. |
| Advanced Audio Features | AEC, beamforming, dereverberation, DoA detection, DNN-based noise suppression, 60dB AGC. |
| Visual Feedback | Device state and audio activity shown via RGB LED patterns and status indicators. |
| Audio Quality | Equal or better than the previous XVF3000-based designs. |
The ReSpeaker XVF3800 is offered in two variants—one without XIAO and another with the XIAO ESP32S3 onboard. The version without XIAO operates with default USB firmware. To use the XIAO-integrated version, you must flash firmware built for INT-Device (I2S) mode. For detailed setup instructions, refer to the official wiki guide.
XIAO ESP32S3 support
- Stereo I2S input/output with multiple output options; I2C interface for configuring and managing XVF3800 parameters.
- XIAO reset via IO pin
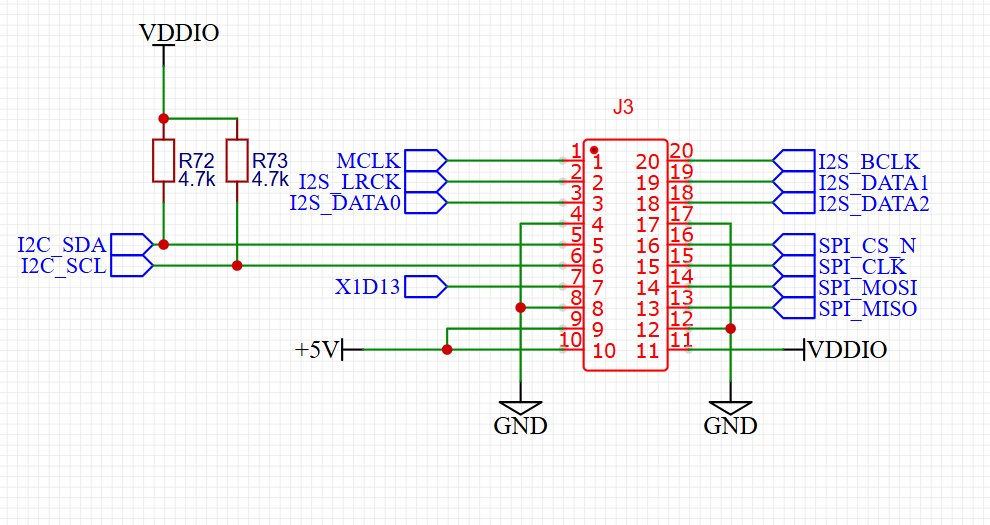
- Interface and solder pads
Pin Out
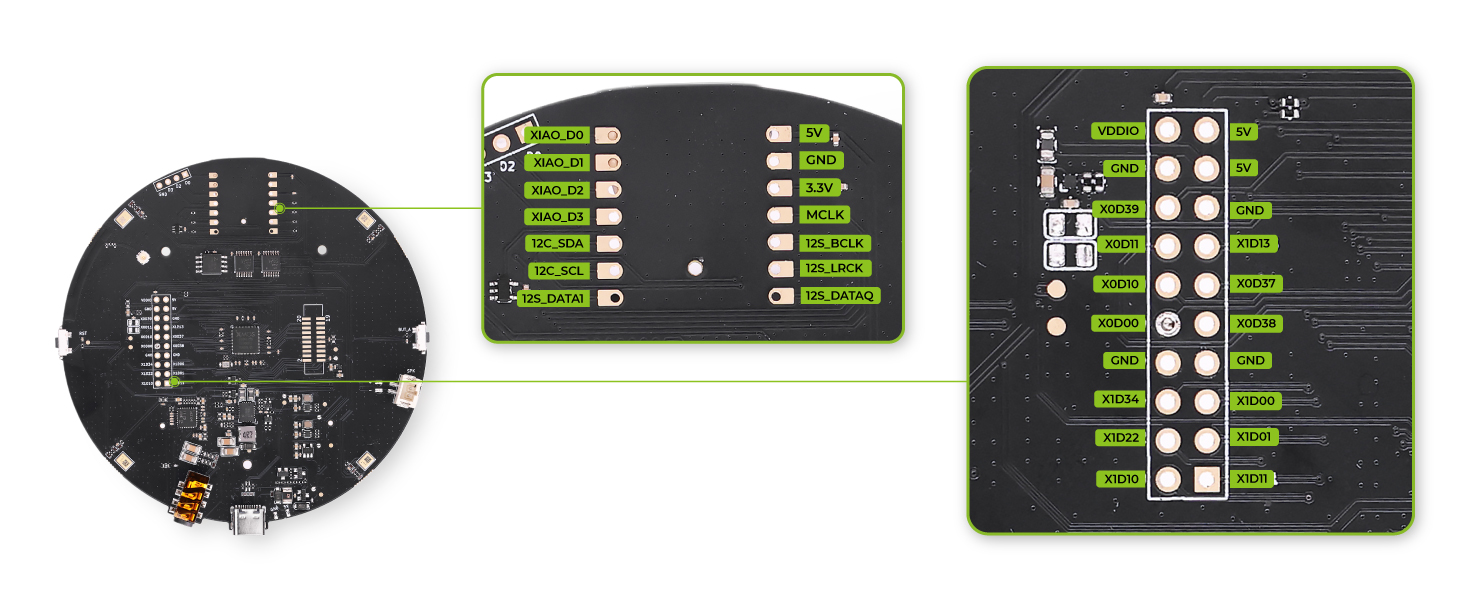
GPIO Overview
The reSpeaker XVF3800 exposes 3 input pins (GPI) and 5 output pins (GPO) for external control. You can use these to read button states or control hardware like the mute LED, amplifier, or LEDs.
| Pin Name | Direction | Function |
|---|---|---|
| X1D09 | Input (RO) | Mute button status (high when released) |
| X1D13 | Input (RO) | Floating |
| X1D34 | Input (RO) | Floating |
| X0D11 | Output (RW) | Floating |
| X0D30 | Output (RW) | Mute LED + mic mute control (high = mute) |
| X0D31 | Output (RW) | Amplifier enable (low = enabled) |
| X0D33 | Output (RW) | WS2812 LED power control (high = on) |
| X0D39 | Output (RW) | Floating |
Getting Started
Hardware Preparation
- USB Type-C cable
- Host computer or Raspberry Pi
Software Preparation
Out of Box Usage
DOA (Direction of Arrival)
You can experience the LED array following the direction of the incoming voice.
Mute Button
The Mute button on your ReSpeaker is used to temporarily disable voice capture from the microphone array. What happens when you press the Mute button?
- The microphones are muted — external voices will no longer be captured or processed.
- A red LED lights up to indicate that mute mode is active.
- This means the ReSpeaker will not send any audio input to your computer or host device.
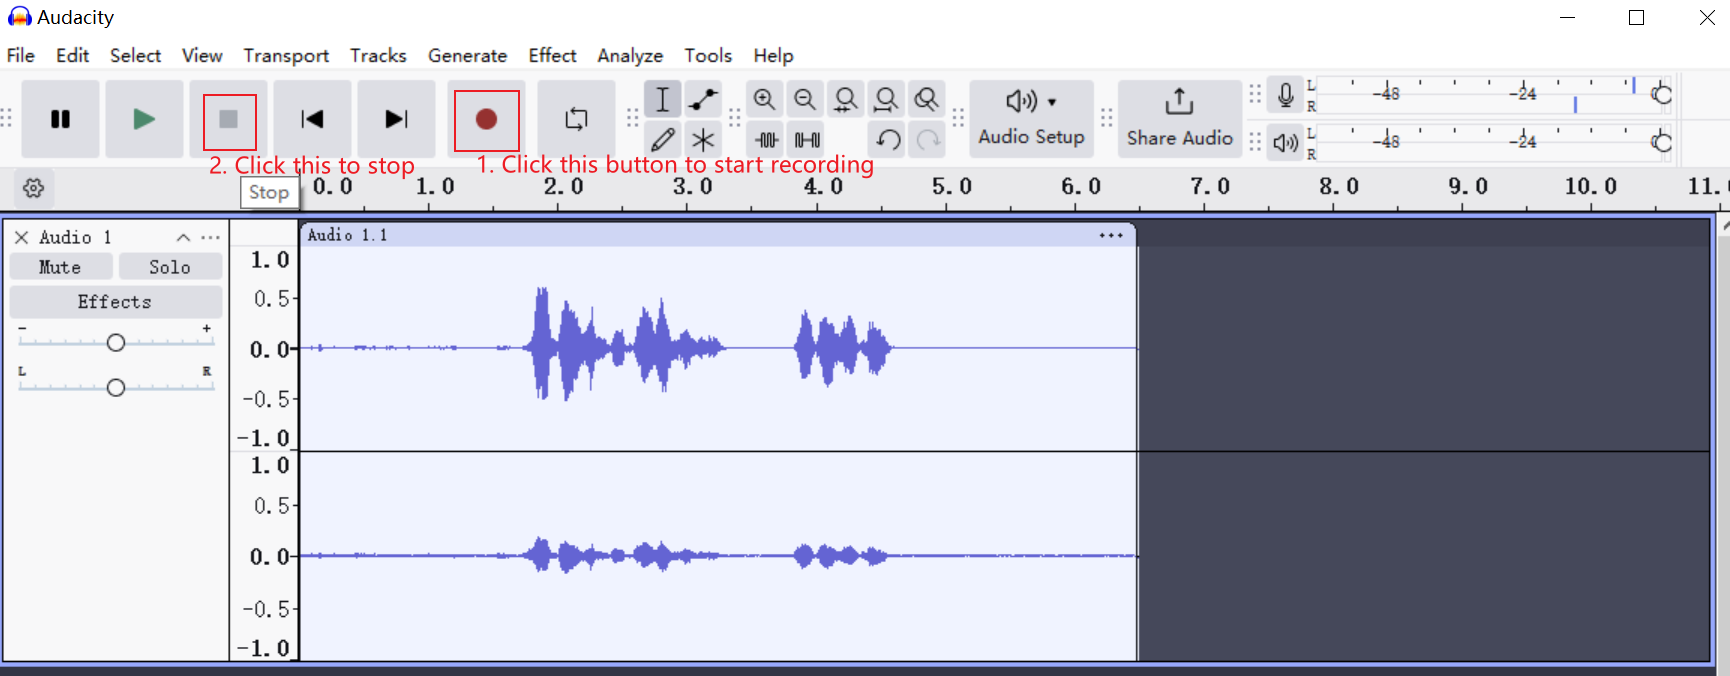
Try It Yourself with Audacity
Reset Button
The reset (RST) button provides a hardware reset for the XVF3800—when pressed, it restarts the chip and reinitializes the system from the very beginning, just like a full power cycle.

Speaker Connection
Here you can see how to connect speakers using either the 3.5mm AUX headphone jack or the onboard JST speaker interface, depending on your audio output preference.
Safe Mode
Safe Mode is a special recovery mode on the ReSpeaker XVF3800 that allows you to flash firmware via USB DFU or I2C—for devices like the Raspberry Pi and ESP32. If you've previously flashed the I2S firmware and want to switch back to the USB firmware, you can enter Safe Mode and reflash the USB firmware using USB DFU.
Each type of firmware on the ReSpeaker XVF3800 supports different update methods:
-
The USB firmware only supports USB DFU, which means you can update the device using a USB connection. However, it does not support I2C DFU.
-
The I2S firmware is the opposite—it supports I2C DFU, allowing firmware updates over an I2C interface, but it does not support USB DFU.
-
The Safe Mode firmware, which is stored in the Factory partition, is the most flexible. It supports both USB DFU and I2C DFU.
When to Use Safe Mode
- Your firmware isn't working properly (e.g. USB not detected, LED not lighting up as expected).
- You need to re-flash a new firmware but the current one won’t respond.
- You accidentally flashed something wrong and want to recover.
How to Enter Safe Mode
- Power off the device completely.
- Press and hold the Mute button.
- While holding the mute button, reconnect the power.
- The red LED will start blinking — this confirms the device is now in Safe Mode.
- Now the device runs the Safe Mode firmware stored in the Factory partition.
Update Firmware
Three firmware versions are available in the official GitHub repository. You can choose and flash the appropriate firmware depending on your application requirements. For more details and downloads, please refer to the Github Link
Please make sure that you will need to download whole repository.
- USB
- I2S
- HA
The USB firmware is designed for use with host operating systems such as Windows, Linux, and macOS when communicating through the USB hardware interface.
Two firmware variants are available: respeaker_xvf3800_usb_dfu_firmware_v2.0.x.bin, which provides 2-channel audio, and respeaker_xvf3800_usb_dfu_firmware_6chl_v2.0.x.bin, which provides 6-channel audio. Both firmware versions operate at a 16 kHz sampling rate with 32-bit depth.
You can explore these firmware files in this link
| Firmware | Channels | Notes |
|---|---|---|
| respeaker_xvf3800_usb_dfu_firmware_v2.0.x.bin | 2 | Processed 2-channel output Channel 0: Conference Channel 1: ASR |
| respeaker_xvf3800_usb_dfu_firmware_6chl_v2.0.x.bin | 6 | Channel 0: Processed audio (Conference) Channel 1: Processed audio (ASR) Channel 2: Mic 0 raw data Channel 3: Mic 1 raw data Channel 4: Mic 2 raw data Channel 5: Mic 3 raw data |
The I2S firmware is intended for use when the device is connected to a microcontroller host such as the XIAO ESP32S3. In this configuration, voice data is transmitted using the I2S protocol.
The firmware file respeaker_xvf3800_i2s_dfu_firmware_v1.0.x.bin is available in here. This firmware supports 2-channel audio with a 32-bit depth.
| Firmware | Channels | Notes |
|---|---|---|
| respeaker_xvf3800_i2s_dfu_firmware_v1.0.x.bin | 2 | Processed 2-channel output Channel 0: Conference Channel 1: ASR |
The Home Assistant firmware is another I2S-based firmware specifically designed for integration with Home Assistant. This optimized firmware uses 2-channel audio with a 48 kHz sampling rate, providing better compatibility and performance within the Home Assistant environment. You can view the firmware from here
| Firmware | Channels | Notes |
|---|---|---|
| respeaker_xvf3800_i2s_master_dfu_firmware_v1.0.x_48k.bin | 2 | Processed 2-channel output Channel 0: ASR Channel 1: Wake word |
Connect the reSpeaker XVF3800 to your PC via the USB cable. Note that you need to use the XMOS USB-C port(close to 3.5mm jack port) to flash XMOS’s firmware.
Install DFU Util
dfu-util is a command line tool for Device Firmware Upgrade via USB.
- Windows
- macOS
- Linux
-
Download
dfu-util-0.11-binaries.tar.xzand extract it, e.g.,D:\dfu-util-0.11-binaries\win64\
Download Link -
Add the path to
dfu-util.exeto your systemPathvariable:
My Computer > Properties > Advanced > Environment Variables > Path -
Open Command Prompt (
cmd) and verify installation:
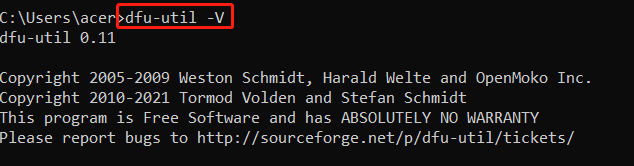
dfu-util -V
- Connect the ReSpeaker XVF3800 and check device detection:
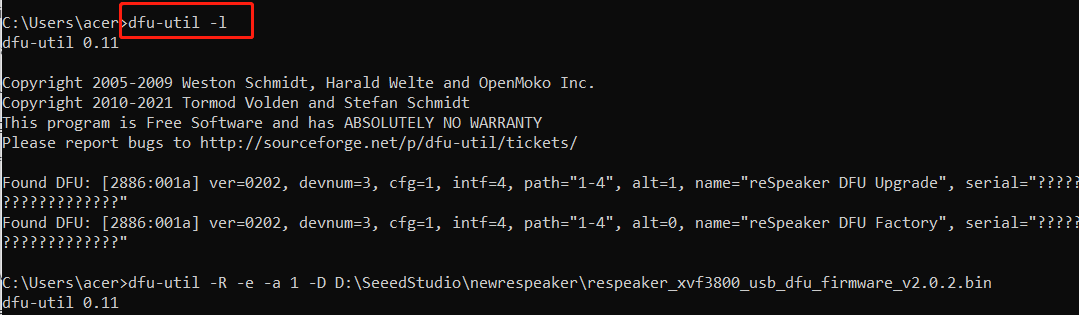
dfu-util -l
If you get:
Cannot open DFU device 2886:001a ... (LIBUSB_ERROR_NOT_SUPPORTED)
Proceed with the driver installation step below.
- Install Zadig
- Open Zadig →
Options > List All Devices - Select
reSpeaker 3800orreSpeaker XVF3800 4-Mic Array - Install WinUSB driver
- Power-cycle the device
- Run
dfu-util -lagain to confirm detection.
- Open Zadig →
- Install dfu-util with Homebrew:
brew install dfu-util
- Check if the device is detected:
dfu-util -l
Expected Output:
dfu-util -l
dfu-util 0.11

Copyright 2005-2009 Weston Schmidt, Harald Welte and OpenMoko Inc.
Copyright 2010-2021 Tormod Volden and Stefan Schmidt
This program is Free Software and has ABSOLUTELY NO WARRANTY
Please report bugs to http://sourceforge.net/p/dfu-util/tickets/

Found DFU: [2886:001a] ver=0202, devnum=3, cfg=1, intf=4, path="2-1.1.4", alt=1, name="reSpeaker DFU Upgrade", serial="101991441000000001"
Found DFU: [2886:001a] ver=0202, devnum=3, cfg=1, intf=4, path="2-1.1.4", alt=0, name="reSpeaker DFU Factory", serial="101991441000000001"
- Install dfu-util:
sudo apt install dfu-util
- Connect the XVF3800 and check detection:
sudo dfu-util -l
Expected Output:
pi@raspberrypi:~ $ sudo dfu-util -l
dfu-util 0.9

Copyright 2005-2009 Weston Schmidt, Harald Welte and OpenMoko Inc.
Copyright 2010-2016 Tormod Volden and Stefan Schmidt
This program is Free Software and has ABSOLUTELY NO WARRANTY
Please report bugs to http://sourceforge.net/p/dfu-util/tickets/

Found DFU: [2886:001a] ver=0202, devnum=5, cfg=1, intf=3, path="1-1.1", alt=1, name="reSpeaker DFU Upgrade", serial="101991441000000001"
Found DFU: [2886:001a] ver=0202, devnum=5, cfg=1, intf=3, path="1-1.1", alt=0, name="reSpeaker DFU Factory", serial="101991441000000001"
Flash Firmware
Download the complete firmware repository from GitHub hereXMOS XVF 3800
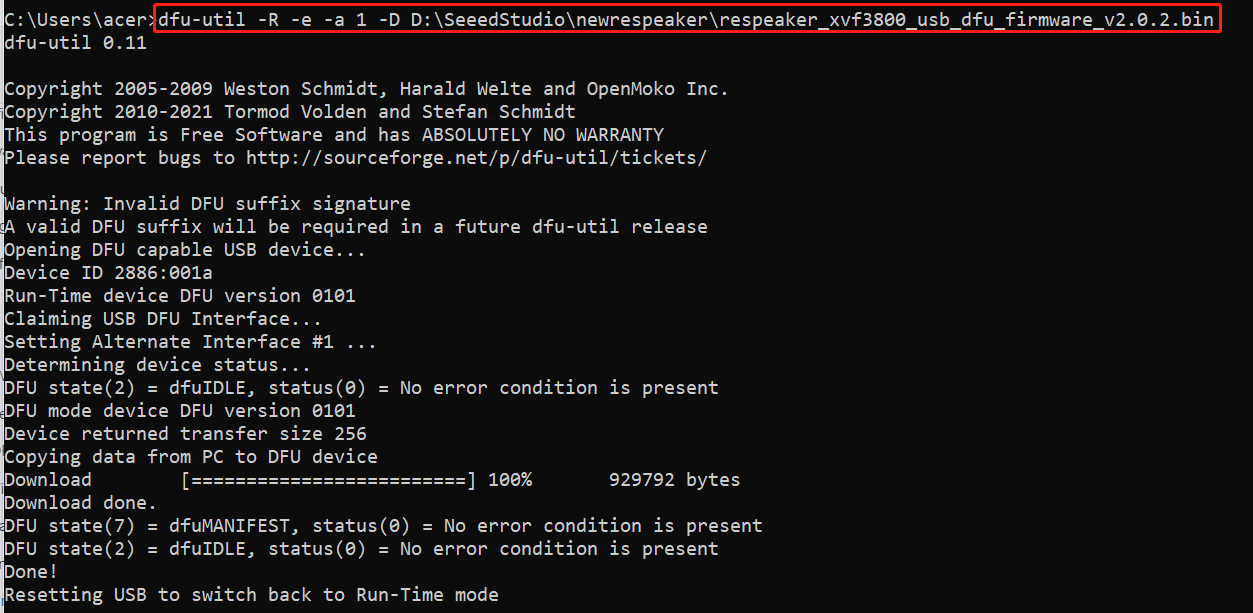
- Run the following command to flash the firmware
dfu-util -R -e -a 1 -D /path/to/dfu_firmware.bin
- On Linux, run it with sudo
sudo dfu-util -R -e -a 1 -D /path/to/dfu_firmware.bin
- The
-Roption will automatically restart the board after flashing.
- Check the firmware version again with
dfu-util -lcommand, to make sure the new firmware is flashed
Recording and Playback
- Windows
- macOS
- Raspberry Pi / Linux
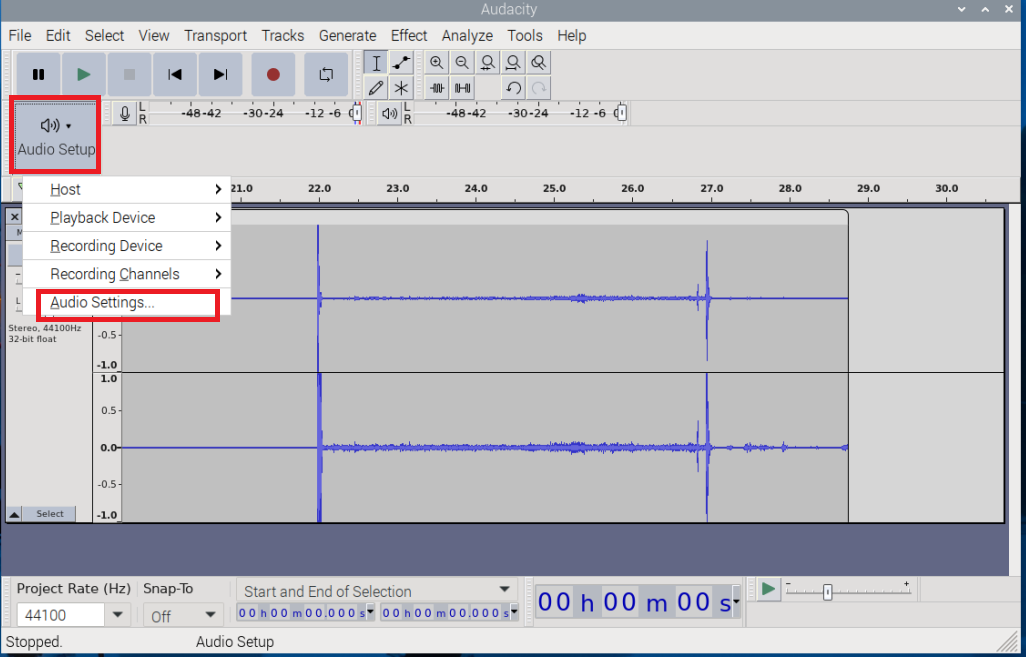
Setup Audacity (Windows)
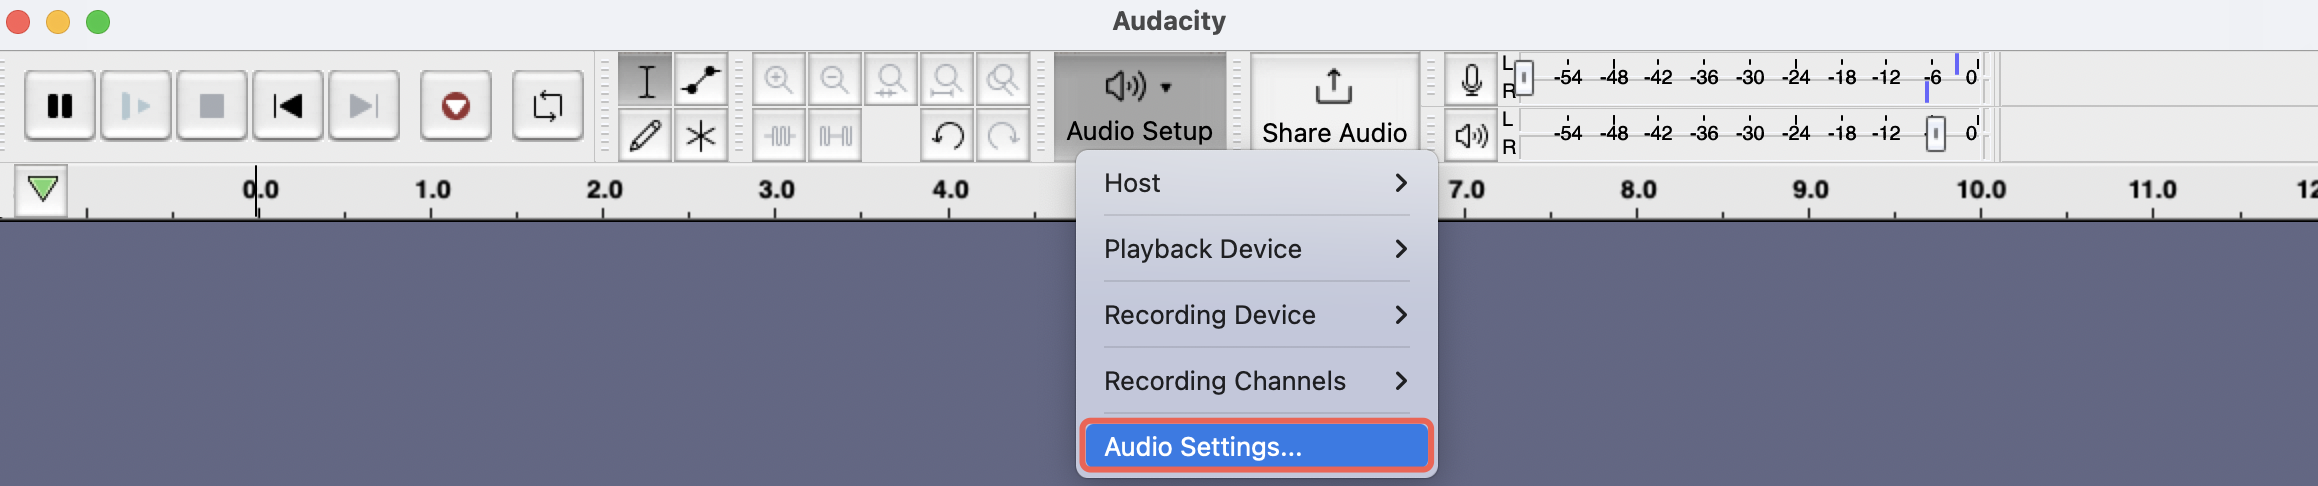
- Open Audacity
- Go to Audio Setup > Audio Settings
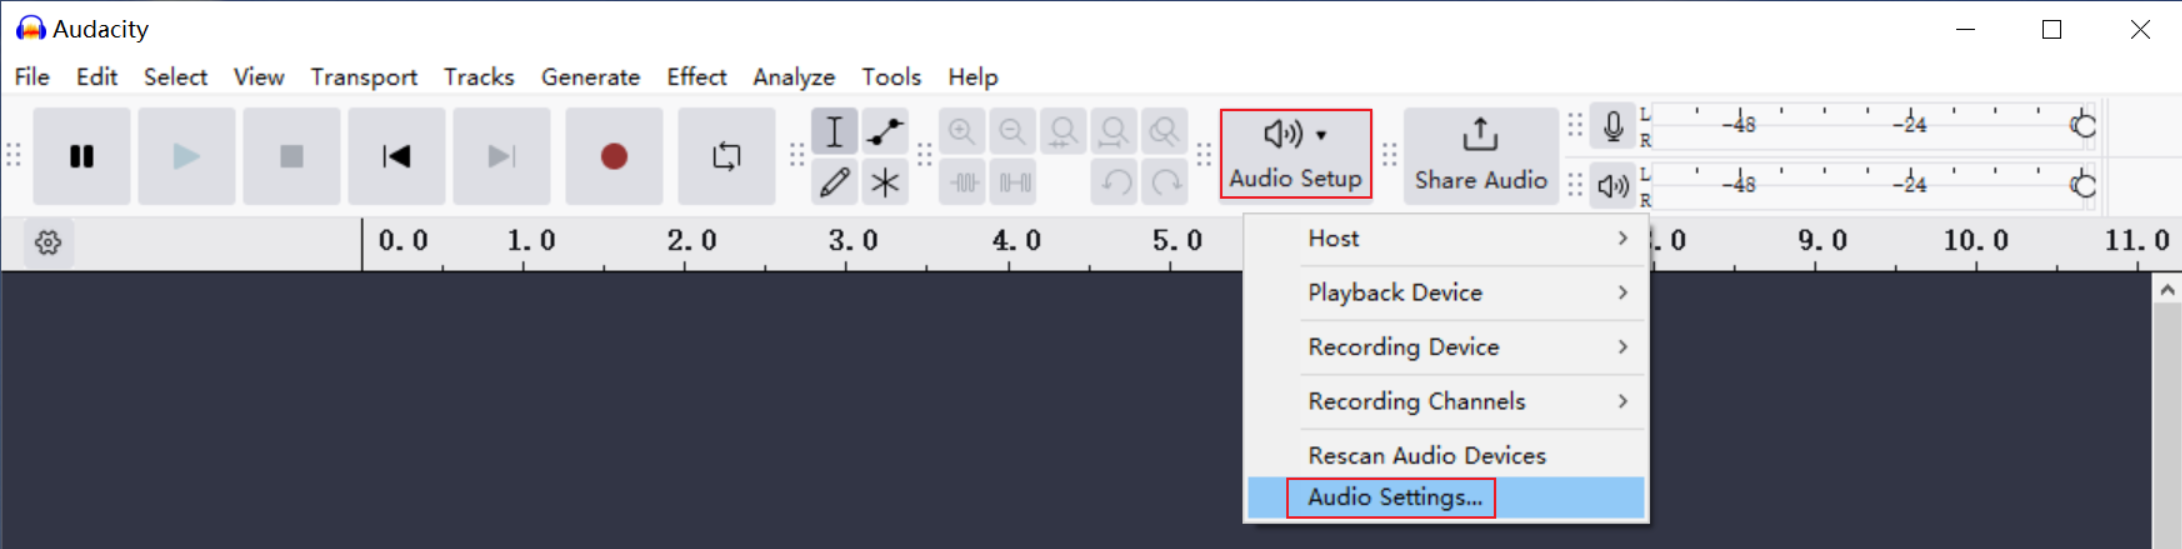
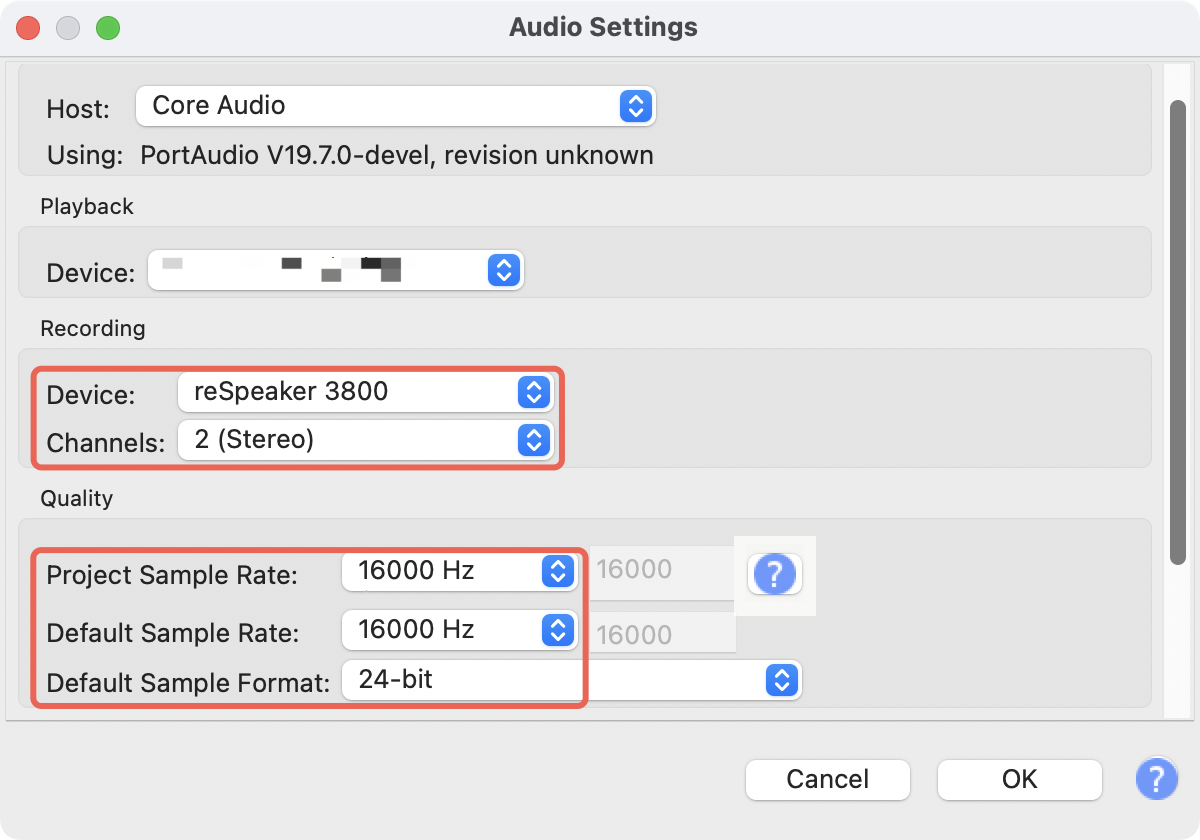
- Set:
- Host:
Windows WASAPI - Recording Device:
reSpeaker 3800 - Channels:
2 (Stereo) - Sample Rate:
16000 Hz(for both Project and Default Sample Rate) - Sample Format:
24-bit
- Host:
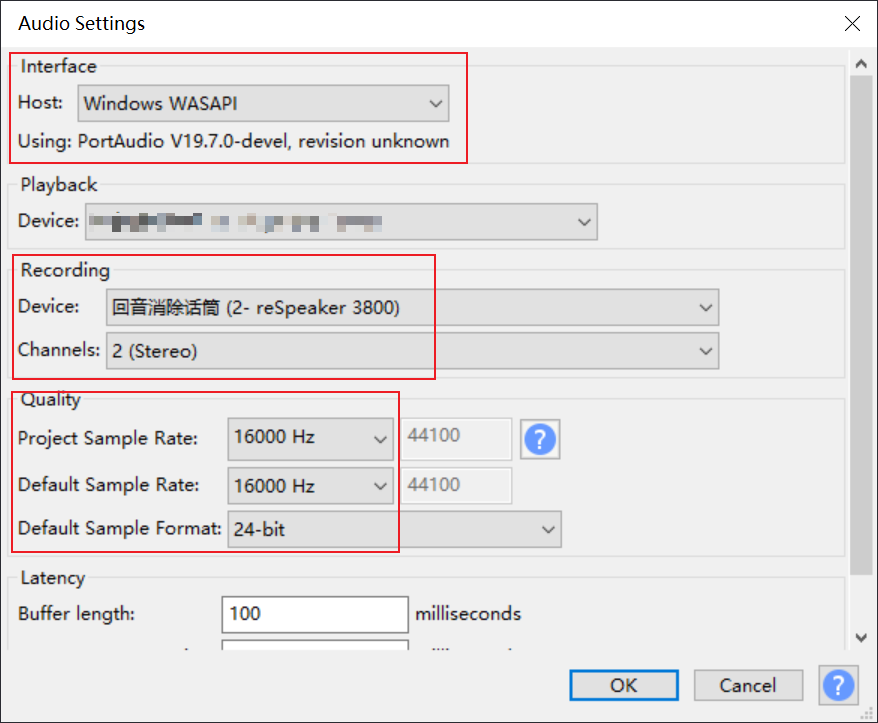
- Click OK
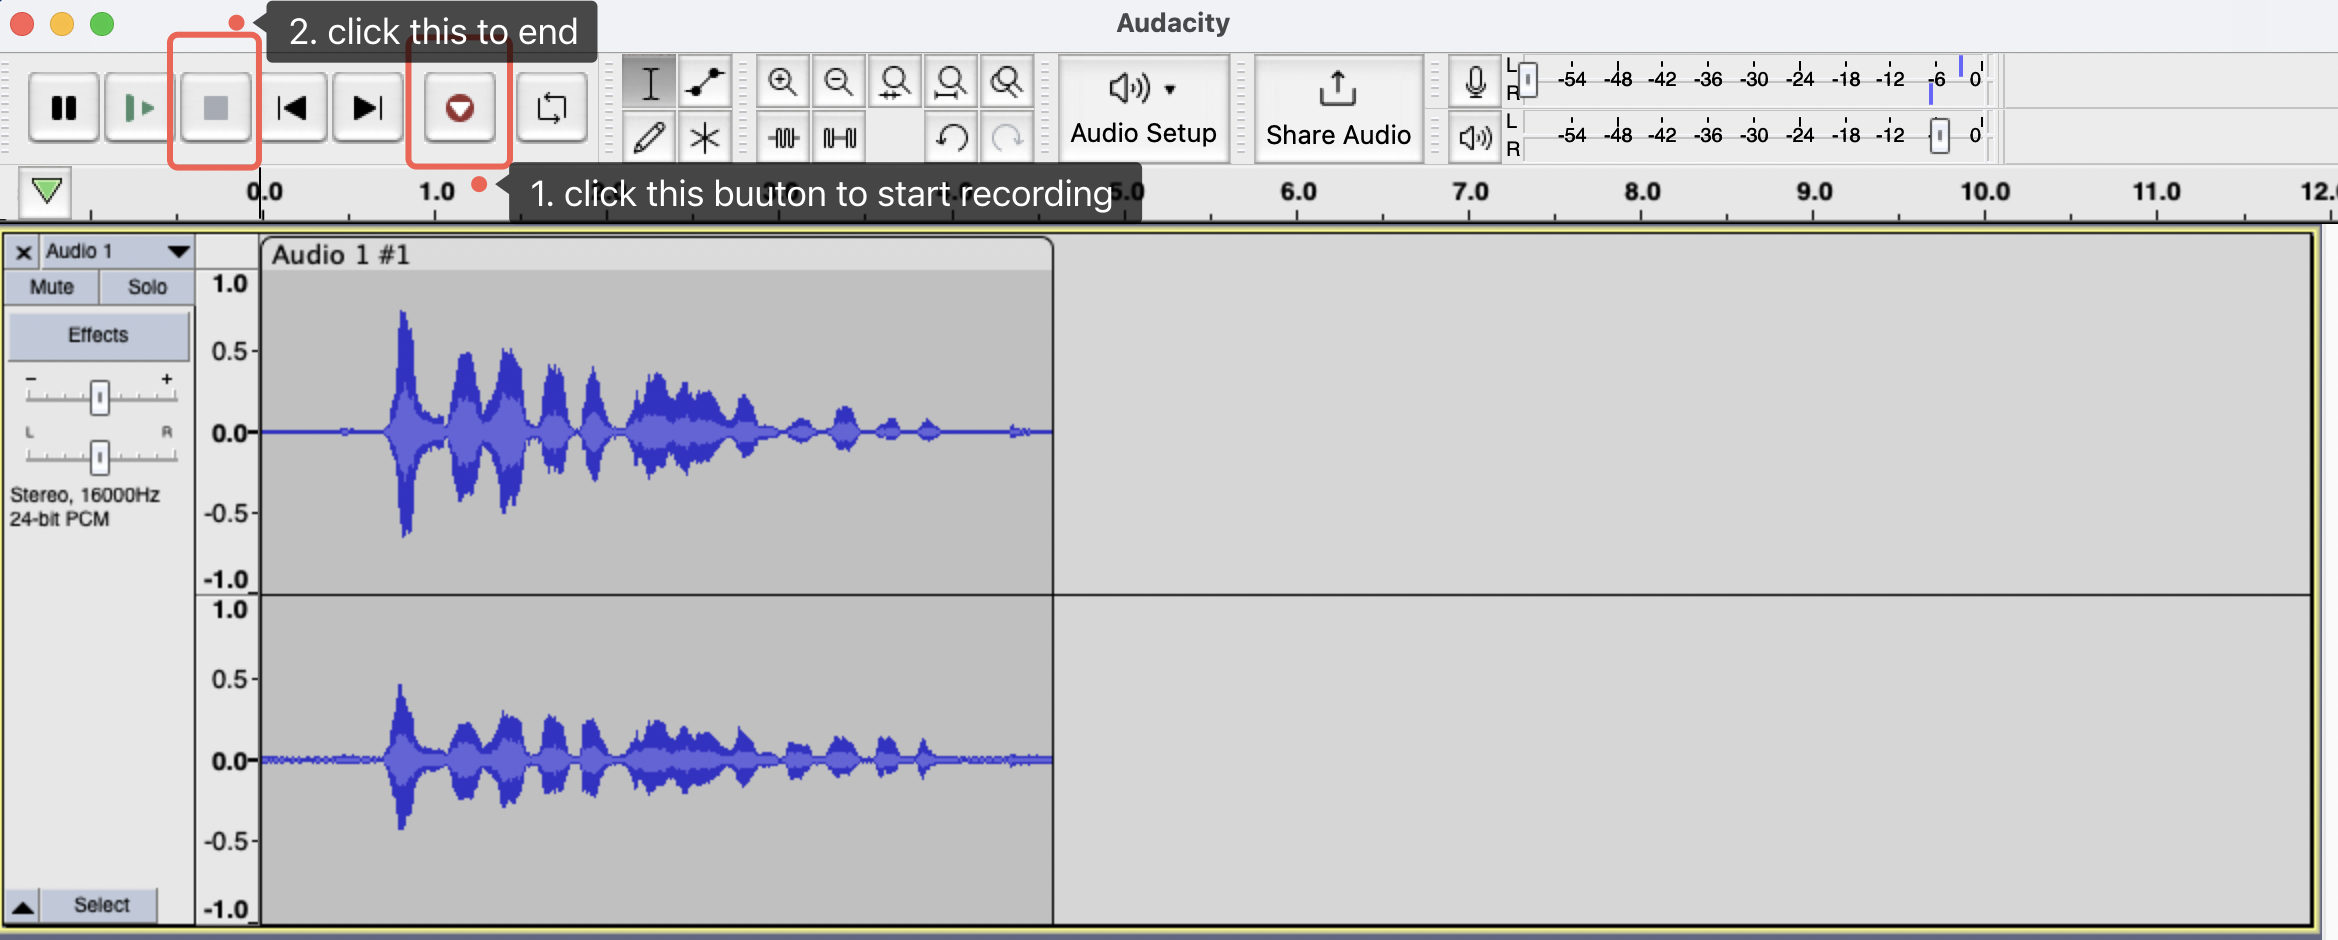
- You’re ready — start recording!
Setup Audacity (macOS)
- Open Audacity
- Go to Audio Setup and select Recording Device as reSpeaker 3800
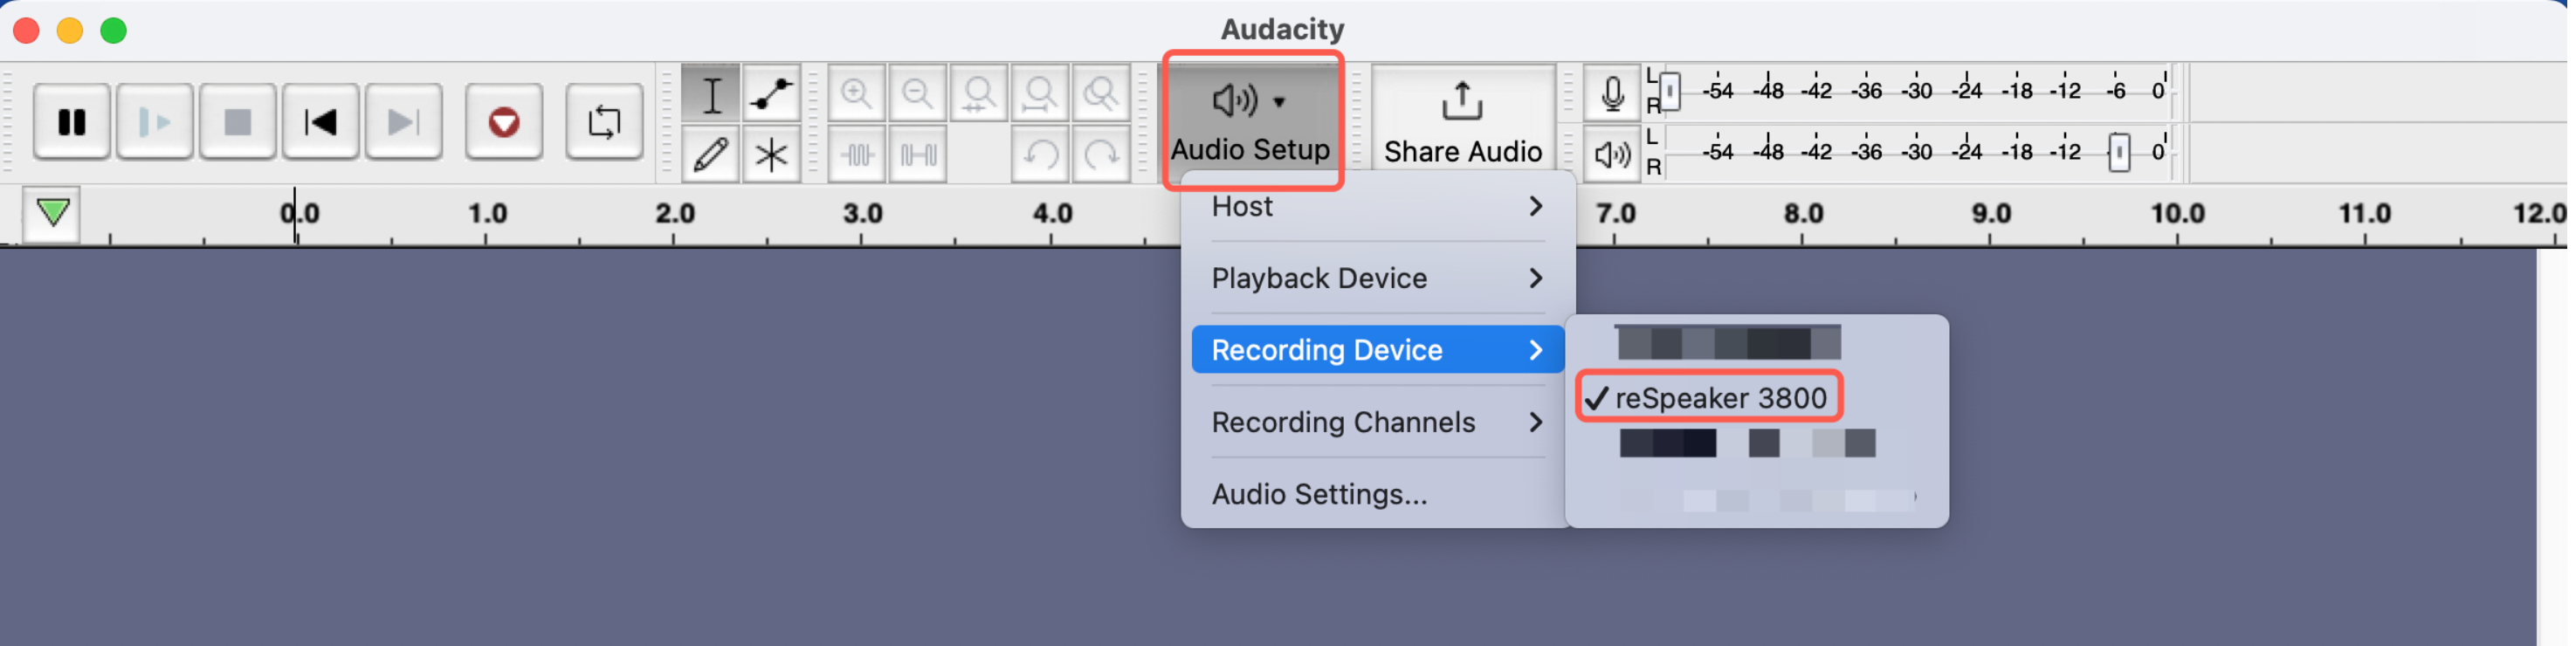
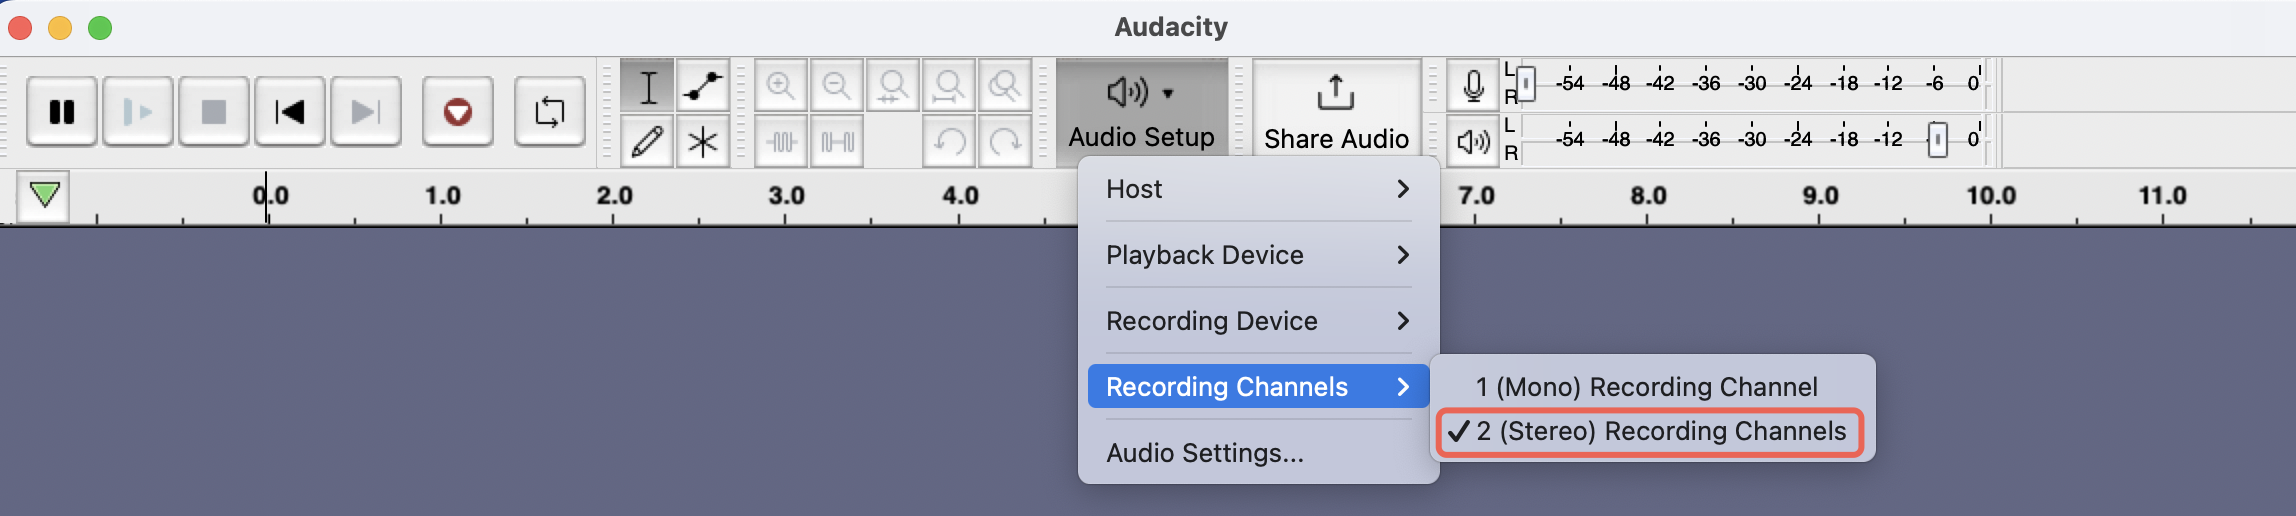
- Go to Audio Setting Set:
- Recording Device:
reSpeaker 3800 - Channels:
2 (Stereo) - Sample Rate:
16000 Hz(for both Project and Default Sample Rate) - Sample Format:
24-bit
- Click OK
- Ready to record!
Recording on Raspberry Pi (Command Line)
- Find sound card number:
arecord -l
Example output:
**** List of CAPTURE Hardware Devices ****
card 4: Array [reSpeaker XVF3800 4-Mic Array], device 0: USB Audio [USB Audio]
  Subdevices: 1/1
  Subdevice #0: subdevice #0
In this case, card number is 4
- Record audio (5 seconds):
arecord -D plughw:4,0 -c 2 -r 16000 -f S16_LE -d 5 output.wav
Replace 4 with your actual sound card number
- Adjusting Volume for ReSpeaker XVF3800 on ALSA
alsamixer
In alsamixer, use the left/right arrow keys to navigate to the correct sound device.Use the up arrow key to increase the volume.
- Playback:
aplay -D plughw:4,0 output.wav
Recording on Raspberry Pi (Audacity)
- Install Pi-Apps (if not already installed)
Open a terminal on your Raspberry Pi.Run the following command to install Pi-Apps
wget -qO- https://raw.githubusercontent.com/Botspot/pi-apps/master/install | bash
Wait for the installation to complete. A new Pi-Apps icon will appear in your menu.
-
Install Audacity via Pi-Apps
-
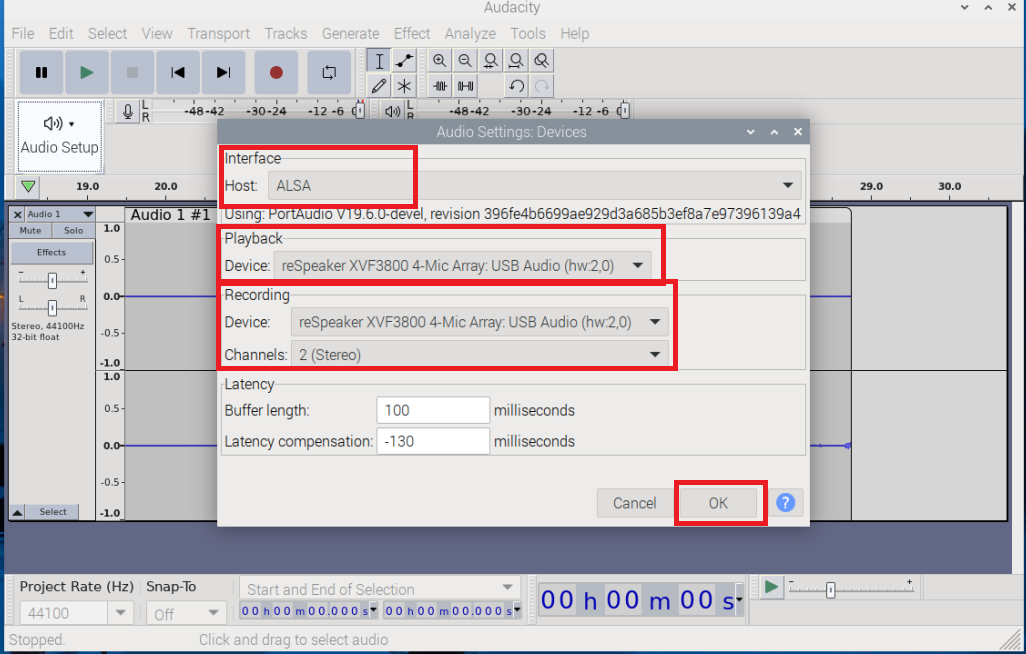
Set Up Audio Input and Output
- Click on "Audio Setup" in the toolbar.
- Select "Audio Settings" from the dropdown menu.
- In the Audio Settings window:
- Choose the correct Recording Device (e.g., reSpeaker XVF3800).
- Choose the appropriate Playback Device (e.g., reSpeaker XVF3800).
- Make sure Host is set to ALSA for best compatibility on Raspberry Pi.
- Click OK to apply the settings.
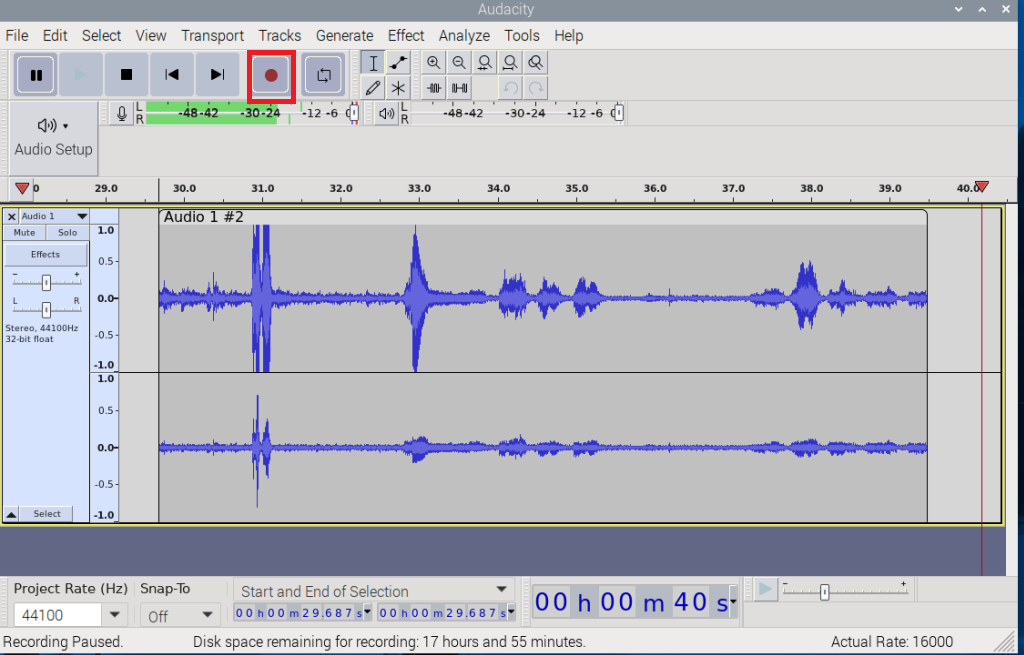
- Record and Playback Audio
How to Control reSpeaker XVF3800
The reSpeaker XVF3800 is equipped with a control interface that allows users to configure the device's operation, set or read parameter data and save parameter data on the device. Users can control the device via the USB or I2C interface. A sample host application, xvf_host (for Linux, macOS, and Raspberry Pi OS) or xvf_host.exe (for Windows), is provided to easily connect to the control interface of the reSpeaker XVF3800.
Download From Here
If you would like to explore more about controlling via xvf_host, please read this article.
- Windows
- macOS / Linux / Raspberry Pi
Windows Users
- Ensure ReSpeaker XVF3800 is connected via USB
- Unzip
xvf_host.exeinto a folder like:
C:\Tools\xvf_host\
Verify Installation
cd C:\Tools\xvf_host
xvf_host.exe --help
Check Device Connection
xvf_host.exe VERSION
Expected output:
Device (USB)::device_init() -- Found device VID: 10374 PID: 26 interface: 3
VERSION 2 0 2
LED Control
| Command | Example | Description |
|---|---|---|
led_effect | xvf_host.exe led_effect 1 | 0=off, 1=breath, 2=rainbow, 3=solid, 4=DoA |
led_color | xvf_host.exe led_color 0xff8800 | Set hex color (orange) |
led_speed | xvf_host.exe led_speed 1 | Set effect speed |
led_brightness | xvf_host.exe led_brightness 255 | Set brightness |
led_gammify | xvf_host.exe led_gammify 1 | Enable gamma correction |
led_doa_color | xvf_host.exe led_doa_color 0x0000ff 0xff0000 | Set DoA base/directional color |
🟠 Example (breath orange):
xvf_host.exe led_effect 1
xvf_host.exe led_color 0xff8800
xvf_host.exe led_speed 1
xvf_host.exe led_brightness 255
Configuration
xvf_host.exe save_configuration 1
xvf_host.exe clear_configuration 1
GPIO Control
Read Inputs:
xvf_host.exe GPI_READ_VALUES
Output example: GPI_READ_VALUES 1 0 0
In this example, the return 1 0 0 means that Pin X1D09 is high level, Pin X1D13 is low level and Pin X1D34 is low level.
Read Outputs:
xvf_host.exe GPO_READ_VALUES
Output example: GPO_READ_VALUES 0 1 1 0 0
In this example, the return 0 0 0 1 0 means that Pin X0D11 is low level, Pin X0D30 is low level, Pin X0D31 is high level, Pin X0D33 is high level and Pin X0D39 is low level.
Set Output:
xvf_host.exe GPO_WRITE_VALUE 30 1  # Turn ON mute LED
xvf_host.exe GPO_WRITE_VALUE 30 0  # Turn OFF mute LED
Direction of Arrival (DoA)
- DoA tells you which direction someone is speaking from.
- The LED ring on the ReSpeaker XVF3800 shows the direction using lights.
- You can also read the DoA values using the
xvf_hosttool.
Command to check DoA values
xvf_host.exe AEC_AZIMUTH_VALUES
Example Output
Device (USB)::device_init() -- Found device VID: 10374 PID: 26 interface: 3
AEC_AZIMUTH_VALUES 0.91378 (52.36 deg) 0.00000 (0.00 deg) 1.57080 (90.00 deg) 0.91378 (52.36 deg)
- Focused beam 1: First fixed listening direction
- Focused beam 2: Second fixed listening direction
- Free running beam: Always scanning direction
- Auto selected beam: Final beam chosen for best audio (used for DoA indication)
Speech Indication
- Speech Energy shows how strong the voice signal is — like a speech volume meter.
- Used to detect if someone is speaking and how loud/close they are.
- Noise, echo, and distance can affect the energy value.
Command to check Speech Energy:
xvf_host.exe AEC_SPENERGY_VALUES
Example Output
Device (USB)::device_init() -- Found device VID: 10374 PID: 26 interface: 3
AEC_SPENERGY_VALUES 2080656 0 2083455 2080656
- Focused beam 1: Energy of first beam
- Focused beam 2: Energy of second beam
- Free running beam: Energy of scanning beam
- Auto selected beam: Energy of beam chosen for final output
Audio Output Channels
- The XVF3800 provides 2 audio channels:
- Left channel: Clean, post-processed audio
- Right channel: ASR beam or echo/reference data
You can re-route these channels to output different sources.
Example commands
Set left channel to Amplified Microphone 0
xvf_host.exe AUDIO_MGR_OP_L 3 0
Set right channel to Far End (reference) data
xvf_host.exe AUDIO_MGR_OP_R 5 0
Example Output:
Device (USB)::device_init() -- Found device VID: 10374 PID: 26 interface: 3
Tuning Parameters (Make It Sound Better!)
- These settings help improve echo cancellation, noise suppression, gain, etc.
- Use them when default settings aren’t good enough.
Common Parameters:
| Parameter | Meaning |
|---|---|
| AUDIO_MGR_REF_GAIN | Speaker input gain (echo signal) |
| AUDIO_MGR_MIC_GAIN | Microphone input gain (how loud the mic hears) |
| AUDIO_MGR_SYS_DELAY | Delay between mic and speaker signals |
| PP_AGCMAXGAIN | Max automatic gain control level |
| AEC_ASROUTGAIN | Gain for ASR beam output |
For deeper documentation and advanced commands, visit the official GitHub repo:
ReSpeaker XVF3800 Host Control README
For Raspberry Pi
- Connect XVF3800 via USB or I2C
- Make
xvf_hostexecutable:
cd /path/to/xvf_host
chmod +x xvf_host
Verify Installation
./xvf_host --help
./xvf_host VERSION
Expected:
Device (USB)::device_init() -- Found device VID: 10374 PID: 26 interface: 3
VERSION 2 0 2
Using I2C:
./xvf_host --use i2c VERSION
LED Control (Same as Windows, prefix with ./)
./xvf_host led_effect 1
./xvf_host led_color 0xff8800
./xvf_host led_speed 1
./xvf_host led_brightness 255
Configuration
./xvf_host save_configuration 1
./xvf_host clear_configuration 1
GPIO Control
chmod +x ./xvf_host
Read Inputs:
./xvf_host GPI_READ_VALUES
Output example: GPI_READ_VALUES 1 0 0
In this example, the return 1 0 0 means that Pin X1D09 is high level, Pin X1D13 is low level and Pin X1D34 is low level.
Read Outputs:
./xvf_host GPO_READ_VALUES
Output example: GPO_READ_VALUES 0 1 1 0 0
In this example, the return 0 0 0 1 0 means that Pin X0D11 is low level, Pin X0D30 is low level, Pin X0D31 is high level, Pin X0D33 is high level and Pin X0D39 is low level.
Set Outputs:
./xvf_host GPO_WRITE_VALUE 30 1
./xvf_host GPO_WRITE_VALUE 30 0
Direction of Arrival (DoA)
- DoA tells you which direction someone is speaking from.
- The LED ring on the ReSpeaker XVF3800 shows the direction using lights.
- You can also read the DoA values using the
xvf_hosttool.
Command to check DoA values
./xvf_host AEC_AZIMUTH_VALUES
Example Output
Device (USB)::device_init() -- Found device VID: 10374 PID: 26 interface: 3
AEC_AZIMUTH_VALUES 0.91378 (52.36 deg) 0.00000 (0.00 deg) 1.57080 (90.00 deg) 0.91378 (52.36 deg)
- Focused beam 1: First fixed listening direction
- Focused beam 2: Second fixed listening direction
- Free running beam: Always scanning direction
- Auto selected beam: Final beam chosen for best audio (used for DoA indication)
Speech Indication
- Speech Energy shows how strong the voice signal is — like a speech volume meter.
- Used to detect if someone is speaking and how loud/close they are.
- Noise, echo, and distance can affect the energy value.
Command to check Speech Energy:
./xvf_host AEC_SPENERGY_VALUES
Example Output
Device (USB)::device_init() -- Found device VID: 10374 PID: 26 interface: 3
AEC_SPENERGY_VALUES 2080656 0 2083455 2080656
- Focused beam 1: Energy of first beam
- Focused beam 2: Energy of second beam
- Free running beam: Energy of scanning beam
- Auto selected beam: Energy of beam chosen for final output
Audio Output Channels
-
The XVF3800 provides 2 audio channels:
- Left channel: Clean, post-processed audio
- Right channel: ASR beam or echo/reference data
You can re-route these channels to output different sources.
Example commands
Set left channel to Amplified Microphone 0
./xvf_host AUDIO_MGR_OP_L 3 0
Set right channel to Far End (reference) data
./xvf_host AUDIO_MGR_OP_R 5 0
Example Output:
Device (USB)::device_init() -- Found device VID: 10374 PID: 26 interface: 3
Tuning Parameters (Make It Sound Better!)
- These settings help improve echo cancellation, noise suppression, gain, etc.
- Use them when default settings aren’t good enough.
Common Parameters:
| Parameter | Meaning |
|---|---|
| AUDIO_MGR_REF_GAIN | Speaker input gain (echo signal) |
| AUDIO_MGR_MIC_GAIN | Microphone input gain (how loud the mic hears) |
| AUDIO_MGR_SYS_DELAY | Delay between mic and speaker signals |
| PP_AGCMAXGAIN | Max automatic gain control level |
| AEC_ASROUTGAIN | Gain for ASR beam output |
For deeper documentation and advanced commands, visit the official GitHub repo: ReSpeaker XVF3800 Host Control README
Troubleshooting
Does playback sound from speaker output not enough ?
If the speaker output volume of the ReSpeaker XVF3800 is too low on Linux, you may need to adjust the ALSA mixer levels for the XVF3800 sound card. Follow the steps below to increase the output volume.
Step 1: Open ALSA Mixer
-
Open a terminal.
-
Type the following command and press Enter:
alsamixer
Step 2: Select the XVF3800 Sound Card
- Press F6 to open the sound card selection menu.
- Use the up/down arrow keys to highlight the XVF3800 sound card.
- Press Enter to confirm the selection.
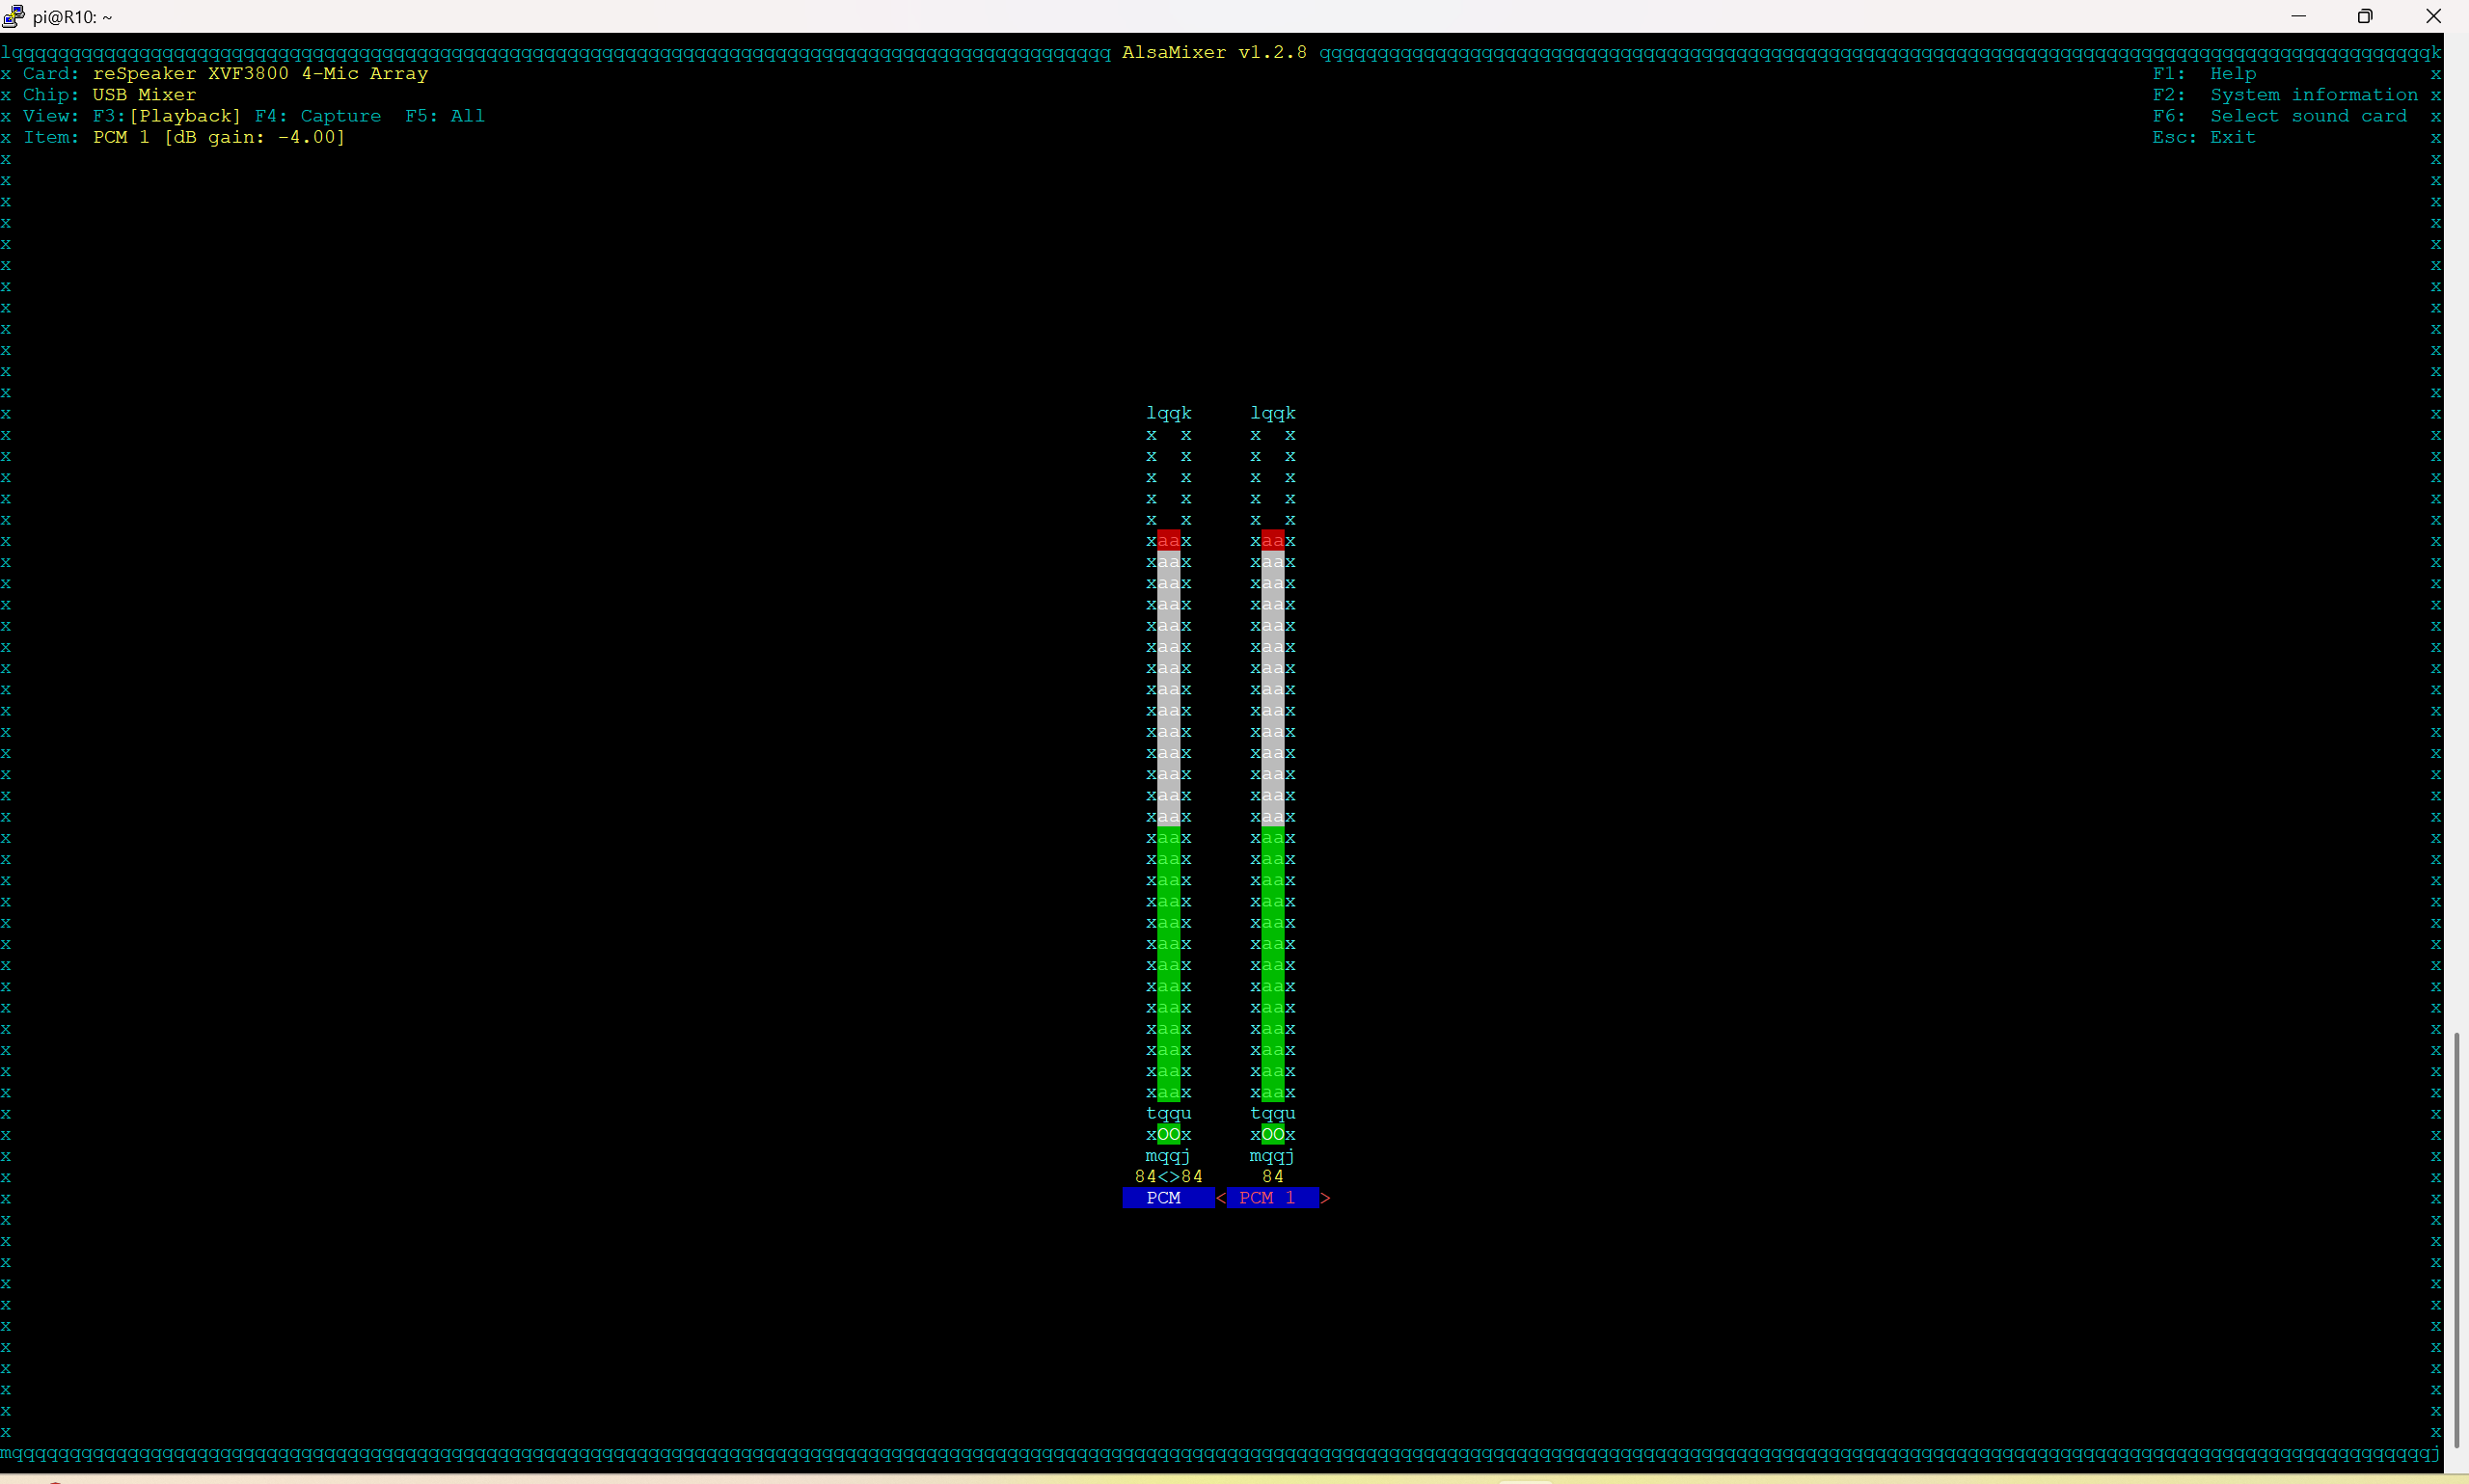
Step 3: Adjust the PCM-1 Volume
- Use the left/right arrow keys to navigate to PCM-1.
- Use the up arrow key to increase the volume level up to 100%.

Step 4: Save ALSA Settings
- Press ESC to exit
alsamixer. - Before unplugging the XVF3800, run the following command to save your settings:
sudo alsactl store
Step 5: Additional Option (Using PulseAudio)
If you still cannot hear sound clearly after adjusting ALSA levels, try installing PulseAudio Volume Control for more detailed volume adjustments:
sudo apt install pavucontrol -y
You can then open pavucontrol and increase the output volume beyond 100% if needed.
After reinstalling the USB drivers, my ReSpeaker doesn’t record and playback
Uninstall all drivers associated with the ReSpeaker in Device Manager. This resolved the issue.
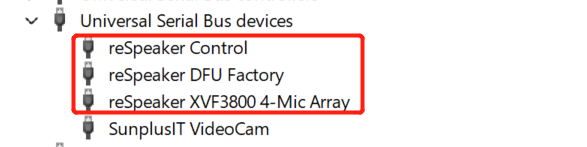
Cannot use as sound devices in Windows after flashing firmware ?
Open the start menu and type Device manager. Find related reSpeaker XVF 3800 devices, right click them and select Uninstall devices. After that, restart the device (usb plug and unplugged) and Windows will re-install the right sound card driver for it.
Resources
- ReSpeaker XVF3800 3D File
- ReSpeaker XVF3800 3D-Enclosure-Up File
- ReSpeaker XVF3800 3D-Enclosure-Down File
Tech Support & Product Discussion
Thank you for choosing our products! We are here to provide you with different support to ensure that your experience with our products is as smooth as possible. We offer several communication channels to cater to different preferences and needs.