Muse Gadget on reSpeaker XVF3800
Introduction
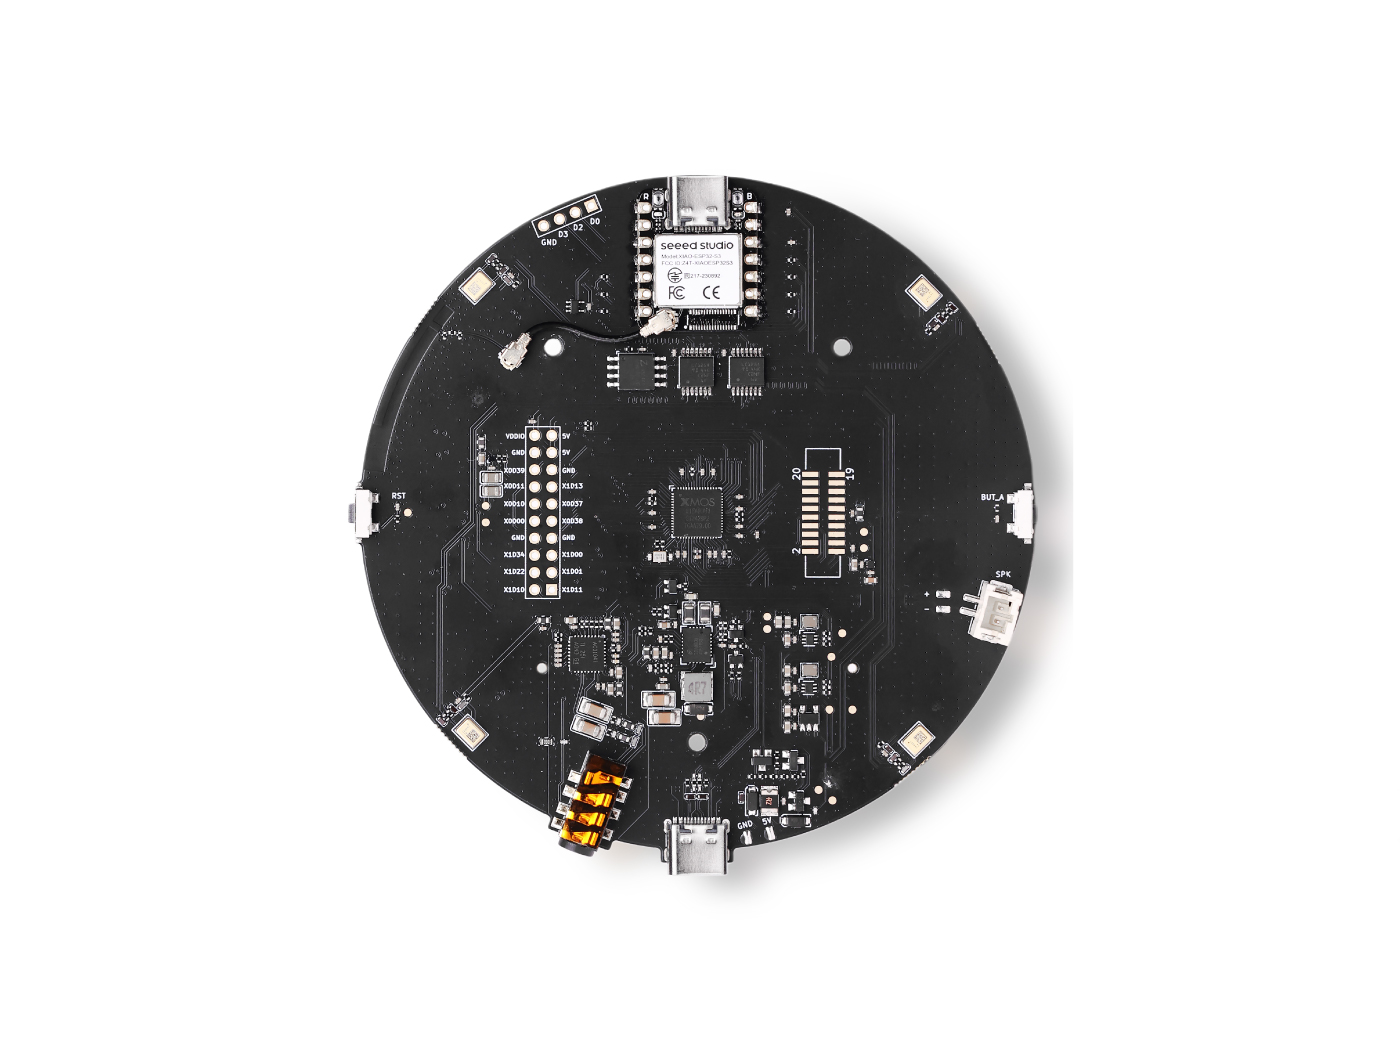
This project turns the reSpeaker XVF3800 4-mic array and a XIAO ESP32-S3 into a Muse Gadget. The gadget pairs with the Muse phone app over BLE, joins your Wi-Fi network, and holds an encrypted Noise session to your Muse VM in the cloud.
- Hold the button: record a voice note. Muse transcribes it and replies; the reply is shown in the app and spoken on the speaker via TTS.
- Tap (under 1 s): start a live voice call (if
MUSE_REALTIME_VOICEis on). - Tap again: hang up.
At a glance, the data path looks like this:
XIAO ESP32-S3 ──BLE──> Muse app (pairing)
      │
      └──Wi-Fi──> encrypted Noise session ──> Muse VM
                        │
                        ├── /link-control : device.health, voice.configure, …
                        └── /chat/stream  : voice note → transcript → reply
The XIAO is the I2S master; the XVF3800 runs the I2S slave 16 kHz firmware and owns its 12-LED ring and amplifier.
What You Need
- Muse SDK token (
mgst_…) - Optional AssemblyAI key for spoken replies
- Muse app on the phone, Developer mode on
- ESP-IDF v6.0.3 installed
- XVF3800 on the I2S slave 16 kHz firmware
- JST 5 W speaker (or 3.5 mm headphones)
- 2.4 GHz Wi-Fi credentials
- USB-C data cable
Accounts and API Keys
| Key / credential | Required? | Where to get it | Where it goes |
|---|---|---|---|
Muse SDK token (mgst_…, 48 chars) | Yes | gadgets.muse.ai | CONFIG_GADGET_SDK_TOKEN in the build sdkconfig |
| AssemblyAI key (32 chars) | Optional — spoken replies | assemblyai.com | CONFIG_MUSE_TTS_API_KEY in the build sdkconfig |
Groq key (gsk_…) | Alternative TTS | console.groq.com | Same, with the Groq URL/model |
| Wi-Fi SSID + password | Yes | Your 2.4 GHz network/hotspot | Muse app during pairing |
TTS provider settings
The default provider is AssemblyAI:
CONFIG_MUSE_TTS_ENABLE=y
CONFIG_MUSE_TTS_URL="https://tts.us.assemblyai.com/v1/openai/audio/speech"
CONFIG_MUSE_TTS_MODEL="assemblyai-tts-en"
CONFIG_MUSE_TTS_VOICE="alloy"
CONFIG_MUSE_TTS_RESPONSE_FORMAT="mp3"
CONFIG_MUSE_TTS_MAX_CHARS=800
CONFIG_MUSE_TTS_TIMEOUT_MS=15000
CONFIG_MUSE_TTS_API_KEY="YOUR_ASSEMBLYAI_KEY"
Groq (Orpheus, 200-character input limit) is an alternative:
CONFIG_MUSE_TTS_URL="https://api.groq.com/openai/v1/audio/speech"
CONFIG_MUSE_TTS_MODEL="canopylabs/orpheus-v1-english"
CONFIG_MUSE_TTS_VOICE="hannah"
CONFIG_MUSE_TTS_RESPONSE_FORMAT="wav"
CONFIG_MUSE_TTS_MAX_CHARS=200
CONFIG_MUSE_TTS_API_KEY="gsk_..."
The phone app has no TTS provider setting; TTS is entirely firmware-side.
Phone App Setup
- Install the Muse app (Meta) on Android or iOS.
- Sign in with your Muse account.
- Turn on Settings → Devices → Developer mode.
- Muse launched in the US and Canada; the account/app is required for pairing and for showing the reply text.
- The app shows replies as text; the gadget speaks them if TTS is configured.
Optional external button (Grove Button)
You can add a Grove Button for push-to-talk: VCC → D3, SIG → D0, GND → GND.
| Grove Button | XIAO | GPIO |
|---|---|---|
| GND | GND | — |
| VCC | D3 | 4 (driven high) |
| SIG | D0 | 1 (input, active high) |
| NC | — | — |
The firmware settings are already in the overlay:
CONFIG_HOMEHUB_BUTTON_GPIO=1
CONFIG_HOMEHUB_BUTTON_POWER_GPIO=4
CONFIG_HOMEHUB_BUTTON_ACTIVE_HIGH=y
CONFIG_HOMEHUB_BUTTON_LABEL="TALK"
The Grove Button is active high; the firmware drives GPIO4 high to power it and reads GPIO1 with a pull-down.
Flash the XMOS I2S Firmware
The XIAO is the I2S master, so the XVF3800 must run the I2S slave 16 kHz firmware. The USB firmware does not work with the XIAO.
Flash the respeaker_xvf3800_i2s_slave_v1.0.9_16k.bin image by following the official firmware update guide:
Select
respeaker_xvf3800_i2s_slave_v1.0.9_16k.bin(I2S slave, 16 kHz) — not the default USB firmware.
Verify
The Muse firmware logs:
link.xvf3800: XVF3800 firmware 1.0.9; 16 kHz I2S slave, ESP32 is master
Or run:
xvf_host VERSION
Clone the Project
Clone the maintained fork. It is based on the upstream SDK and already contains the XVF3800 port and the TTS integration:
git clone https://github.com/KasunThushara/muse-gadget-sdk.git
cd muse-gadget-sdk
The
seeed-respeaker-xvf3800port is not upstream infacebookincubator/muse-gadget-sdk. If you use upstream instead, you must apply the additions below yourself.
Files added by the fork:
esp32/devices/sdkconfig.seeed-respeaker-xvf3800
esp32/main/voice_board_xvf3800.c
esp32/main/xvf3800.c
esp32/main/xvf3800.h
Files changed by the fork:
esp32/main/Kconfig.projbuild      (HOMEHUB_LED_BACKEND_XVF3800, button options)
esp32/main/CMakeLists.txt         (xvf3800.c, voice_board_xvf3800.c)
esp32/main/led_status.c           (XVF3800 ring over I2C)
esp32/main/button.c               (active-high button, optional power GPIO)
esp32/main/voice.c                (tap-vs-hold measurement)
esp32/tools/board.sh              (seeed-respeaker-xvf3800 case)
esp32/components/muse/Kconfig     (MUSE_TTS_*)
esp32/components/muse/muse_chat_session.cpp  (start_tts / WAV / MP3)
Build the Firmware
Install ESP-IDF v6.0.3
esp32/cmake/validate_config.cmake requires ESP-IDF v6.0.3:
git clone -b v6.0.3 --recursive https://github.com/espressif/esp-idf.git ~/esp/esp-idf-v6.0.3
~/esp/esp-idf-v6.0.3/install.sh esp32s3
. ~/esp/esp-idf-v6.0.3/export.sh
You also need Git, Python 3, and a USB-C data cable. On Windows, the XIAO console is native USB (303a:1001) and appears as COMx. tools/board.sh is bash, so run it in Git Bash or call idf.py directly.
Set the keys
cd esp32
idf.py -B build-seeed-respeaker-xvf3800 menuconfig
Set under ESP32 Device SDK:
- Muse Gadgets SDK token →
mgst_… - TTS options (under the Muse menu) → provider, URL, model, voice, API key
Or edit build-seeed-respeaker-xvf3800/sdkconfig directly:
CONFIG_GADGET_SDK_TOKEN="mgst_…"
CONFIG_MUSE_TTS_ENABLE=y
CONFIG_MUSE_TTS_URL="https://tts.us.assemblyai.com/v1/openai/audio/speech"
CONFIG_MUSE_TTS_MODEL="assemblyai-tts-en"
CONFIG_MUSE_TTS_VOICE="alloy"
CONFIG_MUSE_TTS_RESPONSE_FORMAT="mp3"
CONFIG_MUSE_TTS_MAX_CHARS=800
CONFIG_MUSE_TTS_API_KEY="YOUR_ASSEMBLYAI_KEY"
The generated
build-*/sdkconfigoverrides the overlay. After changingdevices/sdkconfig.seeed-respeaker-xvf3800, update or delete the generatedsdkconfig.
Compile
tools/board.sh seeed-respeaker-xvf3800 build
Or directly:
idf.py -B build-seeed-respeaker-xvf3800 \
  -DIDF_TARGET=esp32s3 \
  -DSDKCONFIG=build-seeed-respeaker-xvf3800/sdkconfig \
  -DSDKCONFIG_DEFAULTS="sdkconfig.defaults;devices/sdkconfig.seeed-respeaker-xvf3800" \
  build
The image lands at:
esp32/build-seeed-respeaker-xvf3800/muse-gadget.bin
Flash the Firmware
tools/board.sh seeed-respeaker-xvf3800 flash COM10
Or directly:
idf.py -B build-seeed-respeaker-xvf3800 \
  -DIDF_TARGET=esp32s3 \
  -DSDKCONFIG=build-seeed-respeaker-xvf3800/sdkconfig \
  -DSDKCONFIG_DEFAULTS="sdkconfig.defaults;devices/sdkconfig.seeed-respeaker-xvf3800" \
  -p COM10 flash
- Replace
COM10with the XIAO's port (ls /dev/cu.usbmodem*on macOS,/dev/ttyACM*on Linux). - If flashing cannot connect: hold BOOT, tap RESET, release BOOT, then retry.
- Close any serial monitor that holds the port.
- Reflashing keeps the pairing/Wi-Fi.
erase-flashwipes everything, including NVS and pairing.
Pair and Test
- Muse app → Settings → Devices → Developer mode ON.
- Add Device (+) →
MuseGadget-respeaker-XXXXXX. - Press the button (or the Grove Button) to confirm.
- Choose the 2.4 GHz Wi-Fi and enter the password.
- Wait for the green ring.
- Hold the button, speak, and release:
link.voice: recorded X.Xsmuse_chat_session: TTS: N charslink.voice: reply: X.Xs of speech- The reply is spoken on the speaker and shown in the app.
- Volume: ask Muse ("Set volume to 80") or use
voice.configure. - Mute: use the XVF3800 Mute button; when muted, the button keeps its setup role.
- Reset setup: hold the button for 5 seconds to forget pairing/Wi-Fi.
Useful log lines:
link.xvf3800: AIC3104 outputs powered (DAC 0 dB, HP + line out)
link.xvf3800: XVF3800 firmware 1.0.9; 16 kHz I2S slave, ESP32 is master
link.xvf3800: reSpeaker XVF3800 audio ready
link.voice:   ready
link.ble:     advertising as MuseGadget-respeaker-XXXXXX
muse_chat_session: connected to VM …
muse_chat_session: TTS: N chars
muse_chat_session: reply audio: 16000 Hz, 1 ch, 64 kbps
link.xvf3800: amp on: X0D30=0 X0D31=0 X0D33=1
Security Notes
- The SDK token ships inside the firmware (or NVS). Treat it as an identifier, not a password; revoke/rotate at
gadgets.muse.aiif it leaks. - The TTS key lives in
esp32/build-*/sdkconfig, which is gitignored. Do not commit it. - Community pairing has no manufacturer attestation and cannot stop an active MITM; set it up on a trusted network.
- Secure Boot and flash encryption stay off; the app is signed with the committed development key so you can reflash freely.
- NVS encryption is recommended (
CONFIG_HOMEHUB_NVS_ENCRYPTION) and is derived from an eFuse HMAC key automatically; decide before storing credentials. - Do not enable
CONFIG_HOMEHUB_PAIRING_EFUSE_AUTHunless you have Secure Boot.
Resources
- This project (fork with the XVF3800 port): KasunThushara/muse-gadget-sdk
- Muse Gadget SDK (upstream): facebookincubator/muse-gadget-sdk
- Seeed reSpeaker XVF3800 + XIAO: Getting started guide
- XMOS firmware update: Firmware update guide
- I2S playback/record: Record and playback
- I2C command list: I2C command list
- GPIO/GPI control: GPIO control
- Vendor firmware repo: reSpeaker_XVF3800_USB_4MIC_ARRAY
- AssemblyAI TTS: AssemblyAI TTS API
- Groq TTS: Groq text-to-speech
Tech Support & Product Discussion
Thank you for choosing our products! We are here to provide you with different support to ensure that your experience with our products is as smooth as possible. We offer several communication channels to cater to different preferences and needs.