TinyML Speech Recognition with Edge Impulse
Overview
Unlock hands-free control with real-time voice command detection using a Keyword Spotting (KWS) system powered by TinyML. By combining the high-performance ReSpeaker XVF3800 microphone array with the efficient XIAO ESP32S3 and the Edge Impulse platform, we bring voice recognition to compact, low-power devices. Train, deploy, and listen—your device is always ready for your next command!
Hardware Required
Data collection
USB Firmware Installation for ReSpeaker XVF3800 with XIAO ESP32S3
To begin audio data collection, ensure your ReSpeaker is flashed with the USB firmware, enabling it to function as a USB microphone.
Setup Python Environment
Then you need to make python environmnet in your laptop or PC to collect the voice data. here we are going to create the respeaker-env
python -m venv respeaker-env
source respeaker-env/bin/activate
Install Required Libraries:
pip install sounddevice scipy numpy
Find ReSpeaker Device ID
To record from the correct microphone input, we need to identify the device index of the ReSpeaker mic.
import sounddevice as sd

devices = sd.query_devices()
for i, device in enumerate(devices):
    print(f"Device {i}: {device['name']} (input channels: {device['max_input_channels']})")
Look for the device name that corresponds to ReSpeaker (often named something like ReSpeaker XVF3800 USB 4-Mic Array) and note the index number (e.g., Device 2).
Record Audio Samples
The following script will allow you to record labeled audio samples, organized by person and command/keyword.
import os
import sounddevice as sd
from scipy.io.wavfile import write

# === Settings ===
SAMPLERATE = 16000
CHANNELS = 1  # Mono input
DURATION = 10  # seconds
DEVICE_INDEX = 2  # Replace with correct device index

def record_audio(filename, samplerate=SAMPLERATE, channels=CHANNELS, duration=DURATION, device=DEVICE_INDEX):
    print(f"Recording '{filename}' for {duration} seconds...")
    recording = sd.rec(int(duration * samplerate),
                       samplerate=samplerate,
                       channels=channels,
                       dtype='int32',
                       device=device)
    sd.wait()
    write(filename, samplerate, recording)
    print(f"Saved: {filename}")

def get_next_filename(directory, label):
    existing = [f for f in os.listdir(directory) if f.startswith(label) and f.endswith('.wav')]
    index = len(existing) + 1
    return os.path.join(directory, f"{label}.{index}.wav")

def collect_samples():
    while True:
        sample_name = input("Enter sample name (e.g., PersonA): ").strip()
        if not sample_name:
            print("Sample name cannot be empty.")
            continue

        sample_dir = os.path.join(os.getcwd(), sample_name)
        os.makedirs(sample_dir, exist_ok=True)
        print(f"Directory created: {sample_dir}")

        while True:
            label = input("Enter sound/voice to record (e.g., yes, no): ").strip()
            if not label:
                print("Label cannot be empty.")
                continue

            while True:
                filename = get_next_filename(sample_dir, label)
                record_audio(filename)

                cont = input("Record another sample for this label? (yes/no): ").strip().lower()
                if cont != 'yes':
                    break

            next_label = input("Do you want to record a different label? (yes/no): ").strip().lower()
            if next_label != 'yes':
                break

        next_sample = input("Do you want to create a new sample? (yes/no): ").strip().lower()
        if next_sample != 'yes':
            print("Audio collection completed.")
            break

if __name__ == "__main__":
    collect_samples()
Folder Structure Example
/PersonA
    ├── red.1.wav
    ├── red.2.wav
    ├── blue.1.wav
    └── blue.2.wav
/PersonB
    ├── red.1.wav
    └── green.1.wav
Each person's folder contains labeled .wav files which will later be uploaded to Edge Impulse for model training.
Uploading and Preparing Audio Data in Edge Impulse
After collecting raw audio samples using the ReSpeaker XVF3800 and organizing them by label, the next step is to upload and process them in Edge Impulse Studio for training your Keyword Spotting model.
Create a New Project in Edge Impulse
-
Go to Edge Impulse and log in (or sign up if you’re new).
-
Click "Create new project".
-
Provide a name for your project (e.g., "Voice Command KWS")
Upload Existing Audio Samples
To upload your collected data:
- 1.Navigate to the Data Acquisition tab.
- 2.Click on "Upload existing data" (top right).
- 3.Select and upload your .wav files contained folder
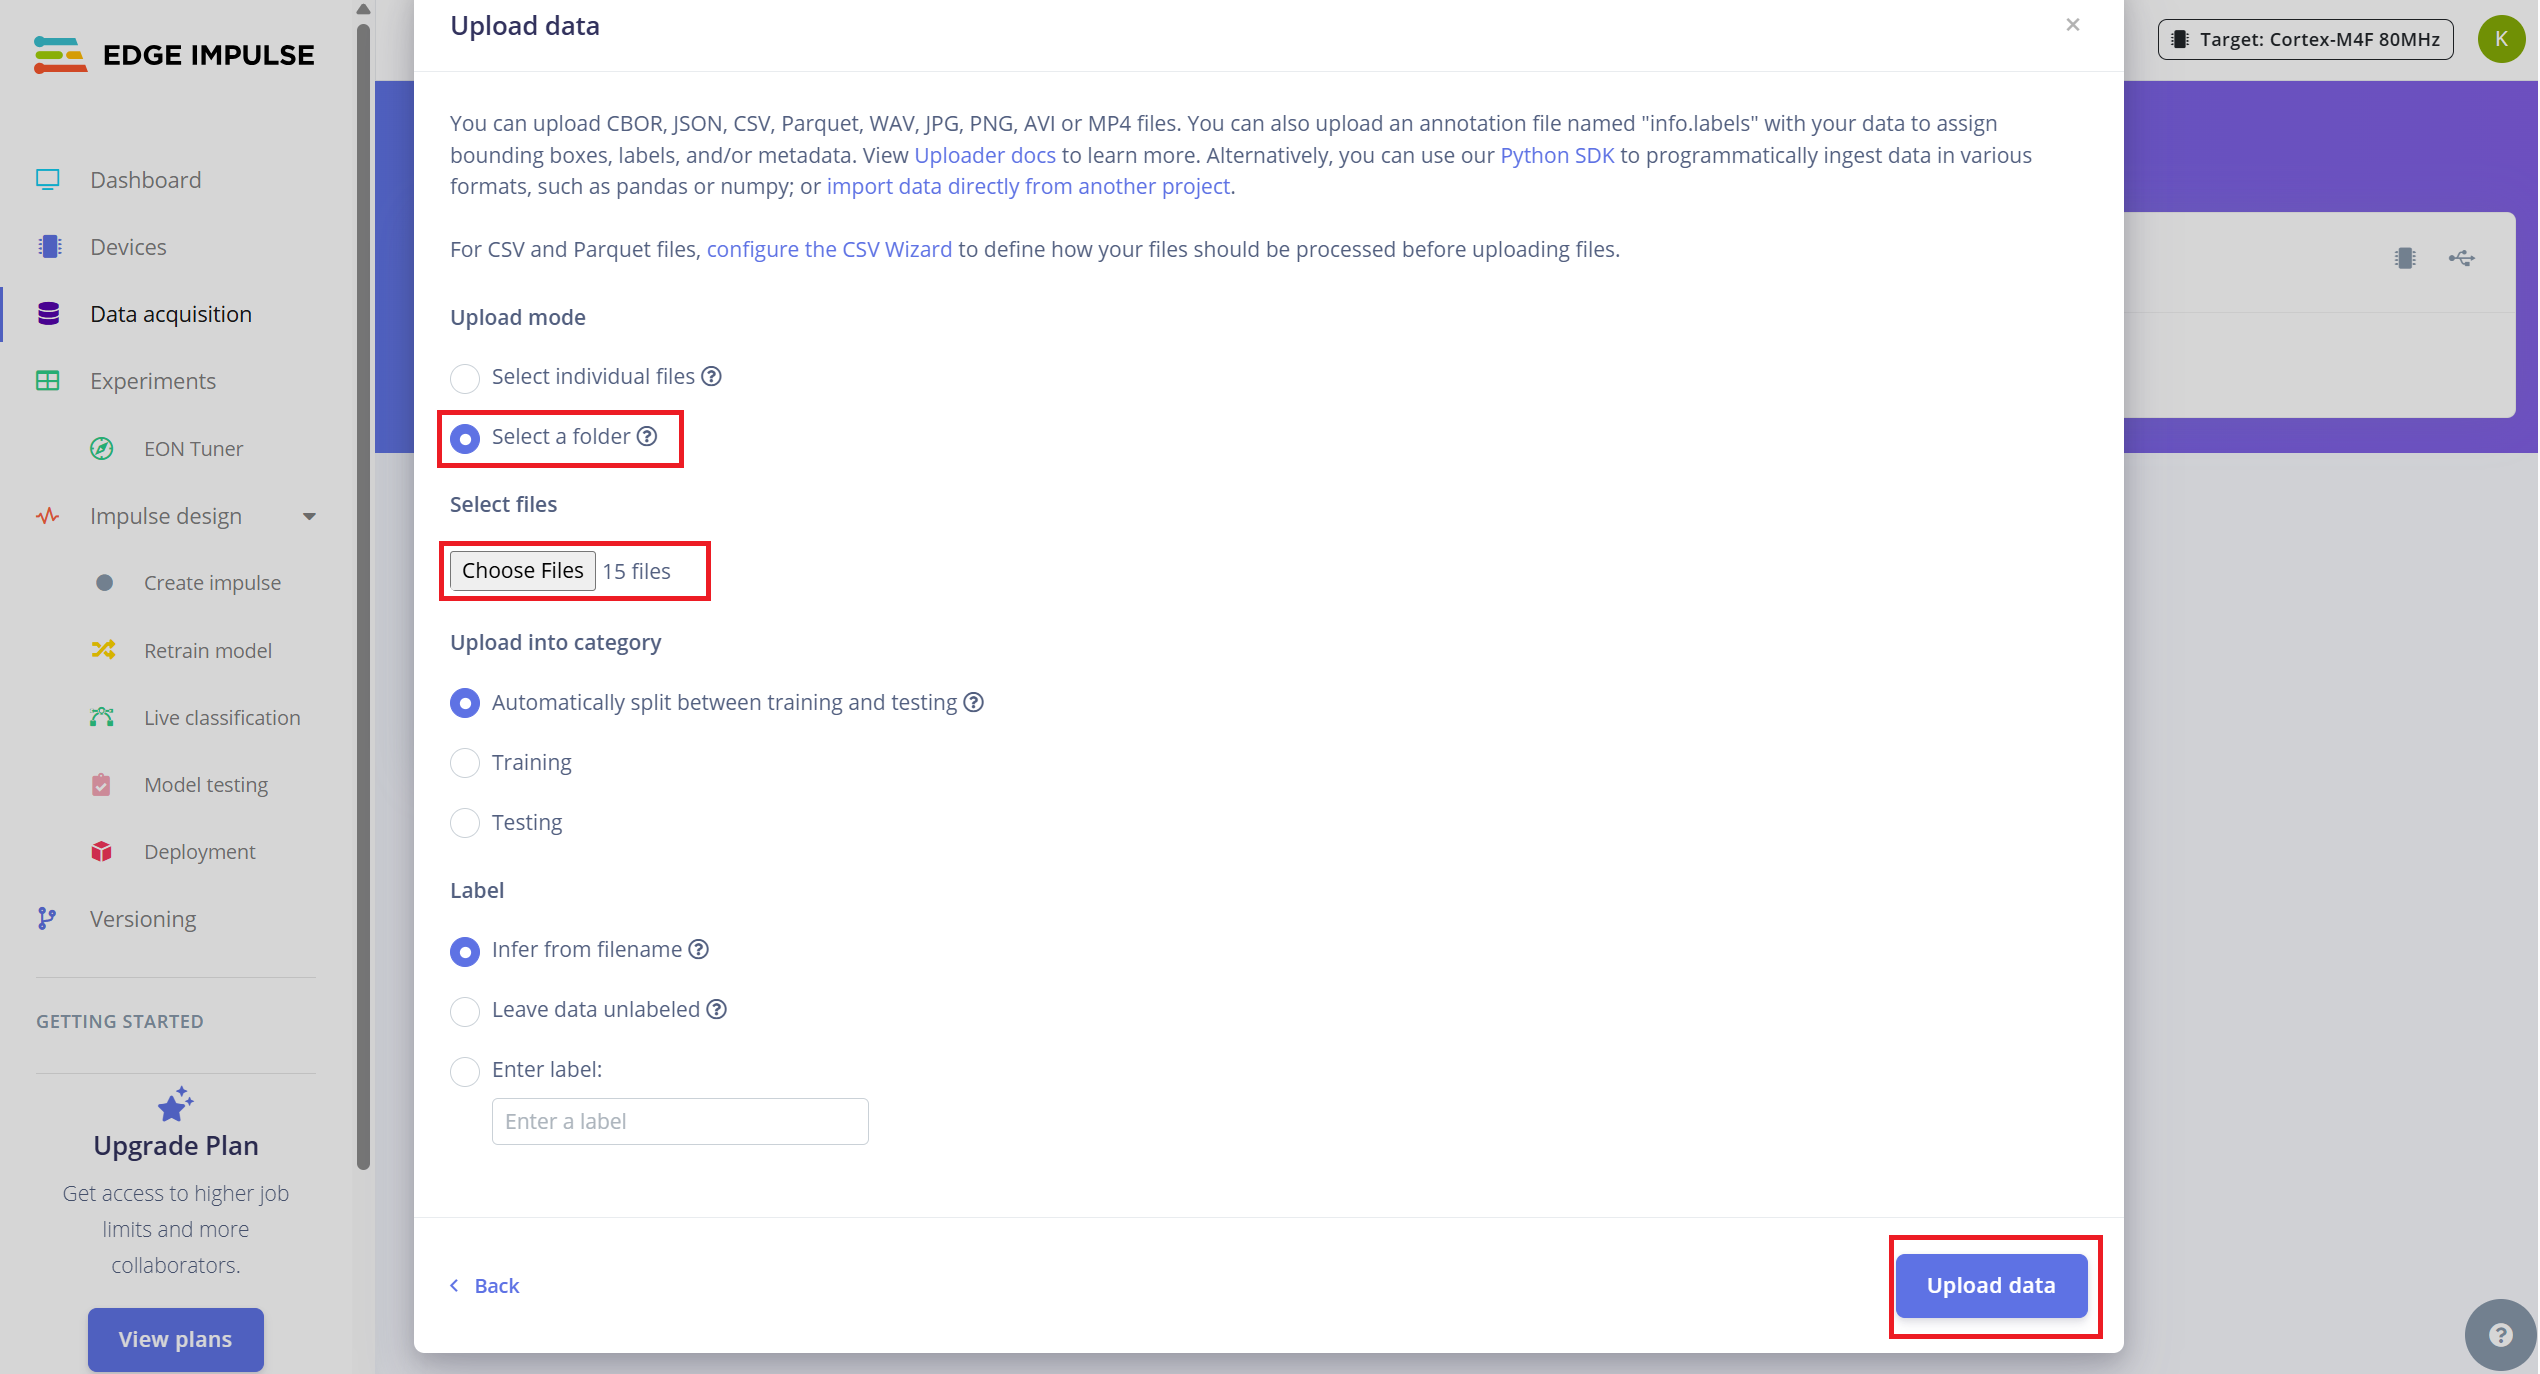
- 4.Enable the option to automatically split data into training and testing (Edge Impulse recommends ~80/20 split).
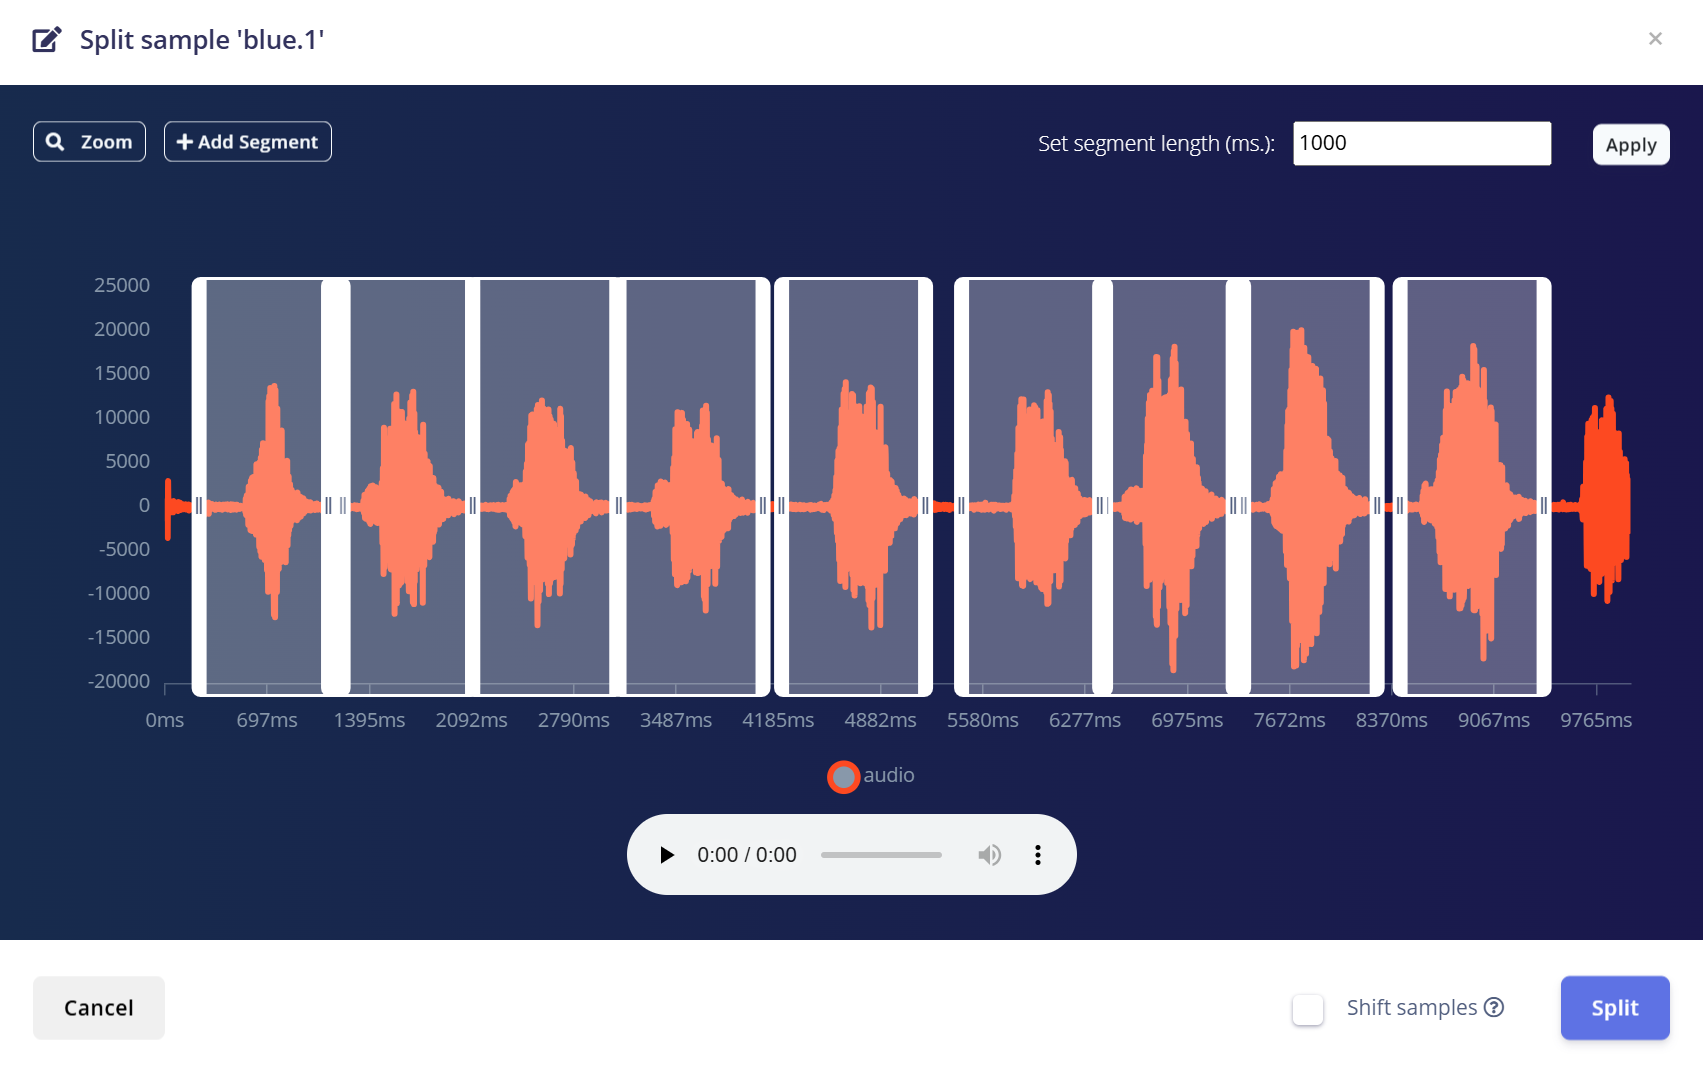
Split 10-Second Audio into 1-Second Samples
Edge Impulse works best with 1-second audio clips for Keyword Spotting. Since the original samples were recorded in 10-second segments, you'll need to split each into multiple 1-second samples.
Follow these steps:
- 1.After uploading, go to the Data Acquisition page.
- 2.Find a sample (e.g., yes.1.wav) and click the three dots (…) next to the sample.
- 3.Select "Split sample" from the menu.
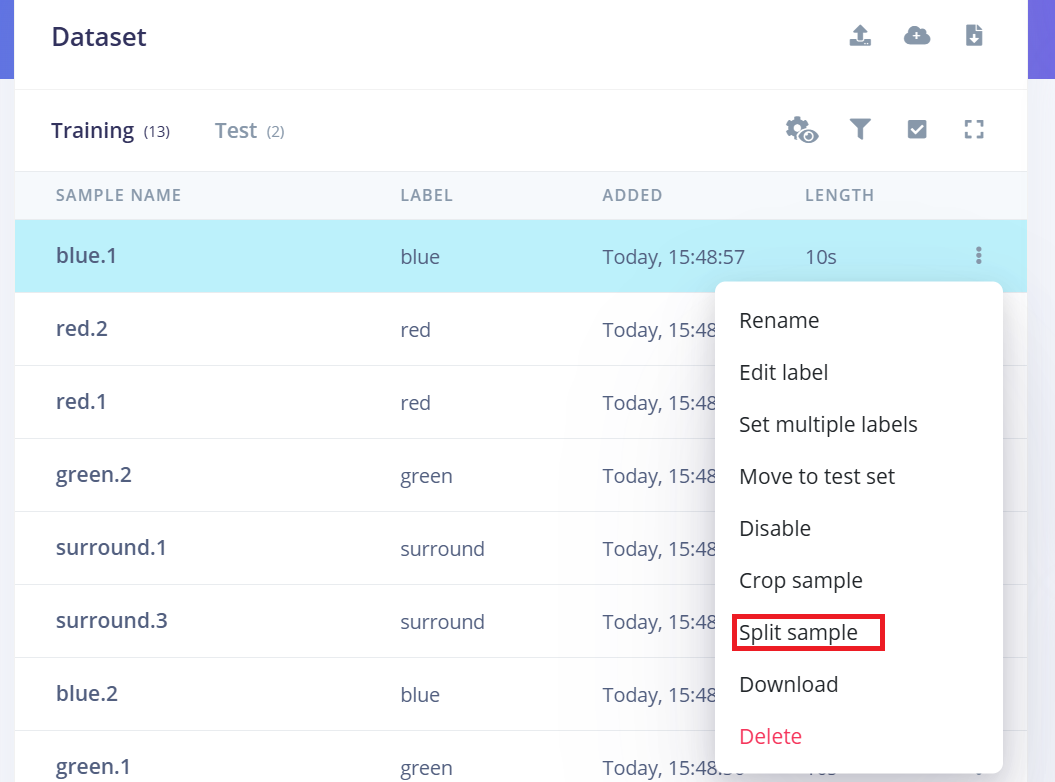
- 4.Use the tool to split the waveform into 1-second segments.
- a.You can drag to adjust segments or add/remove them as needed.
- 5.Click Save and Split.
Repeat this process for every 10-second sample in all classes both training and test.
This ensures that your dataset is properly formatted and optimized for training a high-accuracy model.
Creating Impulse (Pre-Process / Model definition)
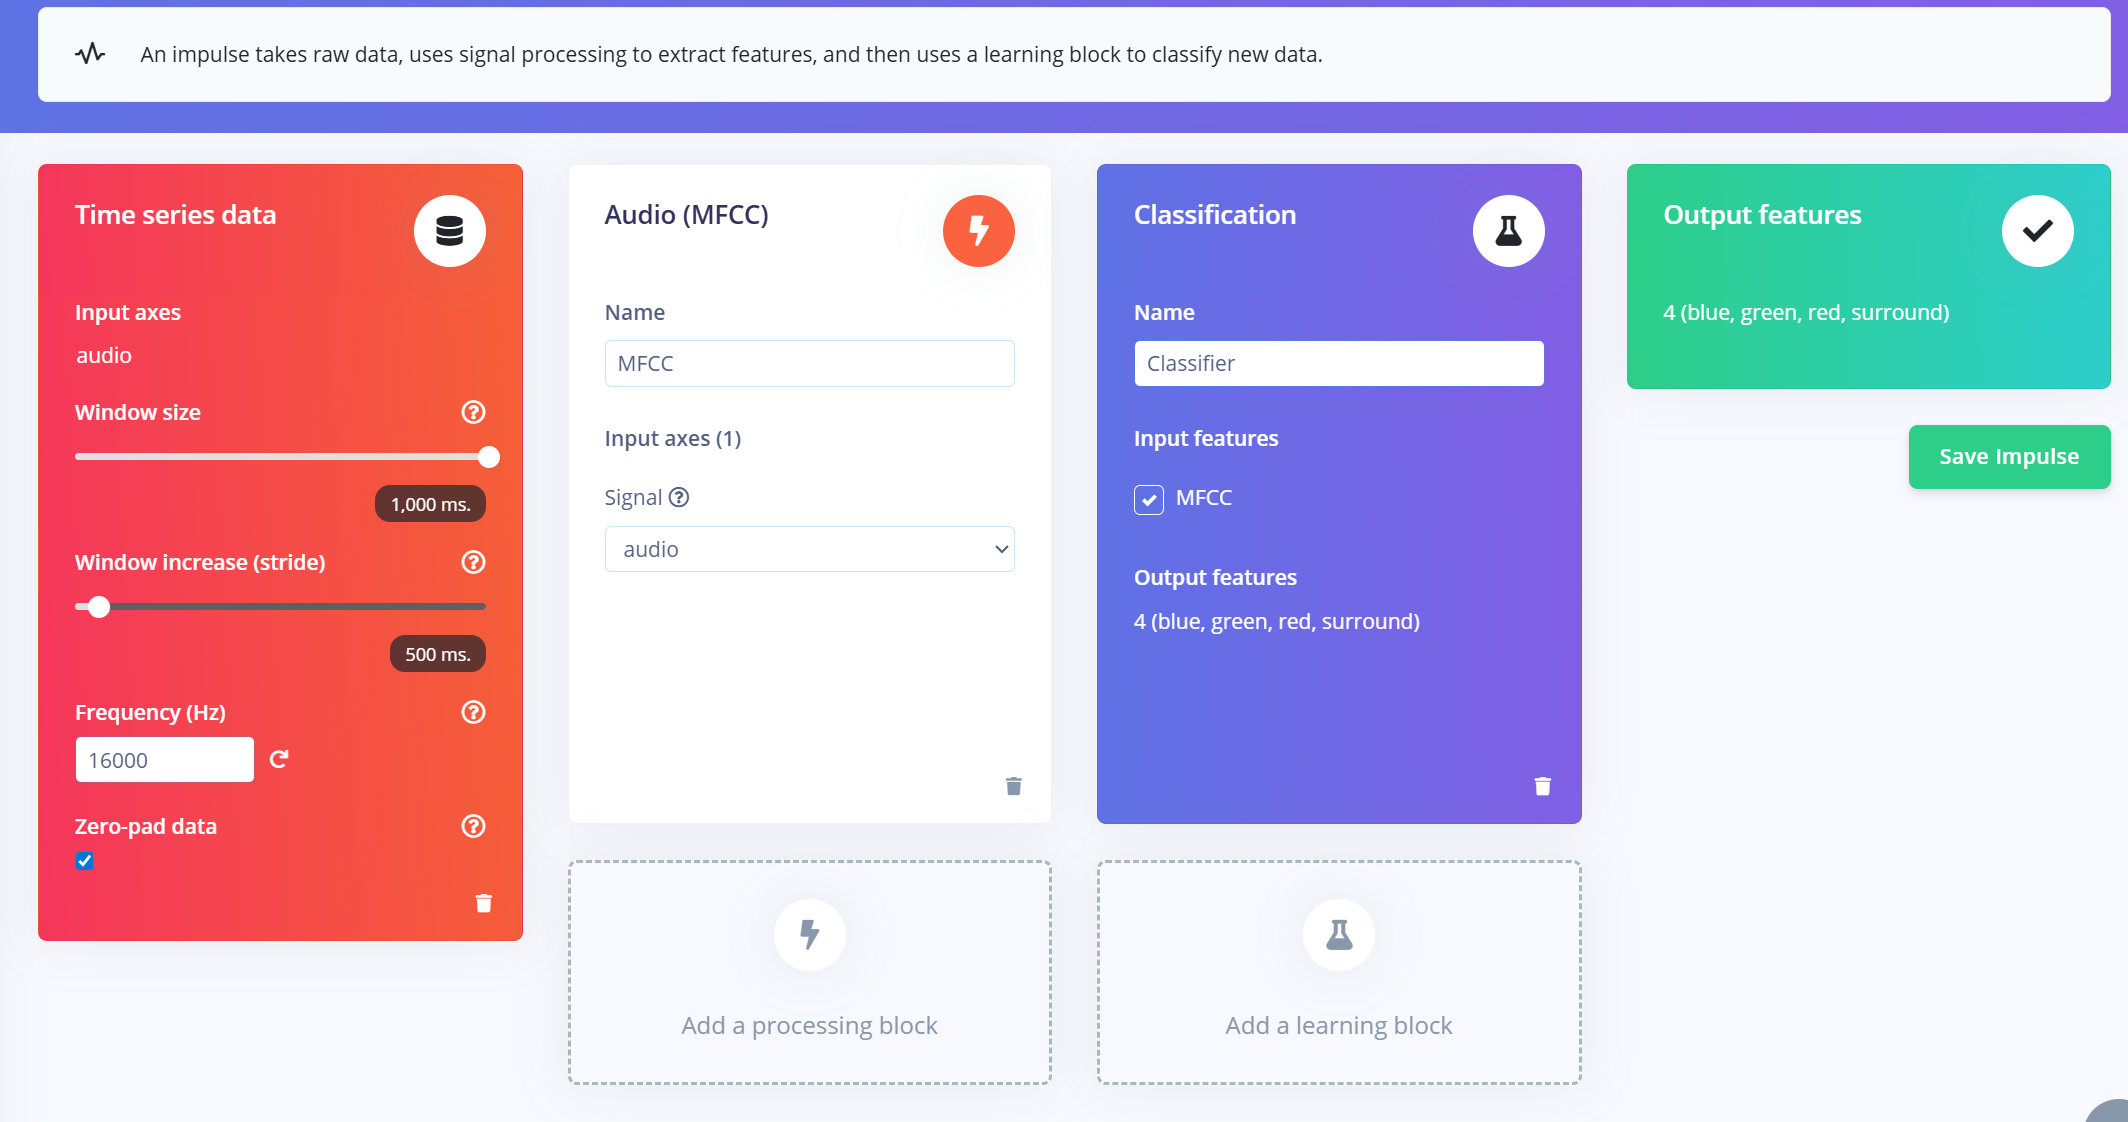
An impulse in Edge Impulse defines the end-to-end pipeline that transforms raw data into a trained machine learning model. It includes signal processing, feature extraction, and a learning block for classification.
Create the Impulse
- 1.Navigate to the "Impulse Design" tab in your Edge Impulse project.
- 2.Click “Create Impulse”.
- 3.Configure the input window:
- a.Window size: 1000 ms (1 second)
- b.Window increase: 500 ms (overlapping windows to augment data)
- c.Enable "Zero-pad data": This ensures shorter segments (e.g., 800ms) are padded with zeros, especially useful when noise trimming is applied during sample splitting.
Add MFCC Feature Extractor
After creating the impulse window:
- 1.Click “Add a processing block” and select MFCC (Mel Frequency Cepstral Coefficients).
- a.MFCC is a widely used method for converting audio signals into 2D features that represent voice frequency patterns.
- b.These features are perfect for voice-based recognition models.
- 2.Set MFCC parameters (default works well for most cases):
- a.Output shape: 13 x 49 x 1
- b.This turns your audio clip into an “image” for classification.
Add a Learning Block
- 1.Click “Add a learning block” and choose “Classification (Keras)”.
- 2.This creates a custom Convolutional Neural Network (CNN) that will perform image classification on the MFCC features.
- 3.You can now proceed to the NN Classifier tab to customize and train your model.
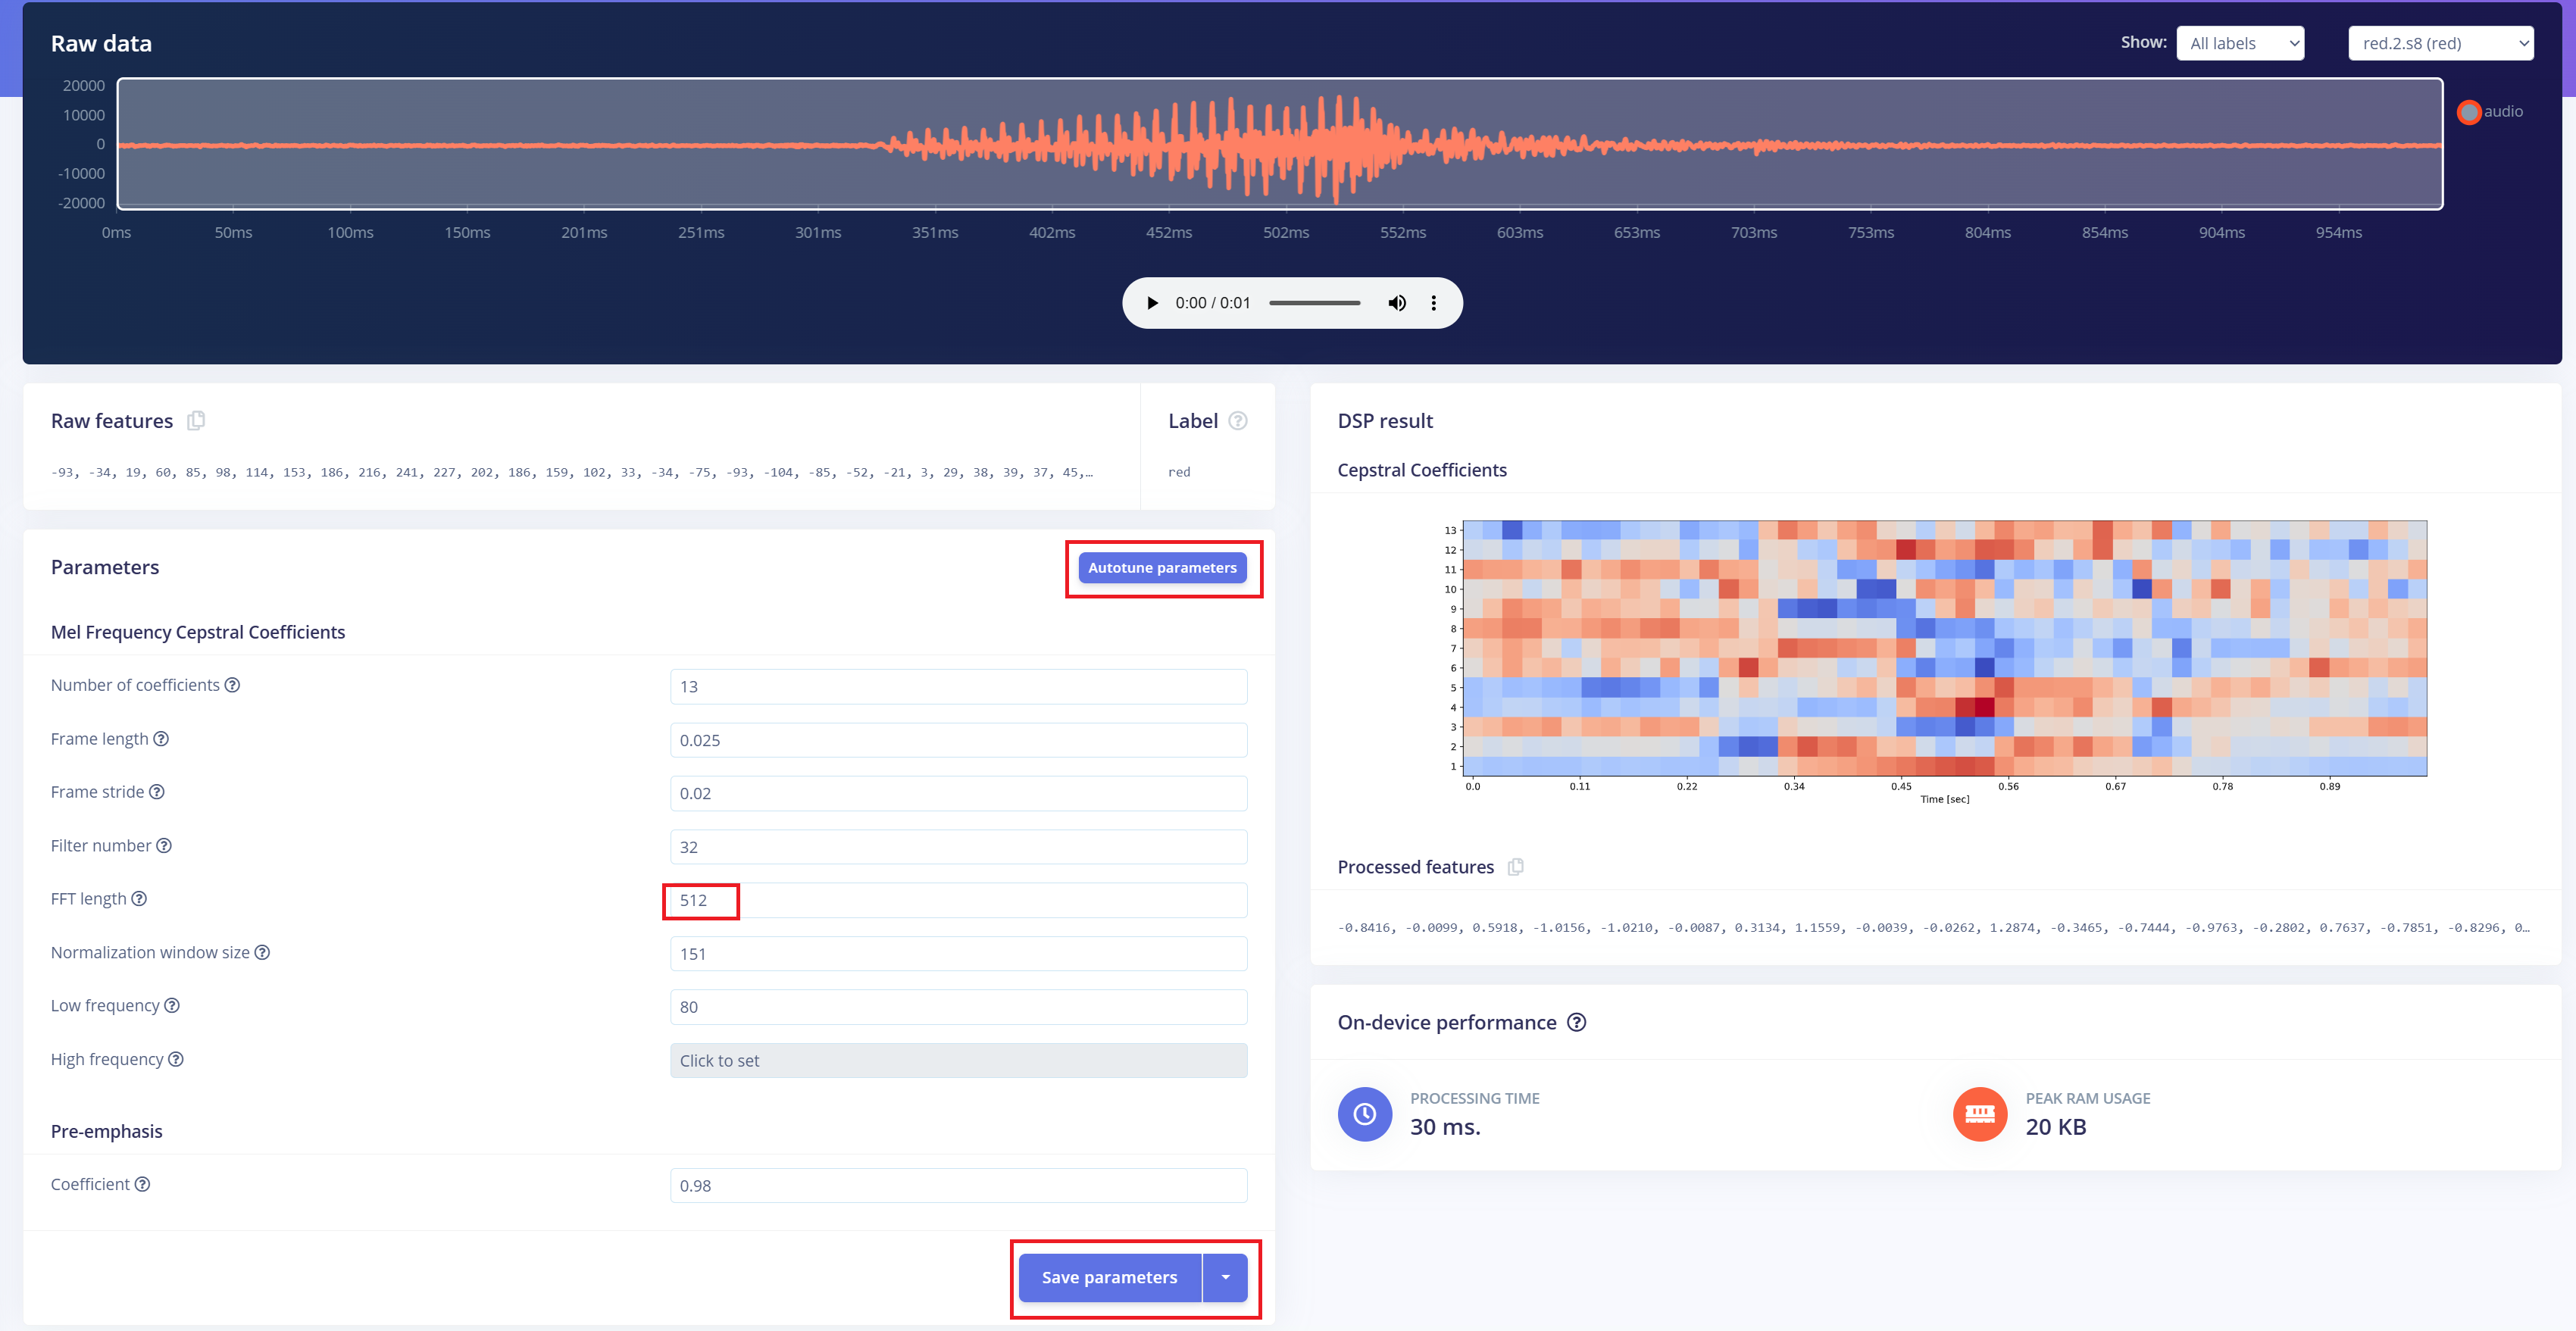
Pre-Processing (MFCC)
The next step is to generate spectrogram images from the recorded audio, which will be used for model training. We can either use the default DSP parameters or, as in our case, leverage the DSP Autotune feature to automatically optimize them for better performance.
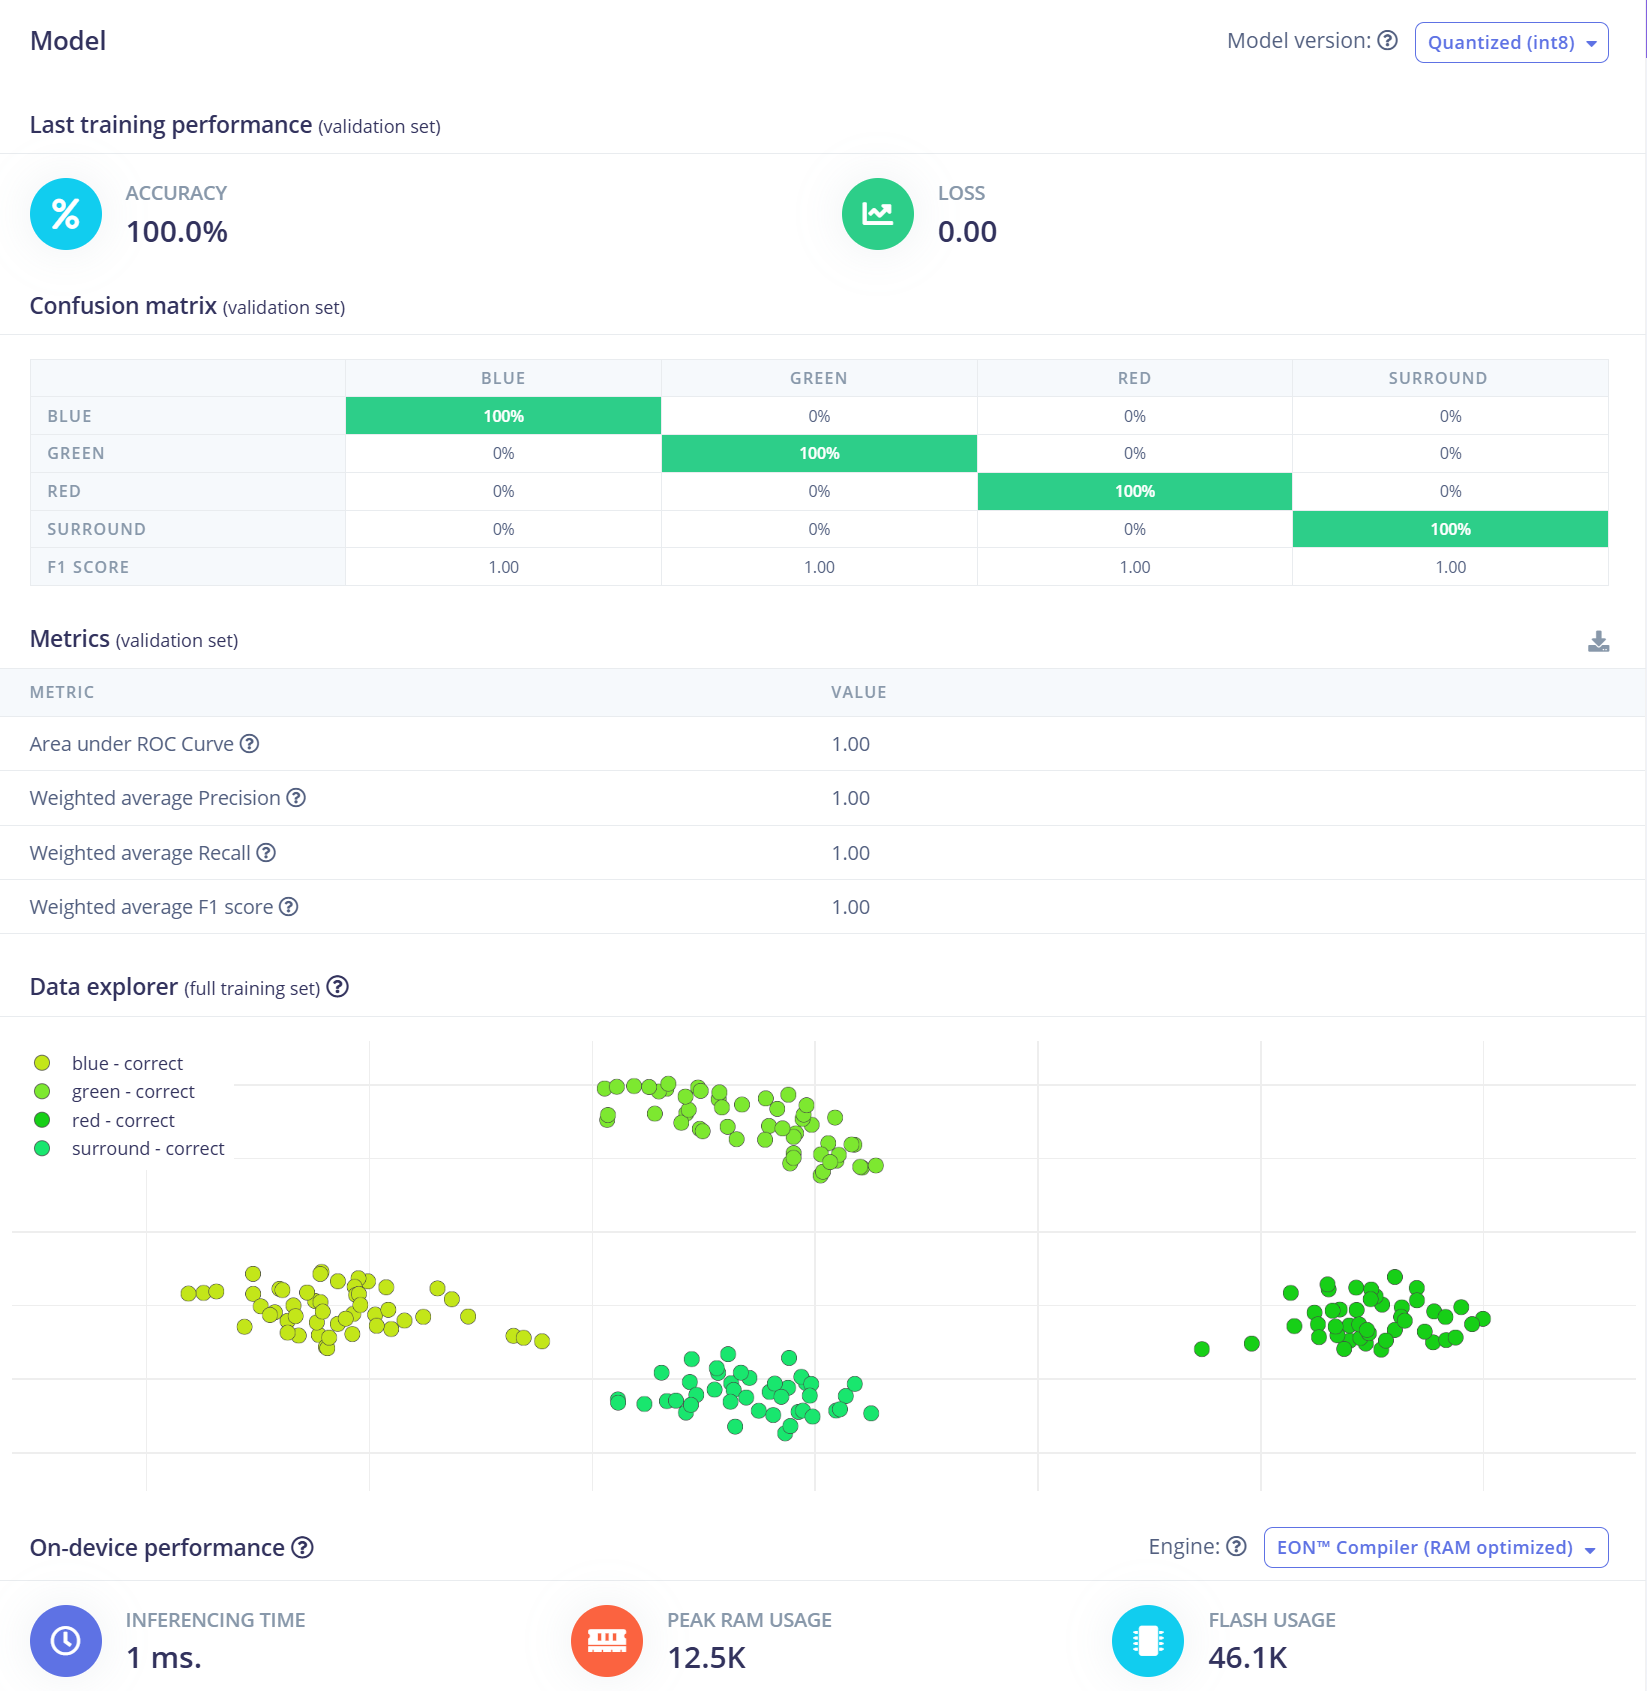
Building a mechine learning model
For this project, we will use a Convolutional Neural Network (CNN) model. The architecture consists of two Conv1D + MaxPooling layers with 8 and 16 filters respectively, followed by a 0.25 Dropout layer. After flattening, the final dense layer includes four neurons—one for each class. We’ll train the model using a learning rate of 0.005 over 100 epochs. To improve generalization and robustness, data augmentation techniques such as background noise will be applied. The initial results are promising.
Deploying to ReSpeaker XVF3800 with XIAO ESP32 S3
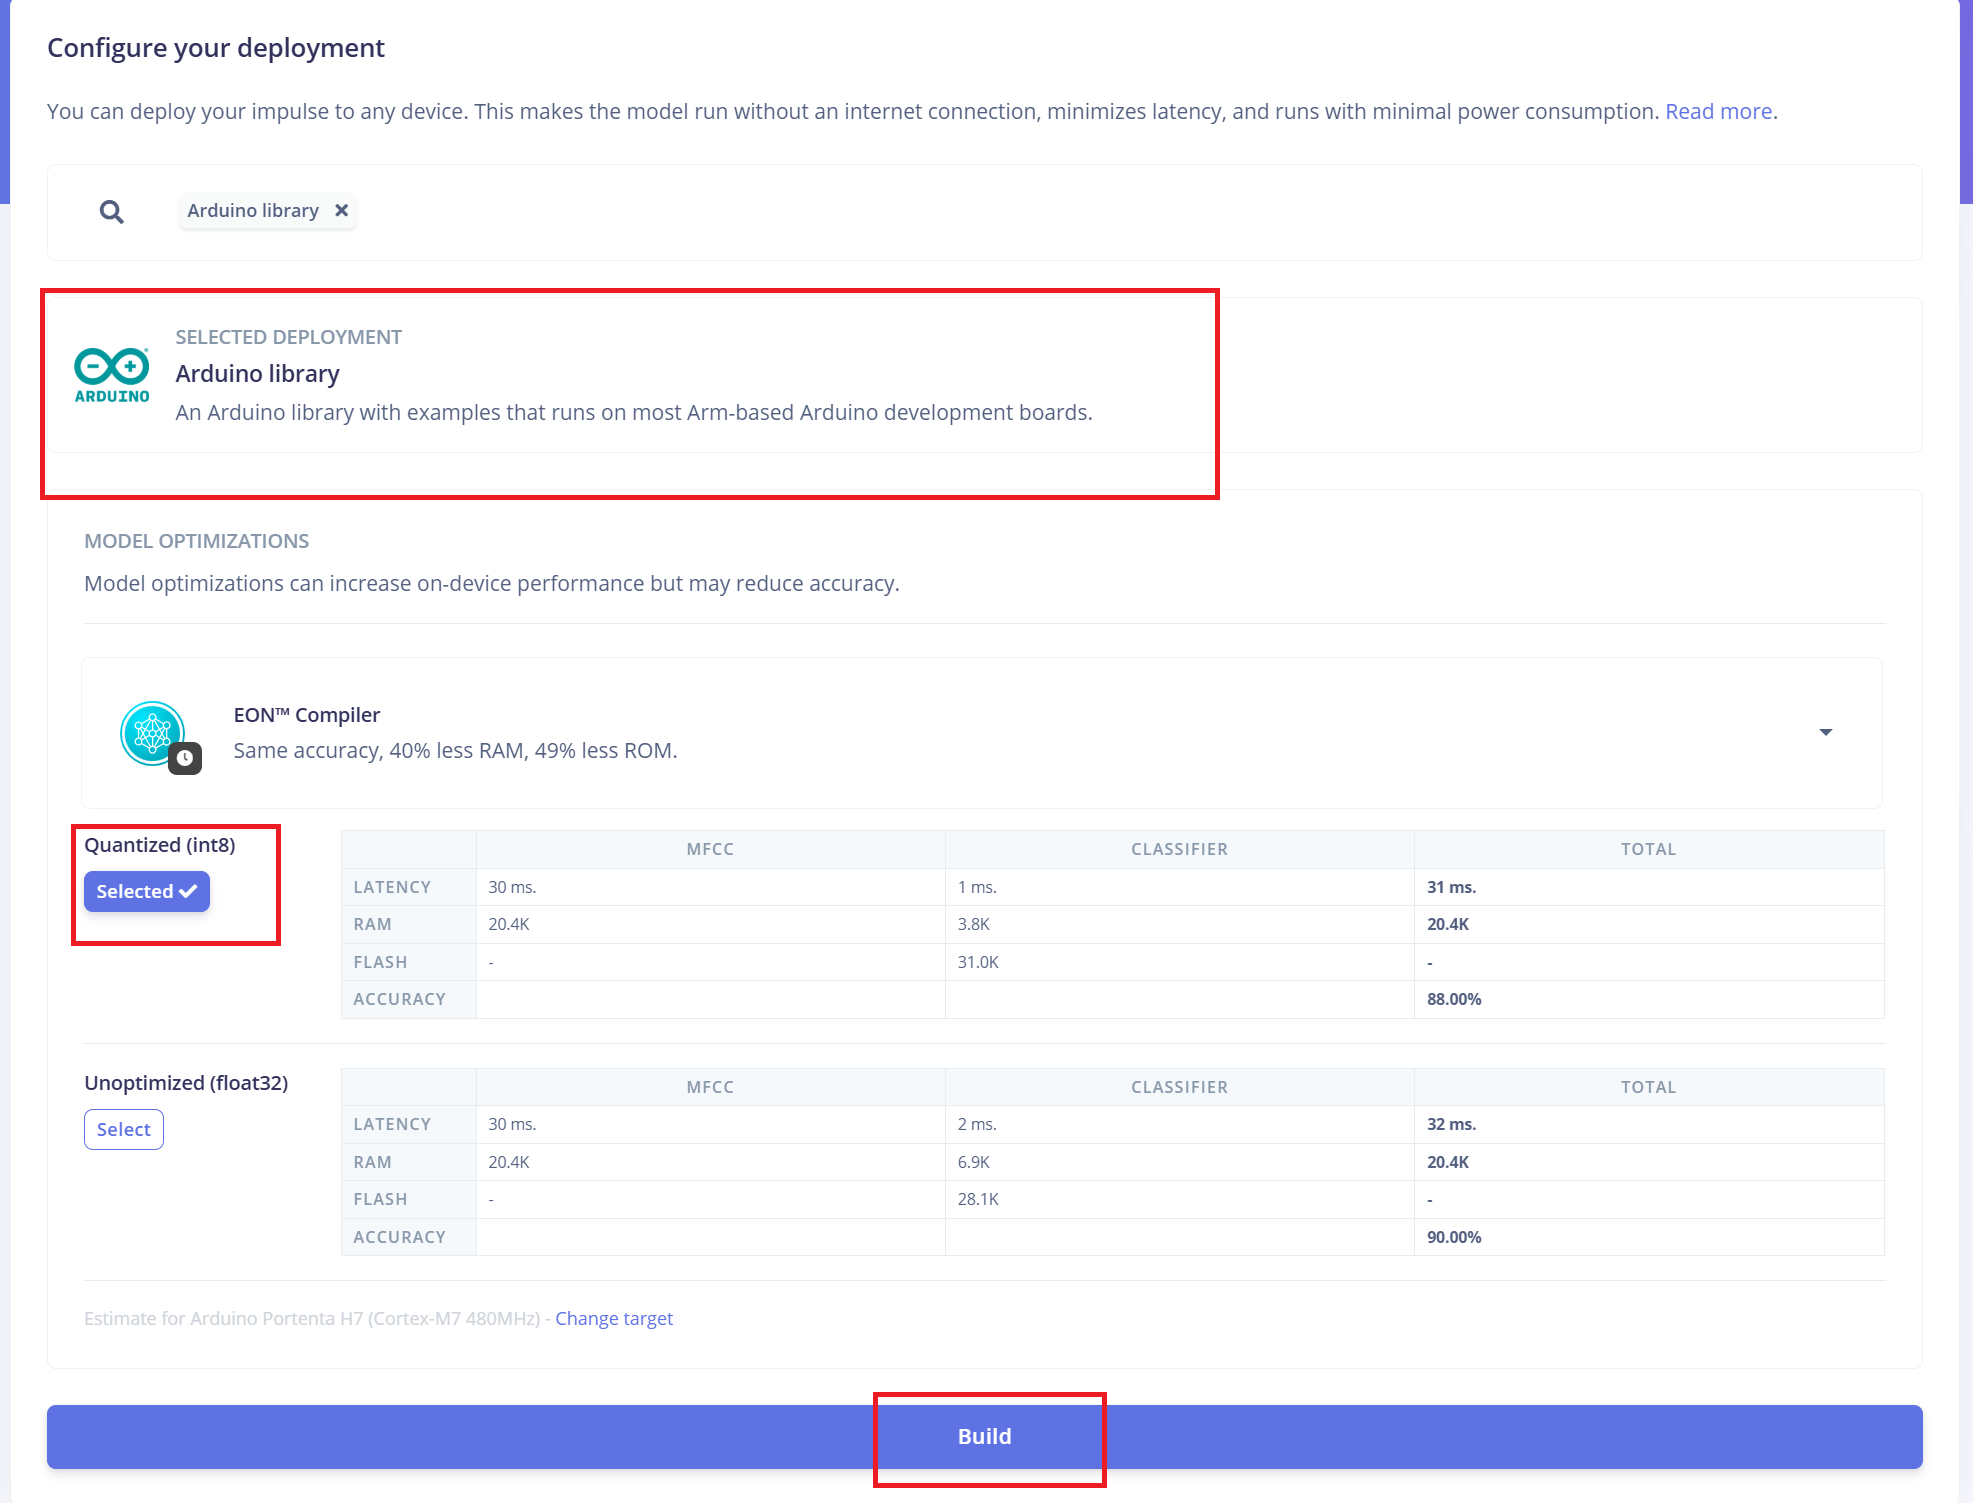
Edge Impulse will automatically bundle all necessary libraries, preprocessing functions, and the trained model into a downloadable package. To proceed:
- 1.Select "Arduino Library" as the deployment option.
- 2.At the bottom, choose the "Quantized (Int8)" format.
- 3.Click "Build" to generate the library.
Once the download is complete:
- 4.Open the Arduino IDE, go to the Sketch menu.
- 5.Select "Include Library" > "Add .ZIP Library..."
- 6.Choose the .zip file downloaded from Edge Impulse to add it to your Arduino project.
Switching Firmware to I2S Mode
Before uploading the Arduino code, you must switch the ReSpeaker XVF3800 firmware to I2S mode to enable communication via the I2C protocol. Firmware Installation Guide
Arduino Code Integration
The Arduino code provided by Edge Impulse will require a few modifications to ensure compatibility with the ReSpeaker XVF3800 and XIAO ESP32S3 hardware:Update GPIO pin definitions, I2S sampling rate, and other hardware-specific parameters according to your setup.
#define EIDSP_QUANTIZE_FILTERBANK 0
#include <Kasun9603-project-1_inferencing.h> // Change with your one
#include "driver/i2s.h"
#include "freertos/FreeRTOS.h"
#include "freertos/task.h"
// ==== AUDIO CONFIG ====
#define I2S_PORT I2S_NUM_0
#define I2S_WS 7 // L/R clock
#define I2S_SD 43 // Serial Data In
#define I2S_SCK 8 // Bit Clock
#define SAMPLE_RATE 16000
#define I2S_SAMPLE_BITS 32
#define SAMPLE_BUFFER_SIZE 2048
// ==== INFERENCE STATE ====
typedef struct {
int16_t *buffer;
uint8_t buf_ready;
uint32_t buf_count;
uint32_t n_samples;
} inference_t;
static inference_t inference;
static int32_t i2s_samples[SAMPLE_BUFFER_SIZE];
static bool record_status = true;
static bool debug_nn = false;
// ==== FUNCTION DECLARATIONS ====
static bool microphone_inference_start(uint32_t n_samples);
static bool microphone_inference_record(void);
static int microphone_audio_signal_get_data(size_t offset, size_t length, float *out_ptr);
static void audio_inference_callback(uint32_t n_bytes);
static void capture_samples(void *arg);
static int i2s_init();
static void i2s_deinit();
void setup() {
Serial.begin(115200);
while (!Serial);
ei_printf("XVF3800 Keyword Spotting Inference Start\n");
ei_printf("Model info:\n");
ei_printf("\tFrame size: %d\n", EI_CLASSIFIER_DSP_INPUT_FRAME_SIZE);
ei_printf("\tSample length: %d ms\n", EI_CLASSIFIER_RAW_SAMPLE_COUNT / (SAMPLE_RATE / 1000));
ei_printf("\tInterval: %.2f ms\n", EI_CLASSIFIER_INTERVAL_MS);
if (!microphone_inference_start(EI_CLASSIFIER_RAW_SAMPLE_COUNT)) {
ei_printf("ERR: Audio buffer allocation failed.\n");
return;
}
ei_printf("Listening...\n");
}
void loop() {
if (!microphone_inference_record()) {
ei_printf("ERR: Failed to record audio.\n");
return;
}
signal_t signal;
signal.total_length = EI_CLASSIFIER_RAW_SAMPLE_COUNT;
signal.get_data = µphone_audio_signal_get_data;
ei_impulse_result_t result = {0};
EI_IMPULSE_ERROR r = run_classifier(&signal, &result, debug_nn);
if (r != EI_IMPULSE_OK) {
ei_printf("ERR: Failed to run classifier (%d)\n", r);
return;
}
ei_printf("Predictions:\n");
for (size_t ix = 0; ix < EI_CLASSIFIER_LABEL_COUNT; ix++) {
ei_printf(" %s: ", result.classification[ix].label);
ei_printf_float(result.classification[ix].value);
ei_printf("\n");
}
#if EI_CLASSIFIER_HAS_ANOMALY == 1
ei_printf(" Anomaly score: ");
ei_printf_float(result.anomaly);
ei_printf("\n");
#endif
}
// ==== INFERENCE AND AUDIO HANDLING ====
static void audio_inference_callback(uint32_t n_bytes) {
for (uint32_t i = 0; i < n_bytes / sizeof(int32_t); i++) {
int16_t val = i2s_samples[i] >> 16; // Convert from 32-bit signed to 16-bit
inference.buffer[inference.buf_count++] = val;
if (inference.buf_count >= inference.n_samples) {
inference.buf_ready = 1;
inference.buf_count = 0;
}
}
}
static void capture_samples(void *arg) {
size_t bytes_read;
while (record_status) {
i2s_read(I2S_PORT, (char *)i2s_samples, SAMPLE_BUFFER_SIZE * sizeof(int32_t), &bytes_read, portMAX_DELAY);
if (bytes_read > 0) {
audio_inference_callback(bytes_read);
} else {
ei_printf("ERR: I2S read failed\n");
}
}
vTaskDelete(NULL);
}
static bool microphone_inference_start(uint32_t n_samples) {
inference.buffer = (int16_t *)malloc(n_samples * sizeof(int16_t));
if (!inference.buffer) return false;
inference.buf_count = 0;
inference.n_samples = n_samples;
inference.buf_ready = 0;
if (i2s_init() != 0) {
ei_printf("ERR: I2S init failed\n");
return false;
}
xTaskCreate(capture_samples, "CaptureSamples", 4096, NULL, 1, NULL);
return true;
}
static bool microphone_inference_record(void) {
while (!inference.buf_ready) {
delay(10);
}
inference.buf_ready = 0;
return true;
}
static int microphone_audio_signal_get_data(size_t offset, size_t length, float *out_ptr) {
numpy::int16_to_float(&inference.buffer[offset], out_ptr, length);
return 0;
}
static int i2s_init() {
i2s_config_t i2s_config = {
.mode = (i2s_mode_t)(I2S_MODE_MASTER | I2S_MODE_RX),
.sample_rate = SAMPLE_RATE,
.bits_per_sample = (i2s_bits_per_sample_t)I2S_SAMPLE_BITS,
.channel_format = I2S_CHANNEL_FMT_ONLY_LEFT,
.communication_format = I2S_COMM_FORMAT_I2S,
.intr_alloc_flags = ESP_INTR_FLAG_LEVEL1,
.dma_buf_count = 8,
.dma_buf_len = 512,
.use_apll = false,
.tx_desc_auto_clear = false,
.fixed_mclk = 0
};
i2s_pin_config_t pin_config = {
.bck_io_num = I2S_SCK,
.ws_io_num = I2S_WS,
.data_out_num = -1,
.data_in_num = I2S_SD
};
esp_err_t err;
err = i2s_driver_install(I2S_PORT, &i2s_config, 0, NULL);
if (err != ESP_OK) return err;
err = i2s_set_pin(I2S_PORT, &pin_config);
if (err != ESP_OK) return err;
err = i2s_zero_dma_buffer(I2S_PORT);
return err;
}
static void i2s_deinit() {
i2s_driver_uninstall(I2S_PORT);
}
Tech Support & Product Discussion
Thank you for choosing our products! We are here to provide you with different support to ensure that your experience with our products is as smooth as possible. We offer several communication channels to cater to different preferences and needs.