Smart Home Voice Control with Home Assistant
Overview
Talk with smart spaces with new ReSpeaker XMOS XVF3800 with XIAO ESP32S3 switch up the lights, crank up the tunes, or even ask about the weather using voice
This chapter we will use the ReSpeaker XMOS XVF3800 with XIAO ESP32S3 HA Voice Assistant to connect the Sonoff smart switch to realize voice control of the light switch.
Hardware Required
| ReSpeaker XVF3800 with XIAO ESP32S3 | Home Assistant Device | Sonoff BASICR2 |
|---|---|---|
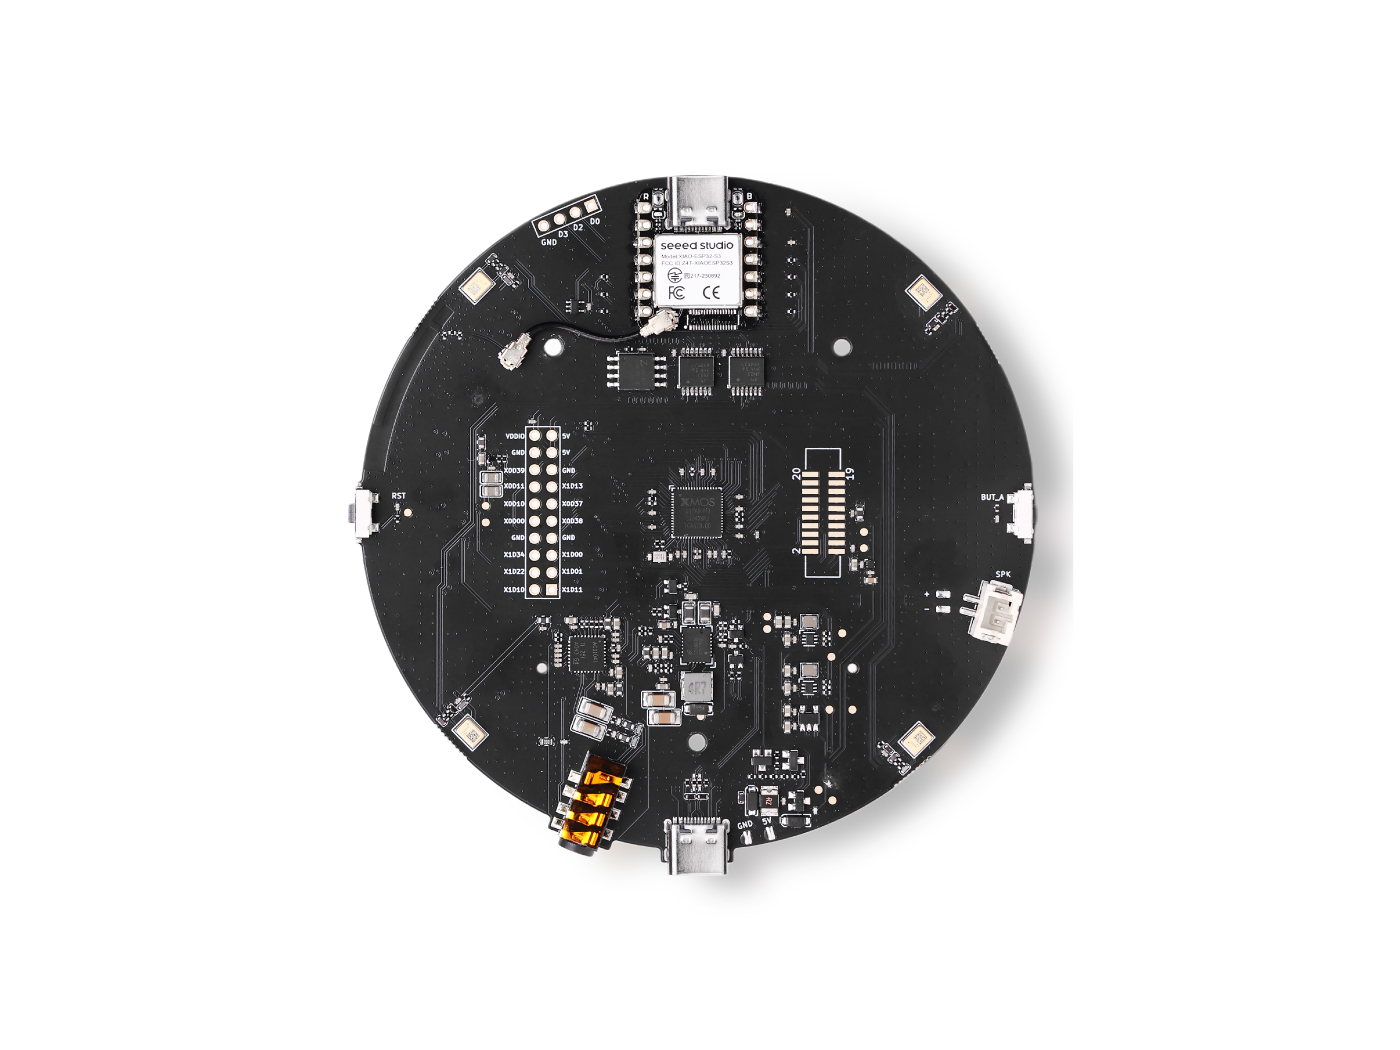 |  |  |
Firmware update
To get the best playback experience, we need to update XMOS firmware to Download the firmware from here. On your computer, plug in the ReSpeaker XMOS XVF3800 with XIAO ESP32S3 and run the in our guide:
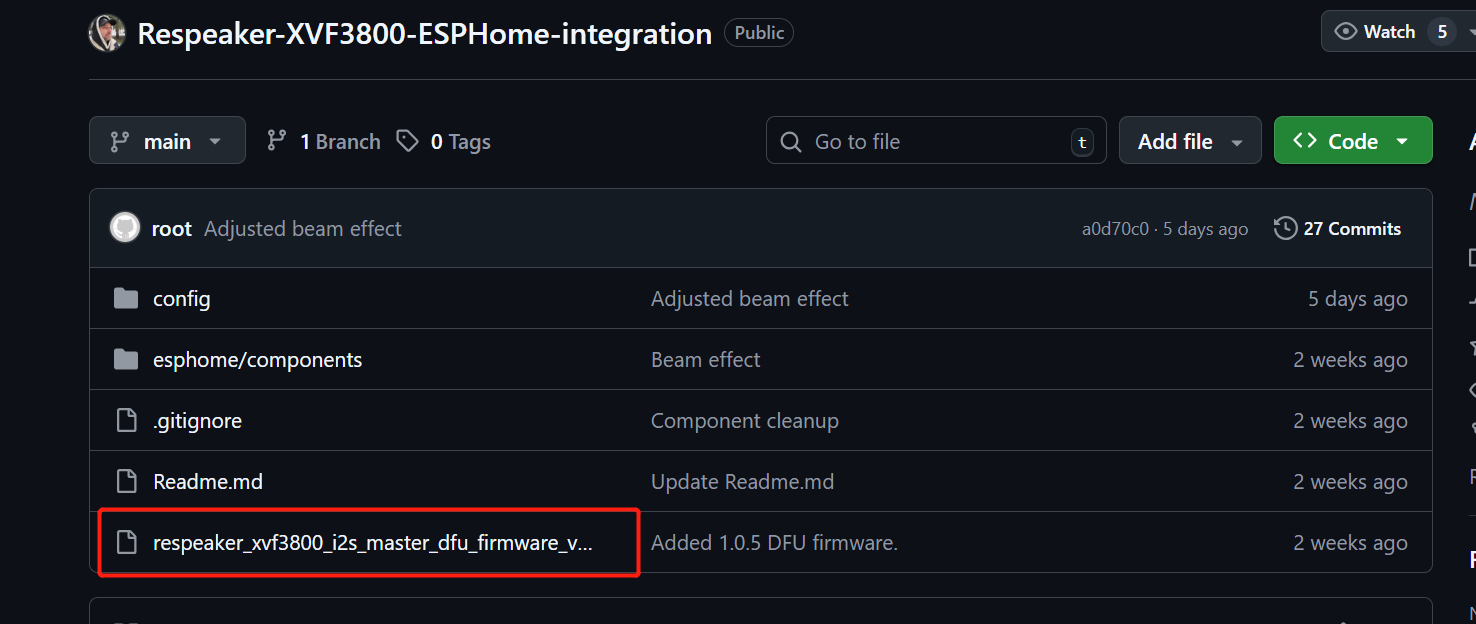
The XVF3800 mic array needs a 12.288 MHz MCLK to work, but ESPHome (used in Home Assistant) can't generate it due to API limits. This firmware makes the XVF3800 act as the I2S master instead, so it can generate its own clocks without needing MCLK from the ESP32. Our firmware fixes this limitation, so the mic works properly with Home Assistant.
You can download Firmware From Here
The installtion guide is Here
Prepare ReSpeaker XMOS XVF3800 with XIAO ESP32S3
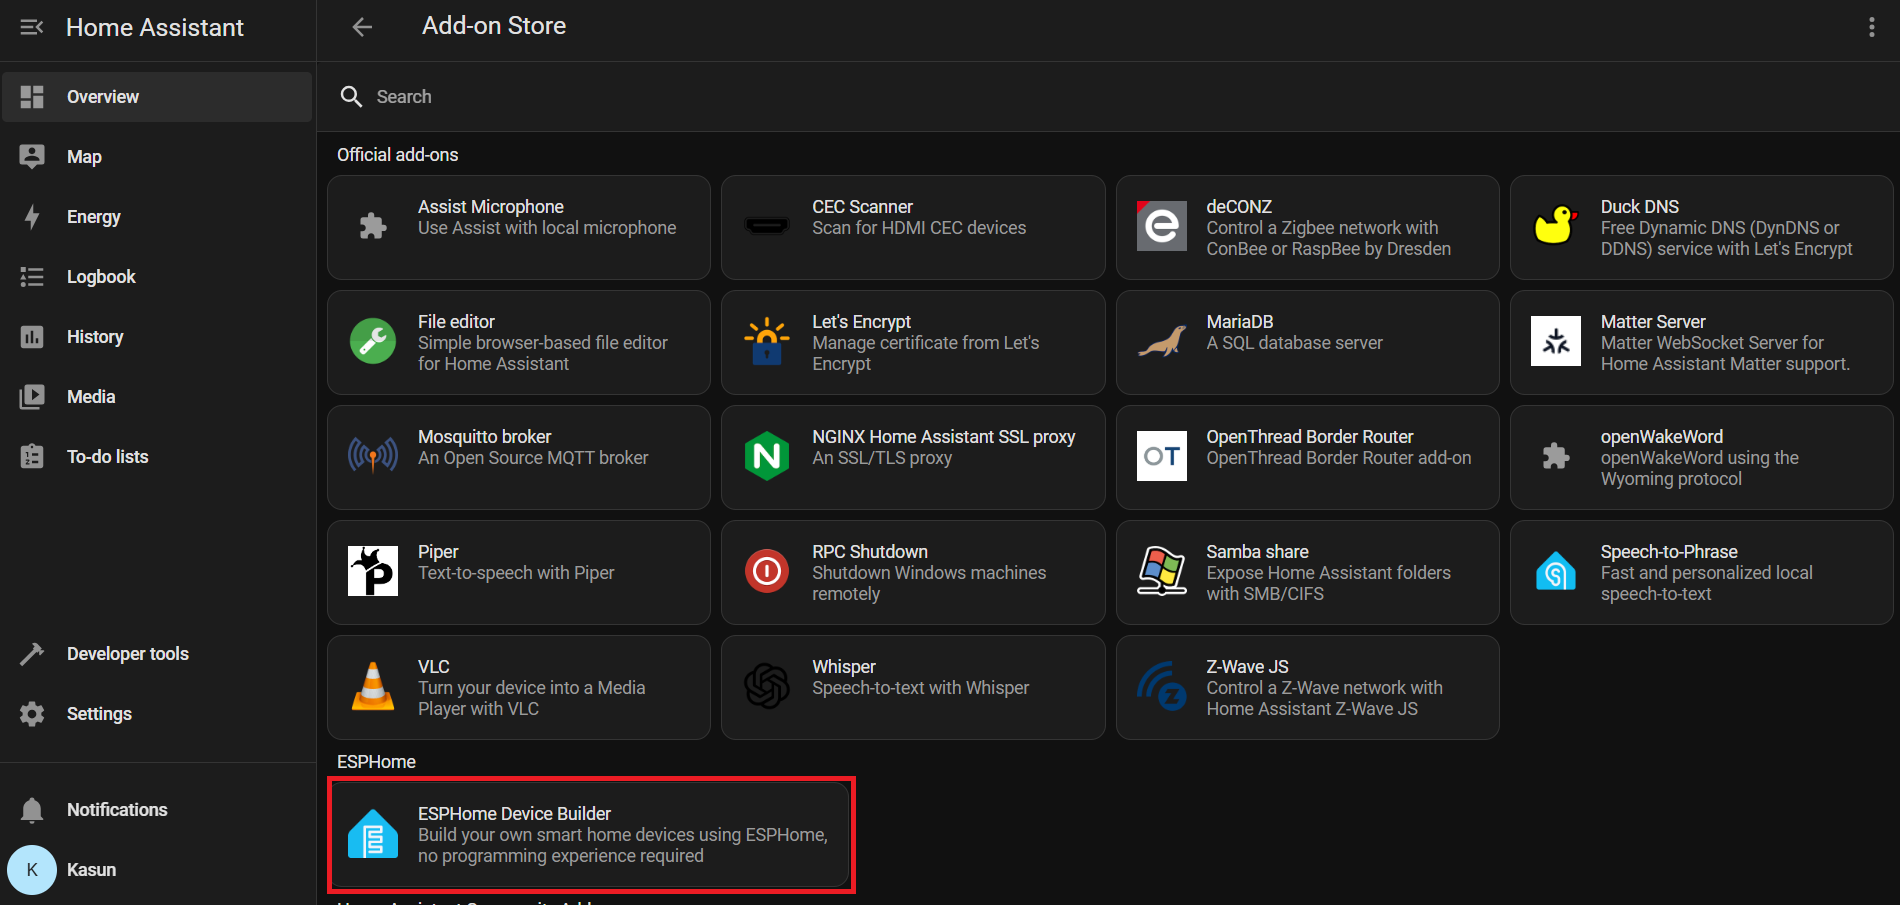
Go to Home Assistant > Settings > Add-ons.
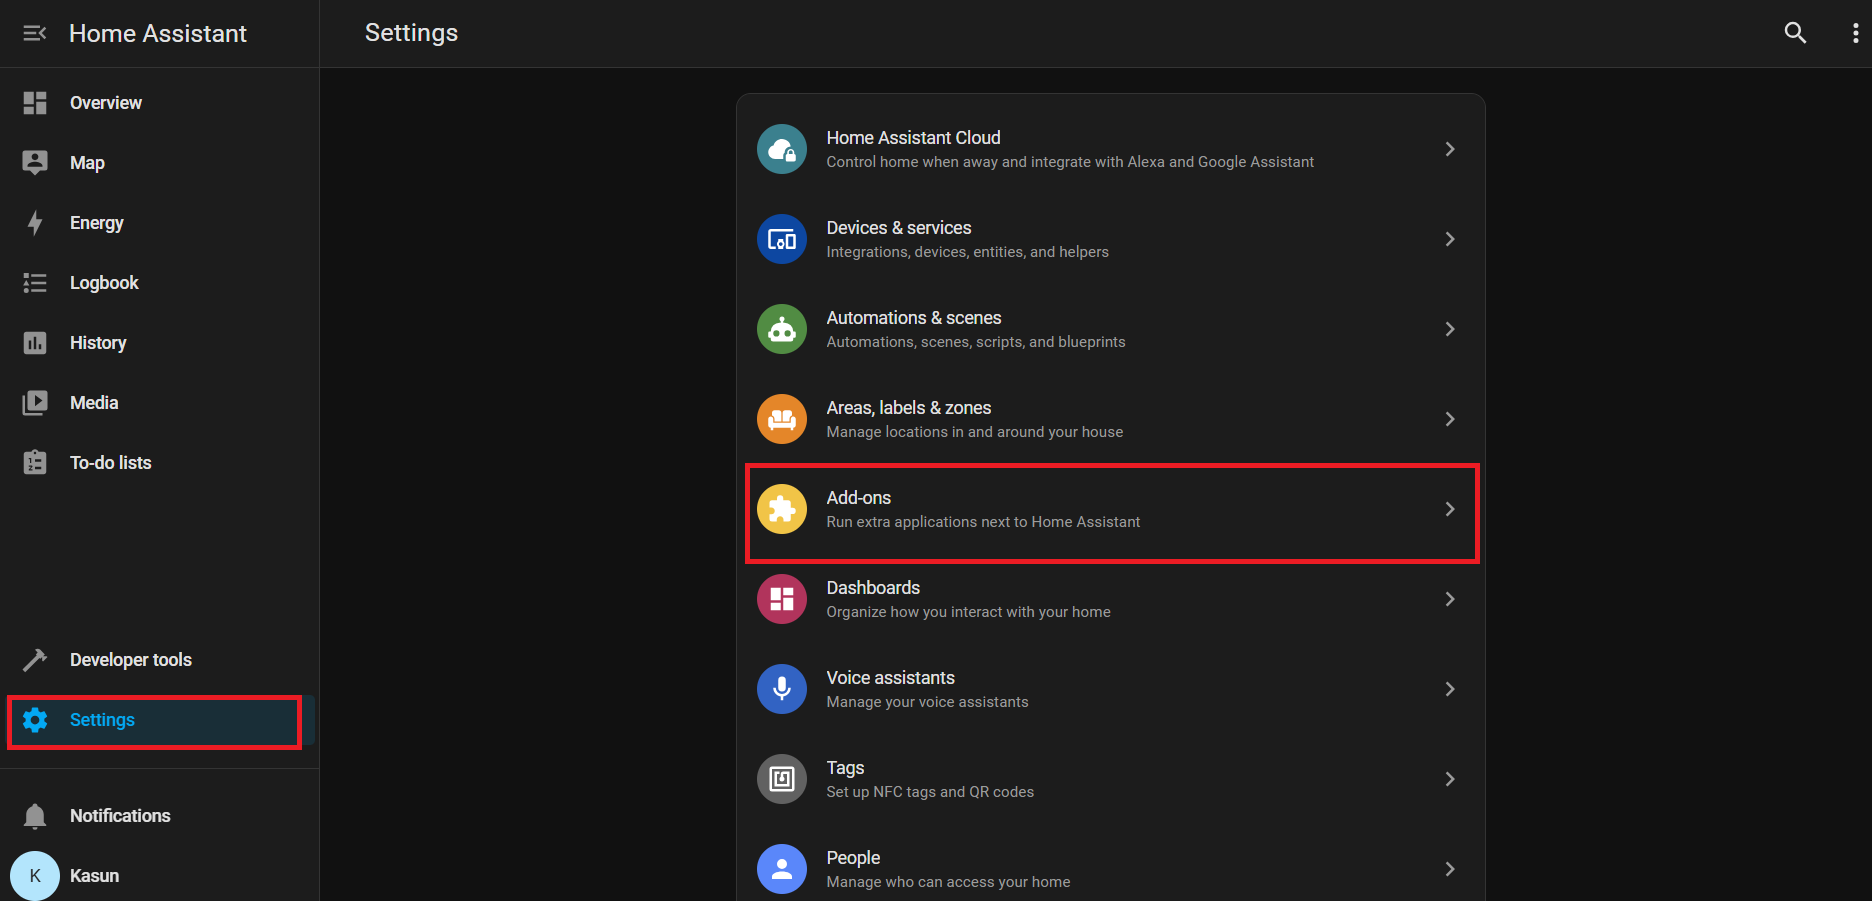
Click Add-on Store (usually at the bottom right)
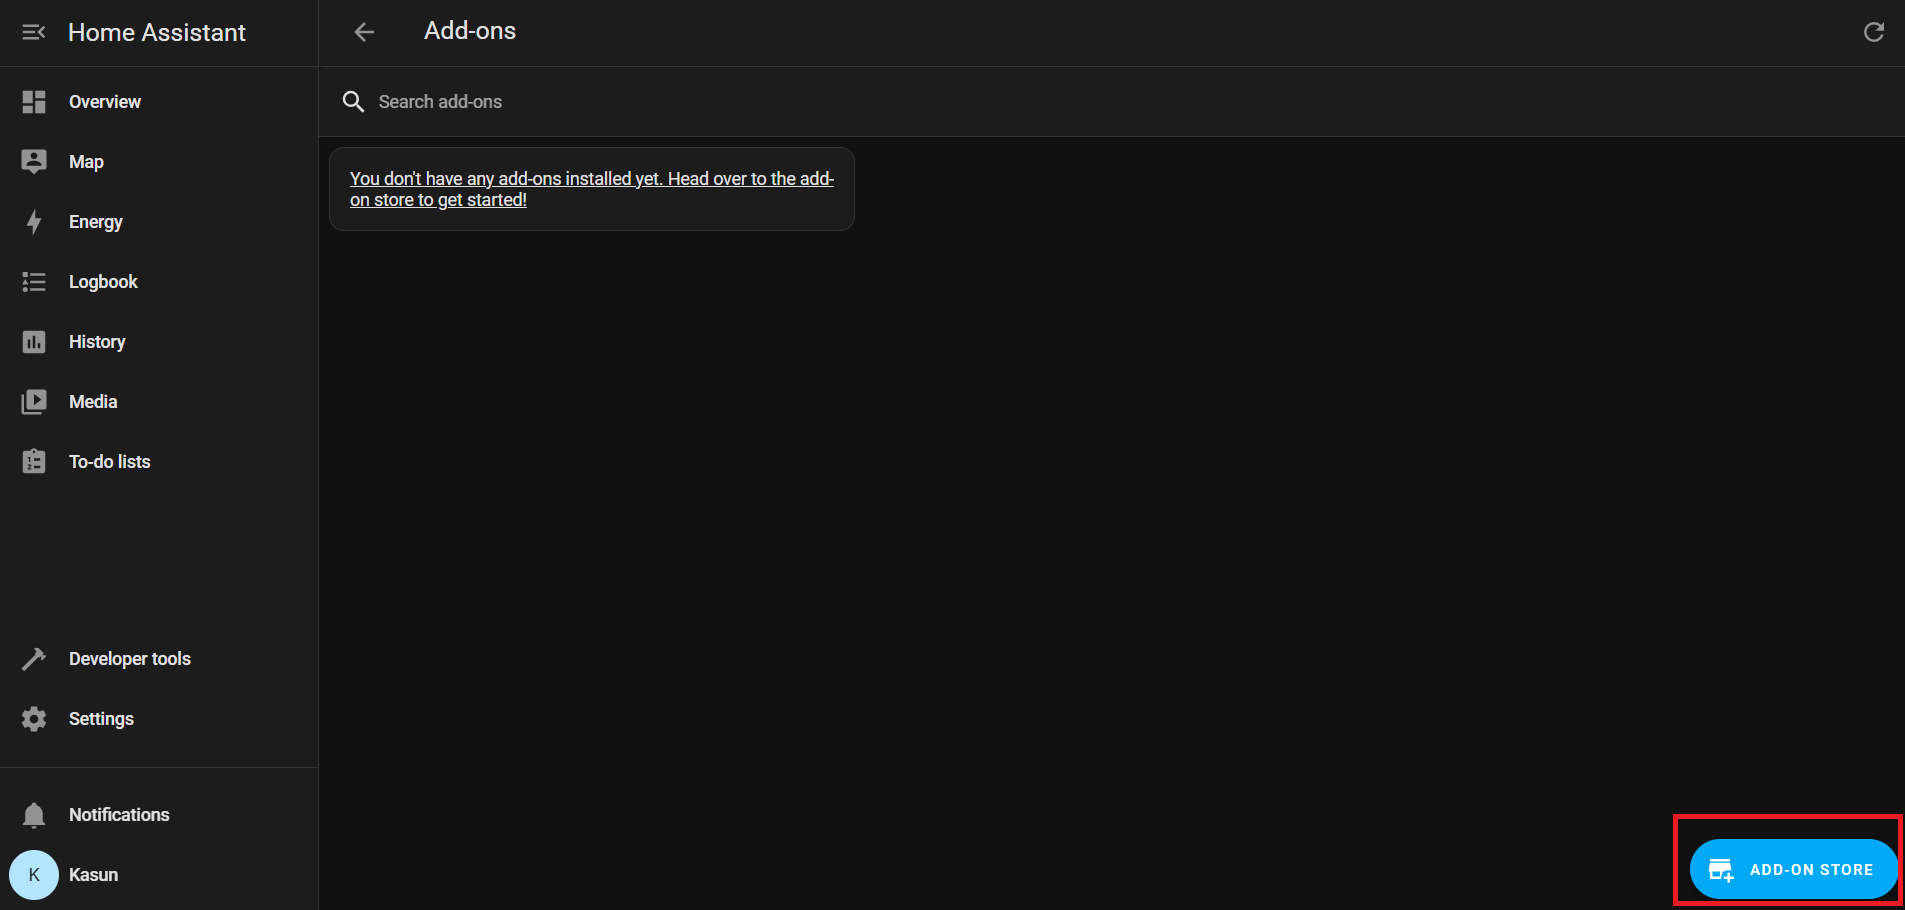
Under Official add-ons, search for and install ESPHome Device Builder.
After installation, click Start to run the ESPHome add-on.
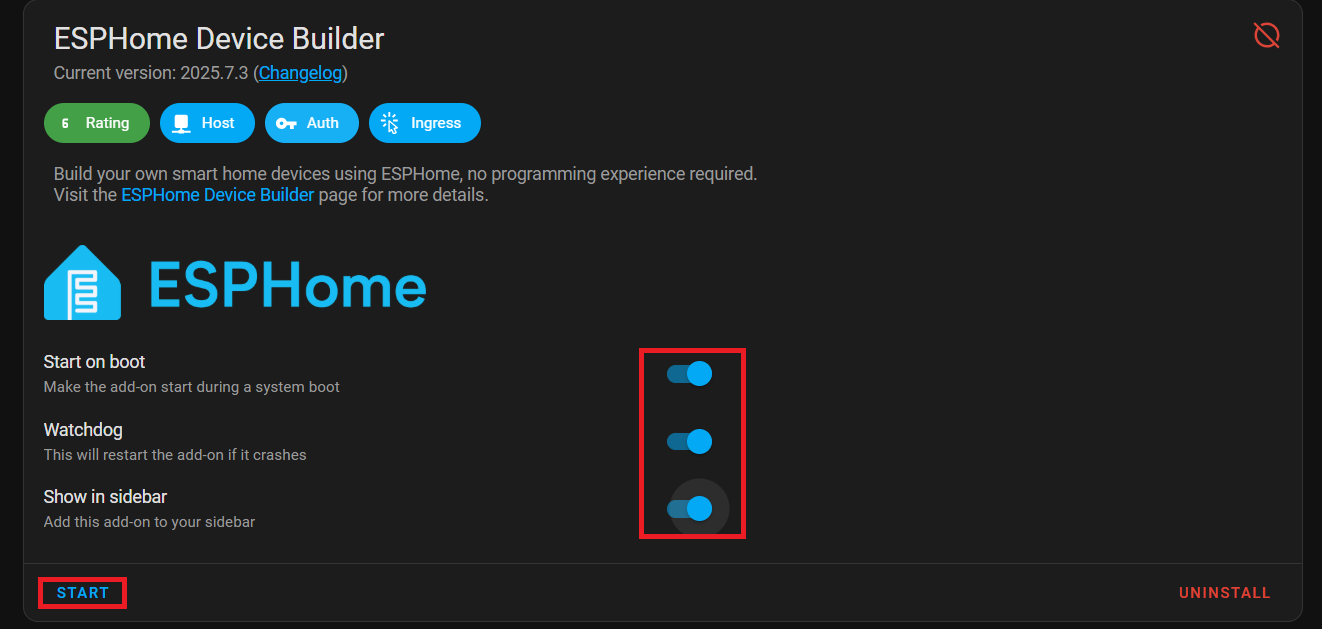
Enable Start on Boot, Watchdog, and Show in Sidebar for easier access.
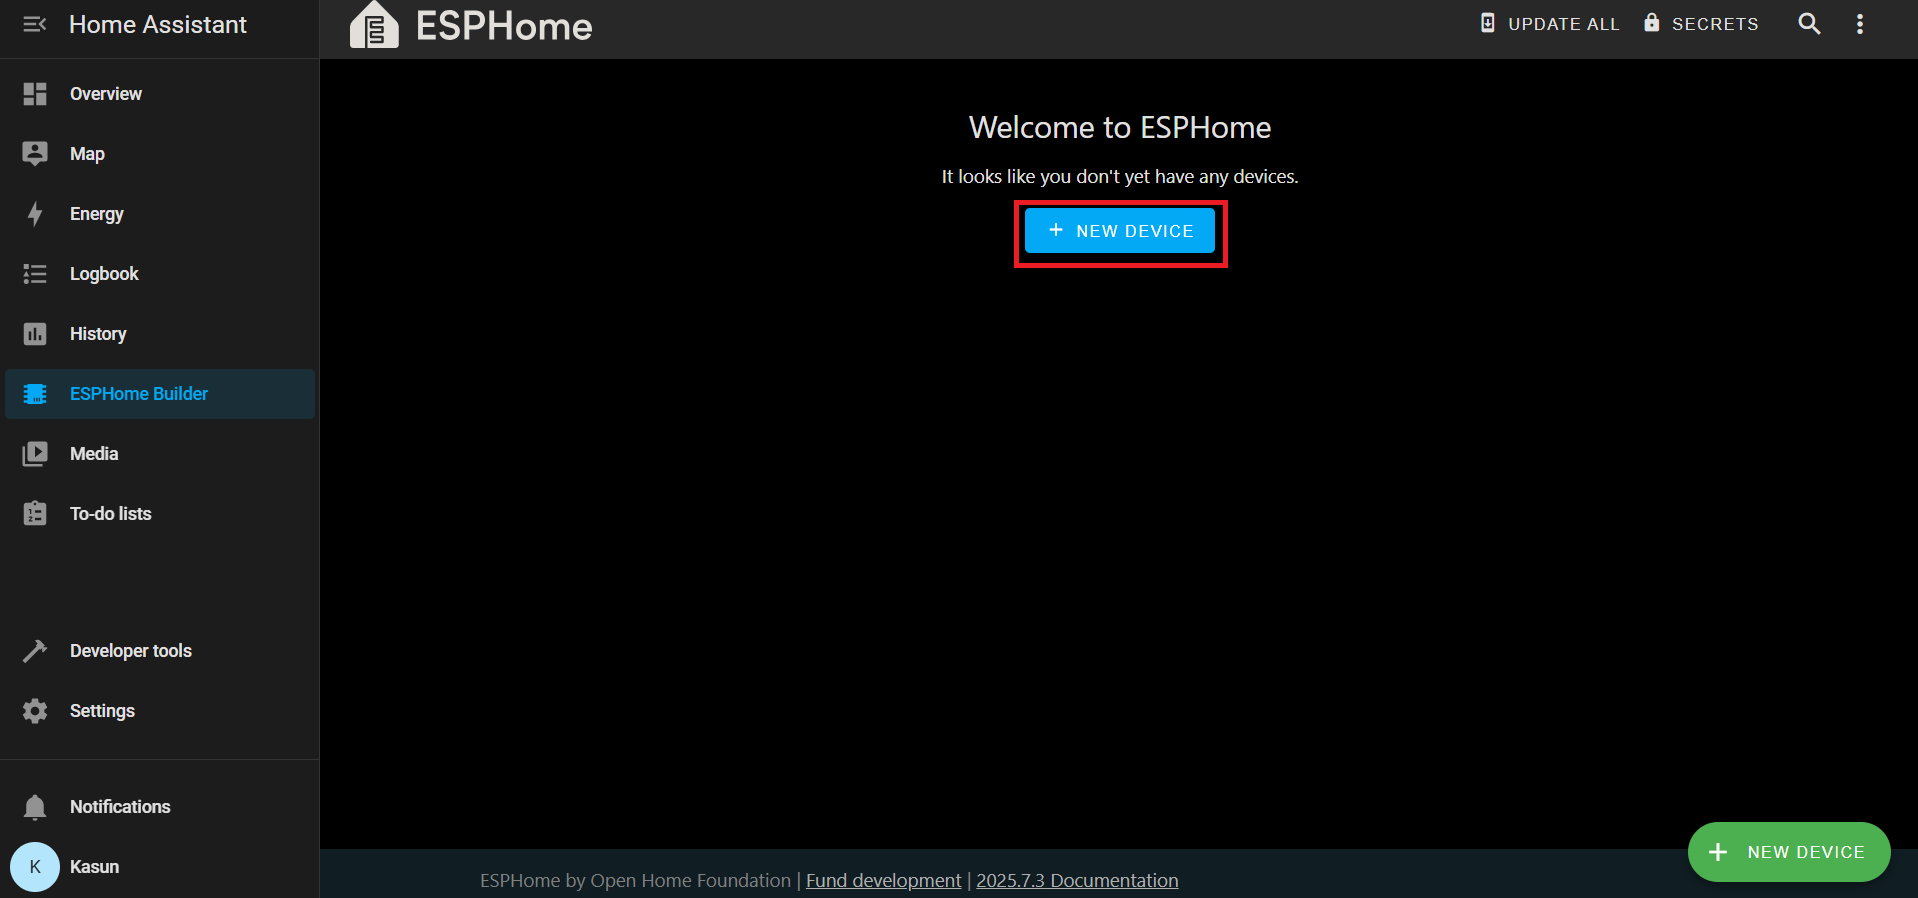
From the Home Assistant sidebar, go to ESPHome Builder.
Click + NEW DEVICE.
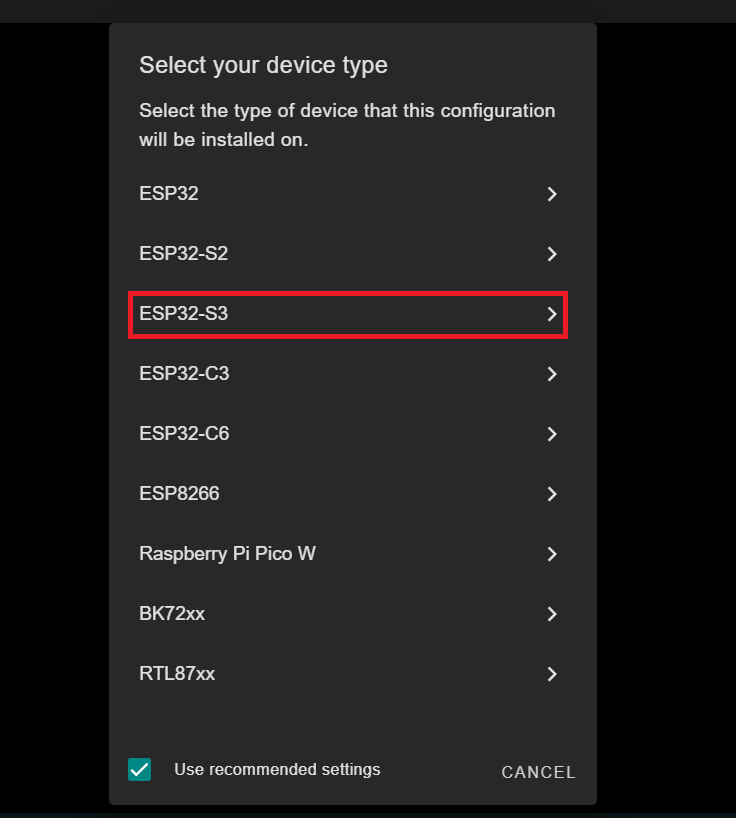
When prompted, click SKIP – we’ll create the configuration manually.
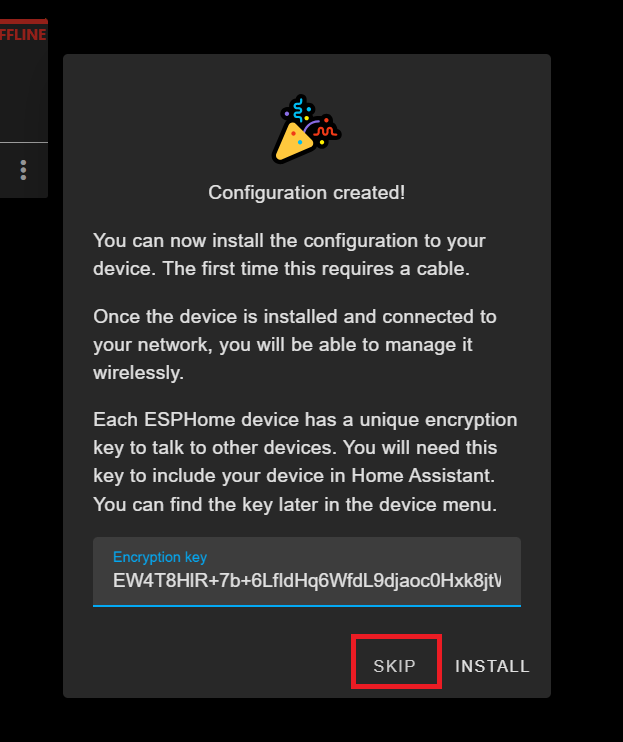
Select your new device entry and click EDIT.

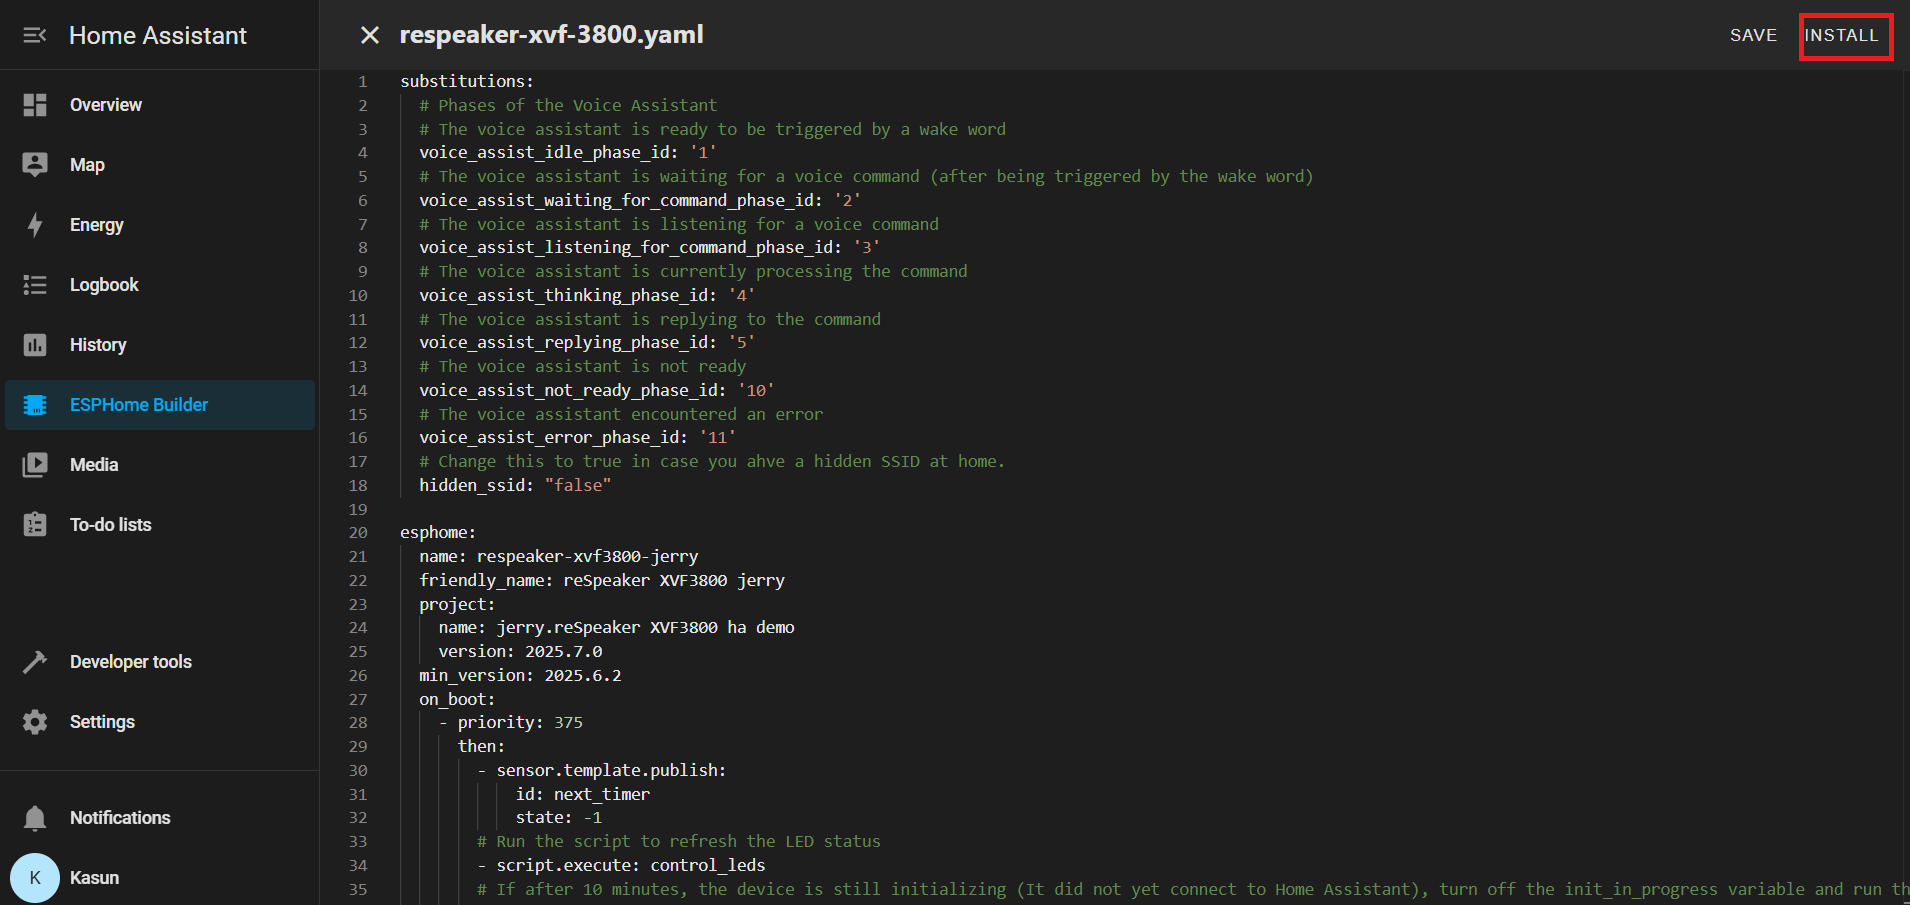
Replace the content with your custom YAML configuration
You can Found the YAML file from Here
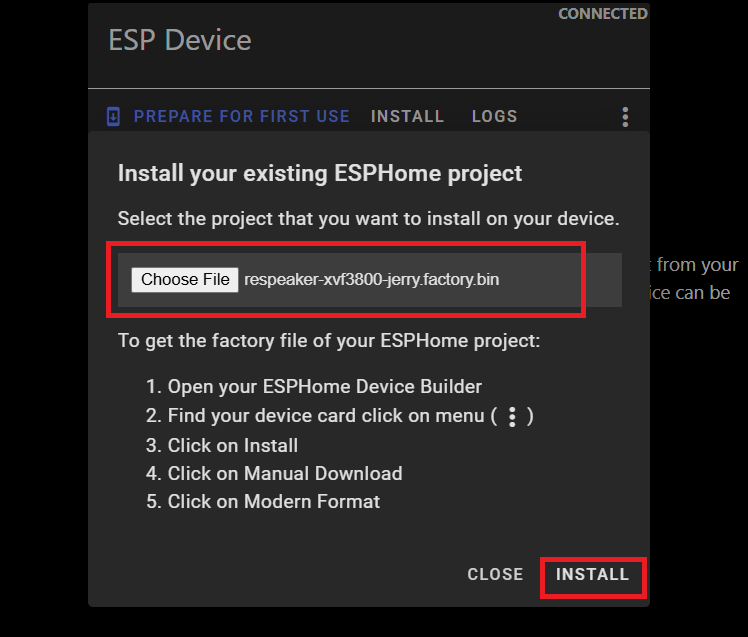
Once your YAML is saved, click INSTALL.
Choose Manual Download
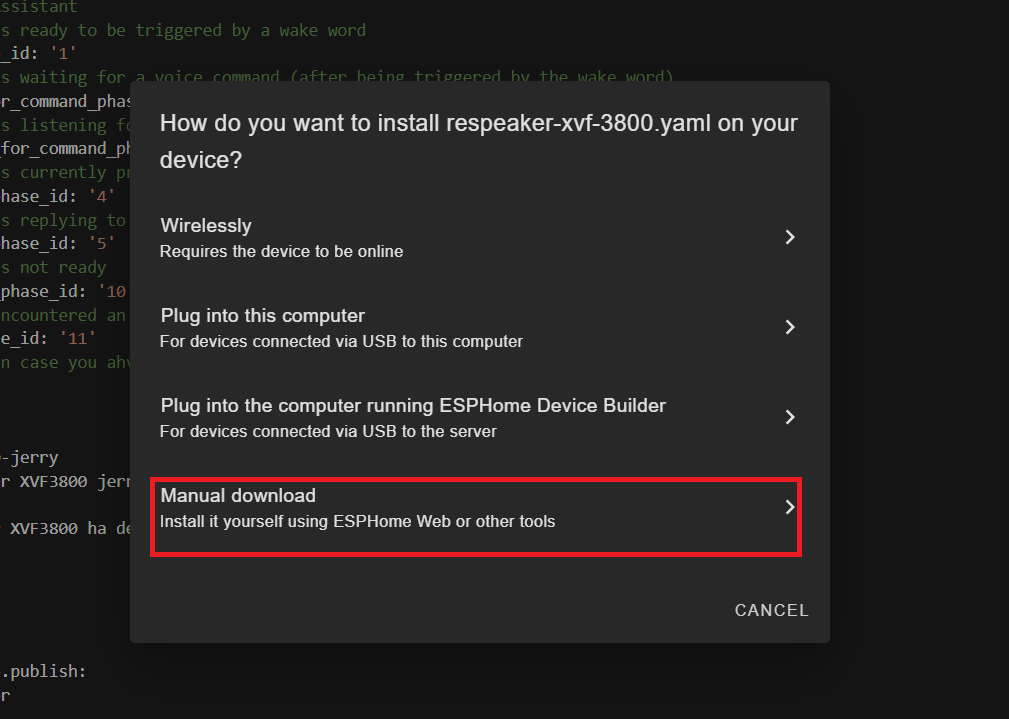
Wait for the firmware to compile.
Download the generated .bin firmware file to your computer.

Connect the ESP32-S3 board (with XVF3800 connected) to your PC using a USB Type-C cable.
Open Web-ESPHome in Chrome or Edge.
Click CONNECT and choose the appropriate serial port

Once connected, click INSTALL
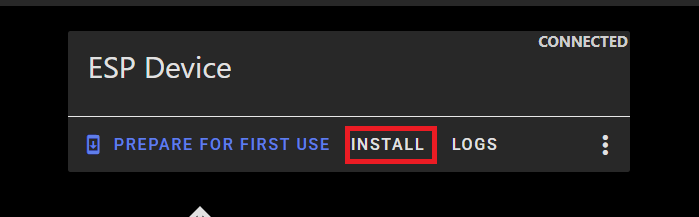
Select the .bin file you just downloaded.
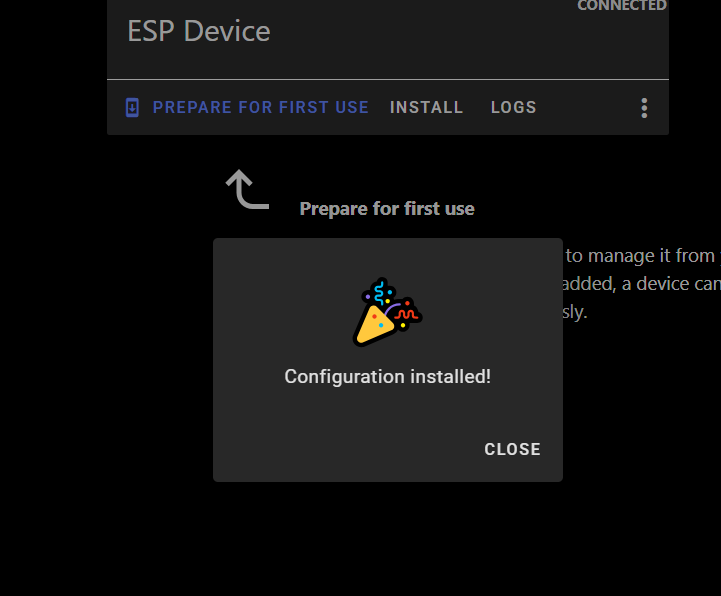
Wait for the installation to complete (may take a few minutes).
After success, you’ll see a confirmation message.
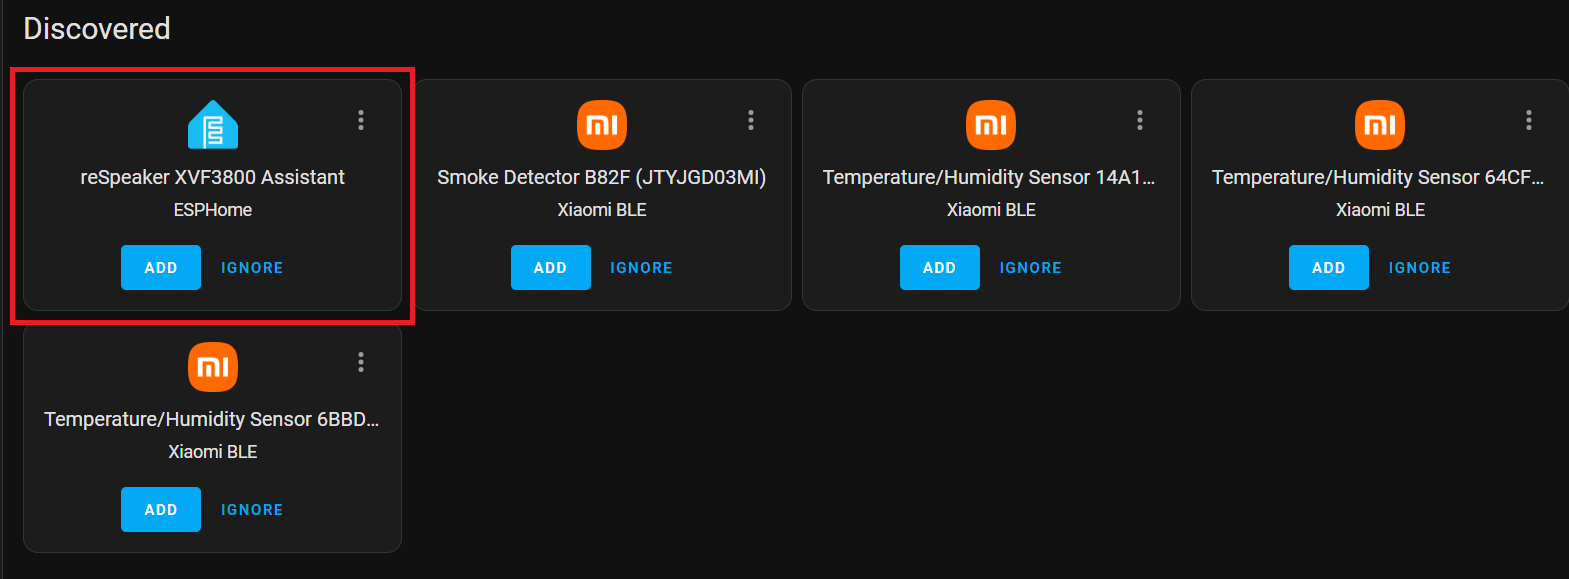
Return to Home Assistant > Settings > Devices & Services.
You should see ESPHome listed as a discovered integration.
Click CONFIGURE, then Submit to finish setup.
Add your smart device
Set up the Sonoff BASICR2 device according to the manufacturer's user manual. You will need to create eWELink account.
Install HACS
If not already installed, follow the official guide to set up the Home Assistant Community Store:
Open HACS from the sidebar. Search for Sonoff LAN in the Search section.
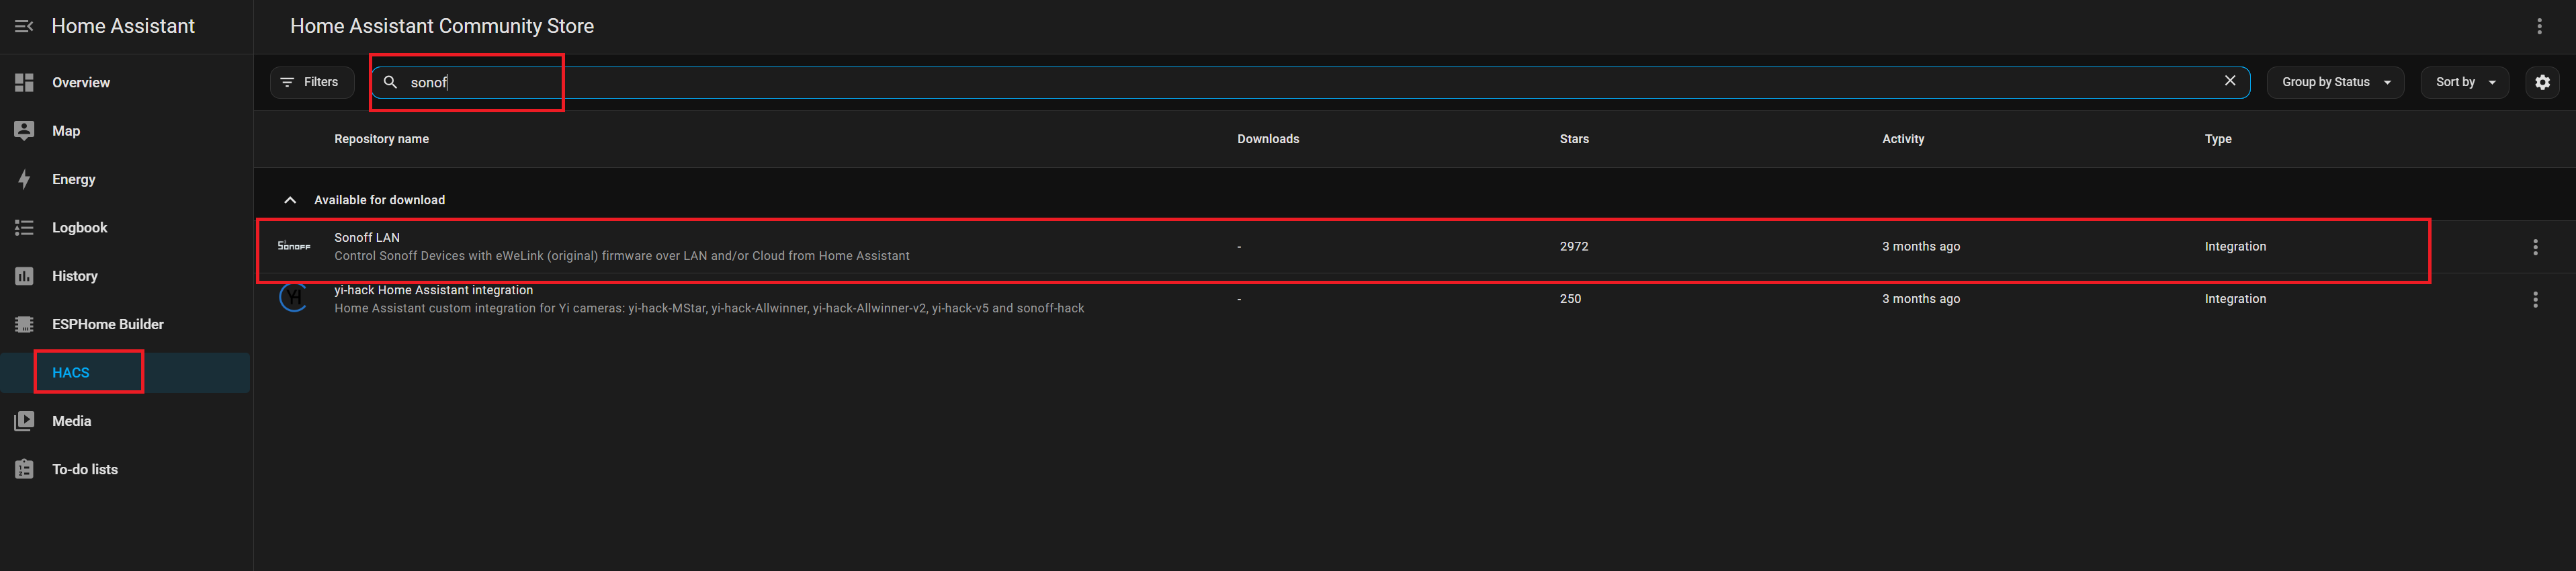
Click Install to add the integration. Restart Home Assistant to apply changes.
Sonoff
Navigate to Settings → Devices & Services. Click Add Integration. Search for and select Sonoff.
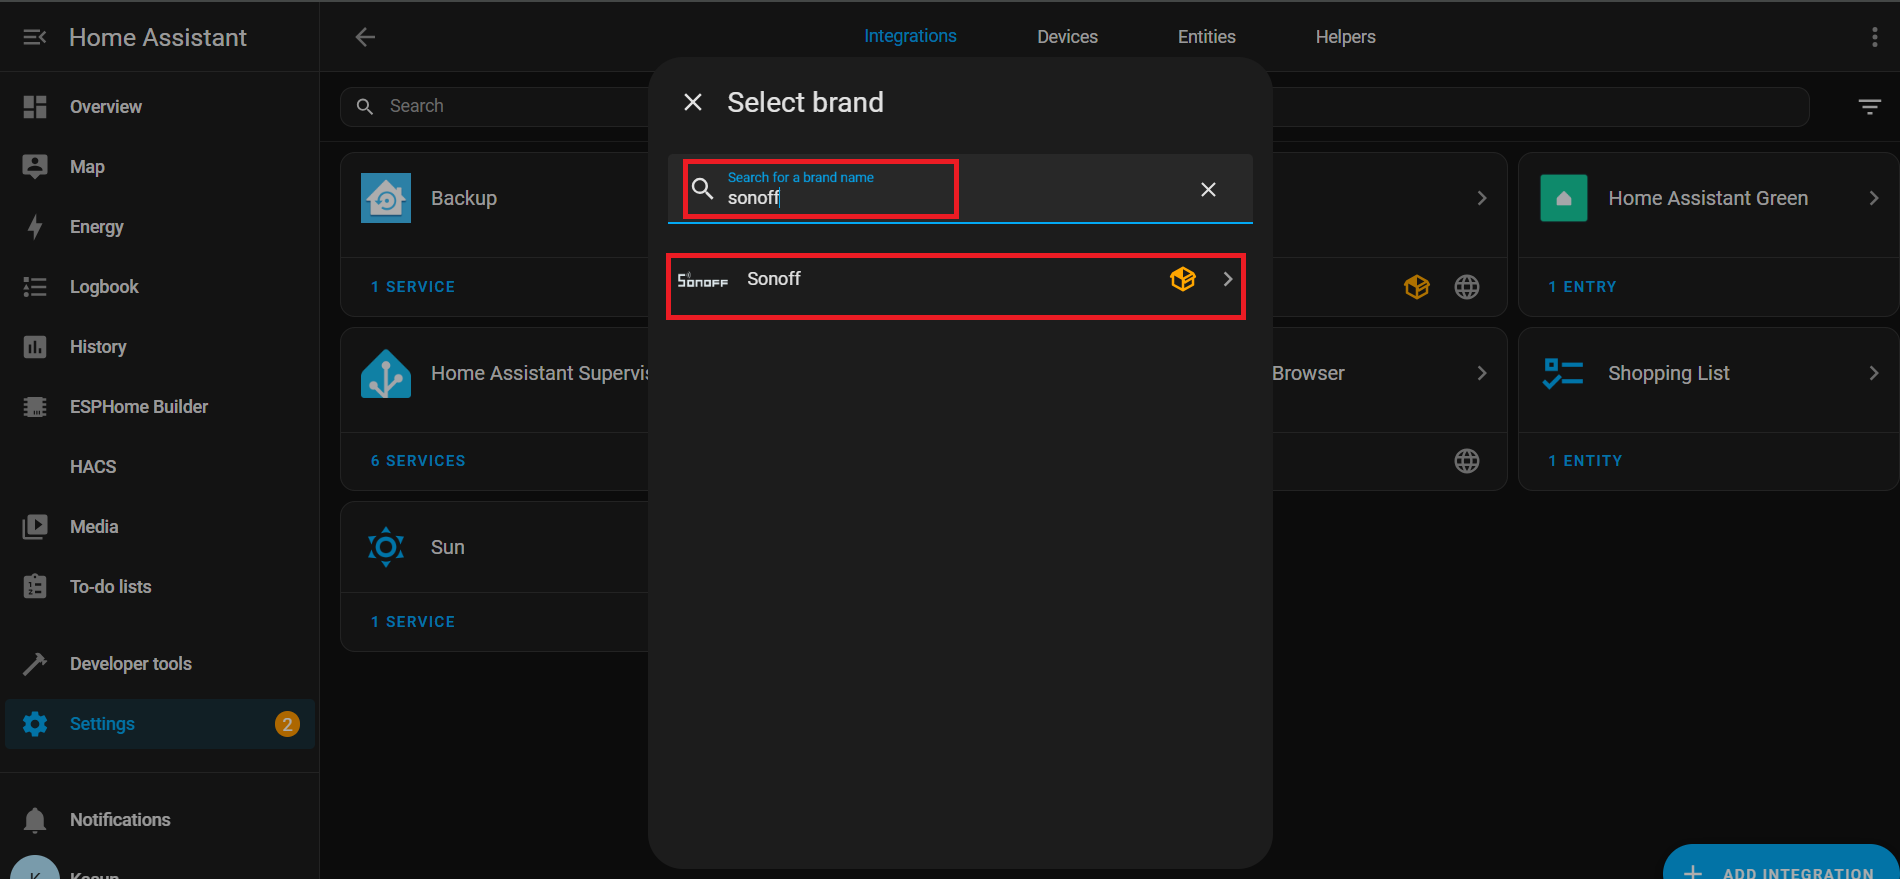
Enter your eWeLink account credentials to authenticate.

Once connected successfully, you will see the associated entities listed under: Settings → Devices & Services → Entities

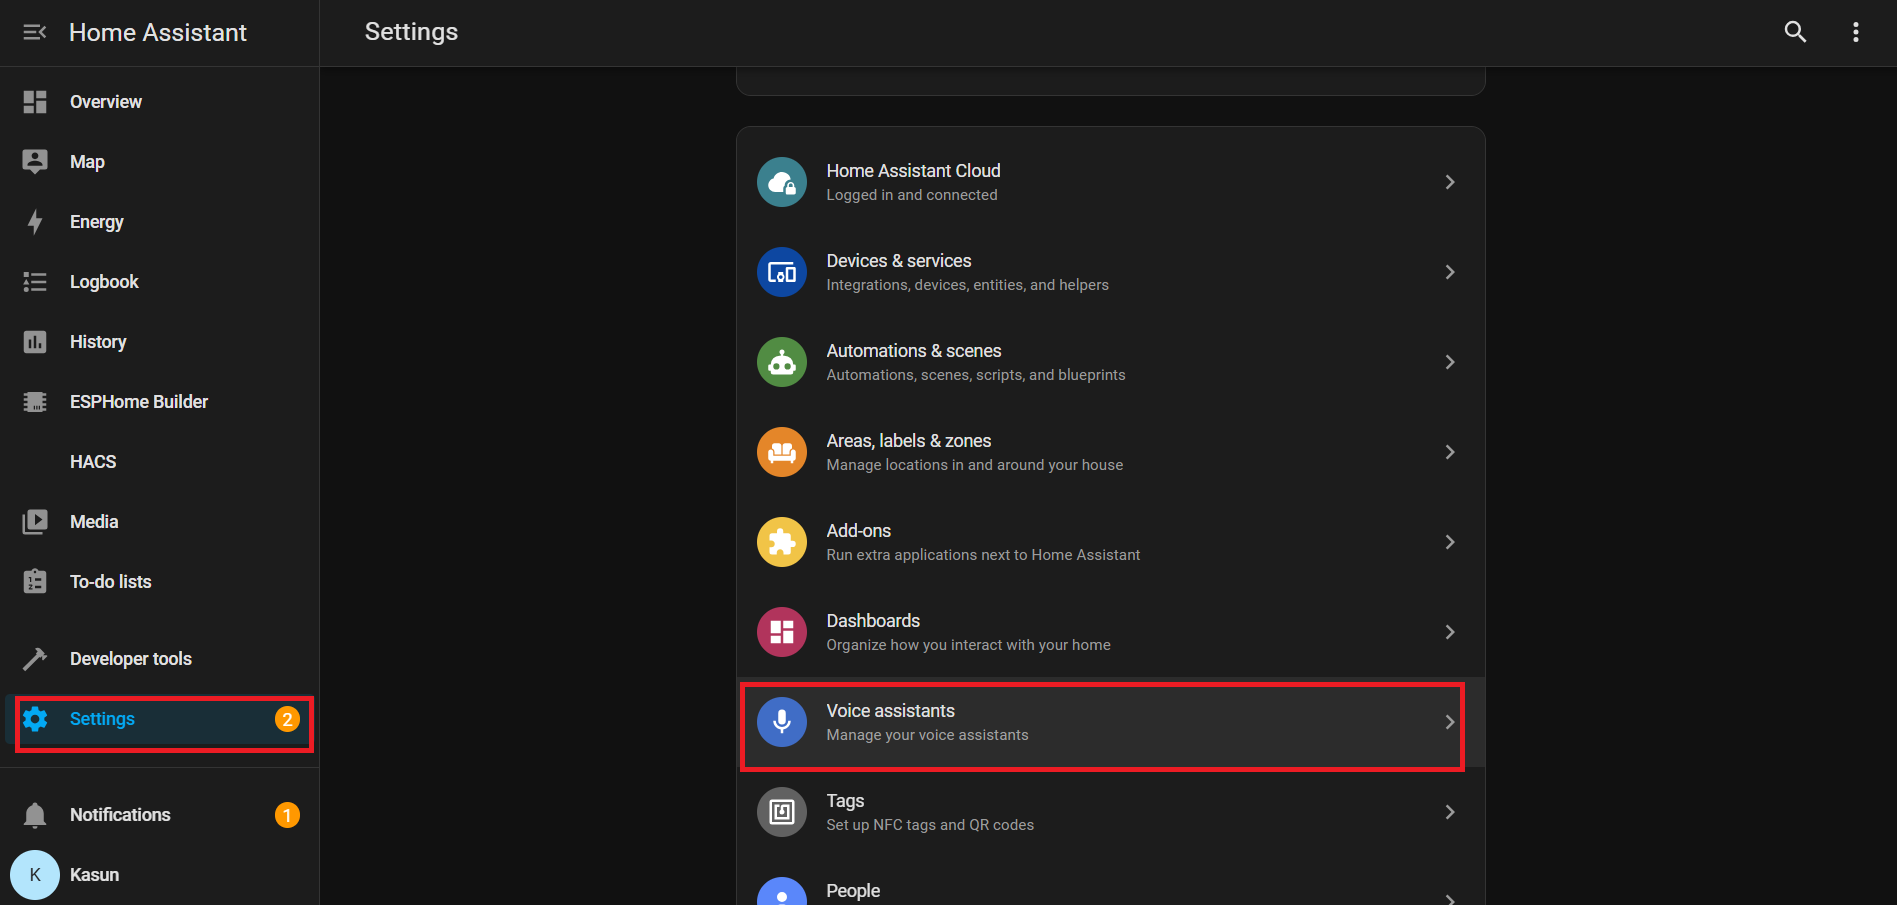
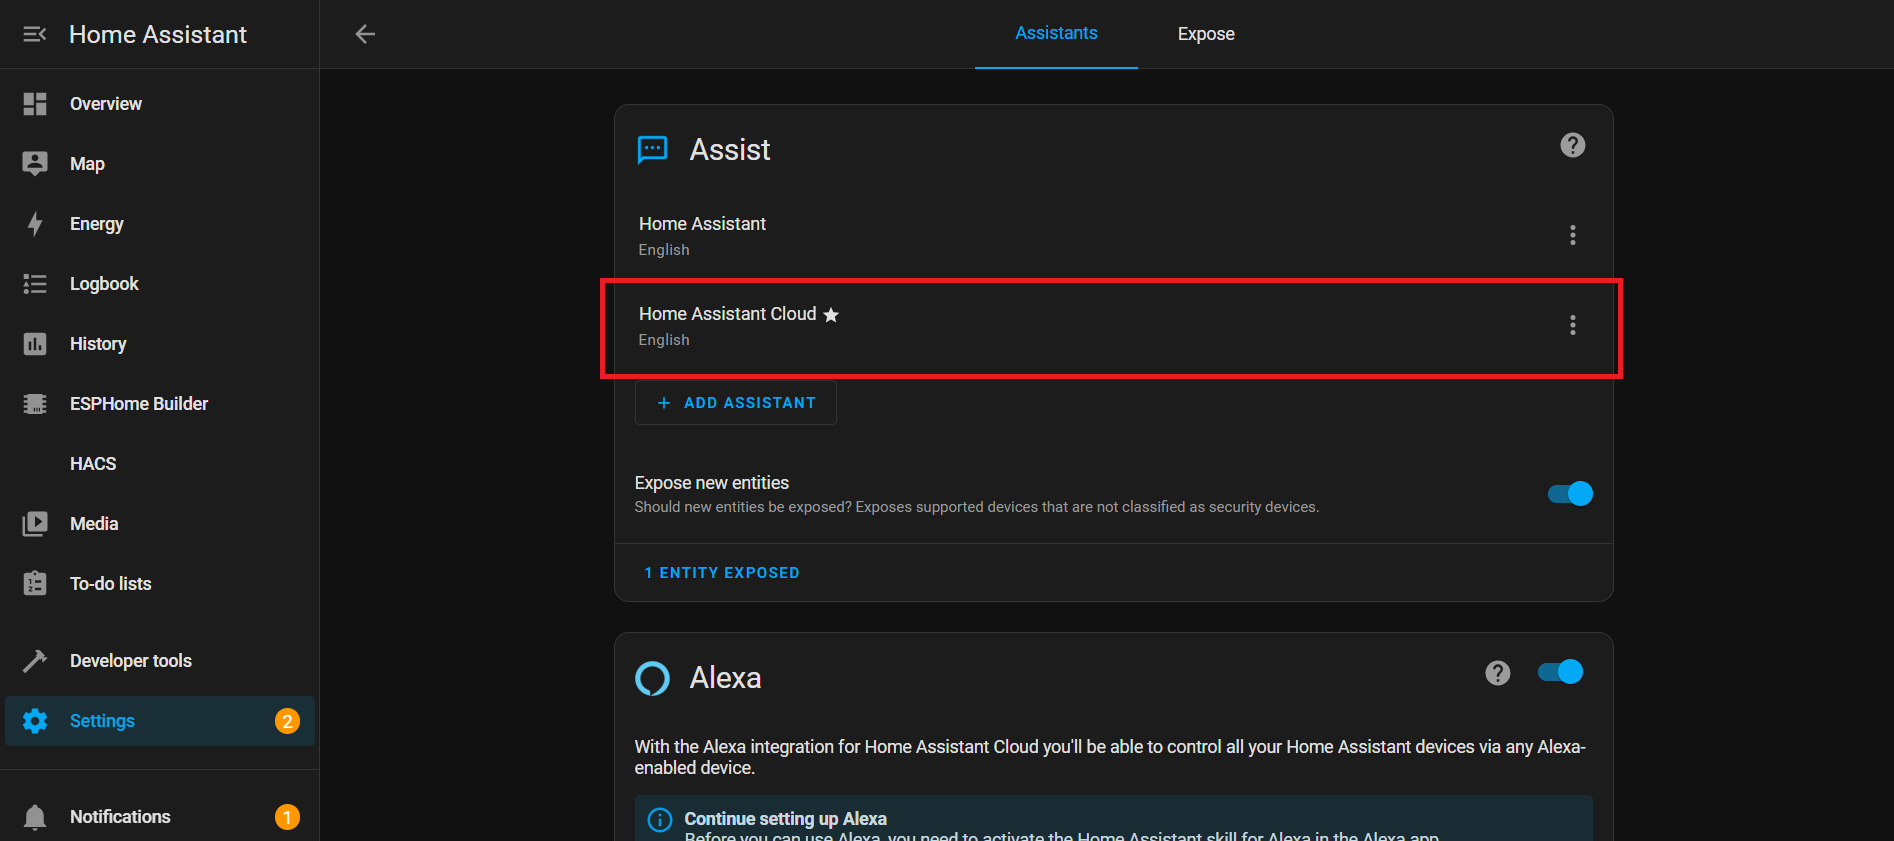
Voice Assistant with Nabu Cloud
In this demo, we are showcasing how to connect with Home Assistant Cloud (Nabu Casa) using voice. The setup is simple, and you can take advantage of a one-month free trial to explore its full capabilities. With the built-in wake word: “Okay Nabu”, you can effortlessly trigger voice commands and seamlessly integrate with devices and services anywhere, anytime — all without complex configurations.
YAML description
WiFi
This section sets up how your device connects to Wi-Fi.
wifi:
  ssid: !secret wifi_ssid
  password: !secret wifi_password
- ssid & password: Taken from your secrets.yaml file so your password isn’t visible in plain text.
- Events: Run actions when Wi-Fi connects or disconnects:
-
on_connect:
- Stops BLE improv setup.
- Runs control_leds script (LED effect for Wi-Fi connected).
-
on_disconnect:
- Runs control_leds script (LED effect for Wi-Fi disconnected).
-
I²C Bus
I²C is a communication line that lets your ESP32 talk to other chips like the microphone or audio codec.
i2c:
  id: internal_i2c
  sda: GPIO5
  scl: GPIO6
  scan: true
  frequency: 100kHz
- id: A name to reference this bus elsewhere.
- sda / scl: Pins used for data and clock.
- scan: Checks connected devices at startup.
- frequency: Communication speed (100kHz is standard).
Switches
Switches
switch:
  # Mute Sound Switch.
  - platform: template
    id: mute_sound
    name: Mute/unmute sound
    icon: "mdi:bullhorn"
    entity_category: config
    optimistic: true
    restore_mode: RESTORE_DEFAULT_ON
  # Wake Word Sound Switch.
  - platform: template
    id: wake_sound
    name: Wake sound
    icon: "mdi:bullhorn"
    entity_category: config
    optimistic: true
    restore_mode: RESTORE_DEFAULT_ON
  # Internal switch to track when a timer is ringing on the device.
  - platform: template
    id: timer_ringing
    optimistic: true
    internal: true
    restore_mode: ALWAYS_OFF
    on_turn_off:
      # Disable stop wake word
      - micro_wake_word.disable_model: stop
      - script.execute: disable_repeat
      # Stop any current annoucement (ie: stop the timer ring mid playback)
      - if:
          condition:
            media_player.is_announcing:
          then:
            media_player.stop:
              announcement: true
      # Set back ducking ratio to zero
      - mixer_speaker.apply_ducking:
          id: media_mixing_input
          decibel_reduction: 0
          duration: 1.0s
      # Refresh the LED ring
      - script.execute: control_leds
    on_turn_on:
      # Duck audio
      - mixer_speaker.apply_ducking:
          id: media_mixing_input
          decibel_reduction: 20
          duration: 0.0s
      # Enable stop wake word
      - micro_wake_word.enable_model: stop
      # Ring timer
      - script.execute: ring_timer
      # Refresh LED
      - script.execute: control_leds
      # If 15 minutes have passed and the timer is still ringing, stop it.
      - delay: 15min
      - switch.turn_off: timer_ringing
  # Defines if alarm is active
  - platform: template
    optimistic: true
    restore_mode: RESTORE_DEFAULT_OFF
    id: alarm_on
    icon: mdi:bell-badge
    name: "Alarm on"
    on_turn_on:
      - script.execute: control_leds
    on_turn_off:
      - script.execute: control_leds
Switches are software-controlled “buttons” in Home Assistant. They control features like sound, timers, or alarms.
Wake Word Sound Switch: Controls wake word audio.
# Wake Word Sound Switch.
  - platform: template
    id: wake_sound
    name: Wake sound
    icon: "mdi:bullhorn"
    entity_category: config
    optimistic: true
    restore_mode: RESTORE_DEFAULT_ON
Timer Ringing Internal Switch:
- Tracks if a timer is active.
- on_turn_on: Ducks other audio by -20dB, starts timer sound, updates LED, auto-stops after 15 min.
- on_turn_off: Stops timer, restores volume, updates LED.
# Internal switch to track when a timer is ringing on the device.
  - platform: template
    id: timer_ringing
    optimistic: true
    internal: true
    restore_mode: ALWAYS_OFF
    ...
    ...
Alarm On Switch:
# Defines if alarm is active
  - platform: template
    optimistic: true
    restore_mode: RESTORE_DEFAULT_OFF
    id: alarm_on
    ...
    ...
- Tracks alarm status.
- Runs LED script when on/off.
Sensors
Sensors
number:
  - platform: template
    id: led_ring_brightness
    name: "LED Ring Brightness"
    icon: mdi:brightness-6
    entity_category: config
    optimistic: true
    restore_value: true
    min_value: 0.4
    max_value: 1.0
    step: 0.05
    initial_value: 0.8
    mode: slider

sensor:
  - platform: template
    id: next_timer
    name: "Next timer"
    update_interval: never
    disabled_by_default: true
    device_class: duration
    unit_of_measurement: s
    icon: "mdi:timer"
    accuracy_decimals: 0

text_sensor:
  - platform: template
    id: next_timer_name
    name: "Next timer name"
    icon: "mdi:timer"
    disabled_by_default: true
  - platform: template
    name: "Alarm time"
    id: alarm_time
    icon: mdi:bell-ring
  - platform: template
    name: "Current device time"
    id: current_time
    icon: mdi:clock
This YAML block adds controls and sensors for timers, alarms, and LED brightness. It lets you adjust the LED ring brightness with a slider, track the next timer (time + name), and display alarm time and the device’s current time in Home Assistant.
LED Ring Brightness:
number:
  - platform: template
    id: led_ring_brightness
    name: "LED Ring Brightness"
    icon: mdi:brightness-6
    ...
- Lets user adjust brightness with a slider.
- min_value / max_value define limits.
- restore_value keeps previous setting after restart.
Next Timer
sensor:
  - platform: template
    id: next_timer
    name: "Next timer"
    update_interval: never
    ...
- Shows remaining time for the next timer.
- Updates only when a timer changes (saves resources).
Alarm Time & Device Time
text_sensor:
  - platform: template
    id: next_timer_name
    name: "Next timer name"
    icon: "mdi:timer"
    ...
- Displays current alarm and ESP32 system time.
LED Effects on interval
interval:
  - interval: 50ms
    id: led_animation_interval
    then:
      - lambda: |-
          if (id(volume_display_active)) {
            id(update_volume_display_effect).execute();
            return;
          }
          std::string effect = id(current_led_effect);
          if (effect == "off") {
            return;
          } else if (effect == "breathe") {
            id(update_breathe_effect).execute();
          } else if (effect == "rainbow") {
            id(update_rainbow_effect).execute();
          } else if (effect == "comet_cw") {
            id(update_comet_cw_effect).execute();
          } else if (effect == "comet_ccw") {
            id(update_comet_ccw_effect).execute();
          } else if (effect == "twinkle") {
            id(update_twinkle_effect).execute();
          } else if (effect == "timer_tick") {
            id(update_timer_tick_effect).execute();
          } else if (effect == "led_beam") {
            id(update_led_beam_effect).execute();
          }
- Intervals run code repeatedly in the background.
- 50ms: Runs code 20 times per second.
- Controls LED animations based on system state or selected effect.
LED Control
LED Control
script:
# =========================================================================
# == Centralized script to control all LED effects ==
# =========================================================================
- id: led_set_effect
mode: restart
parameters:
effect: std::string
r: float
g: float
b: float
speed: float
then:
- lambda: |-
// Update global variables with the new parameters
id(led_ring_color_r) = r;
id(led_ring_color_g) = g;
id(led_ring_color_b) = b;
id(led_ring_speed) = speed;
id(current_led_effect) = effect;
// Handle the two types of effects: Off and Animated
if (effect == "off") {
uint32_t colors[12] = {0};
id(respeaker).set_led_ring(colors);
} else {
id(last_led_update_time) = millis(); // Reset timer for smooth animation start
}
# Individual update scripts for each animated effect
- id: update_breathe_effect
then:
- lambda: |-
static float phase = 0.0f;
uint32_t now = millis();
float dt = (now - id(last_led_update_time)) / 1000.0f;
id(last_led_update_time) = now;
phase += dt * id(led_ring_speed);
while (phase >= 1.0f) phase -= 1.0f;
float master_brightness = id(led_ring_brightness).state;
float breath_brightness = 0.5f * (1.0f + sinf(phase * 2.0f * M_PI)) * master_brightness;
uint8_t r = (uint8_t)(id(led_ring_color_r) * 255.0f * breath_brightness);
uint8_t g = (uint8_t)(id(led_ring_color_g) * 255.0f * breath_brightness);
uint8_t b = (uint8_t)(id(led_ring_color_b) * 255.0f * breath_brightness);
uint32_t current_color = (r << 16) | (g << 8) | b;
uint32_t colors[12];
for (int i = 0; i < 12; i++) colors[i] = current_color;
id(respeaker).set_led_ring(colors);
- id: update_rainbow_effect
then:
- lambda: |-
static float hue_offset = 0.0f;
uint32_t now = millis();
float dt = (now - id(last_led_update_time)) / 1000.0f;
id(last_led_update_time) = now;
hue_offset += dt * id(led_ring_speed);
if (hue_offset >= 1.0f) hue_offset -= 1.0f;
constexpr int NUM_LEDS = 12;
constexpr float HUE_STEP = 1.0f / NUM_LEDS;
uint32_t colors[NUM_LEDS];
float brightness = id(led_ring_brightness).state;
float current_hue = hue_offset;
for (int i = 0; i < NUM_LEDS; i++) {
float r, g, b;
if (current_hue >= 1.0f) current_hue -= 1.0f;
hsv_to_rgb((int)(current_hue * 360.0f), 1.0f, brightness, r, g, b);
colors[i] = ((uint8_t)(r * 255.0f) << 16) | ((uint8_t)(g * 255.0f) << 8) | ((uint8_t)(b * 255.0f));
current_hue += HUE_STEP;
}
id(respeaker).set_led_ring(colors);
- id: update_comet_cw_effect
then:
- lambda: |-
static float comet_pos = 0.0f;
uint32_t now = millis();
float dt = (now - id(last_led_update_time)) / 1000.0f;
id(last_led_update_time) = now;
constexpr int NUM_LEDS = 12;
constexpr int BASE_TAIL = 3;
float leds_per_sec = id(led_ring_speed) * NUM_LEDS;
comet_pos += dt * leds_per_sec;
while (comet_pos >= NUM_LEDS) comet_pos -= NUM_LEDS;
int head_index = (int)comet_pos;
int tail_length = BASE_TAIL + (int)(id(led_ring_speed));
if (tail_length > NUM_LEDS - 1) tail_length = NUM_LEDS - 1;
uint32_t colors[NUM_LEDS] = {0};
float brightness = id(led_ring_brightness).state;
uint8_t head_r = (uint8_t)(id(led_ring_color_r) * 255.0f * brightness);
uint8_t head_g = (uint8_t)(id(led_ring_color_g) * 255.0f * brightness);
uint8_t head_b = (uint8_t)(id(led_ring_color_b) * 255.0f * brightness);
colors[head_index % NUM_LEDS] = (head_r << 16) | (head_g << 8) | head_b;
for (int i = 1; i <= tail_length; i++) {
float tail_factor = (float)i / (tail_length + 1);
float tail_brightness = (1.0f - tail_factor) * brightness;
uint8_t r = (uint8_t)(id(led_ring_color_r) * 255.0f * tail_brightness);
uint8_t g = (uint8_t)(id(led_ring_color_g) * 255.0f * tail_brightness);
uint8_t b = (uint8_t)(id(led_ring_color_b) * 255.0f * tail_brightness);
int tail_index = (head_index - i + NUM_LEDS) % NUM_LEDS;
colors[tail_index] = (r << 16) | (g << 8) | b;
}
id(respeaker).set_led_ring(colors);
- id: update_comet_ccw_effect
then:
- lambda: |-
static float comet_pos = 0.0f;
uint32_t now = millis();
float dt = (now - id(last_led_update_time)) / 1000.0f;
id(last_led_update_time) = now;
constexpr int NUM_LEDS = 12;
constexpr int BASE_TAIL = 3;
float leds_per_sec = id(led_ring_speed) * NUM_LEDS;
comet_pos -= dt * leds_per_sec;
while (comet_pos < 0.0f) comet_pos += NUM_LEDS;
int head_index = (int)comet_pos;
int tail_length = BASE_TAIL + (int)(id(led_ring_speed));
if (tail_length > NUM_LEDS - 1) tail_length = NUM_LEDS - 1;
uint32_t colors[NUM_LEDS] = {0};
float brightness = id(led_ring_brightness).state;
uint8_t head_r = (uint8_t)(id(led_ring_color_r) * 255.0f * brightness);
uint8_t head_g = (uint8_t)(id(led_ring_color_g) * 255.0f * brightness);
uint8_t head_b = (uint8_t)(id(led_ring_color_b) * 255.0f * brightness);
colors[head_index % NUM_LEDS] = (head_r << 16) | (head_g << 8) | head_b;
for (int i = 1; i <= tail_length; i++) {
float tail_factor = (float)i / (tail_length + 1);
float tail_brightness = (1.0f - tail_factor) * brightness;
uint8_t r = (uint8_t)(id(led_ring_color_r) * 255.0f * tail_brightness);
uint8_t g = (uint8_t)(id(led_ring_color_g) * 255.0f * tail_brightness);
uint8_t b = (uint8_t)(id(led_ring_color_b) * 255.0f * tail_brightness);
int tail_index = (head_index + i) % NUM_LEDS;
colors[tail_index] = (r << 16) | (g << 8) | b;
}
id(respeaker).set_led_ring(colors);
- id: update_twinkle_effect
then:
- lambda: |-
constexpr int NUM_LEDS = 12;
static float led_brightness[NUM_LEDS] = {0.0f};
static float led_fade_speed[NUM_LEDS] = {0.0f};
uint32_t now = millis();
float dt = (now - id(last_led_update_time)) / 1000.0f;
id(last_led_update_time) = now;
// Update existing twinkles
for (int i = 0; i < NUM_LEDS; i++) {
if (led_fade_speed[i] != 0.0f) {
led_brightness[i] += led_fade_speed[i] * dt;
if (led_fade_speed[i] > 0.0f && led_brightness[i] >= 1.0f) {
led_brightness[i] = 1.0f;
led_fade_speed[i] *= -1.0f;
} else if (led_fade_speed[i] < 0.0f && led_brightness[i] <= 0.0f) {
led_brightness[i] = 0.0f;
led_fade_speed[i] = 0.0f;
}
}
}
// Start new twinkles
float twinkle_chance = dt * id(led_ring_speed);
if (random_float() < twinkle_chance) {
int led_to_start = (int)(random_float() * NUM_LEDS);
if (led_fade_speed[led_to_start] == 0.0f) {
led_brightness[led_to_start] = 0.0f;
float min_speed = 1.5f, max_speed = 3.0f;
led_fade_speed[led_to_start] = min_speed + (random_float() * (max_speed - min_speed));
}
}
// Render colors
uint32_t colors[NUM_LEDS];
float master_brightness = id(led_ring_brightness).state;
uint8_t base_r = (uint8_t)(id(led_ring_color_r) * 255.0f);
uint8_t base_g = (uint8_t)(id(led_ring_color_g) * 255.0f);
uint8_t base_b = (uint8_t)(id(led_ring_color_b) * 255.0f);
for (int i = 0; i < NUM_LEDS; i++) {
float current_led_brightness = led_brightness[i] * master_brightness;
uint8_t r = (uint8_t)(base_r * current_led_brightness);
uint8_t g = (uint8_t)(base_g * current_led_brightness);
uint8_t b = (uint8_t)(base_b * current_led_brightness);
colors[i] = (r << 16) | (g << 8) | b;
}
id(respeaker).set_led_ring(colors);
- id: update_timer_tick_effect
then:
- lambda: |-
constexpr int NUM_LEDS = 12;
static int tick_index = 0;
uint32_t now = millis();
// Only update tick position every 100ms to reduce I2C traffic
static uint32_t last_tick_update = 0;
if (now - last_tick_update >= 100) {
tick_index = (tick_index - 1 + NUM_LEDS) % NUM_LEDS;
last_tick_update = now;
}
uint32_t colors[NUM_LEDS] = {0};
uint32_t seconds_left = id(first_active_timer).seconds_left;
uint32_t total_seconds = id(first_active_timer).total_seconds;
float timer_ratio = (float)NUM_LEDS * seconds_left / std::max(total_seconds, (uint32_t)1);
float master_brightness = id(led_ring_brightness).state;
uint8_t base_r = (uint8_t)(id(led_ring_color_r) * 255.0f);
uint8_t base_g = (uint8_t)(id(led_ring_color_g) * 255.0f);
uint8_t base_b = (uint8_t)(id(led_ring_color_b) * 255.0f);
for (int i = 0; i < NUM_LEDS; i++) {
float bar_brightness = clamp(timer_ratio - i, 0.0f, 1.0f);
if (bar_brightness > 0.0f) {
float tick_dip = (i == tick_index) ? 0.9f : 1.0f;
float final_brightness = bar_brightness * tick_dip * master_brightness;
uint8_t r = (uint8_t)(base_r * final_brightness);
uint8_t g = (uint8_t)(base_g * final_brightness);
uint8_t b = (uint8_t)(base_b * final_brightness);
colors[i] = (r << 16) | (g << 8) | b;
}
}
id(respeaker).set_led_ring(colors);
- id: update_volume_display_effect
then:
- lambda: |-
constexpr int NUM_LEDS = 12;
uint32_t colors[NUM_LEDS] = {0};
if (id(external_media_player).is_ready()) {
bool is_muted = id(external_media_player).is_muted();
float volume = id(external_media_player).volume;
if (is_muted || volume == 0.0f) {
uint32_t mute_color = (255 << 16); // Red
colors[0] = mute_color;
colors[6] = mute_color;
} else {
float num_leds_on = volume * NUM_LEDS;
float master_brightness = id(led_ring_brightness).state;
uint8_t base_r = (uint8_t)(id(led_ring_color_r) * 255.0f);
uint8_t base_g = (uint8_t)(id(led_ring_color_g) * 255.0f);
uint8_t base_b = (uint8_t)(id(led_ring_color_b) * 255.0f);
for (int i = 0; i < NUM_LEDS; i++) {
float brightness = clamp(num_leds_on - i, 0.0f, 1.0f);
if (brightness > 0.0f) {
uint8_t r = (uint8_t)(base_r * brightness * master_brightness);
uint8_t g = (uint8_t)(base_g * brightness * master_brightness);
uint8_t b = (uint8_t)(base_b * brightness * master_brightness);
colors[i] = (r << 16) | (g << 8) | b;
}
}
}
}
id(respeaker).set_led_ring(colors);
- id: update_led_beam_effect
then:
- lambda: |-
constexpr int NUM_LEDS = 12;
constexpr int FADE_LEDS = 3;
constexpr float TRANSITION_DURATION = 0.5f; // Duration of the smooth transition
uint32_t colors[NUM_LEDS] = {0};
uint32_t now = millis();
float dt = (now - id(last_led_update_time)) / 1000.0f;
id(last_led_update_time) = now;
if (id(beam_direction).has_state()) {
// CORRECTING THE OFFSET: add 5 from the sensor reading
float target_pos = ((int)id(beam_direction).state + 5) % NUM_LEDS;
float current_pos = id(animated_beam_position);
// Calculate the shortest path around the circle
float diff = target_pos - current_pos;
if (diff > NUM_LEDS / 2.0f) {
diff -= NUM_LEDS;
} else if (diff < -NUM_LEDS / 2.0f) {
diff += NUM_LEDS;
}
// Move current position towards target
if (abs(diff) > 0.01f) {
float move_speed = diff / TRANSITION_DURATION;
current_pos += move_speed * dt;
} else {
current_pos = target_pos;
}
// Handle wrap-around for the animated position
if (current_pos >= NUM_LEDS) current_pos -= NUM_LEDS;
if (current_pos < 0.0f) current_pos += NUM_LEDS;
id(animated_beam_position) = current_pos;
// Render the smoothed beam
float master_brightness = id(led_ring_brightness).state;
uint8_t base_r = (uint8_t)(id(led_ring_color_r) * 255.0f);
uint8_t base_g = (uint8_t)(id(led_ring_color_g) * 255.0f);
uint8_t base_b = (uint8_t)(id(led_ring_color_b) * 255.0f);
for (int i = 0; i < NUM_LEDS; i++) {
// Calculate circular distance from current LED to the animated position
float dist = abs(i - current_pos);
if (dist > NUM_LEDS / 2.0f) {
dist = NUM_LEDS - dist;
}
// Calculate brightness based on distance (linear falloff)
float brightness_factor = 1.0f - (dist / (FADE_LEDS + 1.0f));
brightness_factor = std::max(0.0f, brightness_factor);
if (brightness_factor > 0.0f) {
float final_brightness = brightness_factor * master_brightness;
uint8_t r = (uint8_t)(base_r * final_brightness);
uint8_t g = (uint8_t)(base_g * final_brightness);
uint8_t b = (uint8_t)(base_b * final_brightness);
colors[i] = (r << 16) | (g << 8) | b;
}
}
}
id(respeaker).set_led_ring(colors);
# Master script controlling the LEDs, based on different conditions : initialization in progress, wifi and api connected and voice assistant phase.
# For the sake of simplicity and re-usability, the script calls child scripts defined below.
# This script will be called every time one of these conditions is changing.
- id: control_leds
mode: single # Prevent multiple simultaneous executions
then:
- lambda: |
// Cache expensive component checks
static bool last_respeaker_failed = false;
static bool last_wifi_connected = false;
static bool last_api_connected = false;
static int last_voice_phase = -1;
static bool last_timer_ringing = false;
static bool last_timer_active = false;
static bool last_improv_ble = false;
static bool last_init_progress = false;
bool respeaker_failed = id(respeaker).is_failed();
bool wifi_connected = id(wifi_id).is_connected();
bool api_connected = id(api_id).is_connected();
int voice_phase = id(voice_assistant_phase);
bool new_timer_ringing = id(timer_ringing).state;
bool improv_ble = id(improv_ble_in_progress);
bool init_progress = id(init_in_progress);
// Only update if something actually changed
bool needs_update = (
respeaker_failed != last_respeaker_failed ||
wifi_connected != last_wifi_connected ||
api_connected != last_api_connected ||
voice_phase != last_voice_phase ||
new_timer_ringing != last_timer_ringing ||
improv_ble != last_improv_ble ||
init_progress != last_init_progress
);
if (!needs_update) return;
// Update cache
last_respeaker_failed = respeaker_failed;
last_wifi_connected = wifi_connected;
last_api_connected = api_connected;
last_voice_phase = voice_phase;
last_timer_ringing = new_timer_ringing;
last_improv_ble = improv_ble;
last_init_progress = init_progress;
if (respeaker_failed) {
id(control_leds_respeaker_startup_failed).execute();
return;
}
// Only check timers if we need to
id(check_if_timers_active).execute();
if (id(is_timer_active)){
id(fetch_first_active_timer).execute();
}
// Continue with existing logic...
if (improv_ble) {
id(control_leds_improv_ble_state).execute();
} else if (init_progress) {
id(control_leds_init_state).execute();
} else if (!wifi_connected || !api_connected){
id(control_leds_no_ha_connection_state).execute();
} else if (new_timer_ringing) {
id(control_leds_timer_ringing).execute();
} else if (voice_phase == ${voice_assist_waiting_for_command_phase_id}) {
id(control_leds_voice_assistant_waiting_for_command_phase).execute();
} else if (voice_phase == ${voice_assist_listening_for_command_phase_id}) {
id(control_leds_voice_assistant_listening_for_command_phase).execute();
} else if (voice_phase == ${voice_assist_thinking_phase_id}) {
id(control_leds_voice_assistant_thinking_phase).execute();
} else if (voice_phase == ${voice_assist_replying_phase_id}) {
id(control_leds_voice_assistant_replying_phase).execute();
} else if (voice_phase == ${voice_assist_error_phase_id}) {
id(control_leds_voice_assistant_error_phase).execute();
} else if (voice_phase == ${voice_assist_not_ready_phase_id}) {
id(control_leds_voice_assistant_not_ready_phase).execute();
} else if (id(is_timer_active)) {
id(control_leds_timer_ticking).execute();
} else if (voice_phase == ${voice_assist_idle_phase_id}) {
id(control_leds_voice_assistant_idle_phase).execute();
}
# Script executed if respeaker startup failed
- id: control_leds_respeaker_startup_failed
then:
- script.execute:
id: led_set_effect
effect: "breathe"
r: 0.7
g: 0.0
b: 0.0
speed: 0.5
# Script executed during Improv BLE
- id: control_leds_improv_ble_state
then:
- script.execute:
id: led_set_effect
effect: "twinkle"
r: 1.0
g: 0.89
b: 0.71
speed: 10.0
# Script executed during initialization
- id: control_leds_init_state
then:
- if:
condition:
wifi.connected:
then:
- script.execute:
id: led_set_effect
effect: "twinkle"
r: 0.09
g: 0.73
b: 0.95
speed: 20.0
else:
- script.execute:
id: led_set_effect
effect: "twinkle"
r: 0.09
g: 0.73
b: 0.95
speed: 4.0
# Script executed when the device has no connection to Home Assistant
- id: control_leds_no_ha_connection_state
then:
- script.execute:
id: led_set_effect
effect: "twinkle"
r: 1.0
g: 0.0
b: 0.0
speed: 10.0
# Script executed when the voice assistant is waiting for a command (After the wake word)
- id: control_leds_voice_assistant_waiting_for_command_phase
then:
- lambda: |
id(animated_beam_position) = id(beam_direction).state;
- script.execute:
id: led_set_effect
effect: "led_beam"
r: 0.5
g: 0.0
b: 0.5
speed: 0.0
# Script executed when the voice assistant is listening to a command
- id: control_leds_voice_assistant_listening_for_command_phase
then:
- script.execute:
id: led_set_effect
effect: "led_beam"
r: 0.8
g: 0.0
b: 0.8
speed: 0.0
# Script executed when the voice assistant is thinking to a command
- id: control_leds_voice_assistant_thinking_phase
then:
- script.execute:
id: led_set_effect
effect: "breathe"
r: 0.6
g: 0.0
b: 0.6
speed: 1.0
# Script executed when the voice assistant is replying to a command
- id: control_leds_voice_assistant_replying_phase
then:
- script.execute:
id: led_set_effect
effect: "comet_ccw"
r: 0.6
g: 0.0
b: 0.6
speed: 1.0
# Script executed when the voice assistant is in error
- id: control_leds_voice_assistant_error_phase
then:
- script.execute:
id: led_set_effect
effect: "breathe"
r: 1.0
g: 0.0
b: 0.0
speed: 3.0
# Script executed when the voice assistant is not ready
- id: control_leds_voice_assistant_not_ready_phase
then:
- script.execute:
id: led_set_effect
effect: "twinkle"
r: 1.0
g: 0.0
b: 0.0
speed: 5.0
# Script executed when the volume is changed
- id: control_leds_volume_changed
mode: restart
then:
- lambda: |-
id(volume_display_active) = true;
- delay: 2s
- lambda: |-
id(volume_display_active) = false;
# Script executed when the timer is ringing, to control the LEDs
- id: control_leds_timer_ringing
then:
- script.execute:
id: led_set_effect
effect: "breathe"
r: 0.6
g: 0.0
b: 0.6
speed: 5.0
# Script executed when the timer is ticking, to control the LEDs
- id: control_leds_timer_ticking
then:
- script.execute:
id: led_set_effect
effect: "timer_tick"
r: 0.6
g: 0.0
b: 0.6
speed: 1.0
# Script executed when the voice assistant is idle (waiting for a wake word)
- id: control_leds_voice_assistant_idle_phase
then:
- script.execute:
id: led_set_effect
effect: "off"
r: 0.0
g: 0.0
b: 0.0
speed: 0.0
# Script executed when the timer is ringing, to playback sounds.
- id: ring_timer
then:
- script.execute: enable_repeat_one
- script.execute:
id: play_sound
priority: true
sound_file: !lambda return id(timer_finished_sound);
# Script executed when the timer is ringing, to repeat the timer finished sound.
- id: enable_repeat_one
then:
# Turn on the repeat mode and pause for 500 ms between playlist items/repeats
- lambda: |-
id(external_media_player)
->make_call()
.set_command(media_player::MediaPlayerCommand::MEDIA_PLAYER_COMMAND_REPEAT_ONE)
.set_announcement(true)
.perform();
id(external_media_player)->set_playlist_delay_ms(speaker::AudioPipelineType::ANNOUNCEMENT, 500);
# Script execute when the timer is done ringing, to disable repeat mode.
- id: disable_repeat
then:
# Turn off the repeat mode and pause for 0 ms between playlist items/repeats
- lambda: |-
id(external_media_player)
->make_call()
.set_command(media_player::MediaPlayerCommand::MEDIA_PLAYER_COMMAND_REPEAT_OFF)
.set_announcement(true)
.perform();
id(external_media_player)->set_playlist_delay_ms(speaker::AudioPipelineType::ANNOUNCEMENT, 0);
# Script executed when we want to play sounds on the device.
- id: play_sound
parameters:
priority: bool
sound_file: "audio::AudioFile*"
then:
- lambda: |-
if (priority) {
id(external_media_player)
->make_call()
.set_command(media_player::MediaPlayerCommand::MEDIA_PLAYER_COMMAND_STOP)
.set_announcement(true)
.perform();
}
if ( (id(external_media_player).state != media_player::MediaPlayerState::MEDIA_PLAYER_STATE_ANNOUNCING ) || priority) {
id(external_media_player)
->play_file(sound_file, true, false);
}
# Script used to fetch the first active timer (Stored in global first_active_timer)
- id: fetch_first_active_timer
mode: single
then:
- lambda: |
static uint32_t last_fetch_time = 0;
uint32_t now = millis();
// Only fetch every 500ms to reduce overhead
if (now - last_fetch_time < 500) return;
last_fetch_time = now;
const auto timers = id(va).get_timers();
if (timers.empty()) return;
auto output_timer = timers.begin()->second;
for (auto &iterable_timer : timers) {
if (iterable_timer.second.is_active &&
iterable_timer.second.seconds_left <= output_timer.seconds_left) {
output_timer = iterable_timer.second;
}
}
id(first_active_timer) = output_timer;
# Script used to check if a timer is active (Stored in global is_timer_active)
- id: check_if_timers_active
then:
- lambda: |
const auto timers = id(va).get_timers();
bool output = false;
if (timers.size() > 0) {
for (auto &iterable_timer : timers) {
if(iterable_timer.second.is_active) {
output = true;
}
}
}
id(is_timer_active) = output;
# Script used activate the stop word if the TTS step is long.
# Why is this wrapped on a script?
# Becasue we want to stop the sequence if the TTS step is faster than that.
# This allows us to prevent having the deactivation of the stop word before its own activation.
- id: activate_stop_word_once
then:
- delay: 1s
# Enable stop wake word
- if:
condition:
switch.is_off: timer_ringing
then:
- micro_wake_word.enable_model: stop
- wait_until:
not:
media_player.is_announcing:
- if:
condition:
switch.is_off: timer_ringing
then:
- micro_wake_word.disable_model: stop
- id: check_alarm
then:
- lambda: |-
id(publish_current_time).execute();
// Check alarm
if (id(alarm_on).state && id(alarm_time).has_state()) {
// Get the stored alarm time from the sensor
auto set_alarm_time = id(alarm_time).state;
if (set_alarm_time.length() == 5 &&
isdigit(set_alarm_time[0]) && isdigit(set_alarm_time[1]) &&
isdigit(set_alarm_time[3]) && isdigit(set_alarm_time[4])) {
auto alarm_hour = std::stoi(set_alarm_time.substr(0, 2));
auto alarm_minute = std::stoi(set_alarm_time.substr(3, 2));
// Trigger action if current time matches alarm time
auto time_now = id(homeassistant_time).now();
if (time_now.hour == alarm_hour && time_now.minute == alarm_minute) {
auto action = id(alarm_action).state;
if (action == "Play sound") {
id(timer_ringing).turn_on();
} else if (action == "Send event") {
id(send_alarm_event).execute();
} else if (action == "Sound and event") {
id(timer_ringing).turn_on();
id(send_alarm_event).execute();
}
}
} else {
ESP_LOGW("alarm", "Incorrect alarm time setting");
}
}
- id: send_alarm_event
then:
- homeassistant.event:
event: esphome.alarm_ringing
- id: send_tts_uri_event
parameters:
tts_uri: string
then:
- homeassistant.event:
event: esphome.tts_uri
data:
uri: !lambda return tts_uri;
- id: send_stt_text_event
parameters:
stt_text: string
then:
- homeassistant.event:
event: esphome.stt_text
data:
text: !lambda return stt_text;
- id: publish_current_time
mode: single
then:
- lambda: |-
static std::string last_time_string = "";
auto time_now = id(homeassistant_time).now();
std::string current_time_string = time_now.strftime("%H:%M");
// Only publish if time actually changed
if (current_time_string != last_time_string) {
id(current_time).publish_state(current_time_string);
last_time_string = current_time_string;
}
Central Controller (led_set_effect)
script:
  # =========================================================================
  # == Centralized script to control all LED effects ==
  # =========================================================================
  - id: led_set_effect
    mode: restart
    parameters:
      effect: std::string
      r: float
      g: float
      b: float
      speed: float
      ....
- Manages all LED effects in one place.
- Can dynamically set effect type, color (R/G/B), and speed.
- Uses update scripts for smooth motion.
- Off effect immediately turns LEDs off.
Individual Scripts
- Each animation (breathe, rainbow, comet, twinkle, timer tick, volume display, LED beam) has its own script.
- Makes system modular and easy to maintain.
- Triggered periodically by led_animation_interval or by central controller.
| Device State | LED Effect |
|---|---|
| Startup failed | Red breathe |
| Improv BLE mode | Warm twinkle |
| Initialization | Blue twinkle |
| No HA connection | Red twinkle |
| Voice Assistant waiting | Purple beam |
| Voice Assistant listening | Bright purple beam |
| Voice Assistant thinking | Purple breathe |
| Voice Assistant replying | Purple comet |
| Voice Assistant error | Red breathe |
| Voice Assistant idle | LEDs off |
| Timer ringing | Purple fast breathe |
| Volume change | Temporary display |
How LED Control Works (Flow Overview)
-
Triggering an Effect
-
When something happens (e.g., startup failed, voice assistant listening, timer ringing), a script runs.
-
That script calls the central LED controller (
led_set_effect) and tells it:- which effect to run (e.g., breathe, rainbow, comet)
- what color (R, G, B values)
- how fast (speed).
If startup fails →
led_set_effectis called with effect = breathe, color = red. -
-
Central Controller (interval loop)
-
Every 50ms (20 times per second), the
led_animation_intervalloop checks what the current effect is. -
Based on that effect name, it forwards control to the matching update script.
- If effect = breathe → runs
update_breathe_effect. - If effect = rainbow → runs
update_rainbow_effect. - And so on for twinkle, comet, timer tick, LED beam, etc.
- If effect = breathe → runs
-
This loop acts like a dispatcher: it decides which animation script to run next.
interval:
  - interval: 50ms
    id: led_animation_interval
    then:
      - lambda: |-
          if (id(volume_display_active)) {
            id(update_volume_display_effect).execute();
            return;
          }
          std::string effect = id(current_led_effect);
          if (effect == "off") {
            return;
          } else if (effect == "breathe") {
            id(update_breathe_effect).execute();
          } else if (effect == "rainbow") {
            id(update_rainbow_effect).execute();
          } else if (effect == "comet_cw") {
            id(update_comet_cw_effect).execute();
          } else if (effect == "comet_ccw") {
            id(update_comet_ccw_effect).execute();
          } else if (effect == "twinkle") {
            id(update_twinkle_effect).execute();
          } else if (effect == "timer_tick") {
            id(update_timer_tick_effect).execute();
          } else if (effect == "led_beam") {
            id(update_led_beam_effect).execute();
          }
-
Effect Update Script
-
Each effect has its own script that calculates the LED colors frame-by-frame.
-
Example: breathe effect
- Uses a sine wave to fade brightness up and down smoothly.
- Multiplies brightness by the LED ring’s global settings (speed, brightness slider, R/G/B color).
- Builds a color array for all 12 LEDs.
- Sends the colors to the Respeaker LED ring.
-
Example:
 # Individual update scripts for each animated effect
  - id: update_breathe_effect
    then:
      - lambda: |-
          static float phase = 0.0f;
          uint32_t now = millis();
          float dt = (now - id(last_led_update_time)) / 1000.0f;
          id(last_led_update_time) = now;

          phase += dt * id(led_ring_speed);
          while (phase >= 1.0f) phase -= 1.0f;

          float master_brightness = id(led_ring_brightness).state;
          float breath_brightness = 0.5f * (1.0f + sinf(phase * 2.0f * M_PI)) * master_brightness;

          uint8_t r = (uint8_t)(id(led_ring_color_r) * 255.0f * breath_brightness);
          uint8_t g = (uint8_t)(id(led_ring_color_g) * 255.0f * breath_brightness);
          uint8_t b = (uint8_t)(id(led_ring_color_b) * 255.0f * breath_brightness);
          uint32_t current_color = (r << 16) | (g << 8) | b;

          uint32_t colors[12];
          for (int i = 0; i < 12; i++) colors[i] = current_color;
          id(respeaker).set_led_ring(colors);
This makes animations smooth, dynamic, and customizable.
Audio Configuration
I²S Input / Output
I²S (Inter-IC Sound) is a digital connection that lets the ESP32 send and receive high-quality audio to chips like codecs, microphones, and speakers.
i2s_audio:
  - id: i2s_output
    i2s_lrclk_pin:
      number: GPIO7
      allow_other_uses: true
    i2s_bclk_pin:
      number: GPIO8
      allow_other_uses: true
    # i2s_mclk_pin:
    #   number: GPIO9
    #   allow_other_uses: true

  - id: i2s_input
    i2s_lrclk_pin:
      number: GPIO7
      allow_other_uses: true
    i2s_bclk_pin:
      number: GPIO8
      allow_other_uses: true
    # i2s_mclk_pin:
    #   number: GPIO9
    #   allow_other_uses: true
Microphone
- Captures audio from the I²S microphone array / codec.
- GPIO43: Pin where microphone audio data enters.
- Sample rate 48 kHz, 32-bit: High-quality recording (stereo, 2 channels).
- adc_type: external: Uses the external codec (not the ESP32’s built-in ADC).
- i2s_mode: secondary: ESP32 follows the codec’s clock (slave mode).
microphone:
  - platform: i2s_audio
    id: i2s_mics
    i2s_din_pin: GPIO43
    adc_type: external
    pdm: false
    sample_rate: 48000
    bits_per_sample: 32bit
    i2s_mode: secondary
    i2s_audio_id: i2s_input
    channel: stereo
Speaker
- Sends audio to the speaker via the codec (AIC3104 DAC).
- GPIO44: Pin where digital audio goes out.
- 48 kHz, 32-bit stereo: High-quality playback.
- buffer_duration 100ms: Keeps audio smooth (prevents glitches).
- timeout: never: Keeps speaker channel alive (won’t shut off).
speaker:
  # Hardware speaker output
  - platform: i2s_audio
    id: i2s_audio_speaker
    sample_rate: 48000
    i2s_mode: secondary
    i2s_dout_pin: GPIO44
    bits_per_sample: 32bit
    i2s_audio_id: i2s_output
    dac_type: external
    channel: stereo
    timeout: never
    buffer_duration: 100ms
    audio_dac: aic3104_dac
Mixer
- Combines multiple audio streams (media + announcements) into one output.
  # Virtual speakers to combine the announcement and media streams together into one output
  - platform: mixer
    id: mixing_speaker
    output_speaker: i2s_audio_speaker
    num_channels: 2
    source_speakers:
      - id: announcement_mixing_input
        timeout: never
      - id: media_mixing_input
        timeout: never
Resamplers
- Ensures all audio sources match sample rate and bit depth.
  # Vritual speakers to resample each pipelines' audio, if necessary, as the mixer speaker requires the same sample rate
  - platform: resampler
    id: announcement_resampling_speaker
    output_speaker: announcement_mixing_input
    sample_rate: 48000
    bits_per_sample: 16
  - platform: resampler
    id: media_resampling_speaker
    output_speaker: media_mixing_input
    sample_rate: 48000
    bits_per_sample: 16
Media Player
- Controls volume, mute, playback, and ducking (reduces media volume during announcements).
- Preloaded sounds for events (timer, wake word, errors).
media_player:
  - platform: speaker
    id: external_media_player
    name: None
    internal: False
    volume_increment: 0.05
    volume_min: 0.0
    volume_max: 1.0
    ...
    ...
Respeaker XVF3800 Integration
- i2c address: 0x2C
- ID: respeaker
- Microphone Mute Switch: Updates every 1 second, plays sound on toggle.
- DFU Version Reporting: Reports firmware every 120s.
- Beam Direction Sensor: Tracks voice beam (internal only).
- Firmware Management: Auto-flash XVF3800 firmware if needed.
respeaker_xvf3800:
  id: respeaker
  address: 0x2C
  mute_switch:
    id: mic_mute_switch
    name: "Microphone Mute"
    update_interval: 1s
    on_turn_on:
    ...
    ...
References / Repositories
external_components:
  - source:
      type: git
      url: https://github.com/formatBCE/esphome
      ref: respeaker_microphone
    components:
      - i2s_audio
    refresh: 0s
  - source:
      type: git
      url: https://github.com/formatBCE/Respeaker-XVF3800-ESPHome-integration
      ref: main
    components:
      - respeaker_xvf3800
      - aic3104
    refresh: 0s
- formatBCE/esphome: Custom I²S audio component.
- formatBCE/Respeaker-XVF3800-ESPHome-integration:
- XVF3800 driver
- AIC3104 audio codec driver
- refresh: 0s: Always fetches latest code from repositories.
Micro Wake Word
micro_wake_word:
  id: mww
  microphone:
    microphone: i2s_mics
    channels: 1
    # gain_factor: 4
  stop_after_detection: false
  ....
  ....
Detects your wake words (like “Okay Nabu”) and starts the voice assistant.
- id: mww → Reference name.
- microphone: i2s_mics, 1 channel.
- stop_after_detection: false → Keeps listening continuously.
- okay_nabu, kenobi, hey_jarvis, hey_mycroft, stop (internal stop command; you can add your own).
- vad probability_cutoff: 0.05 → Speech sensitivity.
On Detection (if mic not muted)
- Stops timers, announcements, or voice assistant if active.
- Plays wake sound (if enabled).
- Starts voice assistant for commands.
Voice Assistant
voice_assistant:
  id: va
  microphone:
    microphone: i2s_mics
    channels: 0
  media_player: external_media_player
  micro_wake_word: mww
  use_wake_word: false
  noise_suppression_level: 0
  ....
  ....
Controls your voice assistant (VA) behavior and interactions.
- Microphone & media: Uses i2s_mics and an external media player.
- Wake word: Linked to mww but wake word not required (use_wake_word: false).
- Audio settings: Noise suppression off, auto gain 0 dB, normal volume.
Events / What happens
- on_client_connected: Starts VA, LEDs update, unmute mic if needed.
- on_client_disconnected: Stops VA, resets LEDs.
- on_error: Shows error state on LEDs; plays local sound if cloud auth fails.
- on_start: Lowers media volume (ducking) when VA starts.
- on_listening / on_stt_vad_start / on_stt_vad_end: Update VA phase and LEDs during listening and thinking.
- on_intent_progress / on_tts_start / on_tts_end: Handles speaking, updates LEDs, can trigger stop-word script.
- on_stt_end: Sends recognized text event.
- on_end: Stops VA, resets LEDs, ends ducking.
Timer events
- on_timer_started / on_timer_updated / on_timer_cancelled / on_timer_finished / on_timer_tick:
- Updates timer states and names.
- Updates LEDs.
- Reduces LED updates to every 5 seconds for ticking timer.
Special Thanks
We would like to thank FormatBCE for creating this awesome YAML file for the Seeed Studio ReSpeaker XVF3800. Support him on his GitHub
Tech Support & Product Discussion
Thank you for choosing our products! We are here to provide you with different support to ensure that your experience with our products is as smooth as possible. We offer several communication channels to cater to different preferences and needs.