Deploying Your Voice-Controlled Smart Robotic Arm with reSpeaker + HorizonArm-Mark
Target: Get HorizonArm-Mark robotic arm working with reSpeaker XVF3800 to achieve voice-controlled robotic arm operation.
Seeed-Projects: https://github.com/Seeed-Projects
reSpeaker XVF3800 is a professional 4-microphone circular array based on the XMOS XVF3800 chip. It features dual-mode, 360° far-field pickup (up to 5 meters), Acoustic Echo Cancellation (AEC), Automatic Gain Control (AGC), Direction of Arrival (DoA), dereverberation, beamforming, and noise suppression, providing reliable voice pickup in noisy environments. With its powerful audio capture and noise reduction capabilities, it provides excellent "ears" for voice control applications.
Part 1: reSpeaker Hardware and Firmware Preparation
This section explains how to flash the USB firmware for the reSpeaker XVF3800. The USB firmware supports plug-and-play mode, allowing direct connection to PCs, Raspberry Pi, and other devices. USB firmware only supports USB DFU (not I2C DFU). If the device is currently running I2S firmware, please enter Safe Mode first, then flash the USB firmware using USB DFU. Safe Mode supports both USB DFU and I2C DFU.
Reference Resources:
- reSpeaker XVF3800 Getting Started Guide
- reSpeaker XVF3800 Firmware Repository
- reSpeaker Code Repository
1.1 Preparation
Hardware Requirements
| Items | Description |
|---|---|
| reSpeaker XVF3800 USB 4-Mic Array | Main controller microphone array |
| USB Type-C Cable | Used for power and data transmission |
| Computer | Windows / macOS / Linux compatible |
Software Preparation (Installing dfu-util)
Windows:
- Download and extract the
dfu-utilbinaries (e.g.,D:\dfu-util-0.11-binaries\win64\) - Add the directory containing
dfu-util.exeto the system PATH - Open a command prompt and run
dfu-util -Vto verify the installation - If
dfu-util -lreturnsLIBUSB_ERROR_NOT_SUPPORTED, please use Zadig to replace the device driver with WinUSB
macOS (Homebrew):
brew install dfu-util
dfu-util -l
Linux (Debian / Ubuntu / Raspberry Pi OS):
sudo apt update
sudo apt install dfu-util
sudo dfu-util -l
Download USB Firmware
Visit the firmware repository: https://github.com/respeaker/reSpeaker_XVF3800_USB_4MIC_ARRAY/tree/master/xmos_firmwares
Select one of the following USB firmwares based on your needs (the 2-channel version is generally sufficient):
| Firmware | Channels | Description |
|---|---|---|
respeaker_xvf3800_usb_dfu_firmware_v2.0.x.bin | 2 | Processed dual-channel output Channel 0: Conference Channel 1: ASR |
respeaker_xvf3800_usb_dfu_firmware_6chl_v2.0.x.bin | 6 | Channel 0: Processed audio (Conference) Channel 1: Processed audio (ASR) Channels 2-5: Raw data for Microphones 0-3 |
1.2 Connect and Enter DFU Mode
Wiring Instructions
When connecting to a computer, please use the USB-C port near the 3.5mm headphone jack (XMOS side). Do not use the XIAO side port.
Entering Safe Mode
Safe mode is required in the following situations:
- Current firmware is in I2S mode and needs to be switched to USB mode
- Firmware is corrupted or incorrect firmware was flashed
Operation Steps:
- Completely disconnect the device from power
- Press and hold the onboard Mute button
- While holding the button, reconnect the power
- When the red LED starts flashing, release the button — the device has entered Safe Mode
1.3 Flash USB Firmware Using dfu-util
Confirm Device Visibility
Run the following command to check if the device is recognized:
# Linux / Raspberry Pi OS
sudo dfu-util -l

# macOS / Windows
dfu-util -l
The expected output should include: Found DFU: [2886:001a] ... alt=1, name="reSpeaker DFU Upgrade"
Execute Flashing Command
# Linux / Raspberry Pi OS (needs sudo)
sudo dfu-util -R -e -a 1 -D /path/to/respeaker_xvf3800_usb_dfu_firmware_v2.0.x.bin

# macOS / Windows (no sudo needed)
dfu-util -R -e -a 1 -D /path/to/respeaker_xvf3800_usb_dfu_firmware_v2.0.x.bin
Parameter Description:
-R: Reset/reboot the device after flashing is complete-e: Erase original firmware-a 1: Write to the Upgrade partition-D: Specify the path to the firmware file
After flashing is complete, the device will automatically restart and load the USB firmware.
1.4 Verification and Troubleshooting
Verify Firmware
After flashing the USB firmware, you can verify it as follows:
-
Device Manager Detection
- Windows: Open Device Manager; you should see "reSpeaker 3800" under "Sound, video and game controllers"
- macOS/Linux: Run the
lsusbcommand to check if the device is recognized as a USB audio device

-
Recording Test
- Use Audacity or other recording software
- Select "reSpeaker 3800" as the recording device
- Set the sample rate to 16000 Hz and the number of channels according to the flashed firmware (2 or 6 channels)
- Start recording and test voice capture
Common Questions
Q: Can't detect the device with dfu-util -l?
- Check the USB cable and port (you must use the XMOS side connector, the USB-C port near the 3.5mm headphone jack)
- If the device is currently running I2S firmware, please enter Safe Mode first
- Windows users: Ensure the WinUSB driver is used via Zadig
Q: Error during flashing?
- Try changing the USB cable or host port
- Re-flash in Safe Mode
Q: Computer doesn't recognize device after flashing?
- Ensure you are using the USB firmware file (filename starts with
usb), not the I2S firmware - Try re-plugging the device or changing the USB port
Q: No sound or abnormal sound during recording?
- Check if the recording software's sample rate is set to 16000 Hz
- Confirm that the channel count matches the firmware (2 or 6 channels)
- Check if the microphone is muted (see if the red mute LED is on; press the mute button to unmute)
Part 2: Software Configuration and Connection
2.1 Hardware Connection
Ensure the control computer is connected to both the robotic arm and the microphone array via USB.
2.2 Connecting the Robotic Arm
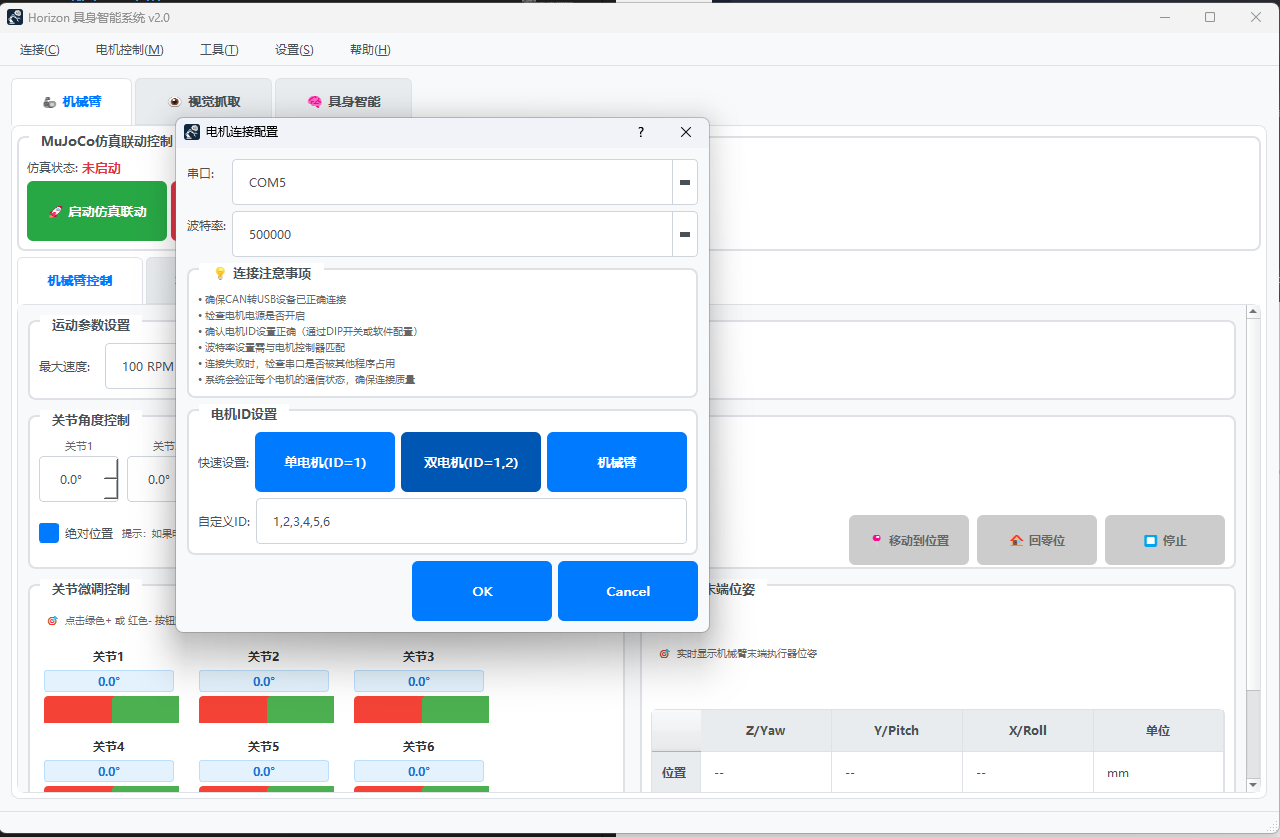
- Open the robotic arm control software, HorizonArm
- Click the Connect button in the top left corner
- Select the corresponding serial port (e.g., COM3) and baud rate (500000)
- Select Motor ID Settings → Robotic Arm → Custom ID, and confirm it displays: 1, 2, 3, 4, 5, 6
- Click Connect
Once the connection is successful, you can see the status of the robotic arm on the HorizonArm interface. Click Go to Zero to return the arm to its initial position (90-degree straight state).
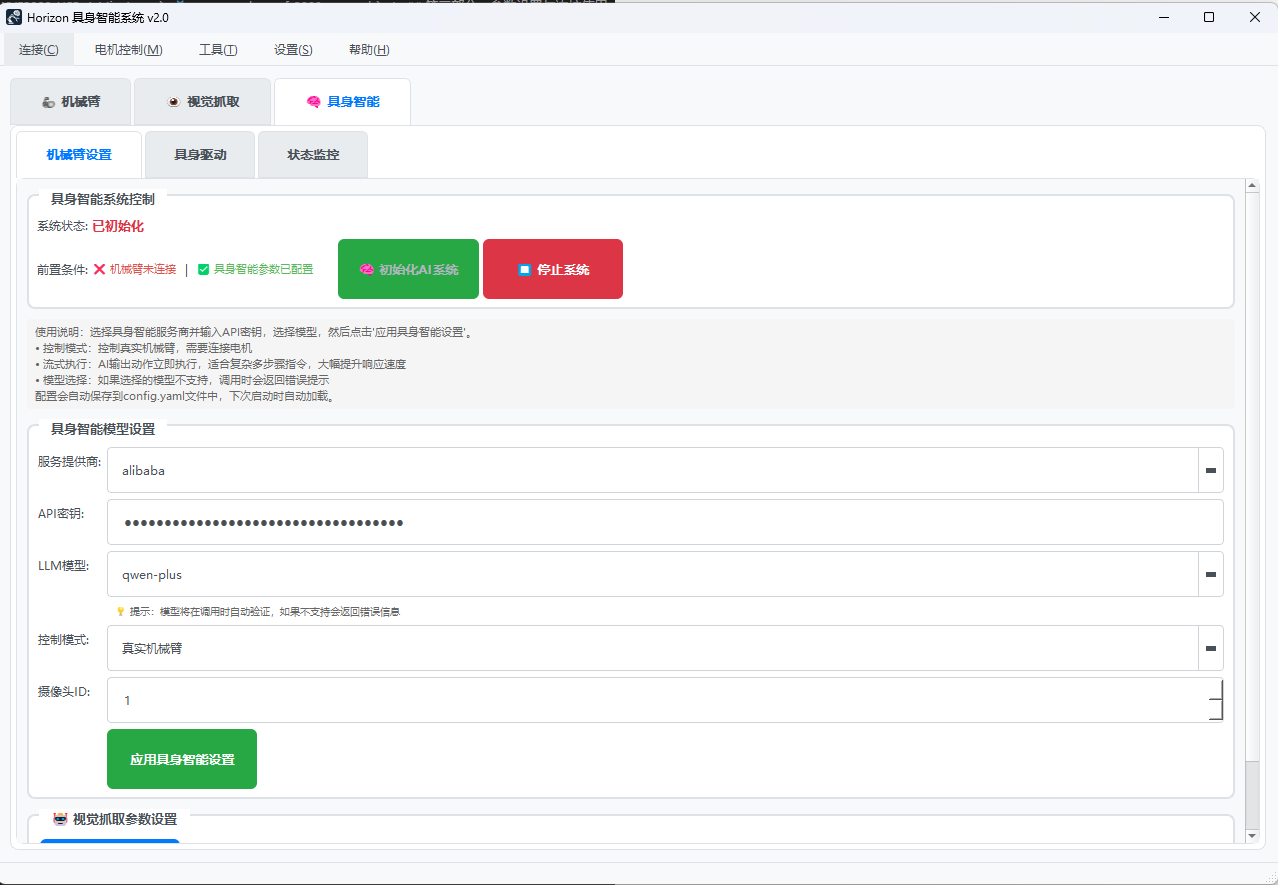
2.3 Configuring the AI System
- Click on the Embodied Intelligence interface
- Configure parameters:
- Enter the API address and key for the LLM (Large Language Model)
- Select the Camera ID (usually 1, or 0 for some models)
- Click Initialize AI System
- Enter the Embodied Drive interface to start using it
2.4 Voice Control Operation
After entering the execution interface, you will see four control buttons:
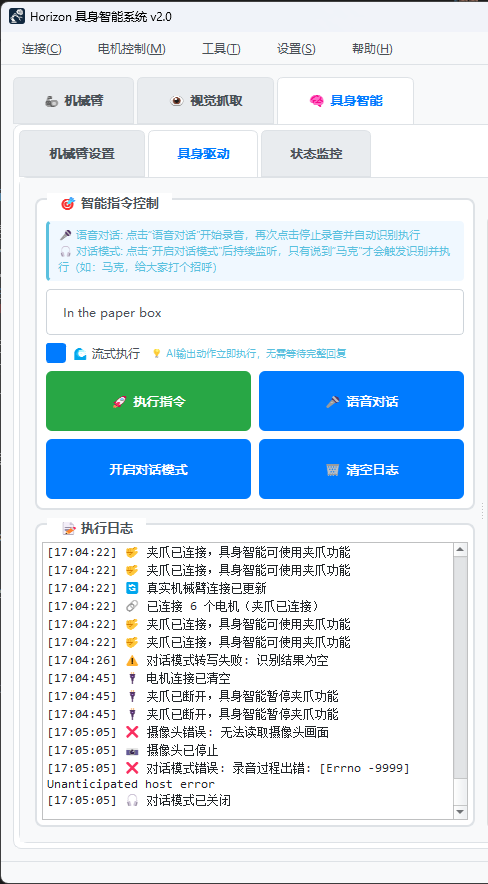
Operation Methods:
| Function | Operation Instructions |
|---|---|
| Execute Command | Enter a command in the text box and click the button to execute it |
| Run Dialogue | Similar to a recording function: • First click: Start recording • Second click: End recording The recording will be sent to the LLM for processing, the results will be displayed on the interface, and the robotic arm will perform actions based on the instructions |
| Enable Dialogue Mode | The robotic arm enters a continuous listening state. After saying the wake word "Mark", subsequent speech will be recognized as a command and executed |
Technical Support and Product Discussion
Thank you for choosing our product! We provide multiple communication channels to ensure you have a smooth product experience.