reTerminal DM with Node Red and BACnet TCP
Introduction
BACnet IP (Building Automation and Control Network over IP) is a communication protocol designed for managing and automating building systems. It enables devices from different manufacturers to interoperate seamlessly over standard IP networks, enhancing system integration and flexibility. The primary advantages of BACnet IP in Building Management Systems (BMS) include improved scalability, easier installation and maintenance, and the ability to leverage existing network infrastructure. BACnet IP also supports real-time data exchange, facilitating better monitoring and control of building systems. This results in increased energy efficiency, reduced operational costs, and enhanced occupant comfort and safety.
Getting Start
Before you start this project, you may need to prepare your hardware and software in advance as described here.
Hardware
| reTerminal DM |
|---|
 |
Software Preparation
We have prepared a Getting started Guide on Node-RED. It is recommended that you review this guide before proceeding to the wiki.
YABE
Please go to this link and download YABE (Yet Another BACnet Explorer). YABE is a versatile tool that allows you to simulate and explore BACnet devices, making it ideal for testing and development purposes. Once downloaded and installed on your Host PC, YABE will be used to simulate room temperature data, which we will then read and process using Node-RED on the reTerminal DM.
Configure Ethernet settings for BACnet IP
Since your Device IP domain is different from your wireless settings, you may have to change the IP configuration manually. For that,
- Step 01: Run the following command:
sudo nano /etc/dhcpcd.conf
- Step 02: Then configure the Ethernet port settings according to your PLC/Device network domain and set priorities using the metric command. The lowest metric has the highest priority.
Install BACnet node
-
Open Node-RED: Start Node-RED on your reTerminal. You can usually access it by opening a web browser and navigating to
http://<your-reTerminal-DM-ip>:1880. -
Access Manage Palette: In the top-right corner of the Node-RED interface, click on the three horizontal lines (menu) to open the main menu. From the drop-down menu, select "Manage palette."
-
Install New Nodes: In the "Manage palette" window, go to the "Install" tab.
-
Search for the Package: In the search box, type
node-red-contrib-bacnet-extendedto find the package. -
Install the Package: Once you see
node-red-contrib-bacnet-extendedin the list of available nodes, click the "Install" button next to it. This will start the installation process. -
Wait for Installation to Complete: The installation might take a few moments. Once it’s complete, you should see a confirmation message.
-
Verify Installation: After the installation is complete, the BACnet nodes will be available in the Node-RED palette. You can verify this by checking the list of nodes on the left sidebar of the Node-RED editor.
Now, you have successfully installed node-red-contrib-bacnet-extended and can start using it to integrate BACnet devices with your Node-RED flows.
Start Room Temperature Controller Simulator
Once you have installed YABE, navigate to the add-on folder and double-click bacnet.Room.Simulator to start it.
Once done, you need to start YABE.
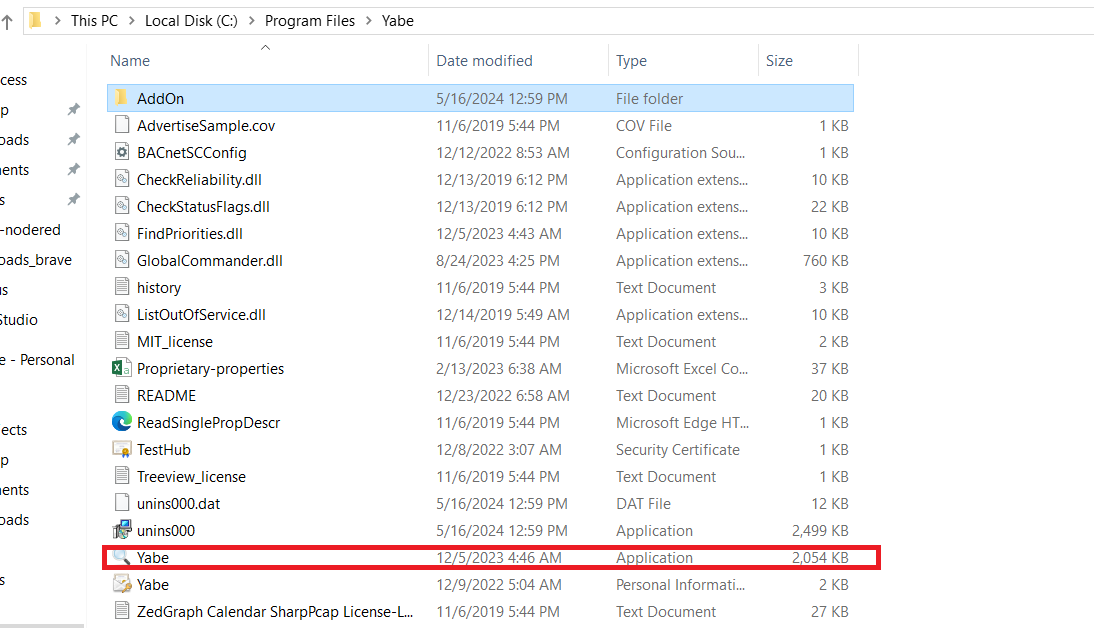
Then, click on the + mark to add a device and enter the IP address of your PC's Ethernet port. Click on "Start."
You might need to configure the Ethernet port IP address to ensure it is in the same network domain as both the reTerminal DM and your PC.
After that, you should be able to see the device with the same device ID as the room temperature simulator.
Discover BACnet IP Devices
-
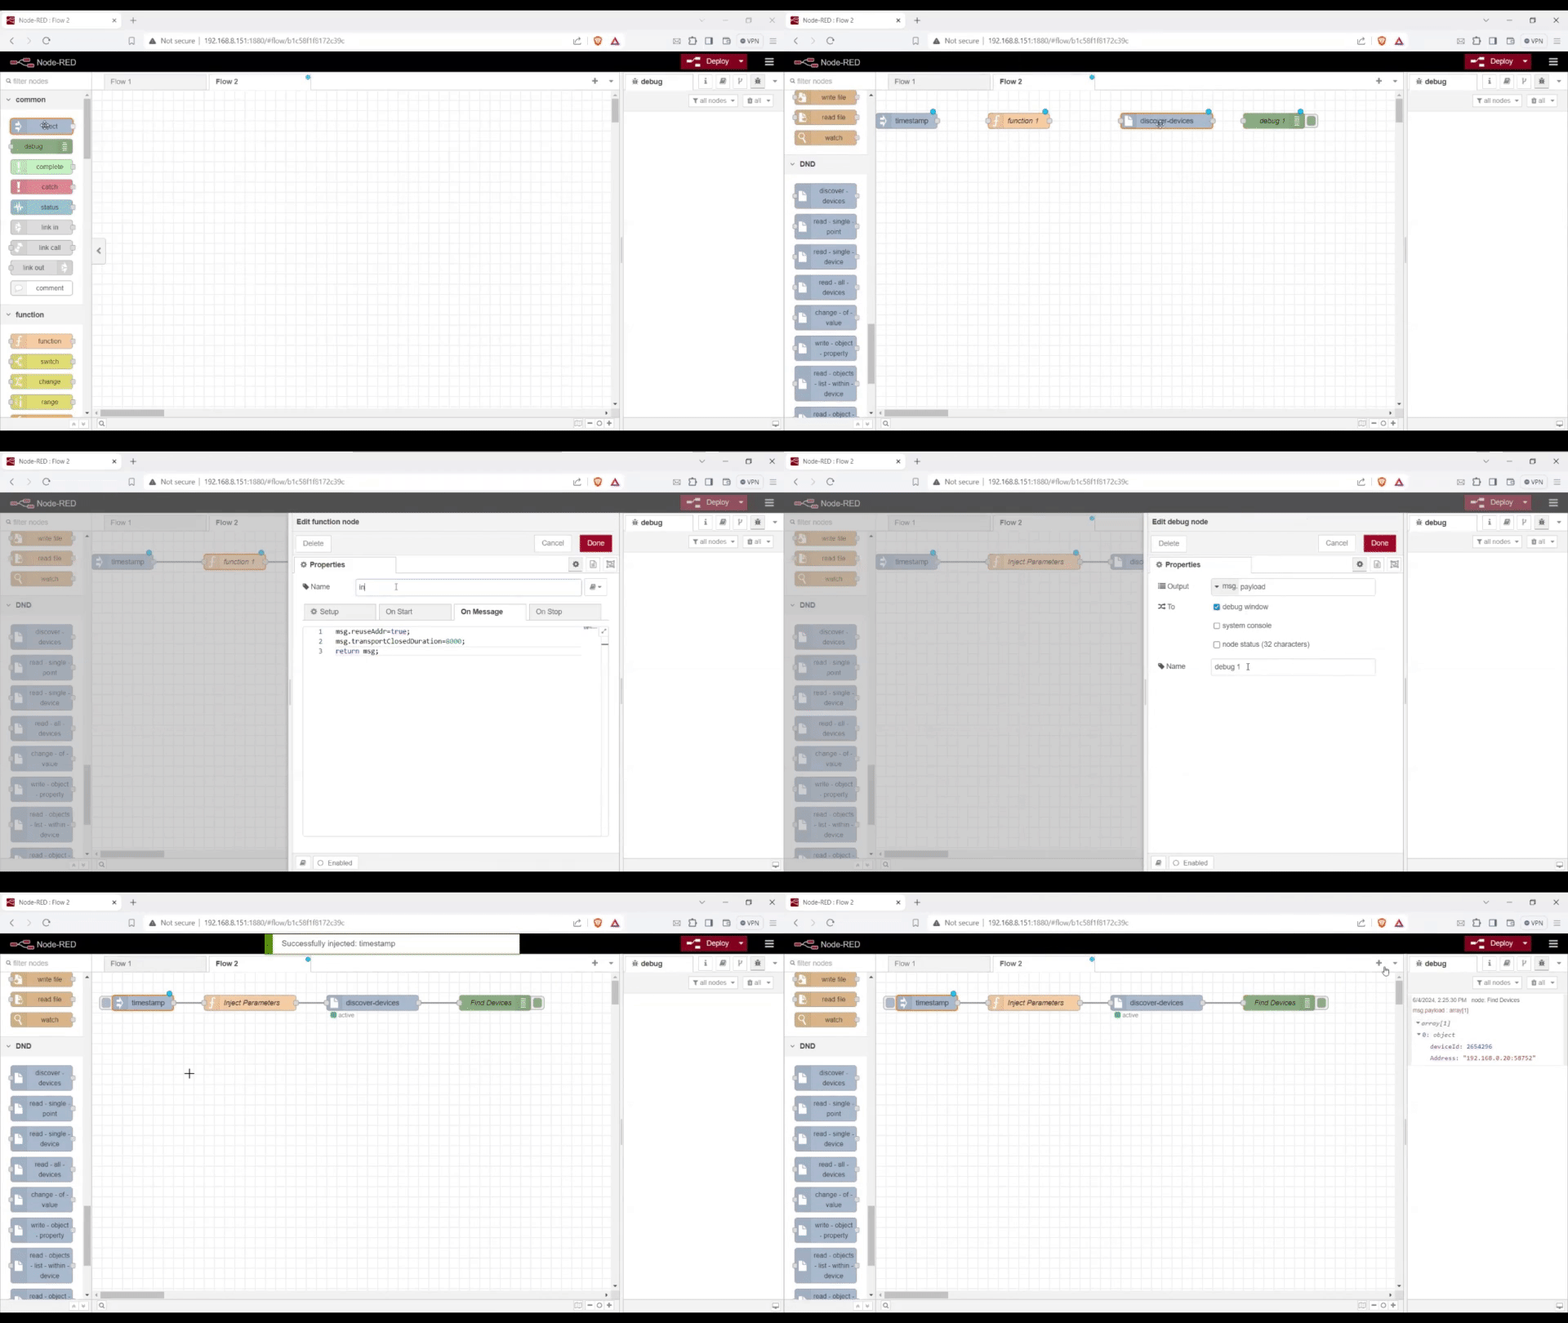
Nodes Required: You will need the following four nodes:
- Inject
- Function
- Discover-devices
- Debug
-
Add Nodes to Flow: Drag and drop the above nodes onto your Node-RED workbench flow.
-
Connect the Nodes: Connect the nodes in the following manner:
- Inject >>> Function >>> Discover-devices >>> Debug
-
Configure the Function Node: Double-click the Function node to open its configuration dialog. In the function block, write the following code:
msg.reuseAddr = true;
msg.transportClosedDuration = 8000;
return msg;
-
Deploy the Flow: Click on the "Deploy" button in the top-right corner of the Node-RED interface to deploy the flow.
-
Trigger Device Discovery: Click on the timestamp button (Inject node) to initiate the discovery process.
-
Check the Debug Output: Wait for the output to appear in the Debug window. You will see the device IP and device ID in the debug message.
Read All Device Parameters
To read all parameters from BACnet devices using Node-RED, follow these steps:
-
Prepare Nodes:
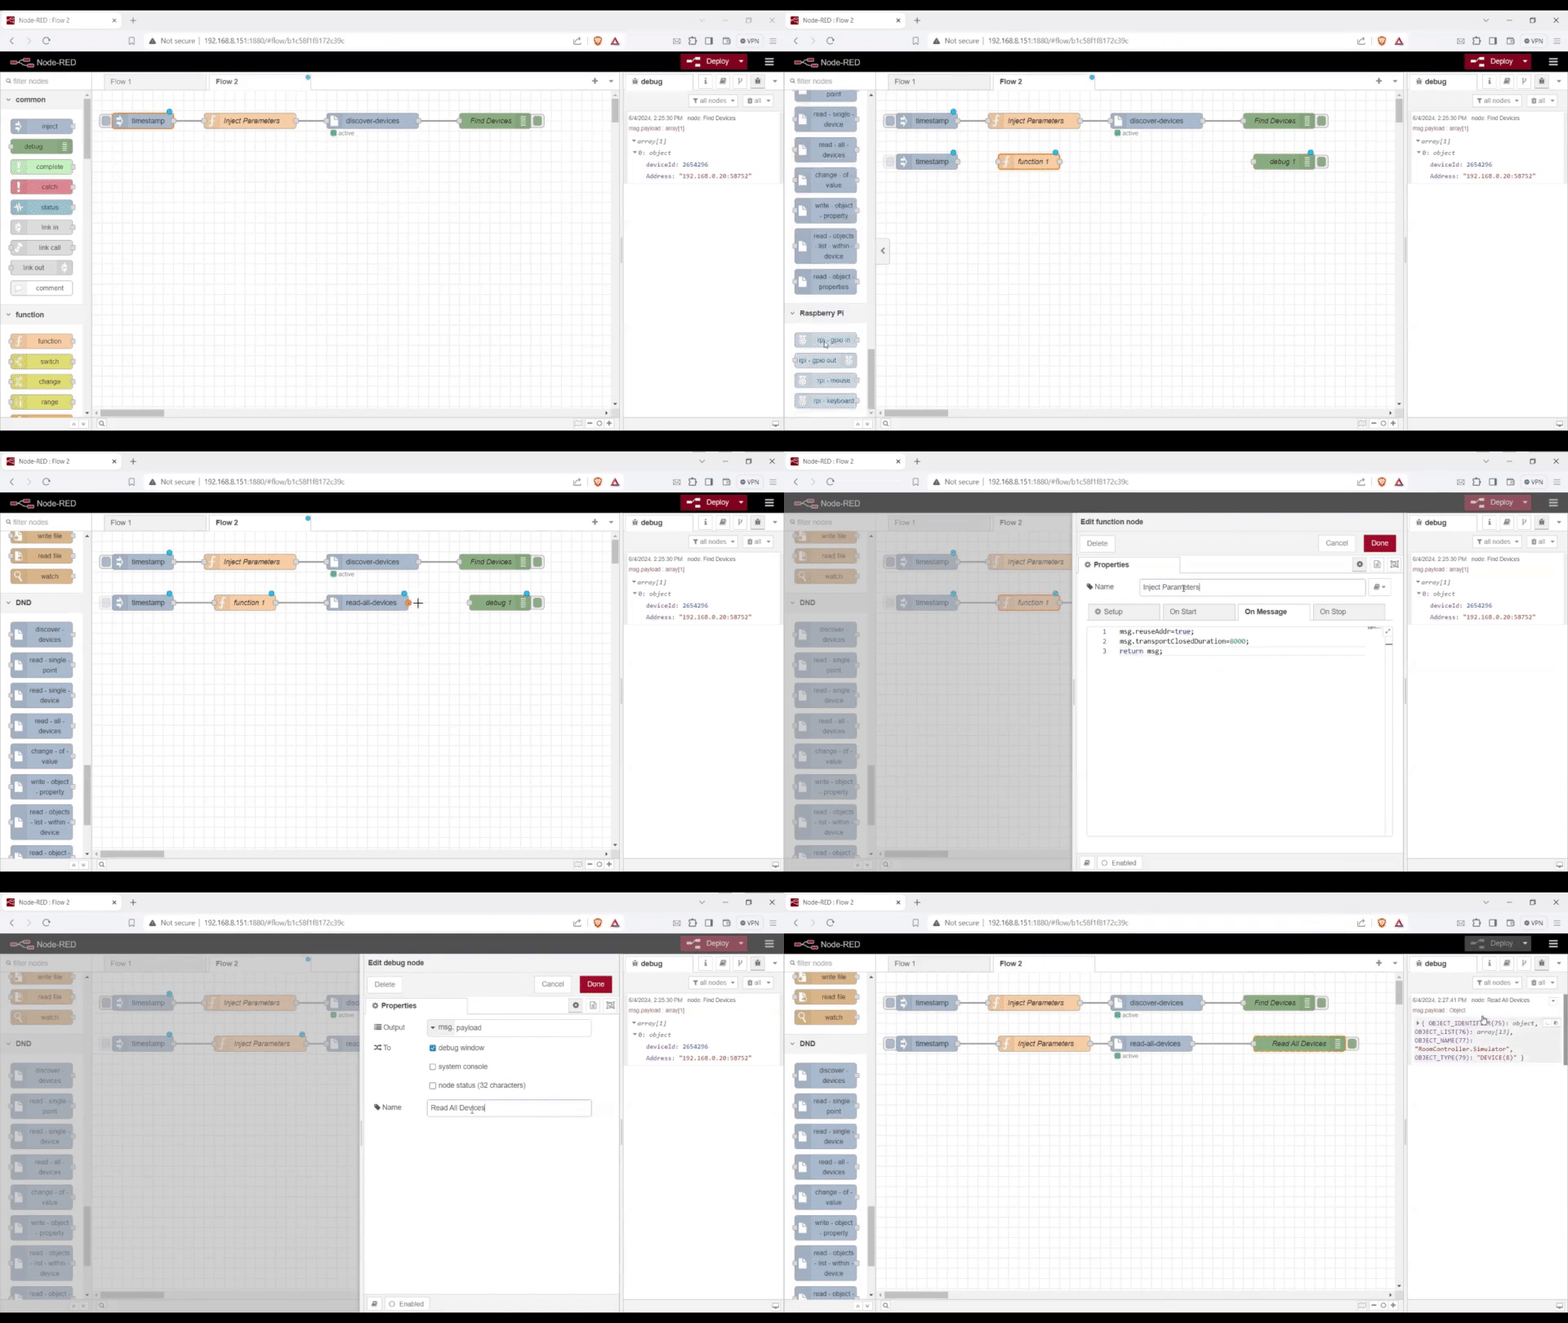
- You will need four nodes: Inject, Function, Read-All-Devices, and Debug.
-
Add Nodes to Workbench:
- Drag and drop the Inject, Function, Read-All-Devices, and Debug nodes onto your workbench.
-
Connect Nodes:
-
Connect the nodes in the following order:
Inject >>>> Function >>>> Read-All-Devices >>>> Debug
-
-
Configure the Function Node:
- Double-click on the Function node to open its configuration window.
- Enter the following code in the function block:
msg.reuseAddr = true;
msg.transportClosedDuration = 8000;
return msg;
-
Deploy the Flow:
- Click the "Deploy" button in the top-right corner of the Node-RED interface to deploy the flow.
-
Initiate Device Parameter Reading:
- Click the timestamp button on the Inject node to initiate the process.
-
Check the Output:
- Wait for the output to appear in the Debug window. You will see the parameters of the devices in the BACnet network area.
This setup will read all the parameters from BACnet devices on your network and display them in Node-RED's Debug window.
Read single device data
-
Prepare Nodes:
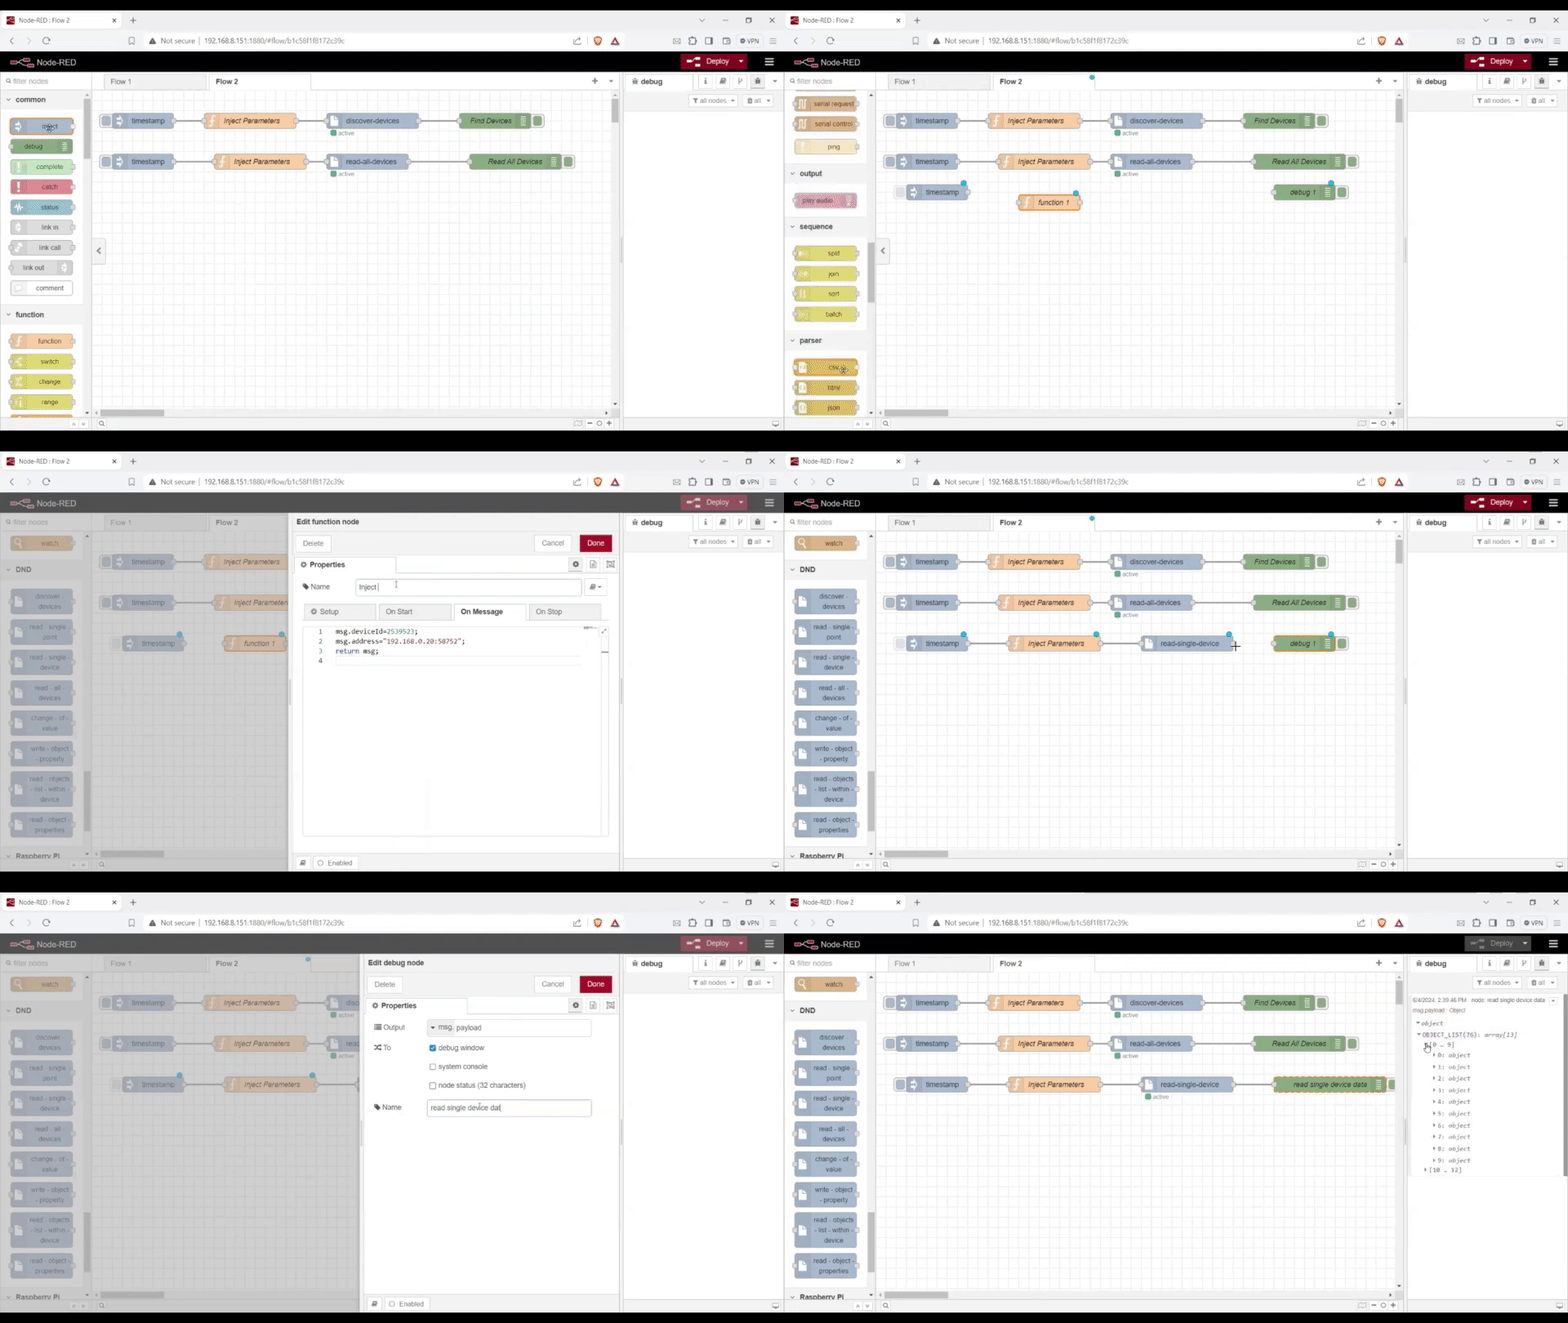
- You will need four nodes: Inject, Function, Read-All-Devices, and Debug.
-
Add Nodes to Workbench:
- Drag and drop the Inject, Function, Read-Single-Device, and Debug nodes onto your workbench.
-
Connect Nodes:
-
Connect the nodes in the following order:
Inject >>>> Function >>>> Read-Single-Device >>>> Debug
-
-
Configure the Function Node:
- Double-click on the Function node to open its configuration window.
- Enter the following code in the function block:
   msg.deviceId=DeviceID;
   msg.address="IP:PORT ADD";
   return msg;
-
Deploy the Flow:
- Click the "Deploy" button in the top-right corner of the Node-RED interface to deploy the flow.
-
Initiate Device Parameter Reading:
- Click the timestamp button on the Inject node to initiate the process.
-
Check the Output:
- Wait for the output to appear in the Debug window. You will see the parameters of the Selected device in the BACnet network area.
Read Single device particular object data
-
Prepare Nodes:
- You will need four nodes: Inject, Two function node, Read-Single-Device, and Debug.
-
Add Nodes to Workbench:
- Drag and drop the Inject, Two function node, Read-Single-Device, and Debug nodes onto your workbench.
-
Connect Nodes:
-
Connect the nodes in the following order:
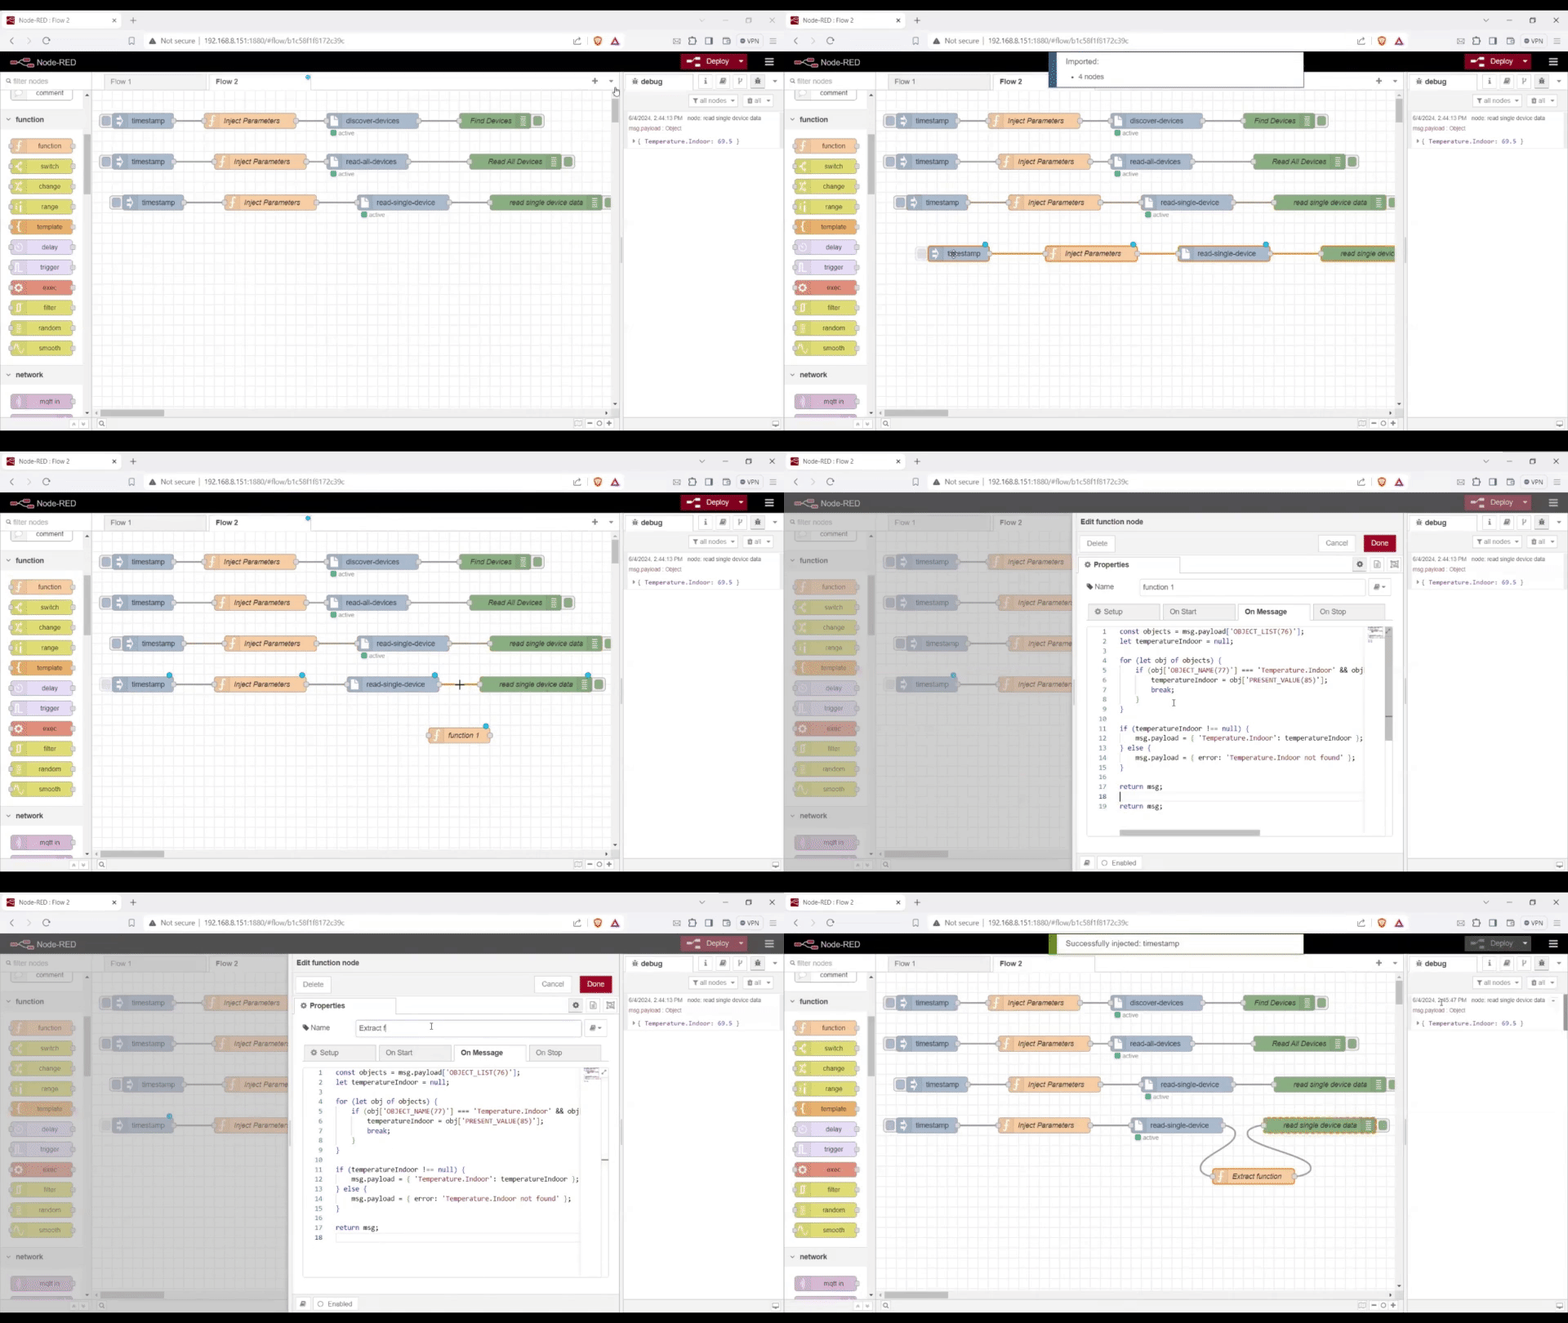
Inject >>>> Function >>>> Read-Single-Devices >>>> Function >>>> Debug
-
-
Configure the Function Node:
- Double-click on the Function node near to inject node to open its configuration window.
- Enter the following code in the function block:
   msg.deviceId=DeviceID;
   msg.address="IP:PORT ADD";
return msg;- Double-click on the Function node near to debug node to open its configuration window.
- Enter the following code in the function block:
   const objects = msg.payload['OBJECT_LIST(76)'];
   let temperatureIndoor = null;

   for (let obj of objects) {
   if (obj['OBJECT_NAME(77)'] === 'Temperature.Indoor' && obj['OBJECT_TYPE(79)'] === 'ANALOG_INPUT(0)') {
   temperatureIndoor = obj['PRESENT_VALUE(85)'];
   break;
   }
   }

   if (temperatureIndoor !== null) {
   msg.payload = { 'Temperature.Indoor': temperatureIndoor };
   } else {
   msg.payload = { error: 'Temperature.Indoor not found' };
   }

   return msg;
-
Deploy the Flow:
- Click the "Deploy" button in the top-right corner of the Node-RED interface to deploy the flow.
-
Initiate Device Parameter Reading:
- Click the timestamp button on the Inject node to initiate the process.
-
Check the Output:
- Wait for the output to appear in the Debug window. You will see the parameters of the only the particular object in Selected device in the BACnet network area.
Tech Support & Product Discussion
Thank you for choosing our products! We are here to provide you with different support to ensure that your experience with our products is as smooth as possible. We offer several communication channels to cater to different preferences and needs.