Work with TRMNL
This guide is the single source of truth for using TRMNL with any compatible Seeed ePaper product. Pick your hardware once at each step that needs it, and the rest of the workflow is identical.
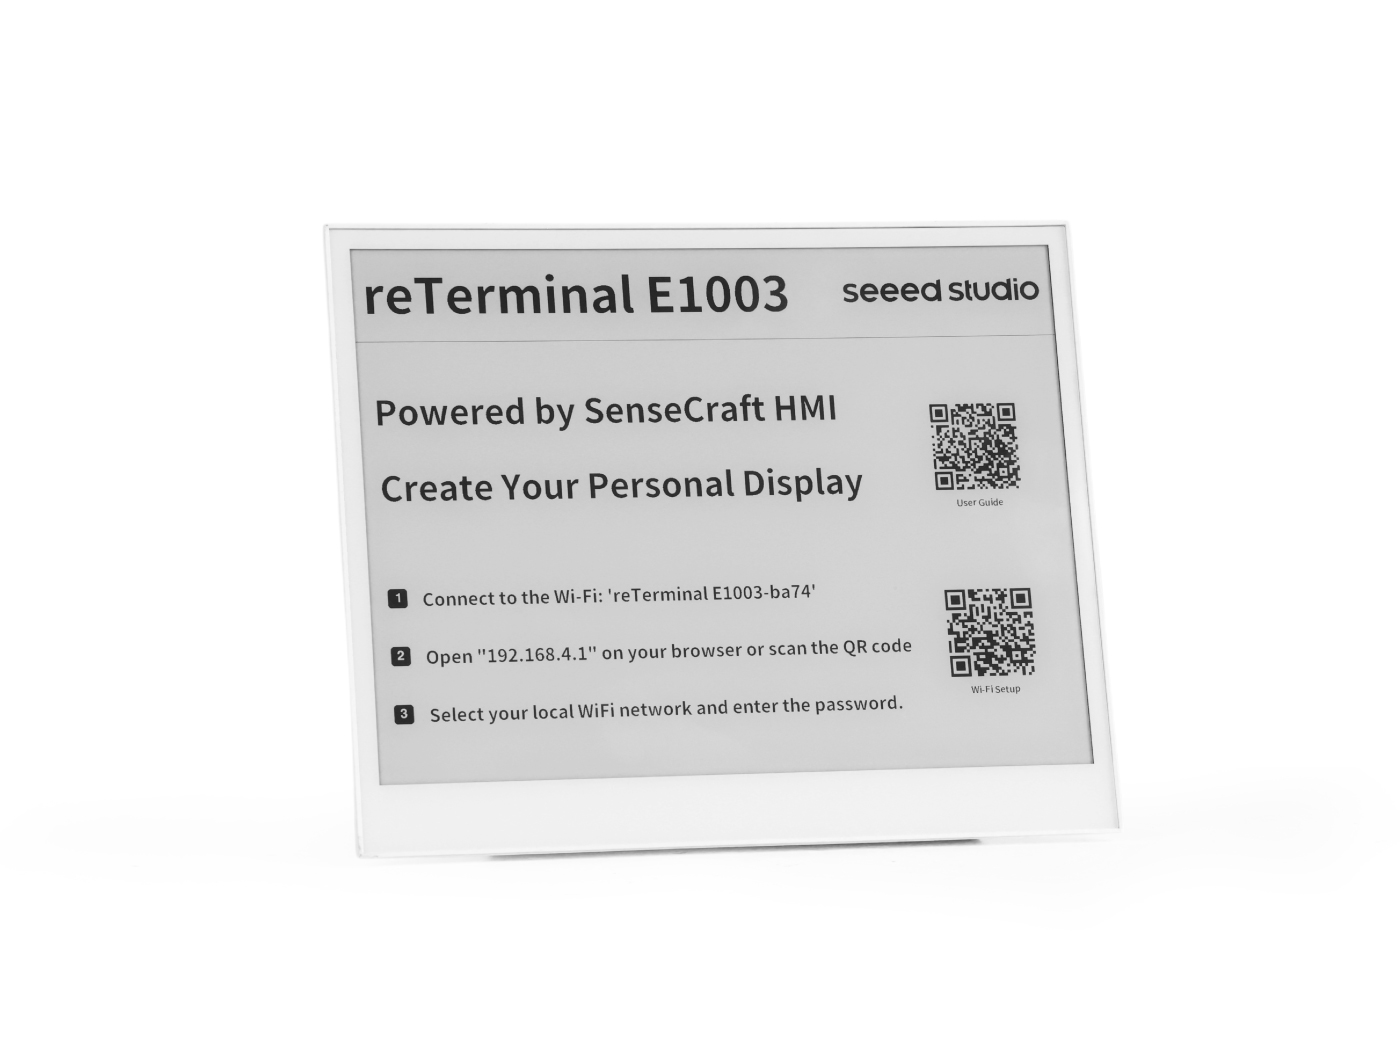
TRMNL officially supports the reTerminal E1001, reTerminal E1002, reTerminal E1003, TRMNL 7.5" (OG) DIY Kit, and XIAO 7.5" ePaper Panel. On the E1002 content is currently rendered in monochrome mode — full-color rendering is planned for a future release. The E1003 capacitive touch panel is available under SenseCraft HMI firmware only; TRMNL firmware uses the physical buttons on the device.
What is TRMNL?
TRMNL is an innovative platform designed to help people stay focused and calm in our increasingly distracting digital world. Founded in 2023, TRMNL has quickly become a leading solution for E Ink® dashboard management, offering a unique approach to displaying information without the constant notifications and distractions of traditional screens.
At its core, TRMNL is built on the philosophy that technology should enhance our lives without demanding constant attention. The platform provides an elegant way to view important information at a glance through E Ink® displays, creating a more mindful and less intrusive technological experience.
Why use TRMNL?
- Simplified dashboard creation: TRMNL's growing library of apps and integrations makes it easy to create custom information displays without complex programming.
- Low power consumption: TRMNL's efficient software combined with E Ink® minimal power requirements creates an extremely energy-efficient solution.
- Distraction-free information: Get the information you need without notifications and eye strain.
- Regular updates: TRMNL's active development means new features and integrations are added weekly.
- Developer-friendly: TRMNL's open API and developer tools allow custom plugins and integrations.
Compatible Hardware
reTerminal E Series
| reTerminal E1001 | reTerminal E1002 | reTerminal E1003 |
|---|---|---|
 |  |  |
| 7.5" Monochrome Integrated terminal | 7.3" Spectra 6 (Color) Integrated terminal Mono mode in TRMNL | 10.3" Monochrome 16-level grayscale Integrated terminal |
TRMNL DIY Kit & XIAO Panel
| TRMNL 7.5" (OG) DIY Kit | XIAO 7.5" ePaper Panel |
|---|---|
 |  |
| 7.5" Mono + DIY case XIAO ESP32-S3 Plus driver | 7.5" Mono bare panel XIAO ESP32-C3 directly |
Step 1: TRMNL Account Setup and BYOD Access
Before connecting your device to TRMNL you need a TRMNL account and BYOD (Bring Your Own Device) access — the same flow regardless of hardware.
-
Purchase TRMNL Access
- Buy access to the TRMNL web app + device capabilities at: https://shop.usetrmnl.com/products/byod
- This provides you with the necessary credentials to use TRMNL's platform.
- Go to https://usetrmnl.com/claim-a-device to activate a virtual device (may take up to 10 minutes following purchase).

-
Create a TRMNL Account
- Visit TRMNL's website
- Click on "Sign Up" to create a new account.
- Follow the registration process.

Your TRMNL credentials are sensitive information. Never share them publicly or commit them to version control systems.
If you encounter any issues, contact the TRMNL team directly at [email protected].
Step 2: Hardware Setup
The reTerminal E Series and the XIAO 7.5" Panel are pre-assembled — you only need to power them on. The TRMNL DIY Kit requires assembly.
- reTerminal E1001 / E1002 / E1003
- TRMNL DIY Kit
- XIAO 7.5" Panel
The reTerminal E Series is fully integrated. Just connect the USB-C cable, slide the power switch to ON, and power it on. No assembly steps are needed.
If the device is asleep and does not respond, press the Refresh button on the top of the unit to wake it before connecting USB or entering flashing mode.
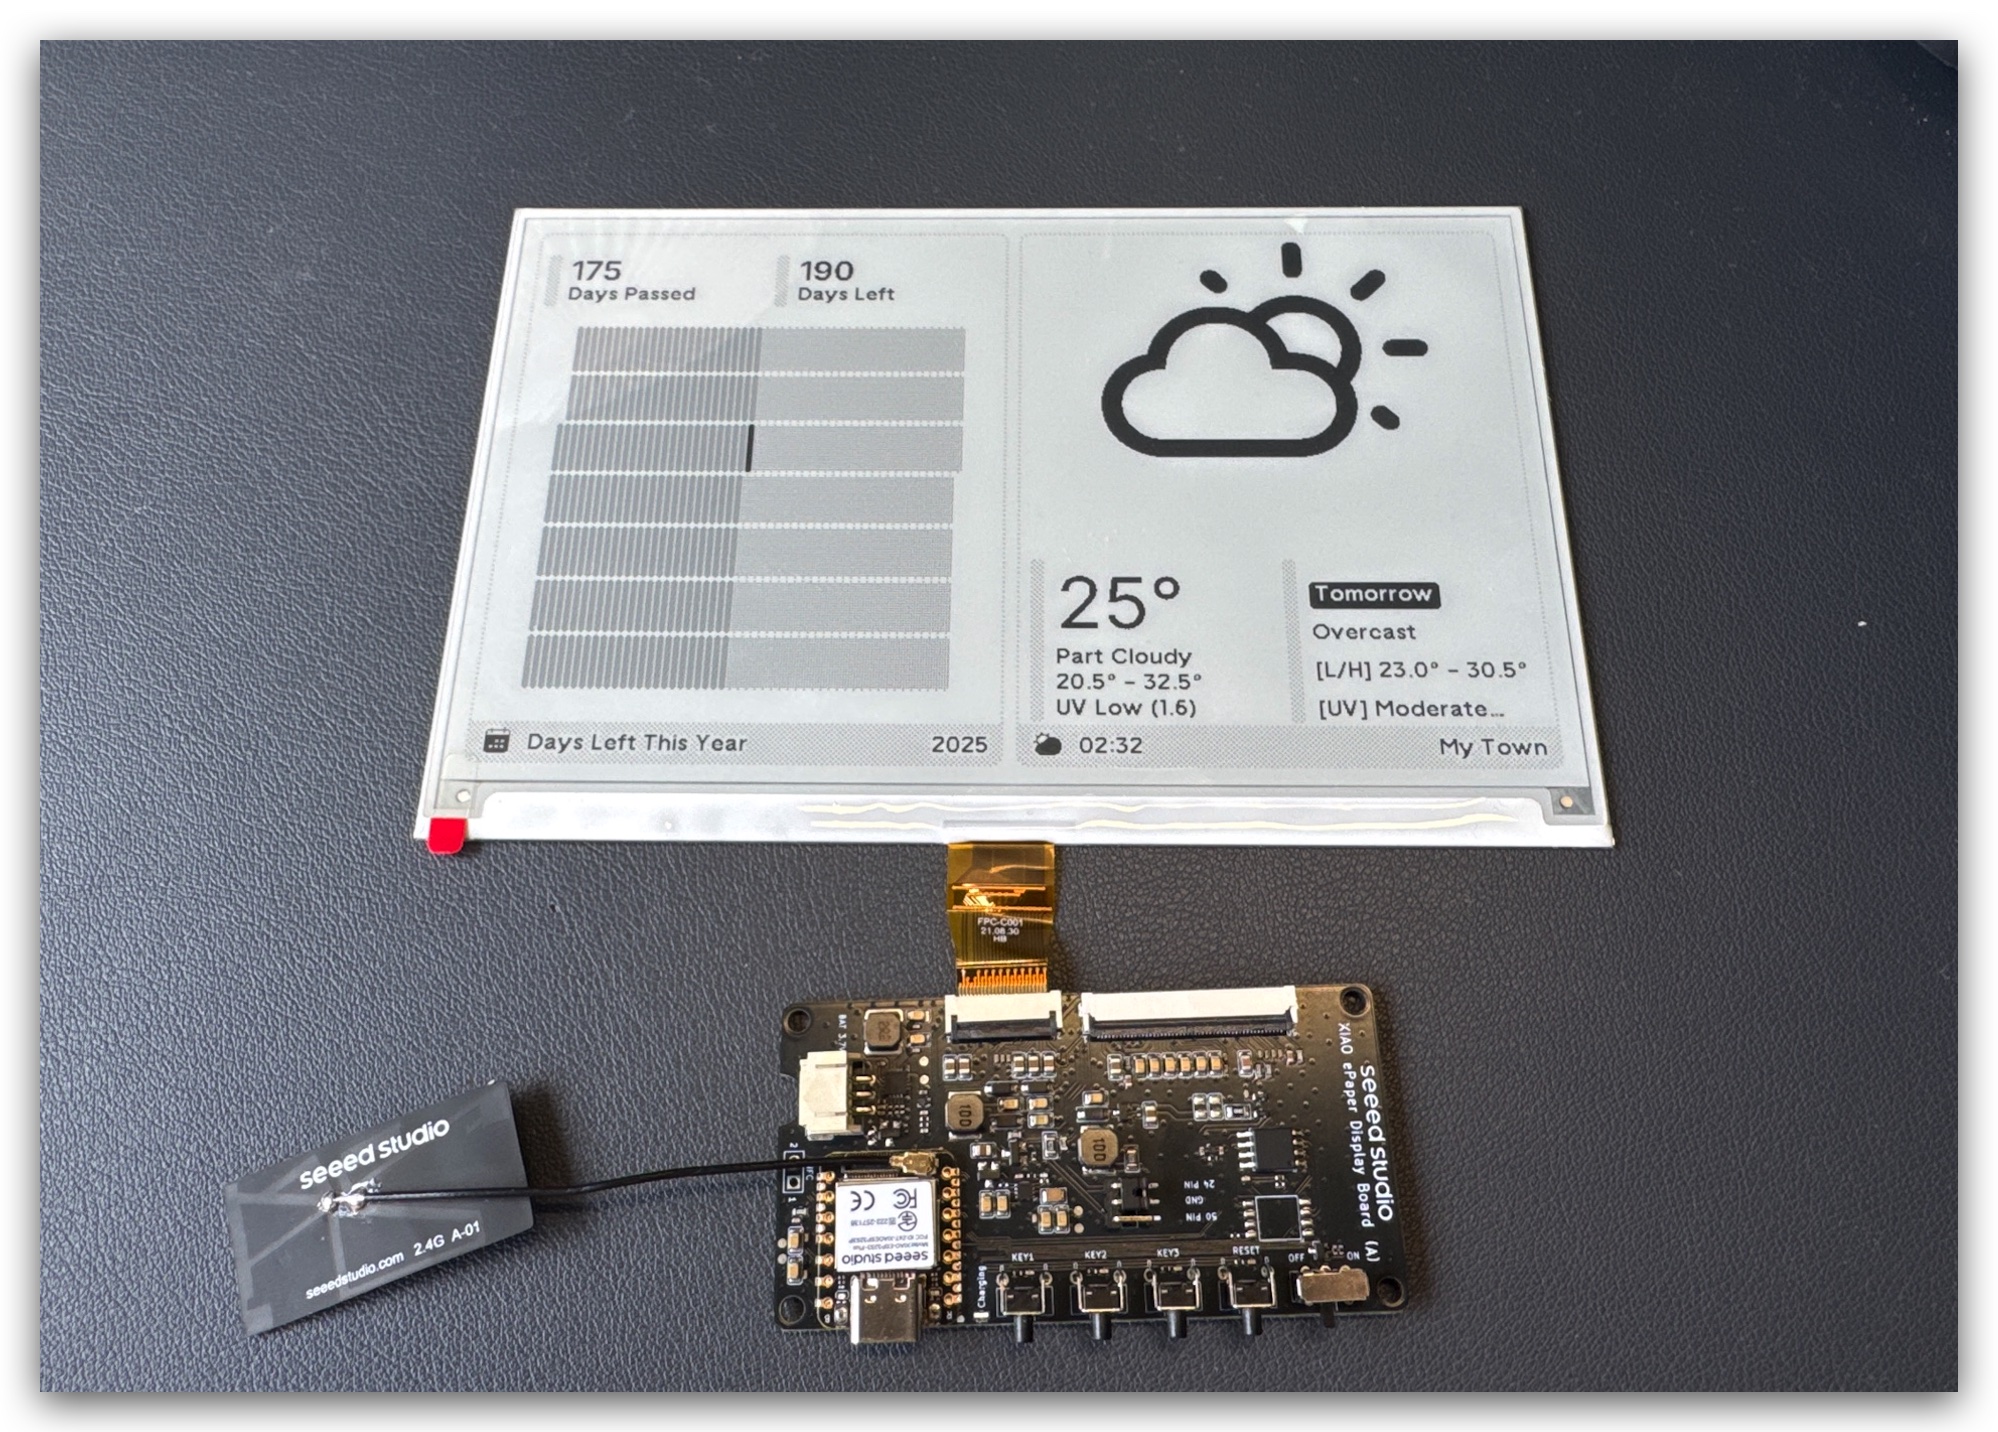
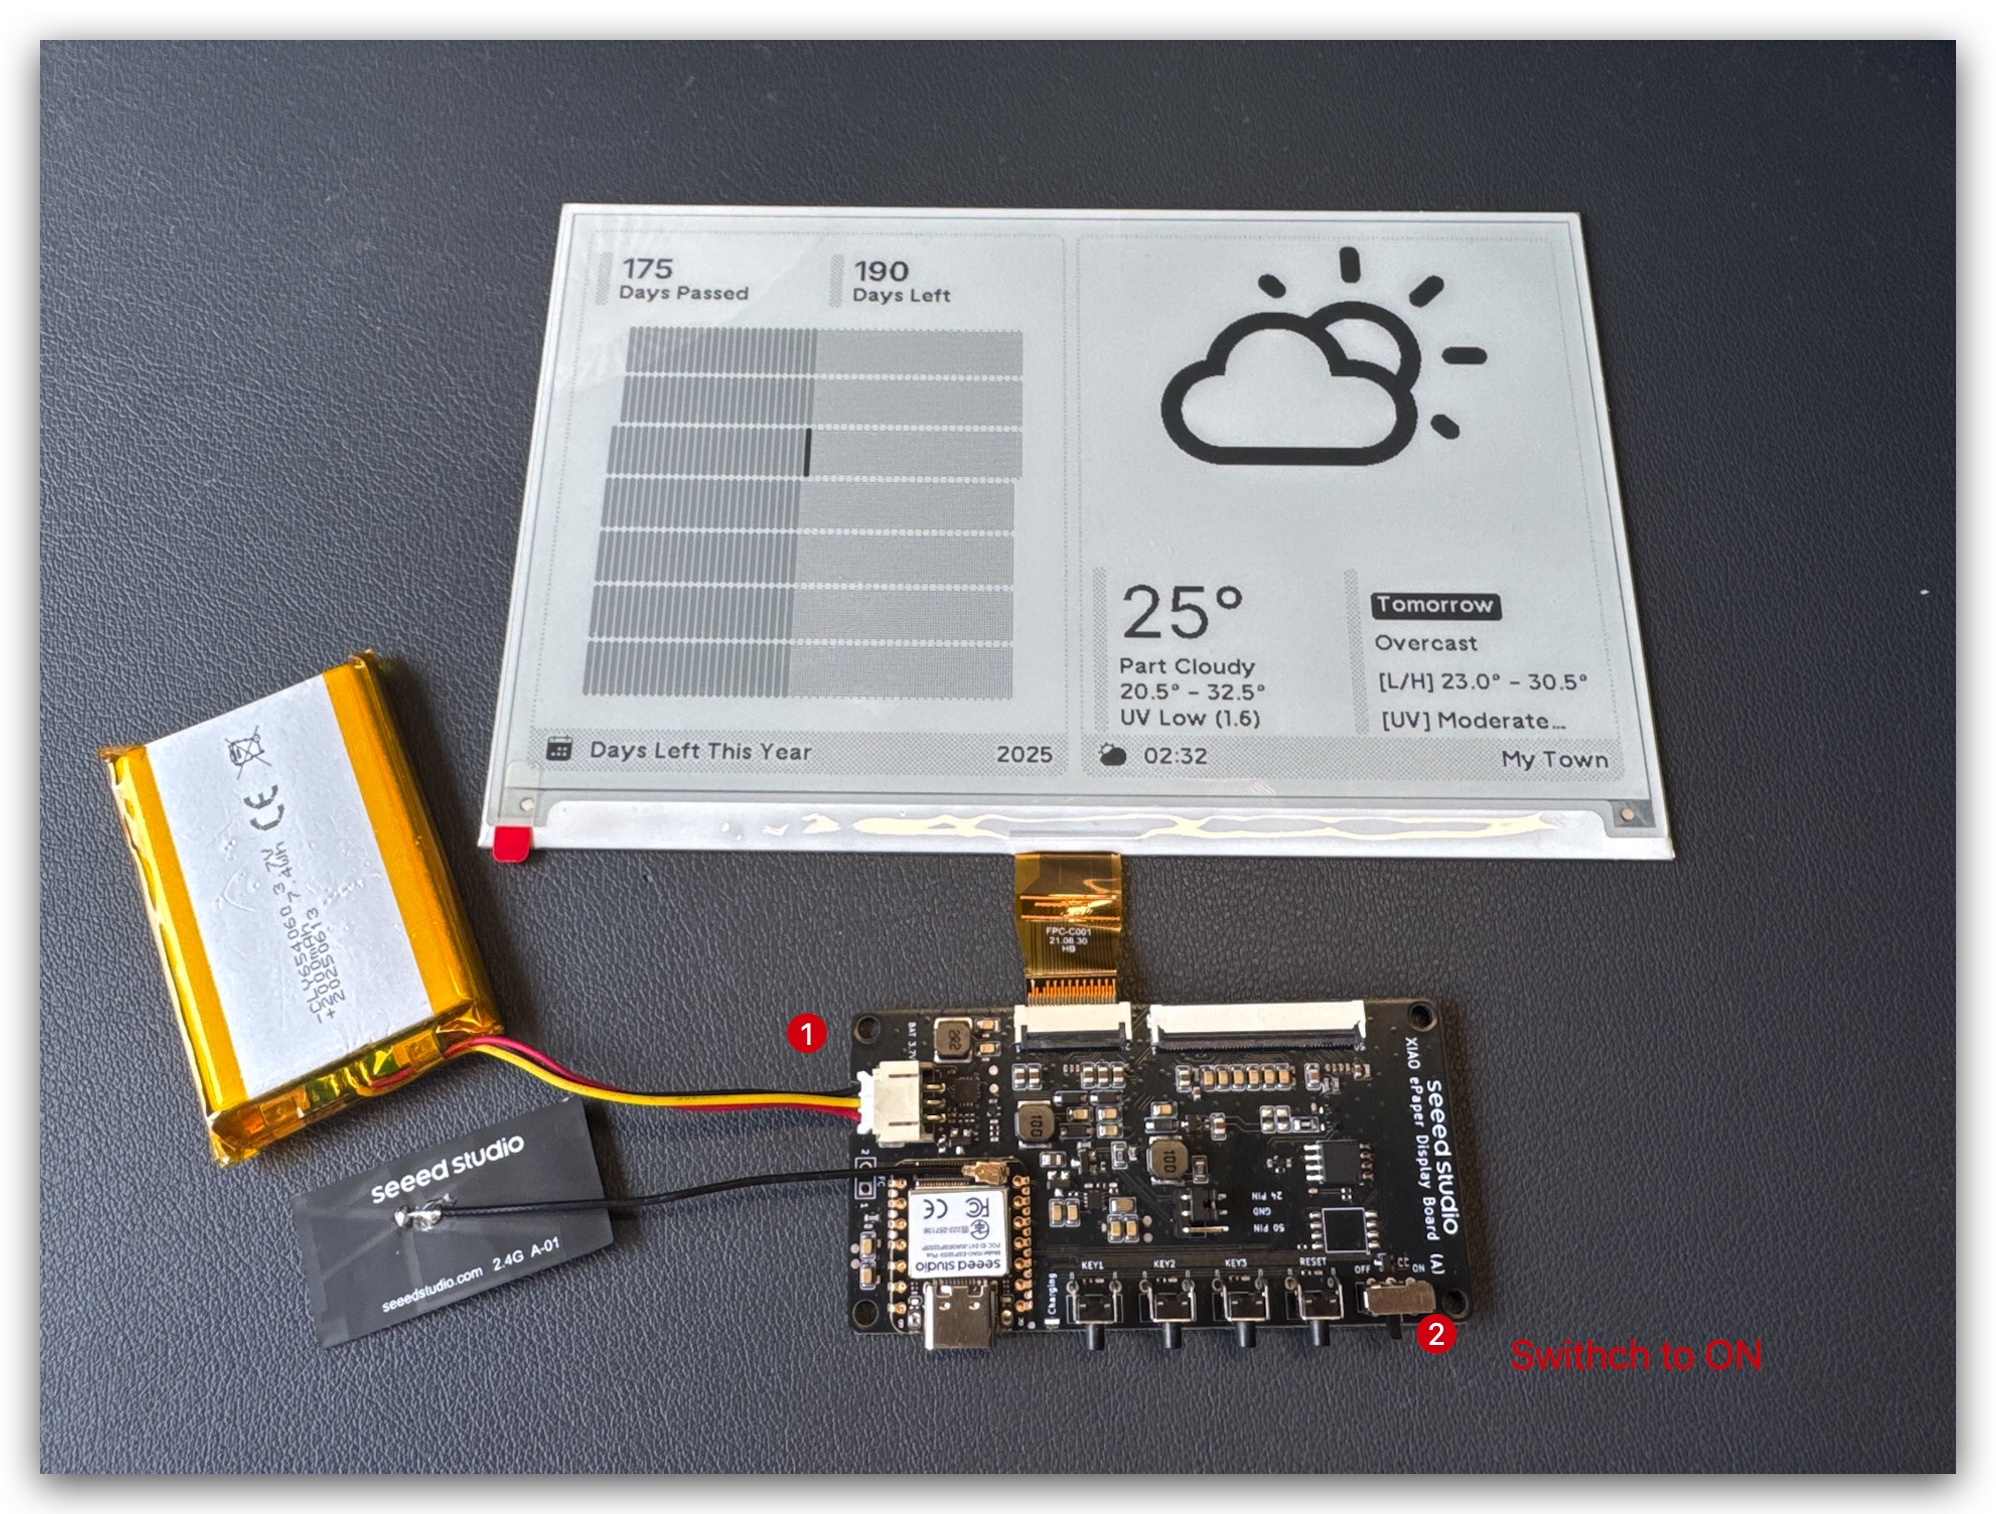
Step 1. Connect the display to the driver board
Align the FPC cable with the connector on the XIAO ePaper Display Board, then secure the latch to ensure a firm connection.
The metal side of the FPC cable should face upwards, otherwise no content will be displayed. Please follow the installation video below — many people get this wrong.
Step 2. Attach the battery
Connect the battery cable to the JST connector on the driver board, ensuring correct polarity (red wire to +, black to -).
Step 3. Enclosure assembly (optional)
Please note that the screen's flexible cable is very fragile. Be careful when operating. If it gets damaged, the entire screen will stop working.
Print the open-source enclosure parts from the Resources section and assemble the components inside.
First, assemble driver board and battery:
Test the TRMNL kit:
Plug the screen into the case and route the FPC cable out:
Connect the FPC extension cable and assemble the whole case:
The L-shape enclosure assembly is very similar:
If your TRMNL kit is far away from your router, you can route the antenna outside the case for better signal performance.
The XIAO 7.5" ePaper Panel ships with the XIAO ESP32-C3 directly mated to the panel. Just plug in via USB-C — no further assembly required.
Step 3: Flash the TRMNL Firmware
Three flashing methods are available. Method 1 (Web Flasher) is the easiest and works for all supported hardware. Method 2 (reTerminal E-Series Firmware Flasher) is exclusive to reTerminal E Series. Method 3 (Build from Source) is for advanced users.
If you bought a brand-new TRMNL 7.5" (OG) DIY Kit, it already has TRMNL firmware preinstalled — you can skip the flashing step entirely and jump to Step 4.
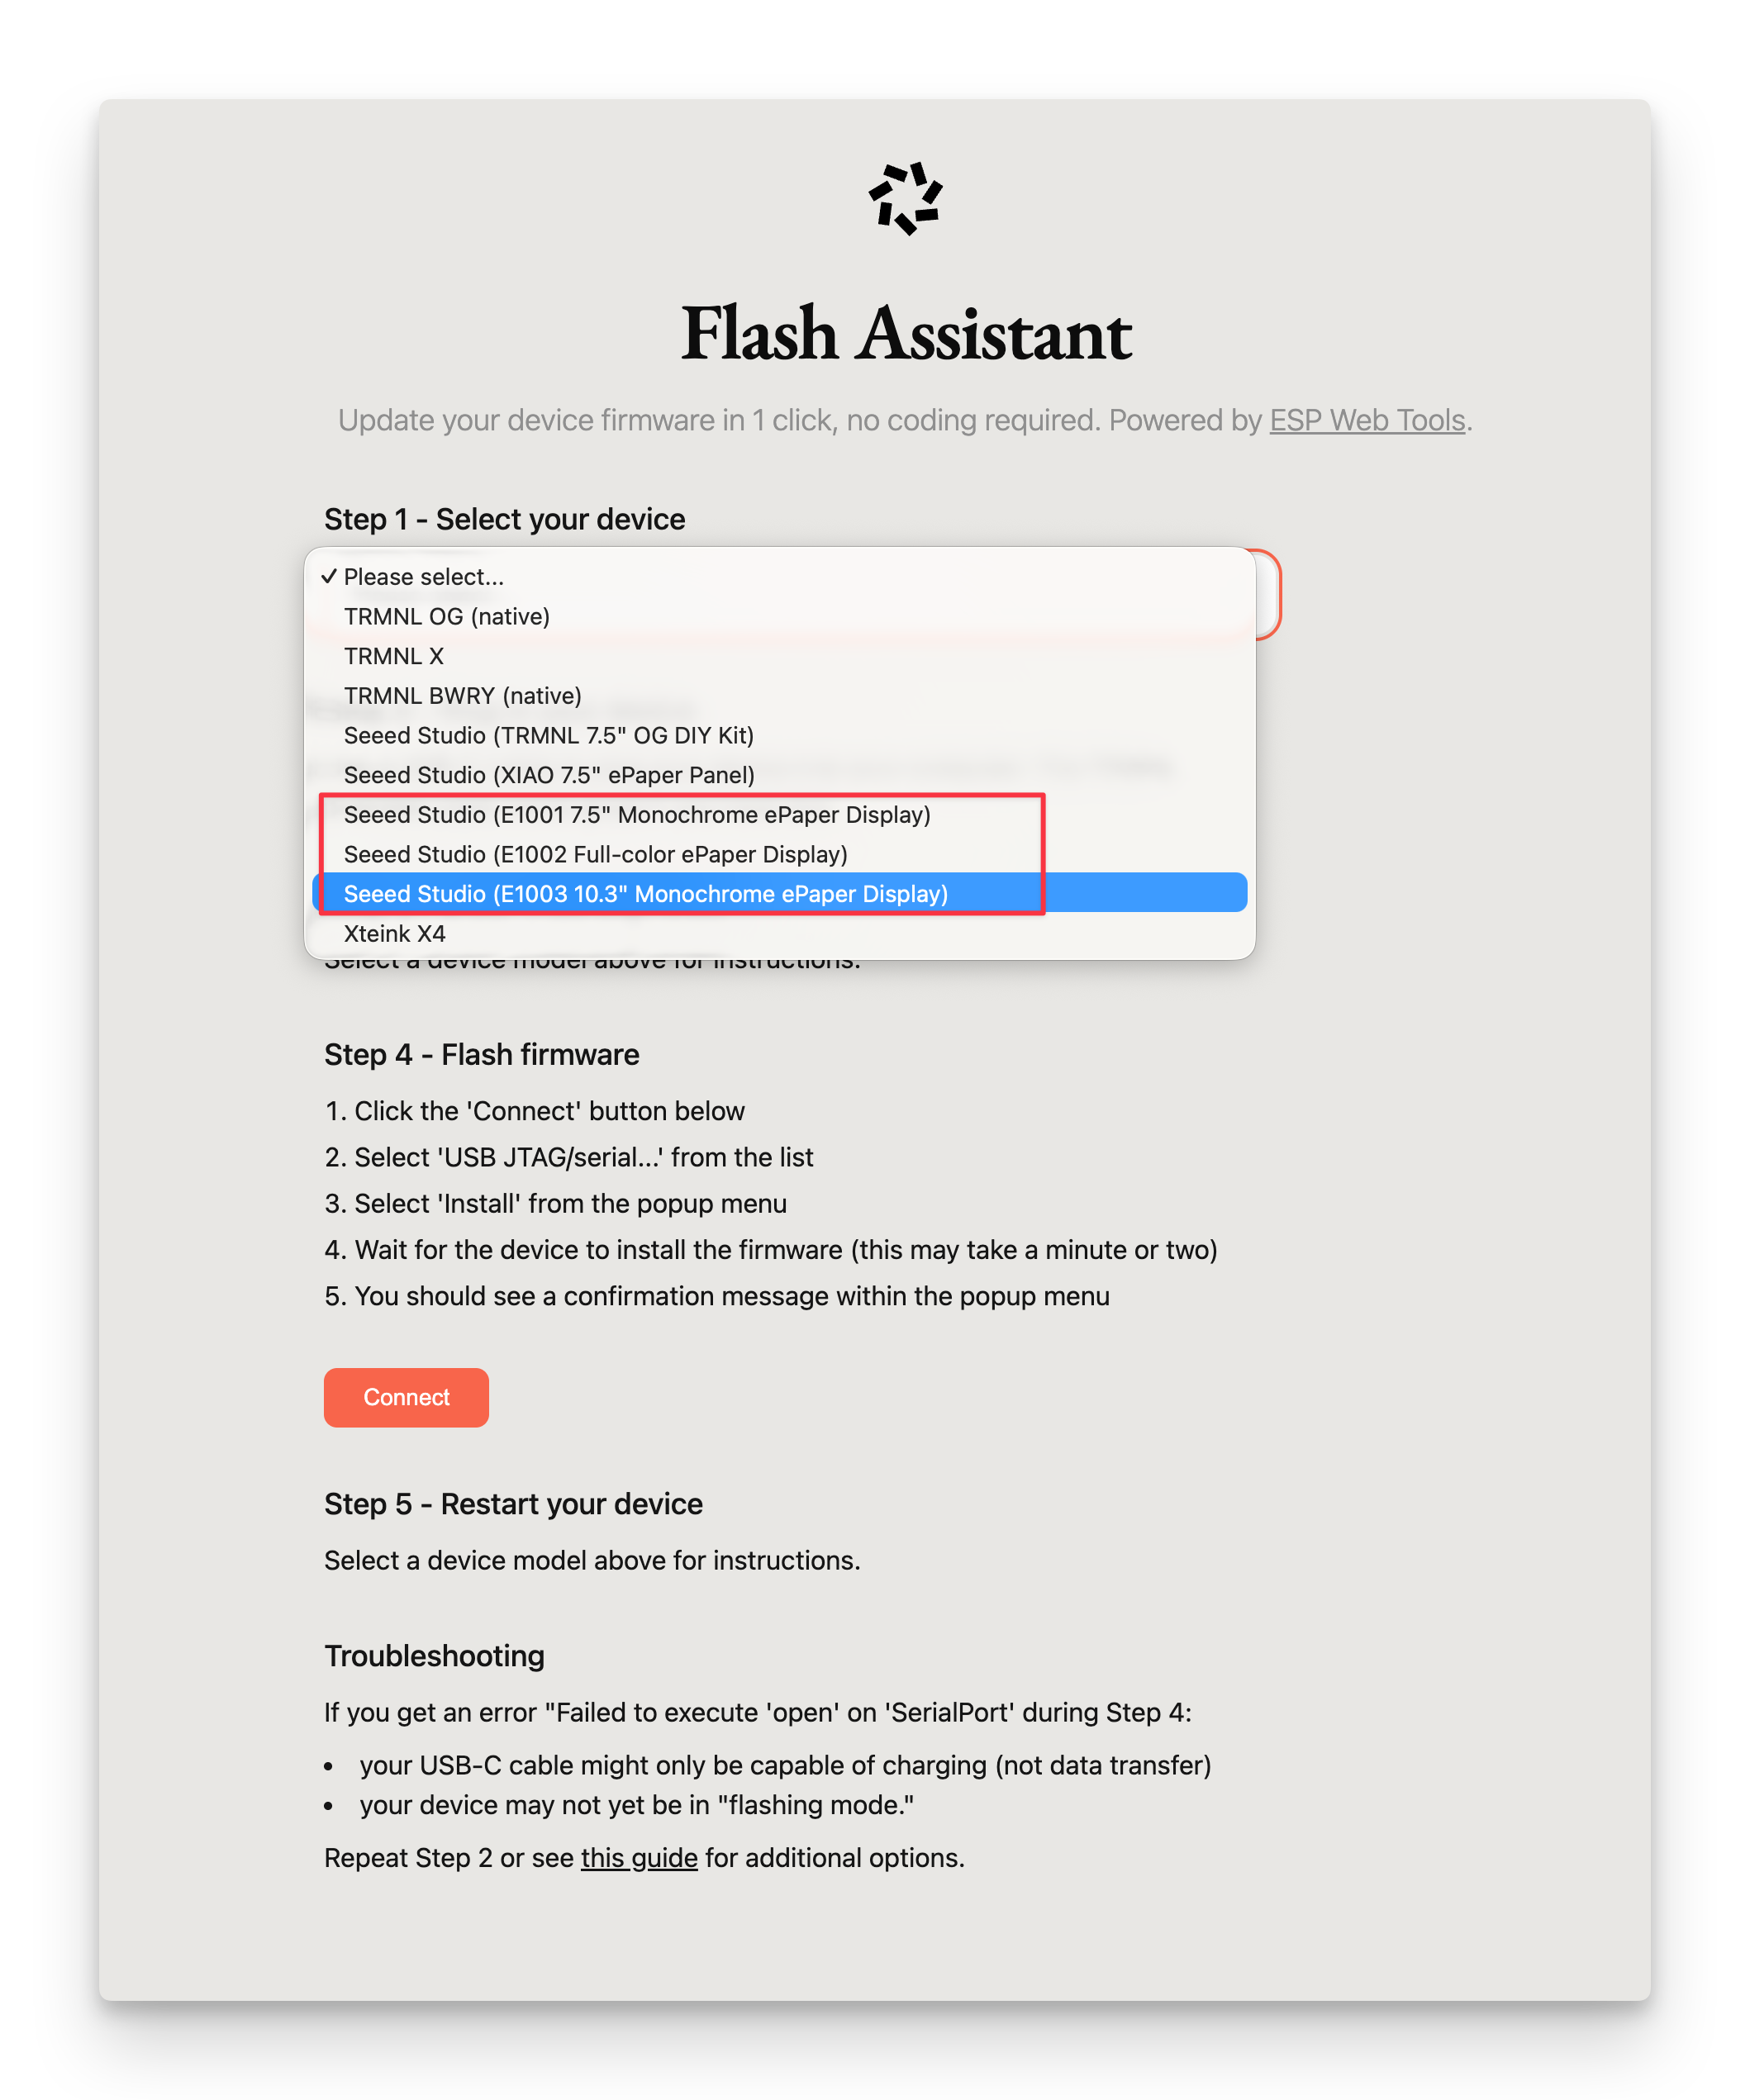
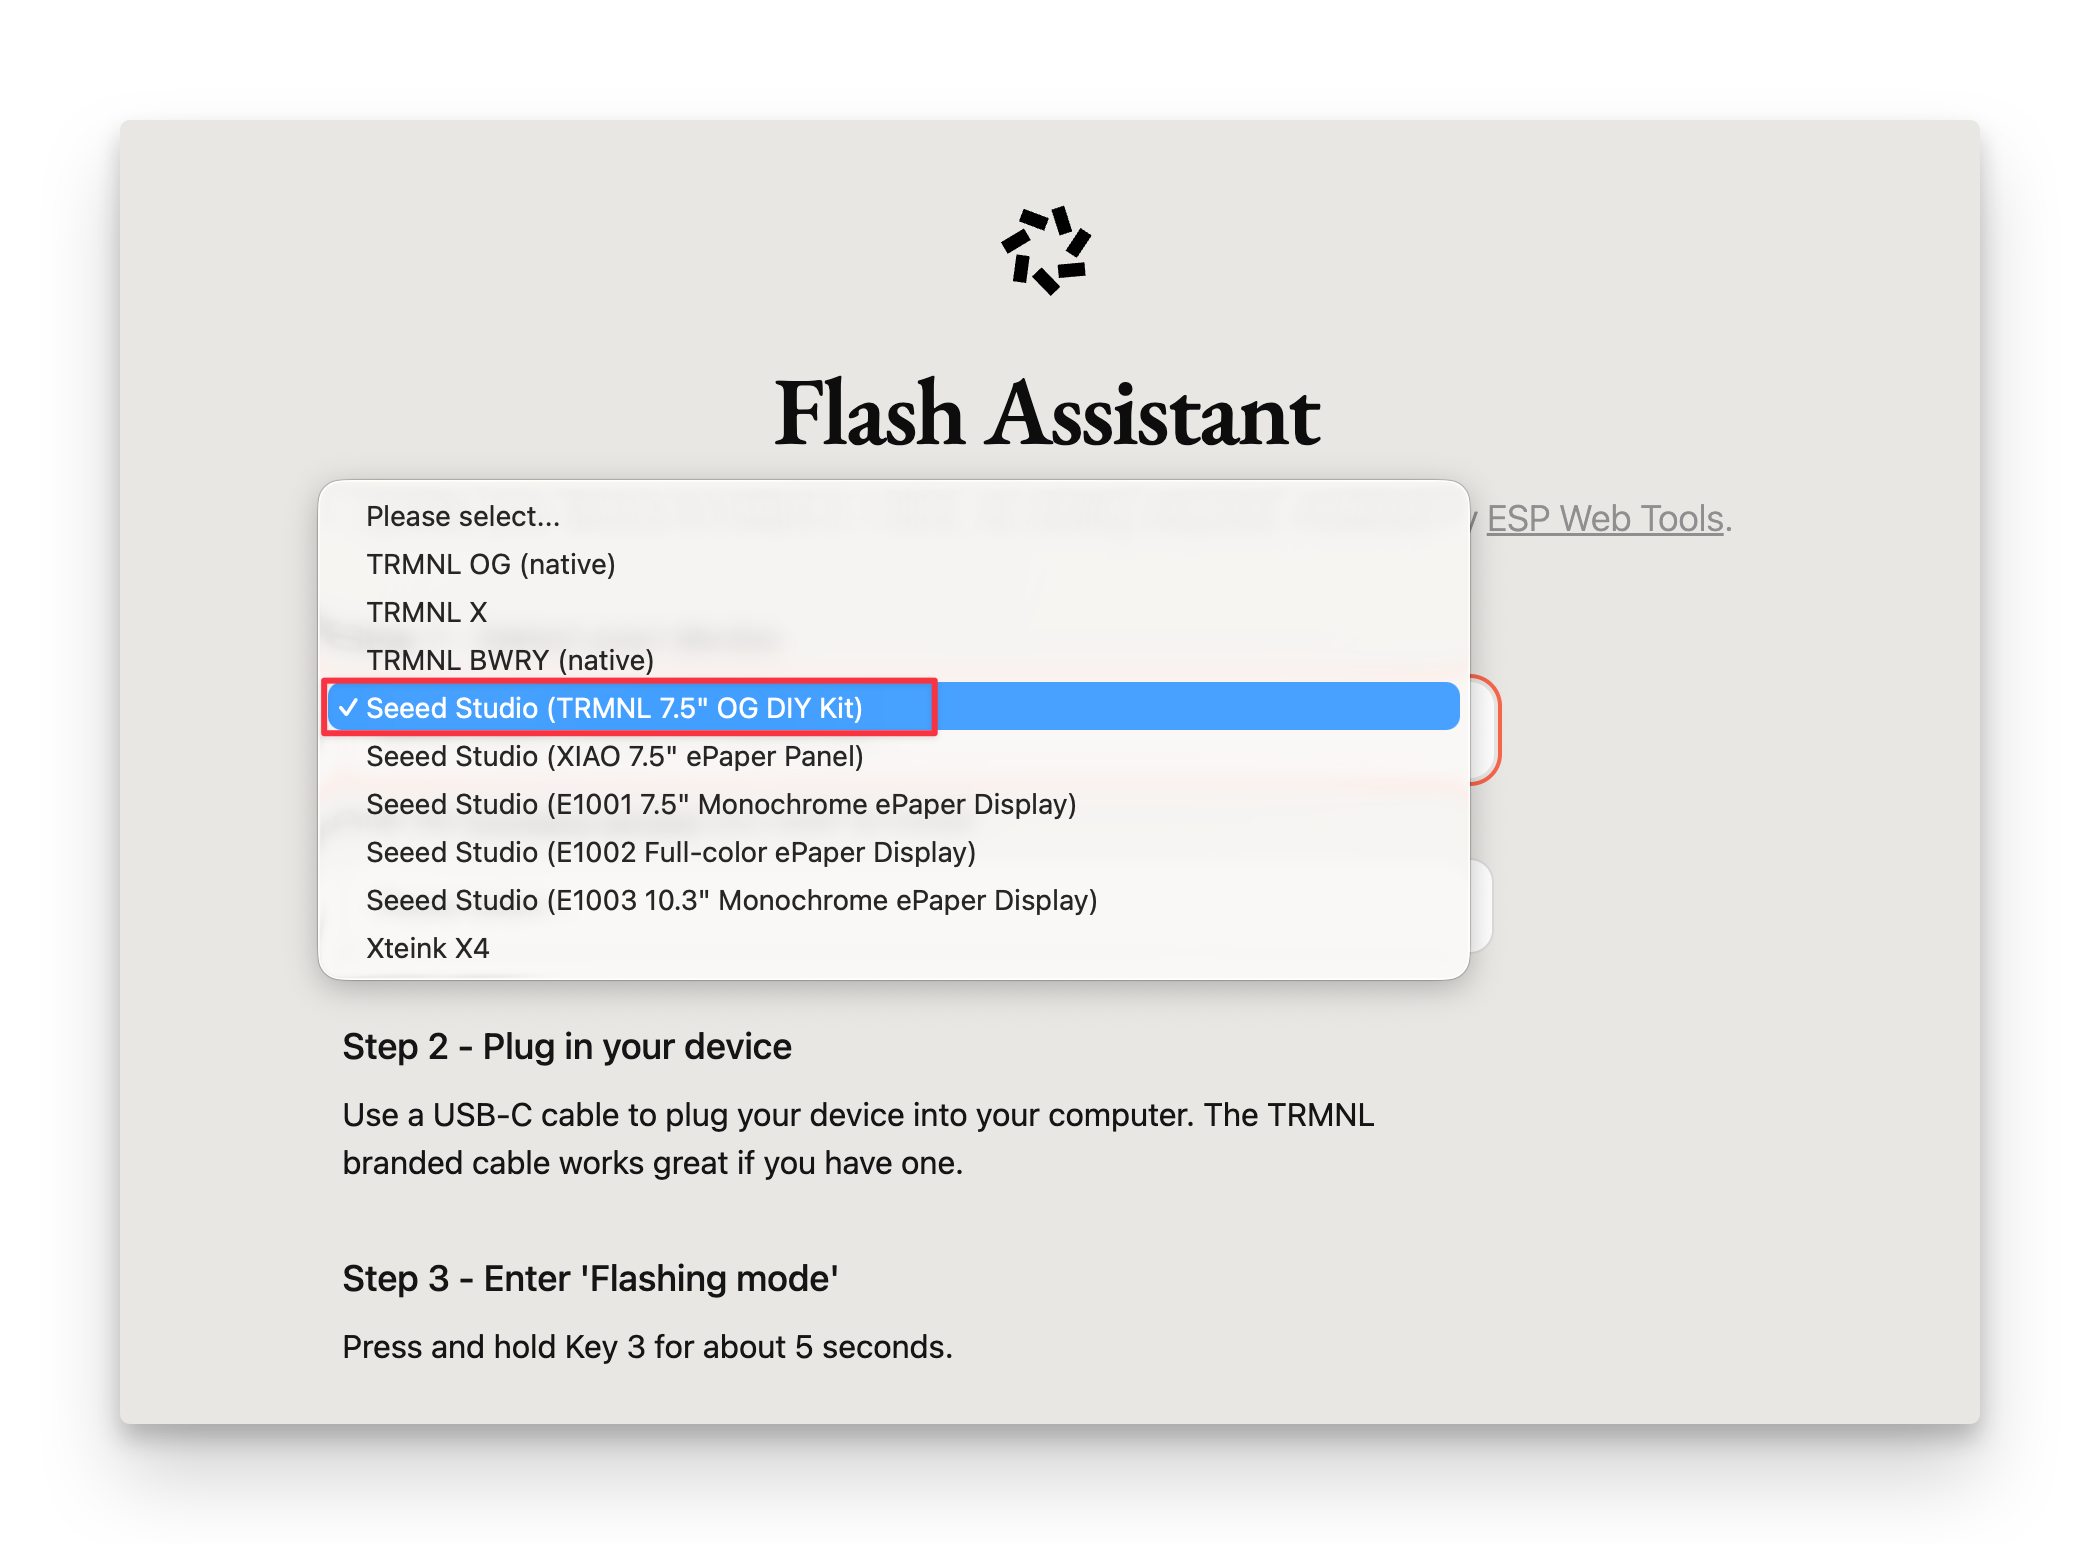
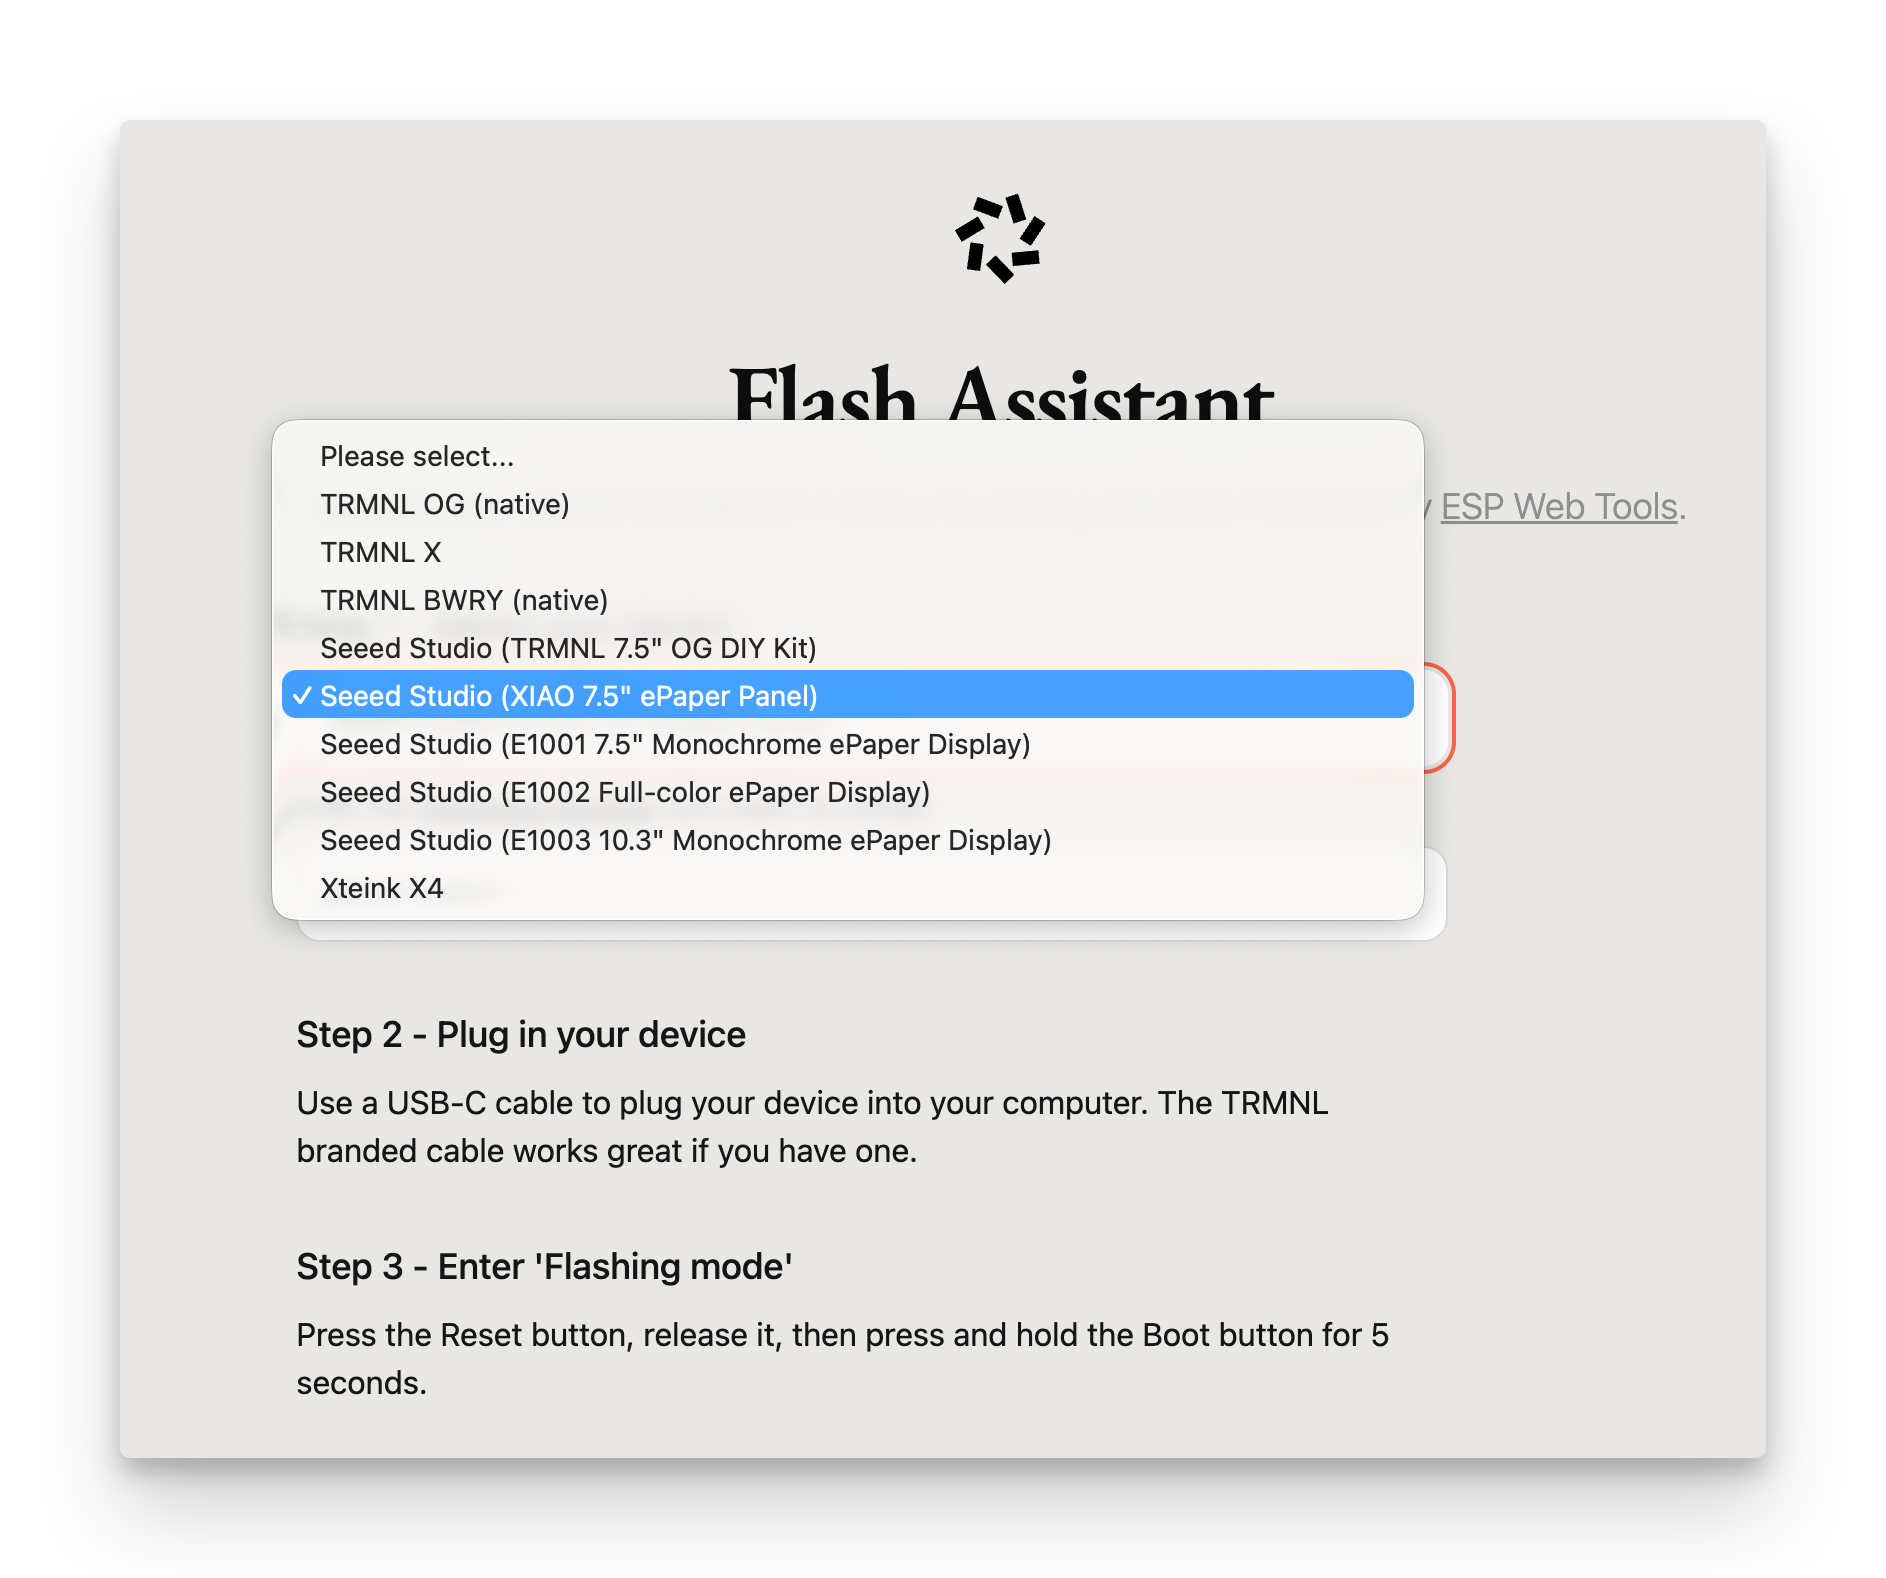
Method 1: TRMNL Web Flasher (recommended)
The TRMNL Web Flasher works directly in the browser and supports every device on this page.
- Visit https://usetrmnl.com/flash.
- Plug in your device via USB-C and follow the on-screen instructions.
- Pick the firmware that matches your hardware:
- reTerminal E1001 / E1002 / E1003
- TRMNL DIY Kit
- XIAO 7.5" Panel
- reTerminal E1001 / E1002: use FW 1.6.7 or newer for Seeed compatibility.
- reTerminal E1003: select reTerminal E1003 in the firmware list and use FW 1.8.7 or newer.
Use FW 1.5.12 or newer for Seeed compatibility on the TRMNL DIY Kit.
Use FW 1.5.12 or newer for Seeed compatibility on the XIAO 7.5" ePaper Panel.
Method 2: Flash via reTerminal E-Series Firmware Flasher (reTerminal E Series only)
This method is only applicable to reTerminal E1001 / E1002 / E1003. The reTerminal E-Series Firmware Flasher provides TRMNL firmware packages for these three reTerminal E Series devices.
The reTerminal E-Series Firmware Flasher provides a Seeed-hosted TRMNL firmware channel for reTerminal E Series devices. Seeed does not update this channel as frequently as the official TRMNL Web Flasher, and not every upstream TRMNL firmware release is synchronized here.
Use Method 1: TRMNL Web Flasher first when you want a newer TRMNL firmware release. Use this method when you need the Seeed-hosted reTerminal E Series flashing flow.
Click to expand the reTerminal E-Series Firmware Flasher steps
-
Visit the reTerminal E-Series Firmware Flasher.
-
In Select platform, choose the TRMNL card from the official platform section.
-
Select your device:
- reTerminal E1001
- reTerminal E1002
- reTerminal E1003
-
On the second page, review the available TRMNL firmware version for your selected device.
-
Connect your device to the computer with a USB data cable.
-
In Flash to device, select Erase flash + flash for the first installation, then click Connect & flash.
-
Choose the serial port for your device in the browser prompt and start the flashing process.
For the first installation, select Erase flash + flash so the device starts from a clean firmware state.
Make sure the power switch is ON. If the device is asleep and the flash does not start, press the Refresh button on the top of the unit to wake it, then retry.
The reTerminal E1002 uses a full-color ePaper screen, but TRMNL firmware currently renders content in monochrome mode. During Wi-Fi provisioning, the E1002 AP screen shows a compact layout with the TRMNL logo in the lower-right corner. When you see this screen, search for and connect to the E1002 hotspot, then continue with the same Wi-Fi setup flow as the other devices.
After flashing is complete, continue to Step 4: Connect Device to Wi-Fi.
Method 3: Build and Flash from Source (advanced)
-
Clone the firmware repository
-
Visit the official firmware repository and clone it:
git clone https://github.com/usetrmnl/trmnl-firmware.git
tipSometimes our PRs to TRMNL upstream are still under review. If you want the latest Seeed-side patches, use the Seeed mirror instead:
git clone https://github.com/Seeed-Projects/Seeed_TRMNL_Eink_Project.git -
-
Install PlatformIO as a VS Code extension or via the command line.
-
Open the project: open the cloned
firmwarefolder in VS Code. -
Select the correct PlatformIO environment for your hardware:
- reTerminal E1001 / E1002 / E1003
- TRMNL DIY Kit
- XIAO 7.5" Panel
In
platformio.ini:- For reTerminal E1001, select the
seeed_reTerminal_E1001environment. - For reTerminal E1002, select the
seeed_reTerminal_E1002environment (TRMNL renders content in monochrome on E1002). - For reTerminal E1003, select the
TRMNL_X_E1003environment in the official TRMNL firmware repository.
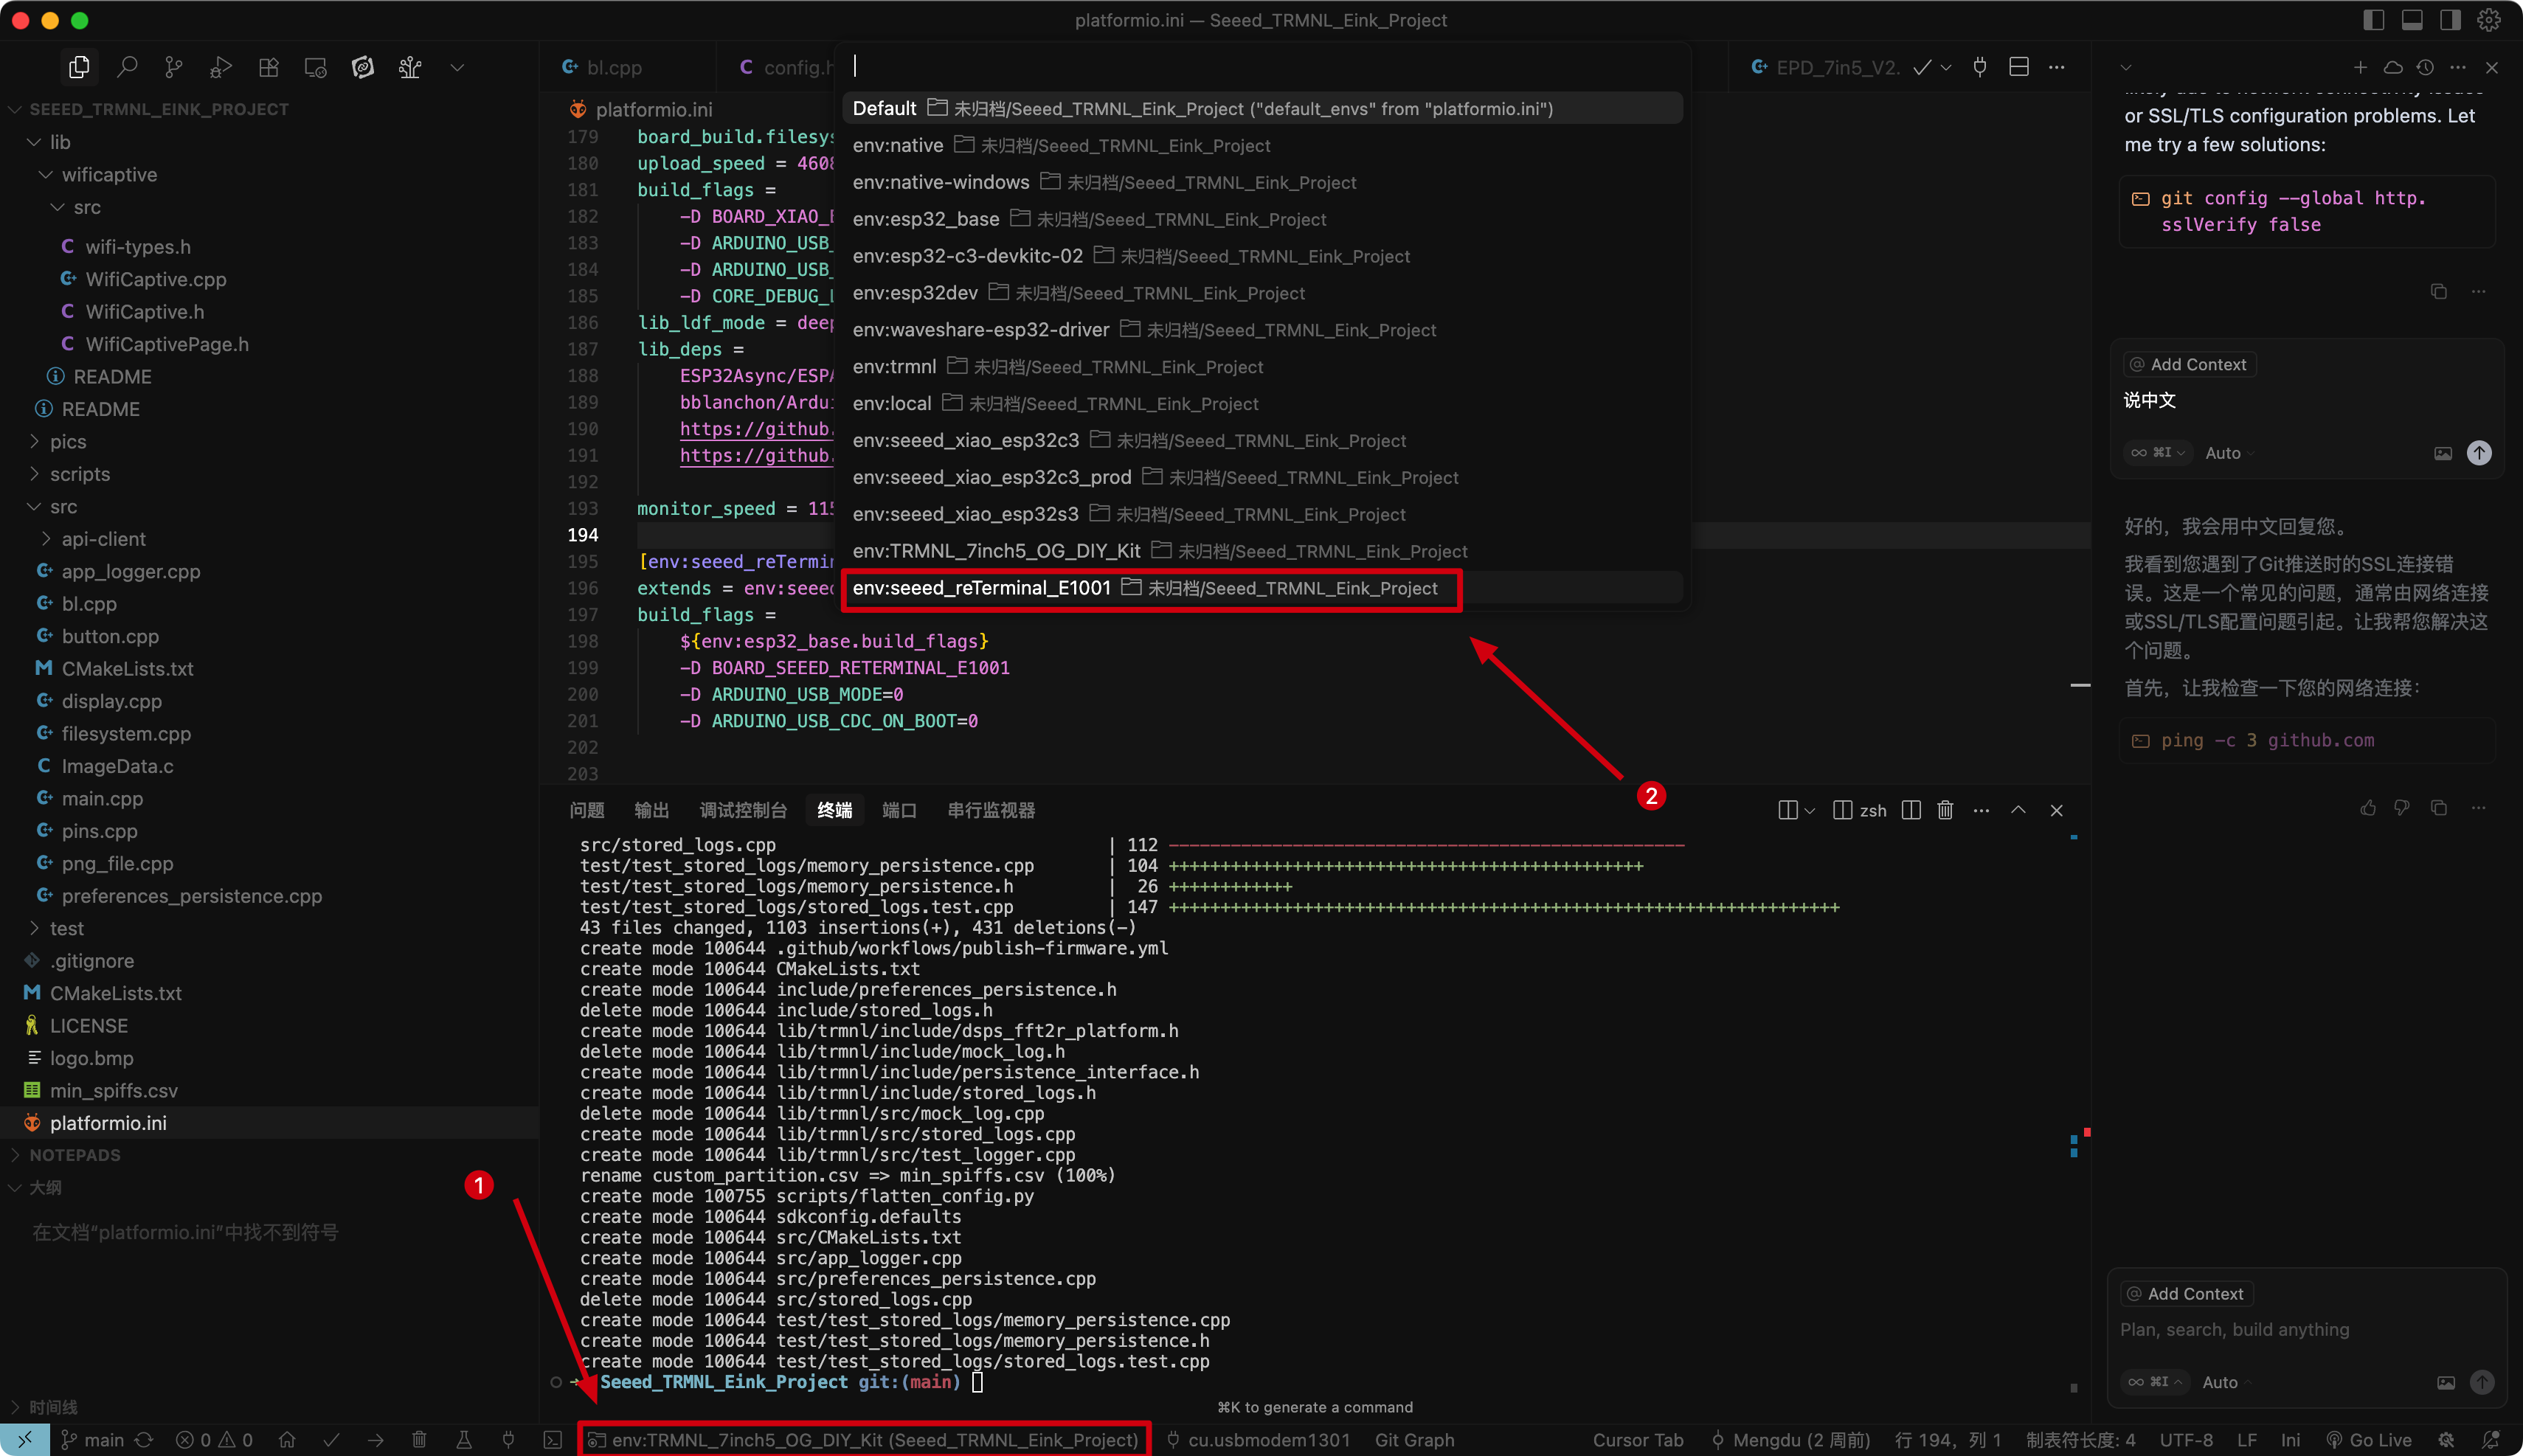
In
platformio.ini, select theTRMNL_7inch5_OG_DIY_Kitenvironment.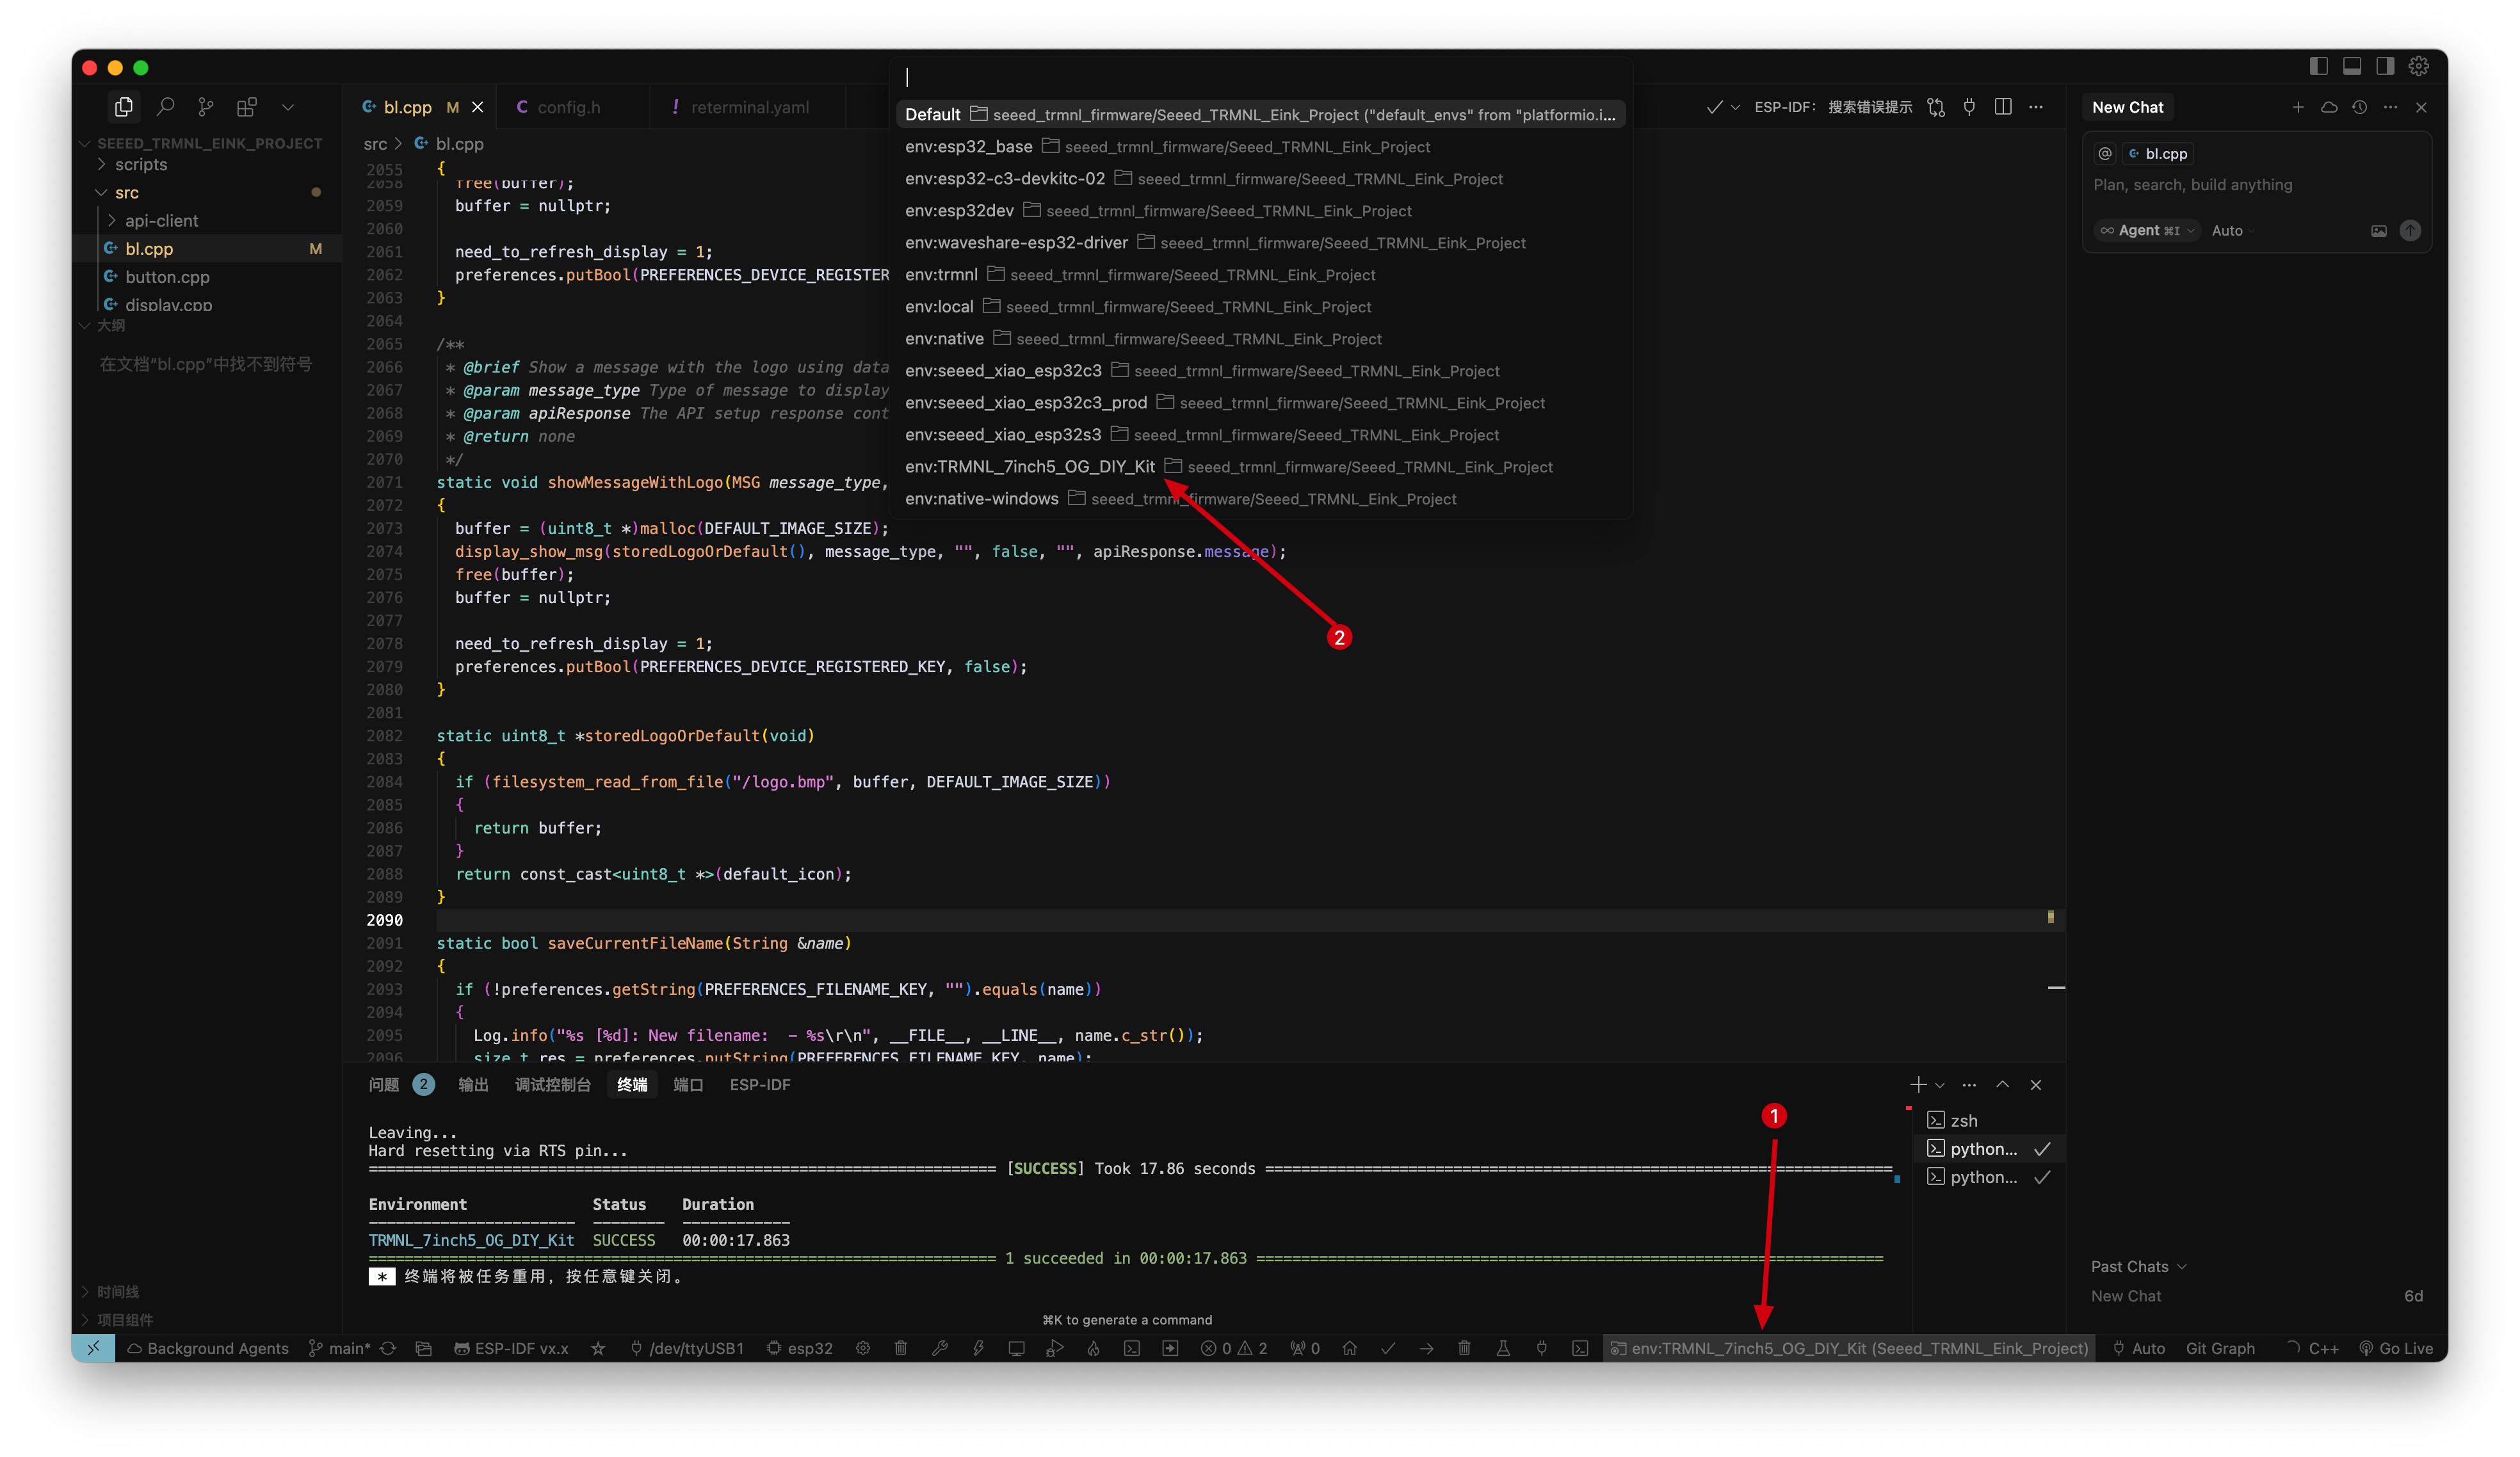
In
platformio.ini, select theseeed_xiao_esp32c3environment.
-
Connect your device via USB-C.
-
Build and upload: click the PlatformIO Upload button or run:
pio run --target upload
Step 4: Configure Wi-Fi and Provision the Device
The Wi-Fi provisioning workflow is identical for all supported hardware.
💡 Trouble connecting Wi-Fi? See the TRMNL Device Wi-Fi Troubleshooting Guide.
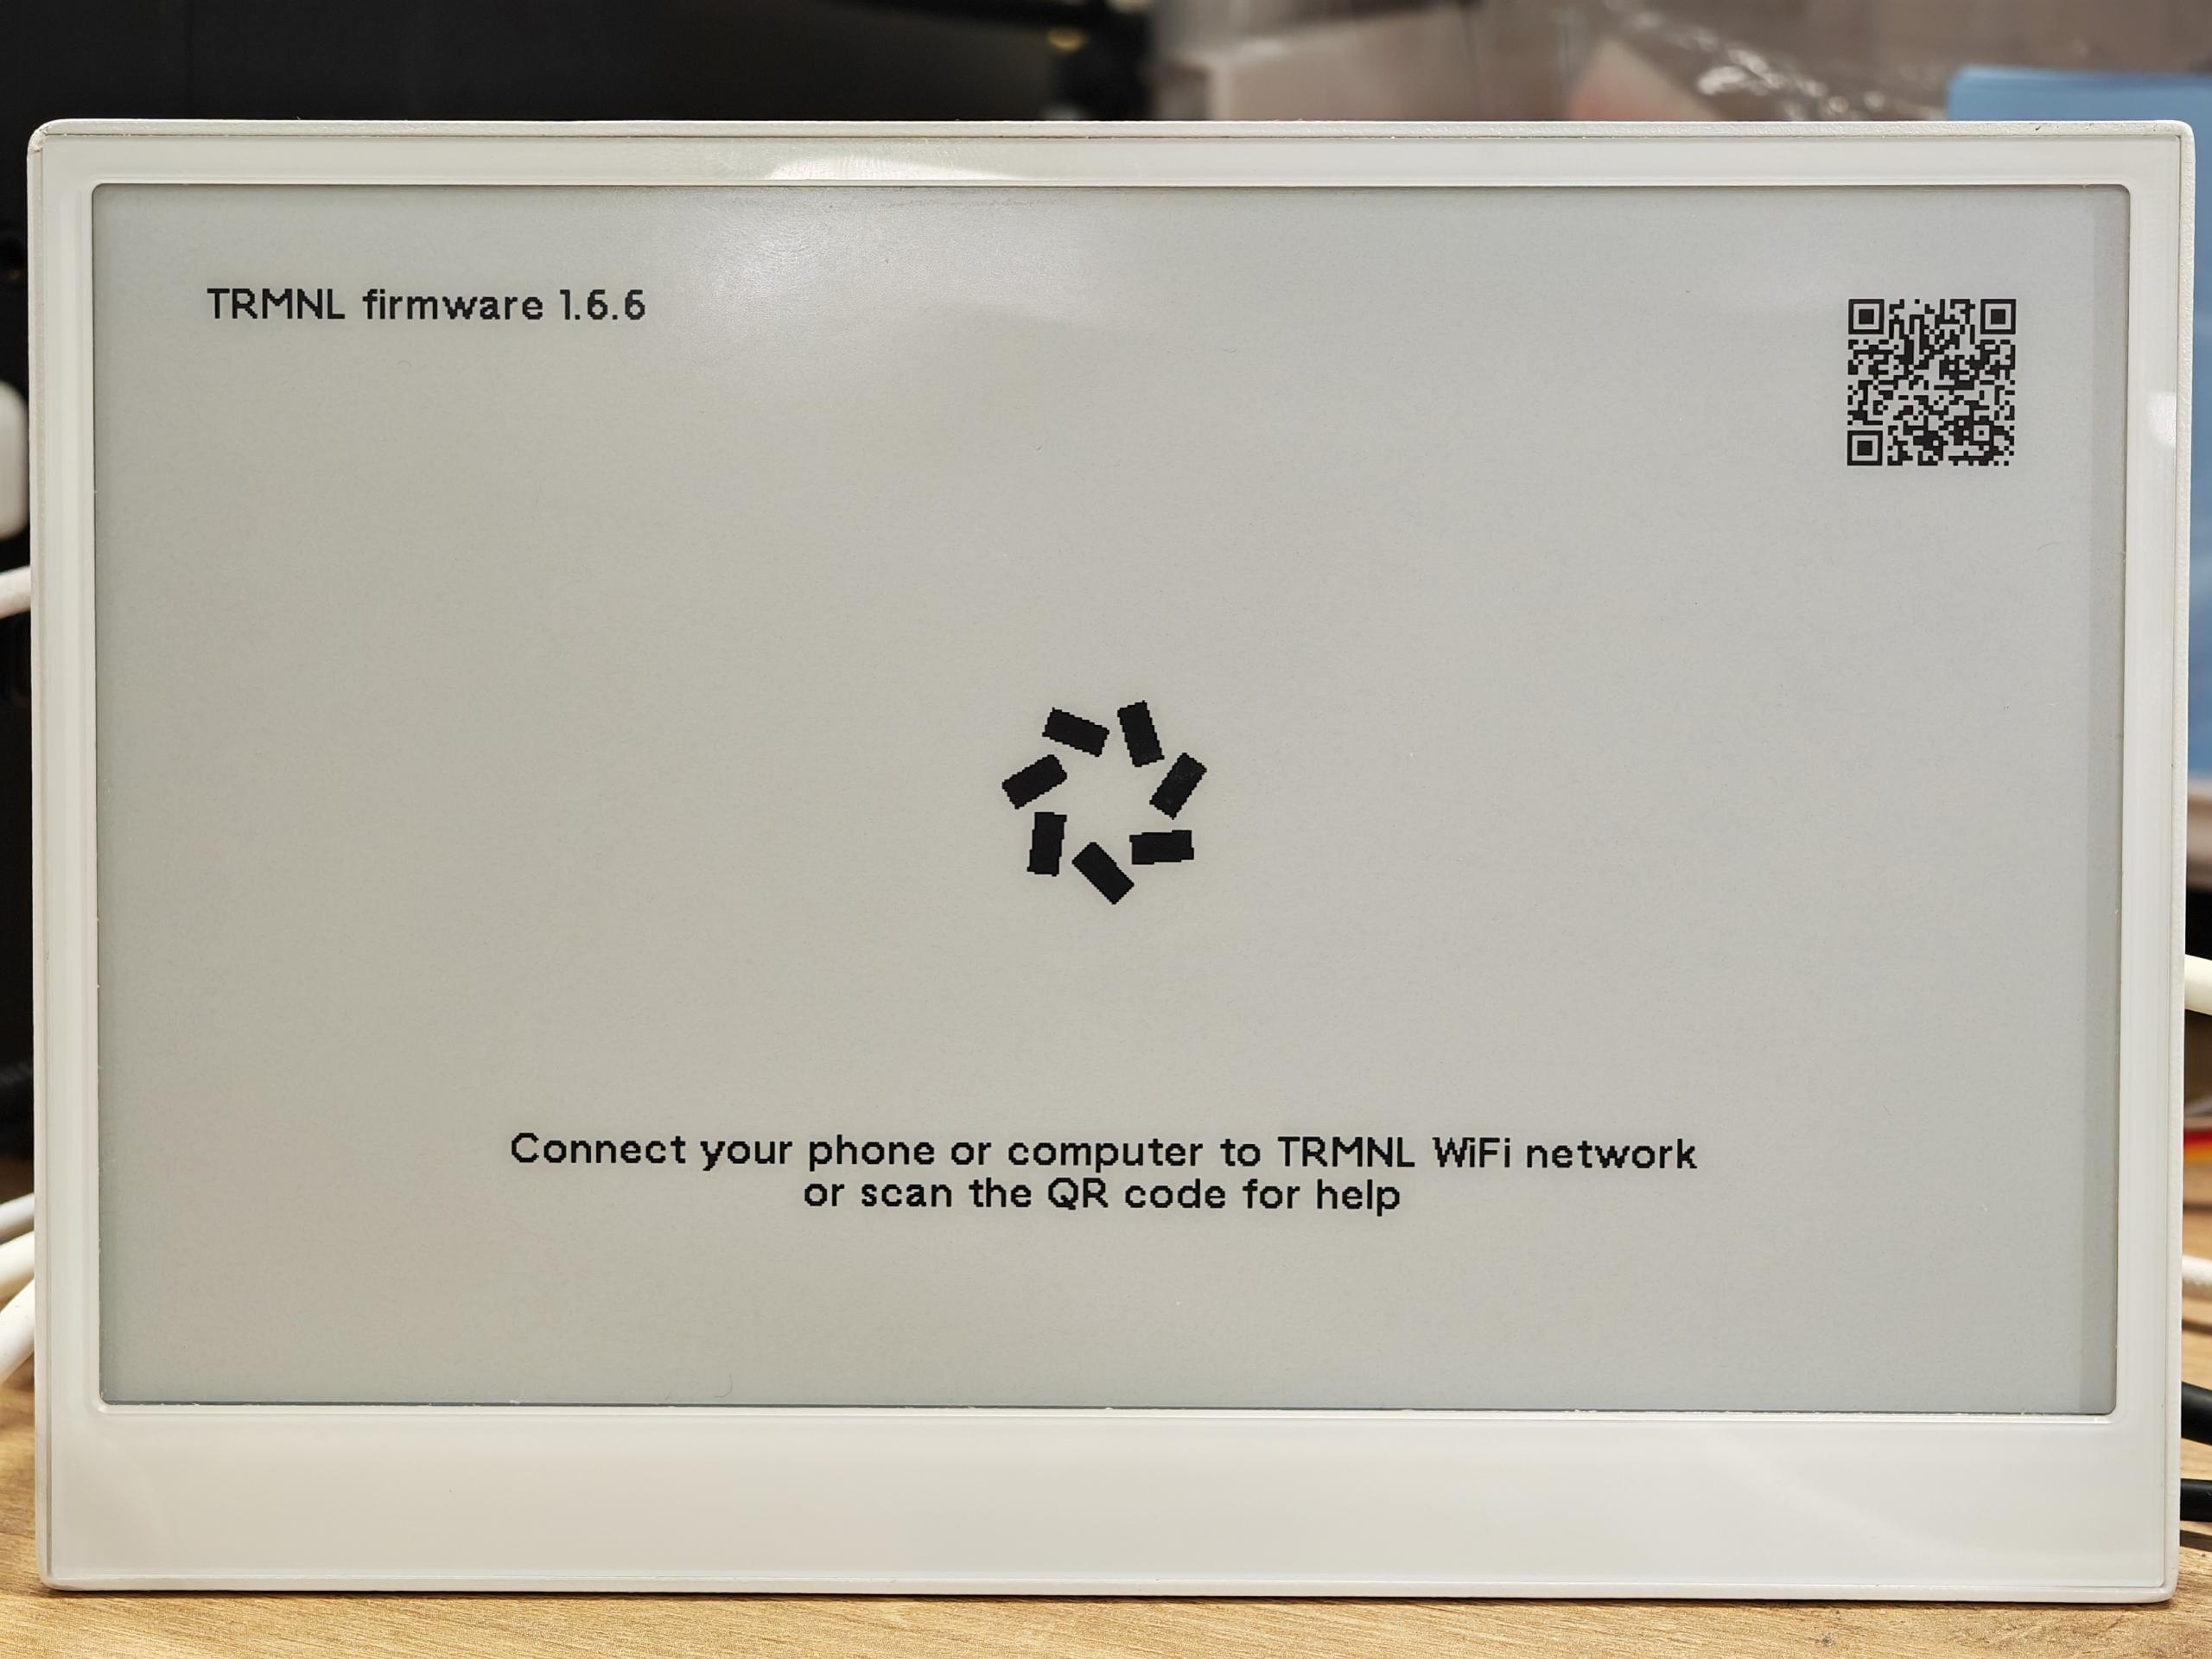
Power on and enter provisioning mode
After flashing the TRMNL firmware and powering on your device, it will automatically enter provisioning mode if it is not yet connected to Wi-Fi.
- reTerminal E1001 / E1002 / E1003
- TRMNL DIY Kit
- XIAO 7.5" Panel

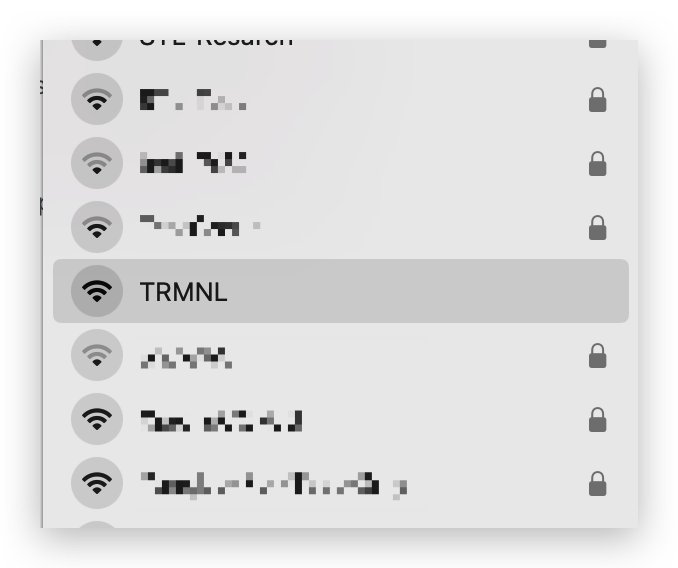
Connect to the TRMNL Wi-Fi
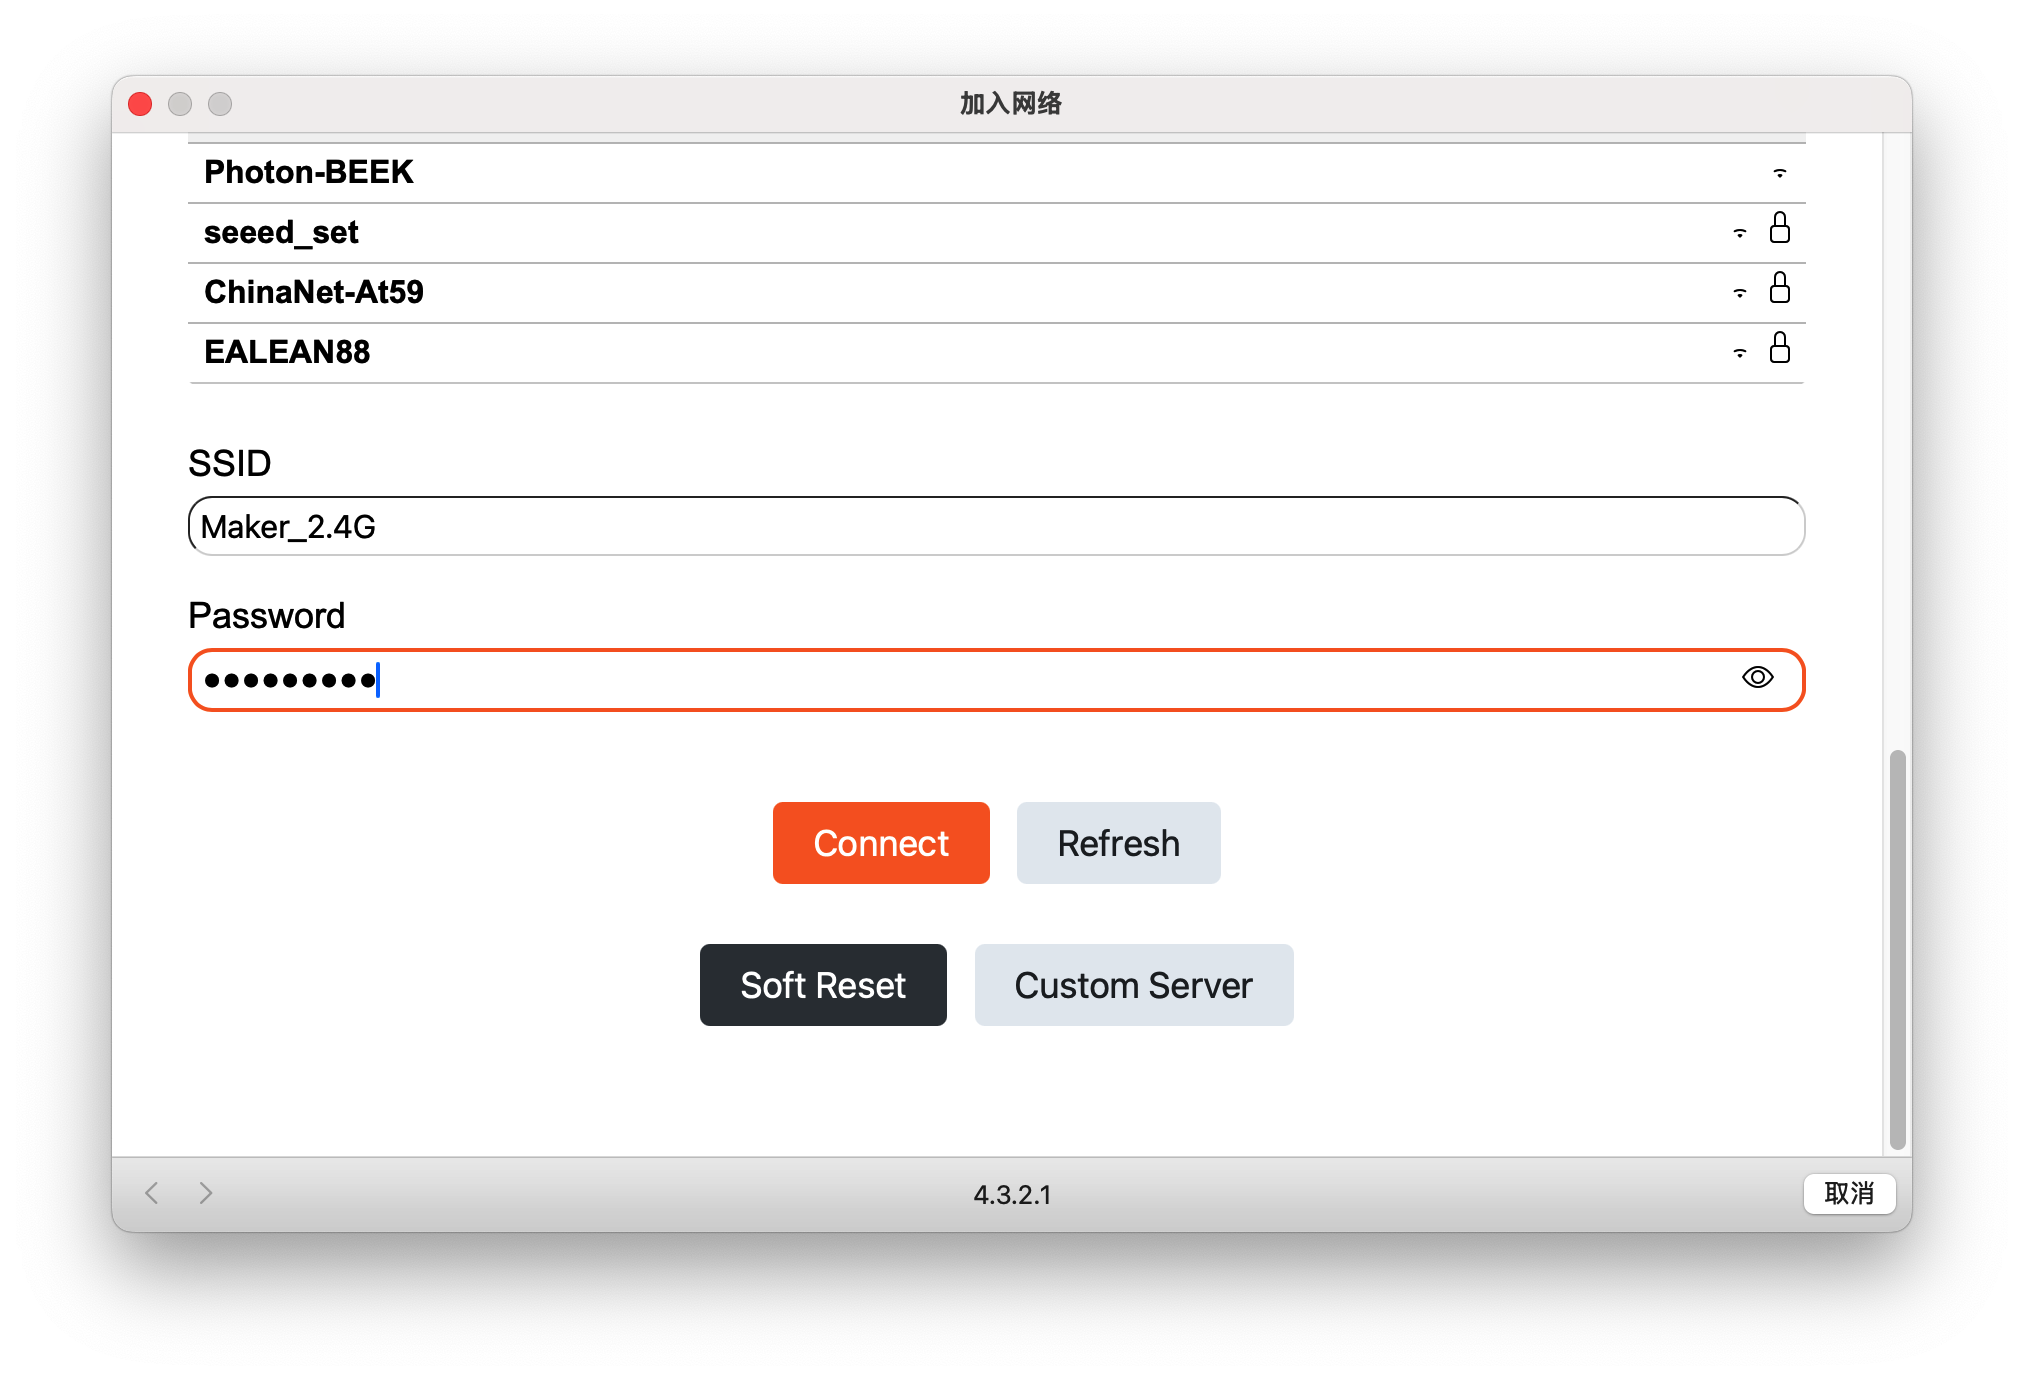
On your phone or computer, open the list of available Wi-Fi networks. Look for a network named TRMNL and connect to it (no password required by default).
Open the captive portal
Once connected, open a web browser. The device should automatically redirect you to the TRMNL configuration page; if it does not, manually visit http://4.3.2.1.
Enter your Wi-Fi credentials
- Select your 2.4 GHz Wi-Fi network (5 GHz networks are not supported).
- Enter your Wi-Fi password and click Save / Connect.
⚠️ Important: make sure to use a 2.4 GHz Wi-Fi network. The ESP32-C3 / ESP32-S3 chips on these devices do not support 5 GHz networks.
Device joins your network
The device will disconnect from the TRMNL Wi-Fi and join your home network. The captive-portal window will show the device's MAC address. Record the MAC address — you'll need it in the next step.
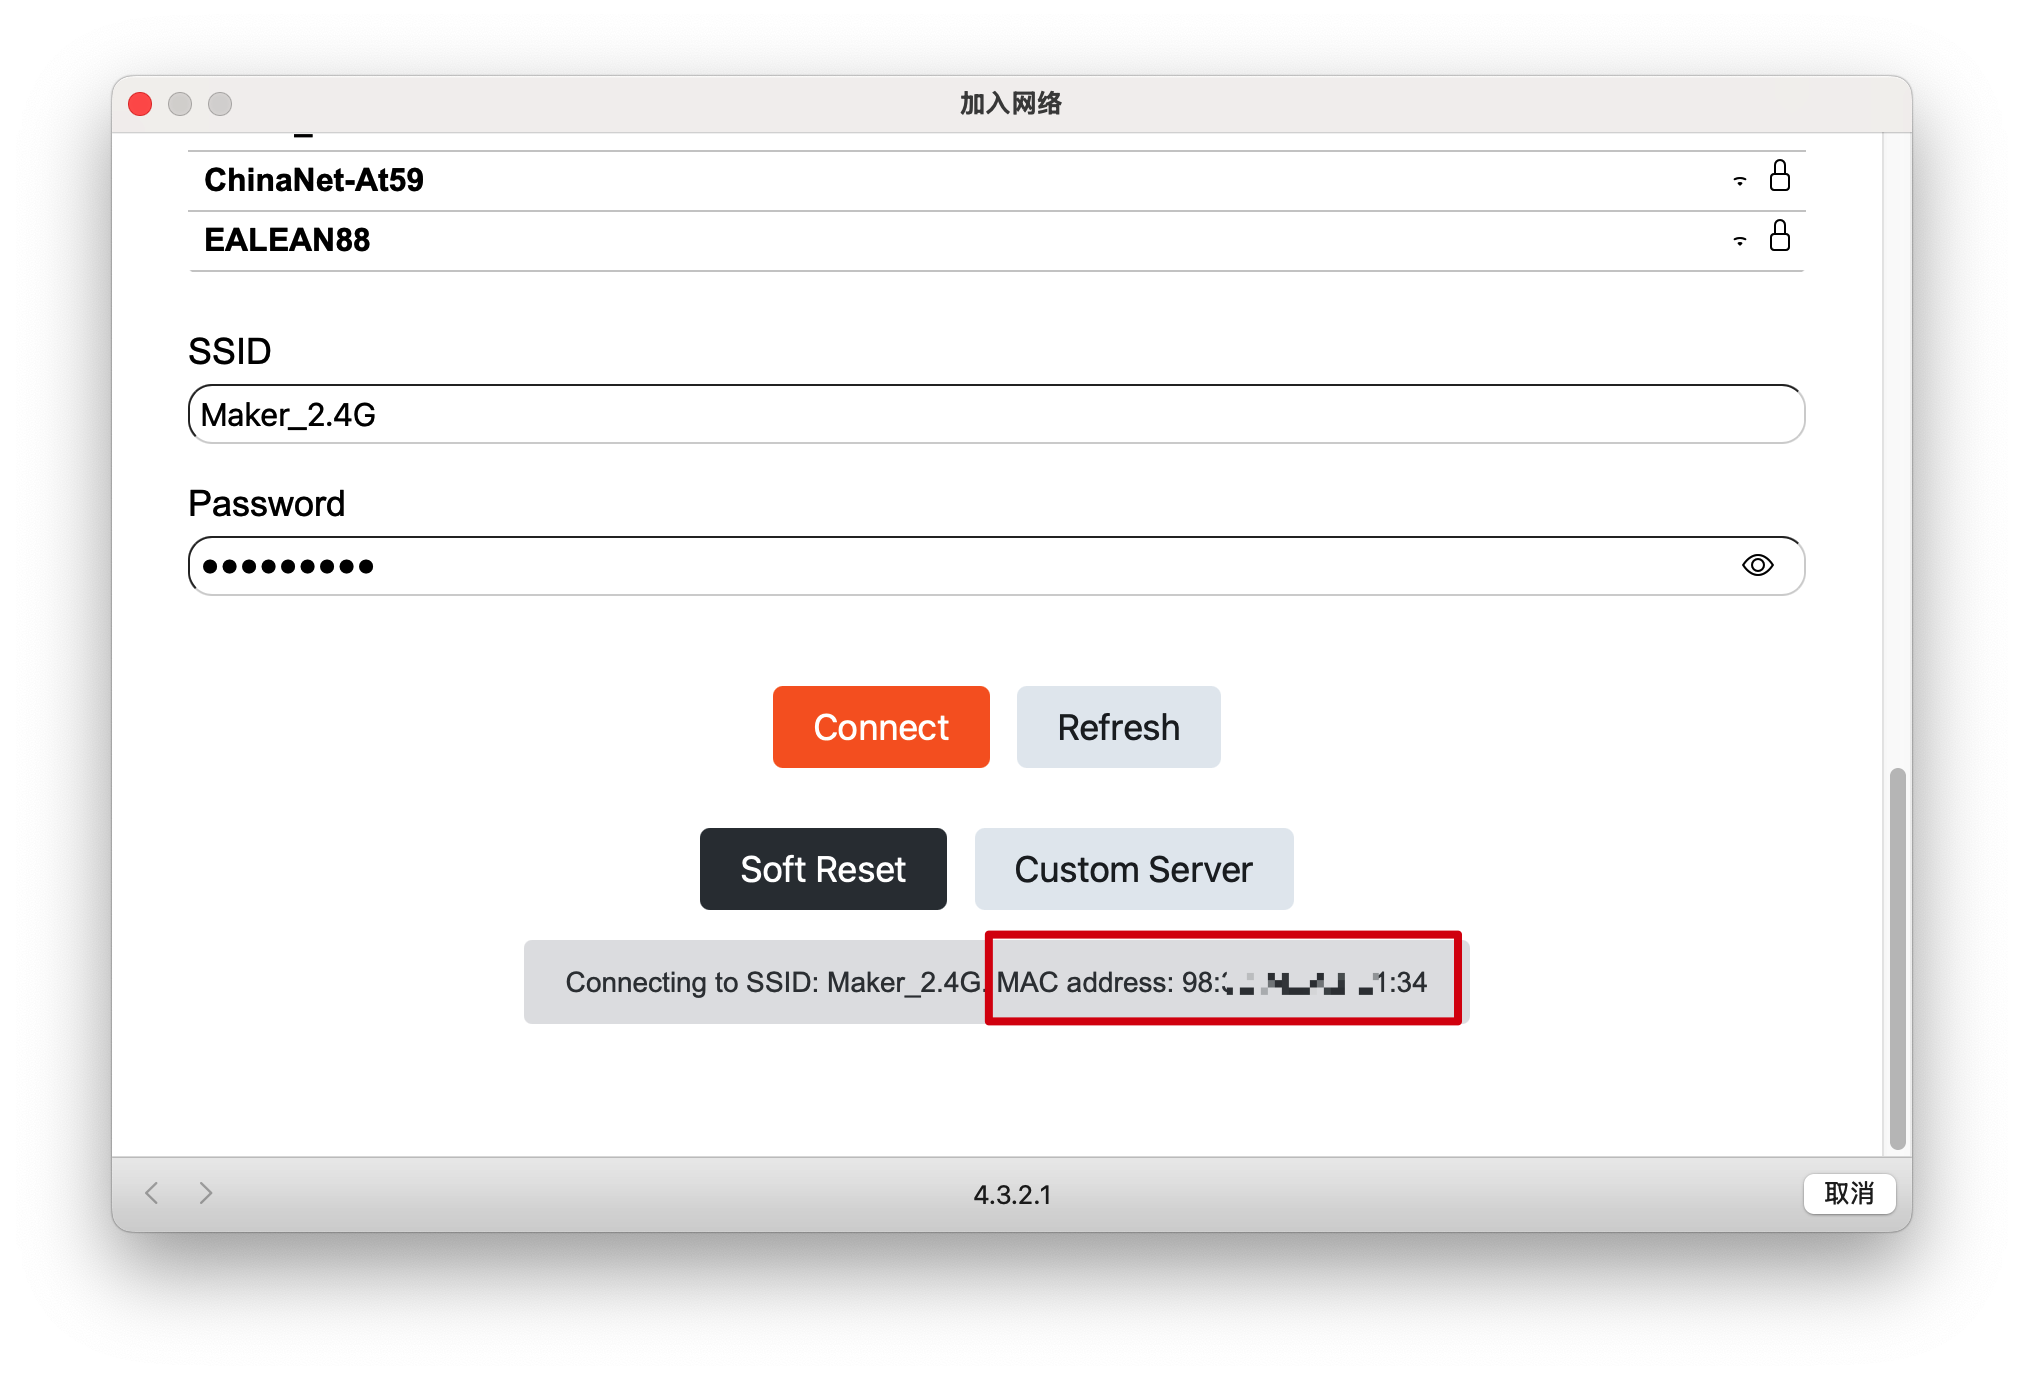
⚠️ Note: the MAC address is only visible in the captive portal for 1–2 seconds. If you miss it you can also:
- Retrieve it from the VS Code → PlatformIO build/upload logs.
- Use the usetrmnl.com/flash method and check the browser developer console during flashing.
- Find it in your router or mesh-network app's list of connected devices.
See the official guide: Finding your TRMNL MAC address.
Step 5: Register the Device on TRMNL
After your device is connected to Wi-Fi and you have its MAC address, register it on the TRMNL web interface:
-
Open the TRMNL web interface at https://trmnl.app.
-
Go to the Devices page.
-
Add a new device (button at top right or in the page center).

-
Enter the Device ID you received when you purchased BYOD access (this is not the MAC address — find the Device ID in your purchase confirmation email or TRMNL dashboard). Click Add new device.

-
Bind the device's MAC address in the device settings page:

You can also set a custom name and adjust other settings here.

Your device is now linked to your TRMNL account! You can now send playlists, images, and other content directly from the TRMNL interface.
💡 Tip: if you have multiple devices, repeat the above steps for each one using their unique Device IDs.
After adding your device in the TRMNL web interface, go to the device's settings page and turn off both Firmware Early Release and OTA Updates Enabled.
If left enabled, your device may automatically download firmware updates intended for official TRMNL hardware that are not compatible with Seeed devices. Installing incompatible firmware may cause your device to malfunction or become unresponsive.
Always keep both options disabled to ensure stable operation.
Buttons Usage
- reTerminal E1001 / E1002
- reTerminal E1003
- TRMNL DIY Kit
- XIAO 7.5" Panel
The reTerminal E1001 and E1002 expose a single user-facing button under TRMNL firmware:
- Green Button — long press 5 s: enter Wi-Fi reconfiguration mode.
- Reset button: single click to reboot the device.
The reTerminal E1003 exposes three top-mounted buttons under TRMNL firmware:
- Refresh button — single press: wake the device or immediately refresh the current screen.
- Page Up + Page Down — press and hold 2 s: enter Wi-Fi reconfiguration mode.
- Power switch: slide to OFF then ON to reboot the device.
Capacitive touch is supported under SenseCraft HMI firmware only. TRMNL firmware does not use the touch panel — all interaction is through the physical buttons above.
The XIAO ePaper Display Board has 4 buttons (RESET / KEY1 / KEY2 / KEY3). Only RESET and KEY3 are used by the TRMNL firmware.
KEY3 usage:
- Single click: refresh the page immediately.
- Double click: custom function — configure it from the TRMNL settings page.
- Long press (~5 s): reconfigure the network.
RESET usage: single click to reset the device.
The XIAO ESP32-C3 has the standard RESET and BOOT buttons.
- Reset → release → hold BOOT for 5 s: reconfigure the network (returns to the TRMNL provisioning portal).
- RESET single click: reboot the device.
Understanding the TRMNL Playlist
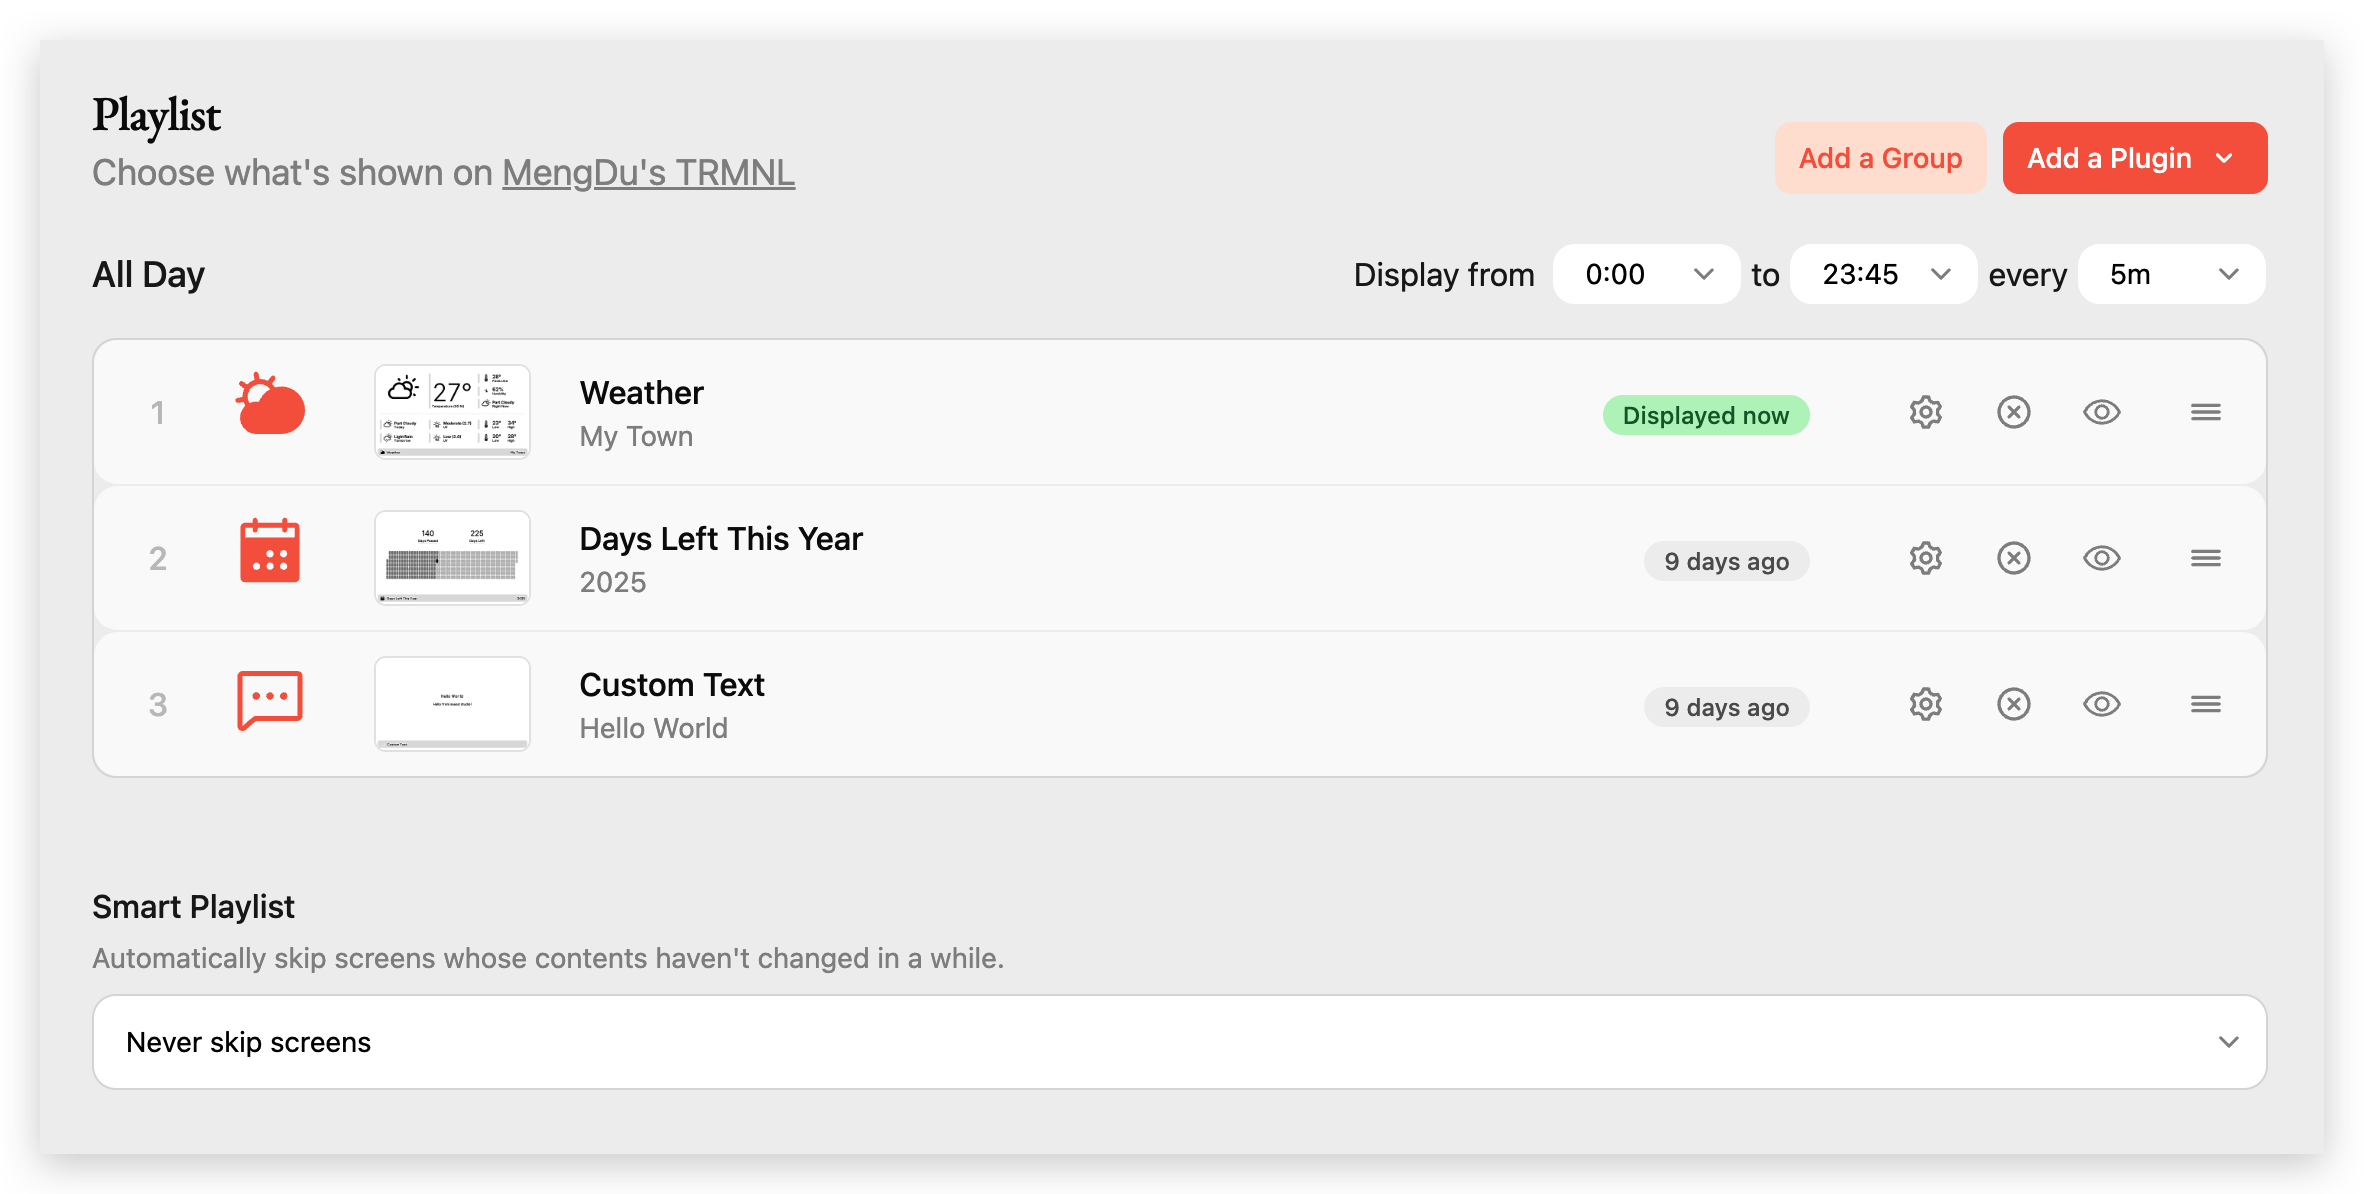
The TRMNL Playlist controls exactly what is displayed on your ePaper device and when.
Playlist overview
- Playlist Title: the name of your TRMNL device.
- Display Time Range: when the playlist is active (e.g. 00:00–23:45).
- Update Interval: how often the display refreshes (e.g. every 5 minutes).
- Add a Group / Add a Plugin: organise the playlist into groups or add new content plugins.
Playlist items
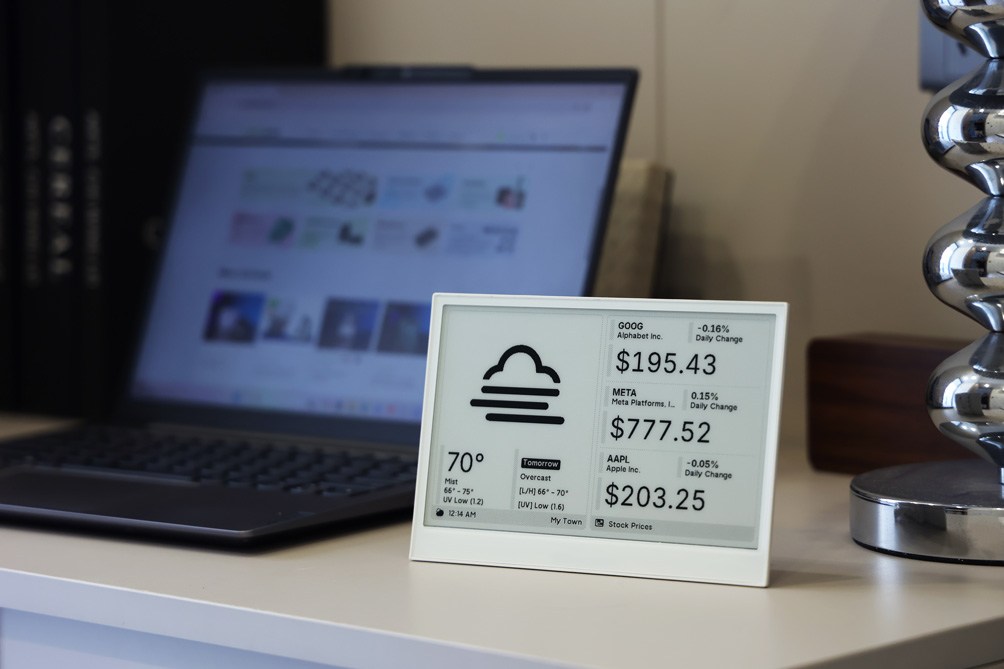
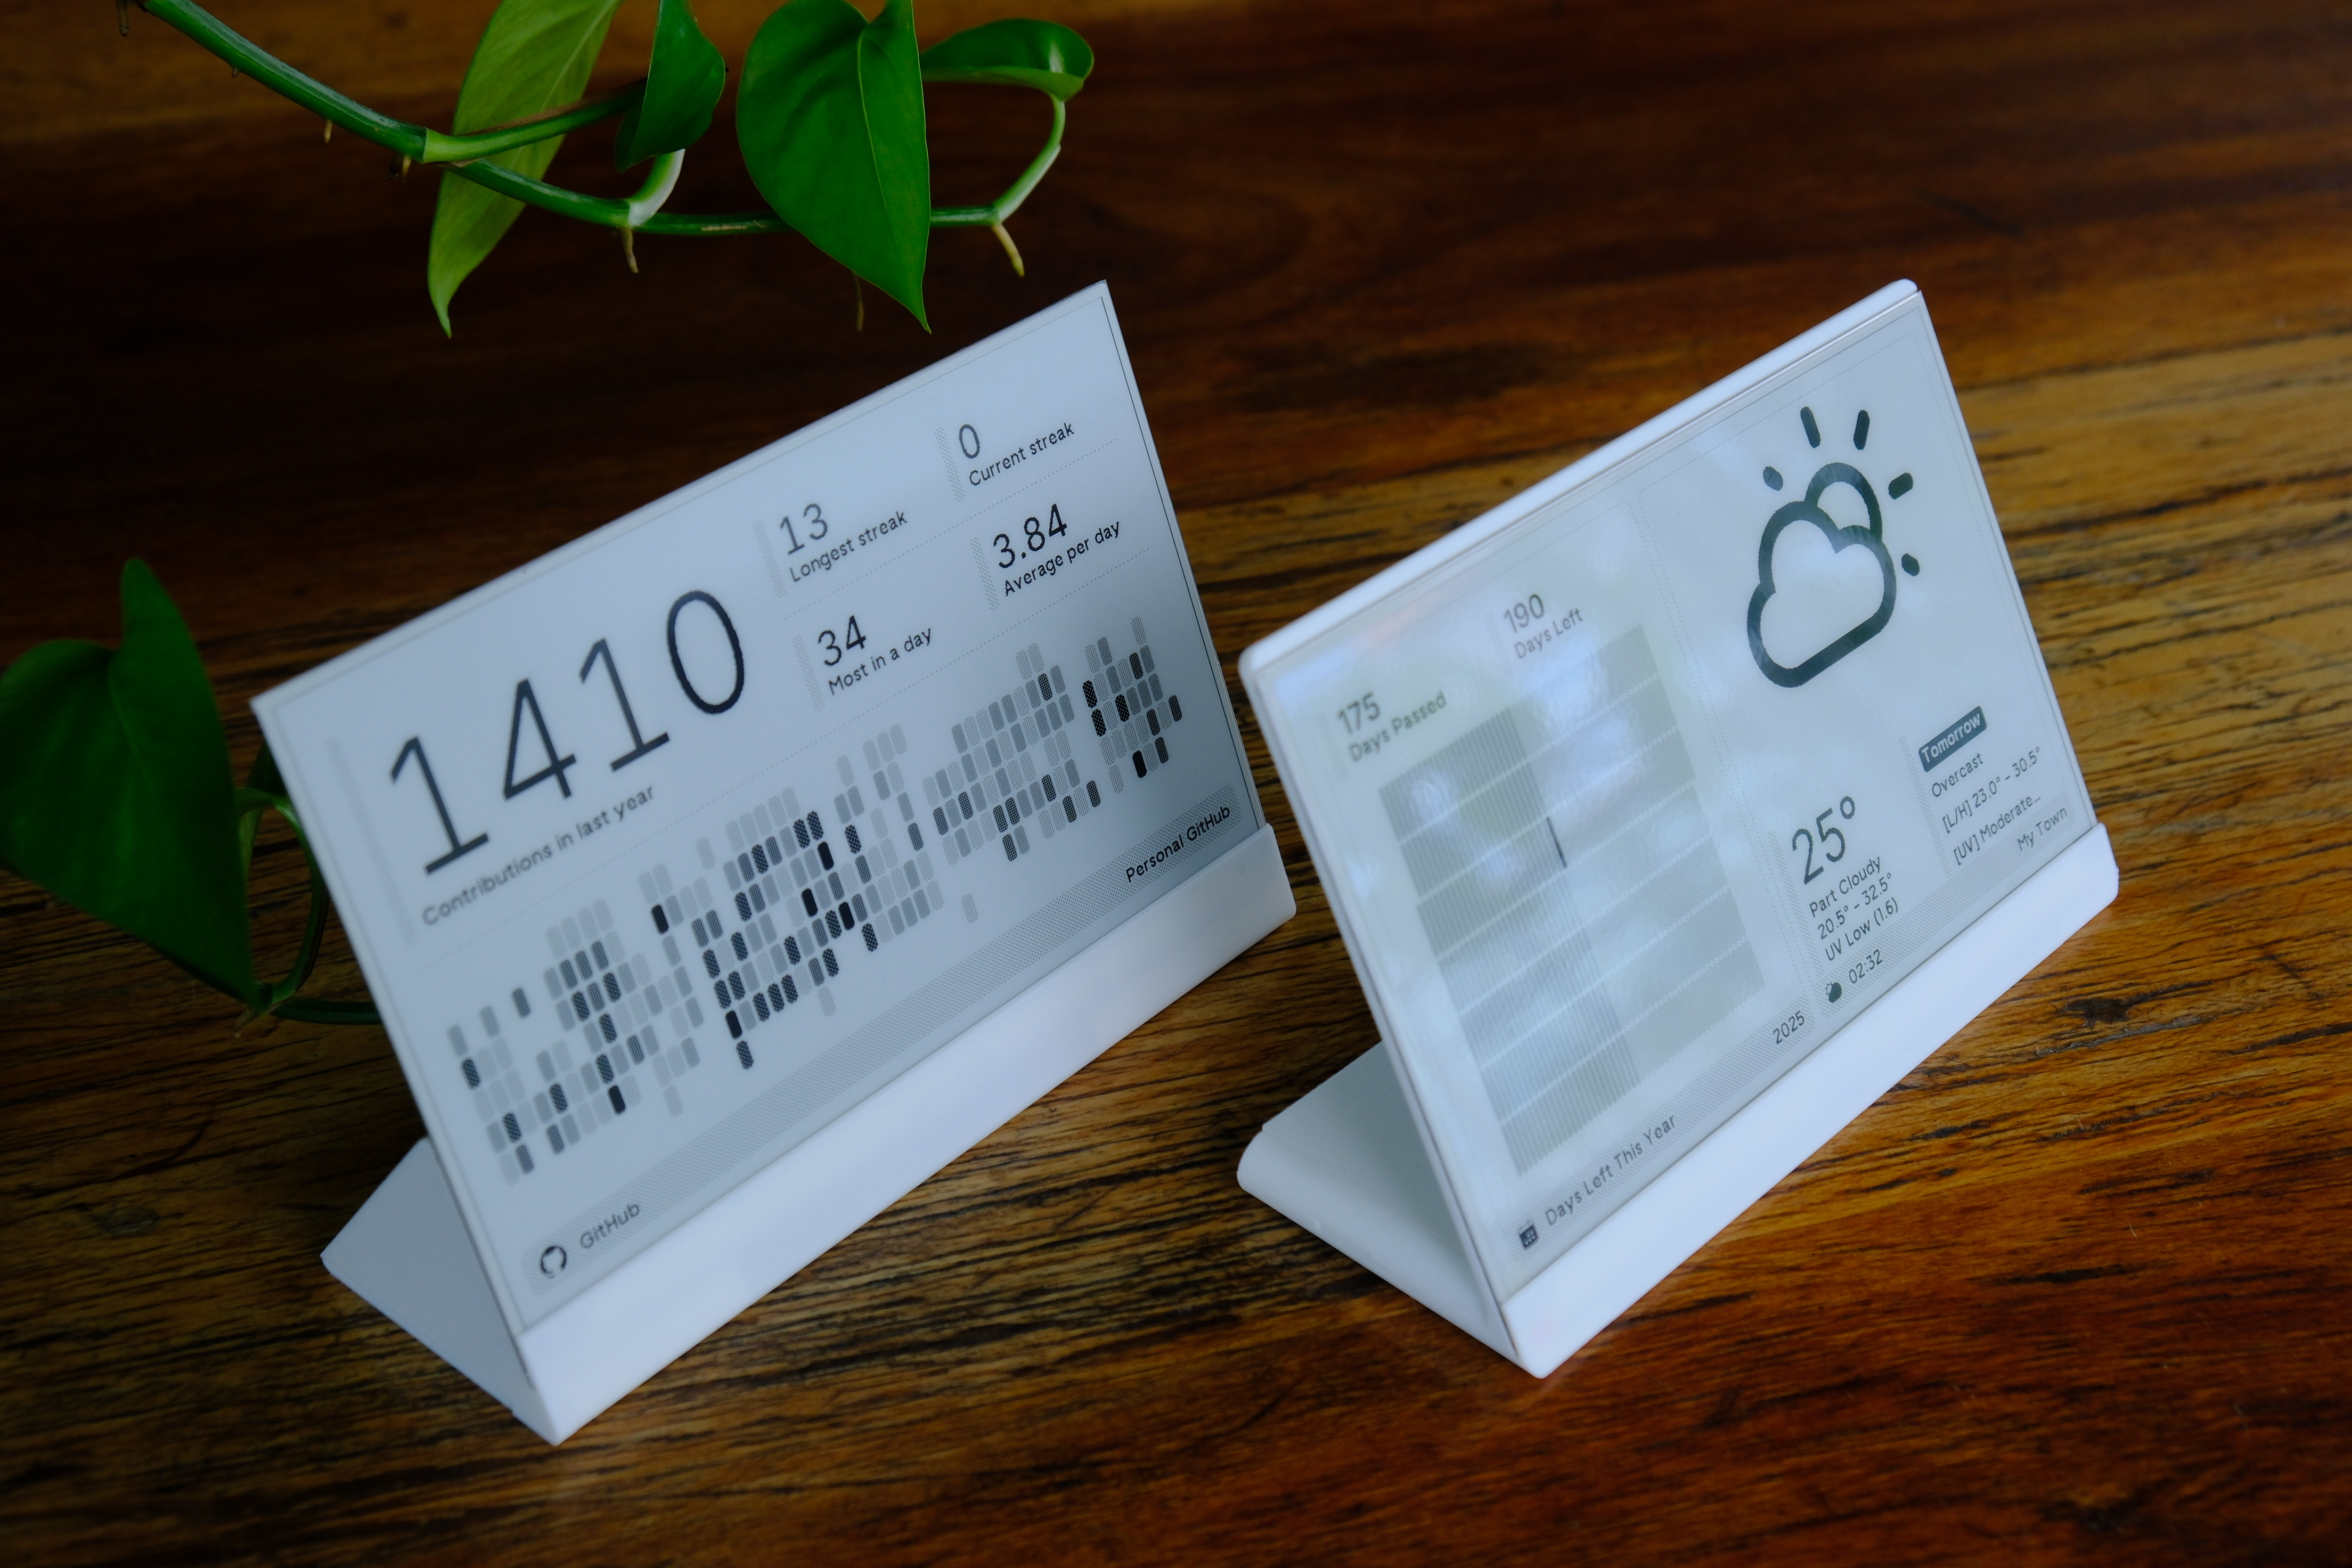
Each row is a screen or widget that will be shown on your device. Examples:
- Weather — current weather information for your location.
- Days Left This Year — countdown of days remaining in the current year.
- Custom Text — display any custom message (e.g. "Hello World").
For each item:
- Settings (gear icon): configure the plugin's options.
- Delete (X icon): remove the item from your playlist.
- Preview (eye icon): preview what the screen will look like.
- Reorder (bars icon): drag to change the order.
Smart Playlist
At the bottom you can choose whether to automatically skip screens whose content hasn't changed. See the Smart Playlists blog post for details.
Exploring TRMNL Plugins

Plugins are modular content blocks that can show weather, calendar events, stock prices, RSS feeds, motivational quotes, GitHub activity, and much more.
Connected plugins
At the top of the Plugins page you see all the plugins already connected to your TRMNL account. Examples include Weather, Days Left This Year, Stock Price, RSS Feed, Reddit, Hacker News, Language Learning, Motivational Quote, Custom Text, …
Plugin marketplace
Below your connected plugins you'll find the marketplace. Plugins are organized by categories and tags (#productivity, #news, #ecommerce, …). Browse, search, and click any plugin to connect it to your account.
Developers can also create and publish their own plugins — see the plugin marketplace docs for details.
For more advanced features see the official TRMNL documentation: https://docs.usetrmnl.com/go.
FAQ
Q1: How do I reconfigure the network?
- reTerminal E1001 / E1002
- reTerminal E1003
- TRMNL DIY Kit
- XIAO 7.5" Panel
Press and hold the Green Button for 5 seconds. The device will return to the initial TRMNL interface and activate the AP.
Press and hold Page Up and Page Down together for 2 seconds. The device will return to the initial TRMNL interface and activate the AP.
If the screen is asleep, press the Refresh button once first to wake the device.
Press and hold KEY3 (next to the Reset button) for 5 seconds. The device will return to the initial TRMNL interface and activate the AP.
Press the Reset button on the XIAO, release it, then press and hold the BOOT button for 5 seconds. The device will return to the initial TRMNL interface and activate the AP.
Q2: What should I do if the screen always shows a low battery warning?
Two different situations can trigger this screen:
-
The battery voltage is actually low. This is the most common case — the device really needs charging. Plug it in or replace/charge the battery and the warning should clear once the voltage recovers.
-
A TRMNL server-side issue. Battery level is evaluated on TRMNL's servers, not only on the device. A server bug or a recent platform update can temporarily mis-report battery status and keep showing the warning even when the hardware is fine.
If the battery is genuinely low, charge the device first — do not hide the warning until you have confirmed the pack is healthy.
If you are sure the battery is fine but the warning will not go away, you do not need to modify the firmware. TRMNL lets you suppress the on-screen prompt from the web dashboard:
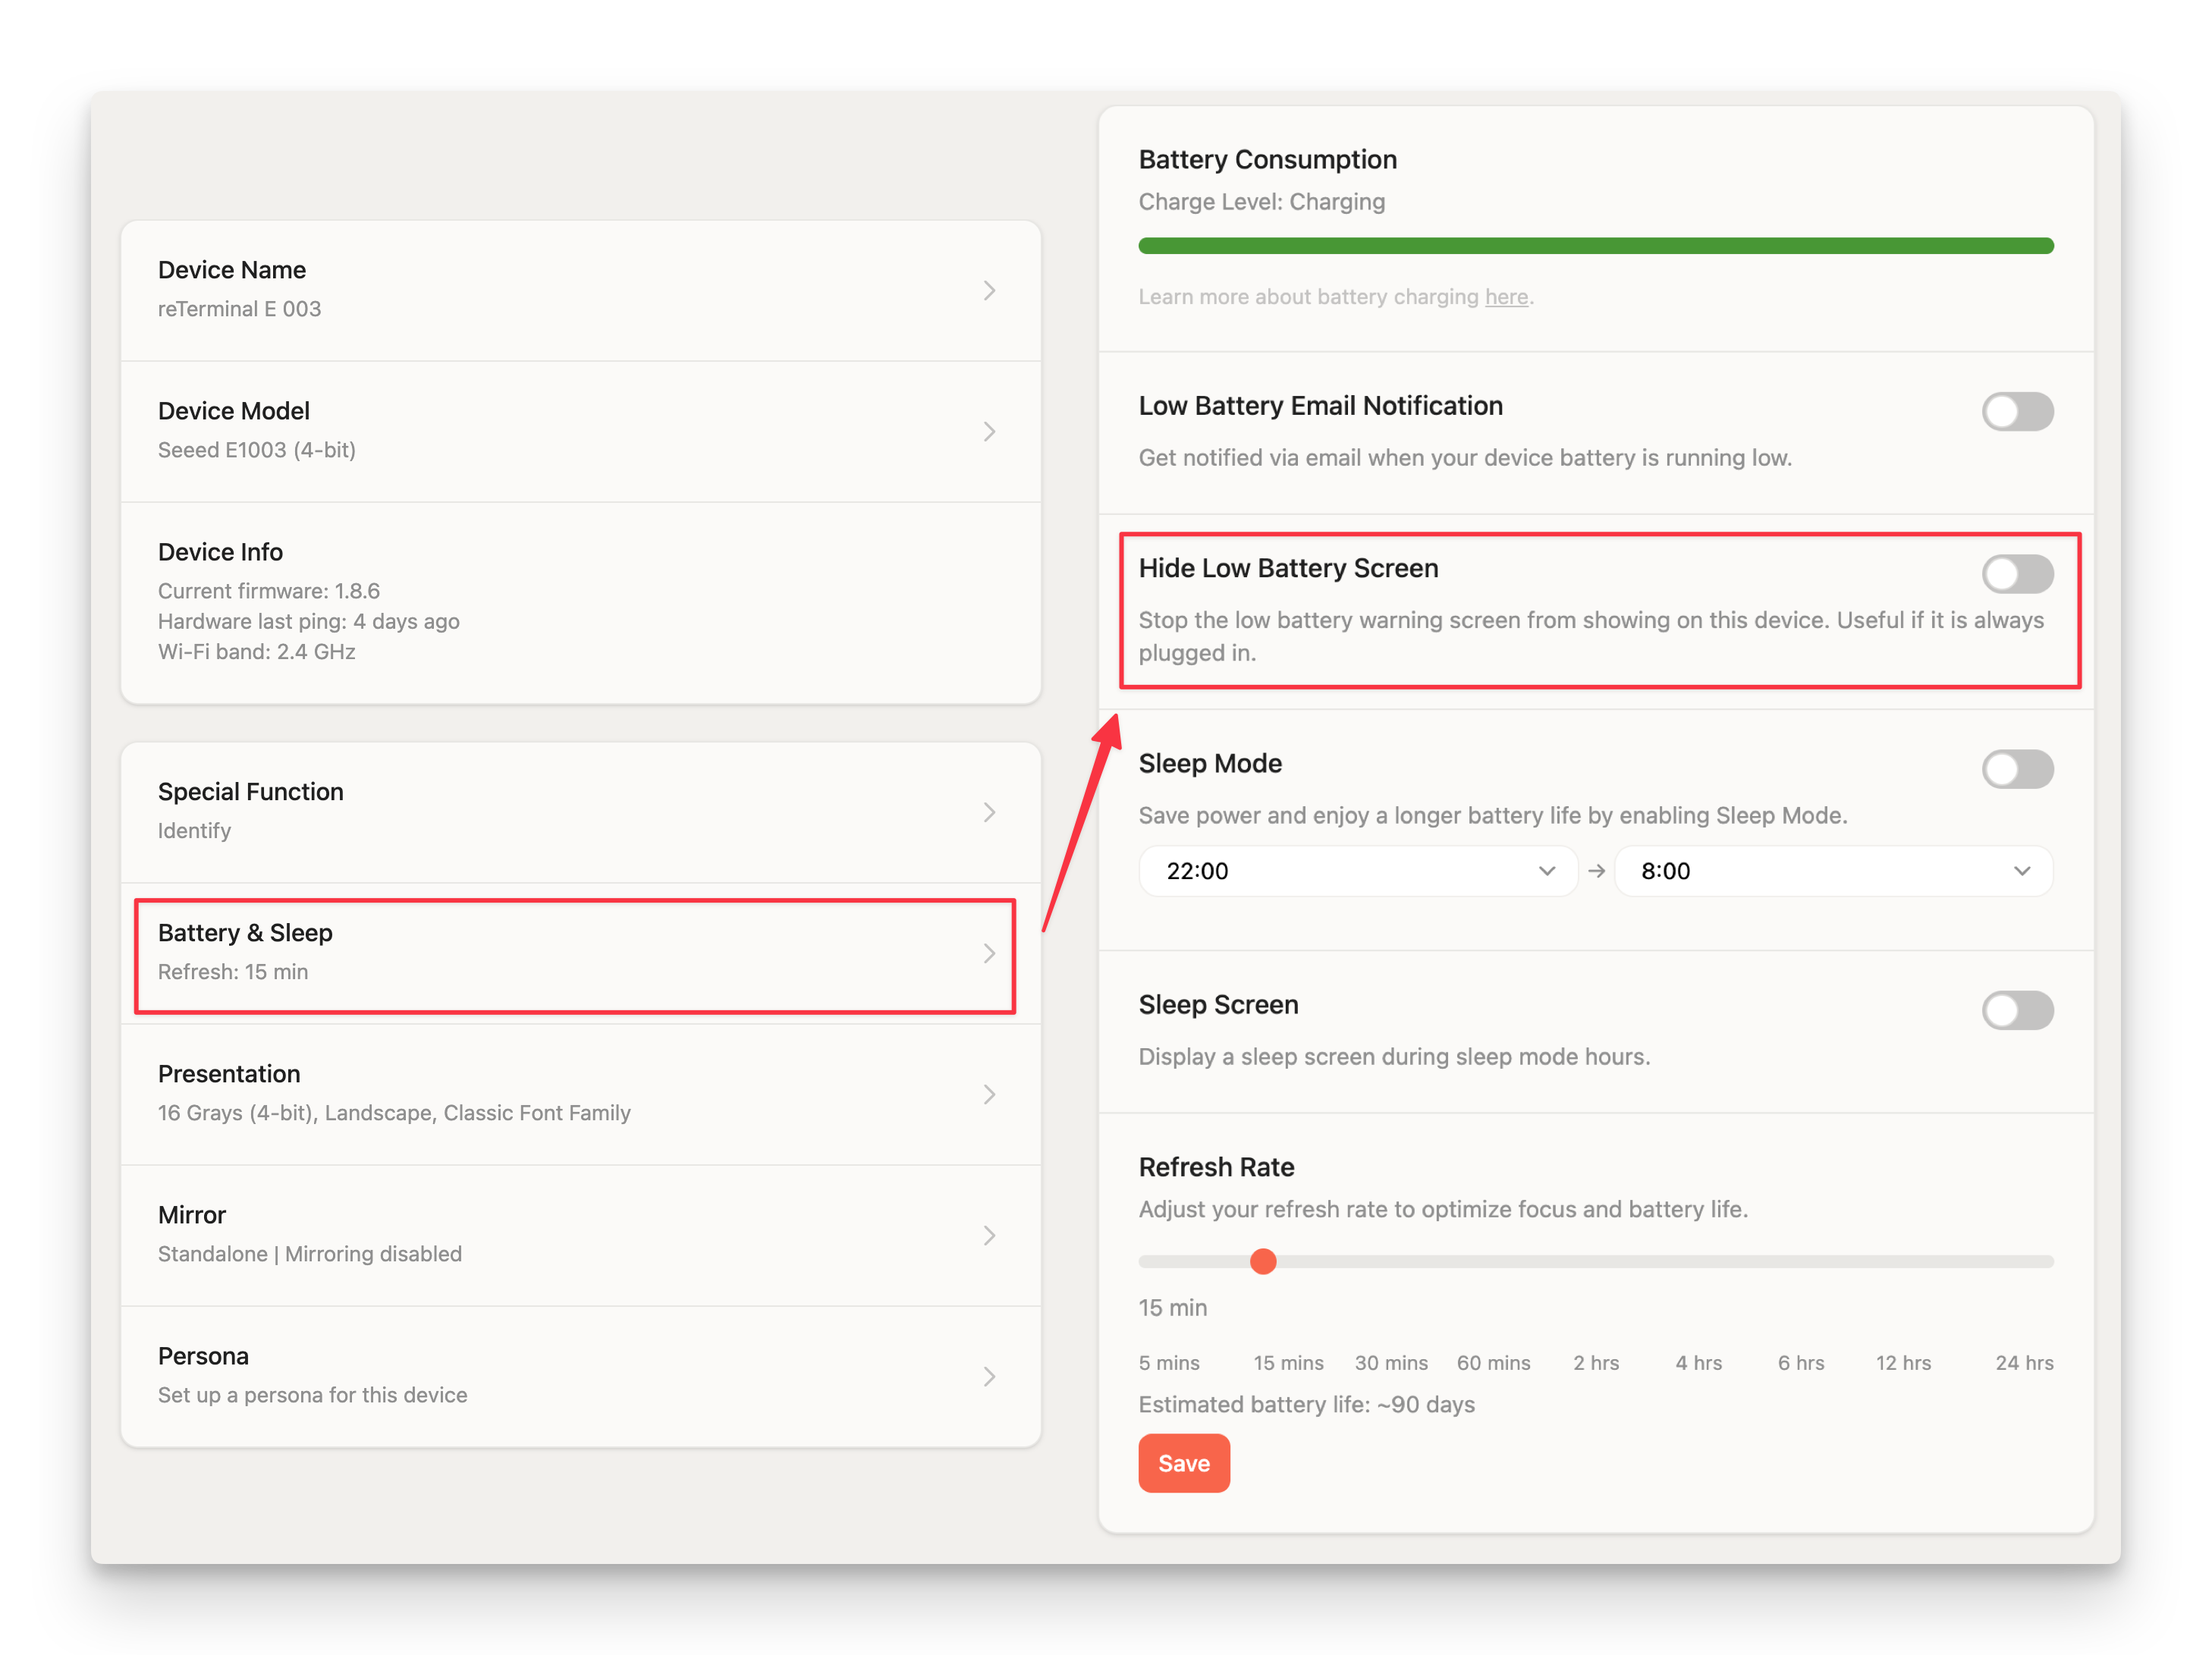
Step 1. Open the TRMNL web interface and go to Devices.
Step 2. Select the affected device and open its Battery settings.
Step 3. Turn on Hide Low Battery Screen. This stops the low-battery warning screen from appearing on the device while TRMNL's server-side battery detection recovers, or when you need the display to stay on your playlist.
Step 4. (Optional) Leave Low Battery Email Notification enabled if you still want email alerts without interrupting the display.
Q3: Web Flasher / PlatformIO can't find the device or upload fails
Sometimes the wrong program can cause the XIAO to lose its port or not function correctly:
- The XIAO is connected but no port number is found.
- The XIAO is connected, the port appears, but the upload fails.
Put the XIAO into BootLoader mode to recover:
- Step 1: press and hold the
BOOTbutton on the XIAO ESP32-S3 / ESP32-C3 without releasing it. - Step 2: while still holding
BOOT, connect the device to the computer via USB-C. ReleaseBOOTafter the device is connected. - Step 3: re-run the upload / flash. Most "device not recognised" or "upload failed" issues are solved by this.
Special Thanks
Special thanks to the entire TRMNL team for their strong support and invaluable help across this integration. In particular we want to thank Bogdan, Ryan Kulp, Fr3d, Schappi, and all other team members for their dedication throughout development and documentation.
Their expertise made this integration possible and greatly improved the experience for the reTerminal E Series (E1001, E1002, and E1003), TRMNL DIY Kit, and XIAO 7.5" ePaper Panel communities.
Resources
- reTerminal E1001 / E1002 / E1003
- TRMNL DIY Kit
- XIAO 7.5" Panel
- [GitHub] Seeed_TRMNL_Eink_Project
- [GitHub] Official TRMNL firmware
- [Wiki] Getting Started with reTerminal E1003
- [Firmware] TRMNL ePaper Library (GitHub)
- [Hardware] Driver Board SCH
- [Printable] Triangular base
- [Printable] Protected triangular base
- [Printable] L-shaped base
- [Thingiverse] Triangular base
- [Thingiverse] Protected triangular base
- [Thingiverse] L-shaped base
- [Makerworld] Triangular base
- [Makerworld] Protected triangular base
- [Makerworld] L-shaped base
- [STP] 3D Model enclosure
- [PDF] ePaper Driver Board SCH PDF
- [GitHub] TRMNL firmware repository
- [GitHub] Seeed_TRMNL_Eink_Project repository
Tech Support & Product Discussion
Thank you for choosing our products! We are here to provide you with different support to ensure that your experience with our products is as smooth as possible. We offer several communication channels to cater to different preferences and needs.