ESPHome Cookbook: Buttons, Buzzer, LED, Battery & Low Power (reTerminal E Series)
This page assumes you've already worked through the ESPHome display cookbook for reTerminal E Series (device on Wi-Fi, Home Assistant integration online, first dashboard rendered). For the platform-level YAML skeleton and Home Assistant integration steps, see Work with ESPHome. For RTC, microSD card detect, and microphone setup, see ESPHome Cookbook: RTC, SD Card & Microphone.
If you want to quickly preview project results or try the basic demo firmware before setting up a development environment, open the reTerminal E-Series Firmware Hub. You can choose a supported reTerminal E Series device and flash demo firmware directly from a browser.
This article covers the onboard I/O and power-related ESPHome configurations for your reTerminal E Series ePaper Display device, building upon the foundational concepts covered in our ESPHome display cookbook. If you're new to ESPHome or the reTerminal E Series, we recommend starting with the display guide before using these hardware examples.
Hardware Capabilities
The reTerminal E Series ePaper Display includes several hardware components that can be leveraged in Home Assistant through ESPHome:
-
Three programmable buttons (GPIO3, GPIO4, GPIO5)
-
Buzzer (GPIO45)
-
Battery level monitoring (GPIO1 for voltage)
-
On-board LED (GPIO6)
-
Temperature and humidity sensor (I²C interface)
Let's explore how to use each of these components in practical applications.
reTerminal E Series ePaper Display Hardware Component Control
Let's explore how to use each of the hardware components on the reTerminal E Series ePaper Display in Home Assistant.
Buttons and LED
This example demonstrates how to use the three buttons on your reTerminal E Series ePaper Display to control functions and provide visual feedback with the on-board LED.
You can use this example by copying the code below and pasting it after the captive_portal code line in your Yaml file.
# Button configuration
binary_sensor:
  - platform: gpio
    pin:
      number: GPIO3         # Green button
      mode: INPUT_PULLUP
      inverted: true
    id: button_1
    name: "Button 1"
    on_press:
      then:
        - light.turn_on: onboard_led
        - delay: 500ms
        - light.turn_off: onboard_led

  - platform: gpio
    pin:
      number: GPIO4          # Right white button
      mode: INPUT_PULLUP
      inverted: true
    id: button_2
    name: "Button 2"
    on_press:
      then:
        - light.turn_on: onboard_led
        - delay: 200ms
        - light.turn_off: onboard_led
        - delay: 200ms
        - light.turn_on: onboard_led
        - delay: 200ms
        - light.turn_off: onboard_led

  - platform: gpio
    pin:
      number: GPIO5           # Left white button
      mode: INPUT_PULLUP
      inverted: true
    id: button_3
    name: "Button 3"
    on_press:
      then:
        - light.toggle: onboard_led

# LED configuration
output:
  - platform: gpio
    pin: GPIO6
    id: led_output
    inverted: true

light:
  - platform: binary
    name: "Onboard LED"
    output: led_output
    id: onboard_led
This configuration:
- Sets up all three buttons as inputs with pull-up resistors
- Configures Button 1 to briefly flash the LED
- Configures Button 2 to flash the LED in a double-blink pattern
- Configures Button 3 to toggle the LED on/off
- Makes the LED available in Home Assistant as a controllable light entity
Buzzer Control
The reTerminal E Series ePaper Display includes a buzzer on GPIO45 that can be used to provide audible feedback. Here's how to configure it:
You can use this example by copying the code below and pasting it after the captive_portal code line in your Yaml file.
# This component creates a raw PWM (Pulse Width Modulation) output signal.
# For ESP32, the correct platform is 'ledc', which uses the dedicated LED Control hardware peripheral.
output:
  - platform: ledc   # CORRECTED: 'ledc' is the correct platform for ESP32 PWM.
    pin: GPIO45
    id: buzzer_pwm
    # The frequency determines the pitch of the buzzer's sound. 1000Hz is a mid-range tone.
    frequency: 1000Hz

# Create a light entity to provide a user-friendly way to control the buzzer.
# The 'brightness' of the light will control the PWM duty cycle, which effectively changes the buzzer's volume.
light:
  - platform: monochromatic
    output: buzzer_pwm
    name: "Buzzer"
    id: buzzer
    # Setting transition length to 0s makes the buzzer turn on and off instantly.
    default_transition_length: 0s

# This section defines the physical button that will trigger the buzzer.
binary_sensor:
  - platform: gpio
    pin:
      number: GPIO3            # The GPIO pin connected to the green button.
      mode: INPUT_PULLUP       # Use the internal pull-up resistor.
      inverted: true           # The signal is low when pressed.
    id: button_1
    # 'on_press' defines the sequence of actions to execute when the button is pressed.
    on_press:
      then:
        # First beep: turn on at 50% volume (brightness) for 200 milliseconds.
        - light.turn_on:
            id: buzzer
            brightness: 50%
        - delay: 200ms
        - light.turn_off: buzzer
        # Pause for 100 milliseconds between beeps.
        - delay: 100ms
        # Second beep: turn on at 70% volume for 200 milliseconds.
        - light.turn_on:
            id: buzzer
            brightness: 70%
        - delay: 200ms
        - light.turn_off: buzzer
This configuration:
- Sets up the buzzer as a PWM output
- Creates a light entity to control the buzzer
- Configures Button 1 to play a short beep pattern when pressed
You can adjust the frequency parameter to change the tone of the buzzer. Higher values create higher-pitched tones.
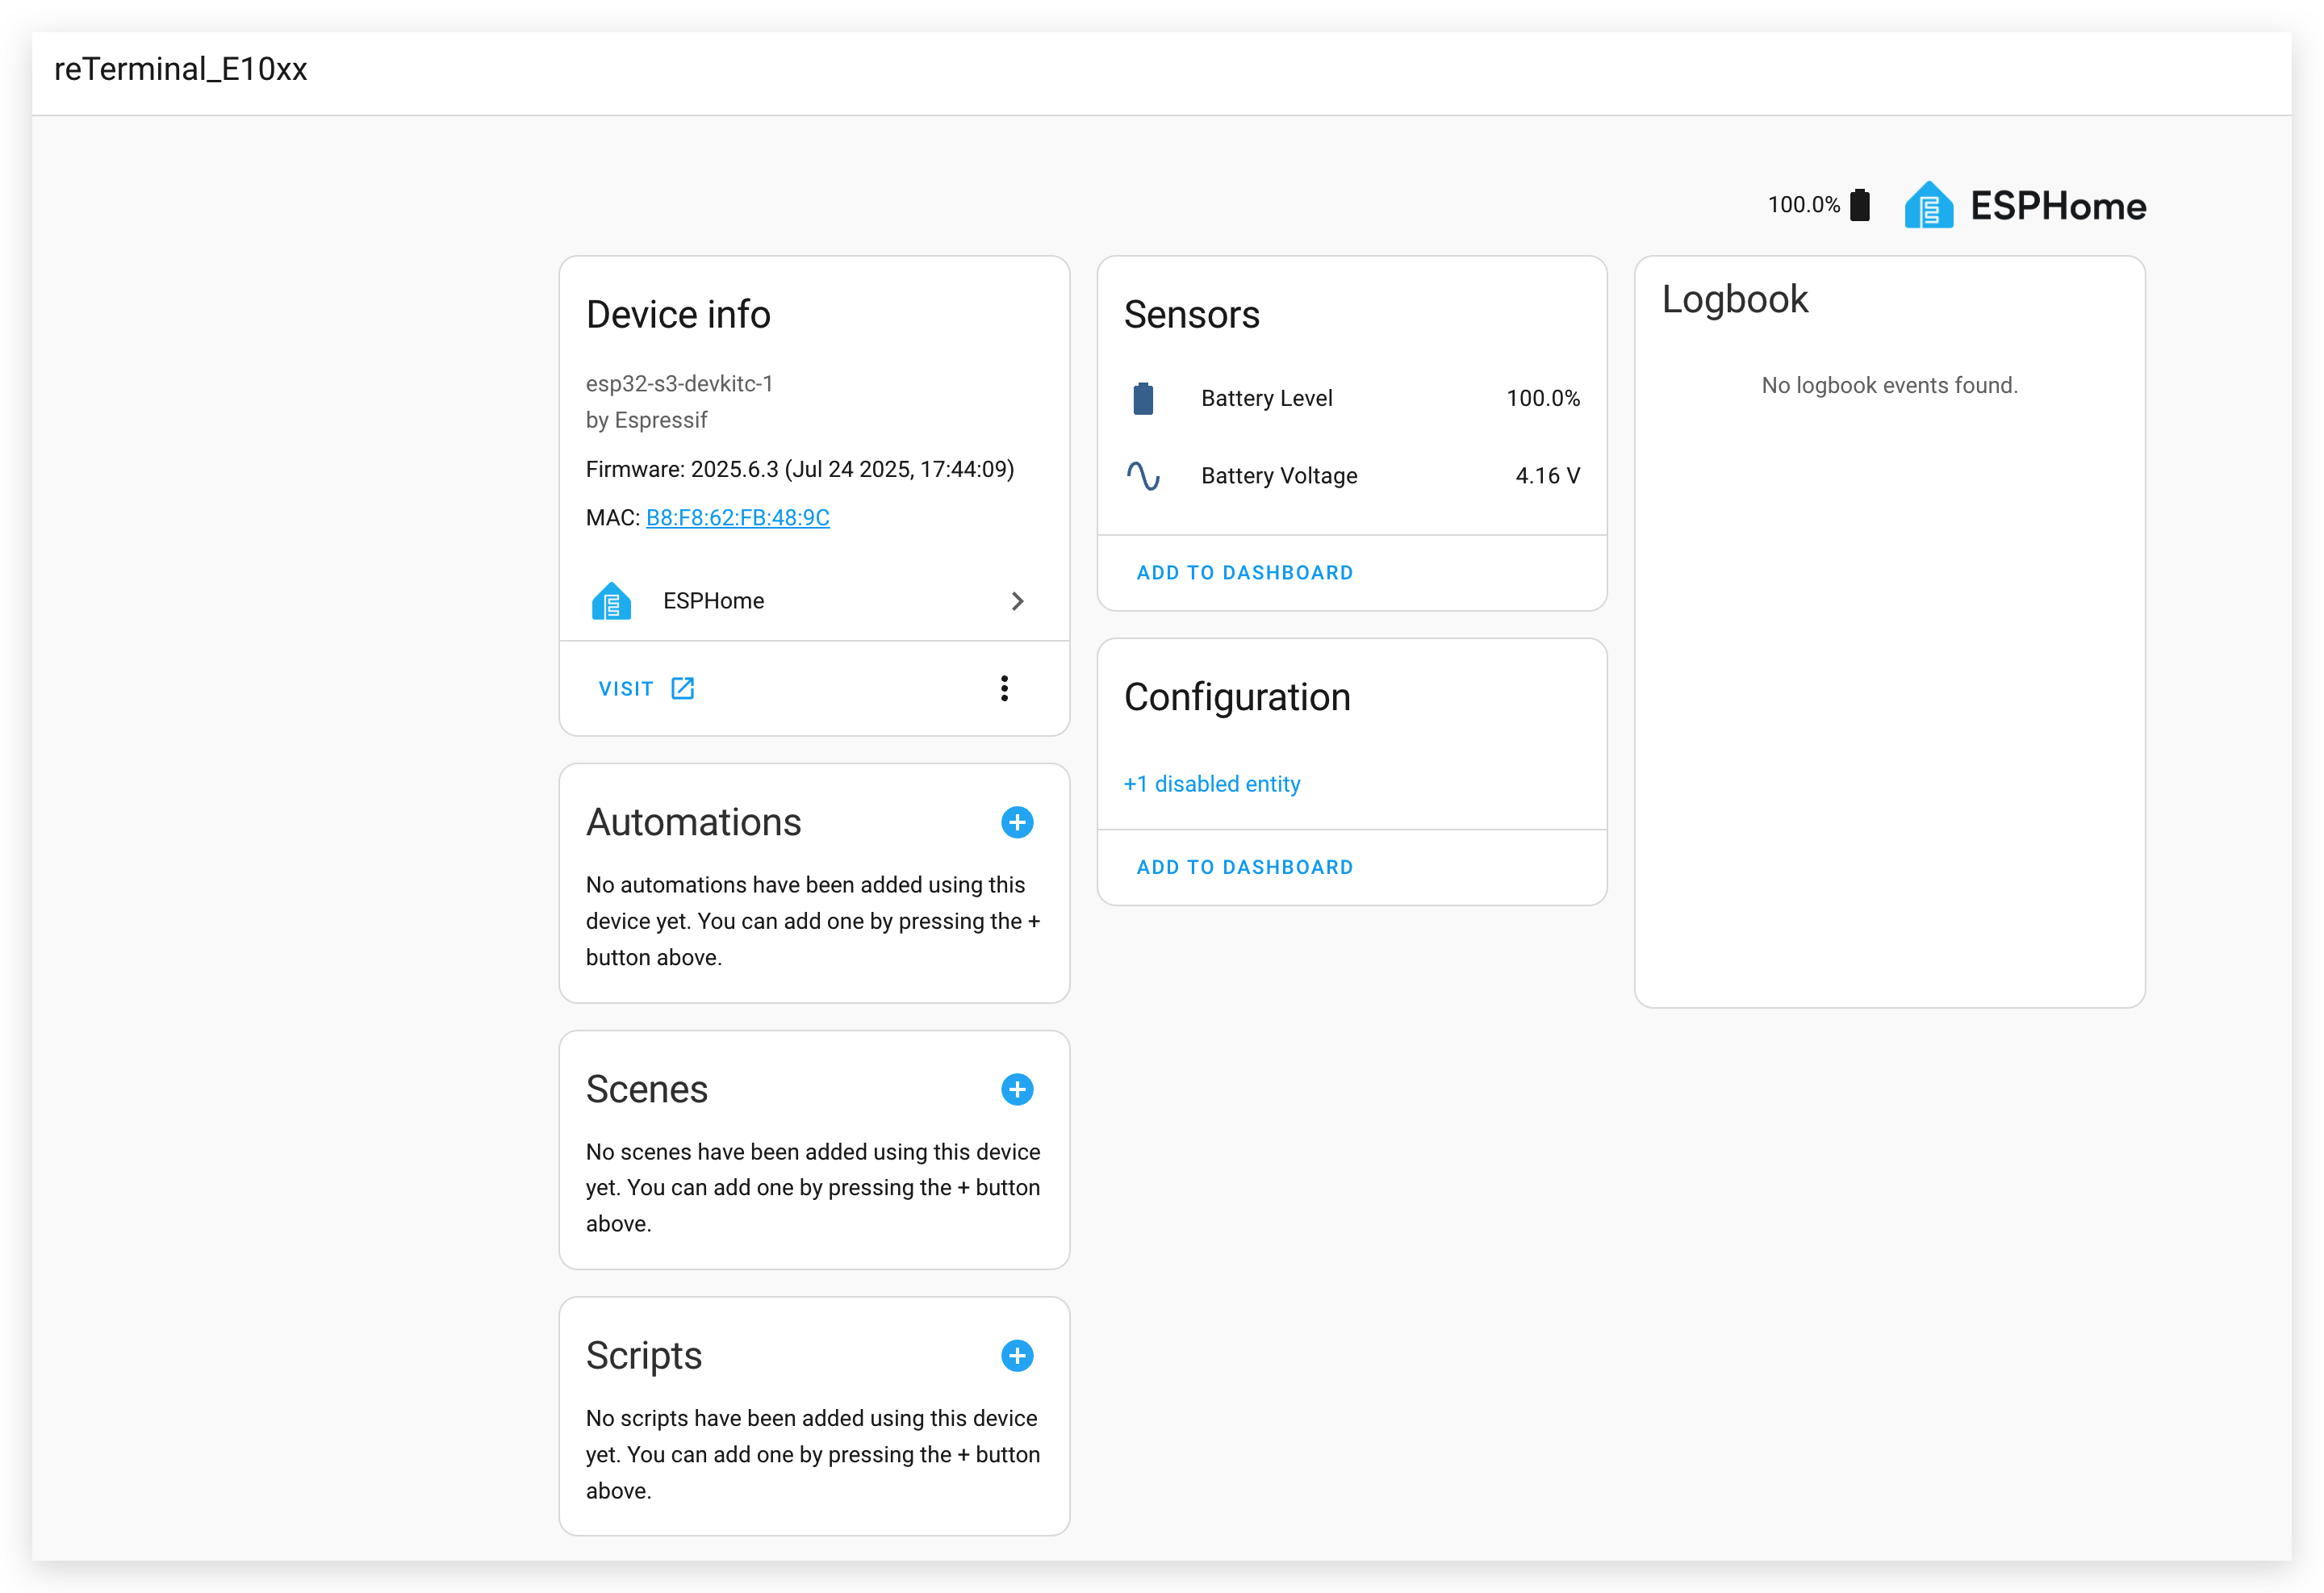
Battery Monitoring
The reTerminal E Series ePaper Display can monitor its battery level through the analog input on GPIO1. Here's how to set it up:
esphome:
  name: reterminal-e10xx
  friendly_name: reTerminal_E10xx
  on_boot:
    priority: 600
    then:
      - output.turn_on: bsp_battery_enable

esp32:
  board: esp32-s3-devkitc-1
  framework:
    type: arduino

# Enable logging
logger:

# Enable Home Assistant API
api:
  encryption:
    key: "REPLACE_WITH_YOUR_API_KEY"

ota:
  - platform: esphome
    password: "REPLACE_WITH_YOUR_OTA_PASSWORD"

wifi:
  ssid: !secret wifi_ssid
  password: !secret wifi_password

  # Enable fallback hotspot (captive portal) in case wifi connection fails
  ap:
    ssid: "Reterminal-E10Xx"
    password: "ChangeMe123"

captive_portal:

output:
  - platform: gpio
    pin: GPIO21
    id: bsp_battery_enable

sensor:
  - platform: adc
    pin: GPIO1
    name: "Battery Voltage"
    id: battery_voltage
    update_interval: 60s
    attenuation: 12db
    filters:
      - multiply: 2.0  # Voltage divider compensation

  - platform: template
    name: "Battery Level"
    id: battery_level
    unit_of_measurement: "%"
    icon: "mdi:battery"
    device_class: battery
    state_class: measurement
    lambda: 'return id(battery_voltage).state;'
    update_interval: 10s
    filters:
      - calibrate_linear:
          - 4.15 -> 100.0
          - 3.96 -> 90.0
          - 3.91 -> 80.0
          - 3.85 -> 70.0
          - 3.80 -> 60.0
          - 3.75 -> 50.0
          - 3.68 -> 40.0
          - 3.58 -> 30.0
          - 3.49 -> 20.0
          - 3.41 -> 10.0
          - 3.30 -> 5.0
          - 3.27 -> 0.0
      - clamp:
          min_value: 0
          max_value: 100
This configuration:
- Reads the battery voltage through the ADC
- Converts the voltage to a battery percentage using a calibration curve
- Makes both the raw voltage and the percentage available in Home Assistant
To measure the battery level, you need to enable the GPIO21 pin. Otherwise it is not possible to read the battery voltage value from GPIO1.
Demo 2. Take the Home Assistant Dashboard as a Screenshot
This example demonstrates how to capture screenshots of your Home Assistant dashboard and display them on your reTerminal E Series.
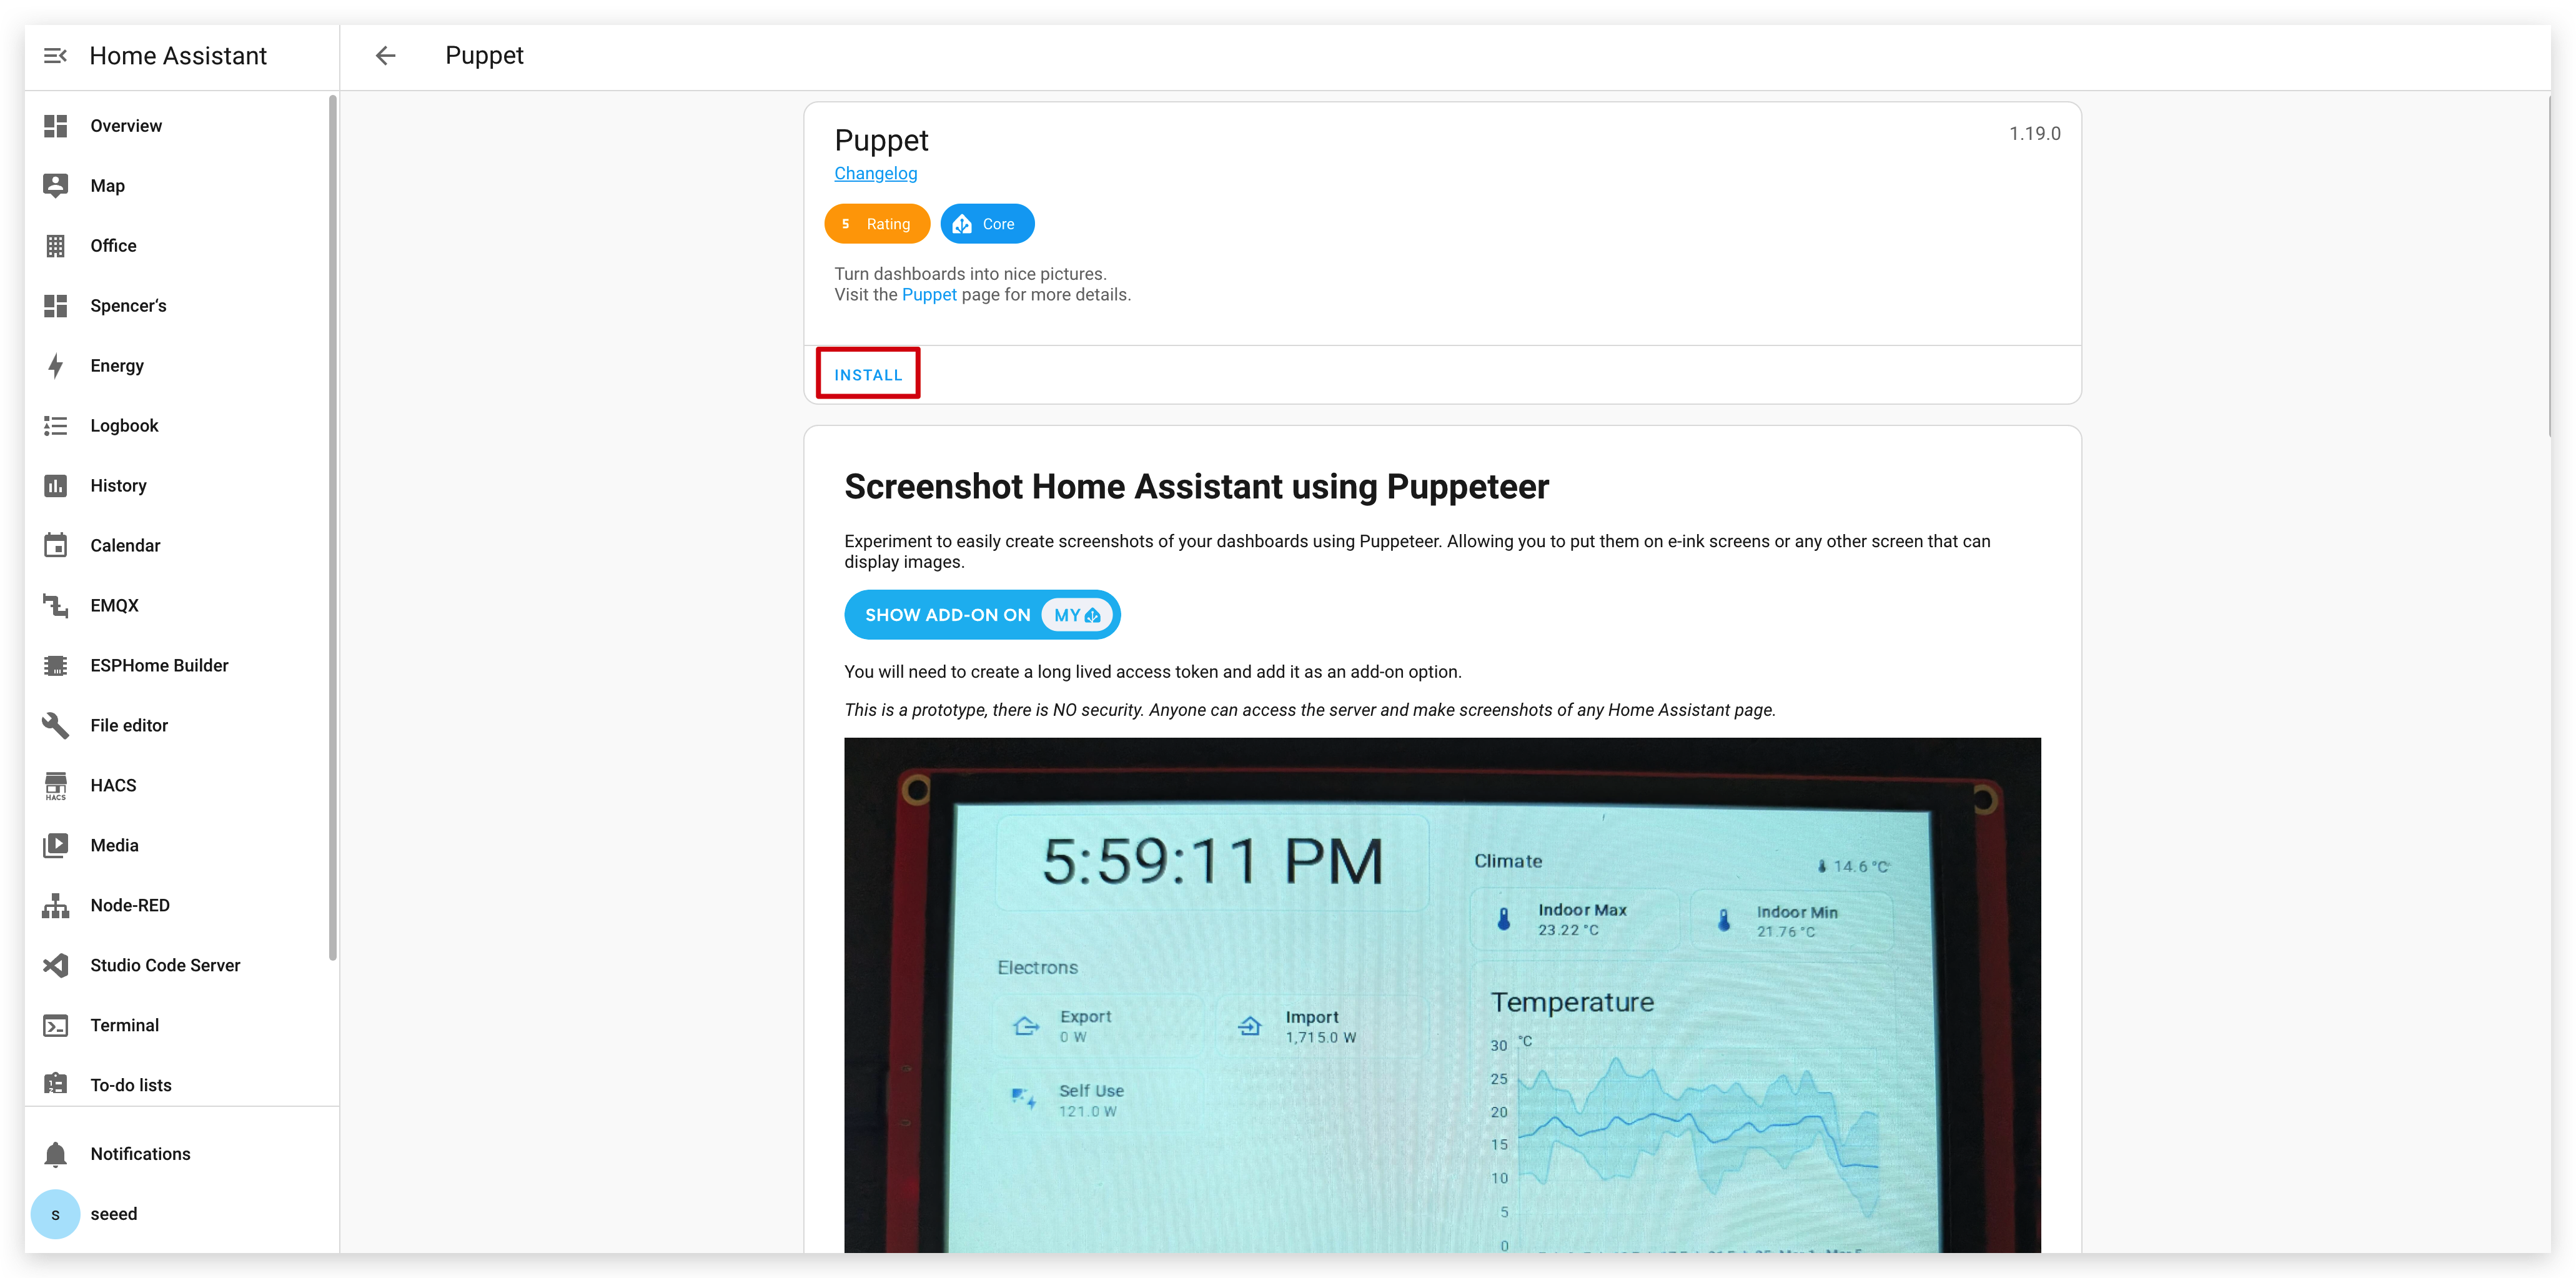
Installing the Puppet Add-on
Step 1. First, you need to install the Puppet add-on. Click the button below, which will take you directly to the add-on installation page in your Home Assistant instance:
Step 2. On the add-on page, click the "INSTALL" button and wait for the installation to complete.
Creating an Access Token
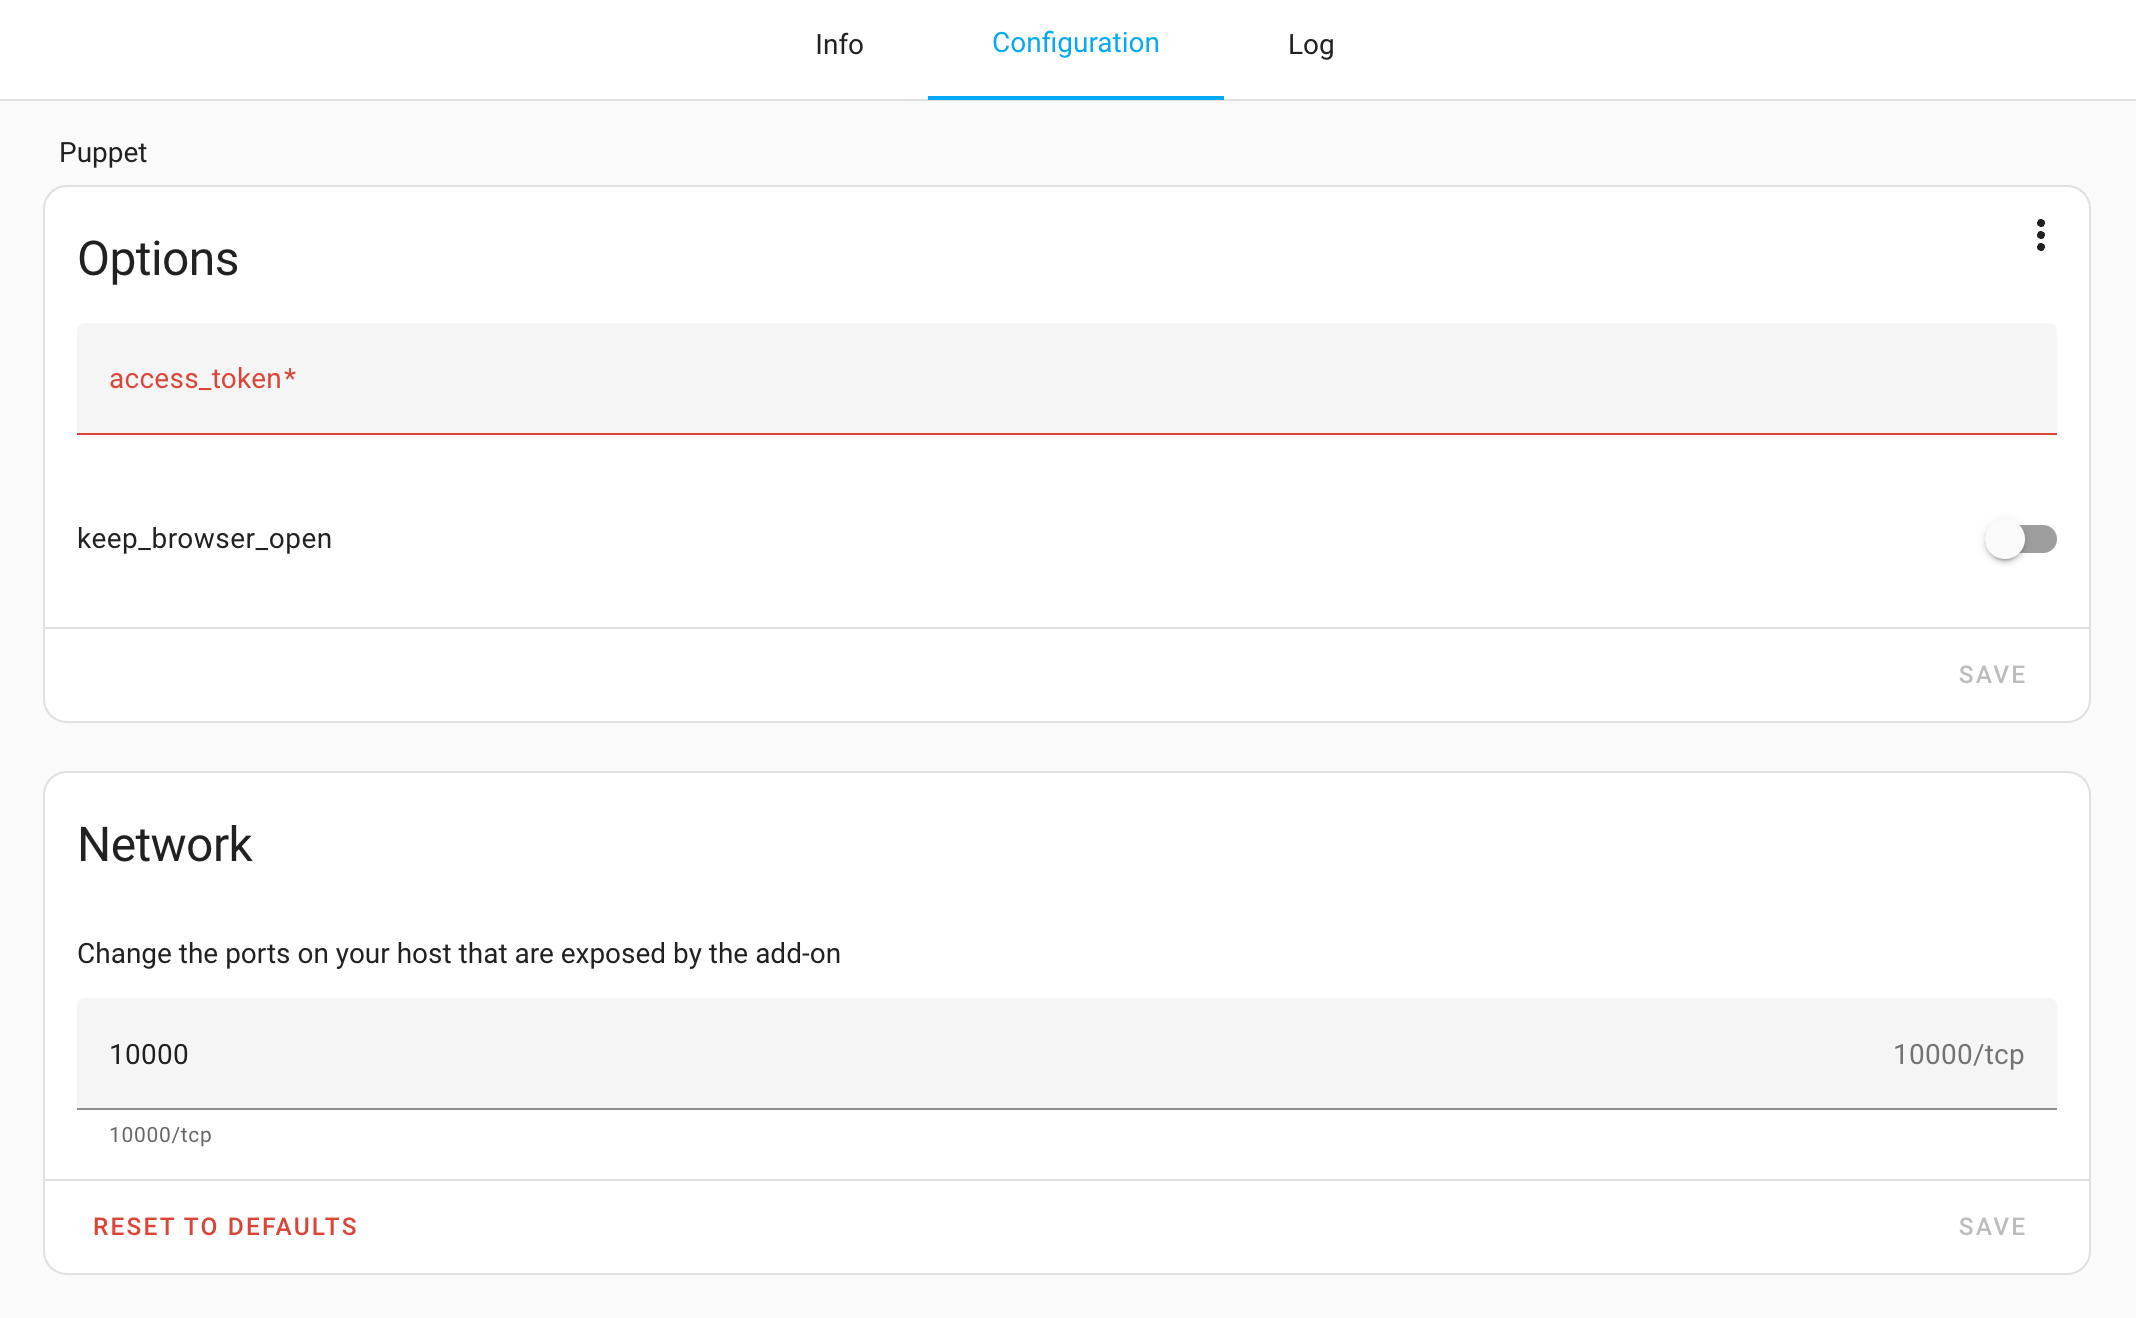
Step 3. After installation, go to the Configuration page of the Puppet add-on. As you can see, here we need to enter the token. You'll need to create an access token for this add-on.
Step 4. Navigate to your profile in Home Assistant by clicking on your username in the bottom left corner, then select "Long-Lived Access Tokens" at the bottom of the page.
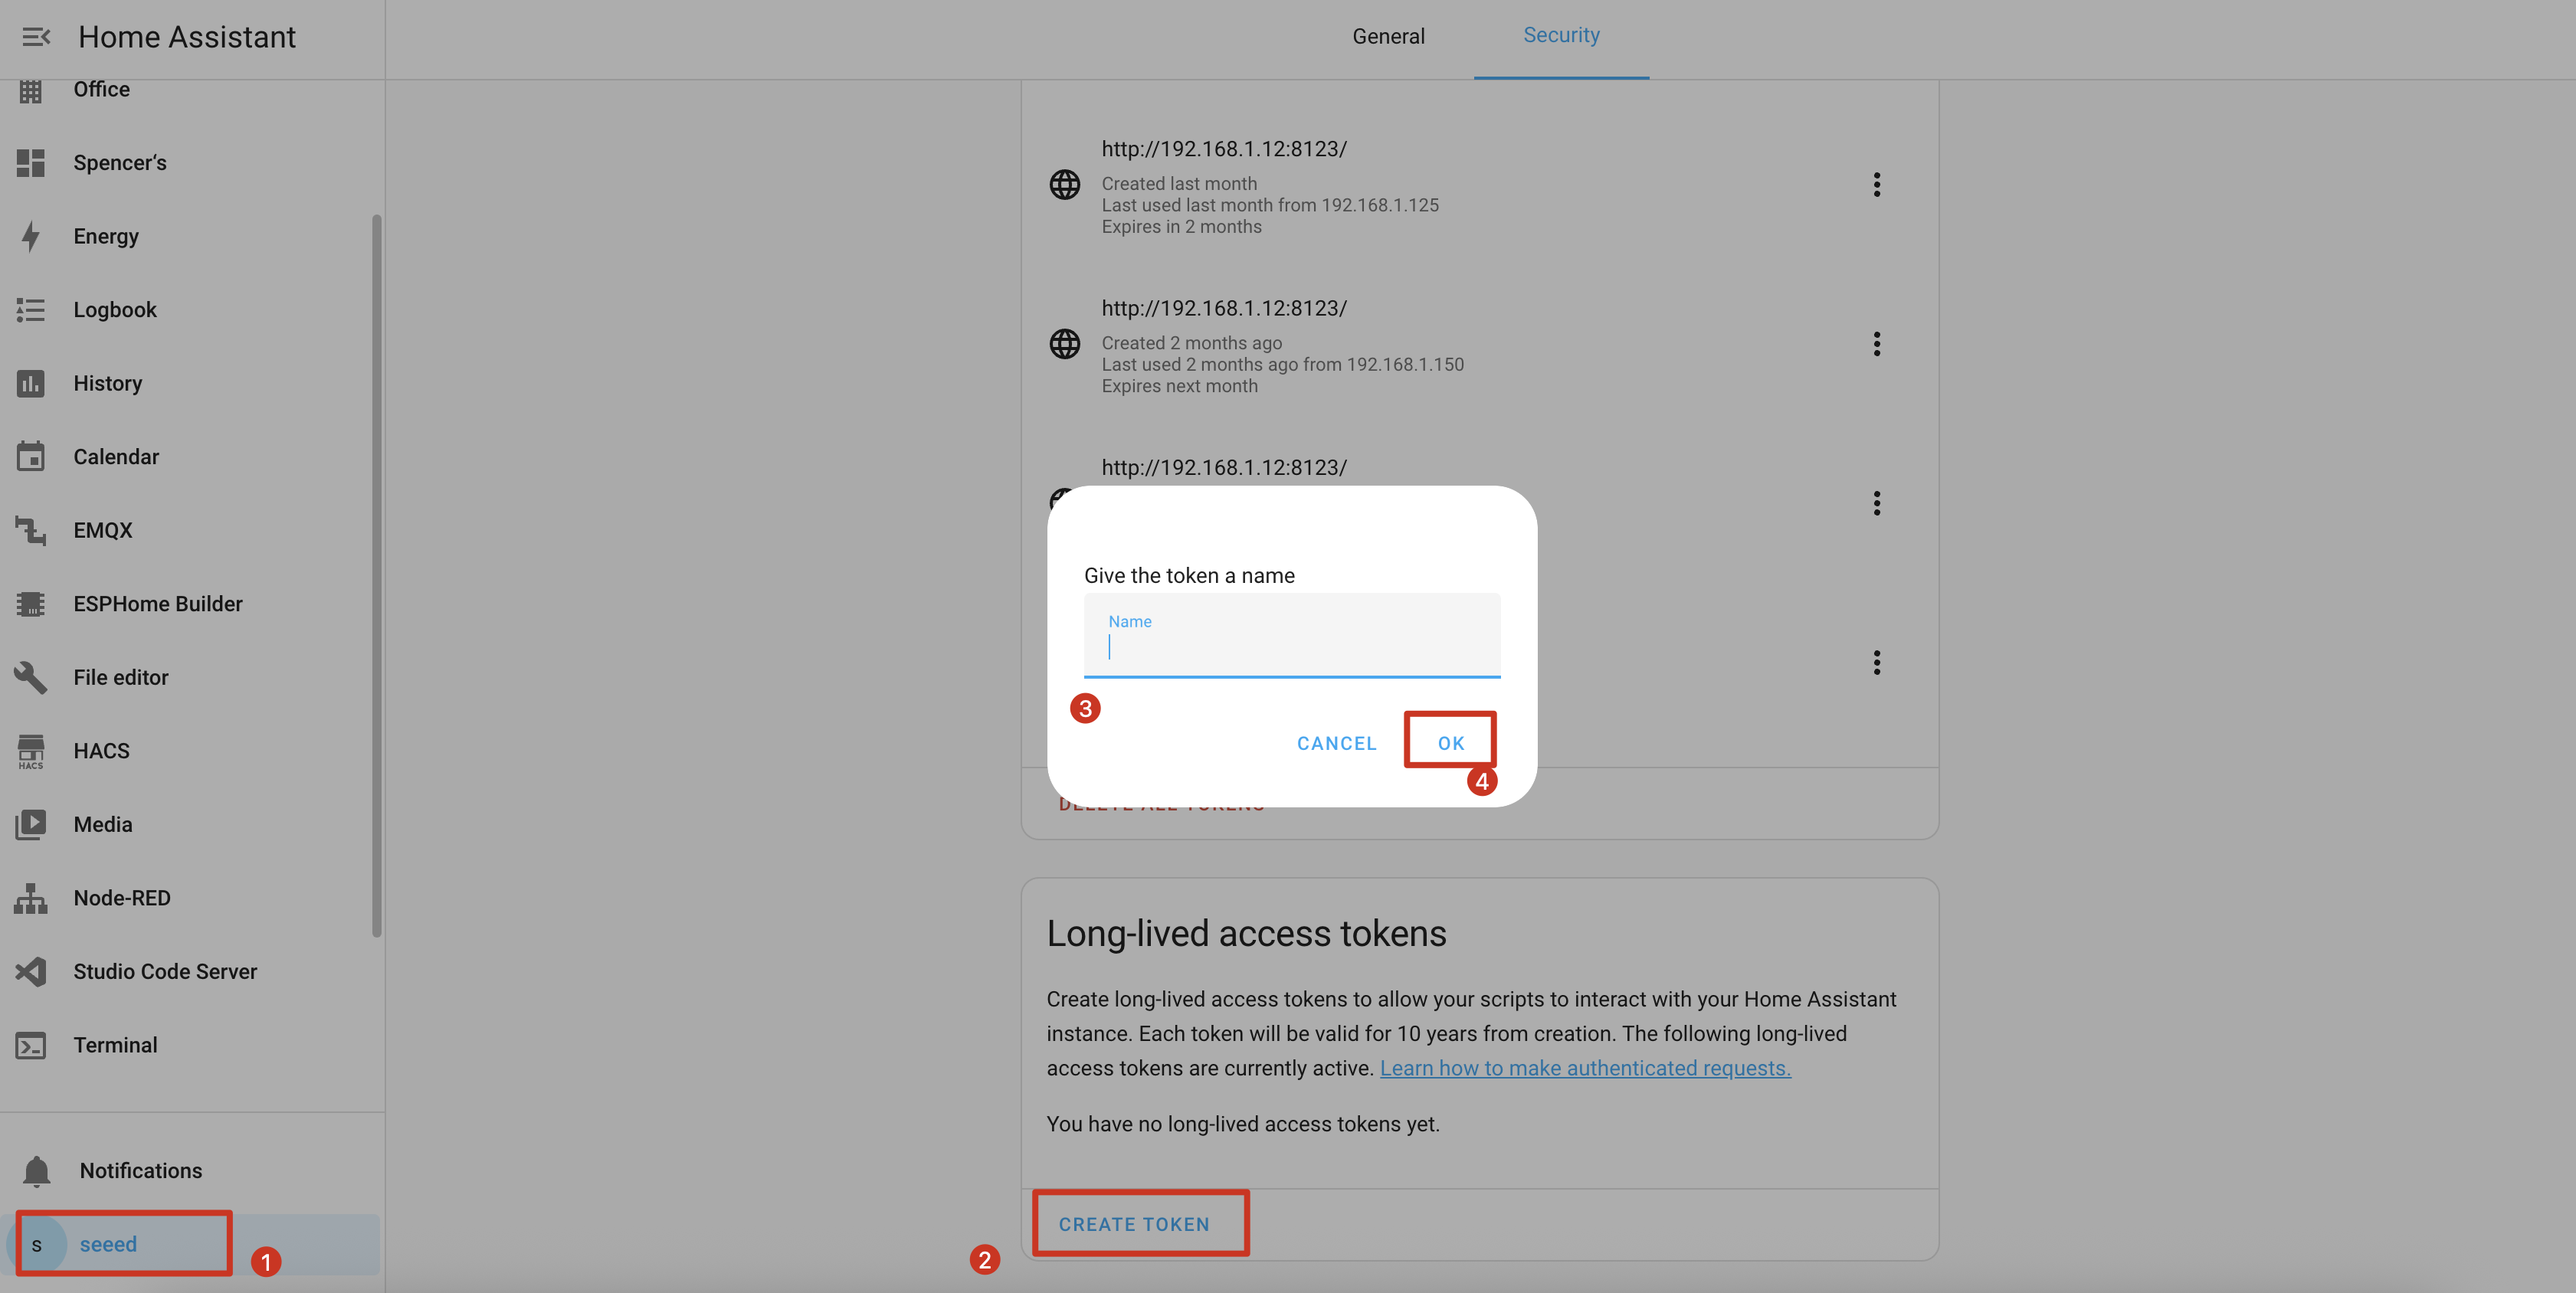
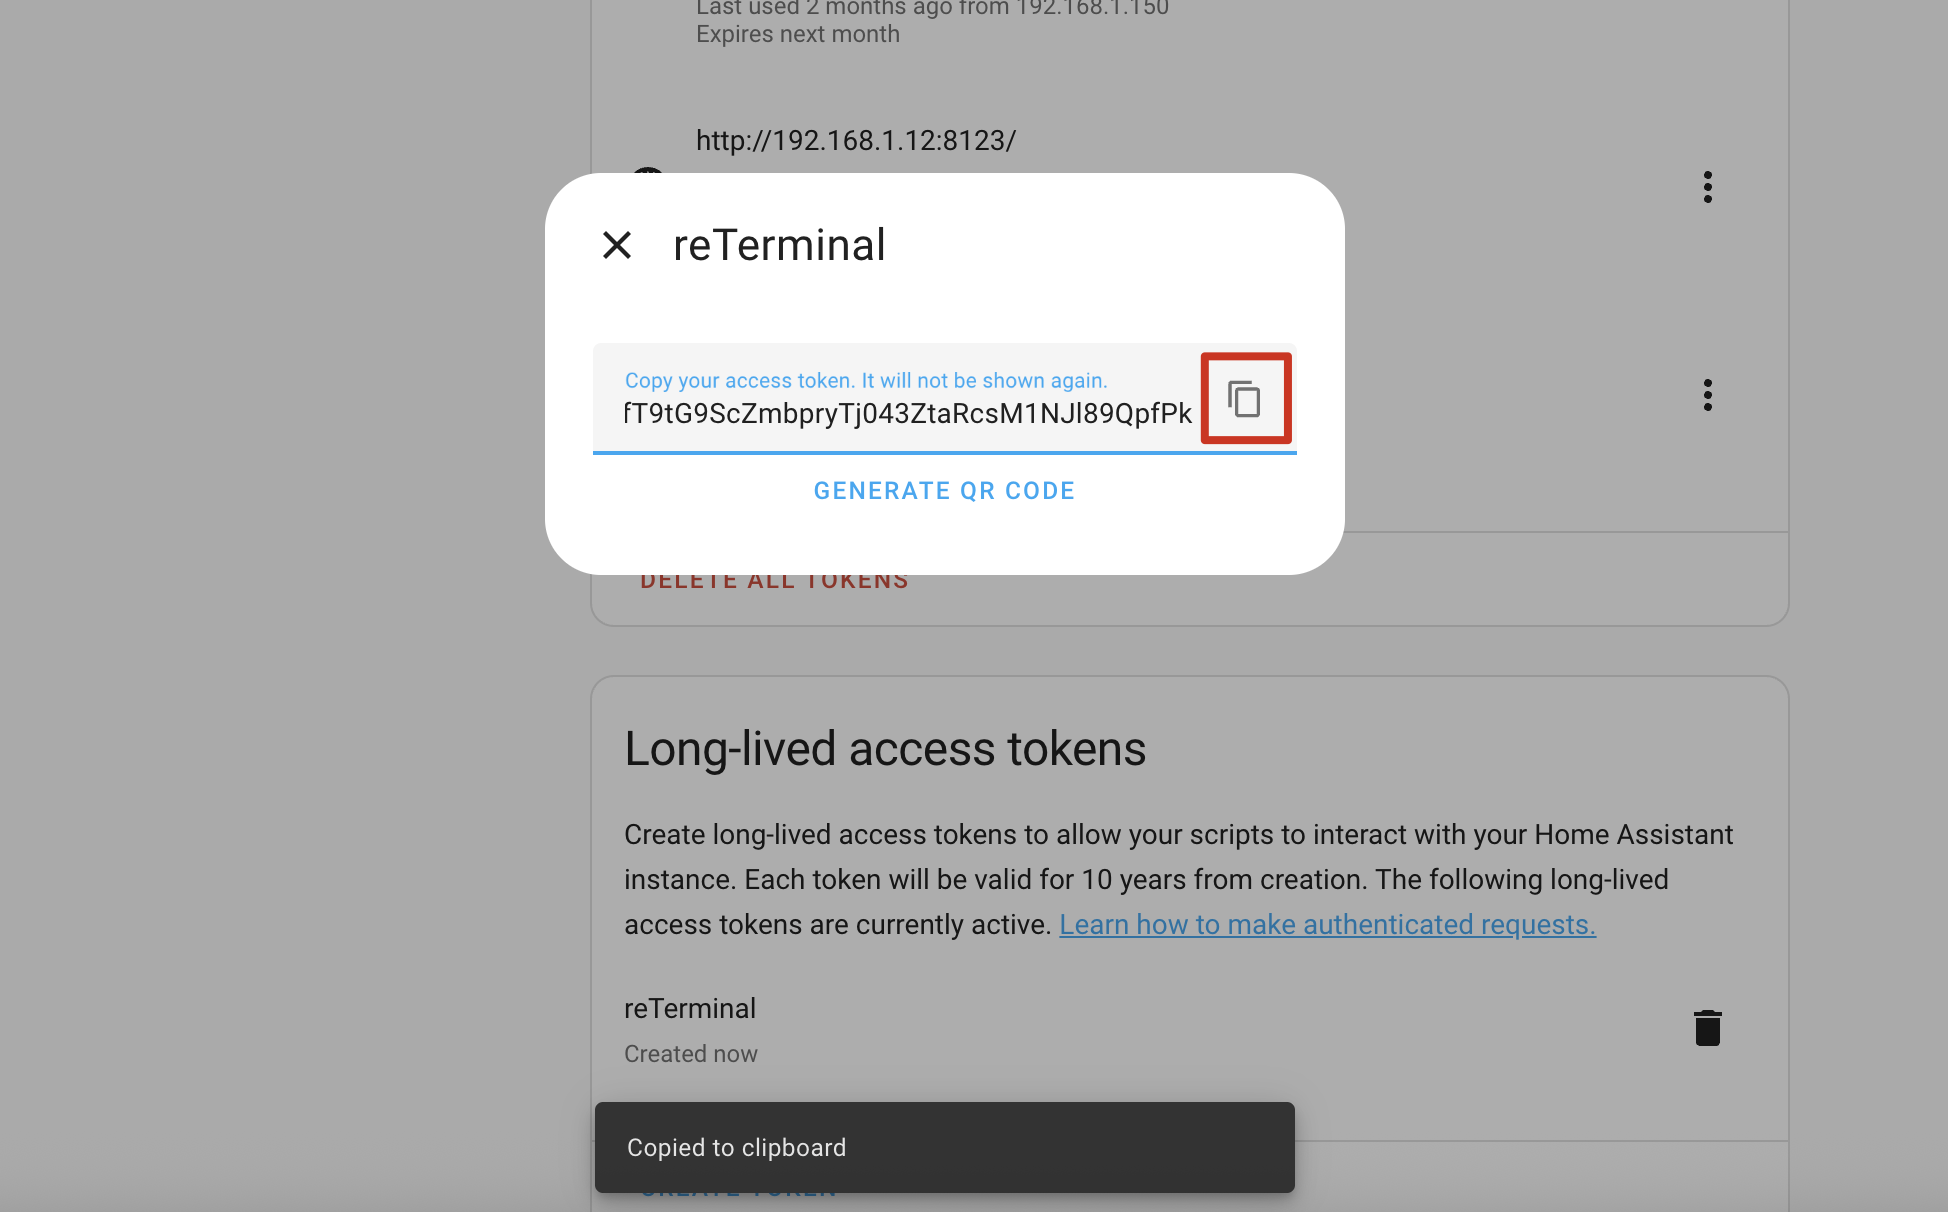
Step 5. Create a new token with a descriptive name like "Puppet Screenshot" and copy the generated token.
Step 6. Return to the Puppet add-on configuration and paste the token in the "Long-Lived Access Token" field.
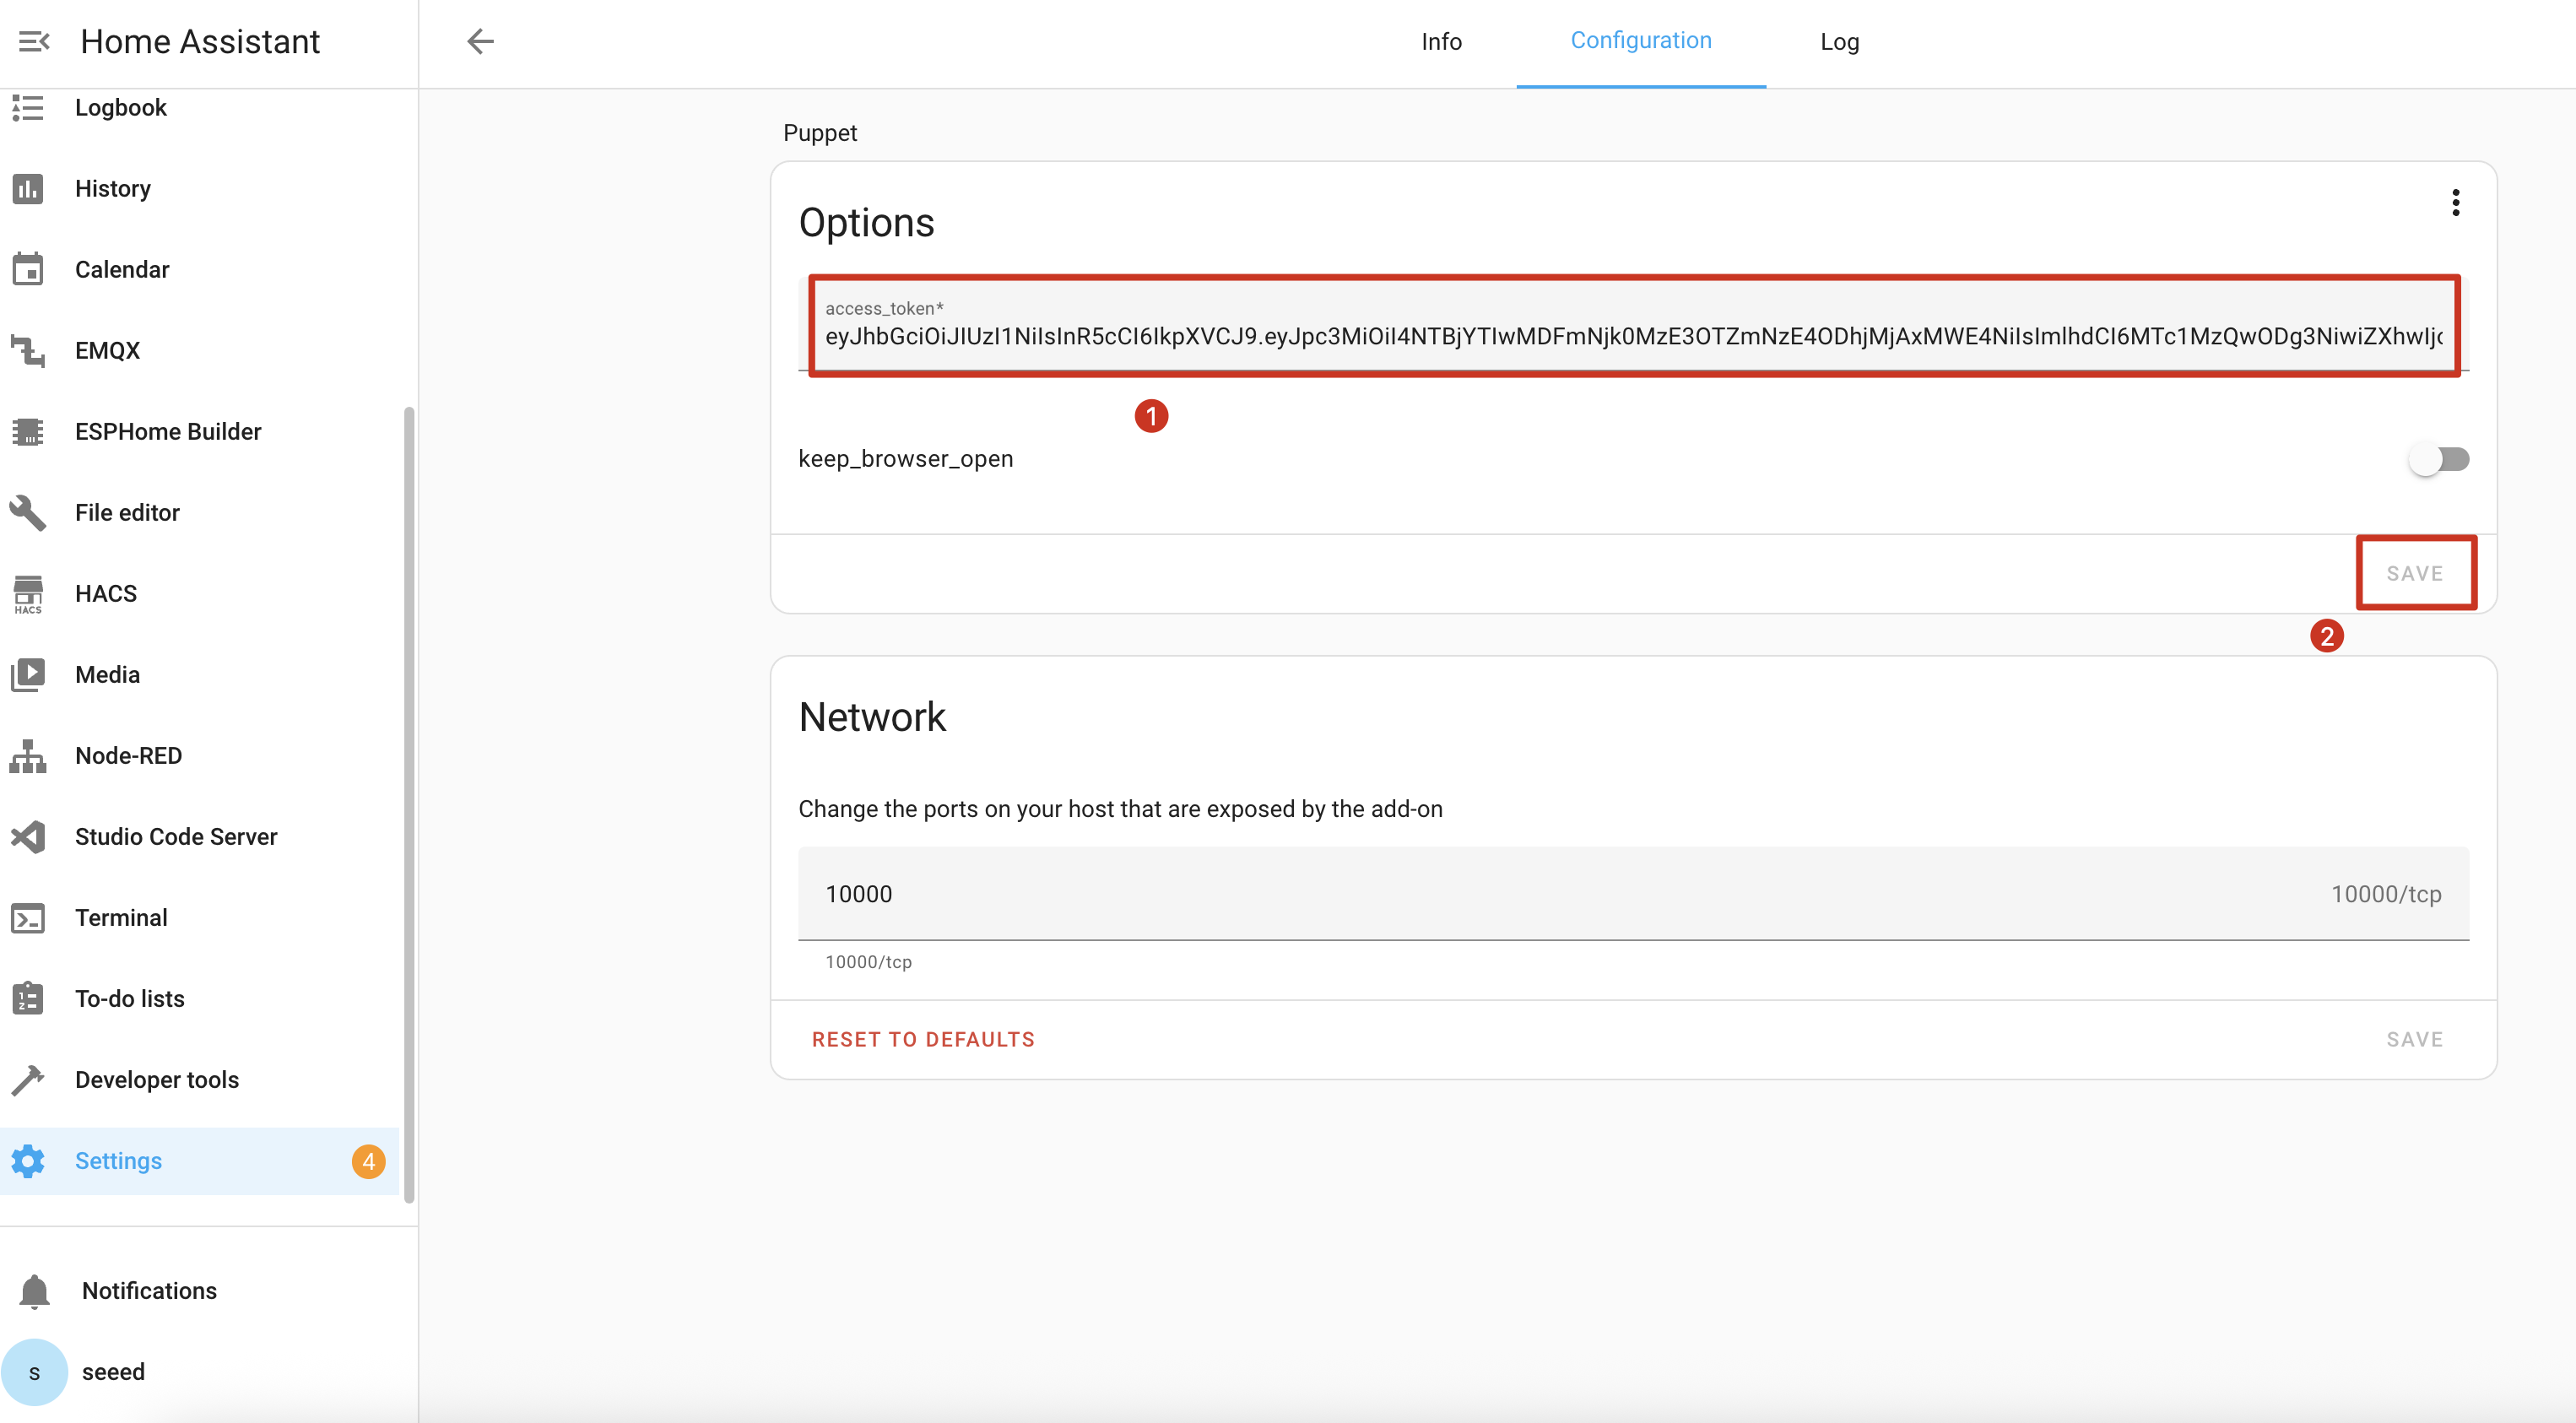
Step 7. Save the configuration and restart the Puppet add-on.

Understanding the Screenshot API
The Puppet add-on launches a server on port 10000 that generates screenshots of any Home Assistant page. Here's how to use it:
Basic Screenshot URL Format
http://homeassistant.local:10000/lovelace/0?viewport=800x480
This URL will capture a screenshot of your default dashboard at 800x480 resolution (perfect for reTerminal E Series).
E-Paper Optimization
For e-paper displays, add the eink parameter to reduce the color palette:
http://homeassistant.local:10000/lovelace/0?viewport=800x480&eink=2
The value 2 represents a 2-color (black and white) palette.
Inverting Colors
Add the invert parameter to invert black and white:
http://homeassistant.local:10000/lovelace/0?viewport=800x480&eink=2&invert
Capturing Different Pages
You can capture any Home Assistant page by changing the URL path:
http://homeassistant.local:10000/todo?viewport=800x480&eink=2&invert
Test your screenshot URL by entering it in a web browser. You should see the screenshot of your selected Home Assistant page.

ESPHome Configuration
Step 11. Add the following code to your ESPHome configuration after the captive_portal section:
- For E1001
- For E1002
……
psram:
  mode: octal
  speed: 80MHz

……

captive_portal:

spi:
  clk_pin: GPIO7
  mosi_pin: GPIO9

http_request:
  verify_ssl: false
  timeout: 20s
  watchdog_timeout: 25s

online_image:
  - id: dashboard_image
    format: PNG
    type: GRAYSCALE
    buffer_size: 65536
    url: http://homeassistant.local:10000/lovelace/0?viewport=800x480&eink=2&invert
    update_interval: 1min
    on_download_finished:
      - component.update: epaper_display

display:
  - platform: waveshare_epaper
    id: epaper_display
    model: 7.50inv2 # You can use 7.50inv2alt when you draw complex info and it display not good.
    cs_pin: GPIO10
    dc_pin: GPIO11
    reset_pin:
      number: GPIO12
      inverted: false
    busy_pin:
      number: GPIO13
      inverted: true
    update_interval: 300s
    lambda: |-
      it.image(0, 0, id(dashboard_image));
……
psram:
  mode: octal
  speed: 80MHz

……

captive_portal:

spi:
  clk_pin: GPIO7
  mosi_pin: GPIO9

http_request:
  verify_ssl: false
  timeout: 20s
  watchdog_timeout: 25s

online_image:
  - id: dashboard_image
    format: PNG
    type: RGB565
    buffer_size: 65536
    url: http://192.168.1.12:10000/lovelace/0?viewport=800x480
    update_interval: 1min
    on_download_finished:
      - component.update: epaper_display

display:
  - platform: epaper_spi
    id: epaper_display
    model: Seeed-reTerminal-E1002
    update_interval: never
    lambda: |-
      it.image(0, 0, id(dashboard_image));
Replace homeassistant.local with your Home Assistant's actual IP address if local DNS resolution doesn't work in your network.
When your configuration is successfully uploaded and running, your reTerminal E Series ePaper Display will display a screenshot of your Home Assistant dashboard:
- For E1001
- For E1002

Demo 3: Deep Sleep Mode
If you start using the Deep Sleep program, we recommend that you use it preferably with the white button on the right side and set the white button on the right side as the Sleep Wake button. This way, when you want to update the program, you won't encounter the awkward situation where the device is sleeping and you can't upload the program through the serial port.
This example demonstrates how to use deep sleep mode to significantly reduce power consumption, making your reTerminal E Series ePaper Display suitable for battery-powered applications.
You can use this example by copying the code below and pasting it after the captive_portal code line in your Yaml file.
- For E1001
- For E1002
globals:
  - id: sleep_counter
    type: int
    restore_value: yes  # Use RTC storage to maintain counter during sleep
    initial_value: '0'

# Deep sleep configuration
deep_sleep:
  id: deep_sleep_1
  run_duration: 30s  # Device remains awake for 30 seconds
  sleep_duration: 5min  # Then sleeps for 5 minutes
  # Optional: Use a button to wake from sleep
  wakeup_pin: GPIO4
  wakeup_pin_mode: INVERT_WAKEUP

interval:
  - interval: 29s  # Schedule sleep just before run_duration ends
    then:
      - logger.log: "Entering deep sleep now..."

font:
  - file: "gfonts://Inter@700"
    id: font1
    size: 24

spi:
  clk_pin: GPIO7
  mosi_pin: GPIO9

display:
  - platform: waveshare_epaper
    id: epaper_display
    model: 7.50inv2
    cs_pin: GPIO10
    dc_pin: GPIO11
    reset_pin:
      number: GPIO12
      inverted: false
    busy_pin:
      number: GPIO13
      inverted: true
    update_interval: 5min
    lambda: |-
      id(sleep_counter) += 1;
      ESP_LOGD("main", "Wakeup count: %d", id(sleep_counter));
      it.printf(100, 100, id(font1), "Wakeup count: %d", id(sleep_counter));
globals:
  - id: sleep_counter
    type: int
    restore_value: yes  # Use RTC storage to maintain counter during sleep
    initial_value: '0'

# Deep sleep configuration
deep_sleep:
  id: deep_sleep_1
  run_duration: 30s  # Device remains awake for 30 seconds
  sleep_duration: 5min  # Then sleeps for 5 minutes
  # Optional: Use a button to wake from sleep
  wakeup_pin: GPIO4
  wakeup_pin_mode: INVERT_WAKEUP

interval:
  - interval: 29s  # Schedule sleep just before run_duration ends
    then:
      - logger.log: "Entering deep sleep now..."

font:
  - file: "gfonts://Inter@700"
    id: font1
    size: 24

spi:
  clk_pin: GPIO7
  mosi_pin: GPIO9

display:
  - platform: epaper_spi
    id: epaper_display
    model: Seeed-reTerminal-E1002
    update_interval: 5min
    lambda: |-
      const auto BLACK   = Color(0,   0,   0,   0);
      id(sleep_counter) += 1;
      ESP_LOGD("main", "Wakeup count: %d", id(sleep_counter));
      it.printf(100, 100, id(font1), BLACK, "Wakeup count: %d", id(sleep_counter));
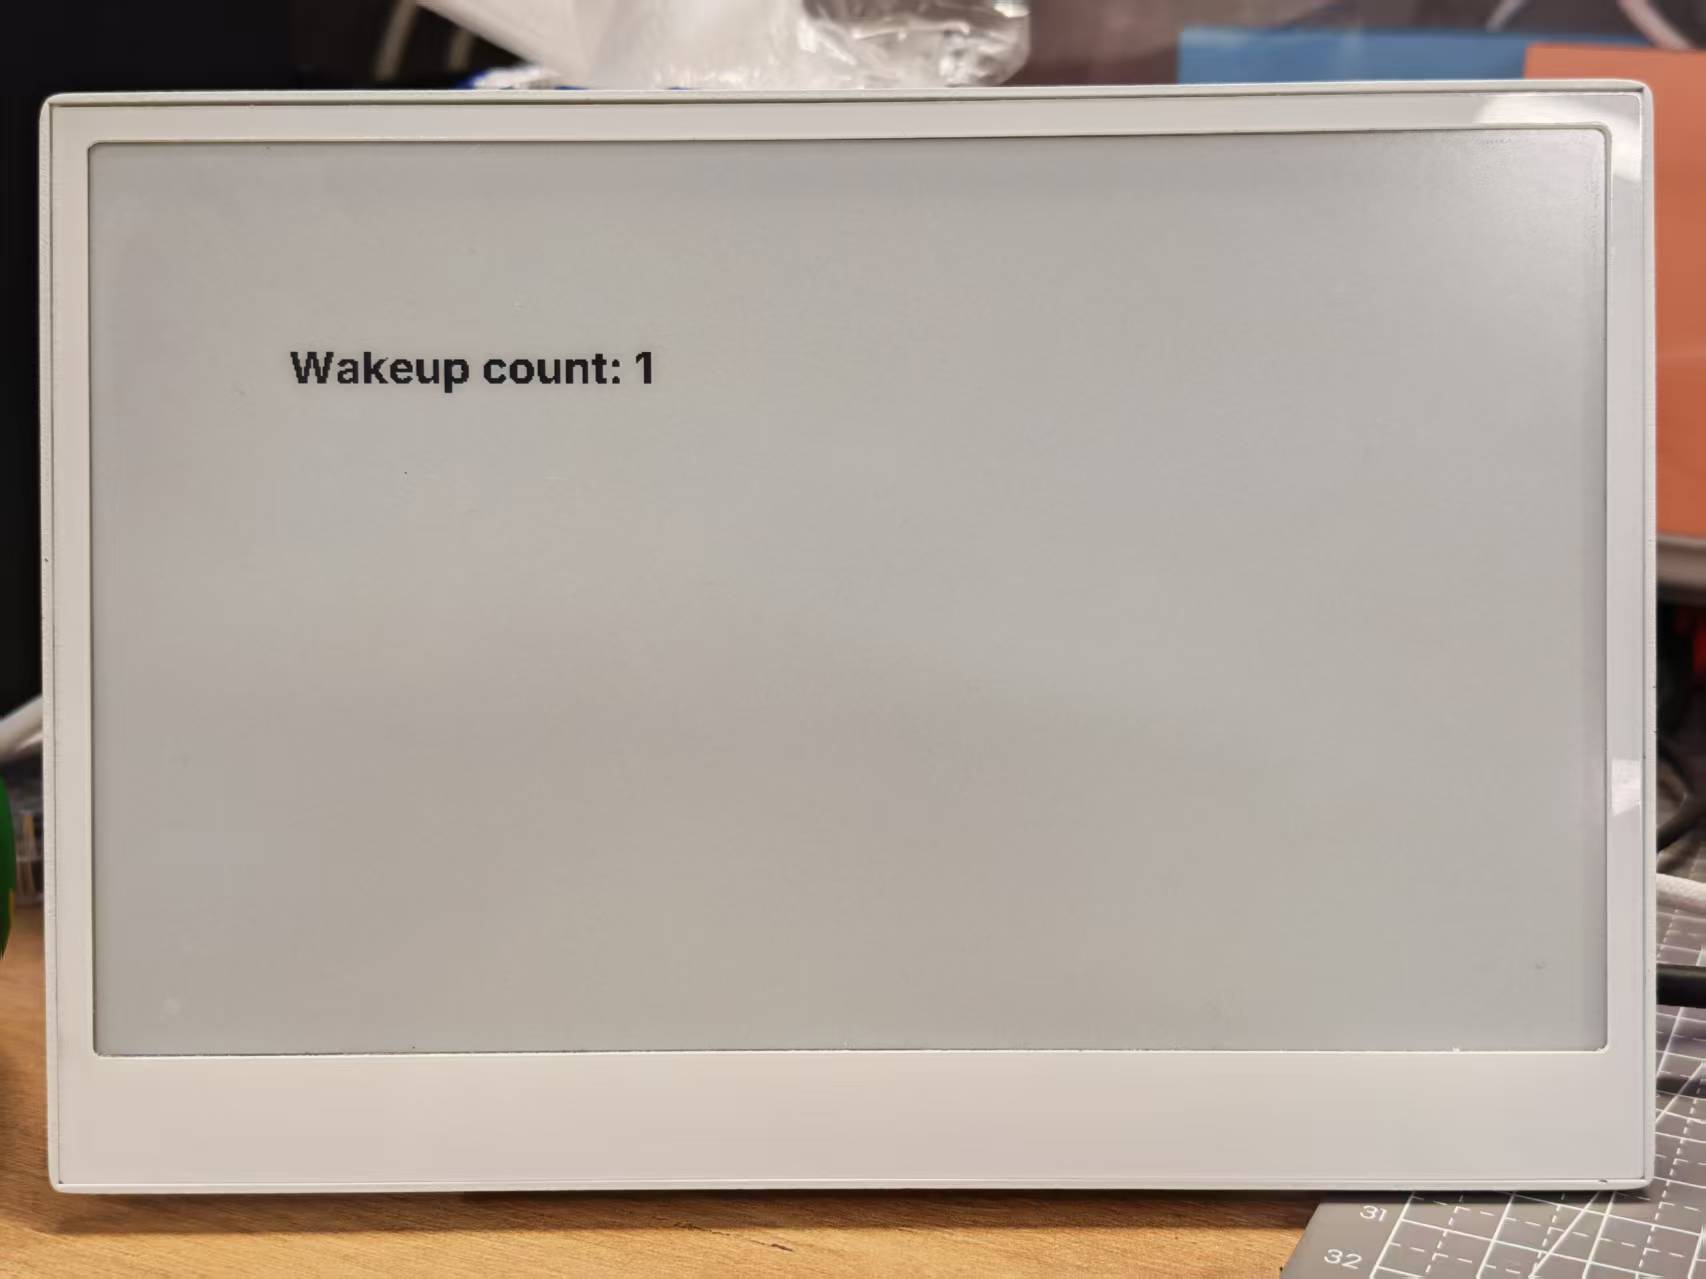
This configuration:
- Creates a counter that persists across sleep cycles
- Configures the device to wake for 30 seconds, then sleep for 3 minutes
- Updates the display with the current wake-up count
- Optionally configures a button to wake the device
When running, you'll see a counter increment each time the device wakes from sleep:
Demo 4: Comprehensive Example
For a better understanding, we strongly recommend that you run the basic examples above first before trying this comprehensive example.
This advanced example combines multiple features into a complete dashboard solution for the reTerminal E Series. It demonstrates:
- Weather and indoor climate display
- Battery monitoring with icons
- Time and date display
- Page switching using buttons
- Battery monitoring
Click here to view the full code
- For E1001
- For E1002
esphome:
  name: reterminal_e1001
  friendly_name: reTerminal_E1001
  on_boot:
    priority: 600
    then:
      - output.turn_on: bsp_sd_enable
      - output.turn_on: bsp_battery_enable
      - delay: 200ms
      - component.update: battery_voltage
      - component.update: battery_level


esp32:
  board: esp32-s3-devkitc-1
  framework:
    type: arduino

# Enable logging
logger:

# Enable Home Assistant API
api:
  encryption:
    key: "REPLACE_WITH_YOUR_API_KEY"

ota:
  - platform: esphome
    password: "REPLACE_WITH_YOUR_OTA_PASSWORD"

wifi:
  ssid: !secret wifi_ssid
  password: !secret wifi_password

  # Enable fallback hotspot (captive portal) in case wifi connection fails
  ap:
    ssid: "reTerminal-E1001"
    password: "ChangeMe123"

captive_portal:

# Deep-sleep, wake by GPIO4
deep_sleep:
  id: deep_sleep_1
  run_duration: 1min
  sleep_duration: 60min
  wakeup_pin: GPIO4          # Right white button
  wakeup_pin_mode: INVERT_WAKEUP

# SPI / I²C
spi:
  clk_pin: GPIO7
  mosi_pin: GPIO9
i2c:
  scl: GPIO20
  sda: GPIO19

# Fonts
font:
  - file: "gfonts://Inter@700"
    id: small_font
    size: 24
  - file: "gfonts://Inter@700"
    id: mid_font
    size: 36
  - file: "gfonts://Inter@700"
    id: big_font
    size: 180
  - file: "gfonts://Inter@700"
    id: time_font
    size: 96      # for the big time display
  - file: 'fonts/materialdesignicons-webfont.ttf'
    id: font_mdi_large
    size: 70
    glyphs:
      - "\U000F050F"  # thermometer
      - "\U000F058E"  # humidity
  - file: 'fonts/materialdesignicons-webfont.ttf'
    id: font_bat_icon
    size: 24
    glyphs:
      - "\U000F007A"  # mdi-battery-10
      - "\U000F007B"  # mdi-battery-20
      - "\U000F007C"  # mdi-battery-30
      - "\U000F007D"  # mdi-battery-40
      - "\U000F007E"  # mdi-battery-50
      - "\U000F007F"  # mdi-battery-60
      - "\U000F0080"  # mdi-battery-70
      - "\U000F0081"  # mdi-battery-80
      - "\U000F0082"  # mdi-battery-90
      - "\U000F0079"  # mdi-battery

globals:
  - id: page_index
    type: int
    restore_value: true
    initial_value: '0'
  - id: battery_glyph
    type: std::string
    restore_value: no
    initial_value: "\"\\U000F0079\""   # default full battery

sensor:
  - platform: sht4x
    temperature:
      name: "Temperature"
      id: temp_sensor
    humidity:
      name: "Relative Humidity"
      id: hum_sensor
  - platform: adc
    pin: GPIO1
    name: "Battery Voltage"
    id: battery_voltage
    update_interval: 60s
    attenuation: 12db
    filters:
      - multiply: 2.0
  - platform: template
    name: "Battery Level"
    id: battery_level
    unit_of_measurement: "%"
    icon: "mdi:battery"
    device_class: battery
    state_class: measurement
    lambda: 'return id(battery_voltage).state;'
    update_interval: 60s
    on_value:
      then:
        - lambda: |-
            int pct = int(x);
            if (pct <= 10)      id(battery_glyph) = "\U000F007A";
            else if (pct <= 20) id(battery_glyph) = "\U000F007B";
            else if (pct <= 30) id(battery_glyph) = "\U000F007C";
            else if (pct <= 40) id(battery_glyph) = "\U000F007D";
            else if (pct <= 50) id(battery_glyph) = "\U000F007E";
            else if (pct <= 60) id(battery_glyph) = "\U000F007F";
            else if (pct <= 70) id(battery_glyph) = "\U000F0080";
            else if (pct <= 80) id(battery_glyph) = "\U000F0081";
            else if (pct <= 90) id(battery_glyph) = "\U000F0082";
            else                id(battery_glyph) = "\U000F0079";
    filters:
      - calibrate_linear:
          - 4.15 -> 100.0
          - 3.96 -> 90.0
          - 3.91 -> 80.0
          - 3.85 -> 70.0
          - 3.80 -> 60.0
          - 3.75 -> 50.0
          - 3.68 -> 40.0
          - 3.58 -> 30.0
          - 3.49 -> 20.0
          - 3.41 -> 10.0
          - 3.30 -> 5.0
          - 3.27 -> 0.0
      - clamp:
          min_value: 0
          max_value: 100

output:
  - platform: gpio
    pin: GPIO6
    id: bsp_led
    inverted: true
  - platform: gpio
    pin: GPIO16
    id: bsp_sd_enable
  - platform: gpio
    pin: GPIO21
    id: bsp_battery_enable

# Onboard LED
light:
  - platform: binary
    name: "Onboard LED"
    output: bsp_led
    id: onboard_led

binary_sensor:
  - platform: gpio    # Next page
    pin:
      number: GPIO3
      mode: INPUT_PULLUP
      inverted: true
    id: key1
    name: "Key1"
    on_press:
      then:
        - lambda: |-
            id(page_index) = (id(page_index) + 1) % 2;
            id(epaper_display).update();

  - platform: gpio     # Prev page
    pin:
      number: GPIO5
      mode: INPUT_PULLUP
      inverted: true
    id: key2
    name: "Key2"
    on_press:
      then:
        - lambda: |-
            id(page_index) = (id(page_index) - 1 + 2) % 2;
            id(epaper_display).update();

  # - platform: gpio
  #   pin:
  #     number: GPIO4
  #     mode: INPUT_PULLUP
  #     inverted: true
  #   id: key2
  #   name: "Key2"
  #   on_press:
  #     then:
  #       - lambda: |-
  #           id(page_index) = (id(page_index) - 1 + 3) % 3;
  #           id(epaper_display).update();

# Home Assistant time
time:
  - platform: homeassistant
    id: ha_time

# e-paper
display:
  - platform: waveshare_epaper
    id: epaper_display
    model: 7.50inv2
    cs_pin: GPIO10
    dc_pin: GPIO11
    reset_pin:
      number: GPIO12
      inverted: false
    busy_pin:
      number: GPIO13
      inverted: true
    update_interval: never
    lambda: |-
      // ----------  PAGE 0  ----------
      if (id(page_index) == 0) {
        const int scr_w = 800;
        const int scr_h = 480;

        // Battery in upper-right corner
        it.printf(670, 13, id(font_bat_icon), "%s", id(battery_glyph).c_str());
        it.printf(700, 10, id(small_font), "%.0f%%", id(battery_level).state);

        //line
        it.filled_rectangle(400, 100, 2, 280);

        // Convert °C to °F
        float temp_f = id(temp_sensor).state * 9.0 / 5.0 + 32.0;

        // ---------------------------------------------------------
        // Horizontal split: two 400 px columns
        const int col_w = scr_w / 2;

        const int icon_y   = 100;   // Icon baseline
        const int value_y  = 220;   // Number baseline
        const int unit_y   = 300;   // Unit baseline
        const int label_y  = 380;   // Text label baseline

        const int icon_size = 70;   // icon font size
        const int val_size  = 120;  // number font size
        const int unit_size = 44;   // unit font size
        const int label_size= 36;   // label font size

        // --- Left column : Temperature -----------------------------
        const int left_mid = col_w / 2 - 30;   // 200 px

        // Icon
        it.printf(left_mid, icon_y, id(font_mdi_large), TextAlign::CENTER, "\U000F050F");
        // Value
        it.printf(left_mid, value_y, id(big_font), TextAlign::CENTER, "%.0f", temp_f);
        // Unit
        it.printf(left_mid + 150, unit_y, id(mid_font), TextAlign::CENTER, "°F");
        // Label
        it.printf(left_mid, label_y, id(mid_font), TextAlign::CENTER, "Temperature");

        // --- Right column : Humidity -------------------------------
        const int right_mid = col_w + col_w / 2;   // 600 px

        // Icon
        it.printf(right_mid, icon_y, id(font_mdi_large), TextAlign::CENTER, "\U000F058E");
        // Value
        it.printf(right_mid, value_y, id(big_font), TextAlign::CENTER, "%.0f", id(hum_sensor).state);
        // Unit
        it.printf(right_mid + 150, unit_y, id(mid_font), TextAlign::CENTER, "%%");
        // Label
        it.printf(right_mid, label_y, id(mid_font), TextAlign::CENTER, "Humidity");
      }
      // ----------  PAGE 1  ----------
      else{
        // Battery top-right
        it.printf(670, 13, id(font_bat_icon), "%s", id(battery_glyph).c_str());
        it.printf(700, 10, id(small_font), "%.0f%%", id(battery_level).state);

        auto now = id(ha_time).now();
        struct tm timeinfo = now.to_c_tm();

        // centering time HH:MM
        char timeStr[6];
        strftime(timeStr, sizeof(timeStr), "%H:%M", &timeinfo);
        it.printf(400, 180, id(time_font), TextAlign::CENTER, timeStr);

        // Date: Day of week
        const char *weekday[] = {"Sun","Mon","Tue","Wed","Thu","Fri","Sat"};
        const char *wday = weekday[timeinfo.tm_wday];

        // Date: month - day
        char dateStr[12];
        strftime(dateStr, sizeof(dateStr), "%b %d", &timeinfo);  // e.g. Jun 15

        // Day of the week + date below the time
        it.printf(400, 280, id(mid_font), TextAlign::CENTER, "%s, %s", wday, dateStr);
      }
esphome:
  name: reterminal_e1002
  friendly_name: reTerminal_E1002
  on_boot:
    priority: 600
    then:
      - output.turn_on: bsp_sd_enable
      - output.turn_on: bsp_battery_enable
      - delay: 200ms
      - component.update: battery_voltage
      - component.update: battery_level


esp32:
  board: esp32-s3-devkitc-1
  framework:
    type: arduino

# Enable logging
logger:

# Enable Home Assistant API
api:
  encryption:
    key: "REPLACE_WITH_YOUR_API_KEY"

ota:
  - platform: esphome
    password: "REPLACE_WITH_YOUR_OTA_PASSWORD"

wifi:
  ssid: !secret wifi_ssid
  password: !secret wifi_password

  # Enable fallback hotspot (captive portal) in case wifi connection fails
  ap:
    ssid: "reTerminal-E1002"
    password: "ChangeMe123"

captive_portal:

# Deep-sleep, wake by GPIO4
deep_sleep:
  id: deep_sleep_1
  run_duration: 1min
  sleep_duration: 60min
  wakeup_pin: GPIO4          # Right white button
  wakeup_pin_mode: INVERT_WAKEUP

# SPI / I²C
spi:
  clk_pin: GPIO7
  mosi_pin: GPIO9
i2c:
  scl: GPIO20
  sda: GPIO19

# Fonts
font:
  - file: "gfonts://Inter@700"
    id: small_font
    size: 24
  - file: "gfonts://Inter@700"
    id: mid_font
    size: 36
  - file: "gfonts://Inter@700"
    id: big_font
    size: 180
  - file: "gfonts://Inter@700"
    id: time_font
    size: 96      # for the big time display
  - file: 'fonts/materialdesignicons-webfont.ttf'
    id: font_mdi_large
    size: 70
    glyphs:
      - "\U000F050F"  # thermometer
      - "\U000F058E"  # humidity
  - file: 'fonts/materialdesignicons-webfont.ttf'
    id: font_bat_icon
    size: 24
    glyphs:
      - "\U000F007A"  # mdi-battery-10
      - "\U000F007B"  # mdi-battery-20
      - "\U000F007C"  # mdi-battery-30
      - "\U000F007D"  # mdi-battery-40
      - "\U000F007E"  # mdi-battery-50
      - "\U000F007F"  # mdi-battery-60
      - "\U000F0080"  # mdi-battery-70
      - "\U000F0081"  # mdi-battery-80
      - "\U000F0082"  # mdi-battery-90
      - "\U000F0079"  # mdi-battery

globals:
  - id: page_index
    type: int
    restore_value: true
    initial_value: '0'
  - id: battery_glyph
    type: std::string
    restore_value: no
    initial_value: "\"\\U000F0079\""   # default full battery

sensor:
  - platform: sht4x
    temperature:
      name: "Temperature"
      id: temp_sensor
    humidity:
      name: "Relative Humidity"
      id: hum_sensor
  - platform: adc
    pin: GPIO1
    name: "Battery Voltage"
    id: battery_voltage
    update_interval: 60s
    attenuation: 12db
    filters:
      - multiply: 2.0
  - platform: template
    name: "Battery Level"
    id: battery_level
    unit_of_measurement: "%"
    icon: "mdi:battery"
    device_class: battery
    state_class: measurement
    lambda: 'return id(battery_voltage).state;'
    update_interval: 60s
    on_value:
      then:
        - lambda: |-
            int pct = int(x);
            if (pct <= 10)      id(battery_glyph) = "\U000F007A";
            else if (pct <= 20) id(battery_glyph) = "\U000F007B";
            else if (pct <= 30) id(battery_glyph) = "\U000F007C";
            else if (pct <= 40) id(battery_glyph) = "\U000F007D";
            else if (pct <= 50) id(battery_glyph) = "\U000F007E";
            else if (pct <= 60) id(battery_glyph) = "\U000F007F";
            else if (pct <= 70) id(battery_glyph) = "\U000F0080";
            else if (pct <= 80) id(battery_glyph) = "\U000F0081";
            else if (pct <= 90) id(battery_glyph) = "\U000F0082";
            else                id(battery_glyph) = "\U000F0079";
    filters:
      - calibrate_linear:
          - 4.15 -> 100.0
          - 3.96 -> 90.0
          - 3.91 -> 80.0
          - 3.85 -> 70.0
          - 3.80 -> 60.0
          - 3.75 -> 50.0
          - 3.68 -> 40.0
          - 3.58 -> 30.0
          - 3.49 -> 20.0
          - 3.41 -> 10.0
          - 3.30 -> 5.0
          - 3.27 -> 0.0
      - clamp:
          min_value: 0
          max_value: 100

output:
  - platform: gpio
    pin: GPIO6
    id: bsp_led
    inverted: true
  - platform: gpio
    pin: GPIO16
    id: bsp_sd_enable
  - platform: gpio
    pin: GPIO21
    id: bsp_battery_enable

# Onboard LED
light:
  - platform: binary
    name: "Onboard LED"
    output: bsp_led
    id: onboard_led

binary_sensor:
  - platform: gpio    # Next page
    pin:
      number: GPIO3
      mode: INPUT_PULLUP
      inverted: true
    id: key1
    name: "Key1"
    on_press:
      then:
        - lambda: |-
            id(page_index) = (id(page_index) + 1) % 2;
            id(epaper_display).update();

  - platform: gpio     # Prev page
    pin:
      number: GPIO5
      mode: INPUT_PULLUP
      inverted: true
    id: key2
    name: "Key2"
    on_press:
      then:
        - lambda: |-
            id(page_index) = (id(page_index) - 1 + 2) % 2;
            id(epaper_display).update();

  # - platform: gpio
  #   pin:
  #     number: GPIO4
  #     mode: INPUT_PULLUP
  #     inverted: true
  #   id: key2
  #   name: "Key2"
  #   on_press:
  #     then:
  #       - lambda: |-
  #           id(page_index) = (id(page_index) - 1 + 3) % 3;
  #           id(epaper_display).update();

# Home Assistant time
time:
  - platform: homeassistant
    id: ha_time

# e-paper
display:
  - platform: epaper_spi
    id: epaper_display
    model: Seeed-reTerminal-E1002
    update_interval: never
    lambda: |-
      const auto BLACK   = Color(0,   0,   0,   0);
      const auto RED     = Color(255, 0,   0,   0);
      const auto GREEN   = Color(0,   255, 0,   0);
      const auto BLUE    = Color(0,   0,   255, 0);
      const auto YELLOW  = Color(255, 255, 0,   0);

      // ----------  PAGE 0  ----------
      if (id(page_index) == 0) {
        const int scr_w = 800;
        const int scr_h = 480;

        // Battery in upper-right corner
        it.printf(670, 13, id(font_bat_icon), GREEN, "%s", id(battery_glyph).c_str());
        it.printf(700, 10, id(small_font), GREEN, "%.0f%%", id(battery_level).state);

        //line
        it.filled_rectangle(400, 100, 2, 280, BLACK);

        // Convert °C to °F
        float temp_f = id(temp_sensor).state * 9.0 / 5.0 + 32.0;

        // ---------------------------------------------------------
        // Horizontal split: two 400 px columns
        const int col_w = scr_w / 2;

        const int icon_y   = 100;   // Icon baseline
        const int value_y  = 220;   // Number baseline
        const int unit_y   = 300;   // Unit baseline
        const int label_y  = 380;   // Text label baseline

        const int icon_size = 70;   // icon font size
        const int val_size  = 120;  // number font size
        const int unit_size = 44;   // unit font size
        const int label_size= 36;   // label font size

        // --- Left column : Temperature -----------------------------
        const int left_mid = col_w / 2 - 30;   // 200 px

        // Icon
        it.printf(left_mid, icon_y, id(font_mdi_large), BLUE, TextAlign::CENTER, "\U000F050F");
        // Value
        it.printf(left_mid, value_y, id(big_font), BLUE, TextAlign::CENTER, "%.0f", temp_f);
        // Unit
        it.printf(left_mid + 150, unit_y, id(mid_font), RED, TextAlign::CENTER, "°F");
        // Label
        it.printf(left_mid, label_y, id(mid_font), RED, TextAlign::CENTER, "Temperature");

        // --- Right column : Humidity -------------------------------
        const int right_mid = col_w + col_w / 2;   // 600 px

        // Icon
        it.printf(right_mid, icon_y, id(font_mdi_large), YELLOW, TextAlign::CENTER, "\U000F058E");
        // Value
        it.printf(right_mid, value_y, id(big_font), YELLOW, TextAlign::CENTER, "%.0f", id(hum_sensor).state);
        // Unit
        it.printf(right_mid + 150, unit_y, id(mid_font), GREEN, TextAlign::CENTER, "%%");
        // Label
        it.printf(right_mid, label_y, id(mid_font), GREEN, TextAlign::CENTER, "Humidity");
      }
      // ----------  PAGE 1  ----------
      else{
        // Battery top-right
        it.printf(670, 13, id(font_bat_icon), BLUE, "%s", id(battery_glyph).c_str());
        it.printf(700, 10, id(small_font), BLUE, "%.0f%%", id(battery_level).state);

        auto now = id(ha_time).now();
        struct tm timeinfo = now.to_c_tm();

        // centering time HH:MM
        char timeStr[6];
        strftime(timeStr, sizeof(timeStr), "%H:%M", &timeinfo);
        it.printf(400, 180, id(time_font), BLUE, TextAlign::CENTER, timeStr);

        // Date: Day of week
        const char *weekday[] = {"Sun","Mon","Tue","Wed","Thu","Fri","Sat"};
        const char *wday = weekday[timeinfo.tm_wday];

        // Date: month - day
        char dateStr[12];
        strftime(dateStr, sizeof(dateStr), "%b %d", &timeinfo);  // e.g. Jun 15

        // Day of the week + date below the time
        it.printf(400, 280, id(mid_font), YELLOW, TextAlign::CENTER, "%s, %s", wday, dateStr);
      }
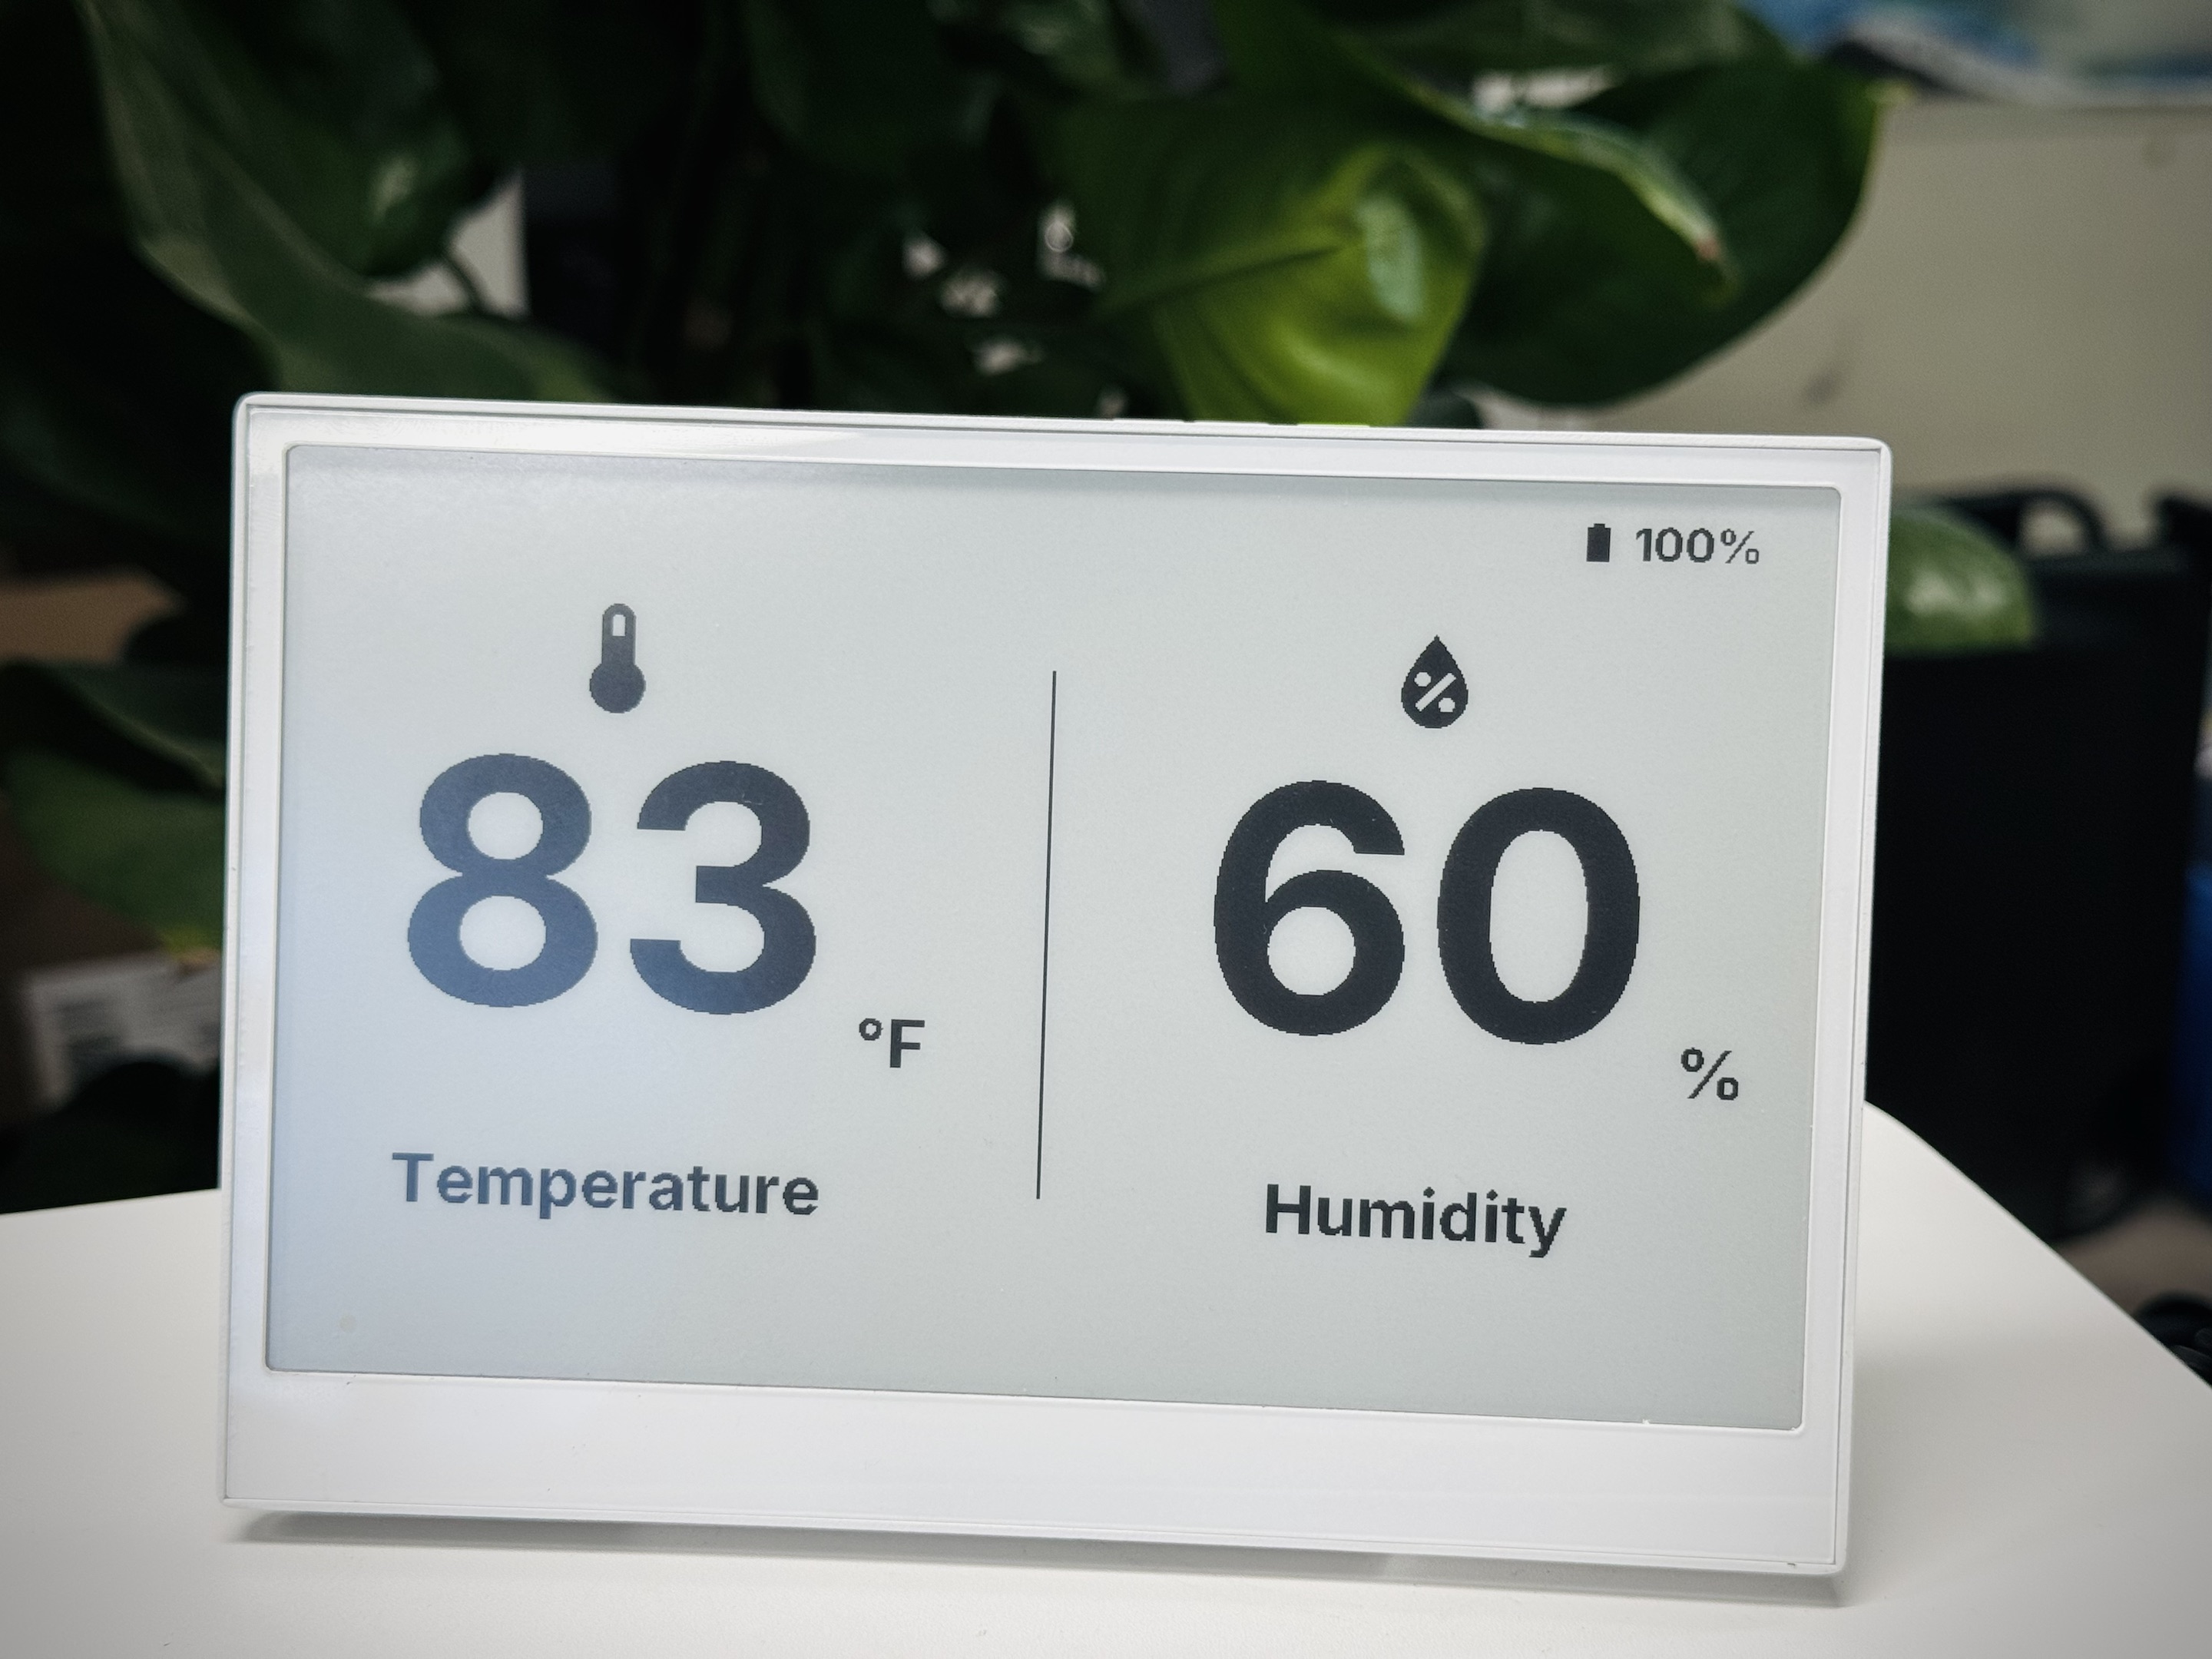
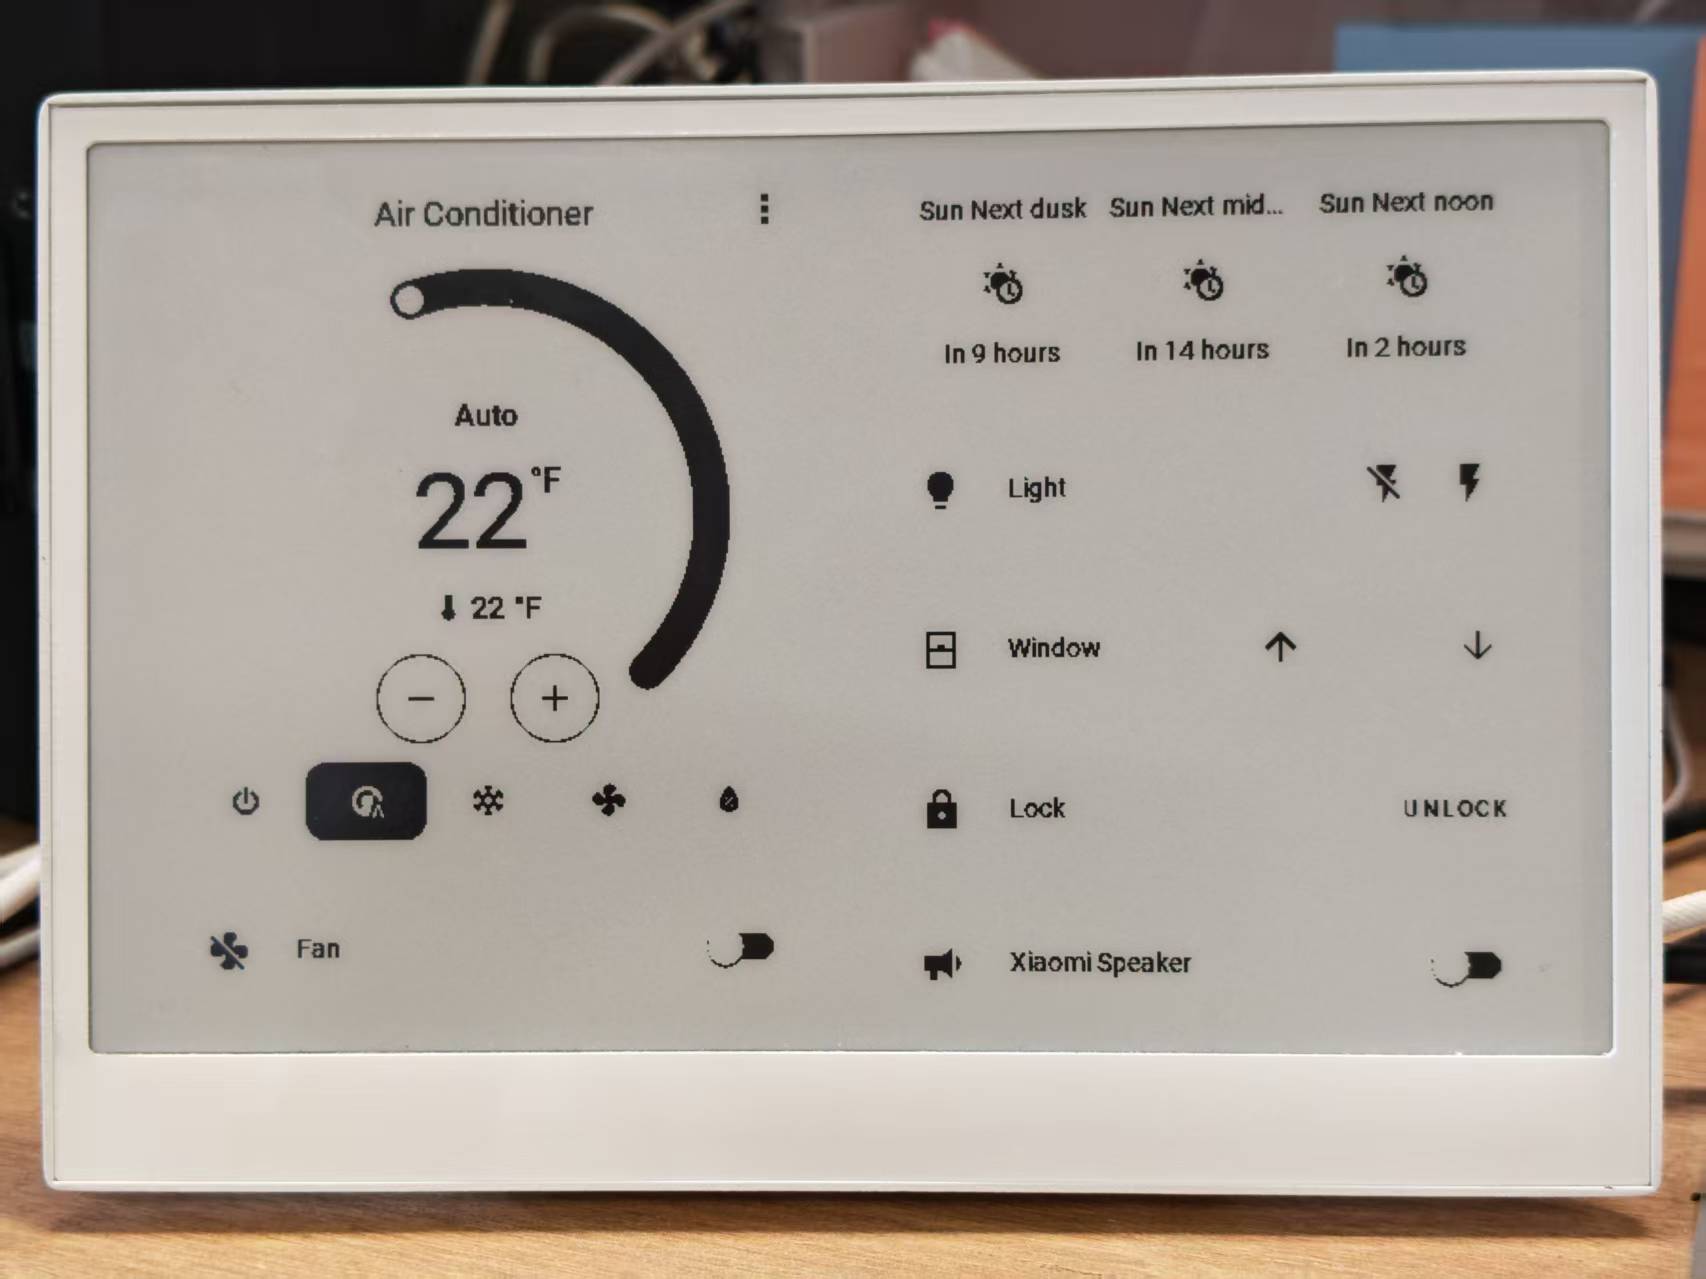
When your configuration is successfully uploaded and running, your reTerminal E Series ePaper Display will display a comprehensive dashboard with environment data, time, and battery status:
Understanding the Comprehensive Example
This example implements:
- Multiple Pages: The display toggles between two pages - a climate dashboard and a time/date display
- Button Navigation: Buttons on GPIO3 and GPIO5 are used to navigate between pages
- Battery Monitoring: Battery level is shown with appropriate icons that change based on the charge level
- Hardware Initialization: SD card and battery monitoring circuits are enabled on boot
- Temperature and Humidity Display: Using the onboard SHT4x sensor via I²C
- Dynamic Icons: Material Design Icons change based on sensor values
FAQ
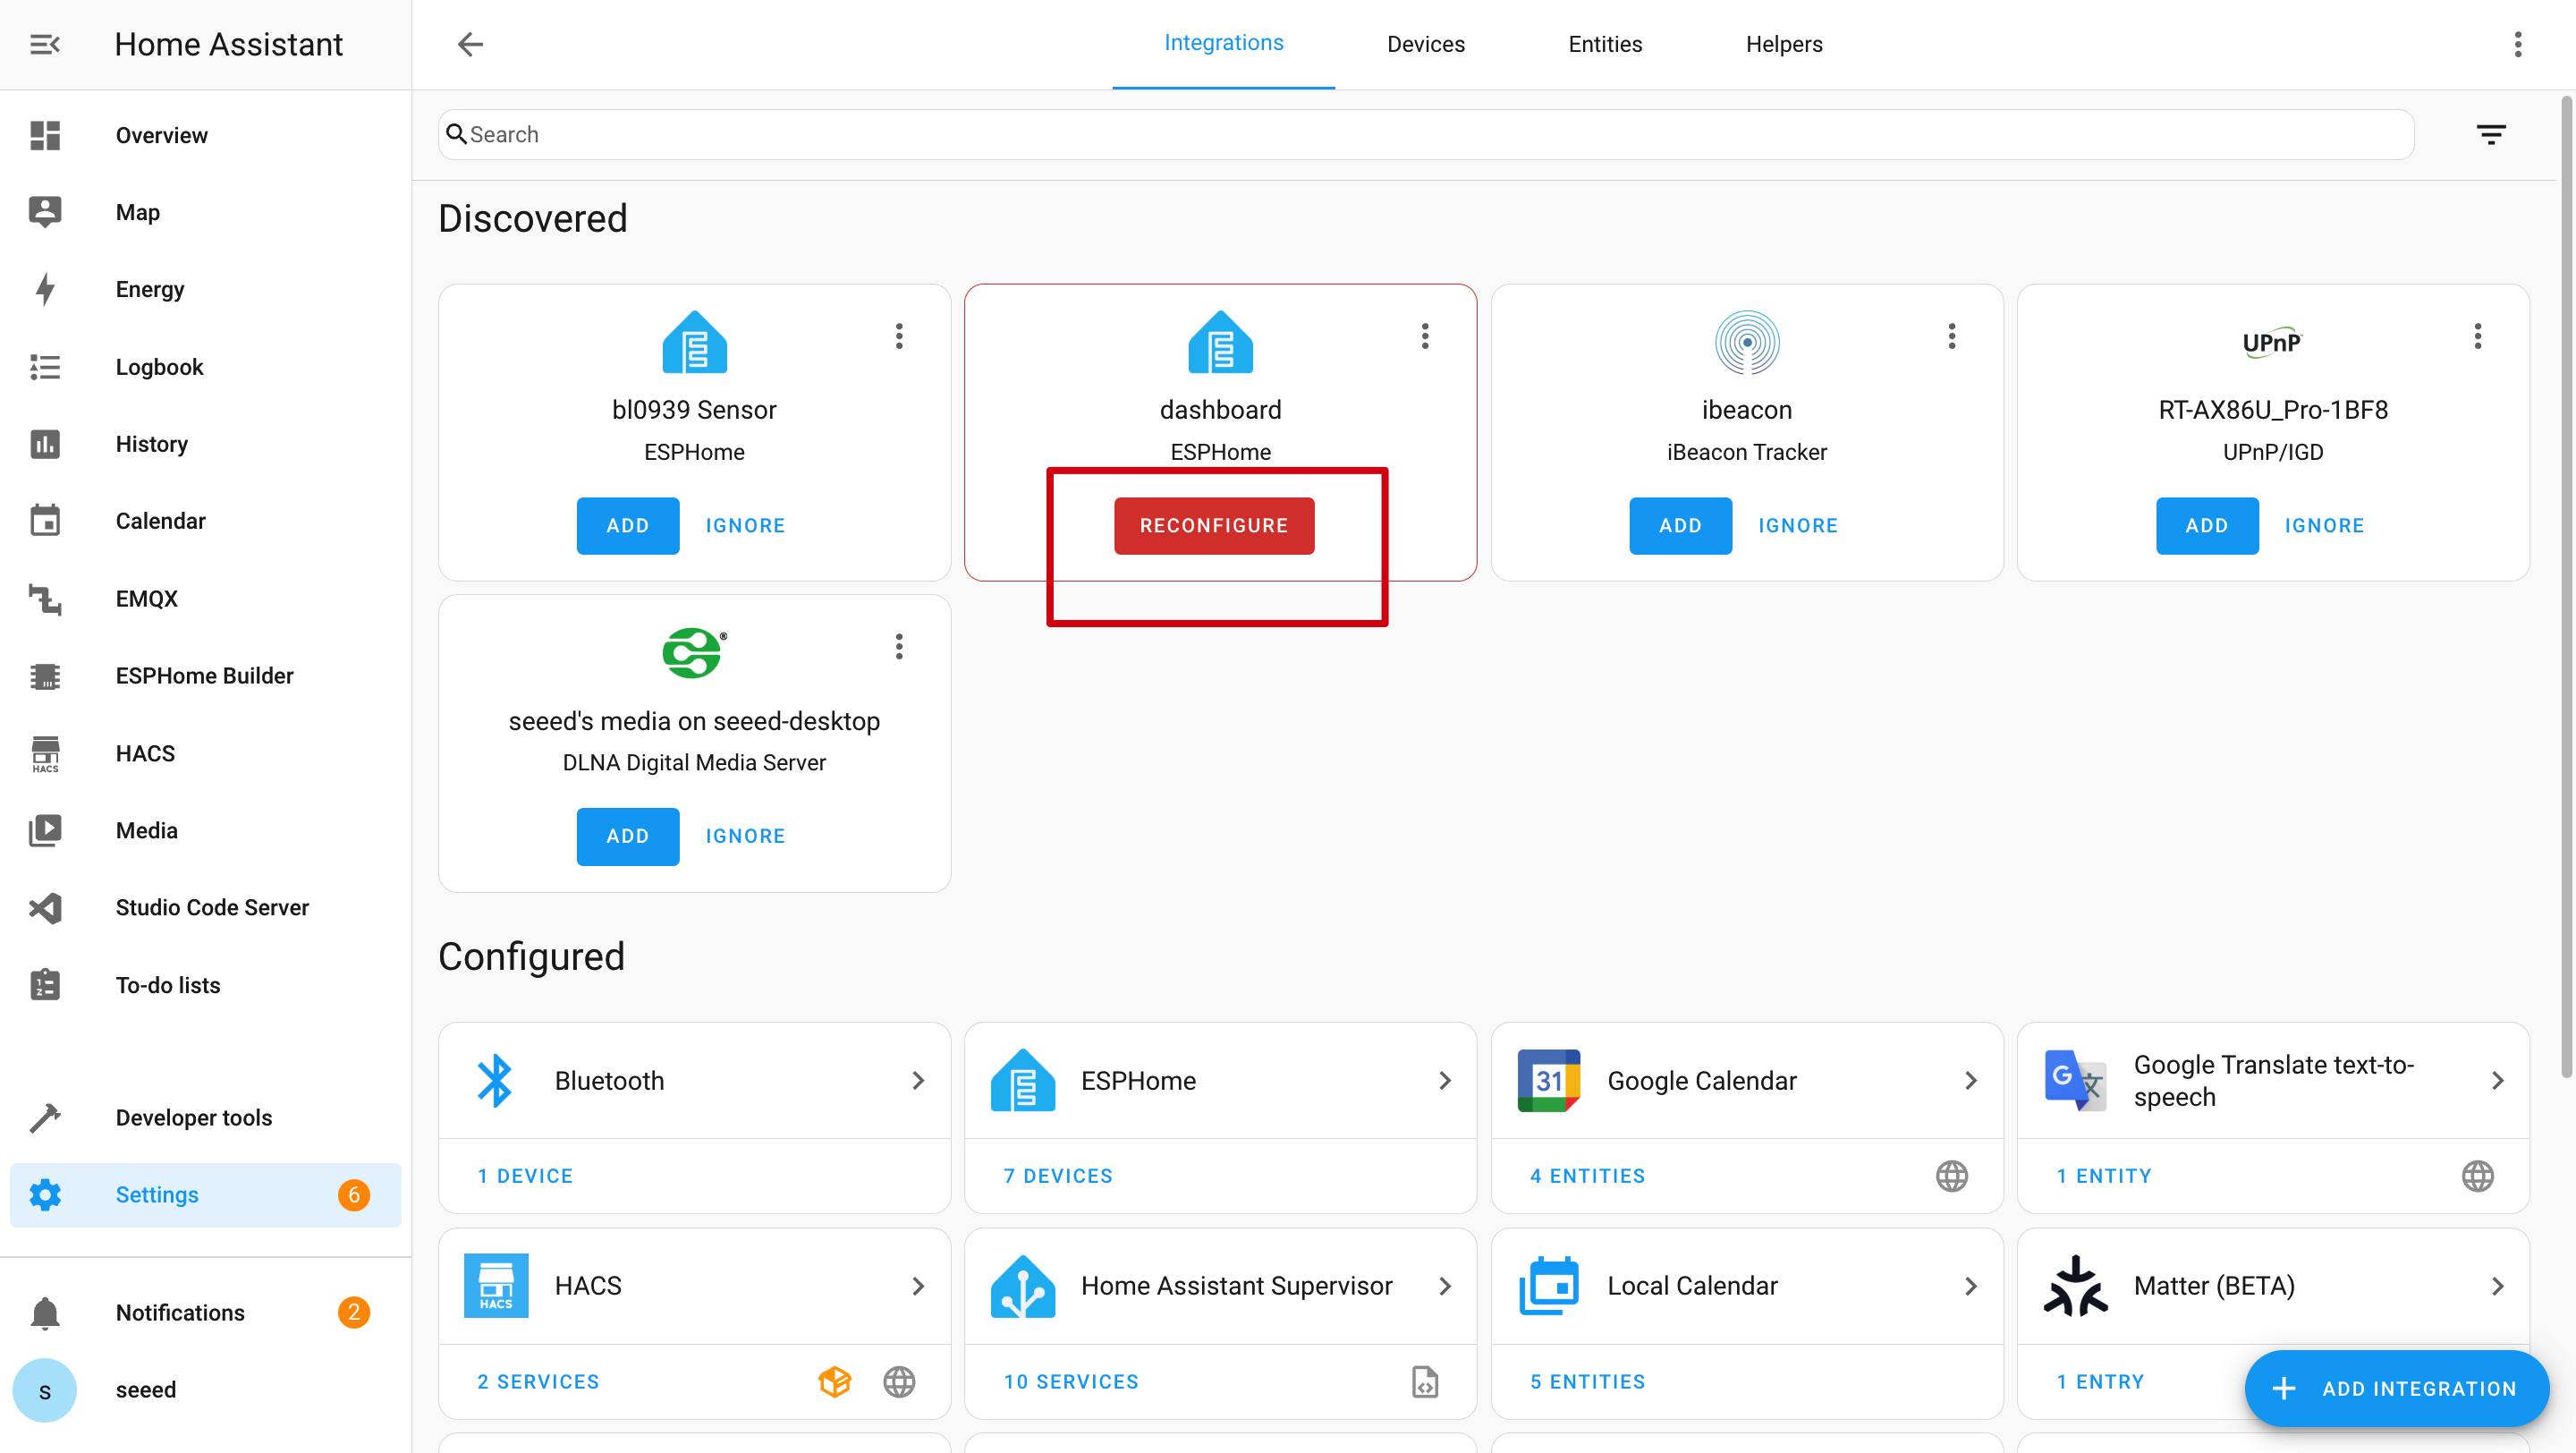
Q1: Why is there no data?
In this case, you should go to Settings -> Devices & Services -> Integrations to RECONGFIGURE device. Haven't found your ePaper Panel? Try to reboot Home Assistant.
Q2: Why can't I get those data in Home Assistant?
In this case, you should go to Settings -> Devices & Services -> Integrations to ADD your device to Home Assistant.

Q3: Wi-Fi upload program failed?

In this case, your device is either offline or in deep sleep mode. Please ensure it's connected to your network or wake it up from sleep mode before attempting to upload.
Q4: Why is there no serial log over USB?
The reTerminal E Series uses a CH340K USB-to-UART bridge on UART0. Keep this logger setting in your YAML:
logger:
  hardware_uart: UART0
Tech Support & Product Discussion
Thank you for choosing our products! We are here to provide you with different support to ensure that your experience with our products is as smooth as possible. We offer several communication channels to cater to different preferences and needs.