ESPHome Cookbook: RTC, SD Card & Microphone (reTerminal E Series)
This page assumes you have already completed the ESPHome display cookbook for reTerminal E Series and your device is online in Home Assistant. For buttons, buzzer, LED, battery monitoring, SHT4x, and deep sleep, see ESPHome Cookbook: Buttons, Buzzer, LED, Battery & Low Power.
If you want to quickly preview project results or try the basic demo firmware before setting up a development environment, open the reTerminal E-Series Firmware Hub. You can choose a supported reTerminal E Series device and flash demo firmware directly from a browser.
This cookbook continues the reTerminal E Series ESPHome examples with three onboard hardware blocks that are not covered in the display and I/O cookbooks:
- PCF8563 RTC - read hardware time from the onboard RTC and sync it from Home Assistant.
- microSD card slot - enable the SD power rail and report whether a card is inserted.
- PDM microphone - enable the onboard microphone power rail and initialize the PDM microphone through ESPHome.
Each section below is organized as a small standalone ESPHome demo. You can copy one complete YAML example, replace the API and OTA placeholders, and upload it directly from ESPHome.
The ready-to-copy examples in this page are written for reTerminal E1001 and reTerminal E1002, matching the tested ESPHome hardware examples. The onboard microphone examples apply to models that include the PDM microphone hardware; reTerminal E1004 does not include the microphone.
Hardware Capabilities
The following pins are used by the demos in this cookbook.
| Function | ESPHome Component | Pin / Address |
|---|---|---|
| PCF8563 RTC | time.pcf8563 | I2C address 0x51, SDA GPIO19, SCL GPIO20 |
| microSD card detect | binary_sensor.gpio | GPIO15, active LOW |
| microSD power enable | output.gpio | GPIO16 |
| PDM microphone power enable | output.gpio | GPIO38 |
| PDM microphone clock | i2s_audio | GPIO42 |
| PDM microphone data | microphone.i2s_audio | GPIO41 |
| Shared SPI bus | spi | CLK GPIO7, MOSI GPIO9, MISO GPIO8 |
The examples use placeholders such as REPLACE_WITH_YOUR_API_KEY and REPLACE_WITH_YOUR_OTA_PASSWORD. Do not publish your real API encryption key, OTA password, Wi-Fi password, or Home Assistant token.
RTC Time Sync
This demo reads time from the onboard PCF8563 RTC and displays it on the ePaper screen. When Home Assistant syncs time to the device, ESPHome writes that time back to the hardware RTC.
The RTC uses the shared I2C bus:
- SDA:
GPIO19 - SCL:
GPIO20 - RTC address:
0x51
You can use this example by replacing the placeholder values and uploading the complete YAML to your device.
- For E1001
- For E1002
esphome:
  name: reterminal-e1001-rtc-demo
  friendly_name: reTerminal_E1001_RTC_Demo
  on_boot:
    priority: 600
    then:
      - pcf8563.read_time:

esp32:
  board: esp32-s3-devkitc-1
  framework:
    type: arduino

logger:
  hardware_uart: UART0

api:
  encryption:
    key: "REPLACE_WITH_YOUR_API_KEY"

ota:
  - platform: esphome
    password: "REPLACE_WITH_YOUR_OTA_PASSWORD"

wifi:
  ssid: !secret wifi_ssid
  password: !secret wifi_password
  ap:
    ssid: "E1001-RTC-Demo"
    password: "ChangeMe123"

captive_portal:

i2c:
  scl: GPIO20
  sda: GPIO19

spi:
  clk_pin: GPIO7
  mosi_pin: GPIO9

time:
  - platform: pcf8563
    id: rtc_time
    address: 0x51
    update_interval: never

  - platform: homeassistant
    on_time_sync:
      then:
        - pcf8563.write_time:
        - component.update: epaper_display

font:
  - file: "gfonts://Inter@700"
    id: font_title
    size: 32
  - file: "gfonts://Inter@700"
    id: font_body
    size: 26

display:
  - platform: waveshare_epaper
    id: epaper_display
    model: 7.50inv2
    cs_pin: GPIO10
    dc_pin: GPIO11
    reset_pin:
      number: GPIO12
      inverted: false
    busy_pin:
      number: GPIO13
      inverted: true
    update_interval: 300s
    lambda: |-
      it.printf(400, 40, id(font_title), TextAlign::TOP_CENTER, "RTC Time Sync Demo");
      auto now = id(rtc_time).now();
      if (now.is_valid()) {
        it.strftime(400, 135, id(font_title), TextAlign::TOP_CENTER, "%Y-%m-%d", now);
        it.strftime(400, 190, id(font_title), TextAlign::TOP_CENTER, "%H:%M:%S", now);
        ESP_LOGD("rtc_demo", "RTC time is valid");
      } else {
        it.printf(400, 150, id(font_body), TextAlign::TOP_CENTER, "RTC: waiting for sync");
        ESP_LOGW("rtc_demo", "RTC time is not valid yet");
      }
esphome:
  name: reterminal-e1002-rtc-demo
  friendly_name: reTerminal_E1002_RTC_Demo
  on_boot:
    priority: 600
    then:
      - pcf8563.read_time:

esp32:
  board: esp32-s3-devkitc-1
  framework:
    type: arduino

logger:
  hardware_uart: UART0

api:
  encryption:
    key: "REPLACE_WITH_YOUR_API_KEY"

ota:
  - platform: esphome
    password: "REPLACE_WITH_YOUR_OTA_PASSWORD"

wifi:
  ssid: !secret wifi_ssid
  password: !secret wifi_password
  ap:
    ssid: "E1002-RTC-Demo"
    password: "ChangeMe123"

captive_portal:

i2c:
  scl: GPIO20
  sda: GPIO19

spi:
  clk_pin: GPIO7
  mosi_pin: GPIO9

time:
  - platform: pcf8563
    id: rtc_time
    address: 0x51
    update_interval: never

  - platform: homeassistant
    on_time_sync:
      then:
        - pcf8563.write_time:
        - component.update: epaper_display

font:
  - file: "gfonts://Inter@700"
    id: font_title
    size: 32
  - file: "gfonts://Inter@700"
    id: font_body
    size: 26

display:
  - platform: epaper_spi
    id: epaper_display
    model: Seeed-reTerminal-E1002
    update_interval: 300s
    lambda: |-
      const auto BLACK = Color(0, 0, 0, 0);
      const auto RED = Color(255, 0, 0, 0);
      const auto BLUE = Color(0, 0, 255, 0);

      it.printf(400, 40, id(font_title), BLACK, TextAlign::TOP_CENTER, "RTC Time Sync Demo");
      auto now = id(rtc_time).now();
      if (now.is_valid()) {
        it.strftime(400, 135, id(font_title), BLUE, TextAlign::TOP_CENTER, "%Y-%m-%d", now);
        it.strftime(400, 190, id(font_title), BLUE, TextAlign::TOP_CENTER, "%H:%M:%S", now);
        ESP_LOGD("rtc_demo", "RTC time is valid");
      } else {
        it.printf(400, 150, id(font_body), RED, TextAlign::TOP_CENTER, "RTC: waiting for sync");
        ESP_LOGW("rtc_demo", "RTC time is not valid yet");
      }
This configuration:
- Reads the PCF8563 RTC once during boot.
- Uses Home Assistant time as the source of truth after the device connects.
- Writes the Home Assistant time back to the hardware RTC.
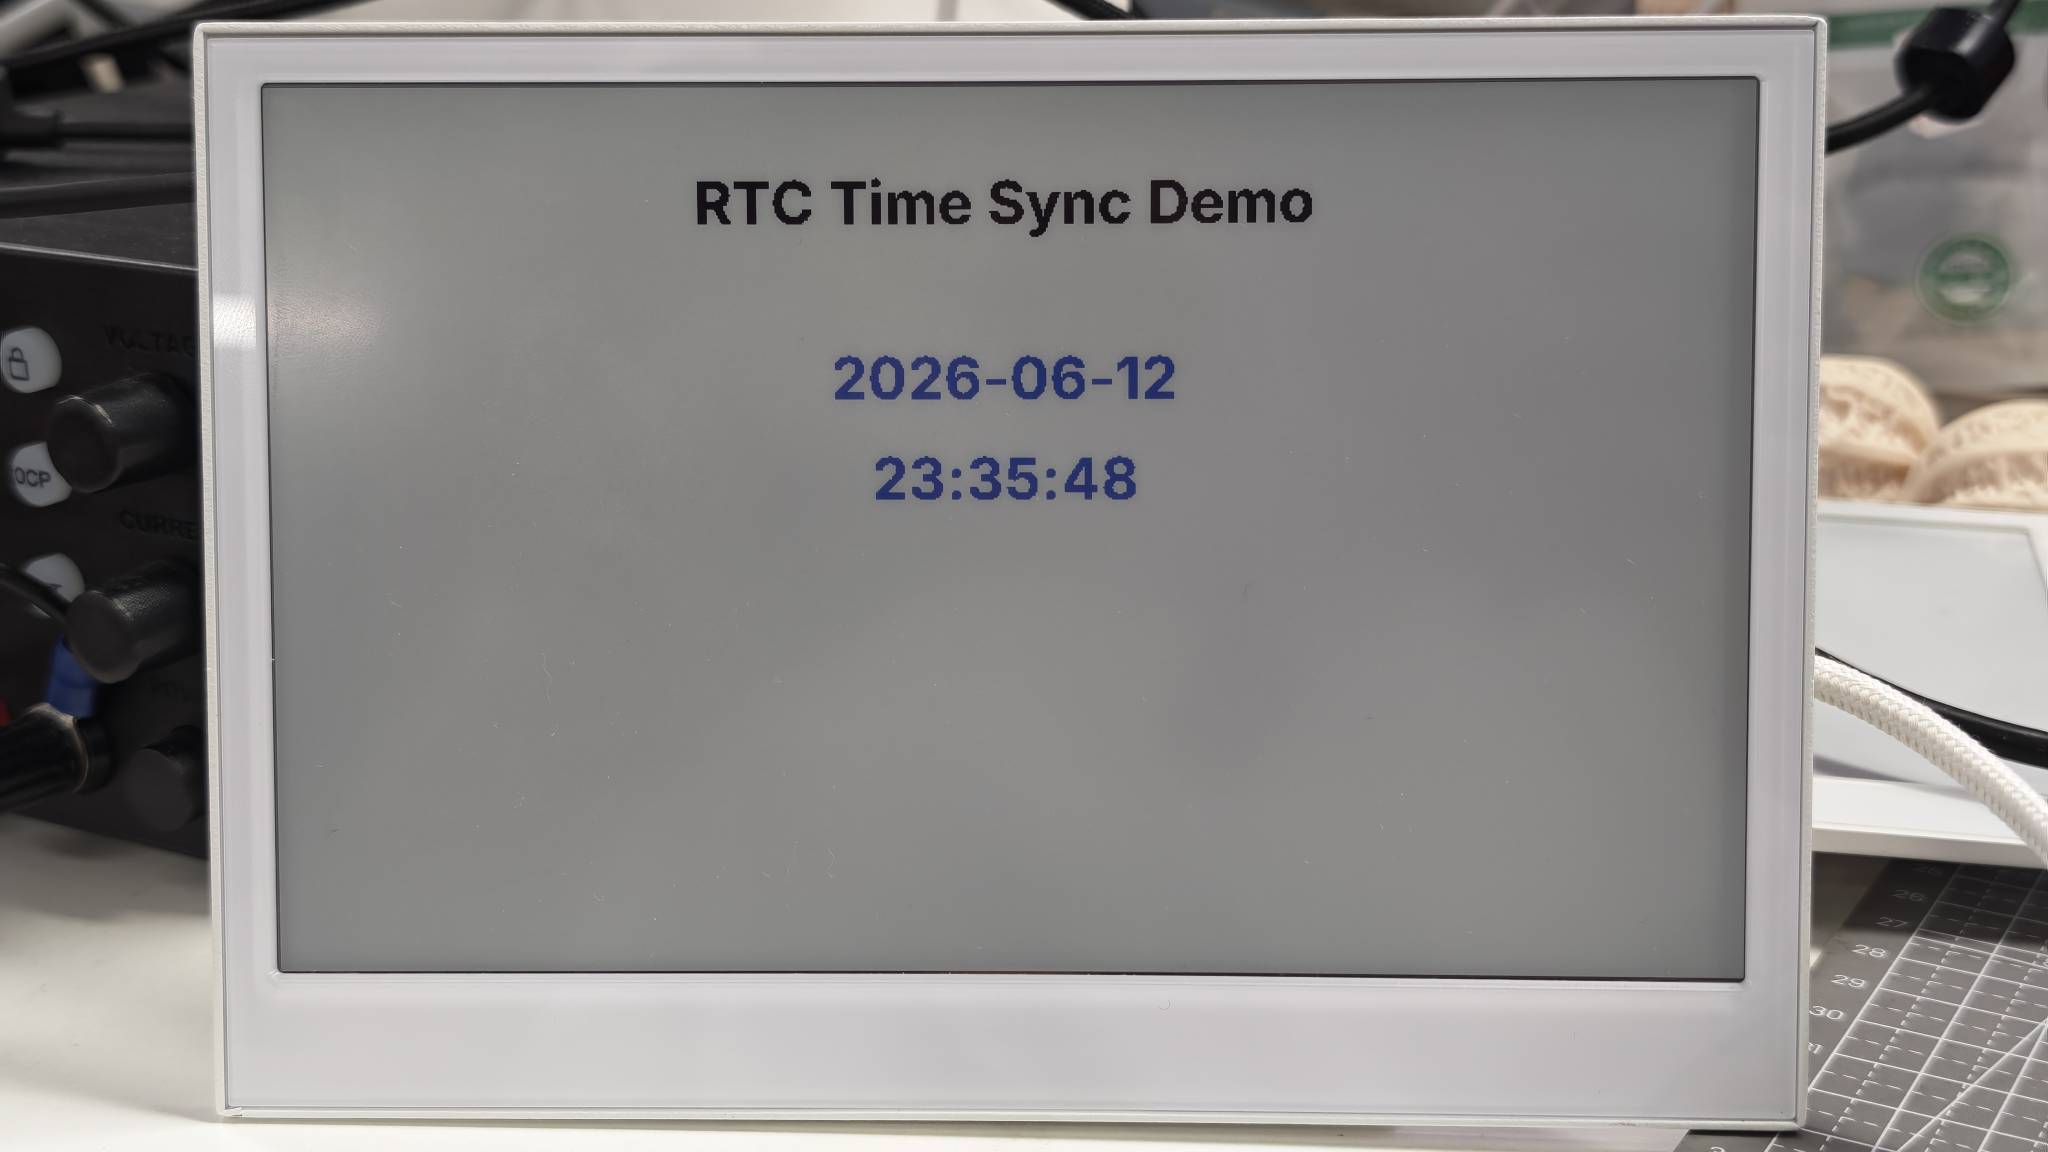
- Displays the current date and time on the ePaper screen.
The following image shows the expected result on reTerminal E1002. The same demo works on both reTerminal E1001 and E1002. The main difference is the display output: E1001 shows a monochrome result, while E1002 can show a color result.
If the RTC time does not stay correct after a full power cycle, install or replace the CR1220 coin cell for the RTC backup holder.
MicroSD Card Detection
This demo reports whether a microSD card is inserted. It also turns on the SD card power rail through GPIO16.
The card detect pin is active LOW, so the binary sensor uses inverted: true.
You can use this example by replacing the placeholder values and uploading the complete YAML to your device.
- For E1001
- For E1002
esphome:
  name: reterminal-e1001-sd-demo
  friendly_name: reTerminal_E1001_SD_Demo
  on_boot:
    priority: 600
    then:
      - output.turn_on: bsp_sd_enable
      - delay: 200ms
      - component.update: epaper_display

esp32:
  board: esp32-s3-devkitc-1
  framework:
    type: arduino

logger:
  hardware_uart: UART0

api:
  encryption:
    key: "REPLACE_WITH_YOUR_API_KEY"

ota:
  - platform: esphome
    password: "REPLACE_WITH_YOUR_OTA_PASSWORD"

wifi:
  ssid: !secret wifi_ssid
  password: !secret wifi_password
  ap:
    ssid: "E1001-SD-Demo"
    password: "ChangeMe123"

captive_portal:

spi:
  clk_pin: GPIO7
  mosi_pin: GPIO9
  miso_pin: GPIO8

output:
  - platform: gpio
    pin: GPIO16
    id: bsp_sd_enable

binary_sensor:
  - platform: gpio
    pin:
      number: GPIO15
      mode: INPUT_PULLUP
      inverted: true
    id: sd_card_detect
    name: "SD Card Detected"
    on_press:
      then:
        - logger.log: "SD card inserted"
        - component.update: epaper_display
    on_release:
      then:
        - logger.log: "SD card removed"
        - component.update: epaper_display

font:
  - file: "gfonts://Inter@700"
    id: font_title
    size: 32
  - file: "gfonts://Inter@700"
    id: font_body
    size: 28

display:
  - platform: waveshare_epaper
    id: epaper_display
    model: 7.50inv2
    cs_pin: GPIO10
    dc_pin: GPIO11
    reset_pin:
      number: GPIO12
      inverted: false
    busy_pin:
      number: GPIO13
      inverted: true
    update_interval: 300s
    lambda: |-
      it.printf(400, 40, id(font_title), TextAlign::TOP_CENTER, "microSD Card Detection");
      if (id(sd_card_detect).state) {
        it.printf(400, 160, id(font_body), TextAlign::TOP_CENTER, "SD Card: inserted");
      } else {
        it.printf(400, 160, id(font_body), TextAlign::TOP_CENTER, "SD Card: not detected");
      }
      it.printf(400, 230, id(font_body), TextAlign::TOP_CENTER, "Detect pin: GPIO15");
esphome:
  name: reterminal-e1002-sd-demo
  friendly_name: reTerminal_E1002_SD_Demo
  on_boot:
    priority: 600
    then:
      - output.turn_on: bsp_sd_enable
      - delay: 200ms
      - component.update: epaper_display

esp32:
  board: esp32-s3-devkitc-1
  framework:
    type: arduino

logger:
  hardware_uart: UART0

api:
  encryption:
    key: "REPLACE_WITH_YOUR_API_KEY"

ota:
  - platform: esphome
    password: "REPLACE_WITH_YOUR_OTA_PASSWORD"

wifi:
  ssid: !secret wifi_ssid
  password: !secret wifi_password
  ap:
    ssid: "E1002-SD-Demo"
    password: "ChangeMe123"

captive_portal:

spi:
  clk_pin: GPIO7
  mosi_pin: GPIO9
  miso_pin: GPIO8

output:
  - platform: gpio
    pin: GPIO16
    id: bsp_sd_enable

binary_sensor:
  - platform: gpio
    pin:
      number: GPIO15
      mode: INPUT_PULLUP
      inverted: true
    id: sd_card_detect
    name: "SD Card Detected"
    on_press:
      then:
        - logger.log: "SD card inserted"
        - component.update: epaper_display
    on_release:
      then:
        - logger.log: "SD card removed"
        - component.update: epaper_display

font:
  - file: "gfonts://Inter@700"
    id: font_title
    size: 32
  - file: "gfonts://Inter@700"
    id: font_body
    size: 28

display:
  - platform: epaper_spi
    id: epaper_display
    model: Seeed-reTerminal-E1002
    update_interval: 300s
    lambda: |-
      const auto BLACK = Color(0, 0, 0, 0);
      const auto RED = Color(255, 0, 0, 0);
      const auto GREEN = Color(0, 255, 0, 0);

      it.printf(400, 40, id(font_title), BLACK, TextAlign::TOP_CENTER, "microSD Card Detection");
      if (id(sd_card_detect).state) {
        it.printf(400, 160, id(font_body), GREEN, TextAlign::TOP_CENTER, "SD Card: inserted");
      } else {
        it.printf(400, 160, id(font_body), RED, TextAlign::TOP_CENTER, "SD Card: not detected");
      }
      it.printf(400, 230, id(font_body), BLACK, TextAlign::TOP_CENTER, "Detect pin: GPIO15");
This configuration:
- Enables SD card power through
GPIO16. - Reads the card-detect signal from
GPIO15. - Shows the card state on the ePaper screen.
- Exposes
SD Card Detectedto Home Assistant as a binary sensor.
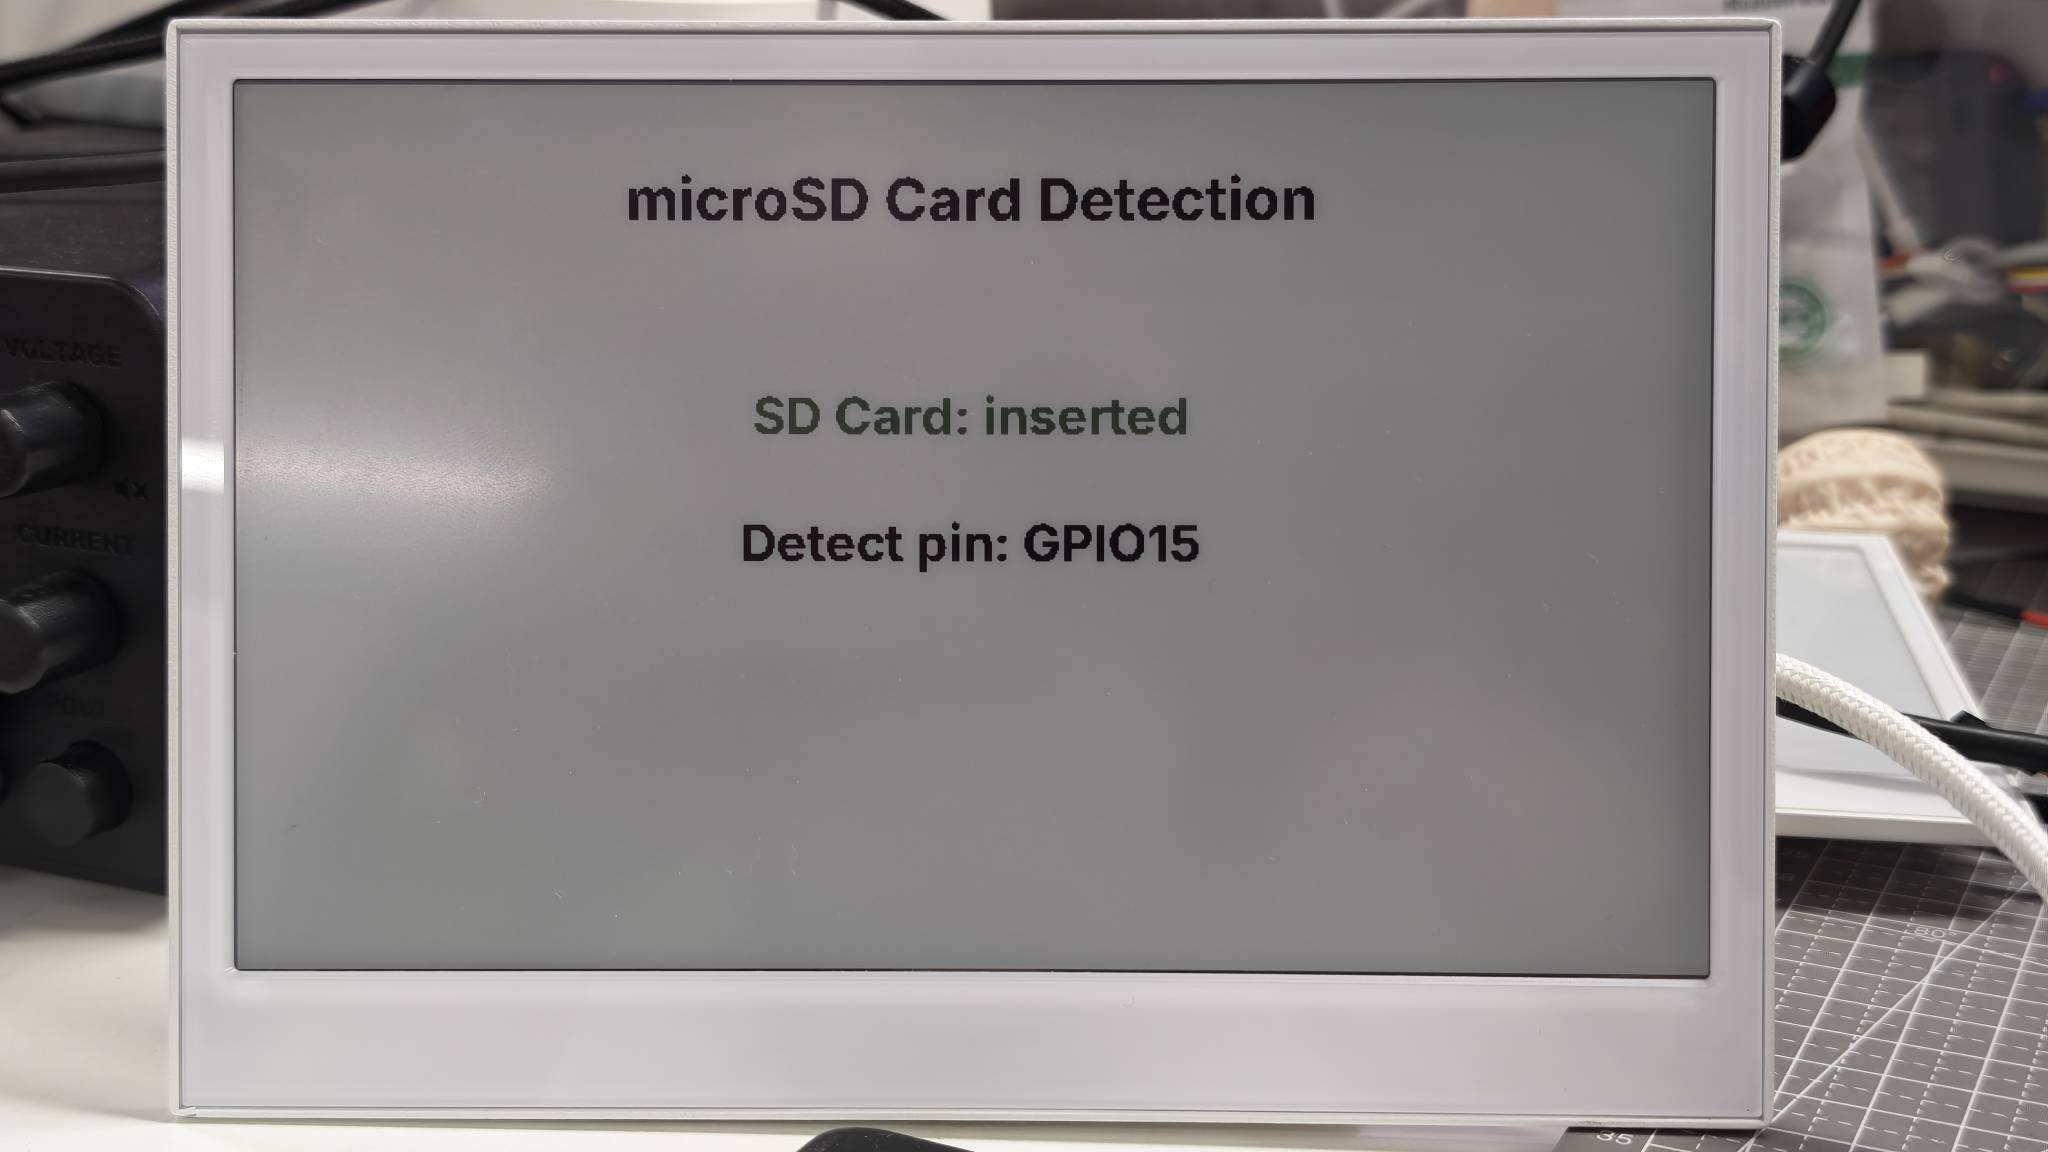
The following image shows the expected result on reTerminal E1002. The same demo works on both reTerminal E1001 and E1002. The main difference is the display output: E1001 shows a monochrome result, while E1002 can show a color result.
In this ESPHome cookbook, the microSD card is used as a device status signal. The demo checks whether a card is inserted, shows the result on the screen, and exposes the same state to Home Assistant.
This is because ESPHome is mainly designed for sensors, switches, displays, and Home Assistant automation. It is not usually used as a local file manager on the device. Tasks such as opening files, creating folders, writing logs, or recording WAV audio directly to the SD card are better handled with Arduino, where your firmware controls the SD card filesystem directly.
In a typical ESPHome setup, the SD card status can be used to:
- show whether storage is physically available;
- trigger Home Assistant automations when a card is inserted or removed;
- display hardware health information together with RTC, battery, and microphone status.
If your goal is direct SD card file read/write, refer to the Arduino SD card cookbook instead.
PDM Microphone Power Check
This demo enables the onboard PDM microphone power rail and displays the microphone pin assignment on the ePaper screen. It keeps the YAML minimal so you can verify the display update first, then add the optional ESPHome I2S microphone configuration if you want to use the microphone with Home Assistant Voice Assistant.
The microphone uses these pins:
- Power enable:
GPIO38 - PDM clock:
GPIO42 - PDM data:
GPIO41
You can use this example by replacing the placeholder values and uploading the complete YAML to your device.
- For E1001
- For E1002
esphome:
  name: reterminal-e1001-mic-demo
  friendly_name: reTerminal_E1001_Mic_Demo
  on_boot:
    priority: 600
    then:
      - output.turn_on: mic_power_enable
      - delay: 200ms
      - logger.log: "PDM microphone power enabled"
      - component.update: epaper_display

esp32:
  board: esp32-s3-devkitc-1
  framework:
    type: arduino

logger:
  hardware_uart: UART0

api:
  encryption:
    key: "REPLACE_WITH_YOUR_API_KEY"

ota:
  - platform: esphome
    password: "REPLACE_WITH_YOUR_OTA_PASSWORD"

wifi:
  ssid: !secret wifi_ssid
  password: !secret wifi_password
  ap:
    ssid: "E1001-Mic-Demo"
    password: "ChangeMe123"

captive_portal:

spi:
  clk_pin: GPIO7
  mosi_pin: GPIO9

output:
  - platform: gpio
    pin: GPIO38
    id: mic_power_enable

font:
  - file: "gfonts://Inter@700"
    id: font_title
    size: 32
  - file: "gfonts://Inter@700"
    id: font_body
    size: 26

display:
  - platform: waveshare_epaper
    id: epaper_display
    model: 7.50inv2
    cs_pin: GPIO10
    dc_pin: GPIO11
    reset_pin:
      number: GPIO12
      inverted: false
    busy_pin:
      number: GPIO13
      inverted: true
    update_interval: 300s
    lambda: |-
      it.printf(400, 40, id(font_title), TextAlign::TOP_CENTER, "PDM Microphone Power");
      it.printf(400, 135, id(font_body), TextAlign::TOP_CENTER, "Mic Power: ON");
      it.printf(400, 190, id(font_body), TextAlign::TOP_CENTER, "CLK GPIO42 / DATA GPIO41");
      it.printf(400, 245, id(font_body), TextAlign::TOP_CENTER, "I2S microphone: optional");
esphome:
  name: reterminal-e1002-mic-demo
  friendly_name: reTerminal_E1002_Mic_Demo
  on_boot:
    priority: 600
    then:
      - output.turn_on: mic_power_enable
      - delay: 200ms
      - logger.log: "PDM microphone power enabled"
      - component.update: epaper_display

esp32:
  board: esp32-s3-devkitc-1
  framework:
    type: arduino

logger:
  hardware_uart: UART0

api:
  encryption:
    key: "REPLACE_WITH_YOUR_API_KEY"

ota:
  - platform: esphome
    password: "REPLACE_WITH_YOUR_OTA_PASSWORD"

wifi:
  ssid: !secret wifi_ssid
  password: !secret wifi_password
  ap:
    ssid: "E1002-Mic-Demo"
    password: "ChangeMe123"

captive_portal:

spi:
  clk_pin: GPIO7
  mosi_pin: GPIO9

output:
  - platform: gpio
    pin: GPIO38
    id: mic_power_enable

font:
  - file: "gfonts://Inter@700"
    id: font_title
    size: 32
  - file: "gfonts://Inter@700"
    id: font_body
    size: 26

display:
  - platform: epaper_spi
    id: epaper_display
    model: Seeed-reTerminal-E1002
    update_interval: 300s
    lambda: |-
      const auto BLACK = Color(0, 0, 0, 0);
      const auto BLUE = Color(0, 0, 255, 0);

      it.printf(400, 40, id(font_title), BLACK, TextAlign::TOP_CENTER, "PDM Microphone Power");
      it.printf(400, 135, id(font_body), BLUE, TextAlign::TOP_CENTER, "Mic Power: ON");
      it.printf(400, 190, id(font_body), BLACK, TextAlign::TOP_CENTER, "CLK GPIO42 / DATA GPIO41");
      it.printf(400, 245, id(font_body), BLACK, TextAlign::TOP_CENTER, "I2S microphone: optional");
This configuration:
- Enables microphone power through
GPIO38. - Shows the PDM clock pin
GPIO42and data pinGPIO41on the ePaper screen. - Keeps the main demo close to the RTC and microSD demos, so the display refresh can be verified before adding the audio component.
If you want to expose the onboard PDM microphone to ESPHome, add the following optional block after confirming that the screen demo refreshes correctly:
i2s_audio:
  i2s_lrclk_pin: GPIO42

microphone:
  - platform: i2s_audio
    id: onboard_mic
    adc_type: external
    pdm: true
    i2s_din_pin: GPIO41
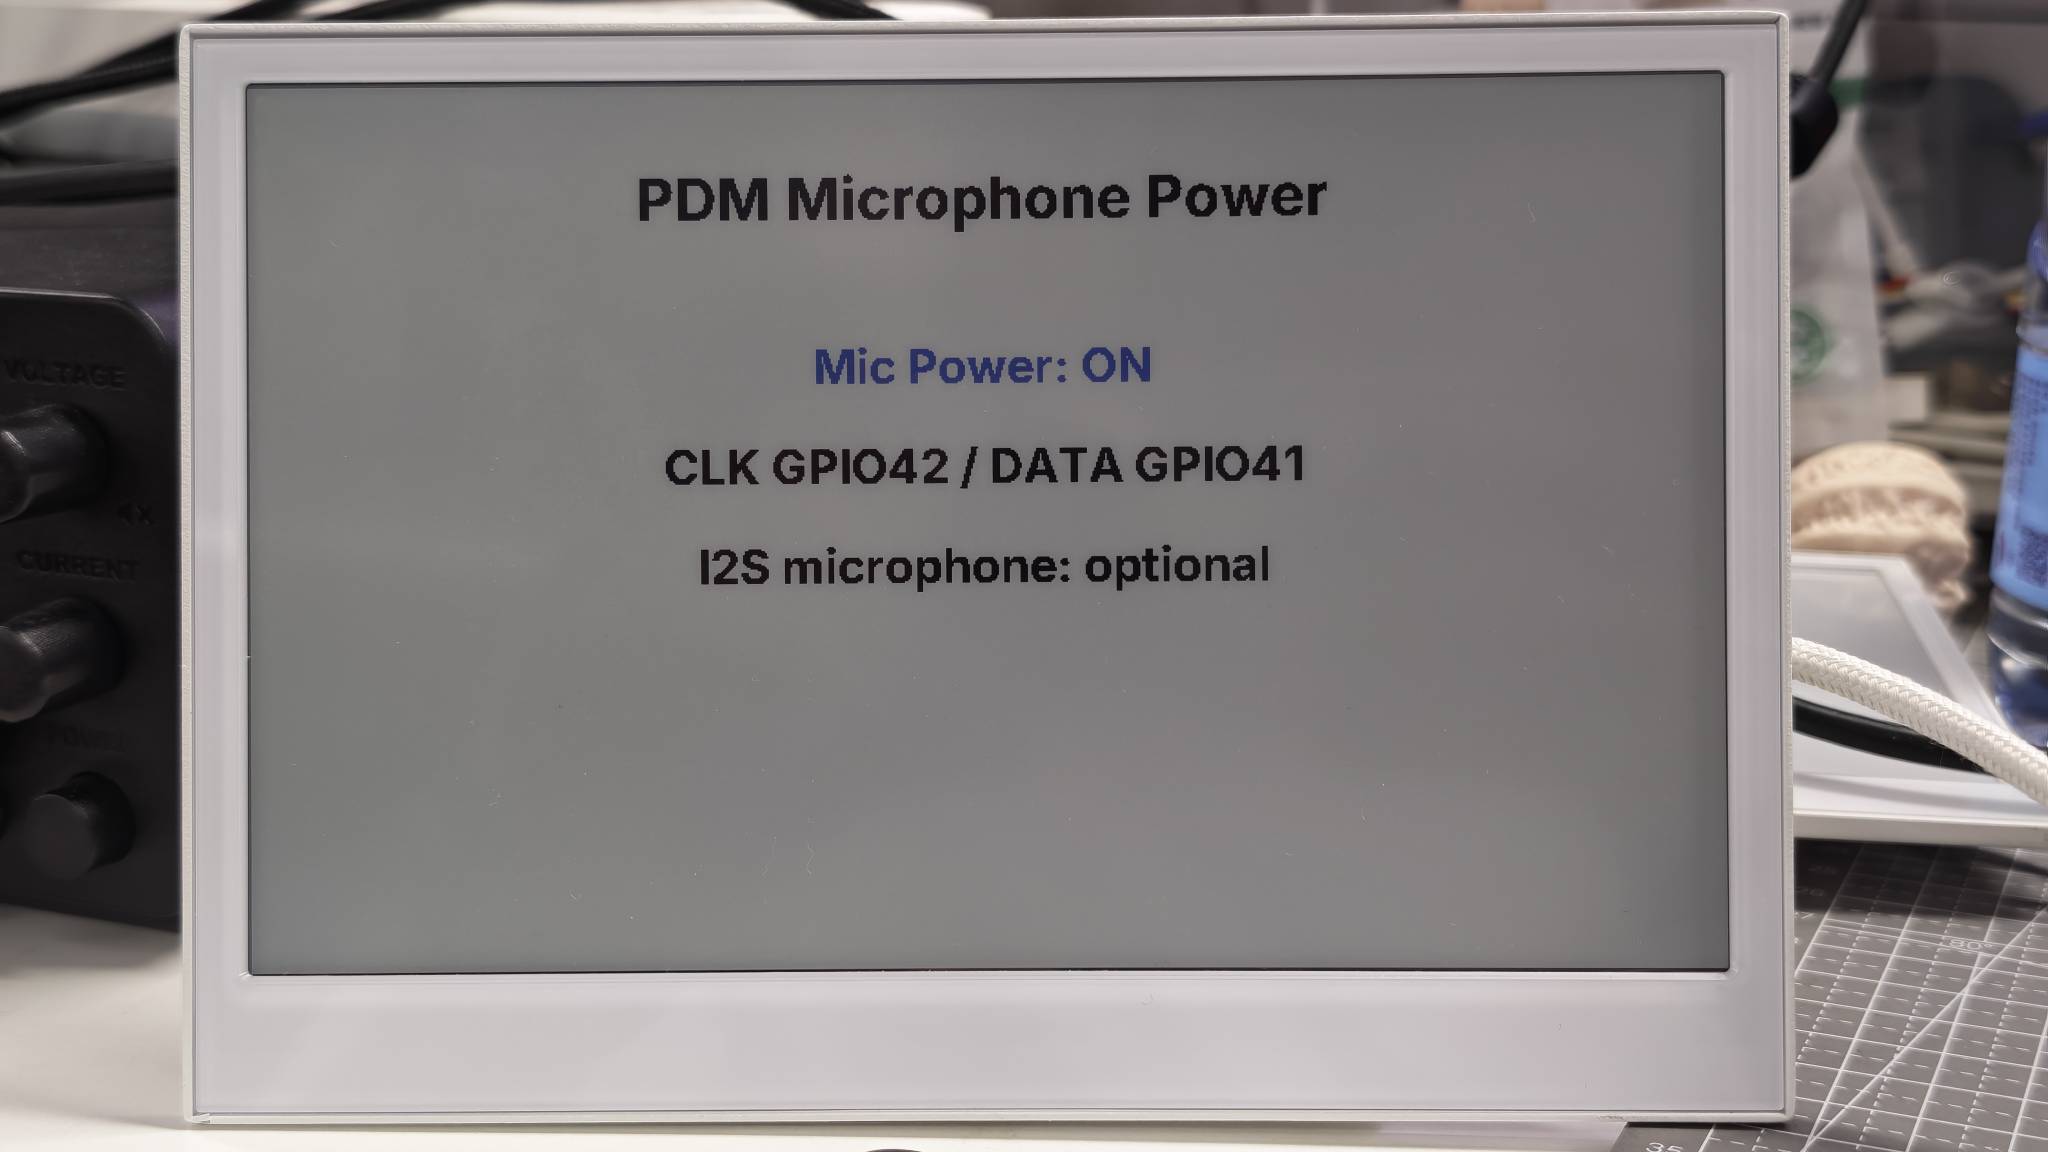
The following image shows the expected result on reTerminal E1002. The same demo works on both reTerminal E1001 and E1002. The main difference is the display output: E1001 shows a monochrome result, while E1002 can show a color result.
This demo only verifies microphone power control and the related pin assignment on the ePaper screen. A complete Home Assistant Assist voice pipeline requires the optional microphone block above and additional voice assistant configuration. Recording audio directly to the SD card is better handled by the Arduino microphone examples.
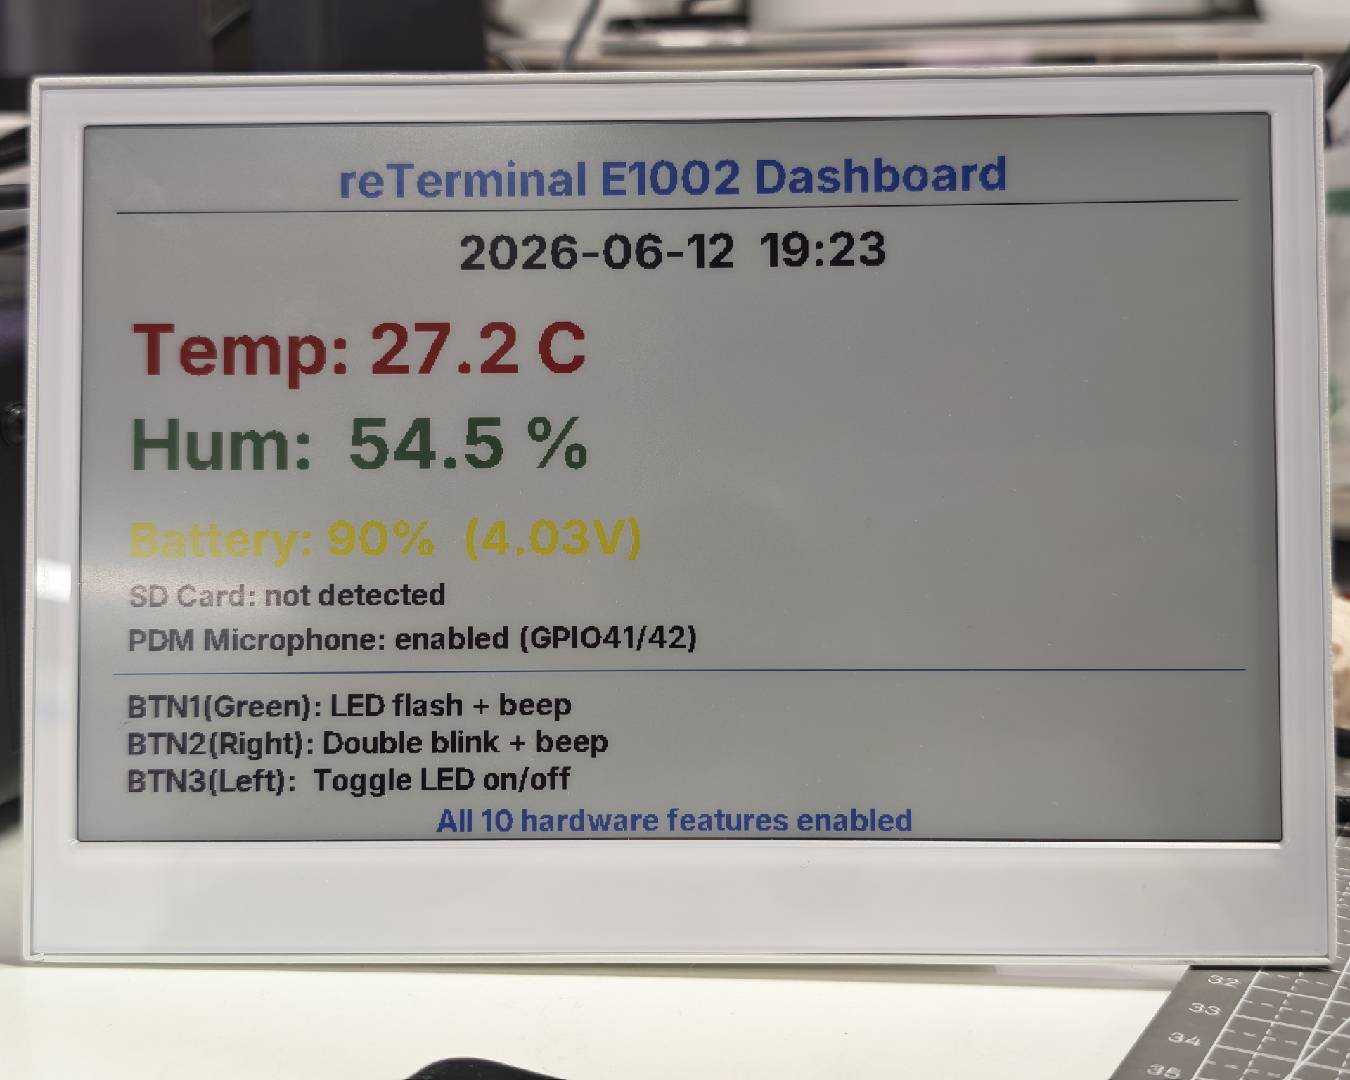
Demo 4: Complete RTC, SD Card and Microphone Status Dashboard
This demo combines the three features above into one hardware status page:
- RTC date and time from the PCF8563.
- microSD card insertion status from
GPIO15. - PDM microphone initialization status.
For a better understanding, run the single-function demos first before trying this combined example.
Click here to view the full code
- For E1001
- For E1002
esphome:
  name: reterminal-e1001-hardware-status
  friendly_name: reTerminal_E1001_Hardware_Status
  on_boot:
    priority: 600
    then:
      - output.turn_on: bsp_sd_enable
      - output.turn_on: mic_power_enable
      - delay: 200ms
      - pcf8563.read_time:
      - component.update: epaper_display

esp32:
  board: esp32-s3-devkitc-1
  framework:
    type: arduino

logger:
  hardware_uart: UART0

api:
  encryption:
    key: "REPLACE_WITH_YOUR_API_KEY"

ota:
  - platform: esphome
    password: "REPLACE_WITH_YOUR_OTA_PASSWORD"

wifi:
  ssid: !secret wifi_ssid
  password: !secret wifi_password
  ap:
    ssid: "E1001-HW-Status"
    password: "ChangeMe123"

captive_portal:

spi:
  clk_pin: GPIO7
  mosi_pin: GPIO9
  miso_pin: GPIO8

i2c:
  scl: GPIO20
  sda: GPIO19

i2s_audio:
  i2s_lrclk_pin: GPIO42

output:
  - platform: gpio
    pin: GPIO16
    id: bsp_sd_enable

  - platform: gpio
    pin: GPIO38
    id: mic_power_enable

time:
  - platform: pcf8563
    id: rtc_time
    address: 0x51
    update_interval: never

  - platform: homeassistant
    on_time_sync:
      then:
        - pcf8563.write_time:
        - component.update: epaper_display

microphone:
  - platform: i2s_audio
    id: onboard_mic
    adc_type: external
    pdm: true
    i2s_din_pin: GPIO41

binary_sensor:
  - platform: gpio
    pin:
      number: GPIO15
      mode: INPUT_PULLUP
      inverted: true
    id: sd_card_detect
    name: "SD Card Detected"
    on_press:
      then:
        - component.update: epaper_display
    on_release:
      then:
        - component.update: epaper_display

font:
  - file: "gfonts://Inter@700"
    id: font_small
    size: 20
  - file: "gfonts://Inter@700"
    id: font_medium
    size: 32

display:
  - platform: waveshare_epaper
    id: epaper_display
    model: 7.50inv2
    cs_pin: GPIO10
    dc_pin: GPIO11
    reset_pin:
      number: GPIO12
      inverted: false
    busy_pin:
      number: GPIO13
      inverted: true
    update_interval: 300s
    lambda: |-
      it.printf(400, 20, id(font_medium), TextAlign::TOP_CENTER,
                "reTerminal E1001 Hardware Status");
      it.line(20, 60, 780, 60);

      auto now = id(rtc_time).now();
      if (now.is_valid()) {
        it.strftime(30, 95, id(font_medium), "%Y-%m-%d %H:%M", now);
        ESP_LOGD("status", "RTC time is valid");
      } else {
        it.printf(30, 95, id(font_medium), "RTC: waiting for sync");
        ESP_LOGW("status", "RTC time is not valid yet");
      }

      if (id(sd_card_detect).state) {
        it.printf(30, 155, id(font_medium), "SD Card: inserted");
      } else {
        it.printf(30, 155, id(font_medium), "SD Card: not detected");
      }

      it.printf(30, 215, id(font_medium), "PDM Mic: initialized");
      it.printf(30, 265, id(font_small), "RTC: I2C address 0x51");
      it.printf(30, 295, id(font_small), "SD: DET GPIO15 / EN GPIO16");
      it.printf(30, 325, id(font_small), "Mic: CLK GPIO42 / DATA GPIO41 / EN GPIO38");
esphome:
  name: reterminal-e1002-hardware-status
  friendly_name: reTerminal_E1002_Hardware_Status
  on_boot:
    priority: 600
    then:
      - output.turn_on: bsp_sd_enable
      - output.turn_on: mic_power_enable
      - delay: 200ms
      - pcf8563.read_time:
      - component.update: epaper_display

esp32:
  board: esp32-s3-devkitc-1
  framework:
    type: arduino

logger:
  hardware_uart: UART0

api:
  encryption:
    key: "REPLACE_WITH_YOUR_API_KEY"

ota:
  - platform: esphome
    password: "REPLACE_WITH_YOUR_OTA_PASSWORD"

wifi:
  ssid: !secret wifi_ssid
  password: !secret wifi_password
  ap:
    ssid: "E1002-HW-Status"
    password: "ChangeMe123"

captive_portal:

spi:
  clk_pin: GPIO7
  mosi_pin: GPIO9
  miso_pin: GPIO8

i2c:
  scl: GPIO20
  sda: GPIO19

i2s_audio:
  i2s_lrclk_pin: GPIO42

output:
  - platform: gpio
    pin: GPIO16
    id: bsp_sd_enable

  - platform: gpio
    pin: GPIO38
    id: mic_power_enable

time:
  - platform: pcf8563
    id: rtc_time
    address: 0x51
    update_interval: never

  - platform: homeassistant
    on_time_sync:
      then:
        - pcf8563.write_time:
        - component.update: epaper_display

microphone:
  - platform: i2s_audio
    id: onboard_mic
    adc_type: external
    pdm: true
    i2s_din_pin: GPIO41

binary_sensor:
  - platform: gpio
    pin:
      number: GPIO15
      mode: INPUT_PULLUP
      inverted: true
    id: sd_card_detect
    name: "SD Card Detected"
    on_press:
      then:
        - component.update: epaper_display
    on_release:
      then:
        - component.update: epaper_display

font:
  - file: "gfonts://Inter@700"
    id: font_small
    size: 20
  - file: "gfonts://Inter@700"
    id: font_medium
    size: 32

display:
  - platform: epaper_spi
    id: epaper_display
    model: Seeed-reTerminal-E1002
    update_interval: 300s
    lambda: |-
      const auto BLACK = Color(0, 0, 0, 0);
      const auto BLUE = Color(0, 0, 255, 0);
      const auto GREEN = Color(0, 255, 0, 0);
      const auto RED = Color(255, 0, 0, 0);

      it.printf(400, 20, id(font_medium), BLACK, TextAlign::TOP_CENTER,
                "reTerminal E1002 Hardware Status");
      it.line(20, 60, 780, 60, BLACK);

      auto now = id(rtc_time).now();
      if (now.is_valid()) {
        it.strftime(30, 95, id(font_medium), BLUE, "%Y-%m-%d %H:%M", now);
        ESP_LOGD("status", "RTC time is valid");
      } else {
        it.printf(30, 95, id(font_medium), RED, "RTC: waiting for sync");
        ESP_LOGW("status", "RTC time is not valid yet");
      }

      if (id(sd_card_detect).state) {
        it.printf(30, 155, id(font_medium), GREEN, "SD Card: inserted");
      } else {
        it.printf(30, 155, id(font_medium), RED, "SD Card: not detected");
      }

      it.printf(30, 215, id(font_medium), BLUE, "PDM Mic: initialized");
      it.printf(30, 265, id(font_small), BLACK, "RTC: I2C address 0x51");
      it.printf(30, 295, id(font_small), BLACK, "SD: DET GPIO15 / EN GPIO16");
      it.printf(30, 325, id(font_small), BLACK, "Mic: CLK GPIO42 / DATA GPIO41 / EN GPIO38");
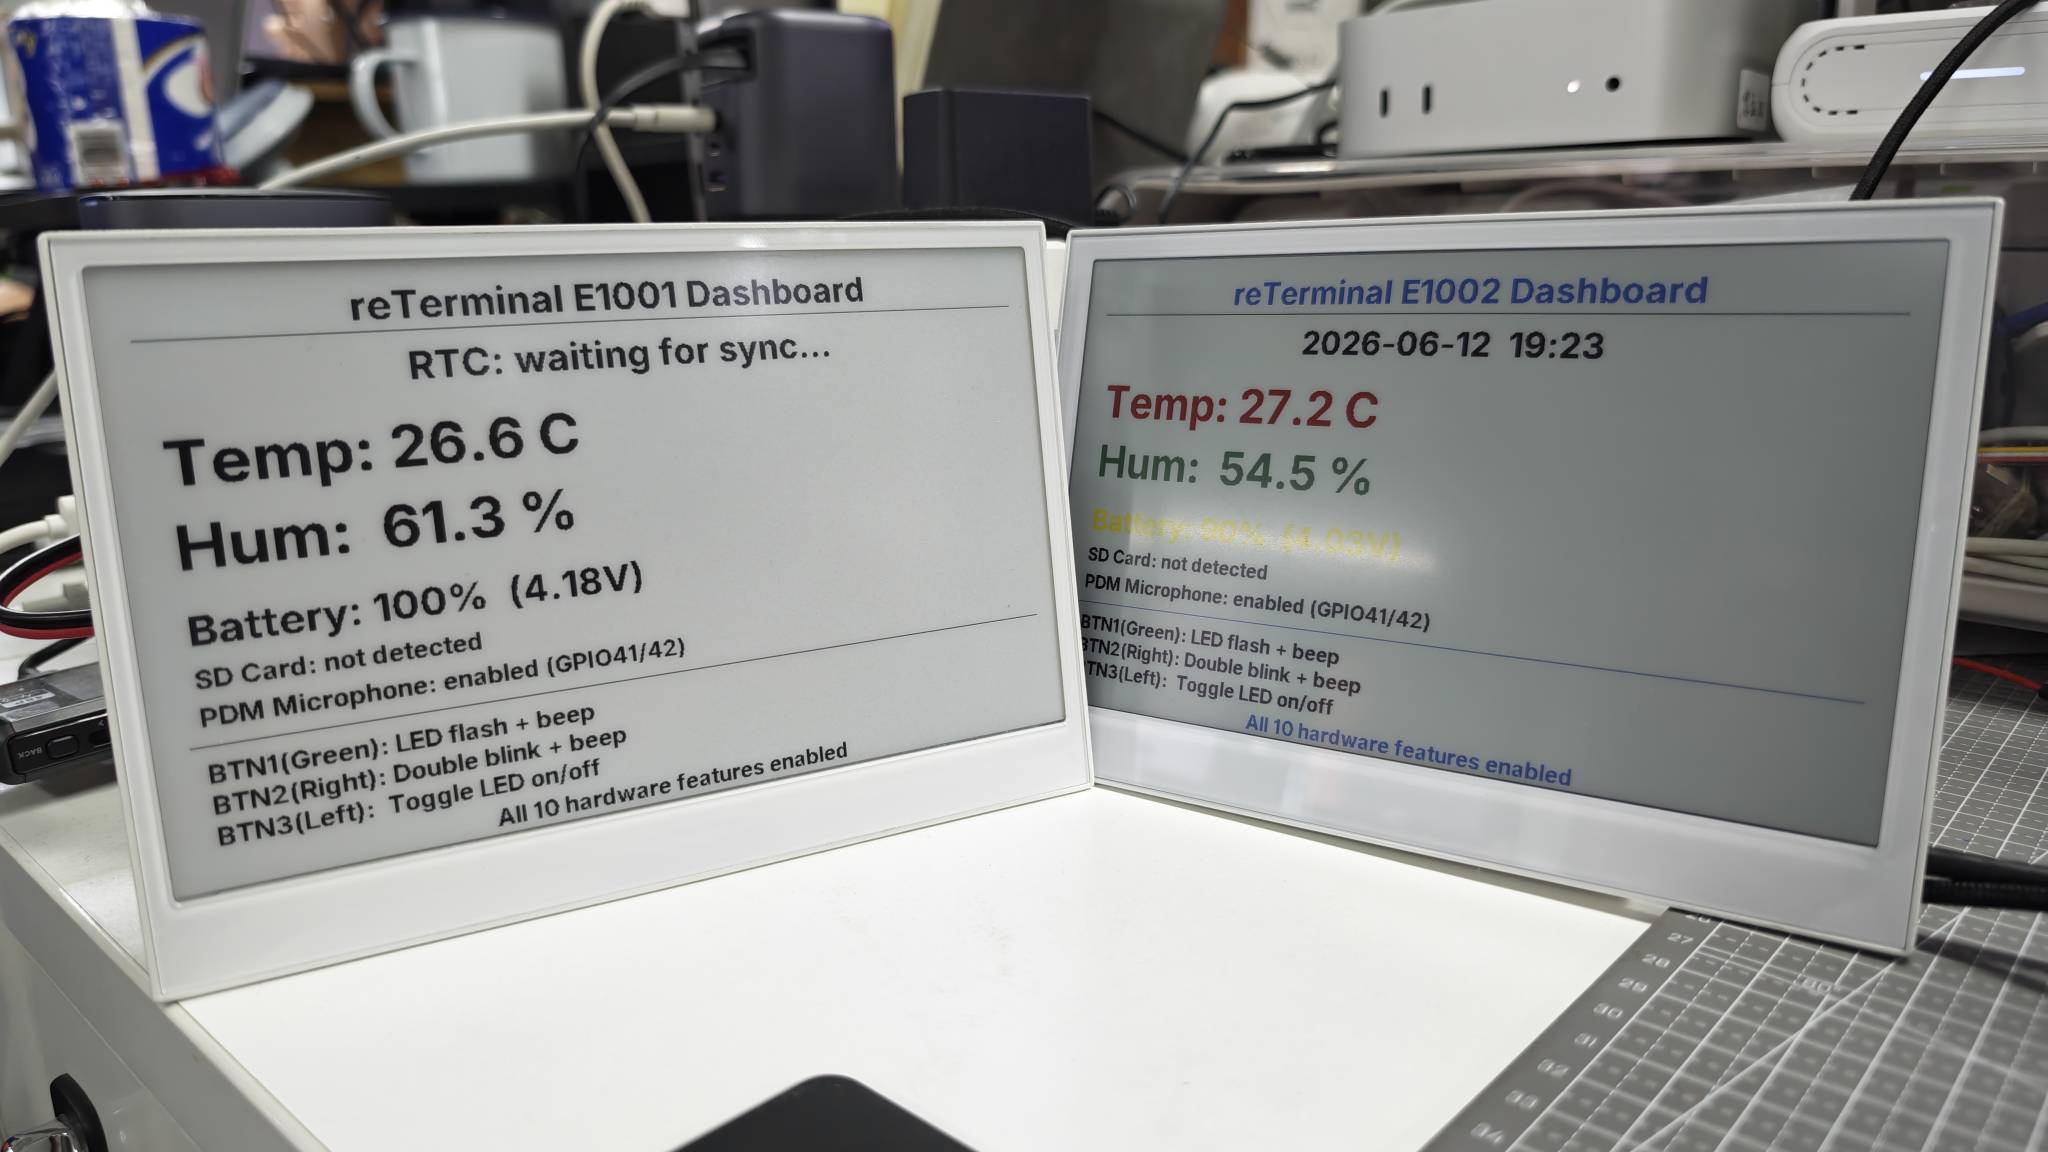
When the firmware is running, the screen shows the RTC time, SD card state, and microphone initialization status on one page.
The following image shows the expected result on reTerminal E1002. The same demo works on both reTerminal E1001 and E1002. The main difference is the display output: E1001 shows a monochrome result, while E1002 can show a color result.
FAQ
Q1: Why does the screen show "RTC: waiting for sync"?
The device has not received valid time yet. Confirm that Wi-Fi is connected, the ESPHome API is connected to Home Assistant, and Home Assistant has the correct system time. After Home Assistant syncs time, ESPHome writes the time back to the PCF8563 RTC.
Q2: Why is there no serial log over USB?
The reTerminal E Series uses a CH340K USB-to-UART bridge on UART0. Keep this logger setting in your YAML:
logger:
  hardware_uart: UART0
Q3: Why does the screen not refresh in the RTC or microphone demo?
If a microSD card is inserted, remove the card first and restart the device. Except for the microSD card detection demo, the other demos on this page do not need the card to be inserted. Keeping a card inserted may affect the shared SPI bus and prevent the ePaper screen from refreshing correctly.
After removing the card, upload or restart the RTC or microphone demo again. The ePaper screen should refresh normally.
Resources
- [Wiki] ESPHome Cookbook: Display Basics
- [Wiki] ESPHome Cookbook: Buttons, Buzzer, LED, Battery & Low Power
- [Wiki] Work with ESPHome
- [Wiki] Arduino Cookbook: Onboard Peripherals
- [Wiki] Arduino Cookbook: RTC, Low Power, Audio & Touch
- [Documentation] ESPHome Time Component
- [Documentation] ESPHome I2S Audio Component
Tech Support & Product Discussion
Thank you for choosing our products! We are here to provide you with different support to ensure that your experience with our products is as smooth as possible. We offer several communication channels to cater to different preferences and needs.