reTerminal E Series ePaper Display Work with SquareLine Vision
Introduction
When you want to create your own intelligent terminal, you surely hope that this device has an attractive and elegant user interface. LVGL can achieve this. It is the most popular free and open-source embedded graphics library to create beautiful UIs for any MCU, MPU and display type. With this library, you can create a large number of beautiful embedded user interfaces. Especially when using our reTerminal E Series ePaper products, an attractive interface is an indispensable part. However, writing the LVGL library code is also a very complicated task. Therefore, this tutorial mainly aims to introduce an Editor that allows you to draw the UI simply by dragging and dropping controls. The WYSIWYG (What You See Is What You Get) creation method can better grasp the final presentation effect, and after drawing the UI, you can export it as LVGL's UI files, which greatly simplifies the development process for developers. The name of this tool is SquareLine Vision, is a visual front-end tool for LVGL.
SquareLine Vision is a UI development environment based on the browser (Web) or Web-compatible environment, dedicated to quickly designing user interfaces (UI) for embedded systems (such as devices with screens). It is also a design + export code tool: you design the interface on the platform, and then you can export the design as code or resources for running on embedded devices.
The features of SquareLine Vision
- Visual UI Design – Design beautiful, interactive interfaces visually with a drag-and-drop editor, eliminating the need for manual LVGL code creation.
- Rapid Embedded Prototyping – Instantly preview and validate your UI on desktop or target hardware, dramatically reducing design-to-device iteration time.
- LVGL-Powered Export – Seamlessly export your designs into clean LVGL-based source code, ready to compile on embedded devices, microcontrollers, or simulation environments.
With SquareLine Vision, you can go from concept to interactive embedded UI prototype in minutes — combining design flexibility, real-time preview, and production-ready LVGL output to accelerate your entire product development cycle.
Materials Required
To complete this tutorial, please prepare one of the following reTerminal E Series devices, E1001 is monochrome and E1002 is full color:
| reTerminal E1001 | reTerminal E1002 |
|---|---|
 |  |
Getting Started with SquareLine Vision
Component Introduction
The entire SquareLine Vision platform can be divided into two parts: Launcher and the Application Interface. On the Launcher interface, we can see the following three main functions:
- projects
- handle imports
- control account settings
When you start to draw the UI, you will learn about five tools:
- hierarchy system
- screen management
- styling options
- various widget types
- how to leverage events, trigger and actions
When you have a clear understanding of the overall organizational structure and tools of the platform, it will be very helpful for the production of your personal project. Next, I will create a project based on our reTerminal E1002.
Create a Project
Start a new LVGL Project
At the top of the SquareLine Vision Launcher interface, click the Create new button. Then, select Seeed Studio to view our products. Choose the reTerminal E1002 to create a project.
The fixed settings of this project is:
Resolution: 800x480Offset: 0(x), 0(y)Rotation: 0°Shape: RectangleColor Depth: 32 bitLVGL version: 9.1Theme: Light

We have supported the SenseCAP Watcher and reTerminal E1001 and E1002 devices. In the future, we will also support more products from Seeed Studio.
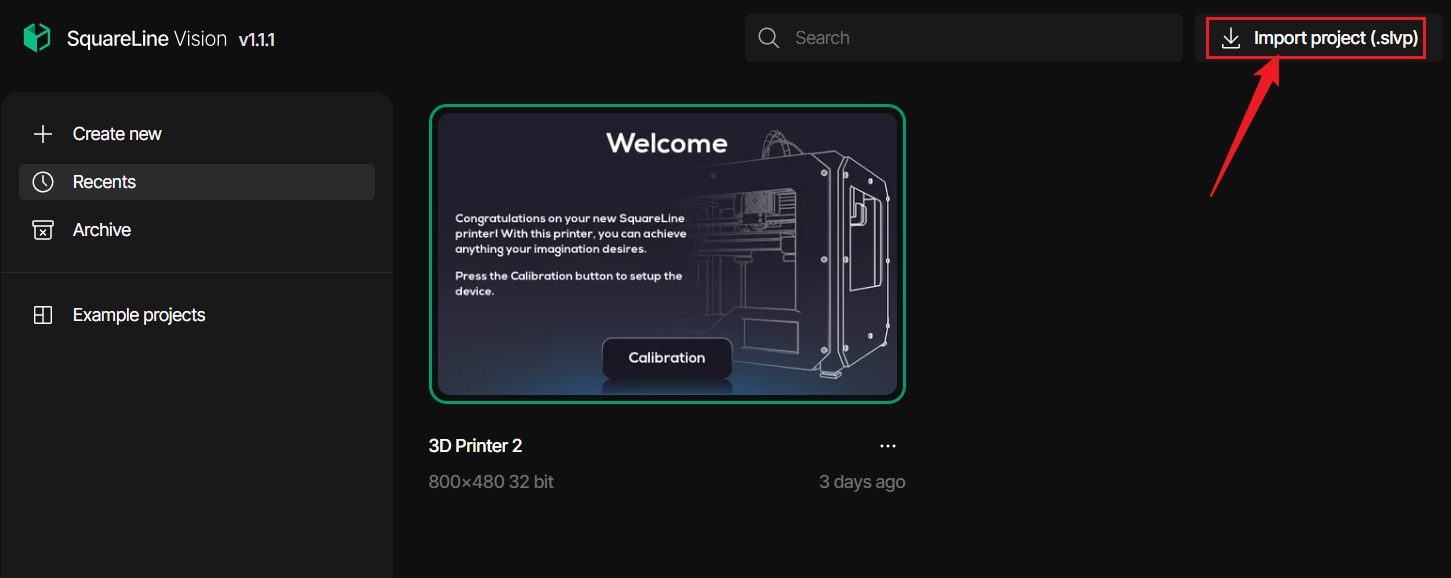
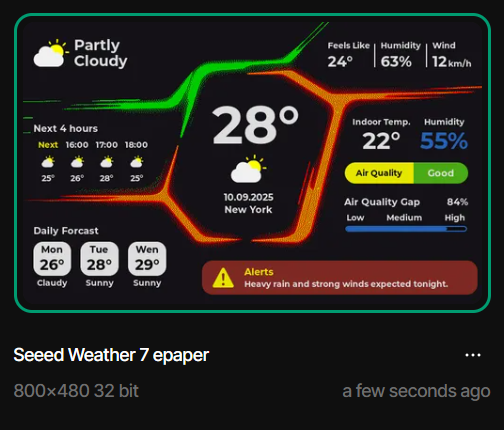
Import an existing .slvp project
If you already have a .slvp file, you can directly import it as a project. We have provided two dashboards related to the weather. You can directly download them below.

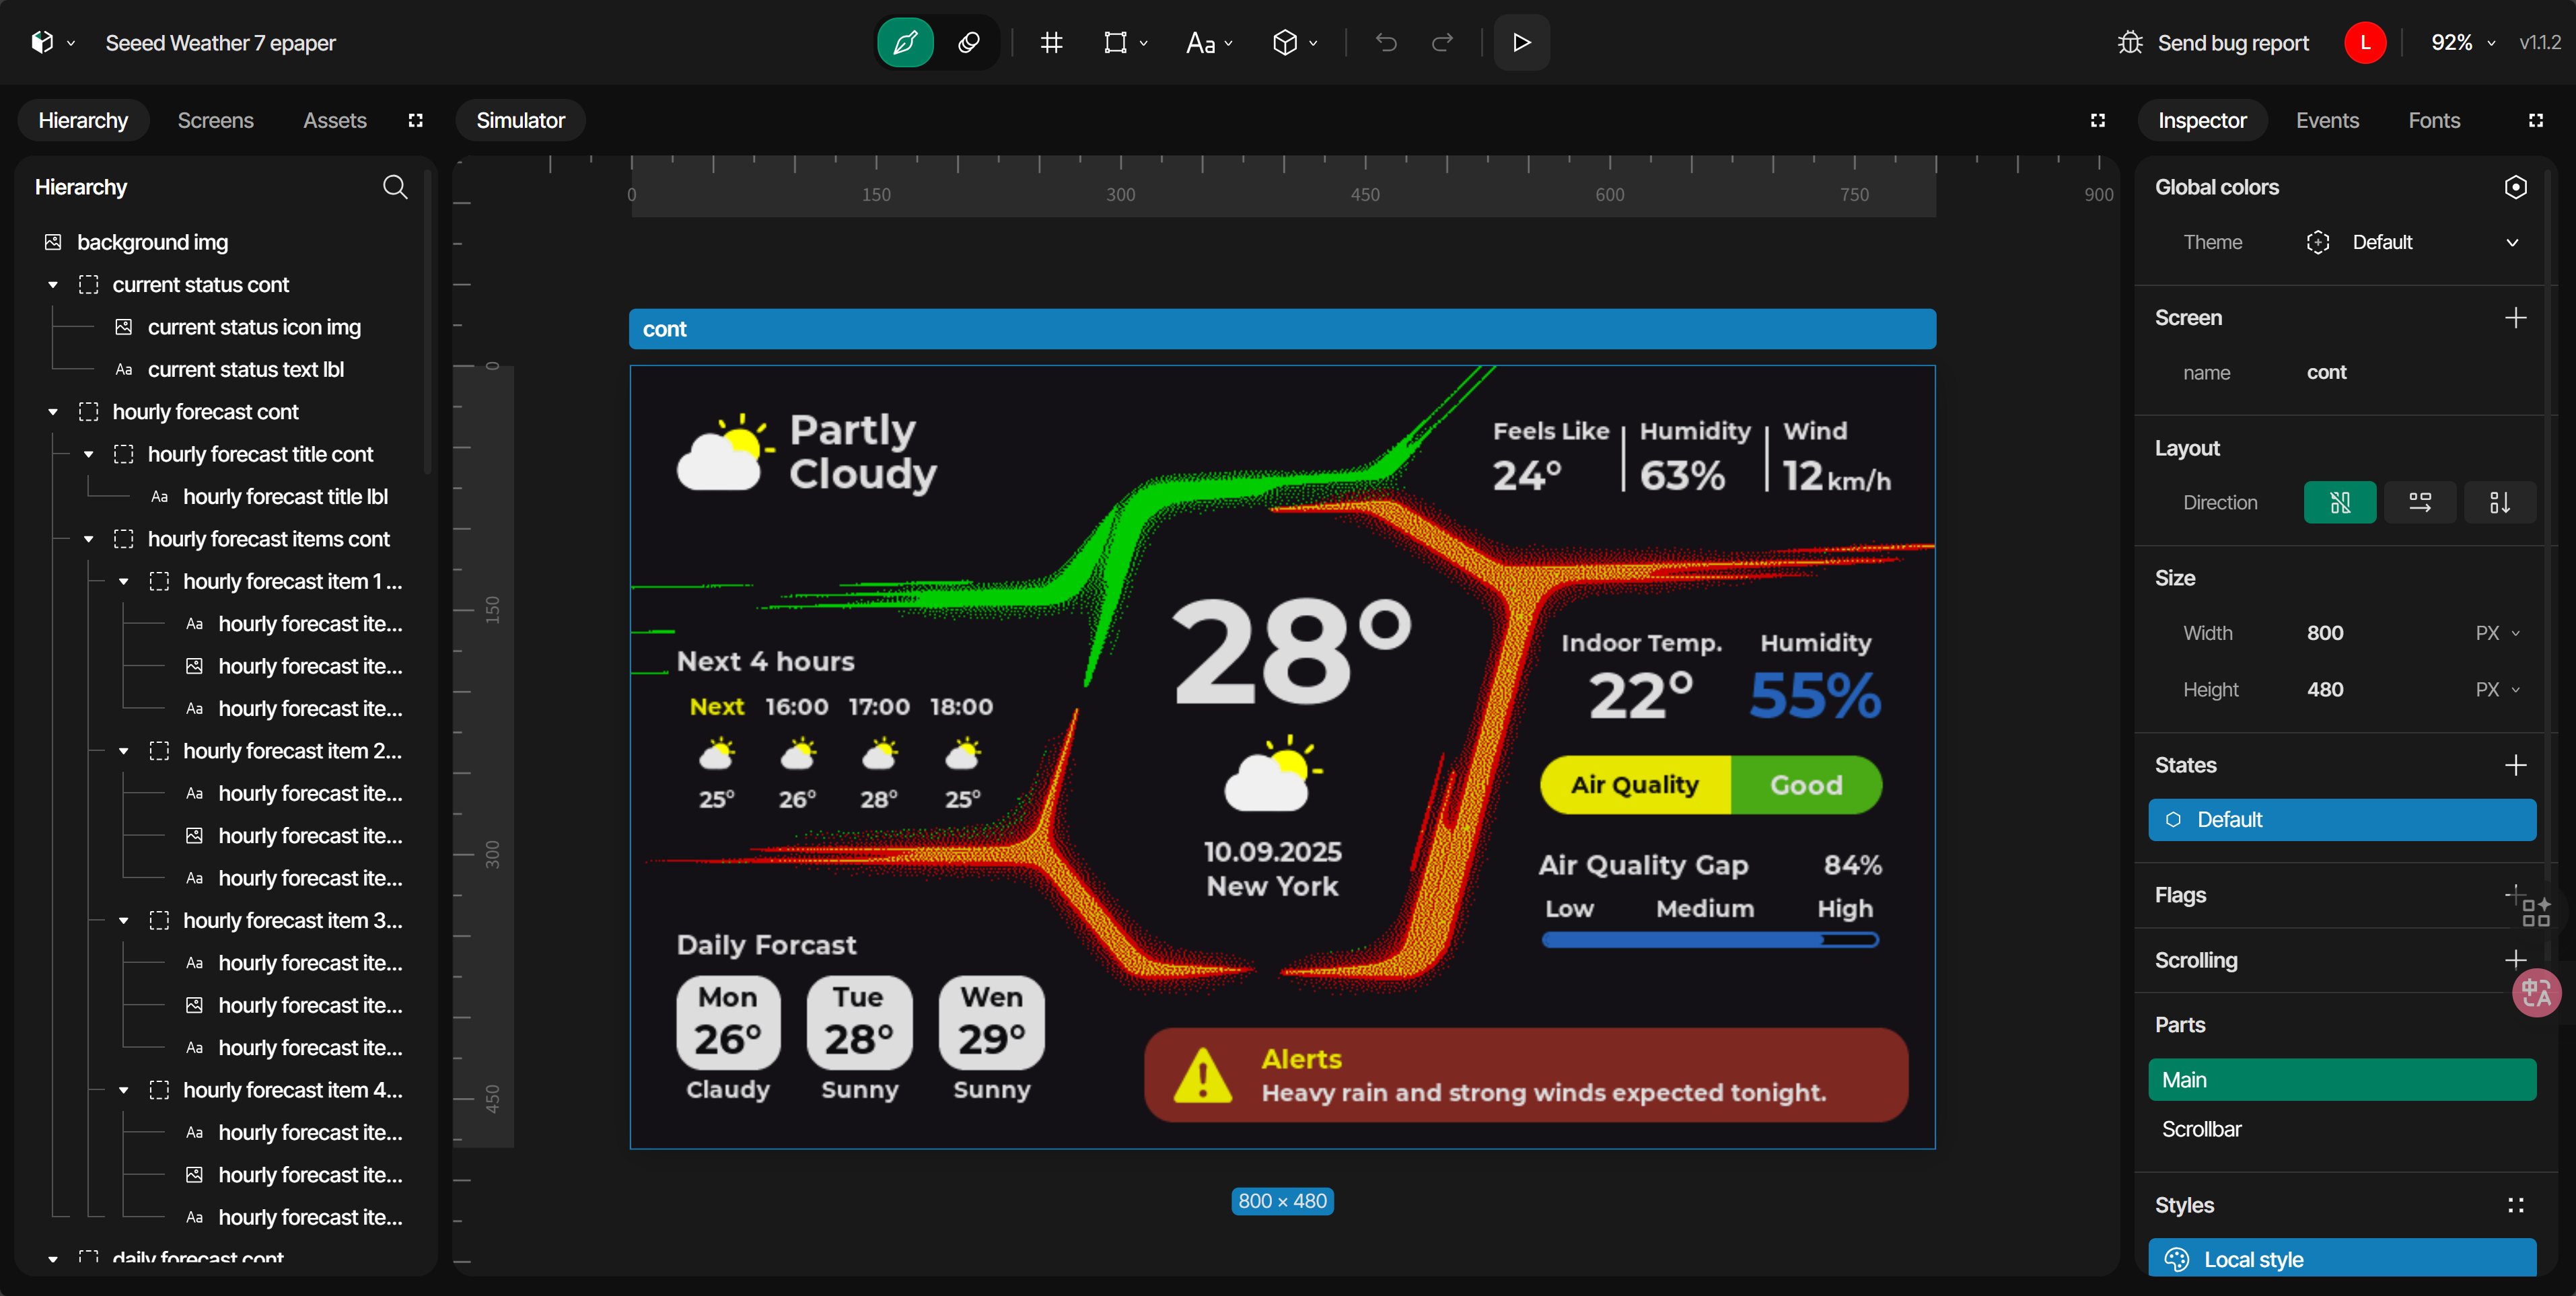
Project Parameter Settings & UI Interface Design
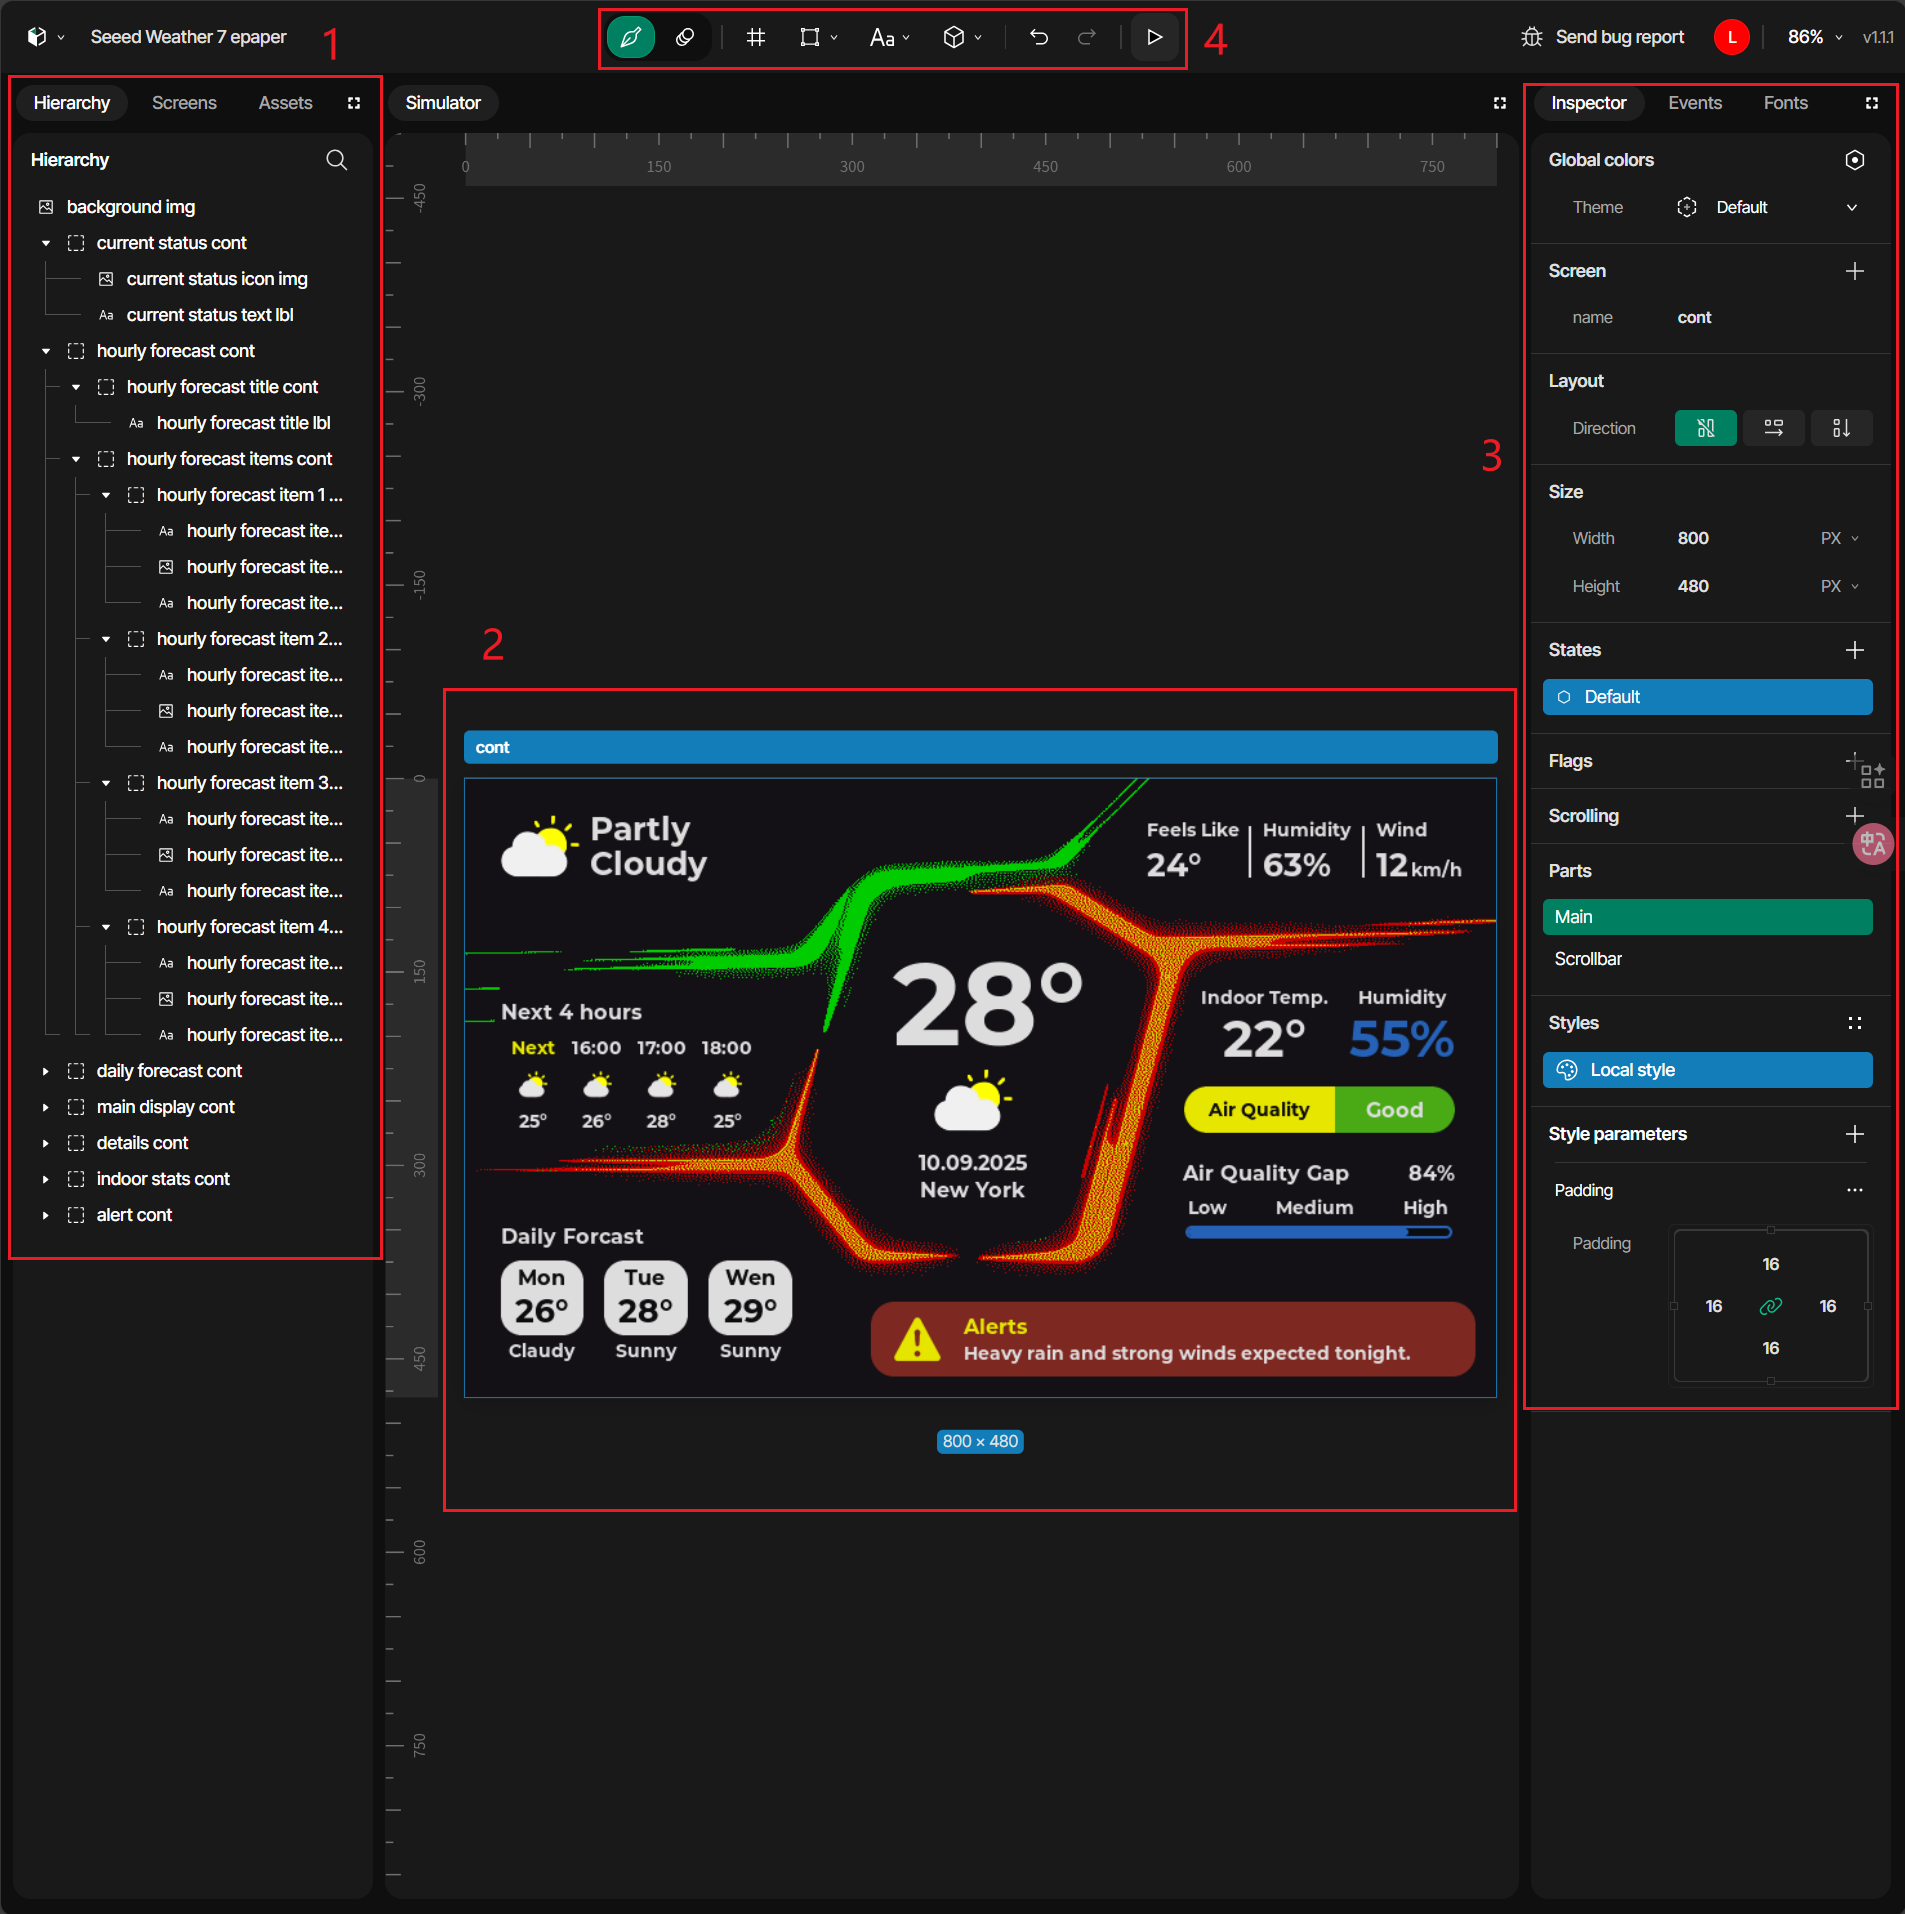
Once you enter the engineering interface, you can see four main areas:
- Region 1 is Hierarchy, which is mainly used to manage the structure of UI elements.
- Region 2 is Simulator, where the UI is displayed and used to view the presentation effects of each UI.
- Region 3 is Inspector, which provides detailed controls for the currently selected element.
- Region 4 is Toolbar, located at the top of the application interface, allowing easy access to many tools and functions.
UI Interface Design
UI (User Interface) design is crucial in embedded product development, as it directly determines the user experience. An aesthetically pleasing, intuitive, and responsive interface not only enhances the product's usability but also boosts its overall appeal.
In SquareLine Vision, you can rapidly assemble interfaces by dragging and dropping components. Utilize tools like Styles, Fonts, Bitmaps, and Themes to precisely control visual effects, crafting a professional and distinctive user experience.
This tutorial only covers the controls that appear in this project. However, SquareLine Vision offers many other functionalities, such as animations, events, and different fonts. If you want to explore this tool further, please refer to the official tutorials.
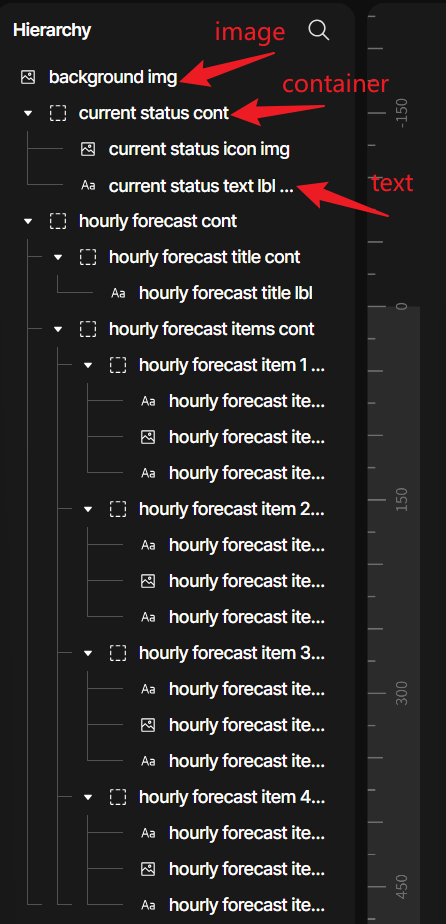
Introduction to Hierarchy
Here you can nest widgets within each other, creating parent-child relationships where the container widget becomes the parent and the elements inside it become child widgets.It can be seen that this picture is composed of various containers, images and texts.These three controls can all be found in the toolbar.
Introduction to Inspector
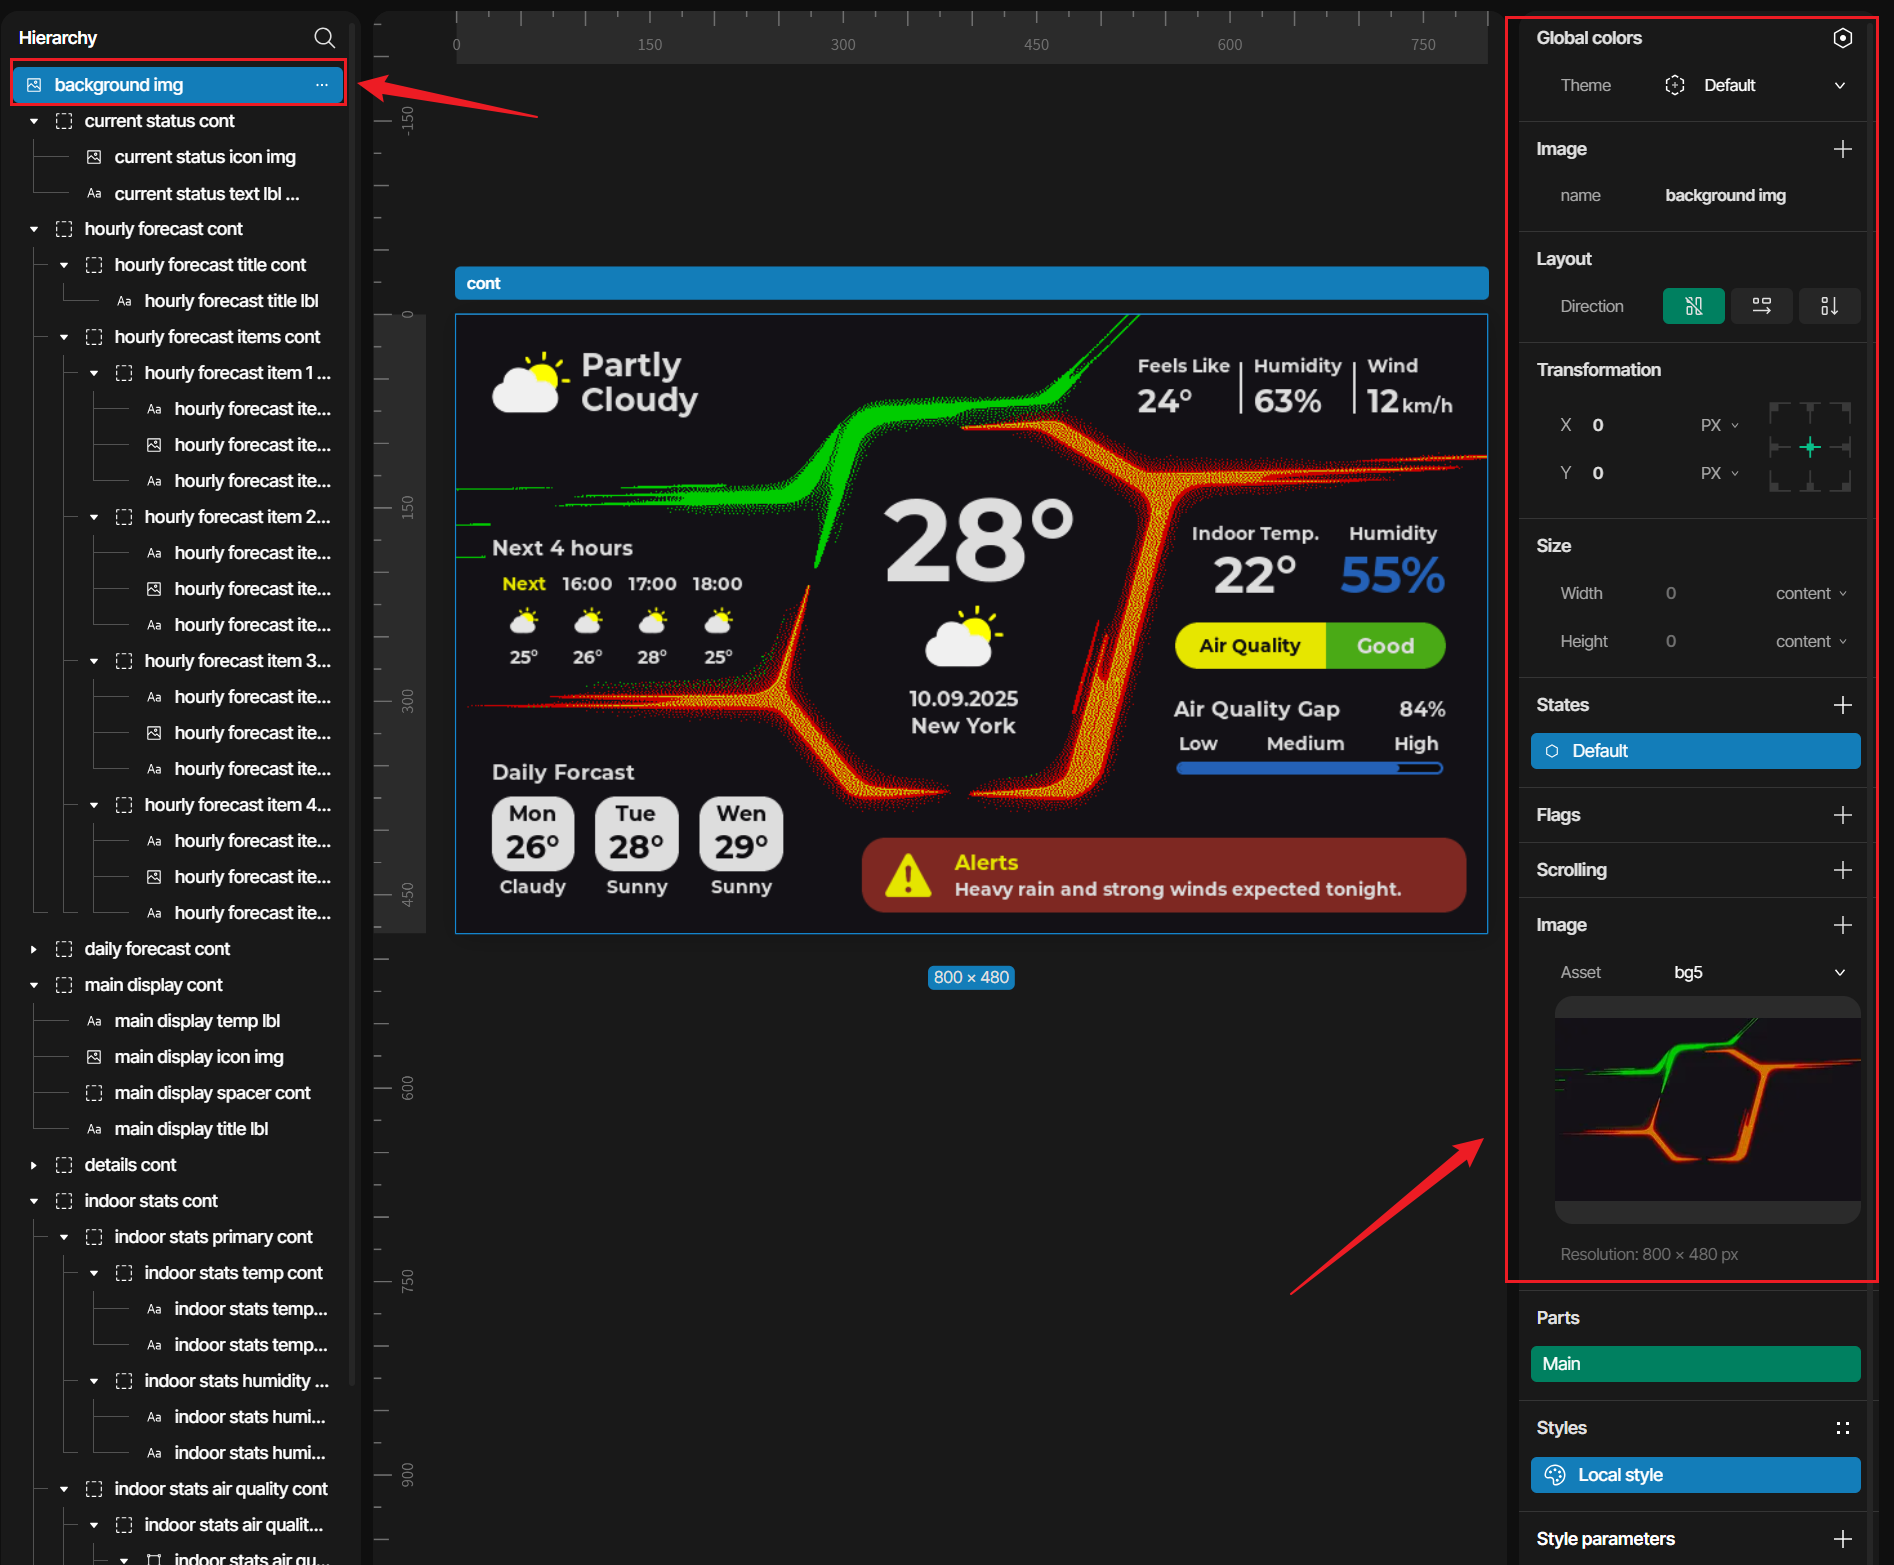
This panel allows you to view and modify properties of screens, containers, widgets, and other UI elements. Besides, there may be special settings that vary by widget type. When I select the "background img", I can see all the components related to the img in the Inspector.
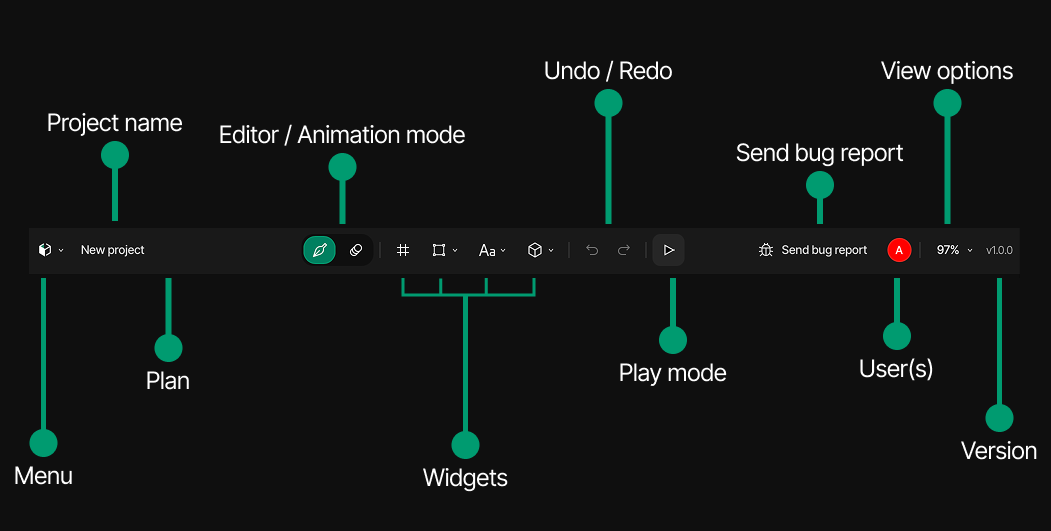
Introduction to Toolbar
Toolbar includes options for project configuration, saving your project, accessing help, reporting issues, modifying project view, downloading your project code, and starting your project in play mode directly in SquareLine Vision.
- Menu: From here, you can access the functions for saving your work, exporting the project, adjusting the project settings, and returning to the launcher screen.
- Project name: Displays the name of your current project.
- Plan: Shows the user's current subscription plan.
- Editor / Animation mode: Toggles between two distinct working environments
- Widgets: Access UI elements through three dropdown menus that logically group components, making it easy to locate the appropriate widget for your project.
- Undo / Redo: Allows stepping backward and forward through design changes, supporting experimentation without risk.
- Play mode: Start preview and test UI simulation.
- Send bug report: Provides direct access to the error reporting system.
- User(s): Displays all active users currently working within your project, supporting collaborative design efforts.
- View options: You can toggle the minimap display and enter precise zoom percentage values in a dedicated input field.
- Version: Displays the current SquareLine Vision version that your project is running on, ensuring you're aware of your software environment.
Code Generation and Project structure
The SquareLine Vision exporter generates LVGL-based GUI code organized in a structured way to separate concerns and make the code maintainable. The exported code follows a modular architecture with clear separation between GUI initialization, screen management, events, styles, and animations.
Project structure
exported_project/
├── GUI/                    # Main GUI folder (or 'ui' for Studio format)
│   ├── Content/            # GUI content files
│   │   ├── screens/        # Individual screen source files
│   │   ├── images/         # Generated image source files
│   │   └── fonts/          # Font source files
│   ├── Behavior/           # Event and animation related files
│   │   ├── GUI_Events.c    # Event handler implementations
│   │   └── GUI_Animations.c # Animation and timeline definitions
│   ├── Framework/          # GUI framework files
│   │   └── LVGL/           # LVGL library files
│   ├── GUI.c               # Main GUI implementation
│   ├── GUI.h               # Main GUI header
│   ├── GUI_variables.c     # GUI object declarations
│   ├── GUI_GlobalStyles.c  # Global style definitions
│   ├── CMakeLists.txt      # CMake build configuration
│   └── filelist.txt        # List of all GUI source files
├── lv_conf.h               # LVGL configuration file
├── main.c                  # Application entry point
├── HAL.c                   # Hardware abstraction layer
├── CMakeLists.txt          # Main CMake configuration
├── build.sh                # Build script
└── run.sh                  # Run script
Key Components
Main interface for the GUI subsystem. Provides high-level functions for:
GUI_load(): Complete GUI initialization including HAL and LVGLGUI_init(): Basic GUI initializationGUI_refresh(): Updates GUI state (calls LVGL handlerGUI_initContent(): Initializes screens and widgetsGUI_initTheme(): Sets up the GUI themeGUI_loadFirstScreen(): Loads the initial screen
Program burning
The main control module of E1002 is ESP32-S3. If you want to program the reTerminal E series e-paper display screen using PlatformIO, you need to set the option for supporting ESP32 in the .ini file.
If this is your first time using PlatformIO, we highly recommend you to refer to Getting Started with PlatformIO.
Usage Examples
PlatformIO Setup
- Step 1: Install PlatformIO in official website. If you have not install software of PlatformIO, you can click on the link above.
-
Step 2: Search for
platformioin the VScode extensions. The first icon that appears is the one you need. Just clickInstallto start the download.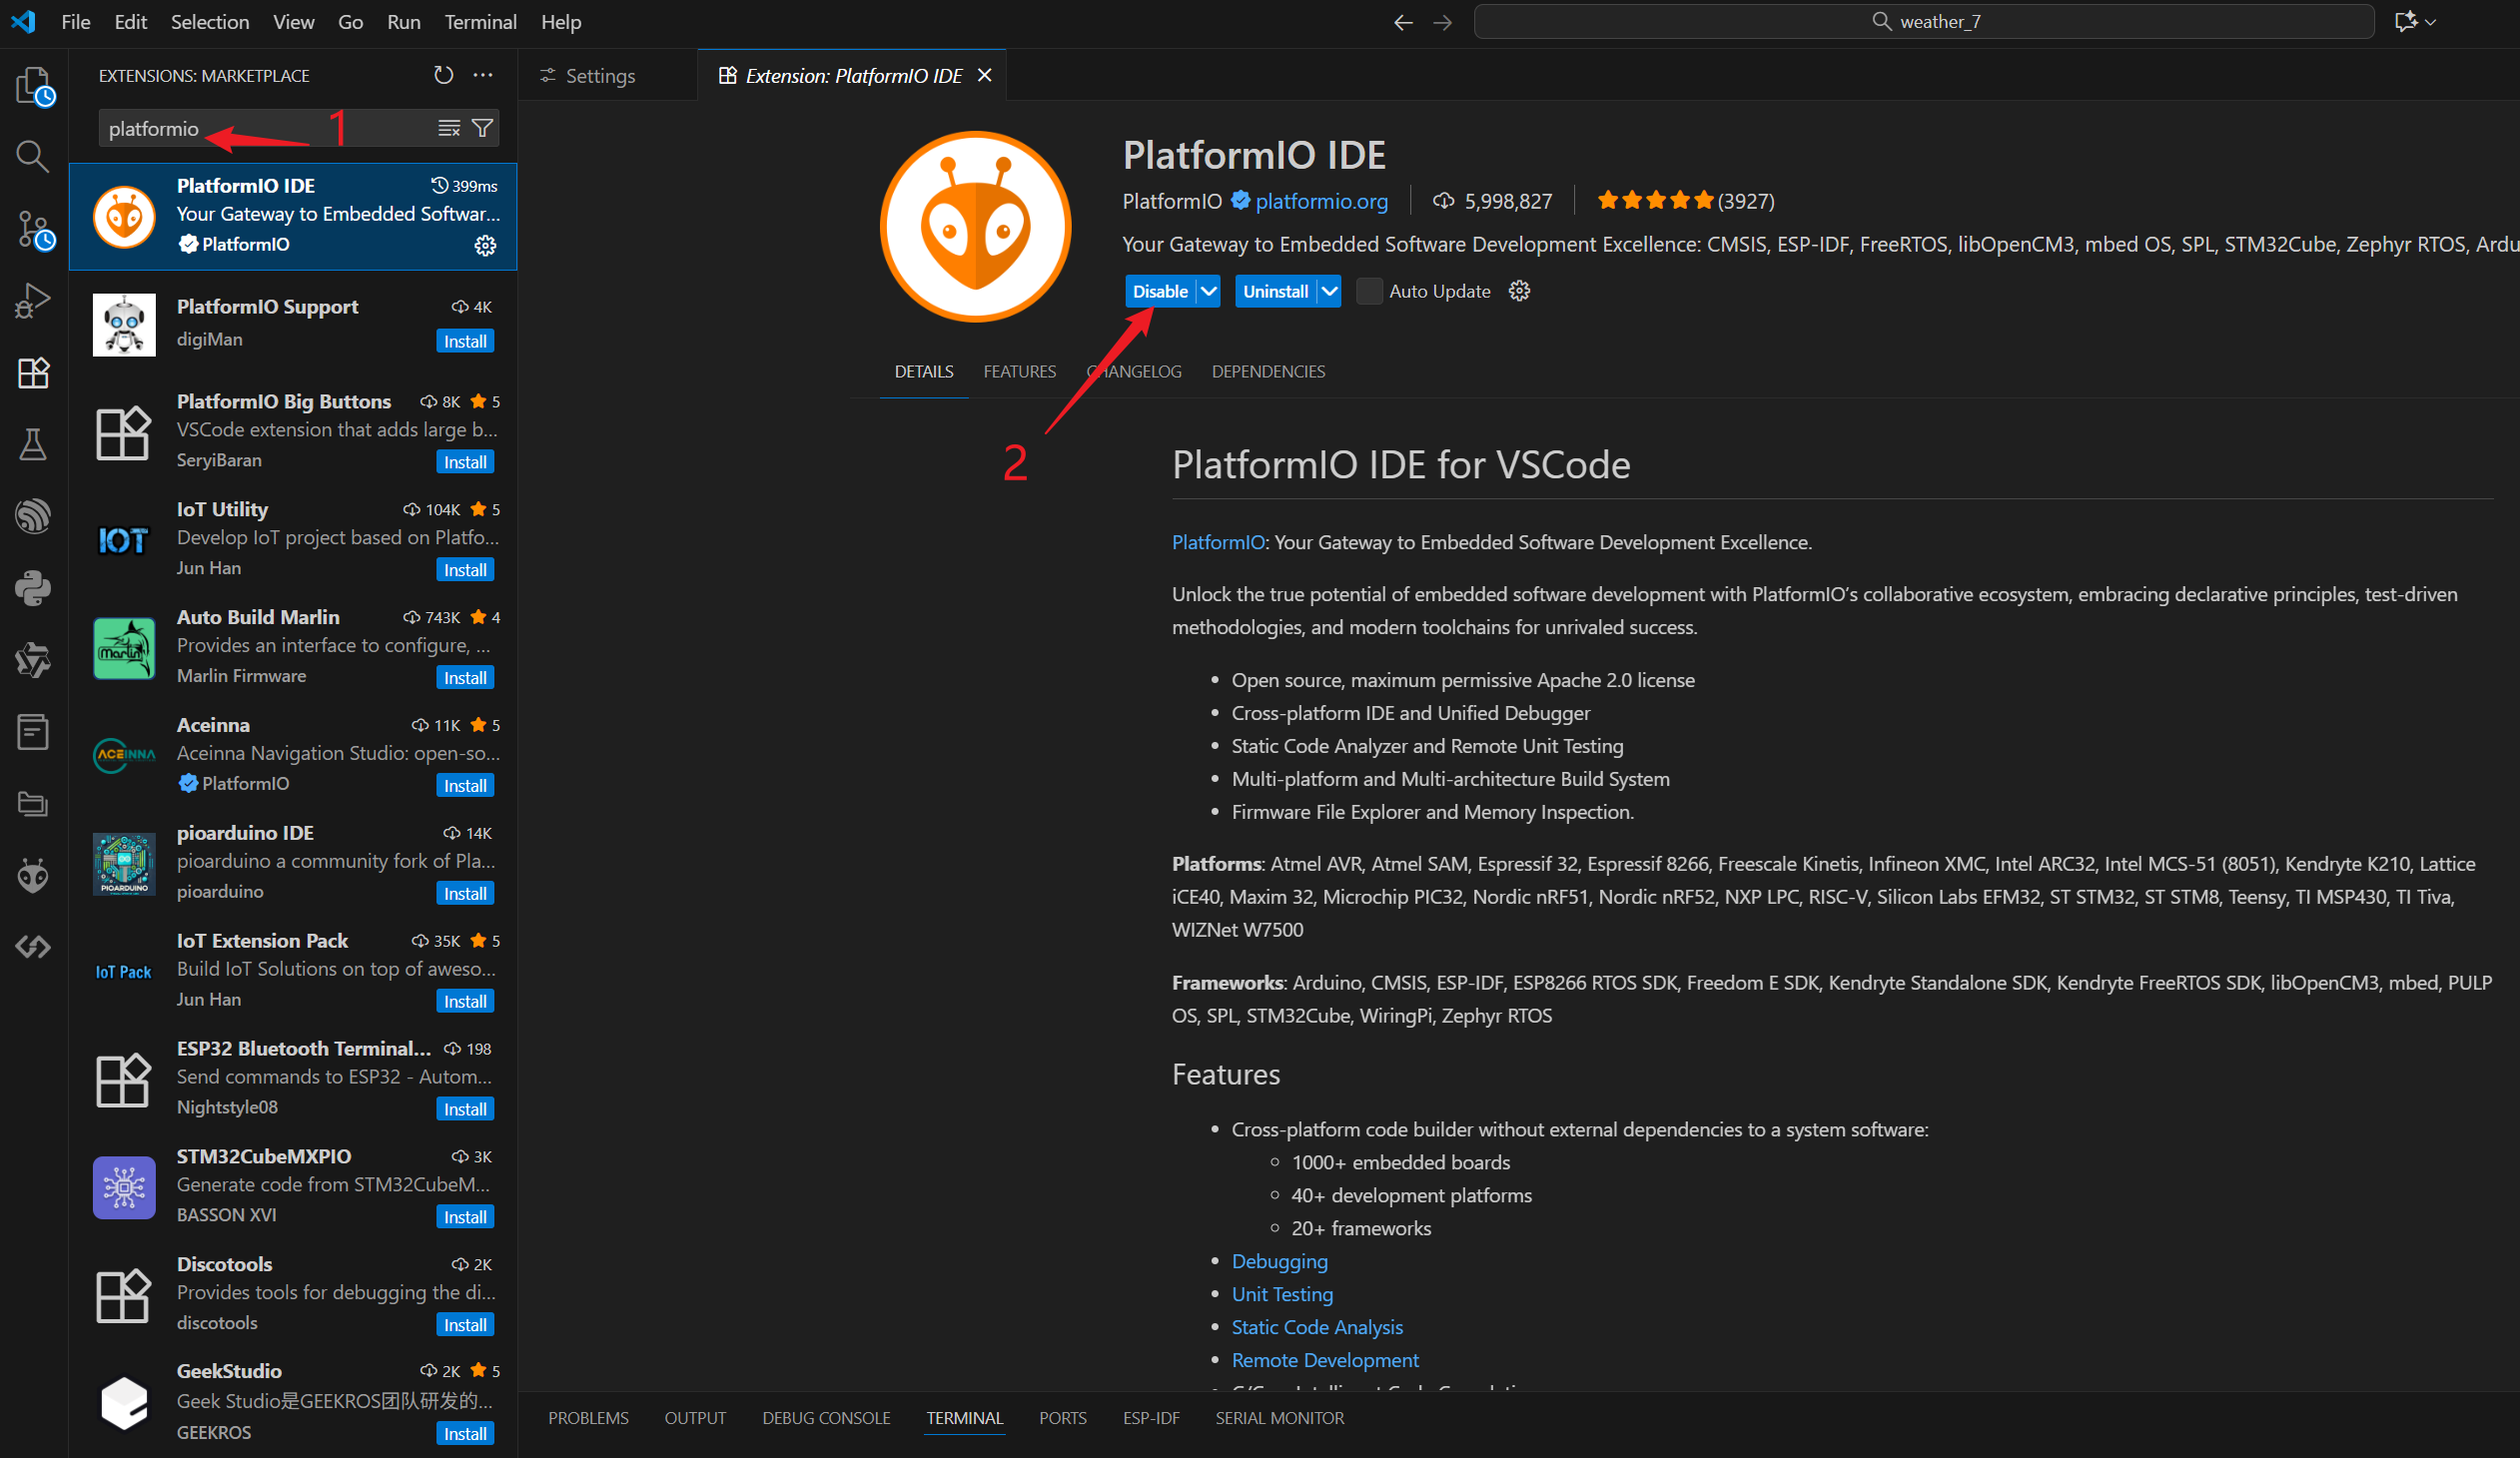
-
Step 3: Open the PlatformIO plugin in sequence. Then, click the
Openbutton and select the local PlatformIO project by clickingOpen Projectto open it.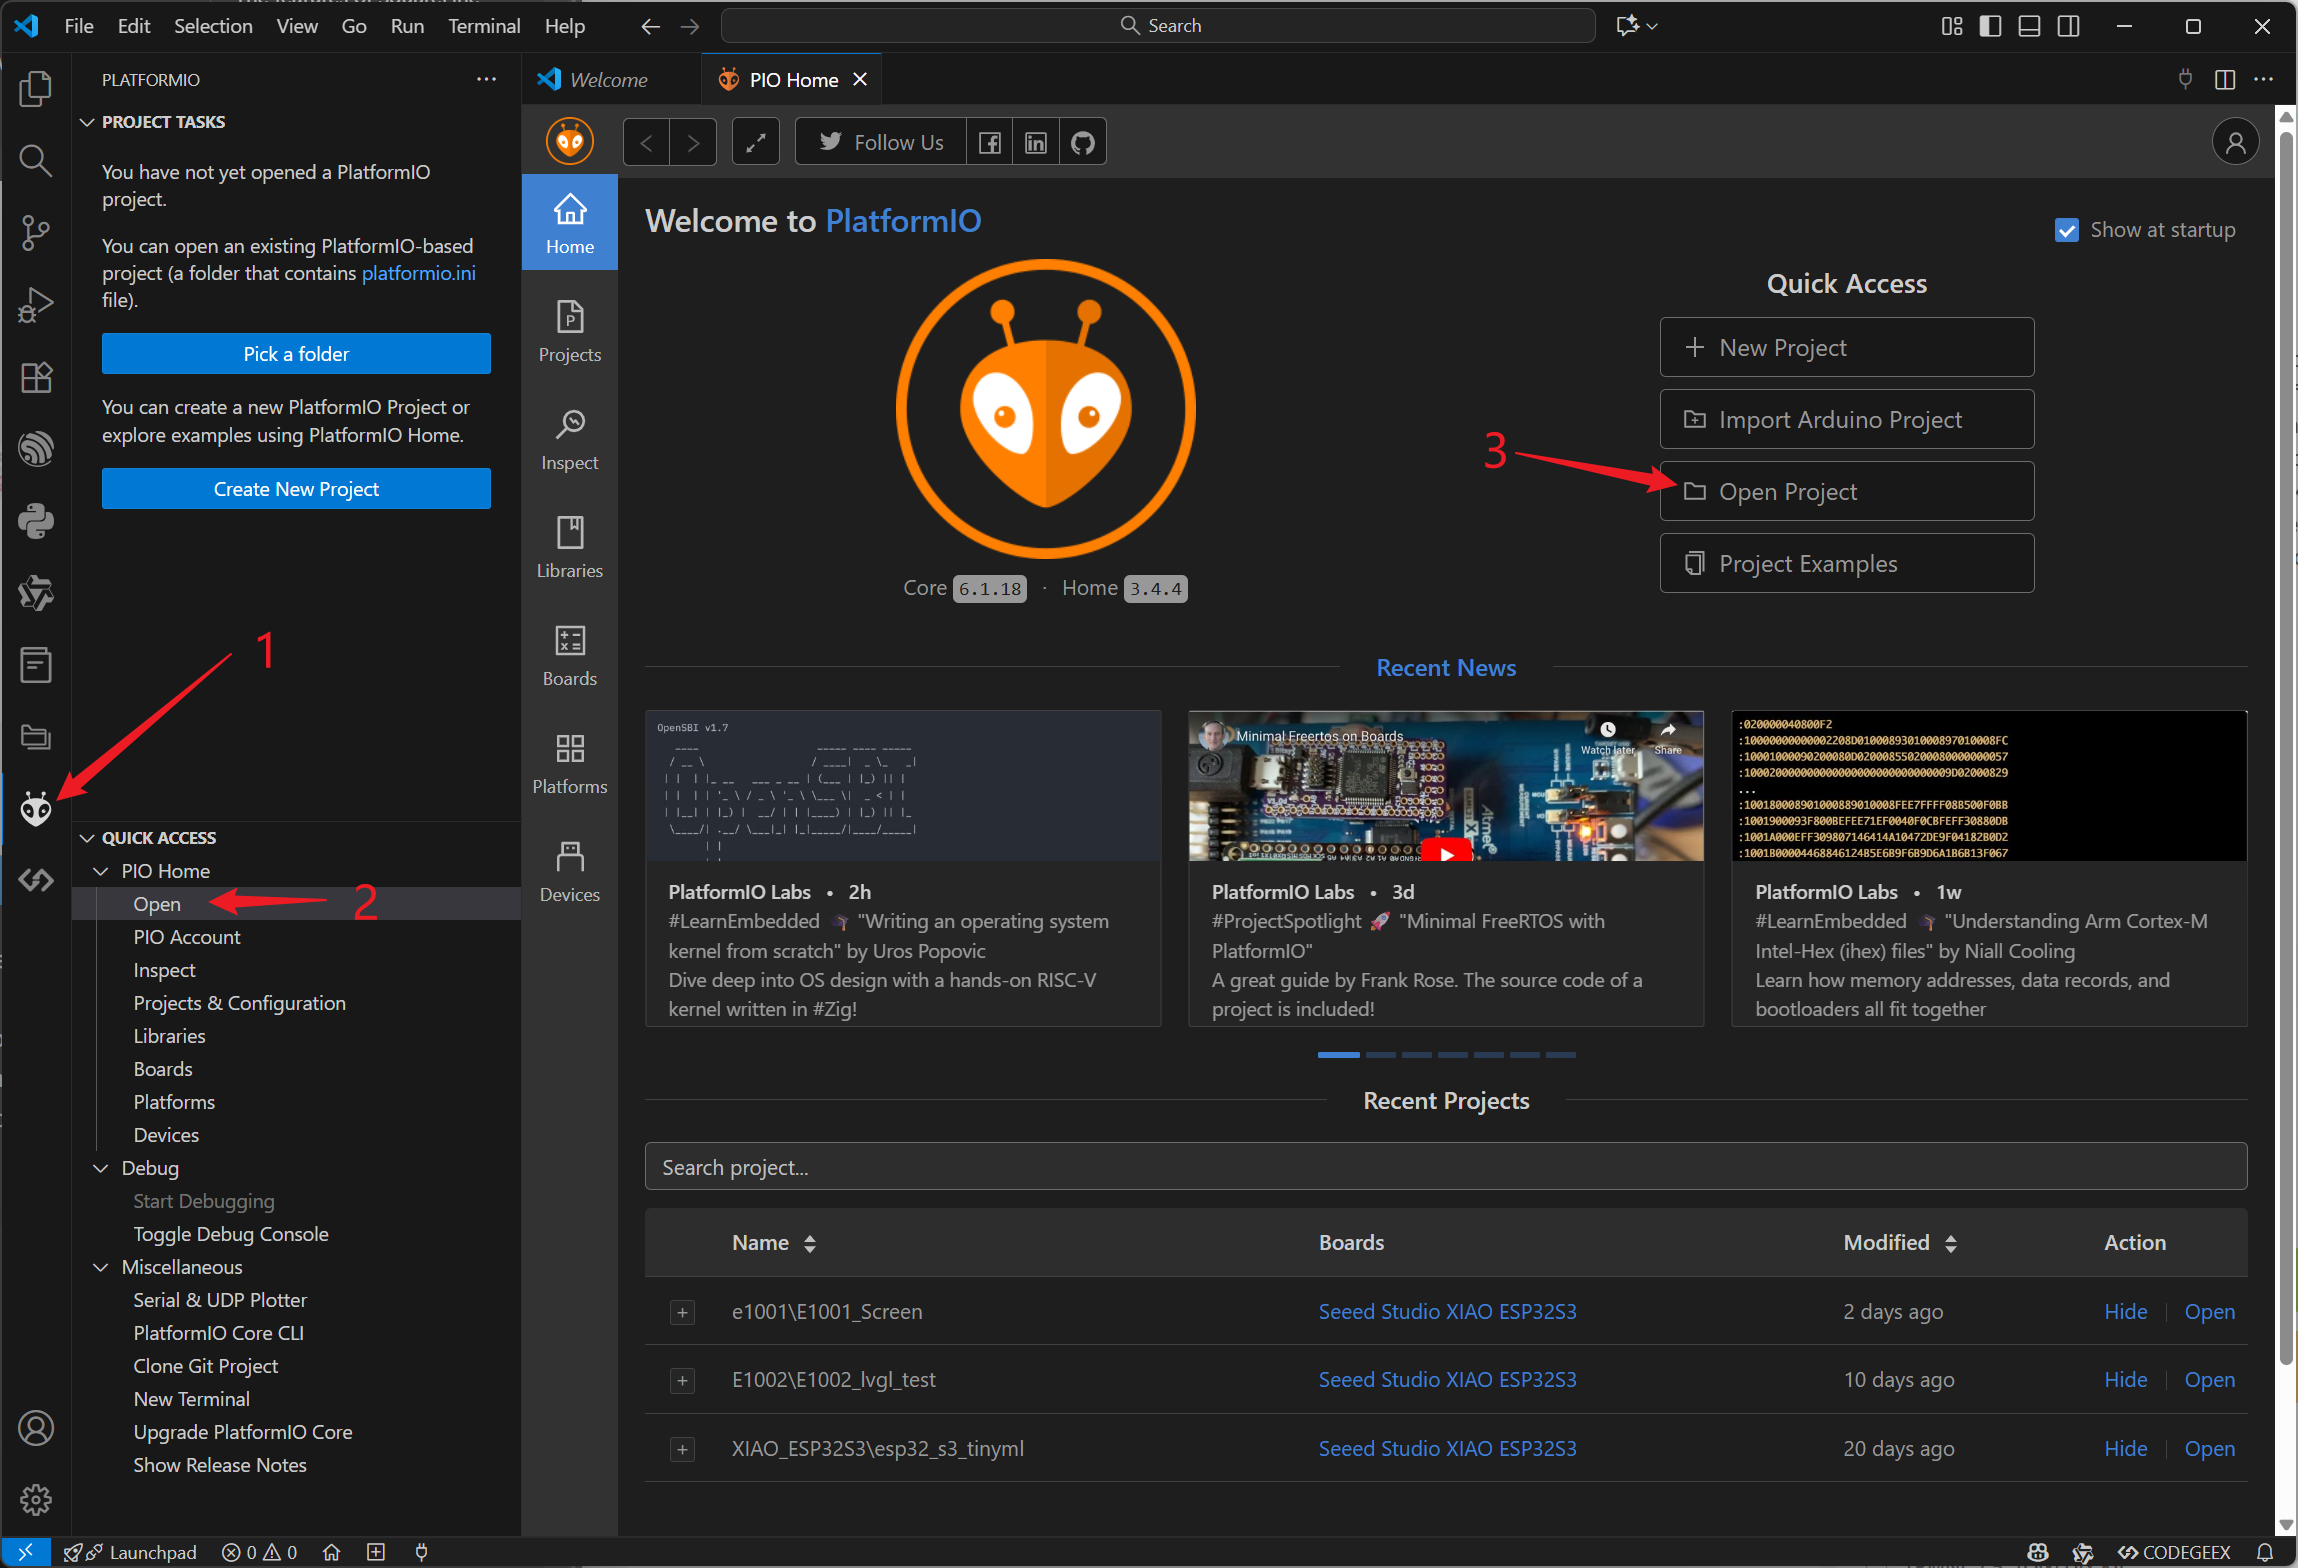
Reference routine
We have provided three existing templates, each with a different UI interface that can display the real-time weather dashboard. They also integrate with OpenWeather(It is a service platform that provides global weather data) to obtain real-time climate changes. All you need to do is obtain the API KEY from OpenWeather and connect to WIFI to use them normally.
-
Step 1: Open the folder in VScode and wait for the related dependencies to be downloaded completely. After opening the project, open the
.inifile and pressCtrl+S. At this point, the project's dependencies will automatically start downloading. When you seeProject has been successfully updated, it means the download process is complete. When the wordsuccessfulis present, it will immediately indicate that the installation has been successfully completed.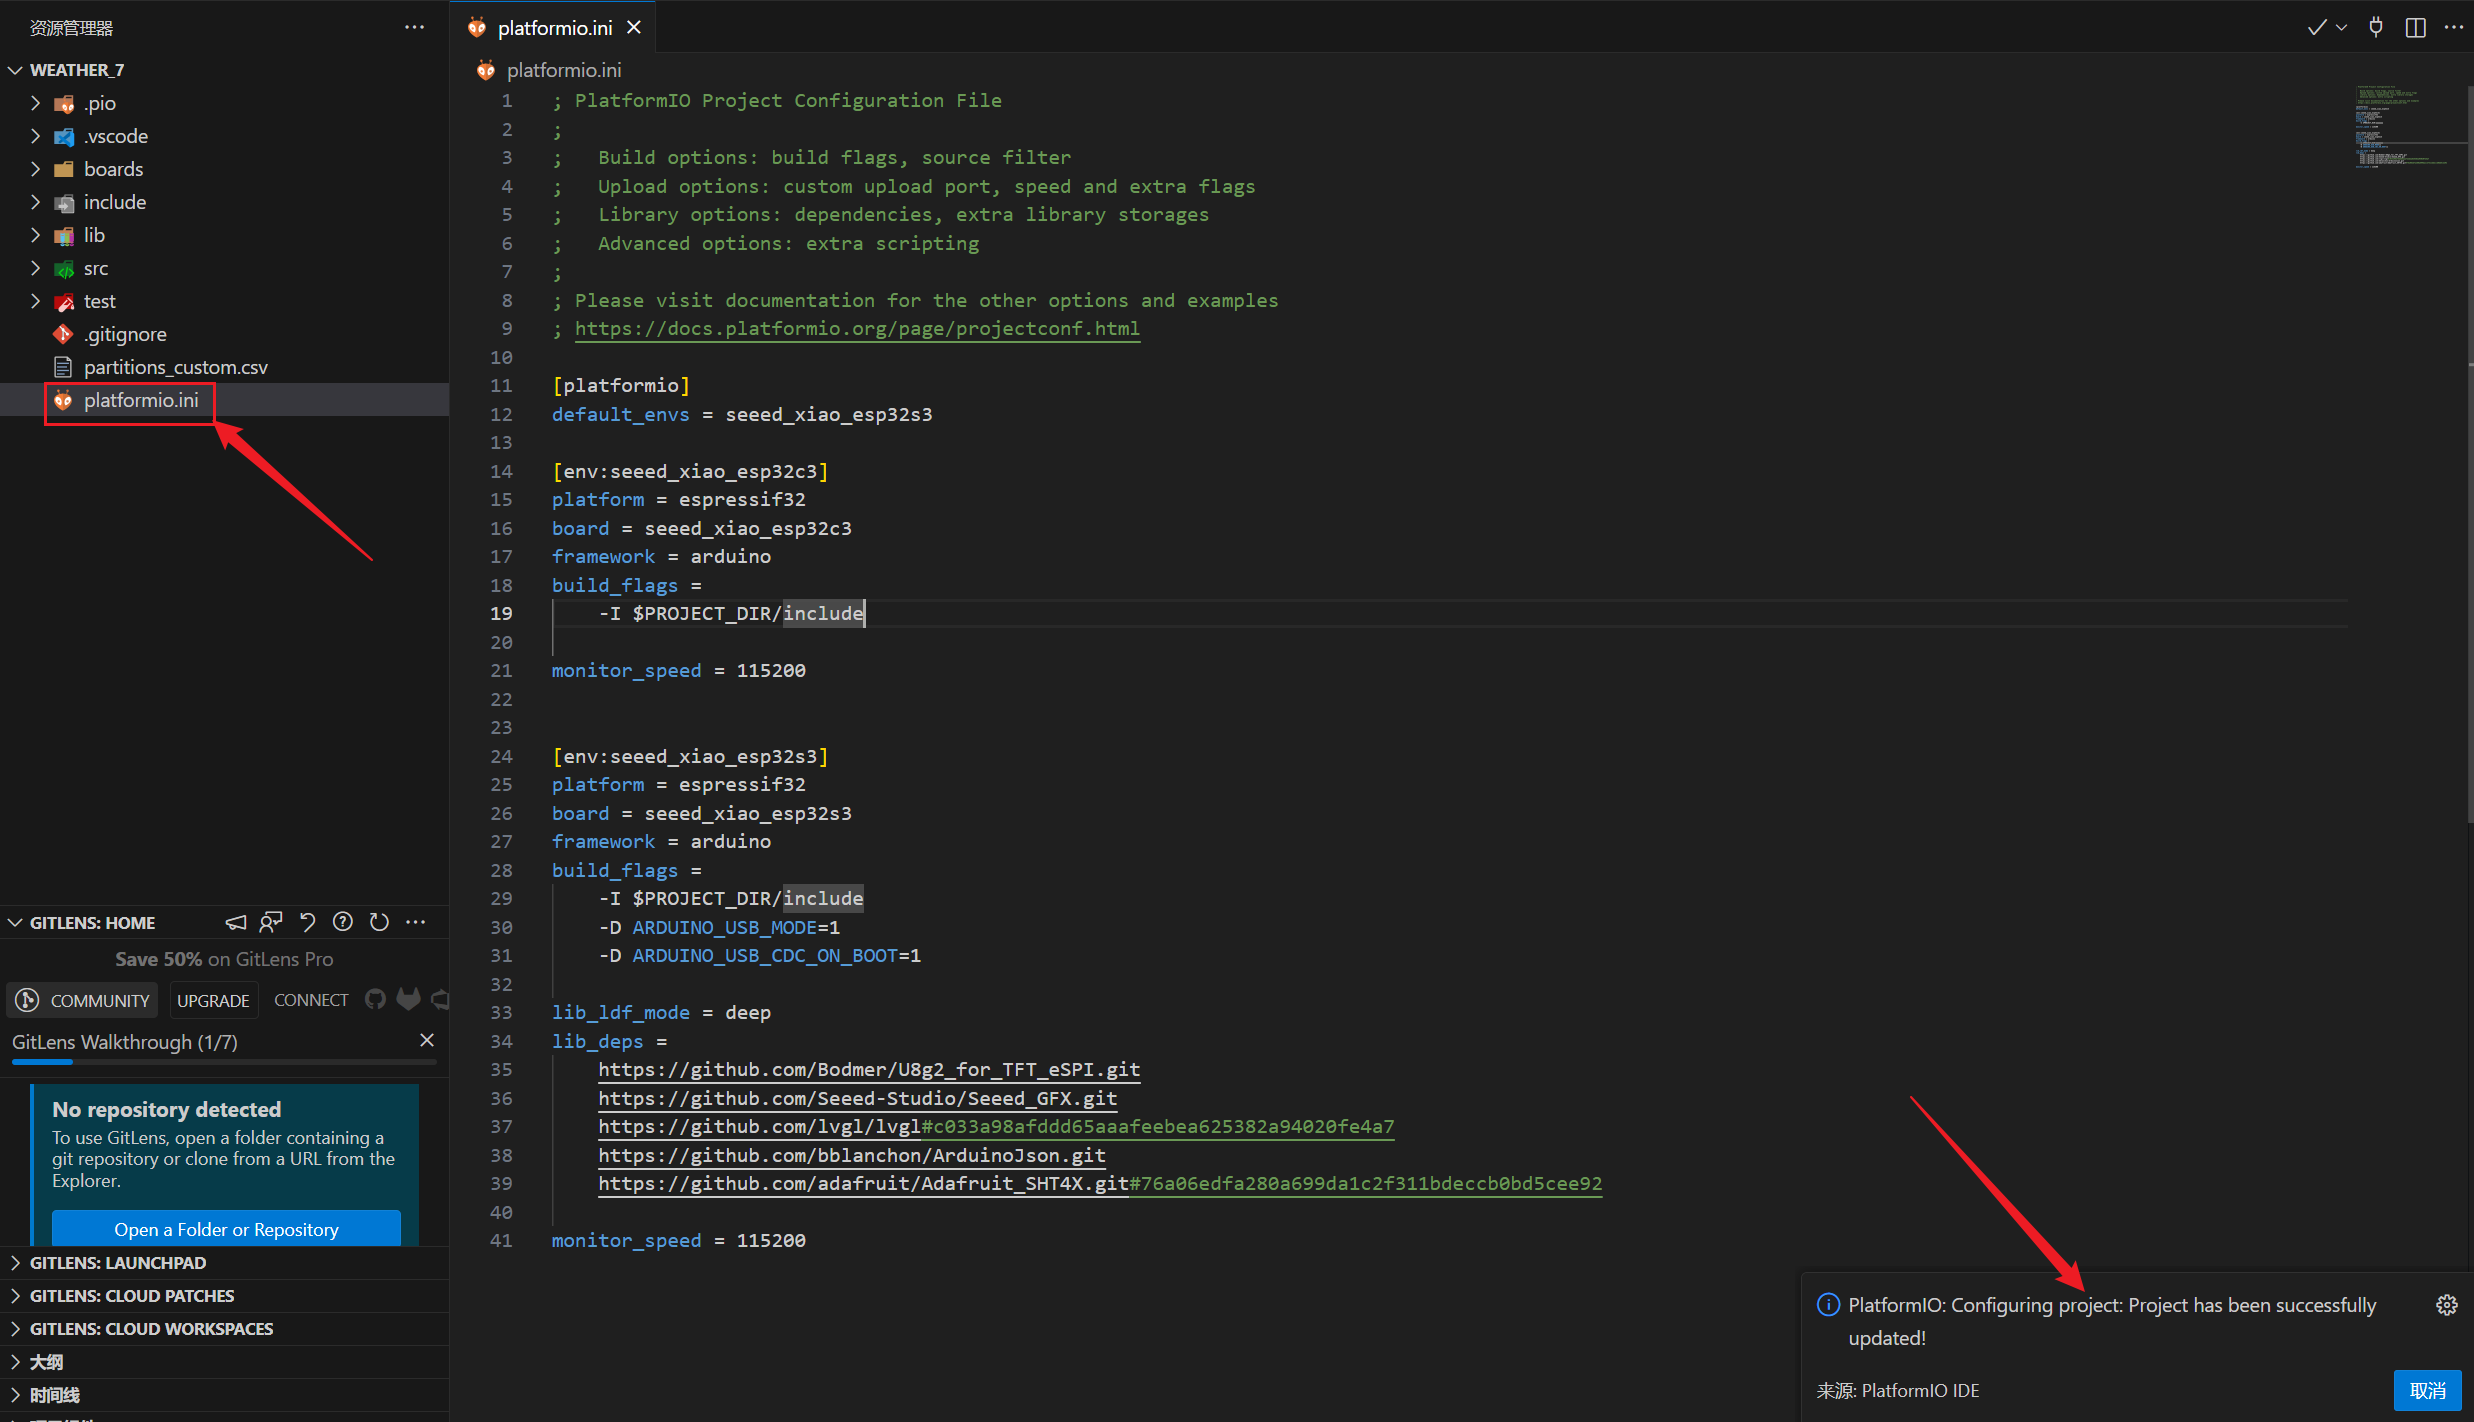
-
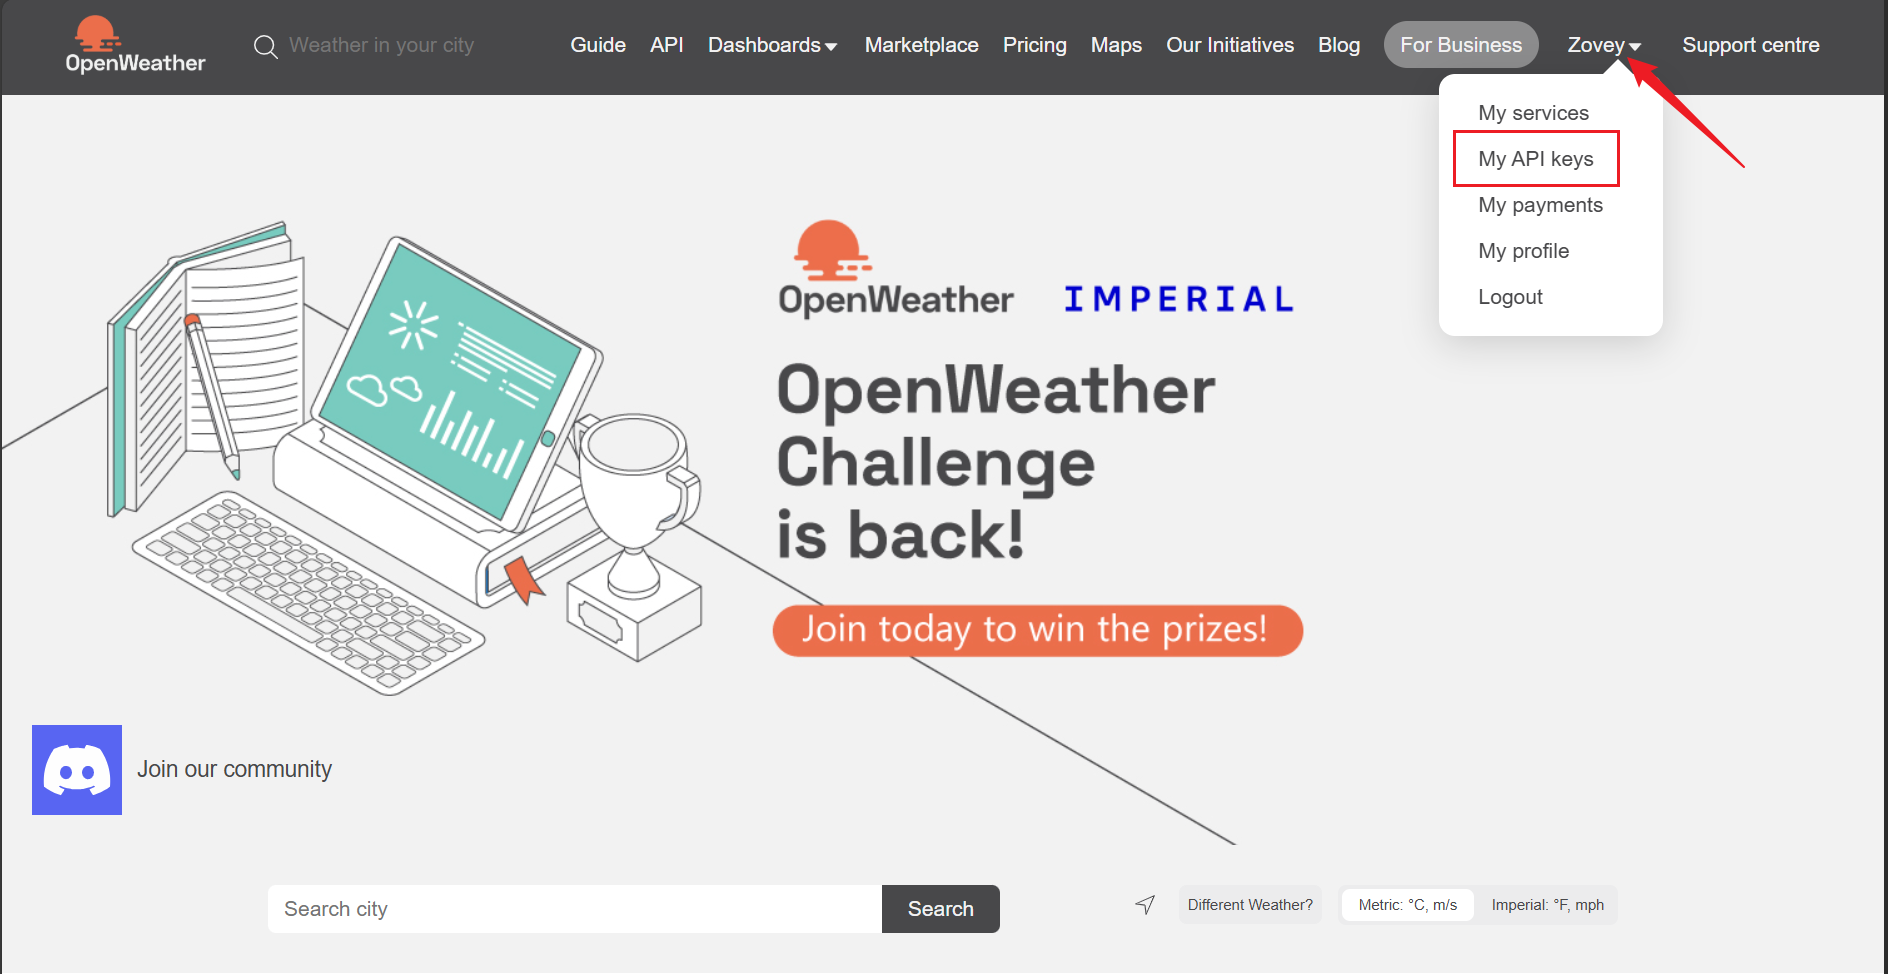
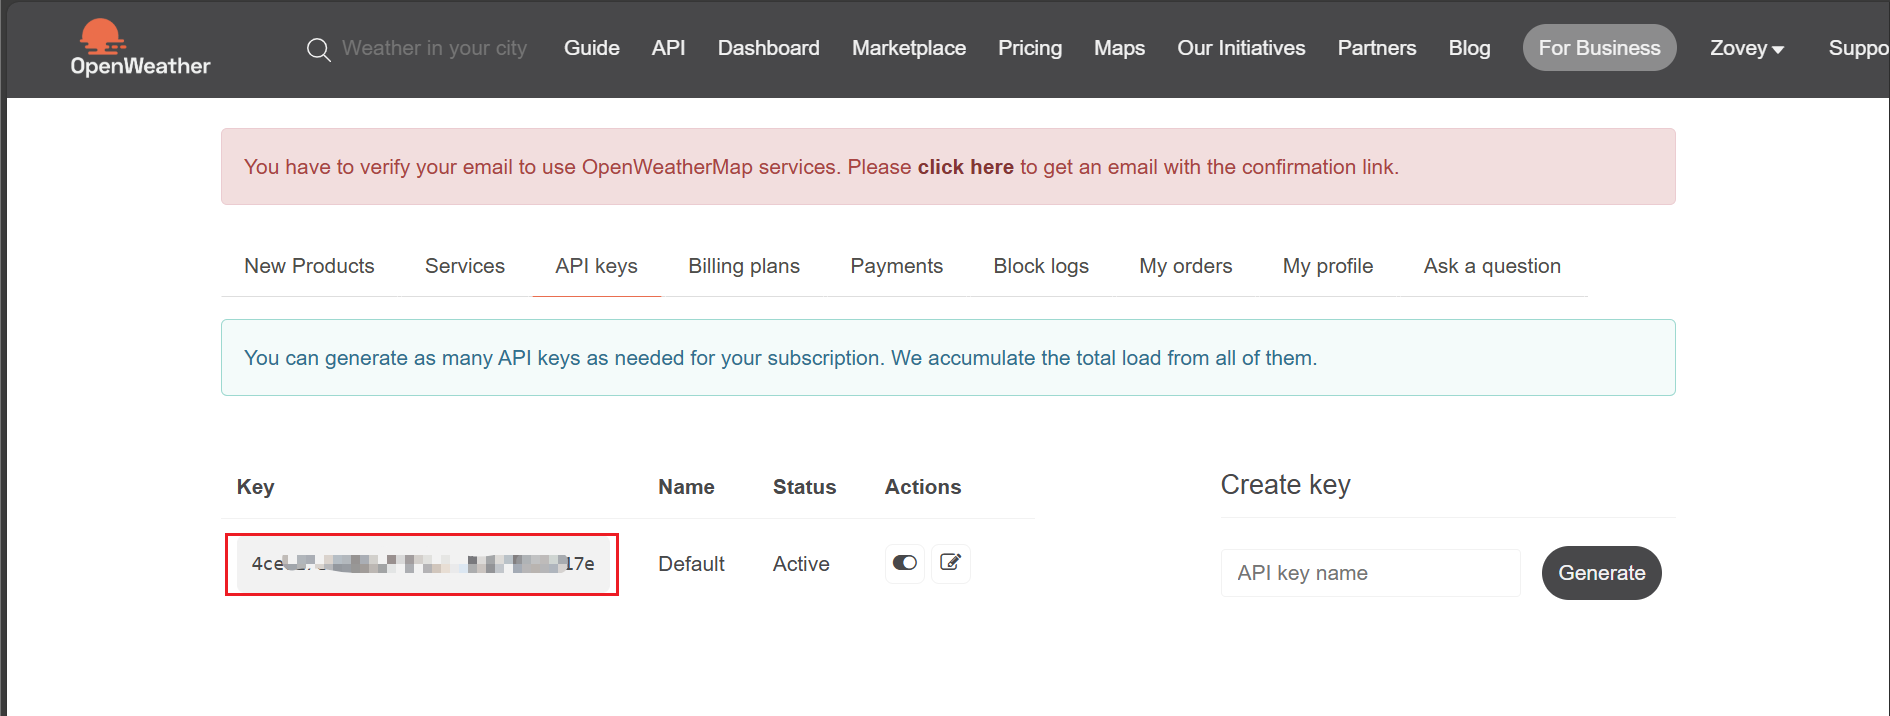
Step 2: Open OpenWeather and get your own API KEY
-
Step 3: Modify your
WIFI_SSID,WIFI_PASSWORDandOW_API_KEYinmain.cpp.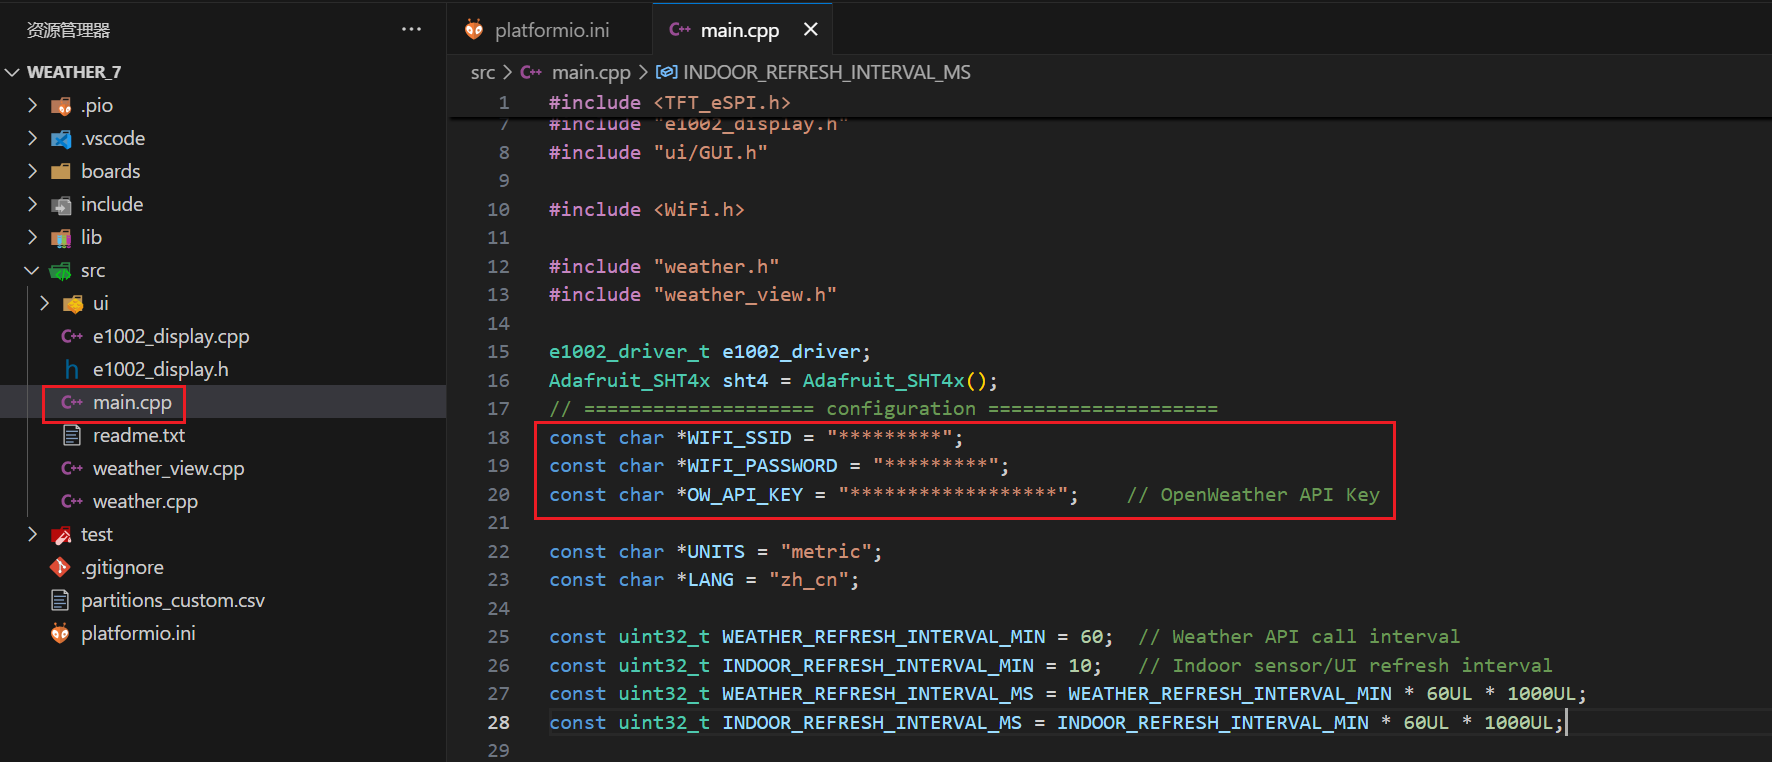
-
Step 4: Connect the reTerminal to the computer using a USB data cable, and select the appropriate serial port for the burning process. Then click the
uploadbutton to perform the burning process.
When the following content appears on the terminal, it indicates that the burning process has been successful. Subsequently, the reTerminal will automatically update the screen image.
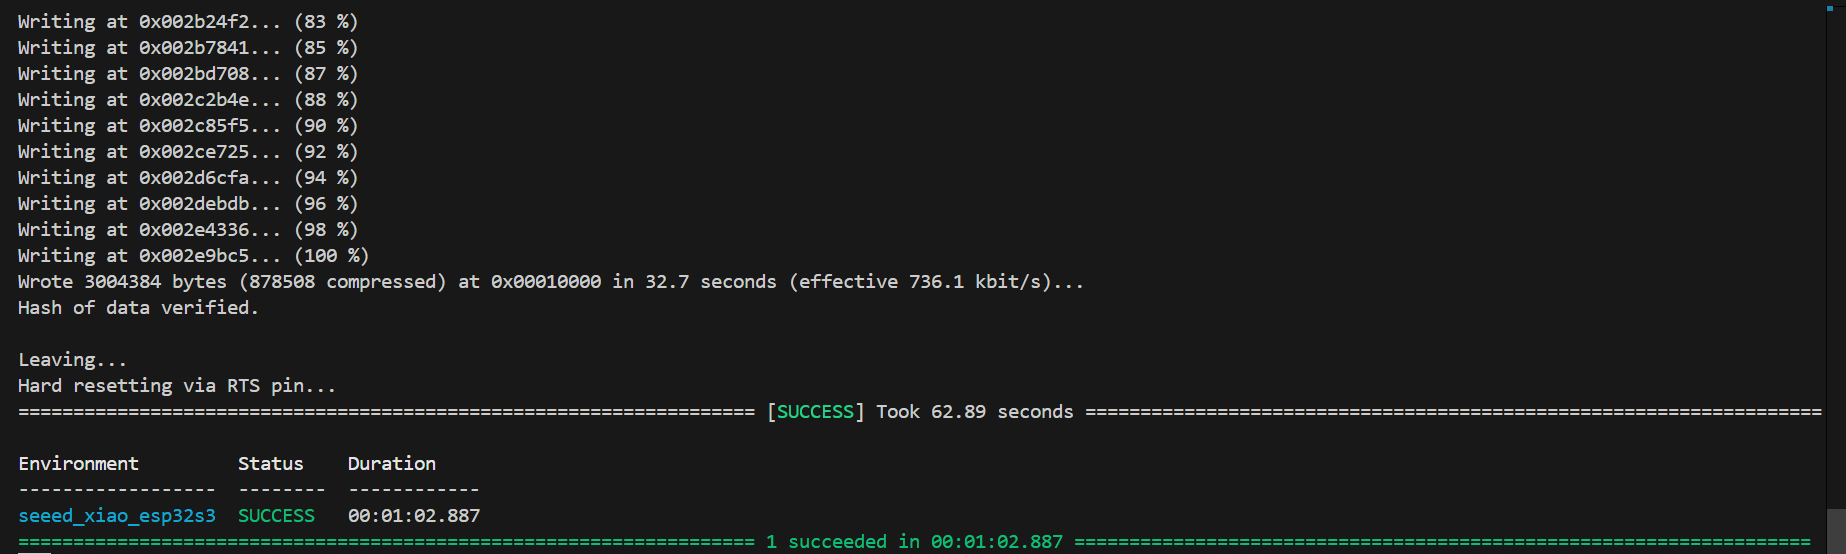
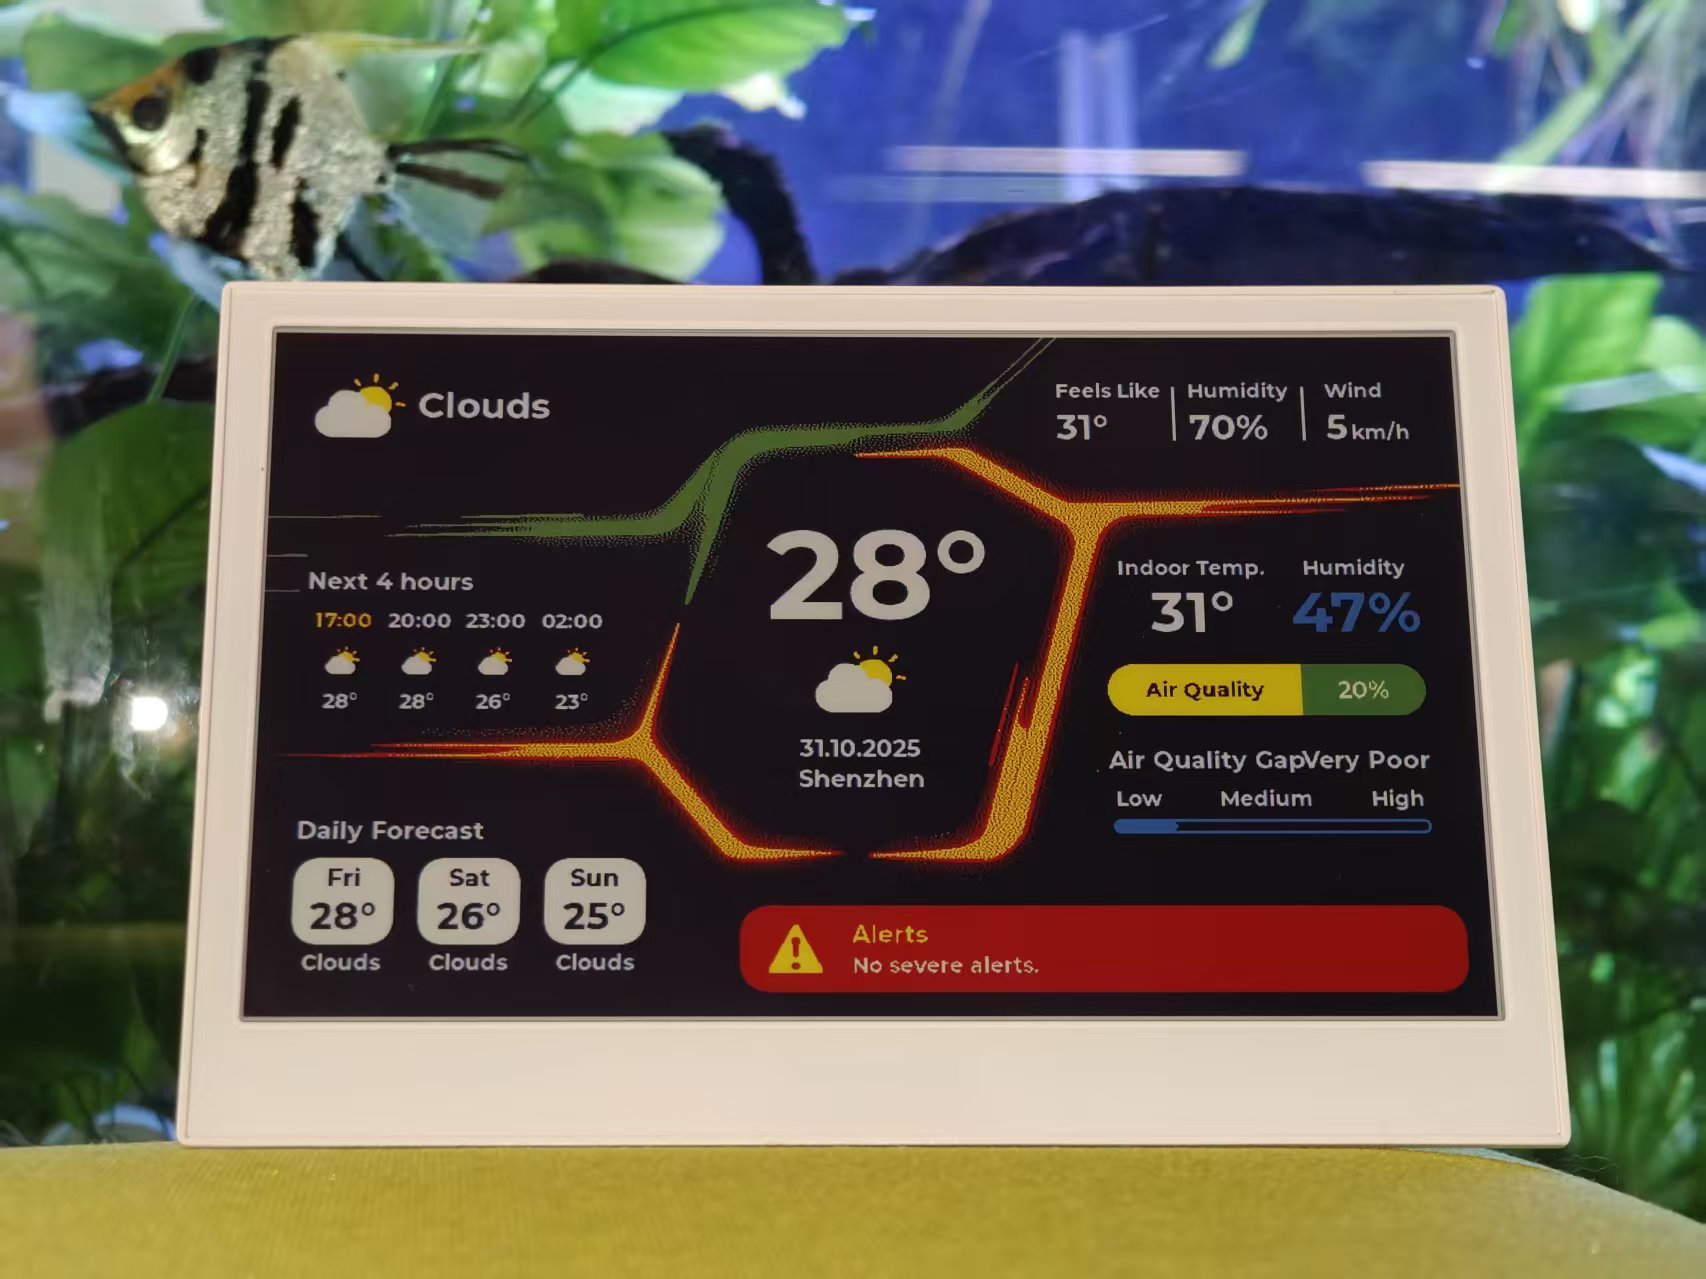
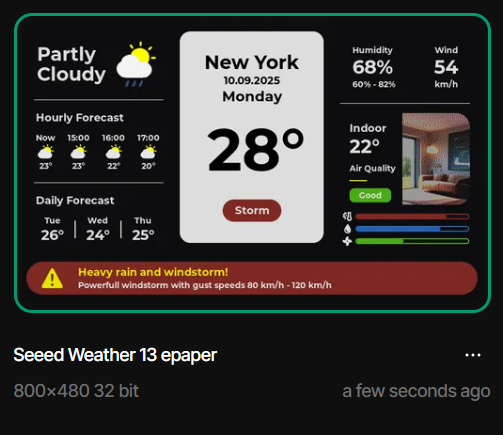
Result presentation
| Monochrome Weather | Full Color Weather | Full Color Weather 2 |
|---|---|---|
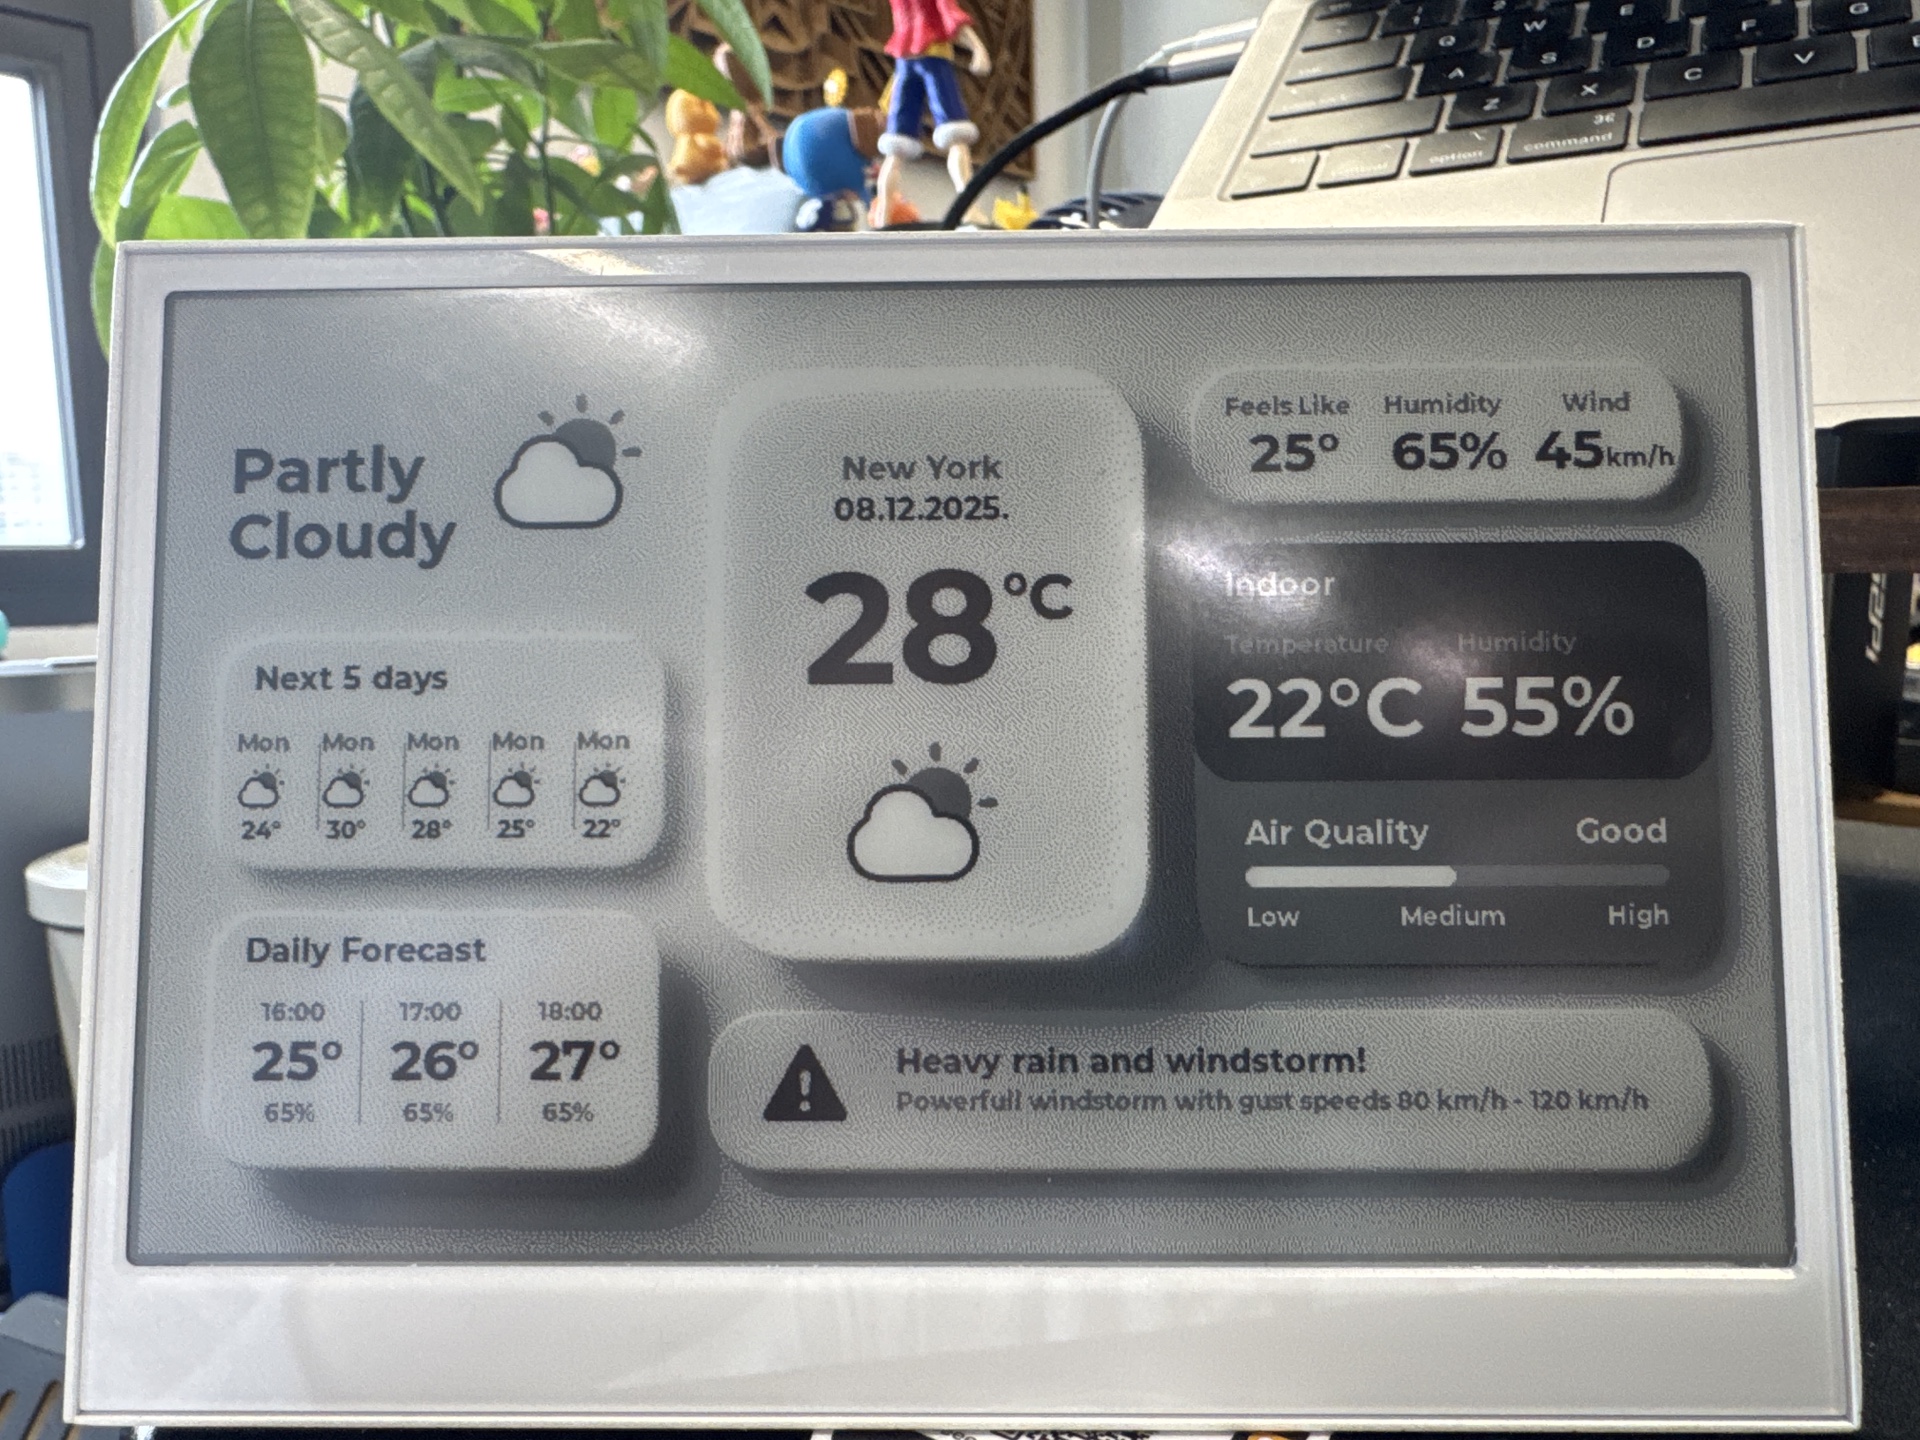 | | 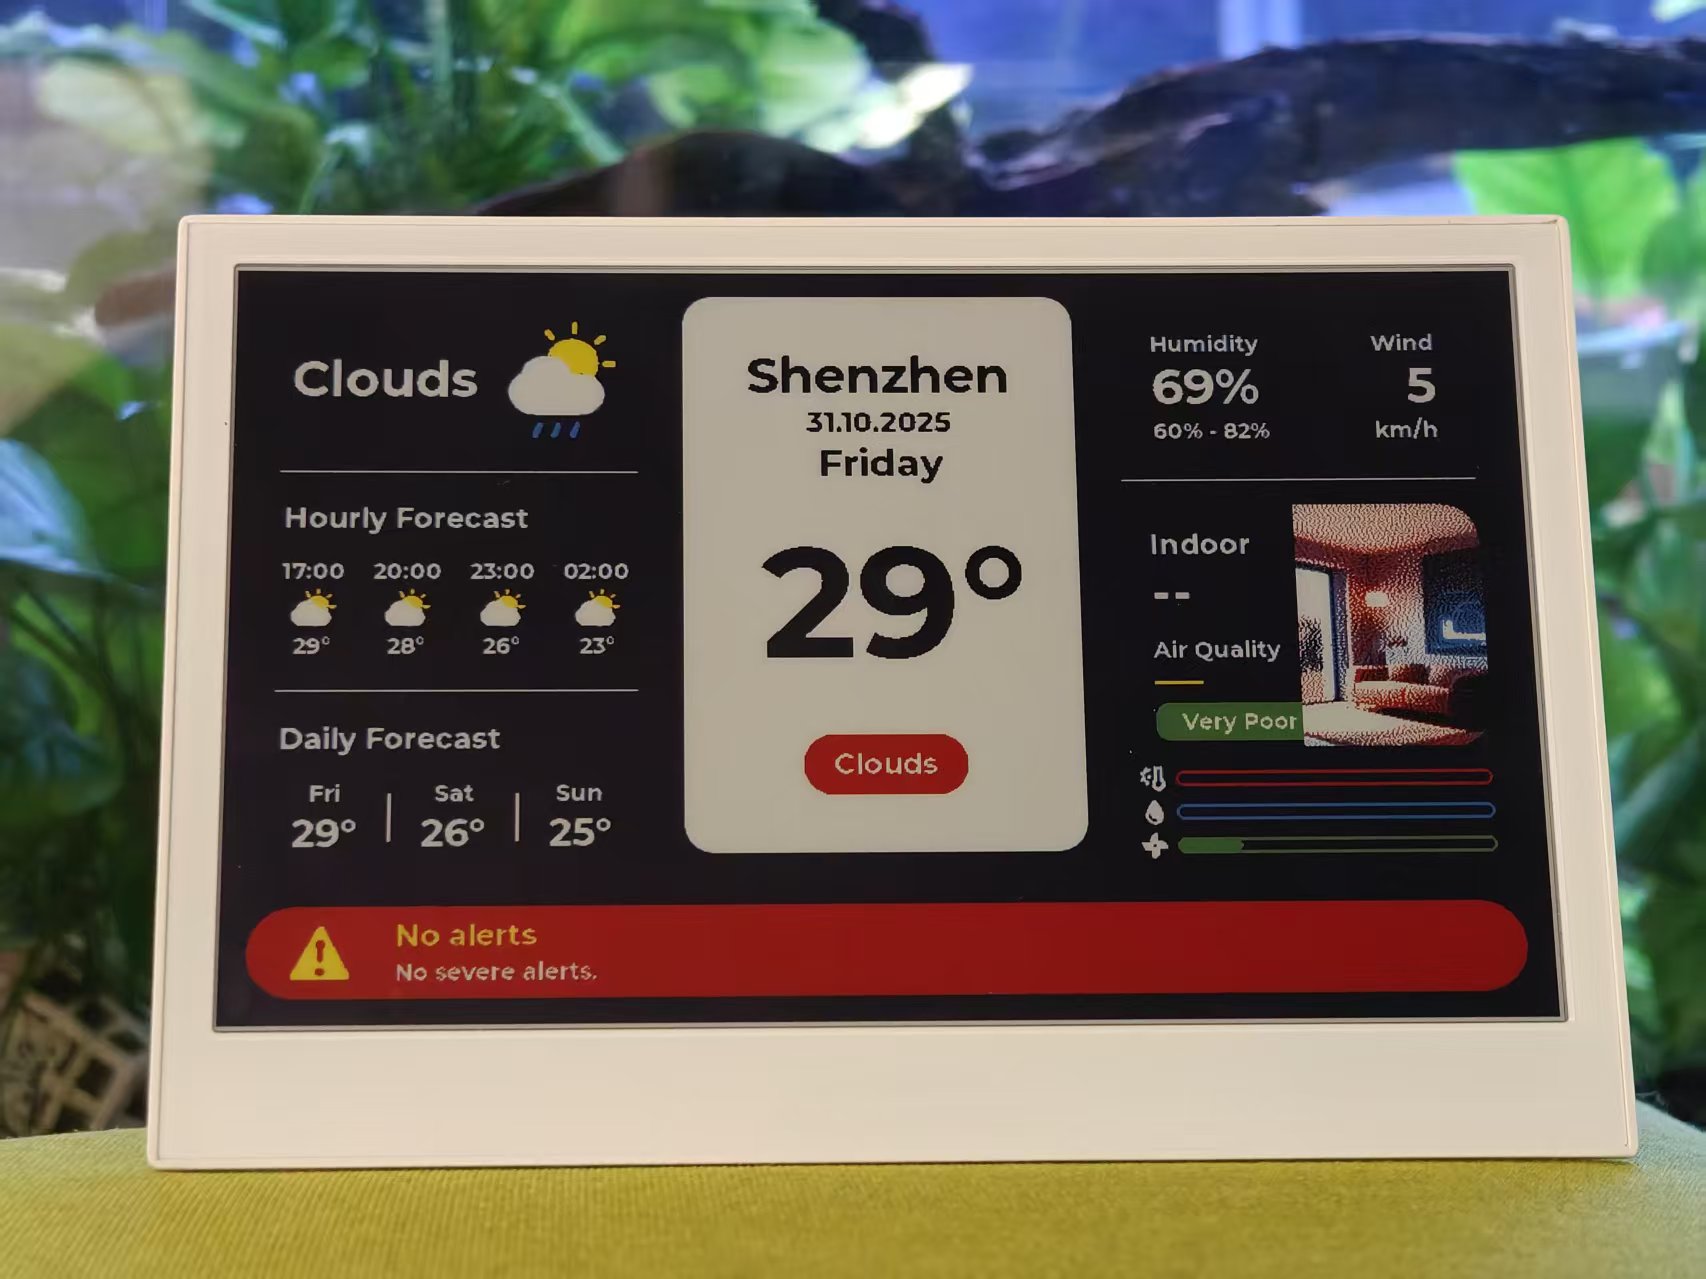 |
Tech Support & Product Discussion
Thank you for choosing our products! We are here to provide you with different support to ensure that your experience with our products is as smooth as possible. We offer several communication channels to cater to different preferences and needs.