Connect Seeed Studio IoT Button To Home Assistant via Zigbee
In this tutorial, we will show you how to connect the Seeed Studio IoT Button to Home Assistant using Zigbee. The Seeed Studio IoT Button features a built-in ESP32-C6 chip with Zigbee functionality, making it a versatile device for your smart home. You'll learn how to flash the Zigbee firmware, pair it with Home Assistant, and even customize the button's behavior through Arduino development.
Materials Required
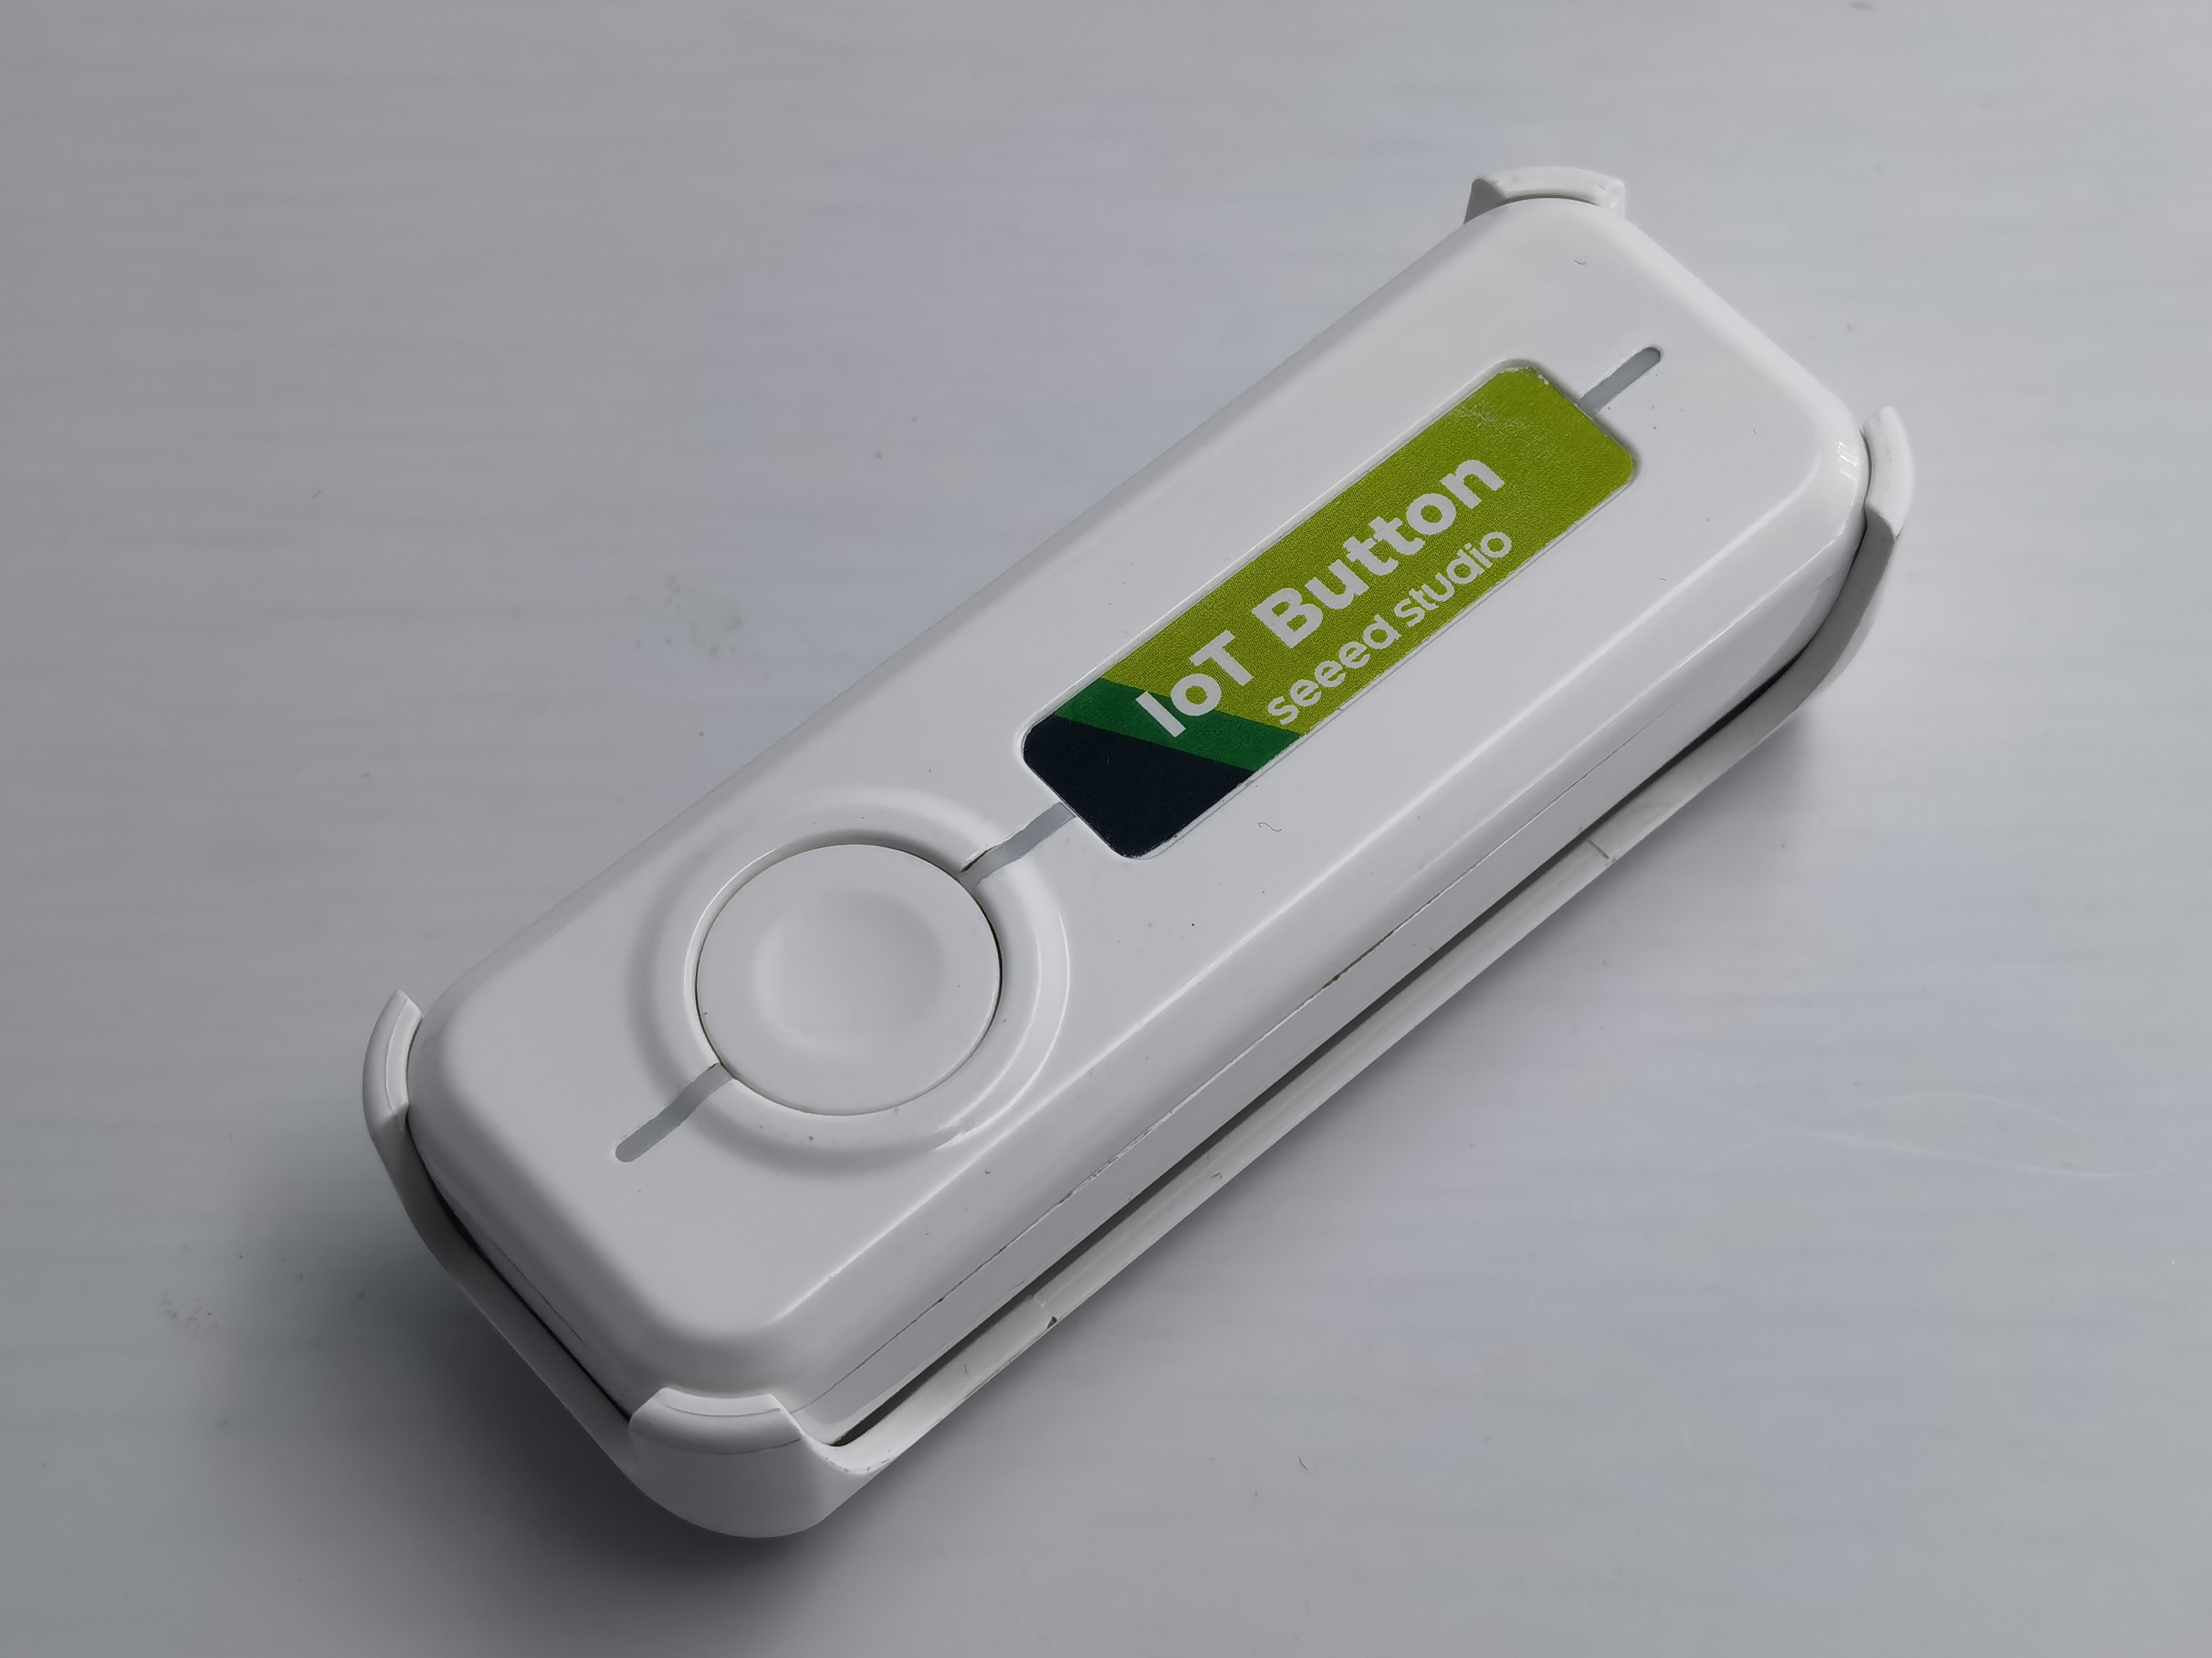
| Seeed Studio IoT Button | Zigbee Coordinator (e.g., Home Assistant Connect ZBT-1) |
|---|---|
|  |
The Seeed Studio IoT Button is a versatile smart button with a built-in ESP32-C6 chip. It's a complete, standalone device that can be integrated with Home Assistant via Zigbee to control various devices and trigger automations. With its ESP32-C6 chip, it offers low power consumption and reliable connectivity.
Functional Overview (based on the latest firmware)
-
Multi-action button detection
- Single, double, and triple click.
- Short long-press (holding for 1-5 seconds).
- Long-press (holding for > 5 seconds) triggers a Zigbee factory reset.
- Immediate press and release events are reported for real-time automations.
-
Four Zigbee Endpoints
- Endpoint 10: A main binary sensor that reflects the physical button's real-time state (on for pressed, off for released).
- Endpoint 11: A virtual switch toggled by a single click.
- Endpoint 12: A virtual switch toggled by a double click.
- Endpoint 13: A virtual switch toggled by a short long-press.
-
Battery Monitoring (IoT Button V2 only)
- Reads battery voltage via ADC and applies an Exponential Moving Average (EMA) filter for smooth, stable readings.
- Reports both voltage (in 0.01V units) and battery percentage to Zigbee.
- A low-battery status (< 20%) drives the red LED indicator.
-
LED Feedback
- An RGB WS2812 LED provides visual feedback (breathing, blink, rainbow effects) for click actions.
- A blue status LED indicates the Zigbee connection status.
- A red status LED (V2 only) indicates a low-battery condition.
-
Power Management
- Automatically enters sleep mode after 2 minutes of inactivity to conserve power.
- Utilizes light-sleep for V1 and deep-sleep with RTC state retention for V2, ensuring button click states are not lost.
- Wakes instantly from sleep upon a button press.
Developing Custom Zigbee Firmware with Arduino
If you want to customize the behavior of your IoT Button, you can develop your own Zigbee firmware using Arduino.
Step 1: Set Up Arduino IDE for ESP32-C6
- Install the latest version of Arduino IDE.
- Add ESP32 board support:
- Go to File > Preferences.
- Add
https://raw.githubusercontent.com/espressif/arduino-esp32/gh-pages/package_esp32_index.jsonto the "Additional Boards Manager URLs" field. - Go to Tools > Board > Boards Manager.
- Search for "esp32" and install the latest version (ensure it is version 3.2.1 or above).
Step 2: Install Required Libraries
The IoT Button firmware uses the FastLED library for RGB effects and the Espressif Zigbee SDK, which is included in the ESP32 Arduino package. The FastLED library can be installed via the Arduino Library Manager.
-
Go to Sketch > Include Library > Manage Libraries....
-
Search for "FastLED" and install the library by Daniel Garcia.
Step 3: Configure Arduino IDE for Zigbee Development
-
Select the correct board:
- Tools > Board > ESP32 Arduino > XIAO ESP32C6
-
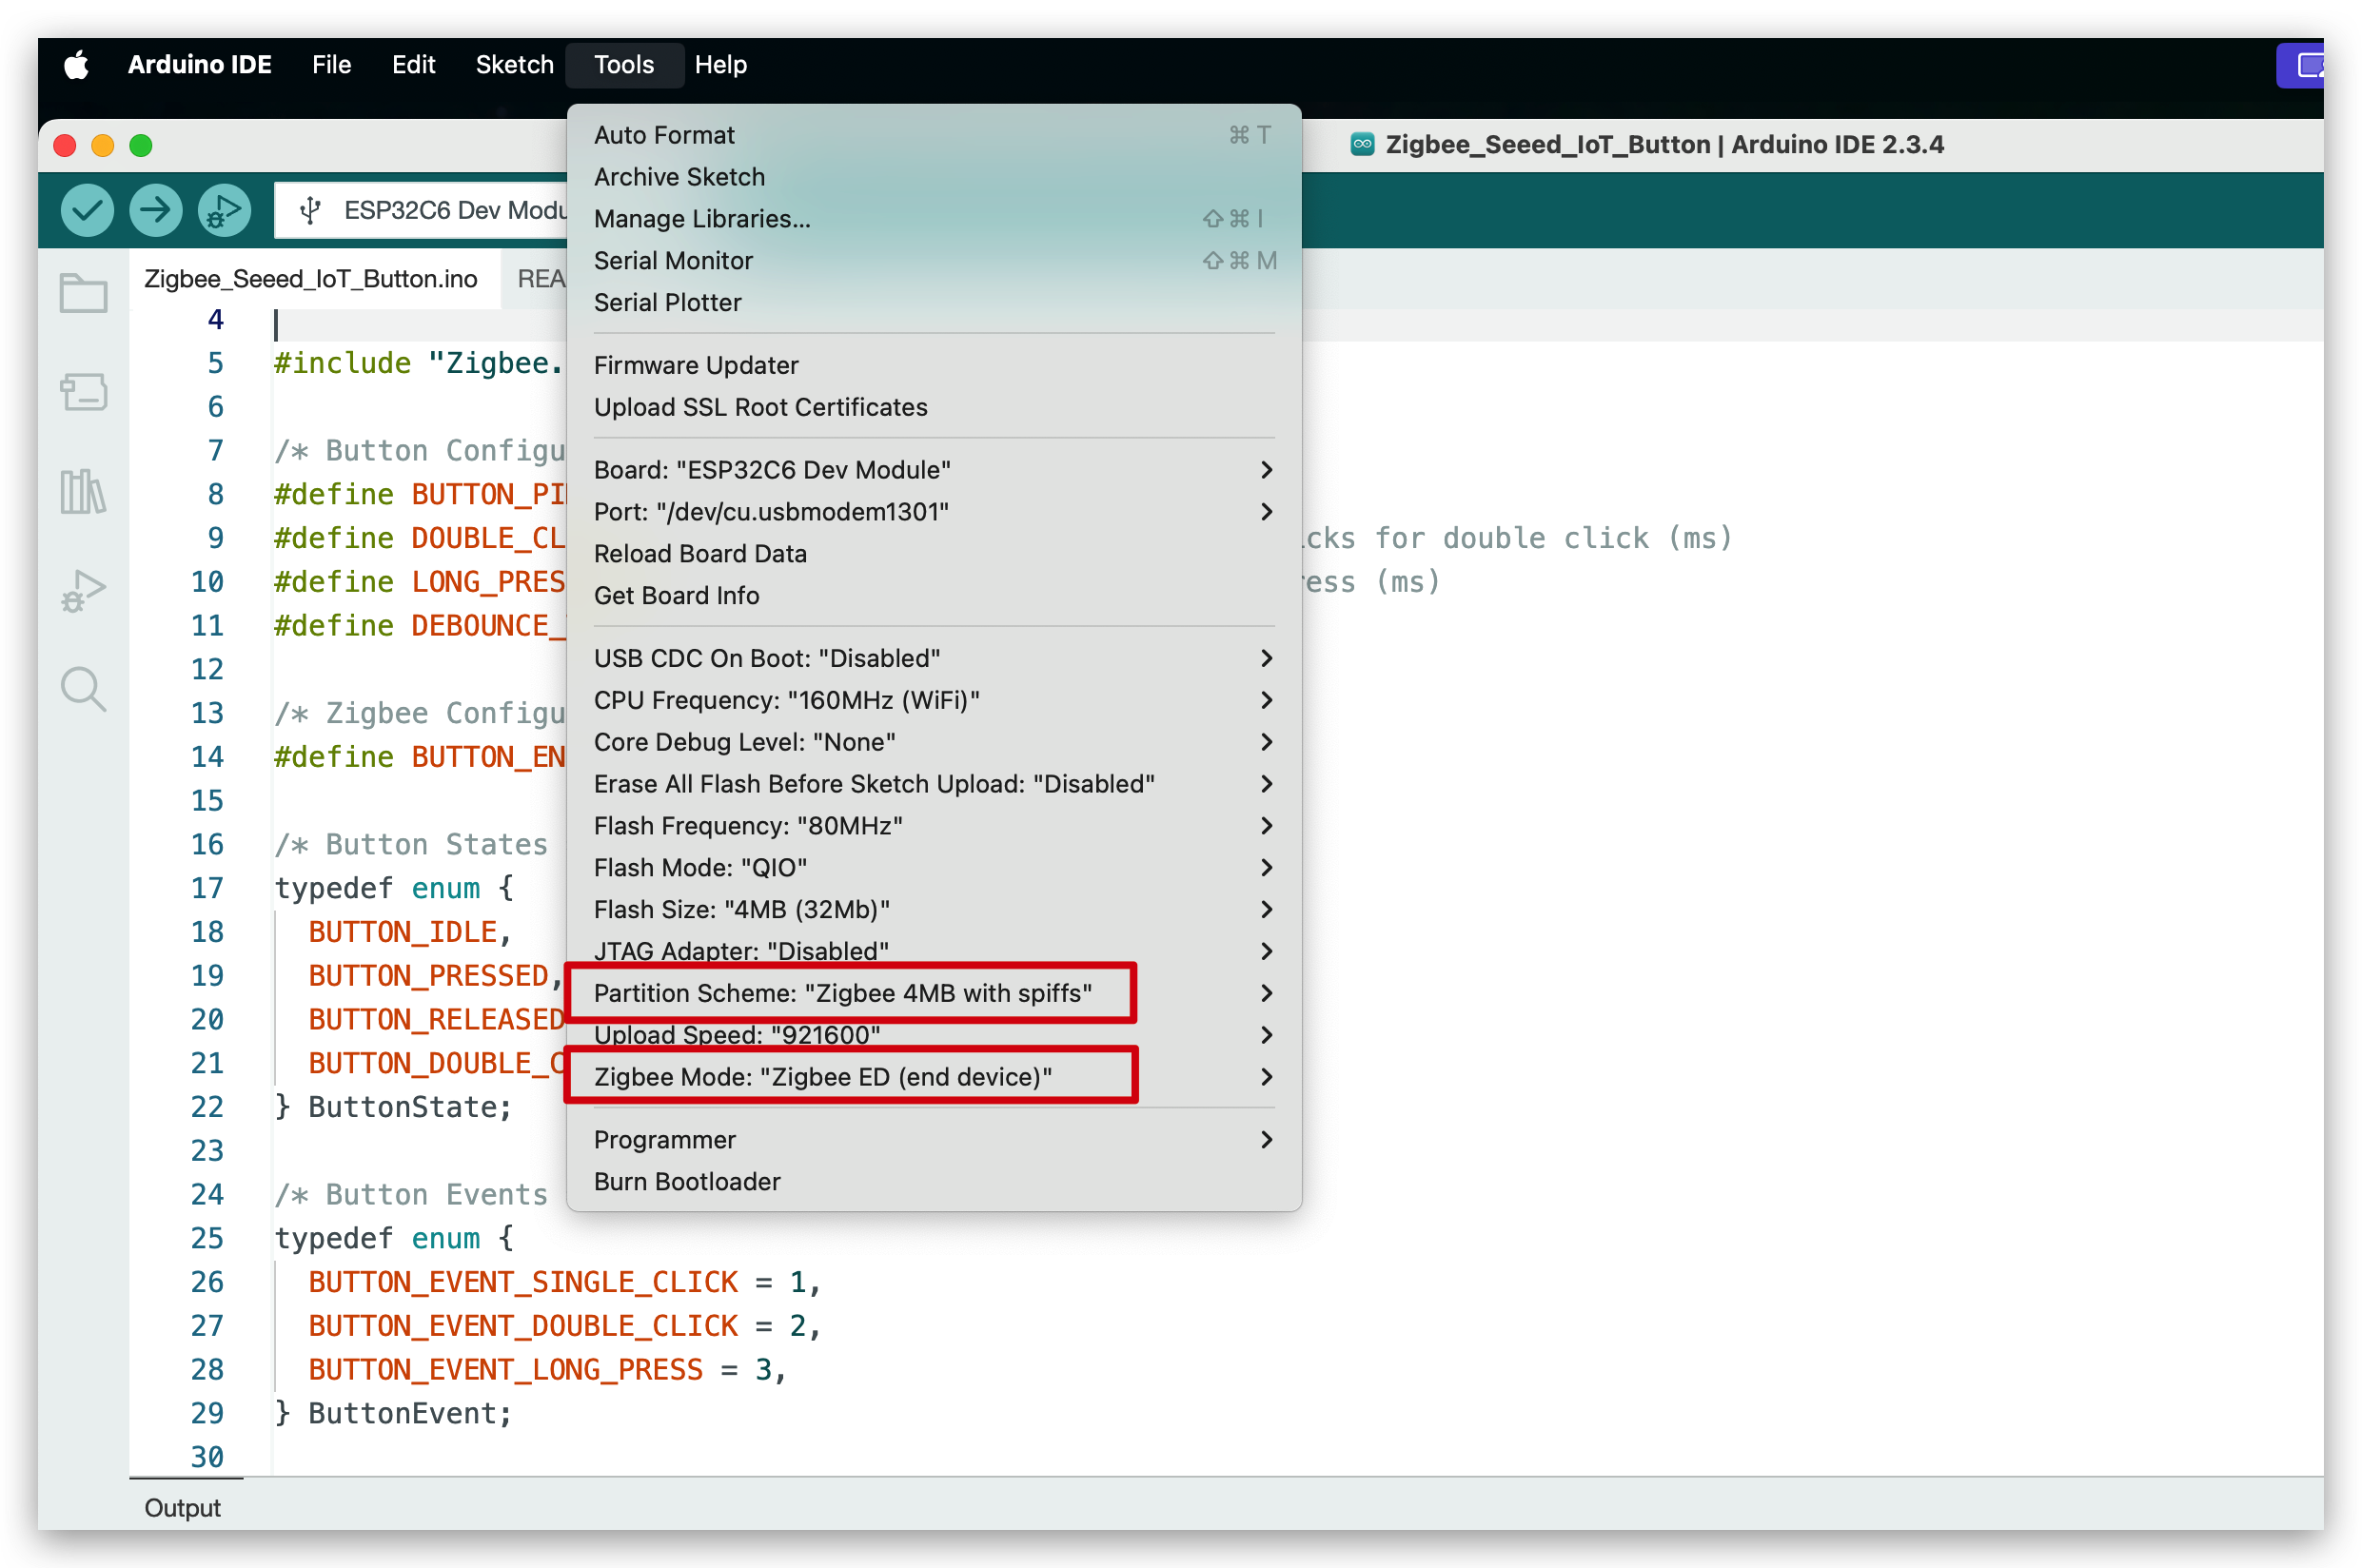
Configure Zigbee settings:
- Tools > Zigbee Mode > Zigbee End Device
- Tools > Partition Scheme > Zigbee 4MB with spiffs
Step 4: Create Your Custom Firmware
The new firmware is a self-contained Arduino sketch. It supports both IoT Button V1 and V2 hardware, advanced button event detection (single, double, triple click, short/long press), battery monitoring (V2), rich LED feedback, and robust Zigbee integration using FreeRTOS tasks.
Hardware Version Selection
The code compiles for IoT Button V2 by default. To compile for V1, you must uncomment the corresponding line at the top of the code:
Please verify the correct device version. All IoT Buttons currently available on the market are V1.
Click here to preview the full code
#ifndef ZIGBEE_MODE_ED
#error "Zigbee end device mode is not selected in Tools->Zigbee mode"
#endif

#include "Zigbee.h"
#include <FastLED.h>
#include <freertos/FreeRTOS.h>
#include <freertos/task.h>
#include <freertos/queue.h>
#include <esp_sleep.h>
#include "driver/rtc_io.h"

// Logging macro switch
#define ENABLE_LOGGING // Comment out to disable logging

#ifdef ENABLE_LOGGING
#define LOG_PRINTLN(x) Serial.println(x)
#define LOG_PRINTF(x, ...) Serial.printf(x, __VA_ARGS__)
#else
#define LOG_PRINTLN(x)
#define LOG_PRINTF(x, ...)
#endif

#define IOT_BUTTON_V1  //Uncomment this line to select to compile the iot button v1 version
// #define IOT_BUTTON_V2  //Uncomment this line to select to compile the iot button v2 version

#if !defined(IOT_BUTTON_V1) && !defined(IOT_BUTTON_V2)
#define IOT_BUTTON_V2
#endif

#define BUTTON_PIN_BITMASK(GPIO) (1ULL << GPIO)

/* Hardware Configuration */
#if defined(IOT_BUTTON_V1)
const uint8_t BUTTON_PIN = 9;
const uint8_t BLUE_LED_PIN = 2;
const uint8_t RGB_ENABLE_PIN = 18;
const uint8_t RGB_PIN = 19;
const uint8_t NUM_RGBS = 1;
#elif defined(IOT_BUTTON_V2)
const uint8_t BUTTON_PIN = 2;
const uint8_t BLUE_LED_PIN = 3;
const uint8_t RED_LED_PIN = 14;
const uint8_t RGB_ENABLE_PIN = 18;
const uint8_t RGB_PIN = 19;
const uint8_t NUM_RGBS = 1;
const uint8_t BATTERY_ADC_PIN = 1;
const uint8_t BATTERY_ENABLE_PIN = 0;
const int SAMPLE_COUNT = 10;
const float MIN_VOLTAGE = 2.75;
const float MAX_VOLTAGE = 4.2;
const float ALPHA = 0.1; // Smoothing factor for EMA
#endif

/* Button Configuration */
const uint32_t MULTI_CLICK_TIME = 300;             // Maximum time between clicks for multi-click (ms)
const uint32_t SHORT_LONG_PRESS_TIME = 1000;       // Minimum time for short long press (1 second)
const uint32_t LONG_PRESS_TIME = 5000;             // Minimum time for long press (5 seconds)
const uint32_t DEBOUNCE_TIME = 20;                 // Debounce time (ms)
const uint32_t INACTIVITY_TIMEOUT = 2 * 60 * 1000; // 2 minutes inactivity timeout (ms)

/* LED Configuration */
CRGB rgbs[NUM_RGBS];

/* Button Events */
enum class ButtonEvent
{
  PRESS,            // Pressed
  RELEASE,          // Released
  SINGLE_CLICK,     // Single click
  DOUBLE_CLICK,     // Double click
  TRIPLE_CLICK,     // Triple click
  SHORT_LONG_PRESS, // Short long press (1-5 seconds)
  LONG_PRESS        // Long press (>5 seconds)
};

/* Zigbee Configuration */
#define BUTTON_ENDPOINT 10
#define SWITCH1_ENDPOINT 11
#define SWITCH2_ENDPOINT 12
#define SWITCH3_ENDPOINT 13
ZigbeeBinary zbIoTButton = ZigbeeBinary(BUTTON_ENDPOINT);
ZigbeeBinary zbSwitch1 = ZigbeeBinary(SWITCH1_ENDPOINT);
ZigbeeBinary zbSwitch2 = ZigbeeBinary(SWITCH2_ENDPOINT);
ZigbeeBinary zbSwitch3 = ZigbeeBinary(SWITCH3_ENDPOINT);
bool buttonStatus = false;
RTC_DATA_ATTR bool switch1Status = false;
RTC_DATA_ATTR bool switch2Status = false;
RTC_DATA_ATTR bool switch3Status = false;

/* Global Variables */
QueueHandle_t eventQueue;

uint32_t pressStartTime = 0;
uint32_t lastReleaseTime = 0;
uint8_t clickCount = 0;
bool longPressTriggered = false;
bool clickSequenceActive = false; // Tracks if a click sequence is in progress
TaskHandle_t clickTimeoutTaskHandle = NULL;
uint32_t lastActivityTime = 0;  // Tracks last button activity for sleep
volatile bool isAwake = true;   // Tracks device awake/sleep state
bool lastConnected = false;     // Track previous Zigbee connection state
bool zigbeeInitialized = false; // Track Zigbee initialization status

#if defined(IOT_BUTTON_V2)
// RTC variables for button state persistence
RTC_DATA_ATTR uint32_t pressStartTimeRTC = 0;
RTC_DATA_ATTR uint32_t lastReleaseTimeRTC = 0;
RTC_DATA_ATTR uint8_t clickCountRTC = 0;
RTC_DATA_ATTR bool longPressTriggeredRTC = false;
RTC_DATA_ATTR bool clickSequenceActiveRTC = false;

float emaVoltage = 0.0;
float batteryPercentage = 100.0;
#endif

#if defined(IOT_BUTTON_V2)
/********************* Battery Functions **************************/
void measureBattery()
{
  digitalWrite(BATTERY_ENABLE_PIN, HIGH);
  vTaskDelay(10 / portTICK_PERIOD_MS); // Wait for stabilization

  // Take multiple samples and compute average
  float adcSum = 0;
  for (int i = 0; i < SAMPLE_COUNT; i++)
  {
    adcSum += analogRead(BATTERY_ADC_PIN);
    vTaskDelay(5 / portTICK_PERIOD_MS); // Small delay between samples
  }
  digitalWrite(BATTERY_ENABLE_PIN, LOW);

  float adcAverage = adcSum / SAMPLE_COUNT;
  float voltage = (adcAverage / 4095.0) * 3.3 * 3.0; // Apply divider ratio

  if (voltage < MIN_VOLTAGE)
  {
    emaVoltage = 0.0;
    batteryPercentage = 0.0;
    LOG_PRINTF("Battery voltage: %.2fV (too low or not connected), EMA voltage: %.2fV, Percentage: %.2f%%\n",
               voltage, emaVoltage, batteryPercentage);
  }
  else
  {
    // Update EMA
    if (emaVoltage == 0.0)
    {
      emaVoltage = voltage;
    }
    else
    {
      emaVoltage = ALPHA * voltage + (1 - ALPHA) * emaVoltage;
    }

    // Calculate battery percentage from emaVoltage
    float localBatteryPercentage = (emaVoltage - MIN_VOLTAGE) / (MAX_VOLTAGE - MIN_VOLTAGE) * 100;
    if (localBatteryPercentage < 0)
      localBatteryPercentage = 0;
    if (localBatteryPercentage > 100)
      localBatteryPercentage = 100;

    // Update global battery percentage
    batteryPercentage = localBatteryPercentage;

    LOG_PRINTF("Battery voltage: %.2fV, EMA voltage: %.2fV, Percentage: %.2f%%\n",
               voltage, emaVoltage, localBatteryPercentage);
  }
}
#endif

/********************* FreeRTOS Tasks **************************/
void breathingLedTask(void *pvParameters)
{
  LOG_PRINTLN("Breathing LED");
  uint8_t hue = random8();    // Random color hue
  for (int i = 0; i < 1; i++) // one breathing cycle
  {
    // Brighten
    for (int brightness = 0; brightness <= 255; brightness += 5)
    {
      rgbs[0] = CHSV(hue, 255, brightness);
      FastLED.show();
      vTaskDelay(20 / portTICK_PERIOD_MS);
    }
    // Dim
    for (int brightness = 255; brightness >= 0; brightness -= 5)
    {
      rgbs[0] = CHSV(hue, 255, brightness);
      FastLED.show();
      vTaskDelay(20 / portTICK_PERIOD_MS);
    }
  }
  rgbs[0] = CRGB::Black;
  FastLED.show();
  vTaskDelete(NULL);
}

void blinkLedTask(void *pvParameters)
{
  LOG_PRINTLN("Blink LED");
  uint8_t rand = random8();
  for (int i = 0; i < 2; i++)
  {
    rgbs[0] = CHSV(rand, 255, 255); // Random color
    FastLED.show();
    vTaskDelay(200 / portTICK_PERIOD_MS);
    rgbs[0] = CRGB::Black;
    FastLED.show();
    vTaskDelay(200 / portTICK_PERIOD_MS);
  }
  vTaskDelete(NULL);
}

void rainbowLedTask(void *pvParameters)
{
  LOG_PRINTLN("Rainbow LED");
  for (int hue = 0; hue < 128; hue += 10)
  {
    rgbs[0] = CHSV(hue, 255, 255);
    FastLED.show();
    vTaskDelay(100 / portTICK_PERIOD_MS);
  }
  rgbs[0] = CRGB::Black;
  FastLED.show();
  vTaskDelete(NULL);
}

void clickTimeoutTask(void *pvParameters)
{
  uint32_t localClickCount = clickCount;
  uint32_t localLastReleaseTime = lastReleaseTime;

  while (millis() - localLastReleaseTime < MULTI_CLICK_TIME)
  {
    vTaskDelay(10 / portTICK_PERIOD_MS);
  }

  ButtonEvent event;
  switch (localClickCount)
  {
  case 1:
    event = ButtonEvent::SINGLE_CLICK;
    break;
  case 2:
    event = ButtonEvent::DOUBLE_CLICK;
    break;
  case 3:
    event = ButtonEvent::TRIPLE_CLICK;
    break;
  default:
    vTaskDelete(NULL);
    return;
  }
  xQueueSend(eventQueue, &event, 0);

  clickCount = 0;
  clickSequenceActive = false;
  clickTimeoutTaskHandle = NULL;

  vTaskDelete(NULL);
}

// --- Button Task Refactor ---
static bool debounceButton(bool currentState, uint32_t currentTime, uint32_t &lastDebounceTime)
{
  if (currentTime - lastDebounceTime < DEBOUNCE_TIME)
  {
    vTaskDelay(1 / portTICK_PERIOD_MS);
    return true;
  }
  return false;
}

static void handleButtonPress(uint32_t currentTime)
{
  pressStartTime = currentTime;
  ButtonEvent event = ButtonEvent::PRESS;
  xQueueSend(eventQueue, &event, 0);
  lastActivityTime = millis();

  if (clickSequenceActive && (currentTime - lastReleaseTime <= MULTI_CLICK_TIME))
  {
    clickCount++;
    if (clickTimeoutTaskHandle != NULL)
    {
      vTaskDelete(clickTimeoutTaskHandle);
      clickTimeoutTaskHandle = NULL;
    }
  }
  else
  {
    clickCount = 1;
    clickSequenceActive = true;
  }
  longPressTriggered = false;
}

static void handleButtonRelease(uint32_t currentTime)
{
  uint32_t pressDuration = currentTime - pressStartTime;
  ButtonEvent event = ButtonEvent::RELEASE;
  xQueueSend(eventQueue, &event, 0);
  lastActivityTime = millis();

  if (!longPressTriggered)
  {
    if (pressDuration >= LONG_PRESS_TIME)
    {
      event = ButtonEvent::LONG_PRESS;
      longPressTriggered = true;
      clickSequenceActive = false;
      clickCount = 0;
      xQueueSend(eventQueue, &event, 0);
      if (clickTimeoutTaskHandle != NULL)
      {
        vTaskDelete(clickTimeoutTaskHandle);
        clickTimeoutTaskHandle = NULL;
      }
    }
    else if (pressDuration >= SHORT_LONG_PRESS_TIME)
    {
      event = ButtonEvent::SHORT_LONG_PRESS;
      longPressTriggered = true;
      clickSequenceActive = false;
      clickCount = 0;
      xQueueSend(eventQueue, &event, 0);
      if (clickTimeoutTaskHandle != NULL)
      {
        vTaskDelete(clickTimeoutTaskHandle);
        clickTimeoutTaskHandle = NULL;
      }
    }
    else
    {
      lastReleaseTime = currentTime;
      if (clickTimeoutTaskHandle != NULL)
      {
        vTaskDelete(clickTimeoutTaskHandle);
        clickTimeoutTaskHandle = NULL;
      }
      xTaskCreate(clickTimeoutTask, "ClickTimeout", 2048, NULL, 1, &clickTimeoutTaskHandle);
    }
  }
}

static void checkLongPress(uint32_t currentTime)
{
  if (currentTime - pressStartTime >= LONG_PRESS_TIME)
  {
    ButtonEvent event = ButtonEvent::LONG_PRESS;
    longPressTriggered = true;
    clickSequenceActive = false;
    clickCount = 0;
    xQueueSend(eventQueue, &event, 0);
    lastActivityTime = millis();
    if (clickTimeoutTaskHandle != NULL)
    {
      vTaskDelete(clickTimeoutTaskHandle);
      clickTimeoutTaskHandle = NULL;
    }
  }
}

void buttonTask(void *pvParameters)
{
  uint32_t lastDebounceTime = 0;
  bool lastState = false;

  // Check if woken up by button press
  if (esp_sleep_get_wakeup_cause() == ESP_SLEEP_WAKEUP_EXT1)
  {
    bool currentState = (digitalRead(BUTTON_PIN) == LOW);
    if (currentState)
    {
      handleButtonPress(millis());
    }
  }

  while (1)
  {
    bool currentState = (digitalRead(BUTTON_PIN) == LOW);
    uint32_t currentTime = millis();

    if (debounceButton(currentState, currentTime, lastDebounceTime))
      continue;

    if (currentState != lastState)
    {
      lastDebounceTime = currentTime;
      lastState = currentState;
      if (currentState)
      {
        handleButtonPress(currentTime);
      }
      else
      {
        handleButtonRelease(currentTime);
      }
    }
    else if (currentState && !longPressTriggered)
    {
      checkLongPress(currentTime);
    }

    vTaskDelay(10 / portTICK_PERIOD_MS);
  }
}

void mainTask(void *pvParameters)
{
  ButtonEvent event;
  while (1)
  {
    if (xQueueReceive(eventQueue, &event, portMAX_DELAY) == pdTRUE)
    {
      switch (event)
      {
      case ButtonEvent::PRESS:
        if (buttonStatus == false)
        {
          buttonStatus = true;
          LOG_PRINTLN("Button Pressed");
          if (zigbeeInitialized && Zigbee.connected())
          {
            zbIoTButton.setBinaryInput(buttonStatus);
            zbIoTButton.reportBinaryInput();
          }
        }
        break;

      case ButtonEvent::RELEASE:
        if (buttonStatus == true)
        {
          buttonStatus = false;
          LOG_PRINTLN("Button Released");
          if (zigbeeInitialized && Zigbee.connected())
          {
            zbIoTButton.setBinaryInput(buttonStatus);
            zbIoTButton.reportBinaryInput();
          }
        }
        break;

      case ButtonEvent::SINGLE_CLICK:
        LOG_PRINTLN("Single Click");
        switch1Status = !switch1Status;
        if (zigbeeInitialized && Zigbee.connected())
        {
          zbSwitch1.setBinaryInput(switch1Status);
          zbSwitch1.reportBinaryInput();
        }
        xTaskCreate(breathingLedTask, "BreathingLed", 2048, NULL, 1, NULL);
        break;

      case ButtonEvent::DOUBLE_CLICK:
        LOG_PRINTLN("Double Click");
        switch2Status = !switch2Status;
        if (zigbeeInitialized && Zigbee.connected())
        {
          zbSwitch2.setBinaryInput(switch2Status);
          zbSwitch2.reportBinaryInput();
        }
        xTaskCreate(blinkLedTask, "BlinkLed", 2048, NULL, 1, NULL);
        break;

      case ButtonEvent::TRIPLE_CLICK:
        LOG_PRINTLN("Triple Click");
        if (zigbeeInitialized && Zigbee.connected())
        {
          // Add any specific Zigbee action here if needed
        }
        break;

      case ButtonEvent::SHORT_LONG_PRESS:
        LOG_PRINTLN("Short Long Press");
        switch3Status = !switch3Status;
        if (zigbeeInitialized && Zigbee.connected())
        {
          zbSwitch3.setBinaryInput(switch3Status);
          zbSwitch3.reportBinaryInput();
        }
        xTaskCreate(rainbowLedTask, "RainbowLed", 2048, NULL, 1, NULL);
        break;

      case ButtonEvent::LONG_PRESS:
        LOG_PRINTLN("Long Press\nReset Zigbee");
        vTaskDelay(1000 / portTICK_PERIOD_MS);
        if (zigbeeInitialized)
        {
          Zigbee.factoryReset();
        }
        break;
      }
    }
  }
}

#if defined(IOT_BUTTON_V1)
void ledTask(void *pvParameters)
{
  pinMode(BLUE_LED_PIN, OUTPUT);
  while (1)
  {
    if (isAwake)
    {
      if (!zigbeeInitialized || !Zigbee.connected()) // Blink when not connected or not initialized
      {
        digitalWrite(BLUE_LED_PIN, LOW); // On
        vTaskDelay(500 / portTICK_PERIOD_MS);
        digitalWrite(BLUE_LED_PIN, HIGH); // Off
        vTaskDelay(500 / portTICK_PERIOD_MS);
      }
      else
      {
        digitalWrite(BLUE_LED_PIN, LOW); // On when connected
      }
    }
    else
    {
      digitalWrite(BLUE_LED_PIN, HIGH); // Off during sleep
    }
    vTaskDelay(10 / portTICK_PERIOD_MS);
  }
}
#elif defined(IOT_BUTTON_V2)
void ledTask(void *pvParameters)
{
  pinMode(BLUE_LED_PIN, OUTPUT);
  pinMode(RED_LED_PIN, OUTPUT);
  bool ledState = false;

  while (1)
  {
    if (isAwake)
    {
      bool isLowBattery = (batteryPercentage < 20.0);
      bool isConnected = zigbeeInitialized && Zigbee.connected();
      uint8_t activeLedPin = isLowBattery ? RED_LED_PIN : BLUE_LED_PIN;
      uint8_t inactiveLedPin = isLowBattery ? BLUE_LED_PIN : RED_LED_PIN;

      if (isConnected)
      {
        digitalWrite(activeLedPin, LOW);
        digitalWrite(inactiveLedPin, HIGH);
      }
      else
      {
        ledState = !ledState;
        digitalWrite(activeLedPin, ledState ? LOW : HIGH);
        digitalWrite(inactiveLedPin, HIGH);
      }
    }
    else
    {
      digitalWrite(BLUE_LED_PIN, HIGH);
      digitalWrite(RED_LED_PIN, HIGH);
    }
    vTaskDelay(500 / portTICK_PERIOD_MS);
  }
}
#endif

#if defined(IOT_BUTTON_V2)
void batteryTask(void *pvParameters)
{
  pinMode(BATTERY_ENABLE_PIN, OUTPUT);

  while (1)
  {
    measureBattery();
    if (zigbeeInitialized && Zigbee.connected())
    {
      zbIoTButton.setBatteryVoltage((uint8_t)(emaVoltage * 100)); // Unit: 0.01V
      zbIoTButton.setBatteryPercentage((uint8_t)batteryPercentage);
      zbIoTButton.reportBatteryPercentage();
    }
    vTaskDelay(30000 / portTICK_PERIOD_MS); // Check every 30 seconds
  }
}
#endif

void sleepTask(void *pvParameters)
{
  while (1)
  {
    if (isAwake && (millis() - lastActivityTime > INACTIVITY_TIMEOUT))
    {
      LOG_PRINTLN("Entering sleep due to inactivity");
#if defined(IOT_BUTTON_V1)
      isAwake = false;
      digitalWrite(BLUE_LED_PIN, HIGH);
      esp_sleep_enable_gpio_wakeup();
      digitalWrite(BLUE_LED_PIN, HIGH); // Turn off LED
      gpio_wakeup_enable((gpio_num_t)BUTTON_PIN, GPIO_INTR_LOW_LEVEL);
      digitalWrite(RGB_ENABLE_PIN, LOW);
      esp_light_sleep_start();
      digitalWrite(RGB_ENABLE_PIN, HIGH);
      LOG_PRINTLN("Woke up from light sleep");
      isAwake = true;
      digitalWrite(BLUE_LED_PIN, LOW); // Turn on LED
#elif defined(IOT_BUTTON_V2)
      // Save button state to RTC memory
      pressStartTimeRTC = pressStartTime;
      lastReleaseTimeRTC = lastReleaseTime;
      clickCountRTC = clickCount;
      longPressTriggeredRTC = longPressTriggered;
      clickSequenceActiveRTC = clickSequenceActive;

      digitalWrite(BLUE_LED_PIN, HIGH);
      digitalWrite(RED_LED_PIN, HIGH);
      digitalWrite(RGB_PIN, LOW);
      digitalWrite(RGB_ENABLE_PIN, LOW);
      static gpio_num_t WAKEUP_GPIO = (gpio_num_t)BUTTON_PIN;
      esp_sleep_enable_ext1_wakeup_io(BUTTON_PIN_BITMASK(WAKEUP_GPIO), ESP_EXT1_WAKEUP_ANY_LOW);
      esp_deep_sleep_start();
#endif
    }
    vTaskDelay(10000 / portTICK_PERIOD_MS); // Check every 10 seconds
  }
}

/********************* Zigbee Functions **************************/
void onZigbeeConnected()
{
  if (!zigbeeInitialized)
  {
    return;
  }
#if defined(IOT_BUTTON_V2)
  measureBattery();                                           // Ensure latest battery data
  zbIoTButton.setBatteryVoltage((uint8_t)(emaVoltage * 100)); // Unit: 0.01V
  zbIoTButton.setBatteryPercentage((uint8_t)batteryPercentage);
  zbIoTButton.reportBatteryPercentage();
#endif
  zbSwitch1.setBinaryInput(switch1Status);
  zbSwitch1.reportBinaryInput();
  zbSwitch2.setBinaryInput(switch2Status);
  zbSwitch2.reportBinaryInput();
  zbSwitch3.setBinaryInput(switch3Status);
  zbSwitch3.reportBinaryInput();
}

void zigbeeSetupTask(void *pvParameters)
{
  zbIoTButton.addBinaryInput();
  zbIoTButton.setBinaryInputApplication(BINARY_INPUT_APPLICATION_TYPE_SECURITY_MOTION_DETECTION);
  zbIoTButton.setBinaryInputDescription("Button");
  zbSwitch1.addBinaryInput();
  zbSwitch1.setBinaryInputApplication(BINARY_INPUT_APPLICATION_TYPE_SECURITY_MOTION_DETECTION);
  zbSwitch1.setBinaryInputDescription("Switch1");
  zbSwitch2.addBinaryInput();
  zbSwitch2.setBinaryInputApplication(BINARY_INPUT_APPLICATION_TYPE_SECURITY_MOTION_DETECTION);
  zbSwitch2.setBinaryInputDescription("Switch2");
  zbSwitch3.addBinaryInput();
  zbSwitch3.setBinaryInputApplication(BINARY_INPUT_APPLICATION_TYPE_SECURITY_MOTION_DETECTION);
  zbSwitch3.setBinaryInputDescription("Switch3");

  // Set Zigbee device information
#if defined(IOT_BUTTON_V1)
  zbIoTButton.setManufacturerAndModel("Seeed Studio", "IoT_Button");
#elif defined(IOT_BUTTON_V2)
  zbIoTButton.setManufacturerAndModel("Seeed Studio", "IoT Button V2");
  zbIoTButton.setPowerSource(ZB_POWER_SOURCE_BATTERY, 100);
#endif

  // Add endpoint to Zigbee Core
  Zigbee.addEndpoint(&zbIoTButton);
  Zigbee.addEndpoint(&zbSwitch1);
  Zigbee.addEndpoint(&zbSwitch2);
  Zigbee.addEndpoint(&zbSwitch3);
  esp_zb_cfg_t zigbeeConfig = ZIGBEE_DEFAULT_ED_CONFIG();
  zigbeeConfig.nwk_cfg.zed_cfg.keep_alive = 10000;

  Zigbee.setTimeout(10000); // Set timeout for Zigbee Begin to 10s (default is 30s)
  LOG_PRINTLN("Starting Zigbee...");
  if (!Zigbee.begin(&zigbeeConfig, false))
  {
    LOG_PRINTLN("Zigbee failed to start!");
    LOG_PRINTLN("Please try holding down the 5S key for a long time to reset zigbee");
    zigbeeInitialized = false;
  }
  else
  {
    LOG_PRINTLN("Zigbee started successfully!");
    zigbeeInitialized = true;
  }

  vTaskDelete(NULL); // Terminate the task after completion
}

/********************* Arduino Setup **************************/
void setup()
{
  Serial.begin(115200);

  LOG_PRINTLN("Zigbee IoT Button Starting...");
#if defined(IOT_BUTTON_V2)
  // Restore button state from RTC memory
  pressStartTime = pressStartTimeRTC;
  lastReleaseTime = lastReleaseTimeRTC;
  clickCount = clickCountRTC;
  longPressTriggered = longPressTriggeredRTC;
  clickSequenceActive = clickSequenceActiveRTC;
#endif

  // Initialize button pin
  pinMode(BUTTON_PIN, INPUT_PULLUP);

  pinMode(RGB_ENABLE_PIN, OUTPUT);
  digitalWrite(RGB_ENABLE_PIN, HIGH);
#if defined(IOT_BUTTON_V2)
  pinMode(BATTERY_ENABLE_PIN, OUTPUT);
#endif

  // Initialize LED
  FastLED.addLeds<WS2812, RGB_PIN, GRB>(rgbs, NUM_RGBS);
  FastLED.setBrightness(50);

  // Create event queue
  eventQueue = xQueueCreate(10, sizeof(ButtonEvent));
  if (eventQueue == NULL)
  {
    LOG_PRINTLN("Failed to create event queue!");
    ESP.restart();
  }

#if defined(IOT_BUTTON_V2)
  // Check if woken up by button press and handle immediately
  if (esp_sleep_get_wakeup_cause() == ESP_SLEEP_WAKEUP_EXT1)
  {
    uint32_t currentTime = millis();
    if (digitalRead(BUTTON_PIN) == LOW)
    {
      handleButtonPress(currentTime);
    }
  }
#endif

  // Create FreeRTOS tasks
  xTaskCreate(buttonTask, "ButtonTask", 2048, NULL, 4, NULL);
  xTaskCreate(ledTask, "LedTask", 1024, NULL, 0, NULL);
  xTaskCreate(mainTask, "MainTask", 2048, NULL, 3, NULL);
  xTaskCreate(sleepTask, "SleepTask", 2048, NULL, 2, NULL);
  xTaskCreate(zigbeeSetupTask, "ZigbeeSetup", 2048, NULL, 1, NULL);
#if defined(IOT_BUTTON_V2)
  xTaskCreate(batteryTask, "BatteryTask", 2048, NULL, 1, NULL);
#endif
}

/********************* Arduino Loop **************************/
void loop()
{
  if (zigbeeInitialized)
  {
    bool currentConnected = Zigbee.connected();
    if (currentConnected && !lastConnected)
    {
      LOG_PRINTLN("Zigbee connected!");
      onZigbeeConnected();
    }
    else if (!currentConnected && lastConnected)
    {
      LOG_PRINTLN("Zigbee disconnected!");
    }
    lastConnected = currentConnected;
    if (!currentConnected)
    {
      LOG_PRINTLN("Zigbee not connected, retrying...");
      vTaskDelay(5000 / portTICK_PERIOD_MS);
    }
    else
    {
      vTaskDelay(1000 / portTICK_PERIOD_MS);
    }
  }
  else
  {
    vTaskDelay(1000 / portTICK_PERIOD_MS); // Keep loop running even if Zigbee fails
  }
}
The documentation may not be up to date with code updates, you can also click the button below to get the latest procedures.
Step 5: Upload and Test Your Firmware
- Connect your IoT Button to your computer via USB.
- Select the correct port in Arduino IDE.
- Click the Upload button.
- Open the Serial Monitor (baud rate 115200) to view debug information.
- Once flashing is complete, the button is ready to be paired.
Step 6: Set Up Zigbee in Home Assistant
Before pairing your IoT Button, you need to set up a Zigbee coordinator in Home Assistant:
- Install a Zigbee Coordinator: Connect a Zigbee coordinator like the Home Assistant Connect ZBT-1 to your Home Assistant server.
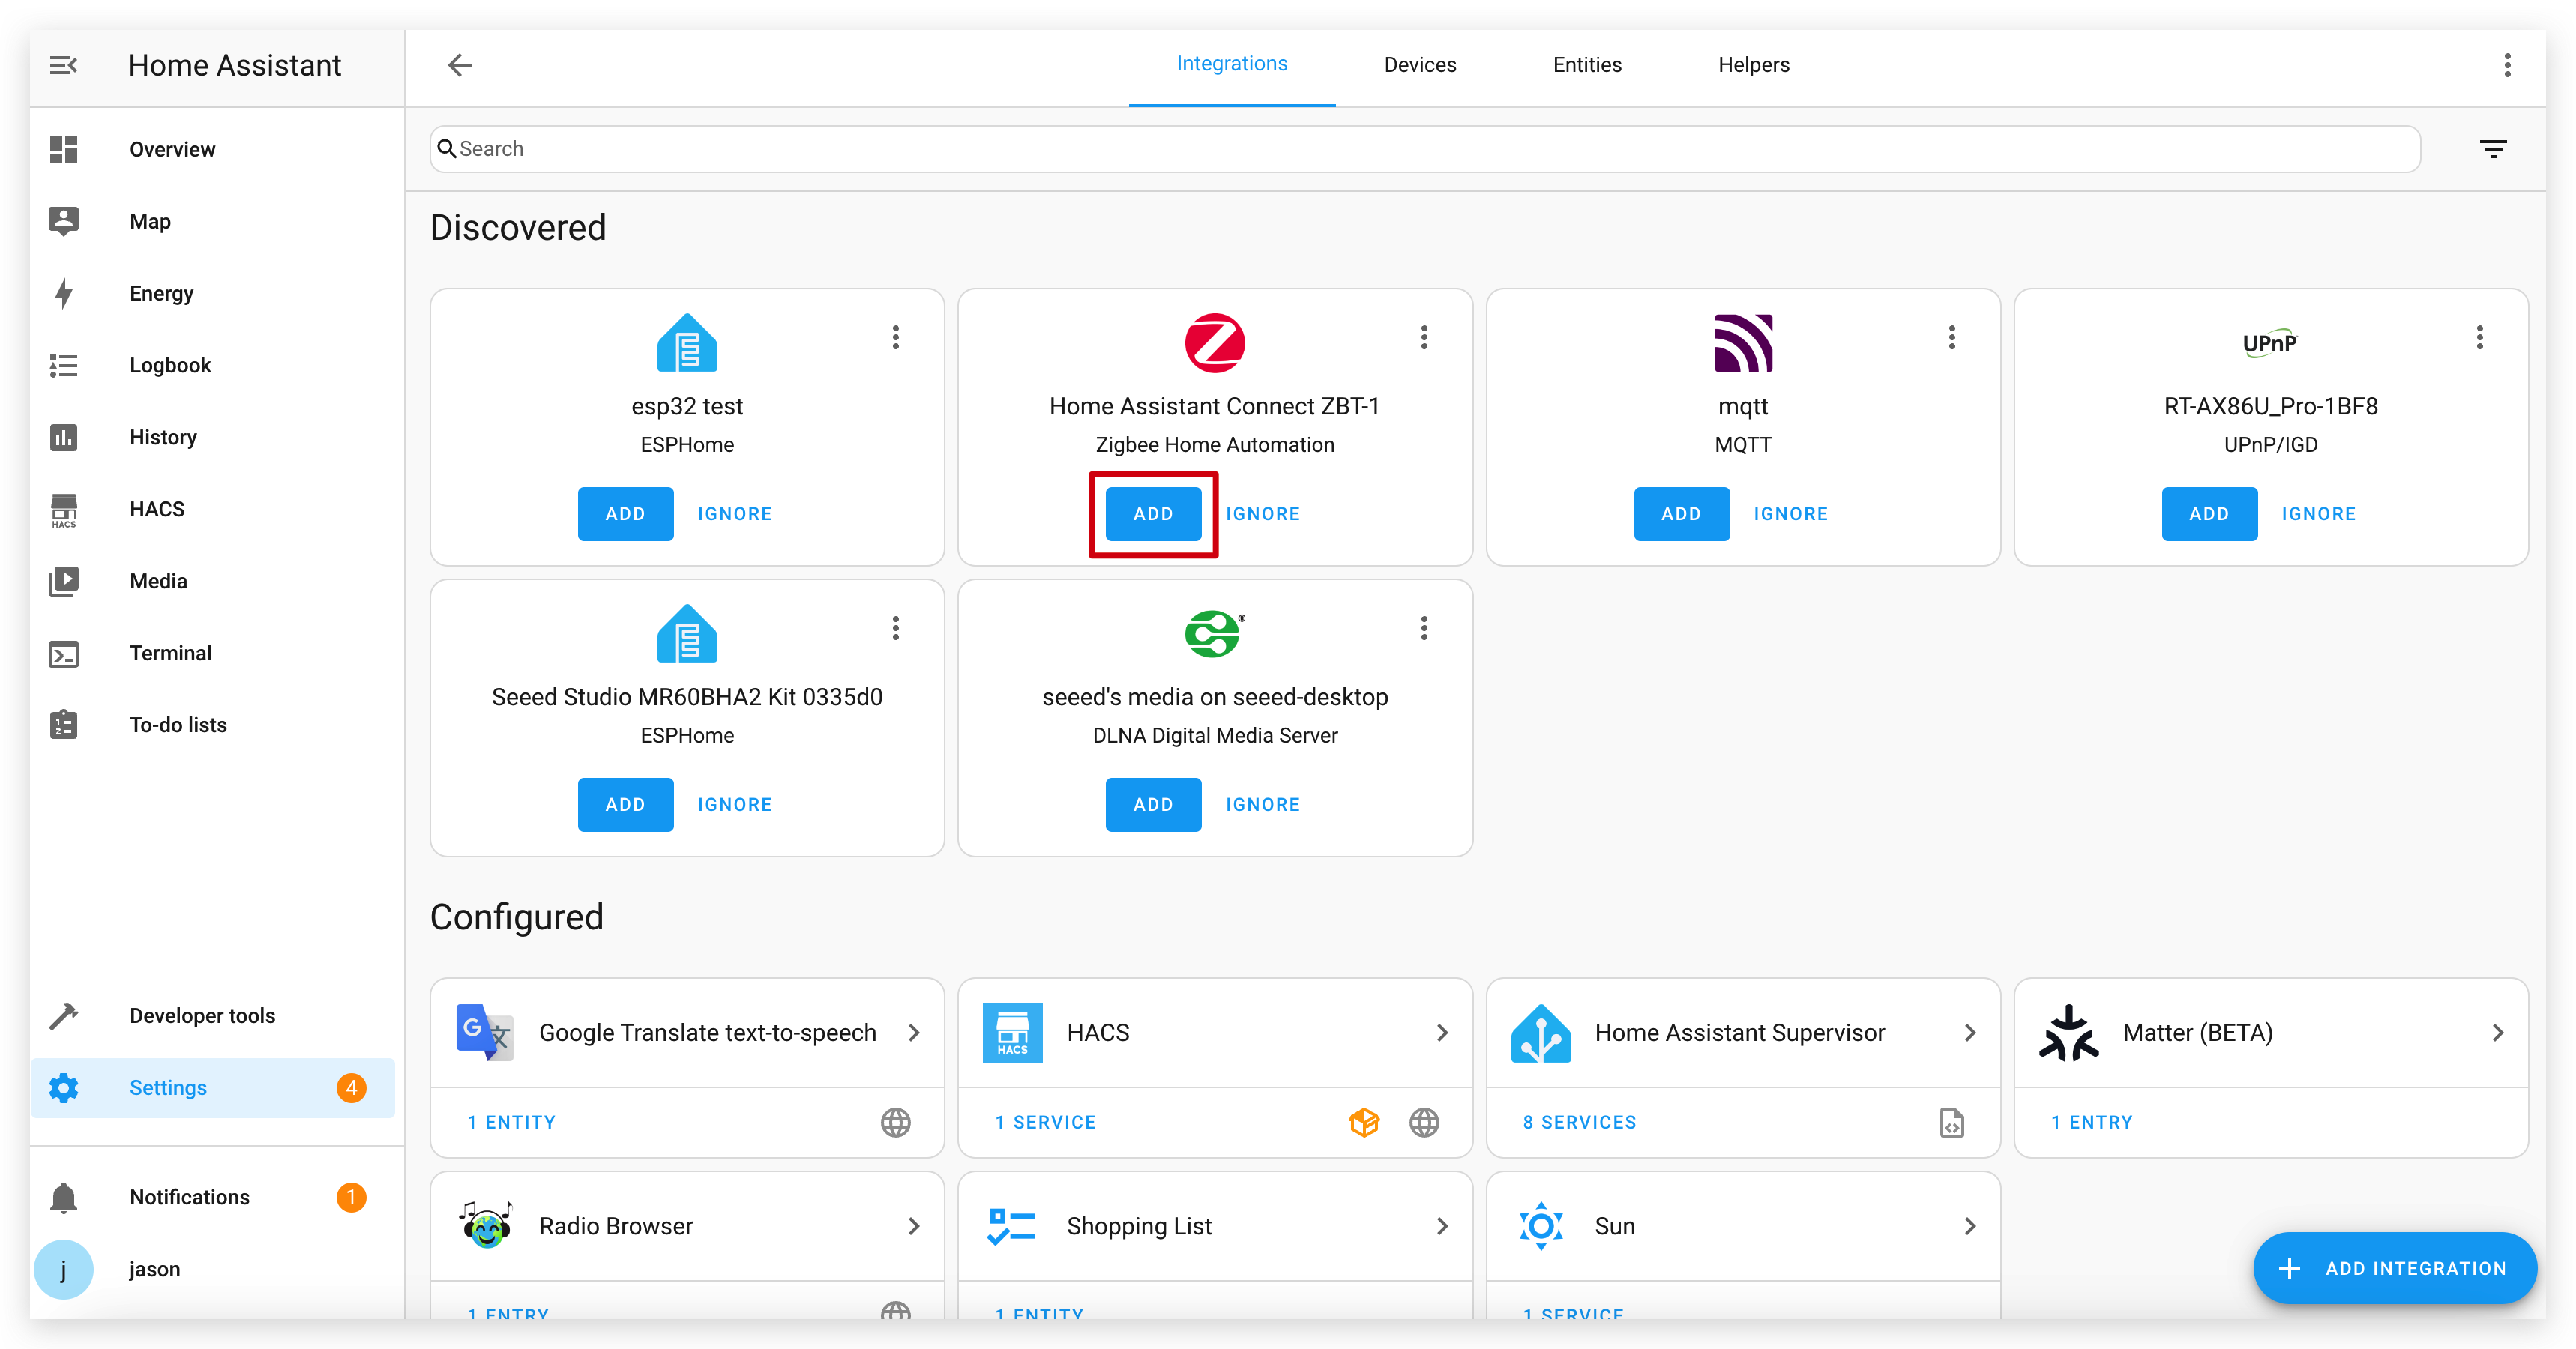
- Set Up Zigbee Home Automation (ZHA):
- Go to Settings > Devices & Services.
- Click "Add Integration" and search for "Zigbee Home Automation".
- Follow the prompts to set up ZHA with your coordinator.
Step 7: Pair the IoT Button with Home Assistant
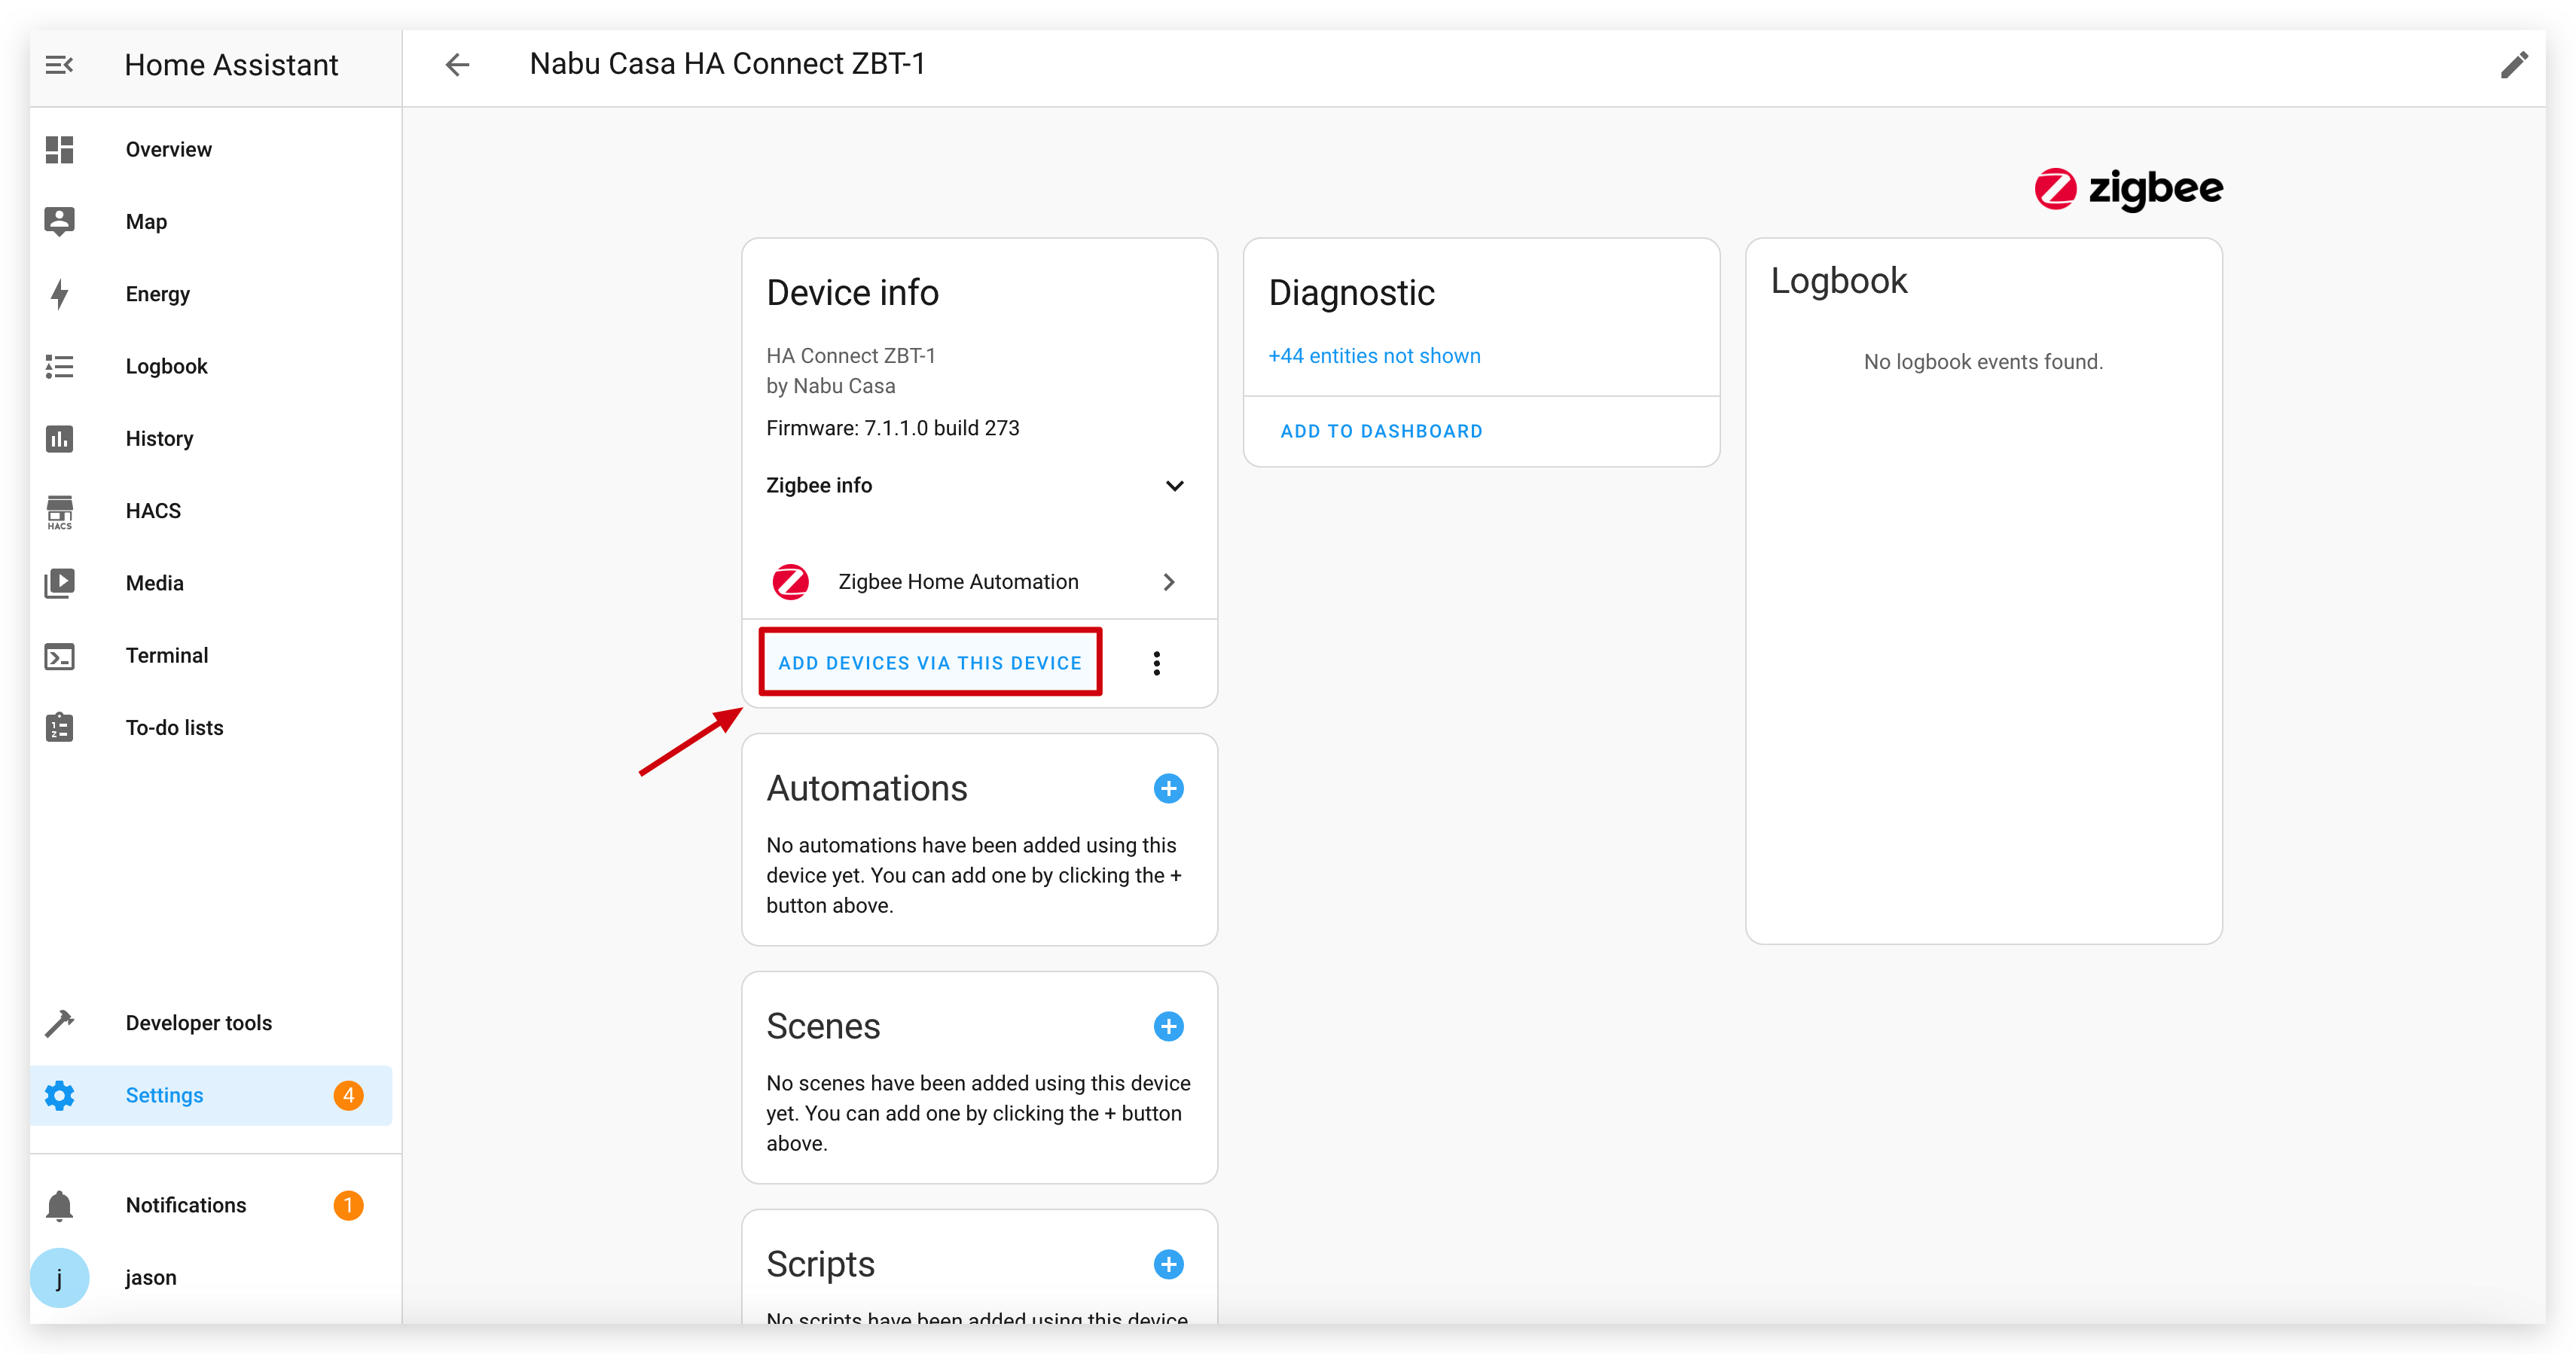
- In Home Assistant, go to Settings > Devices & Services > Zigbee Home Automation.
- Click on your Zigbee coordinator device.
- Click "Add Device" to put the coordinator in pairing mode.
- Press the button on your IoT Button once to wake it and initiate pairing. If it doesn't pair, try holding the button for more than 5 seconds to trigger a factory reset, which will also put it into pairing mode.
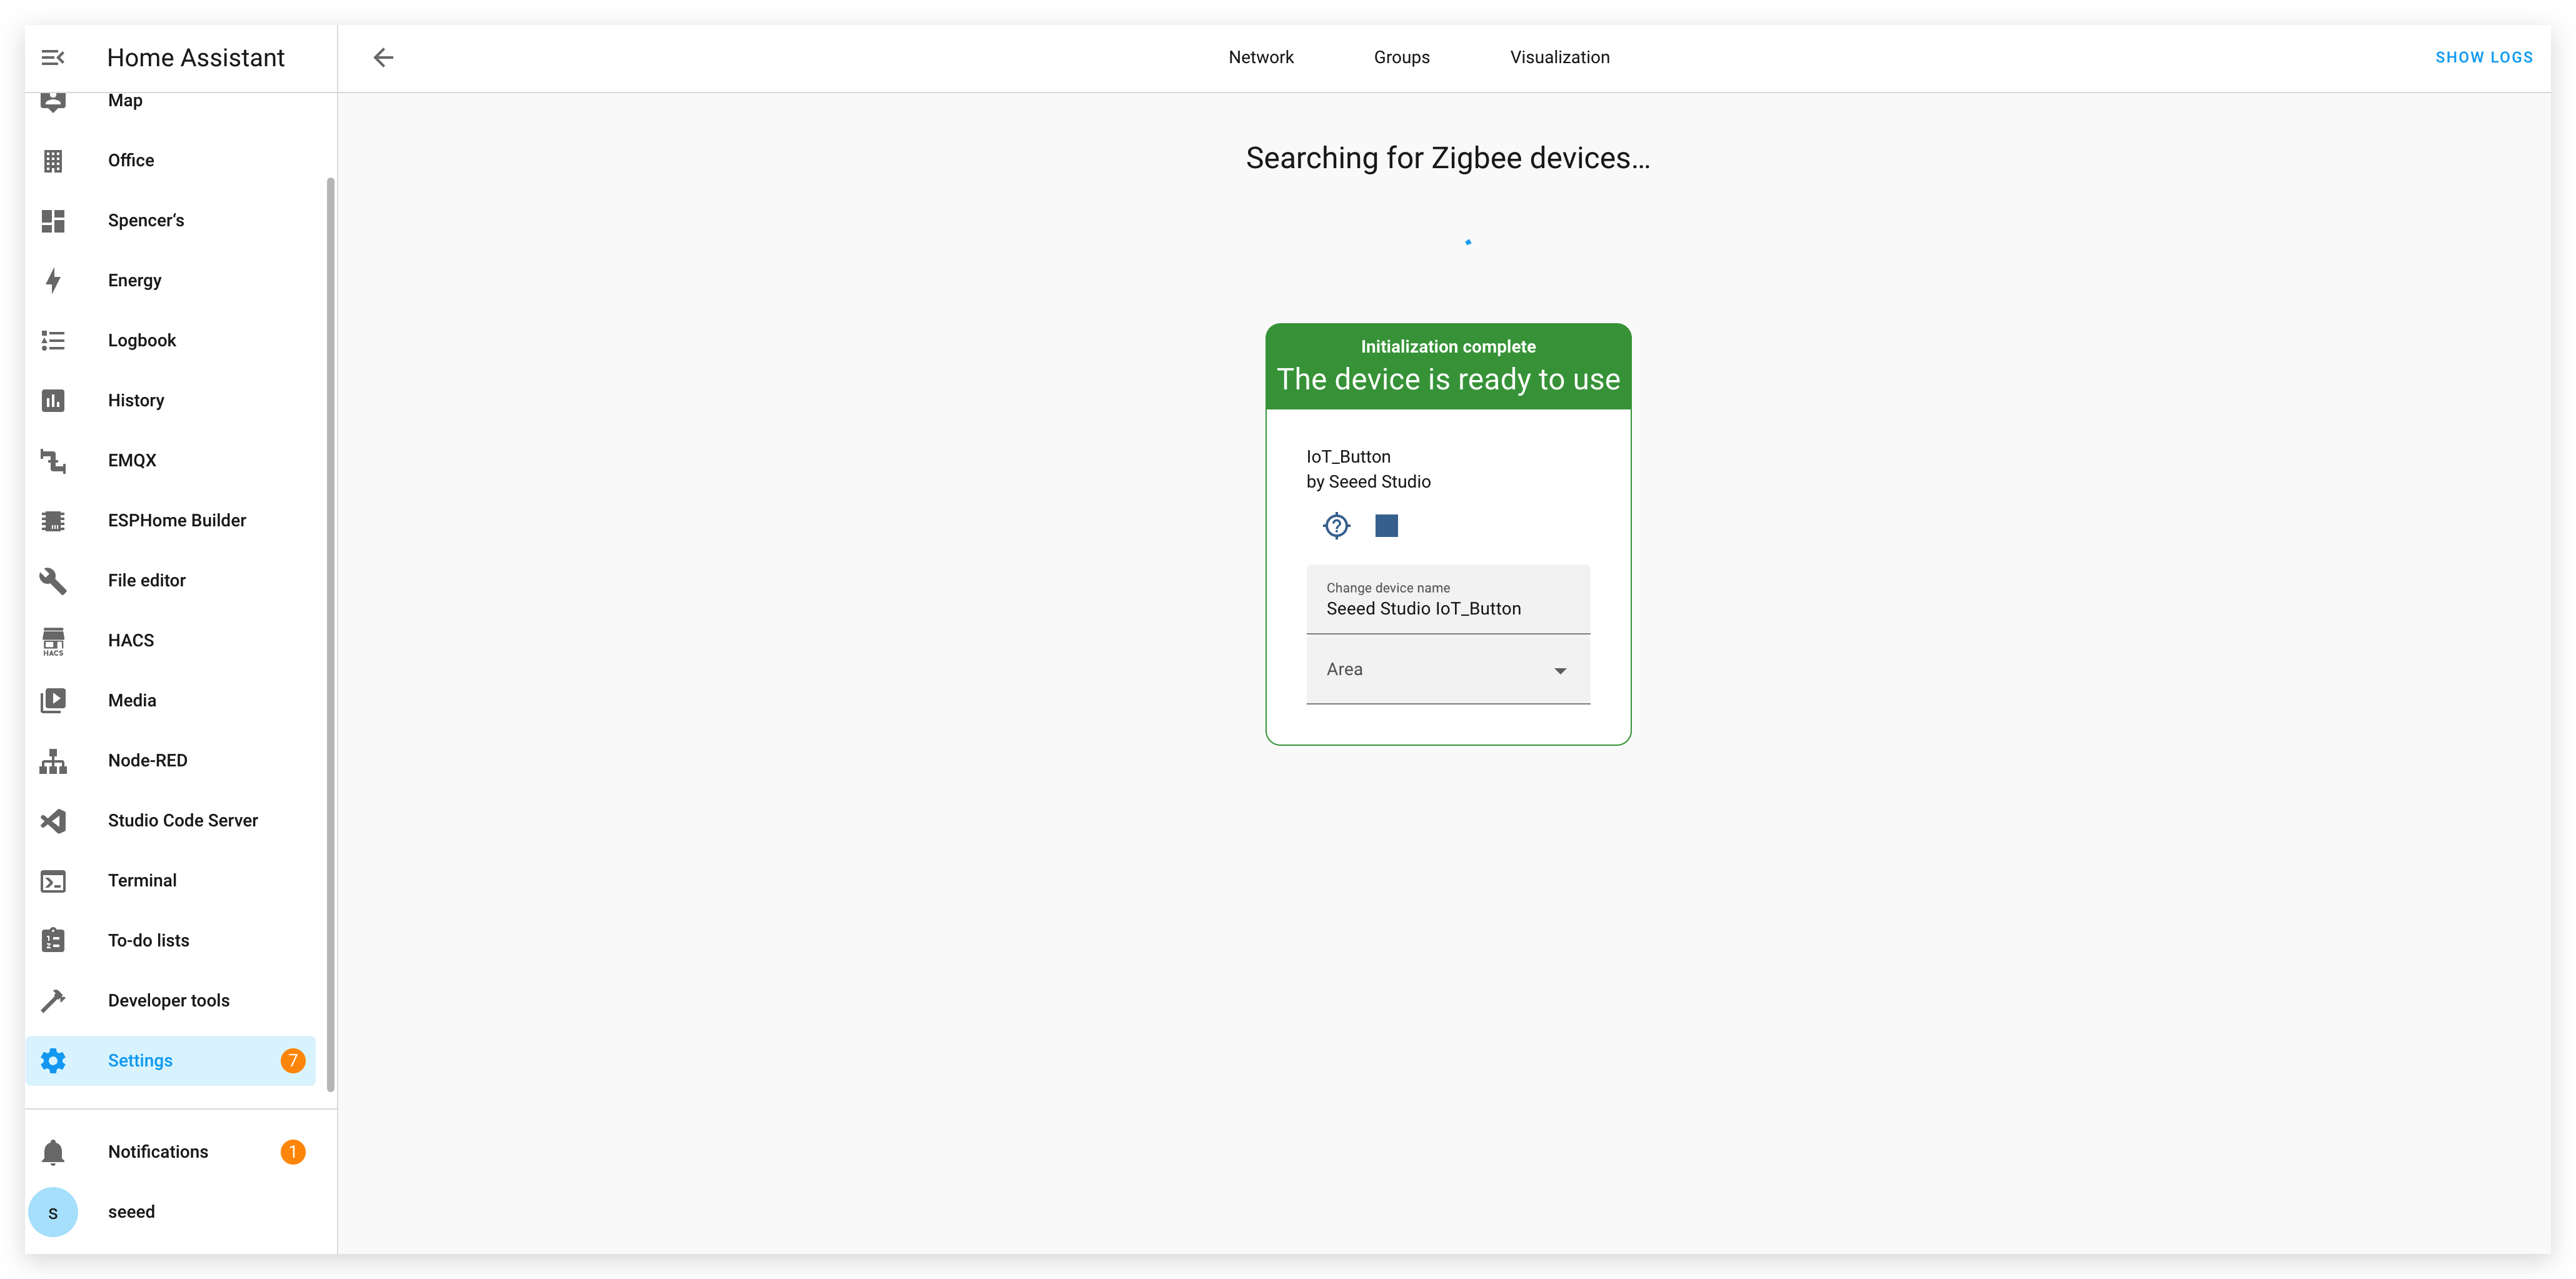
- Home Assistant should discover the IoT Button as "Seeed Studio IoT_Button".
- Follow the prompts to complete the pairing process. You will see a device with multiple entities (a binary sensor and three switches).
Step 8: Create Automations in Home Assistant
Once paired, you can create automations based on the button's actions. The firmware exposes different click types as separate switches, making automation simple.
- Go to Settings > Automations & Scenes > Create Automation.
- Select "Device" as the trigger type.
- Find your IoT Button in the device list.
- Select the desired trigger from the list. ZHA will expose the different clicks as device actions, for example:
- "Single press" (from the virtual switch on Endpoint 11)
- "Double press" (from the virtual switch on Endpoint 12)
- "Long press" (from the virtual switch on Endpoint 13)
- Configure the actions you want to perform when the button is pressed.
- Save the automation.
Example automation in Home Assistant YAML to toggle a light with a double click:
alias: IoT Button Double Click - Toggle Living Room Light
description: ""
trigger:
  - platform: device
    domain: zha
    device_id: YOUR_DEVICE_ID_HERE # Replace with your button's device ID
    type: "remote_button_double_press" # The exact type may vary, select it from the UI
action:
  - service: light.toggle
    target:
      entity_id: light.living_room
mode: single
Conclusion
The Seeed Studio IoT Button with Zigbee functionality offers a versatile and power-efficient way to control your smart home. Whether you use the pre-built firmware or develop your own custom solution, the button provides a simple interface for triggering complex automations in Home Assistant.
By leveraging the ESP32-C6's built-in Zigbee capabilities, the IoT Button can operate for extended periods on battery power while maintaining reliable connectivity with your smart home ecosystem.
Troubleshooting
Q1: Why does my device keep dropping out and not being able to connect to the internet after replacing the battery? I can confirm that the battery is charged
After the battery has been removed, due to the chip protection strategy of the 18650 battery, it needs to be activated a bit by a charged USB power cable to work properly.
Resources
- [GITHUB] Seeed IoT Button Github Repository
- [PDF] Seeed IoT Button SCH PDF
- [SCH&PCB] Seeed IoT Button SCH & PCB
Tech Support & Product Discussion
Thank you for choosing our products! We are here to provide you with different support to ensure that your experience with our products is as smooth as possible. We offer several communication channels to cater to different preferences and needs.