Using Tool Blocks
In the deployment flow you can insert SenseCraft AI integrated features in one click. They streamline both your authoring experience and end-user deployment.
AI Vision
Deploy AI vision models for object recognition, detection, classification, and related tasks on supported hardware. Inference results can be streamed in real time via MQTT, GPIO, or serial (Serial), depending on configuration.
The tool block currently supports Detection and Classification. Segmentation and pose estimation are planned for a later release.
Supported devices
Select a model
- SenseCraft AI model: Select high-quality models shared publicly by the community from the model library.
- My model: Pick a model from your private saved list.
- Upload model: Upload model files trained on third-party platforms. You must provide the model name, task type (Task), model categories (Class ID and Class Name), attach the model file, and select supported devices. After upload, the model appears under My model.
- Train model: To train a new model or retrain from an existing one, open the training entry and follow the wizard. When finished, open Historical models, choose Send to SenseCraft, complete the upload flow, and save the result to My model.
When you publish an application that includes a private model to the community, that model will automatically become public.
Select device
From the drop-down, choose the hardware you actually use from the list supported by this model.
Recommended parameters
Tune inference and device settings for your scenario. These values are written to the device as defaults at deployment time.
- Confidence threshold: Criterion for whether the model emits a final prediction. Raising the threshold tends to reduce false positives; lowering it tends to reduce false negatives.
- IOU threshold: In detection tasks, IoU compares predicted boxes to ground truth. A higher threshold helps separate overlapping objects but may produce duplicate boxes on one object if set too high. A lower threshold merges duplicates but may merge two nearby objects if set too low.
Output mode
- None: After power-on, inference does not start until another trigger runs. Suited to low-power setups where inference runs only when needed.
- MQTT: Start inference immediately after power-on and send results over Wi-Fi via MQTT.
- SenseCraft official service (recommended): Select or create a Dev Kit for your application and MQTT is configured automatically. Open the SenseCraft Data platform to view and process incoming data.
- Third-party service: Use your own or a third-party MQTT broker and configure parameters manually.
- GPIO: Drive GPIO pins with level signals.
- Trigger conditions: Define rules with object, condition, and confidence threshold.
- Trigger actions: When conditions match, the device can pull a pin high/low, save captures to SD card, light an LED, and so on.
- Serial: Use the SSCMACore library to export inference data over UART (GPIO), I2C, or SPI.
**UART (GPIO)**
Baud Rate Value: 921600
Data Format: 8N1
TX: GPIO43
RX: GPIO44

**I2C**
Slave Address: 0x62
SDA: GPIO5 (PULLUP)
SCL: GPIO6 (PULLUP)
Protocol:
- READ:0x10,0x01, LEN << 8, LEN & 0xff
- WRITE: 0x10,0x02, LEN << 8, LEN & 0xff
- AVAIL(to read): 0x10,0x03
- RESET(clear buffer): 0x10,0x06

**SPI**
Slave CPOL0 CPHA0
MOSI GPIO9 (PULLUP)
MISO GPIO8,
SCLK GPIO7 (PULLUP)
CS GPIO4 (PULLUP)
Protocol:
- READ:0x10,0x01, LEN << 8, LEN & 0xff
- WRITE: 0x10,0x02, LEN << 8, LEN & 0xff
- AVAIL(to read): 0x10,0x03
- RESET(clear buffer): 0x10,0x06
AI Audio
Deploy AI audio models for speech recognition on supported hardware. Results can be streamed via MQTT, GPIO, or serial, depending on configuration.
Supported devices
Select a model
- SenseCraft AI model: Select community-shared models from the library.
- My model: Choose from your private list.
- Upload model: Upload model files trained on third-party platforms. Provide the model name and categories (Class ID and Class Name). After upload, the model appears under My model.
- Train model: Train a new or updated model, then send it to SenseCraft from Historical models as with vision models.
When you publish an application that includes a private model to the community, that model will automatically become public.
Select device
Audio models currently support XIAO ESP32S3 Sense only.
Recommended parameters
Fine-tune values for your scenario.
- Confidence threshold: Same role as for vision; adjust the trade-off between missed and spurious outputs.
- Output mode: Default output path for the audio model.
AI Vibration
Deploy vibration anomaly detection by learning “normal” vibration and flagging deviations.
Supported devices
- XIAO ESP32S3 Sense (with 3-axis accelerometer)
Recommended parameters
Tune sampling, power-on behavior, GPIO, and output for your setup.
- Sampling window: Samples per time unit. Too large slows inference; too small may underfit normal vibration.
- Enable default power-on inference: When off, inference does not auto-start at power-on; use an external trigger for low-power use.
- GPIO: Drive pins on abnormal vibration—for example set a level or toggle an LED.
- Output mode: Default output path for the vibration model.
Deploy Container App
Deploy container applications to edge devices in a few clicks.
Featured apps
The built-in library includes (and continues to grow):
- Home Assistant — open-source home automation hub
- Ollama — run open-source large language models locally on the edge
- OpenClaw — open-source platform for deploying and managing containerized edge applications
- reComputer AI Suite — Computer Vision (CV), Vision-Language Models (VLM), and Large Language Models (LLM) optimized for reComputer hardware
Compatible with M1 Gate, Raspberry Pi 4 / 5, NVIDIA Jetson, and Seeed reComputer.
How it works with SenseCraft Fleet
Container apps are managed on SenseCraft Fleet and deployed through SenseCraft AI (under Applications):
- SenseCraft Fleet is where container images live—you upload images, define their configuration schema, and bind your devices.
- SenseCraft AI is where you pick an app from your library, choose a target device, configure it, and trigger deployment.
Your SenseCraft AI account is linked with SenseCraft Fleet automatically; bound devices and apps stay in sync across both platforms.
Supported platforms
Apps are platform-specific—the image and target device must match:
- Linux / ARM64 — e.g., Seeed reComputer, Raspberry Pi 4 / 5, NVIDIA Jetson, M1 Gate
- Linux / AMD64 — coming soon
Configuration workflow
Select an app: Choose from the app library on SenseCraft Fleet—the built-in catalog. If you prefer to upload your customized container app, you will need to add it through SenseCraft Fleet.
Configure the app: Each app exposes the configuration items its author defined on SenseCraft Fleet. Typically you shouldn't need to configure anything, unless you have unique requirements.
Deployment workflow
Step 1 — Select an app: Click Deploy Container App. SenseCraft AI loads your full app library from SenseCraft Fleet (built-in catalog plus any custom apps you've uploaded), each shown with name, icon, and description.
Step 2 – Bind a device: If you already have a bound device, skip to Step 3. Otherwise, power on the device, connect it to the network, then bind it based on your hardware:
- Seeed device running the Seeed factory image: Enter the last 6 digits of the device's CPU ID or MAC address to bind instantly.
- Seeed device without the factory image, or third-party device: Get the device's IP address, open a terminal and SSH into it, then run the binding command shown in the binding flow.
Once binding completes, the device appears in your bound device list.
Step 3 — Select a target device: Pick from the list of bound devices compatible with the app's platform. Incompatible devices are filtered out automatically.
Step 4 — Configure the app: Fill in the configuration items exposed by the app author. See the Configuration workflow section above for control types and defaults.
Step 5 — One-click deploy: Click Deploy. SenseCraft AI shows a live progress indicator and streams status through each phase. If anything fails, the exact error appears in a popup so you can fix and retry. Re-deploy with new values to update an existing deployment—the previous one is replaced automatically.
Single-image Docker apps are supported today. Docker Compose (multi-container apps) is on the roadmap.
Flash firmware
Flash a precompiled firmware binary to an ESP32 device directly from the browser, without installing a separate flashing tool. Use this when your firmware is already compiled with all parameters baked in.
Supported devices:
- Seeed Studio XIAO ESP32C3
- Seeed Studio XIAO ESP32C6
- Seeed Studio XIAO SAMD21
- Seeed Studio XIAO ESP32S3
- Seeed Studio XIAO ESP32S3 Sense
- Seeed Studio XIAO ESP32S3 Plus
- Seeed Studio XIAO nRF52840
- Seeed Studio XIAO nRF52840 Sense
- Seeed Studio XIAO nRF52840 Plus
- Seeed Studio XIAO nRF52840 Sense Plus
- Seeed Studio XIAO RP2040
- Seeed Studio XIAO RP2350
- Seeed Studio XIAO RA4M1
- Seeed Studio XIAO MG24
- Seeed Studio XIAO MG24 Sense
- Wio Terminal (D51R) (coming soon)
- Seeeduino Lotus (coming soon)
- Grove Beginner Kit for Arduino (coming soon)
Prerequisites:
A single merged .bin file. If you have separate bootloader, partition, and app binaries, merge them before uploading.
- Arduino IDE 2.x: A merged binary is only produced when you run Sketch → Export Compiled Binary. The output
*.ino.merged.binis written to abuild/folder next to your.inofile. - Older Arduino IDE / manual merge: Export Compiled Binary writes separate bootloader, partition, and app
.binfiles — merge them withesptool.py merge_binbefore uploading. See the Seeed Studio forum guide: How to export a single merged.binfile from Arduino IDE.
Configuration Workflow
- Click Upload firmware and upload your
.binfile. - Select device type from the drop-down.
Deployment Workflow
- Connect the device to your computer.
- Click Flash firmware. The button shows the current phase, with a progress bar and debug log below it: connect serial → detect device → flash → reboot.
- After flashing completes, verify behavior in the preview window.
If any step fails, an error popup explains the cause so you can fix and retry.
Node-RED
The Node-RED block helps you build visual logic flows for reCamera.
Official resources
Supported devices
Prepare your workflow
After you add the Node-RED block, configure the flow in either of these ways:
- Create new workflow: Connect to reCamera (wired or wireless), open its Dashboard, and edit online.
- Upload local file: Upload a JSON flow you already built. The system validates file type so it can be parsed reliably.
Select AI vision model
JSON flows do not embed model binaries. Specify which model this flow should use:
- Device built-in: Use models preinstalled on reCamera, including YOLO11n variants for classification, detection, segmentation, and pose.
- Public models: Browse SenseCraft public models shared by others for reCamera.
- My model: Choose from your private library.
If you use a private model under My model and publish the app to the public community, that model will be made public as well. You will be prompted before publishing.
Aily Blockly
 Aily Blockly is a visual programming environment. With this block you can flash programs you built in Aily Blockly to edge devices in one step.
Official resources
Supported devices
- Seeed Studio XIAO ESP32C3
- Seeed Studio XIAO ESP32C6
- Seeed Studio XIAO SAMD21
- Seeed Studio XIAO ESP32S3
- Seeed Studio XIAO ESP32S3 Sense
- Seeed Studio XIAO ESP32S3 Plus
- Seeed Studio XIAO nRF52840
- Seeed Studio XIAO nRF52840 Sense
- Seeed Studio XIAO nRF52840 Plus
- Seeed Studio XIAO nRF52840 Sense Plus
- Seeed Studio XIAO RP2040
- Seeed Studio XIAO RP2350
- Seeed Studio XIAO RA4M1
- Seeed Studio XIAO MG24
- Seeed Studio XIAO MG24 Sense
- Wio Terminal (D51R)
- Seeeduino Lotus
- Grove Beginner Kit for Arduino
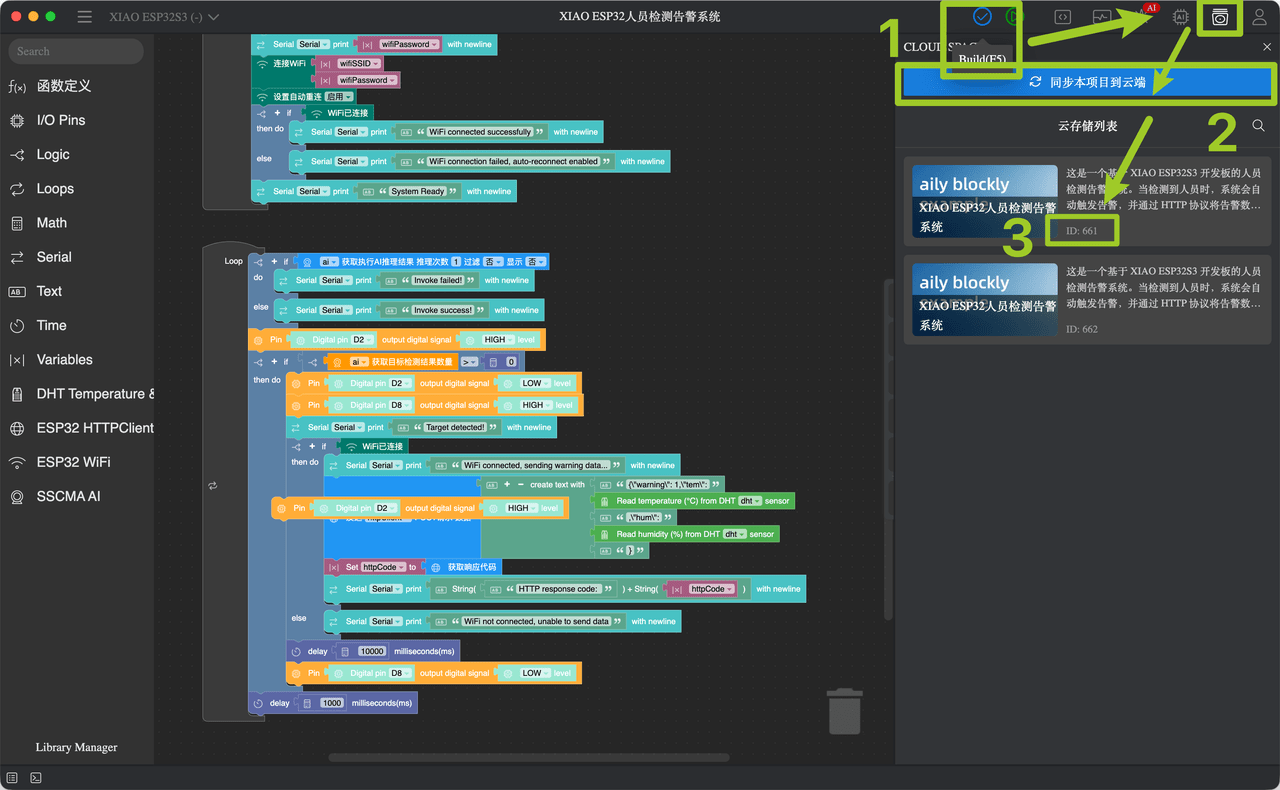
Bind Project ID
Enter the project code that points to your public Aily Blockly template.
How to get a Project ID
- Build your project in Aily Blockly, then click
Build (F5)to compile. - After a successful compile, open the Cloud Space panel and click
Sync this project to cloud. - Your Project ID appears in the labeled area (
ID: …), only use the numbers. - Repeat these steps whenever you change the project so the cloud copy stays up to date.