Train and Run π0.5 with SO-ARM
SenseCraft Robotics Platform Download: Download
This tutorial uses a desktop organization project with three tasks to demonstrate data collection, cloud training, and real-world validation with SO-ARM + π0.5. The detailed steps focus on placing the square box in a storage bin. Collect data for the other two tasks in the same way, then merge all three task datasets for training.
After completing this tutorial, enter “Place the square box in the storage bin” to test whether the robot can put the square box in the storage bin. Then enter instructions for the other tasks to test whether the robot can switch to performing them.
You can watch the video tutorial below first, or follow the step-by-step guide that follows.
1. Understand the Training Workflow
A VLA (Vision-Language-Action) model combines visual, language, and action information. In this project, the cameras capture the objects to be tidied and their destination containers, the task instruction specifies which object to pick up and where to put it, and the robot state provides information such as current joint positions. The model combines these inputs to predict the next robot actions.
The complete workflow is:
Create a project → Configure the robot and cameras → Collect demonstrations with instructions → Review and merge datasets → Train in the cloud → Run on the real robot → Evaluate and collect more data
A task typically requires multiple demonstrations. In a dataset containing multiple tasks, each episode must retain its corresponding task instruction.
| Concept | Meaning | Example |
|---|---|---|
| Task instruction (Task) | Describes the goal the robot should accomplish | Place the square box in the storage bin |
| Episode | A complete task execution recording, including images, robot states, actions, and related data | Pick up the square box from its starting position, place it in the storage bin, and stop recording |
2. Prerequisites
Before you begin, prepare the following:
-
A fully assembled, working SO-ARM leader arm and follower arm.
-
Compatible power supplies, USB cables, and cameras.
-
A computer with the SenseCraft Robotics desktop app updated to V1.1.27, with a stable network connection.
Software download: Download
-
Sufficient local storage on your computer and enough account credits for the training task.
-
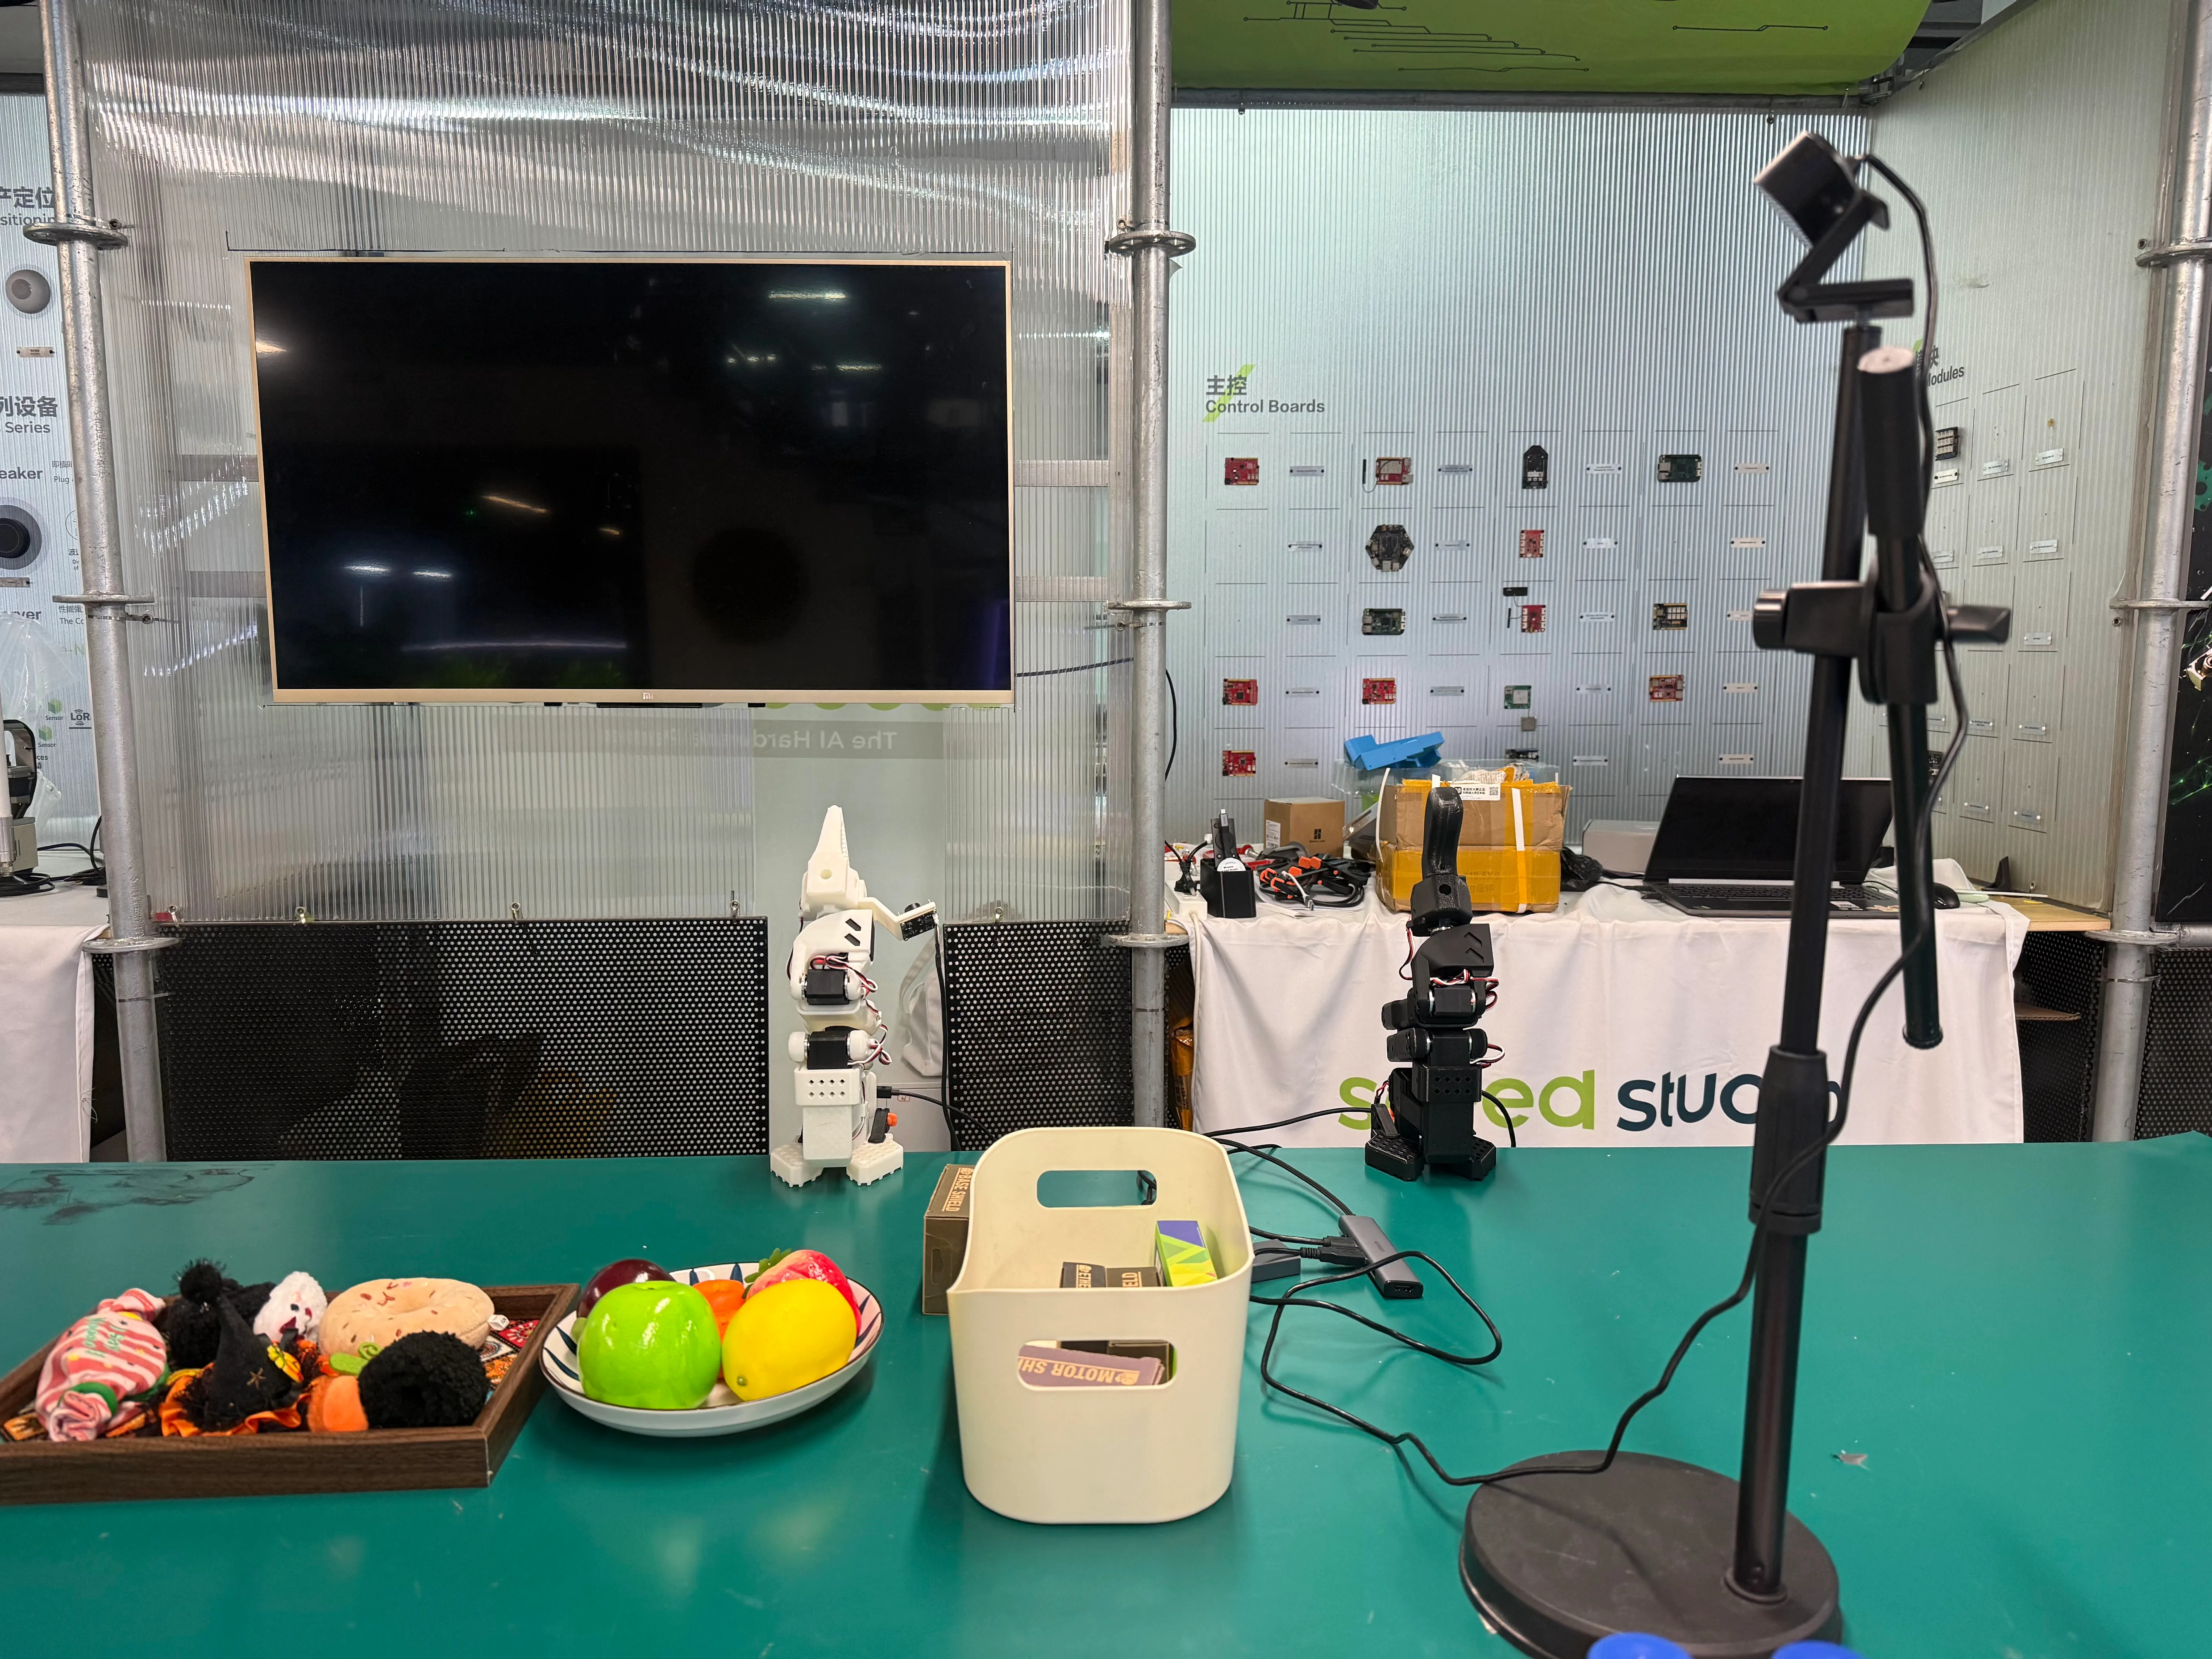
Task-related objects such as the square box and a storage bin, and a stable workbench.
If this is your first time using the robot, complete assembly and basic setup before proceeding.
Before running the robot, secure its base, clear its workspace, and make sure you can stop it promptly. Keep people and fragile objects outside the robot's movement area during initial tests.
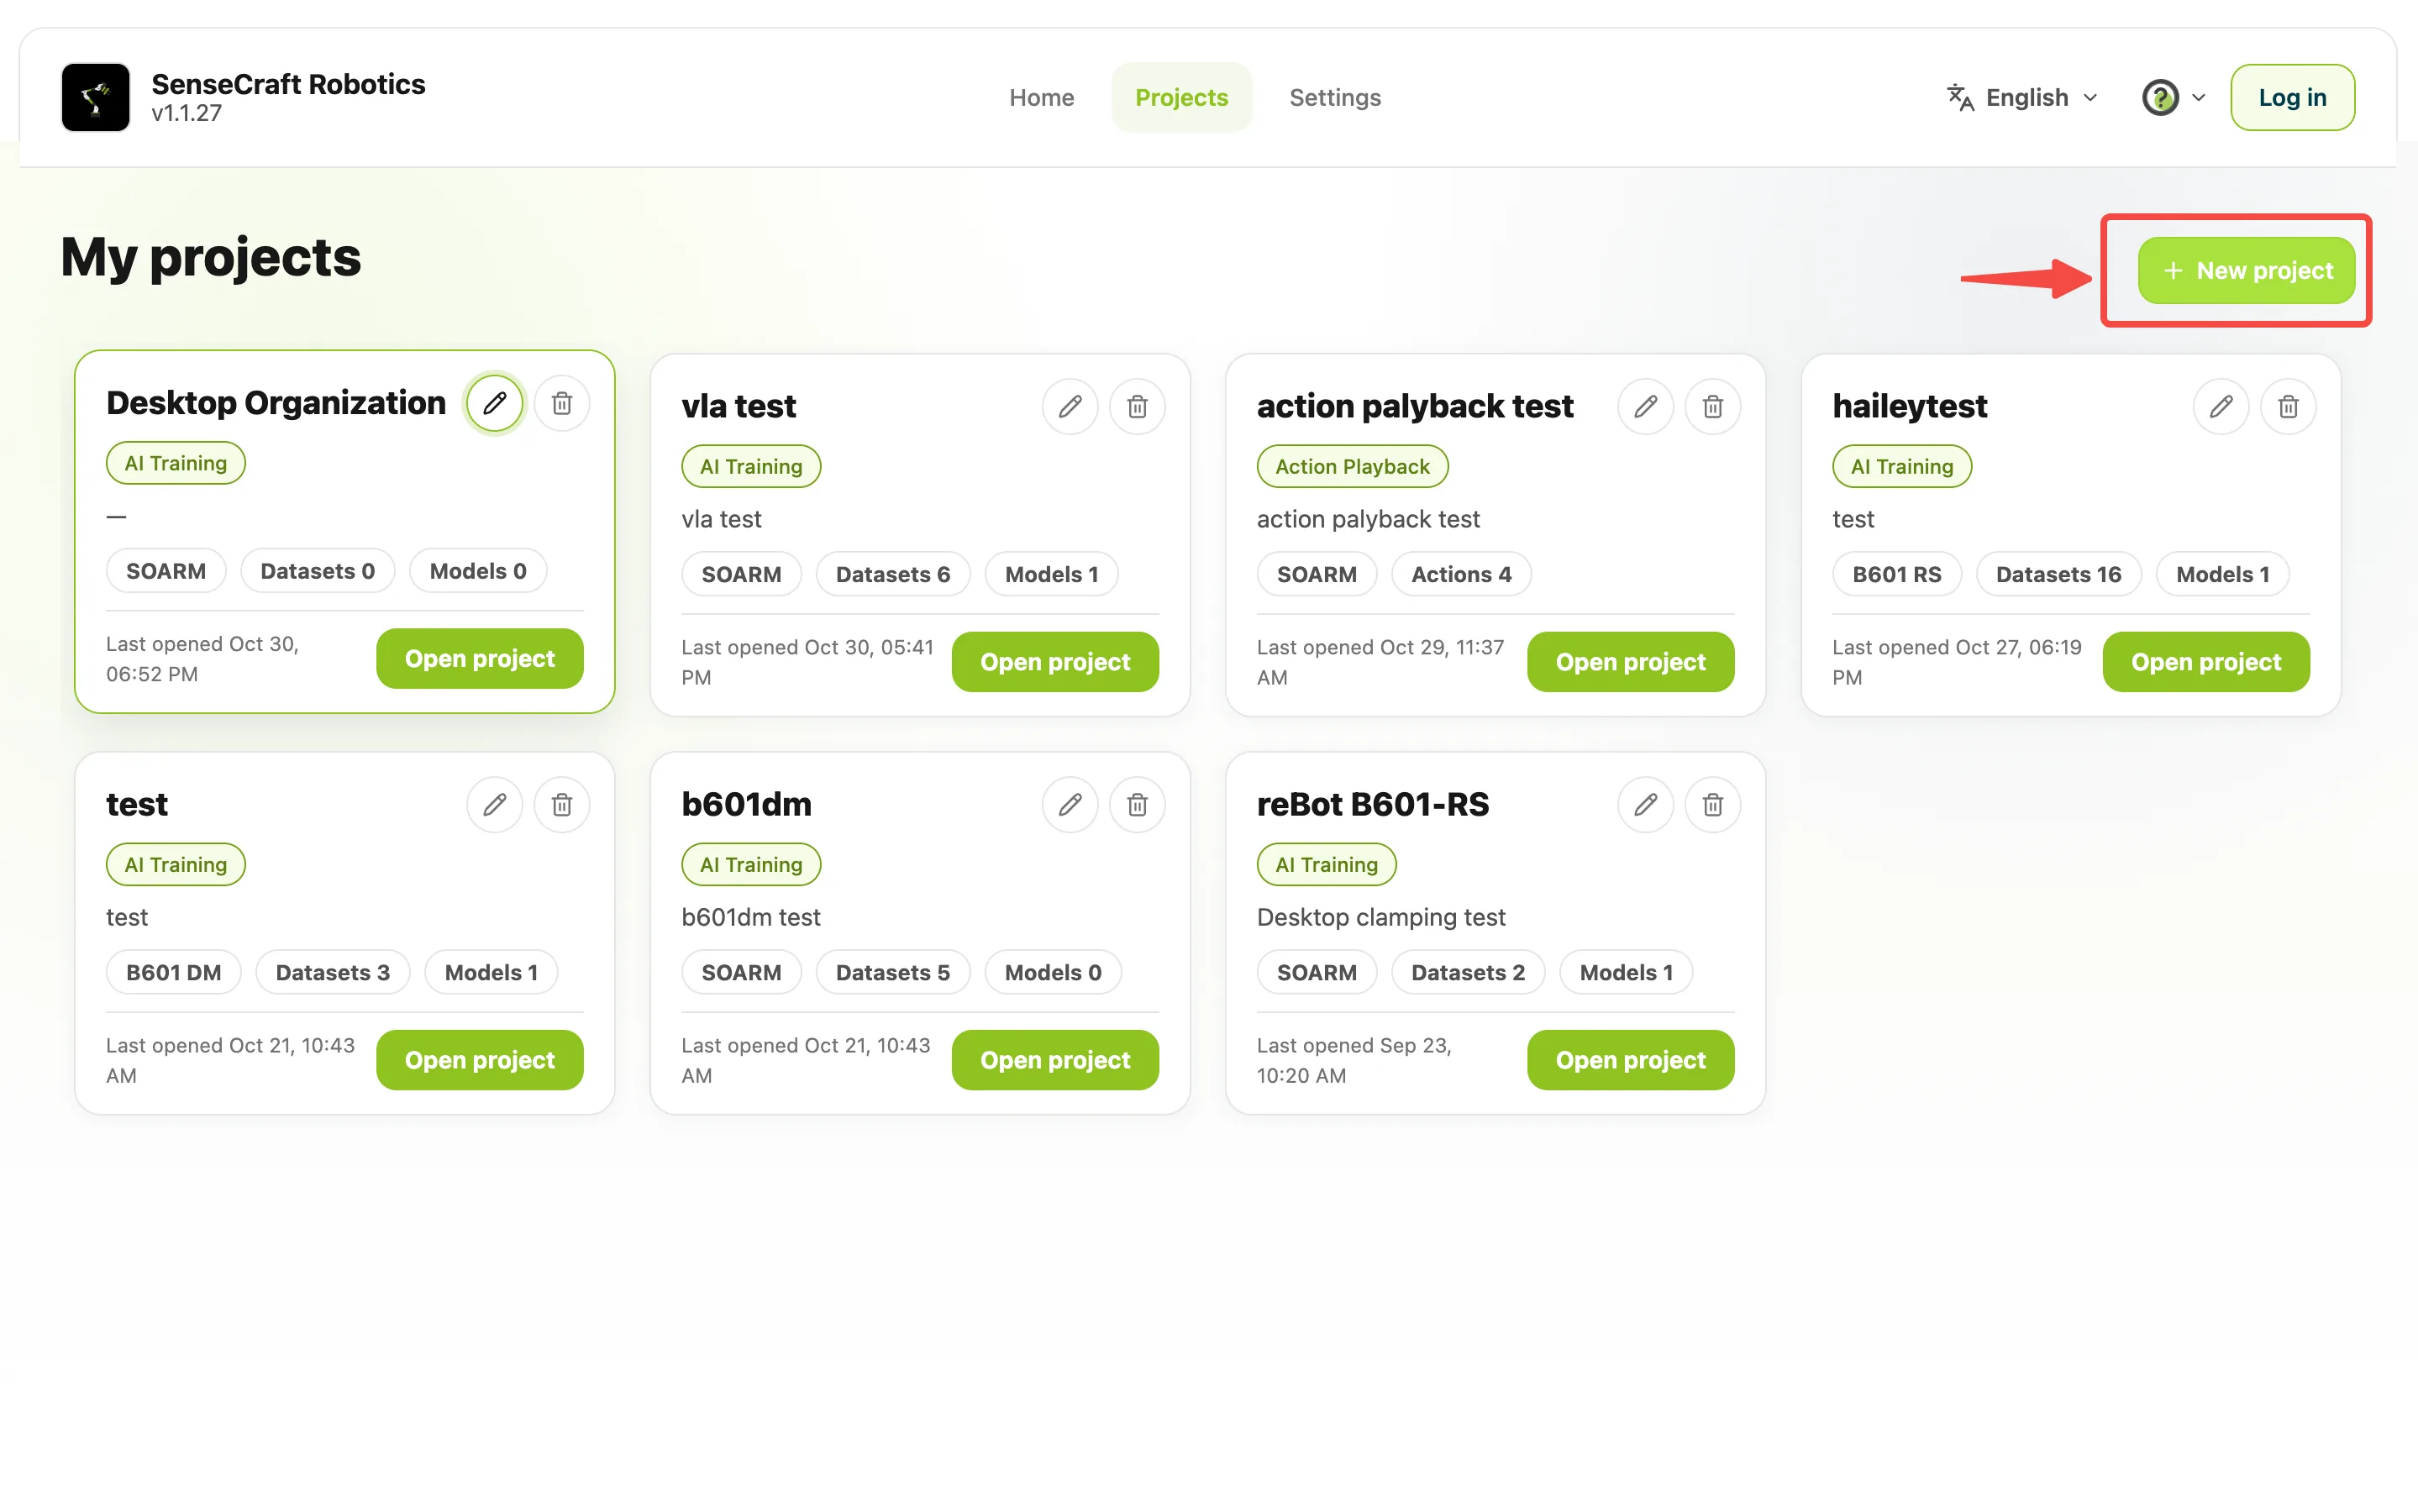
3. Create an AI Model Training Project
- Open SenseCraft Robotics.
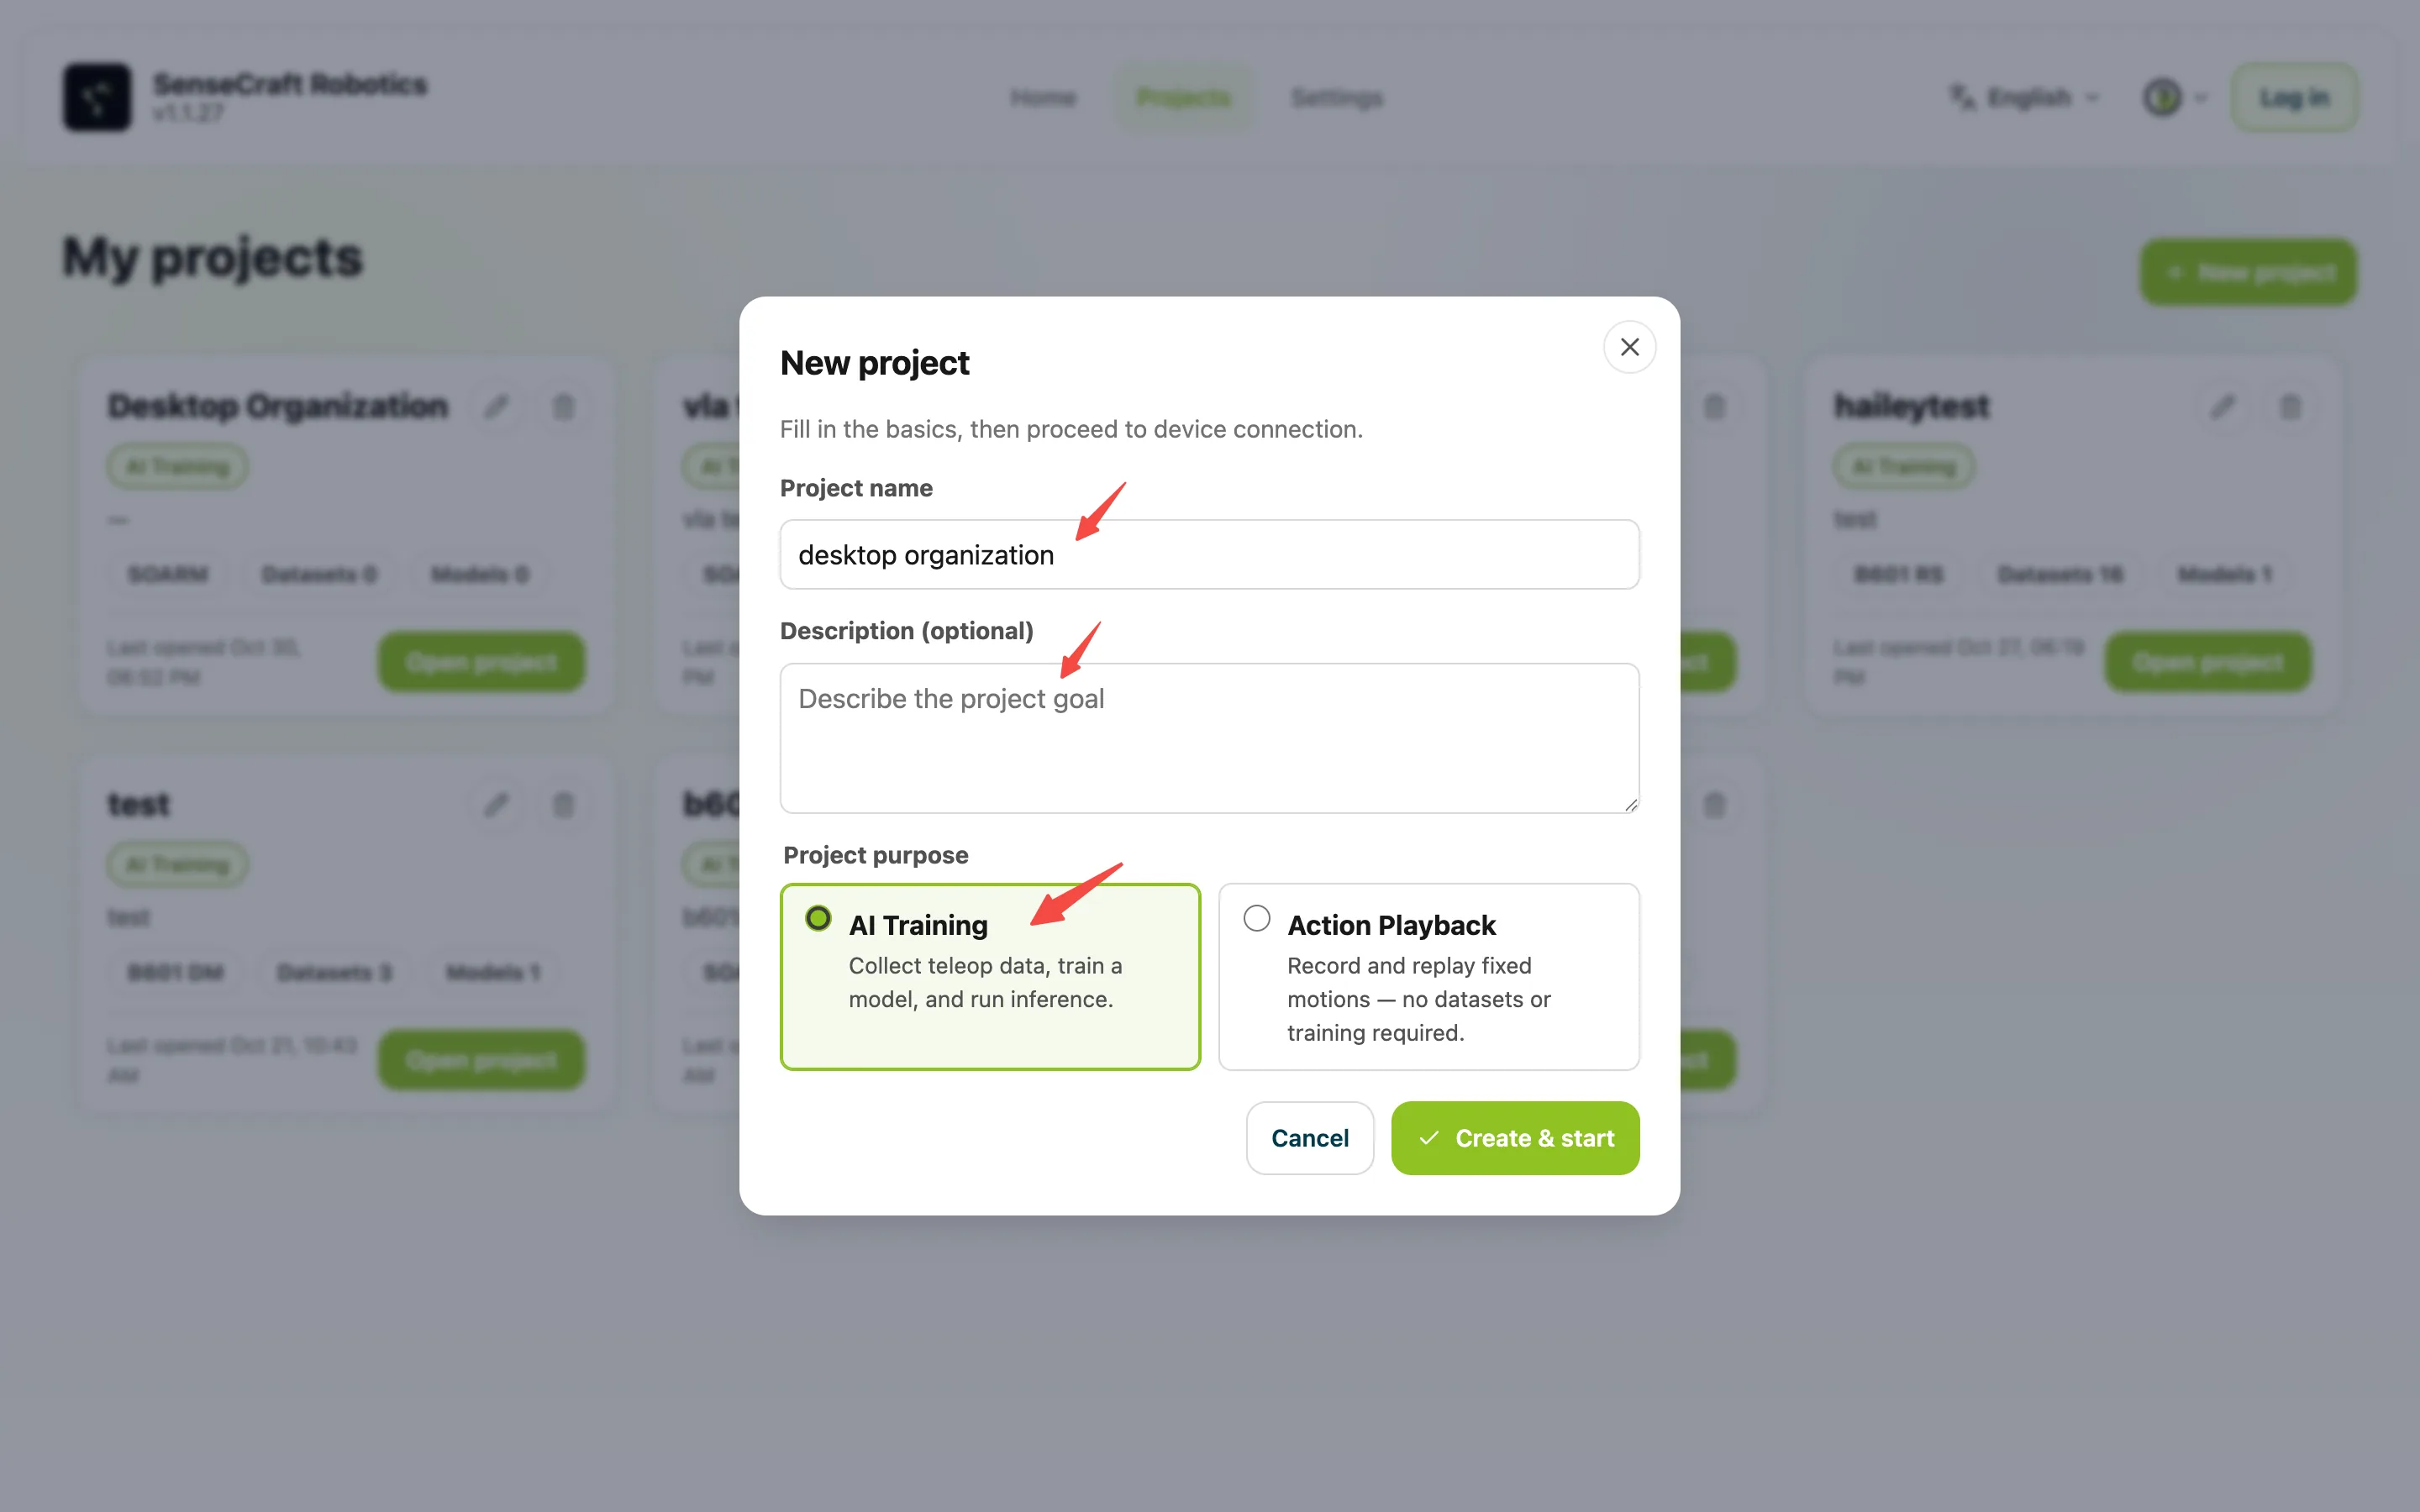
- Create a project with a recognizable name, such as
SOARM-Desktop-Organization. - Select AI Model Training as the project purpose.
- After creating the project, open Device Setup.
AI Model Training projects support data collection, model training, and inference. If you only need to record and repeat a fixed trajectory, choose an Action Playback project instead. This tutorial uses an AI Model Training project.
4. Configure the Robot Arm and Cameras
In Device Setup, follow the on-screen instructions to complete these steps:
- Select the device: Choose the robot arm model you are using. This tutorial uses SO-ARM.
- Bind serial ports: Identify the ports for the leader and follower arms. To avoid swapping them, connect the leader arm's USB cable first and bind its port, then connect and bind the follower arm.
- Calibrate: Follow the guided procedure to establish joint position references so the follower arm can track the leader correctly. SO-ARM supports automatic and manual calibration. For automatic calibration, position the arm as instructed and leave enough room around it to prevent collisions during calibration.
- Verify teleoperation: Move the leader arm slowly. Confirm that the follower tracks it correctly and that the gripper opens and closes normally.
- Bind cameras: Select the cameras needed for data collection and check their live feeds.
Check the live camera feeds: the square box and storage bin should be clearly visible. Simulate moving from the square box’s starting position to the storage bin and confirm that grasping and placement stay within the frame. If using a wrist camera, check that the grasp area is visible as the gripper approaches the box. Check the grasping and placement areas for the other two tasks in the same way.
Keep camera positions, viewing angles, device settings, and lighting as consistent as possible between data collection and execution. After changing the setup, check compatibility with your existing data and models.
For detailed setup instructions, see the SO-ARM101 Guide.
5. Collect Demonstrations with Task Instructions
5.1 Create a Dataset and Enter a Task Description
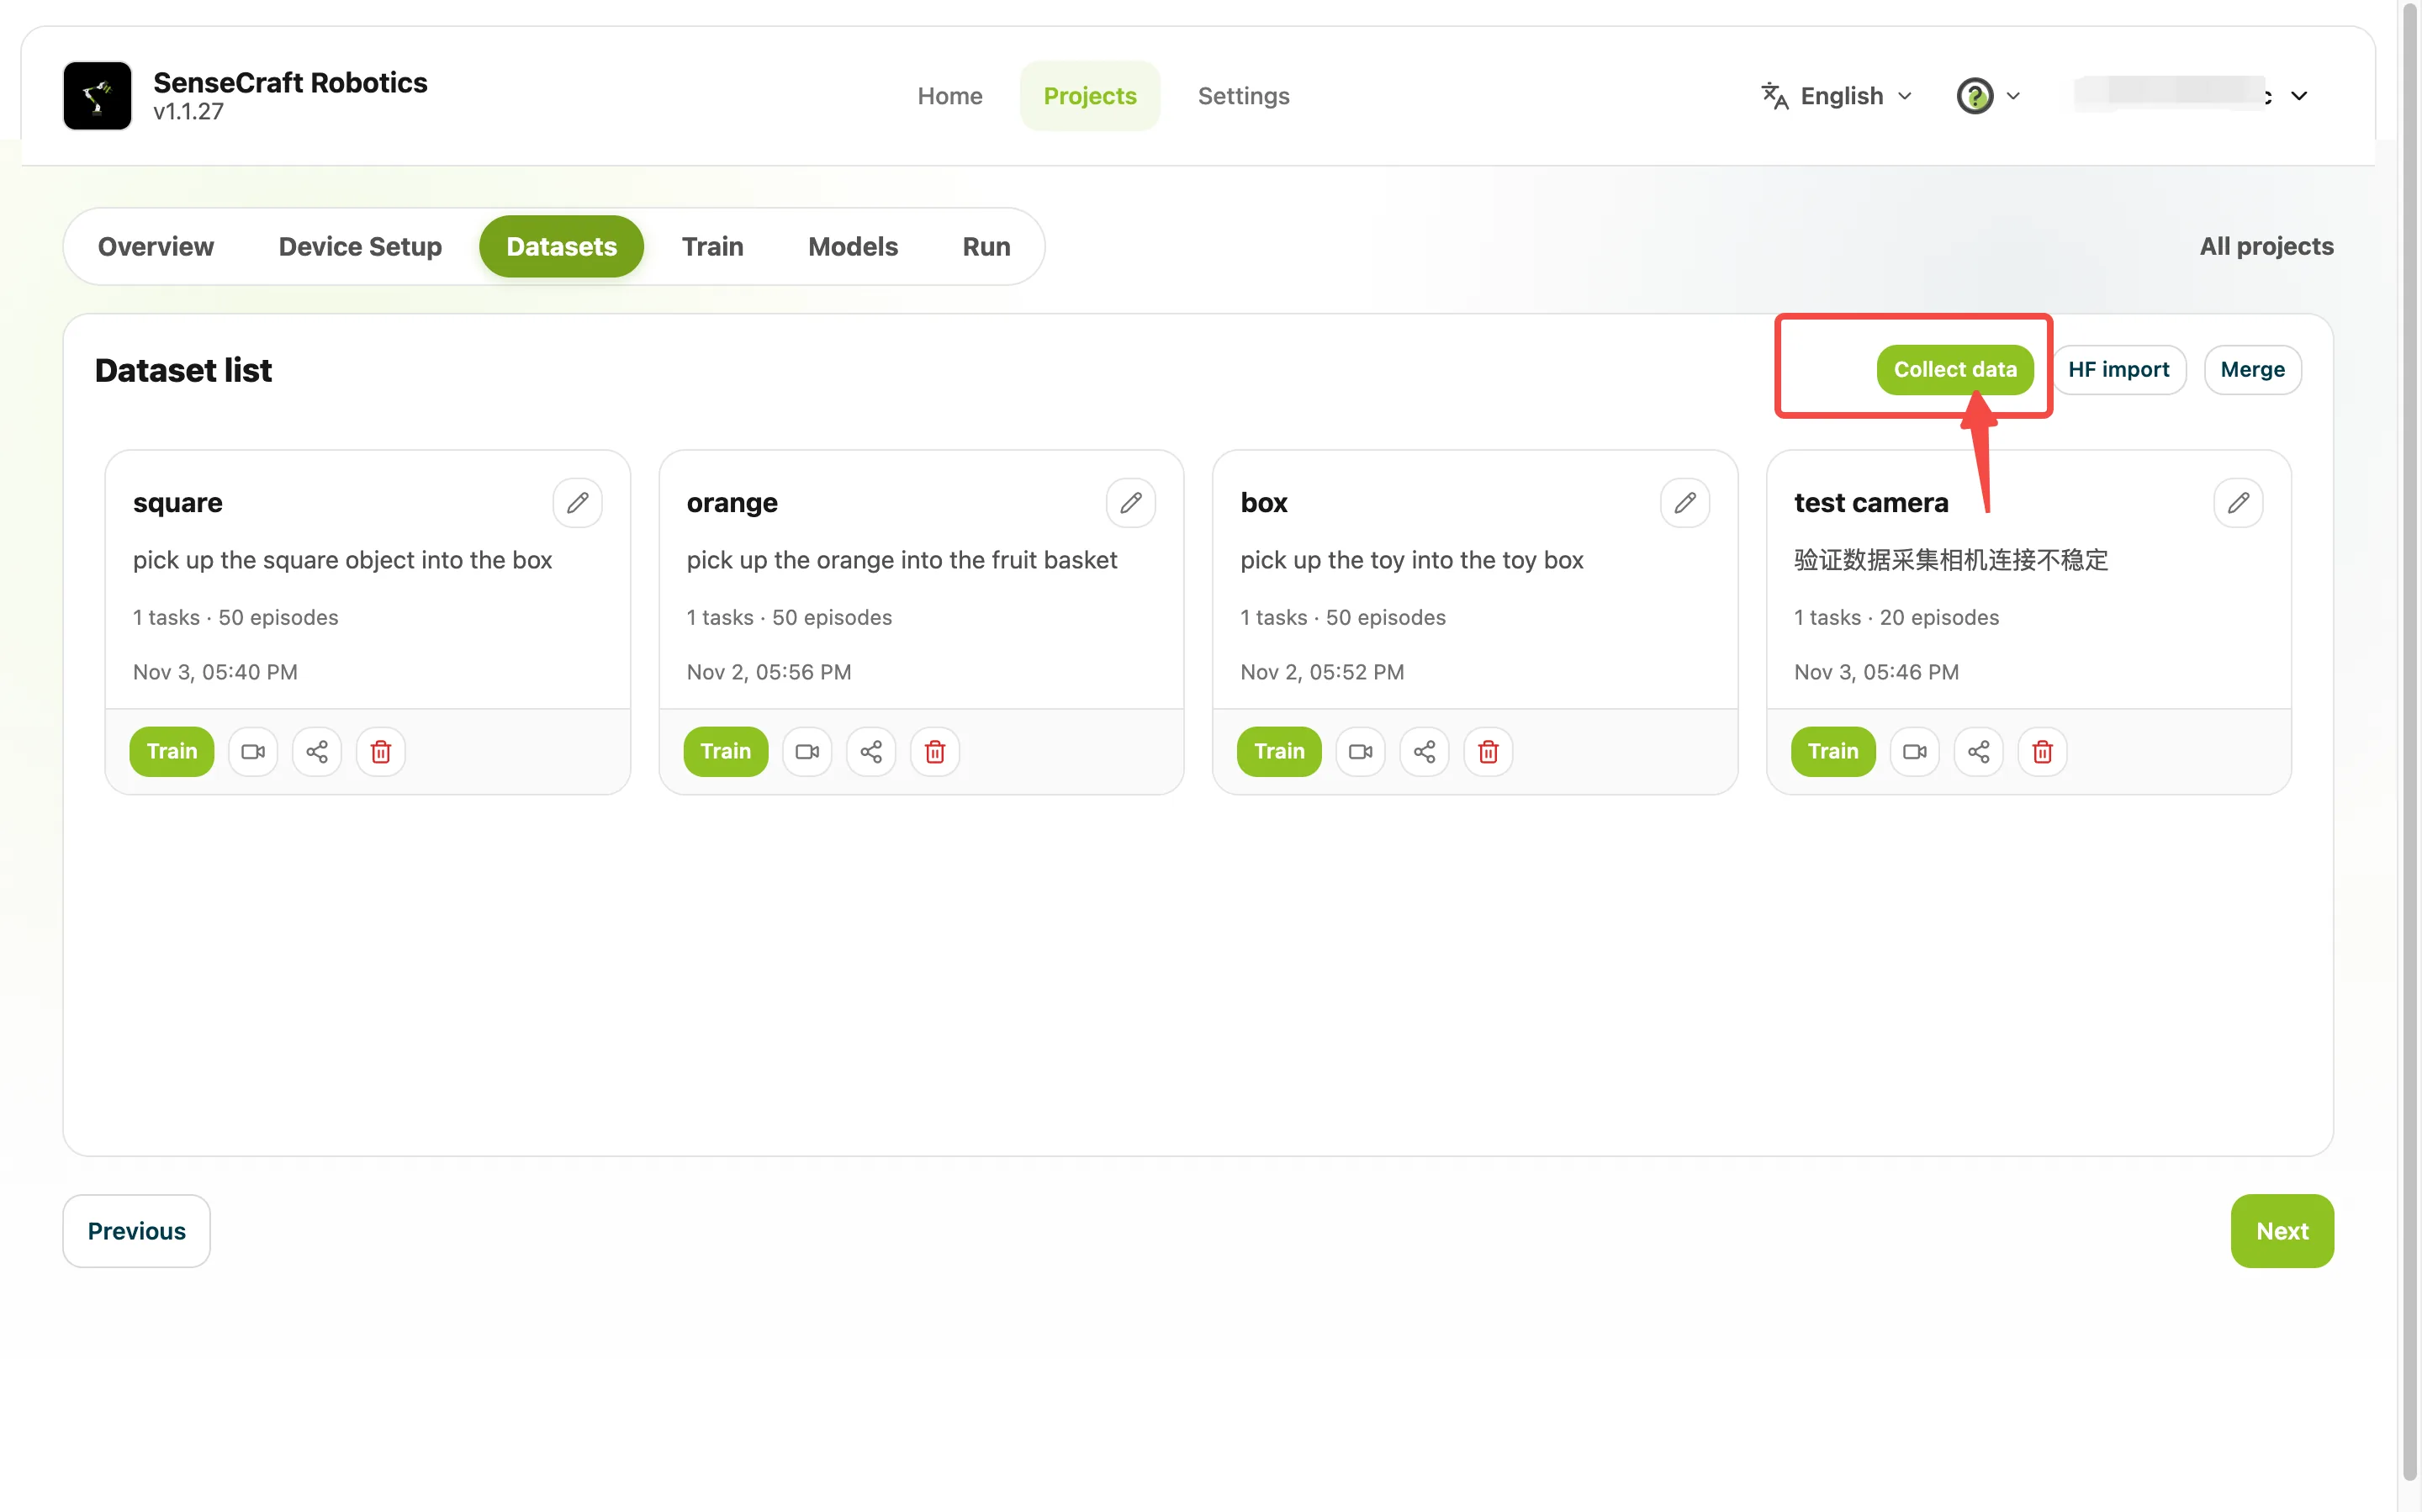
- Open Datasets and create a dataset for the task.
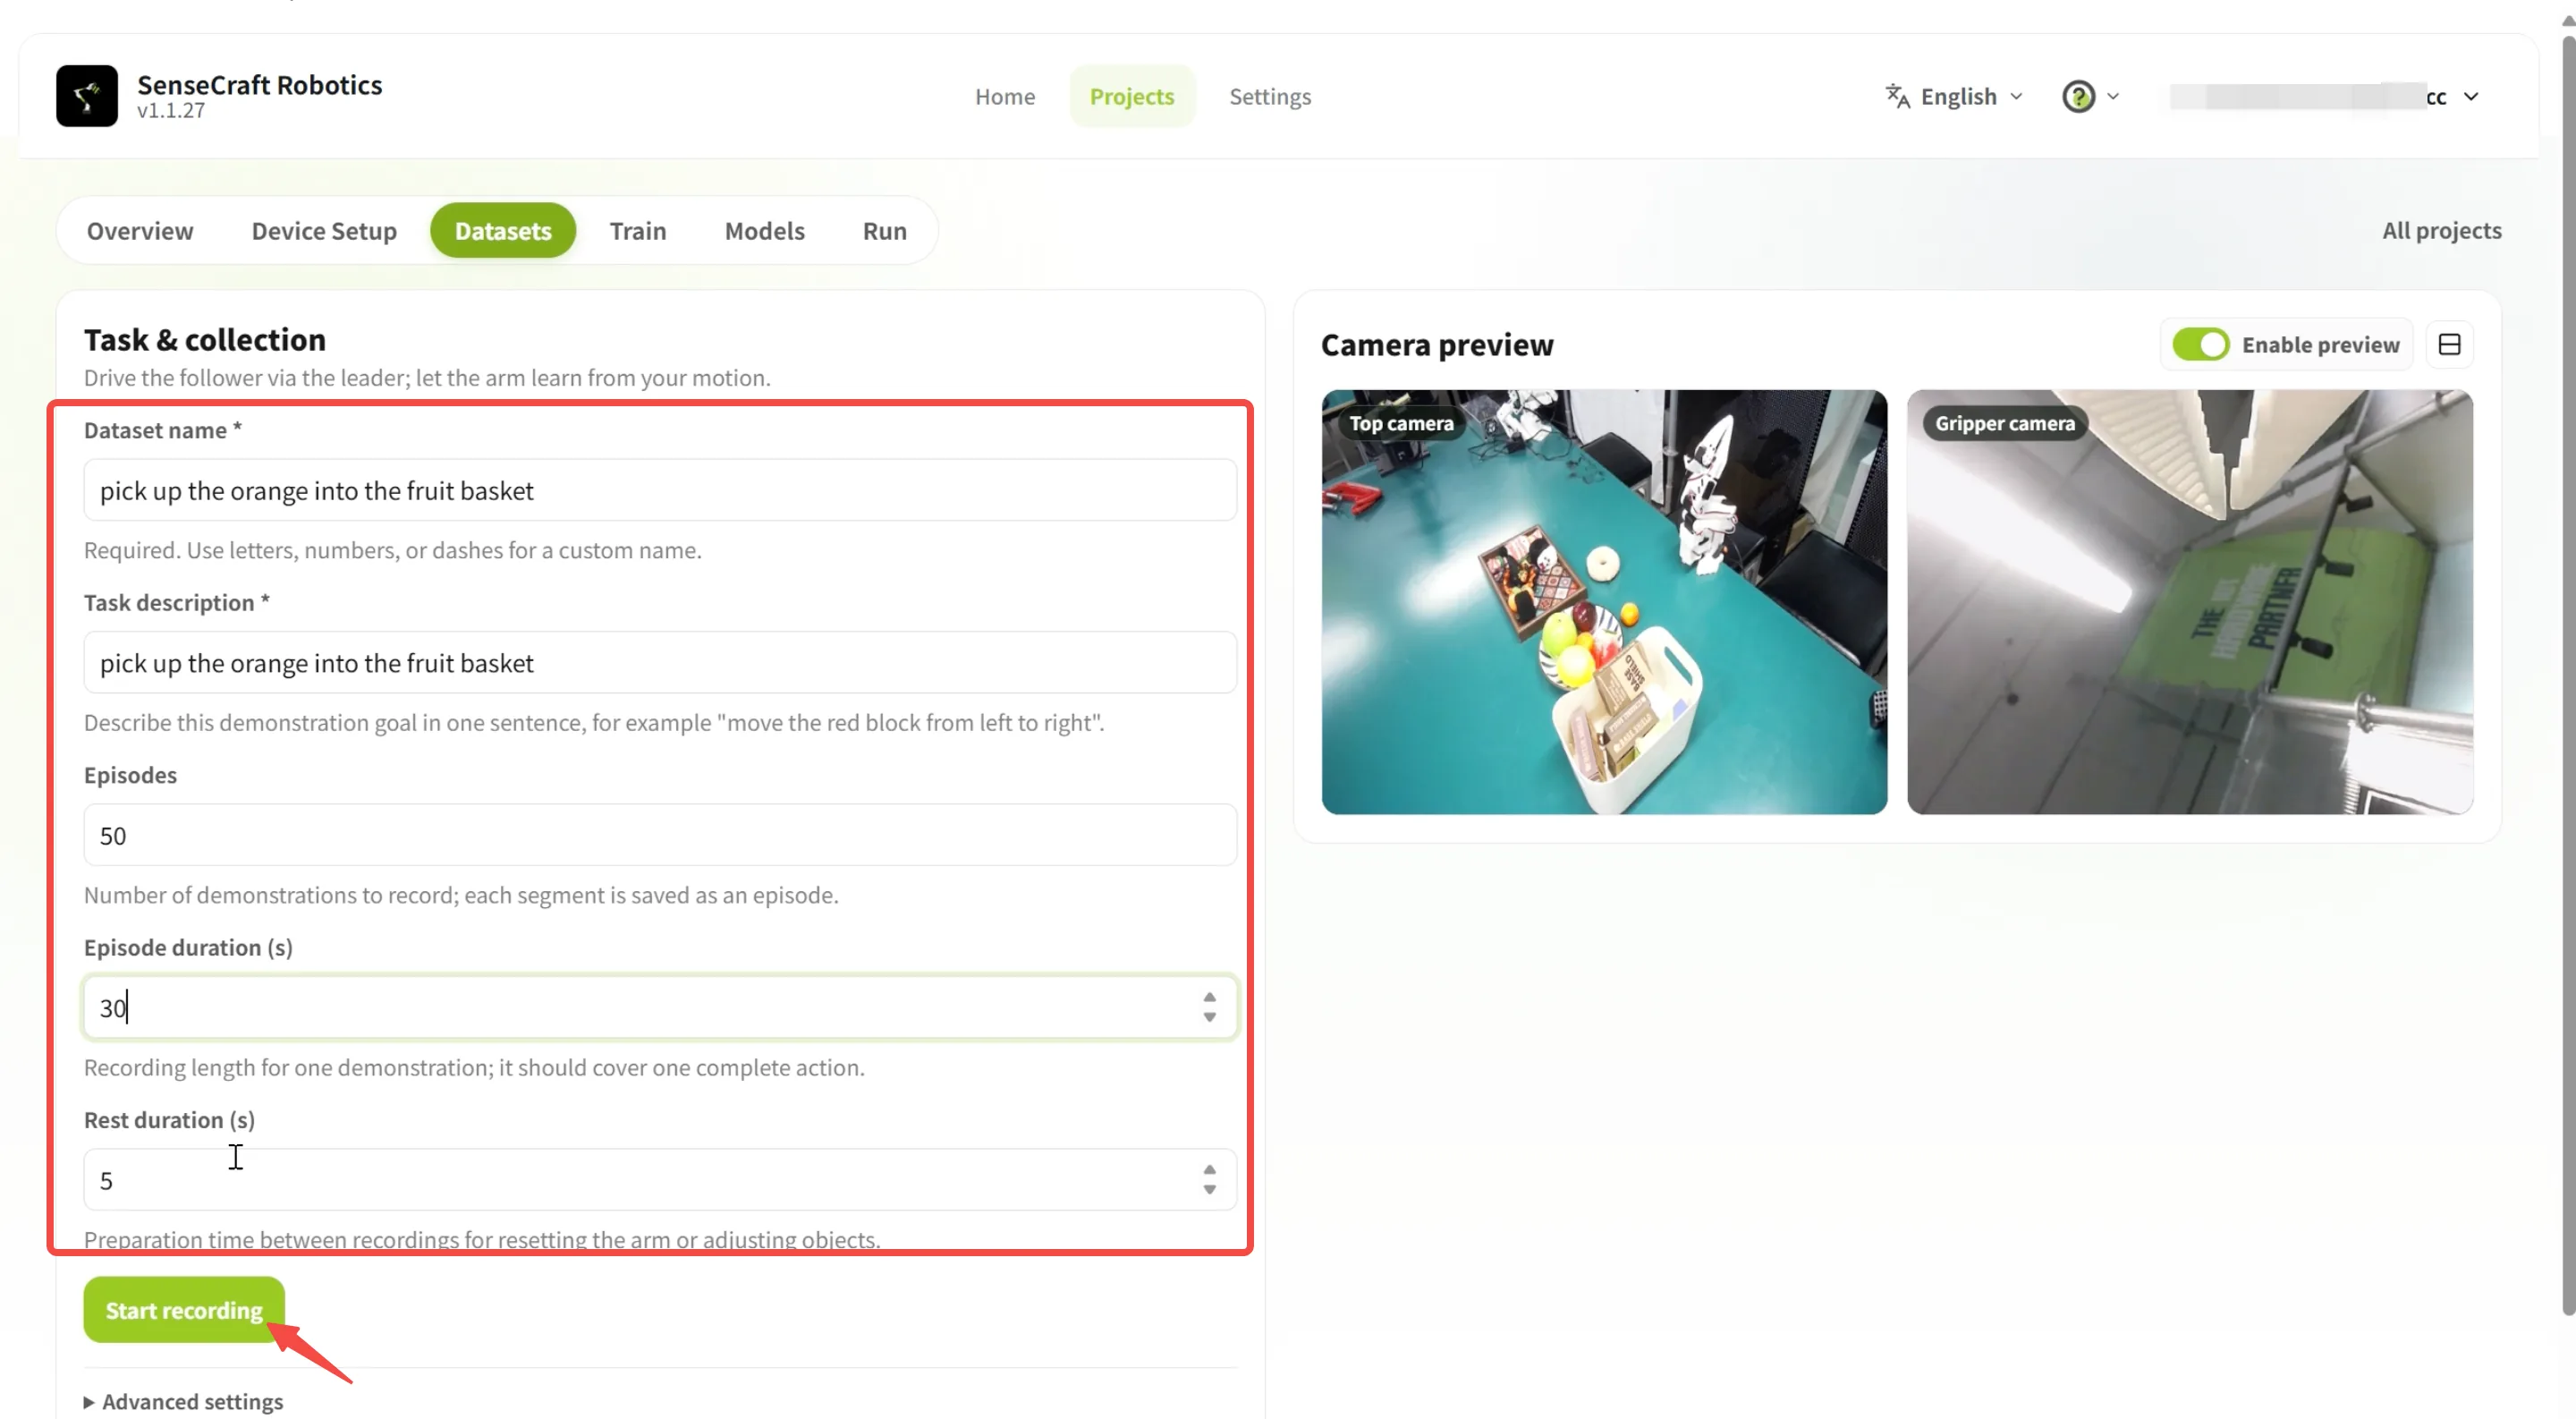
- In the collection settings, enter a dataset name and task description. The task description becomes the instruction for each episode in this batch. Clearly describe the action and destination, for example, “Pick up the square box and place it in the storage bin.” Avoid vague descriptions such as “pick up” or “task 1.” Choose a dataset name that clearly identifies the collected content; you can also use the task description itself to make the dataset easy to identify and manage.
- Set the number of episodes, duration per episode, and rest duration. Adjust the episode count to the difficulty of the task. For this tutorial, start with 50 episodes per task and record replacements after filtering so that you have at least 50 valid demonstrations. First record one complete pick-and-place attempt to determine an appropriate episode duration. Allow enough rest time to reset the objects and robot to their starting positions. For simple setups, 10–15 seconds is usually sufficient.
- Check the robot arm, camera, and storage settings.
- Position the objects and robot arm so they are ready for the demonstration. Make sure both the object’s starting position and its destination are within the robot’s reach. Keep the object’s starting position and the container position fixed during initial collection to make resetting easier. Collect data with randomized positions later, during optimization.
5.2 Record Multiple Episodes
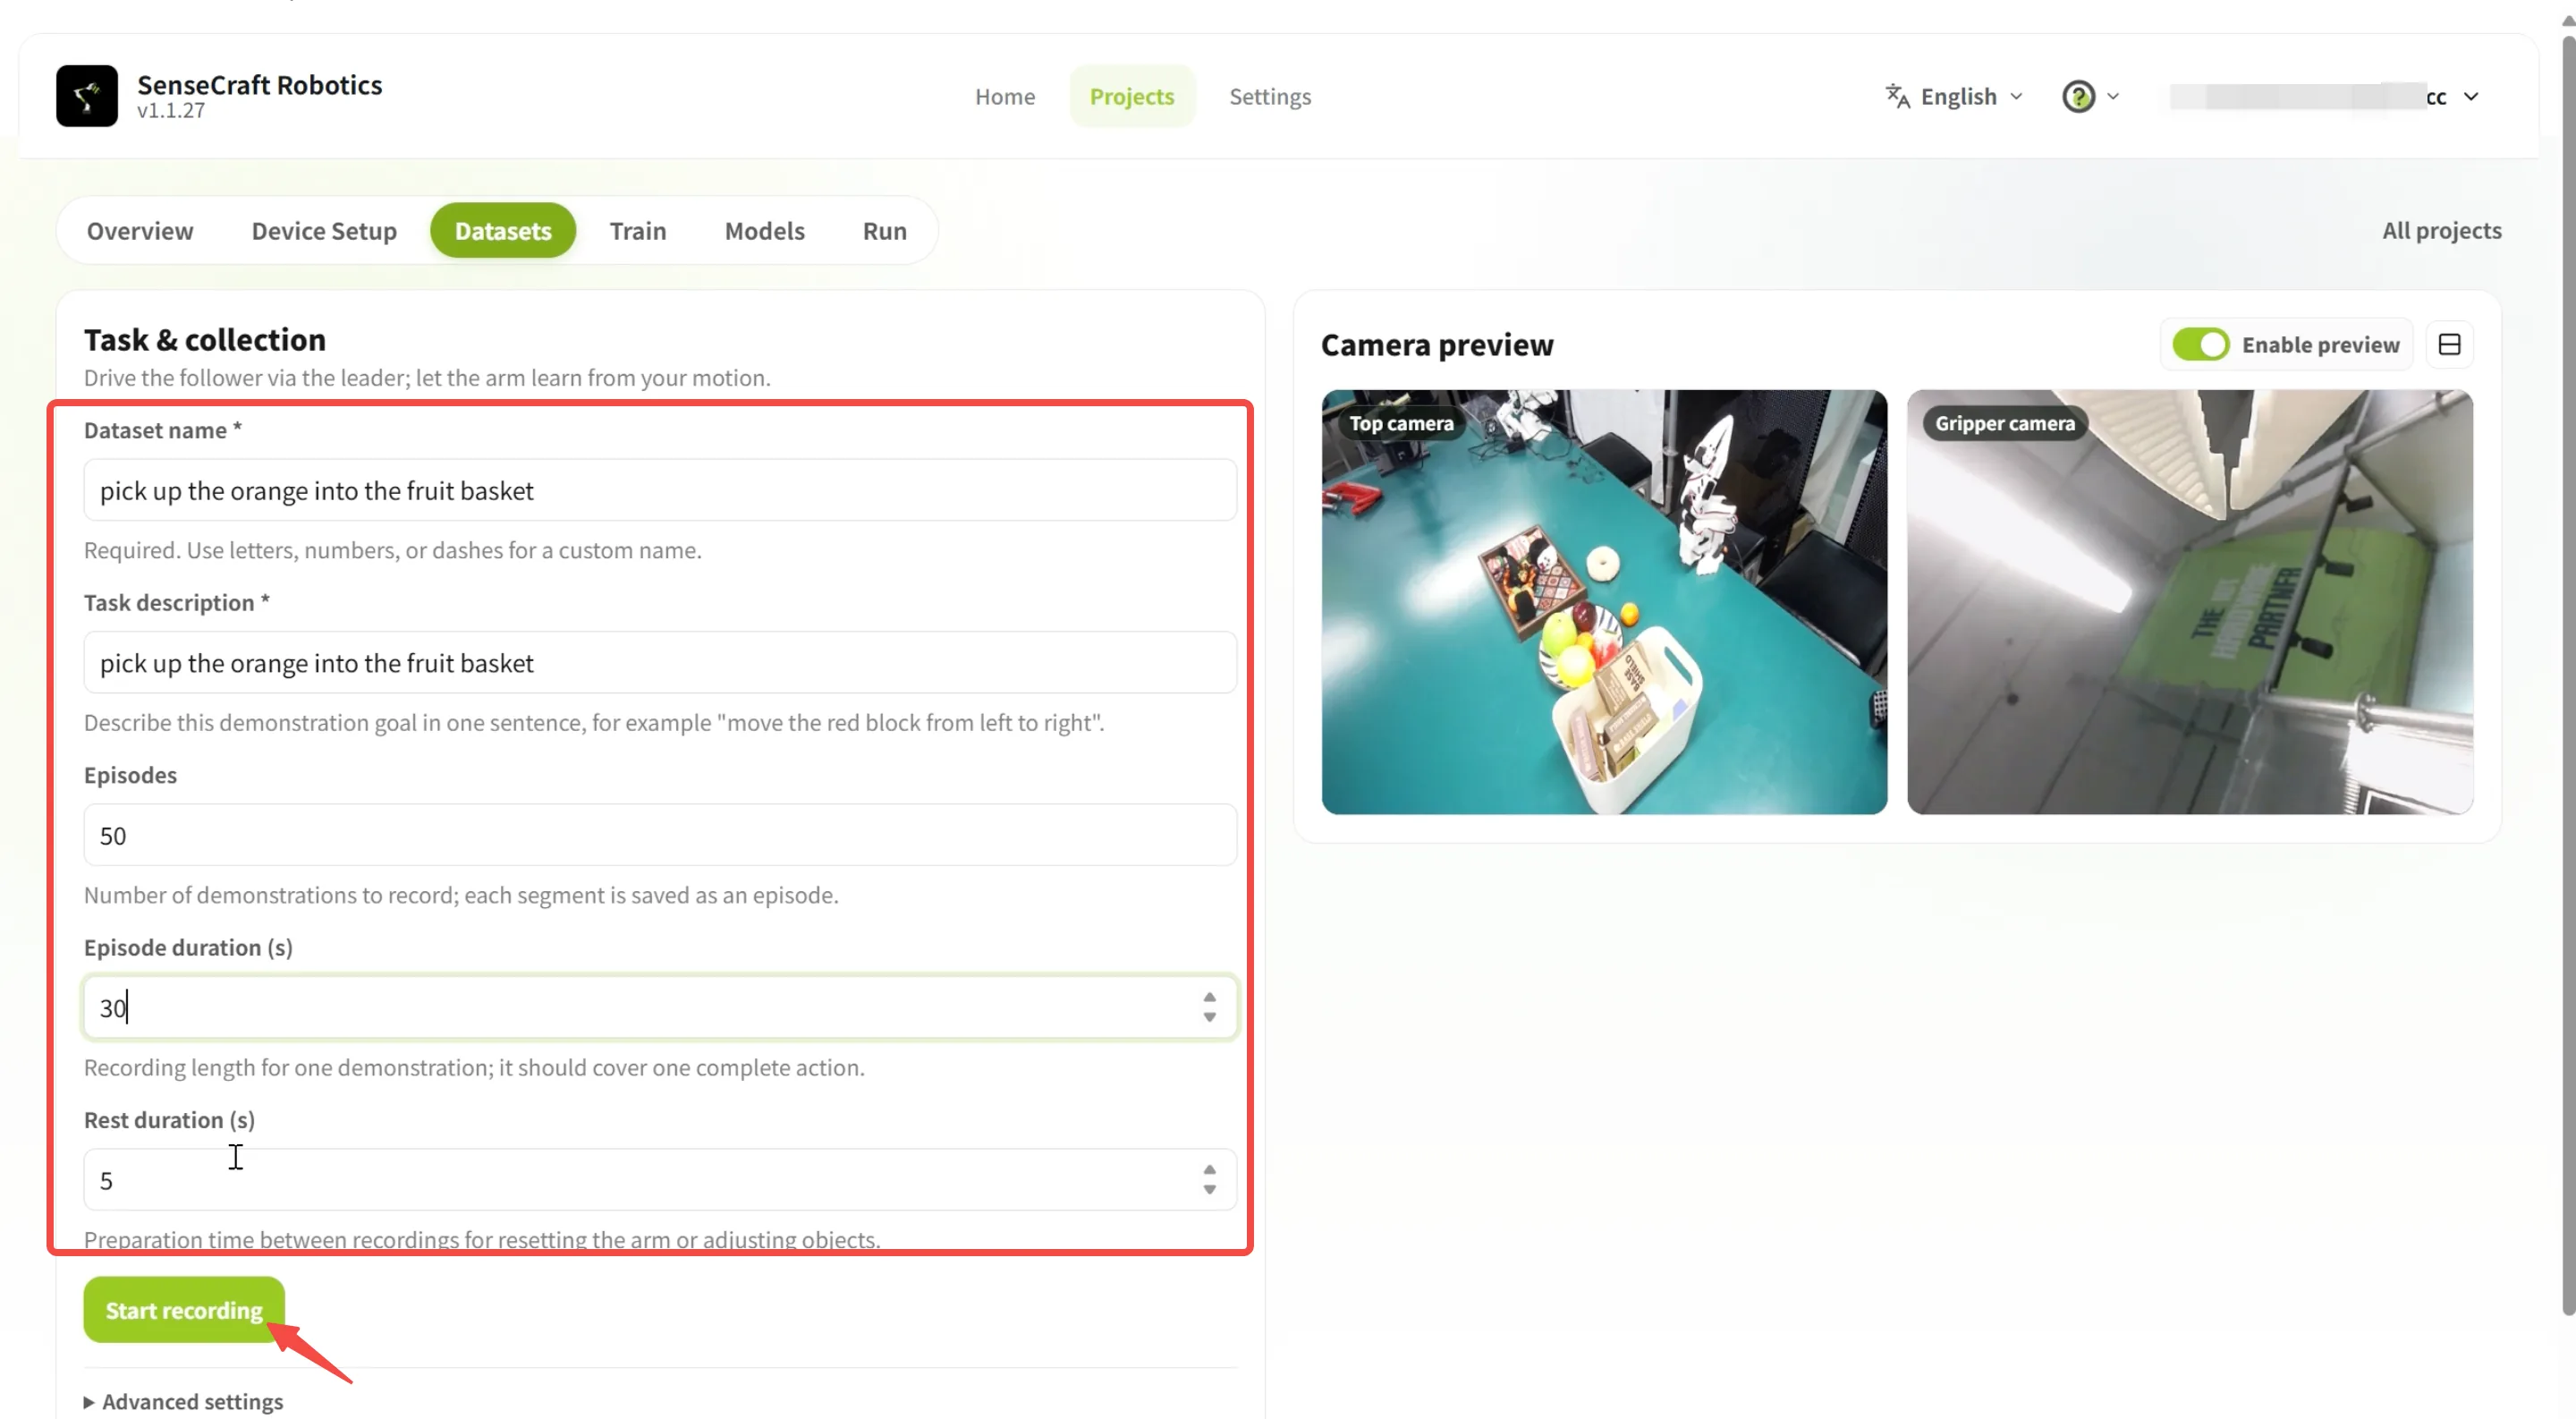
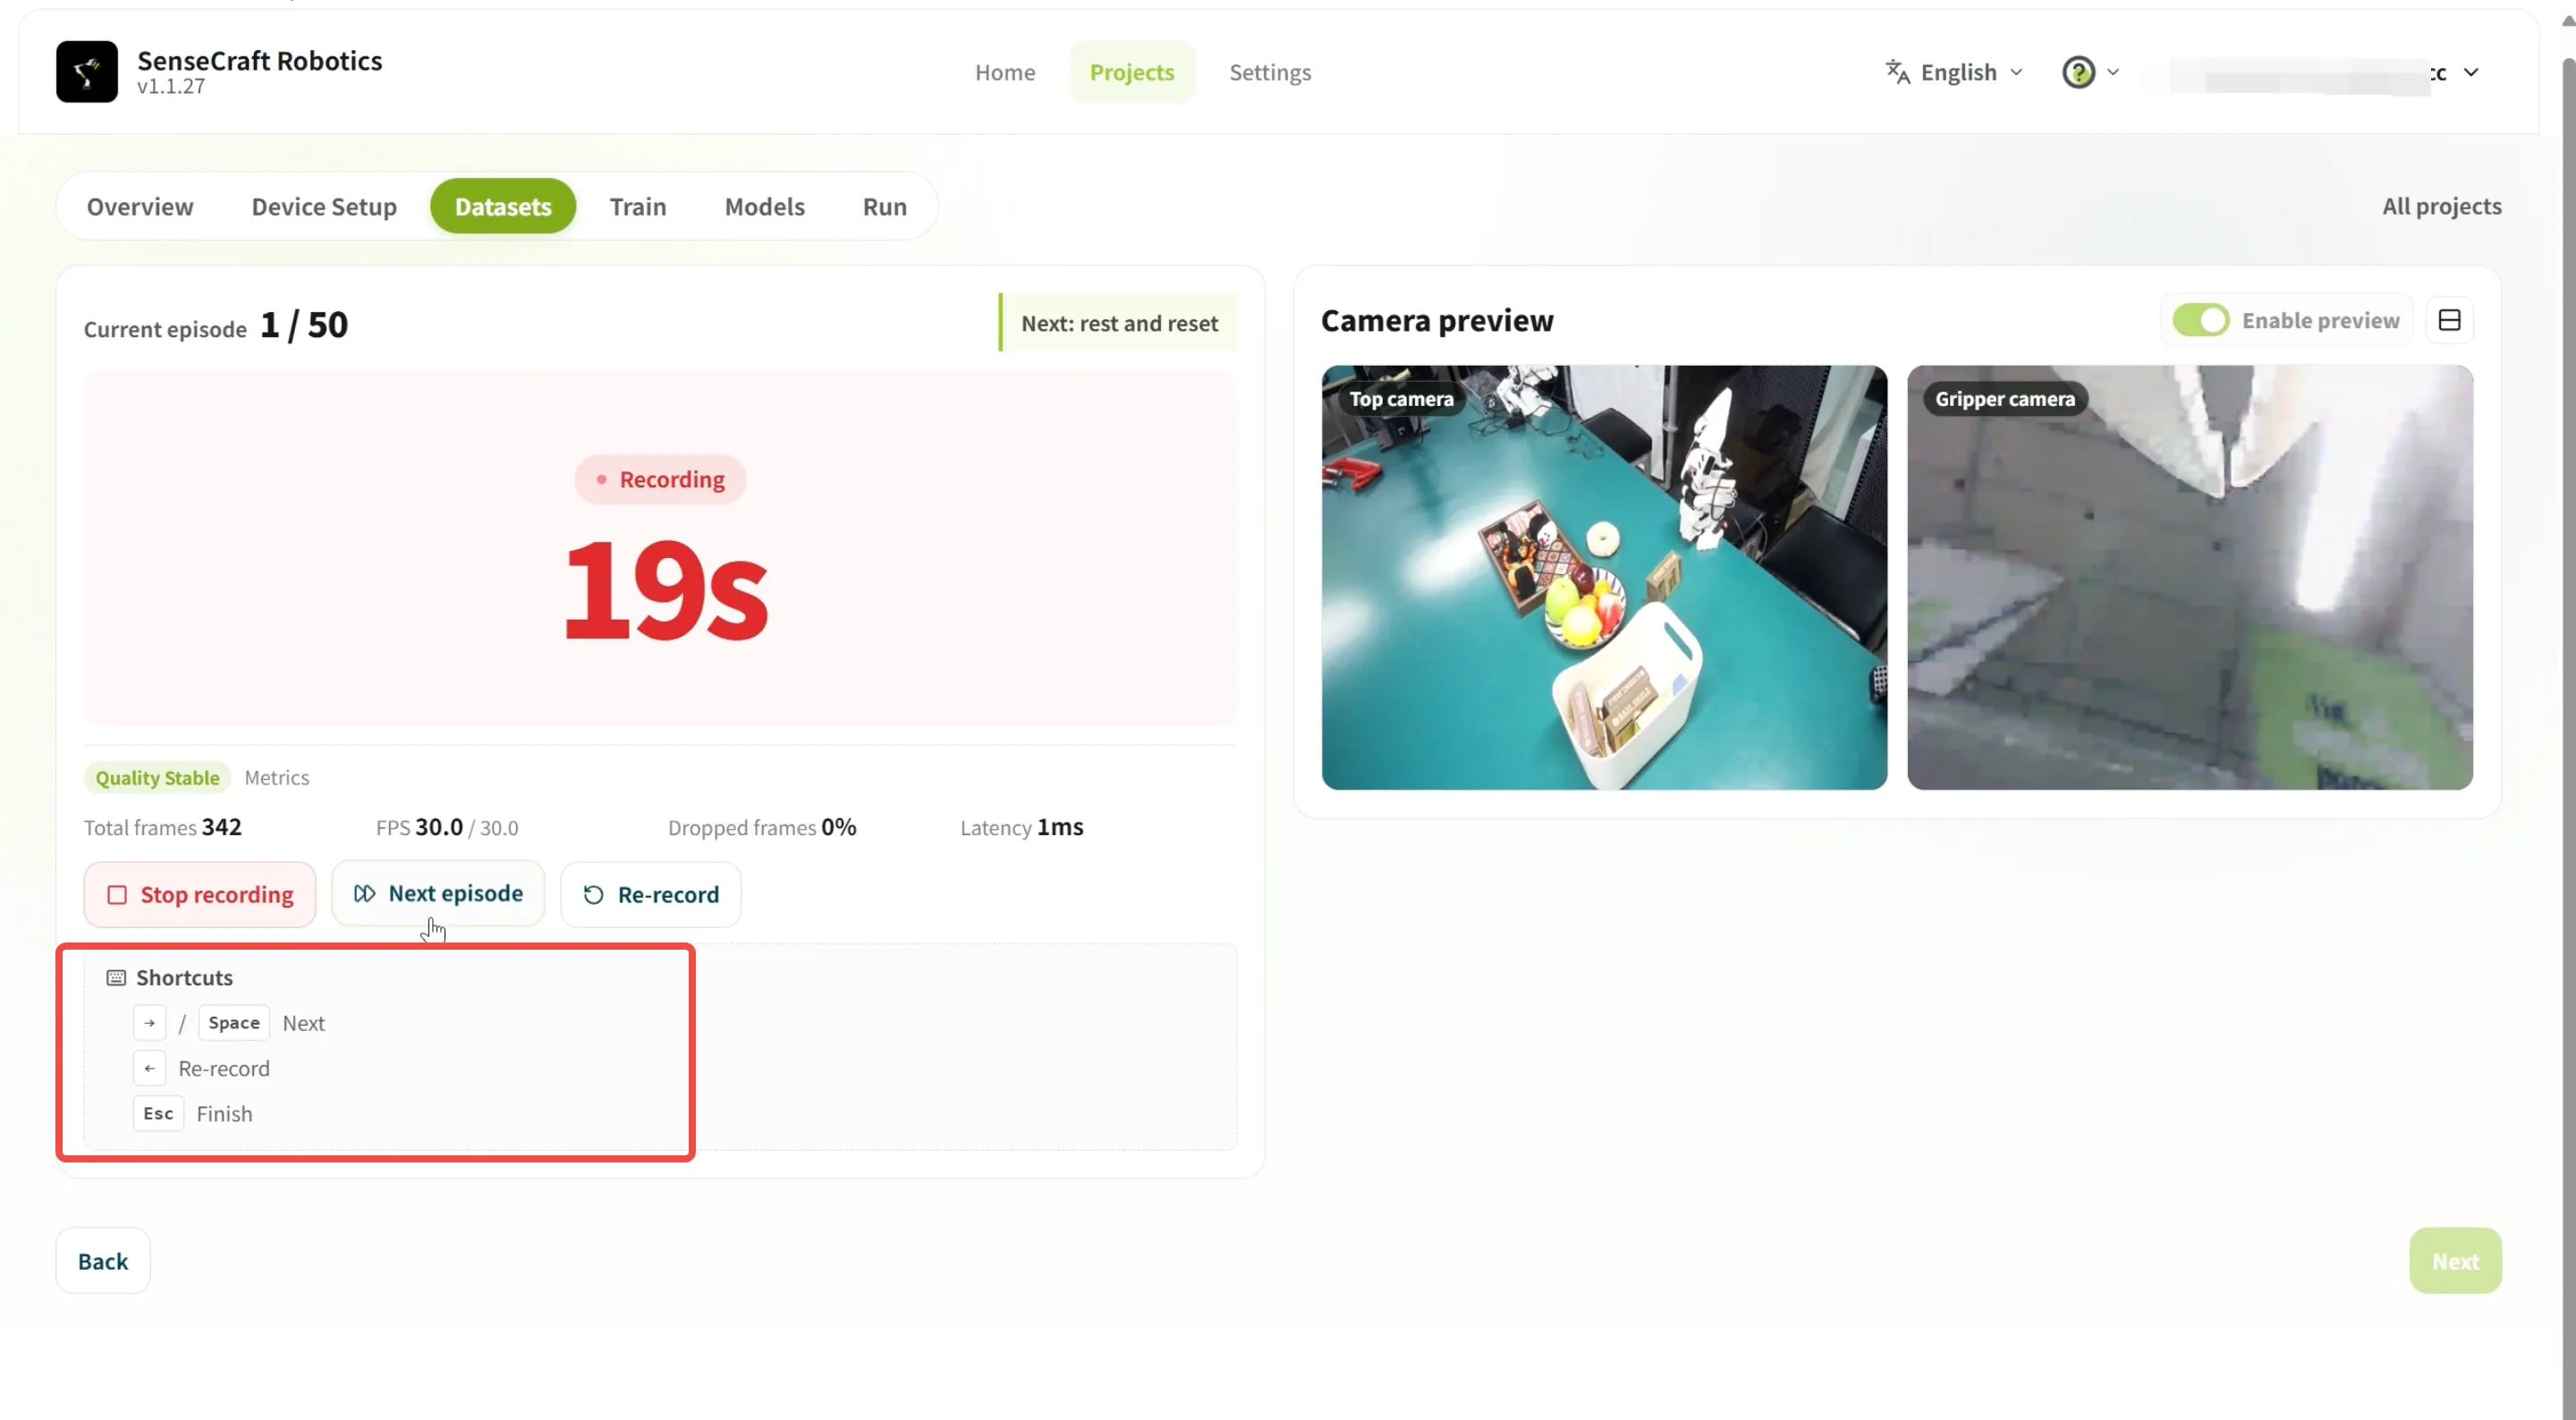
- Start recording.
- Use the leader arm to teleoperate the follower arm through a complete pick-and-place demonstration.
- Stop recording once the task is complete.
- Review the recording and retain valid demonstrations.
- Reset the objects and robot arm, then record the next demonstration.
Before each episode, use the rest period to return the square box to its starting position, keep the storage bin in place, and return the robot to a consistent starting pose. Record the sequence: approach the square box → close the gripper → lift → move above the storage bin → release. Record and reset the other two tasks separately in the same way.
5.3 Collect Data for Different Tasks
To train one model to perform multiple tasks, record demonstrations for each task separately. For example:
| Task | Example instruction |
|---|---|
| Pick up the square box and place it in the storage bin | Pick up the square box and place it in the storage bin. |
| Pick up the orange and place it on the fruit plate | Pick up the orange and place it on the fruit plate. |
| Pick up the donut and place it in the toy box | Pick up the donut and place it in the toy box. |
This project contains three organization tasks. After collecting the square-box task, create separate datasets for the other two tasks, enter their corresponding task descriptions, and record their demonstrations. Each batch’s instruction must match the demonstrated action. Do not reuse the square-box instruction for the other tasks.
6. Review and Merge Datasets
Before training, open the dataset details, review episodes by task, and check that:
- Task instructions are accurate and complete.
- Images are clear and important actions are visible.
- Demonstrations are complete, with no obvious failures or unrelated segments.
- No task has significant gaps in data coverage.
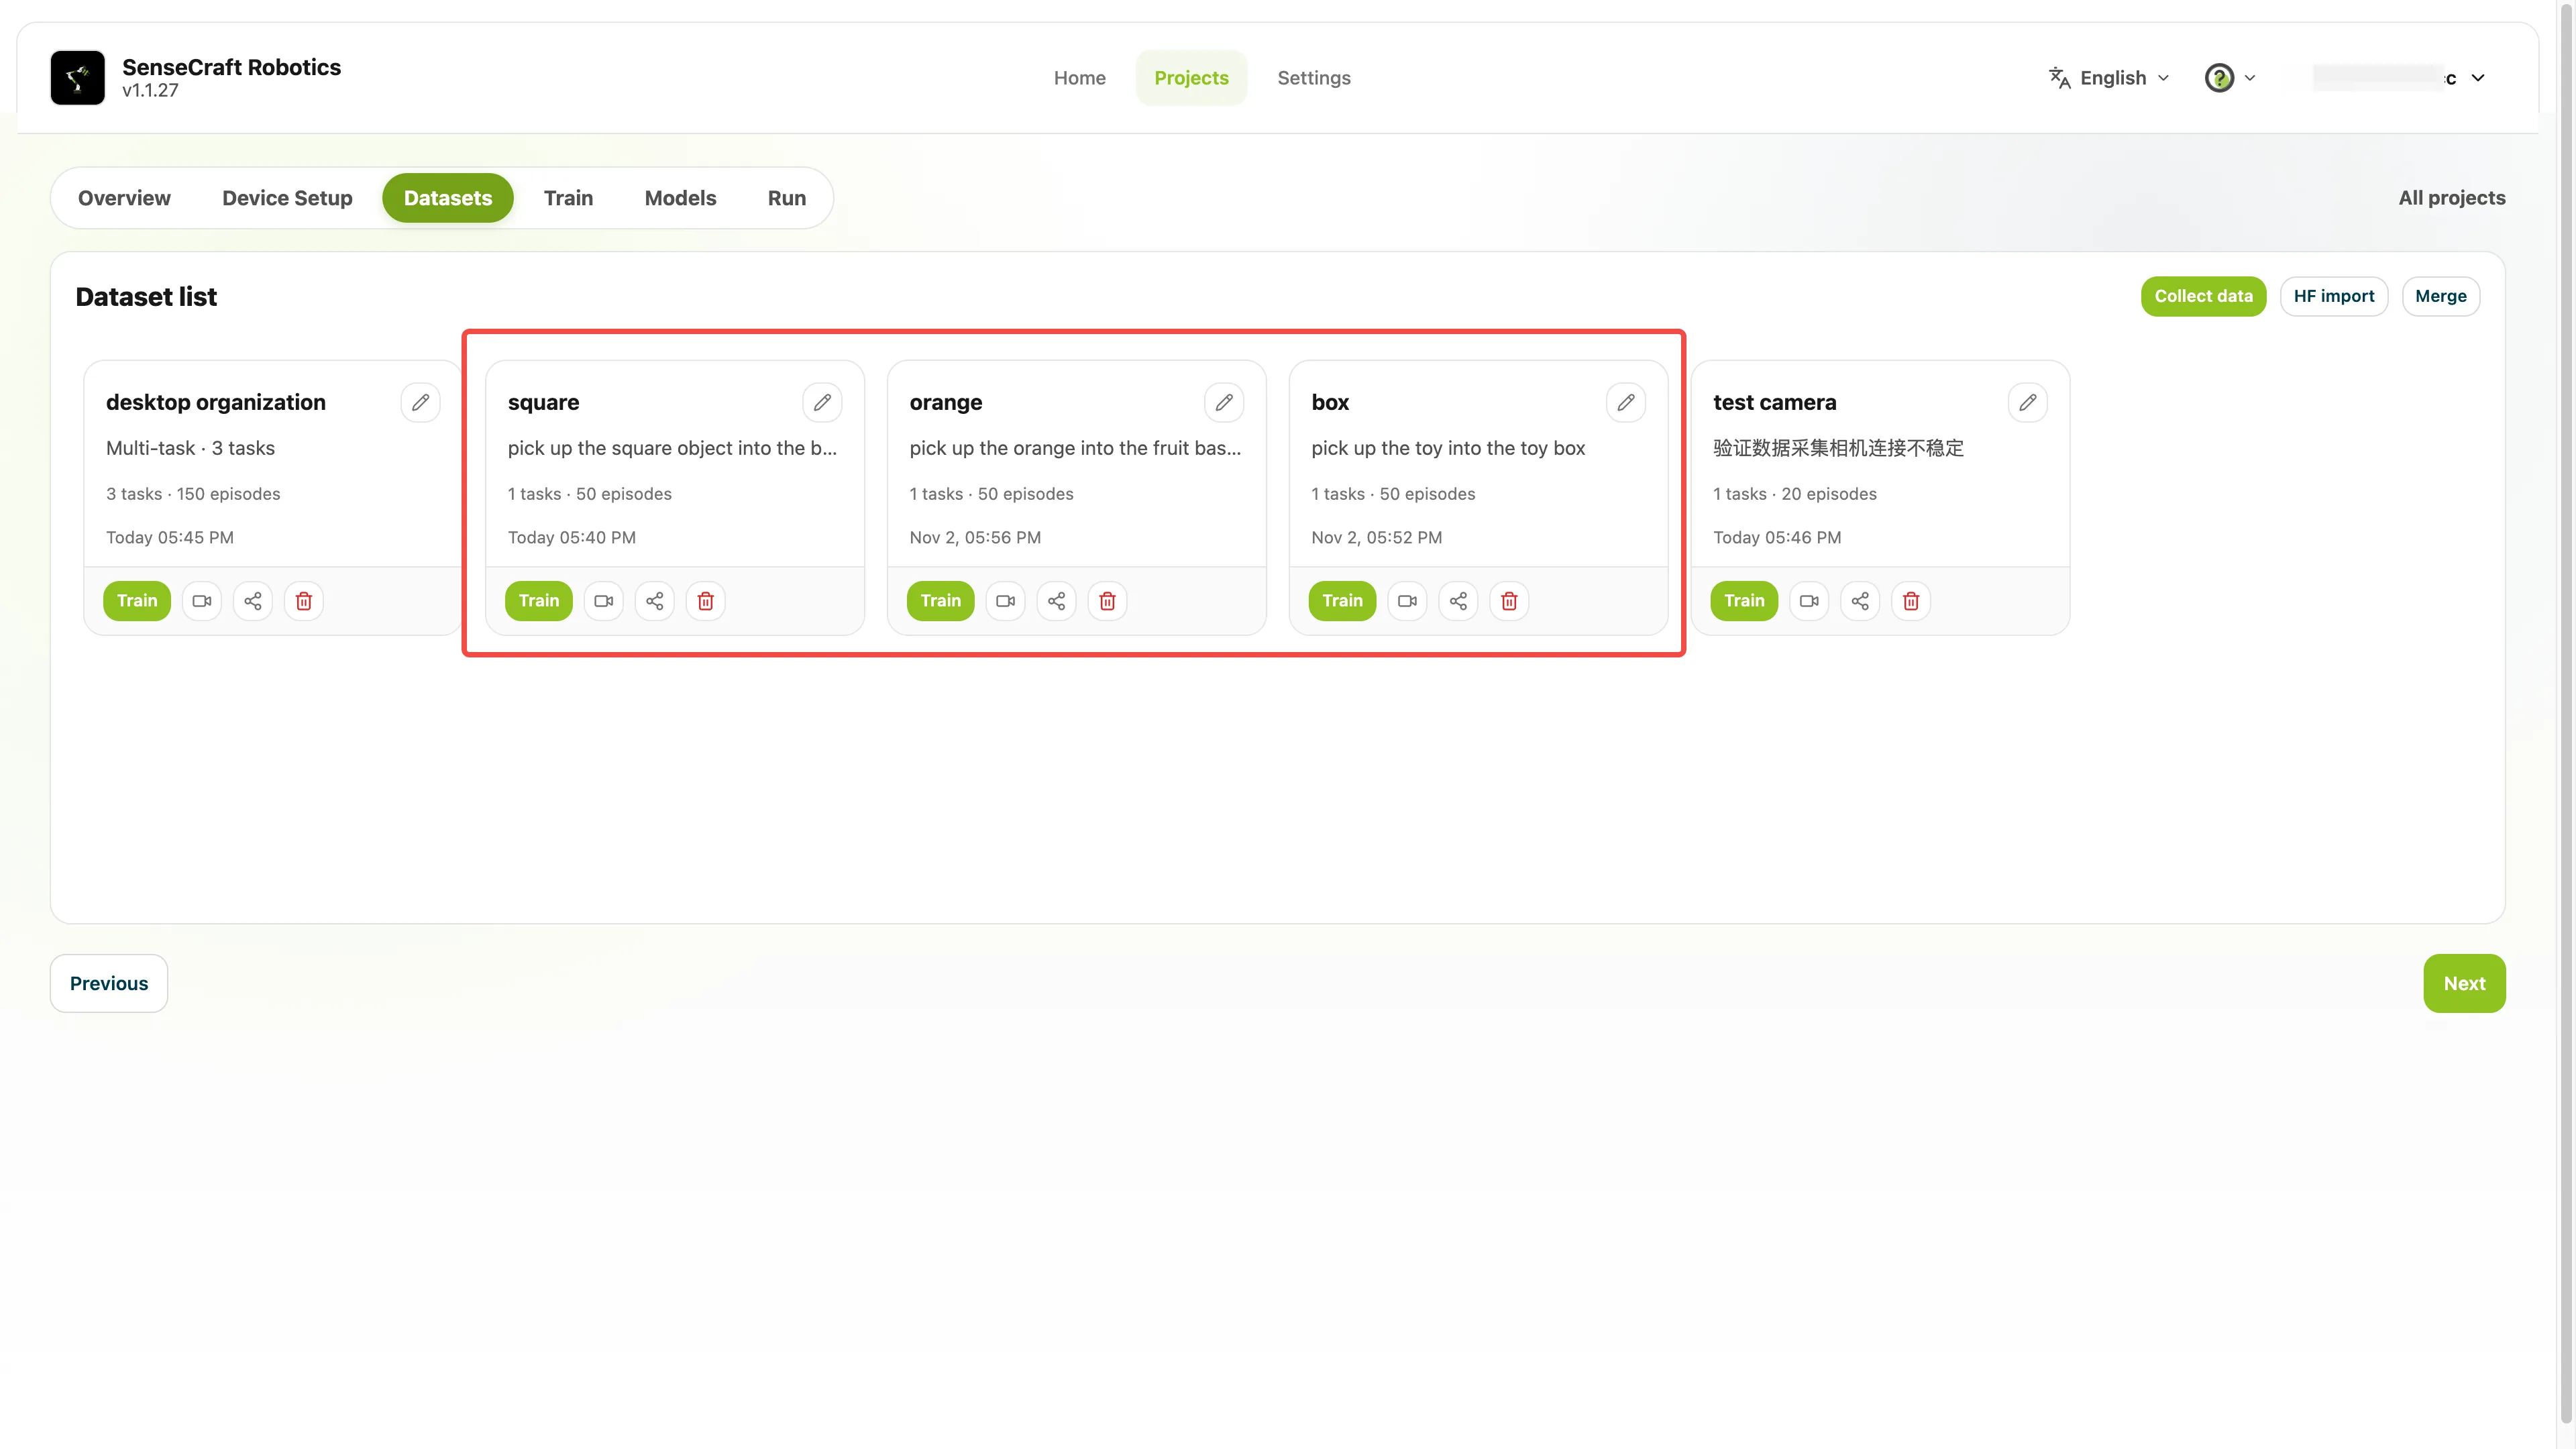
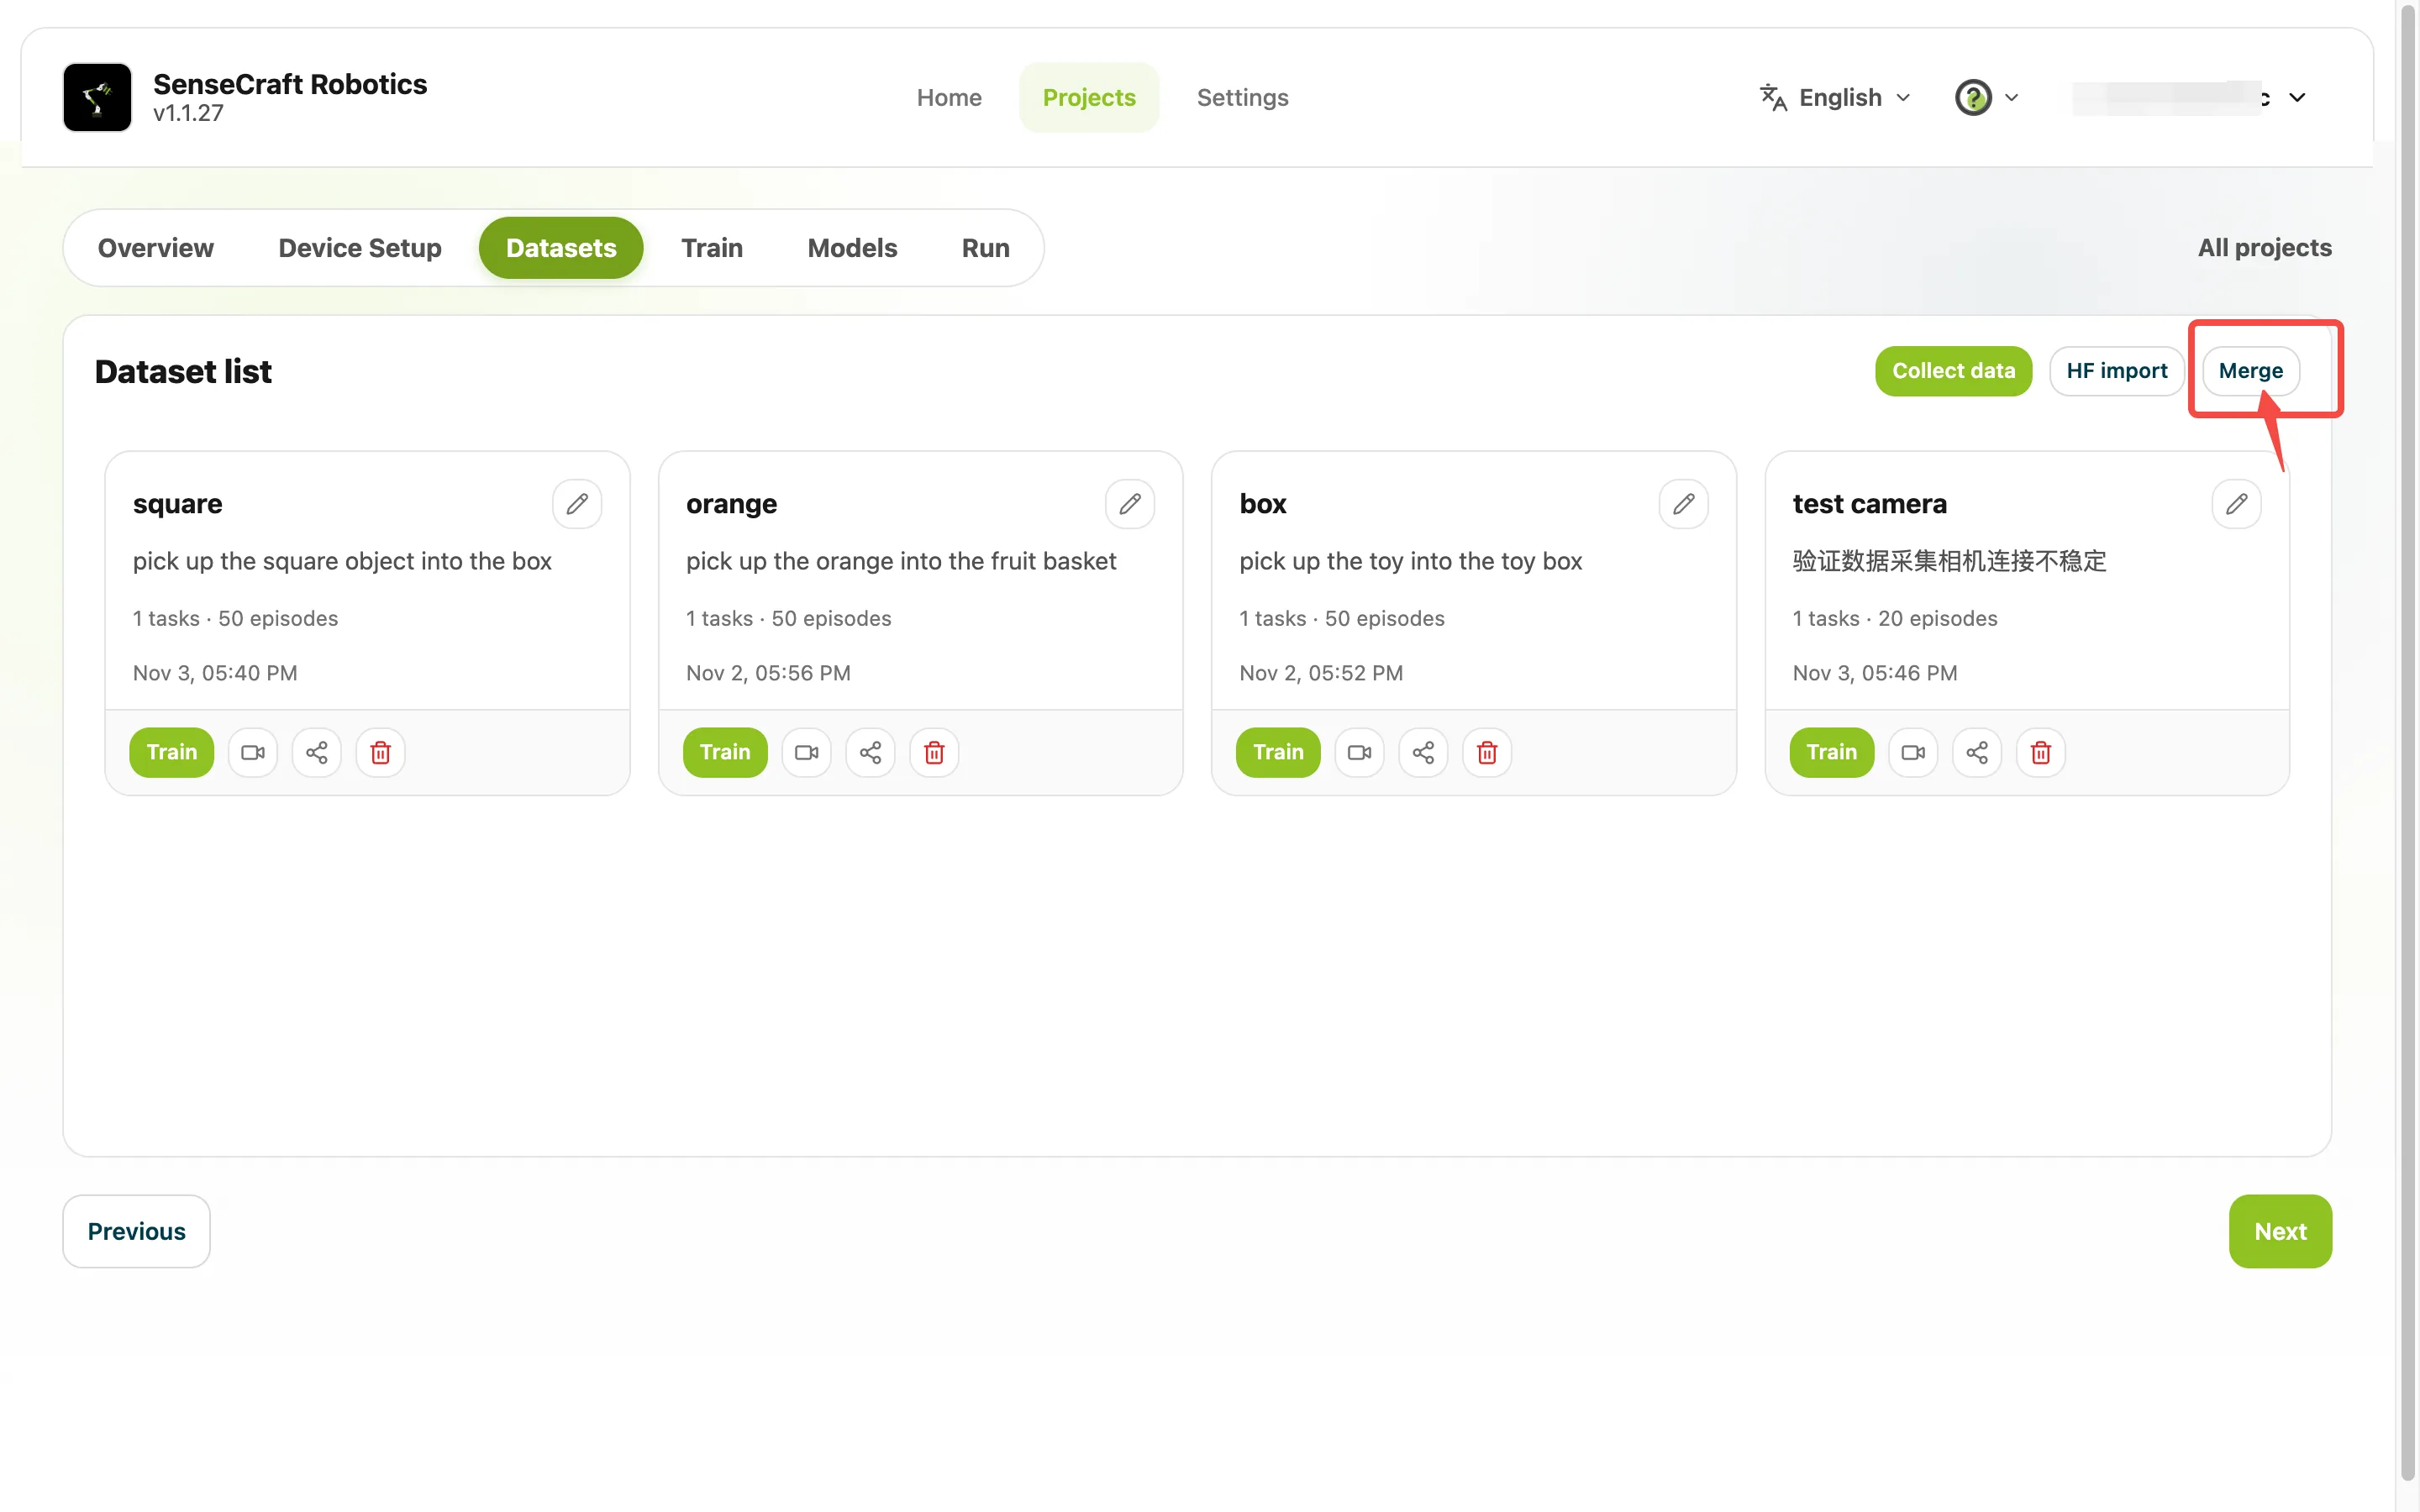
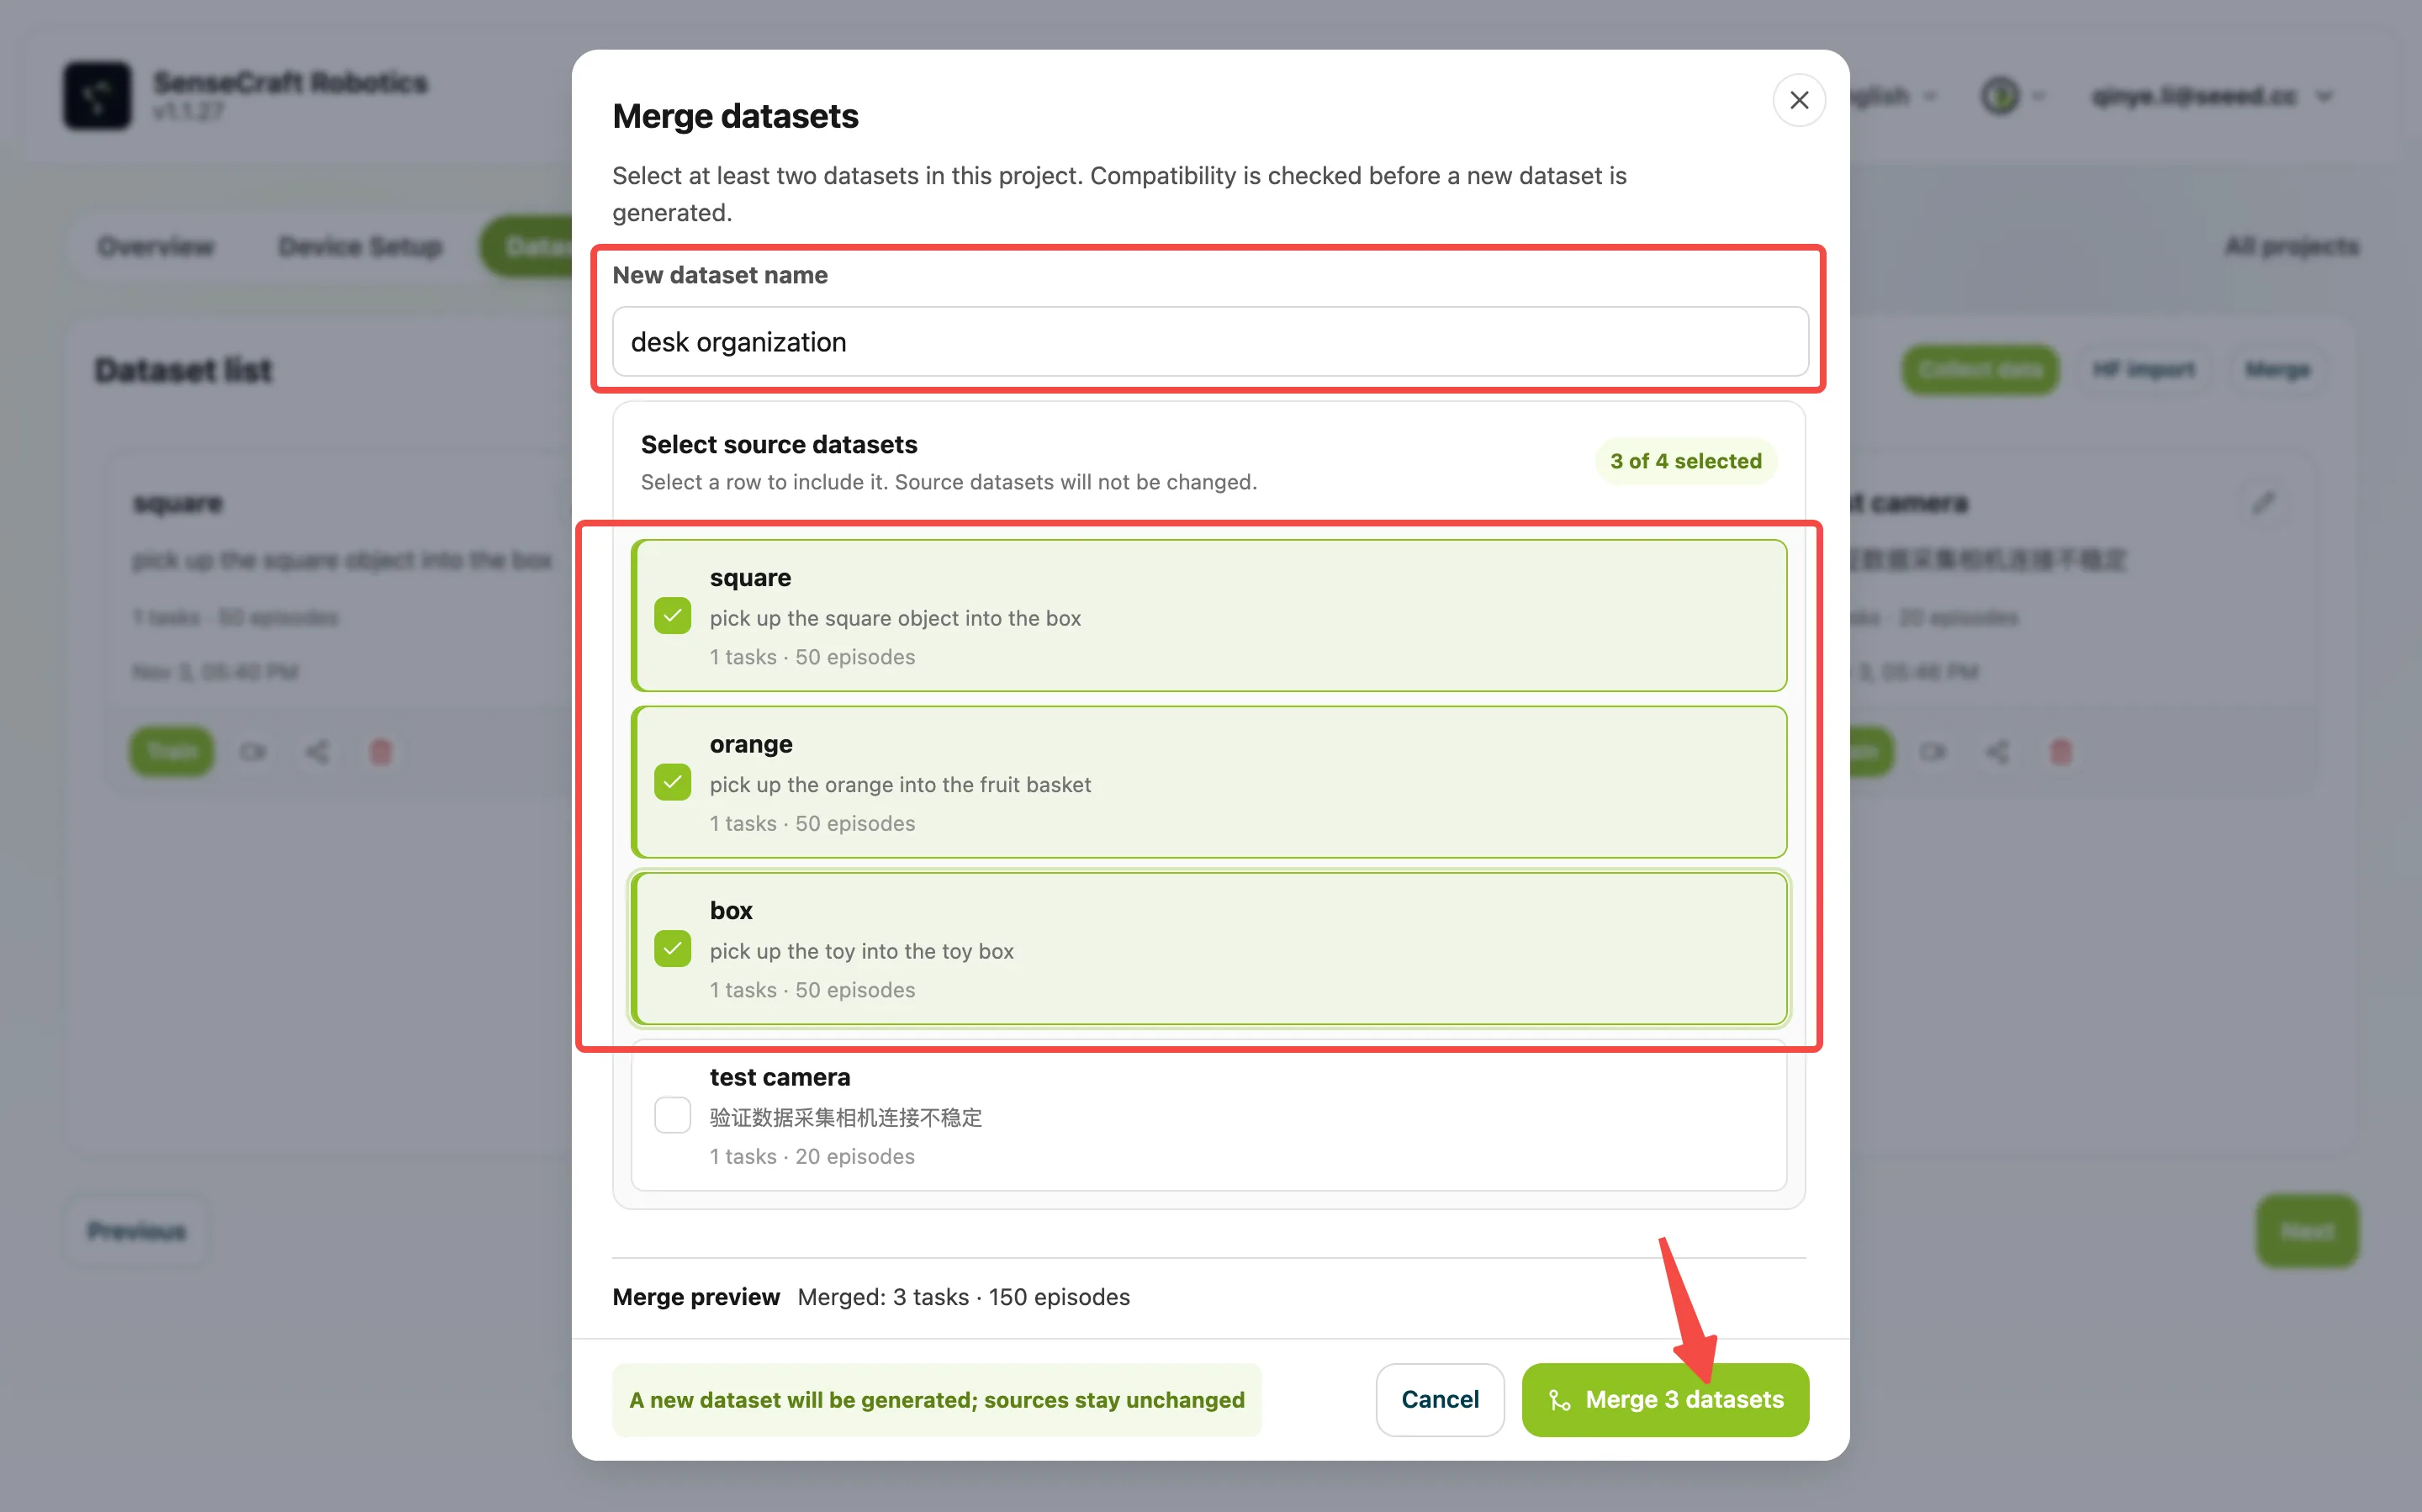
After collecting and reviewing all three tasks, select the three corresponding datasets in the merge feature. You can name the merged dataset “desktop organization.” Preserve each episode’s original task association and instruction, then use the merged three-task dataset to train the model.
Before merging, check compatibility across robot types, camera configurations, collection frame rates (FPS), action spaces, and other relevant settings. If the platform reports an incompatibility, adjust the source datasets or collect new data as instructed.
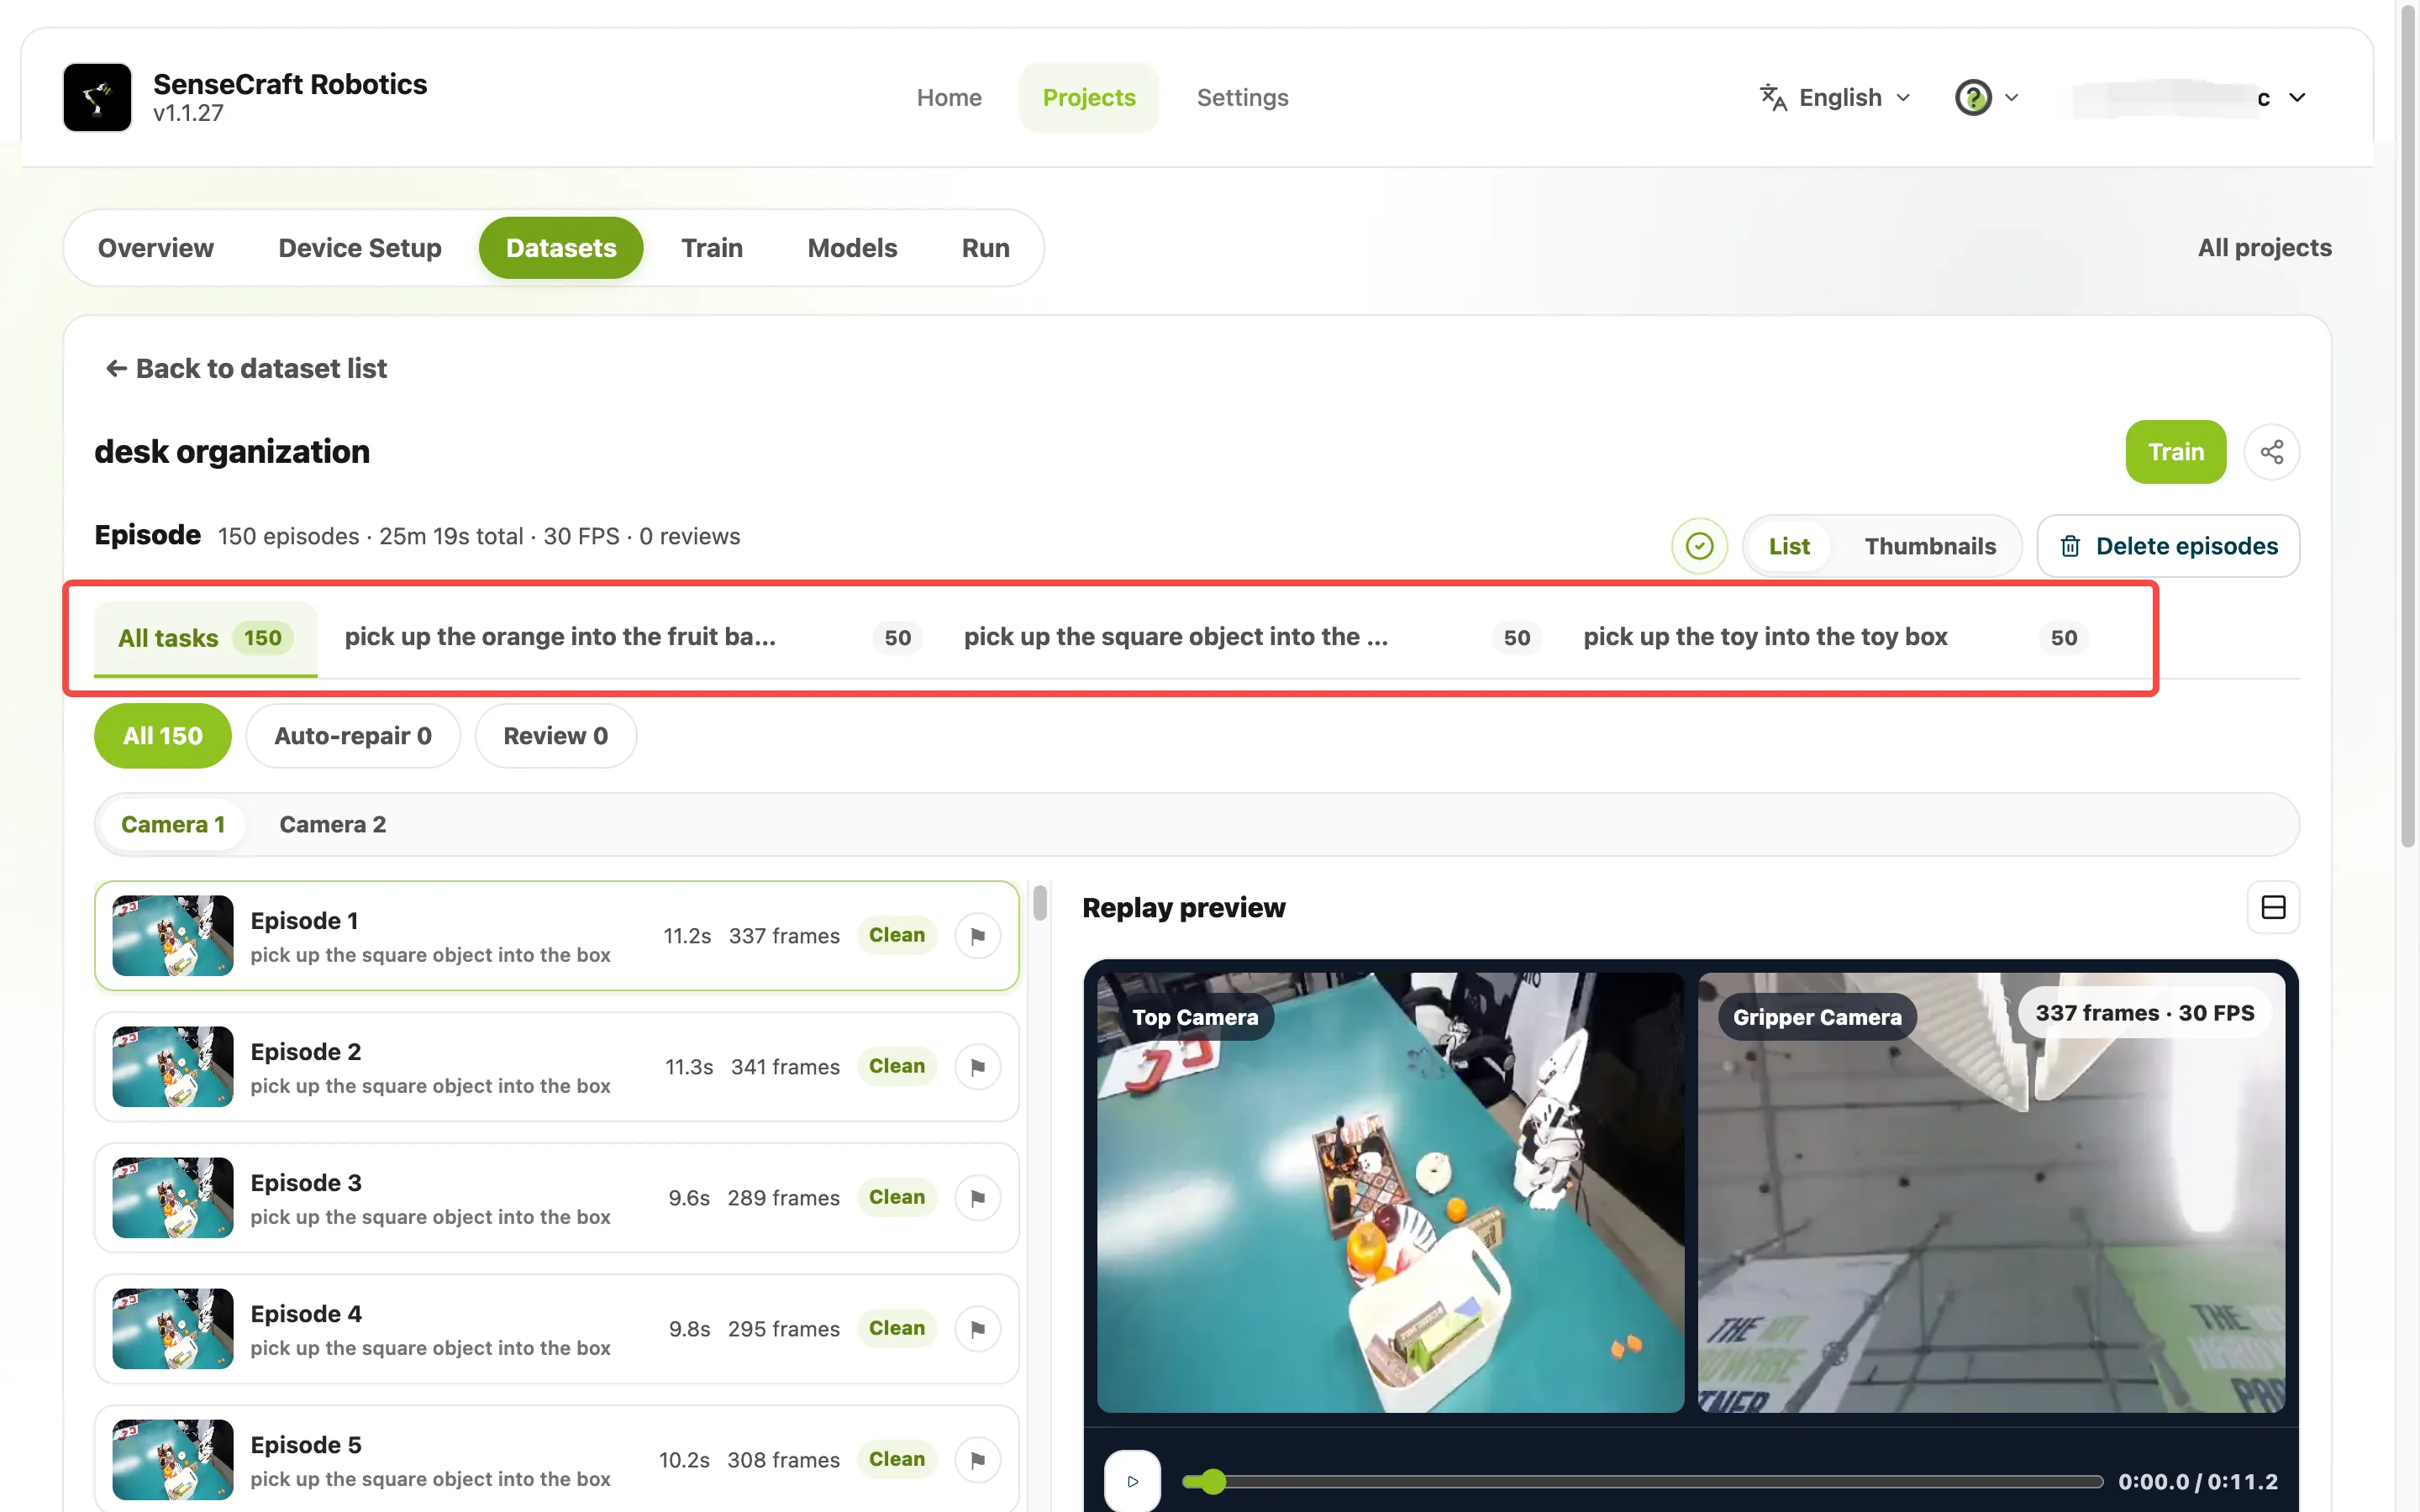
For example, if each of the three source datasets contains 50 valid episodes, check that the merged dataset shows 3 tasks and 150 episodes. Filter by each task and play back a few episodes to confirm that the instructions match the demonstrations and that the cameras captured the entire process. Exclude failed or incomplete recordings from successful demonstrations, then record replacements. Check the other two tasks against their respective success criteria as well.
7. Train π0.5 in the Cloud
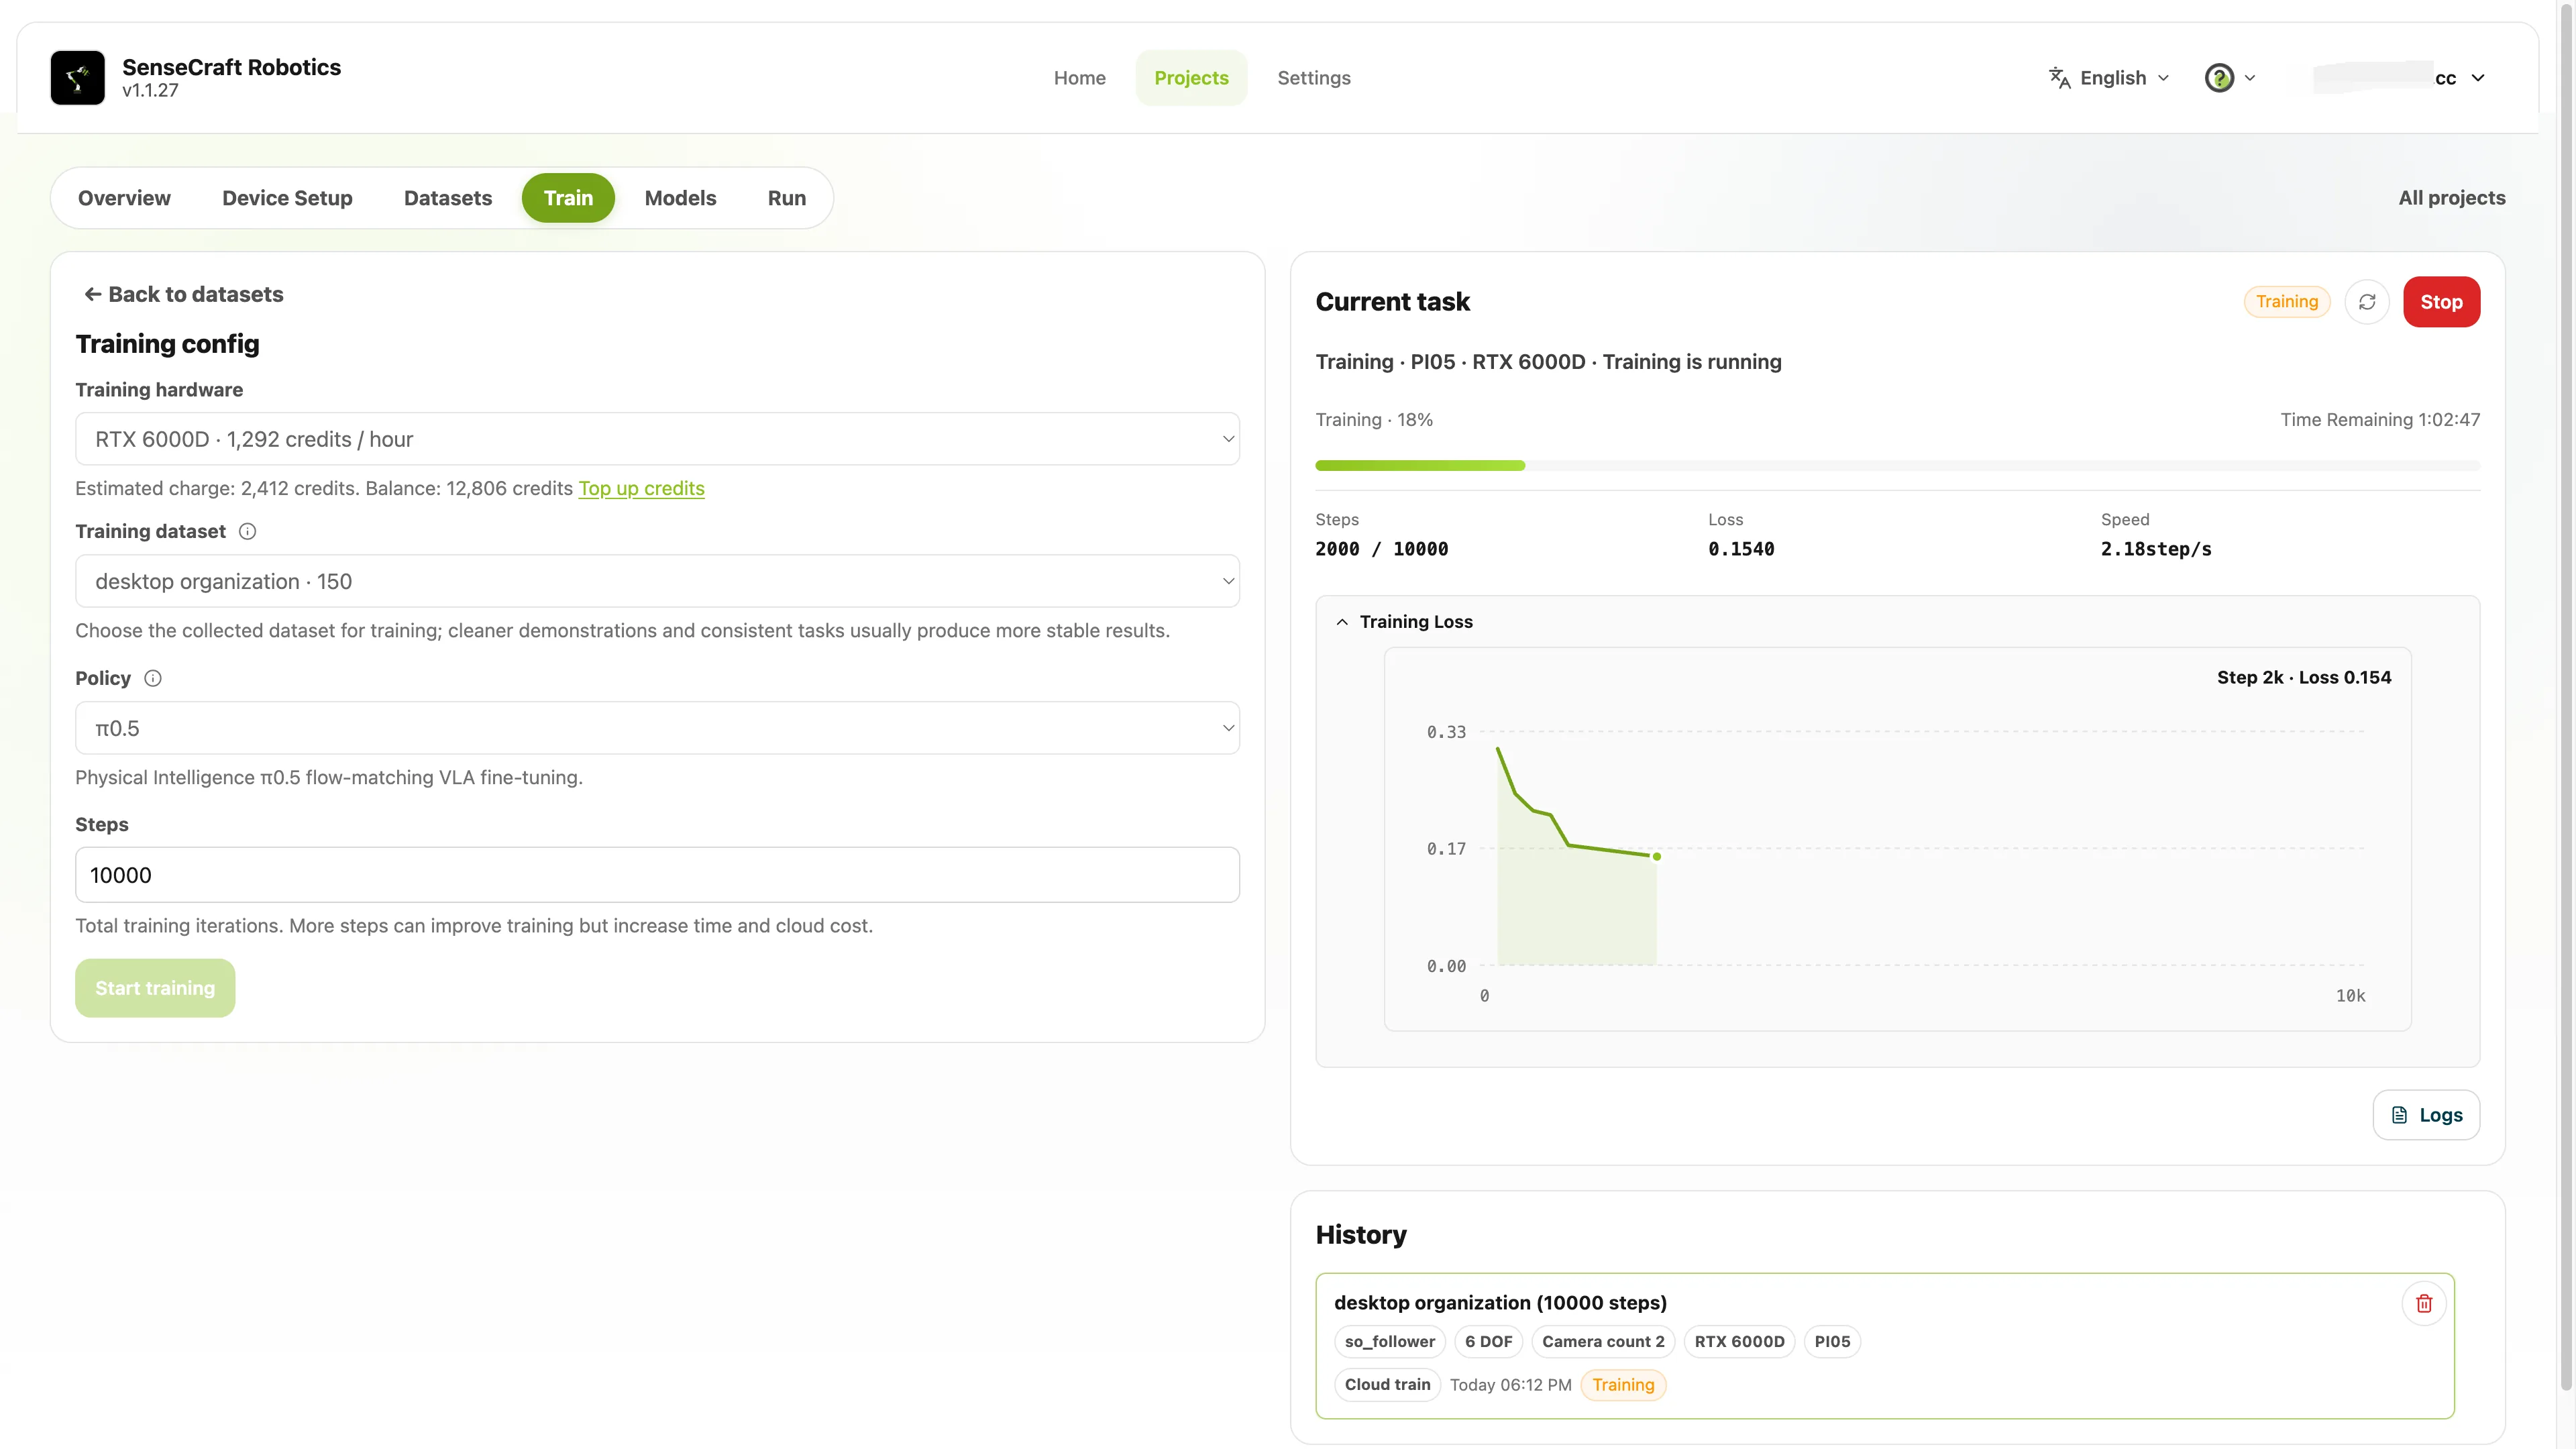
- Open the Train page.
- Choose the cloud GPU you want to use.
- Select the dataset you have reviewed.
- Select π0.5 as the training strategy.
- Use the platform's recommended training configuration as a starting point for your first run.
- Review the training parameters and the resource, quota, or cost information shown on the page.
- Submit the training job and monitor its status and progress on the training page.
Before submission, the platform checks whether the data meets the model's requirements. If it reports missing task instructions, camera configuration mismatches, or other data issues, resolve them before submitting again.
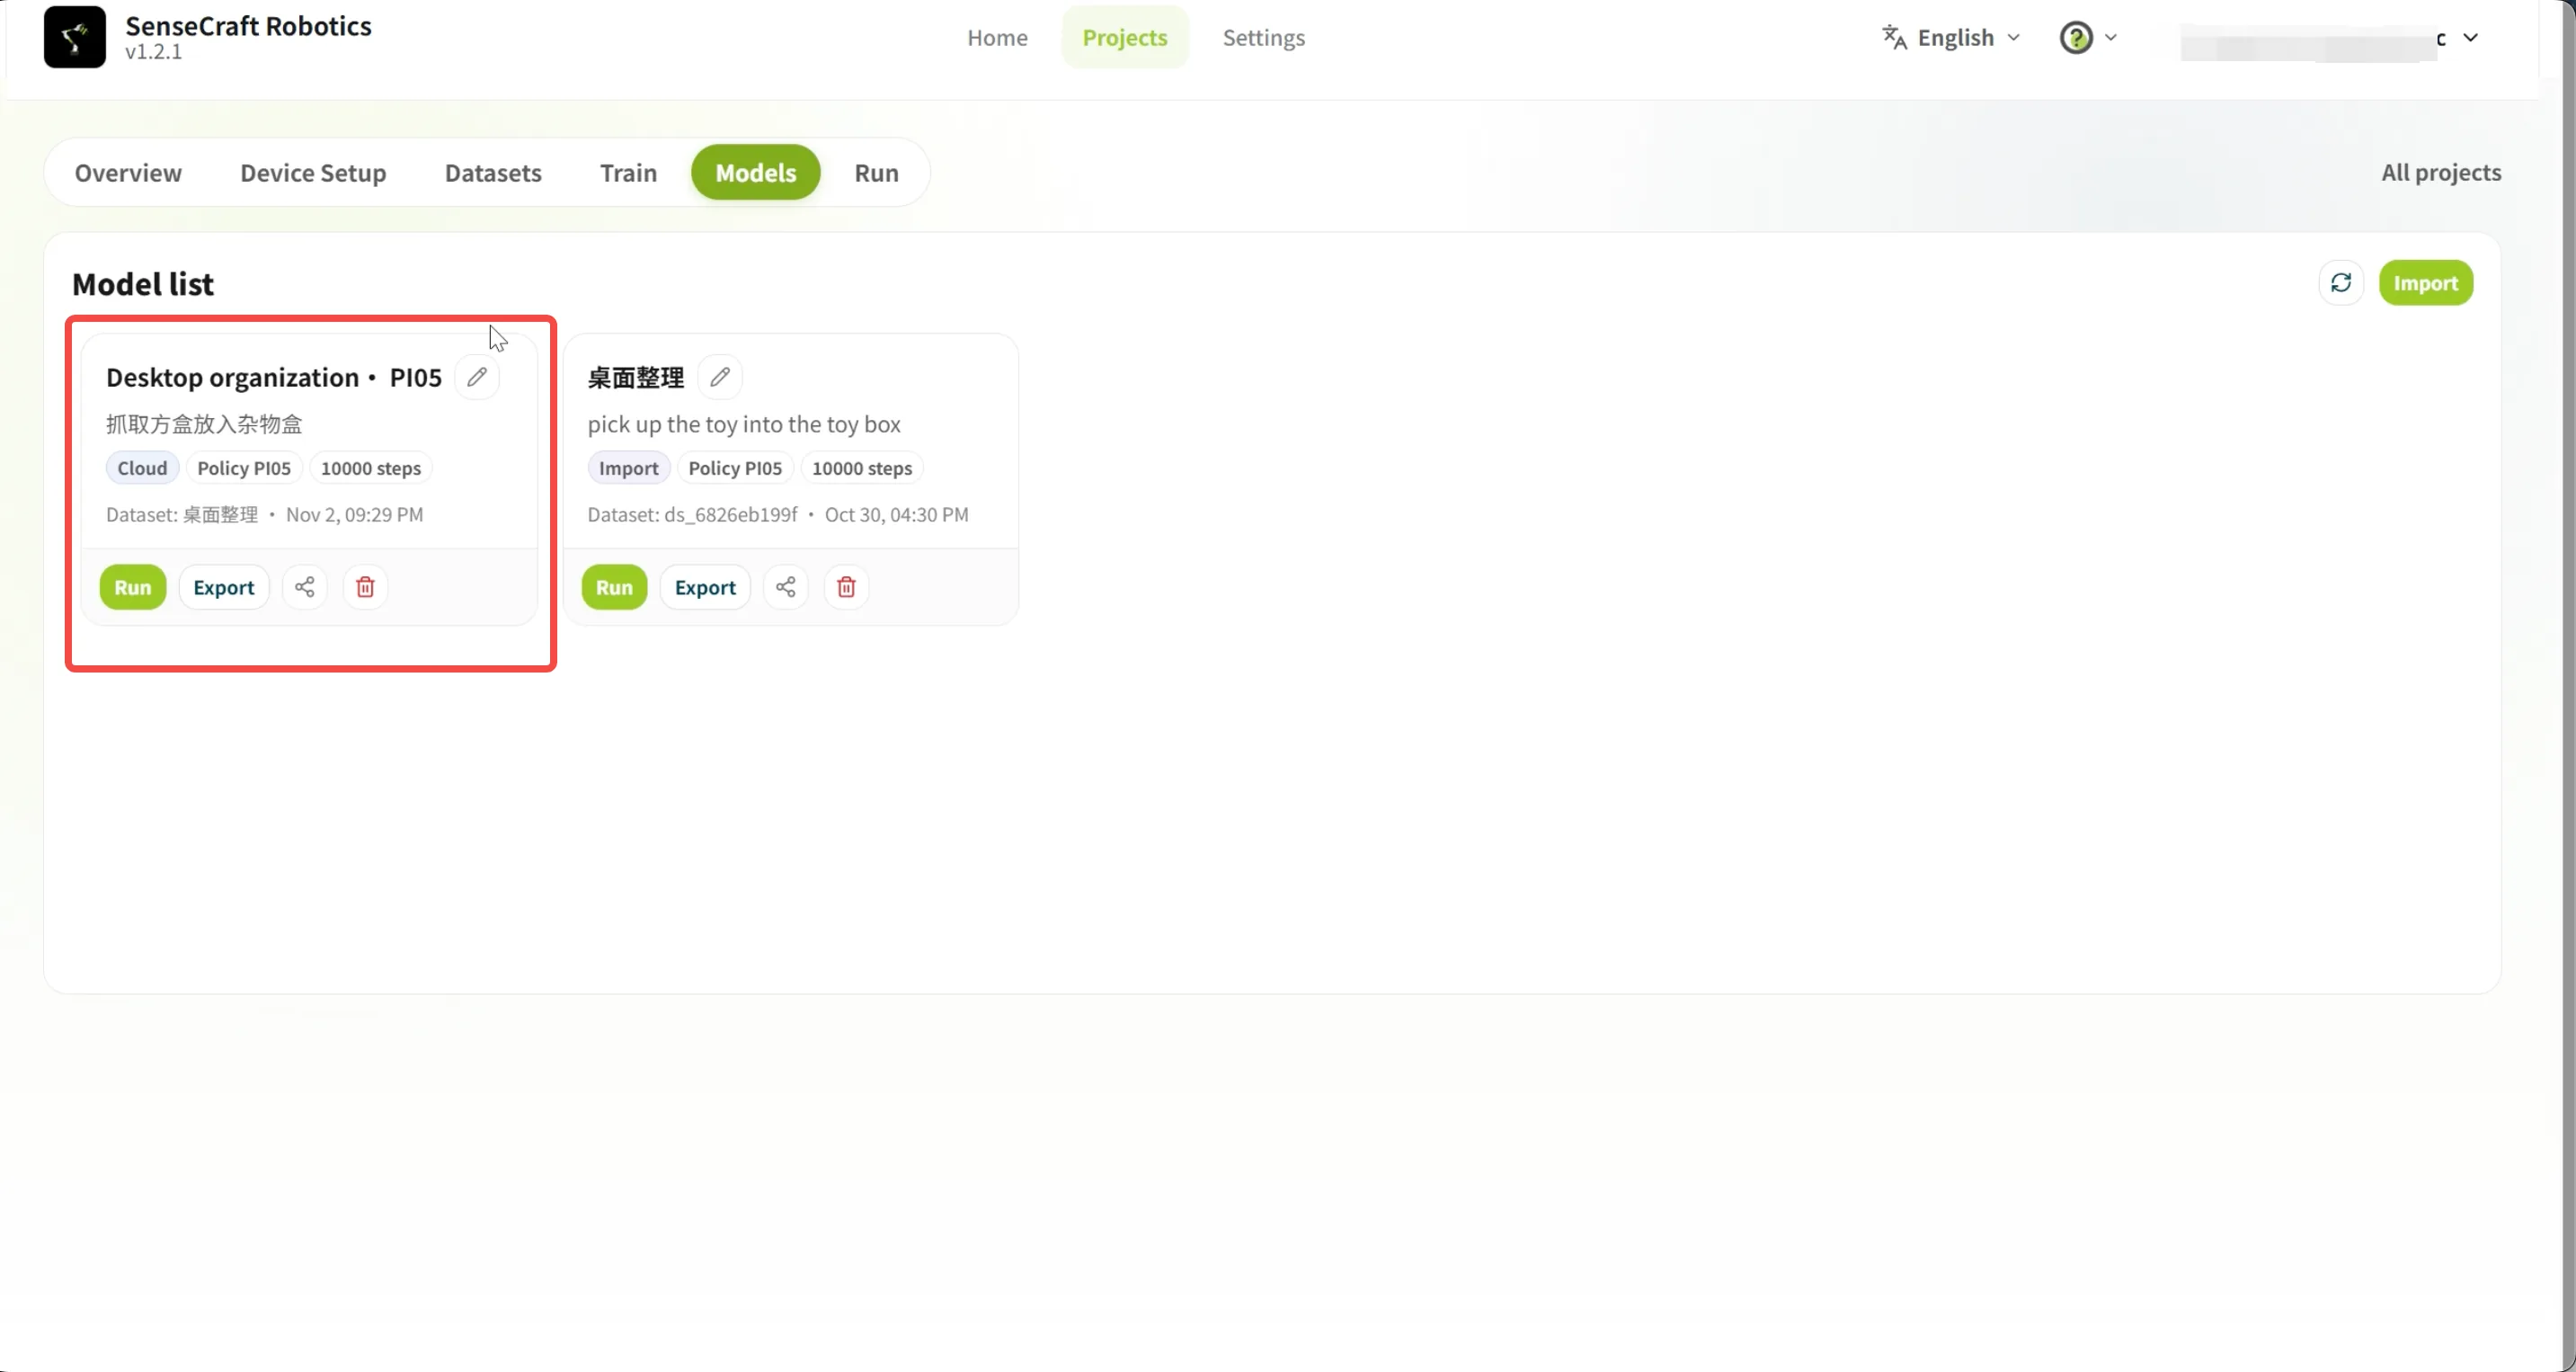
Once training finishes, open Models and find the model from this training job. The task name is usually the dataset name followed by the training strategy.
A completed training job does not establish real-world task performance; you still need to validate the model on the robot. For your first iteration, run the model before deciding whether to add data or adjust training settings based on observed failures.
8. Run the Model on SO-ARM
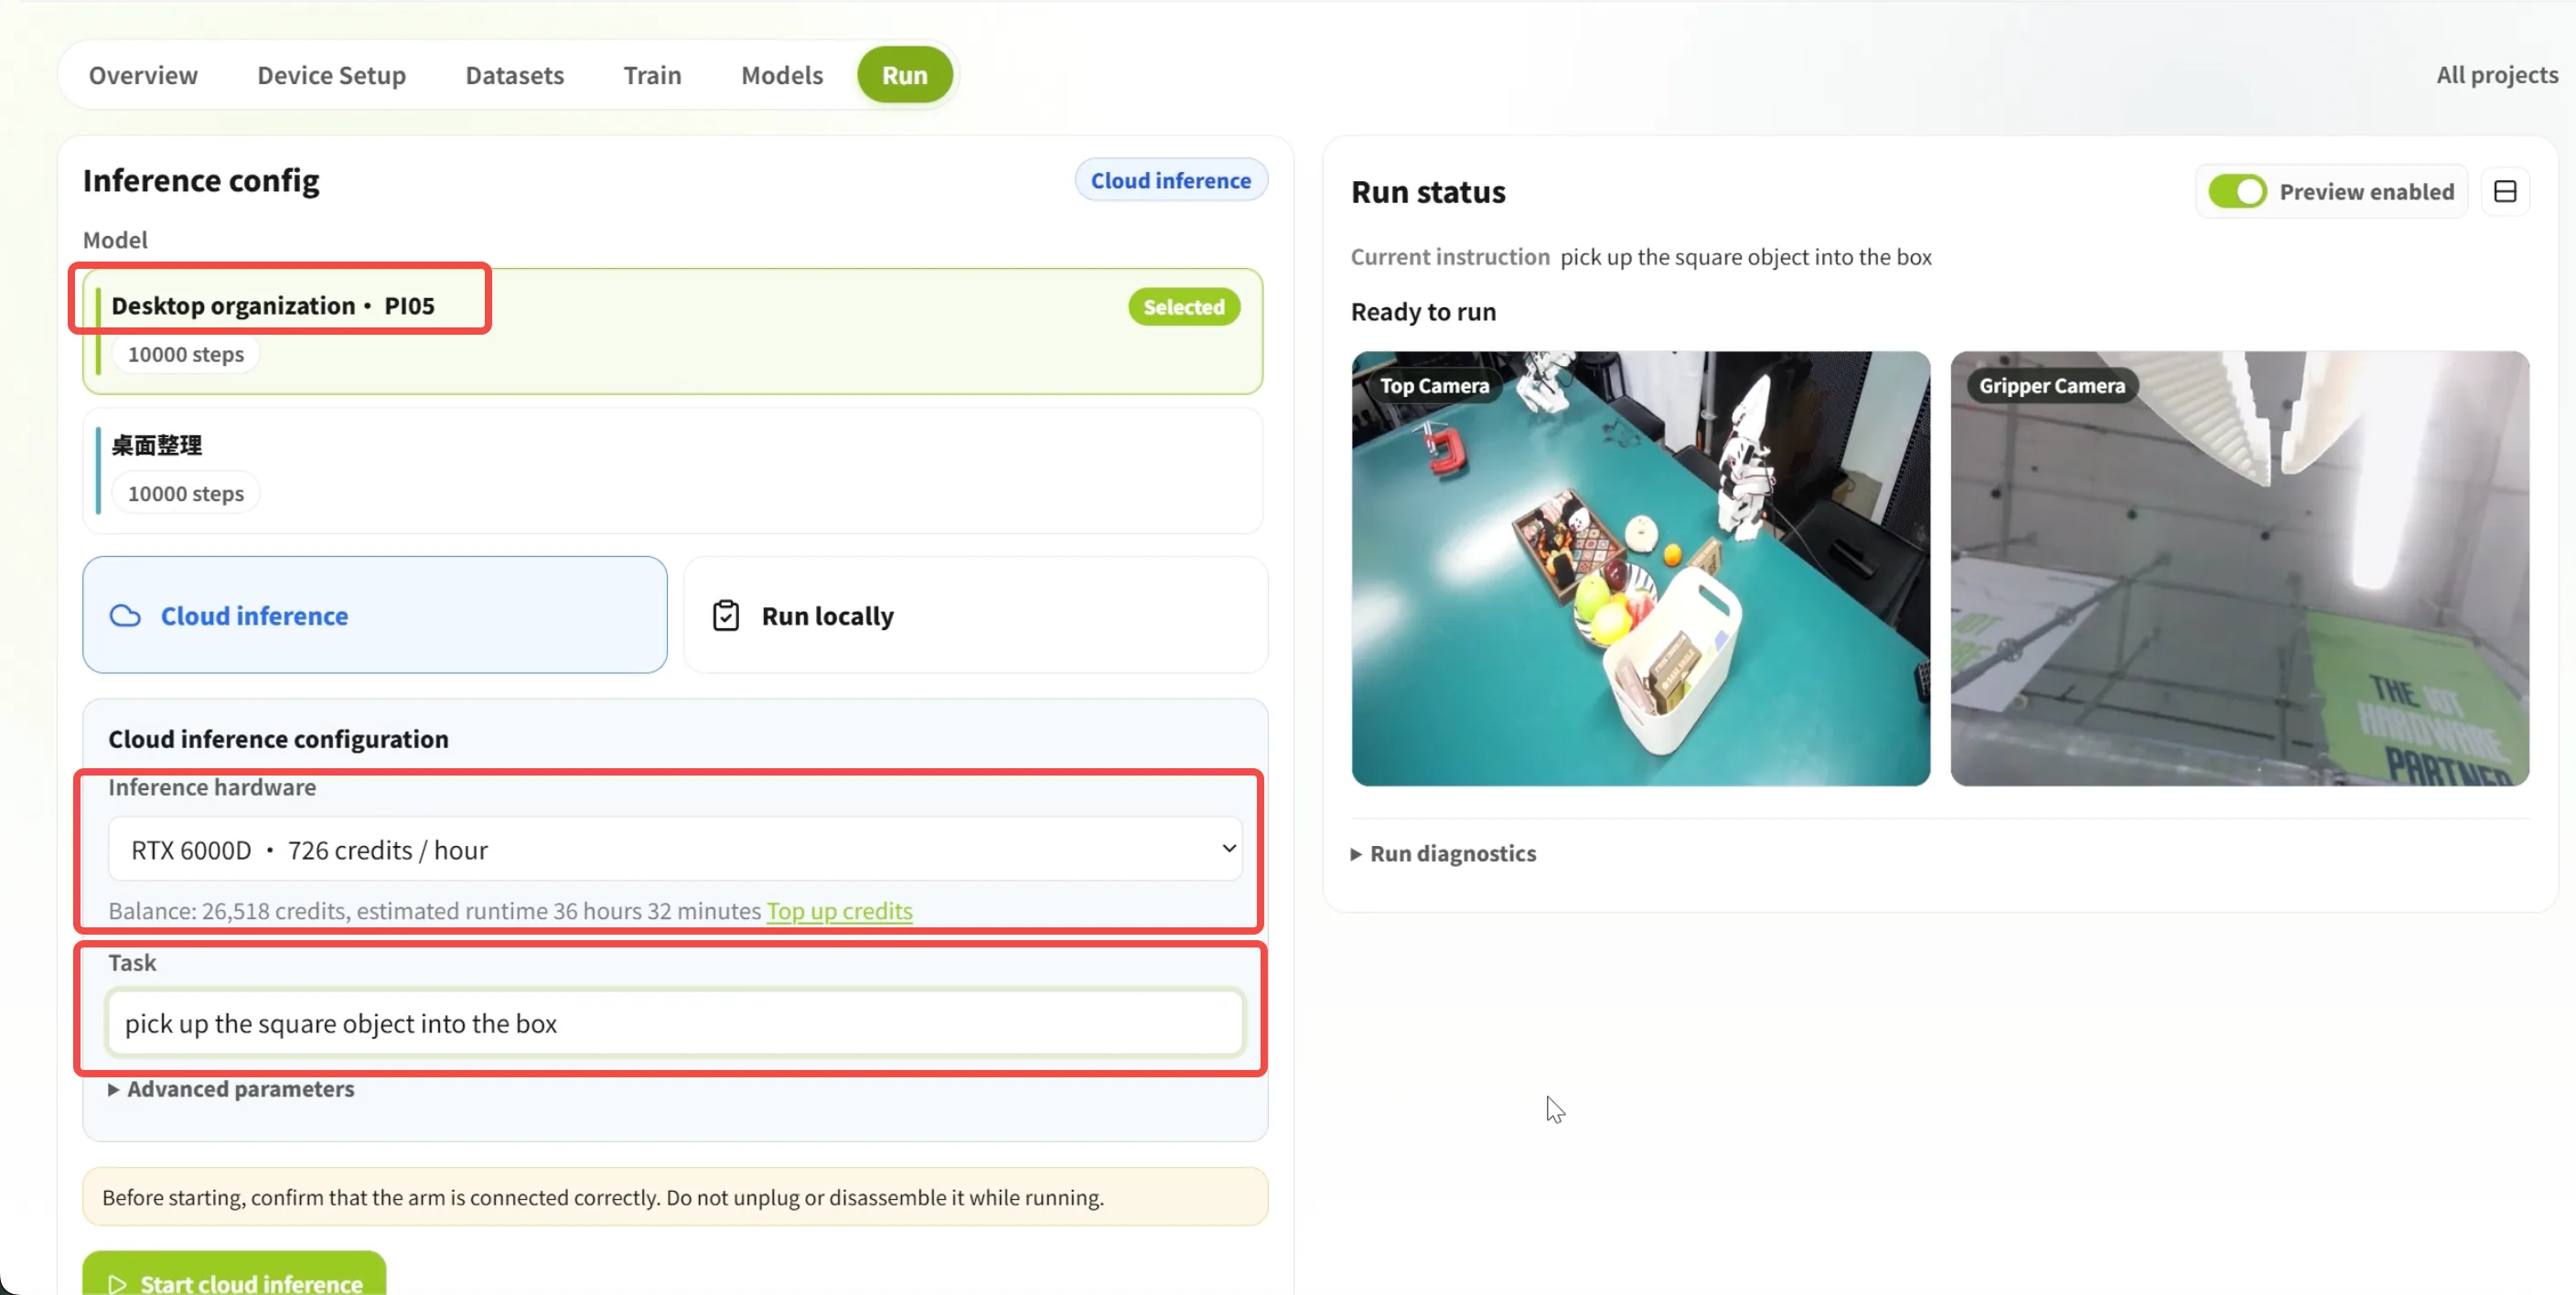
Execution mode: VLA models, especially π0.5 used in this tutorial, require substantial GPU compute and memory. A typical computer may struggle to run them smoothly. For this tutorial, use a cloud GPU for inference. The robot arm and cameras remain connected to your local computer, and the robot executes the model’s output locally. Keep your network connection stable. Before attempting local inference, confirm that your hardware and software environment meet the selected model’s requirements.
- Open the Run page.
- Choose the cloud GPU you want to use.
- Select the trained π0.5 model and an available execution mode compatible with it.
- Confirm that the robot and cameras are connected correctly and that their configuration matches the training data.
- Return the square box and storage bin to their positions during data collection, and return the robot to the starting pose used in the demonstrations. For the first test, use the same camera views, objects, and desktop arrangement as during collection.
- For this example, enter “Pick up the square box and place it in the storage bin.” Use the same instruction as for the square-box demonstrations. When validating the other two tasks, reset their respective scenes and enter each task’s original instruction.
- Start execution and observe whether the robot completes the task. Stop promptly if you notice abnormal movements.
For a model trained on multiple tasks, validate each task using its corresponding instruction.
9. Improve the Model Based on Execution Results
| Observed issue | What to check or add first |
|---|---|
| Success only from a few starting positions | Add correct demonstrations with different object positions |
| Frequent missed grasps or inaccurate placement | Check cameras, robot calibration, and data quality; add demonstrations for the affected scenarios |
| Poor performance on one task in a multi-task model | Check that task's instructions, episode quality, and data coverage |
| Performance drops after changing cameras or the scene | Check configuration consistency and collect data under the new conditions |
| Actions do not match the task instruction | Check episode-to-task associations and the instruction entered at runtime |
Keep dataset versions, training configurations, and test results for each iteration so you can assess whether changes help. For your first improvements, prioritize clear data issues before adjusting training parameters.
10. Frequently Asked Questions
Can a dataset contain multiple tasks?
Yes. Each episode should retain the correct task instruction. When merging data from different tasks, make sure the device models, cameras, and other data configurations are compatible.
After training, can I perform any task just by changing the instruction?
There is no such guarantee. Performance depends on the foundation model, demonstration data, and real-world conditions. Validate tasks covered during training first, then gradually test new instructions or conditions.
Can evaluation data be used for further training?
Yes, after reviewing and filtering the data and confirming that it meets the requirements. Use failed recordings to analyze problems, and prioritize adding correct demonstrations for those scenarios.
What if I run out of local storage?
View and change the local data storage path in the app settings, then follow the prompts to migrate existing data. After migration, confirm that your datasets, models, action recordings, and evaluation data remain accessible.