How to set up Rclone from web UI
Rclone is a program to manage files on cloud storage drives. You can use it to make sure your cloud files are always in sync with the local storage.
Eventhough there is a UI to configure Rclone within OpenWrt Luci interface, you need to first do all the configurations within a command line. After that only you will be able to view your files by using the web UI.
Please follow the steps below:
-
Step 1. Visit OpenWrt Luci web UI and navigate to
Services > Terminal -
Step 2. Log in with your OpenWrt credentials
-
Step 3. Start the rclone configuration process by typing the following
rclone config
-
Step 4. Press n and press Enter to create a new remote.
-
Step 5. Type a name of your choice for the new remote

- Step 6. Find the type of storage you are creating a remote connection to, and enter the corresponding number from the long list

Note: Here number 13 is chosen for Google Drive as an example
-
Step 7. When you are prompted for a Client ID, press Enter to accept the default
-
Step 8. When you are prompted for a Client Secret, press Enter to accept the default
-
Step 9. Choose 1 as the scope that rclone should use when requesting access from the drive

Note: This will give full access to all the files in the drive
-
Step 10. When you are prompted for root folder ID, press Enter to accept the default
-
Step 11. When you are prompted for service account credentials JSON file path, press Enter to accept the default
-
Step 12. On Edit advanced config prompt, press Enter which selects No by default
-
Step 13. On Use auto config menu, press n and then press Enter
-
Step 14. Copy and paste the link shown on a web browser

-
Step 15. Sign in to your Google account and Allow access
-
Step 16. Copy the code shown on the Google sign in page and paste it inside the command line that we used before
-
Step 17. On Configure as a team drive press Enter to accept the default
-
Step 18. Press Enter to confirm the creation of the remote
You will see the output as follows:

-
Step 19. Type q to quit the configuration
-
Step 20. Navigate to
NAS > Rclone, check the box next to run Rclone as daemon and click SAVE & APPLY -
Step 21. Copy the rclone address

-
Step 22. Click WEBUI REACT and a new web page will open
-
Step 23. Paste the previously copied rclone address on to the first blank column
-
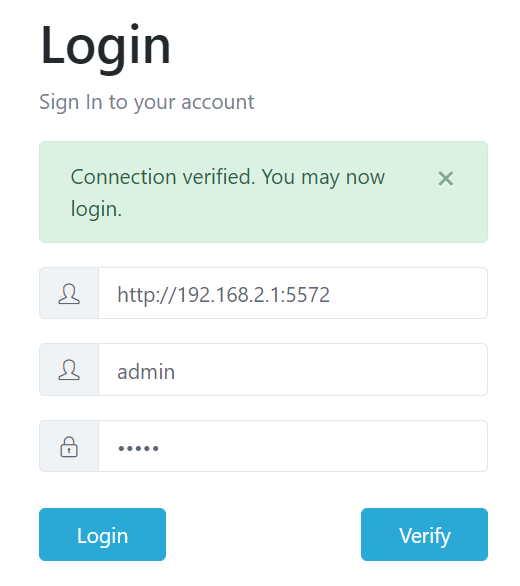
Step 24. Type admin for both username and password, and press Verify
You will see the following output if the connection is verified
-
Step 25. Click Login and go to Explore from the side menu
-
Step 26. Type the name of the remote we created before and click Open

Now you will see all your files in available in your drive