The remaining space in the eMMC in the received reComputer is only about 2GB, how to solve the problem of insufficient space?
We currently offer three ways to deal with this particular situation, and you can choose the right solution for you based on the actual situation.
Option 1. Redeployment of systems to external storage devices
If you haven't started a project with reComputer, you might consider using this option to redeploy the new system on a storage device with sufficient capacity.
- There are generally two ways to install a system for reComputer, the first is to use the NVIDIA SDK Manager.
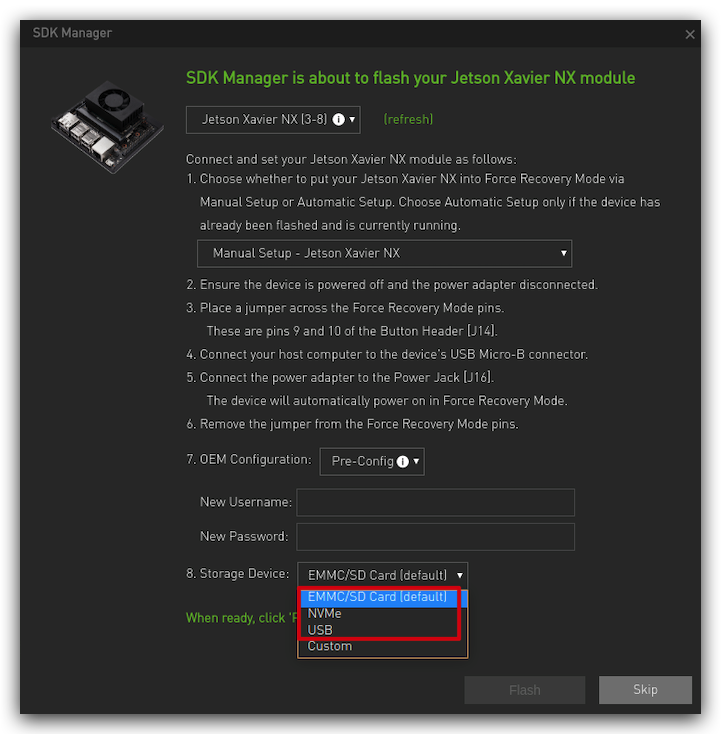
If you are on a reComputer J2011 or reComputer J2012, in step 12 of Flashing to eMMC with SDK Manager, you can expand the capacity by changing the location of the system burn-in.
This method is not applicable to the Jetson Nano module.
-
There are generally two ways to install a system for reComputer, the second is to use the command lines.
-
If you are using an A20X carrier board, the method to install the system using the command line is in Flashing to eMMC with command-line.
-
If you are using the reComputer J1010 Carrier Board, then use the command line to install the system at Flashing to eMMC with command-line.
They both essentially complete the installation of the system by using the following command.
sudo ./flash.sh [options] <board> <rootdev>
Where:
-
[options]is one or more command line options. All of the options are optional. See Flashing Script Usage for information about the options. -
<board>specifies the configuration to be applied to the device to be flashed. Values are listed in the table in Jetson Modules and Configurations in the topic Quick Start.flash.shgets the configuration from a configuration file named<board>.conf. -
<rootdev>specifies the type of device to be flashed. Use the value mmcblk0p1 to flash a local storage device (eMMC or SD card, depending on platform), as distinguished from an NFS server, for example.
As you can see from the above explanation, if we want to install the system in external storage, we can do so by changing the <rootdev> option.
For a partition on a USB storage device connected to the reComputer device, enter this command:
sudo ./flash.sh <board> sda<x>
For a partition on an NVMe storage device connected to the reComputer device, enter this command:
sudo ./flash.sh <board> nvme0n1p<x>
<x> is a number specifying the APP partition’s position on the storage device, e.g. sda1 for a USB device, or nvme0n1p1 for an NVMe storage device.
Option 2. Remove unneeded JetPack components to increase eMMC space.
NVIDIA JetPack SDK is the most comprehensive solution for building end-to-end accelerated AI applications. All Jetson modules and developer kits are supported by JetPack SDK.
JetPack SDK includes the Jetson Linux Driver Package (L4T) with Linux operating system and CUDA-X accelerated libraries and APIs for Deep Learning, Computer Vision, Accelerated Computing and Multimedia. It also includes samples, documentation, and developer tools for both host computer and developer kit, and supports higher level SDKs such as DeepStream for streaming video analytics and Isaac for robotics.
This table lists all components included in JetPack 4.6.
| Component Group | Packages | |
|---|---|---|
| CUDA Toolkit for L4T | cuda cuda-11-4 cuda-cccl-11-4 cuda-command-line-tools-11-4 cuda-compiler-11-4 cuda-cudart-11-4 cuda-cudart-dev-11-4 cuda-cuobjdump-11-4 cuda-cupti-11-4 cuda-cupti-dev-11-4 cuda-cuxxfilt-11-4 cuda-documentation-11-4 cuda-driver-dev-11-4 cuda-gdb-11-4 cuda-gdb-src-11-4 cuda-libraries-11-4 cuda-libraries-dev-11-4 cuda-minimal-build-11-4 cuda-nvcc-11-4 cuda-nvdisasm-11-4 cuda-nvml-dev-11-4 cuda-nvprof-11-4 cuda-nvprune-11-4 cuda-nvrtc-11-4 cuda-nvrtc-dev-11-4 cuda-nvtx-11-4 | cuda-runtime-11-4 cuda-samples-11-4 cuda-sanitizer-11-4 cuda-toolkit-11-4 cuda-toolkit-11-4-config-common cuda-toolkit-11-config-common cuda-toolkit-config-common cuda-tools-11-4 cuda-visual-tools-11-4 libcublas-11-4 libcublas-dev-11-4 libcudla-11-4 libcudla-dev-11-4 libcufft-11-4 libcufft-dev-11-4 libcurand-11-4 libcurand-dev-11-4 libcusolver-11-4 libcusolver-dev-11-4 libcusparse-11-4 libcusparse-dev-11-4 libnpp-11-4 libnpp-dev-11-4 |
| cuDNN | libcudnn8 libcudnn8-dev | libcudnn8-samples |
| TensorRT | graphsurgeon-tf libnvinfer-bin libnvinfer-dev libnvinfer-doc libnvinfer-plugin-dev libnvinfer-plugin8 libnvinfer-samples libnvinfer8 | libnvonnxparsers-dev libnvonnxparsers8 libnvparsers-dev libnvparsers8 python3-libnvinfer python3-libnvinfer-dev tensorrt uff-converter-tf |
| OpenCV | libopencv libopencv-dev opencv-licenses | libopencv-python libopencv-samples |
| VPI | libnvvpi2 vpi2-dev python-vpi2 | python3.9-vpi2 vpi2-samples vpi2-demos |
| NVIDIA container runtime with Docker integration | libnvidia-container0 libnvidia-container1 libnvidia-container-tools | nvidia-container-toolkit nvidia-container-runtime nvidia-docker2 |
| Multimedia API | nvidia-l4t-jetson-multimedia-api | |
The JetPack SDK contains a lot of content, but it's not something that all developers will need to use. So, it is one of the good options to selectively remove them for more storage space.
We can view information about the JetPack installed in reComputer Jetson with the following command.
sudo apt-cache show nvidia-jetpack
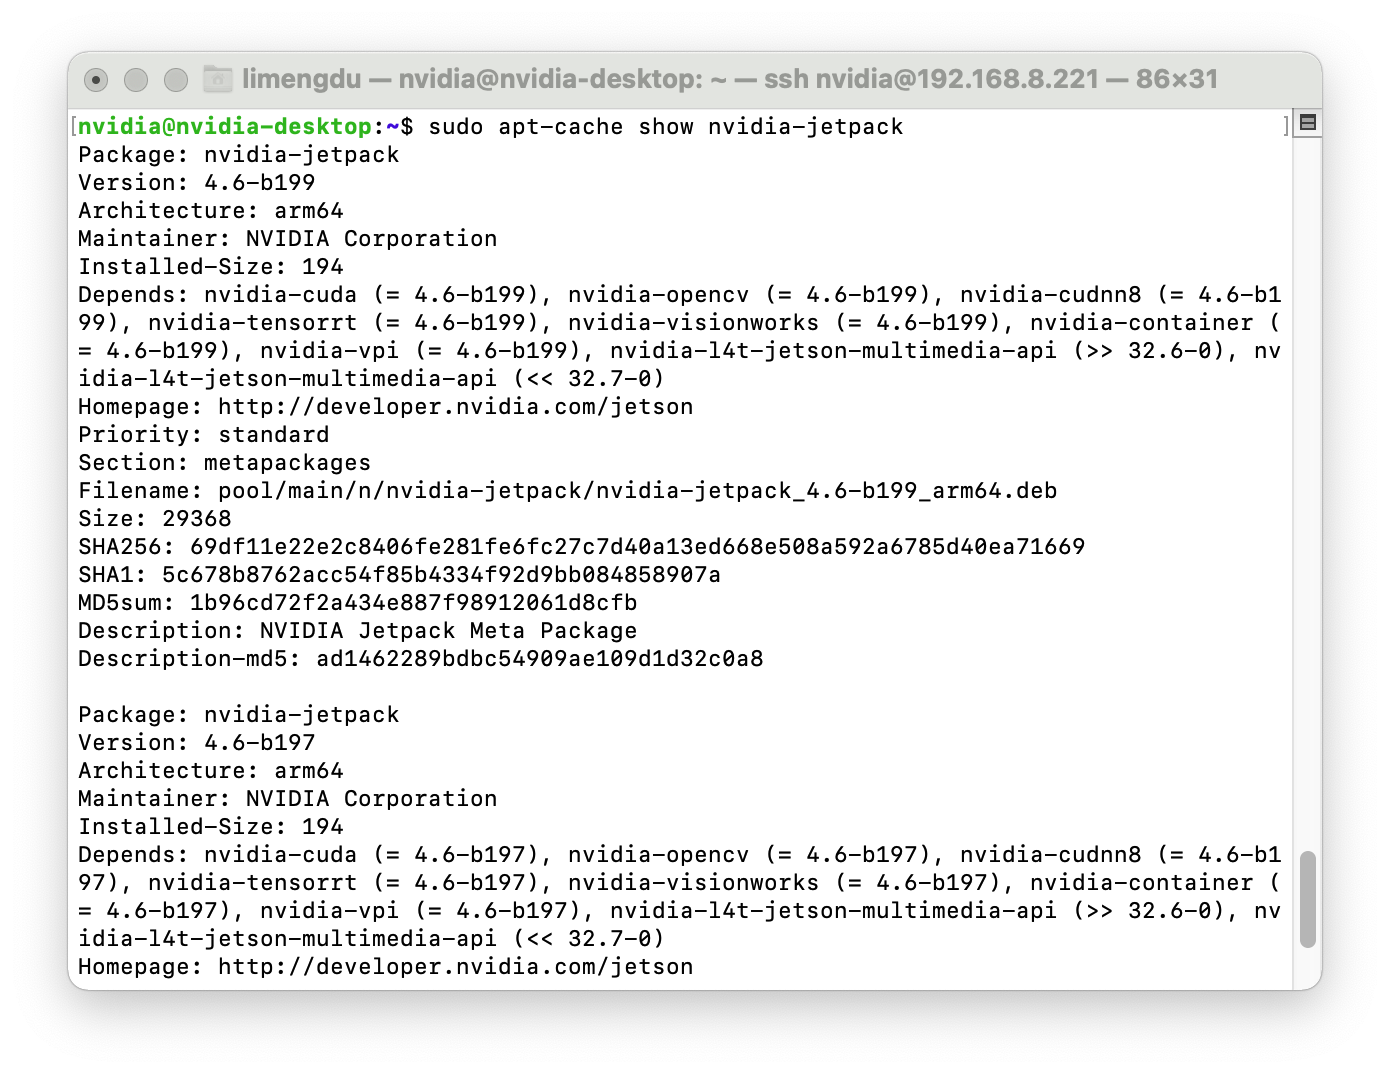
With this command, you can quickly learn the content of the installed components in JetPack, such as CUDA, openCV, etc.
To get more detailed information, you can use the following command to find out all the software currently installed by reComputer and its description information.
dpkg-query -l
Then, you can selectively remove the content you don't need according to your actual needs and the description information for the component. The command to delete is as follows.
sudo apt autoremove ${packagesname}
The environment variable ${packagesname} indicates the name of the component package you want to remove. If you want to remove all packages prefixed by a certain name, you can add * to this prefix to indicate that.
As an example, if we want to remove all components about CUDA, then we can use the following command.
sudo apt autoremove cuda*
After releasing the contents of the CUDA component, you can see that the remaining capacity of the eMMC will also become larger.

The same applies to other JetPack components.
Option 3. Capacity expansion via external storage devices.
You can choose this option if you have been using reComputer normally for some time and do not want to destroy the existing system environment to complete the expansion solution.
We already have a well-developed expansion wiki Memory Expansion for reComputer series.
It is worth noting that any expansion operation is dangerous and we expect you to be proactive in making backups of your system before everything starts.