Bluetooth Indoor Positioning System with LoRaWAN
Introduction
Overview
Indoor positioning is a common challenge for many industries. While high-precision systems like UWB exist, they can be costly and complex. This solution offers a flexible and cost-effective alternative by combining two powerful wireless technologies: Bluetooth Low Energy (BLE) for location sensing and LoRaWAN for long-range, low-power data transmission.
The system is built around the SenseCAP T1000 Tracker and supports two distinct positioning modes, allowing you to balance precision with battery life based on your needs:
-
High-Precision Tracking (Trilateration): When a tracker detects signals from three or more BLE beacons, it can calculate its precise (x, y) coordinates on a map. This mode is ideal for tracking the movement of assets or personnel, providing accurate location updates periodically or whenever movement occurs.
-
Zone-Based Positioning (Proximity): When a tracker is in range of only one or two beacons, it identifies its location based on proximity to the nearest beacon. This mode is perfect for simpler use cases like automated check-ins, confirming an asset is in a designated room, or conserving battery life by reporting location less frequently.
By supporting both methods, this solution provides a versatile and easy-to-deploy system for a wide range of indoor tracking applications, from simple presence detection to more detailed coordinate-based monitoring.
Check out our Indoor & Outdoor Integrated Positioning bundle page for all the products you need to implement this solution.
Key Features & Benefits
- Cost-Effective & Scalable: Leverages affordable BLE beacons and avoids the need for expensive gateway installations in every room.
- Long-Range Data Transmission: A single LoRaWAN gateway can cover an entire building or campus, drastically reducing infrastructure costs.
- Instant SOS Alert: Trackers include a panic button that, when pressed, immediately sends an SOS alert via LoRaWAN for rapid emergency response.
- Intelligent Power Management: By using a built-in accelerometer, the tracker can report only when movement is detected and send periodic "heartbeat" signals otherwise. This dramatically extends battery life to up to 6 months with optimal settings for many asset tracking applications.
- Simple Deployment: Setting up BLE beacons and LoRaWAN gateways is straightforward, getting your positioning system online quickly.
- Open-Source Software: The project is fully open-source, allowing you to build and customize your own backend server using our GitHub repository.
Use Cases
Use Cases
This solution is ideal for a wide range of zone-based tracking and safety applications:
Campus & School Safety
Provide students and staff with a wearable tracker. The built-in SOS button allows them to instantly send an emergency alert with their last known location from anywhere on campus, providing peace of mind and enabling faster response times.
Asset Management
Track the location of valuable assets, both indoors and outdoors (e.g., vehicles in a parking lot). Configure the tracker to only report when it moves, conserving battery while ensuring you are alerted to unauthorized movement.
Automated Check-In & Personnel Management
By adjusting the signal strength of a BLE beacon, you can create a "check-in" zone for offices or nursing homes. When a person wearing a tracker enters the zone, their presence is automatically logged.
System Architecture
The system operates on a simple yet powerful principle. Mobile trackers listen for signals from fixed beacons and report what they hear to a central server.

Prerequisites
The main components are:
- BLE Beacons: These are small, fixed transmitters placed at known locations (e.g., room entrances, key zones). They continuously broadcast a unique ID.
- SenseCAP T1000 Tracker: This is the mobile device attached to the asset or person you want to track. It scans for nearby BLE beacons and identifies the one with the strongest signal.
- LoRaWAN Gateway: The tracker sends a data packet containing the ID of the nearest BLE beacon to the gateway via LoRaWAN.
- Network & Application Server: The gateway forwards the data to a LoRaWAN Network Server(SenseCraft Data), which then routes it to an application server. The application server holds a map of the beacon IDs and their real-world locations, allowing it to determine the tracker's position (e.g., "Tracker #58 is near Beacon #12, which is in Conference Room 3").
Before you begin, make sure you have the following:
- A SenseCAP T1000 Tracker
- One or more BLE beacons
- A LoRaWAN gateway connected to the internet
- A server or computer with Docker installed
SenseCAP T1000 Tracker
LoRaWAN® mobile tracker with BLE scanning capabilities
BLE Beacon Detection: Supports BLE 5.1 for precise indoor and outdoor positioning.
Wide Area Network: LoRaWAN® Class A(v1.0.4) connectivity for long-range, low-power communication.
Motion Detection: Built-in accelerometer for real-time motion and stationary status sensing.
Emergency Button: Independent SOS button to trigger emergency alerts with one press.
BLE Beacons
Regular Bluetooth Broadcasting
Protocol Compatible: Bluetooth® LE 5.0 | Full support for iBeacon and Eddystone formats.
Flexible Deployment: Configurable transmission power for adjustable coverage radius.
Long-lasting: Up to 2 years of battery life with standard settings.
Easy Installation: Comes with adhesive backing for easy mounting on walls or other surfaces.
Broadcasting Range: Up to 75 meters outdoors, 120 meters indoors in open areas.
SenseCAP M2 Multi-Platform Gateway
LoRaWAN® Network Infrastructure
Wide Coverage: Indoor coverage radius of up to 2 km, ensuring stable signal.
Massive Connectivity: Supports over 200 concurrent devices with excellent performance.
Multiple Backhauls: Provides multiple network backhaul options including Ethernet, Wi-Fi, and 4G.
Integrated Solution: Built-in local LoRaWAN server capabilities to simplify network deployment and management.
Getting Started Guide

- Deploy Beacons: Place BLE beacons at strategic locations throughout your facility. Create a map or list documenting the unique ID of each beacon and its physical location (e.g.,
Beacon_ID_01: "Main Entrance",Beacon_ID_02: "Warehouse Zone A"). - Set up the Gateway: Connect your LoRaWAN gateway to the internet and configure it to forward packets to your chosen LoRaWAN Network Server.
- Deploy the Application: On your application server, create the logic to map the reported beacon IDs back to the physical locations you documented in Step 3.
- Configure the Tracker: Activate the SenseCAP T1000 and onboard it to your LoRaWAN Network Server. Ensure it is configured for BLE scanning mode.
- Visualize: As the tracker moves through the facility, it will report the nearest beacon, and your application can display its location on a dashboard or map.
Step 1: Set Up Your Hardware
First, you need to set up the physical devices in your facility.
1a. Deploy Beacons
For full technical specifications, please refer to the BC01 Indoor Bluetooth Beacon documentation.
Begin by placing BLE (Bluetooth Low Energy) beacons at strategic locations within your facility—such as the main entrance, warehouse, and office areas.
Refer to the video below for a step-by-step guide on adding your beacon information to the system. You can also check the Tips section for additional help.
Quick view of the parameters of BC01 beacon
| Parameters | Default Value |
|---|---|
| UUID | FDA50693-A4E2-4FB1-AFCF-C6EB07647825 |
| Major | 10001 |
| Minor | 19641 |
| Measured power | -59dBm |
| Tx Power | -30 - +4dBm, default 0dBm |
| Adv Interval | 100ms~10s, default 500ms |
| Password | seeed123 (Letters and numbers) |
| Device Name | BC01 (1-7 characters) |
| Soft Reboot | seeed123 (same with the password) |
1b. Set Up the Gateway
Power on your LoRaWAN gateway and connect it to the internet.
Next, follow the instructions below according to the network server you are using.
- SenseCraft Data
- ChirpStack (Local LoRaWAN Server)
By default, the LoRaWAN gateway forwards data to the SenseCraft Data platform (formerly SenseCAP Portal).
- Follow the official user manual to ensure your gateway is online and linked to your account.
- Once the connection is verified, you can proceed to next step(Step 2).
If you’re using a self-hosted ChirpStack server integrated with your gateway, you’ll need to redirect the gateway data and prepare a decoder script.
- Configure the Gateway: Follow this guide to redirect your gateway’s uplink data to ChirpStack.
- Download the Decoder Script: ChirpStack requires a decoder to interpret data from the T1000 tracker. Download the script below so it’s ready for the later configuration step.
- Download T1000 Decoder Script Note: This script should be added to your ChirpStack Application Settings, not on the gateway device itself.
Step 2: Install the Positioning Application
Install the SenseCraft Indoor Positioning application on your server using Docker. If you’d like to explore the interface first, you can check out the live demo.
Run the Installation Command
Open a terminal on your server and run the following command:
- Global
- Mirror
docker run -p 5173:5173 \
--name indoor-positioning \
--restart unless-stopped \
-v ./db:/app/db/ \
-v ./config:/app/server/config/json \
-v ./uploads:/app/uploads \
-d seeedcloud/sensecraft-indoor-positioning
For China mainland users, you could use chsrc to change source for better boost up.
💡 Note: Use PowerShell instead of a CMD terminal if you are running the command on Windows.
What this command does:
- Downloads and starts the SenseCraft Indoor Positioning application container.
-p 5173:5173makes the web dashboard accessible on port5173.- Mounts the local directories:
/app/db/→ stores databases and maps./app/server/config/json→ stores configuration files./app/uploads→ stores uploaded files.
-druns the application in the background.
Once the container starts successfully, open your web browser and navigate to:
👉 http://<your_server_ip>:5173
You should now see the SenseCraft Indoor Positioning dashboard running on your server.
- Username:
admin - Password:
83EtWJUbGrPnQjdCqyKq
Step 3: Configure the Application
3a. Runtime Configuration (Connecting to LoRaWAN)
Use this setting to connect the application to your LoRaWAN Network Server and receive tracker data. The application can connect to both SenseCraft Data and Local ChirpStack server at the same time.

Enable one or both MQTT sources in the dashboard:
Connect to SenseCraft Data
- Turn on SenseCAP OpenStream MQTT.
- Enter your Username and API Key - Get these from the Data OpenStream API Quickstart guide.
Connect to ChirpStack
- Turn on ChirpStack MQTT.
- Enter the server address and Application ID - The MQTT topic will auto-fill. You can find the Application ID on your ChirpStack application page.
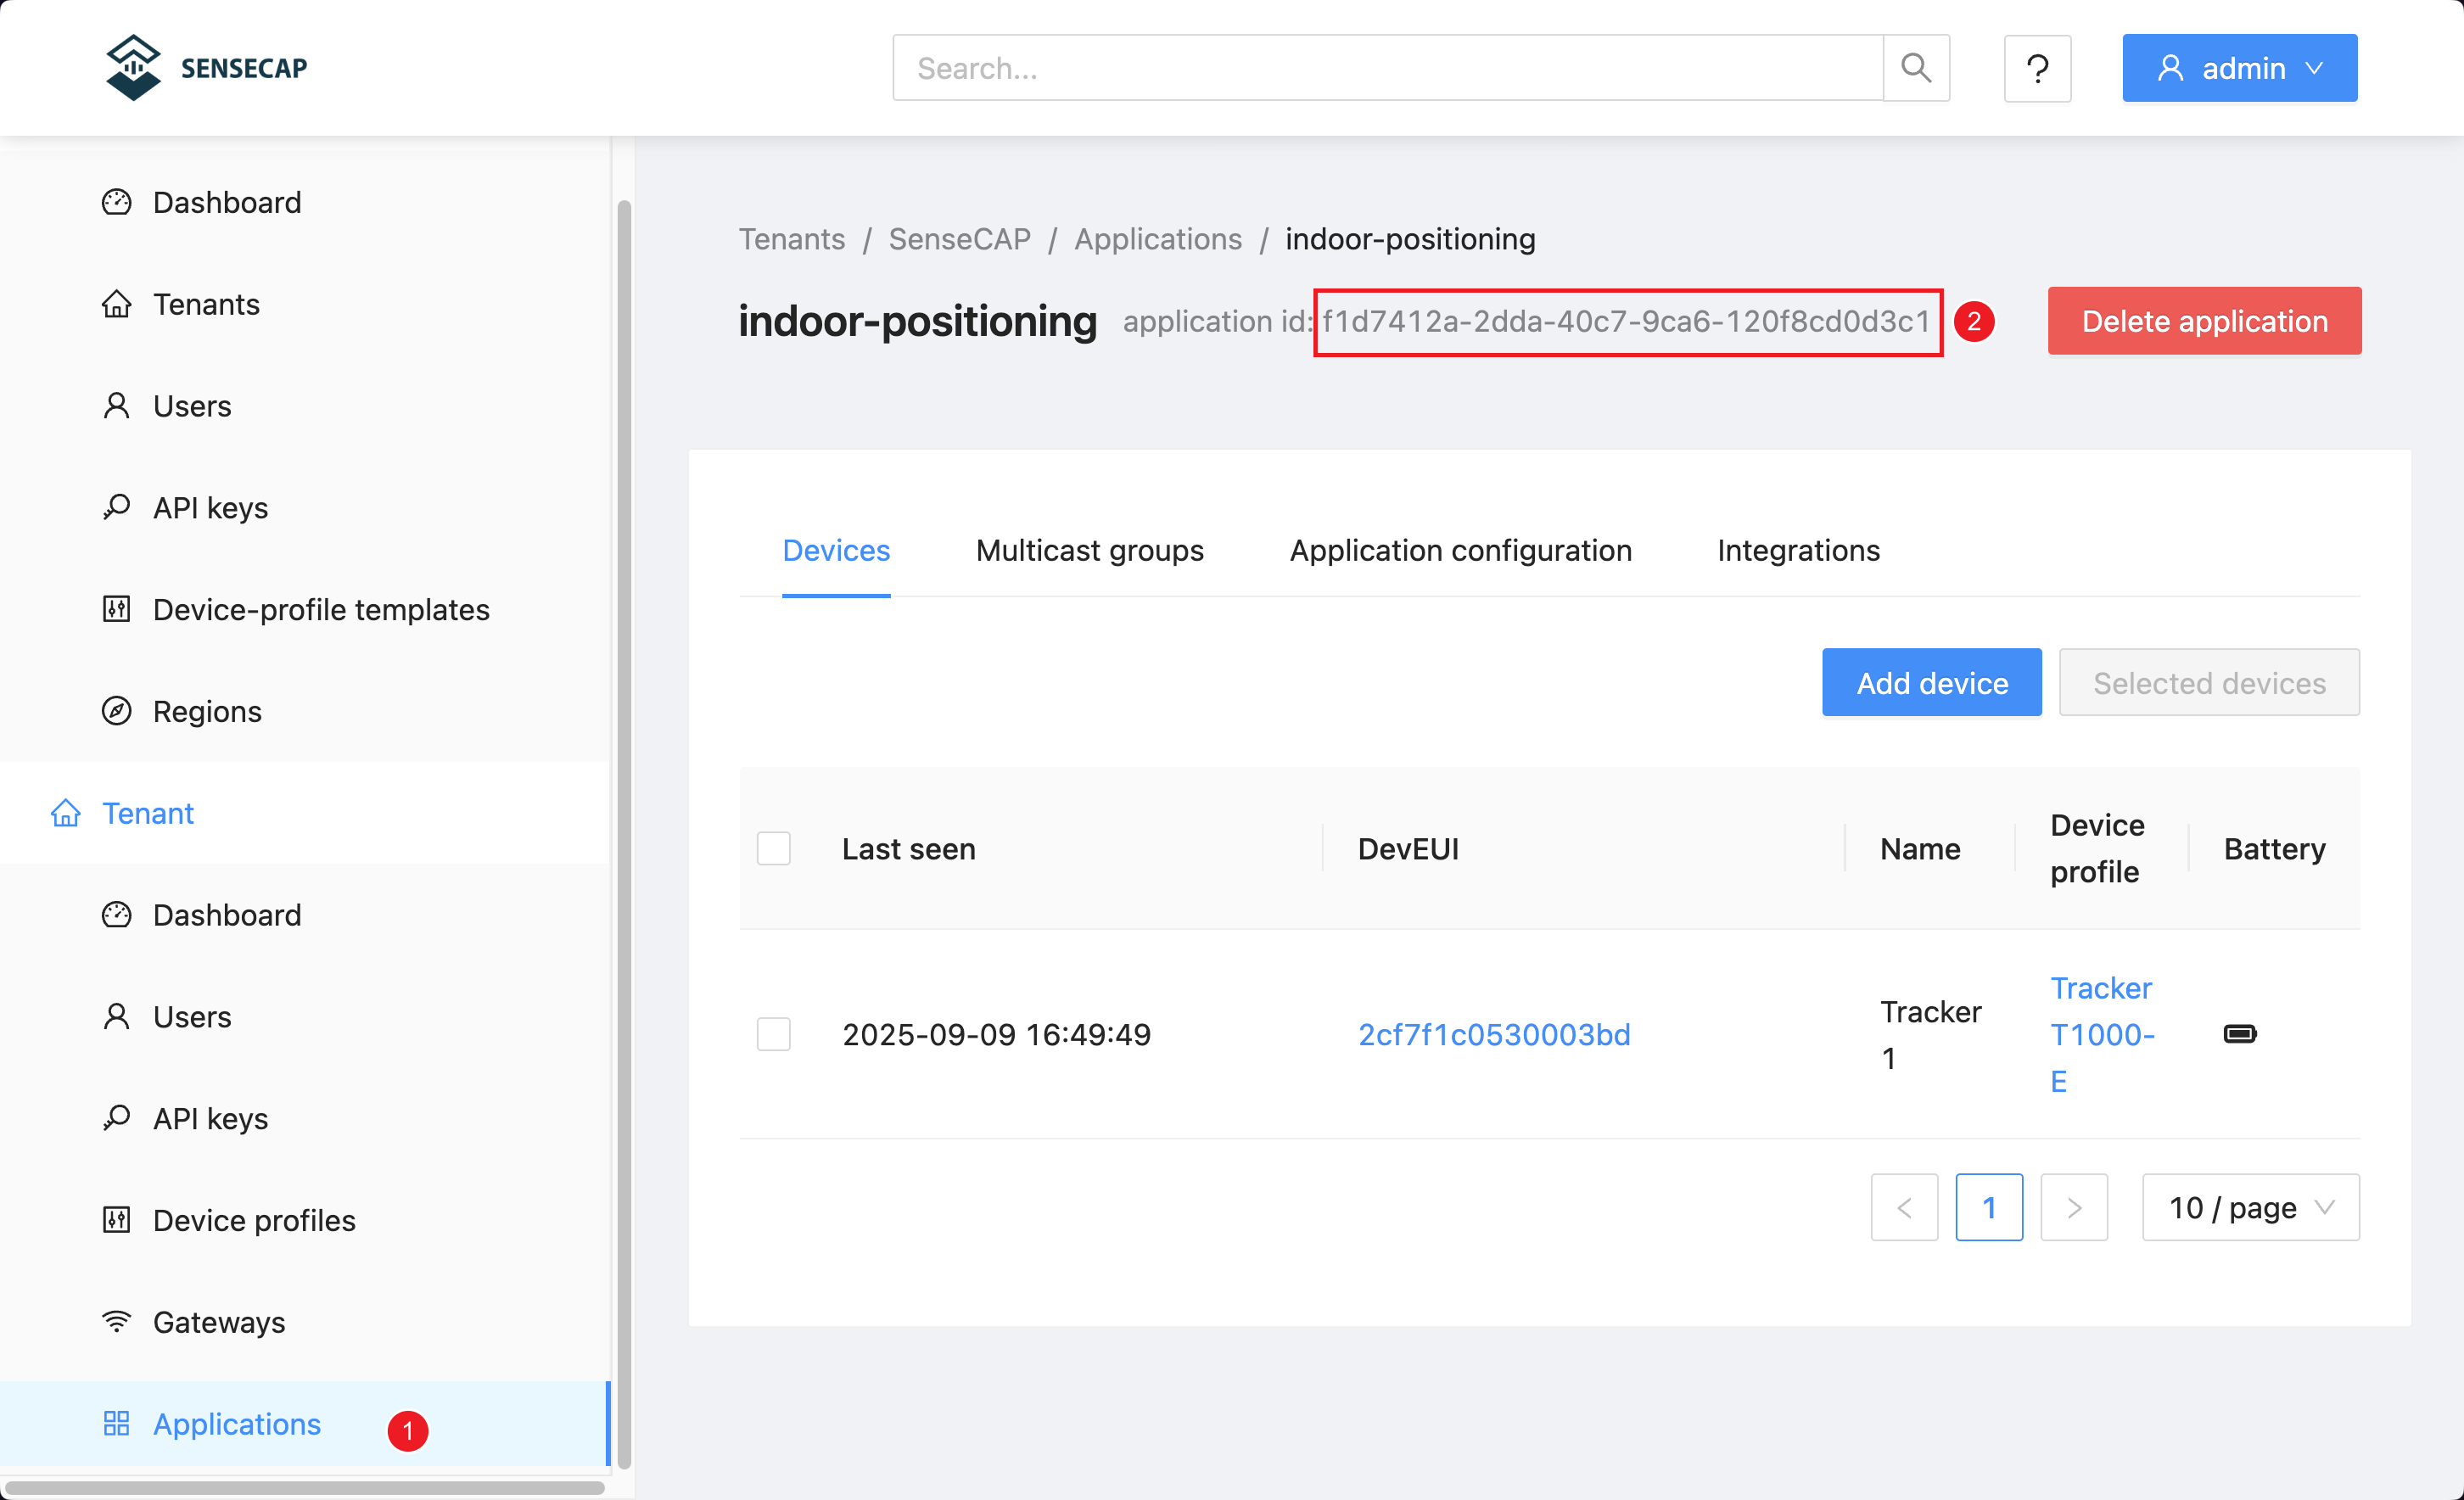
Note: The
{clientID}field is auto-generated; do not edit it.
Important: After any changes, restart the Docker container for updates to take effect.
Other Settings
These options can be changed anytime (no restart required):
- Authentication – Update dashboard login credentials.
- Area Positioning – Estimate approximate tracker location when beacon signals are weak or sparse.
- Tracker Access Control – Limit which devices can be positioned (open to all or by whitelist).
- Webhook – Push location data to your service via HTTP POST.
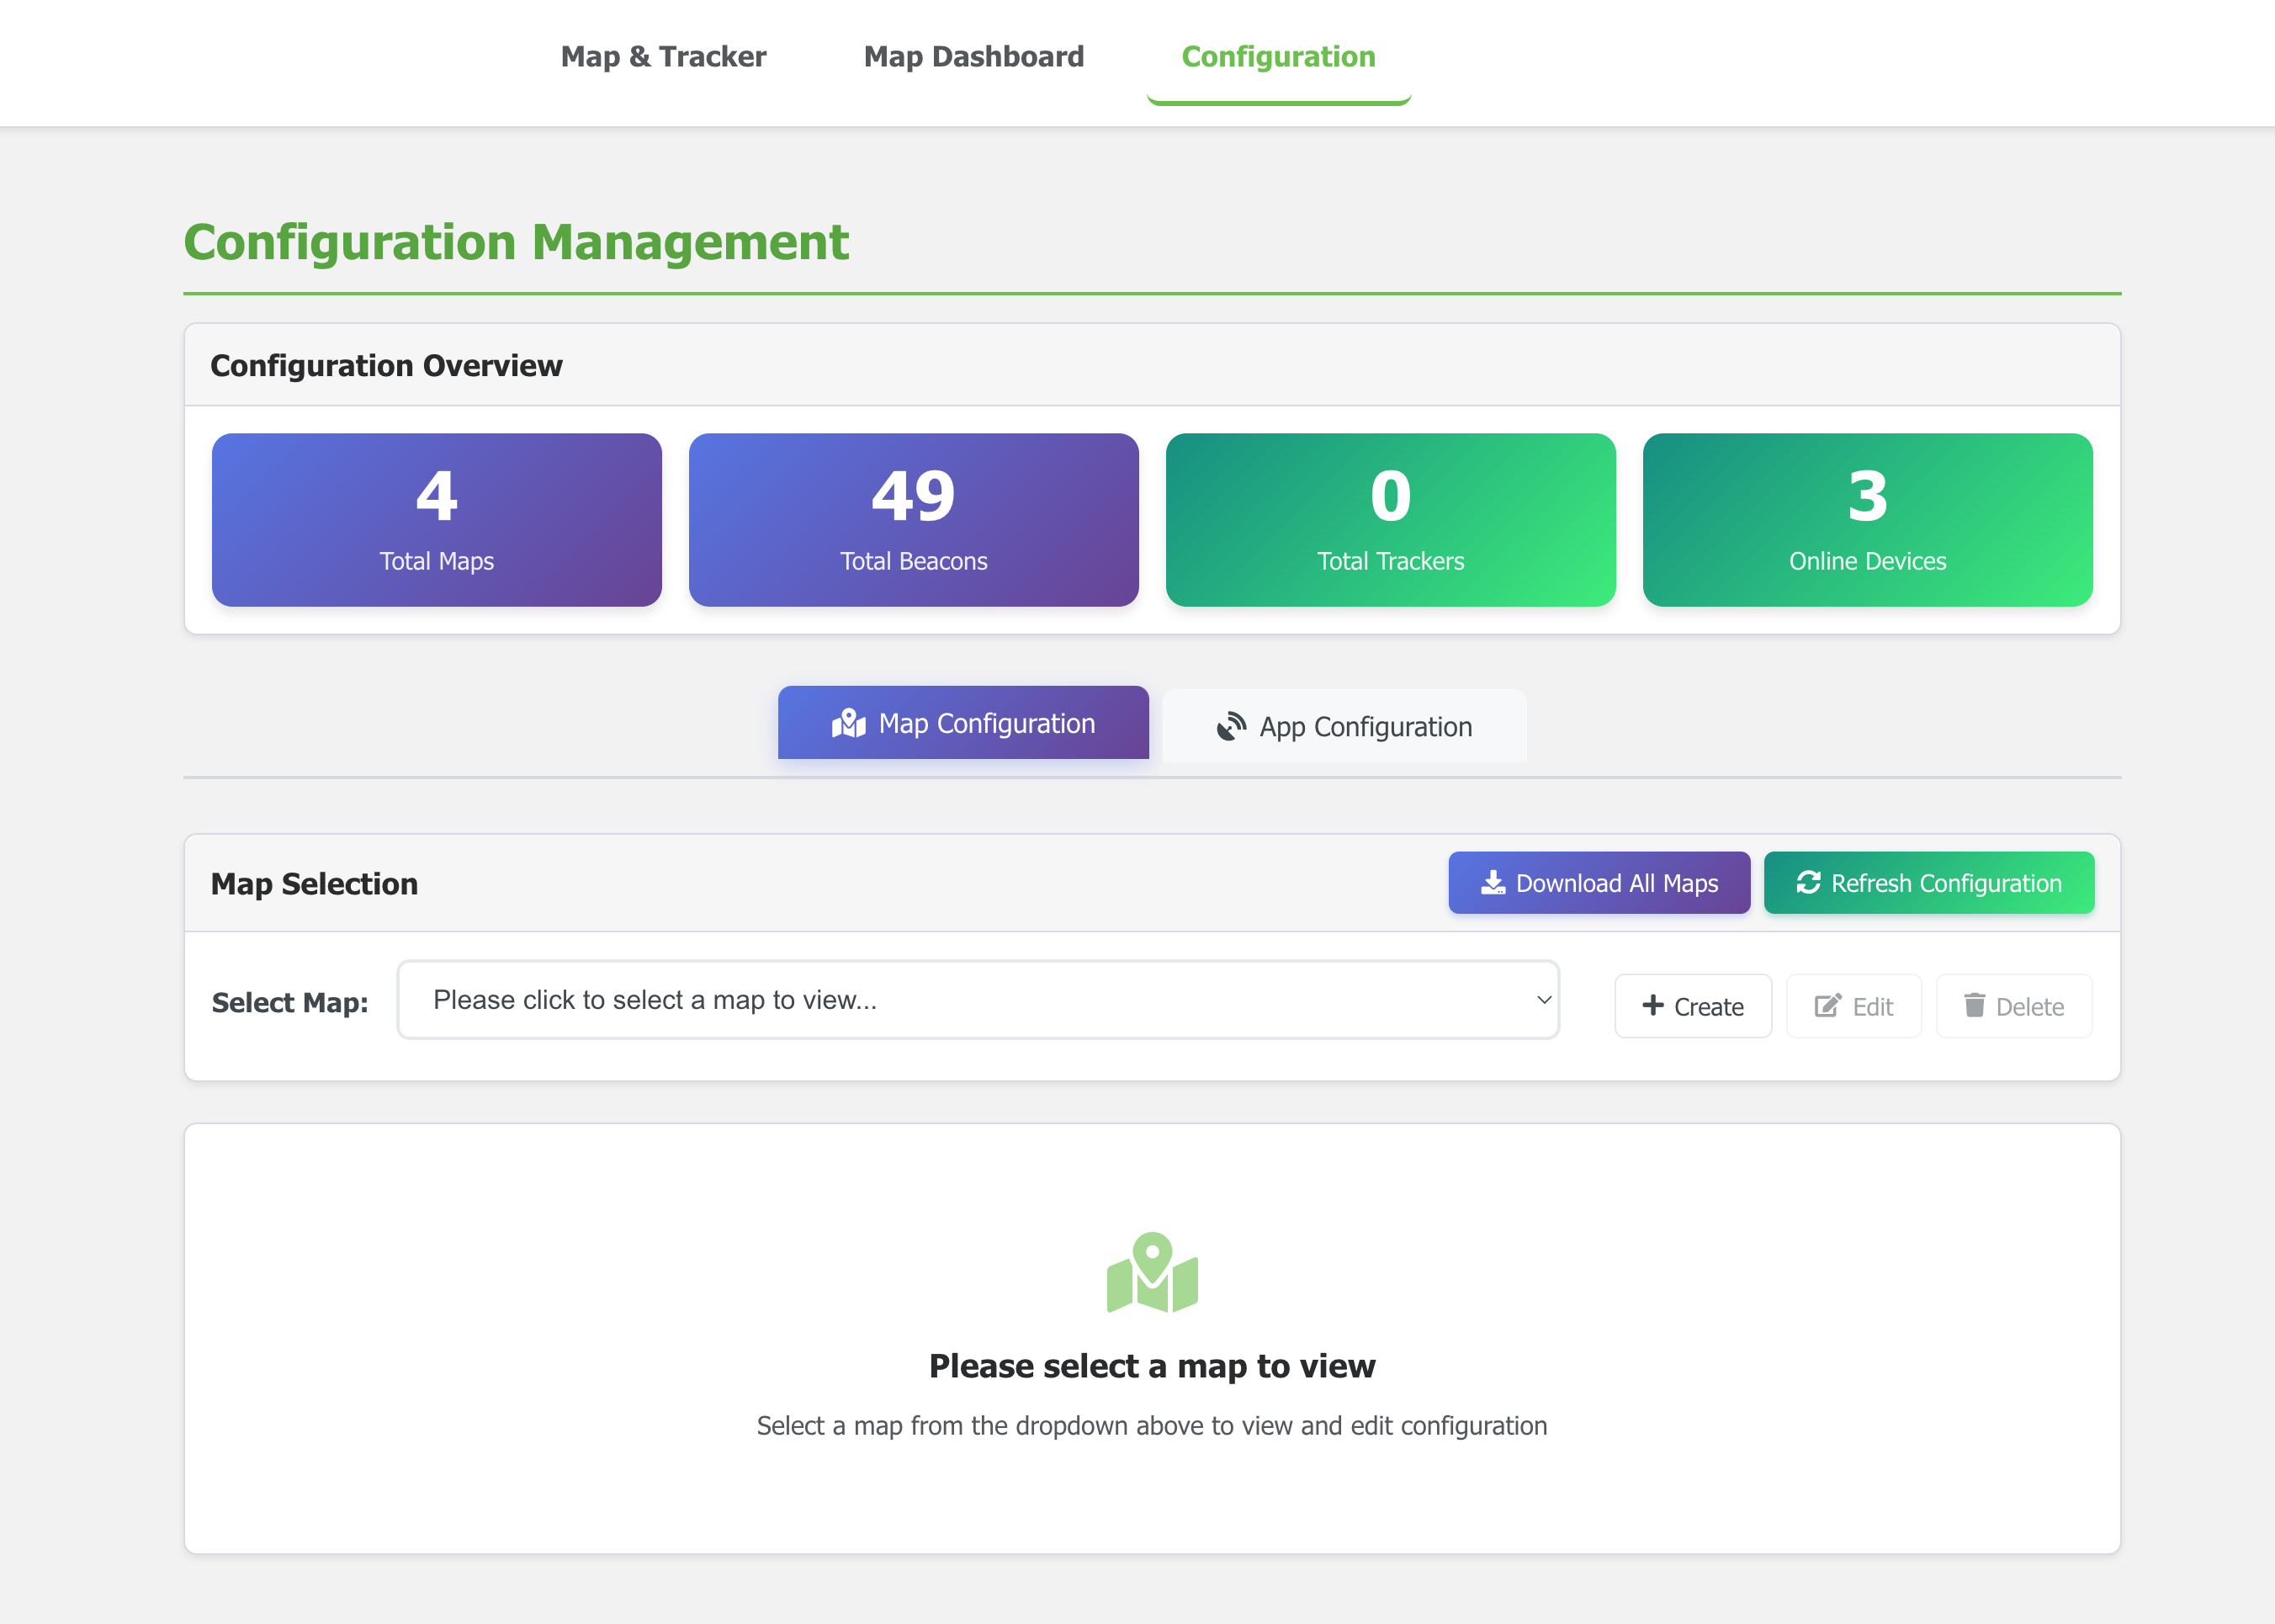
3b. Map and Beacon Configuration
Click Create to create your first map.
Upload your map data in this panel. Currently, the demo version only supports importing files in a GeoJSON-like format that contains polyline entities. Below is a sample JSON template for reference:
{
  "map": {
    "width": 29.53000000000094,
    "height": 22.212853765822828,
    "entities": [
      {
        "type": "polyline",
        "points": [
          [12.894968342021272, 17.07477114091087],
          [12.894968342021272, 17.114771140910868]
        ],
        "closed": false
      },
      {
        "type": "polyline",
        "points": [
          [12.944968342021284, 17.114771140910868],
          [12.894968342021272, 17.07477114091087]
        ],
        "closed": false
      }
    ]
  },
  "beacons": {}
}
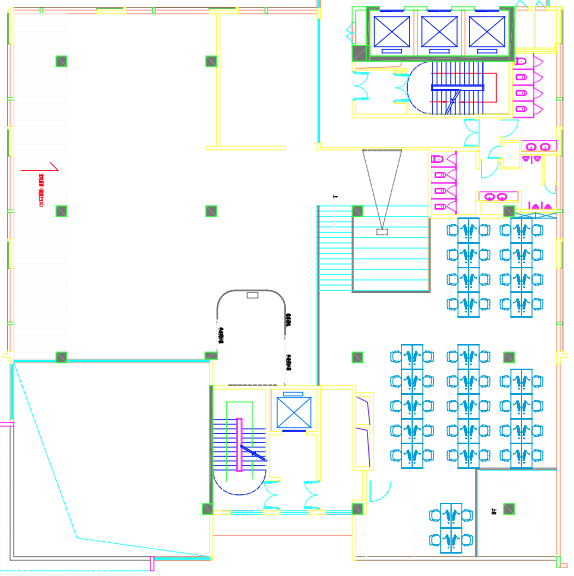
This JSON defines a 2D floor layout using coordinate-based polylines, which represent map elements such as walls or boundaries. Other geometry types are not supported in the current demo version.

- Add Beacons
In the Beacons section, add each beacon’s MAC address, ID, and location. You can place them directly on the uploaded map using the list you created in Step 1a.
- Adjust Environmental Factor (Optional)
Fine-tune location accuracy by adjusting how signal strength (RSSI) is converted into distance.
- Default value (~2.0) works well for open areas.
- For complex indoor environments, try values between 1.8 and 4.0.
- Start with the default setting and adjust later if needed.
Step 4: Activate and Visualize Your Tracker
The final step is to turn on your tracker and see it on the map.
- Activate the SenseCAP T1000 Tracker and onboard it to your LoRaWAN Network Server. Ensure your gateway is online and the tracker devices is 'registered' on the LNS server. check Step 1b for details.
- Ensure it is set to BLE scanning mode so it can detect the beacons. Check the video below for help.
- Visualize: As the tracker moves through your facility, it will detect the nearest beacons and report its location. You will see its icon moving across the map on your dashboard.
Opt for Other Platform, When using ChirpStack.
Retain the default platform settings (SenseCAP for The Things Network), When using SenseCraft Data.
Application Features Overview
Feature 1: Data Pushing (Webhook & WebSocket)
You can get real-time data from the system in two ways:
- Webhook: As mentioned in the configuration, this pushes data to a URL you provide.
- WebSocket: For real-time applications, you can connect to the
/wsendpoint using Basic HTTP Authentication. The data formats forsos,tracker_update(trilateration), andtracker_location_approximate(proximity) are detailed in the JSON examples provided in the original document.
Data Formats
- SOS Alert
- Trilateration/Multilateral
- Area Positioning
{
    "type": "tracker_sos",
    "data": {
        "2CF7F1C0530004AD": {
            "timestamp": 1756967508000,
            "sos": 0
        }
    }
}
{
    "type": "tracker_update",
    "data": {
        "2CF7F1C0530003BD": {
            "trackerId": "2CF7F1C0530003BD",
            "timestamp": 1756967455550,
            "position": {
                "x": 11.1,
                "y": 12.3
            },
            "last_detected_beacons": [
                {
                    "macAddress": "C3:00:00:56:4B:5D",
                    "major": null,
                    "minor": null,
                    "name": "Unknown Beacon",
                    "rssi": -79,
                    "txPower": null,
                    "configured_x": null,
                    "configured_y": null
                },
                {
                    "macAddress": "C3:00:00:3E:7D:AA",
                    "major": null,
                    "minor": null,
                    "name": "Unknown Beacon",
                    "rssi": -80,
                    "txPower": null,
                    "configured_x": null,
                    "configured_y": null
                },
                {
                    "macAddress": "C3:00:00:13:3C:99",
                    "major": null,
                    "minor": null,
                    "name": "Unknown Beacon",
                    "rssi": -80,
                    "txPower": null,
                    "configured_x": null,
                    "configured_y": null
                }
            ],
            "position_history": [],
            "map": "10 Floor",
            "sos": 2
        }
    }
}
{
    "type": "tracker_location_approximate",
    "data": {
        "2CF7F1C0530004AD": {
            "trackerId": "2CF7F1C0530004AD",
            "timestamp": 1756967098851,
            "radius": 5.248074602497725,
            "last_detected_beacons": [
                {
                    "txPower": -59,
                    "rssi": -77,
                    "name": "corner",
                    "configured_x": 32.41,
                    "configured_y": 21.26,
                    "macAddress": "C3:00:00:56:4B:59"
                }
            ],
            "map": "10.5 Floor",
            "sos": 0
        }
    }
}
Feature 2: Two Positioning Modes
The system supports two positioning methods:
- Trilateration: When the tracker detects three or more beacons, it calculates a precise (x, y) coordinate. This is the default and most accurate mode.
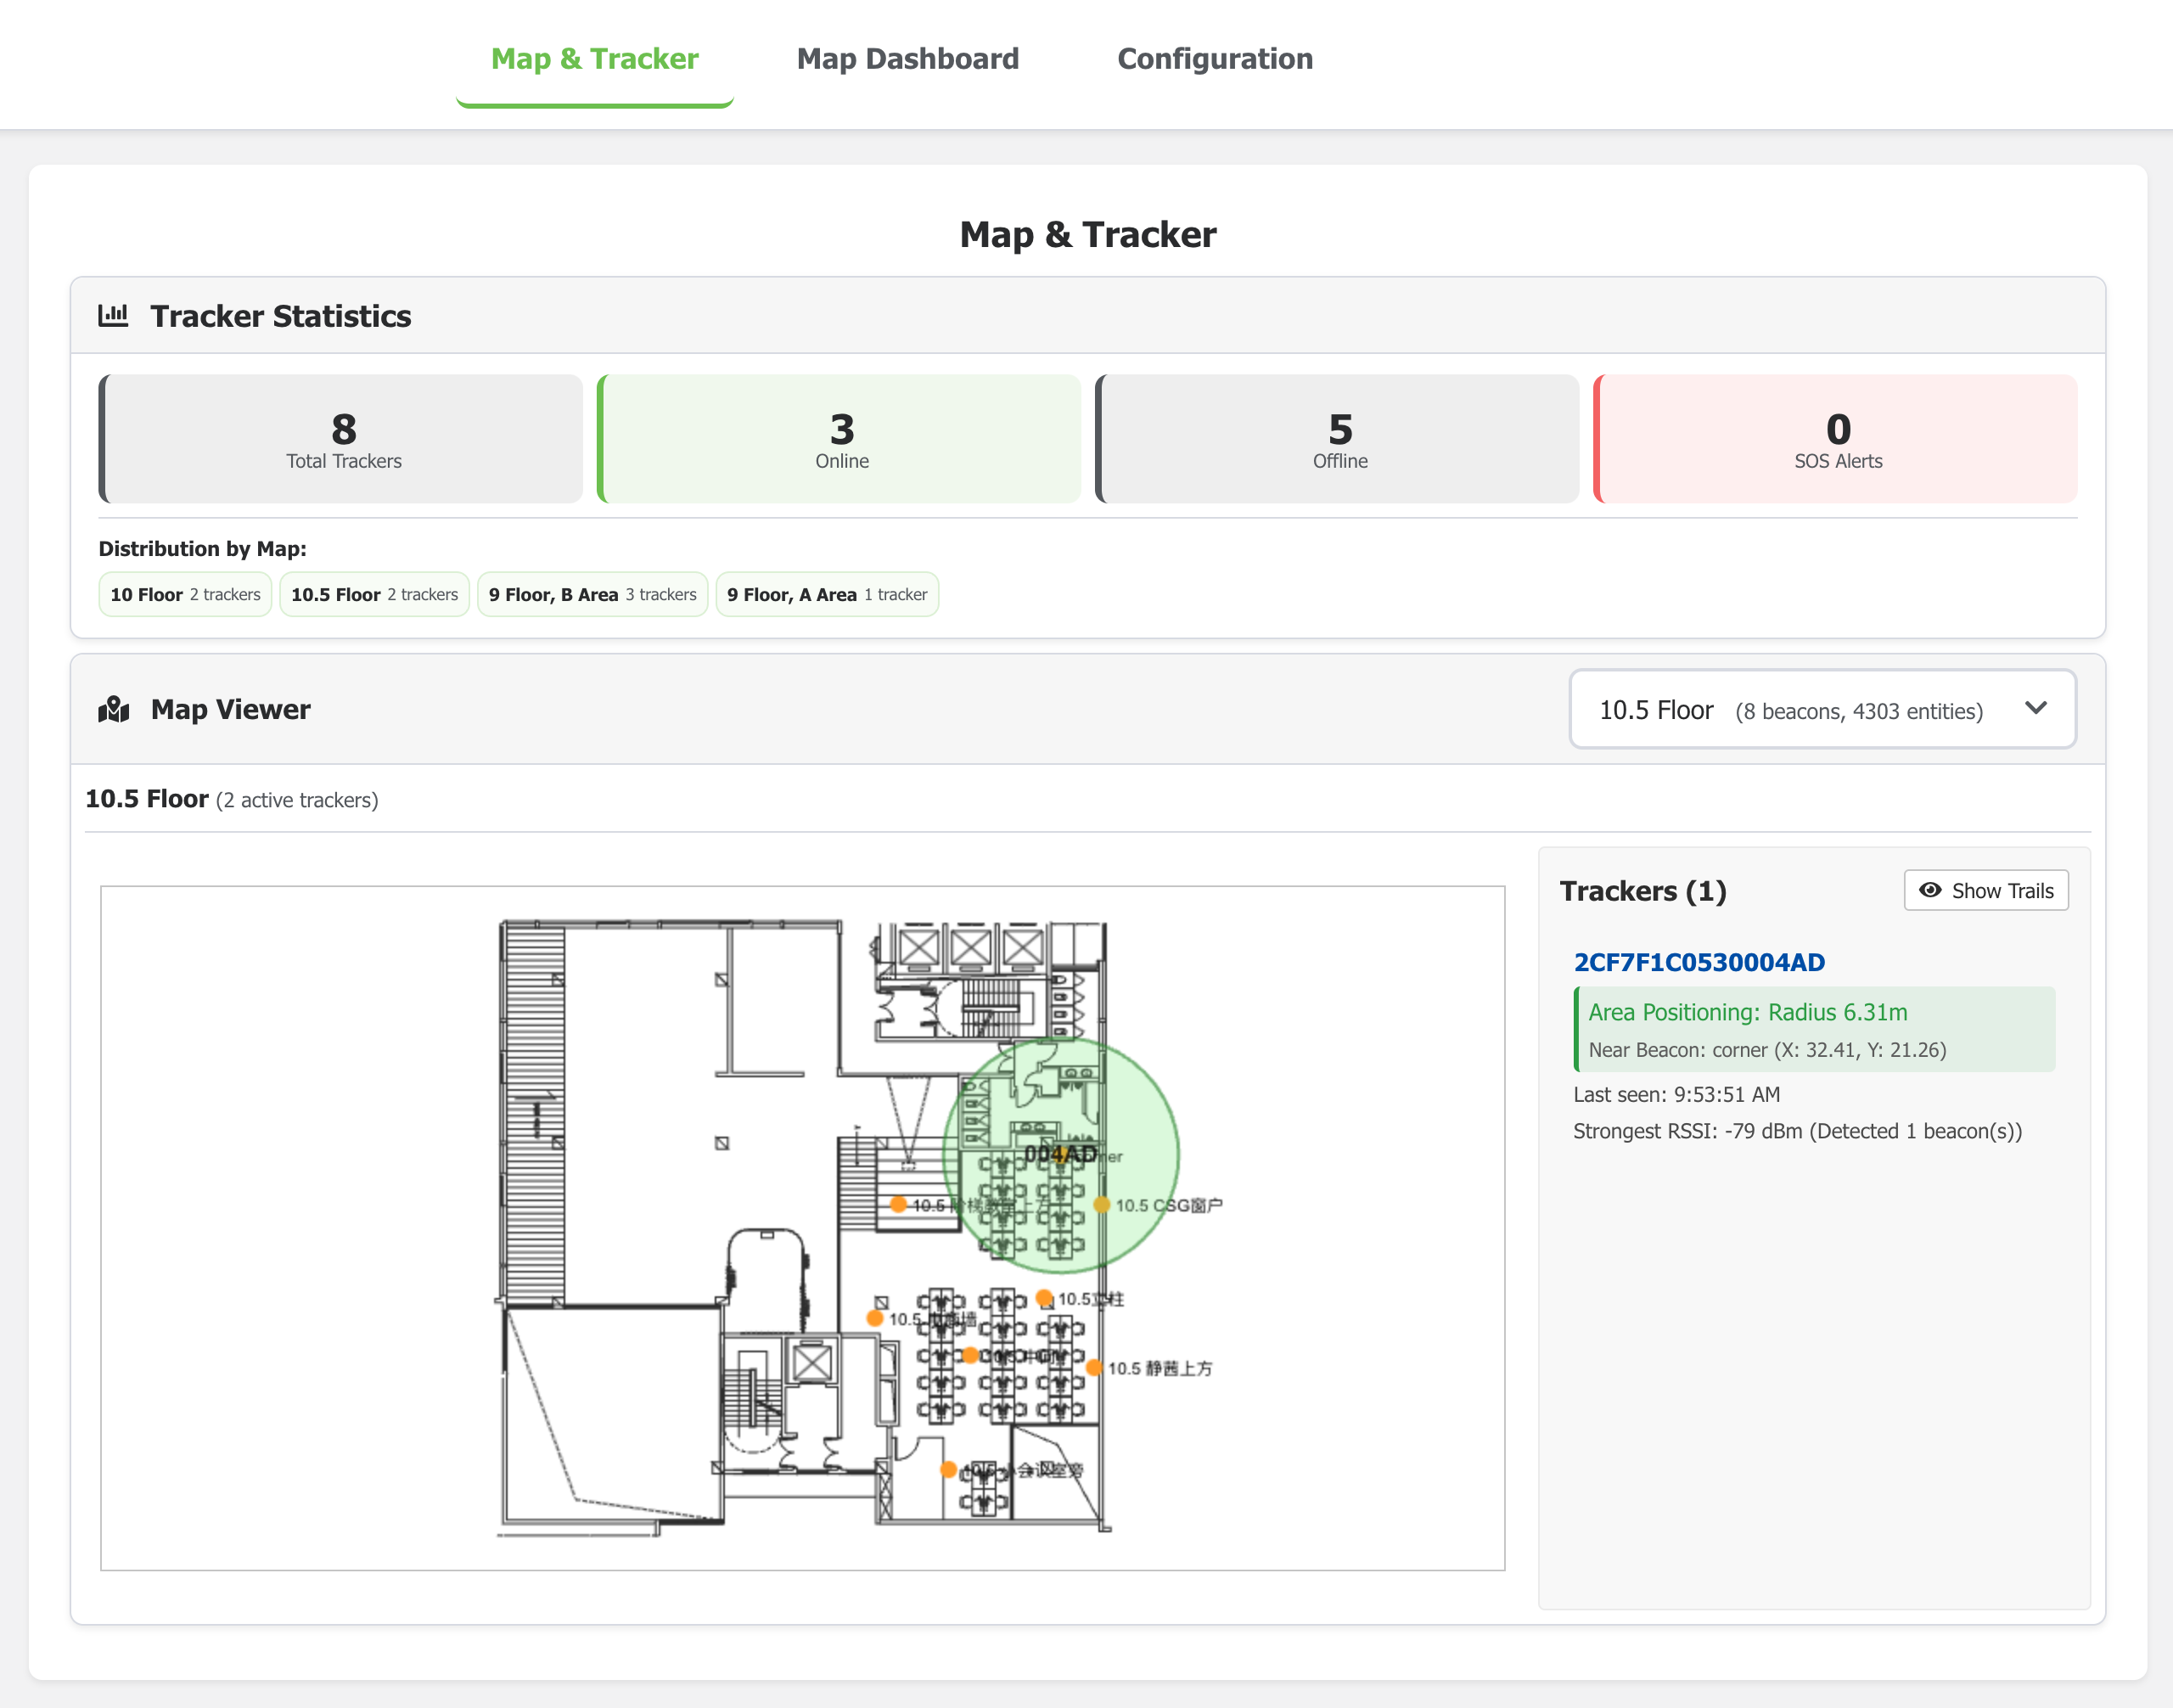
- Proximity (Area Positioning): If you enable this and the tracker can only detect one beacon, it will report its position as being "near" that beacon within a calculated radius. This is useful for ensuring coverage in all areas.
Trilateration
| Trilateration | Trilateration(SOS) |
|---|---|
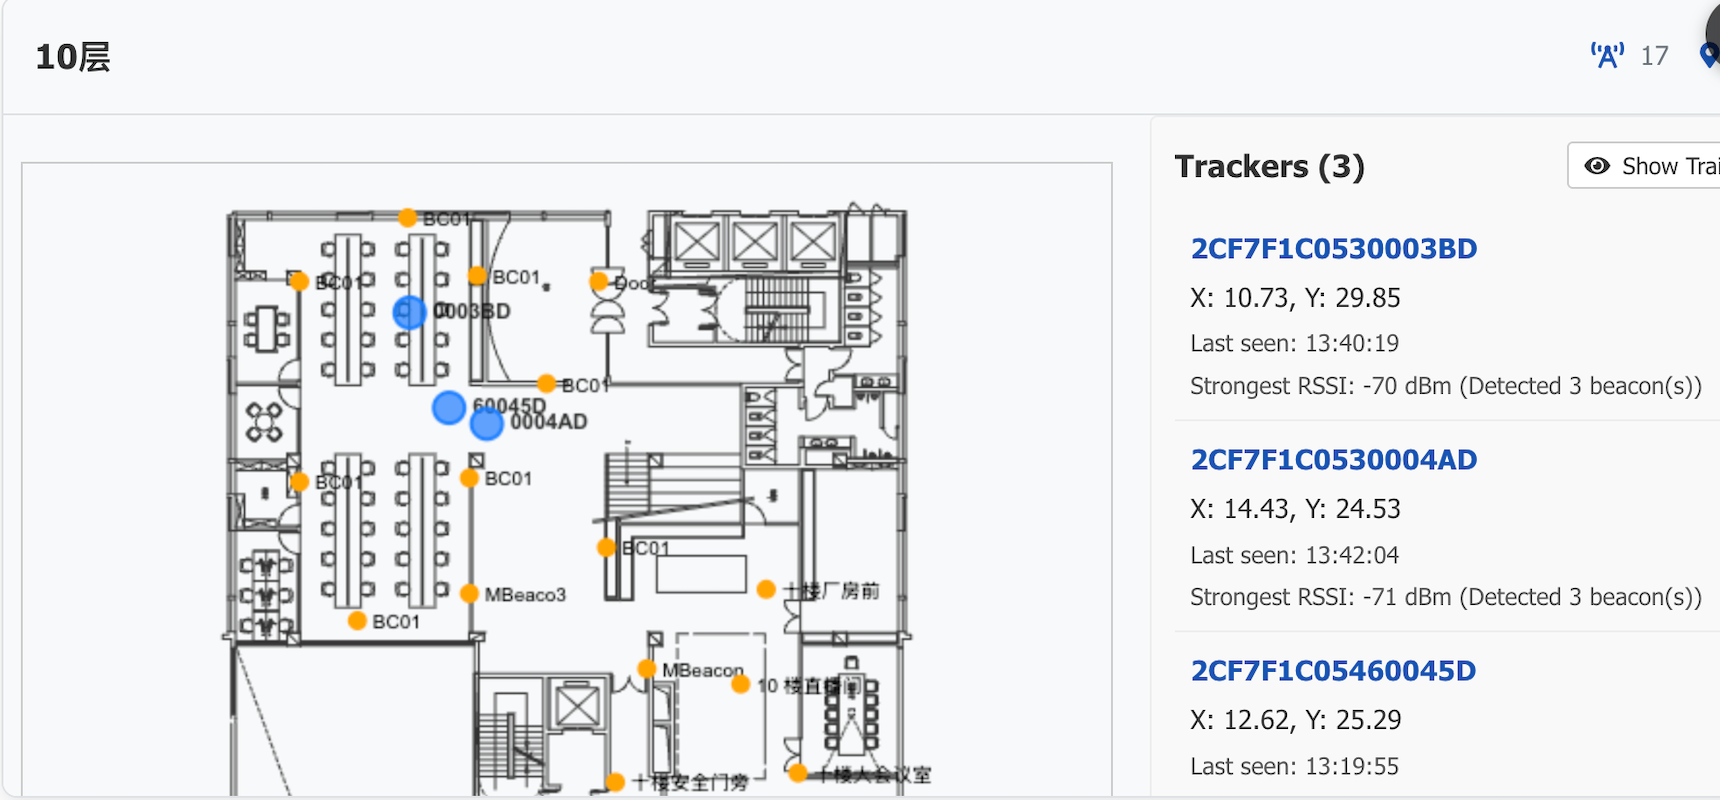 | 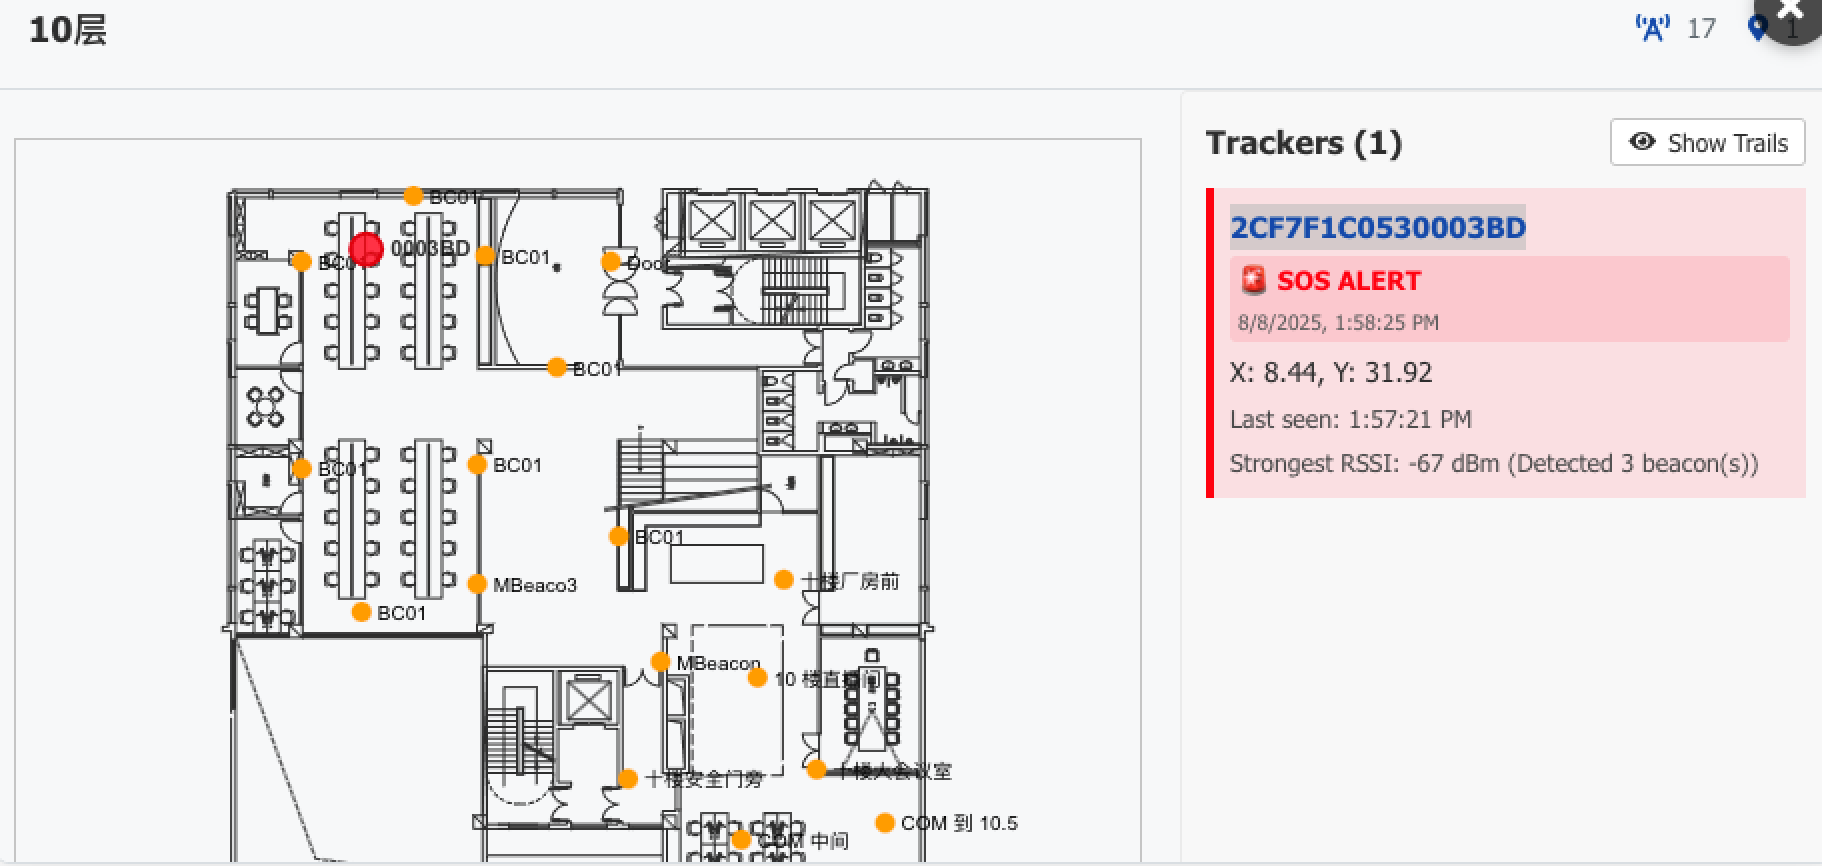 |
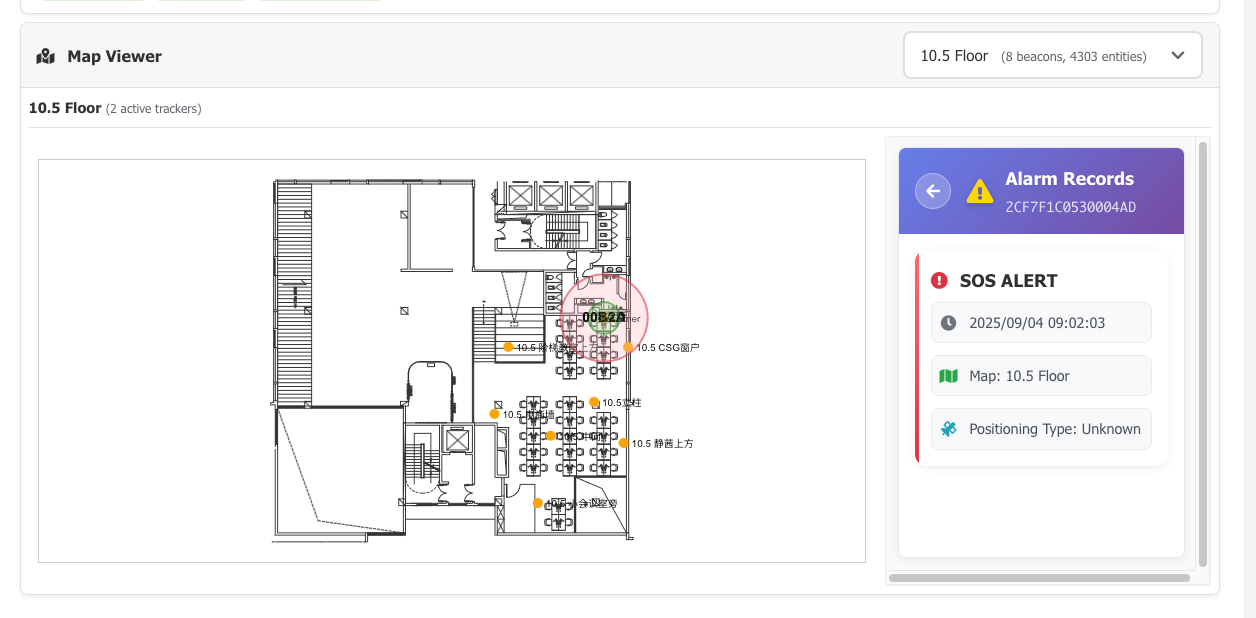
Area Positioning
| Area Positioning | Area Positioning(SOS) |
|---|---|
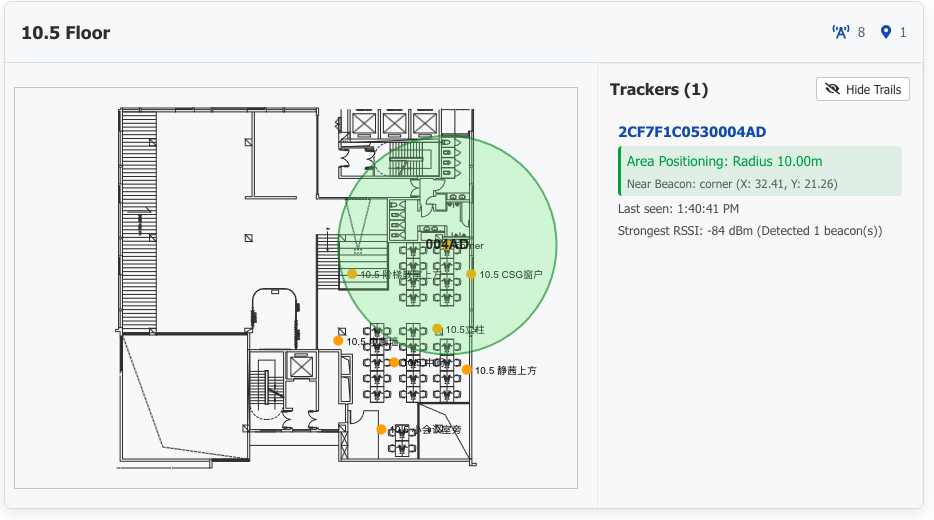 | 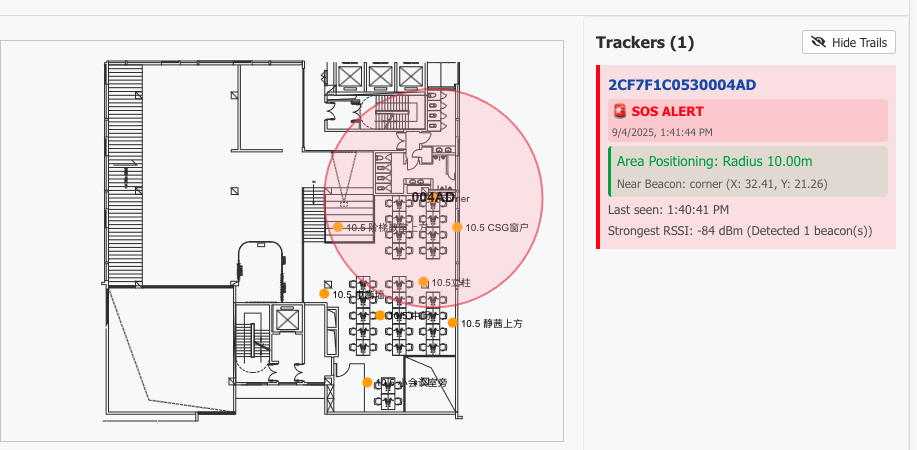 |
Feature 3: Viewing Alert History
You can view the alert history (e.g., SOS button presses) for any tracker by clicking on its icon on the map. The system logs each new alert and will continue to push notifications for an active alert until it is resolved.
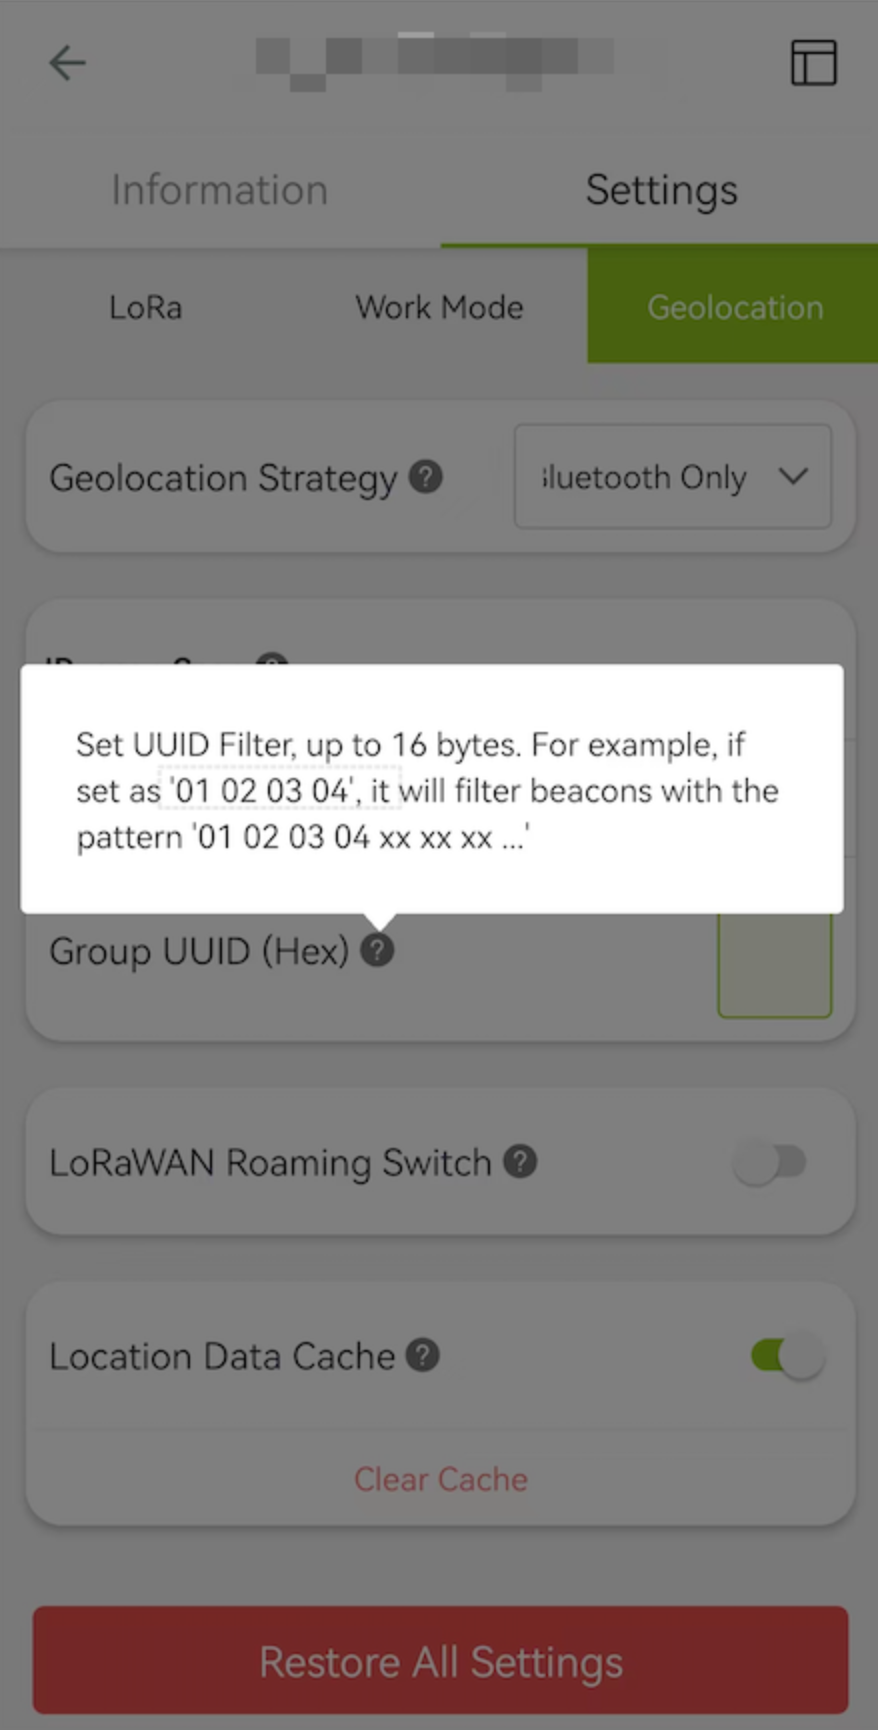
Feature 4: Filter by Beacon UUID
You can filter the displayed trackers on the map by their associated beacon UUIDs. This allows for more focused monitoring of specific areas or assets. it is valued not to be hacked.
Reference & Resource
- Landing Page: SenseCraft Indoor Positioning Solution
- Docker Image: seeedcloud/sensecraft-indoor-positioning - Docker Hub
- Live Demo Site: IndoorPositioning
Tips
Here are some useful tips to help you deploy and configure your beacons more efficiently:
1. Record Beacon Information
It is strongly recommended to record each beacon’s unique MAC address together with its installation location.
This will be crucial during the software configuration step and will help you easily identify and select the correct beacon during mapping or troubleshooting.
| MAC Address | Location | Beacon ID |
|---|---|---|
| c30000564b31 | Main Entrance | 01 |
| c30000564b32 | Warehouse Zone A | 02 |
| c30000564b33 | Corner Office | 03 |
2. Use a Consistent UUID for All Beacons
For easier management, you can use the SenseCraft app to assign a consistent UUID to all your beacons.
This ensures that your tracker only listens to your own devices and ignores other nearby beacons.
Check out Feature 4: Filter by Beacon UUID for more details.
3. Choose Stable Mounting Locations
Install beacons in fixed, open, and unobstructed areas to ensure a stable Bluetooth signal.
Avoid placing them near metal surfaces, electrical panels, or Wi-Fi routers that may cause interference.
4. Label and Secure Each Beacon
Attach a visible label (e.g., Beacon-01, Beacon-02) matching the record table to avoid confusion during maintenance.
Ensure the device is firmly mounted to prevent accidental displacement.
5. Verify Signal Range
Before finalizing placement, test the signal coverage using a BLE scanner app or configuration tool to ensure consistent detection in your target zones.
6. Quickly Add or Adjust Beacon Data
If you’re using a GeoJSON-like configuration file, you can also edit the exported map file directly to quickly add or adjust beacon data, and then re-import it into the application.
{
  "map": {
    "width": 29.53000000000094,
    "height": 22.212853765822828,
    "entities": [
      {
        "type": "polyline",
        "points": [
          [12.894968342021272, 17.07477114091087],
          [12.894968342021272, 17.114771140910868]
        ],
        "closed": false
      },
      {
        "type": "polyline",
        "points": [
          [12.944968342021284, 17.114771140910868],
          [12.894968342021272, 17.07477114091087]
        ],
        "closed": false
      }
    ]
  },
  "beacons": {
    "beacon-01": {
      "uuid": "FDA50693-A4E2-4FB1-AFCF-C6EB07647825",
      "major": 10001,
      "minor": 19641,
      "x": 26.38,
      "y": 4.4,
      "txPower": -59,
      "displayName": "Corner",
      "macAddress": "C3:00:00:58:4B:38",
    }
  }
}
Tip: Editing the JSON directly is useful when adding multiple beacons at once or fine-tuning their coordinates outside the dashboard.
FAQ
Why is my tracker not reporting its location?
- Probable Cause: There may be an issue with the LoRaWAN connectivity.
- Solution: Check the status of your LoRaWAN gateway to ensure it's online and connected. Also, verify that the tracker's Device EUI is correctly registered on your network server.
Why is the tracker's position inaccurate?
- Probable Cause: The placement of your BLE beacons might be causing interference or weak signal coverage.
- Solution: Try adjusting the transmission power of the beacons. You may also need to relocate them to reduce signal obstruction from walls or machinery.
Why is the tracker's battery draining so quickly?
- Probable Cause: The reporting frequency is set too high, causing the device to transmit data more often than necessary.
- Solution: Optimize the motion detection settings to only report when the tracker is moving. You can also increase the reporting interval (the time between location updates) to conserve power.
Why is location data missing or not showing up?
- Probable Cause: There could be a problem with the database or API, often related to how the data payload is being interpreted.
- Solution: First, verify that the payload decoder on your application server is correct and working. If the decoder is correct, check the application server logs for any errors or connectivity issues.
Why are SOS alerts not being received promptly?
- Probable Cause: The LoRaWAN network may be congested, or the device class isn't suitable for urgent messages.
- Solution: For time-critical applications like SOS alerts, ensure your tracker is configured to use Class C mode. This keeps the device's receiver on continuously, allowing for immediate reception of messages from the server.
How do I adjust the advertising interval and transmission power of a BC01 beacon?
You can use the SenseCraft app to configure the BC01 beacon.
- Install the SenseCraft app from the Google Play Store or Apple App Store.
- Open the app and enable Bluetooth on your phone.
- Scan for nearby beacons and select the one you wish to configure.
- Enter the default password "seeed123" to access the settings.
- Adjust the advertising interval (100ms to 10s) and transmission power (-30dBm to +4dBm) to your needs.
- Save the changes.
CHANGELOG
2025-11-10:
- Reworked the beacon deployment and gateway setup guidance to clarify placement best practices, reference materials, and network-server specific instructions for SenseCraft Data and ChirpStack.
- Expanded the runtime configuration plus map/beacon setup sections with clearer UI guidance, GeoJSON import samples, and optional tuning tips for environmental factors.
- Added a dedicated Tips section covering beacon record keeping, UUID management, mounting, validation, and bulk editing so deployments are easier to scale and troubleshoot.