Smart Retail Voice AI
Leverage Seeed's Smart Retail Voice AI solution to capture and analyze in-store customer conversations. Our edge AI technology enables on-device speech-to-text processing, transforming voice data into actionable insights without relying on cloud services. Enhance customer experience, optimize store operations, and gain valuable feedback with our offline AI-powered voice analytics tailored for retail environments.
| Smart Retail Voice AI |
|---|
 |
Smart Retail Voice AI
Build an in-store voice analytics pipeline using edge devices and SenseCraft Voice to capture conversations on-site, run on-device speech-to-text, and turn customer voice into structured data.
On-Device Speech-to-Text at the Edge
SenseCraft Voice runs directly on in-store edge devices to handle voice activity detection and speech recognition locally. All speech is processed at the edge, dramatically reducing dependency on cloud connectivity for real-time transcript generation.
Far-Field, Retail-Ready Audio Capture
The solution is designed for far-field audio capture in noisy retail environments. With support for microphone arrays, beamforming, and noise suppression, it focuses on real customer–staff conversations even with background music and surrounding chatter.
Privacy-First Edge Architecture
Because audio is transcribed locally on edge devices and only text plus metadata are sent upstream, retailers can better control privacy and compliance risks, while keeping cloud costs and network requirements low.
From Conversations to Data-Driven Decisions
Transcripts generated by SenseCraft Voice become structured, analyzable data. Retailers can measure service quality, identify common questions and pain points, and continuously improve scripts, policies, and overall store experience.
Getting Started
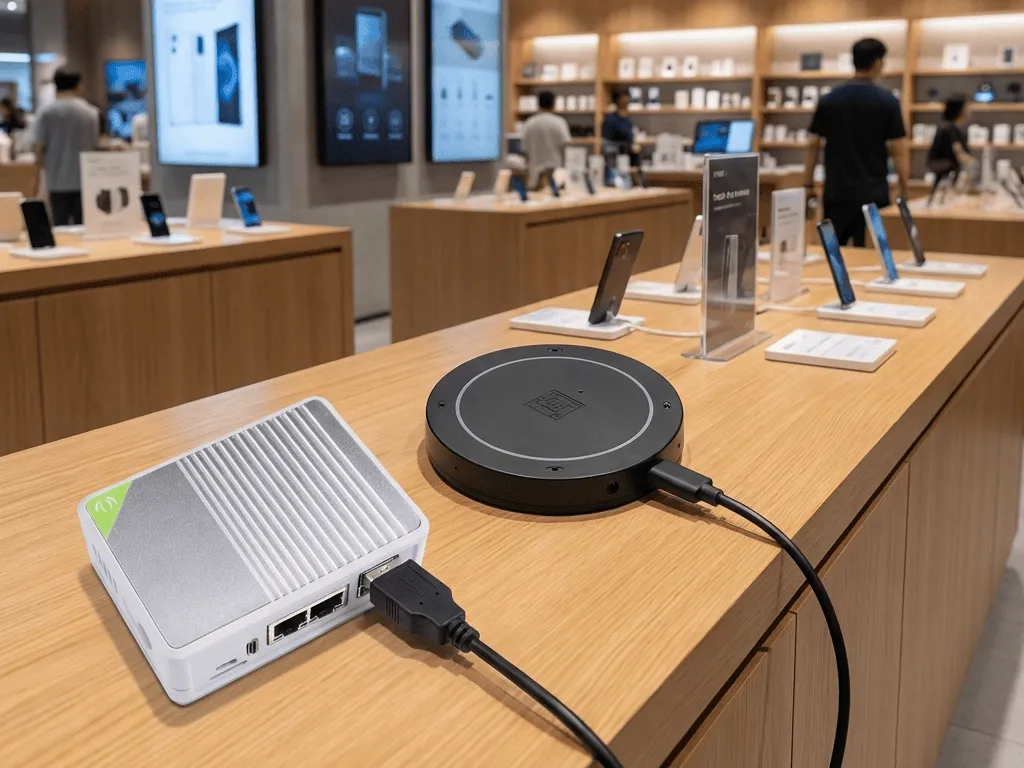
In this section, we will guide you through the steps to set up the Smart Retail Voice AI solution using Seeed's reRouter and reSpeaker XVF3800 microphone array.
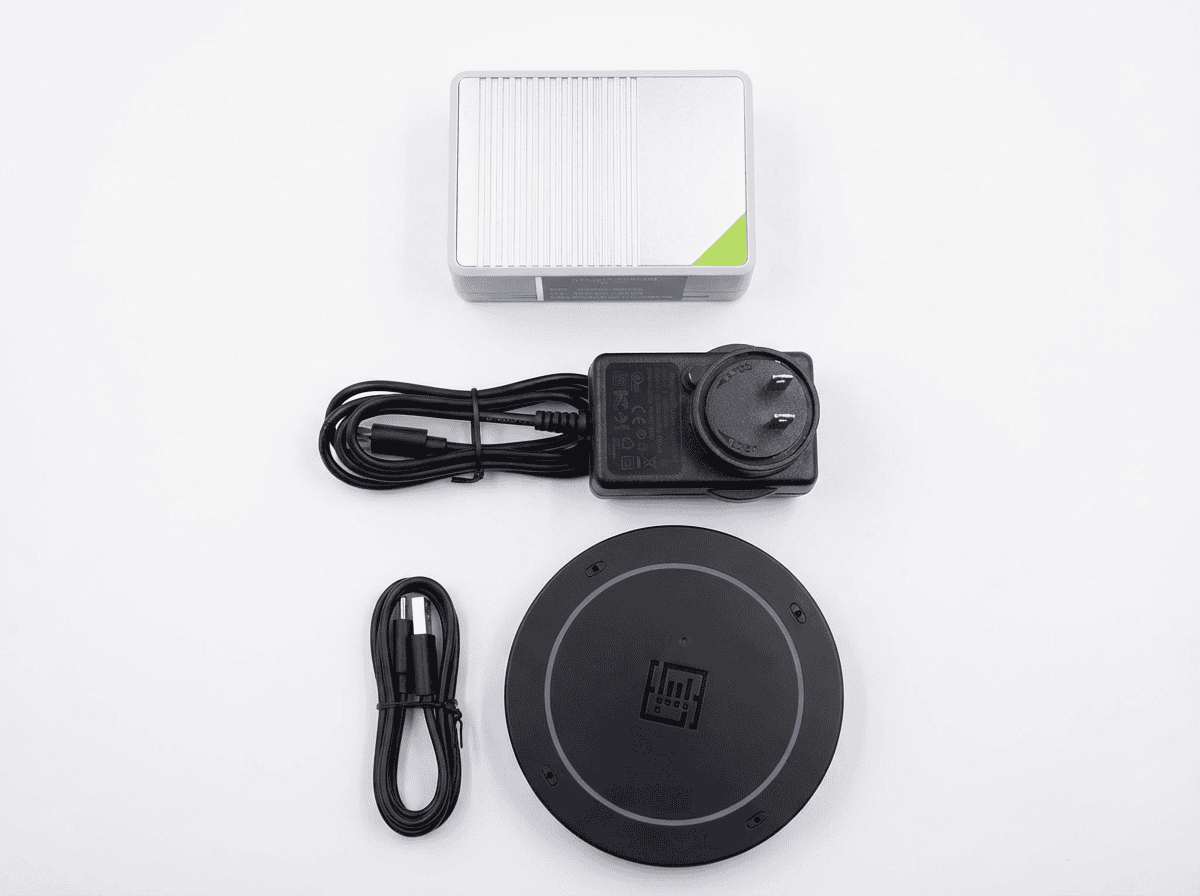
1. Hardware Requirements
This guide uses Seeed's reRouter and the reSpeaker XVF3800 microphone array to demonstrate how to build a Smart Retail Voice AI solution.
| reRouter (Edge Compute) | reSpeaker XVF3800 (Audio Capture) |
|---|---|
 |  |
Role: Processing Unit
| Role: Voice Capture
|
Hardware Setup
1.1 Get reRouter Firmware
There are two versions of the OpenWrt firmware available for reRouter:
one for global users, and another optimized for users in Mainland China.
The current firmware is based on OpenWrt 24.10.3 (Build r28872).
- Global
- Chinese Mainland
Please refer to the reRouter flashing guide for detailed instructions on the flashing procedure.
Note that: you should use the firmware provided above, not the one from the guide page.
1.2. Hardware Connection
Please connect the reRouter as follows:
- Internet Access: Connect an Ethernet cable from your router/modem to the WAN port.
- Host Connection: Connect wirelessly to the Wi-Fi hotspot named
OpenWrt-XXXXor connect your computer to the LAN port via Ethernet.
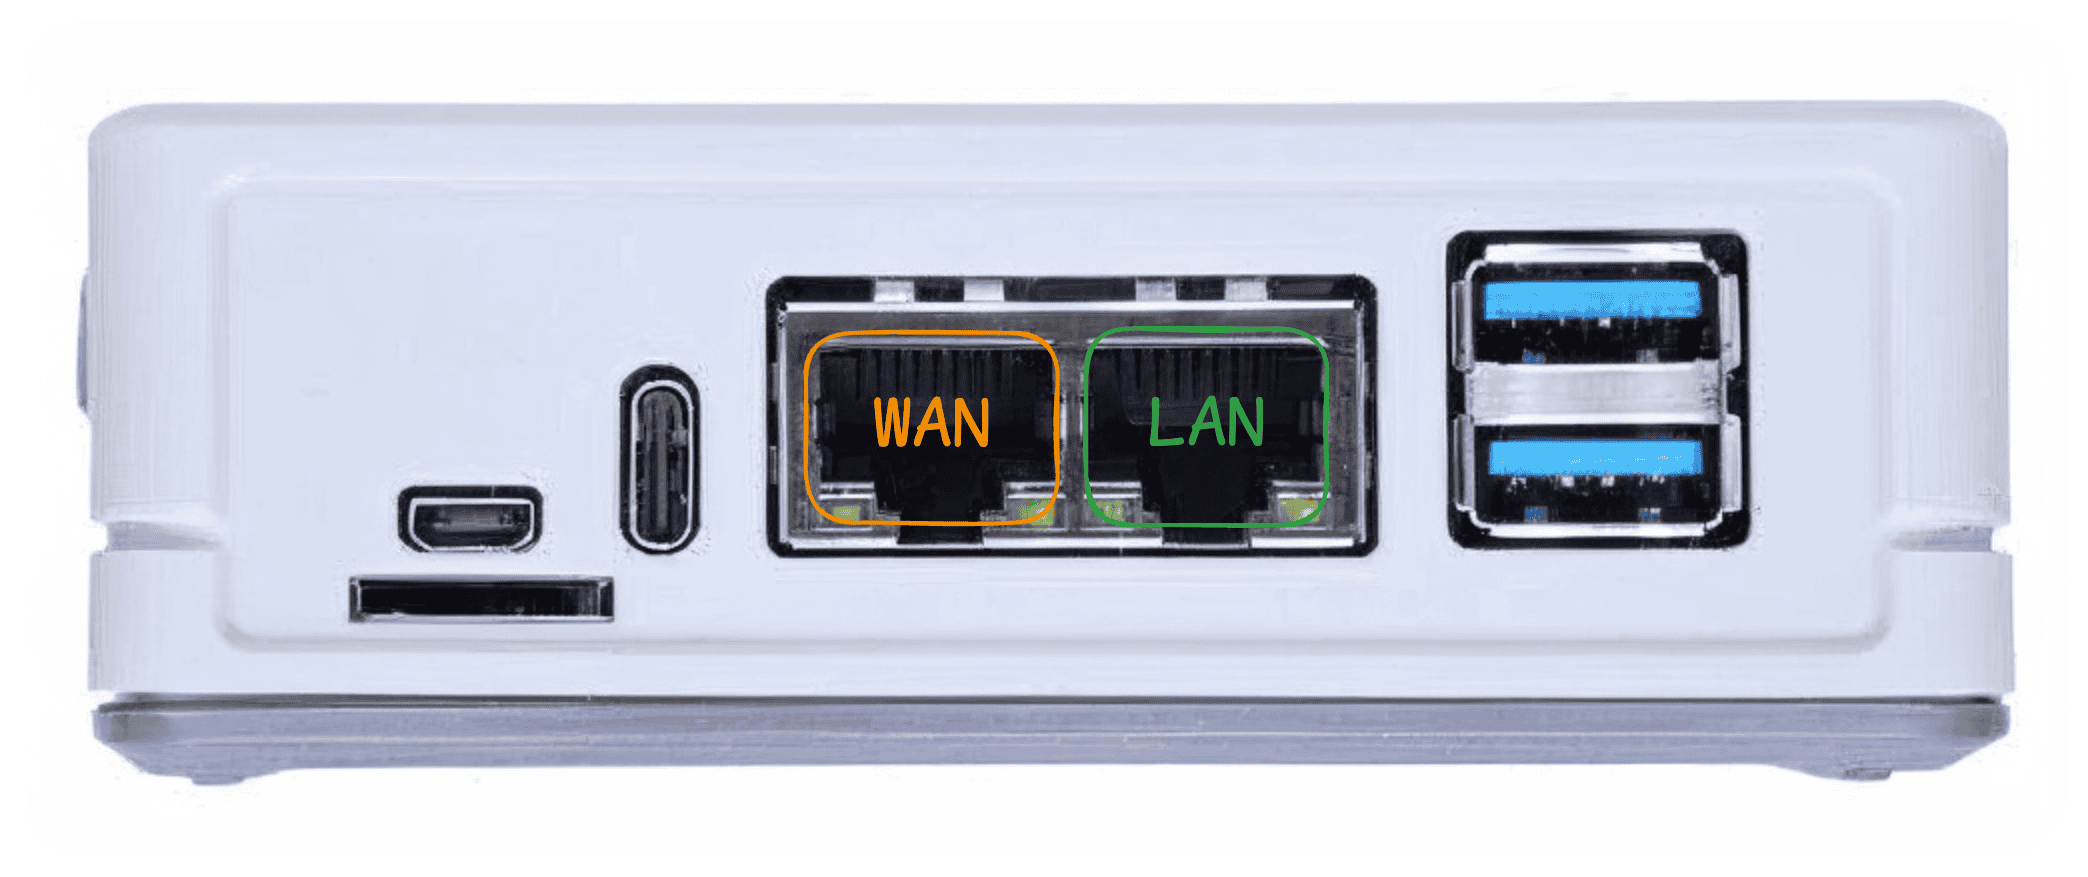
- WAN Port: Connects to the internet.
- LAN Port: Connects to your host computer for configuration.
1.3. reSpeaker XVF3800 Setup
Connect the reSpeaker XVF3800 microphone array to your host device via USB to configure.
- Linux/MacOS
- Windows
- Clone the repository and navigate to the control folder:
Depending on your device, replace <YOUR_HOST_DIR> with the folder matching your system (e.g., linux_x86_64, rpi_64bit, mac_arm64, or jetson).
git clone https://github.com/respeaker/reSpeaker_XVF3800_USB_4MIC_ARRAY.git
cd reSpeaker_XVF3800_USB_4MIC_ARRAY/host_control/<YOUR_HOST_DIR>
- Execute the configuration sequence:
Grant execution permissions and run the following three commands to initialize the device (use sudo if required on Linux):
chmod +x ./xvf_host

# 1. Clear existing configuration
sudo ./xvf_host clear_configuration 1

# 2. Enable specific audio manager setting
sudo ./xvf_host audio_mgr_op_r 8 0

# 3. Save configuration
sudo ./xvf_host save_configuration 1
- Clone the repository and navigate to the control folder:
Open Command Prompt (cmd) or PowerShell and run:
git clone https://github.com/respeaker/reSpeaker_XVF3800_USB_4MIC_ARRAY.git
cd reSpeaker_XVF3800_USB_4MIC_ARRAY\host_control\win32
- Execute the configuration sequence:
Run the following three commands to initialize the device:
# 1. Clear existing configuration
.\xvf_host.exe clear_configuration 1

# 2. Enable specific audio manager setting
.\xvf_host.exe audio_mgr_op_r 8 0

# 3. Save configuration
.\xvf_host.exe save_configuration 1
2. Software Installation
2.1. Prerequisites
Before starting, ensure the following conditions are met:
- Access: Root access to your OpenWrt device via SSH (e.g.,
ssh [email protected]). - Network: The OpenWrt device has a stable internet connection.
- Audio: The reSpeaker XVF3800 is connected to reRouter.
2.2 Accessing the Device
Once your computer is connected to the reRouter (via LAN or Wi-Fi), you can access the system using the following defaults:
- SSH Access:
By default, no password is set for the root user.
You can also use the OpenWrt web interface to configure network settings, including connecting the reRouter to your Wi-Fi or Ethernet network for internet access.
- Open a browser and visit: http://192.168.49.1
- Username: root
- Password: (none / empty by default)
If you need other language support, such as Chinese, you can install the luci-i18n-base-zh-cn package via the web interface or SSH.
opkg update
opkg install luci-i18n-base-zh-cn
Before proceeding to the installation steps below, please verify that the reRouter can access the internet (for example, run ping google.com or ping openwrt.org in the SSH terminal).
2.3 Step-by-Step Installation
Execute the following commands sequentially after establishing an SSH connection to your OpenWrt device.
Step 1: Install Docker and Dependencies
This step installs the container runtime environment and necessary tools, including the SHA-256 checksum utility for file verification.
- Global
- Chinese Mainland
# 1. Update the local package list
opkg update

# 2. Install Docker core components
# Note: On some systems, you might need to install these separately: dockerd, docker, containerd, runc
opkg install dockerd docker containerd runc

# 3. Install utility packages
opkg install wget-ssl unzip ca-certificates

# 4. Enable and start the Docker daemon service
/etc/init.d/dockerd enable
/etc/init.d/dockerd start

# Optional: verify downloaded files
# sha256sum <filename>
# For users in Mainland China, switch to Tsinghua University mirror for faster package downloads
sed -i 's_https\?://downloads.openwrt.org_https://mirrors.tuna.tsinghua.edu.cn/openwrt_' /etc/opkg/distfeeds.conf

# 1. Update the local package list
opkg update

# 2. Install Docker core components
# Note: On some systems, you might need to install these separately: dockerd, docker, containerd, runc
opkg install dockerd docker containerd runc

# 3. Install utility packages
opkg install wget-ssl unzip ca-certificates

# 4. Enable and start the Docker daemon service
/etc/init.d/dockerd enable
/etc/init.d/dockerd start

# Optional: verify downloaded files
# sha256sum <filename>
Step 2.2: Prepare Data Directories and Configuration
Create the persistent storage directories required by the SenseCraft containers and download the default configuration file.
# 1. Create required application data directories
mkdir -p /data-iot/respeaker/recordings \
         /data-iot/respeaker/models \
         /data-iot/respeaker/voiceprints \
         /data-iot/respeaker/logs

# 2. Navigate to the base directory
cd /data-iot/respeaker

# 3. Download the configuration file
wget -q -O config.yaml 'https://appstore.seeed-fleet.com/config.yaml'
Step 2.3: Download and Extract Models
We will download the pre-trained ASR model package directly from the Seeed Studio server, verify its integrity using SHA-256, and extract it.
| File | URL |
|---|---|
models.zip | https://files.seeedstudio.com/wiki/solution/ai-sound/reRouter-firmware-backup/models.zip |
| Expected SHA-256 Hash | 7b9e7606a2ddcad56f3f72a77b16eb2c60437ae4bfc3f1423bd33db177385c9d |
Execute the following commands on the OpenWrt host via SSH:
# 1. Navigate to the base directory
cd /data-iot/respeaker

# 2. Define the Model URL
MODEL_URL="https://files.seeedstudio.com/wiki/solution/ai-sound/reRouter-firmware-backup/models.zip"

# 3. Download the large model package.
# -c allows the download to resume if interrupted.
wget -O models.zip -c "$MODEL_URL"
echo "Model package download completed. Check file size is approximately 500MB."

# 4. Verify the file integrity using SHA-256 Checksum
# The result MUST match the expected hash above.
sha256sum models.zip

# 5. Extract the model package into the 'models' directory
unzip -o models.zip

# 6. Clean up the temporary ZIP file
# rm -f models.zip

# 7. Verify the model files are present
ls -l /data-iot/respeaker/models/
Step 2.4: Configure Audio Device Permissions
The Voice Client container requires privileged access to the audio devices. Ensure the device files have appropriate permissions.
# 1. Check for audio devices
ls -l /dev/snd/

# 2. Set read/write permissions for all users on audio device nodes
chmod -R 666 /dev/snd/*
Step 2.5: Deploy Docker Containers
Define the image variables and launch the three required services: sensecraft-voice-client, sensecraft-asr-server, and watchtower.
# Define Image Variables
VOICE_CLIENT_IMAGE="sensecraft-missionpack.seeed.cn/respeaker/sensecraft-voice-client:v0.0.2"
ASR_SERVER_IMAGE="sensecraft-missionpack.seeed.cn/respeaker/sensecraft-asr-server:latest"
WATCHTOWER_IMAGE="sensecraft-missionpack.seeed.cn/respeaker/containrrr/watchtower:latest"

# 1. Pull Images
docker pull $VOICE_CLIENT_IMAGE
docker pull $ASR_SERVER_IMAGE
docker pull $WATCHTOWER_IMAGE

# 2. Stop and remove any containers with the same names
docker rm -f sensecraft-voice-client sensecraft-asr-server watchtower

# 3. Launch sensecraft-voice-client
docker run -d --name sensecraft-voice-client \
    --restart=unless-stopped \
    --privileged \
    --device /dev/snd \
    --network host \
    --group-add audio \
    --group-add video \
    --cap-add SYS_ADMIN \
    --cap-add SYS_RAWIO \
    -e TZ=Asia/Shanghai \
    -e AUDIO_CARD_ID=1 \
    -e AUDIO_DEVICE_ID=0 \
    -v /etc/wpa_supplicant:/etc/wpa_supplicant \
    -v /etc/network:/etc/network \
    -v /var/run/dbus:/var/run/dbus \
    -v /dev:/dev \
    -v /run/udev:/run/udev:ro \
    -v /proc:/proc:ro \
    -v /sys:/sys:ro \
    -v /data-iot/respeaker/recordings:/app/recordings \
    -v /data-iot/respeaker/voiceprints:/app/voiceprints \
    -v /data-iot/respeaker/logs:/app/logs \
    -e WIFI_INTERFACE=wlan0 \
    -e WIFI_CONFIG_PATH=/etc/wpa_supplicant \
    $VOICE_CLIENT_IMAGE

# 4. Launch sensecraft-asr-server (model server)
docker run -d --network host \
    -v /data-iot/respeaker/models:/app/models \
    -v /data-iot/respeaker/voiceprints:/app/data \
    --restart=always \
    --name=sensecraft-asr-server \
    $ASR_SERVER_IMAGE

# 5. Launch watchtower (for continuous container monitoring and update)
docker run -d --name watchtower \
    --restart always \
    -v /var/run/docker.sock:/var/run/docker.sock \
    $WATCHTOWER_IMAGE \
    --cleanup -i 60 sensecraft-asr-server sensecraft-voice-client
3. Verification
Check the final state of the deployment.
# Check container status (All three should show Status: Up)
docker ps

# Check the voice client logs for successful initialization and audio device detection
docker logs sensecraft-voice-client
If the logs indicate successful starting without critical errors, the SenseCraft services are successfully deployed.
it is highly recommended to reboot the device to ensure all settings, permissions, and network configurations are fully loaded and recognized by the system.
reboot
After reboot, you navigate to http://192.168.49.1:8090 to access the Edge Client interface for real-time ASR transcription and device configuration. For detailed usage of the SenseCraft Voice platform, please refer to the User Guide section below.
SenseCraft Voice: Edge-to-Cloud Platform Overview
SenseCraft Voice is a cutting-edge platform designed to transform raw audio data captured at the edge (reRouter) into actionable business intelligence through powerful AI analysis and centralized management.
The platform's unique edge-cloud architecture provides unparalleled reliability, speed, and analytical depth for enterprise-grade audio monitoring solutions.
| Feature | Value Proposition | Key Advantages |
|---|---|---|
| Resilient Edge Processing | Guarantees continuous operation and low latency. | Voice ASR and recognition run locally on the reRouter, ensuring real-time response and data collection even during network outages. |
| Deep AI Customization | Adapts the platform to specific business needs and terminology. | Administrators can define custom Keywords, Synonyms, and AI Prompts to direct AI analysis and ensure accurate event detection specific to their business language. |
| Granular Location Mapping | Simplifies large-scale deployment management. | Supports hierarchical organization of thousands of edge devices by Store, Location, and Device Name, moving beyond confusing MAC addresses for easy filtering and reporting. |
| Actionable Dashboards | Provides immediate business insight and performance tracking. | Centralized Dashboard features Multi-Store Filtering, real-time Device Online Rate, and Keyword Hotspot Analysis to monitor operational status and business events instantly. |
The SenseCraft Voice solution is built upon a robust edge-cloud architecture, ensuring both real-time local processing and centralized management. The service consists of two primary components: the Edge-side Client running on the reRouter, and the Cloud/Server-side Management Platform.
User Guide
Edge-side Client (reRouter) Access
The Edge Client is essential for real-time validation and local setup.
- Access: Open your web browser and navigate to the reRouter's IP address on port 8090:
http://192.168.49.1:8090. - Core Function: The interface provides real-time ASR transcription (to verify audio input), controls for Voiceprint Recognition (speaker identification), and Device Configuration (network settings, upstream server address).
| Module Name | Description | Interface Screenshot |
|---|---|---|
| Voice ASR | Description: Displays the current operational status of the local Automatic Speech Recognition (ASR) service. Purpose: Provides real-time transcription of detected speech, essential for verifying local audio input and recognition accuracy. | 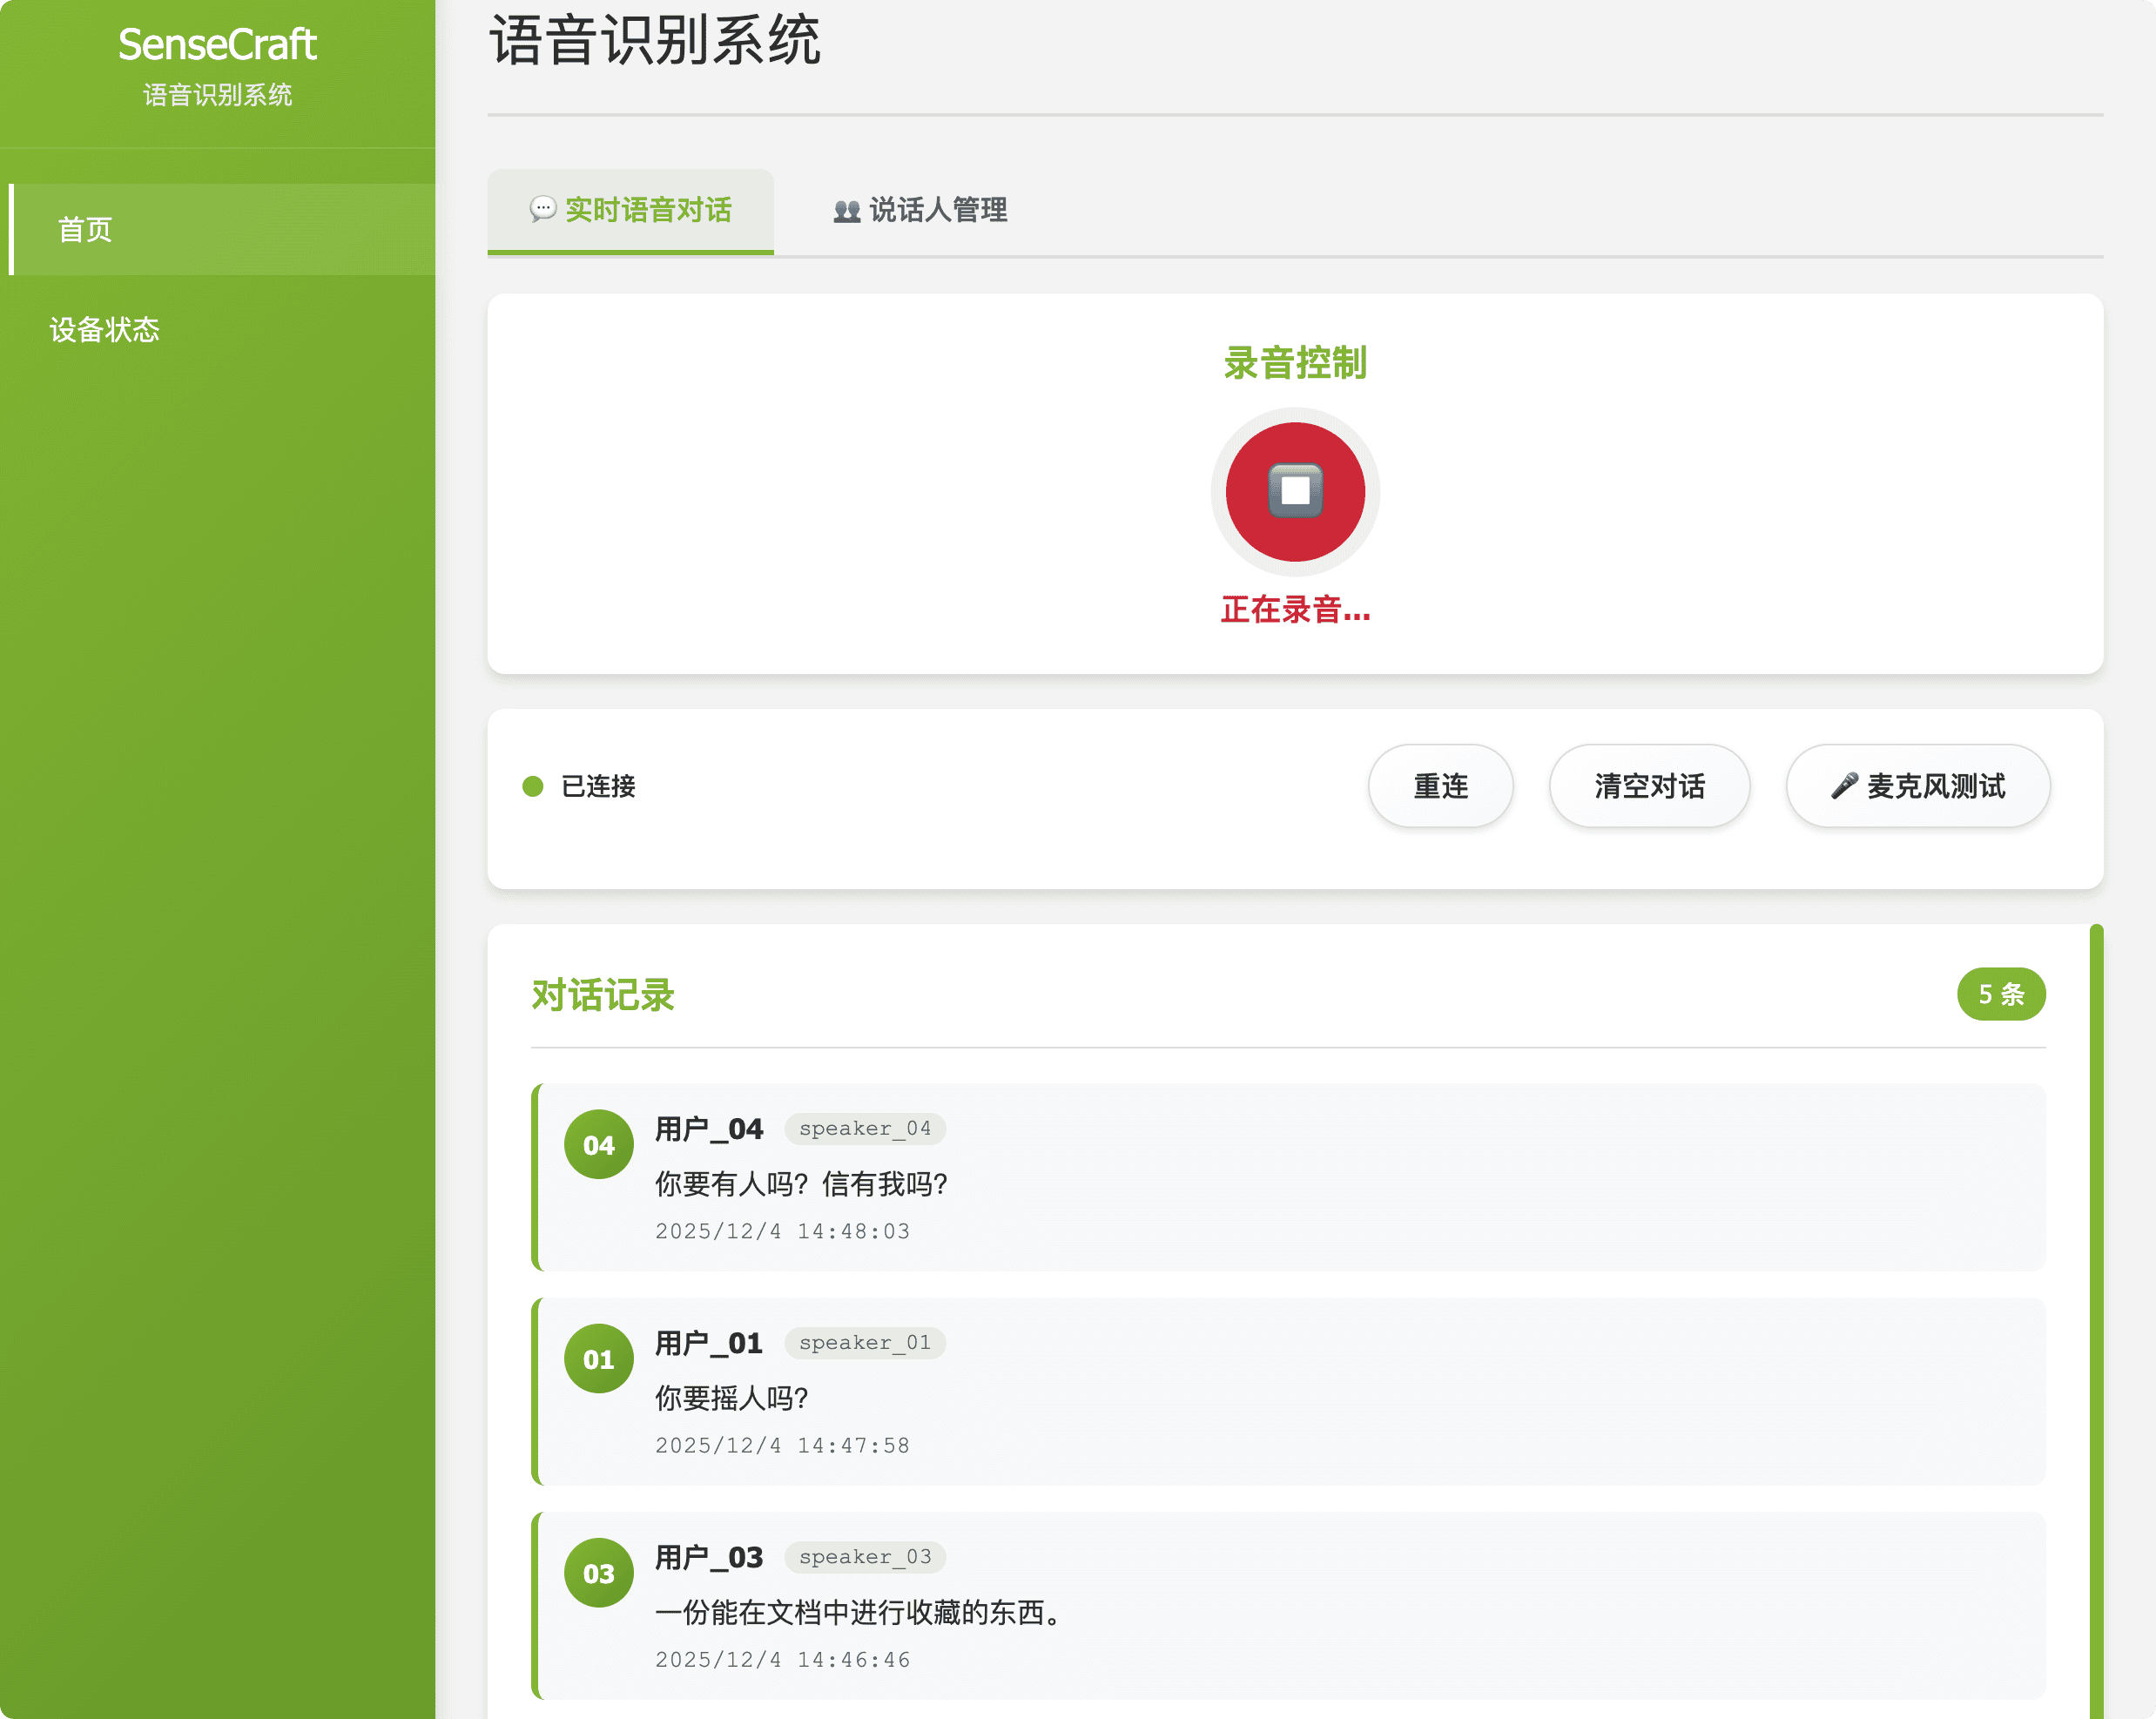 Figure 1: Voice ASR Module |
| Voiceprint Recognition | Description: Manages and monitors the Voiceprint Recognition system. Purpose: Automatically generates unique voiceprints from audio recordings to enable speaker differentiation and identification. | 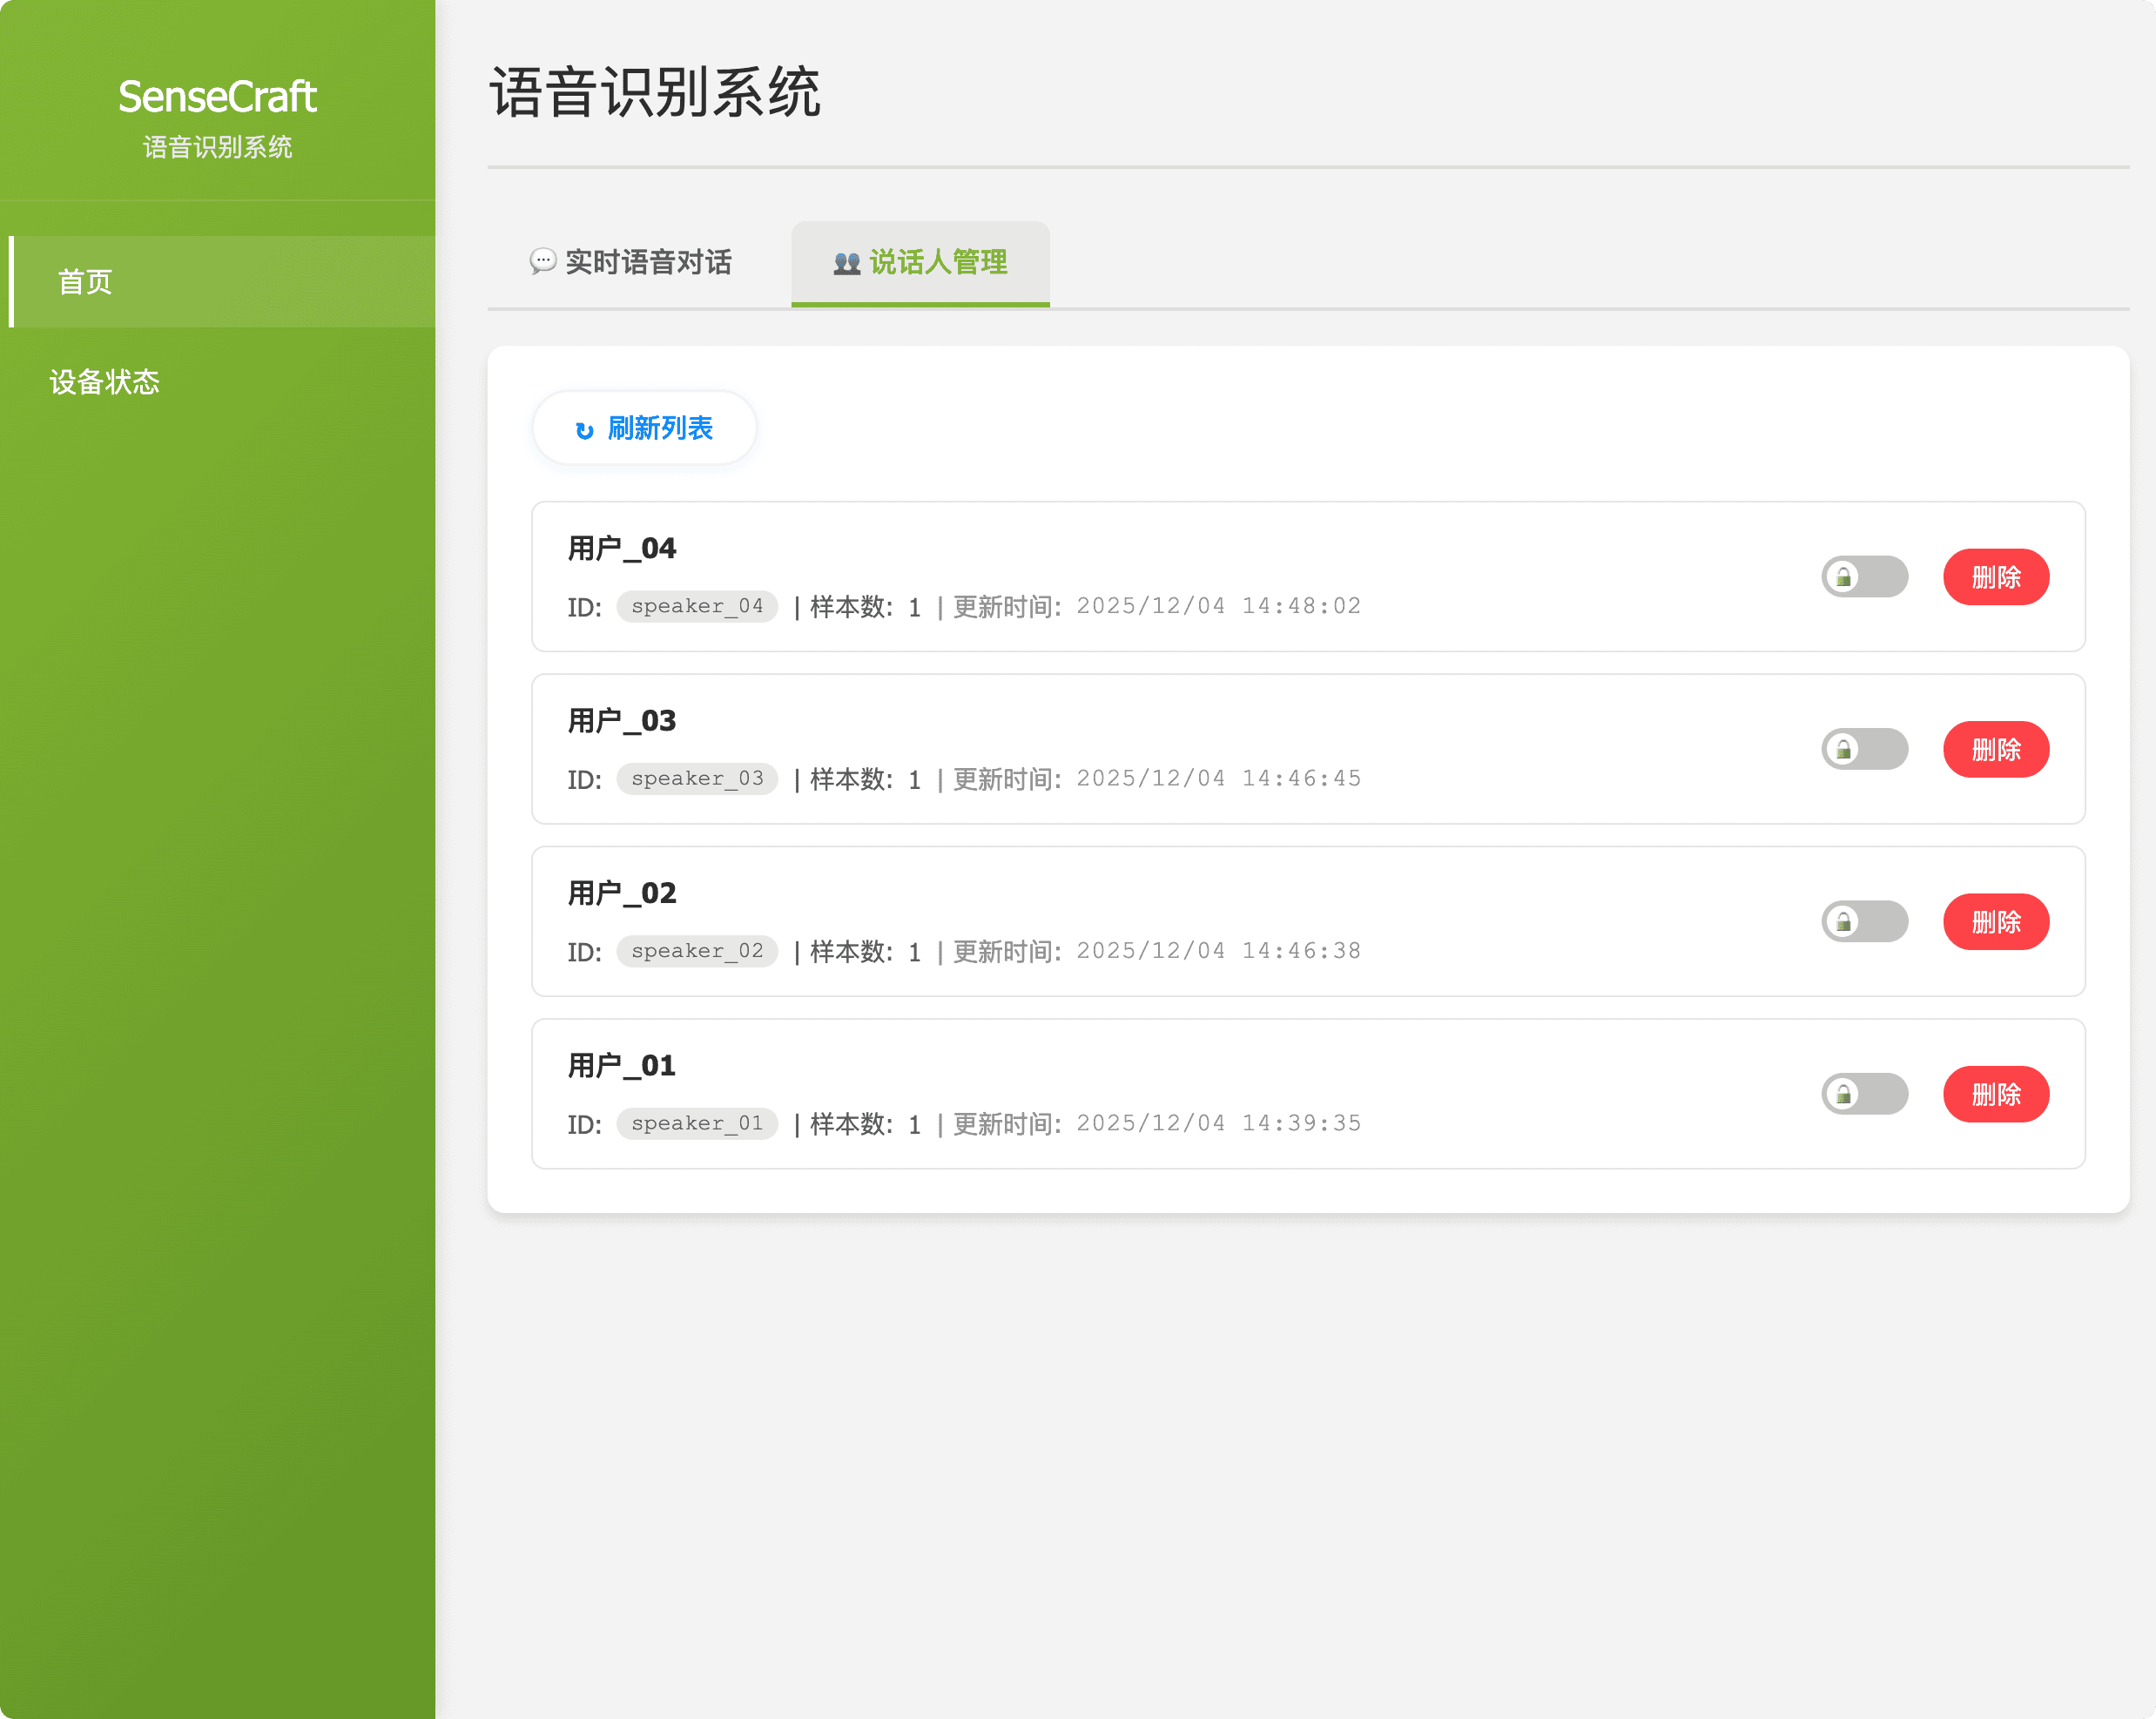 Figure 2: Voiceprint Recognition Module |
| Device Status & Configuration | Description: Provides detailed information about the reRouter's operating status and allows core parameter changes. Purpose: Enables configuration updates such as network settings (Wi-Fi) and changing the upstream server address for cloud communication. | 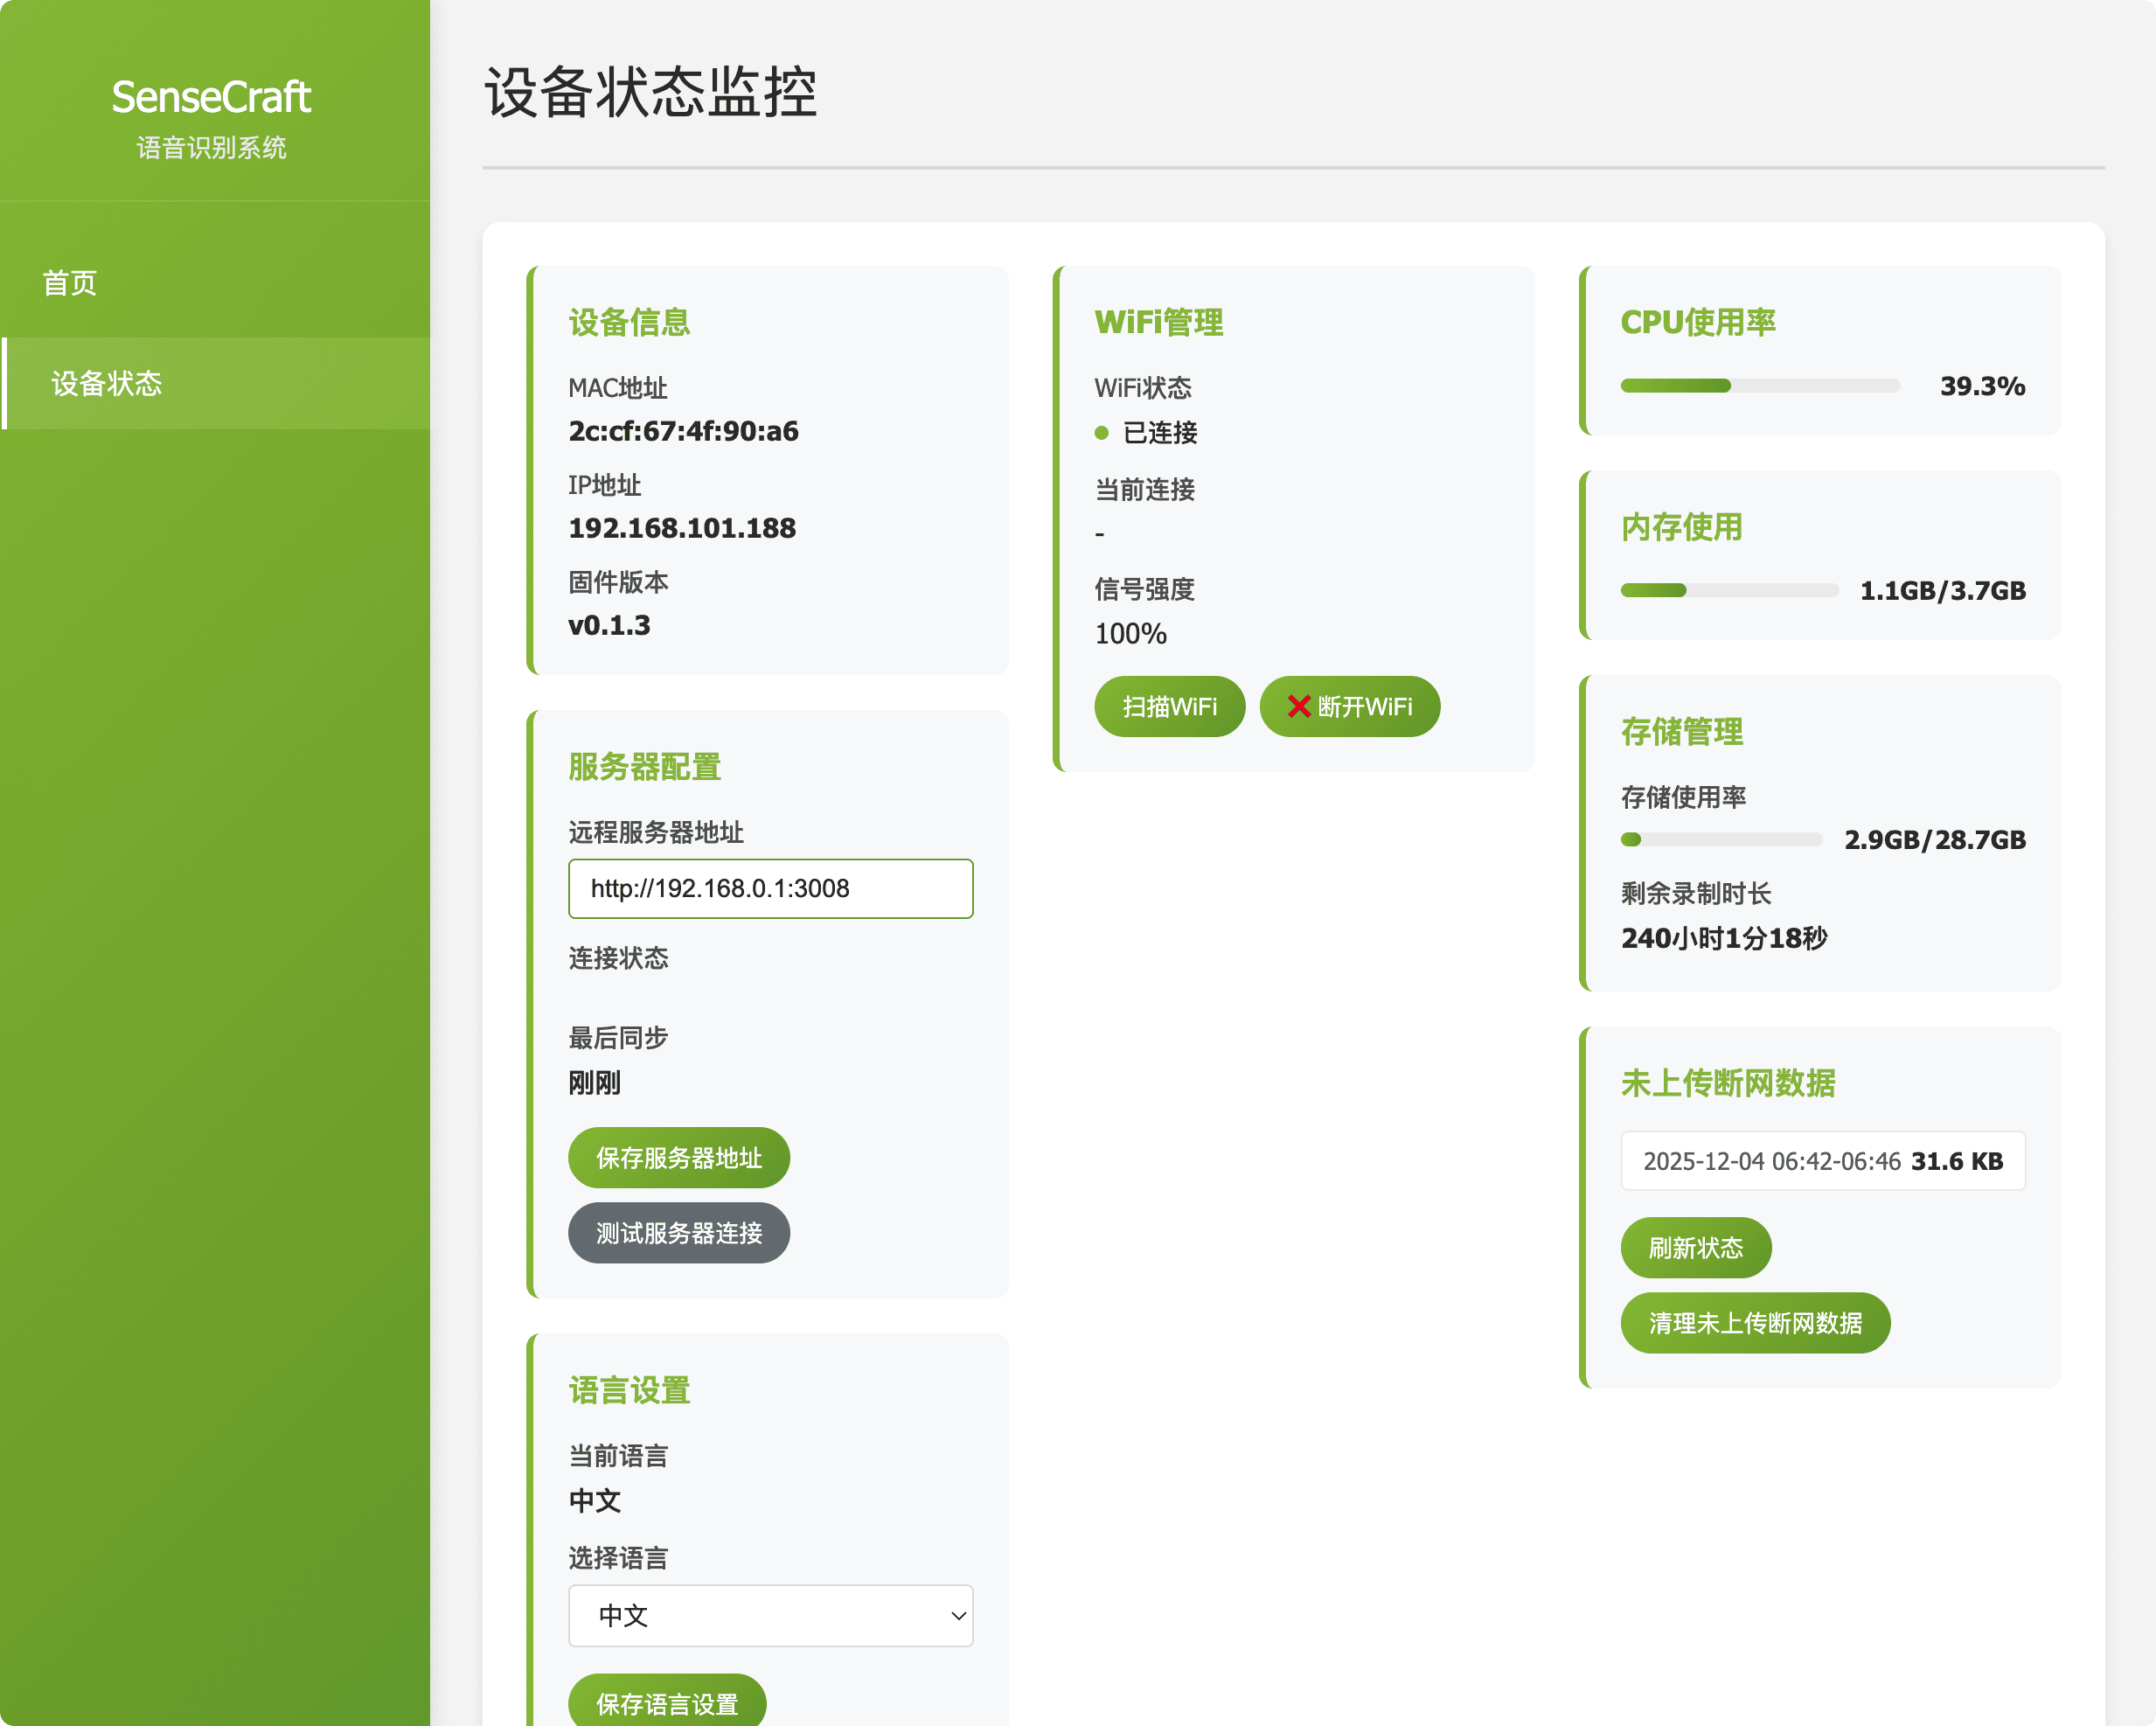 Figure 3: Device Status & Configuration |
Cloud-side Management Platform
The Cloud Platform is organized into five main navigation areas, offering powerful data analysis and system configuration tools.
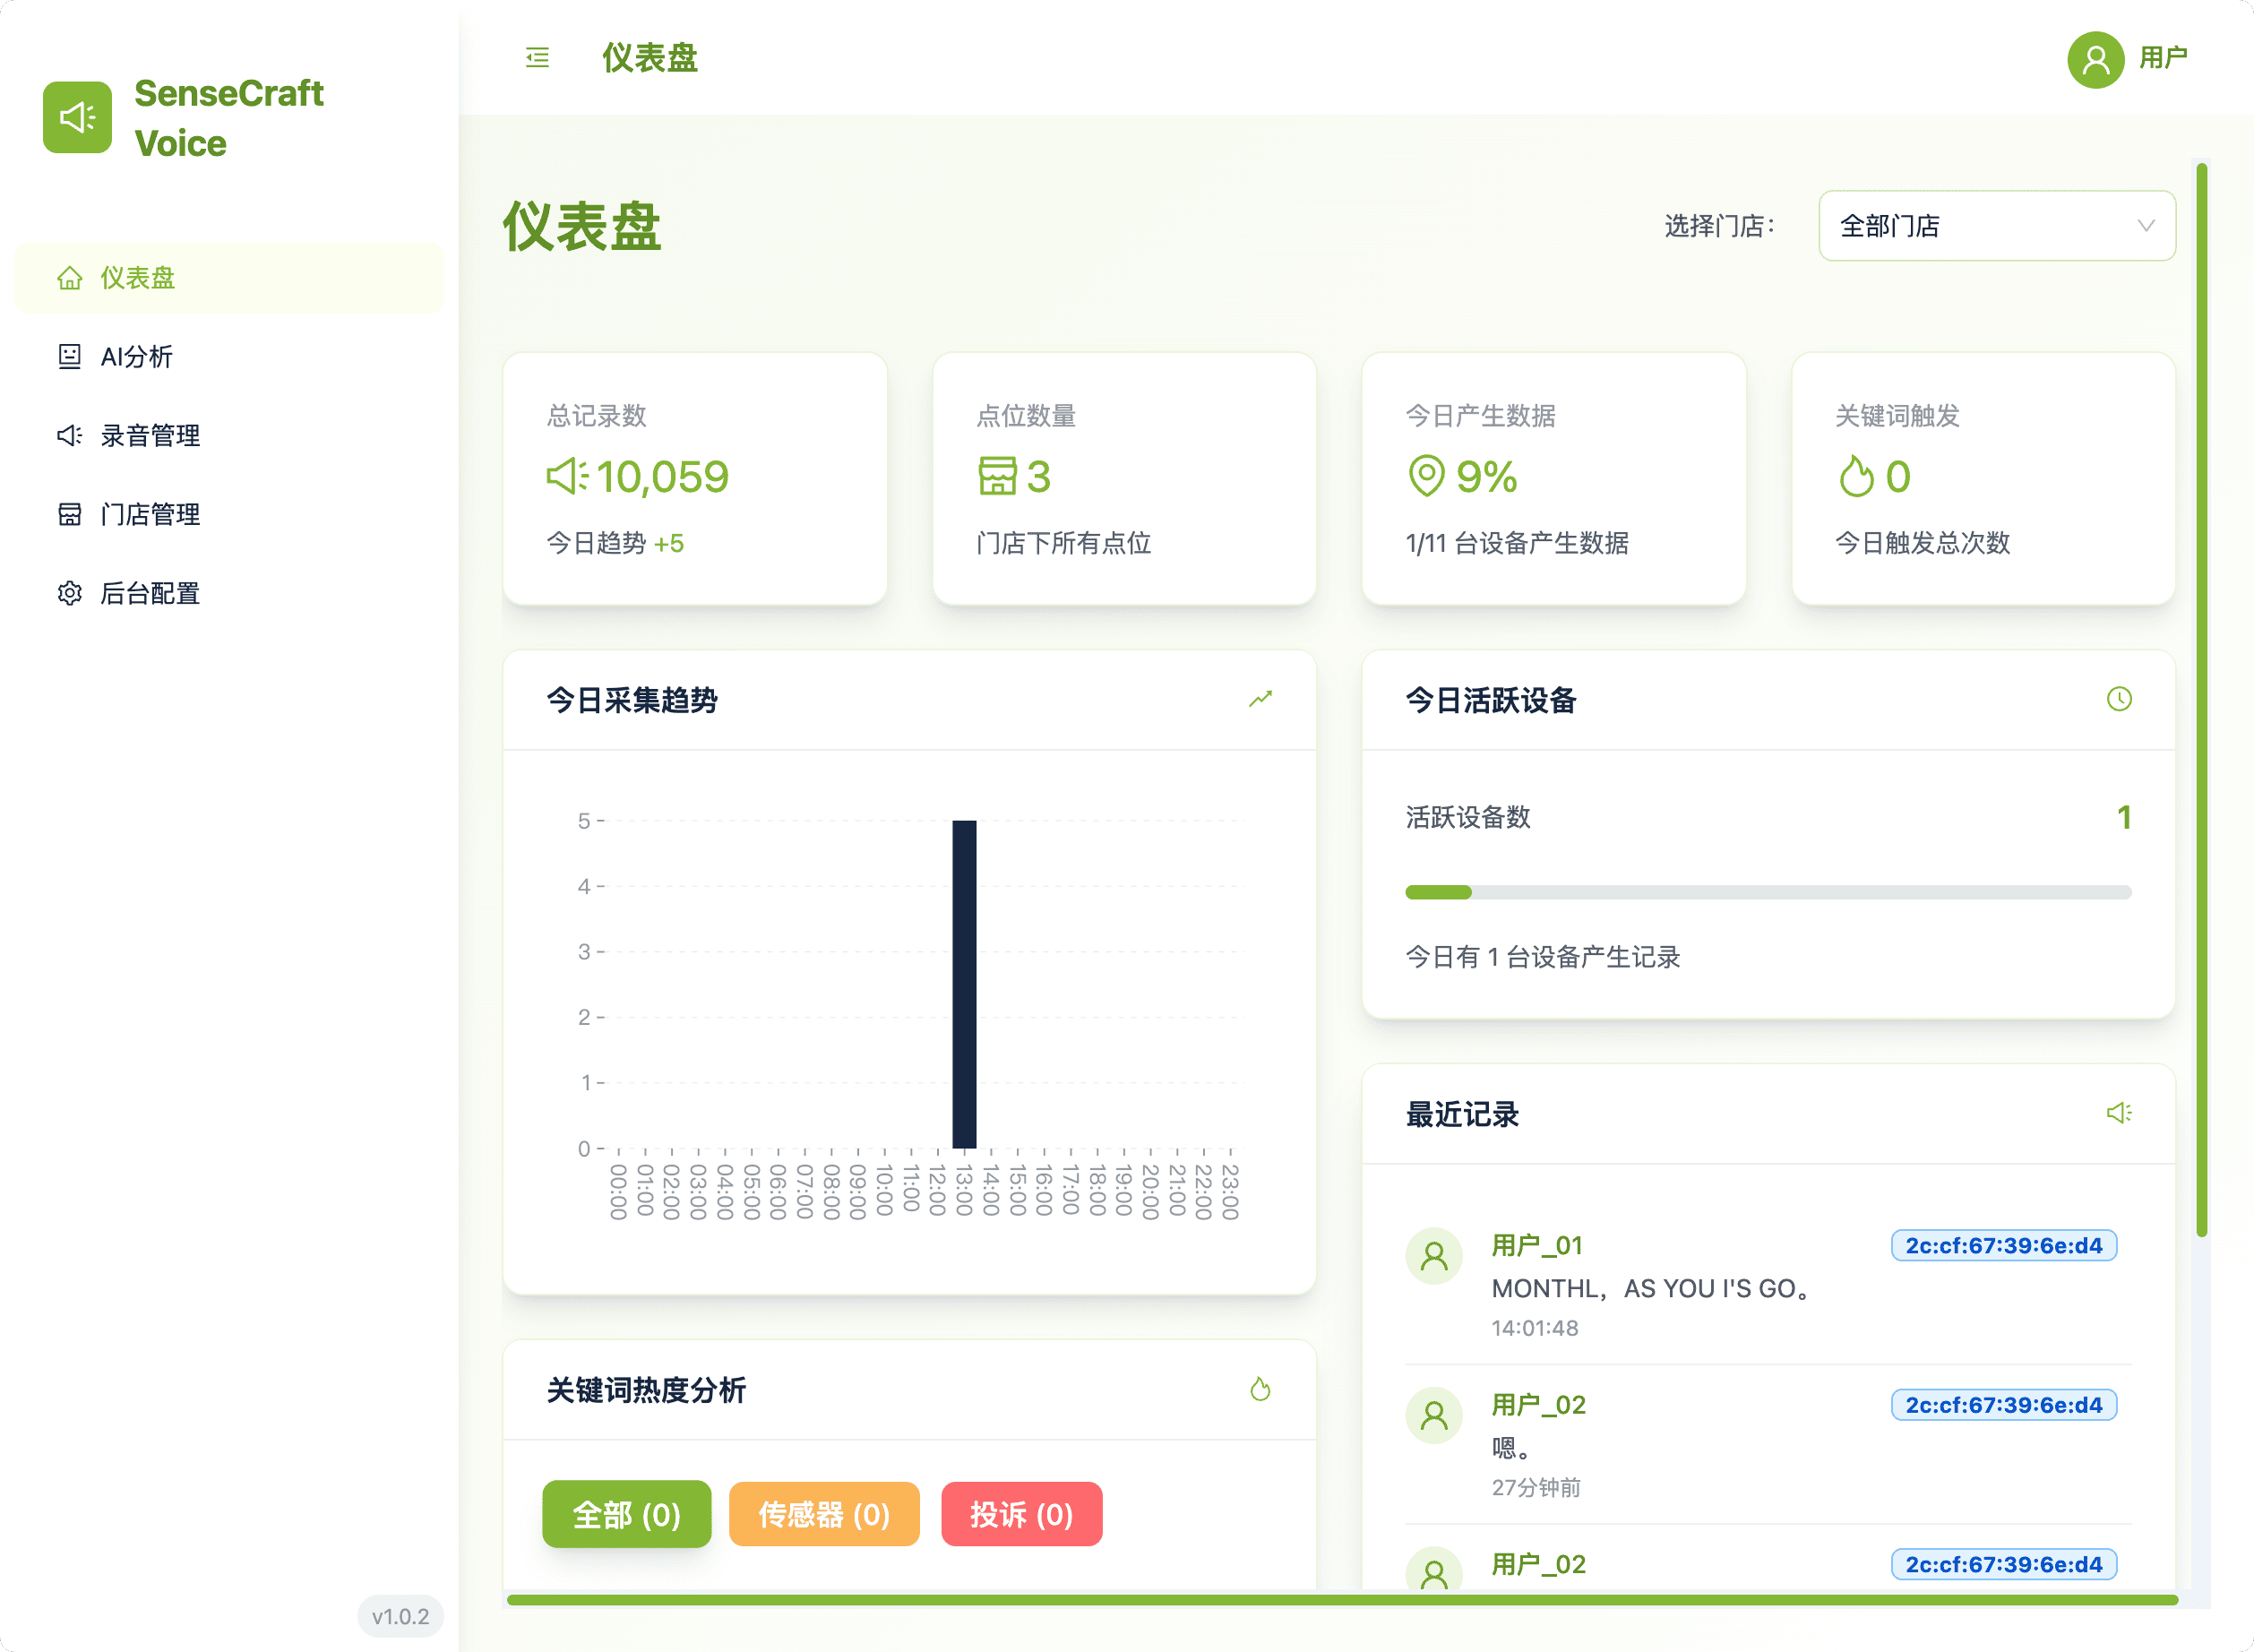
1. Dashboard: Insights at a Glance
The Dashboard is your operational command center, providing aggregated metrics and performance trends:
- Store Filtering: Easily switch views by selecting one or more stores, with all charts updating instantly.
- Analysis: Monitor Daily Collection Trends (hourly records) and Keyword Hotspot Analysis (showing which keywords are frequently triggered and the associated Device Names).
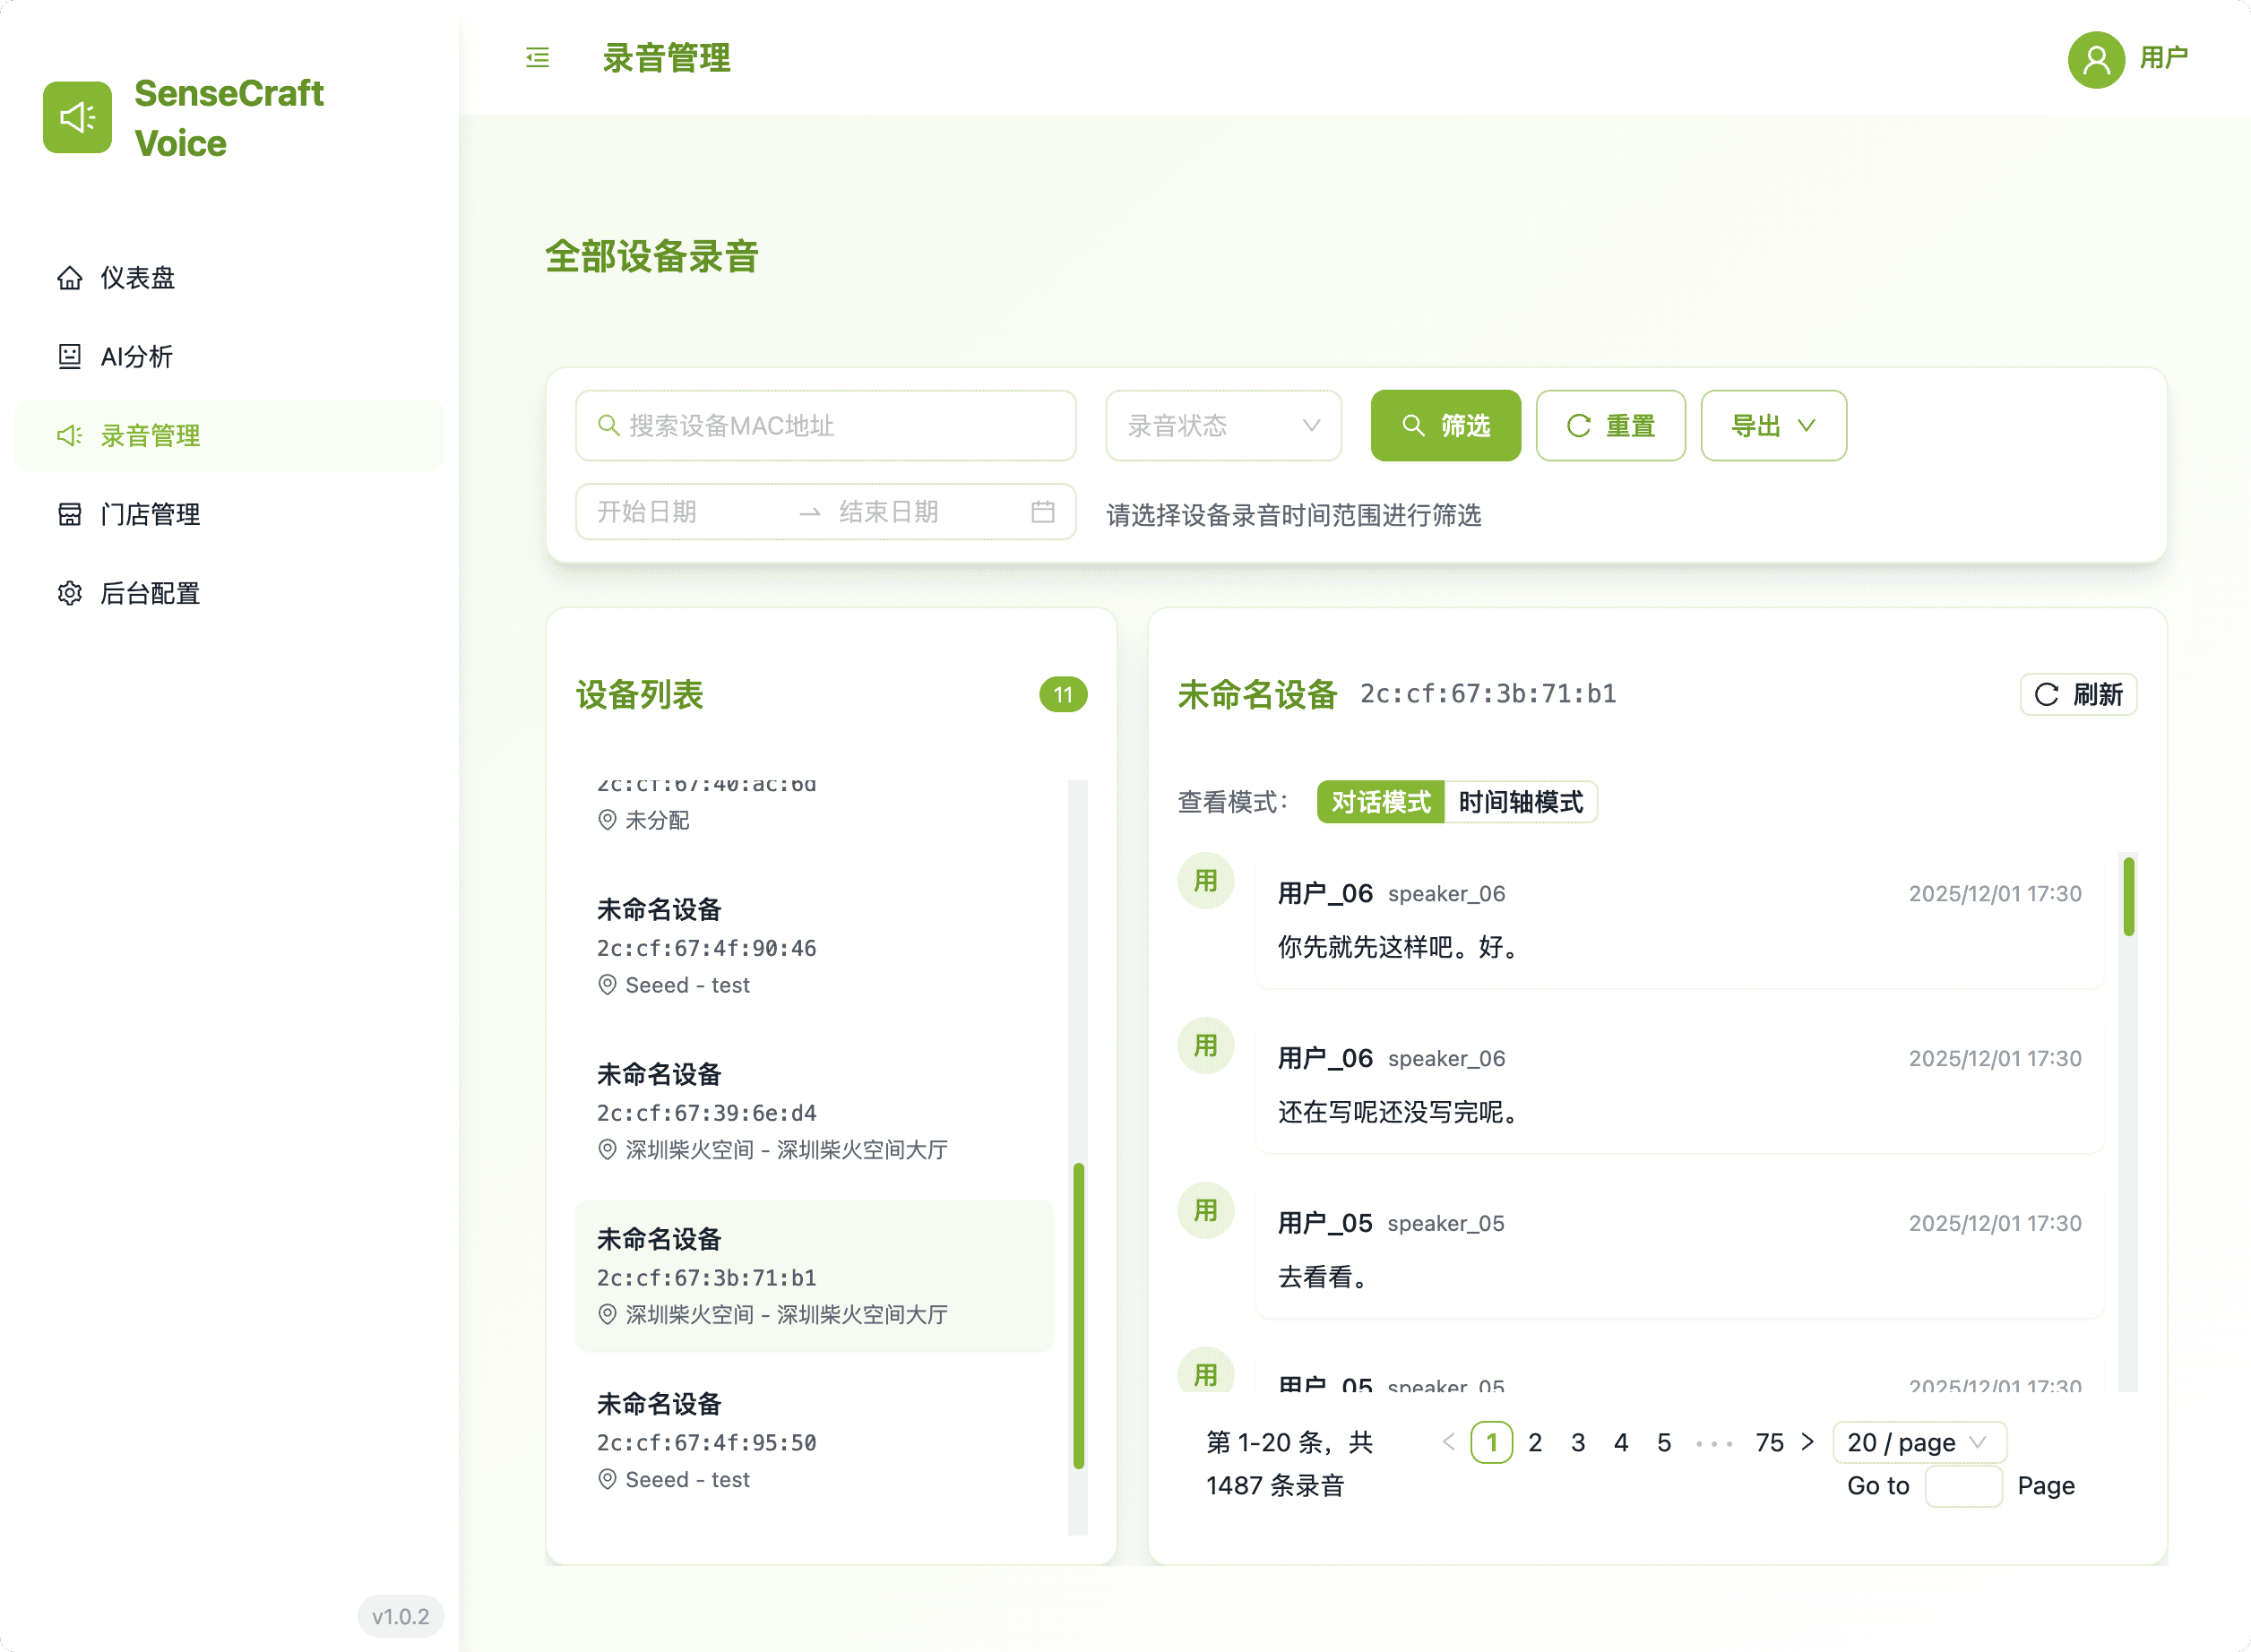
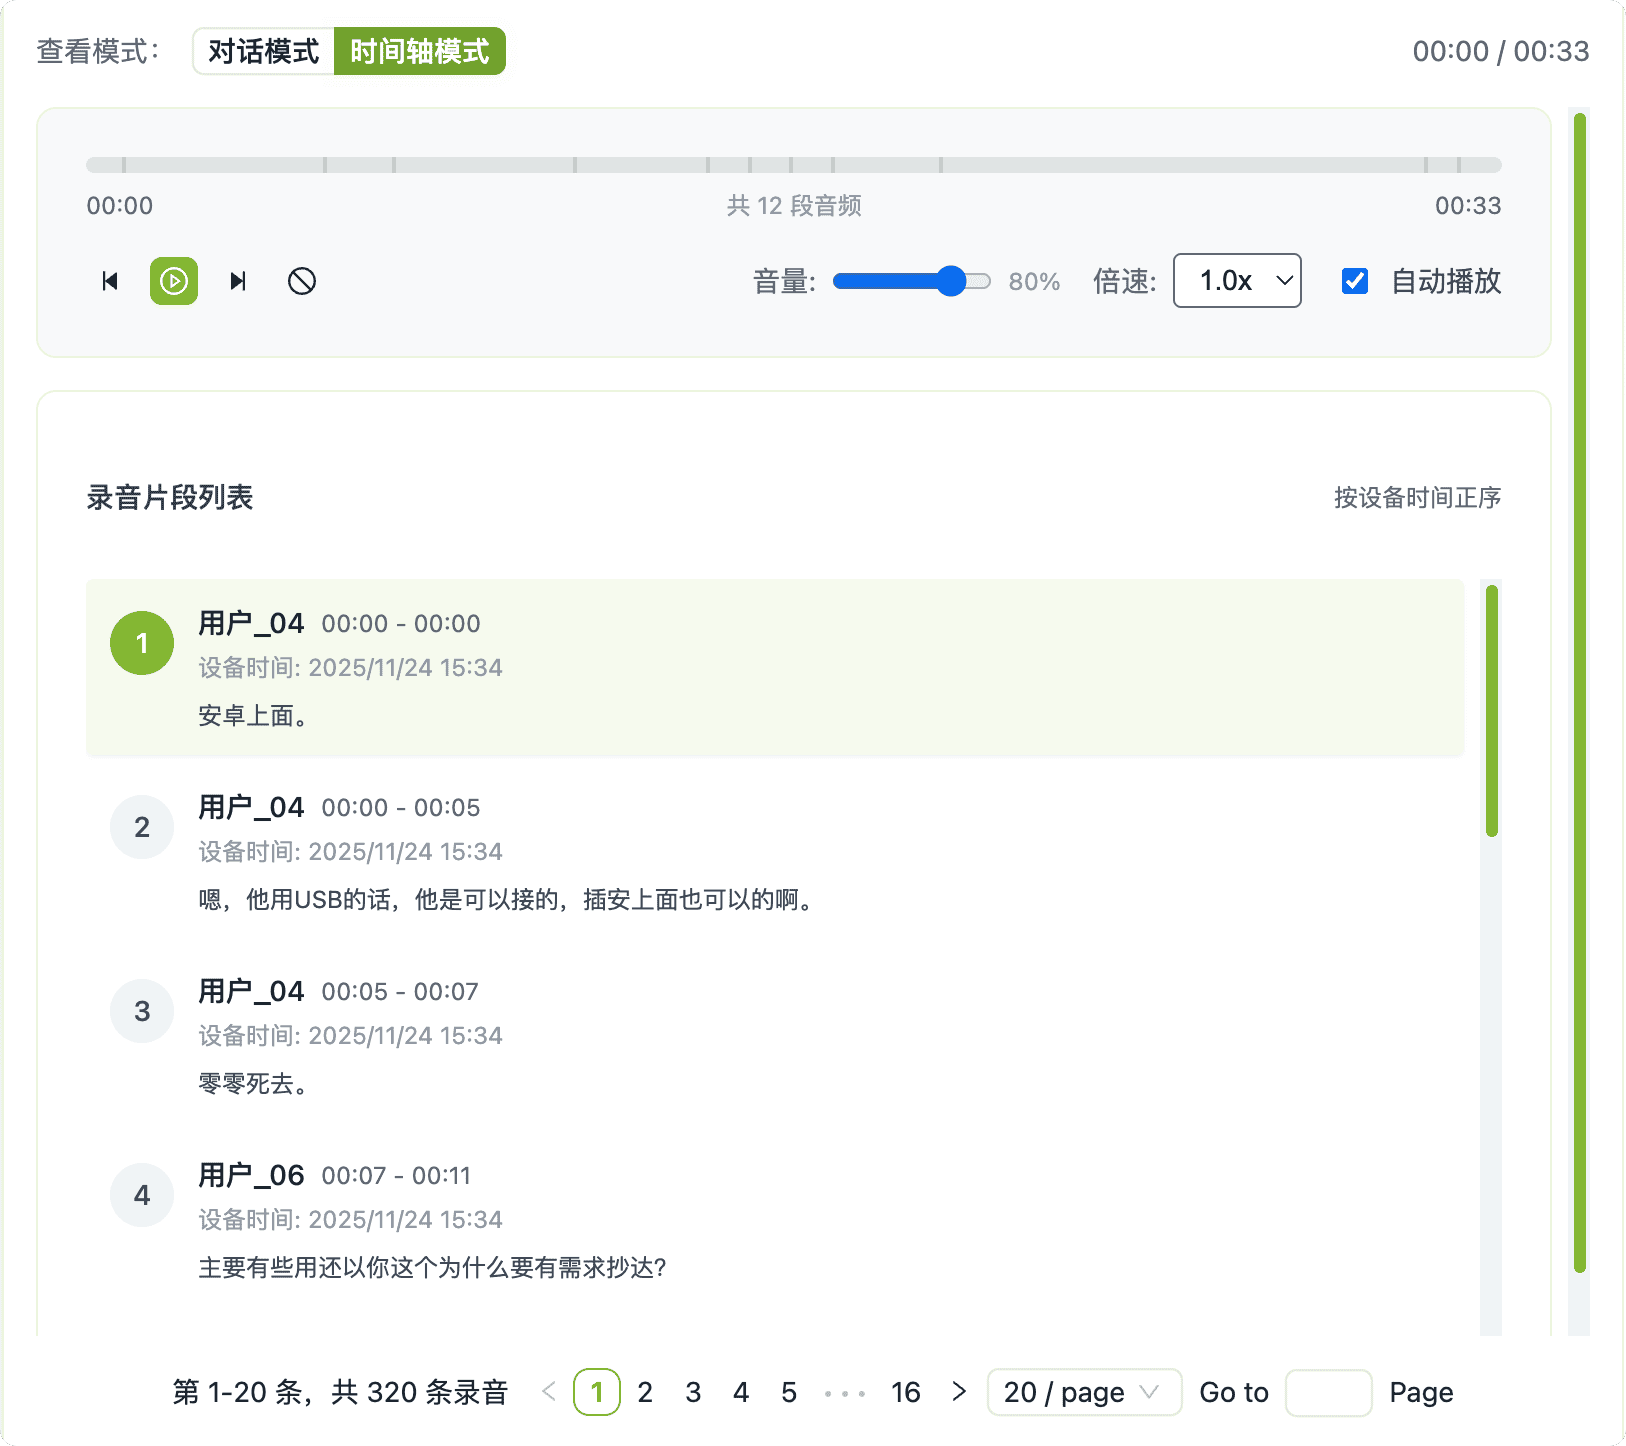
2. Record Management: Data Auditing & Export
This module provides the definitive view of all collected voice records.
- Advanced Filtering: Use Device Name, Store Name, Location Name, or MAC Address for precise data retrieval. Searches are executed only after clicking the "Filter" button, giving users full control.
- Export Capability: Select and export filtered data in three formats for external use (choose one at a time): Markdown, Plain Text (.txt), or Original Audio File.
- Dual-View Auditing: Easily switch between Conversation Mode to review transcribed dialogues and Timeline Mode to listen to the original audio playback. This dual approach allows for rapid verification of transcription accuracy and a deeper understanding of the interaction's context.
- Clarity: All record views prioritize the easily identifiable Device Name over the MAC address.
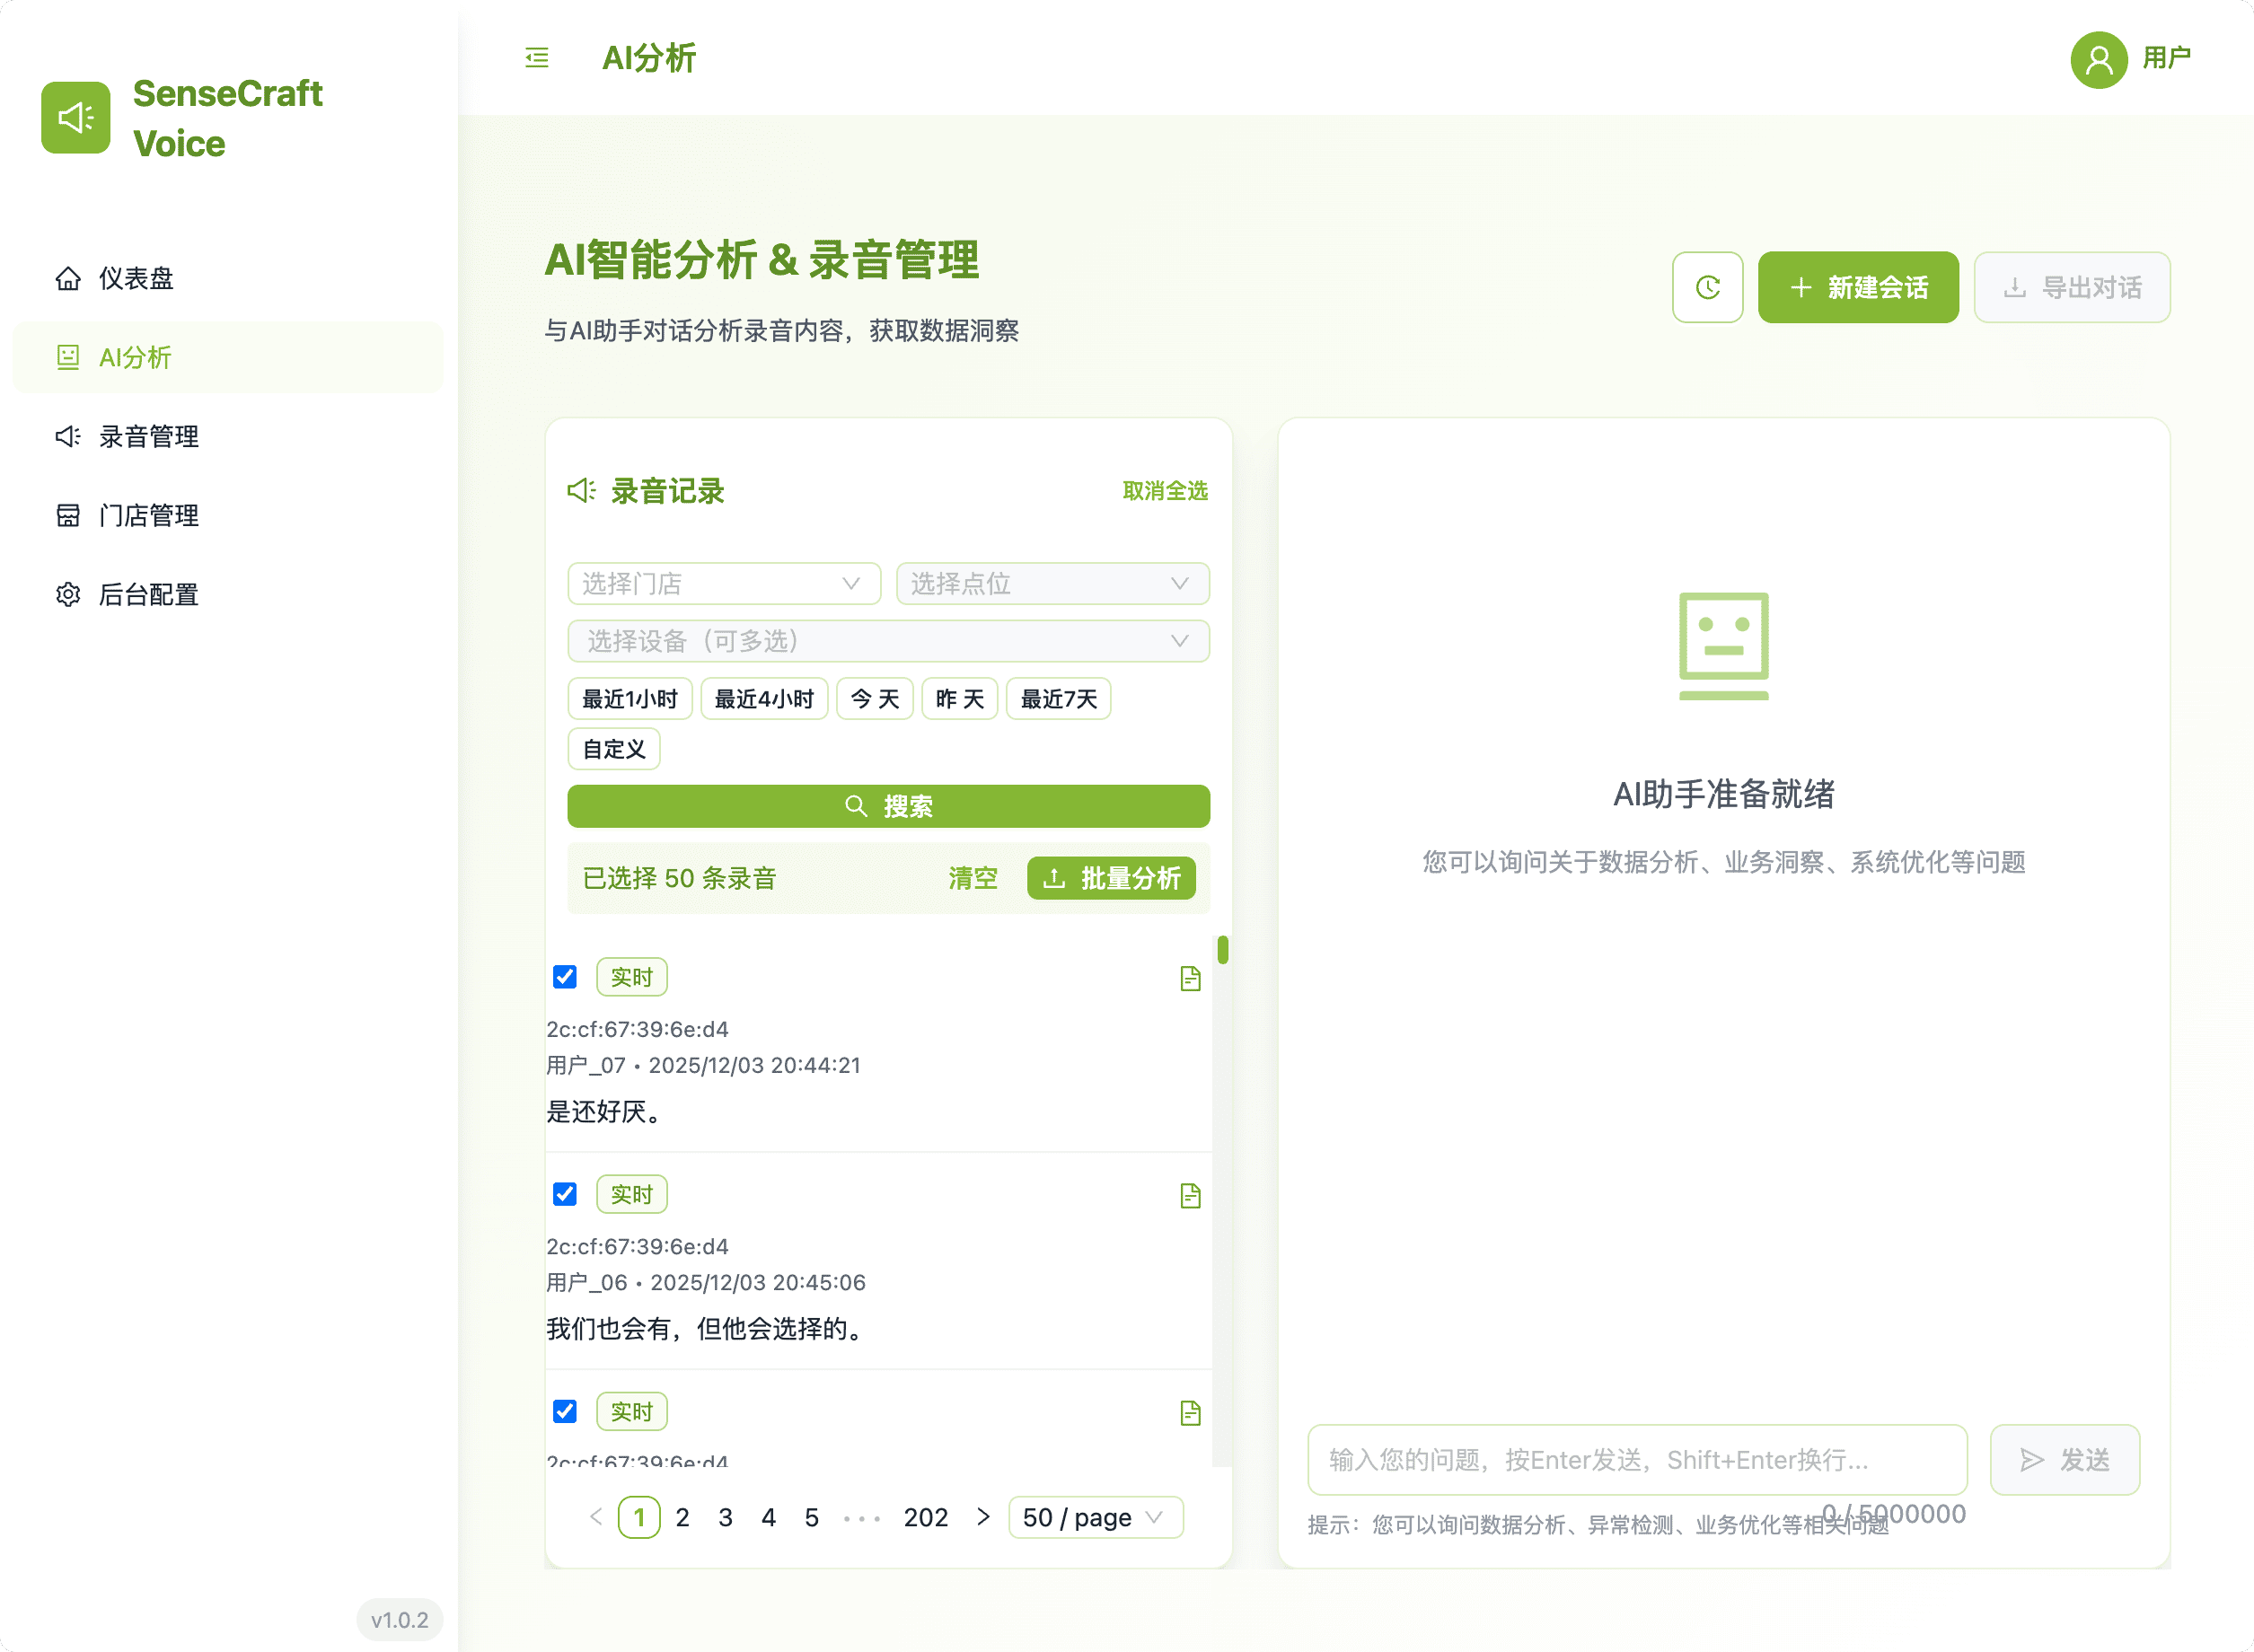
3. AI Analysis: Historical & Custom Processing
This area handles the submission of speech records for advanced processing by the AI engine.
- Historical Sessions: Review your past interactions with the AI analysis engine. The history window displays conversations chronologically, and clicking a session immediately loads the previous conversation thread for review.
- Processing: Submit filtered records for AI processing based on the currently selected AI Prompt.
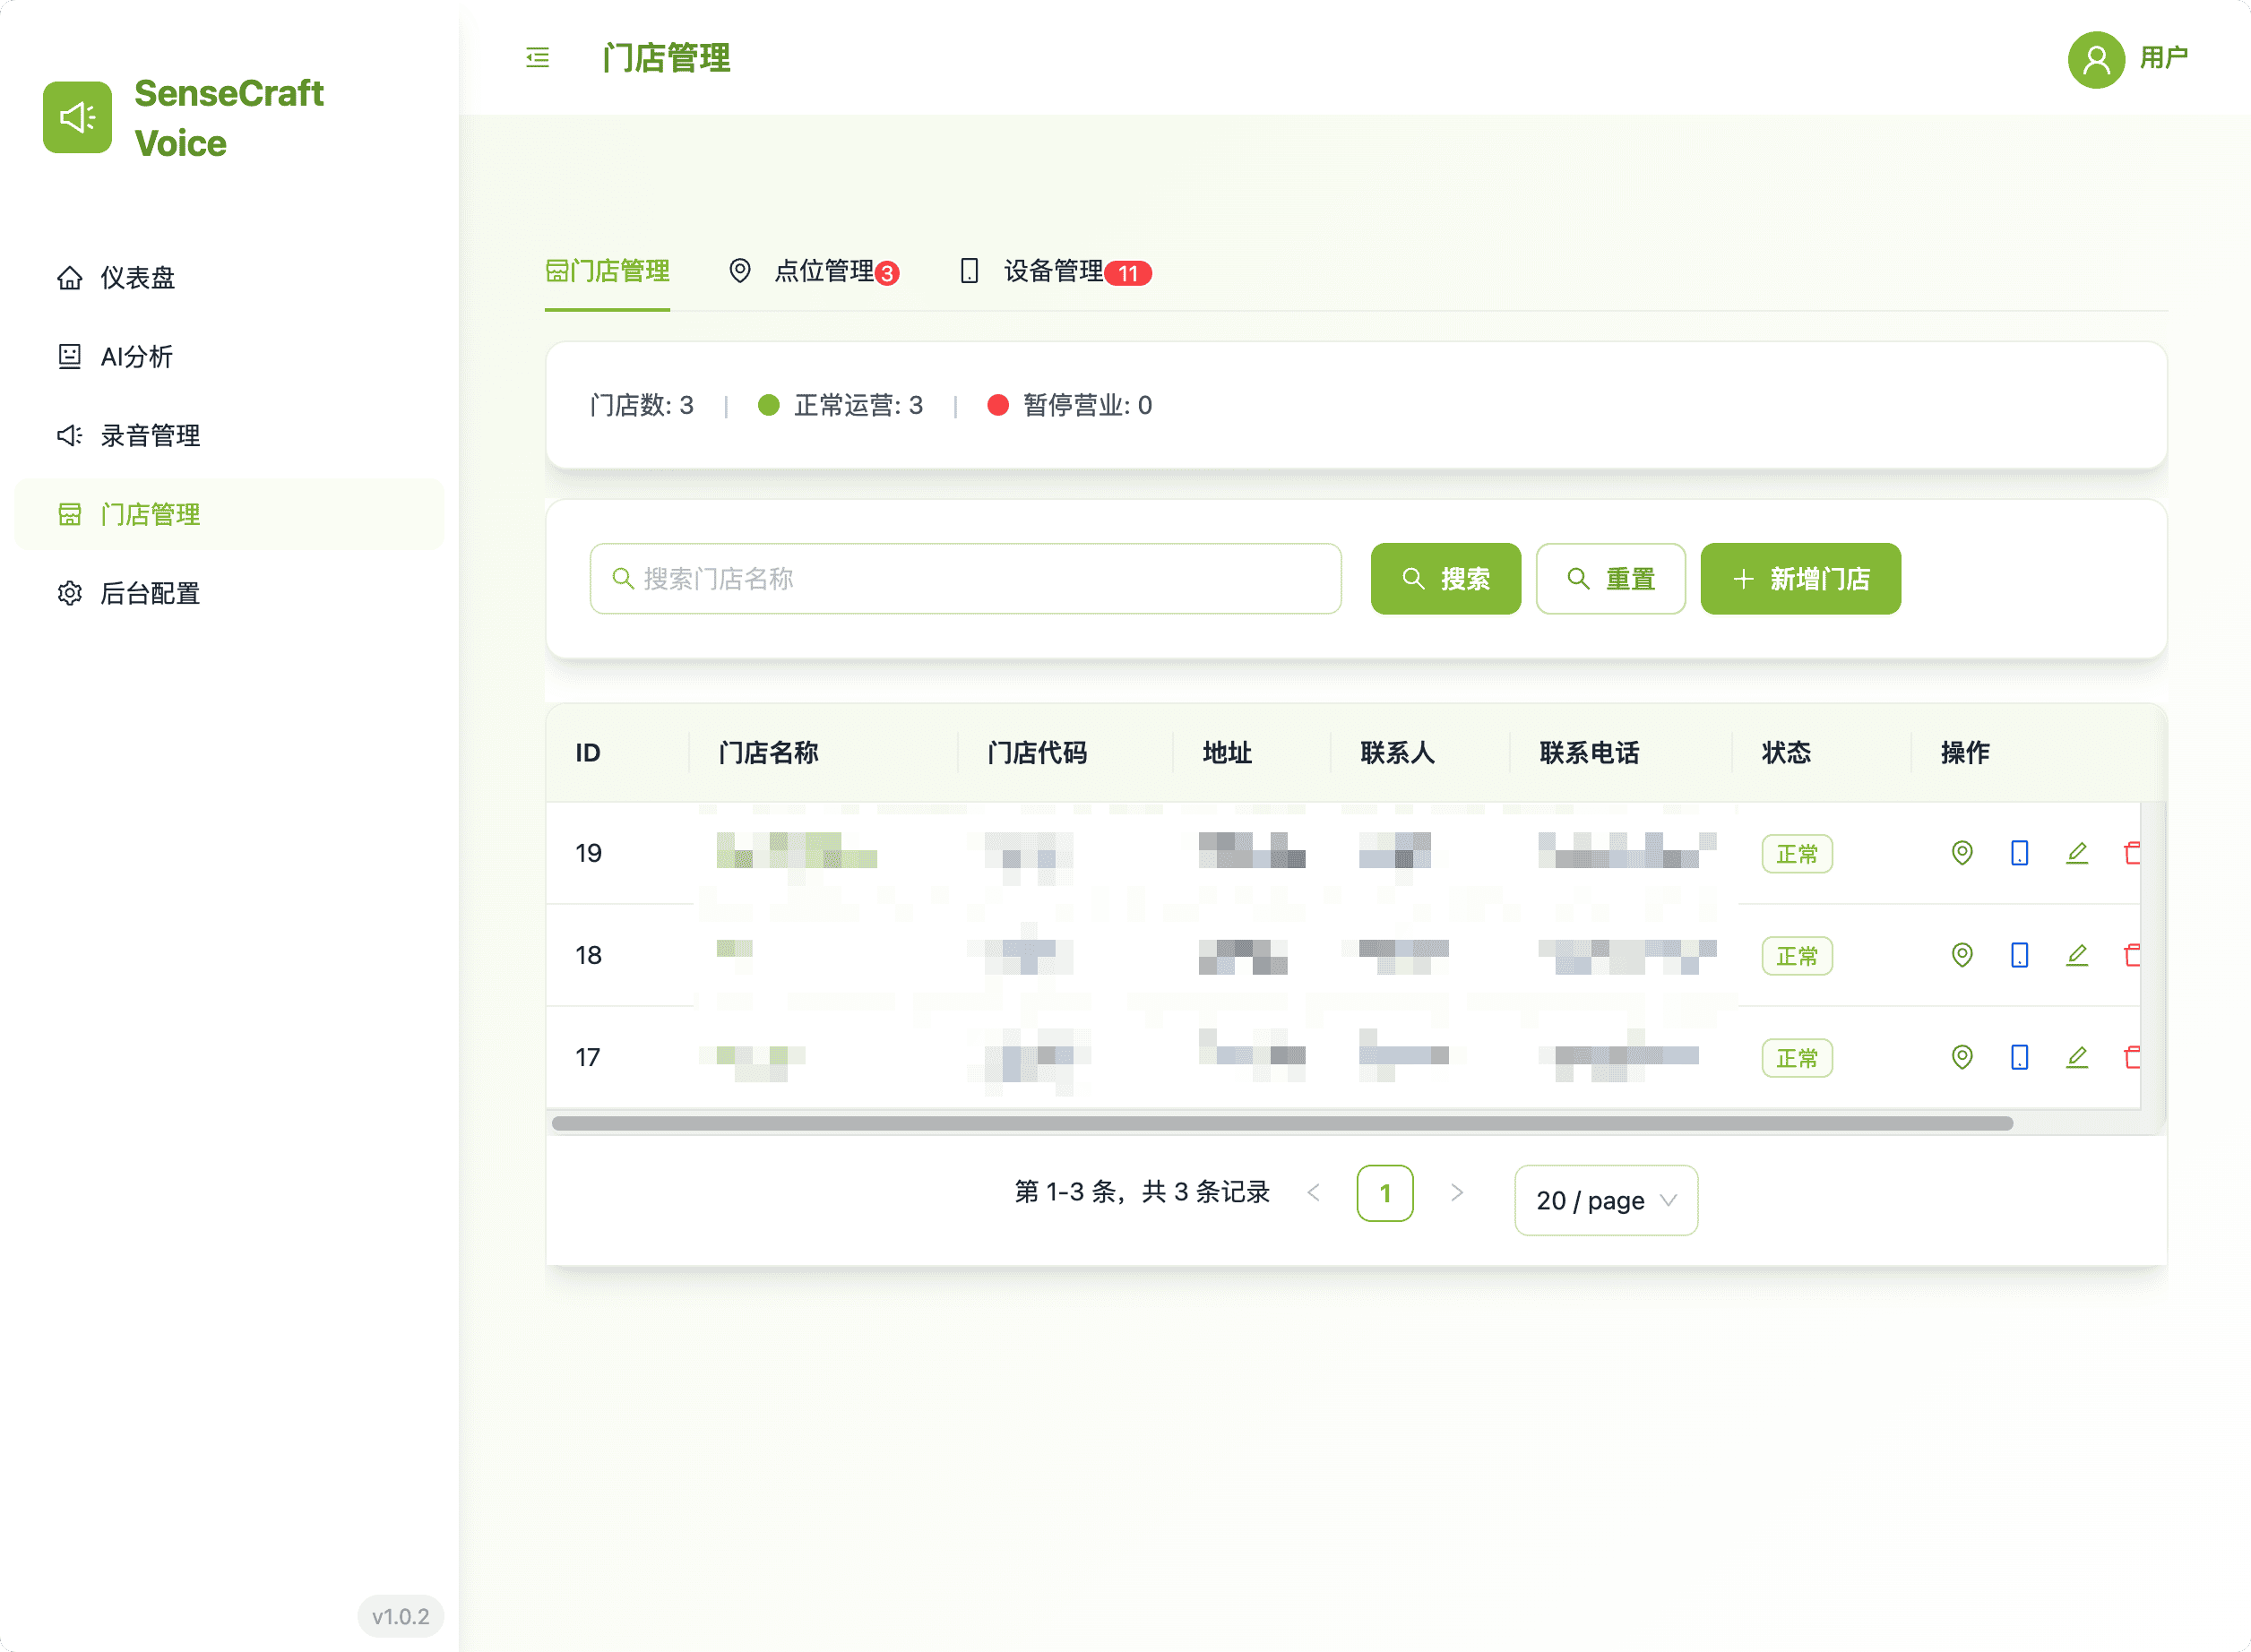
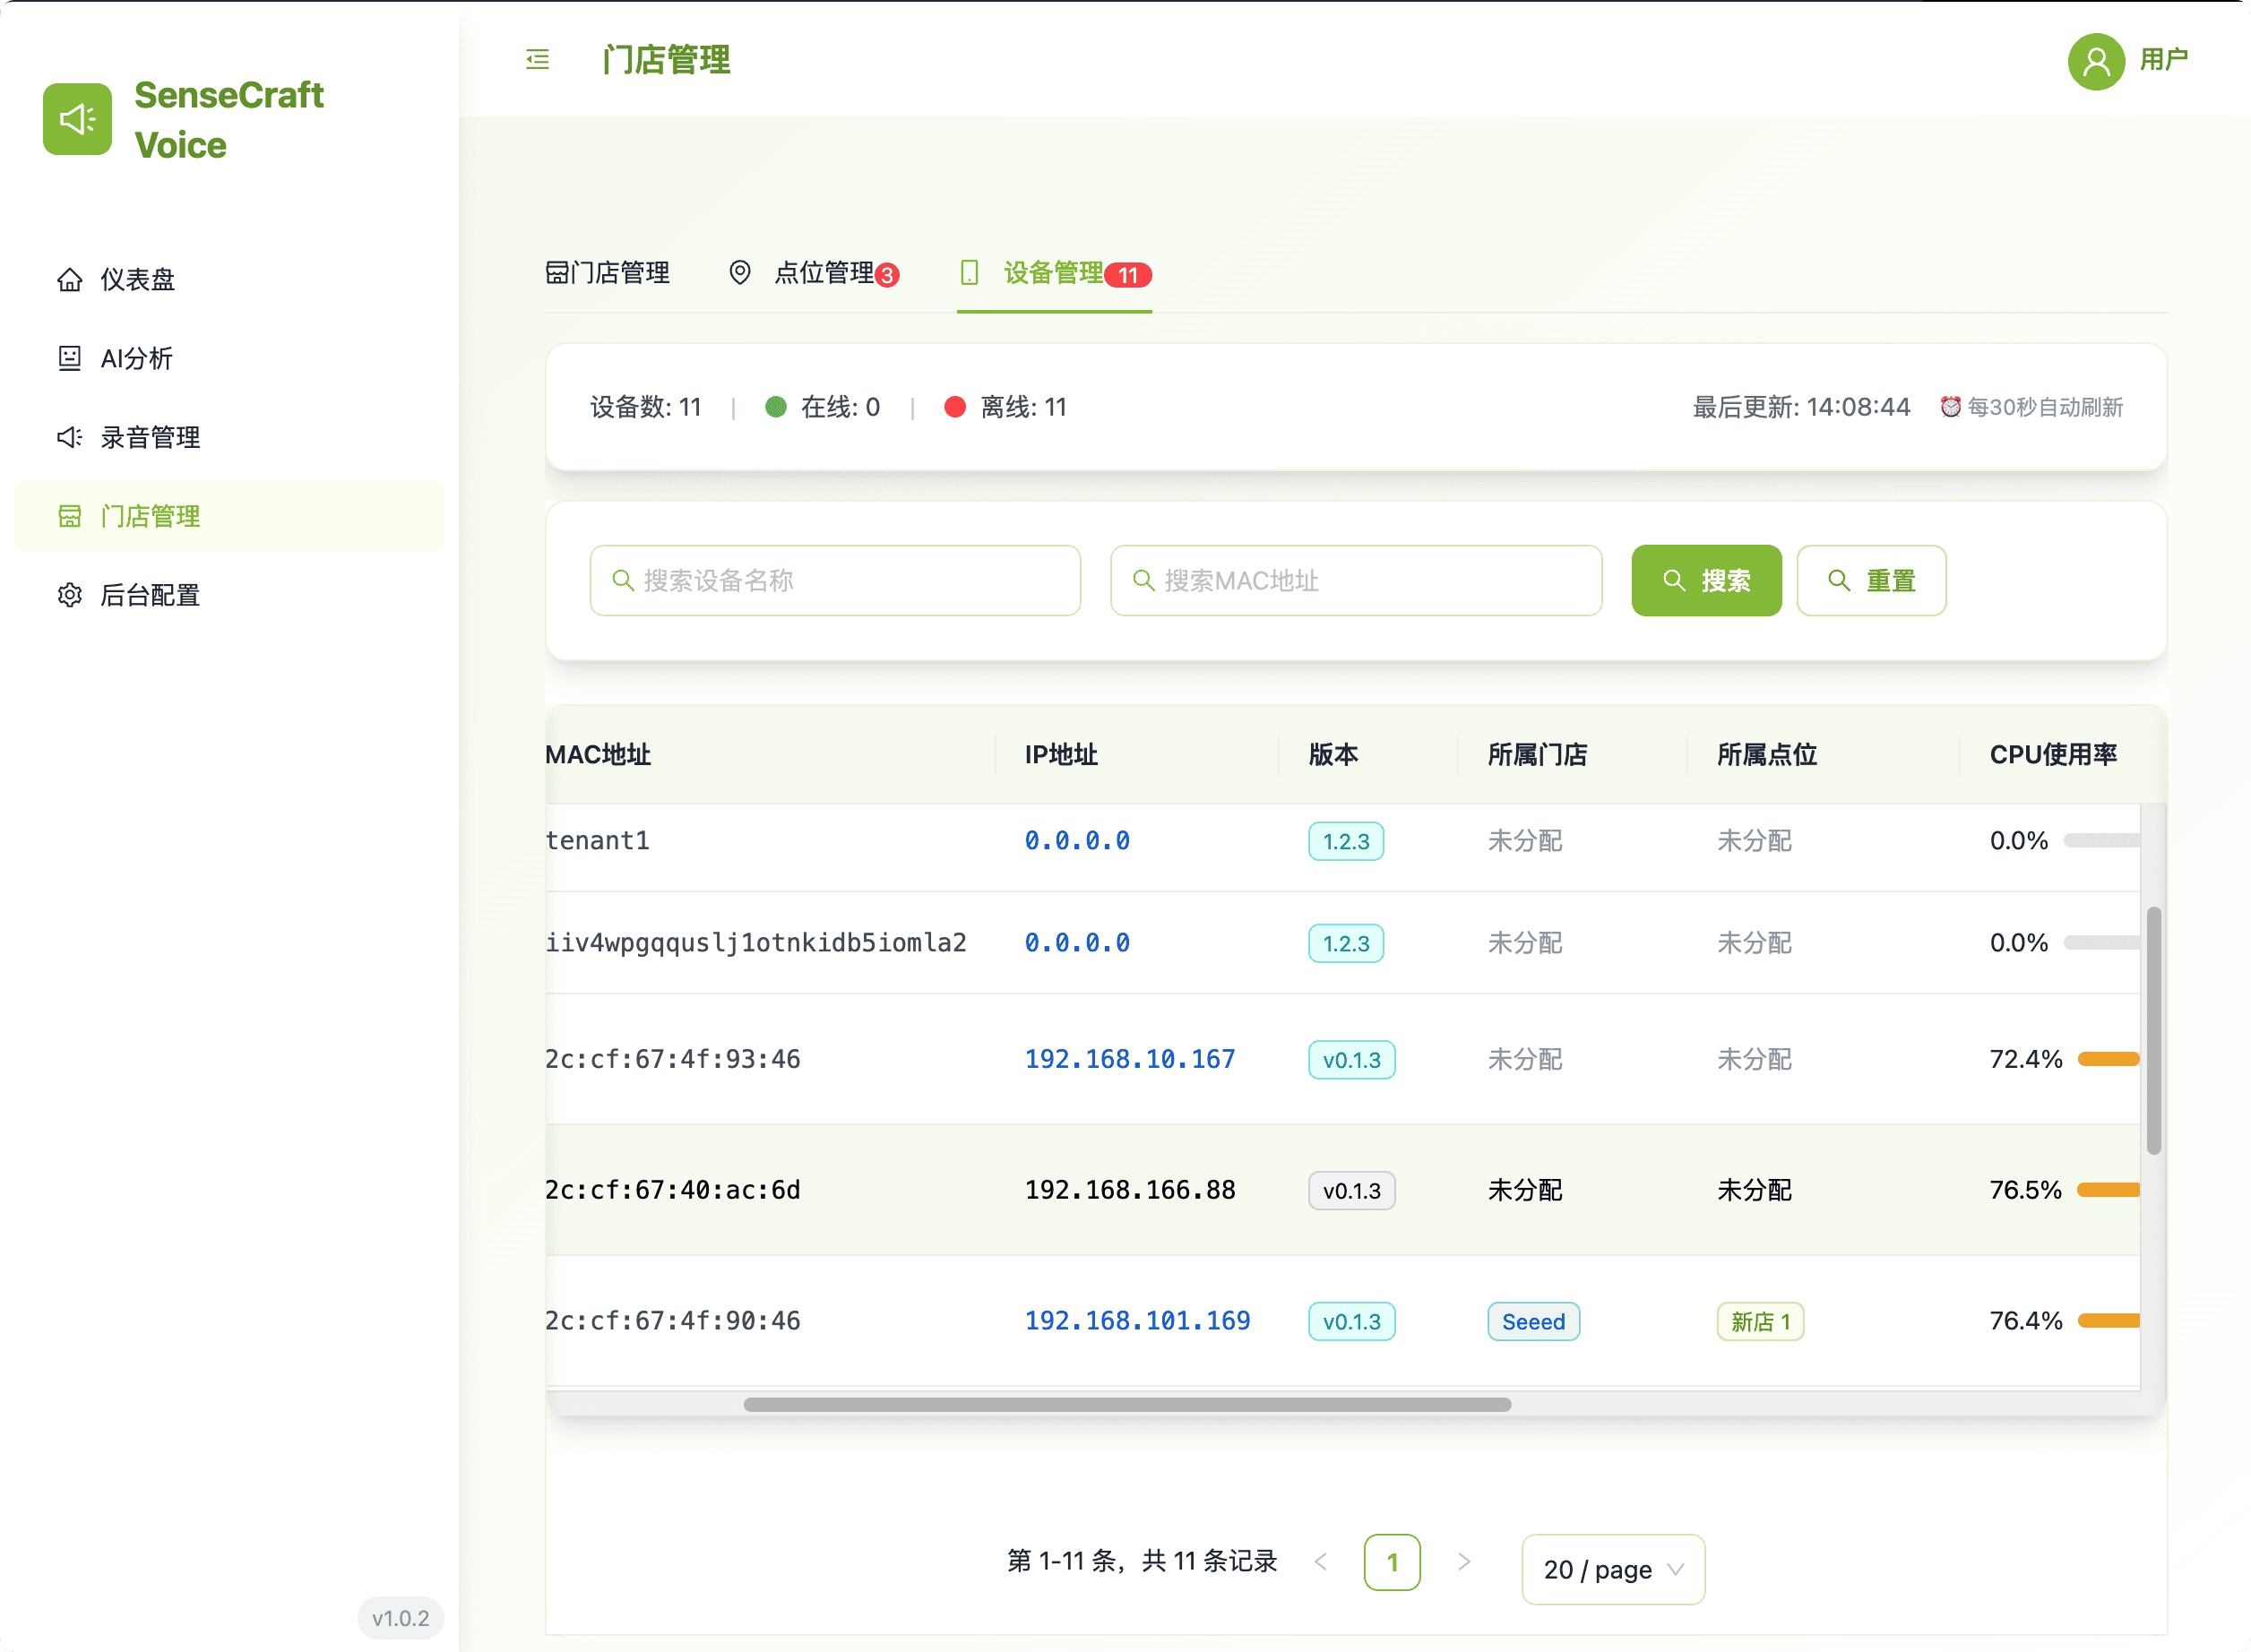
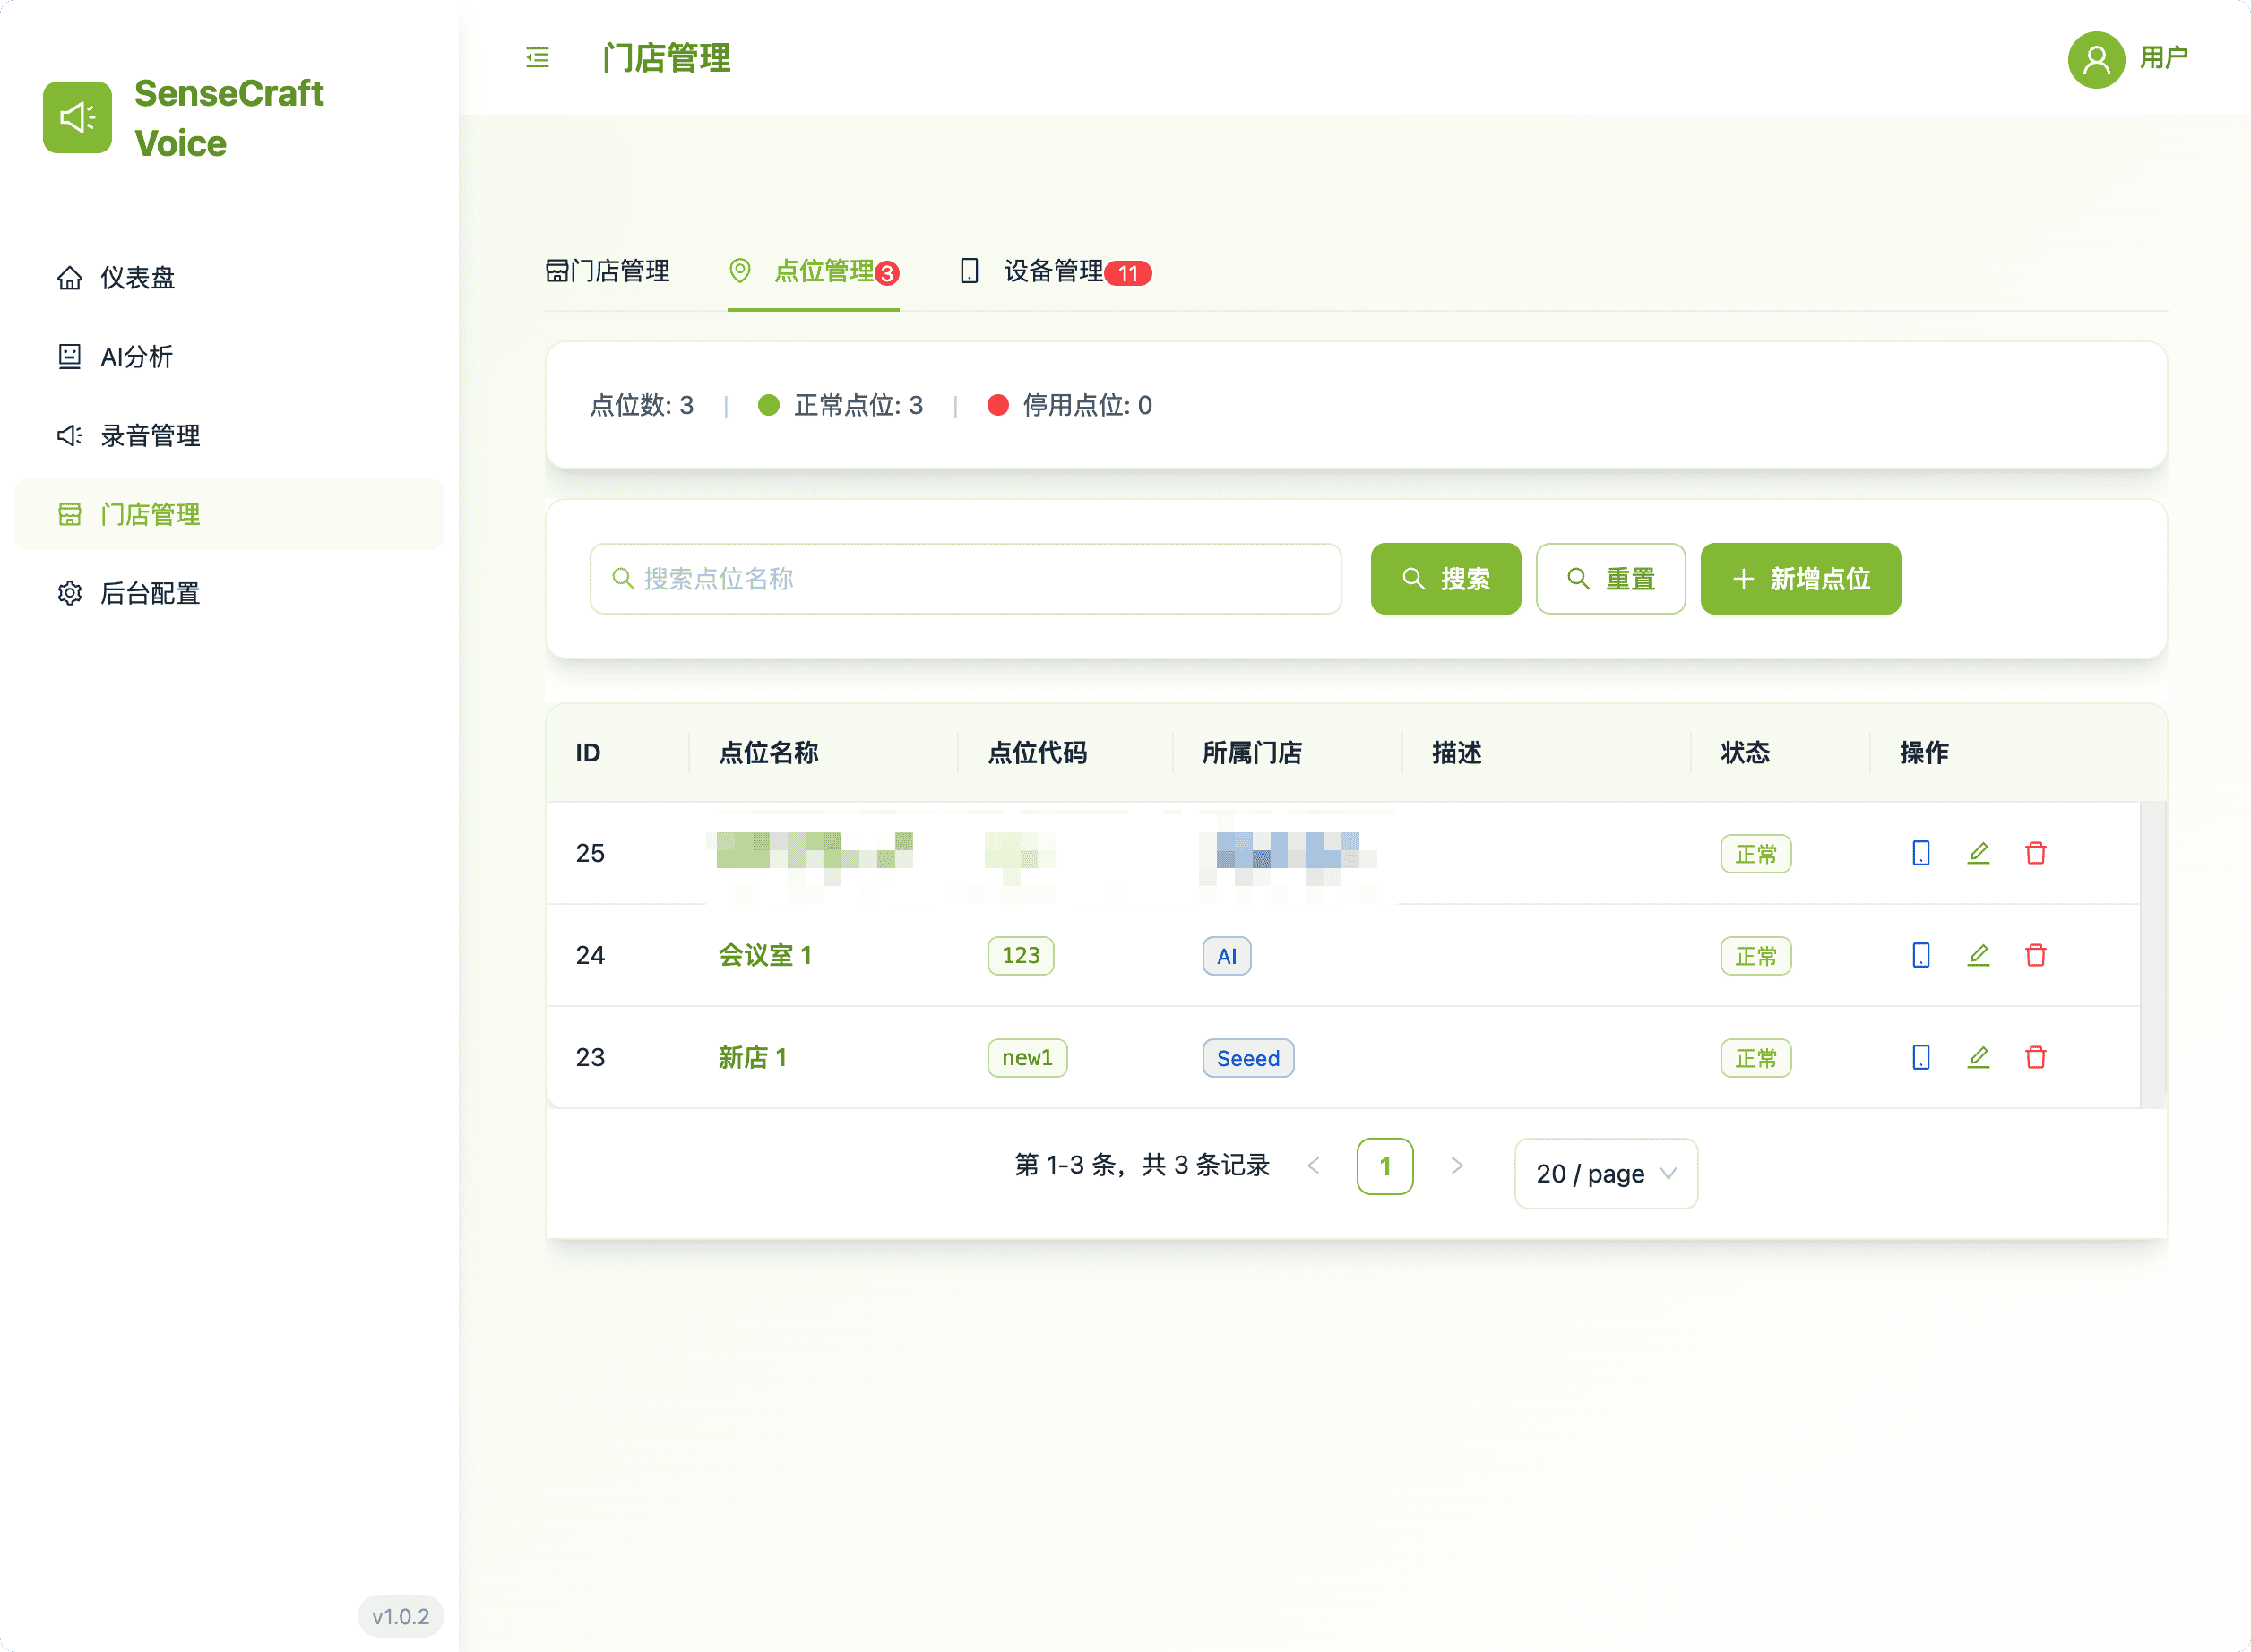
4. Store Management: Device & Location Hierarchy
This area provides the necessary tools for setting up and maintaining the organizational hierarchy of all edge devices.
- Hierarchical View: Easily manage stores, their specific in-store locations, and the associated reRouter devices.
- Centralized Control: Streamline device deployment and configuration by grouping devices logically.
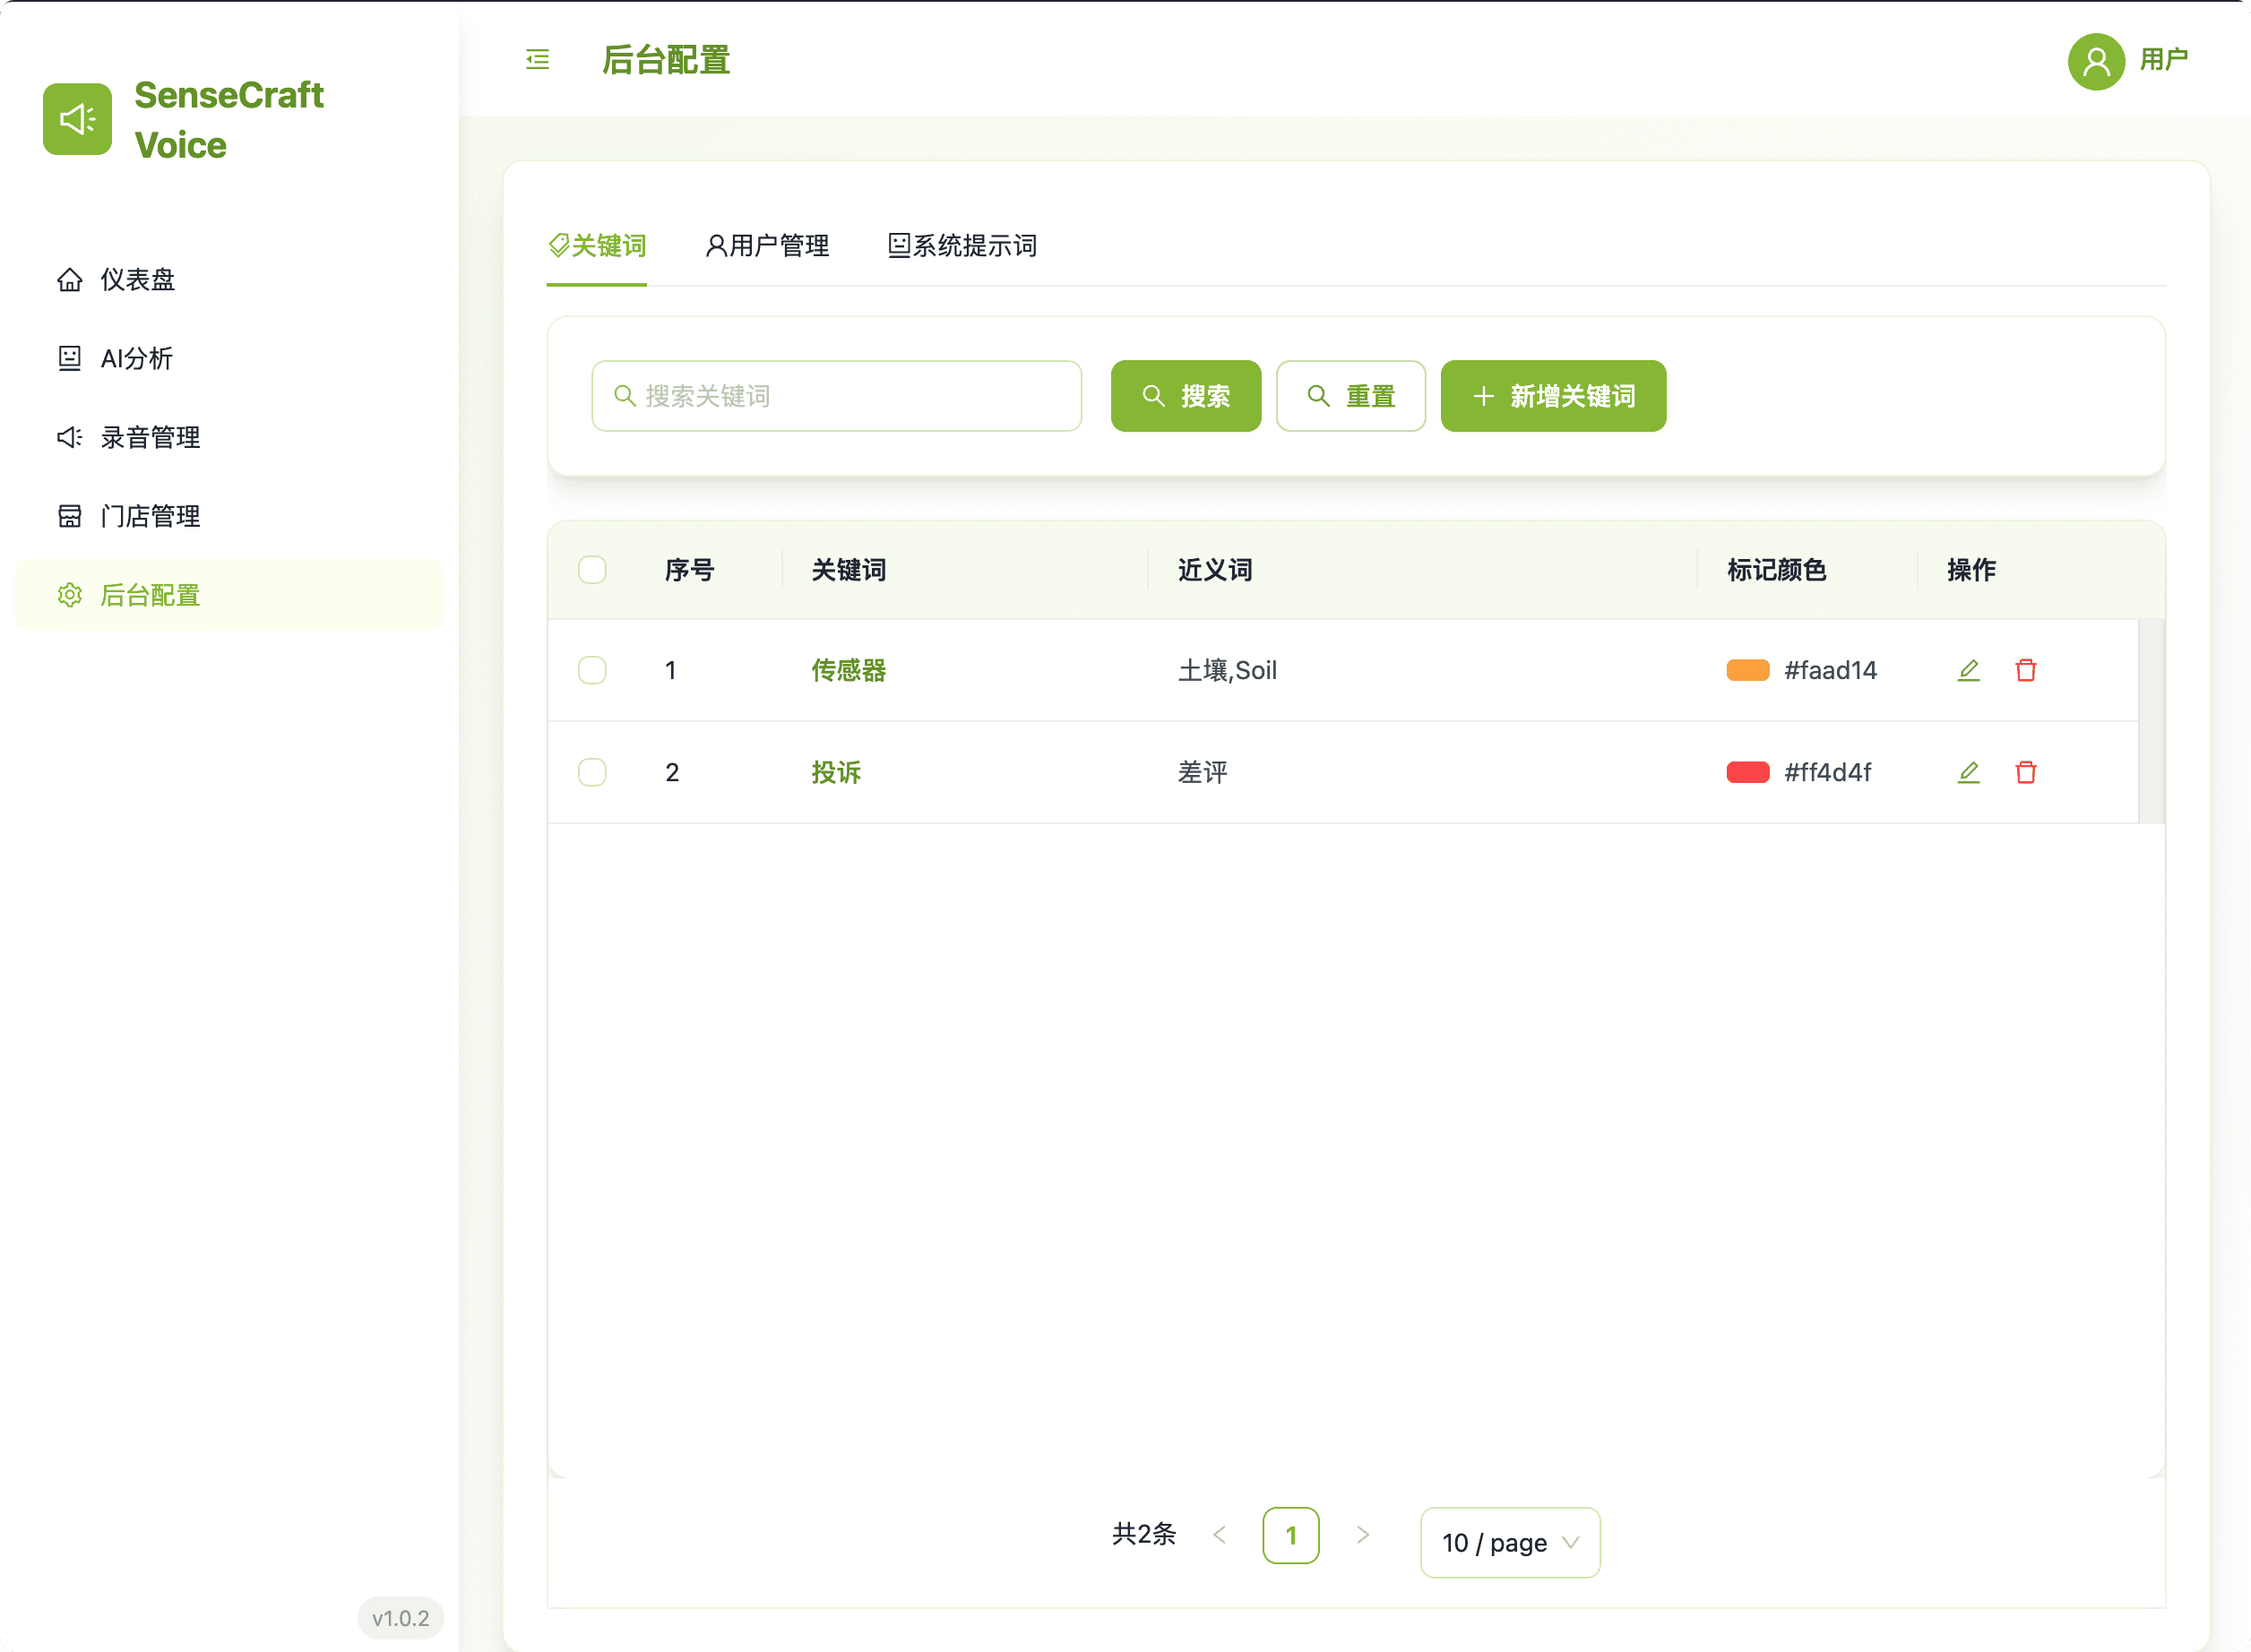
5. Backend Configuration: System Control & Customization
This section allows administrators to define system-wide parameters for AI processing and event triggering.
5.1. Keyword Settings
Define custom keywords and synonyms to identify specific business events in recordings.
- Customization: Define Keywords and their Synonyms for event detection.
- Visualization: Assign a Marking Color for visual distinction on the Dashboard.
- Management: Supports Adding, Editing, Deleting, and Batch Deletion.
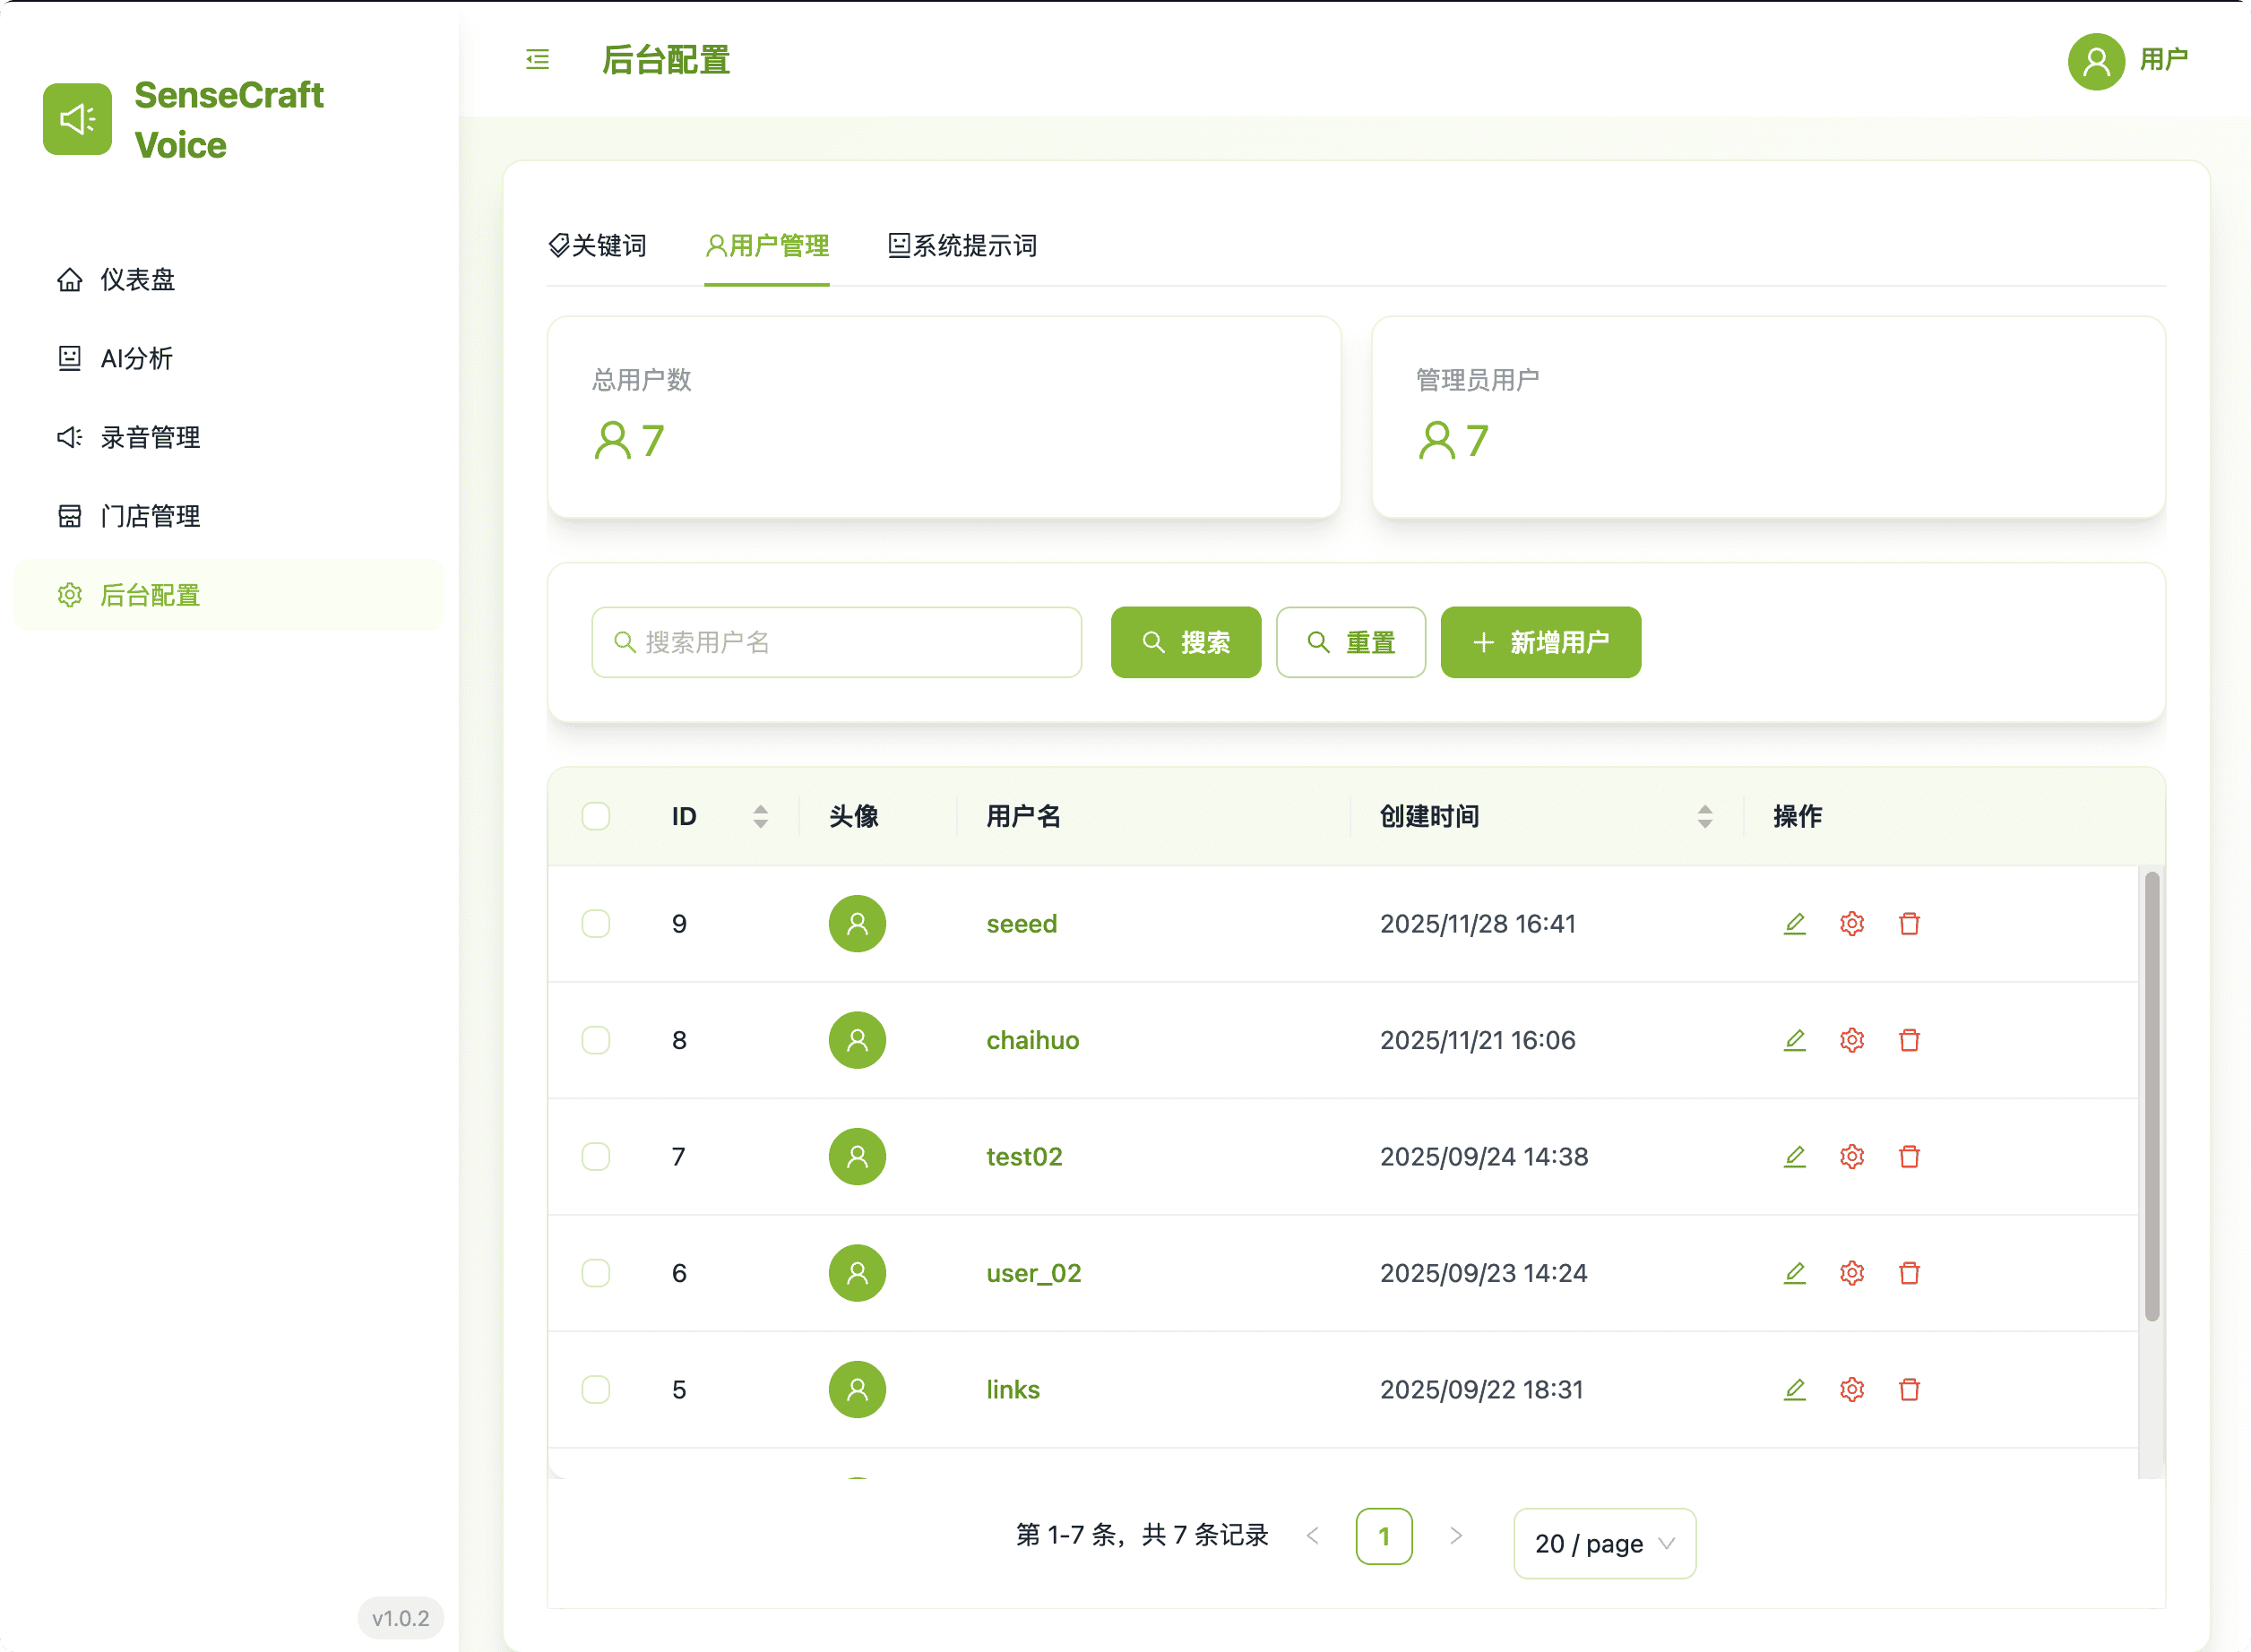
5.3. User Management
The User Management module controls platform access and permissions.
5.2. AI Prompt Settings
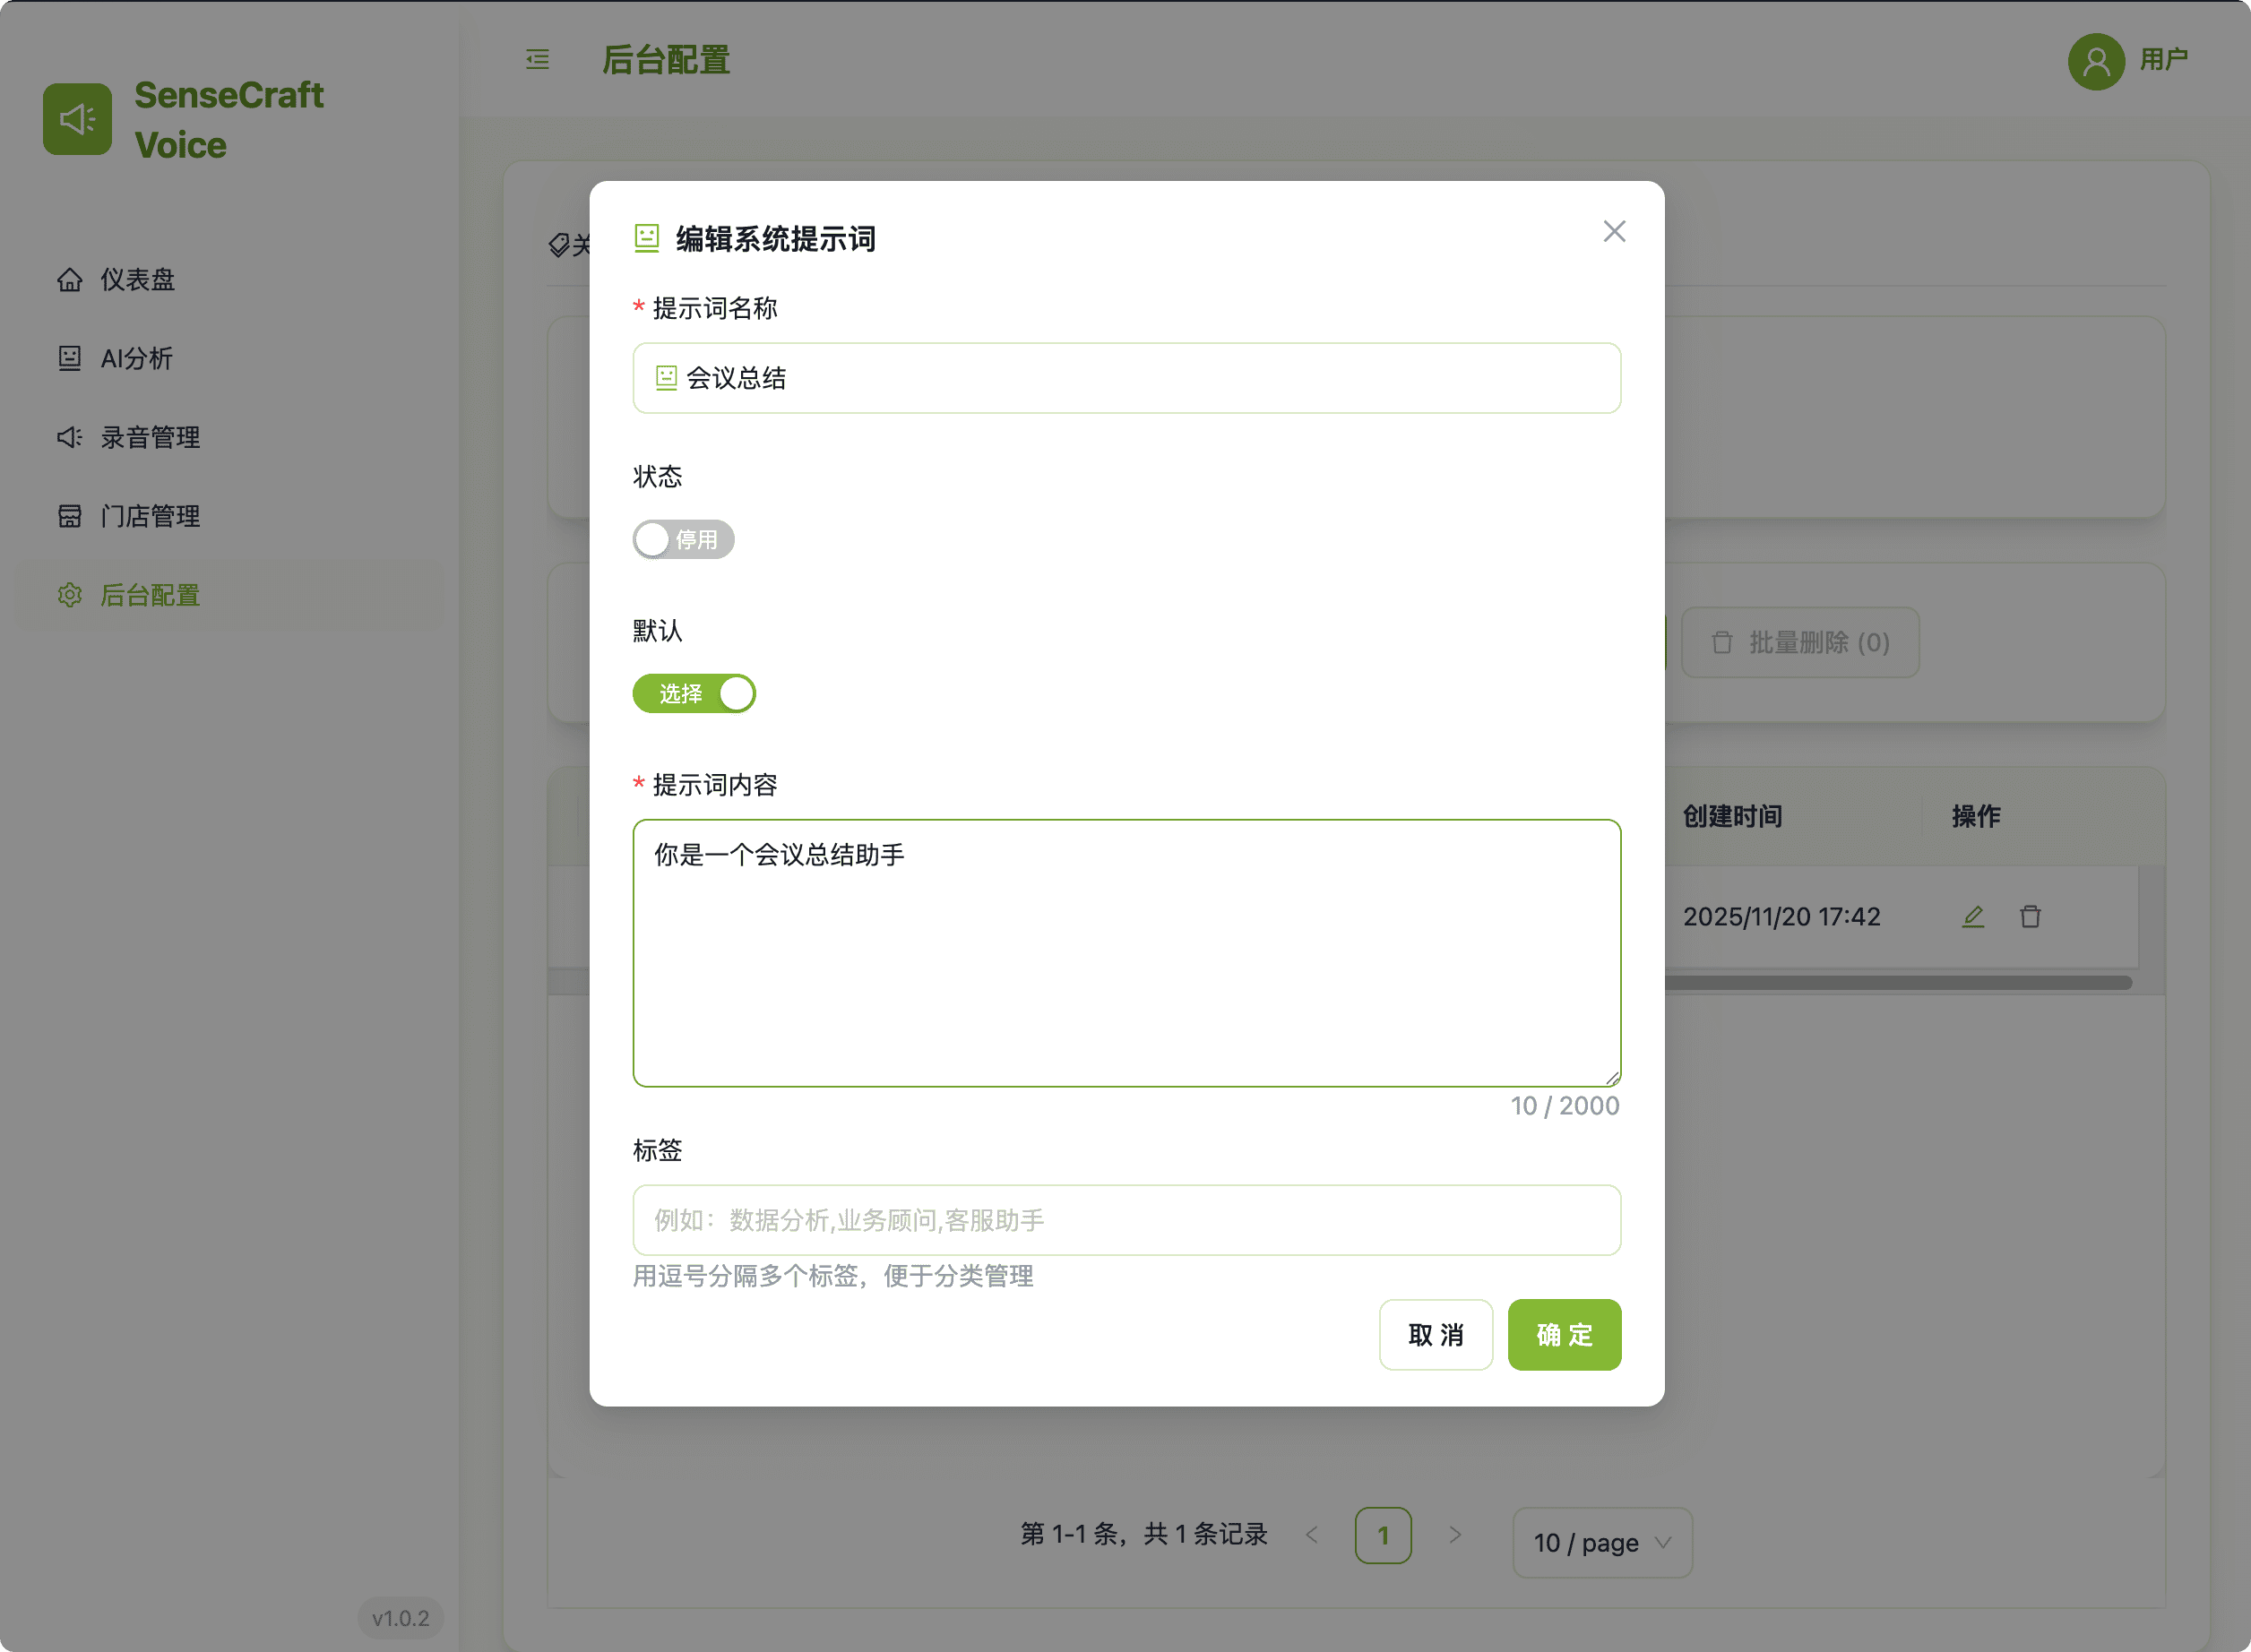
Create and manage custom AI Prompts to dictate how the AI processes selected voice records.
- Control: Define prompt Name, Tags, and Content. Only one Enabled prompt is active for use at a time.
- Management: Supports Adding, Editing, Deleting, and Batch Deletion.