How to run VLM with speech interaction on reComputer Jetson
Introduction
This guide provides a detailed explanation on how to run a multimodal Visual Language Model (VLM) with speech interaction on a reComputer Nvidia Jetson device. The model leverages the powerful computational capabilities of the official Nvidia Jetson platform, combined with Alibaba's open-source speech-to-text model SenseVoice and coqui-ai's text-to-speech (TTS) model, to perform complex multimodal tasks. By following this guide, you will be able to successfully install and operate this system, enabling it with both visual recognition and speech interaction capabilities, thereby offering smarter solutions for your projects.
VLM (Visual Language Model) Introduction
The Visual Language Model (VLM) is a multimodal model optimized for the Nvidia Jetson platform. It combines visual and language processing to handle complex tasks, such as object recognition and generating descriptive language. VLM is applicable in fields like autonomous driving, intelligent surveillance, and smart homes, offering intelligent and intuitive solutions.
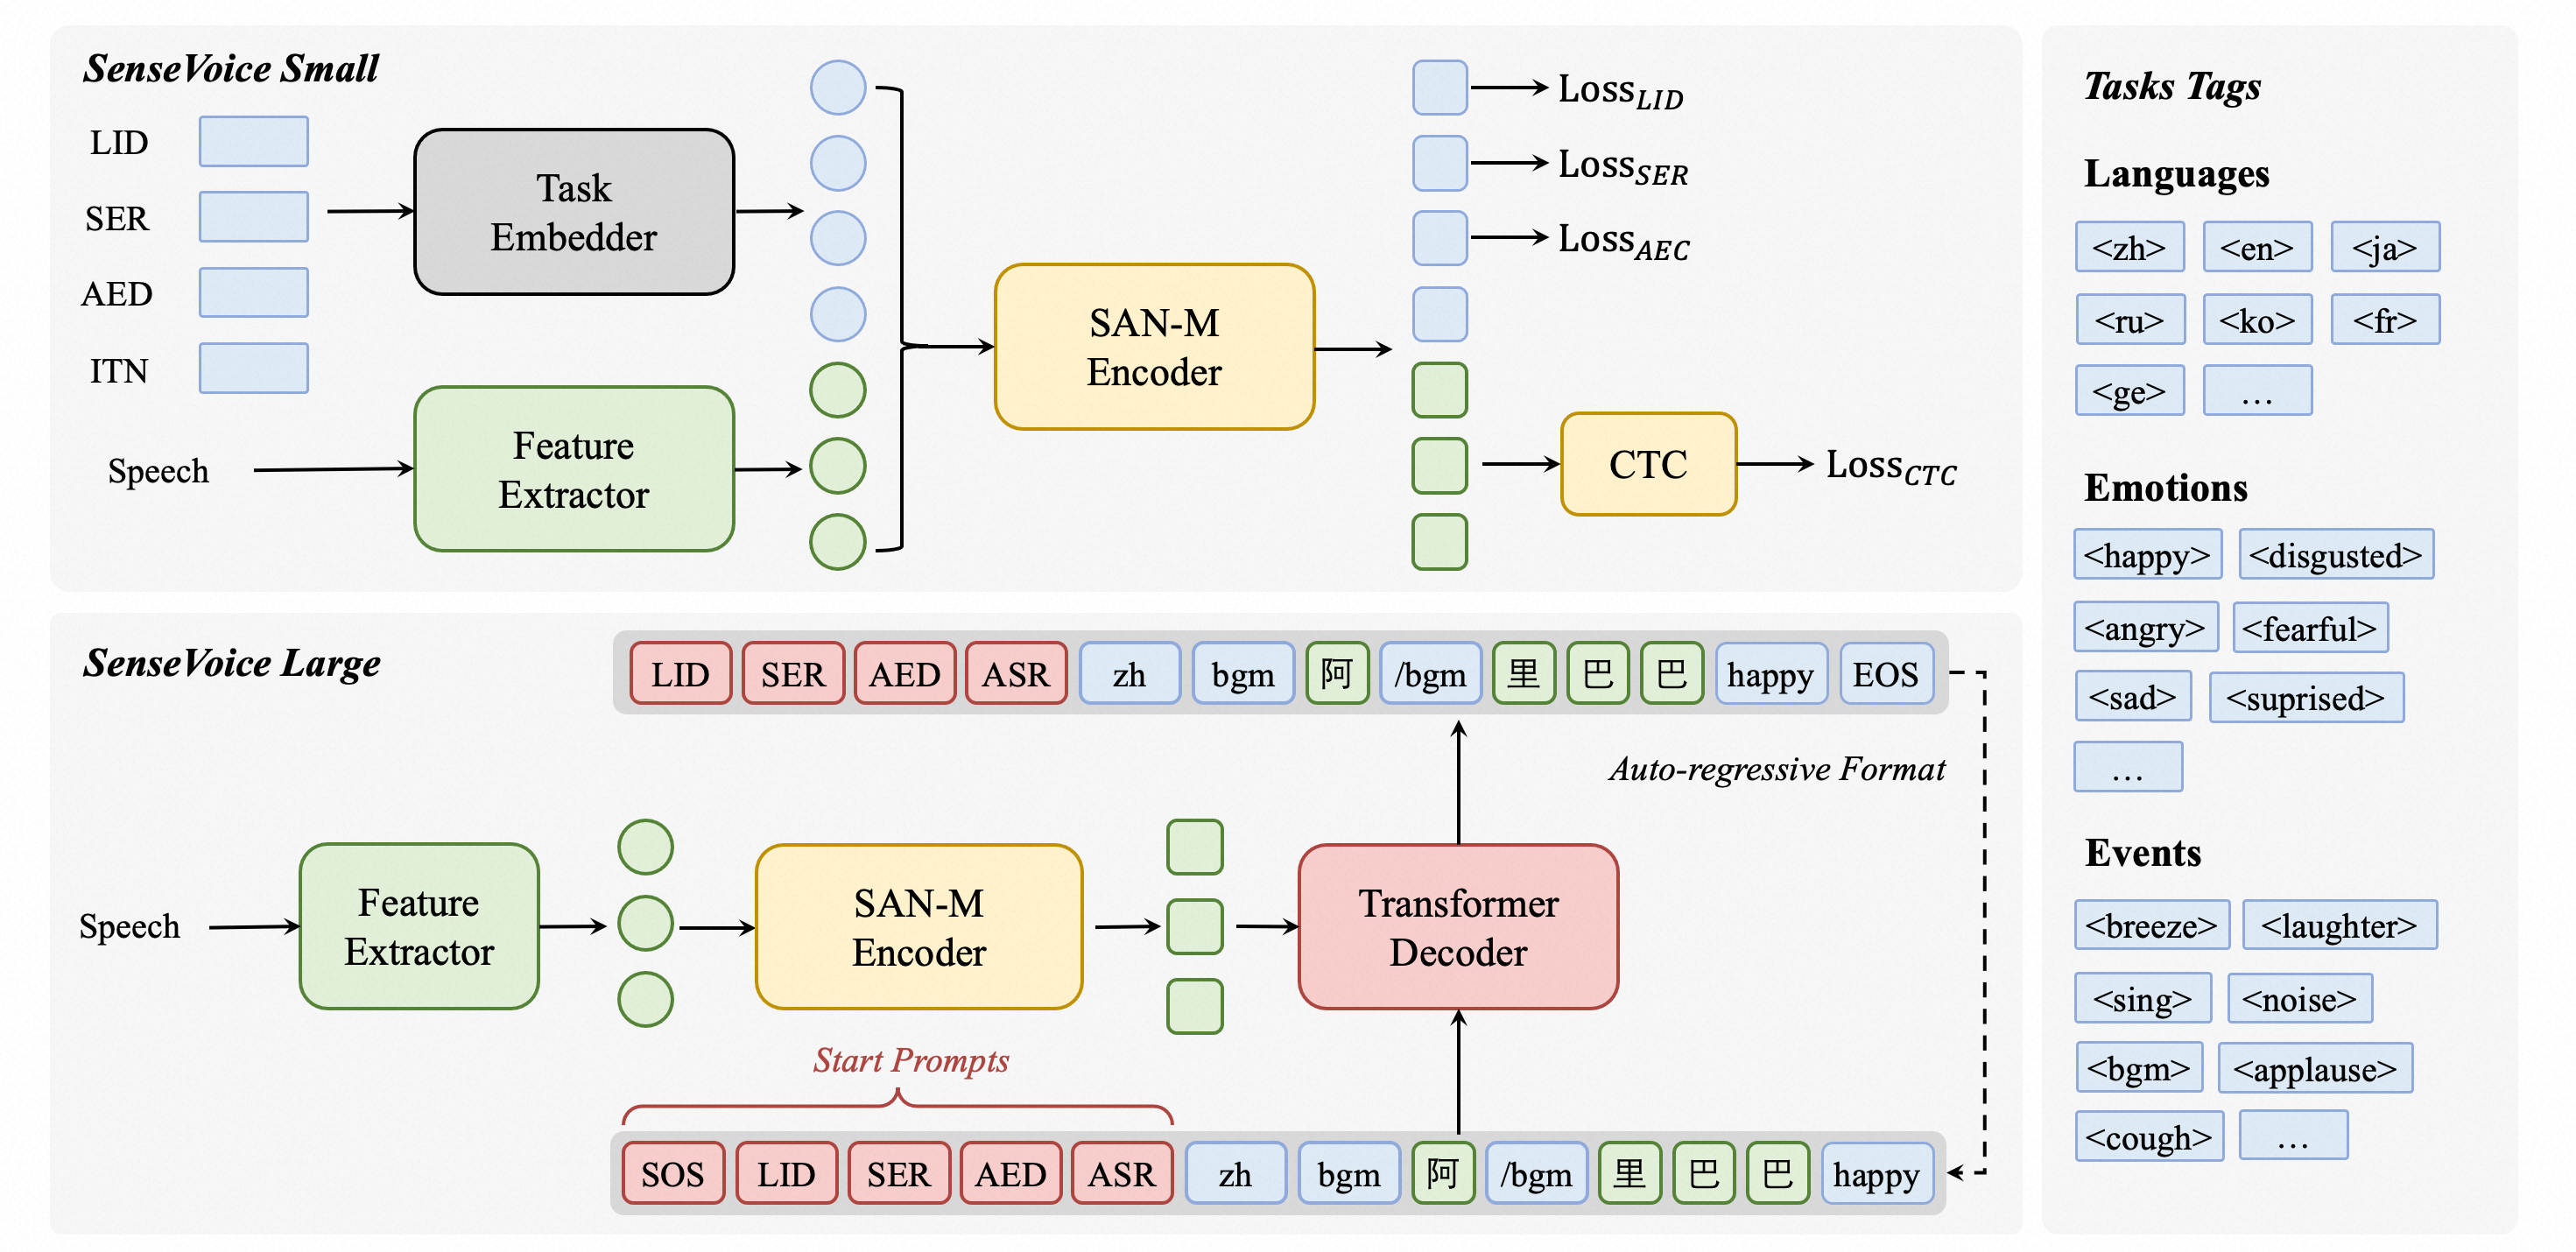
SenseVoice Introduction
SenseVoice is an open-source model focused on high-accuracy multilingual speech recognition, speech emotion recognition, and audio event detection. Trained on over 400,000 hours of data, it supports 50+ languages and outperforms the Whisper model. The SenseVoice-Small model delivers ultra-low latency, processing 10 seconds of audio in just 70ms. It also provides convenient finetuning and supports deployment in multiple languages, including Python, C++, HTML, Java, and C#.
TTS (Text-to-Speech) Introduction
The TTS model is a high-performance deep learning model for text-to-speech tasks. It includes various models like Tacotron2 and vocoders such as MelGAN and WaveRNN. The TTS model supports multi-speaker TTS, efficient training, and offers tools for dataset curation and model testing. Its modular codebase allows easy implementation of new features.

Prerequisites
- reComputer Jetson AGX Orin 64G or reComputer Jetson J4012 16G device with more than 16GB of memory.
- USB driver-free speaker microphone
- An IP camera that can output an RTSP stream address. We have also included instructions on how to use the NVIDIA Nvstreamer tool to convert local videos into RTSP streams.
We have already tested the feasibility of this wiki on reComputer Orin NX 16GB and AGX Orin 64GB Developer Kit.

Installation
Initialize system environment
-
After installing the initial system with JP6, you need to check the installation of
CUDAand other libraries. You can verify and install them by runningsudo apt-get install nvidia-jetpack. -
Install
python3-pip,jtop, anddocker-ce. -
Install the necessary dependencies by running the following commands:
sudo apt-get install libportaudio2 libportaudiocpp0 portaudio19-dev
sudo pip3 install pyaudio playsound subprocess wave keyboard
sudo pip3 --upgrade setuptools
sudo pip3 install sudachipy==0.5.2 -
Check that the audio input and output, as well as the USB speaker microphone, are functioning properly and that the network connection is stable.
Install VLM
The core functionality of this project is the visual language model (VLM). We have provided a guide on how to use the VLM on the reComputer Nvidia Jetson. Please refer to this link for installation and usage instructions. Make sure you fully understand how to perform inference using text descriptions in the VLM before proceeding with the following steps.
Install Pytorch Torchaudio
We have provided an Nvidia Jetson AI course for beginners, which includes instructions on how to install PyTorch, Torchaudio, and Torchvision. Please download and install these packages according to your system environment.
Install Speech_vlm (Based on SenseVoice)
-
Clone Speech_vlm packages:
cd ~/
git clone https://github.com/ZhuYaoHui1998/speech_vlm.git -
Install Speech_vlm environment:
cd ~/speech_vlm
sudo pip3 install -r requement.txt
Install TTS (Based on Coqui-ai)
cd ~/speech_vlm/TTS
sudo pip3 install .[all]
Usage
The structure of the speech_vlm repository is as follows:
speech_vlm/
├── /TTS   # Coqui-ai TTS program
├── config # VLM config
├── README.md    #Project Introduction
├── requirements.txt   #SenseVoice required environment libraries
├── compose.yaml   #VLM Docker Compose startup file
├── delete_id.sh     #Delete camera ID script
├── example_1.wav     #Audio feedback sound tone template (replaceable)
├── model.py     #SenseVoice main program
├── set_alerts.sh     #Set up camera alerts
├── set_describe.sh     #Text input to have the VLM describe the current scene
├── set_streamer_id.sh  #Add RTSP camera to VLM
├── view_rtsp.py  # View RTSP stream by opencv
└── vlm_voice.py  # multimodal main program
-
Start the VLM
cd ~/speech_vlm
sudo docker compose up -d
-
Add RTSP stream to VLM
View the contents of set_streamer_id.sh under the speech_vlm repository:
#!/bin/bash
curl --location 'http://0.0.0.0:5010/api/v1/live-stream' \
--header 'Content-Type: application/json' \
--data '{"liveStreamUrl": "RTSP stream address"}'
Replace 0.0.0.0 with the IP address of the Jetson device and replace RTSP stream address with the camera's RTSP stream address.
For example:
#!/bin/bash
curl --location 'http://192.168.49.227:5010/api/v1/live-stream' \
--header 'Content-Type: application/json' \
--data '{"liveStreamUrl": "rtsp://admin:[email protected]:554//Streaming/Channels/1"}'
If you don't have an RTSP camera, we have provided instructions on how to use NVStreamer to stream local videos as RTSP and add them to the VLM.
Run set_streamer_id.sh
cd ~/speech_vlm
sudo chmod +x ./set_streamer_id.sh
./set_streamer_id.sh
We will obtain a camera ID, this ID is very important and needs to be recorded, like this:

- Run vlm_voice.py
You need to replace 0.0.0.0 in the following two lines of Python code:
API_URL = 'http://0.0.0.0:5010/api/v1/chat/completions'  # API endpoint
REQUEST_ID = ""  # Request ID
with the Jetson IP address and fill in the camera ID returned from Step 2 in place of REQUEST_ID.
vlm_voice.py
import pyaudio
import wave
import keyboard
import subprocess
import json
from funasr import AutoModel
from funasr.utils.postprocess_utils import rich_transcription_postprocess
import time
import torch
from TTS.api import TTS
import os
# Get device
device = "cuda" if torch.cuda.is_available() else "cpu"

# Init TTS
api = TTS("tts_models/en/ljspeech/glow-tts").to(device)

# Configuration parameters
FORMAT = pyaudio.paInt16  # 16-bit resolution
CHANNELS = 1  # Mono channel
CHUNK = 1024  # Number of samples per chunk
OUTPUT_FILENAME = "output.wav"  # Output file name
API_URL = 'http://192.168.49.227:5010/api/v1/chat/completions'  # API endpoint
REQUEST_ID = "1388b691-3b9f-4bda-9d70-0ff0696f80f4"  # Request ID

# Initialize PyAudio
audio = pyaudio.PyAudio()
# Prepare the list to store recording data
frames = []

# Initialize Micphone Rate
print("Available audio input devices:")
for i in range(audio.get_device_count()):
    info = audio.get_device_info_by_index(i)
    print(f"Device {i}: {info['name']} - {info['maxInputChannels']} channels")

device_index = int(input("Please select the device index for your USB microphone: "))

device_info = audio.get_device_info_by_index(device_index)
supported_sample_rates = [8000, 16000, 32000, 44100, 48000]
supported_rate=0
for rate in supported_sample_rates:
    try:
        if audio.is_format_supported(rate,
                                     input_device=device_index,
                                     input_channels=1,
                                     input_format=pyaudio.paInt16):
            supported_rate=rate
            print(f"{rate} Hz is supported.")
    except ValueError:
        print(f"{rate} Hz is not supported.")


# Initialize the model
model = "./SenseVoiceSmall"
model = AutoModel(
    model=model,
    vad_model="./speech_fsmn_vad_zh-cn-16k-common-pytorch",
    vad_kwargs={"max_single_segment_time": 30000},
    trust_remote_code=True,
    disable_log=True
)


def extract_content(json_response):
    try:
        # 解析JSON字符串
        data = json.loads(json_response)

        # 提取content部分
        content = data["choices"][0]["message"]["content"]

        print(f"{content}")
        return content
    except KeyError as e:
        print(f"Key error: {e}")
    except json.JSONDecodeError as e:
        print(f"JSON decode error: {e}")
    except Exception as e:
        print(f"An unexpected error occurred: {e}")

def start_recording():
    global frames
    frames = []

    try:
        stream = audio.open(format=FORMAT, channels=CHANNELS,
                            rate=supported_rate, input=True,
                            frames_per_buffer=CHUNK, input_device_index=device_index)
        print("Recording started... Press '2' to stop recording.")

        while True:
            if keyboard.is_pressed('2'):
                print("Recording stopped.")
                break
            data = stream.read(CHUNK)
            frames.append(data)

        stream.stop_stream()
        stream.close()

    except Exception as e:
        print(f"An error occurred during recording: {e}")

def save_recording():
    try:
        waveFile = wave.open(OUTPUT_FILENAME, 'wb')
        waveFile.setnchannels(CHANNELS)
        waveFile.setsampwidth(audio.get_sample_size(FORMAT))
        waveFile.setframerate(supported_rate)
        waveFile.writeframes(b''.join(frames))
        waveFile.close()
        print(f"Recording saved as {OUTPUT_FILENAME}")
    except Exception as e:
        print(f"An error occurred while saving the recording: {e}")

def send_alert(text):
    # Construct the JSON payload
    payload = {
        "messages": [
            {
                "role": "system",
                "content": "You are a helpful AI assistant."
            },
            {
                "role": "user",
                "content": [
                    {
                        "type": "stream",
                        "stream": {
                            "stream_id": REQUEST_ID
                        }
                    },
                    {
                        "type": "text",
                        "text": text
                    }
                ]
            }
        ],
        "min_tokens": 1,
        "max_tokens": 128
    }

    # Convert the payload to a JSON string
    json_payload = json.dumps(payload)

    # Execute the curl command using subprocess
    curl_command = [
        'curl', '--location', API_URL,
        '--header', 'Content-Type: application/json',
        '--data', json_payload
    ]

    try:
        result = subprocess.run(curl_command, check=True, capture_output=True, text=True)
        ##Get words
        content_result=extract_content(result.stdout)
        # TTS
        api.tts_to_file(
            str(content_result),
            speaker_wav="./example_1.wav",
            file_path="speech.wav"
        )
        # Convert audio rate
        subprocess.run(['ffmpeg', '-i', 'speech.wav', '-ar',str(supported_rate), 'speech1.wav','-y'])
        # Play audio
        wf = wave.open('./speech1.wav', 'rb')
        stream = audio.open(format=pyaudio.paInt16,
                        channels=1,
                        rate=supported_rate,
                        output=True,
                        output_device_index=device_index)
        data = wf.readframes(1024)
        while data:
            stream.write(data)
            data = wf.readframes(1024)
        # Play audio
        os.remove('speech.wav')
        os.remove('speech1.wav')
        stream.stop_stream()
        stream.close()
        wf.close()  # Close the wave file as well

        #print(f"Alert sent successfully: {result.stdout}")
    except subprocess.CalledProcessError as e:
        print(f"An error occurred while sending the alert: {e.stderr}")
    finally:
        # Even if an error occurs, try to close the stream
        if stream.is_active():
            stream.stop_stream()
            os.remove('speech.wav')
            os.remove('speech1.wav')
            stream.close()
print("Welcome to the Recording and Speech-to-Text System!")
print("Press '1' to start recording, '2' to stop recording.")

while True:
    if keyboard.is_pressed('1'):
        print("Preparing to start recording...")
        start_recording()
        save_recording()

        print("Processing the recording file, please wait...")
        try:
            res = model.generate(
                input=f"./{OUTPUT_FILENAME}",
                cache={},
                language="auto",  # "zh", "en", "yue", "ja", "ko", "nospeech"
                use_itn=True,
                batch_size_s=60,
                merge_vad=True,
                merge_length_s=15,
            )
            text = rich_transcription_postprocess(res[0]["text"])
            print(f"Speech-to-Text Result:\n{text}")

            # Send the transcription result as an alert
            send_alert(text)

        except Exception as e:
            print(f"An error occurred while processing the recording: {e}")

    time.sleep(0.1)  # Reduce CPU usage
Run python:
cd ~/speech_vlm
sudo python3 vlm_voice.py
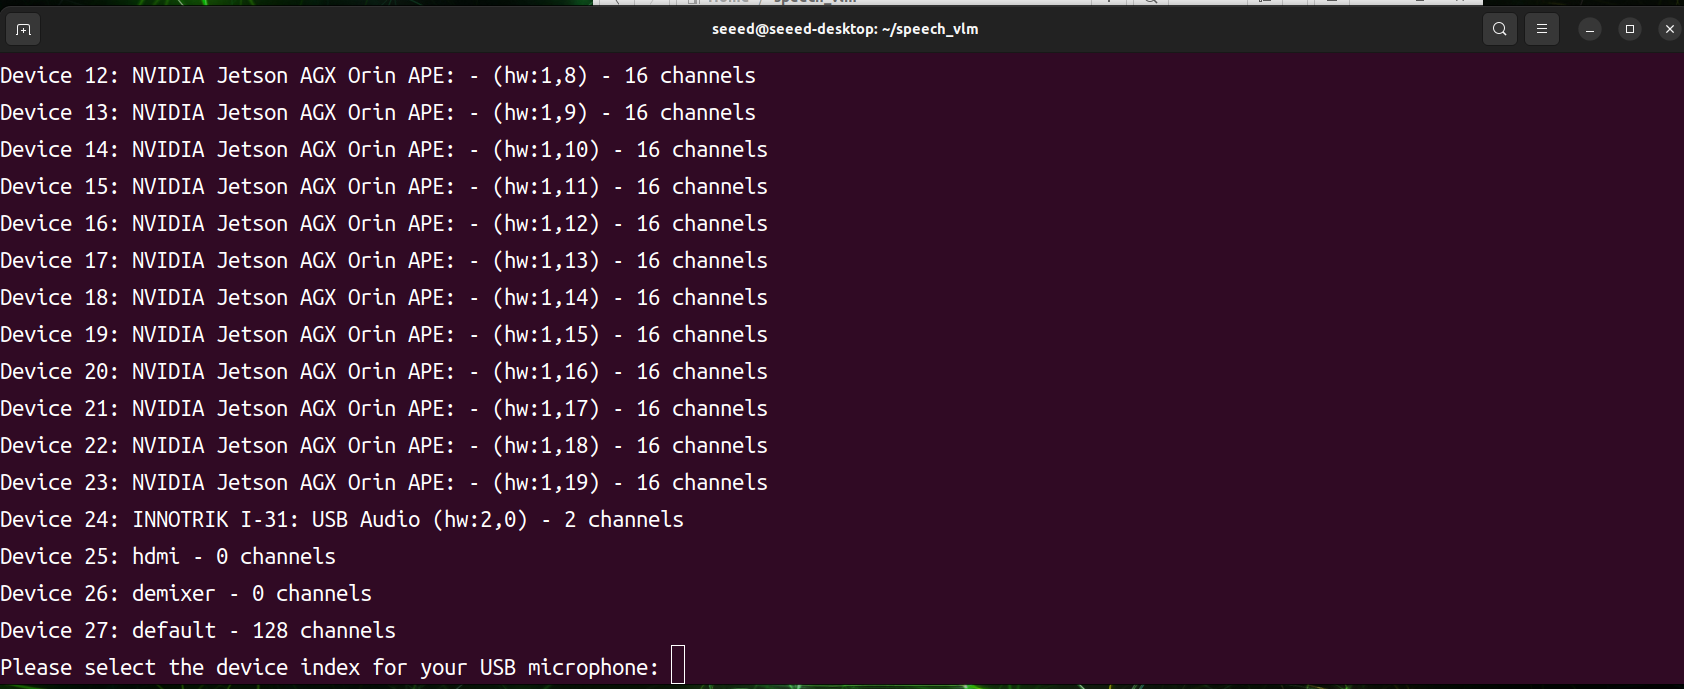
After the program starts, it will scan all audio input and output devices. You will need to manually select the index ID of the desired audio device. The program is about to start working, then press 1 to record and 2 to send.
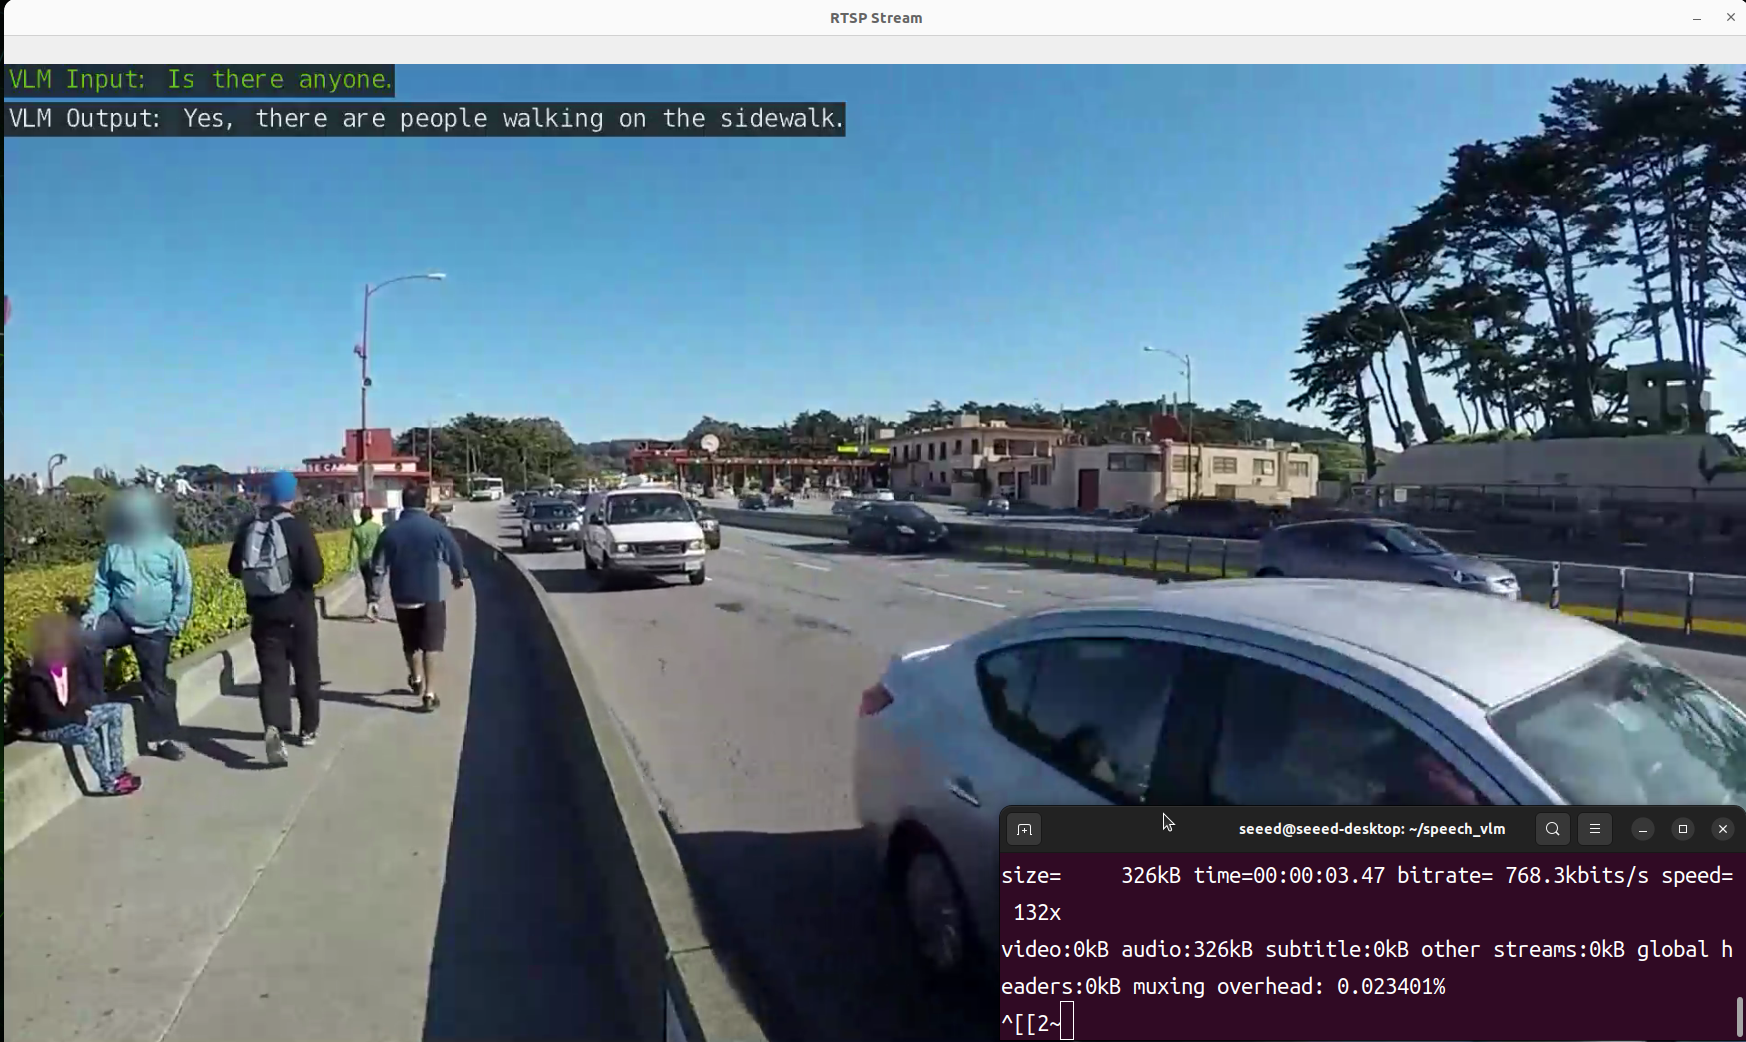
- View result
We have prepared a view_rtsp.py script to view the output results. You need to replace the IP part of the rtsp_url = "rtsp://0.0.0.0:5011/out" with the IP address of your Jetson device.
viwe_rtsp.py
import cv2

rtsp_url = "rtsp://192.168.49.227:5011/out"

cap = cv2.VideoCapture(rtsp_url)

if not cap.isOpened():
    print("Cannot open RTSP stream")
    exit()

while True:
    ret, frame = cap.read()
    if not ret:
        print("Failed to retrieve frame")
        break

    height, width = frame.shape[:2]

    frame_resized = cv2.resize(frame, (int(width // 1.1), int(height // 1.1)))

    cv2.imshow('RTSP Stream', frame_resized)

    if cv2.waitKey(1) & 0xFF == ord('q'):
        break

cap.release()
cv2.destroyAllWindows()
sudo pip3 install opencv-python
cd ~/speech_vlm
sudo python3 view_rtsp.py
Demonstration
Tech Support & Product Discussion
Thank you for choosing our products! We are here to provide you with different support to ensure that your experience with our products is as smooth as possible. We offer several communication channels to cater to different preferences and needs.