Get Started with Arduino
Before flashing the firmware, please ensure you device is T1000-E for LoRaWAN version and please don't flash other Meshtastic firmware to this tracker model, it may cause the device to be completely dead.
The following Arduino examples are available:
| Example | Description |
|---|---|
| Blinky | LED flash - Controls GPIO pins to make an LED blink, used for function tests and status indication. |
| Button | Print button event - Detects button state changes and prints event information for user interaction. |
| Buzzer | Loop play sound - Drives a buzzer to produce sounds for reminders or alarms. |
| Sensor | Print temp/lux/battery value - Reads and prints temperature, light intensity, and battery voltage data. |
| Accelerometer | Print ax/ay/az/event value - Collects acceleration data for motion detection and posture recognition. |
| GNSS | Print latitude/longitude value - Obtains and prints GNSS-based location data. |
| LoRaWAN | Join through OTAA, send test data to LNS - Connects to LoRaWAN and sends test data. |
| LoRaWAN Sensor | Join through OTAA, read temp/lux/bat/ax/ay/az, send data to LNS - Collects and transmits various sensor data via LoRaWAN. |
| LoRaWAN GNSS | Join through OTAA, scan lat/lon, send data to LNS - Captures and transmits GNSS location data in real-time. |
| LoRaWAN WiFi | Join through OTAA, scan WiFi MAC, send data to LNS - Scans WiFi MAC addresses and transmits data for positioning. |
| LoRaWAN Beacon | Join through OTAA, scan Beacon MAC, send data to LNS - Scans and transmits Beacon MAC data for tracking and identification. |
Preparation
Hardware Preparation
- SenseCAP T1000-E x 1
- USB Cable x 1
- Computer x 1
Software Preparation
Before you can start developing,the following software tools are required.
Check here for to Get Started with Arduino.
The version needs to be newer than v1.6.12.
Get Started
Prerequisites
- Add URL
Navigate to File -> Preferences, and add the following URL to Additional Boards Manager URLs:
https://files.seeedstudio.com/arduino/package_seeeduino_boards_index.json

- Install Board
Navigate to Boards Manager, searchseeed nrf52, select the latest version and install it.
Building an Example
- Select board and port
Board: Seeed Tracker T1000 E
Port: Your device port

- build example
Navigate to File -> Examples -> Seeed Tracker T1000 E LoRaWAN, Then open an example of your choice (in this case the accelerator example):

Uploading to target device
As the T1000-E bootloader only supports flashing via .uf2 drag&drop, it is not possible upload the examples directly via the Arduino IDE.
Instead, follow these steps:
- Export the compiled binary from the Arduino IDE. You will find it in the same folder as the
.inosketch.

-
Convert the
.hexfile into a.uf2file. This is done using a python script which can be downloaded here. Download and run the script with the following parameters from a terminal:
python uf2conv.py -f 0xADA52840 -c -o test.uf2 <your_hex_file>.hex -
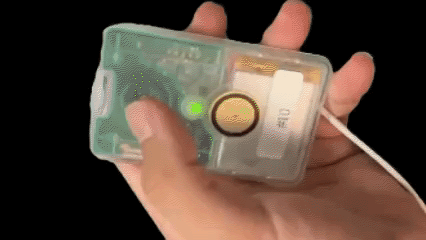
Put the device into DFU mode by pressing and holding the device button, then quickly connect the charging cable twice, the green LED will be solid on. You should now find the T1000-E as mass storage device.
If no driver window pops up after pressing and holding the device button when connecting the cable, please quickly double-tap the charging cable as shown in the operation below.

- Copy the
.uf2file over to the mass storage. After it has been copied over, the device automatically starts running it.
Reading serial messages
Messages from the device print out using Serial.println and Serial.printf can be read using the integrated terminal of the arduino IDE.
Make sure you have enabled selected USB-CDC and enabled it:

Then open the serial monitor using Tools -> Serial Monitor and start observing the messages:

LoRaWAN examples
The examples which include LoRaWAN messaging need two further steps.
Set up a LNS
You need a LoRaWAN network server (LNS) where your tracker can connect to. In this example we use The Things Network (TTN), but any other should work fine. In order to work with TTN, you need to have an account with The Things Industries or The Things Network and access to a gateway (either a public one or your own if none is available).
Step 1: Create an application
Navigate to Applications page and click "+ Create application".

Enter an Application ID and click "Create application" to save your changes.

Step 2: Register the Device
Click "+ Register end device".

Set the following parameters:
Frequency Plan: Select the appropriate Frequency plan for the target region
LoRaWAN version:LoRaWAN Specification 1.0.4
Regional Parameters version: V1.0.3 REV A

Now, create the credentials for your device. Either generate a new set or enter exsisting ones.

Adjust example code
To make it work, set the credentials from the previous step in the example code. Also specify the region, e.g. SMTC_MODEM_REGION_AS_923_GRP1, SMTC_MODEM_REGION_EU_868, or SMTC_MODEM_REGION_US_915.

If your region has duty cycle restrictions, make sure to enable the limitation in the reset handler:

Running example code
Compile and flash the LoRaWAN example in the same manner as described for the other examples (create .uf2 file and flash via drag&drop).
Afterwards you should see messages incoming in the TTN interface:

✨ Contributor Project
- This project is supported by the Seeed Studio Contributor Project.
- A special thanks to Frederik for his dedicated efforts. Your work will be exhibited.
Tech Support & Product Discussion
Thank you for choosing our products! We are here to provide you with different support to ensure that your experience with our products is as smooth as possible. We offer several communication channels to cater to different preferences and needs.