Train Image Classification Models Online Quickly with SenseCraft AI
SenseCraft AI offers a set of browser-based tools for training image classification models. There's no need to set up a local deep learning environment or write training code. Simply prepare images for different categories, and you can complete data collection, model training, performance preview, and device deployment online.
Online Training Entrance: SenseCraft AI Online Training
Feature Overview
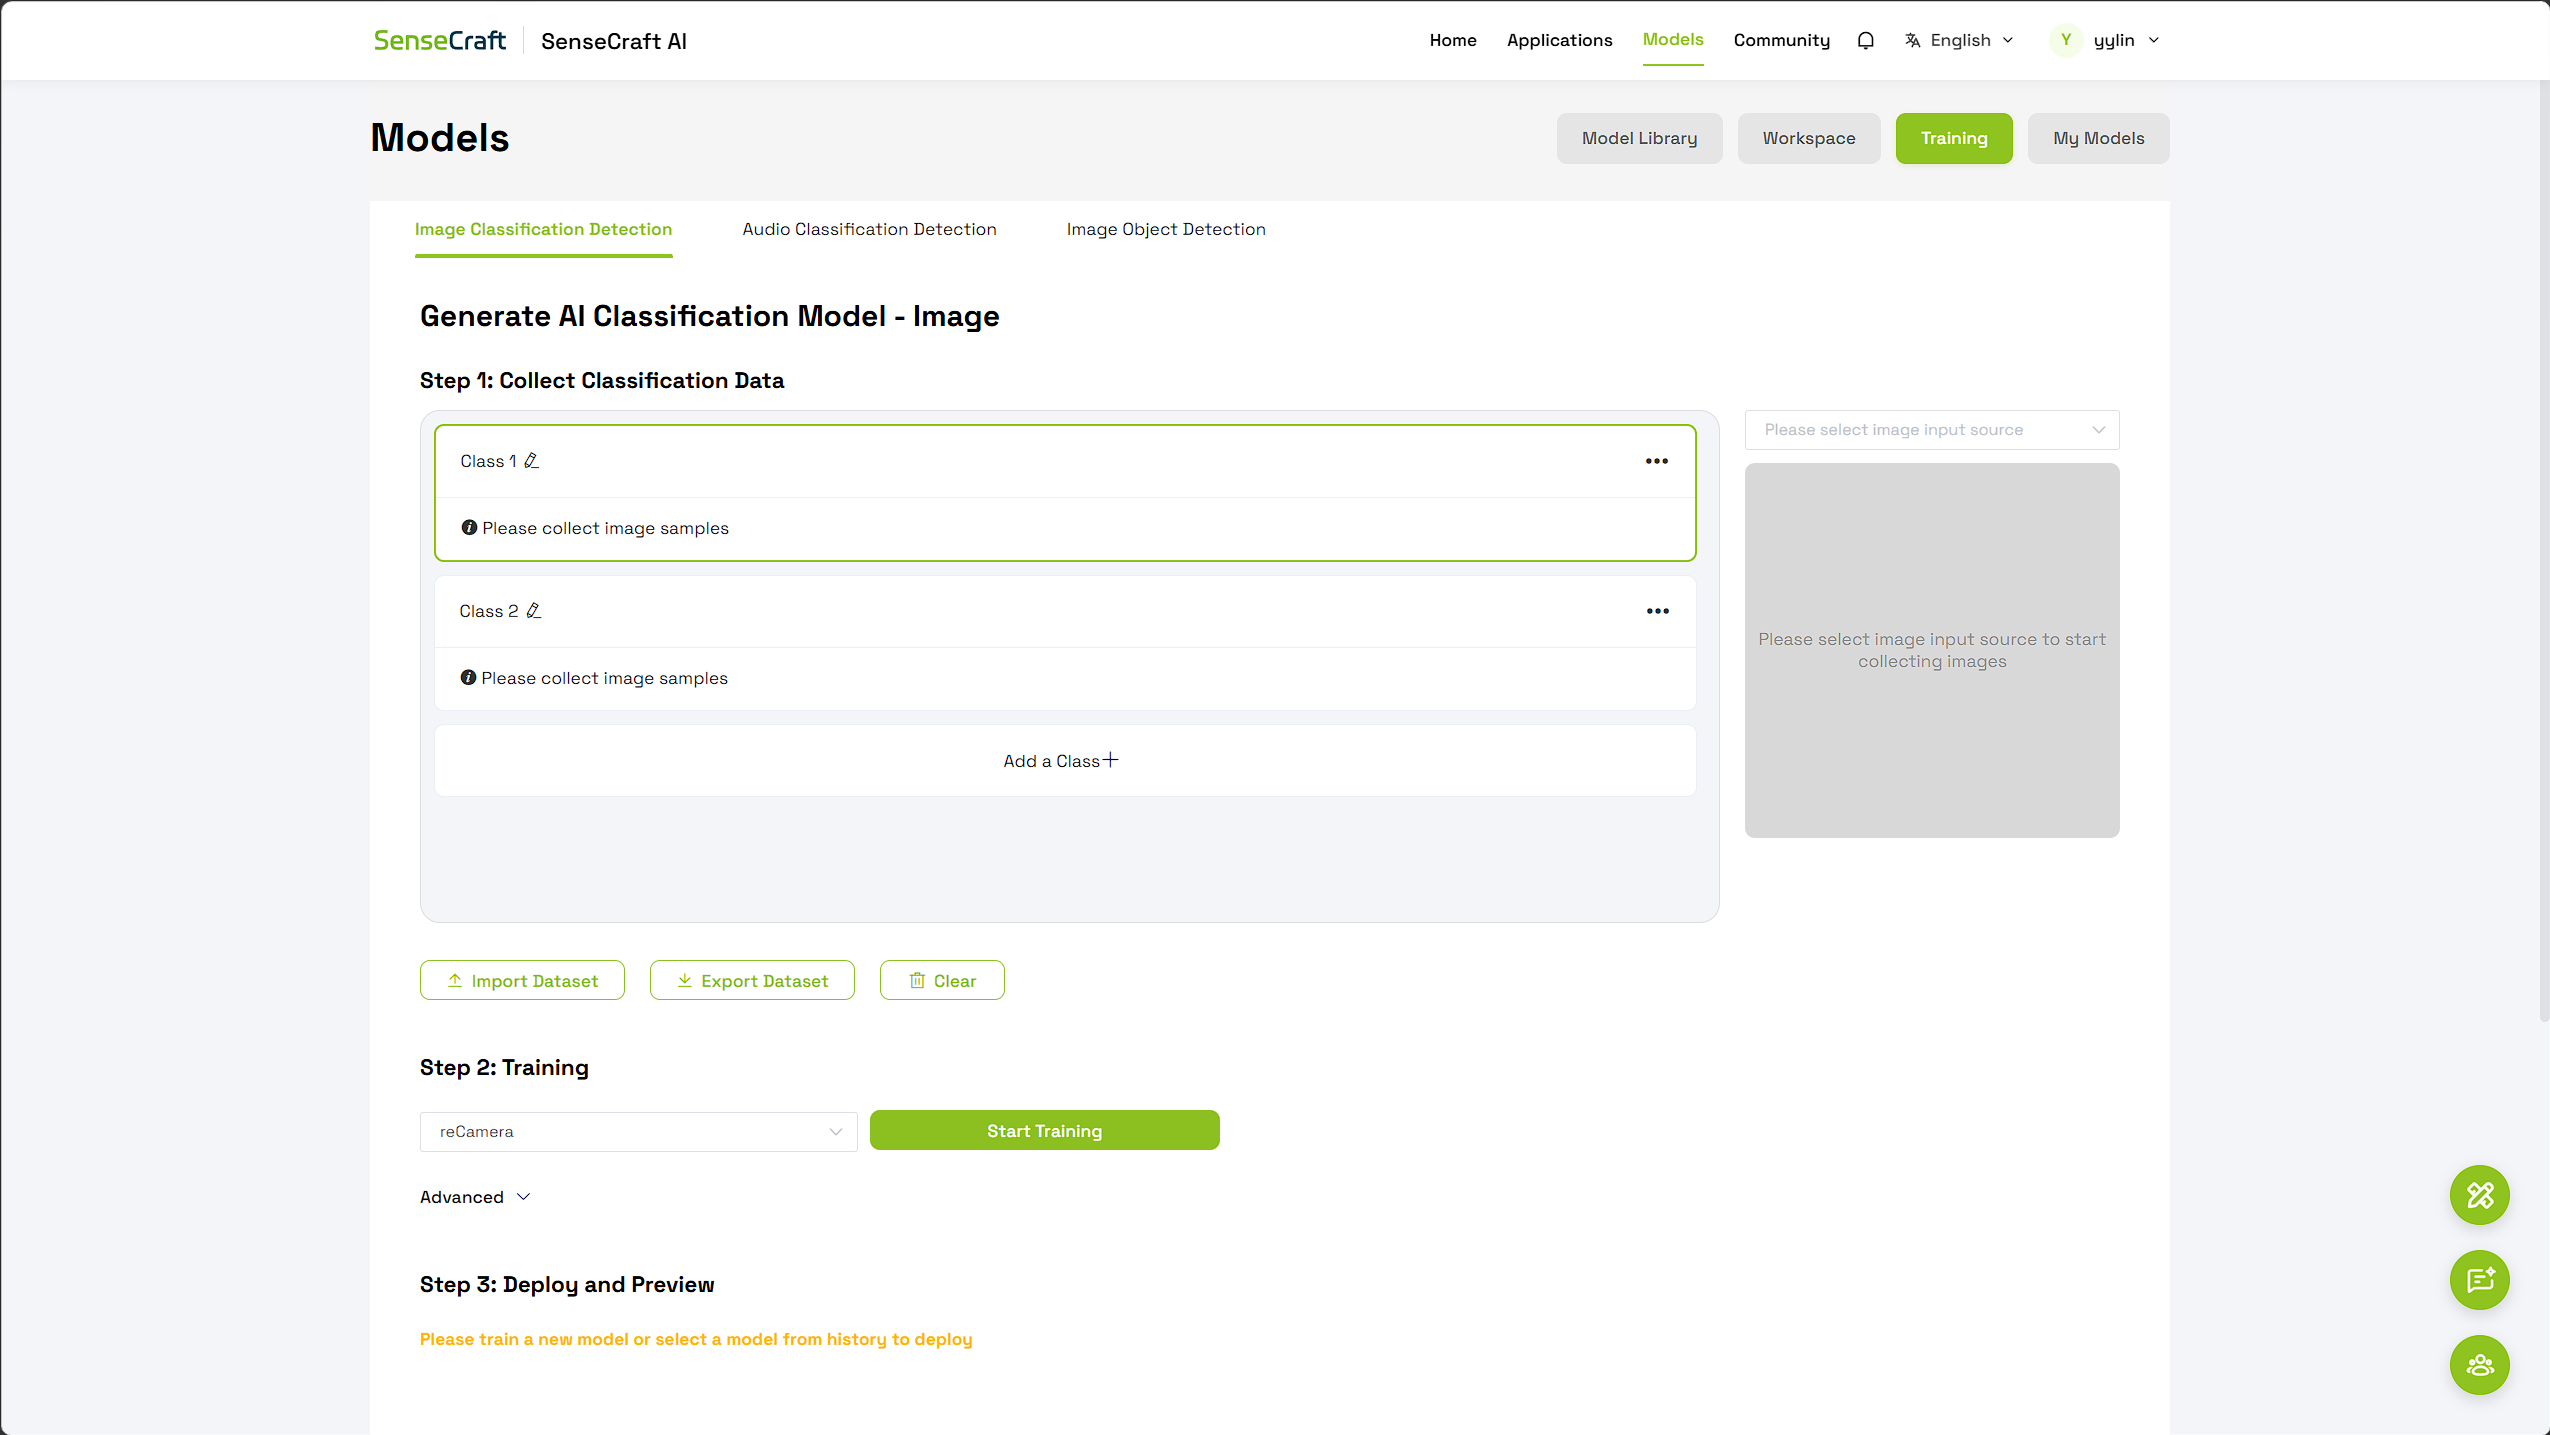
With SenseCraft AI's online training tool, you can:
- Use your computer's camera to capture training images in real-time.
- Create multiple classification categories for your recognition targets.
- Import existing datasets or export your current dataset for backup.
- Quickly train image classification models in the cloud.
- Use trained models with reCamera.
- Preview model classification results online.
- View and manage trained models in the historical models section.
The entire process can be summarized as:
- Create classification categories.
- Collect image samples for each category.
- Select the target device and start training.
- Preview classification effects using the camera.
- Deploy the model to reCamera.
What Image Classification is Suitable For
Image classification models are used to determine which category an entire image belongs to. For example:
| Application Scenario | Example Categories |
|---|---|
| Weather Recognition | Sunny, Cloudy, Rainy, Foggy |
| Object Classification | Bottle, Cup, Box |
| Product Quality Inspection | Qualified, Scratched, Damaged |
| Scene Recognition | Indoor, Outdoor, Warehouse, Office |
| Gesture Recognition | OK, Thumbs Up, Stop |
| Device Status Recognition | Normal, Alert, Offline |
Image classification outputs a single category for the entire image. If you need to locate one or more targets within the same frame and obtain their positions, you should use the "Image Object Detection" feature.
Preparation Before Use
Before you start training, please prepare:
- An account that can log in to SenseCraft AI.
- A modern browser like Chrome or Edge.
- A functional computer camera, or already organized classification images.
- At least two categories to distinguish between.
- If deployment is needed, a reCamera connected to SenseCraft AI.
When collecting samples using the browser camera, you will need to allow the webpage to access the camera.
Step 1: Access the Online Training Page
- Open the SenseCraft AI Online Training Page.
- Log in to your SenseCraft AI account.
- Navigate to the "Models" page in the top navigation, then select "Training."
- Choose "Image Classification" as the training type.
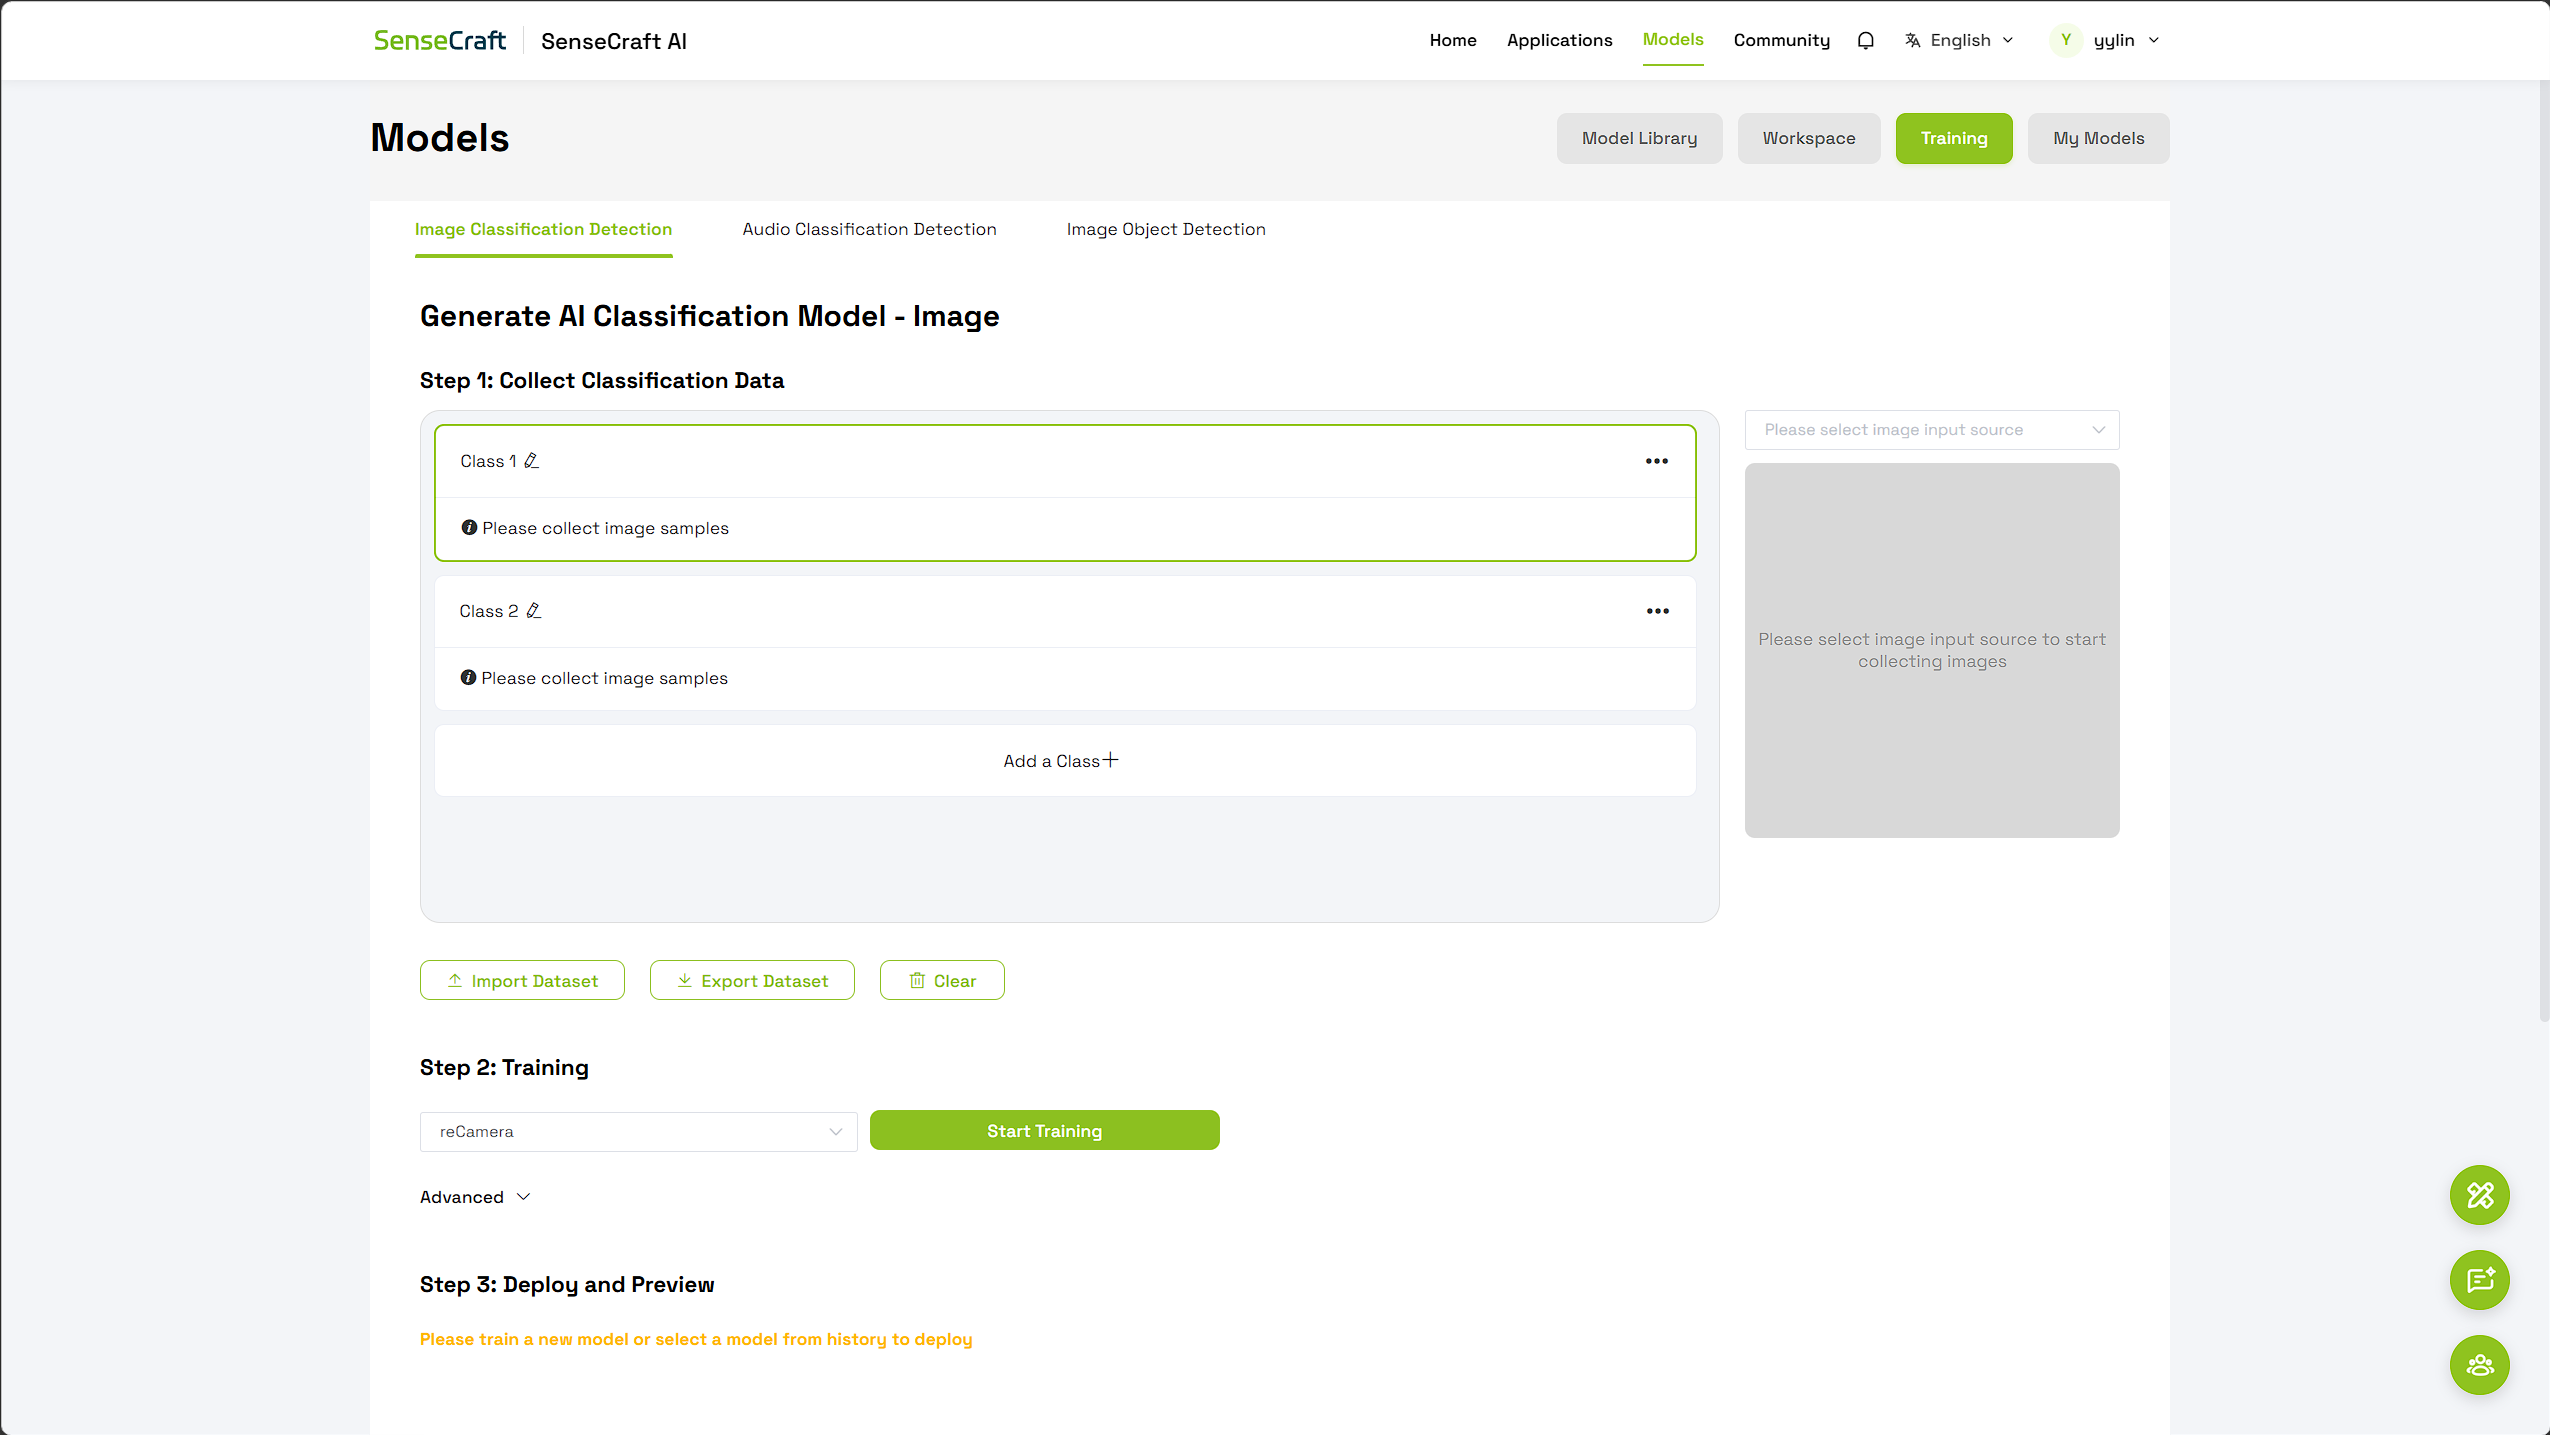
The page is mainly divided into three areas:
- Classification Data Collection: Create categories and add training samples.
- Model Training: Select a device and start training.
- Deployment & Preview: Test or deploy the model after training.
Step 2: Create Classification Categories
The system provides Class 1 and Class 2 by default. It's recommended to rename them to easily understandable category names. We will use have person and no person for demonstration here.
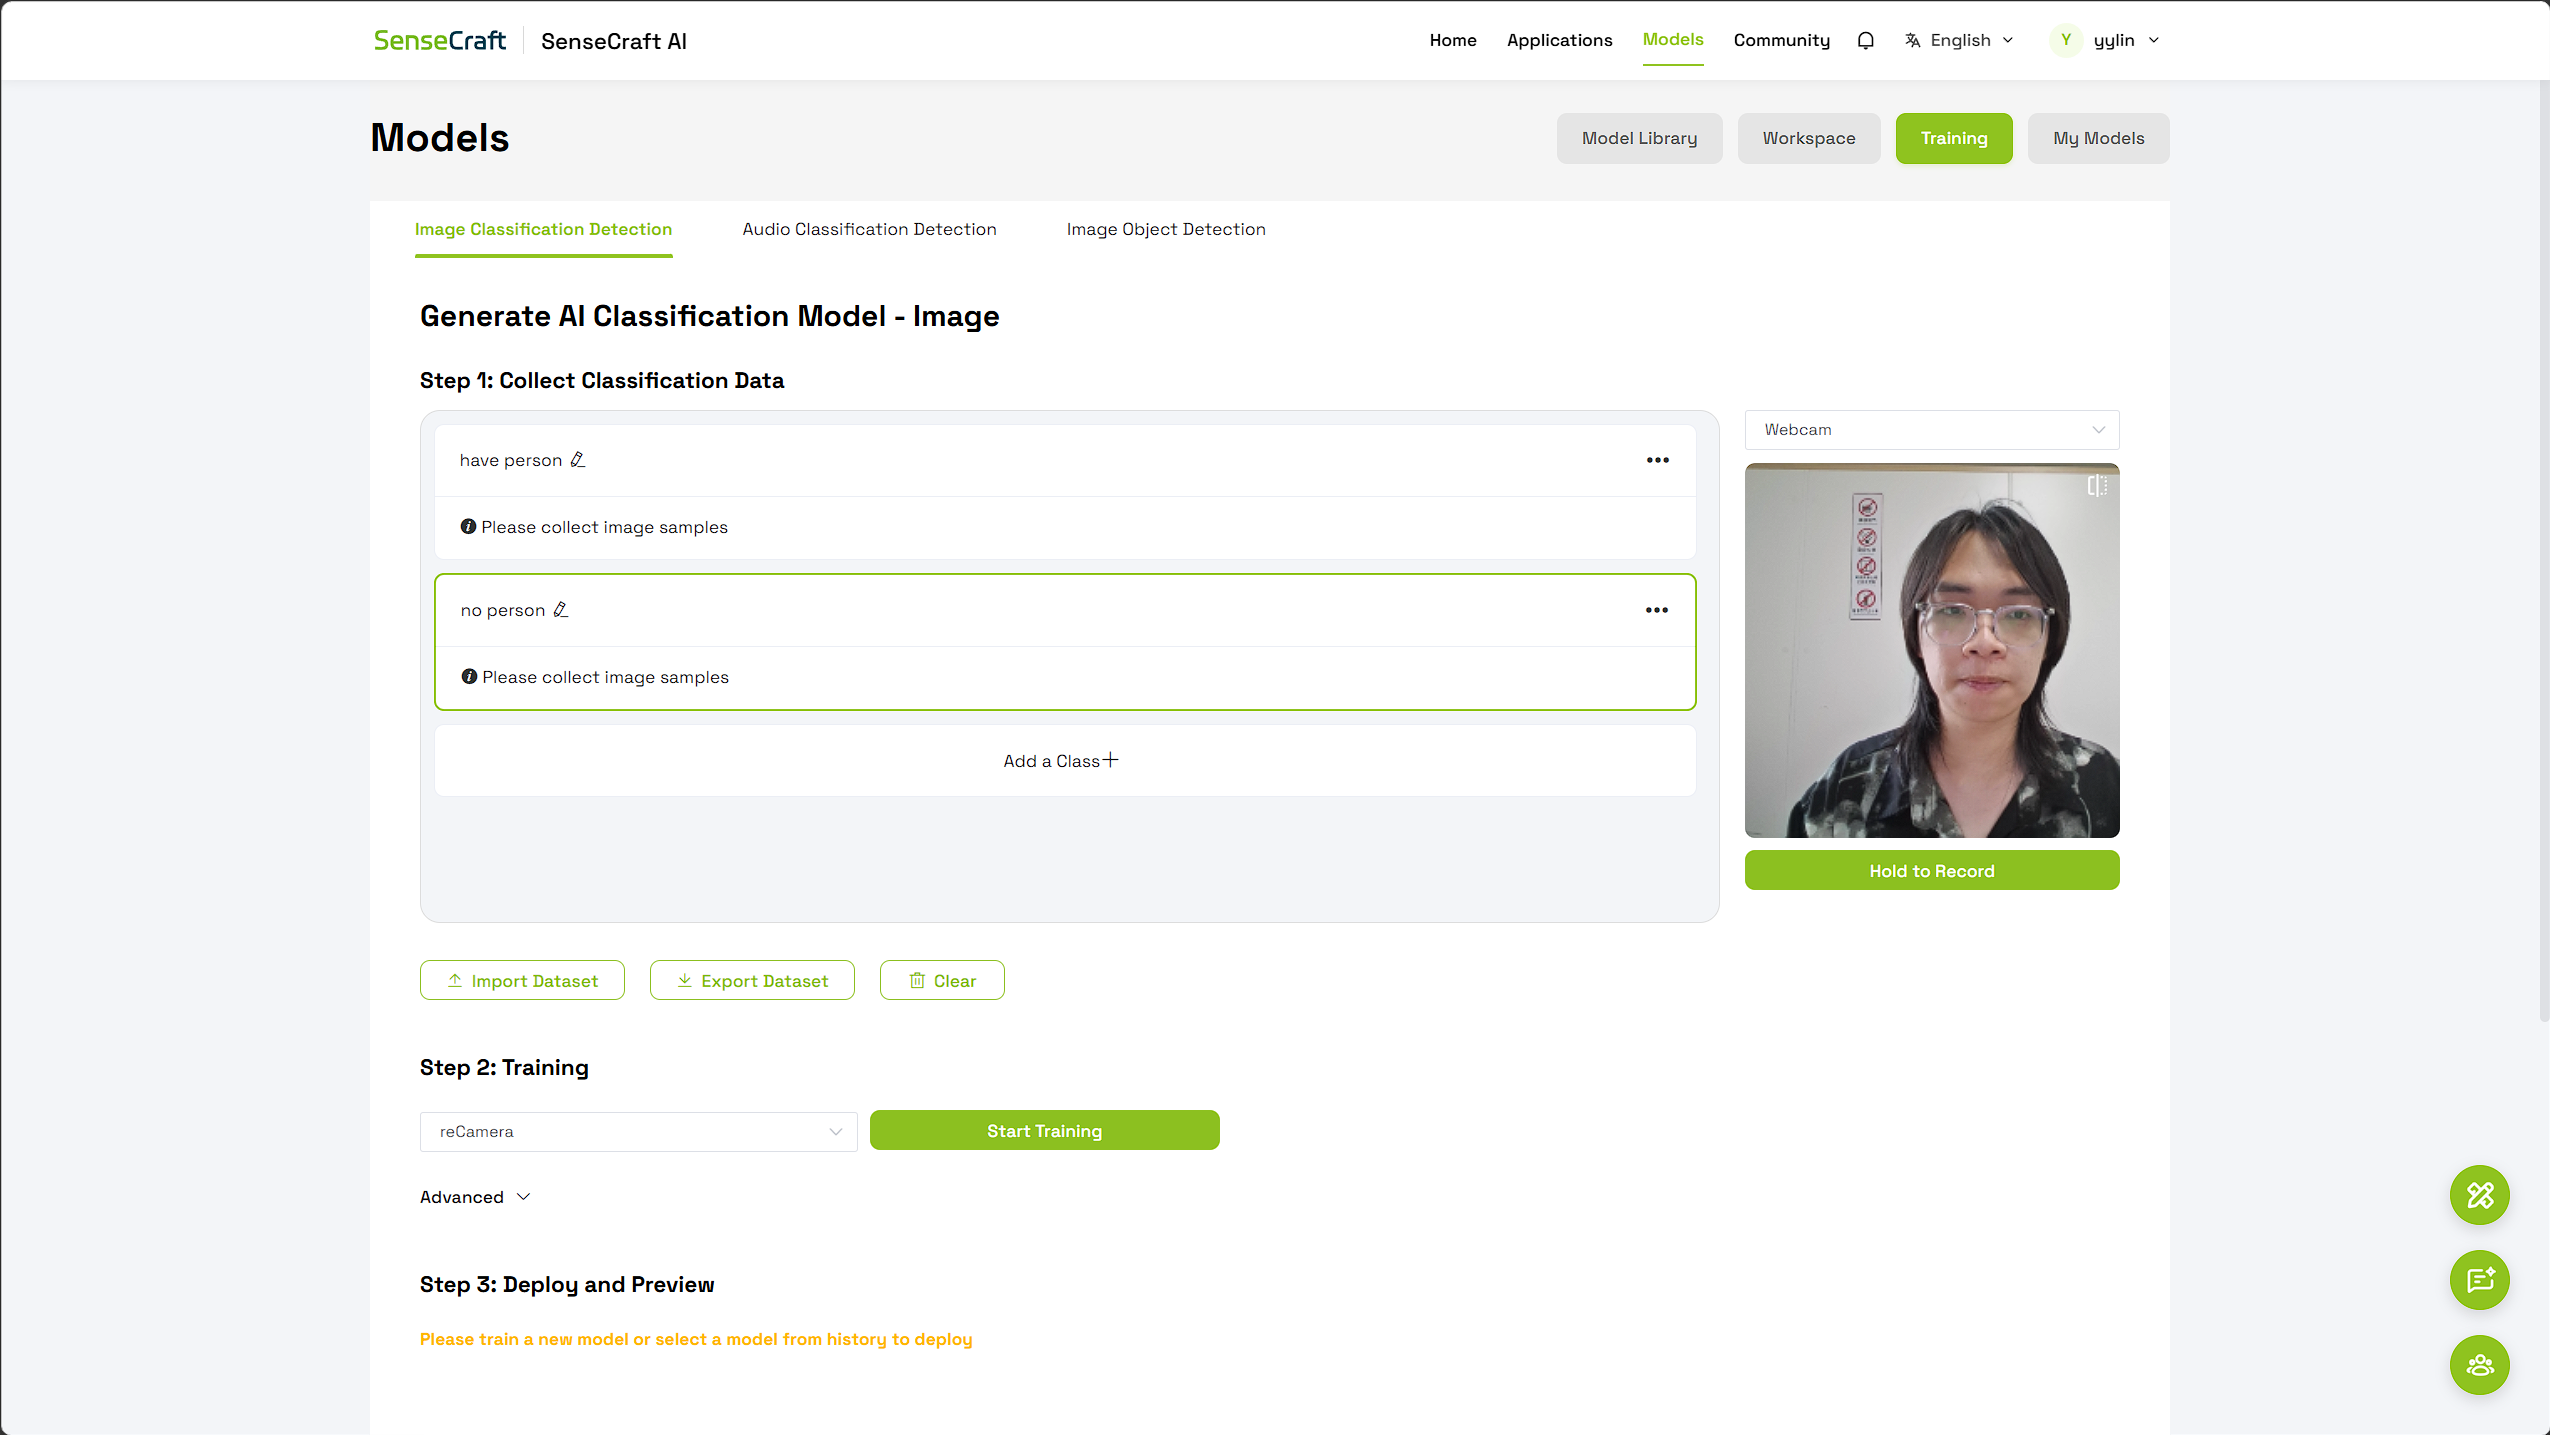
- Click the edit icon next to the category name.
- Enter the category name, for example,
have person,no person. - Click "Add Category +" if you need more categories.
- Use the more menu on the right of a category to manage or delete it.
Category Naming Recommendations:
- Names should be short, clear, and not overlap.
- It's recommended to use names from your actual business.
- Try to use Chinese or English consistently within the same project.
- Do not arbitrarily split samples that look very similar and have unclear meanings into multiple categories.
Step 3: Collect Training Samples
Collect via Camera
- Select the category to which you want to add samples on the left.
- In the "Input Source" dropdown menu on the right, select
Webcam. - Position the target in front of the camera.
- Press and hold the green "Press and Hold to Record" button.
- Repeat the collection from different angles, positions, distances, and lighting conditions.
- Switch to the next category and repeat the process.
When collecting, avoid maintaining the exact same background and composition at all times, as the model might mistakenly learn background features instead of the target itself.

Import Existing Dataset
If you have already prepared your training data, you can click "Import Dataset" and upload it according to the on-screen instructions.
You can choose to import only one category by clicking the three dots next to that category and selecting import.
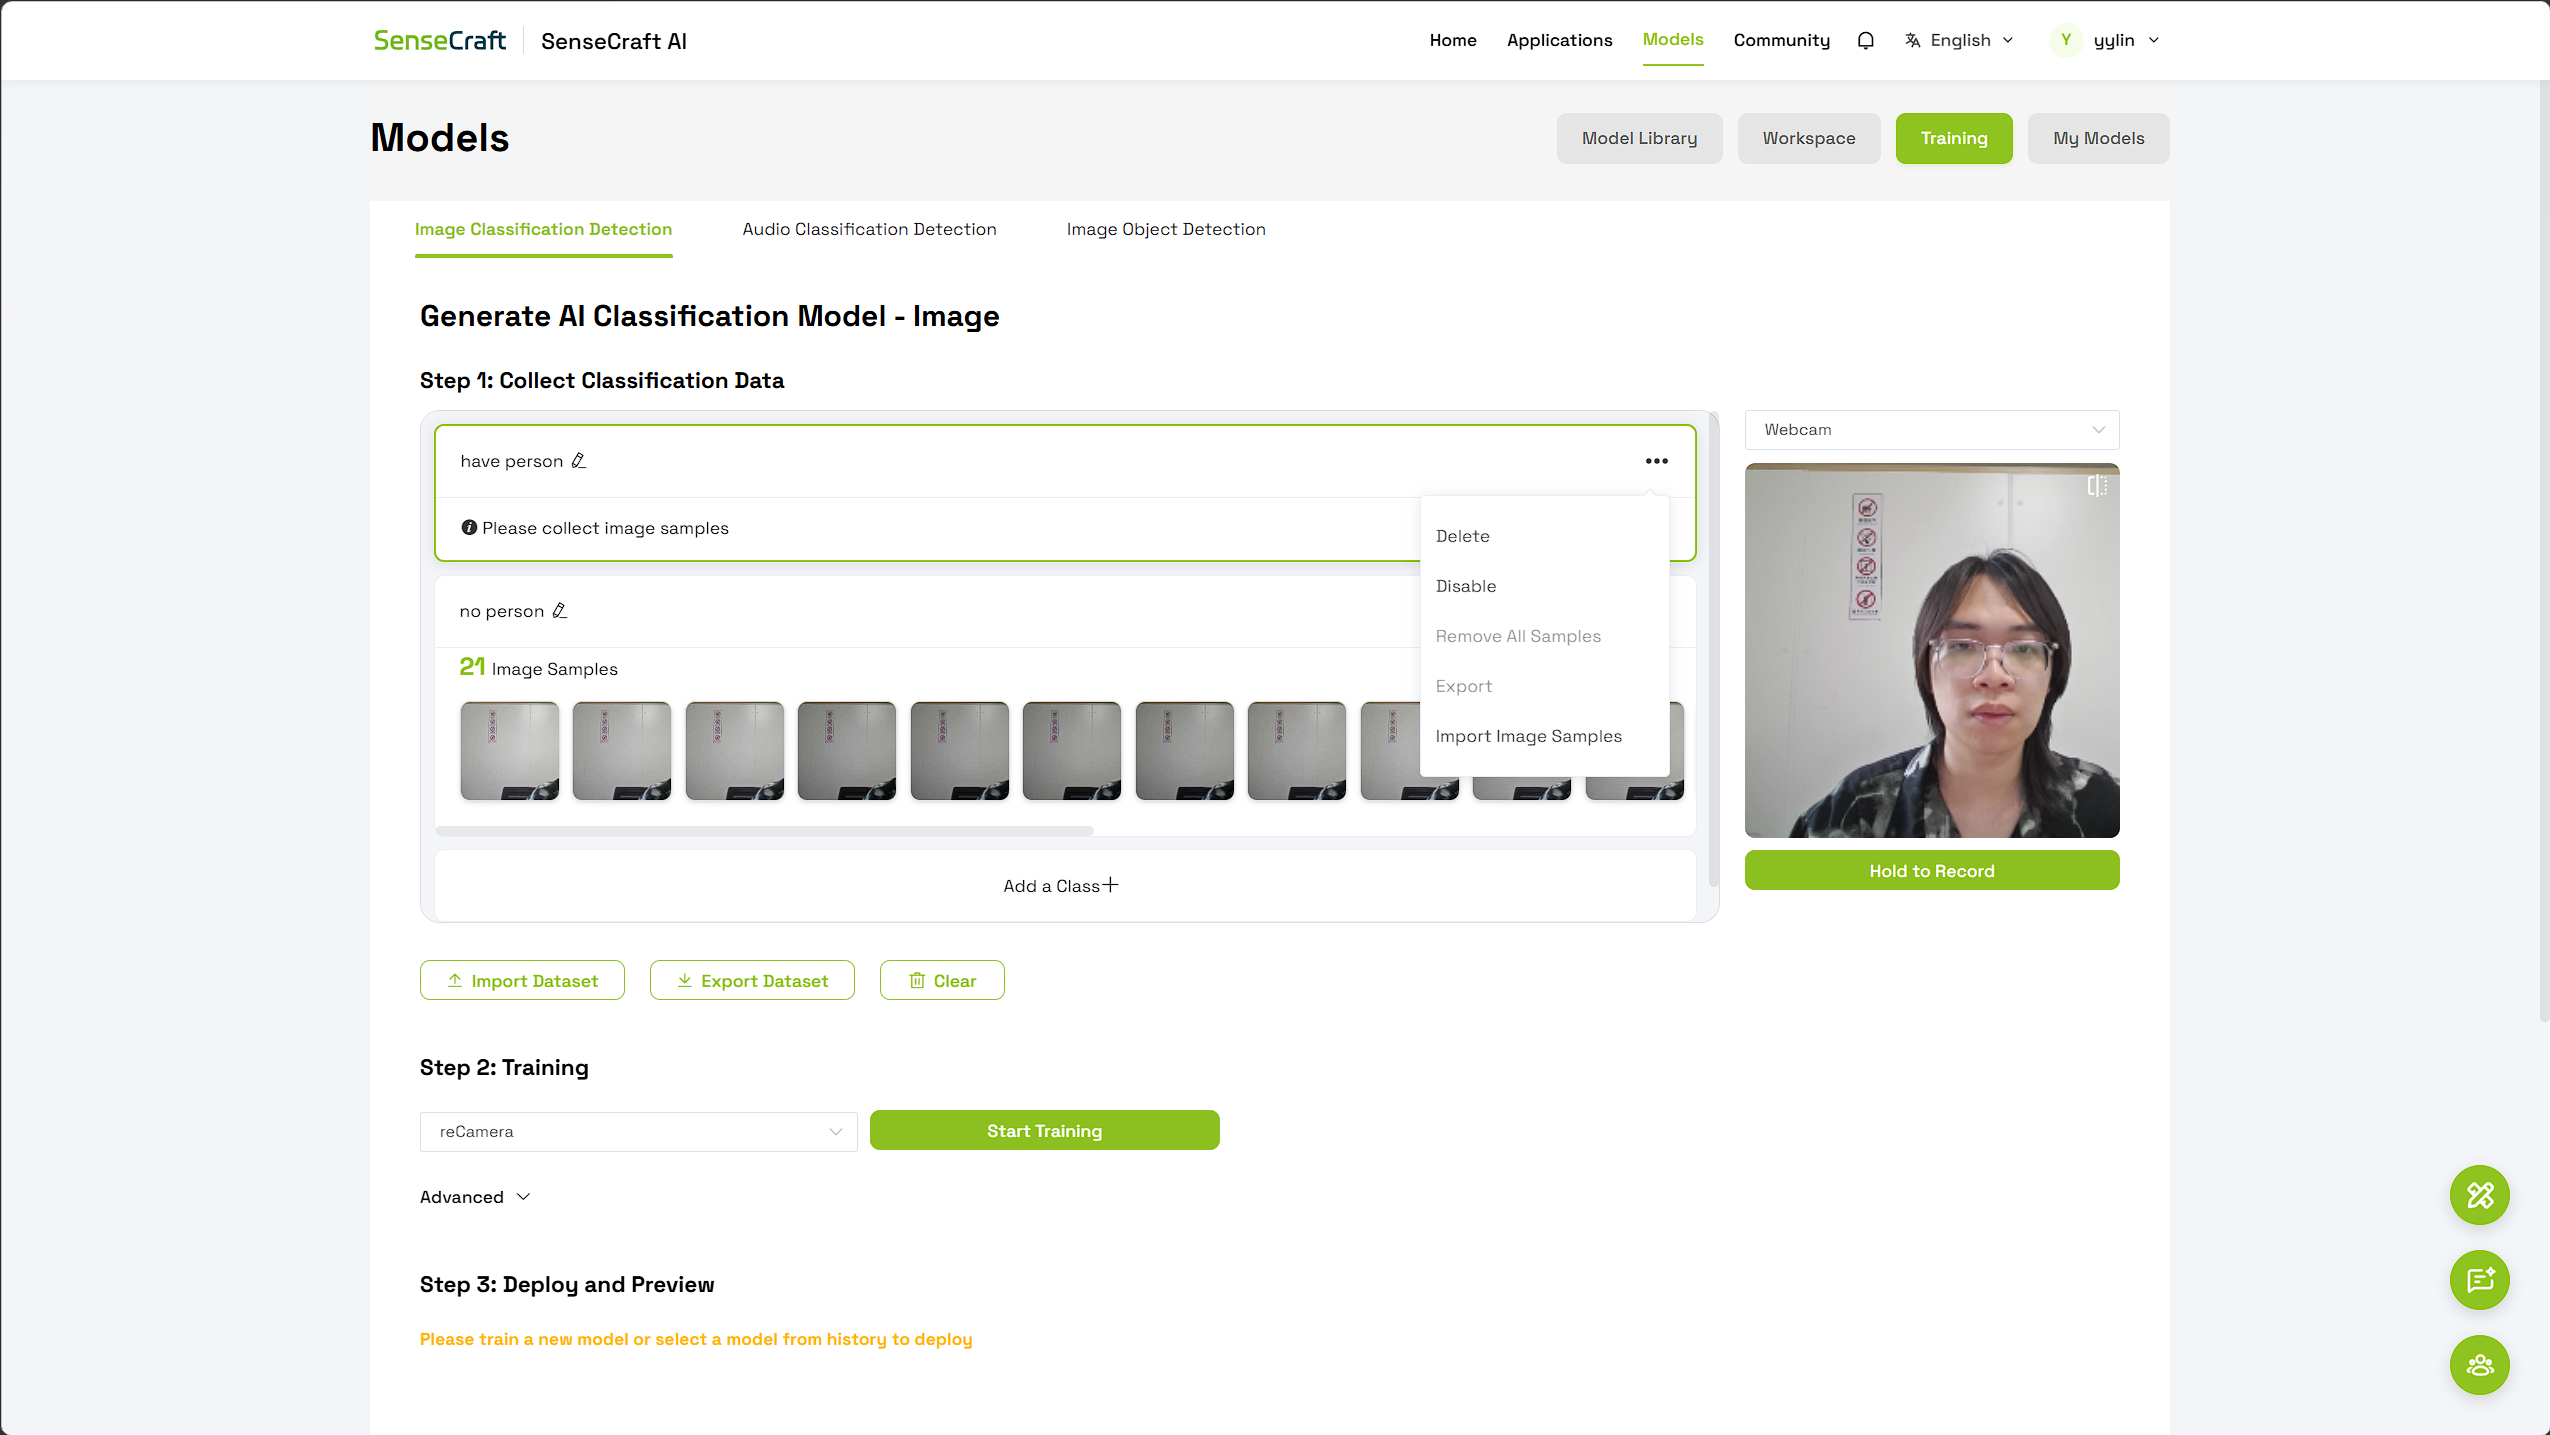
You can also import an entire dataset for a model. However, before compressing it into a zip file, you must organize the data for each category into folders named according to the required class_name, then compress them into a single zip file for import. The system will automatically assign them.
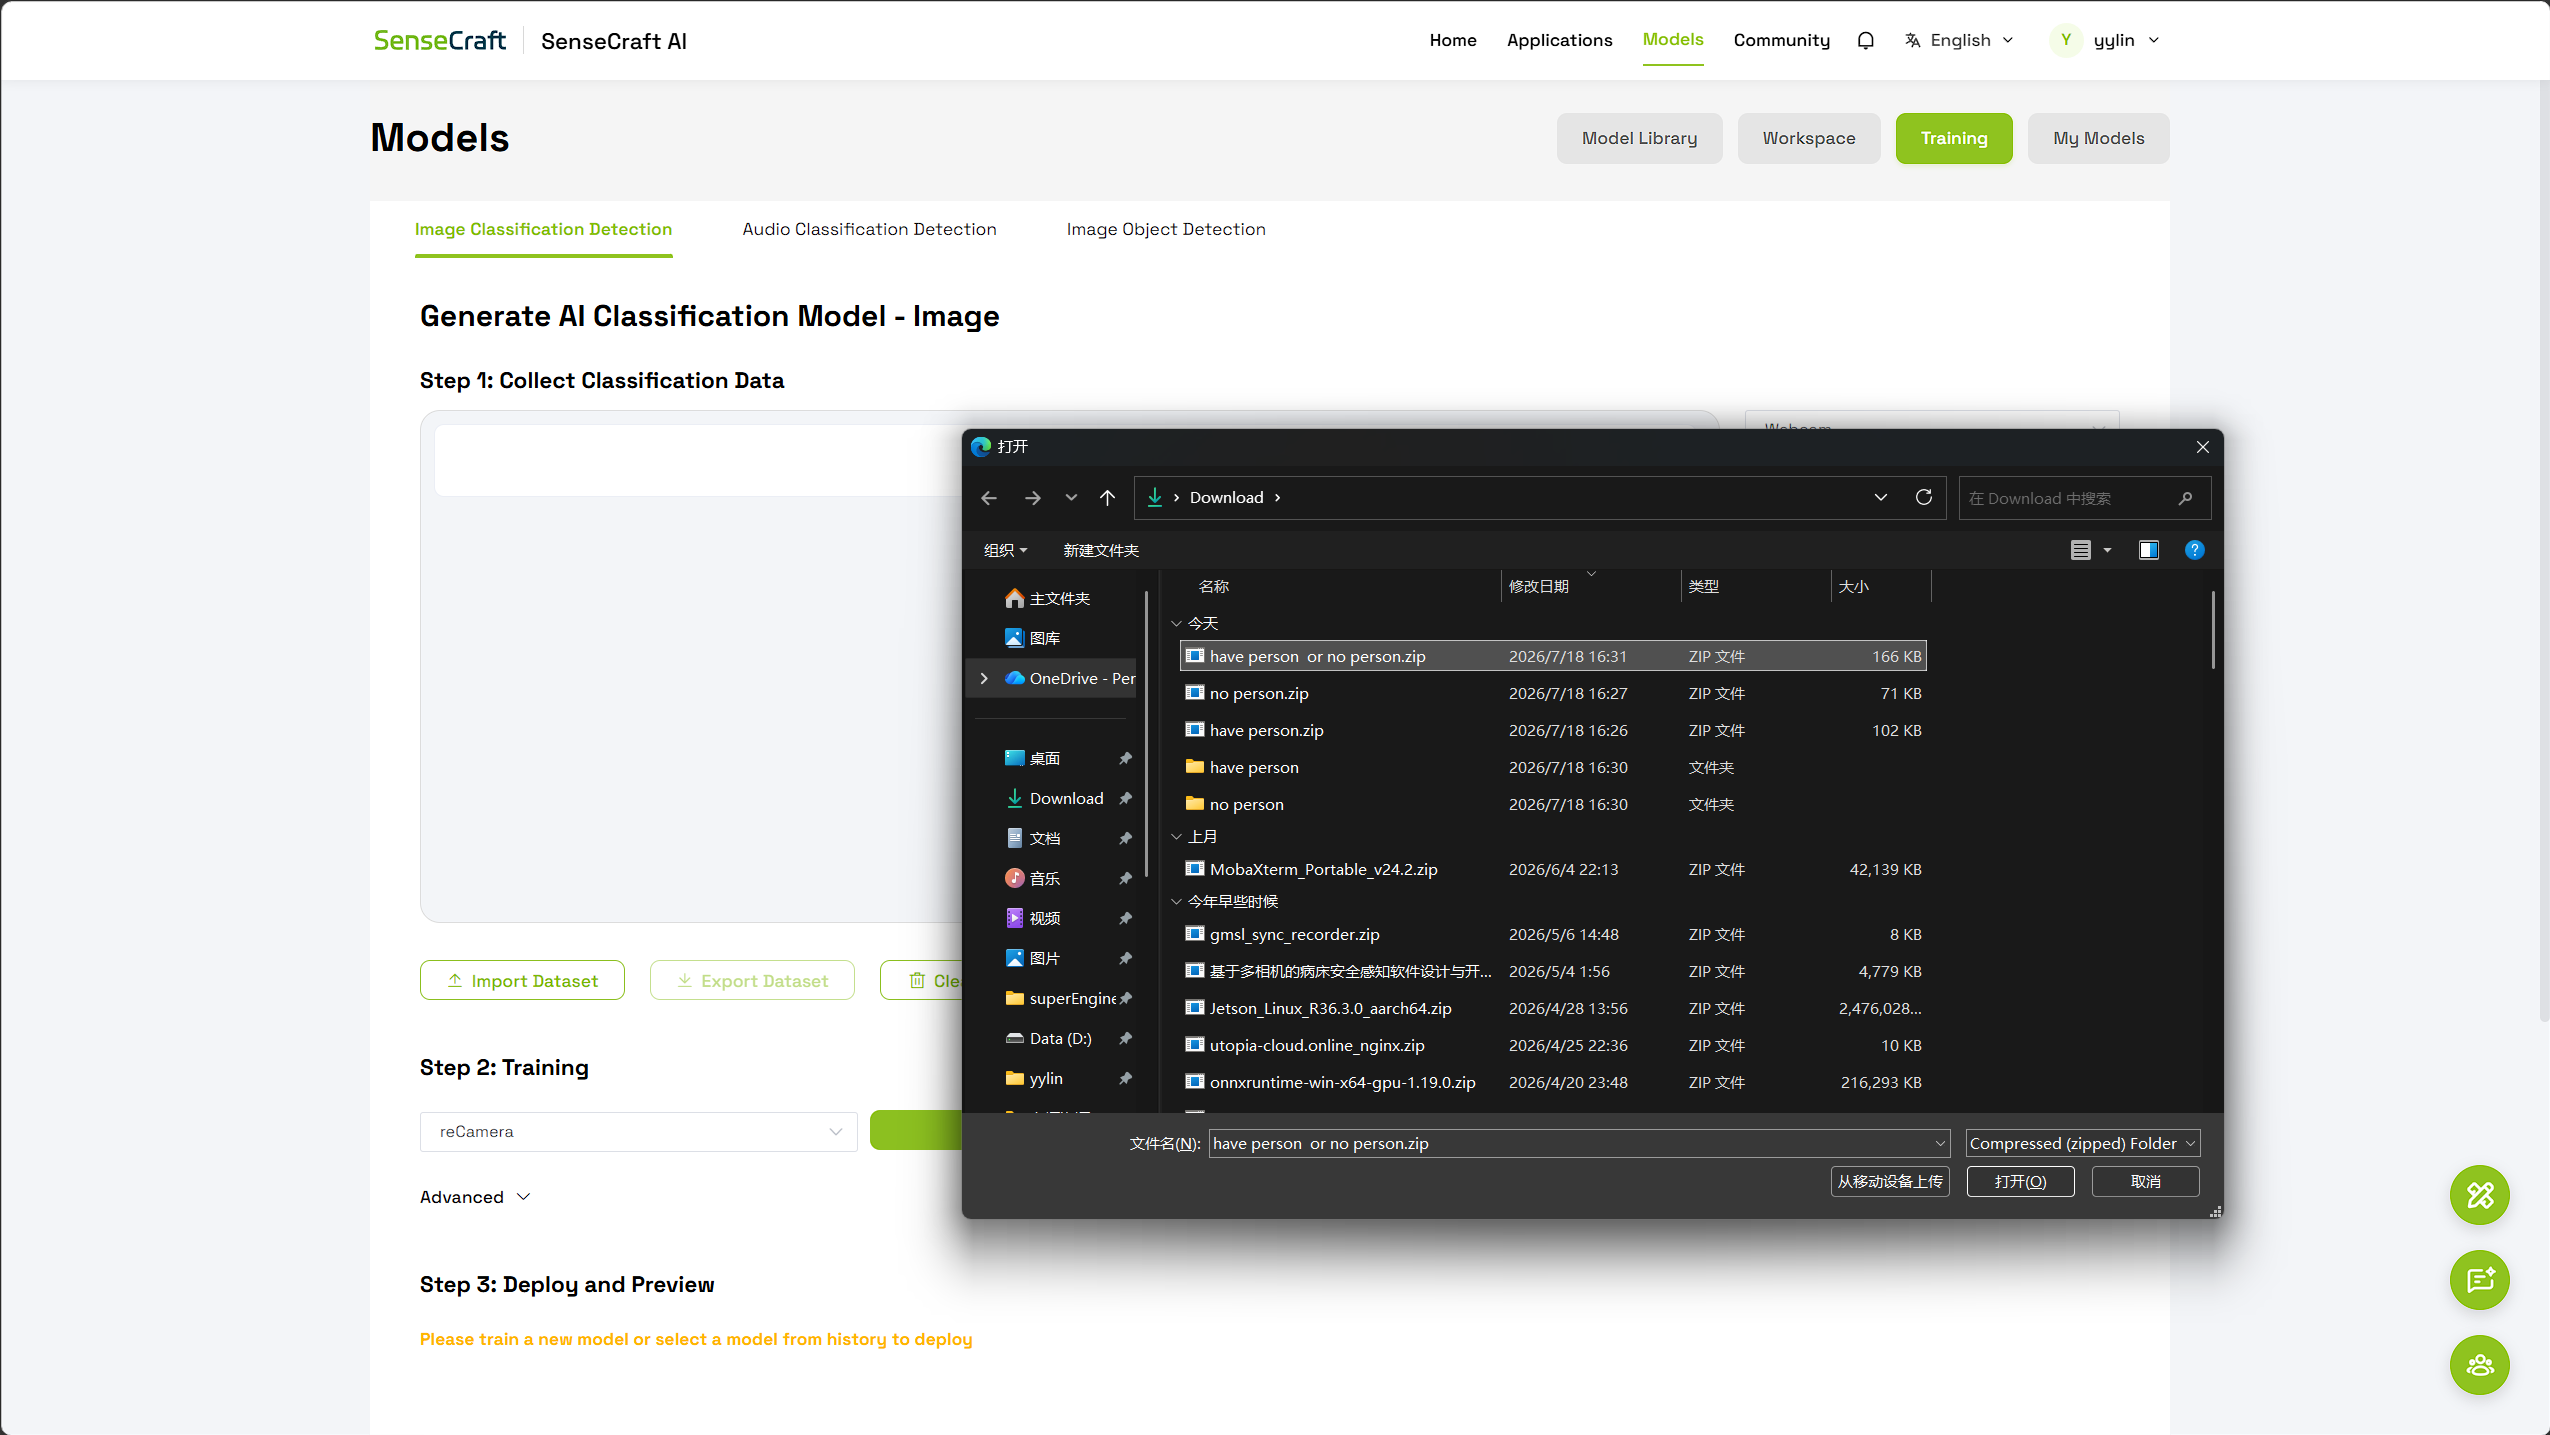
When organizing data, it is recommended to:
- Ensure each image represents only one clear category.
- Delete blurry, severely occluded, or mislabeled images.
- Aim for a similar number of samples in each category.
- Include variations that might occur in the actual deployment environment.
- Avoid collecting training samples from consecutive frames of the same continuous video.
Export or Clear Dataset
- Click "Export Dataset" to back up your currently collected data.
- Click "Clear" to remove samples from the current training task and start over.
The clear operation may be irreversible, so it's recommended to export the dataset for backup first.
How to Collect Higher Quality Data
Model performance largely depends on the training data. It's recommended to collect diverse samples for each category rather than just focusing on quantity.
Maintain Relatively Balanced Category Counts
If one category has a large number of samples while others have only a few, the model may be more inclined to output the category with the most samples.
Cover Real-World Usage Environments
Samples should ideally cover:
- Different lighting conditions: daytime, nighttime, backlight, low light.
- Different angles: front, side, top-down, bottom-up.
- Different distances: close-up, medium, far.
- Different positions: center, edges, and corners of the frame.
- Different backgrounds: simple and complex backgrounds.
- Different states: slight occlusion, pose variations, and appearance differences.
Add Negative Samples or Background Categories
If your actual scenes frequently include situations where "nothing belongs to any target category," you can add a Background, Other, or "No Target" category based on your business needs. This reduces the probability of the model forcefully outputting a target category in scenes without a target.
Avoid Data Leakage
Images used for testing should be different from training images. Do not judge model effectiveness solely based on images that have already appeared during training.
Step 4: Train the Model
After completing sample collection, proceed to "Step 2: Model Training."
- Check if each category has sufficient and valid samples.
- Select
reCamerafrom the device dropdown menu. - If needed, expand "Advanced Settings" to view the training options available on the current page.
- Click "Start Training."
- Wait for the training to complete. Do not close the page or clear data during training.
Training time is influenced by factors such as the number of categories, sample count, training configuration, and server status.
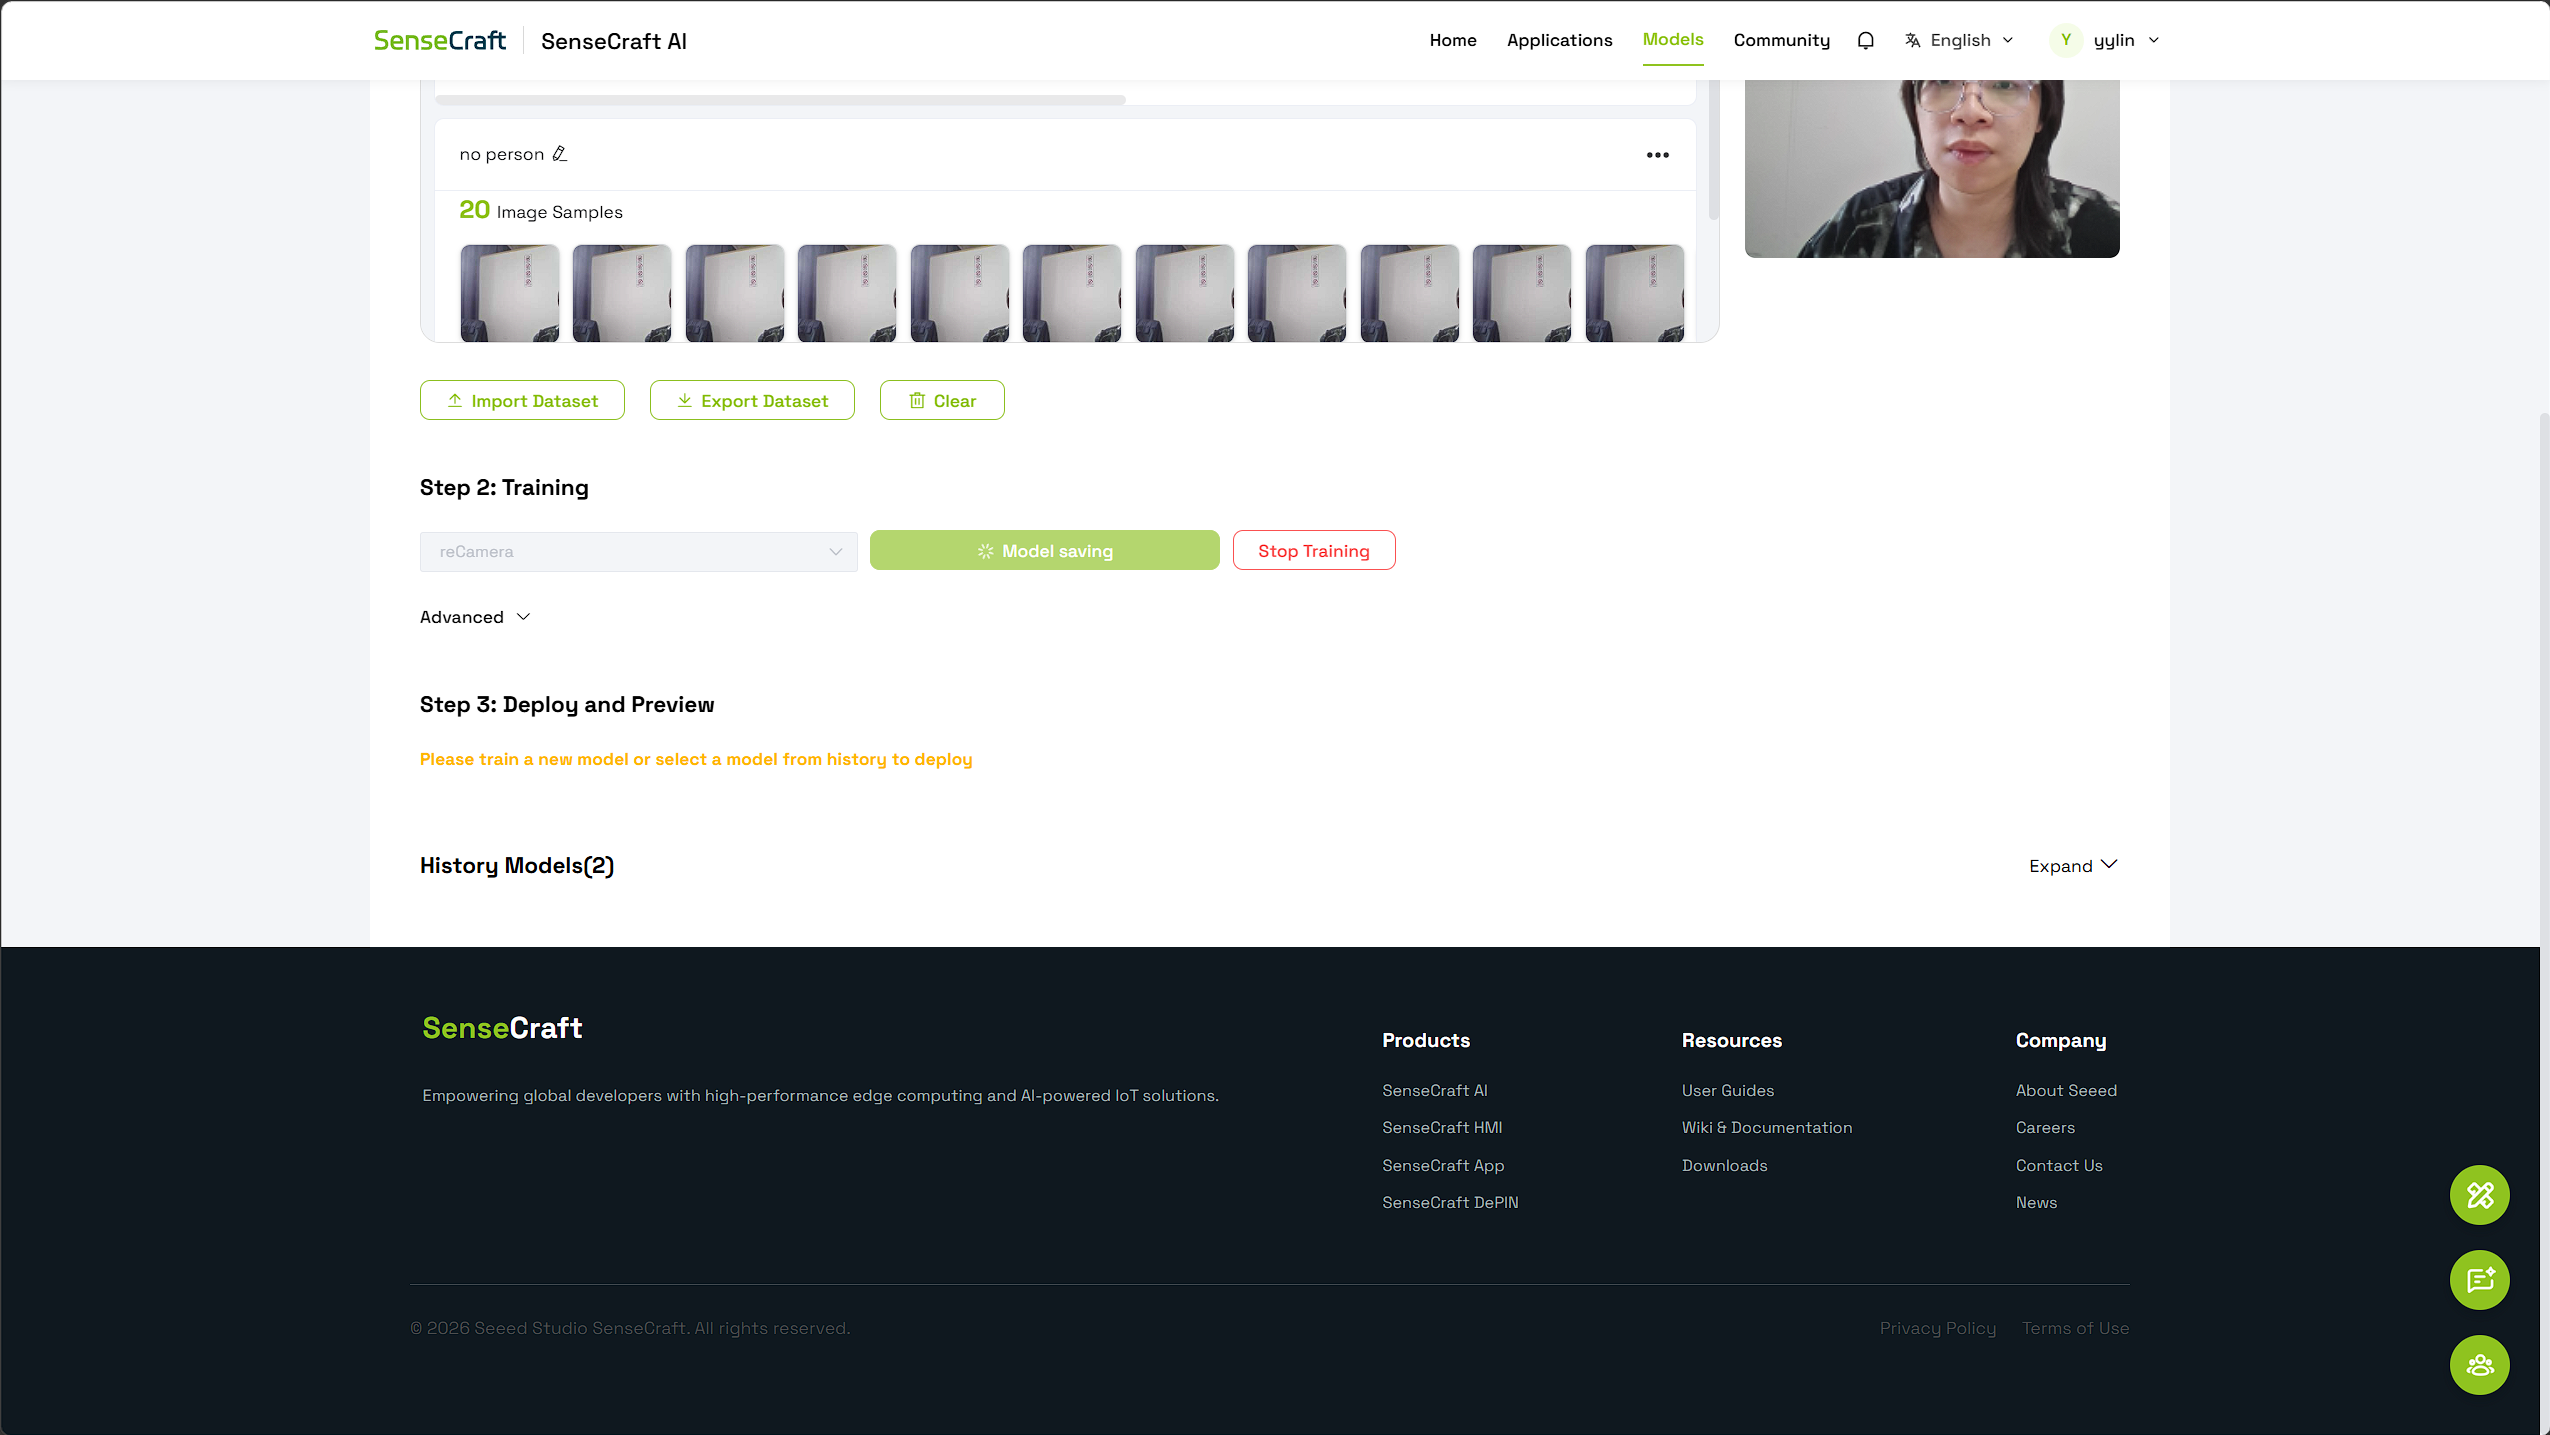
For first-time use, it's recommended to complete a baseline model using the default training configuration. After confirming the data and process are correct, adjust advanced settings based on actual performance.
Step 5: Preview and Validate the Model
Once training is complete, you can select the newly generated model in the "Step 3: Deployment & Preview" area. The model will also appear in "Historical Models" at the bottom of the page.
When testing, it is recommended to:
- Use new images that were not part of the training set or real-time camera feed.
- Test each category individually.
- Vary the target's angle, distance, position, and ambient lighting.
- Observe if the predicted category and confidence score are stable.
- Test scenes with no targets and those that are easily confused.
- Record misclassified and missed samples for the next round of training.
If the model performs well on training samples but fails to recognize correctly with a different background or angle, it usually indicates insufficient data diversity, rather than simply needing more similar samples.
Step 6: Deploy to reCamera
After training is complete and validated through preview, you can select the corresponding model in the deployment area and follow the on-screen instructions to deploy it to reCamera.
There are two deployment methods to reCamera devices; choose the one that suits your needs.
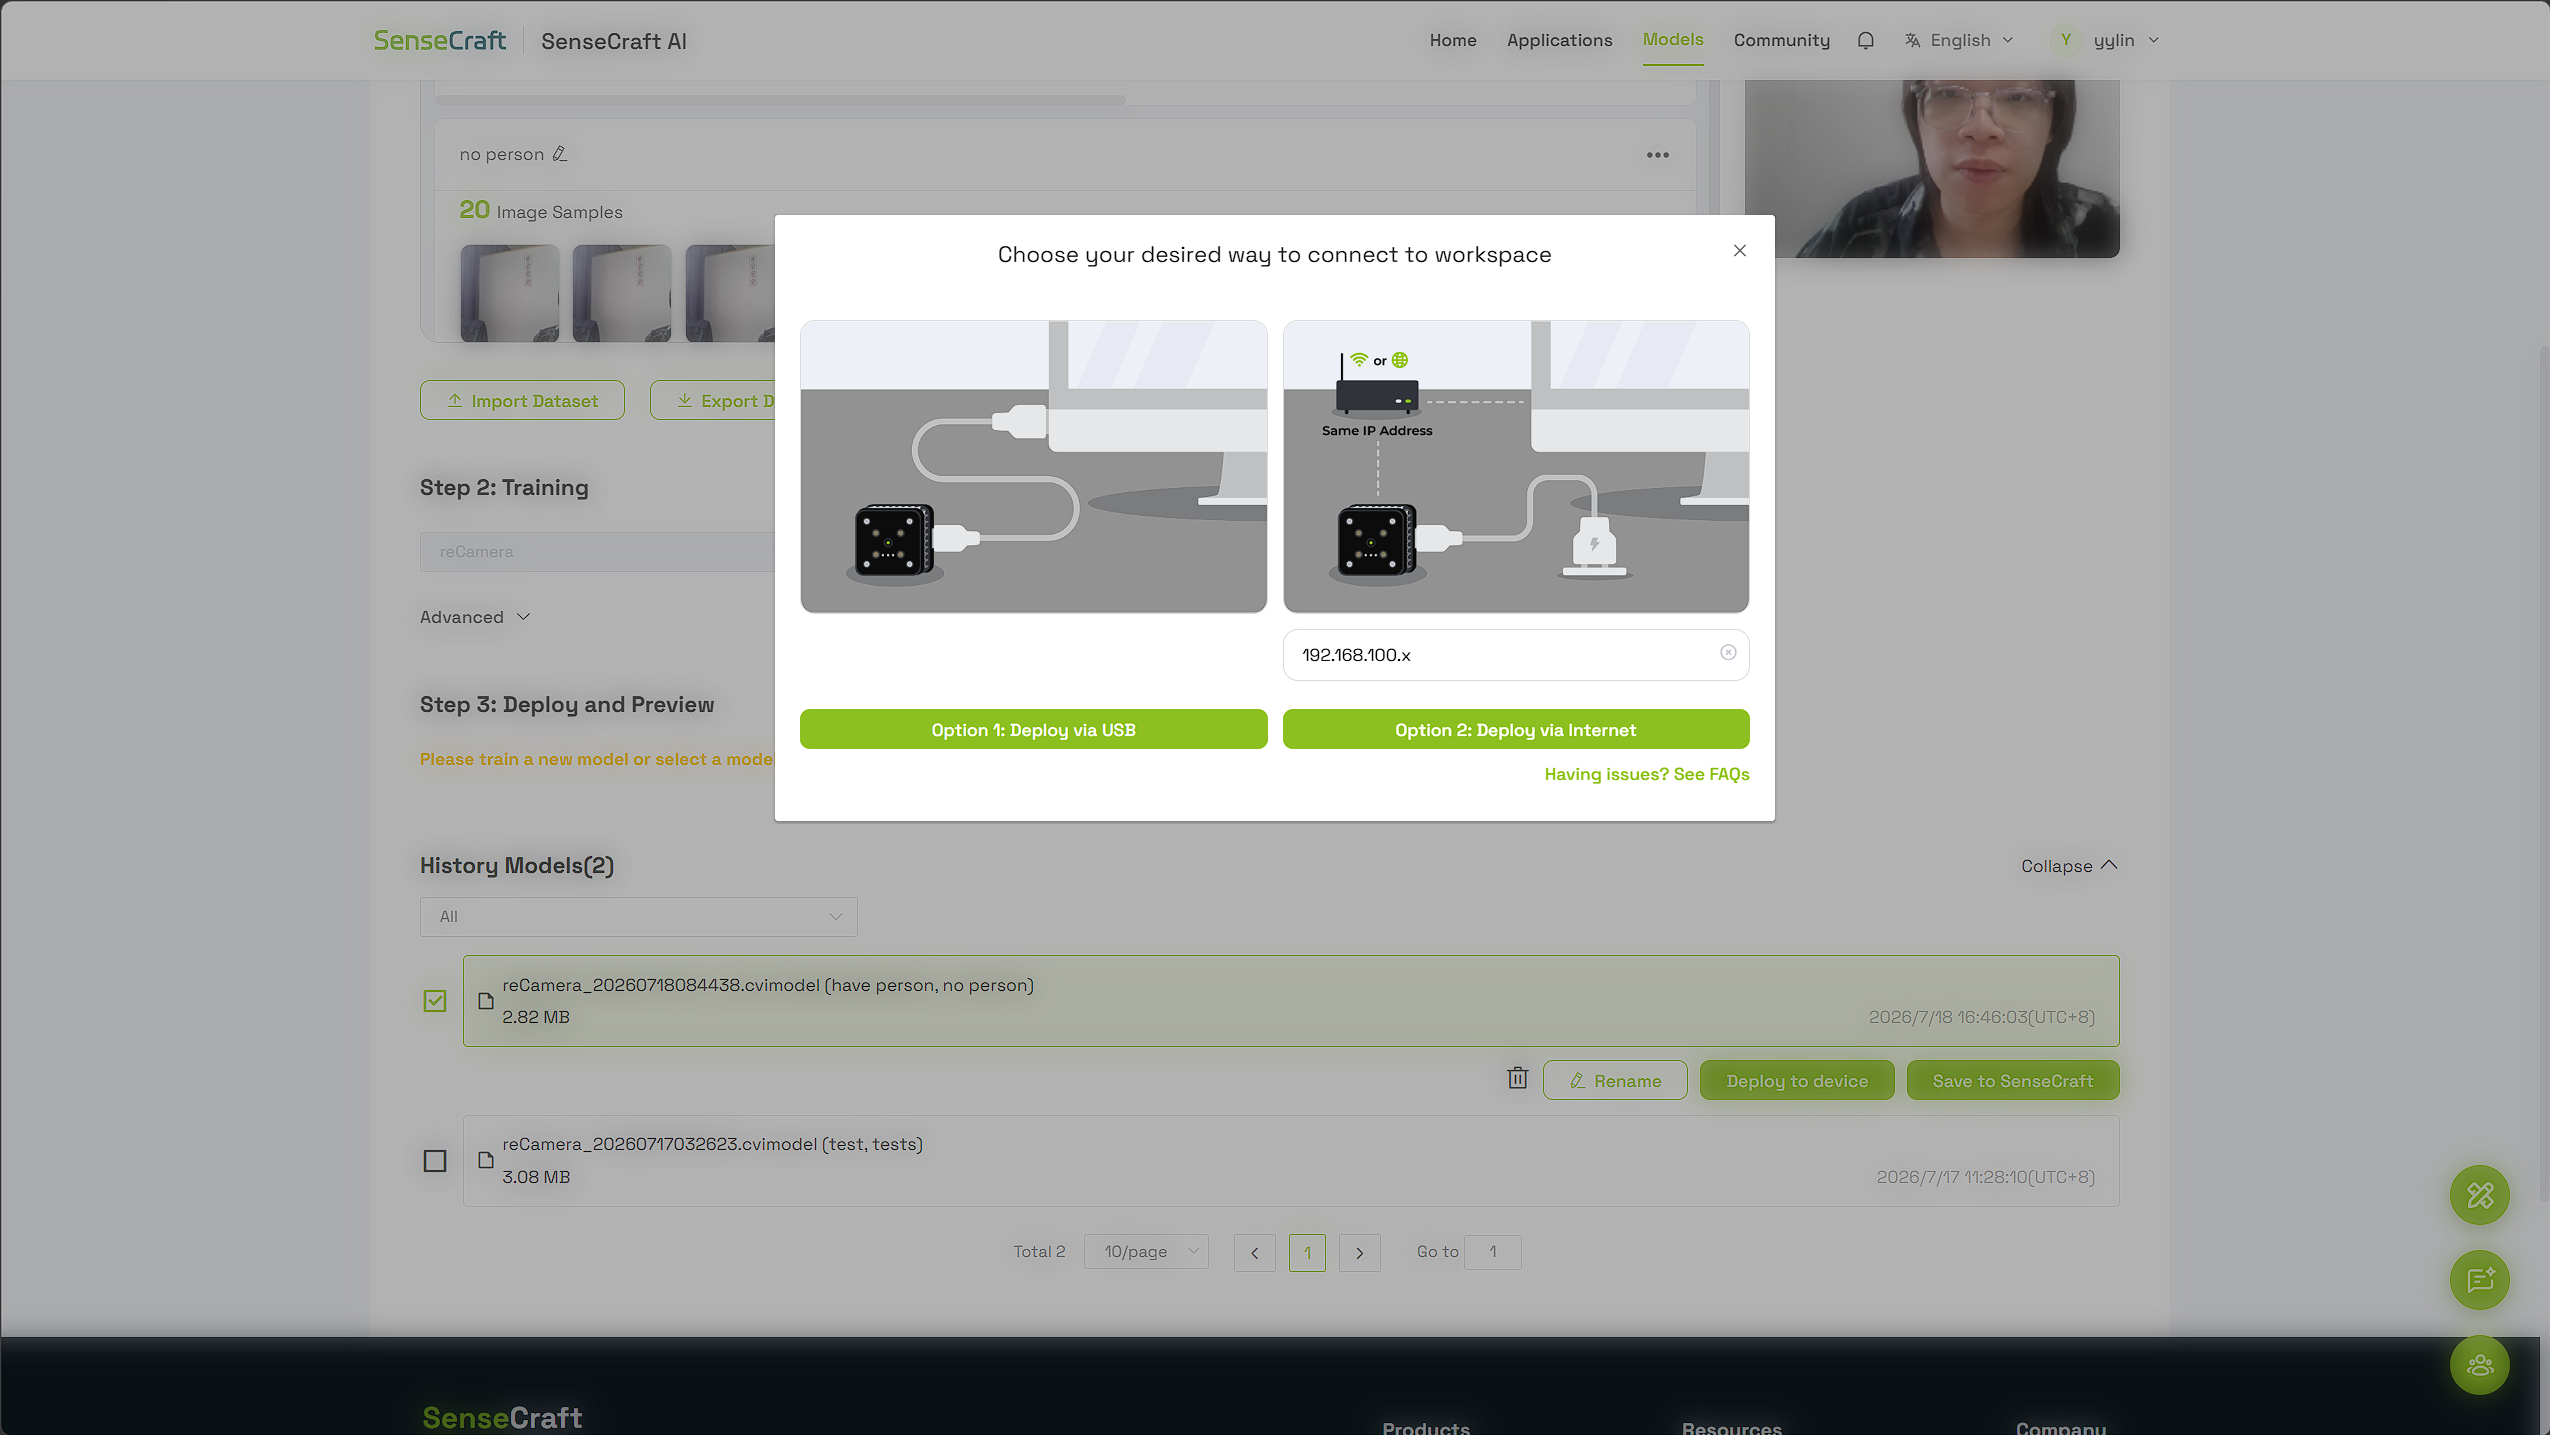
Before deploying, please confirm:
- The reCamera is properly connected to the network and online.
- The device is bound to your current SenseCraft AI account.
- You have selected the correct model generated from this training session.
- The device's current task allows for model updates or switching.
After deployment, the browser will redirect to the corresponding device interface, where you can view the model's running status in real-time.
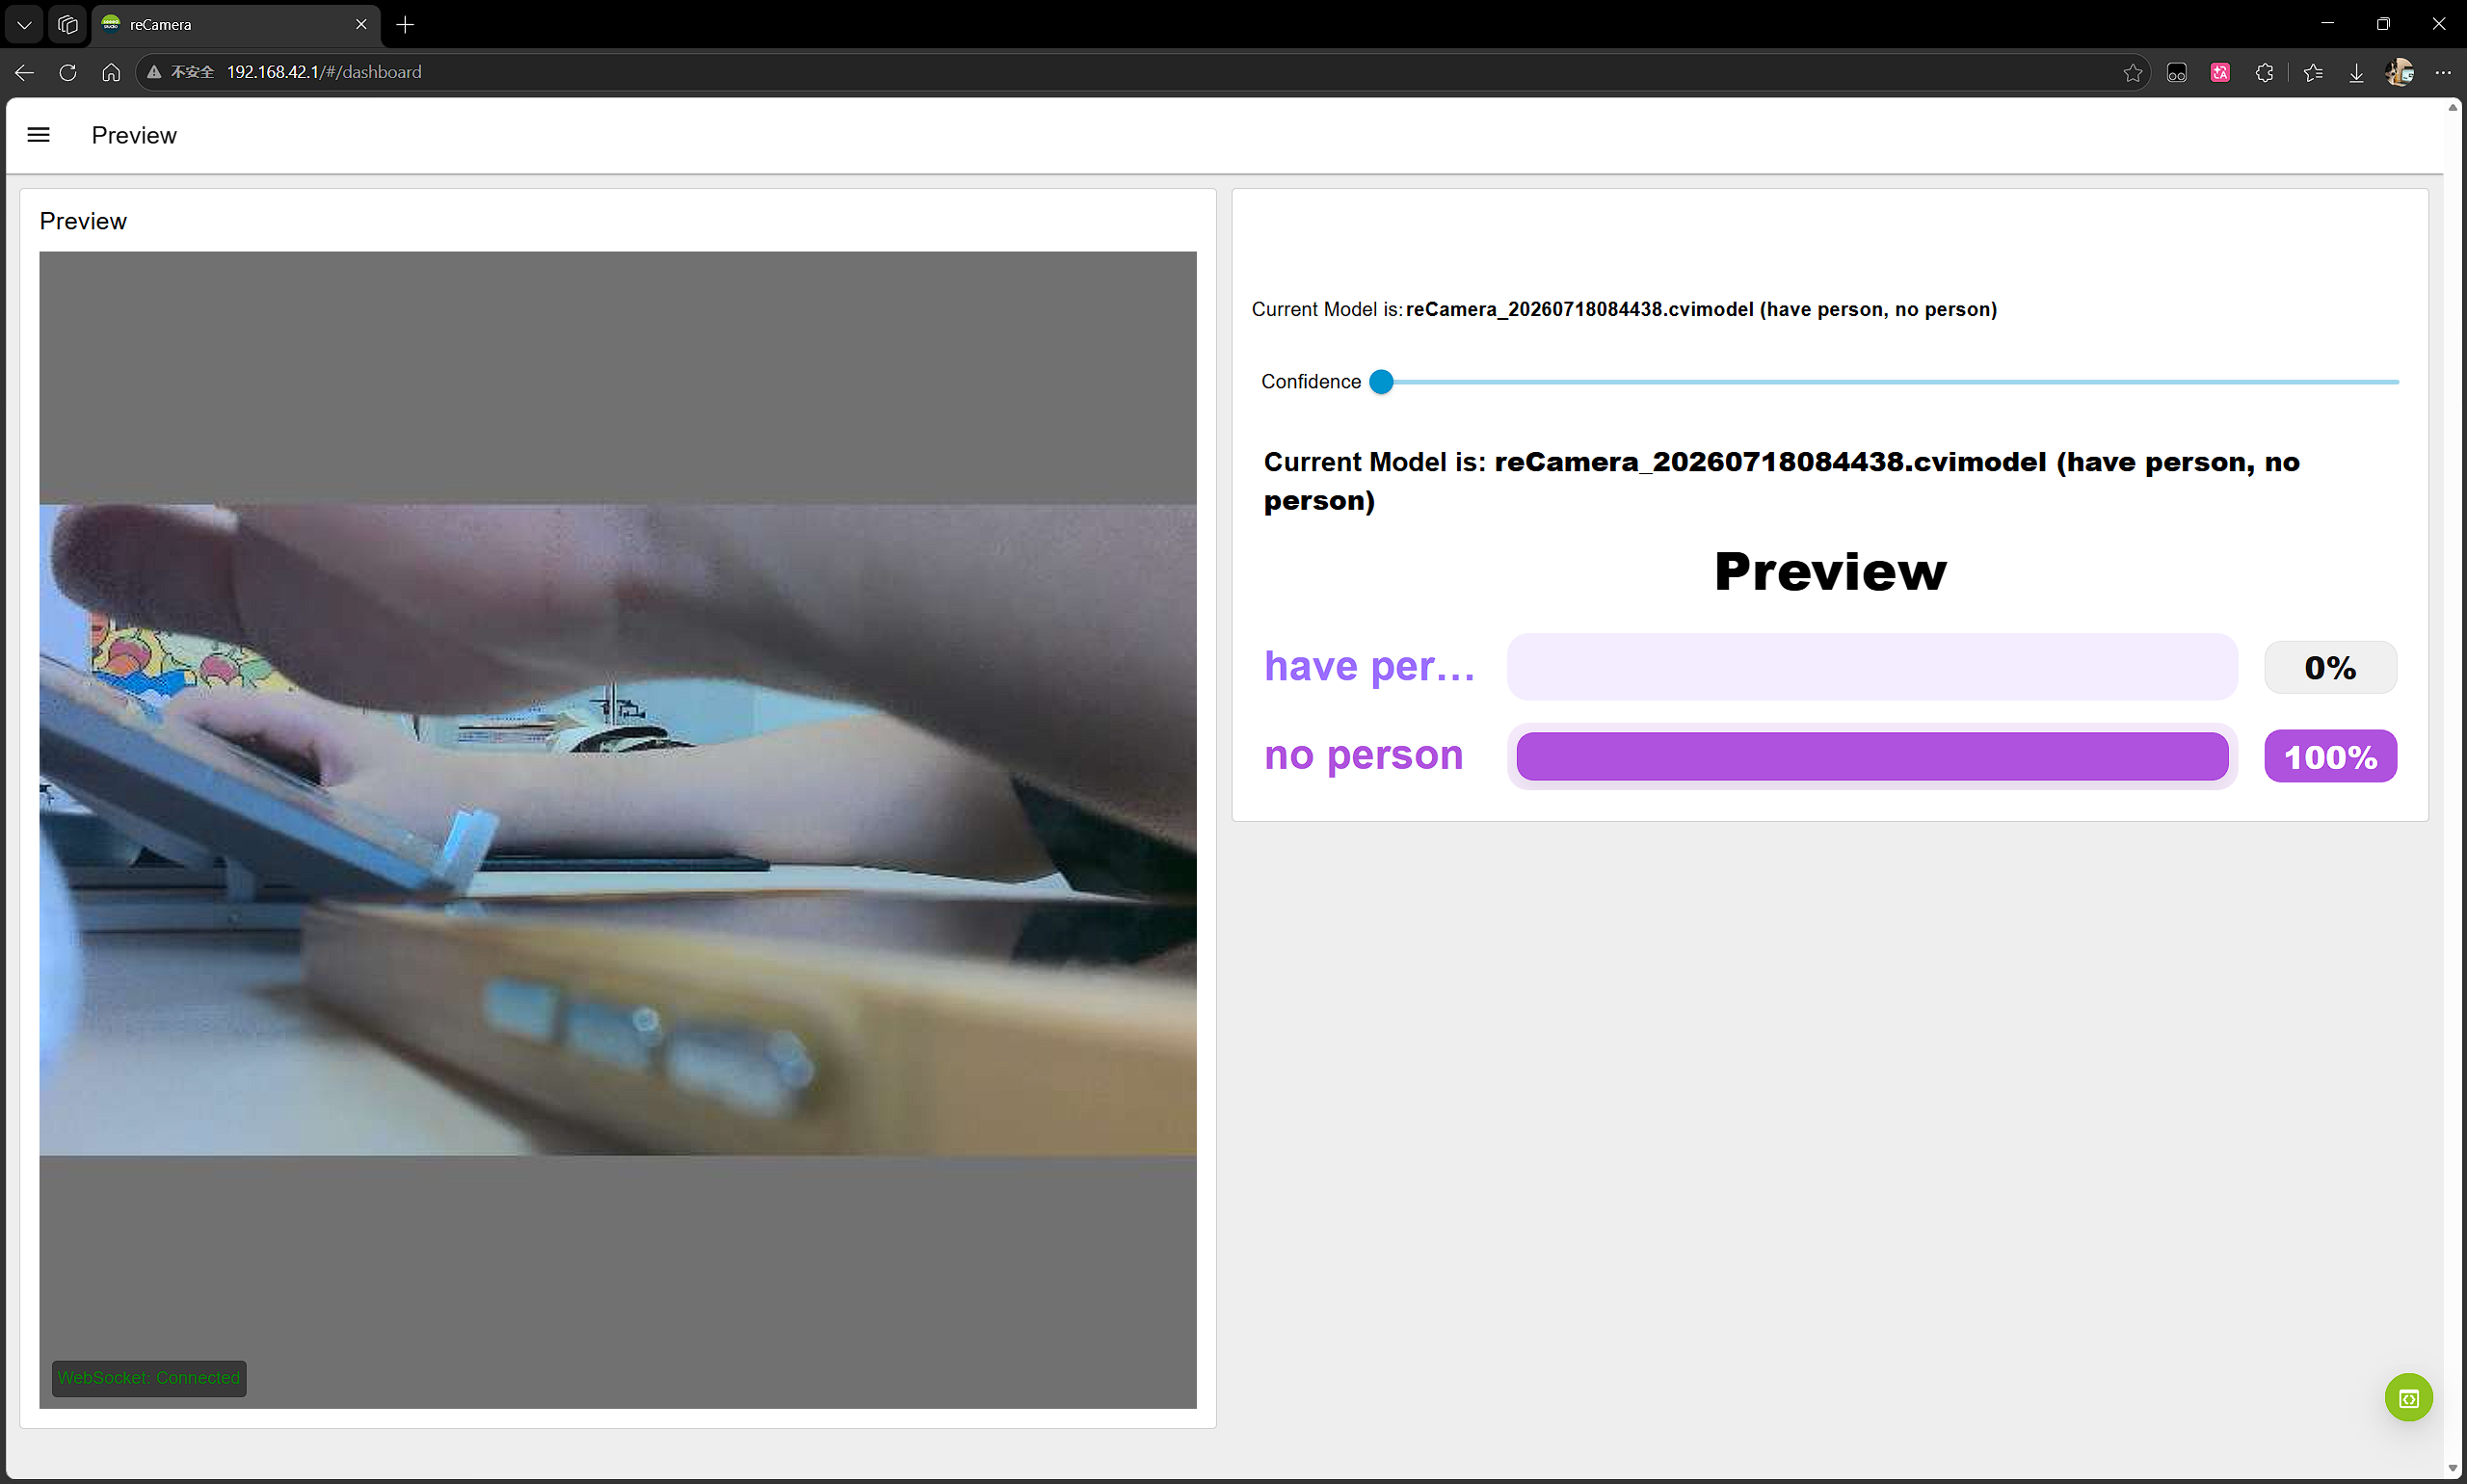
The deployment method shown here is for a reCamera device connected via USB cable. It will automatically redirect to the device's default IP address 192.168.42.1 to preview the model's detection results.
Using Historical Models
The "Historical Models" section at the bottom of the page is used to view previously completed training tasks. When you need to use an older model, you can expand the historical model list and select the corresponding record for preview or deployment.
To facilitate the management of multiple training results, it is recommended to save the following in your project records:
- Training date.
- List of categories.
- Number of samples per category.
- Dataset version.
- Main training settings.
- Test results.
- Corresponding deployed device.
Frequently Asked Questions
The browser does not display the camera feed.
- Check if the browser has been granted camera permissions.
- Ensure the camera is not exclusively used by another application.
- Re-select the camera in the input source dropdown menu.
- Refresh the page and re-authorize.
- Try using the latest version of Chrome or Edge.
The model always predicts the same category.
Common reasons include imbalanced category samples, an excessive amount of data for one category, indistinct features for other categories, or the presence of a fixed background in the training images. It is recommended to supplement samples for underrepresented categories and ensure comparable collection conditions for all categories.
Training accuracy is high, but actual performance is poor.
This usually means the training data is too uniform, or the test images are too similar to the training images. You should supplement with diverse conditions from the real deployment environment, including different angles, distances, backgrounds, and lighting, and use entirely new images for testing.
Two categories are easily confused.
Check if the category definitions are clear and focus on supplementing samples that highlight the differences between the two categories. Also, remove images with incorrect labels, unclear targets, or features from multiple categories.
The model outputs a category even when there is no target.
Classification models typically choose the most probable category from the existing ones. You can add a "Background" or "Other" category and use confidence thresholds in the application to filter unreliable results.
The newly trained model cannot be found.
- Confirm that the training task has been completed.
- Expand "Historical Models" to check.
- Ensure you are logged in with the account that created the model.
- Refresh the page and check again.
Cannot deploy to reCamera.
- Confirm the device is online and bound to the current account.
- Check the device's network connection.
- Ensure you have selected a model compatible with the target device.
- Avoid deploying repeatedly while the device is performing other update tasks.
- Ensure the reCamera device's operating environment is normal, meaning the web configuration interface can be used properly.
Recommended Iteration Process
A reliable classification model typically requires multiple iterations:
- Train the first model using a small but balanced dataset.
- Test with new scenarios and record erroneous results.
- Supplement the correct categories with representative misclassified scenes.
- Clean up incorrect labels and overly redundant samples.
- Retrain and conduct comparative tests under the same conditions.
- Deploy to reCamera once the performance meets requirements.
- Continuously collect difficult samples in the real environment and update the model.
Best Practices Checklist
Before Training:
- Category definitions are clear and have no obvious overlaps.
- Each category has training samples.
- Sample counts for each category are roughly balanced.
- Samples cover different angles, distances, backgrounds, and lighting.
- Blurry images and incorrect labels have been removed.
- Background or other categories have been prepared as needed.
- Important datasets have been exported and backed up.
Before Deployment:
- Tested with new scenes not used in training.
- All categories and no-target scenarios have been tested.
- Easily confused categories have been examined.
- reCamera is connected to the network and bound to the current account.
- Model and target device have been confirmed correctly.
- A secondary validation in the actual installation environment has been planned.
Tech Support & Product Discussion
Thank you for choosing our products! We are here to provide you with different support to ensure that your experience with our products is as smooth as possible. We offer several communication channels to cater to different preferences and needs.