Getting Started with USB KVM Capture Kit
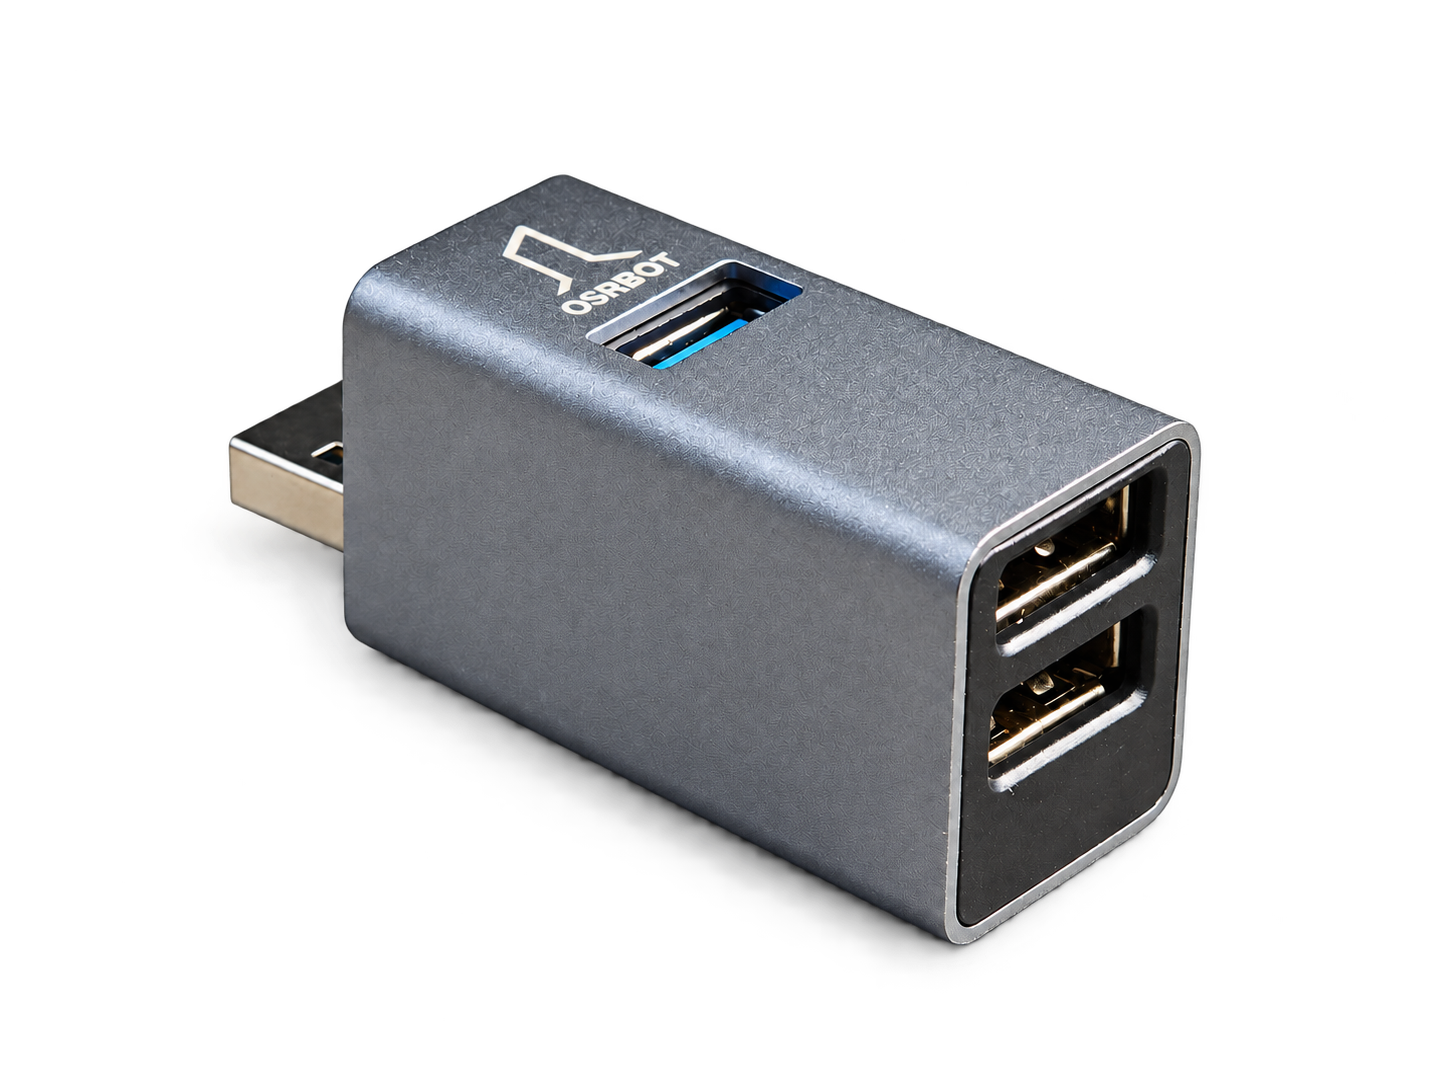
The USB KVM Capture Kit combines an OSRBOT Link keyboard and mouse sharing device with optional video capture accessories. Use your computer's keyboard and mouse to operate a reComputer Jetson, and view the Jetson's video output in the OSRBOT Link application when a capture card is connected. This is useful for on-site setup and troubleshooting without a separate monitor, keyboard, and mouse.
In this guide, the controller is the computer running OSRBOT Link, and the target is the reComputer Jetson being operated. The target does not need OSRBOT Link installed, but it must support USB keyboard and mouse input.
Features
- USB keyboard and mouse control without installing software on the target.
- Controller software for Windows, macOS, and Ubuntu.
- Optional HDMI video capture, with a DP-to-HDMI adapter for targets with DisplayPort output.
- Screenshots, video recording, GIF capture, and ASCII command paste.
- Separate USB expansion ports for the controller and target.
- Optional Ethernet network sharing and LAN browser control with OSRBOT Link Pro.
Keyboard/mouse input, video capture, and network sharing use separate connections. The sharing device alone does not capture video, and its USB data cable does not carry network traffic. Video resolution, frame rate, and latency depend on the capture card and video path.
Specifications
Keyboard and Mouse Sharing Device
| Item | Specification |
|---|---|
| Product | OSRBOT Link keyboard and mouse sharing device |
| Housing | Aluminum alloy and engineering plastic |
| Controller connection | USB 3.0, with one controller-side USB 3.0 expansion port |
| Target connection | USB 2.0, with one target-side USB 2.0 expansion port |
| Supplied data cable | USB-A male to USB-A male, 1 m |
| Controller software | OSRBOT Link |
| Controller platforms | Windows, macOS, Ubuntu |
| Video viewing | Requires an external capture card |
Capture Card
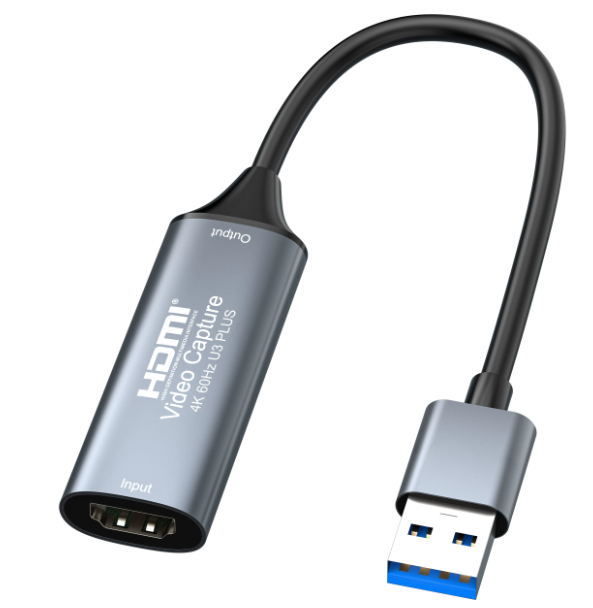
The following specifications describe the capture card listed in the OSRBOT Link v1.1 manuals. They do not apply to every third-party capture card.
| Item | Specification |
|---|---|
| Connection | HDMI input to USB-A output |
| MJPG capture | 4K at 60 fps / 2K at 60 fps / 1080p at 144 fps |
| NV12 capture | 4K at 30 fps / 2K at 60 fps / 1080p at 60 fps |
| YUY2 capture | 4K at 25 fps / 2K at 50 fps / 1080p at 60 fps |
| XRGB (RGB24), as listed in the manual | 2K at 30 fps / 1080p at 60 fps |
| Audio output | Stereo by default, 48 kHz / 24 bit |
| Audio capture | 5.1 / 7.1-channel support |
| Preview latency | 40–80 ms, typically approximately 60 ms |
| Video protocol | UVC |
These capture-card specifications and latency figures are supplier-provided, not Jetson test results. The stated latency conditions are USB 3.0, 1080p at 60 fps, and RGB24 preview on a computer. Available modes depend on the actual capture card, source output, USB connection, and software. Audio capabilities of the card do not by themselves establish audio support in every application workflow.
Package Contents
| Accessory | Basic | HDMI | HDMI + DP |
|---|---|---|---|
| Keyboard and mouse sharing device | Included | Included | Included |
| USB-A to USB-A data cable | Included | Included | Included |
| Capture card | — | Included | Included |
| HDMI cable | — | Included | Included |
| DP-to-HDMI adapter | — | — | Included |
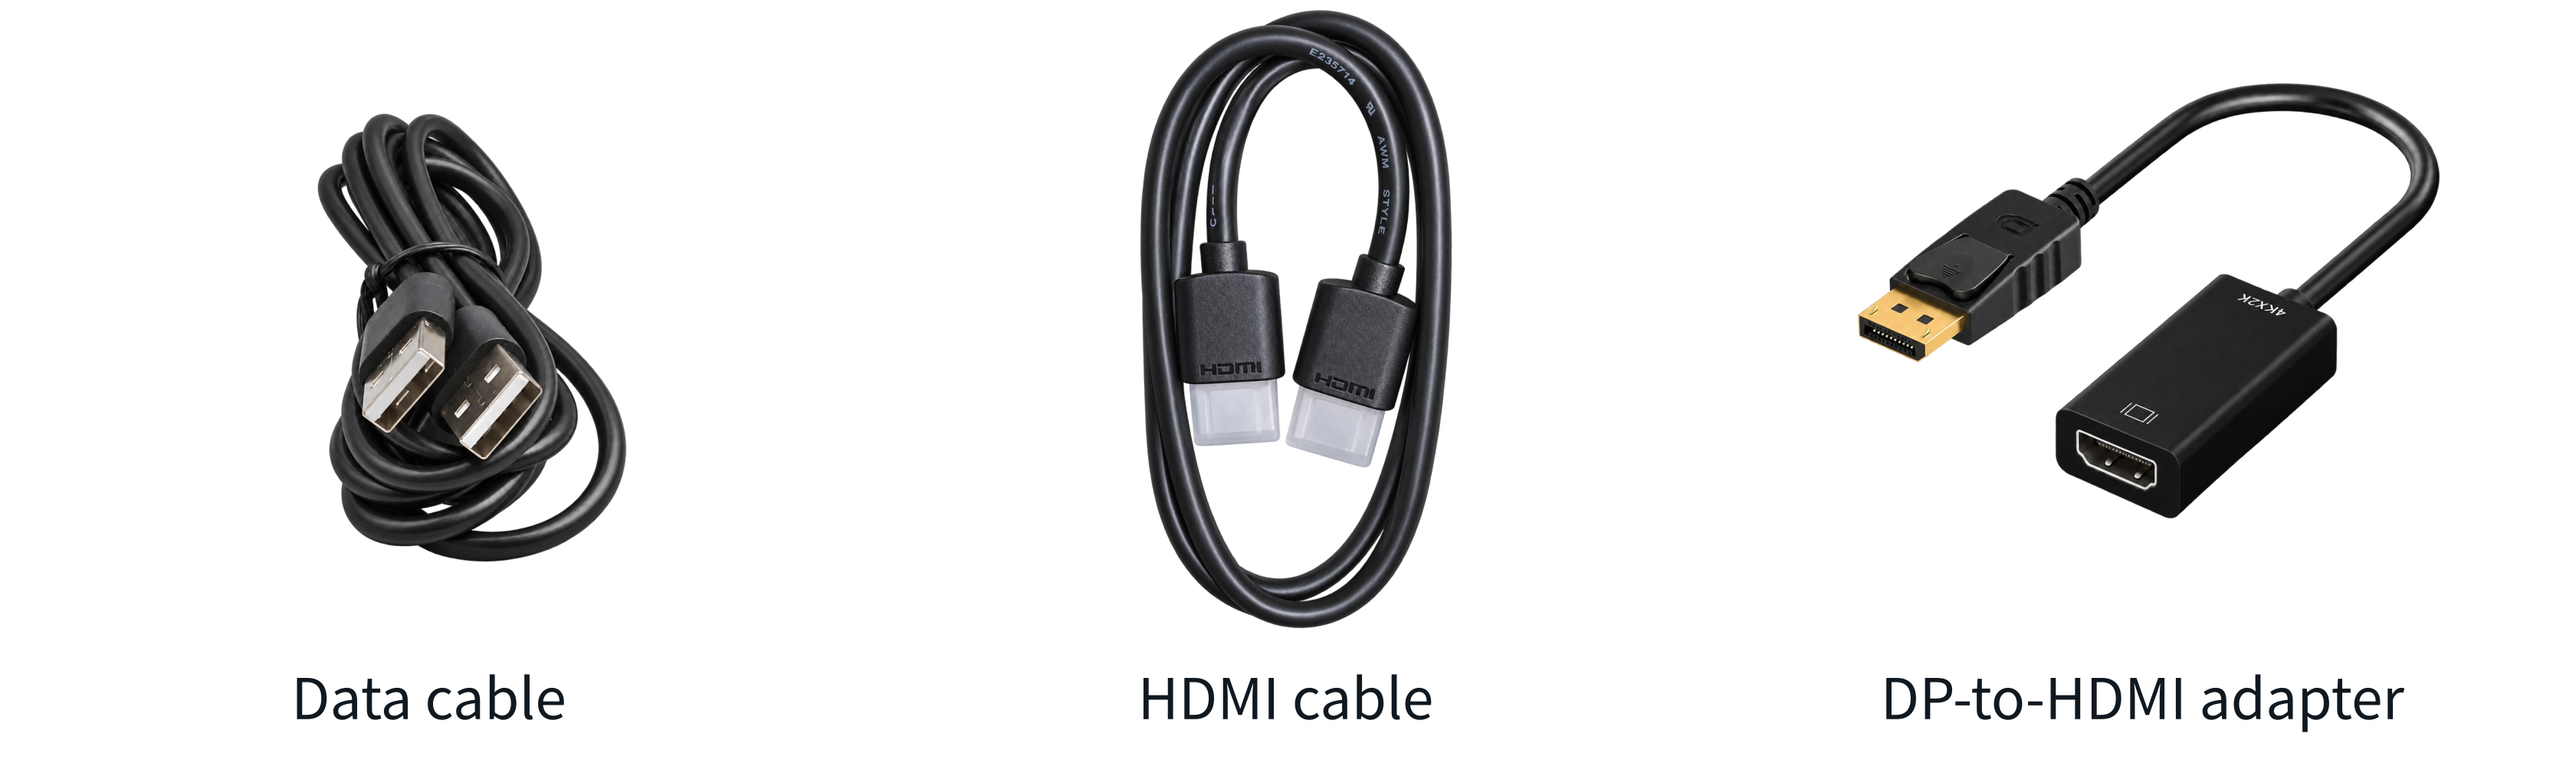
The manual lists a 1 m USB-A data cable, a 0.6 m HDMI male-to-male cable (HDMI 2.0, 19+1), and a DP male-to-HDMI female adapter. Package contents and accessory specifications may change; confirm the supplied items when ordering.
Supported Devices and Requirements
Prepare the following:
- Controller: a Windows, macOS, or Ubuntu computer with USB connectivity. For the capture card's stated performance, use USB 3.0. Both the sharing device and the capture card must connect to the controller when using video.
- Target: a powered reComputer Jetson with a USB host port supporting keyboard/mouse input. For video, it also needs a working HDMI or DisplayPort output.
- Software: an OSRBOT Link package matching the controller's operating system and processor architecture.
- Accessories: the supplied USB-A data cable and, for video, a capture card, HDMI cable, and DP-to-HDMI adapter if required.
- Optional networking: an Ethernet cable and suitable network adapters for network sharing; a reachable trusted LAN for browser access.
This guide describes connection requirements rather than a tested compatibility list for every reComputer model or JetPack release. Check your device's hardware documentation for its USB host ports and display connector. The Jetson is the target here; do not install a controller package on it merely because it runs Ubuntu.
Hardware Connection
Identify the Ports
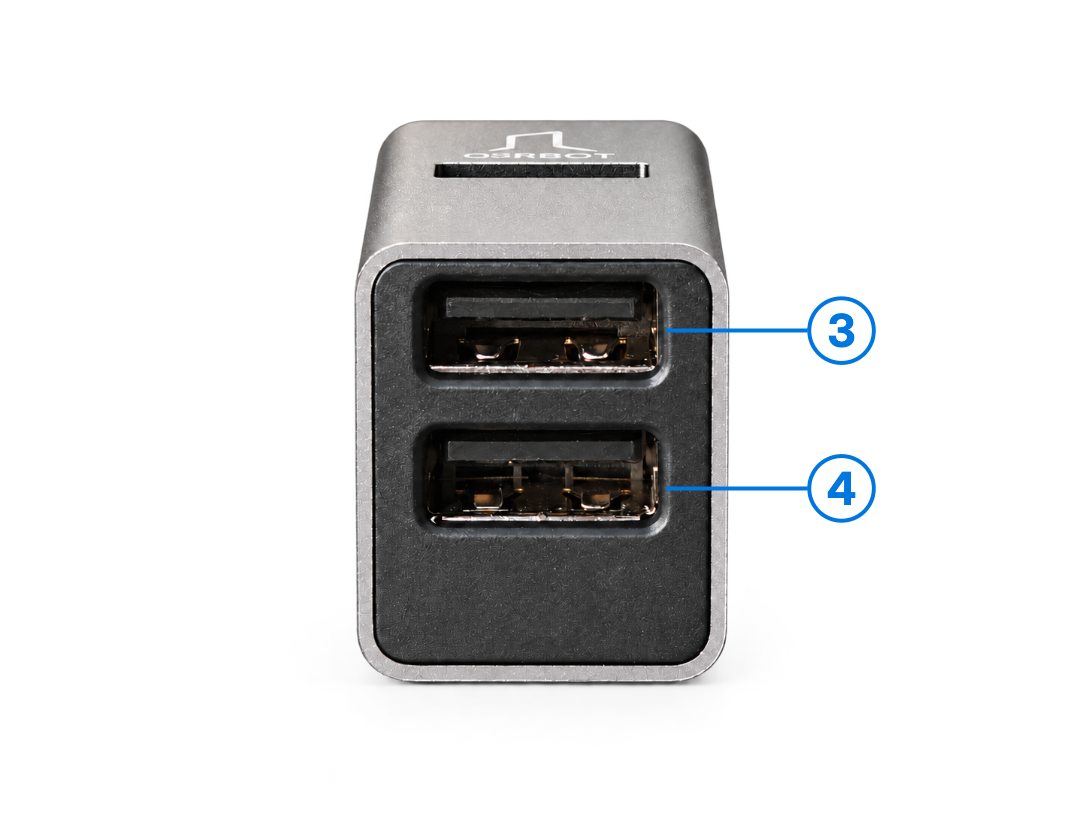
| Port | Purpose | Connection |
|---|---|---|
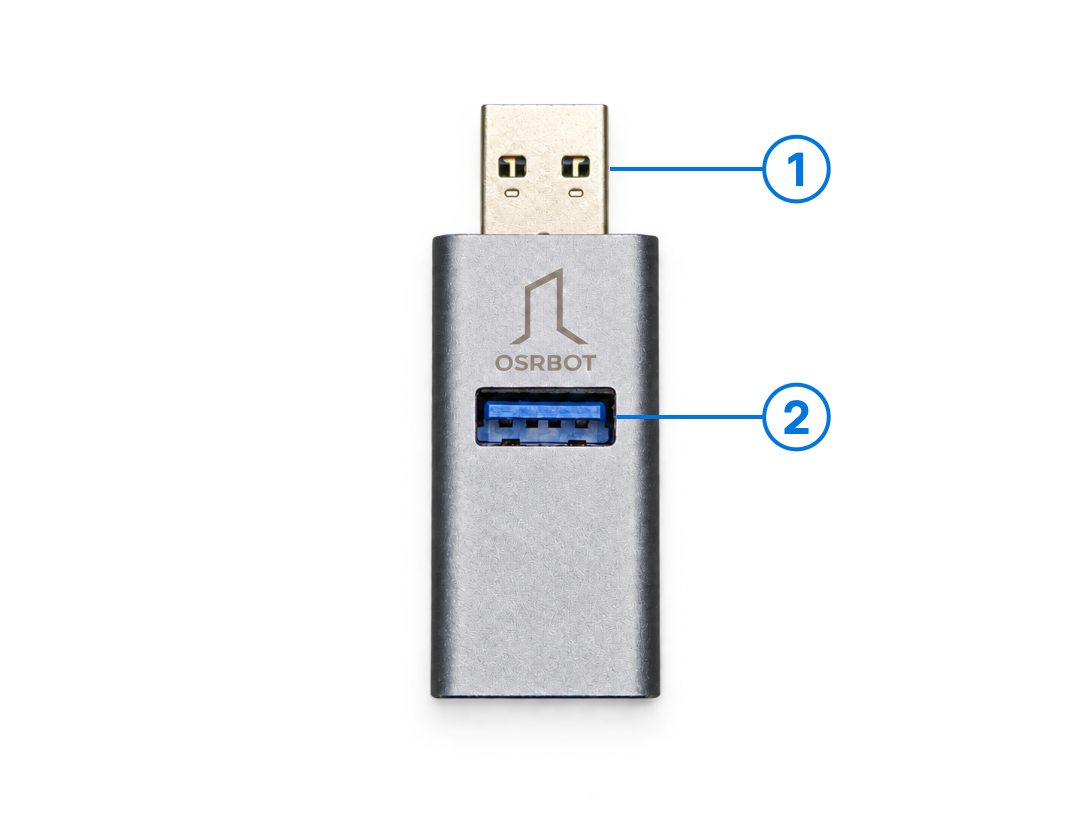
| 1 | Controller connection | Insert the built-in USB-A plug into the computer running OSRBOT Link. |
| 2 | Controller-side USB 3.0 expansion | Attach a peripheral belonging to the controller, such as a USB drive or keyboard receiver. |
| 3 | Target-side USB 2.0 expansion | Attach a USB peripheral belonging to the Jetson. |
| 4 | Target connection | Use the supplied USB-A to USB-A data cable to connect this lower port to a USB host port on the Jetson. |
Connect the supplied data cable between port 4 of the sharing device and the Jetson. Do not use it to connect the controller's USB port directly to the Jetson's USB host port. Ports 2 and 3 are expansion ports, not substitutes for port 4.
reComputer Connection Overview
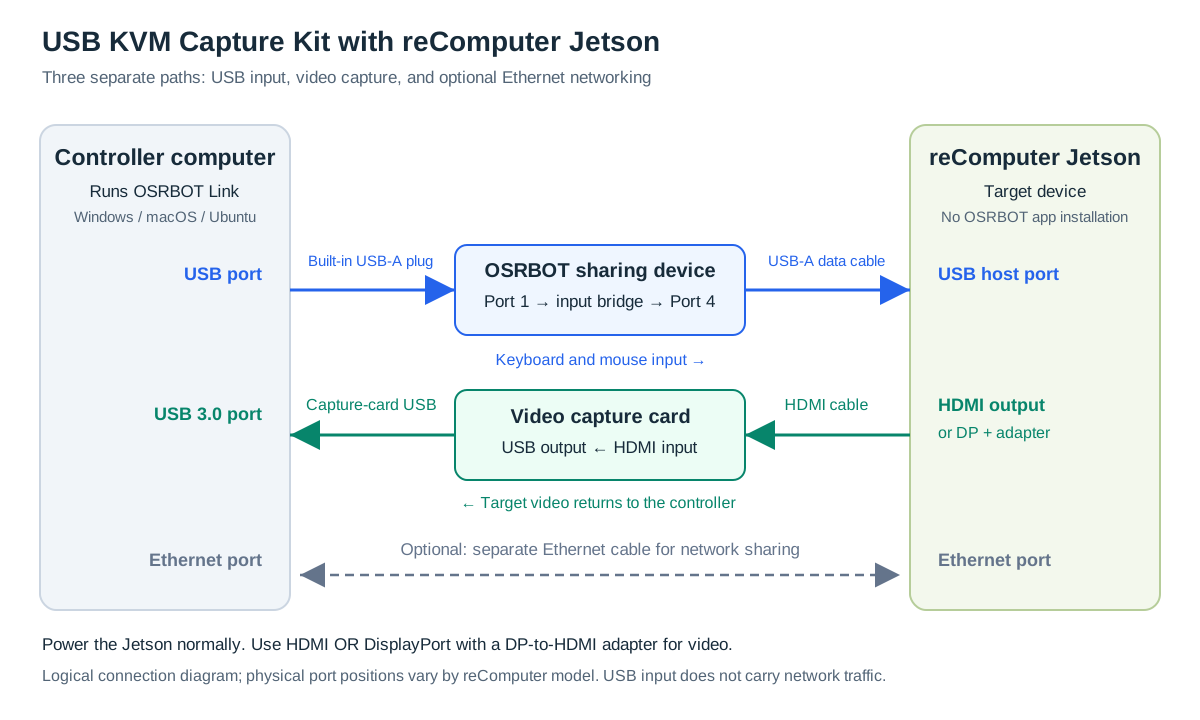
The diagram is a logical wiring guide; connector positions depend on your reComputer model. Power the Jetson using its normal power supply. Choose one of the three setups below.
Option 1: Keyboard and Mouse Only
- Insert the sharing device's port 1 into the controller.
- Connect port 4 to the Jetson's USB host port using the supplied data cable.
- Use the target's existing display if needed. Without a capture card, OSRBOT Link provides input control but no target video preview.

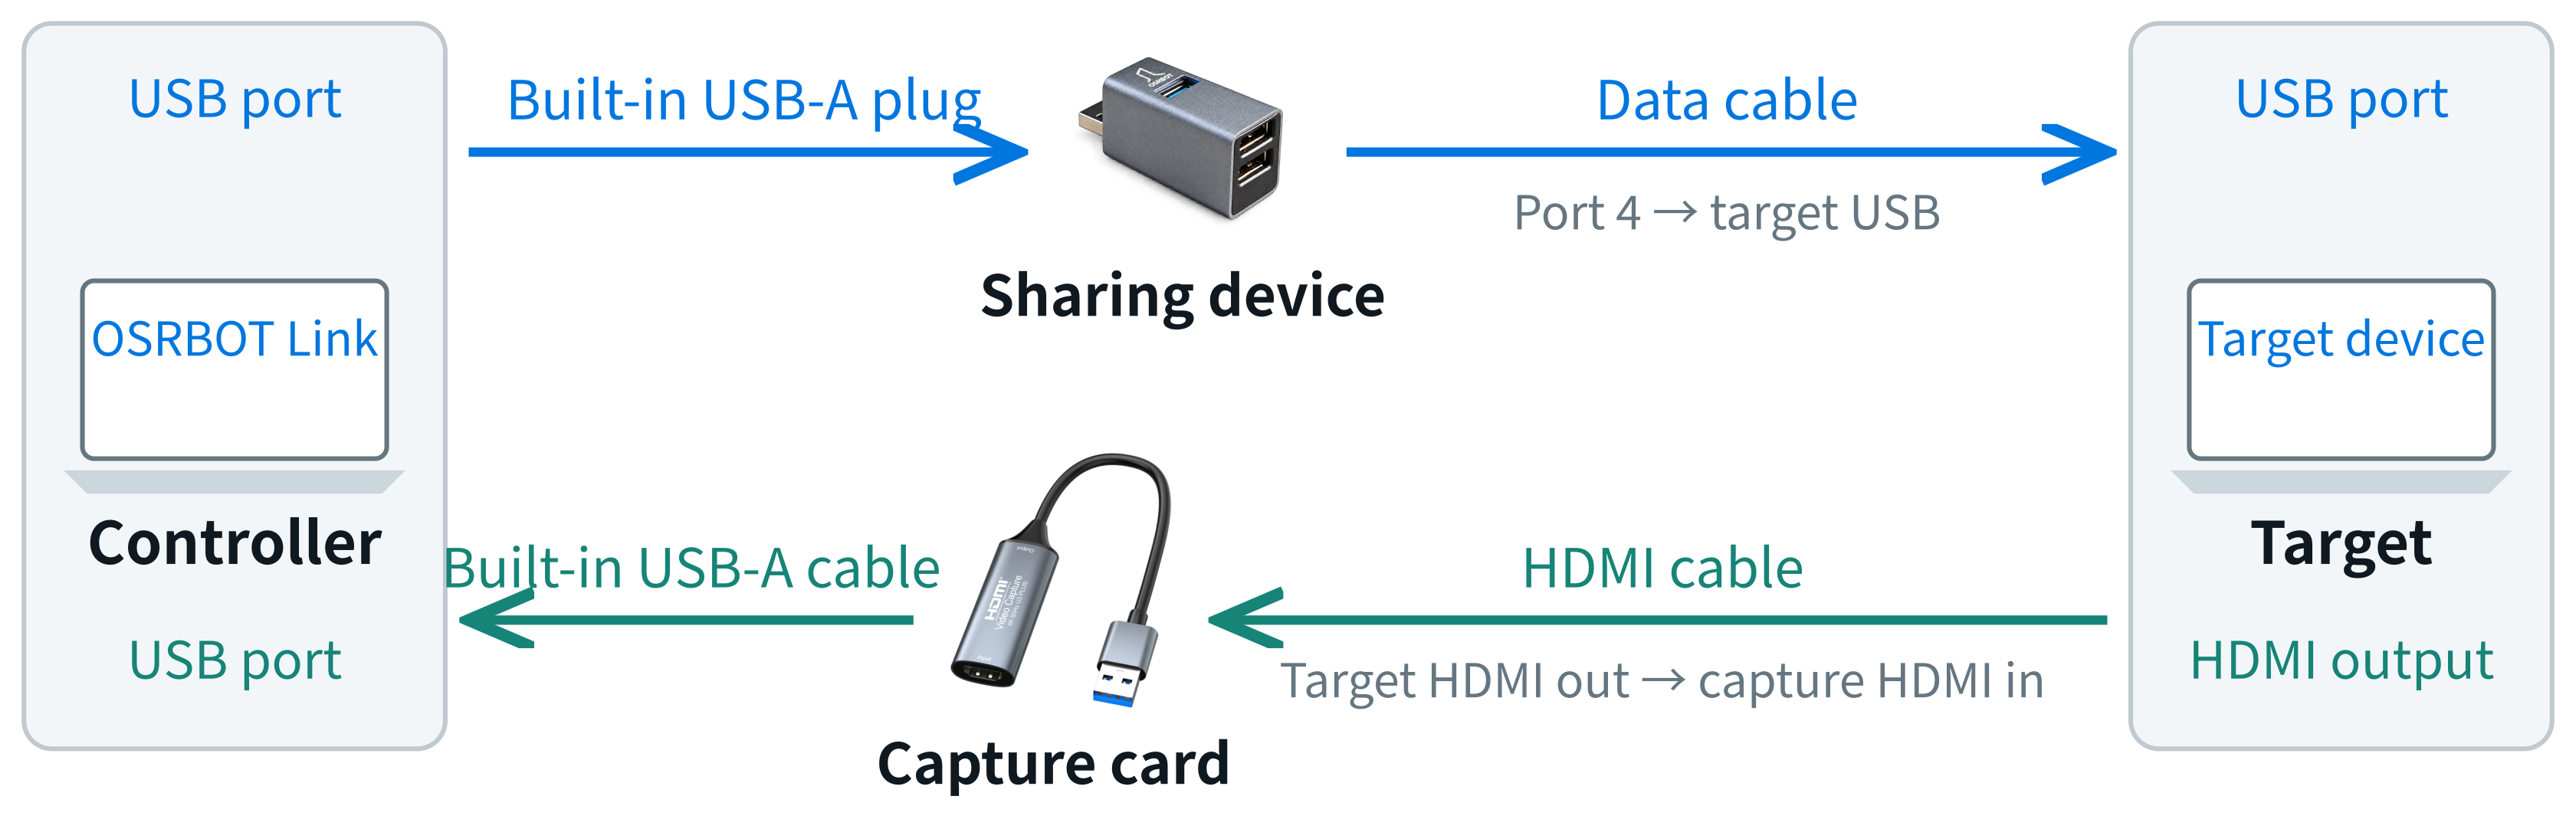
Option 2: Keyboard and Mouse with HDMI Video
- Complete the keyboard/mouse connections above.
- Connect the Jetson's HDMI output to the capture card's HDMI input using the HDMI cable.
- Connect the capture card's USB output to the controller.
Option 3: Keyboard and Mouse with DisplayPort Video
- Complete the keyboard/mouse connections from Option 1.
- Connect the DP-to-HDMI adapter to the Jetson's DisplayPort output.
- Connect an HDMI cable from the adapter to the capture card's HDMI input.
- Connect the capture card's USB output to the controller.
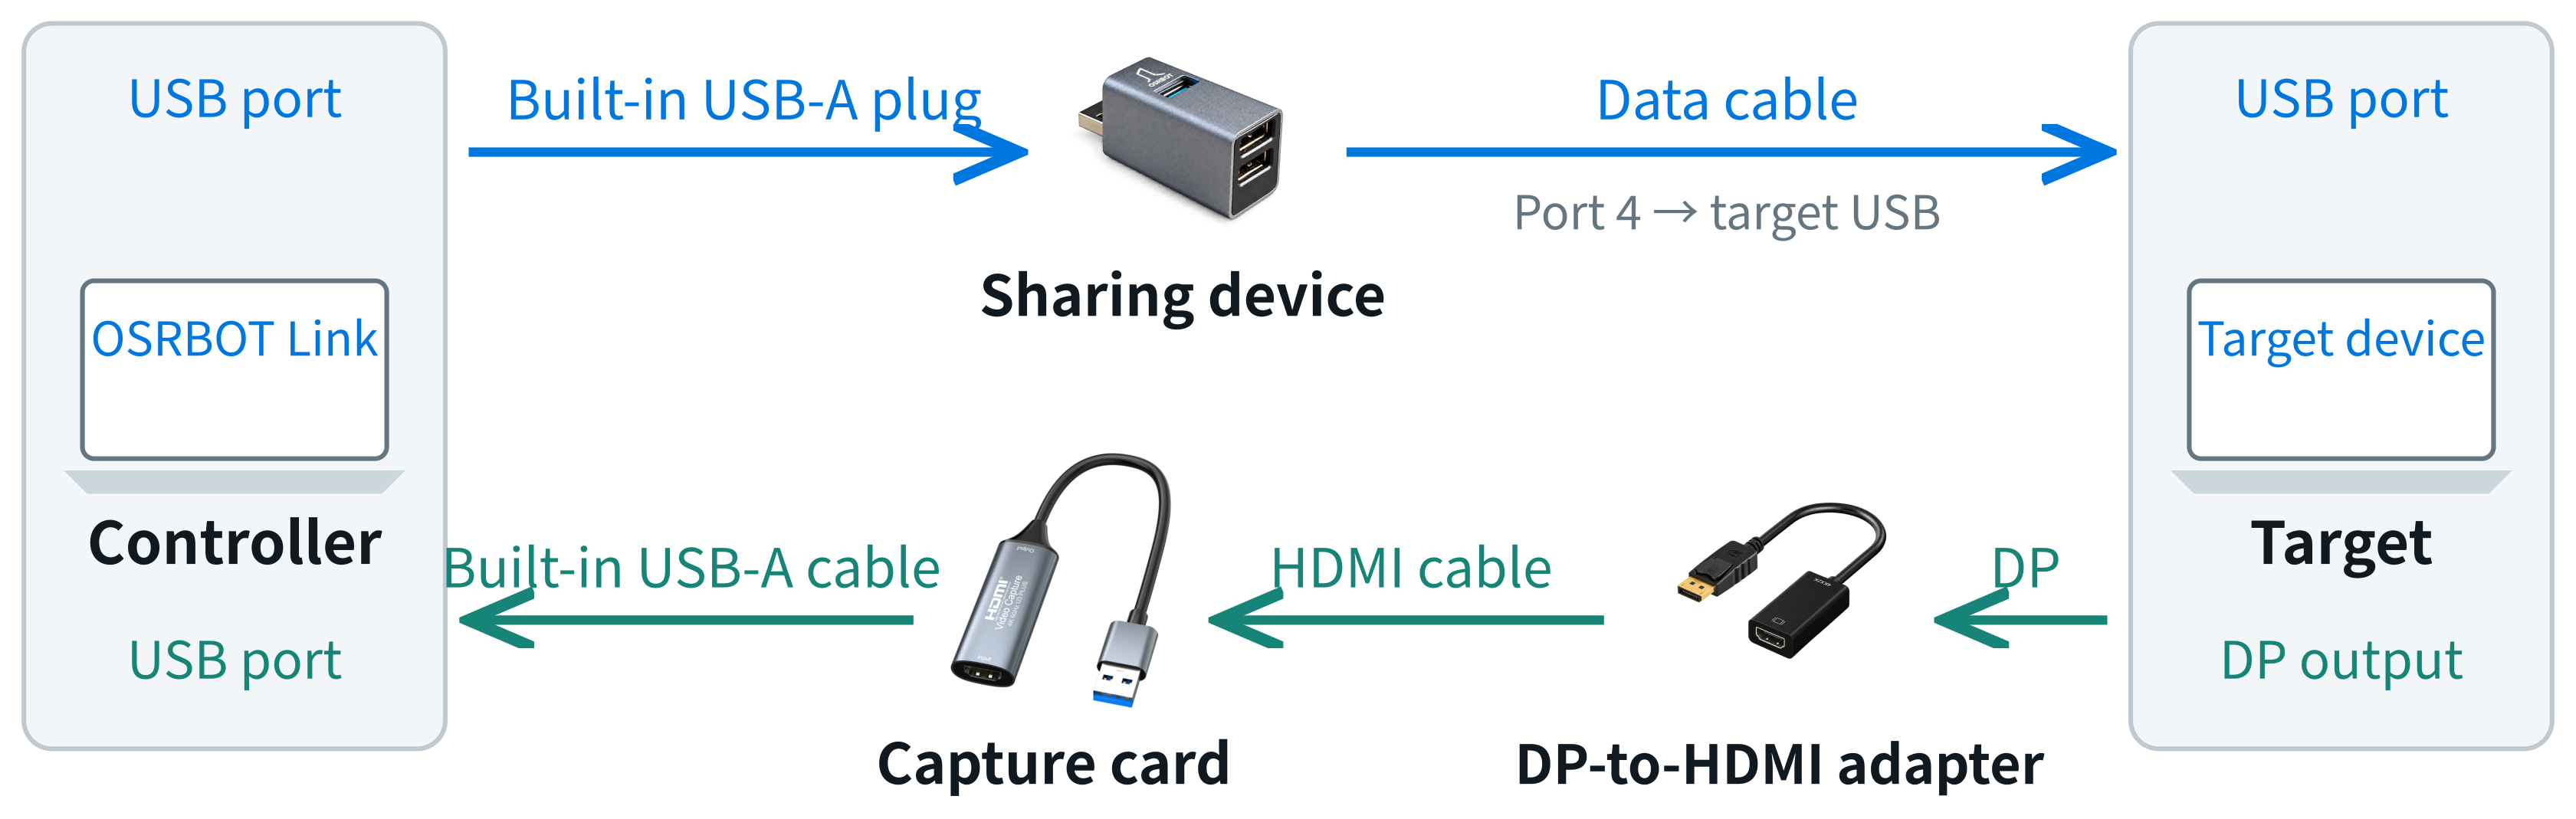
The adapter direction is DP source to HDMI capture input. The sharing device remains connected in both video setups.
Software Installation
Download OSRBOT Link
Open the official OSRBOT Link releases on the controller and select a package for its platform.
| Controller platform | Package |
|---|---|
| Windows | Installer or portable package matching the supported Windows version and architecture |
| macOS | Apple Silicon or Intel package, matching the Mac |
| Ubuntu | DEB or AppImage for a supported architecture; check the release's requirements |
OSRBOT Link Pro includes the network-sharing and LAN browser-control workflows described below. Lite is intended for local USB control and capture tools. Use Pro to follow the full guide, and consult the selected release's notes for supported systems and installation details.
Allow Required Permissions
- Windows and macOS: allow camera access for the capture card.
- macOS: allow Accessibility access when forwarding system shortcuts. Configure Internet Sharing manually in System Settings if using that optional feature.
- Ubuntu: if HID access fails, open Settings → Input and Shortcuts → Fix Linux HID Permissions, authorize the action, and rescan. Reconnect the sharing device if necessary.
Interface labels can vary between releases. The screenshots and operating limits in this guide come from the v1.1 product manuals.
Start Control
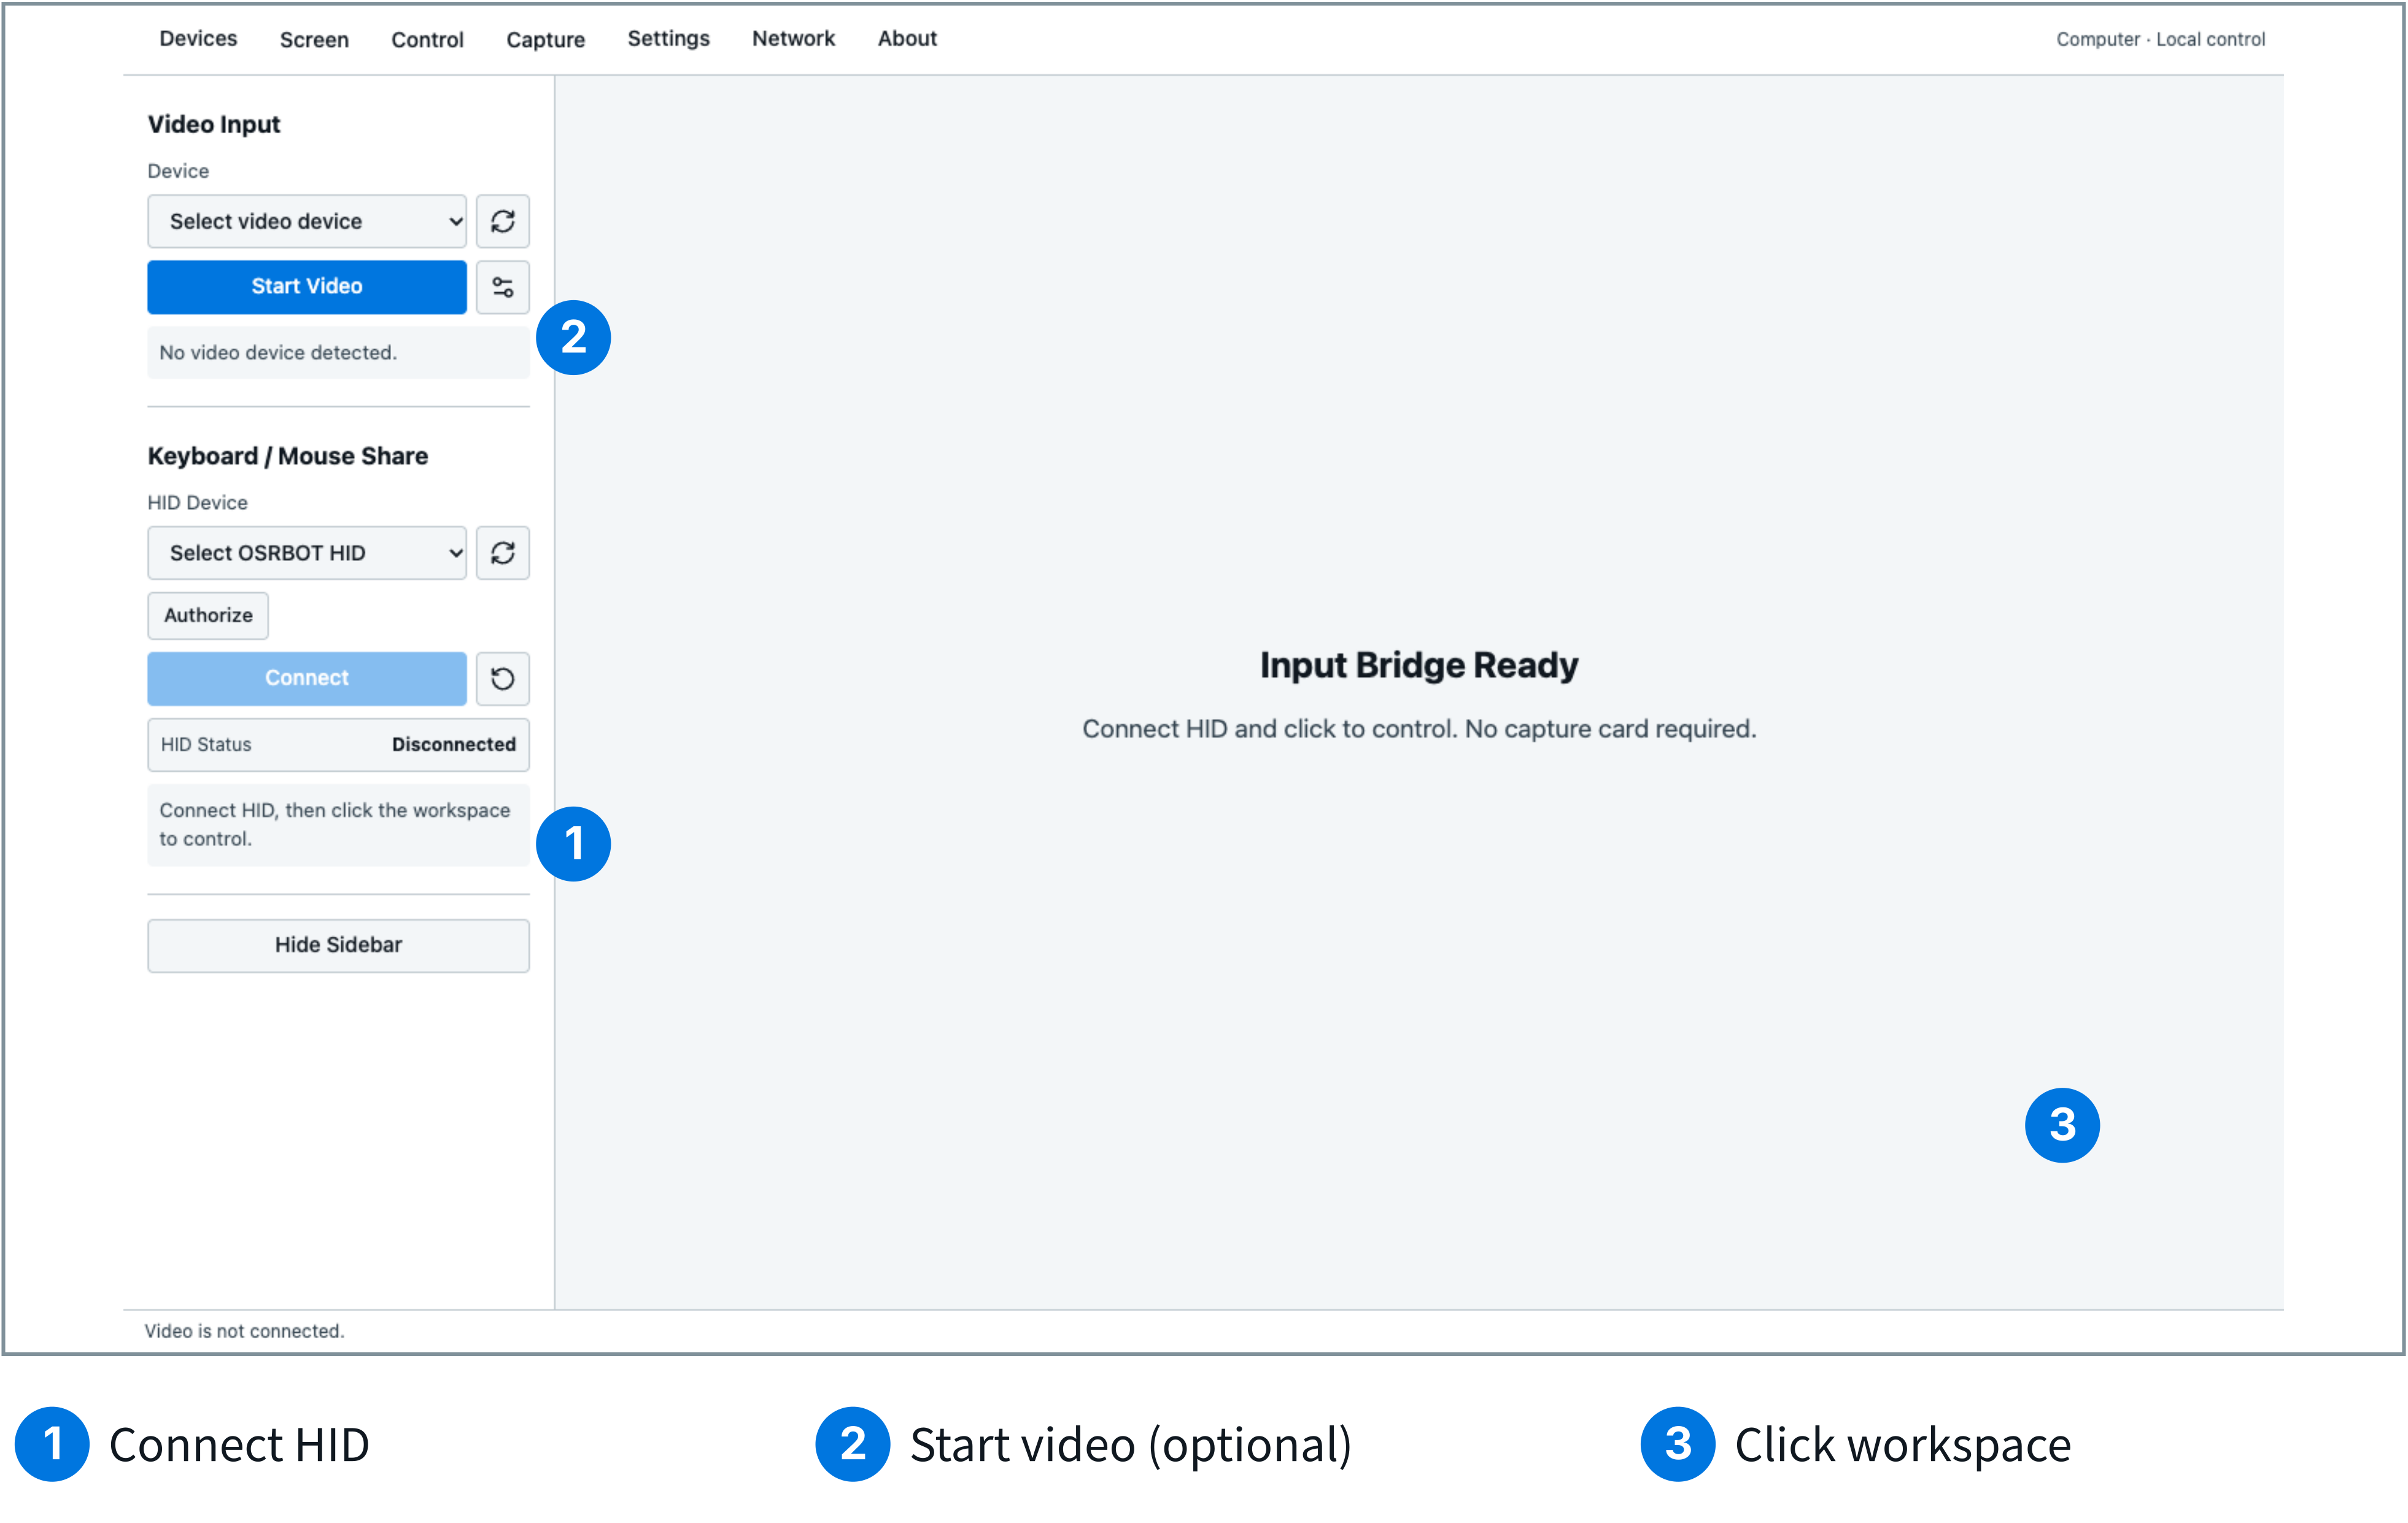
- Connect HID. Open OSRBOT Link, refresh the Keyboard/Mouse Sharing list, select OSRBOT HID, and click Connect. Confirm that the status is Connected.
- Start video, if connected. Select the capture card under Video Capture (shown as Video Input in some interfaces), choose a supported resolution and frame rate in Capture Settings, then click Start Video. Skip this step for keyboard/mouse-only operation.
- Choose the mouse mode. Use Computer for computer targets such as a Jetson desktop. The Android mode uses relative movement for Android targets.
- Start input. Click the video or blank workspace. The controller's keyboard and mouse now operate the target.
- Verify operation. With video enabled, confirm that the expected Jetson desktop appears. Move the pointer and type a harmless test string in a text field on the target.
Press Shift + Esc to release input and exit full screen. Click the workspace again to resume. Opening settings, changing modes, or switching windows pauses control. An optional Right Ctrl release shortcut can be enabled in Settings.
When finished, click Disconnect under Keyboard/Mouse Sharing. Use the Control menu to send Ctrl+Alt+Del where appropriate; forwarding reserved system shortcuts depends on the controller platform.
Additional Features
Display and Capture Settings
| Display mode | Behavior |
|---|---|
| Fit | Preserve the aspect ratio and show the entire image. |
| Fill | Preserve the aspect ratio; edges may be cropped. |
| Original | Display the original pixel dimensions. |
| Stretch | Fill the workspace; the aspect ratio may change. |
Use the Display menu to enter full screen or show/hide the sidebar and toolbar. Stop video before changing the capture card or capture settings. The status bar shows the actual resolution and frame rate; entering a custom resolution does not add capabilities to the capture card.
Screenshots, Recording, and GIFs
Start video, then use the Capture menu or full-screen toolbar:
- Screenshot: save the current captured frame to a chosen location.
- Recording: click Record, then Stop Recording to save. Each recording automatically stops and saves at 256 MiB; start another segment to continue.
- GIF: record a short clip, then stop to save. Each clip is limited to approximately 10 seconds.
Stopping video also ends recording. Wait for saving to finish before closing the app or unplugging devices. Under Settings → Capture and Watermark, a custom name can be appended to the OSRBOT Link watermark.
Paste Commands
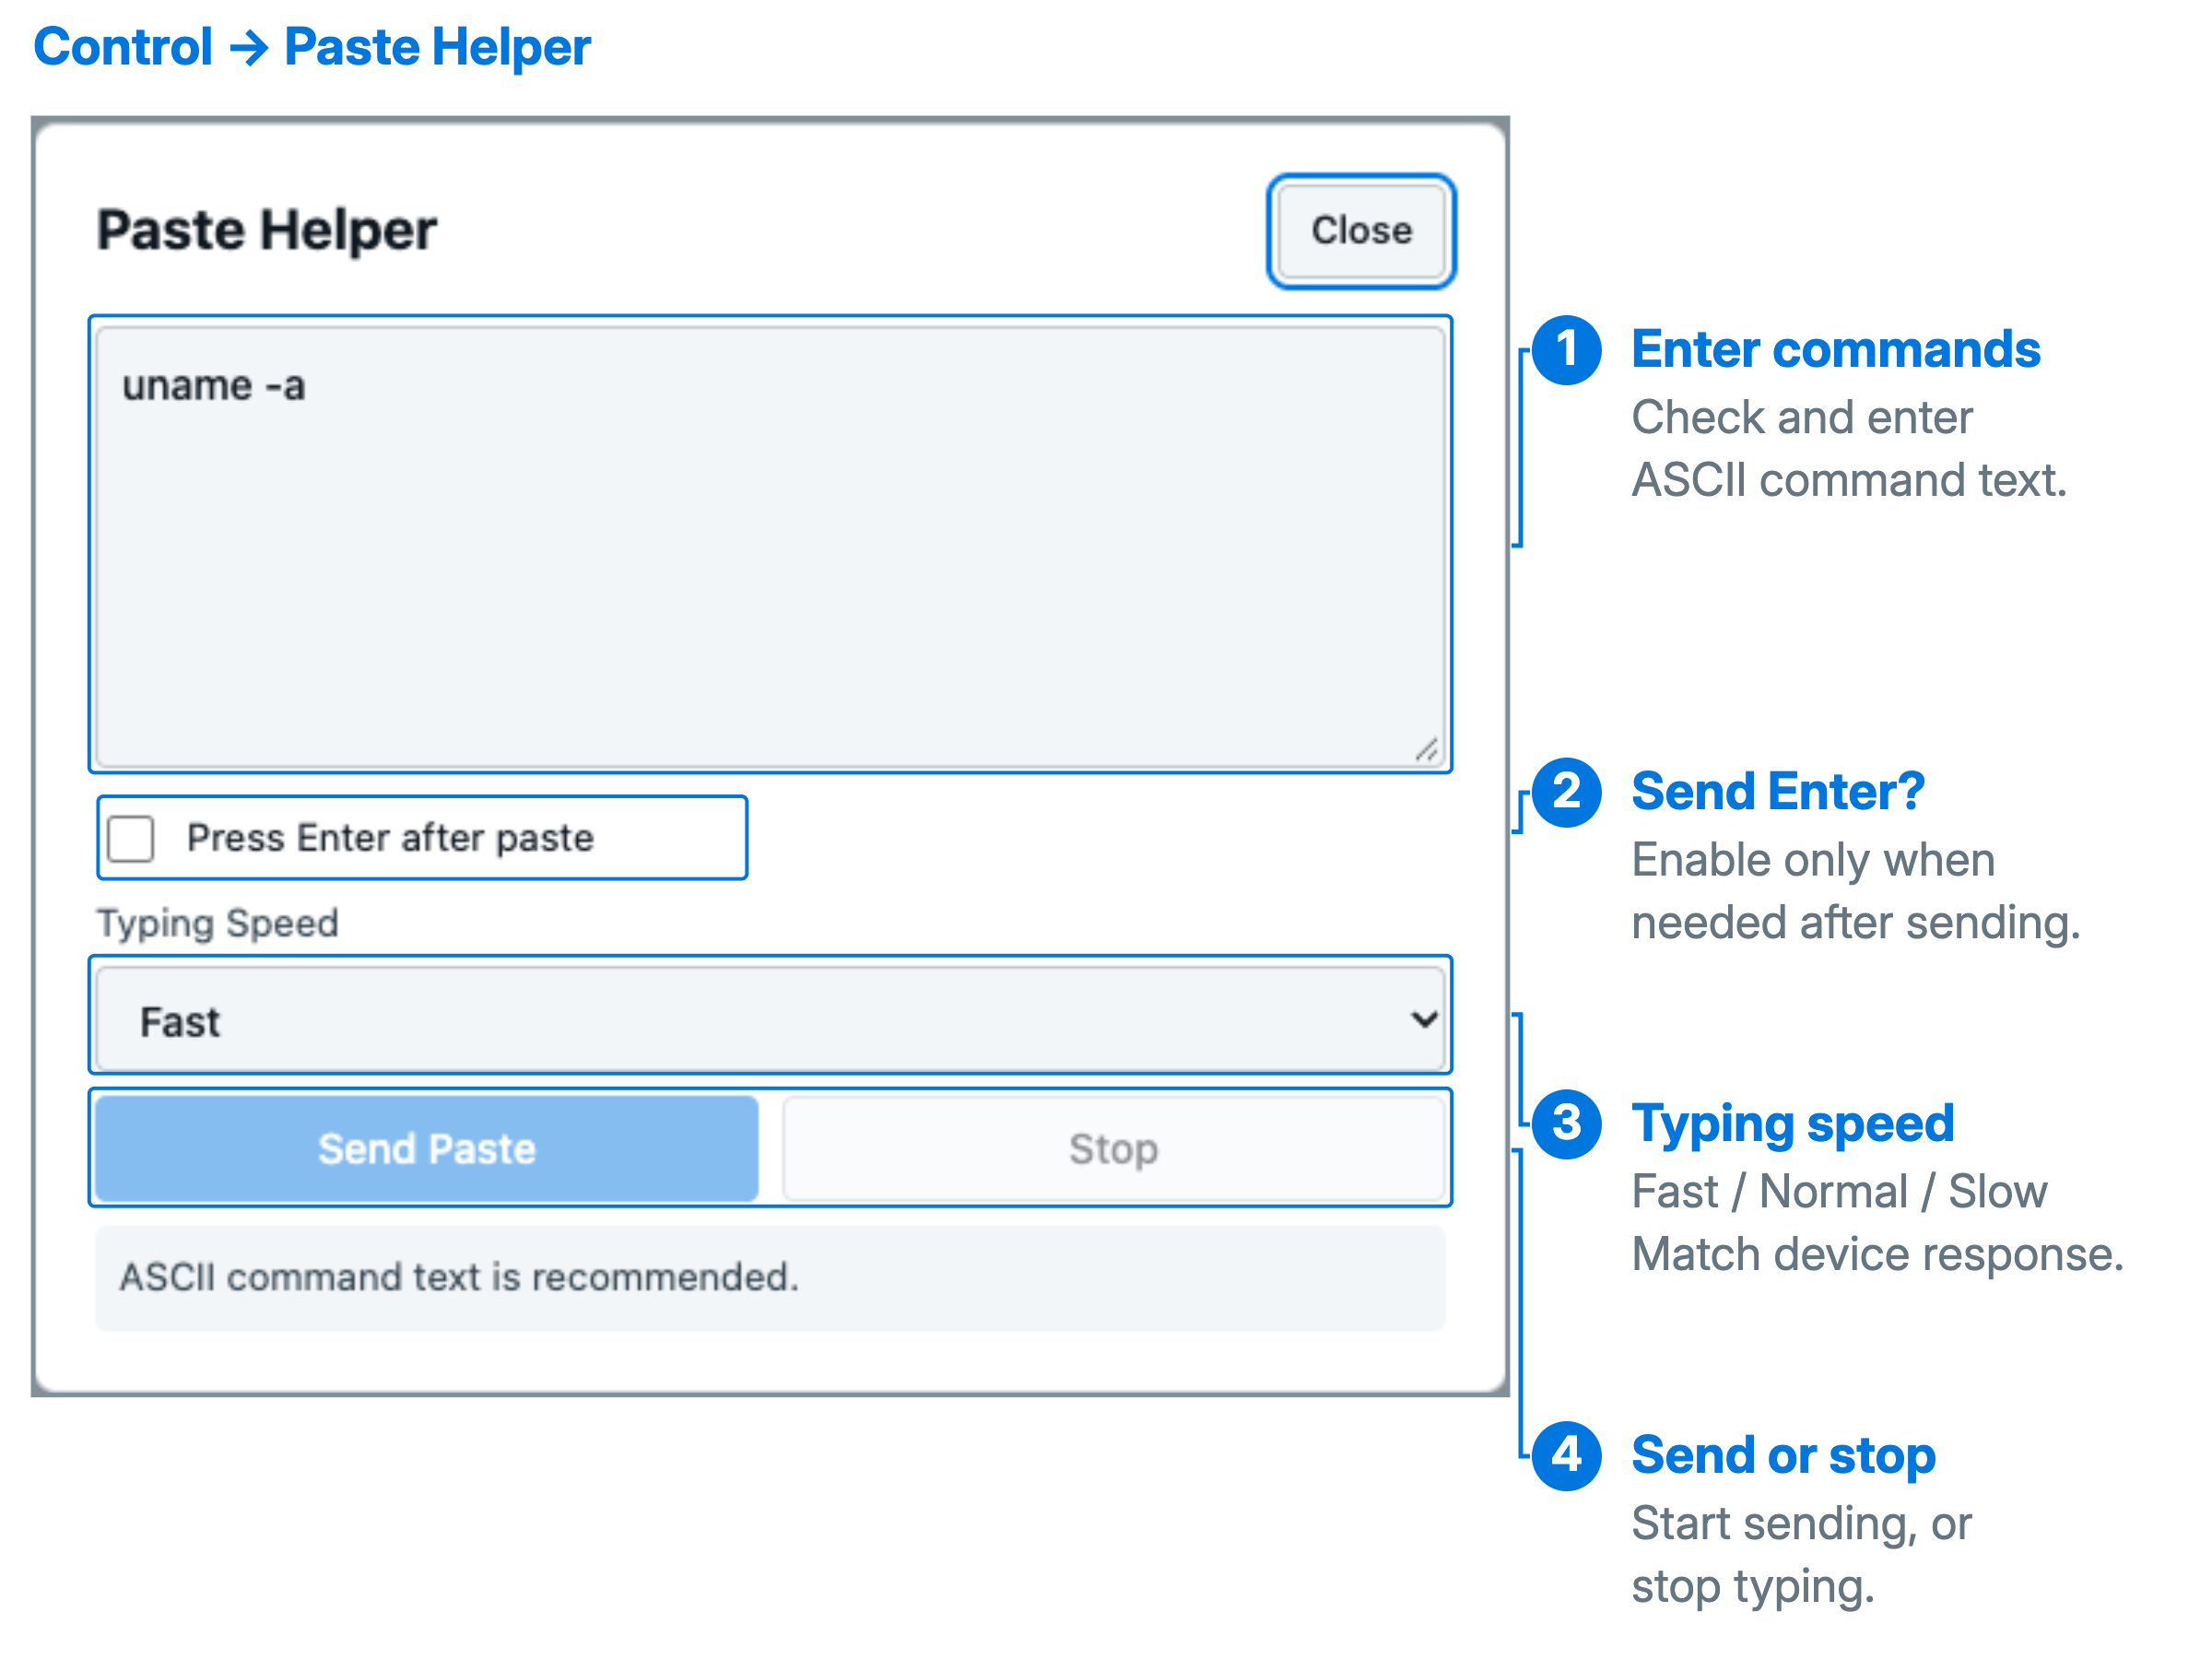
- Keep HID connected and focus a terminal or text field on the Jetson.
- Open Control → Paste Helper. Review the clipboard text or enter the command.
- Choose Fast, Standard, or Slow, and check whether Press Enter after sending is enabled.
- Click Send Paste and wait for completion. Use Stop Sending to interrupt.
During local control, Ctrl + Alt + V sends a single line of up to 256 printable ASCII characters, without pressing Enter. Longer or multiline text opens a preview. Paste Helper accepts up to 1,200 ASCII characters and does not support Chinese text or file transfer.
Paste Helper generates keyboard input in the target's focused field. Check the target focus and command before sending, especially when the option to press Enter is enabled.
Settings and Diagnostics
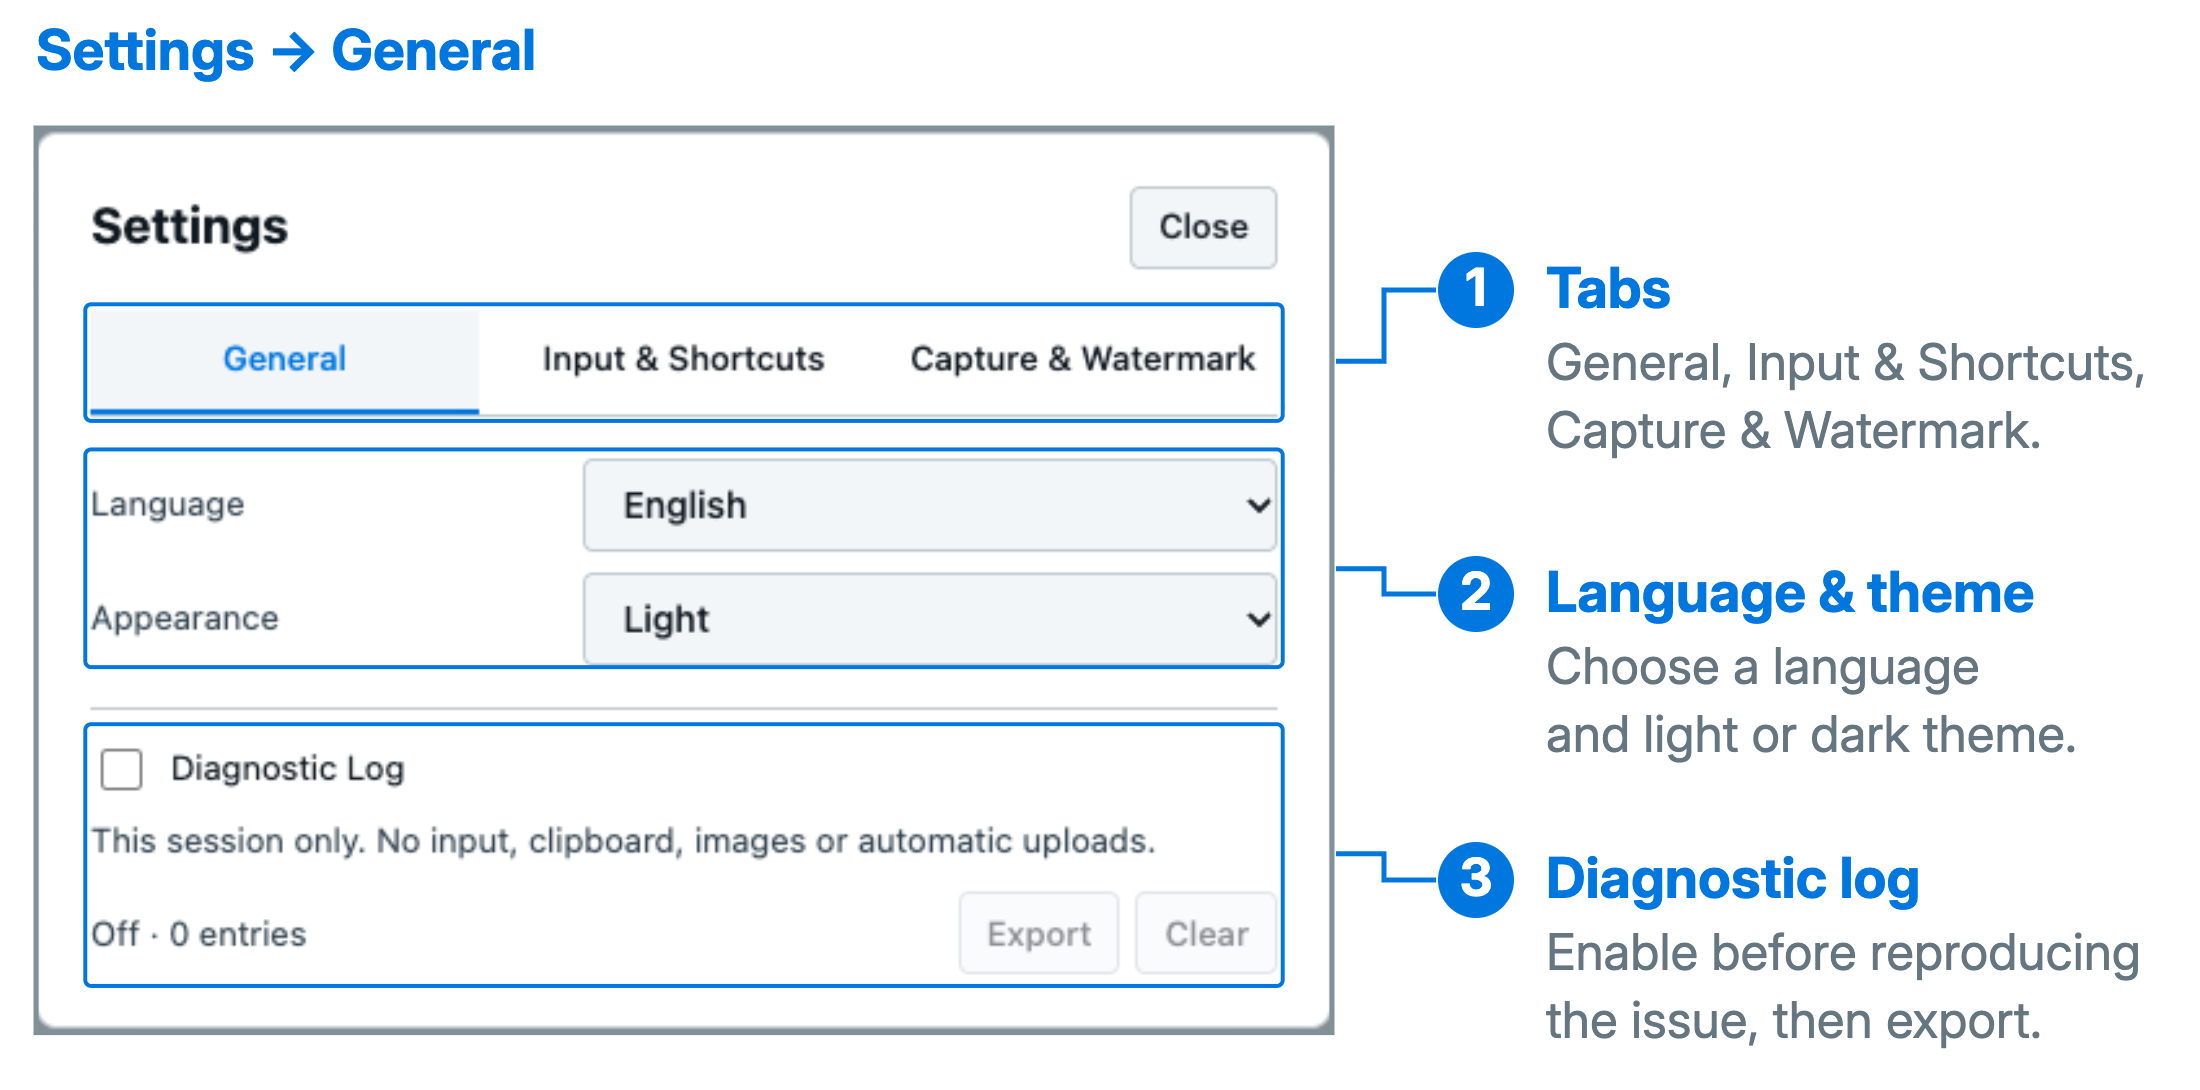
Settings include English/Chinese language, light/dark/system appearance, scroll direction, release shortcuts, pointer hints, and quick paste. Preferences are saved on the controller; changing them does not automatically connect devices.
For troubleshooting, enable diagnostic logs under Settings → General, reproduce the problem, and select Export. According to the manual, logs record session status rather than keystrokes, clipboard contents, or video, and are not uploaded automatically.
Optional: Network Sharing
In OSRBOT Link Pro, open Network and Remote. Network sharing gives the Jetson access to the controller's upstream connection; it is independent of keyboard/mouse control and video capture.
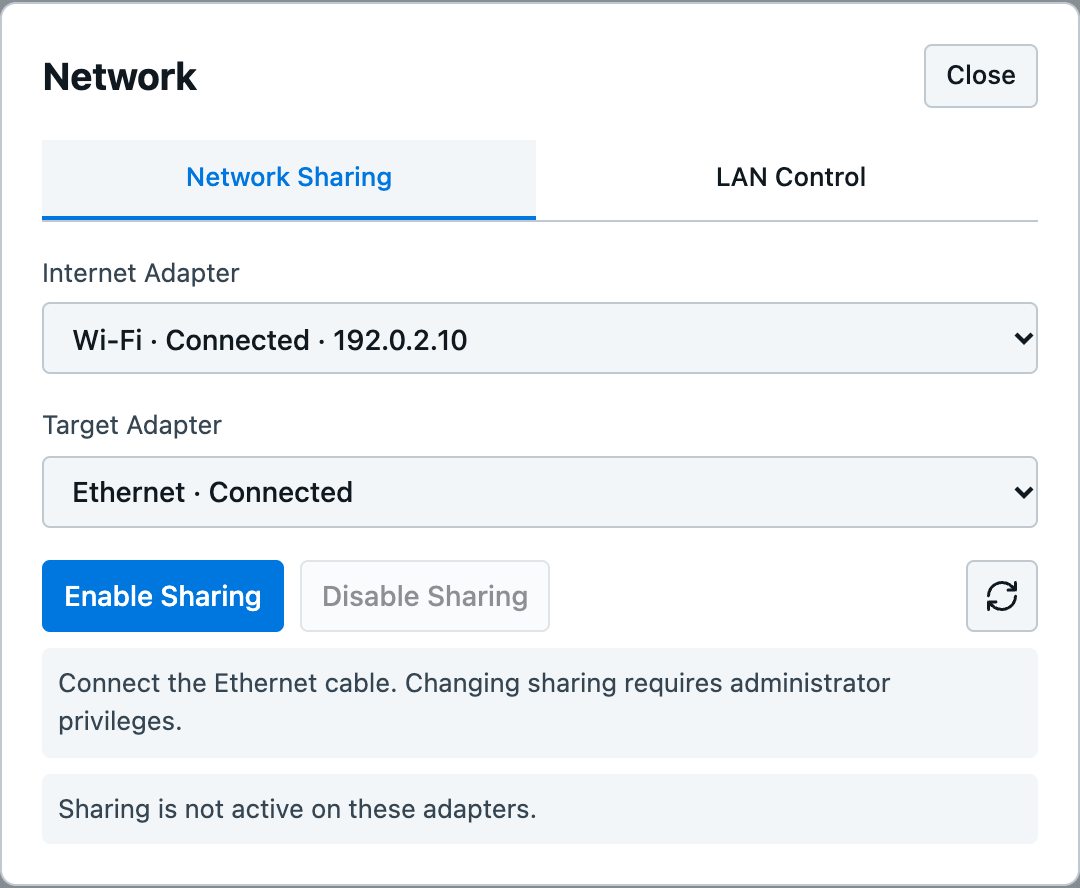
- Connect the controller and Jetson Ethernet ports with an Ethernet cable.
- Connect the controller to the upstream network through Wi-Fi or a second Ethernet adapter.
- Select the Upstream Adapter and Target Adapter, click Enable Sharing, and grant the requested system permissions.
- Check the displayed status and IP information, then verify the required LAN service or internet access from the Jetson.
- Click Disable Sharing when finished.
Windows requires administrator access. Linux requires NetworkManager, system authorization, and a default route on the upstream adapter. On macOS, enable Internet Sharing manually in System Settings.
The USB keyboard/mouse cable does not provide this network connection. For an offline direct Ethernet link, use mutually reachable IP addresses; internet access and network sharing are unnecessary. Closing OSRBOT Link does not disable system network sharing. Adapter names and addresses in the screenshot are examples.
Optional: LAN Browser Control
Keep OSRBOT Link Pro running on the controller. Other computers on a reachable trusted LAN can view the captured Jetson screen and, when authorized, operate it through a browser. Network sharing does not need to be enabled for this feature.
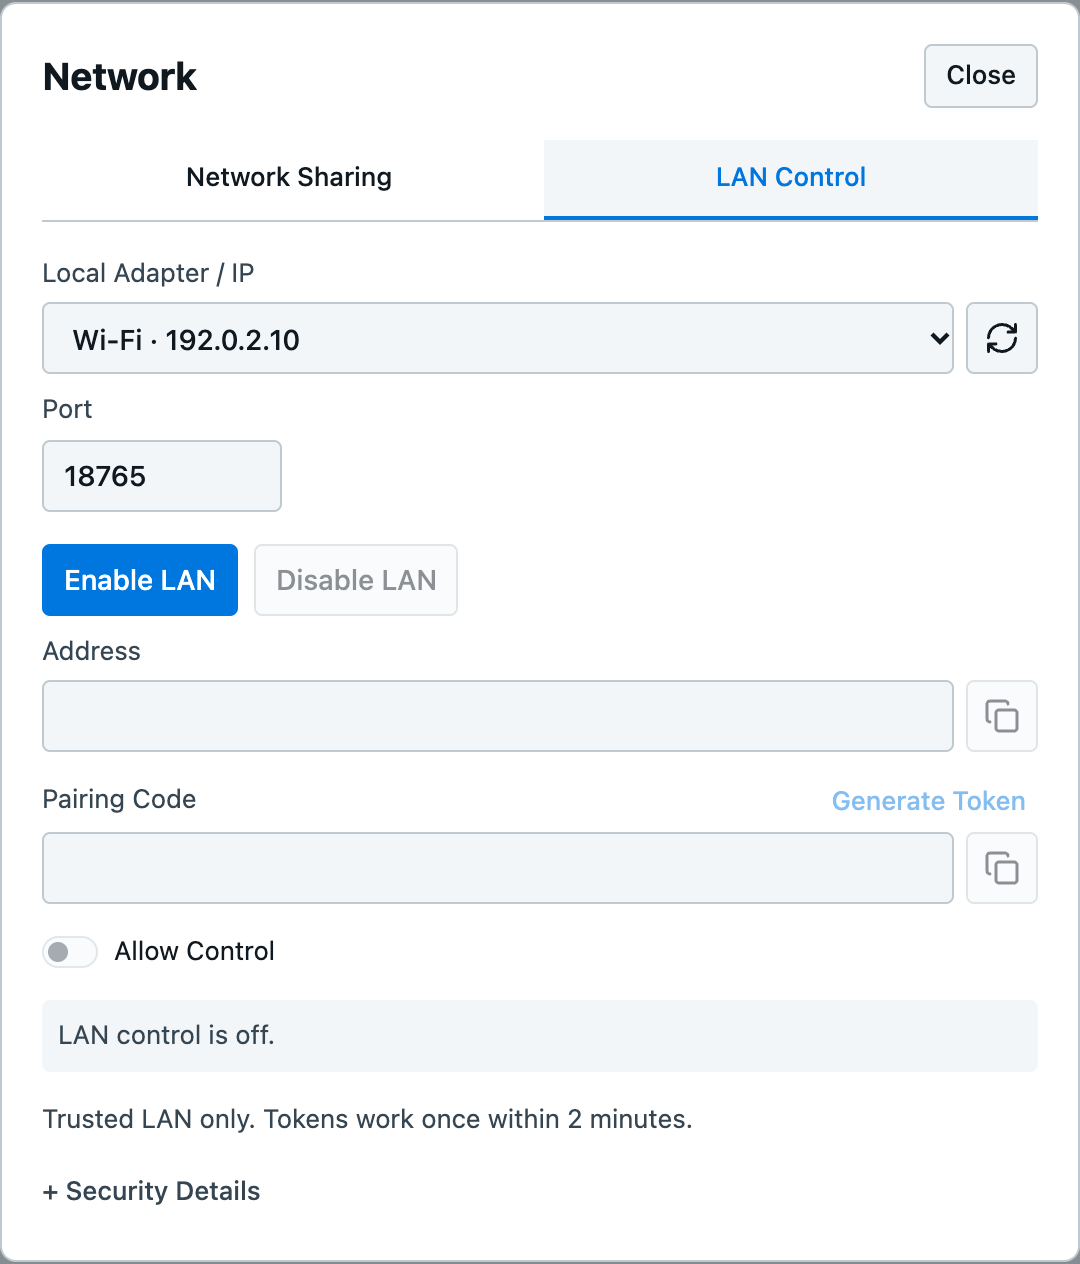
- On the controller, select its LAN IP and port, then click Enable LAN.
- On another computer, open the actual address displayed by the app, enter the pairing code, and click Connect. Each code is single-use and expires after 2 minutes.
- For viewing, ensure video is running on the controller.
- For input, also connect HID, enable Allow Control, and grant control permission to that browser. The browser user can click Request Control.

Up to 4 browsers can view at once, with only 1 browser granted remote input. The controller and authorized browser can both send input, so coordinate operation. Disable Control revokes remote input while allowing viewing; disabling LAN control ends all sessions.
Use a trusted LAN, allow private-network firewall access as needed, and do not forward the port to the public internet. Reconnection requires a new pairing code. If the controller IP changes, restart LAN control and use the new address.
Troubleshooting
| Symptom | What to check |
|---|---|
| Sharing device is missing or HID cannot connect | Check the controller USB connection, refresh the list, and reselect the HID device. If needed, use Reset HID or fix Linux HID permissions, then reconnect. |
| Video works but input does not | Confirm HID is Connected, the target cable uses port 4, and the workspace has been clicked. For browser input, also check control authorization. |
| No video or a black screen | Check target video output, HDMI/DP direction, capture-card USB connection, and camera permission. Close other apps using the capture card. |
| A resolution or frame rate cannot start | Stop video and select a mode supported by the capture card and source. Check the USB connection; custom settings cannot exceed hardware capabilities. |
| Input stops after opening settings or switching windows | Click the workspace again to resume control. If still unresponsive, use Reset HID, refresh, and reconnect. |
| Network sharing is enabled but access fails | Check both adapter selections, Ethernet wiring, and the target's address, gateway, and DNS. Verify the required service from the target; a successful ping alone is insufficient. |
| Browser pairing fails | Generate a fresh pairing code and check LAN reachability and firewall access. Use the current controller address. |
| Browser can view but cannot control | Check HID, Allow Control, and the browser's granted control permission. Only one browser can hold remote input permission. |
Reset HID does not automatically resume control or stop video/recording. Reconnect and click the workspace afterward.
For a support request, include the controller OS, target model, wiring photos, error message, reproduction steps, and exported diagnostic logs if needed.
Related Resources
- OSRBOT Link software releases and installation notes
- reComputer Super hardware and interfaces usage
- reComputer Robotics J401 interfaces and pinouts
- Seeed Wiki repository and discussions
Product information, operating limits, and manual illustrations are based on the OSRBOT Link Product Manual v1.1 (English and Chinese, November 2026). The reComputer connection overview is a schematic for this guide, not a photograph of a tested setup. For OSRBOT software and hardware support, contact winter@osrbot.com.
Tech Support & Product Discussion
Thank you for choosing our products! We are here to provide you with different support to ensure that your experience with our products is as smooth as possible. We offer several communication channels to cater to different preferences and needs.