Use docker on reComputer
Introduction

This wiki explains how to use the docker on reComputer box. Docker is an open-source platform used to automate the deployment, scaling, and management of applications inside lightweight, portable containers. Containers allow developers to package applications and their dependencies together in a consistent environment, ensuring that they run smoothly across different computing environments.
Prepare Hardware
| reComputer R1125 | reComputer AI R2130 | reComputer AI Industrial R2145 |
|---|---|---|
 |  |  |
| reComputer Industrial R20xx | reComputer Industrial R21xx |
|---|---|
 |  |
Prepare software
update the system
sudo date -s "$(wget -qSO- --max-redirect=0 google.com 2>&1 | grep Date: | cut -d' ' -f5-8)Z"
sudo apt update
sudo apt full-upgrade
Install docker
curl -fsSL https://get.docker.com -o get-docker.sh
sudo sh get-docker.sh
Add the current user to the docker group
sudo usermod -aG docker $USER
reboot
Check docker version
docker --version
The result is as follow:

Use docker
Creat your project
Here, we use my_app as an example to demonstrate the usage of docker.
mkdir my_app
cd my_app
Creat src folder and creat main.py
mkdir src && cd src
nano main.py
main.py
from fastapi import FastAPI, Request
from fastapi.responses import HTMLResponse
from fastapi.staticfiles import StaticFiles
from fastapi.templating import Jinja2Templates
import os

app = FastAPI()

# Create directories if they don't exist
os.makedirs("static", exist_ok=True)
os.makedirs("templates", exist_ok=True)

# Mount static files directory
app.mount("/static", StaticFiles(directory="static"), name="static")

# Set up Jinja2 templates
templates = Jinja2Templates(directory="templates")

@app.get("/", response_class=HTMLResponse)
async def read_root(request: Request):
    return templates.TemplateResponse("index.html", {"request": request})

@app.get("/items/{item_id}")
async def read_item(item_id: int, q: str = None):
    return {"item_id": item_id, "q": q}
Creat static folder
cd .. && mkdir static
cd static
mkdir css && mkdir js
Creat css file:
cd css
nano style.css
style.css
body {
    font-family: 'Roboto', sans-serif;
    margin: 0;
    padding: 0;
    background: linear-gradient(135deg, #667eea 0%, #764ba2 100%);
    min-height: 100vh;
    color: #333;
}

.container {
    max-width: 800px;
    margin: 0 auto;
    padding: 20px;
}

header {
    text-align: center;
    padding: 40px 0;
    color: white;
}

header h1 {
    font-size: 2.5rem;
    margin-bottom: 10px;
}

header p {
    font-size: 1.2rem;
    font-weight: 300;
}

main {
    display: flex;
    flex-direction: column;
    gap: 20px;
}

.card {
    background: white;
    border-radius: 10px;
    box-shadow: 0 4px 20px rgba(0, 0, 0, 0.1);
    padding: 25px;
    transition: transform 0.3s ease, box-shadow 0.3s ease;
}

.card:hover {
    transform: translateY(-5px);
    box-shadow: 0 6px 25px rgba(0, 0, 0, 0.15);
}

.card h2 {
    margin-top: 0;
    color: #667eea;
    display: flex;
    align-items: center;
    gap: 10px;
}

.card ul {
    padding-left: 20px;
}

.card li {
    margin-bottom: 10px;
    display: flex;
    align-items: center;
    gap: 10px;
}

.endpoint {
    display: flex;
    justify-content: space-between;
    align-items: center;
    background: #f8f9fa;
    padding: 15px;
    border-radius: 5px;
    margin-top: 10px;
}

.endpoint code {
    background: #e9ecef;
    padding: 5px 10px;
    border-radius: 3px;
    font-family: 'Courier New', monospace;
}

.button {
    background: #667eea;
    color: white;
    padding: 10px 20px;
    border-radius: 5px;
    text-decoration: none;
    font-weight: bold;
    transition: background 0.3s ease;
}

.button:hover {
    background: #5a6fd8;
}

footer {
    text-align: center;
    padding: 30px 0;
    color: white;
    font-weight: 300;
}

footer p {
    margin: 0;
}

footer i {
    color: #ff6b6b;
}
Then creat js file:
cd .. && mkdir js
cd js
nano main.js
main.js
// Simple JavaScript to add interactivity to the UI
document.addEventListener('DOMContentLoaded', function() {
    // Add a click event listener to the "Try it" button
    const tryButton = document.querySelector('.button');
    if (tryButton) {
        tryButton.addEventListener('click', function(e) {
            // Add a simple animation effect
            this.style.transform = 'scale(0.95)';
            setTimeout(() => {
                this.style.transform = '';
            }, 100);
        });
    }

    // Add a hover effect to the cards
    const cards = document.querySelectorAll('.card');
    cards.forEach(card => {
        card.addEventListener('mouseenter', function() {
            this.style.transform = 'translateY(-5px)';
        });

        card.addEventListener('mouseleave', function() {
            this.style.transform = '';
        });
    });
});
Creat html file
cd ../../
mkdir templates
nano index.html
index.html
<!DOCTYPE html>
<html lang="en">
<head>
<meta charset="UTF-8">
<meta name="viewport" content="width=device-width, initial-scale=1.0">
<title>FastAPI App</title>
<style>
body {
font-family: 'Segoe UI', Tahoma, Geneva, Verdana, sans-serif;
max-width: 800px;
margin: 0 auto;
padding: 20px;
background: linear-gradient(135deg, #667eea 0%, #764ba2 100%);
min-height: 100vh;
color: #333;
}
.container {
background: white;
border-radius: 10px;
padding: 30px;
box-shadow: 0 4px 20px rgba(0, 0, 0, 0.1);
text-align: center;
}
h1 {
color: #667eea;
}
.card {
background: #f8f9fa;
border-radius: 8px;
padding: 20px;
margin: 20px 0;
box-shadow: 0 2px 10px rgba(0, 0, 0, 0.05);
transition: transform 0.3s ease;
}
.endpoint {
display: flex;
justify-content: space-between;
align-items: center;
background: #e9ecef;
padding: 15px;
border-radius: 5px;
margin-top: 10px;
}
code {
background: #dee2e6;
padding: 5px 10px;
border-radius: 3px;
font-family: 'Courier New', monospace;
}
.button {
background: #667eea;
color: white;
padding: 10px 20px;
border-radius: 5px;
text-decoration: none;
font-weight: bold;
transition: all 0.2s ease;
}
.button:hover {
background: #5a6fd8;
transform: scale(1.05);
}
</style>
</head>
<body>
<div class="container">
<h1>FastAPI Application</h1>
<p>A modern, high-performance web application</p>
<div class="card">
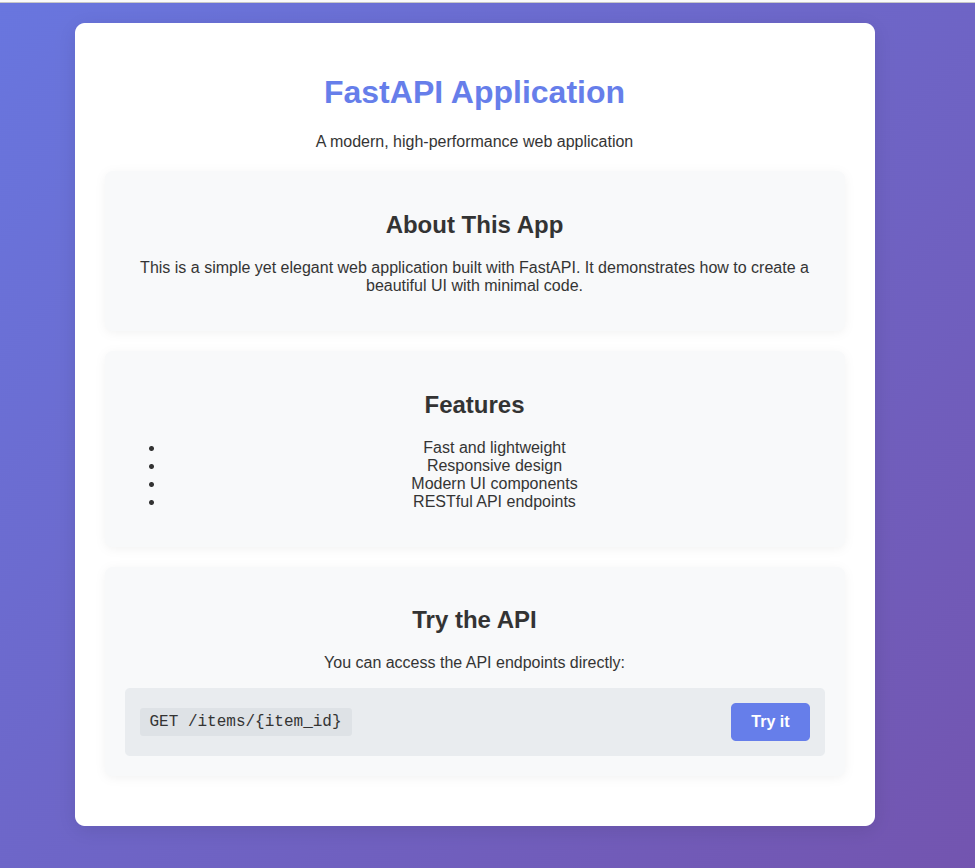
<h2>About This App</h2>
<p>This is a simple yet elegant web application built with FastAPI. It demonstrates how to create a beautiful UI with minimal code.</p>
</div>
<div class="card">
<h2>Features</h2>
<ul>
<li>Fast and lightweight</li>
<li>Responsive design</li>
<li>Modern UI components</li>
<li>RESTful API endpoints</li>
</ul>
</div>
<div class="card">
<h2>Try the API</h2>
<p>You can access the API endpoints directly:</p>
<div class="endpoint">
<code>GET /items/{item_id}</code>
<a href="/items/42" class="button">Try it</a>
</div>
</div>
</div>
<script src="/static/js/main.js"></script>
</body>
</html>
Creat Dockerfile
cd ..
nano Dockerfile
Dockerfile
# Use the official Python image as the base image
FROM python:3.9-slim

# Set the working directory in the container
WORKDIR /app

# Copy the requirements file into the container
COPY requirements.txt .

# Install the required packages
RUN pip install --no-cache-dir -r requirements.txt

# Create directories for templates and static files
RUN mkdir -p templates static

# Copy the source code into the container
COPY src/ ./src

# Copy the templates and static files into the container
COPY templates/ ./templates
COPY static/ ./static

# Expose the port that the application will run on
EXPOSE 8000

# Define the command to run the application
CMD ["uvicorn", "src.main:app", "--host", "0.0.0.0", "--port", "8000"]
Creat requirements.txt
nano requirements.txt
requirements.txt
fastapi
uvicorn[standard]
jinja2
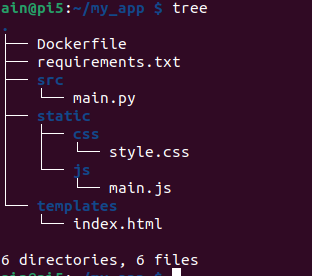
The project directory is as follows
tree
Build and pubilsh image
Build image
Note:If you have no account for the dockerhub, please register an account.
xxxis username of you docker hub.
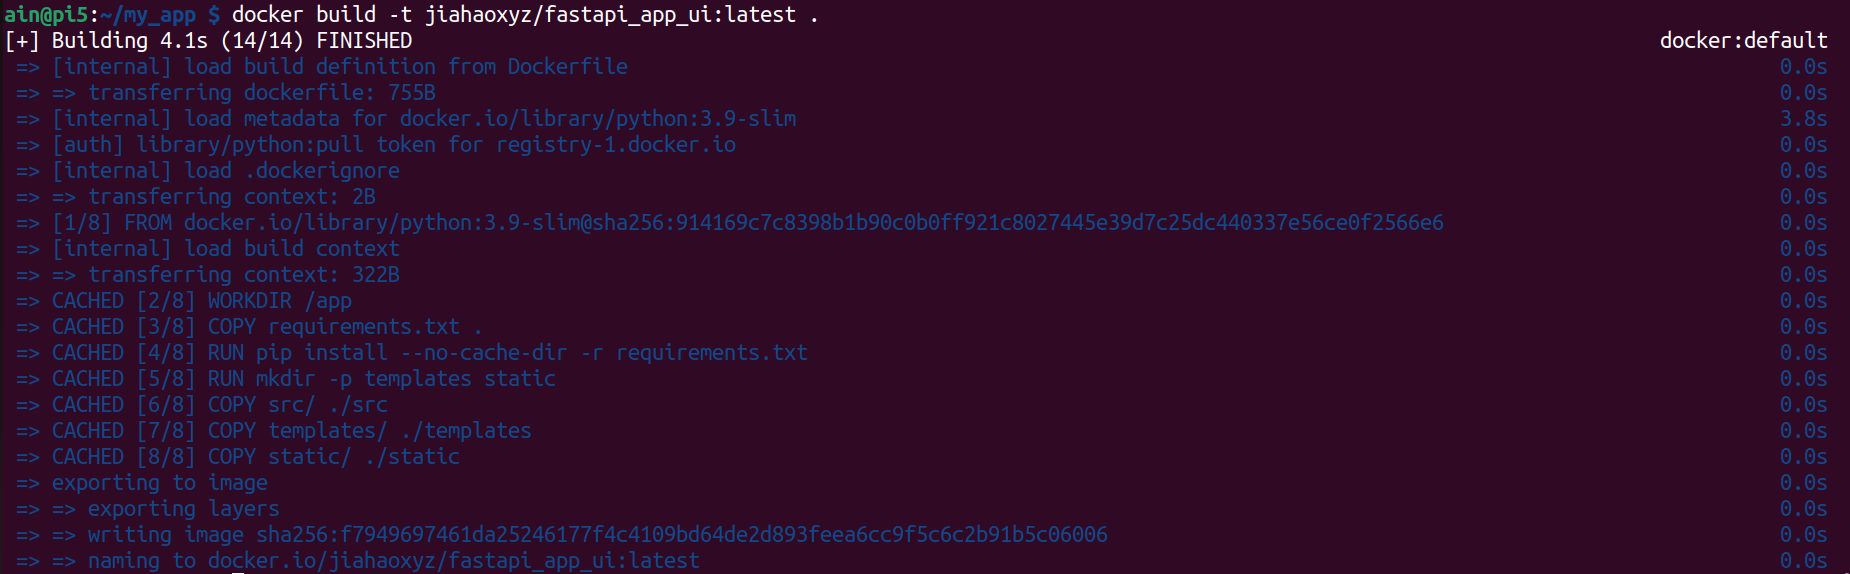
docker build -t xxx/fastapi_app_ui:latest .
Test the image
docker image ls -a

docker run -d -p 8000:8000 jiahaoxyz/fastapi_app_ui
The result is show as below :
Publish the image
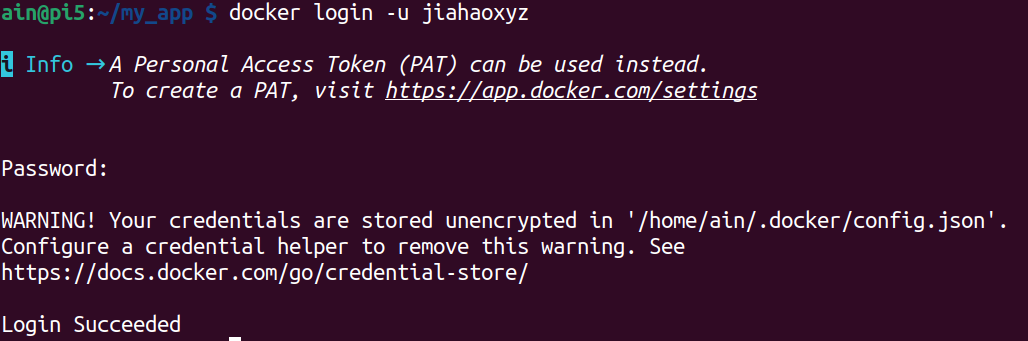
and creat your own token.
Note:
xxxis your own username of dockerhub
docker login -u xxx
Note:
xxxis your own username of dockerhub
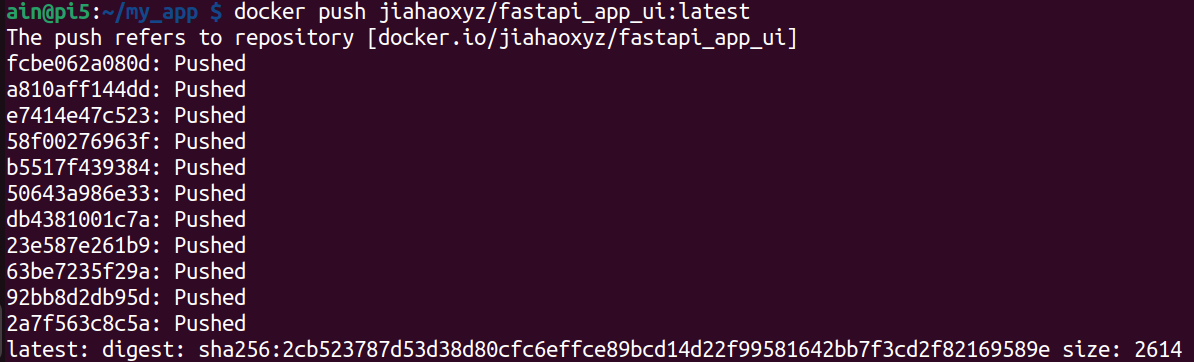
docker push xxx/fastapi_app_ui:latest
Result
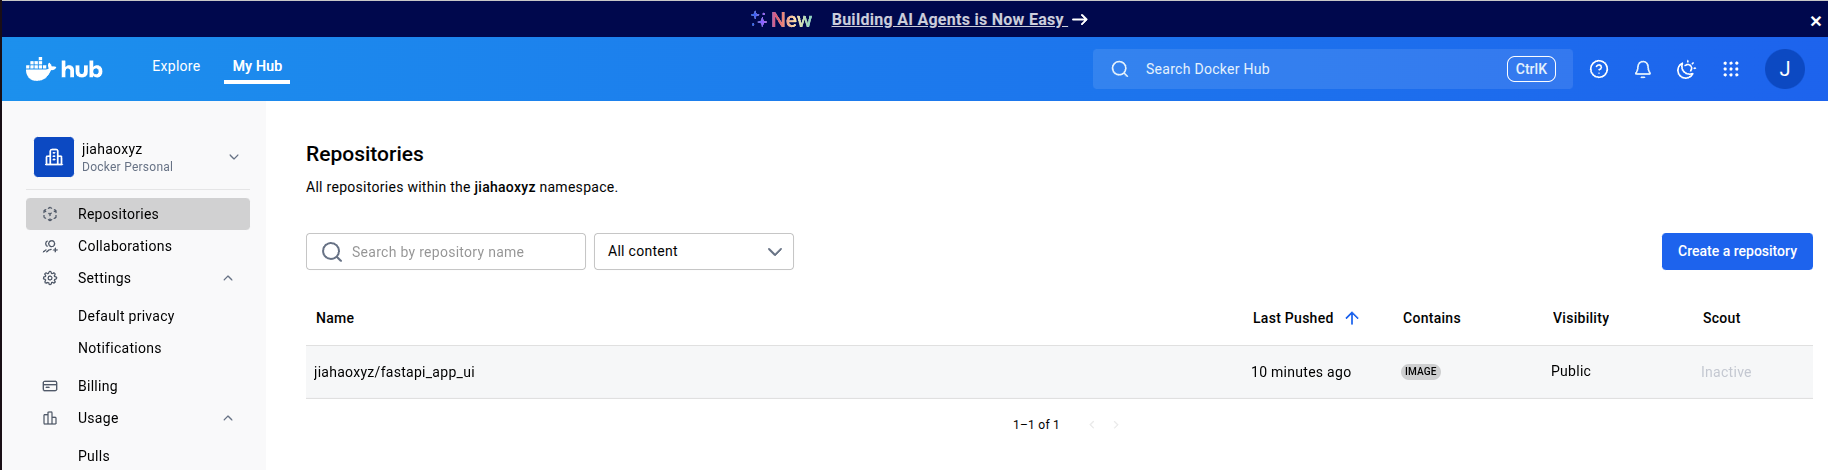
You can see that the image packaged using Docker has been uploaded to Docker Hub, and it is available for anyone to use.
You can use my images as below, and here is the project github page:
docker pull jiahaoxyz/fastapi_app_ui
Tech Support & Product Discussion
Thank you for choosing our products! We are here to provide you with different support to ensure that your experience with our products is as smooth as possible. We offer several communication channels to cater to different preferences and needs.