Building a crowd density based on Grove Vision AI V2 and Home Assistant
In the era of smart homes and IoT, integrating intelligent sensors and devices into home automation systems has become increasingly popular. Home Assistant, a powerful open-source home automation platform, offers a wide range of possibilities for creating custom solutions tailored to individual needs. In this tutorial, we will explore how to build an advanced environment detection system using the Grove Vision AI V2 and XIAO ESP32C3, seamlessly integrated with Home Assistant.
The Grove Vision AI V2, a cutting-edge vision sensor, combined with the versatile XIAO ESP32C3 microcontroller, provides an ideal foundation for creating a feature-rich and highly capable environment detection system. By leveraging the power of these devices, we can implement a wide array of functionalities, including multi-model recognition, custom settings, real-time frame rate, live view, target tracking, target heatmap, and cross-area counting.
Throughout this tutorial, we will guide you through the step-by-step process of setting up the hardware, configuring the software, and integrating the system with Home Assistant. Whether you are a beginner or an experienced user, this tutorial aims to provide you with the knowledge and tools necessary to create a sophisticated environment detection system that enhances your smart home experience.
Get ready to embark on an exciting journey as we unlock the potential of the Grove Vision AI V2 and XIAO ESP32C3, and discover how they can revolutionize the way you monitor and interact with your home environment using Home Assistant. Let's dive in and start building your very own intelligent environment detection system!
Hardware Preparation
Before the tutorial content of this article begins, you may need to have the following hardware ready.
Materials Required
| Grove Vision AI V2 | XIAO ESP32C3 | Home Assistant Green |
|---|---|---|
 |  |  |
Home Assistant Green is the easiest and most privacy-focused way to automate your home. It offers an effortless setup and allows you to control all the smart devices with just one system, where all the data is stored locally by default. This board benefits from the thriving Home Assistant ecosystem and it will be improved every month by open source.
We recommend using Home Assistant Green as the Home Assistant host for this tutorial, or you can use any Home Assistant host with a Supervisor.
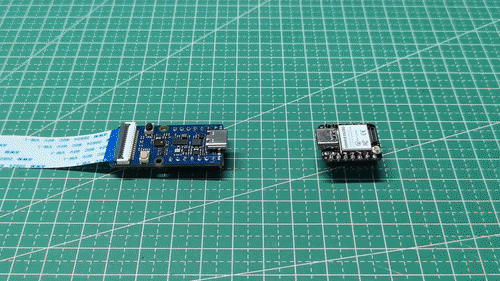
Once you have the Grove Vision AI V2 and camera ready to go, then you can connect them via the CSI connection cable. When connecting, please pay attention to the direction of the row of pins and don't plug them in backwards.
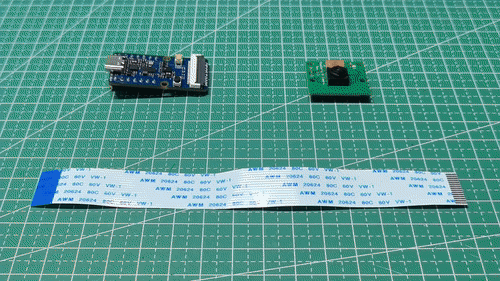
You then need to connect the XIAO and Grove Vision AI V2 via the row of pins (or use the expansion board and Grove interface).
And we have assumed that you have uploaded a recognition model for the device.
Flash Network Transparency Firmware for XIAO ESP32C3
Connect the XIAO ESP32C3 to your computer using a suitable USB-C cable. Ensure the device drivers are installed correctly.
Open the SenseCraft Model Assistant Tool in your web browser.
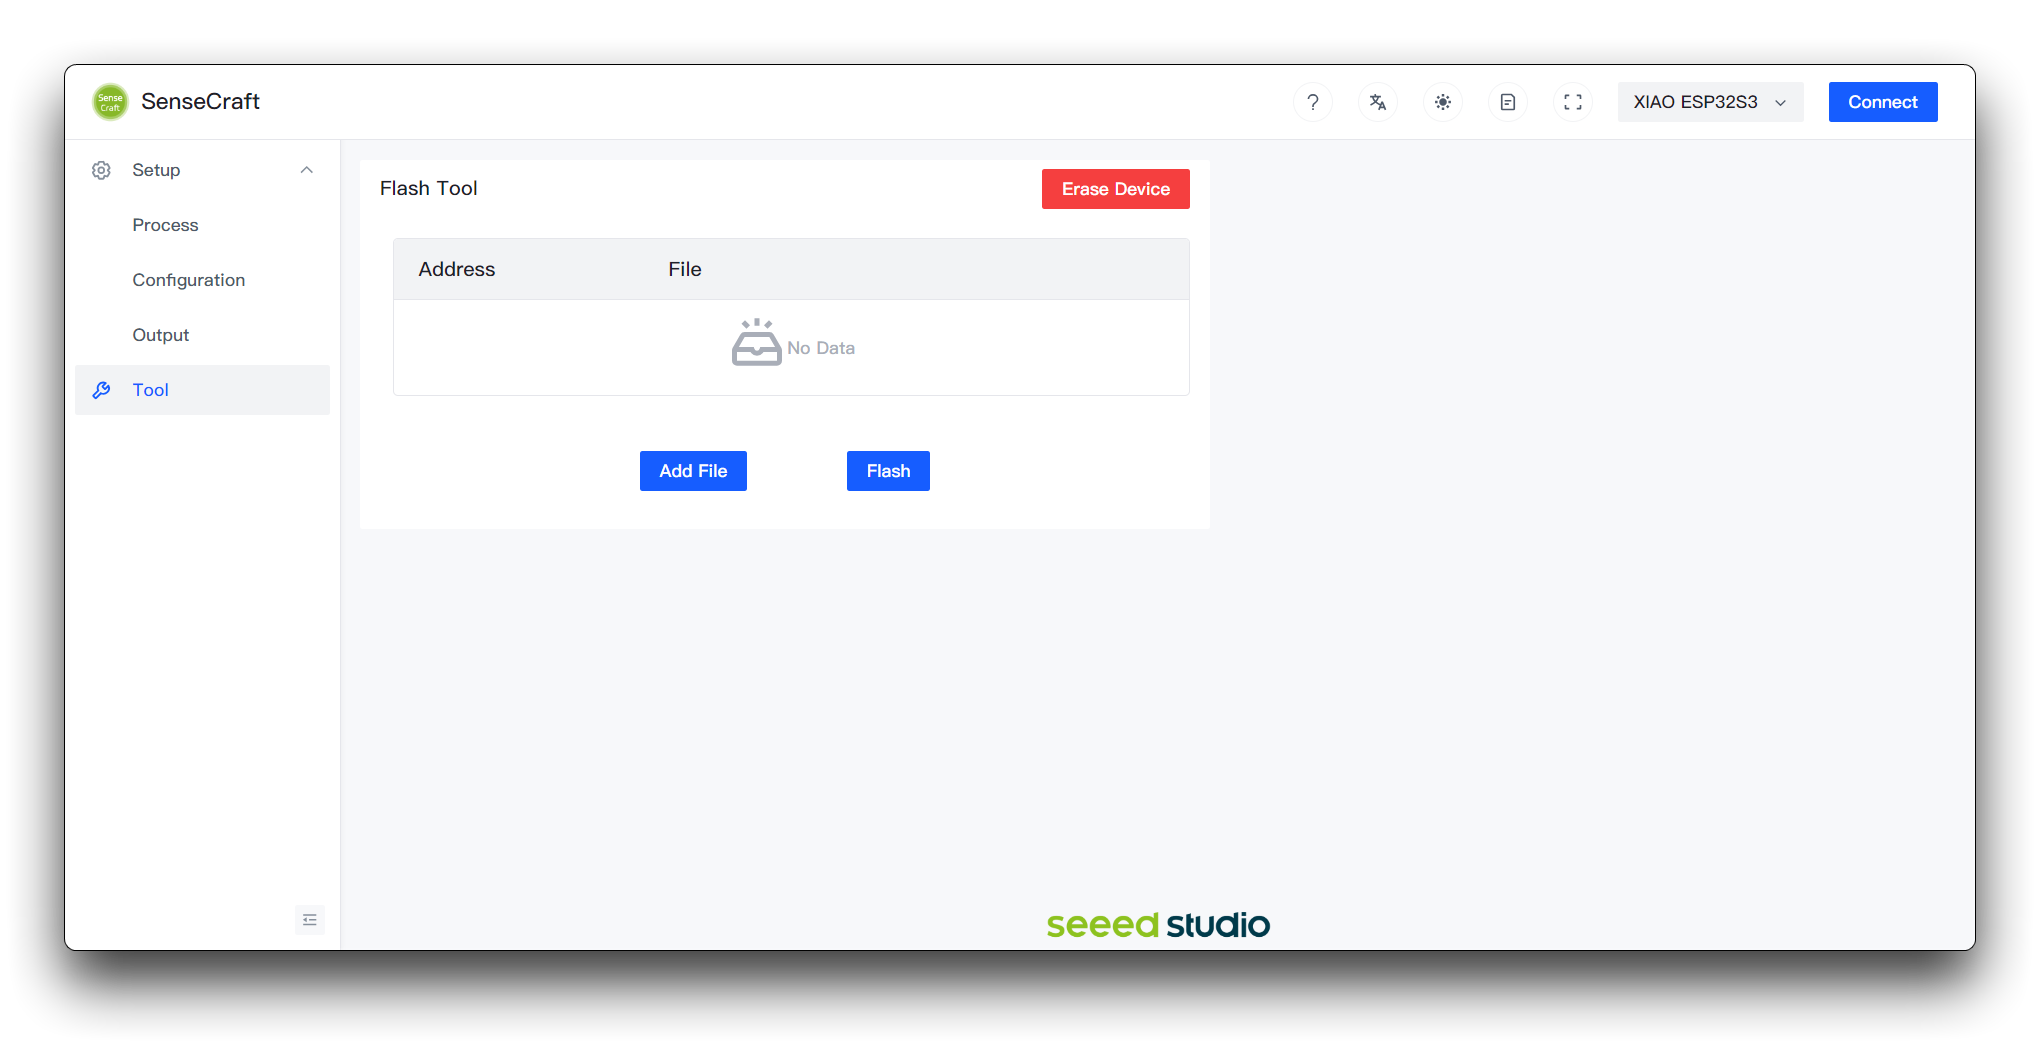
Then select XIAO ESP32S3 and click Connect.
Note that although the XIAO ESP32S3 is selected here, we are still using the XIAO ESP32C3!
Click the button below to download the firmware file and click the Add File button on the web page to flash the sscma_xiao_c3_network_v1.1.0.bin firmware for the 0x0 address.
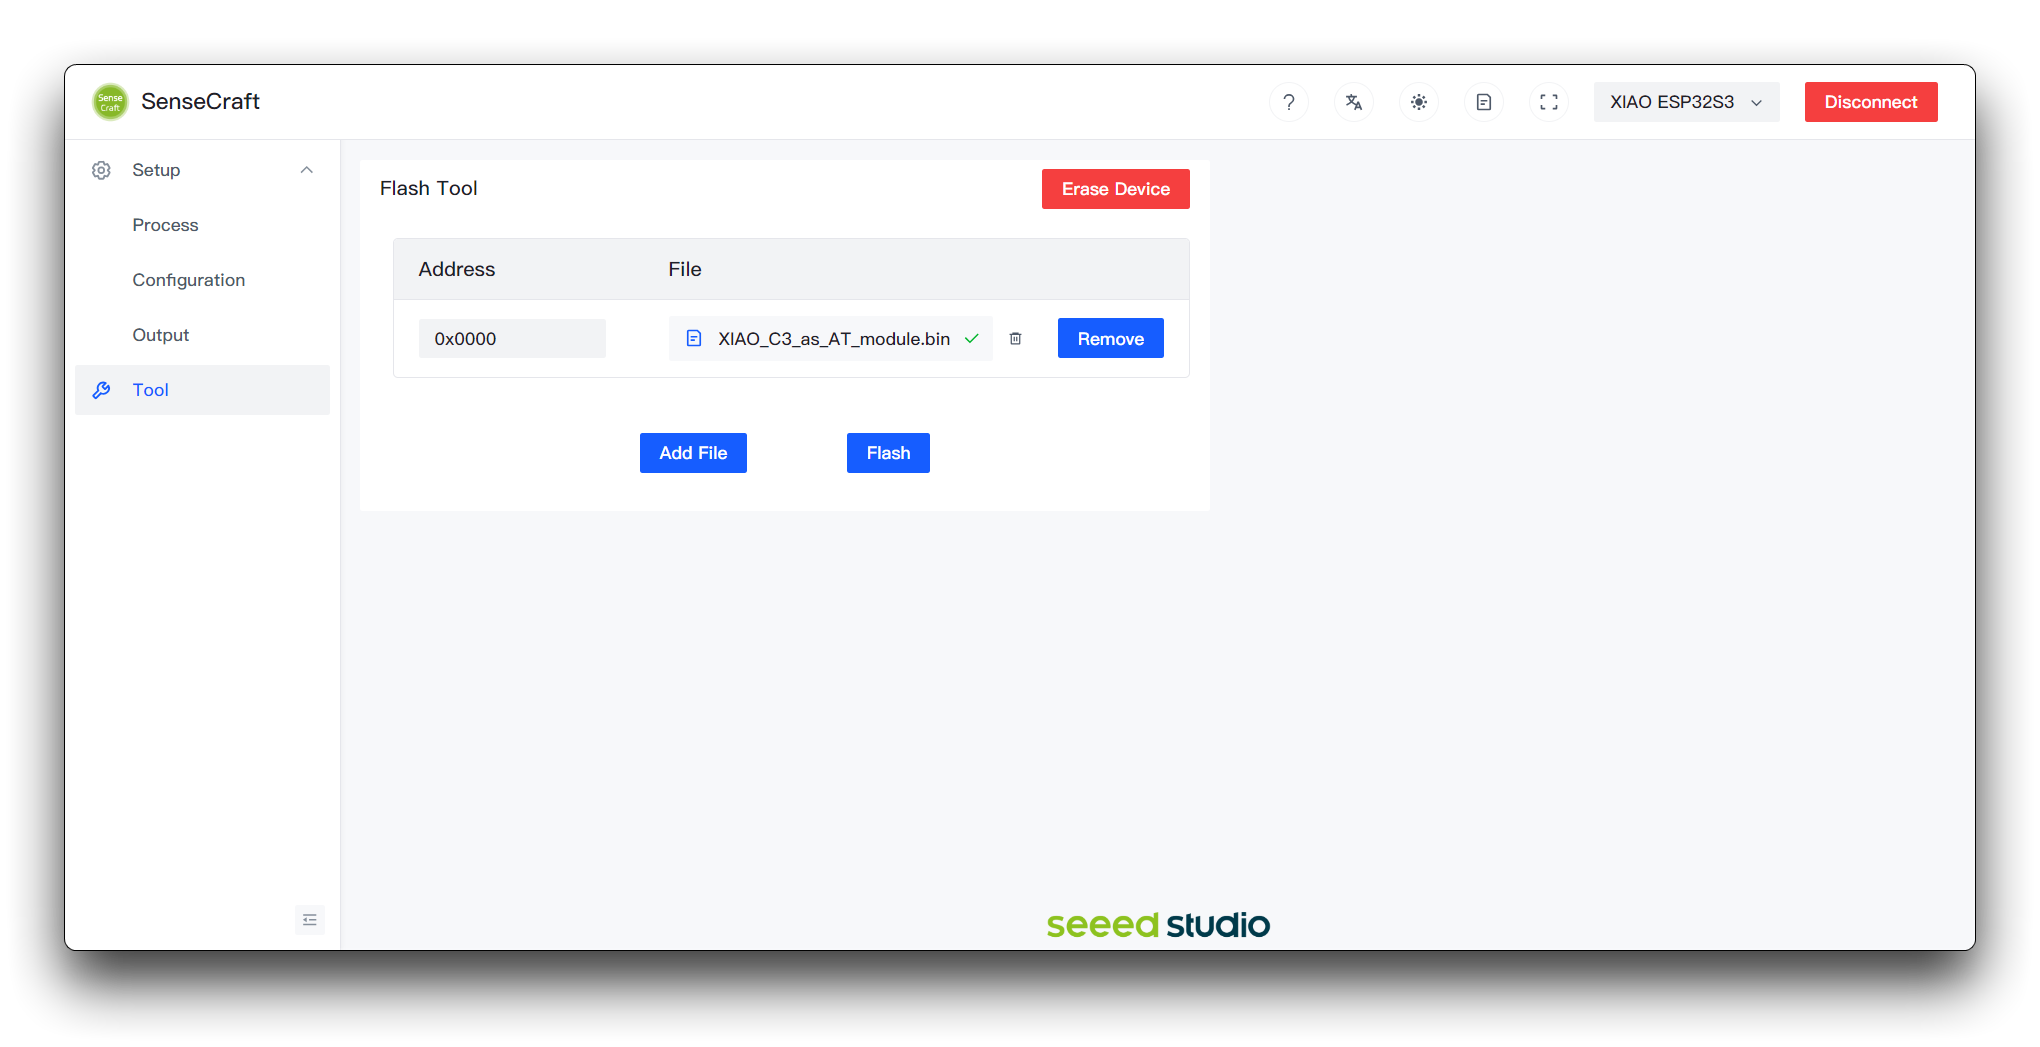
Finally, click the Flash button and wait for the programme to be uploaded successfully before disconnecting the XIAO ESP32C3 from the computer.
Installation of plug-ins on Home Assistant
Before we begin building our environment detection system, we need to install a few essential add-ons in Home Assistant. These add-ons will provide the necessary functionality and tools to integrate the Grove Vision AI V2 and XIAO ESP32C3 with Home Assistant. The required add-ons are EMQX, Advanced SSH & Web Terminal, and Node-RED. Let's go through the installation process for each add-on.
Step 1. Installing EMQX
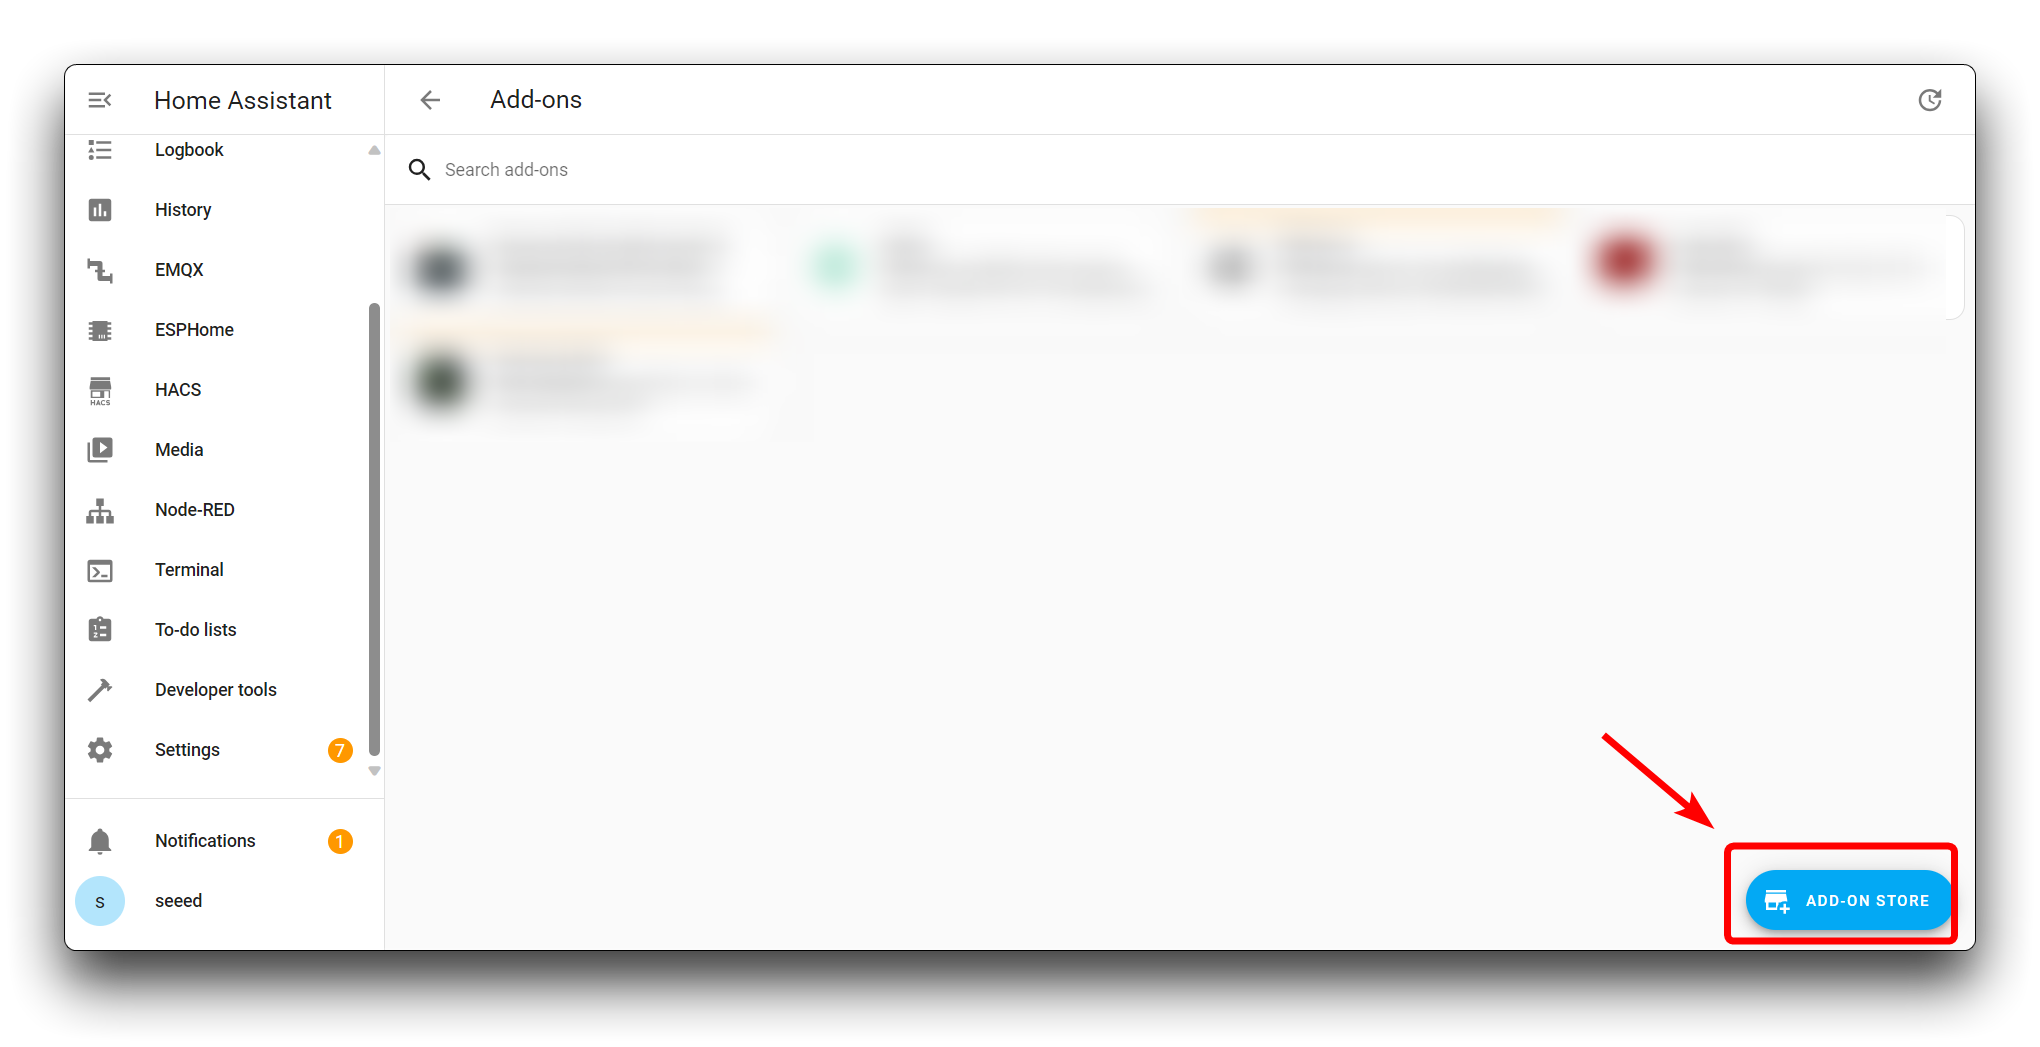
Open your Home Assistant web interface and navigate to the Settings menu. Click on the Add-ons option to access the add-on management page.

In the bottom right corner of the page, click on the ADD-ON STORE button to open the add-on store.
In the search bar of the add-on store, type EMQX and press enter to search for the add-on.
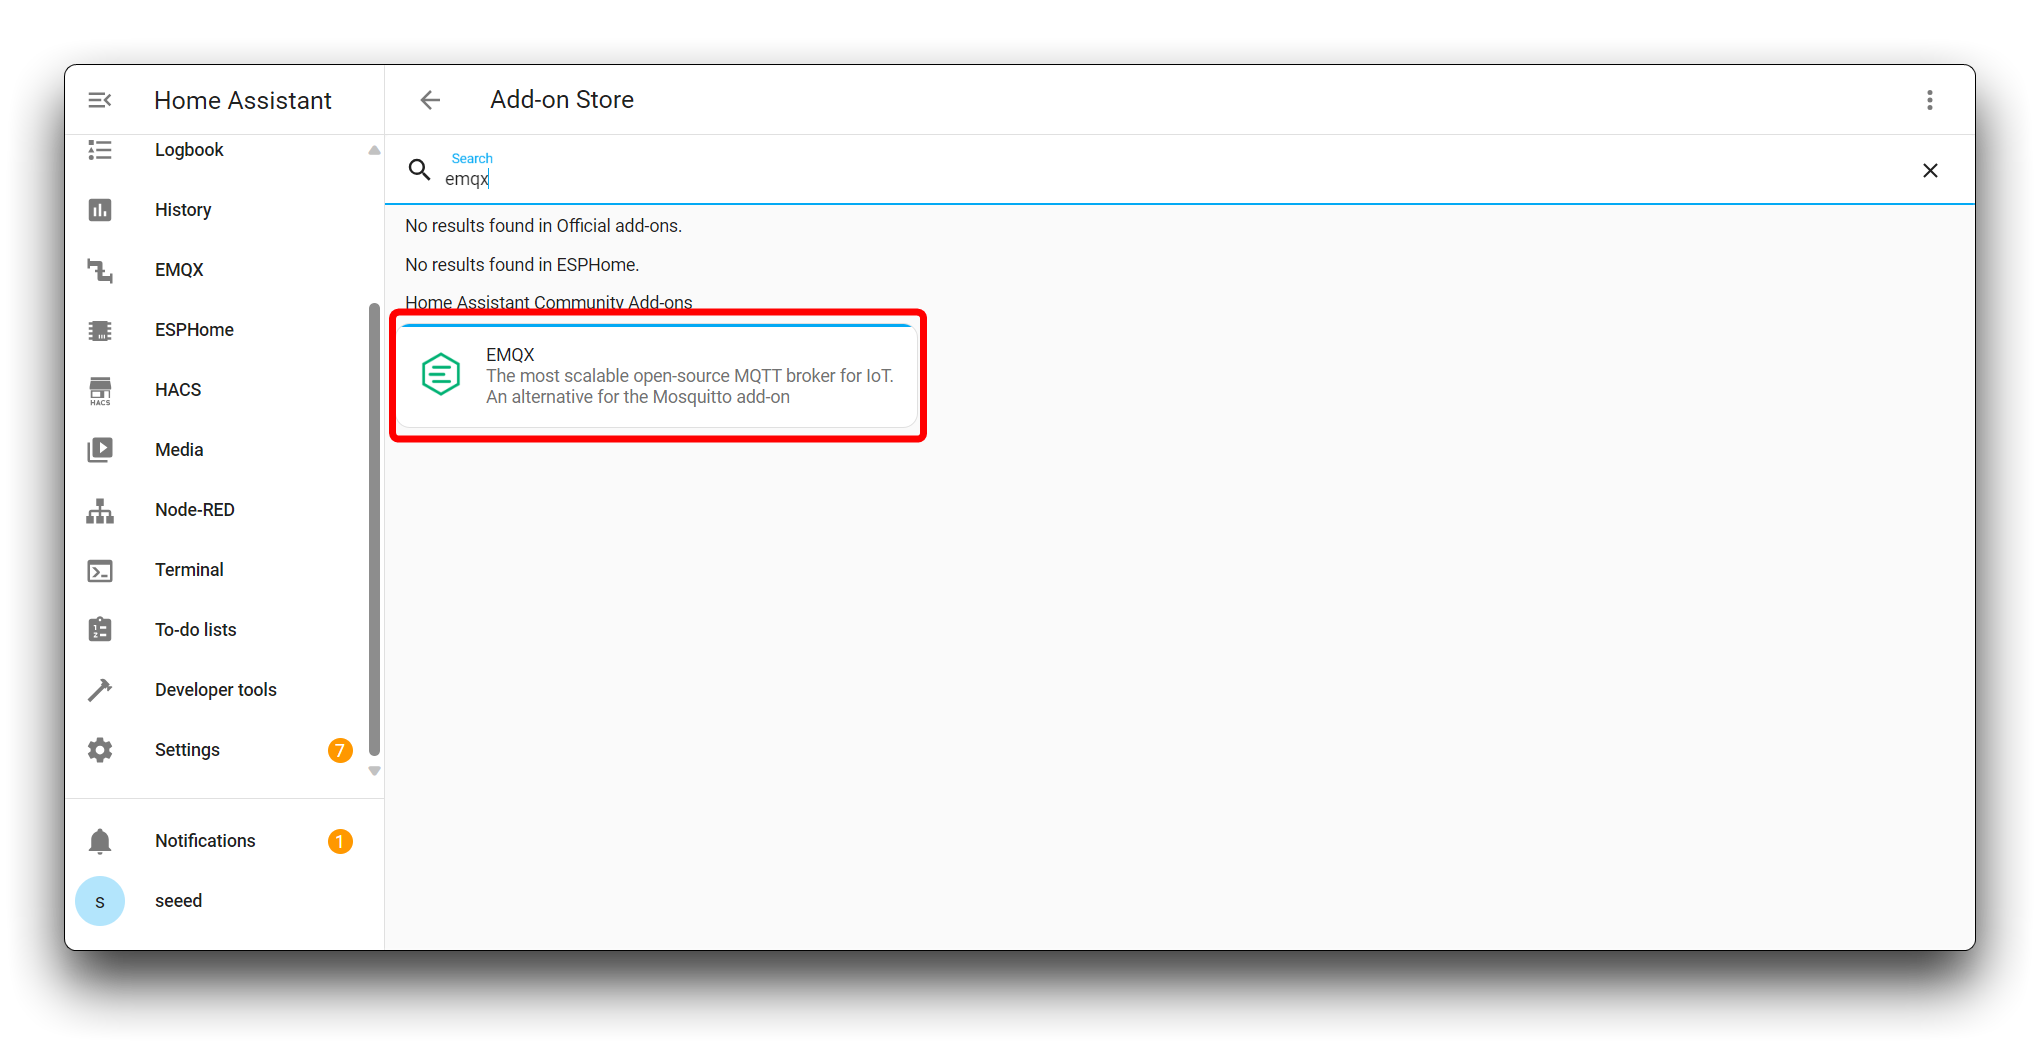
Locate the EMQX add-on in the search results and click on it to view its details. Click on the INSTALL button to begin the installation process. Home Assistant will download and install the EMQX add-on. Wait for the installation to complete.
Step 2. Installing Advanced SSH & Web Terminal
In the Home Assistant "Add-on Store," search for Advanced SSH & Web Terminal.

Locate the Advanced SSH & Web Terminal add-on and click on it to view its details. Click on the Install button to start the installation process. Home Assistant will download and install the Advanced SSH & Web Terminal add-on.
Step 3. Installing Node-RED
Again, in the Home Assistant "Add-on Store," search for Node-RED.
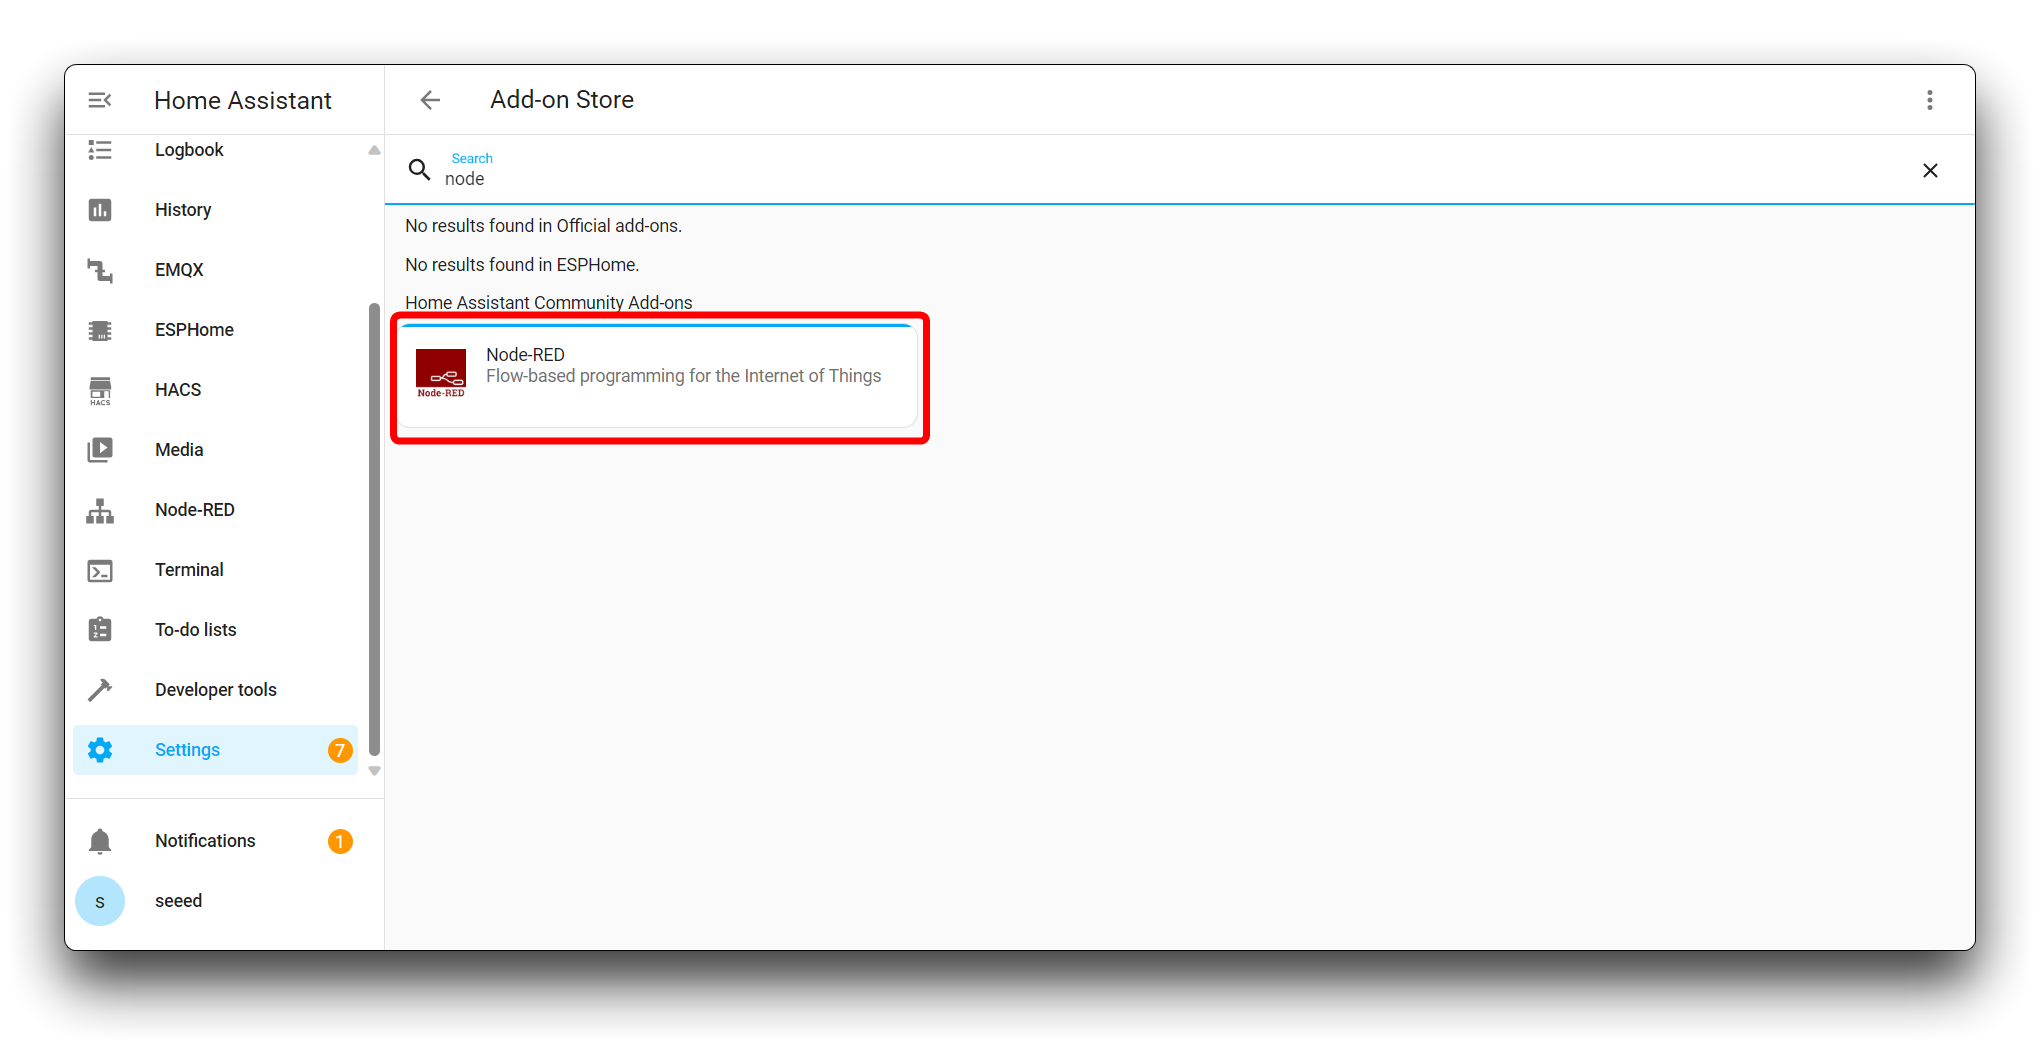
Find the Node-RED add-on and click on it to access its details. Click on the "Install" button to initiate the installation process. Allow Home Assistant to download and install the Node-RED add-on.
Deploying pysscma via Docker on Home Assistant
In this step, we will download and set up the Python SSCMA (Seeed Studio Cross-platform Modular API) server using the Advanced SSH & Web Terminal add-on in Home Assistant. This server will enable communication between the Grove Vision AI V2 and Home Assistant. Follow the detailed steps below:
Step 4. Accessing the Advanced SSH & Web Terminal
Open your Home Assistant web interface and navigate to the Settings menu. Click on the Add-ons option to access the add-on management page. Locate the Advanced SSH & Web Terminal add-on and click on it to open its details page.
Please turn off the Protection mode on this page.
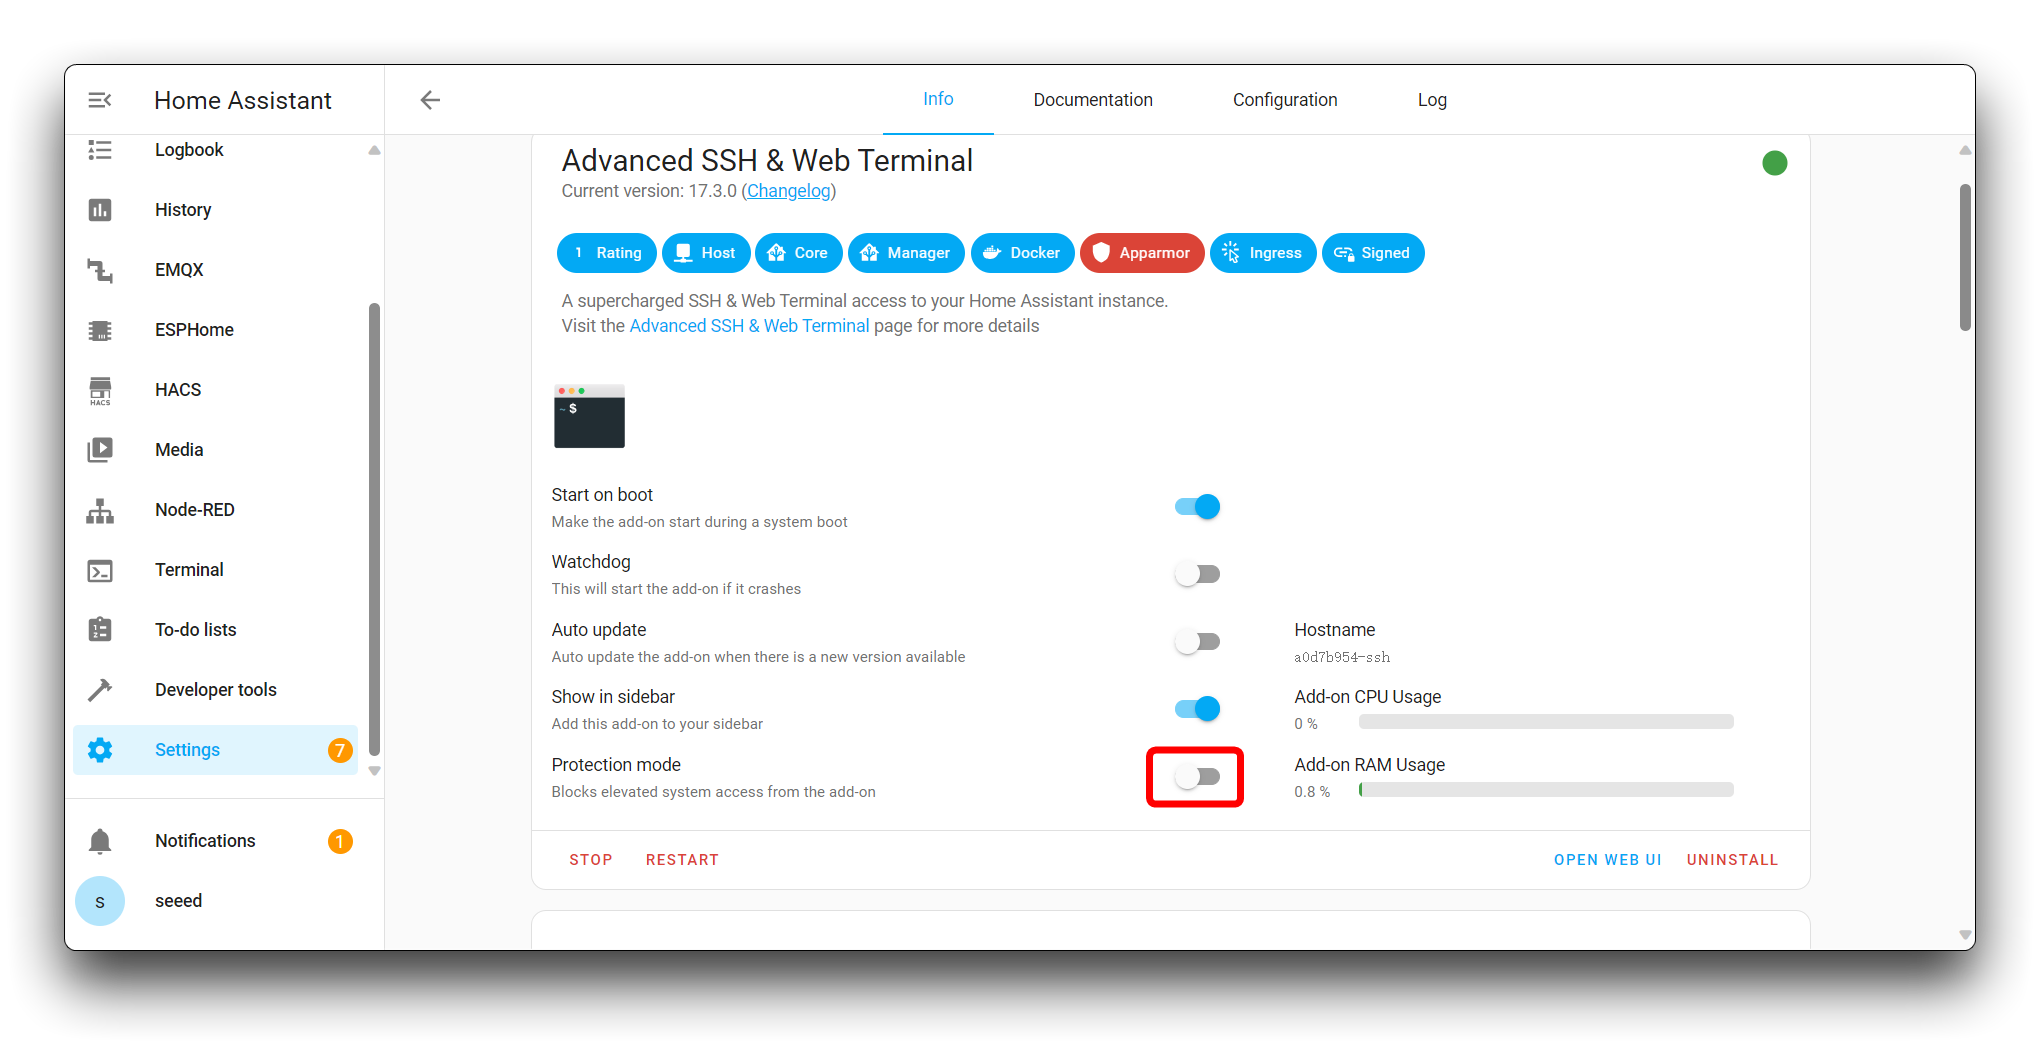
Click on the START button if the add-on is not already running. Once the add-on is running, click on the OPEN WEB UI button to access the terminal interface.
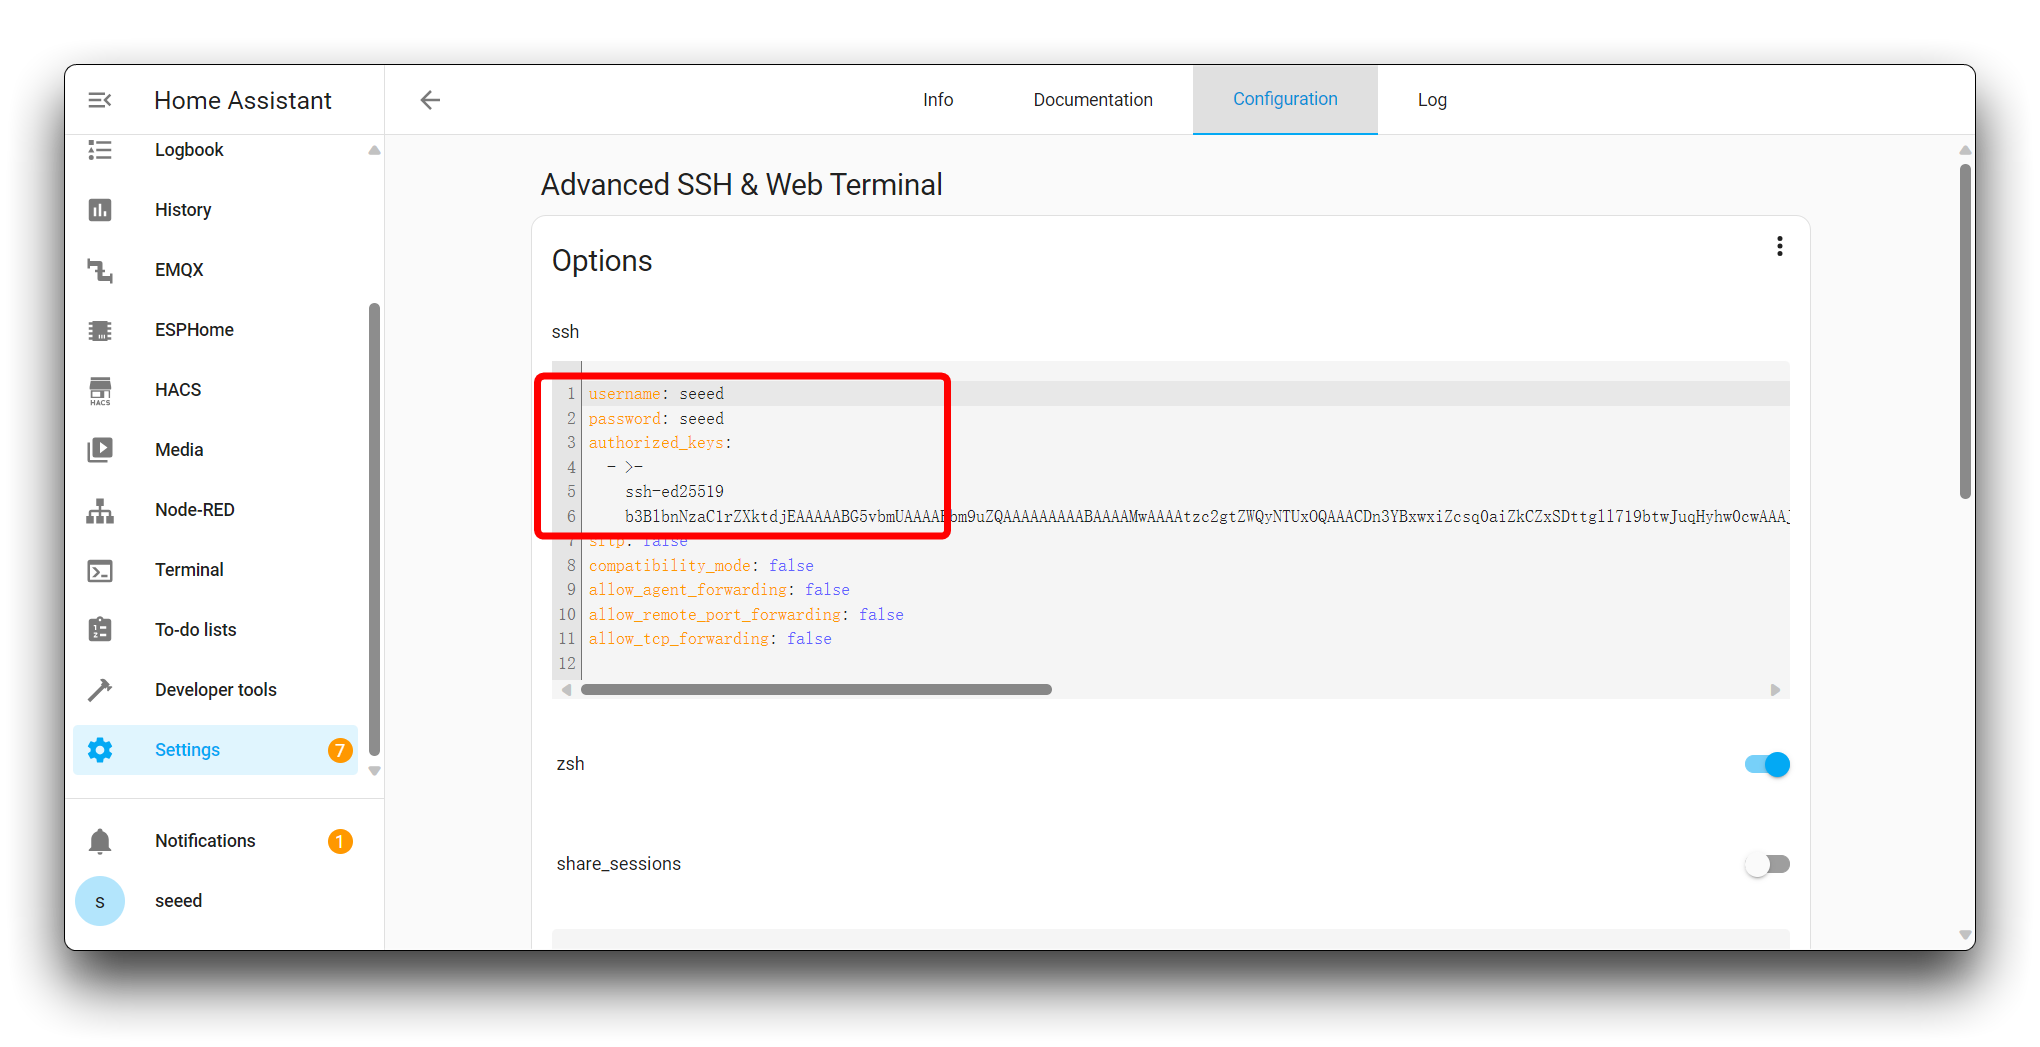
The first time you launch this plugin you may need to fill in username, password and authorized_key on the configuration page of the plugin details page. For detailed configuration information, please read the documentation provided with the plugin.
Step 5. Downloading the pysscma.tar package
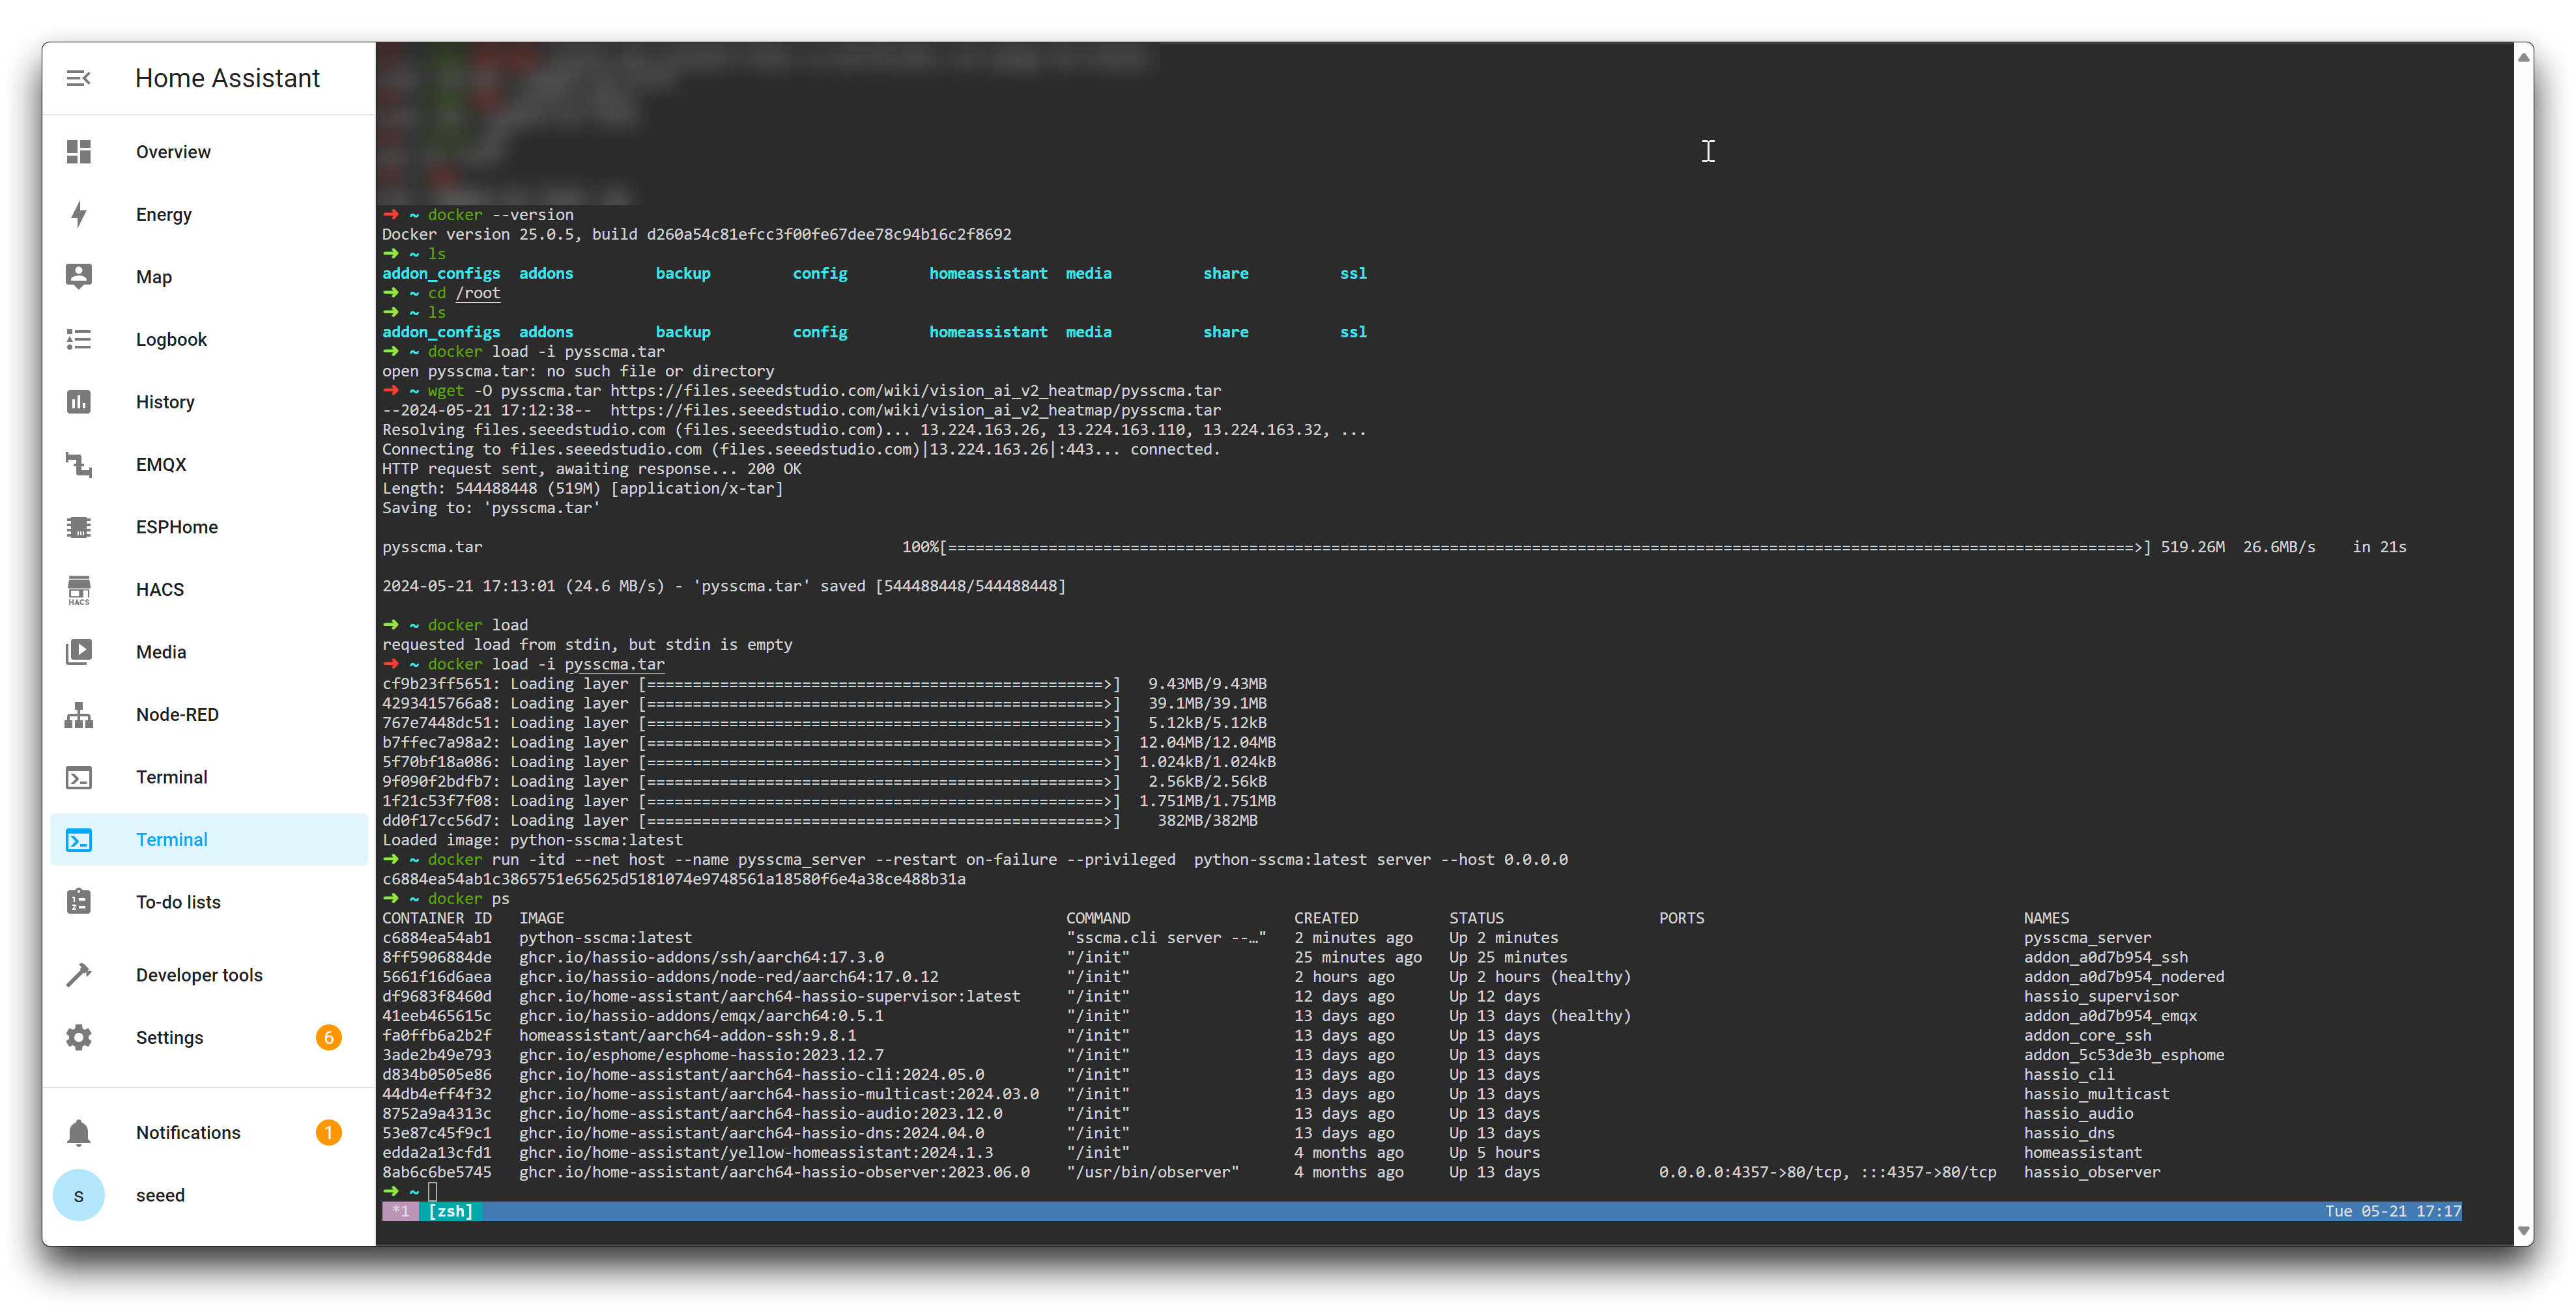
In the Advanced SSH & Web Terminal, navigate to the root directory by executing the following command:
cd /
Download the pysscma.tar package by running the following command:
wget -O pysscma.tar https://files.seeedstudio.com/wiki/vision_ai_v2_heatmap/pysscma.tar
Wait for the download to complete. The pysscma.tar package will be saved in the root directory.
Step 6. Loading the Docker image
After the download is finished, execute the following command to load the Docker image from the pysscma.tar package:
docker load -i pysscma.tar
Docker will load the image, and you will see the image ID once the process is complete.
To start the Python SSCMA server, run the following command:
docker run -itd --net host --name pysscma_server --restart on-failure --privileged python-sscma:latest server --host 0.0.0.0
This command will create and start a Docker container named "pysscma_server" with the necessary configurations.
To check if the Docker container is running properly, execute the following command:
docker ps
You should see the "pysscma_server" container listed with a status of "Up".
Step 7. Obtaining the IP address
To get the IP address of the Docker container, run the following command:
ifconfig | grep docker -A 10
Look for the "inet" field in the output, and note down the IP address associated with it (e.g., 172.30.232.1).
This IP address will be used in the subsequent steps to configure the communication between the Grove Vision AI V2.
Configure MQTT Broker
In this step, we will configure the EMQX add-on in Home Assistant to set up user authentication for secure communication between the Grove Vision AI V2 and Home Assistant.
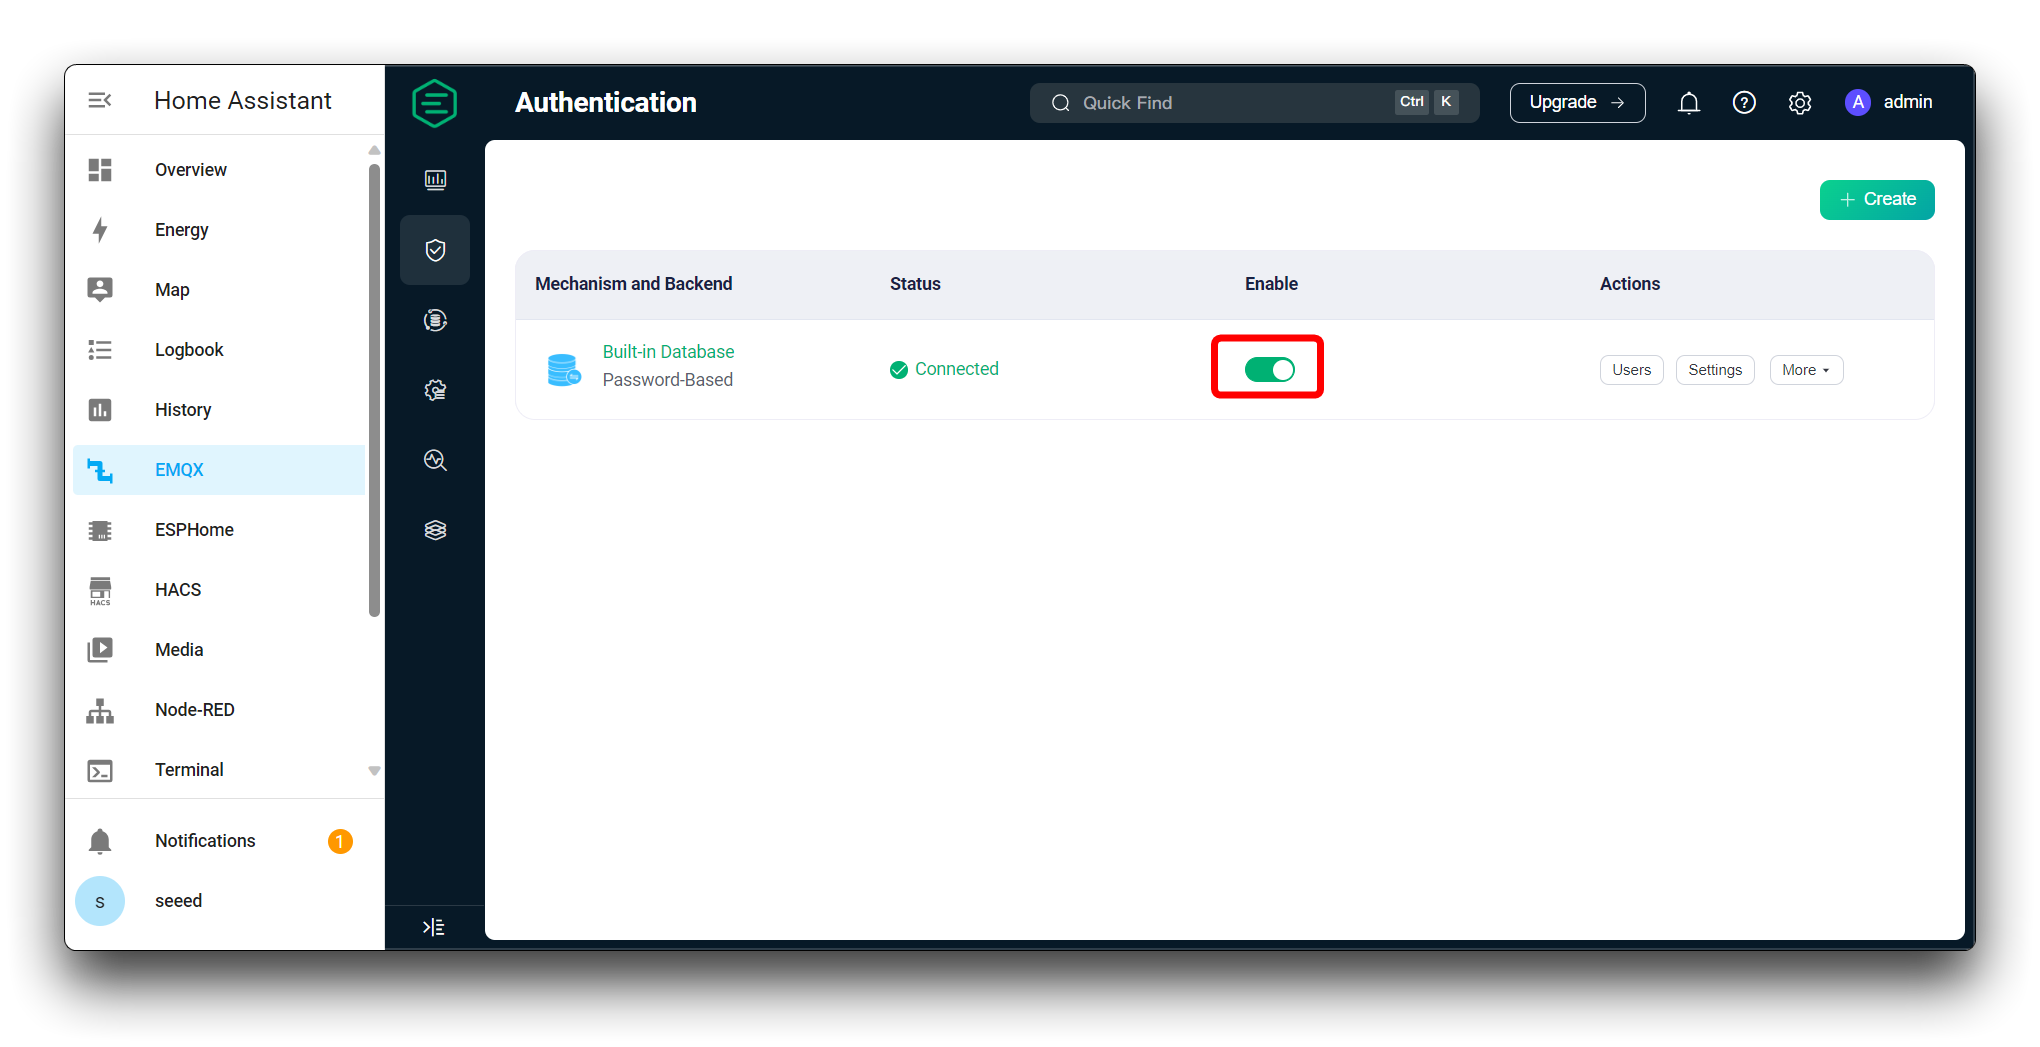
Step 8. Creating a Built-in Database and User
Open your Home Assistant web interface and navigate to the "Settings" menu. Click on the "Add-ons" option to access the add-on management page. Locate the "EMQX" add-on and click on it to open its details page. Click on the "START" button if the add-on is not already running. Once the add-on is running, click on the "OPEN WEB UI" button to access the EMQX Dashboard.
In the EMQX Dashboard login page, enter the default username and password.
- Default username: admin
- Default password: public
Click on the "Login" button to access the EMQX Dashboard.
In the EMQX Dashboard, navigate to the Authentication section from the left sidebar menu. Click on the Databases tab.
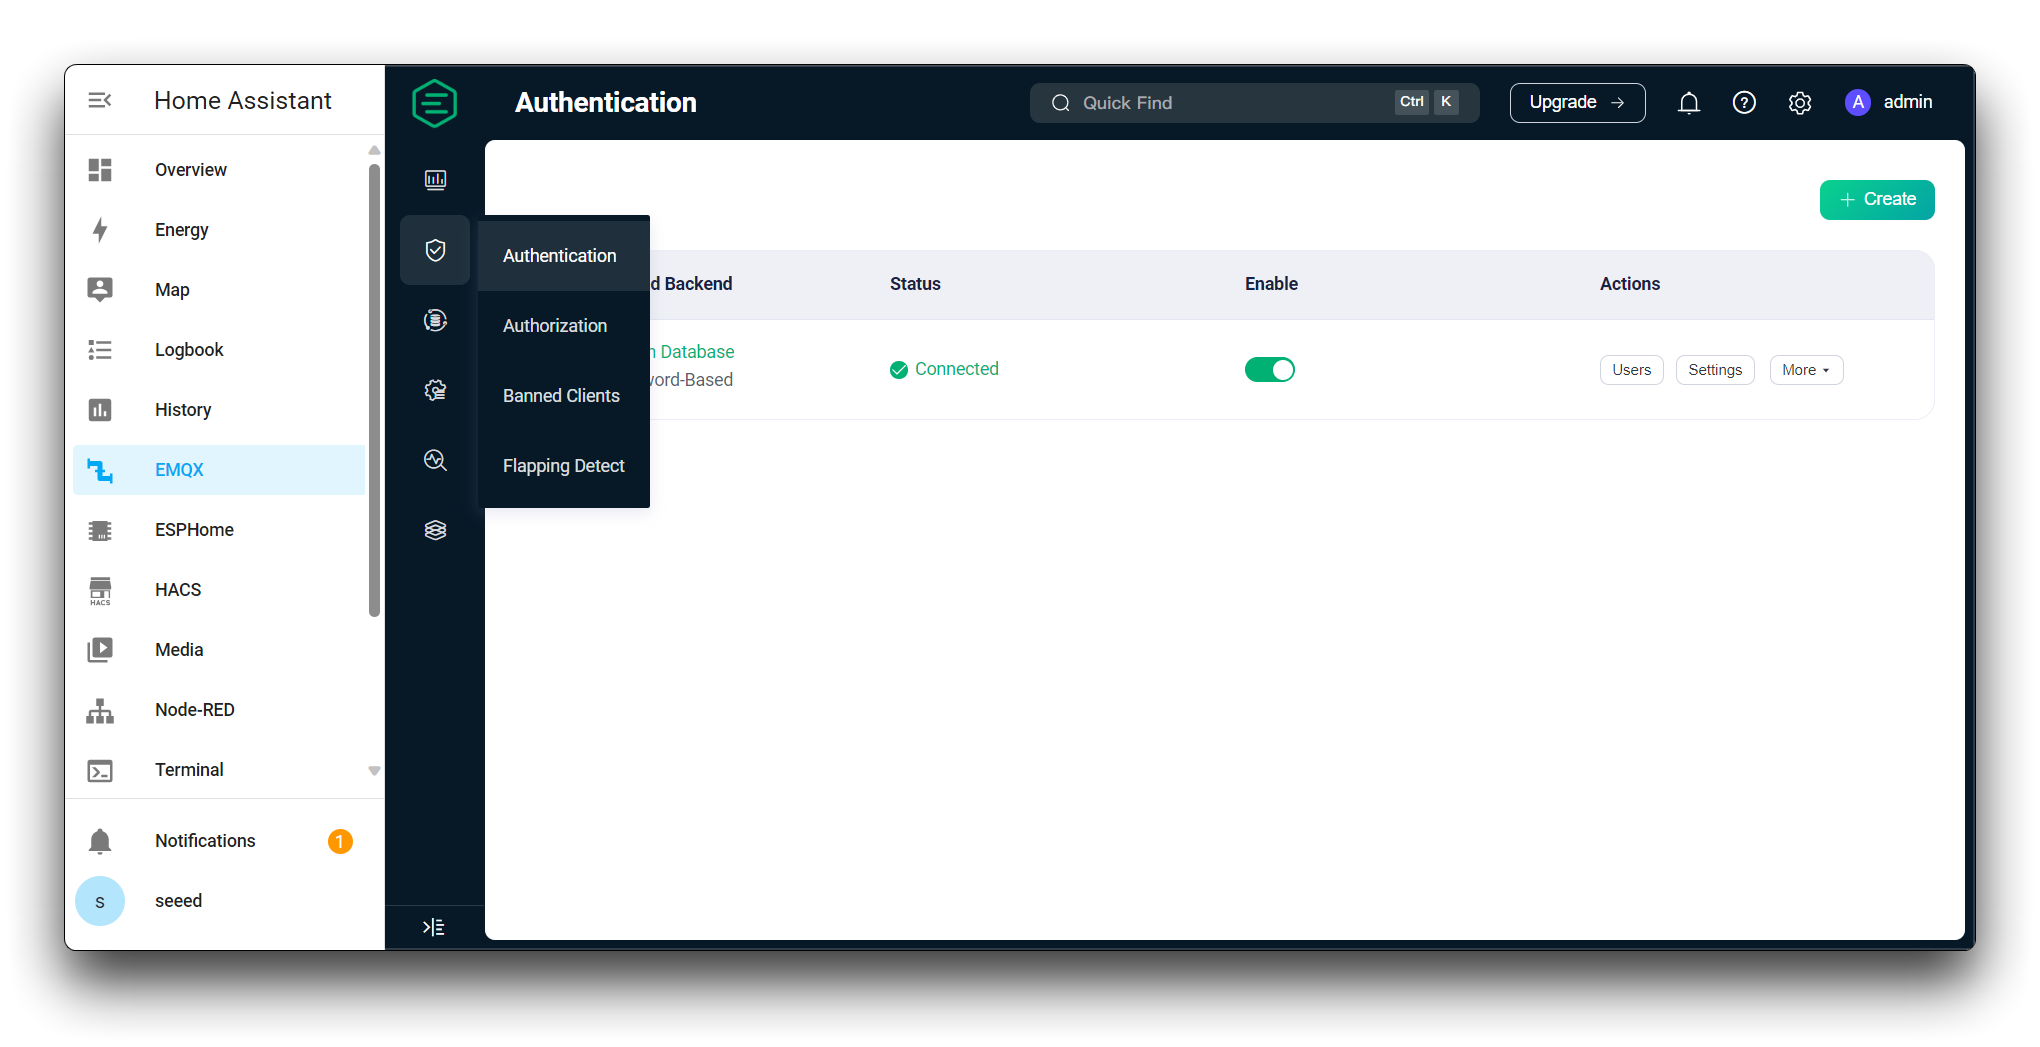
Click on the Create button. In the Mechanism dropdown, select Password-Based, In the Backend dropdown, select Built-in Database. Click on the "Create" button to create the Built-in Database.
After creating the Built-in Database, click on the Users tab in the "Authentication" section. Click on the "Add User" button.
- In the "Username" field, enter "seeed".
- In the "Password" field, enter "seeed".
Go back to the "Databases" tab in the "Authentication" section. Locate the previously created database in the list of databases.
Click on the toggle switch next to the database to enable it. The database status should change to "Enabled".
Step 9. Configure the network for Grove Vision AI V2
Connect the Grove Vision AI V2 to your computer and open the Model Assistant's configuration page.
After clicking on the top right corner to connect to Grove Vision AI V2, please turn on the MQTT button and enter the following information that you need to fill in the page.
- SSID & Password: The device needs to be on the same LAN as the host where the Home Asistant is installed. So please configure the network under the same LAN. XIAO only supports 2.4G WiFi, 5G network is not available.
- Encryption: Select AUTO.
- Host: IP address of the host where Home Assistant is installed.
- Port:
1883. - clientId: For the device identification number, please prefix it with
grove_vision_ai_v2_followed by the custom ID number. - username: The name of the EMQX database you just create.
- password: The password of the EMQX database you just create.
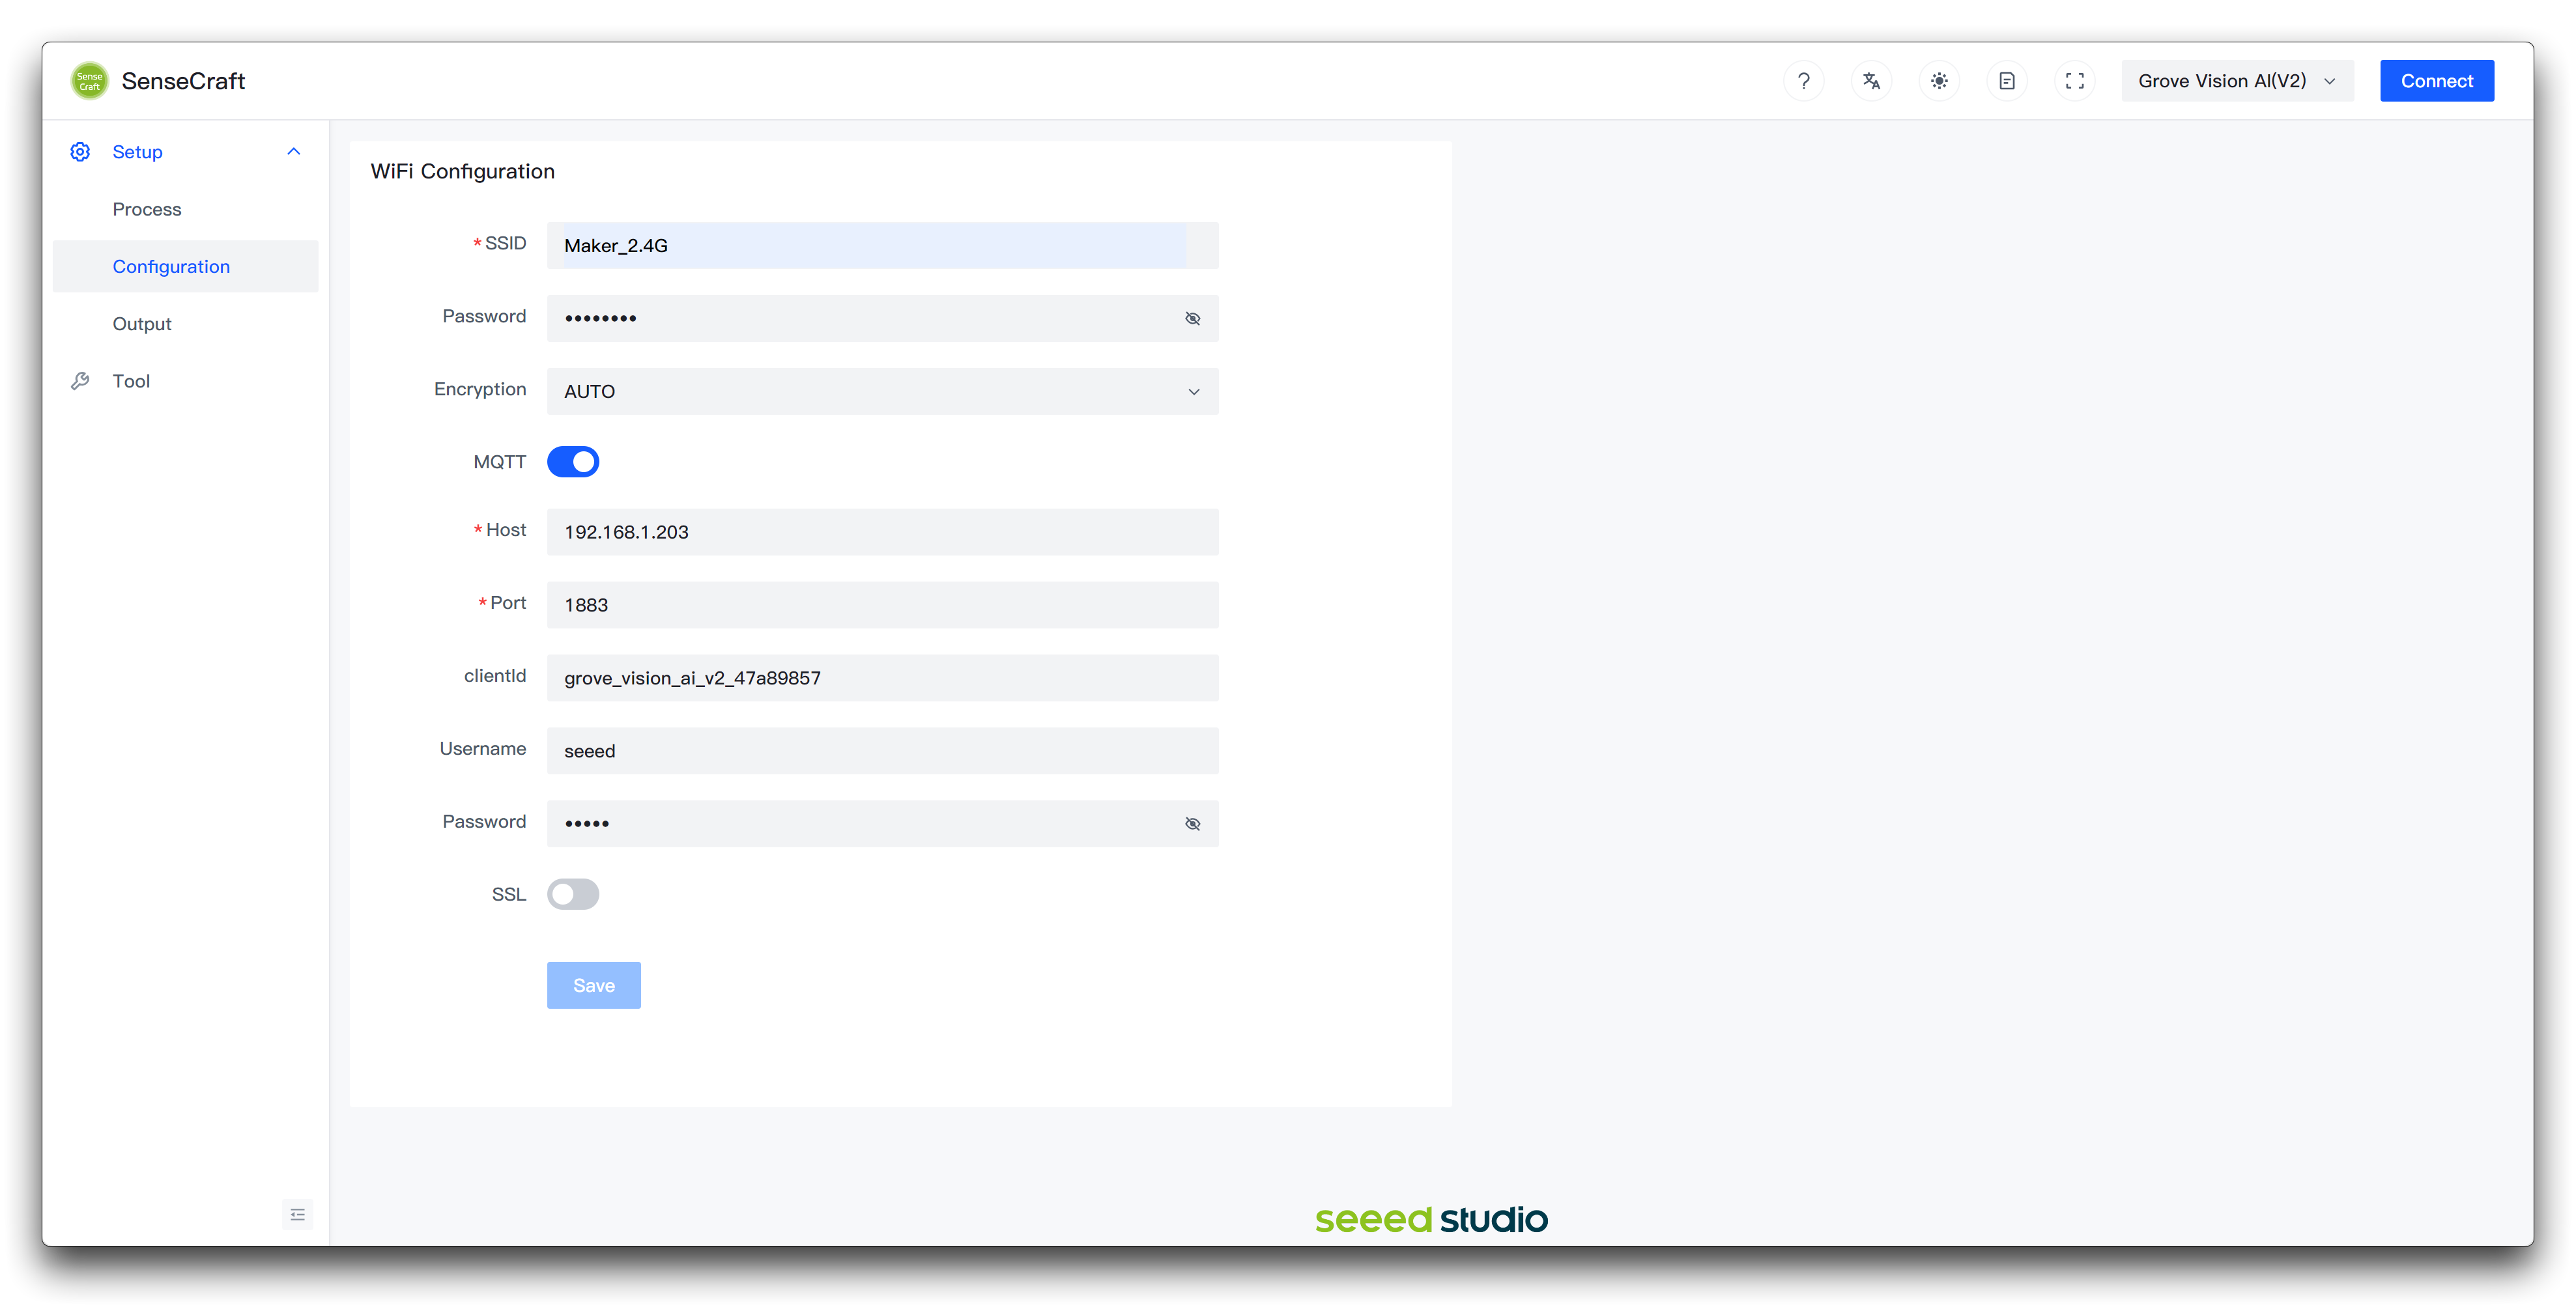
Then click the Save button below. After saving, it does not mean that Grove Vision AI V2 has been written correctly, please go back to Process in the left menu bar and check if the IP address of the device has appeared and if the status of the MQTT connection is correct.
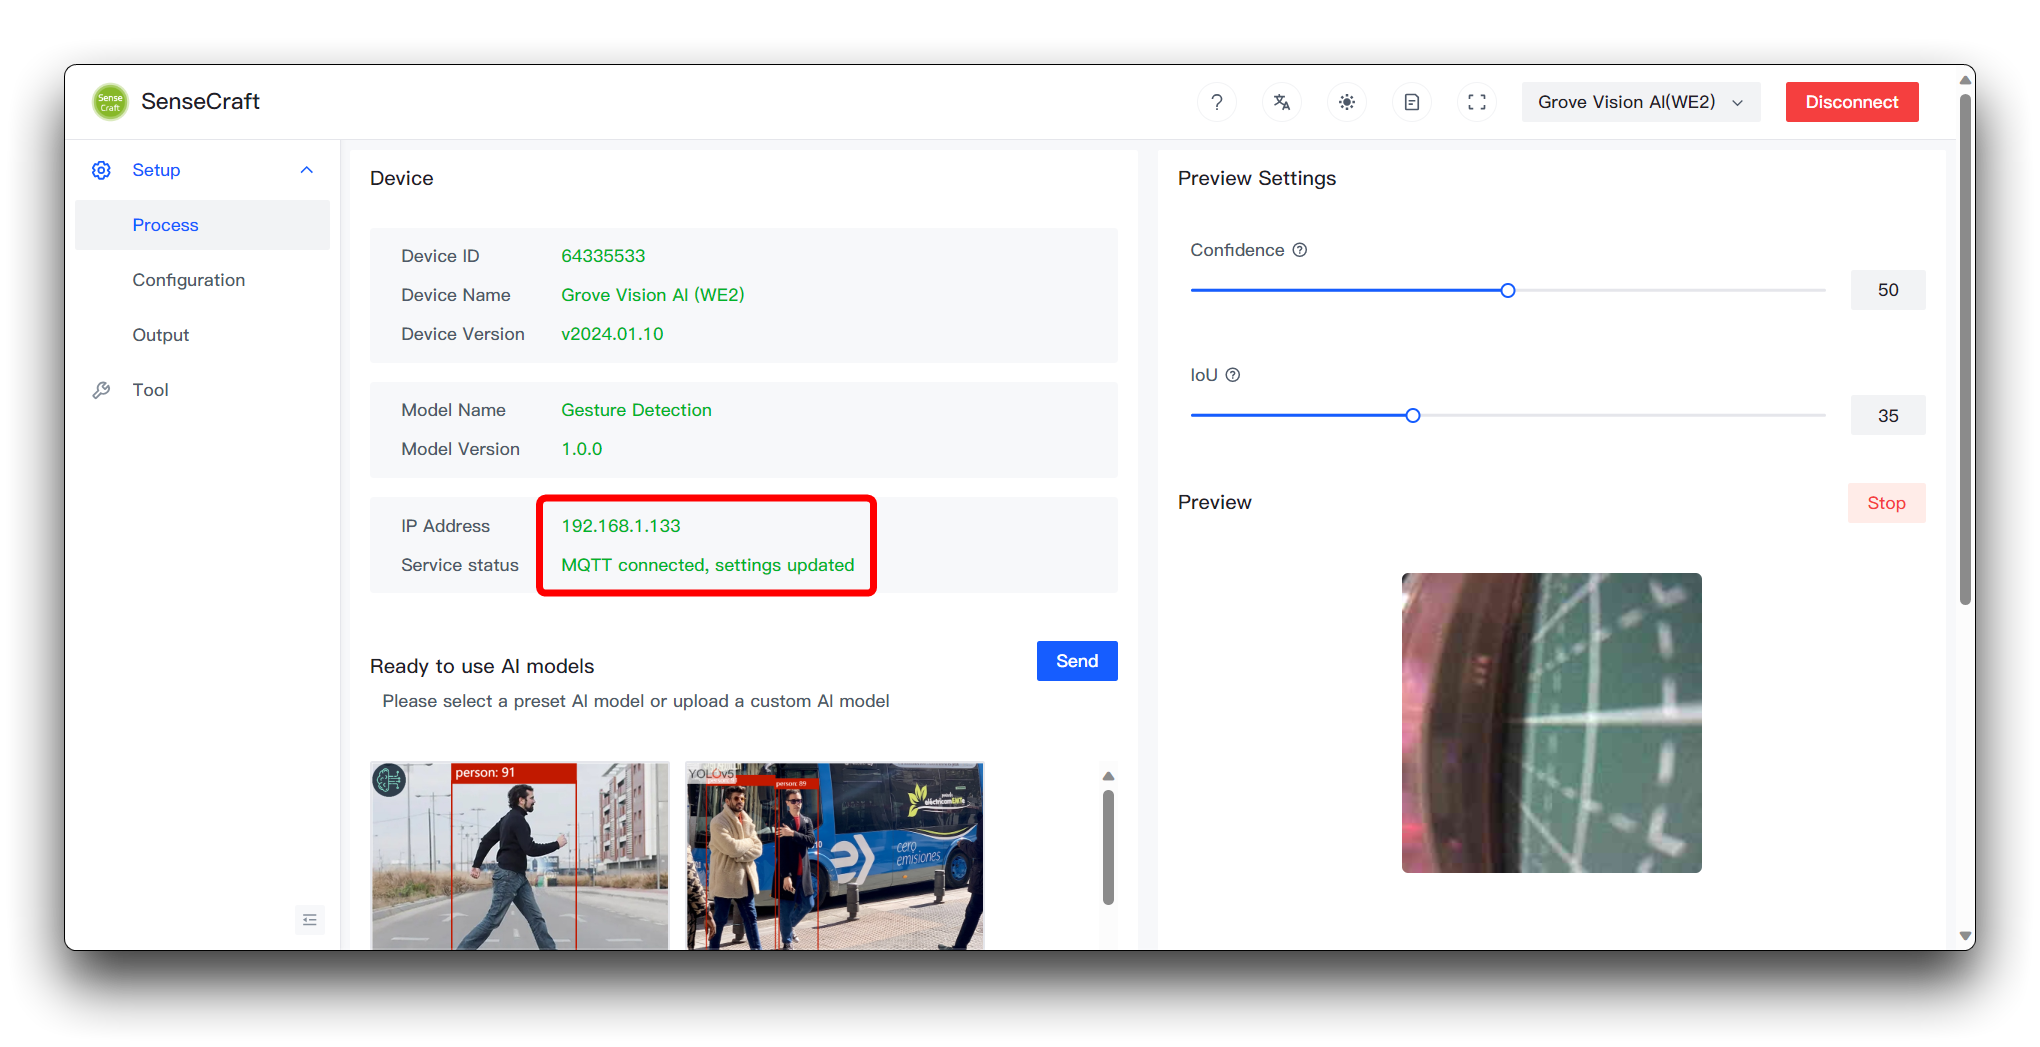
When IP Address is displayed, it means there is no problem with WIFI, and Service status must be the text in the figure to represent normal, note that if WIFI is not normal, MQTT is definitely not normal; when you just switch over, it may show unconnected, and you need to wait for about 10s or so, you don't need to refresh to see the status, and it will show the newest status after the change of the status automatically.
If the connection is working, you can theoretically see the data stream in EMQX.
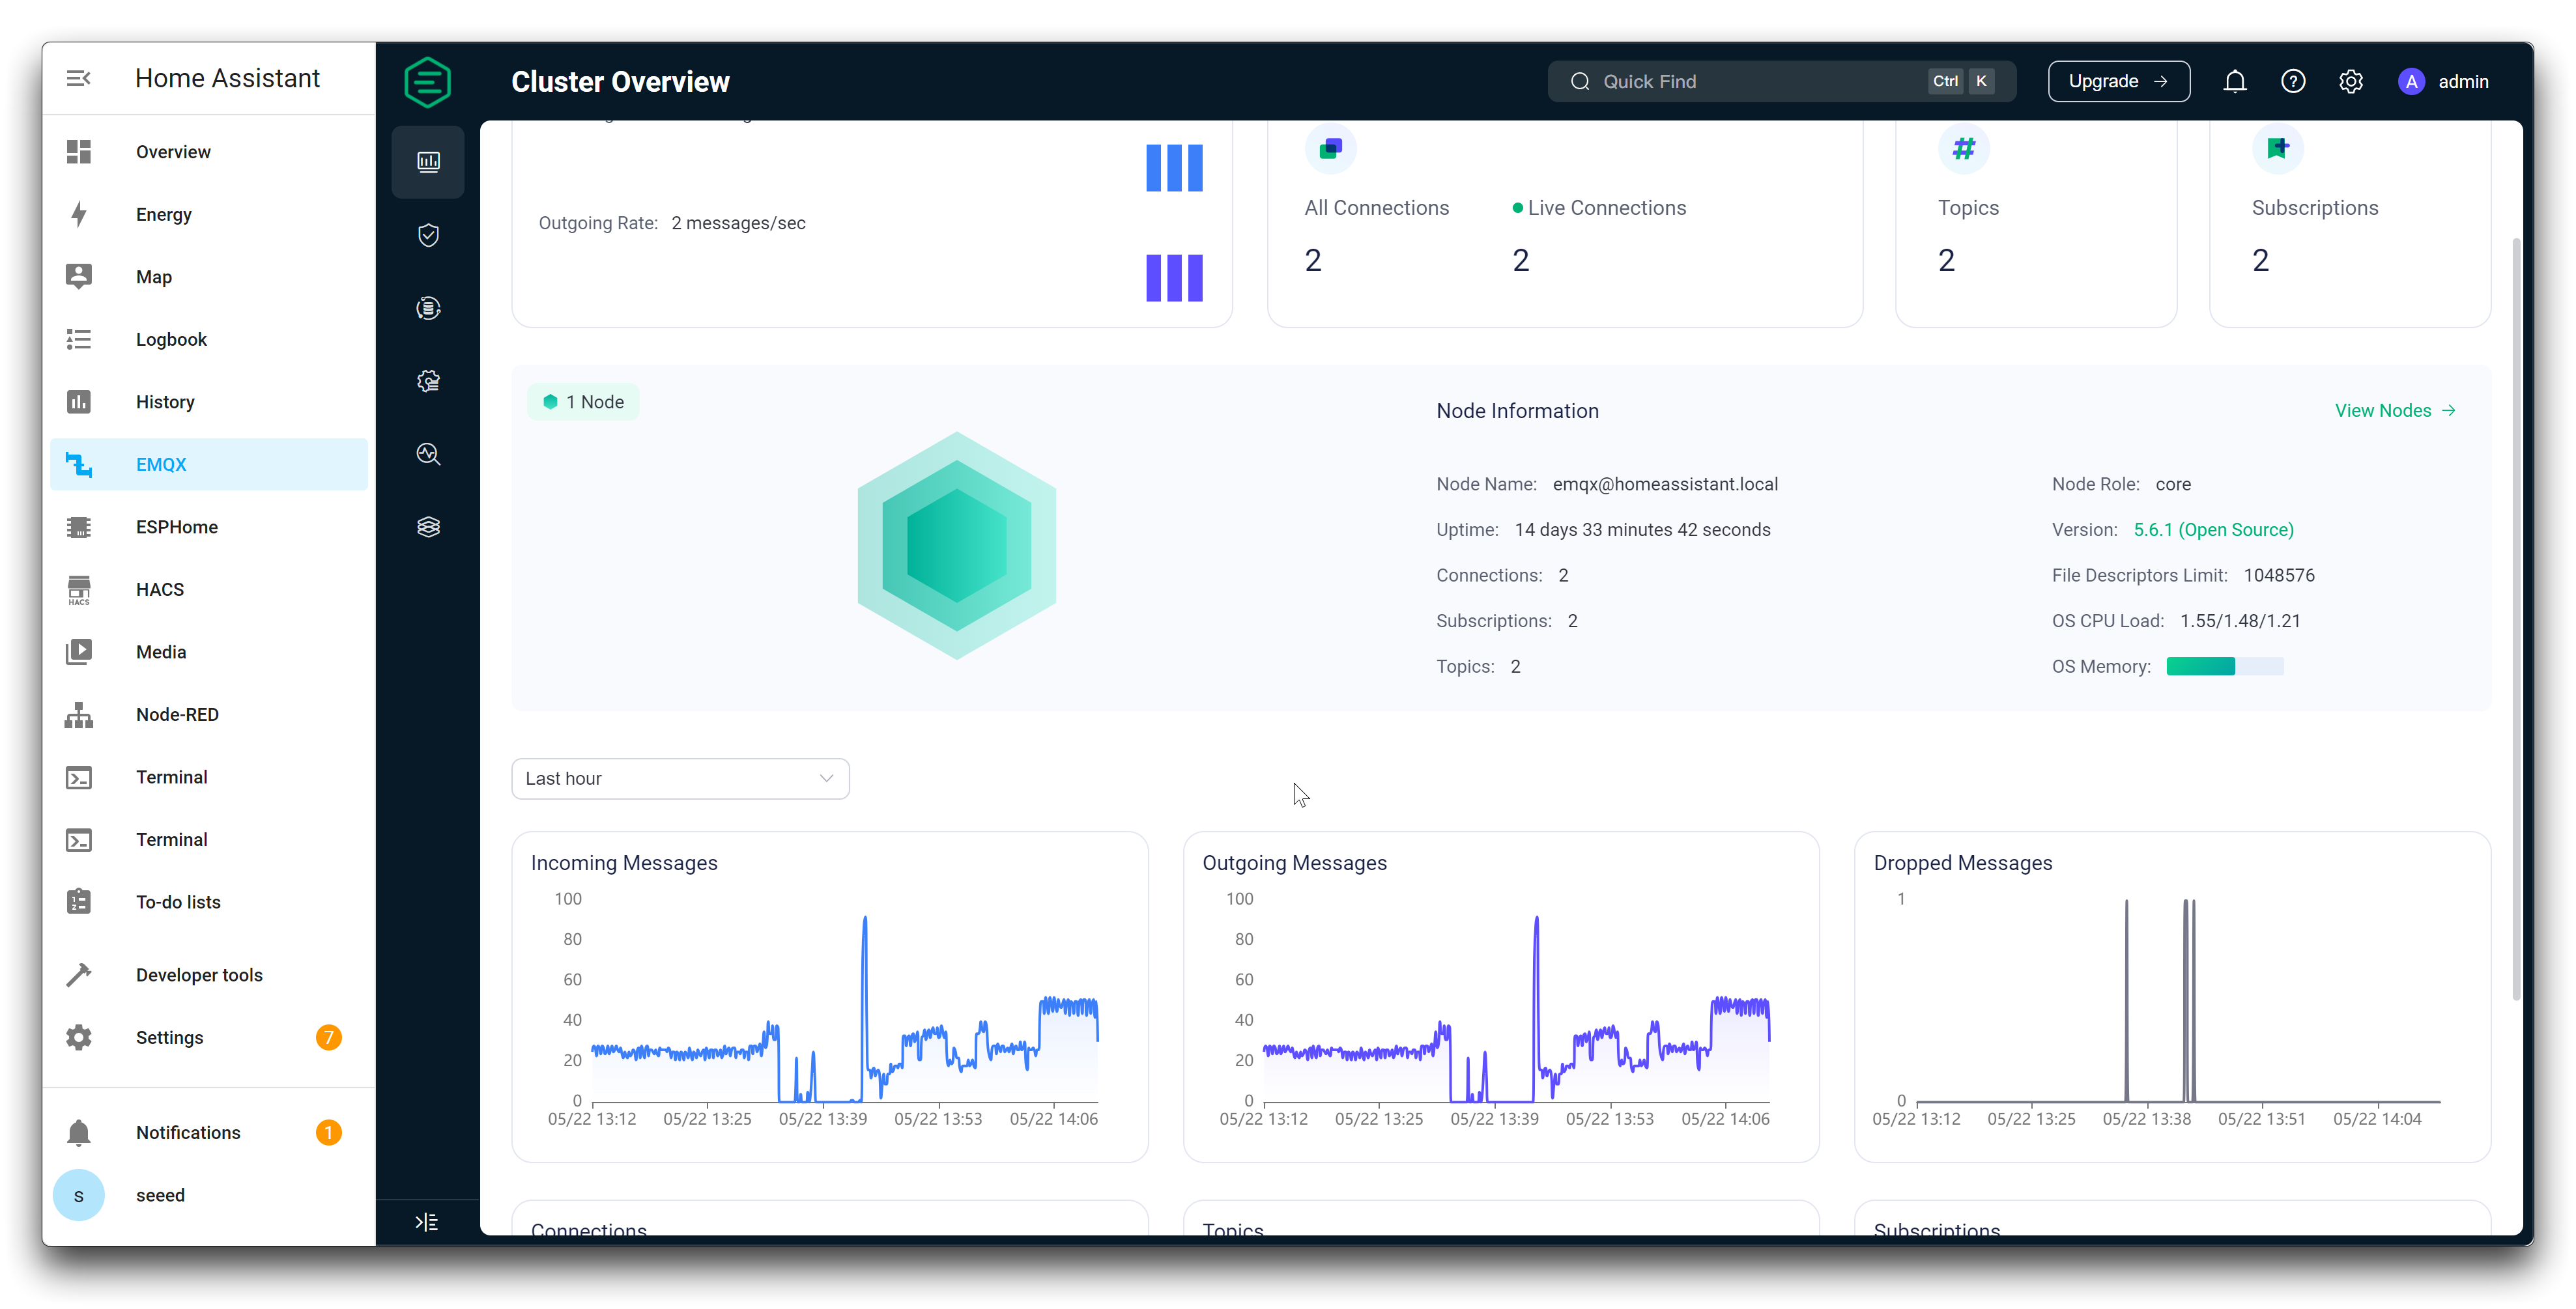
Since the Node-RED connections have not been configured yet, you should see only one All Connections on EMQX.
Configure Node-RED
In this step, we will configure the Node-RED add-on in Home Assistant to create the necessary flows for integrating the Grove Vision AI V2 with Home Assistant.
Step 10. Configure and run Node-RED
Open your Home Assistant web interface and navigate to the "Settings" menu. Click on the "Add-ons" option to access the add-on management page. Locate the "Node-RED" add-on and click on it to open its details page. Click on the "Configuration" tab.
In the Node-RED configuration, locate the ssl option. Disable ssl option. Click on the SAVE button to apply the configuration changes.
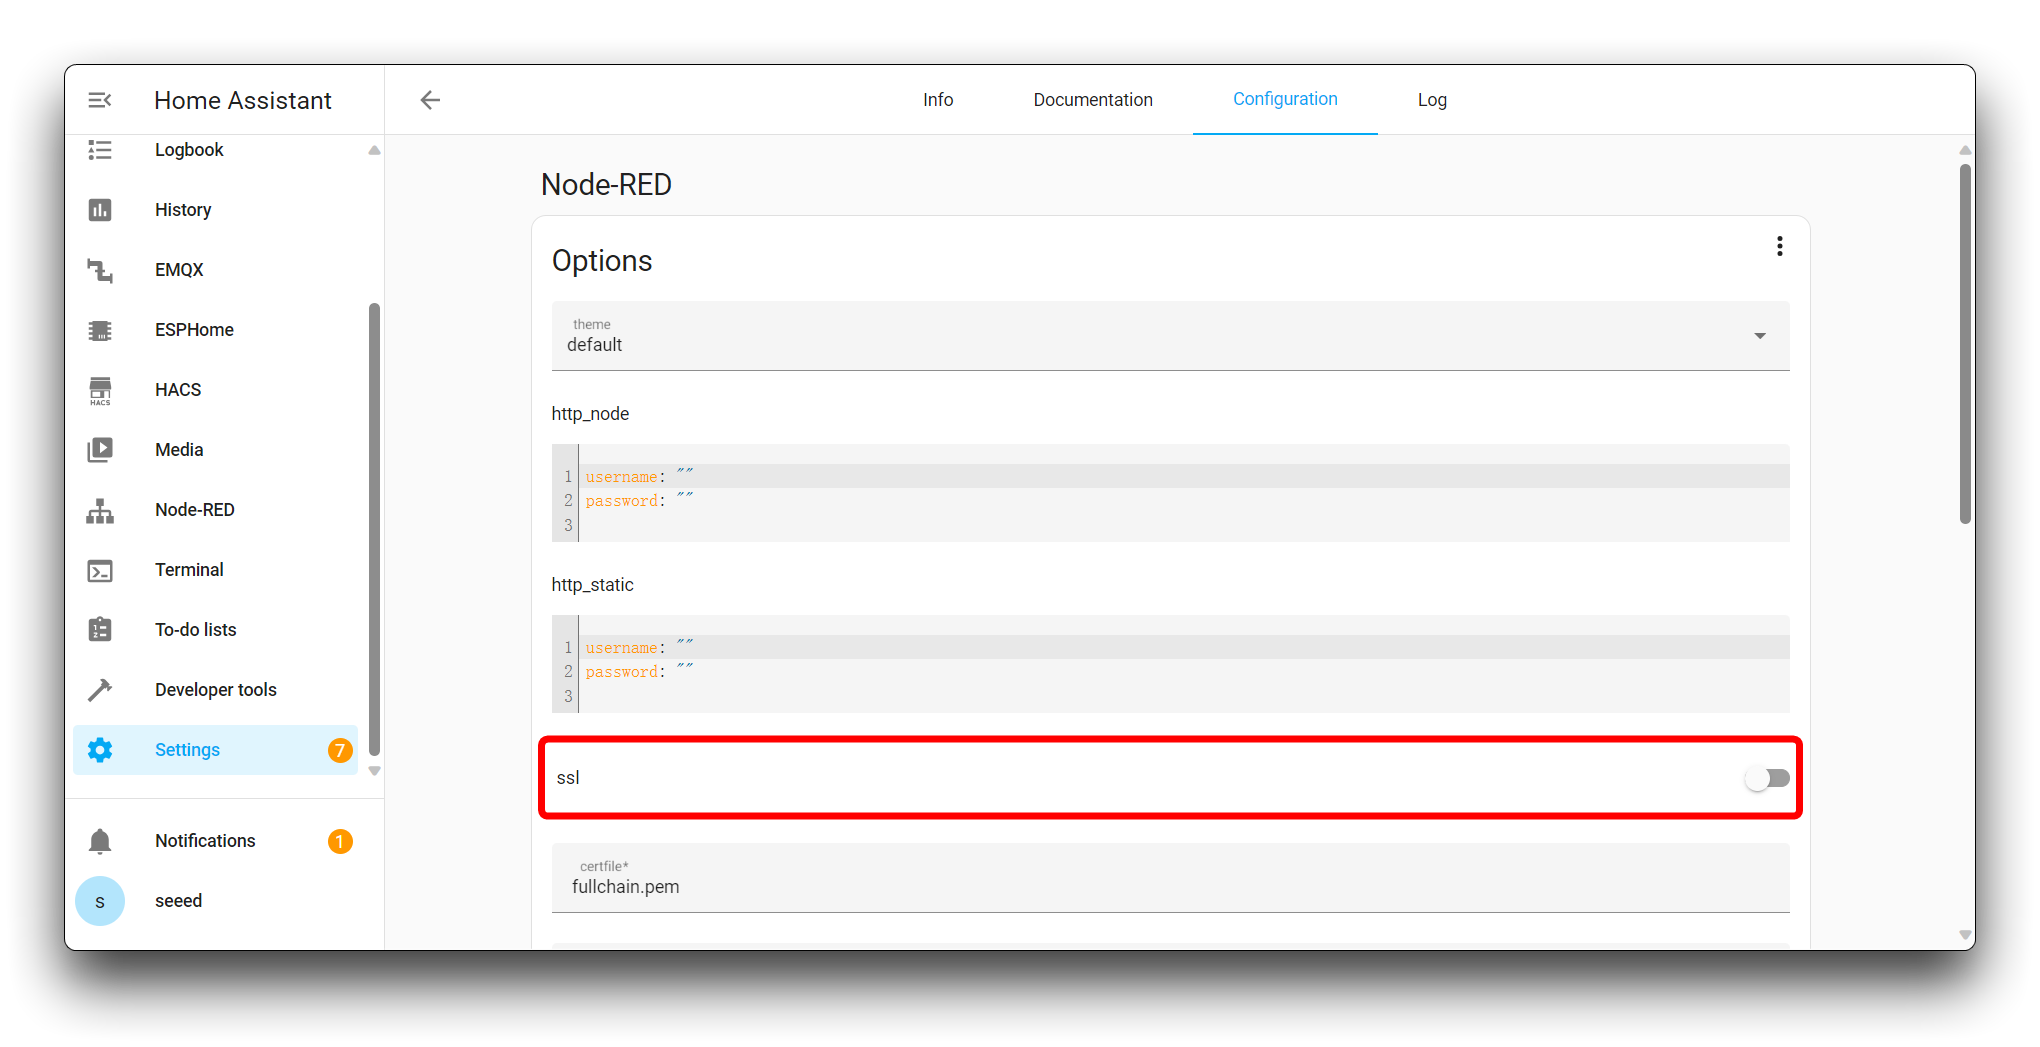
Click on the "START" button to start the Node-RED add-on. Wait for the add-on to start successfully. You can check the logs to monitor the progress. Once the Node-RED add-on is running, click on the "OPEN WEB UI" button to access the Node-RED Editor.
Step 11. Installing the msg-speed node
In the Node-RED Editor, click on the hamburger menu (three horizontal lines) in the top-right corner. Select Manage palette from the menu.
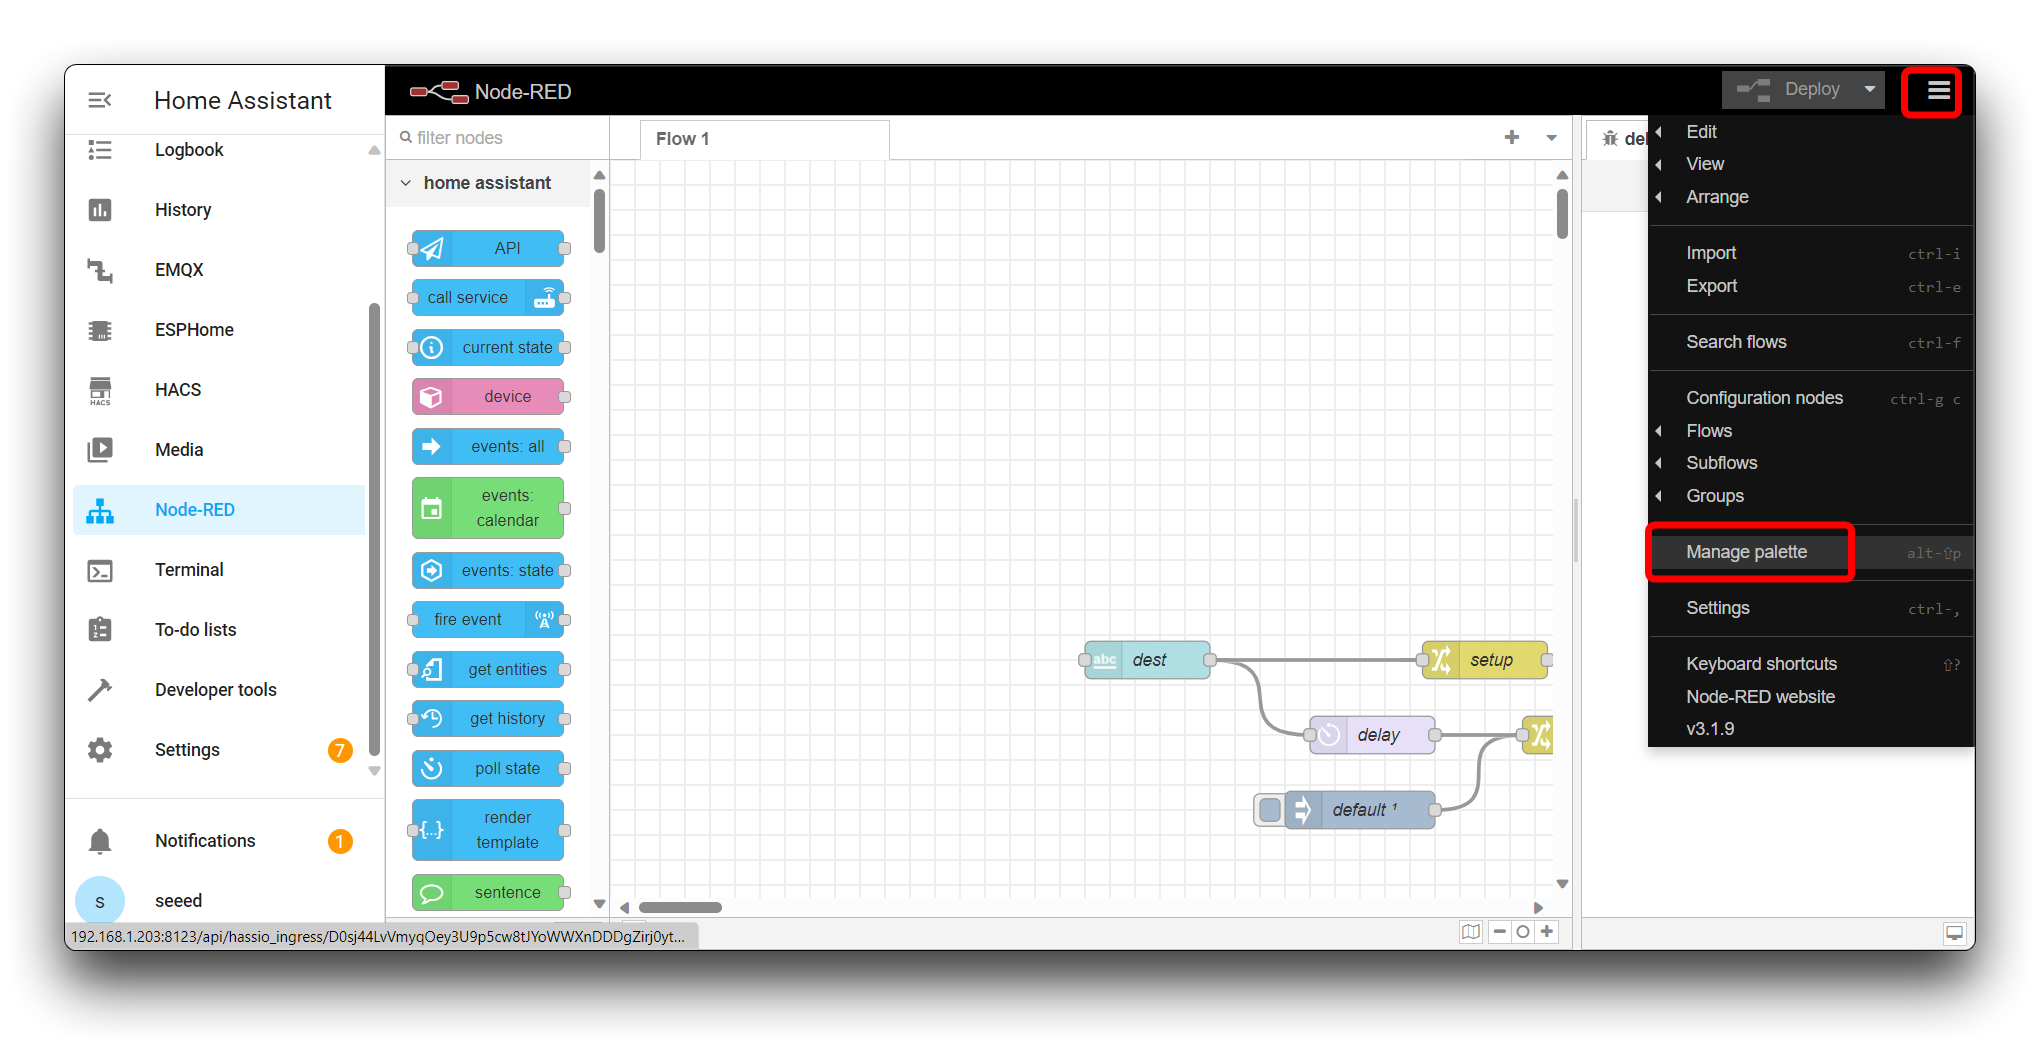
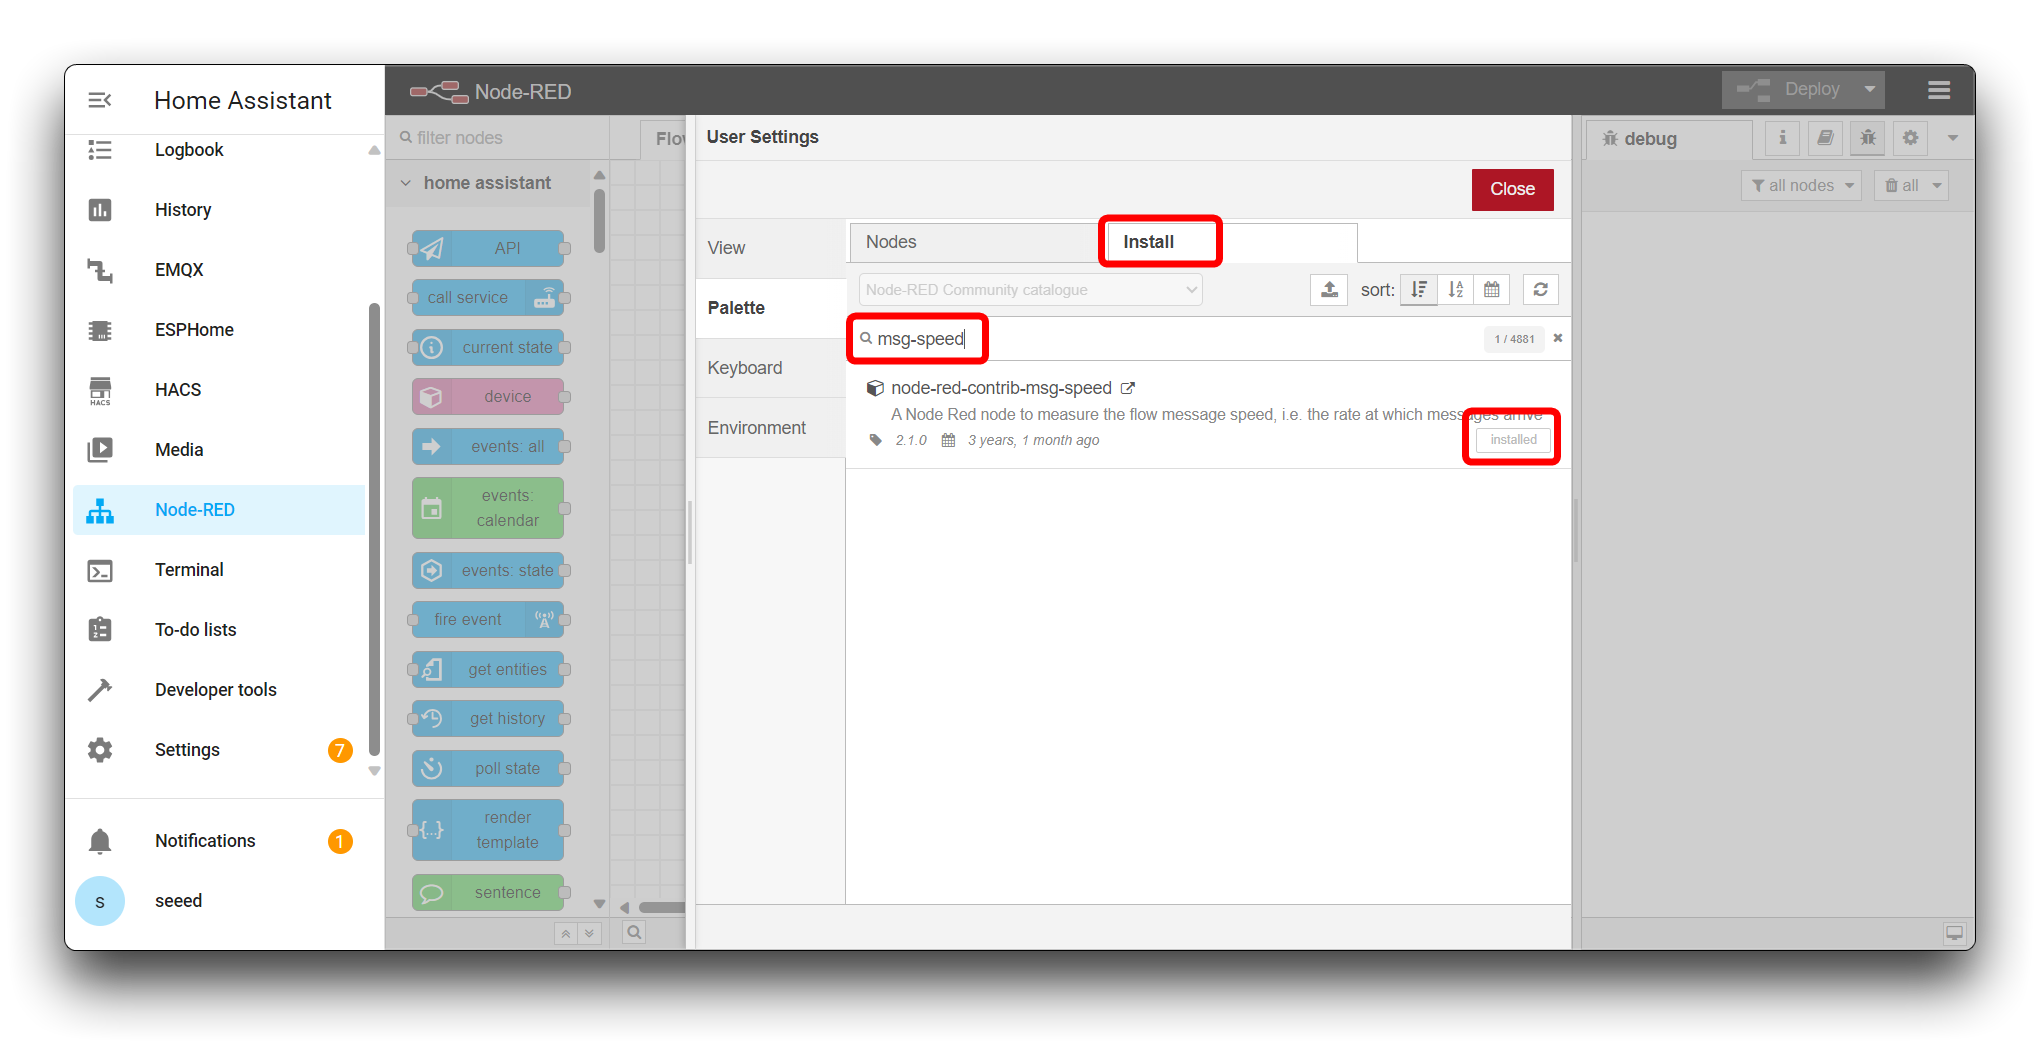
In the Palette sidebar, click on the Install tab. In the search box, type msg-speed and press Enter. Locate the msg-speed node in the search results and click on the Install button next to it. Wait for the installation to complete, then close the "Palette" sidebar.
Step 12. Importing the Flow JSON
Please download our prepared JSON file crowd_density.json for Flow.
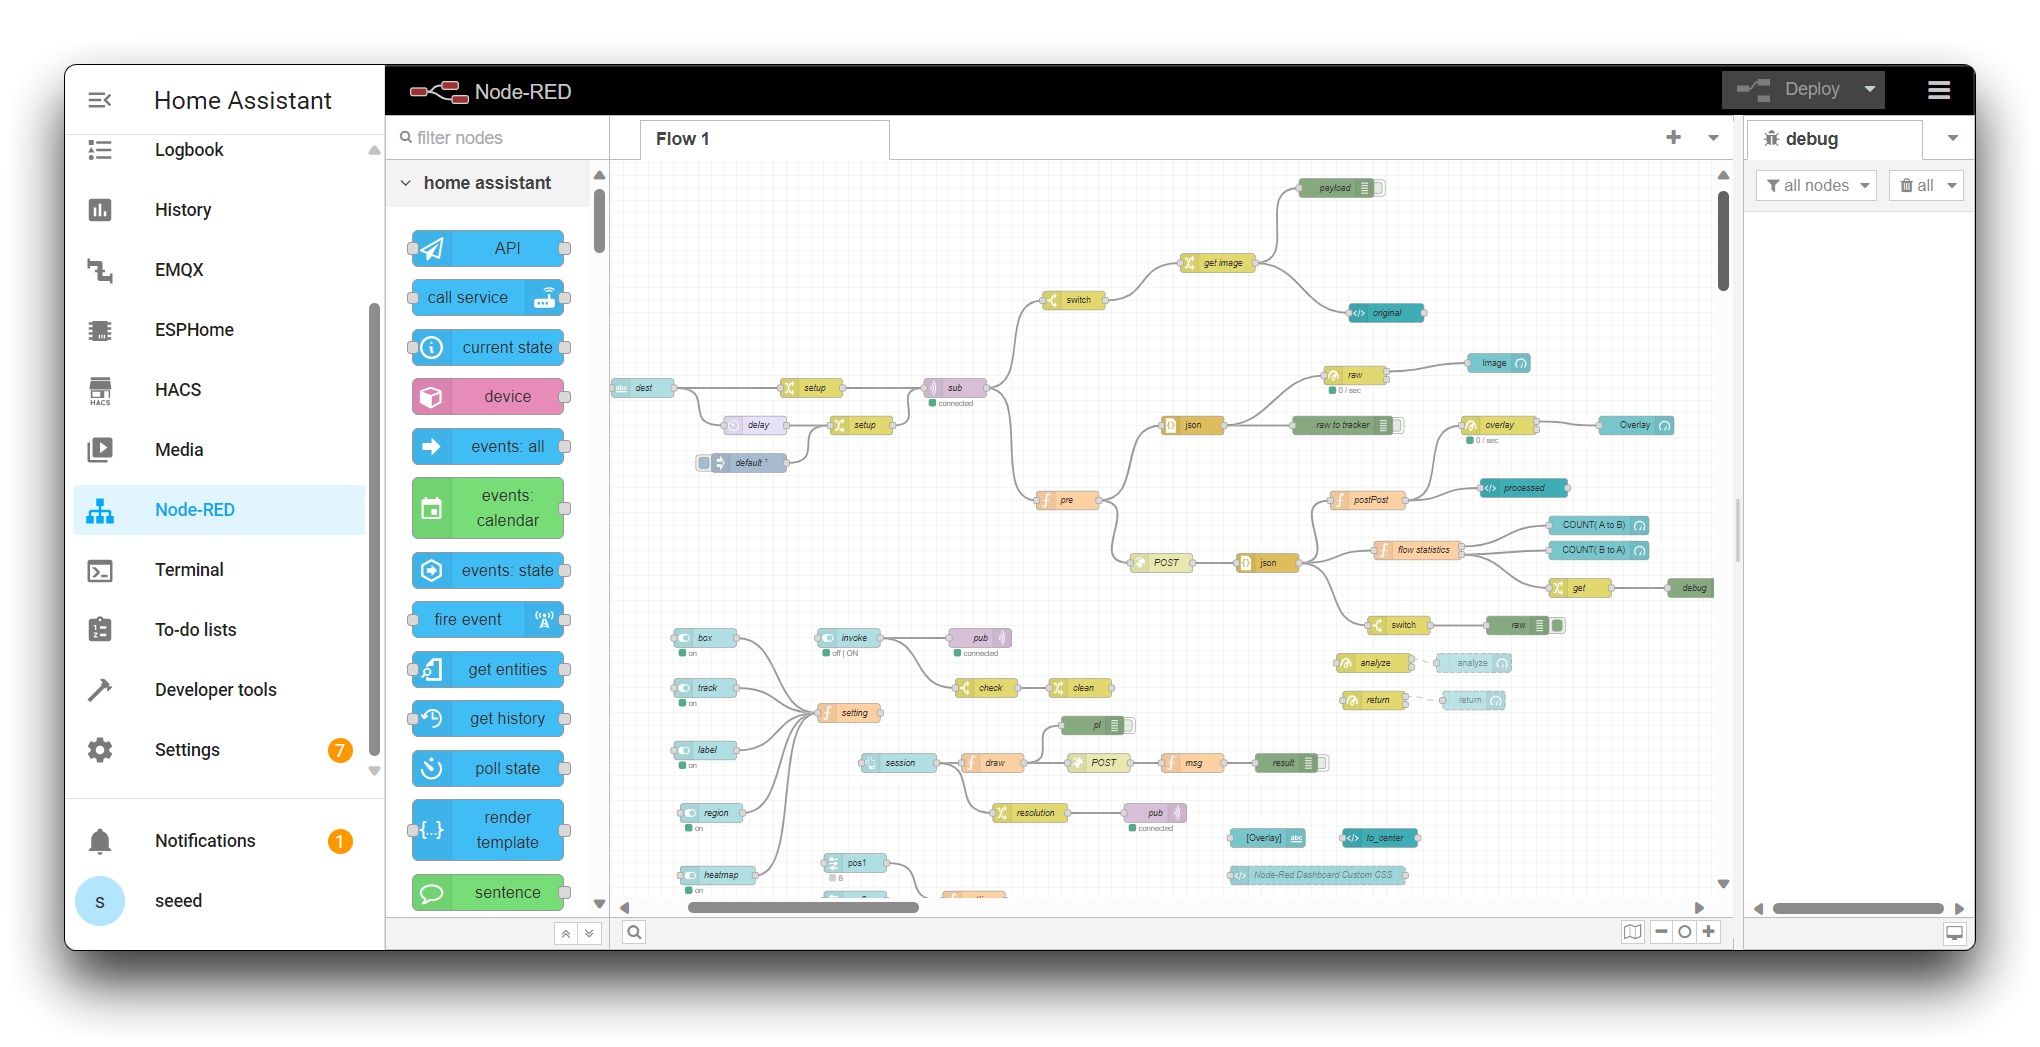
In the Node-RED Editor, click on the hamburger menu again. Select "Import" from the menu. In the "Import nodes" dialog, click on the "select a file to import" button. Browse and select the provided JSON file that contains the pre-configured Node-RED flow. Click on the "Import" button to import the flow into Node-RED.

Then you can see our prepared Node-RED Flow.
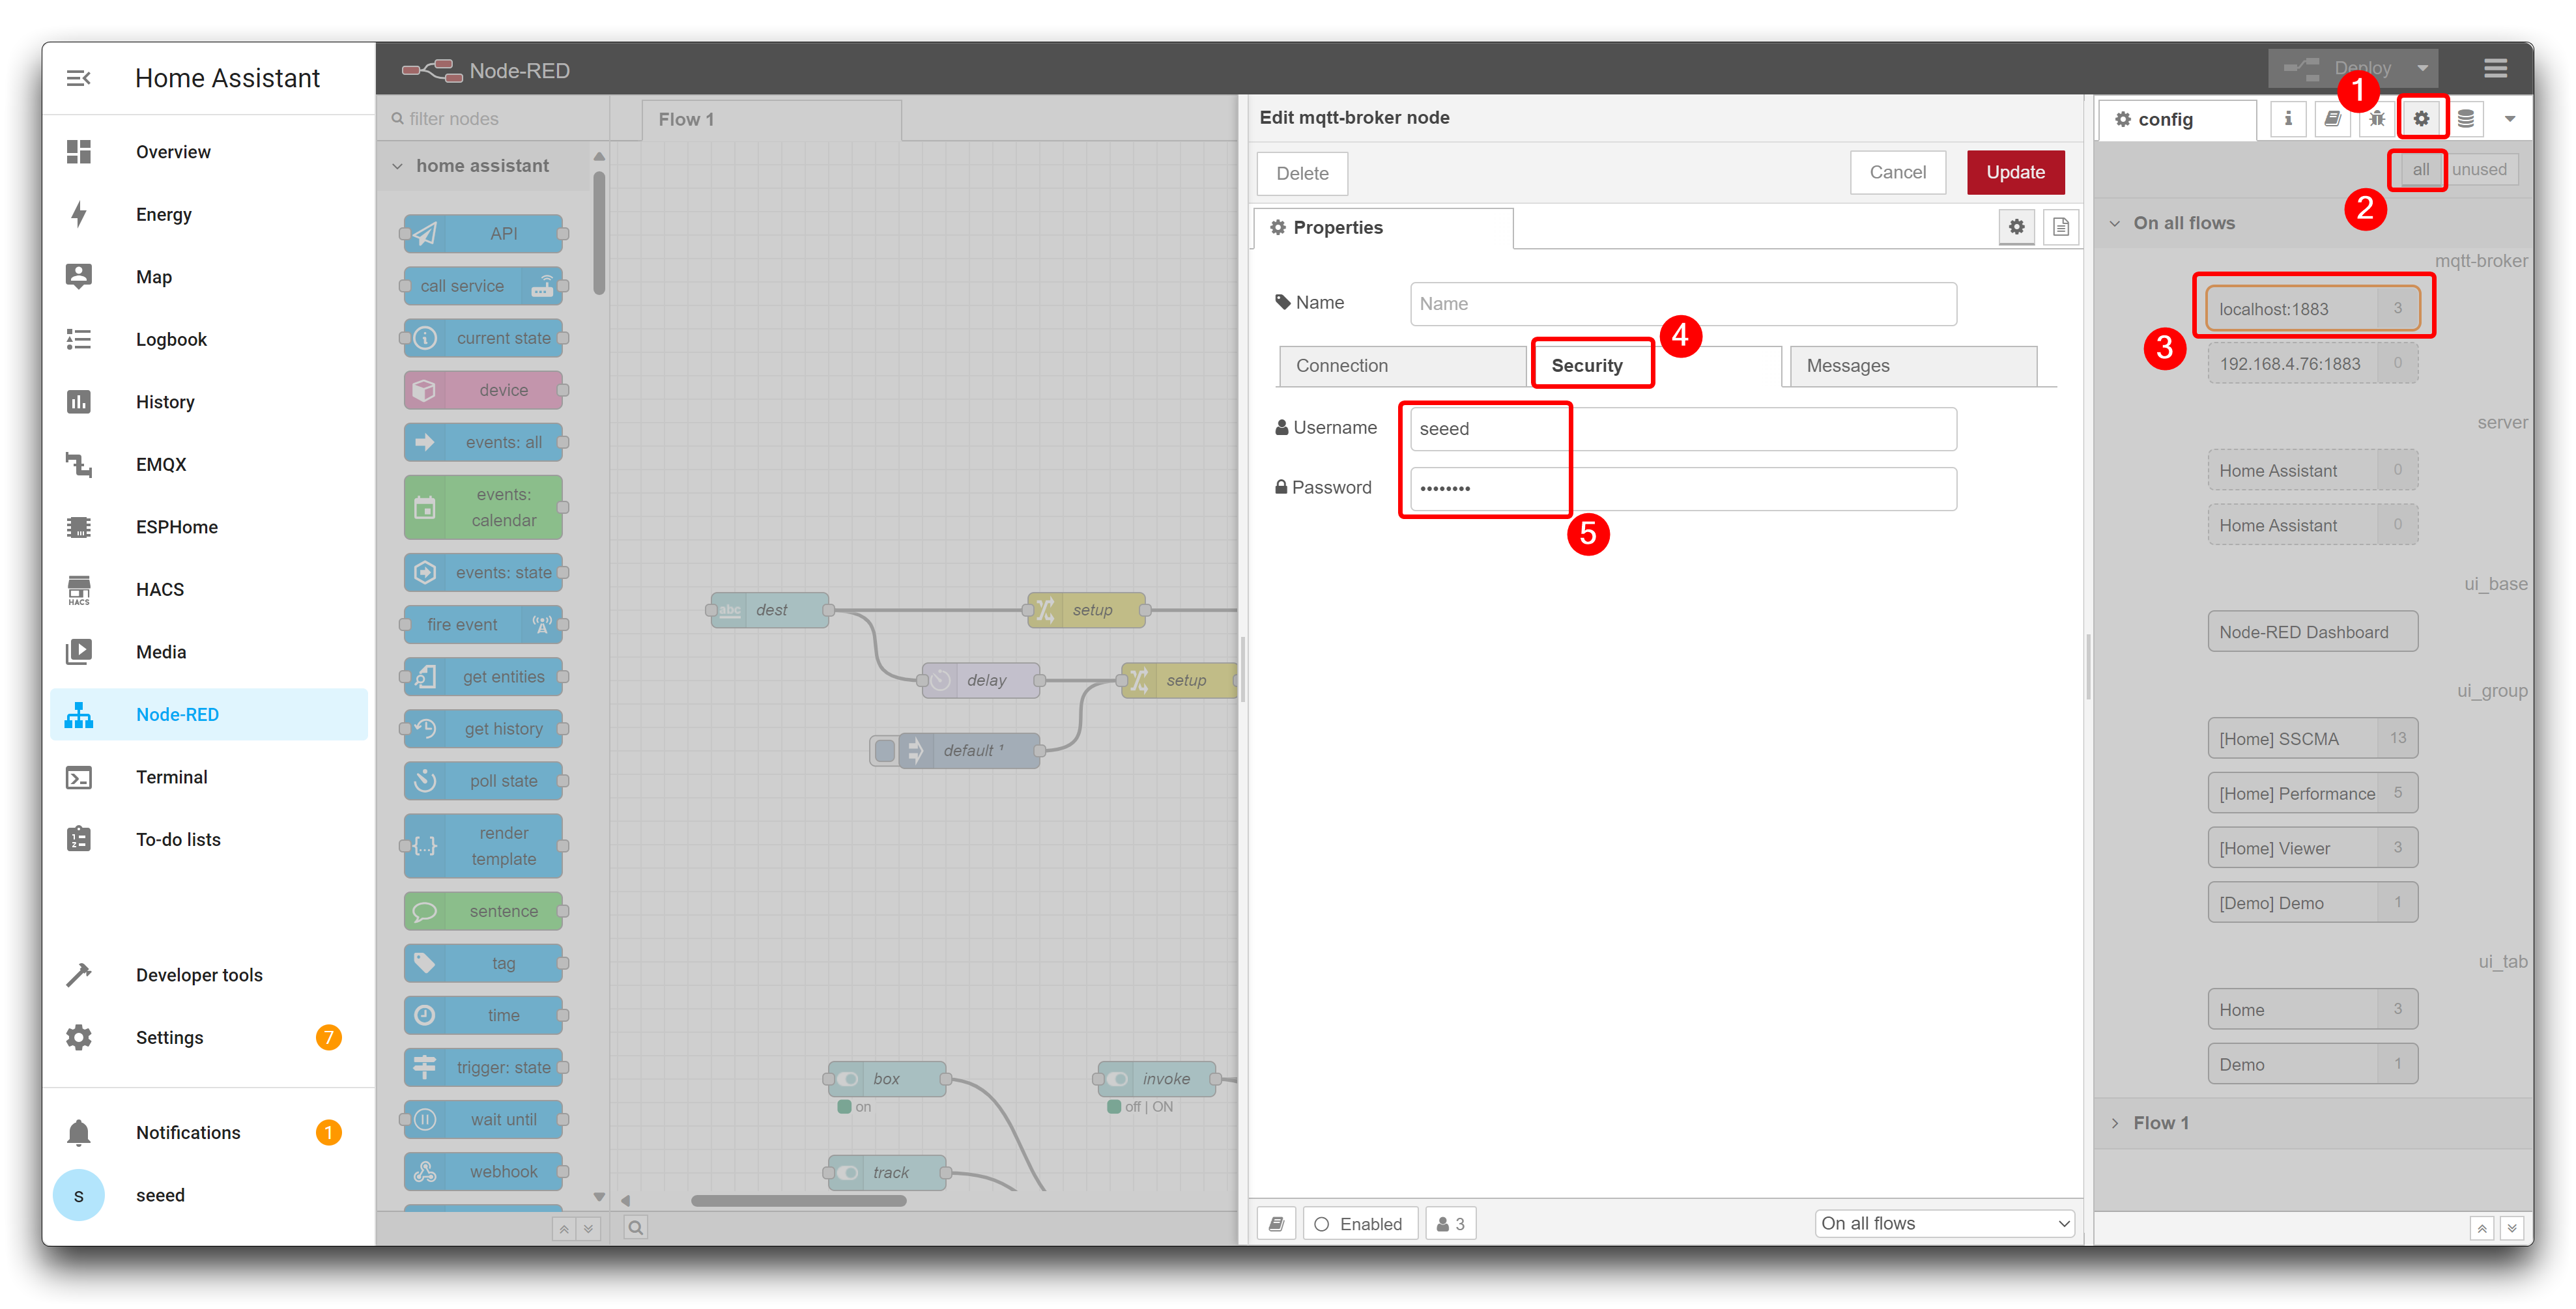
Step 13. Configuring the MQTT Broker node
In the imported flow, locate the mqtt-broker node. Double-click on the node to open its configuration.
In the "Server" field, enter the IP address of the EMQX broker (e.g., localhost or the IP address of the Home Assistant instance).
In the "Username" field, enter the username you created in the EMQX Database (e.g., "seeed").
In the "Password" field, enter the password you set for the user in the EMQX Database (e.g., "seeed"). Click on the "Done" button to save the MQTT broker configuration.
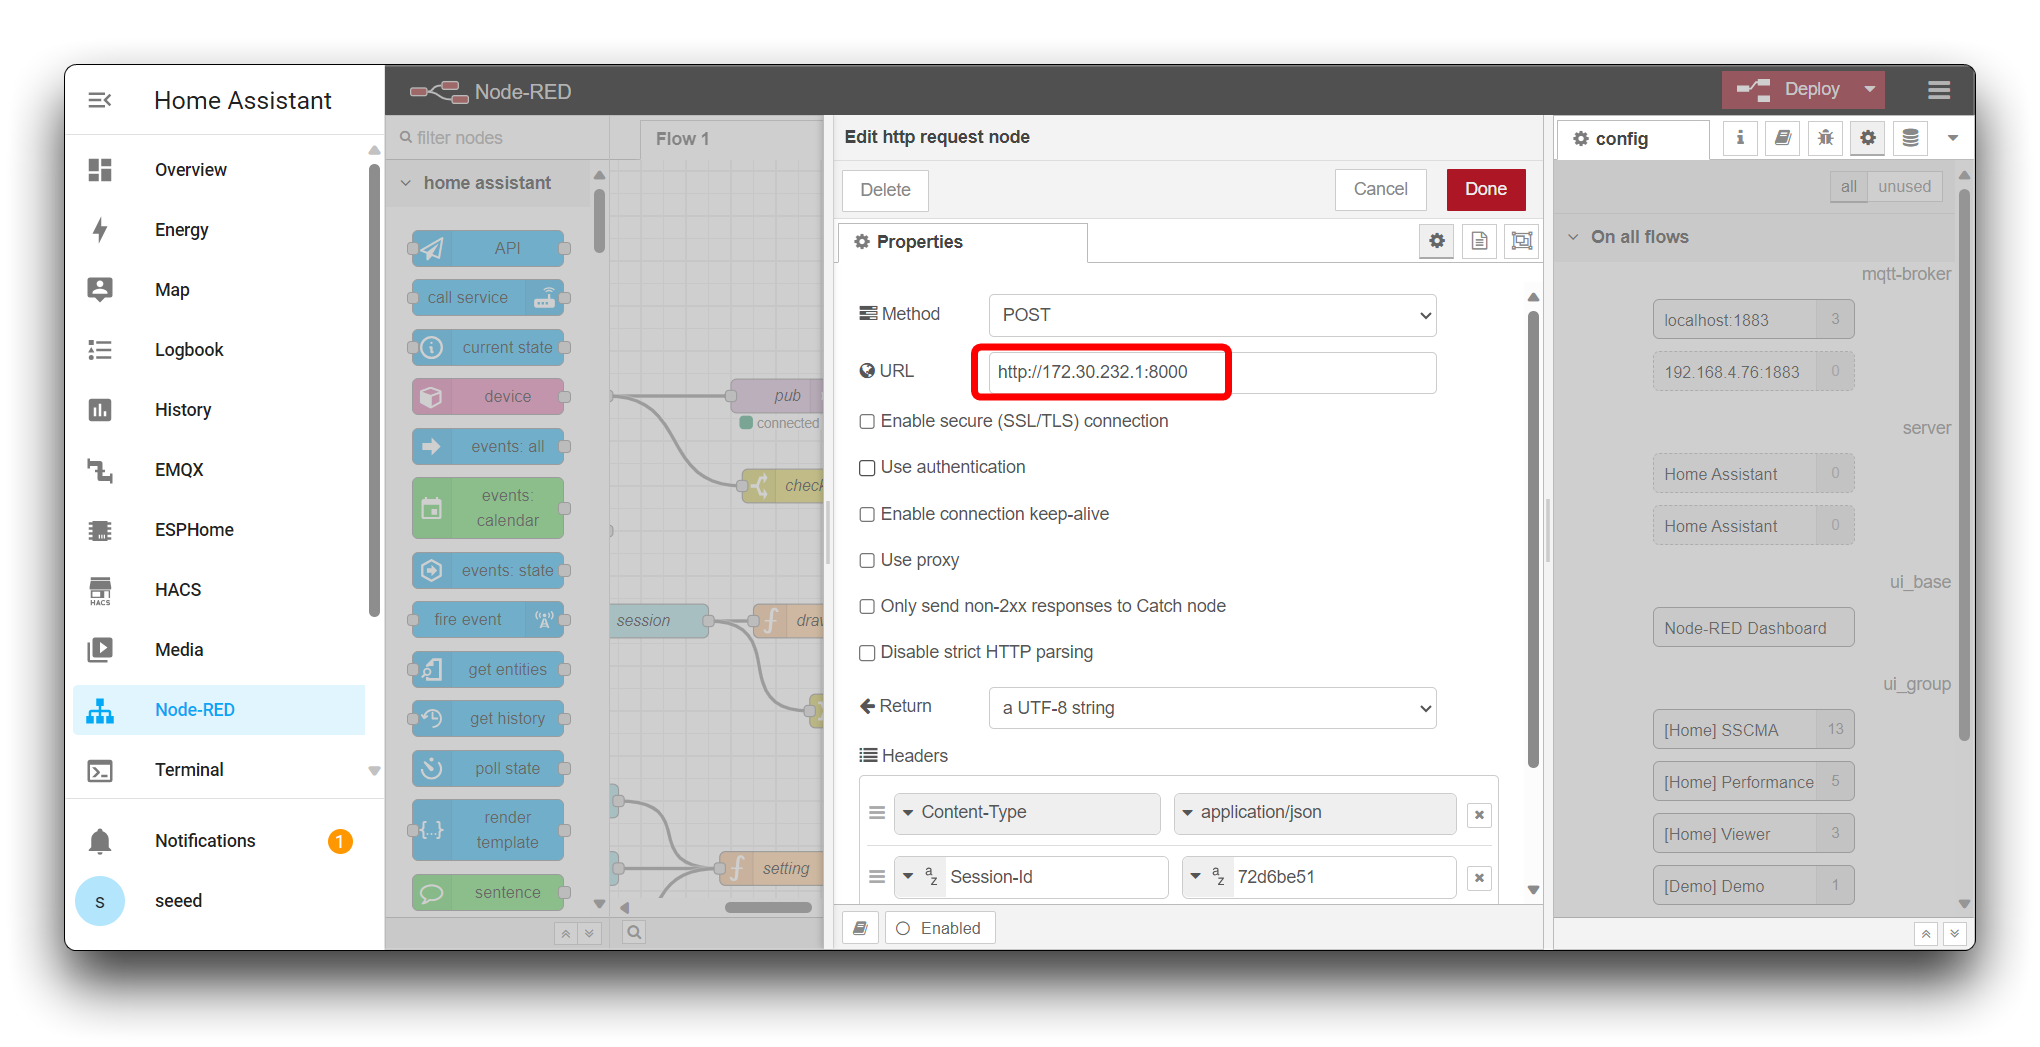
Step 14. Verifying the POST node URL
In the imported flow, locate the "POST" node. Double-click on the node to open its configuration.
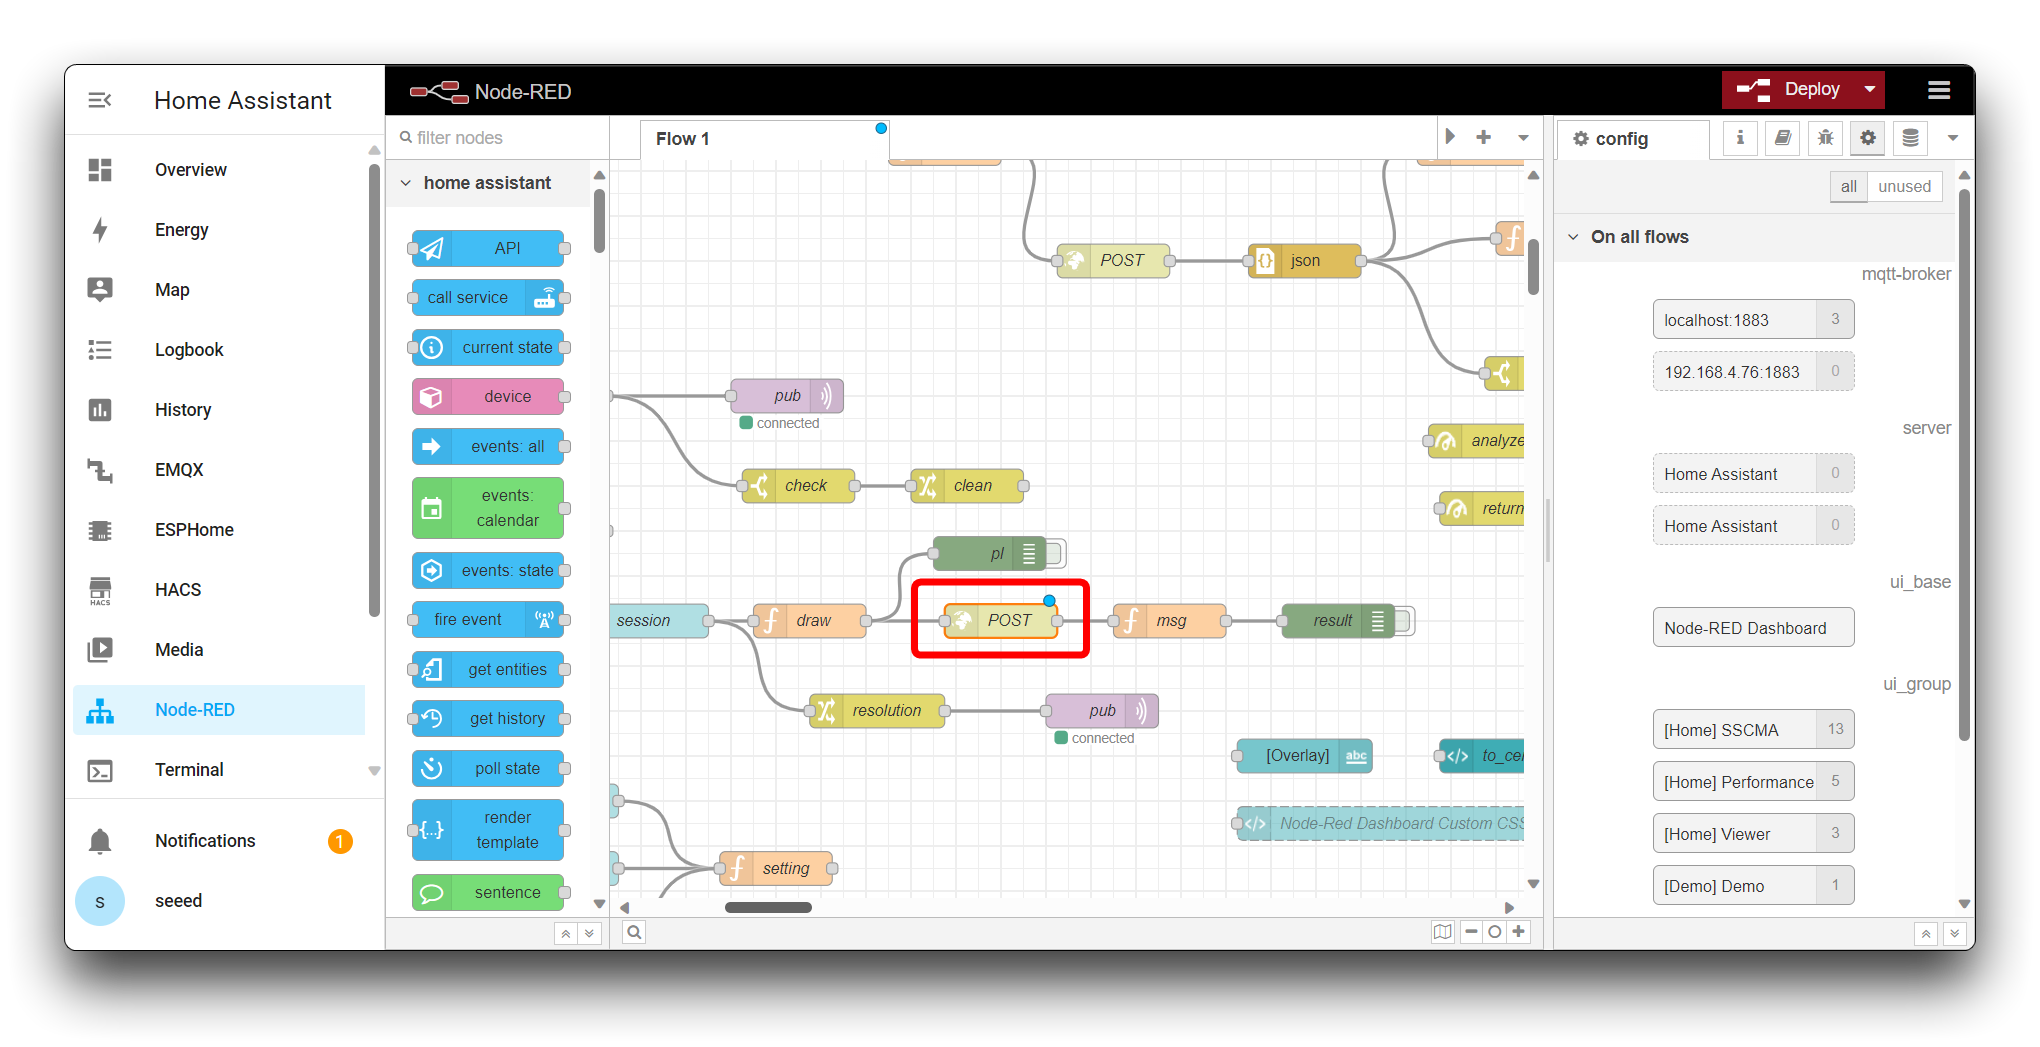
Verify that the "URL" field contains the correct IP address of the pysscma Docker container that you obtained in Step 7. If necessary, update the URL to match the pysscma Docker IP address. Click on the "Done" button to save the POST node configuration.
Step 15. Deploying the Flow
Click on the Deploy button in the top-right corner of the Node-RED Editor to deploy the flow. The flow should now be active and ready to handle data from the Grove Vision AI V2.
Crowd Density Dashboard Setup
In this step, we will access the Node-RED dashboard to monitor and interact with the data from the Grove Vision AI V2 device.
Open a web browser on your computer or mobile device. In the address bar, enter the URL in the following format:
http://homeassistant:1880/endpoint/ui/
You can now monitor the data flow and interact with the nodes in the Node-RED dashboard.
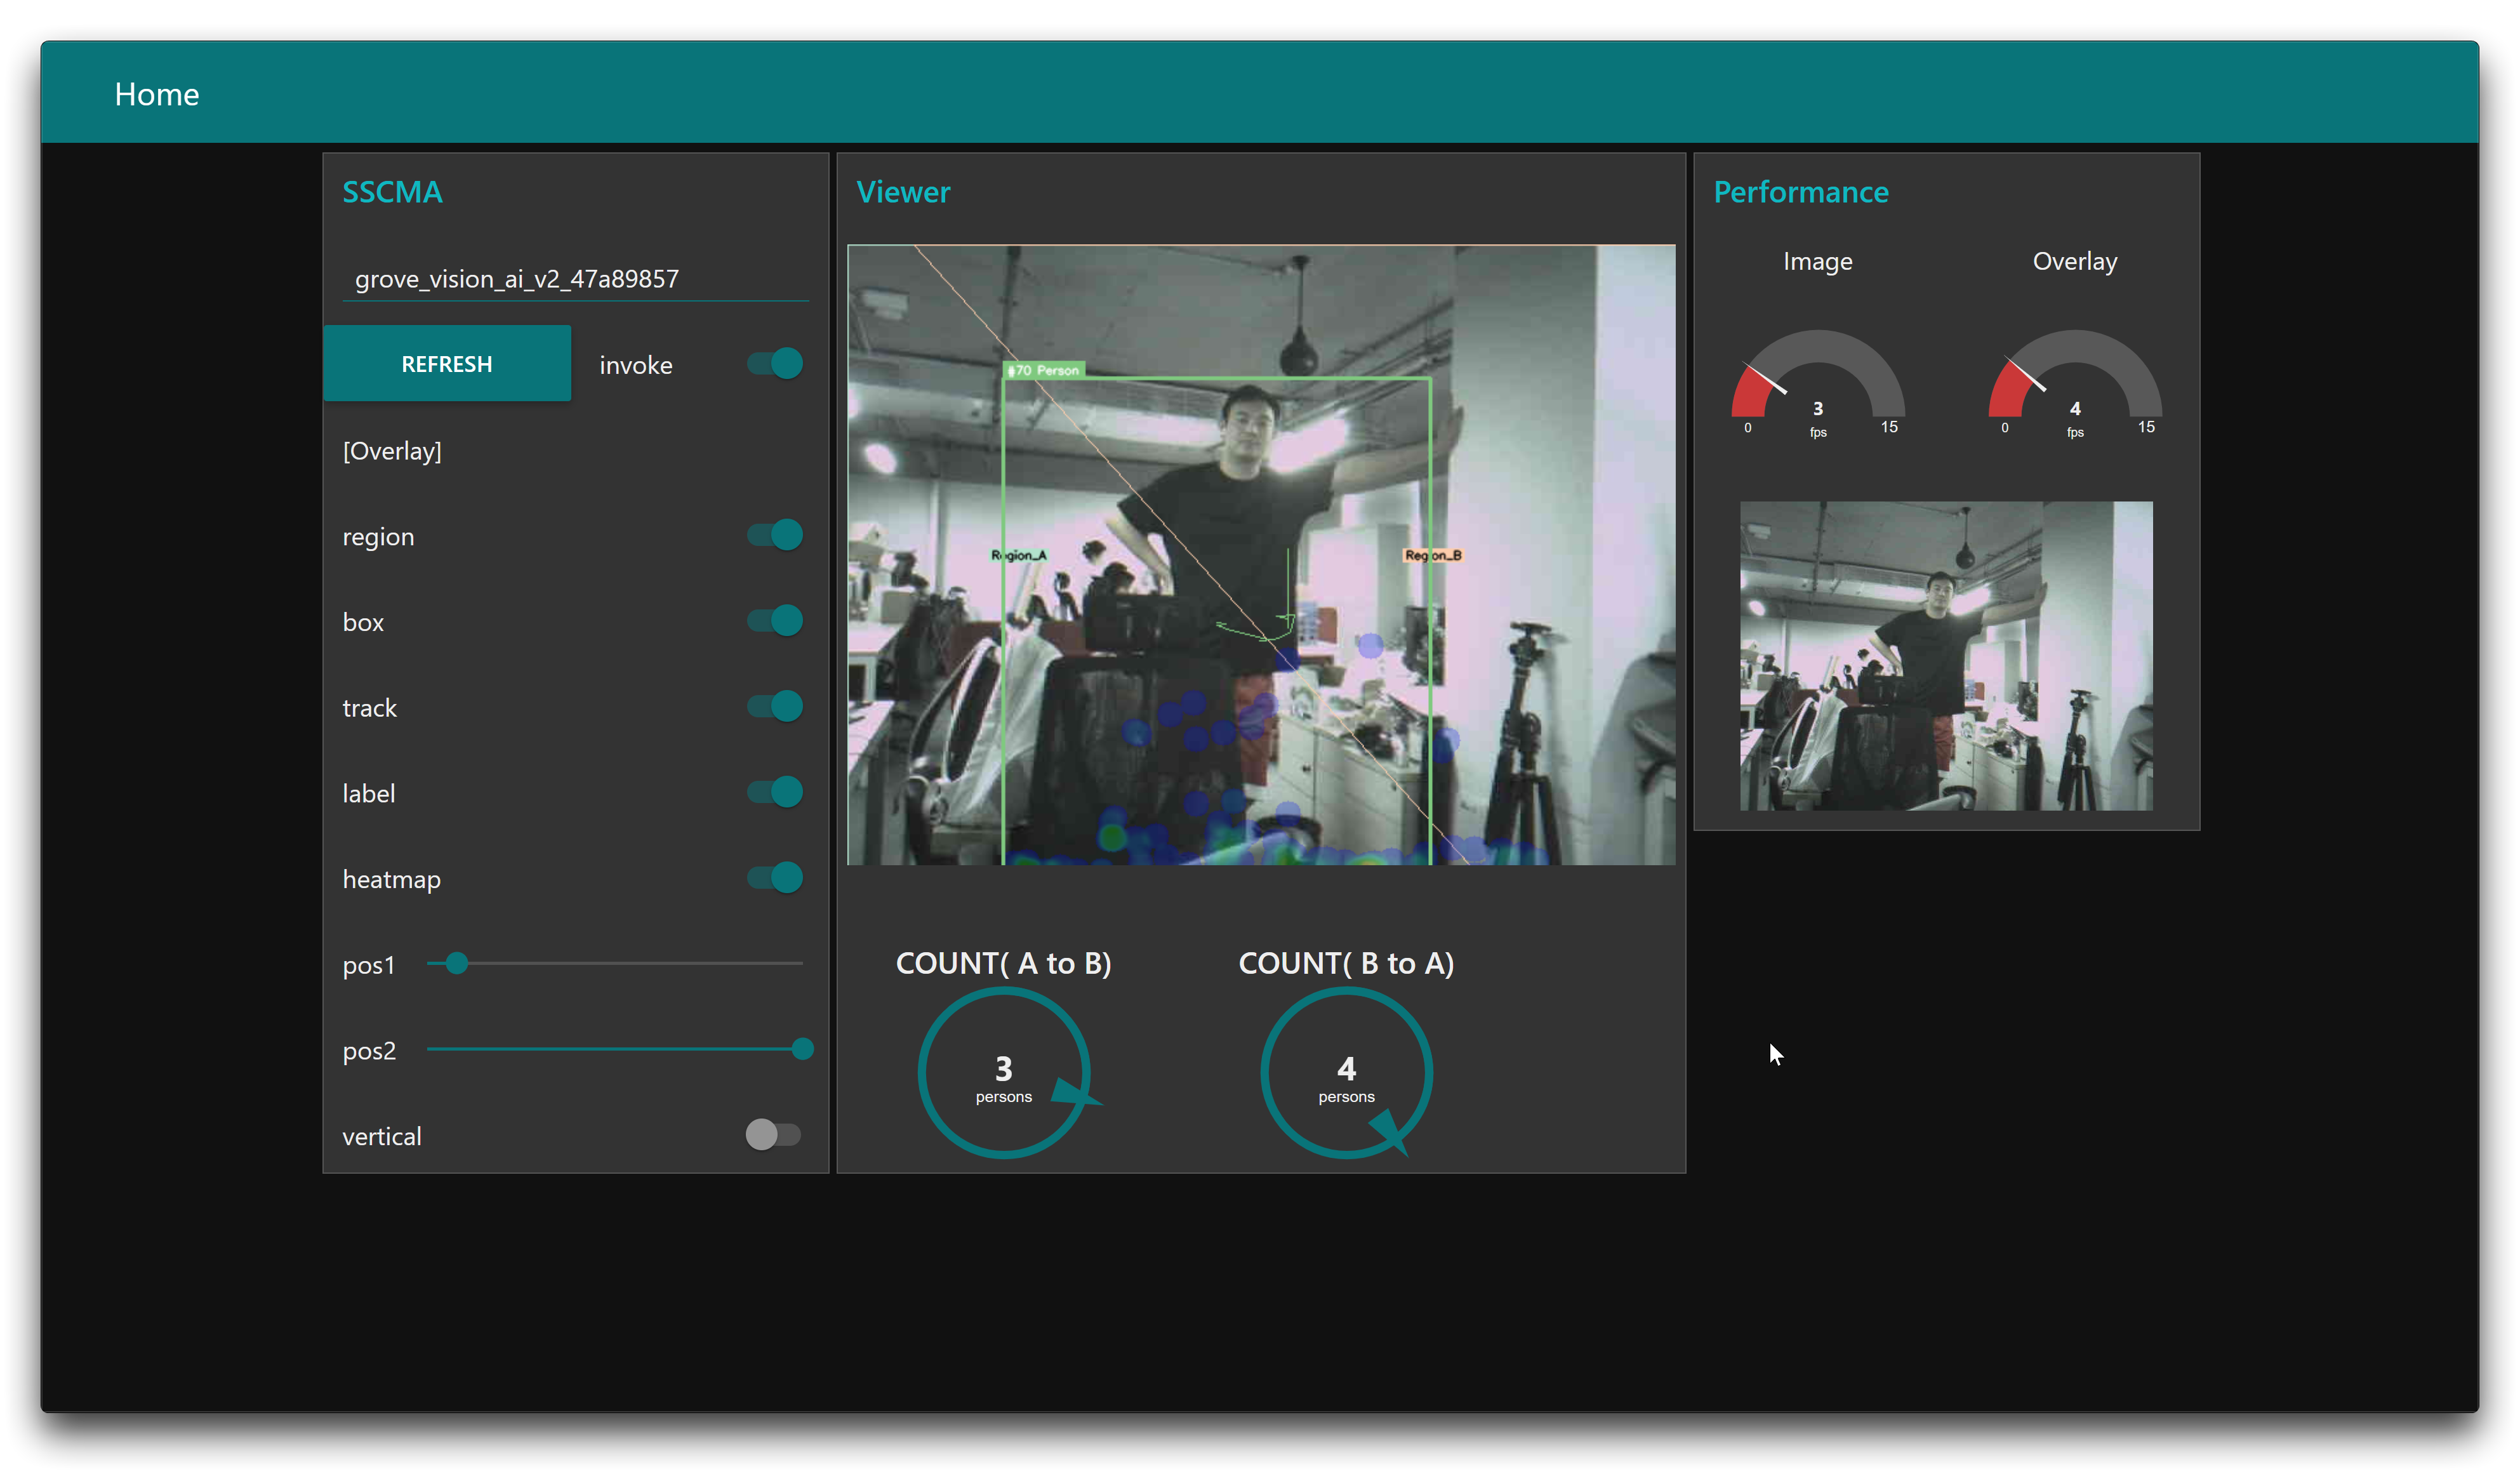
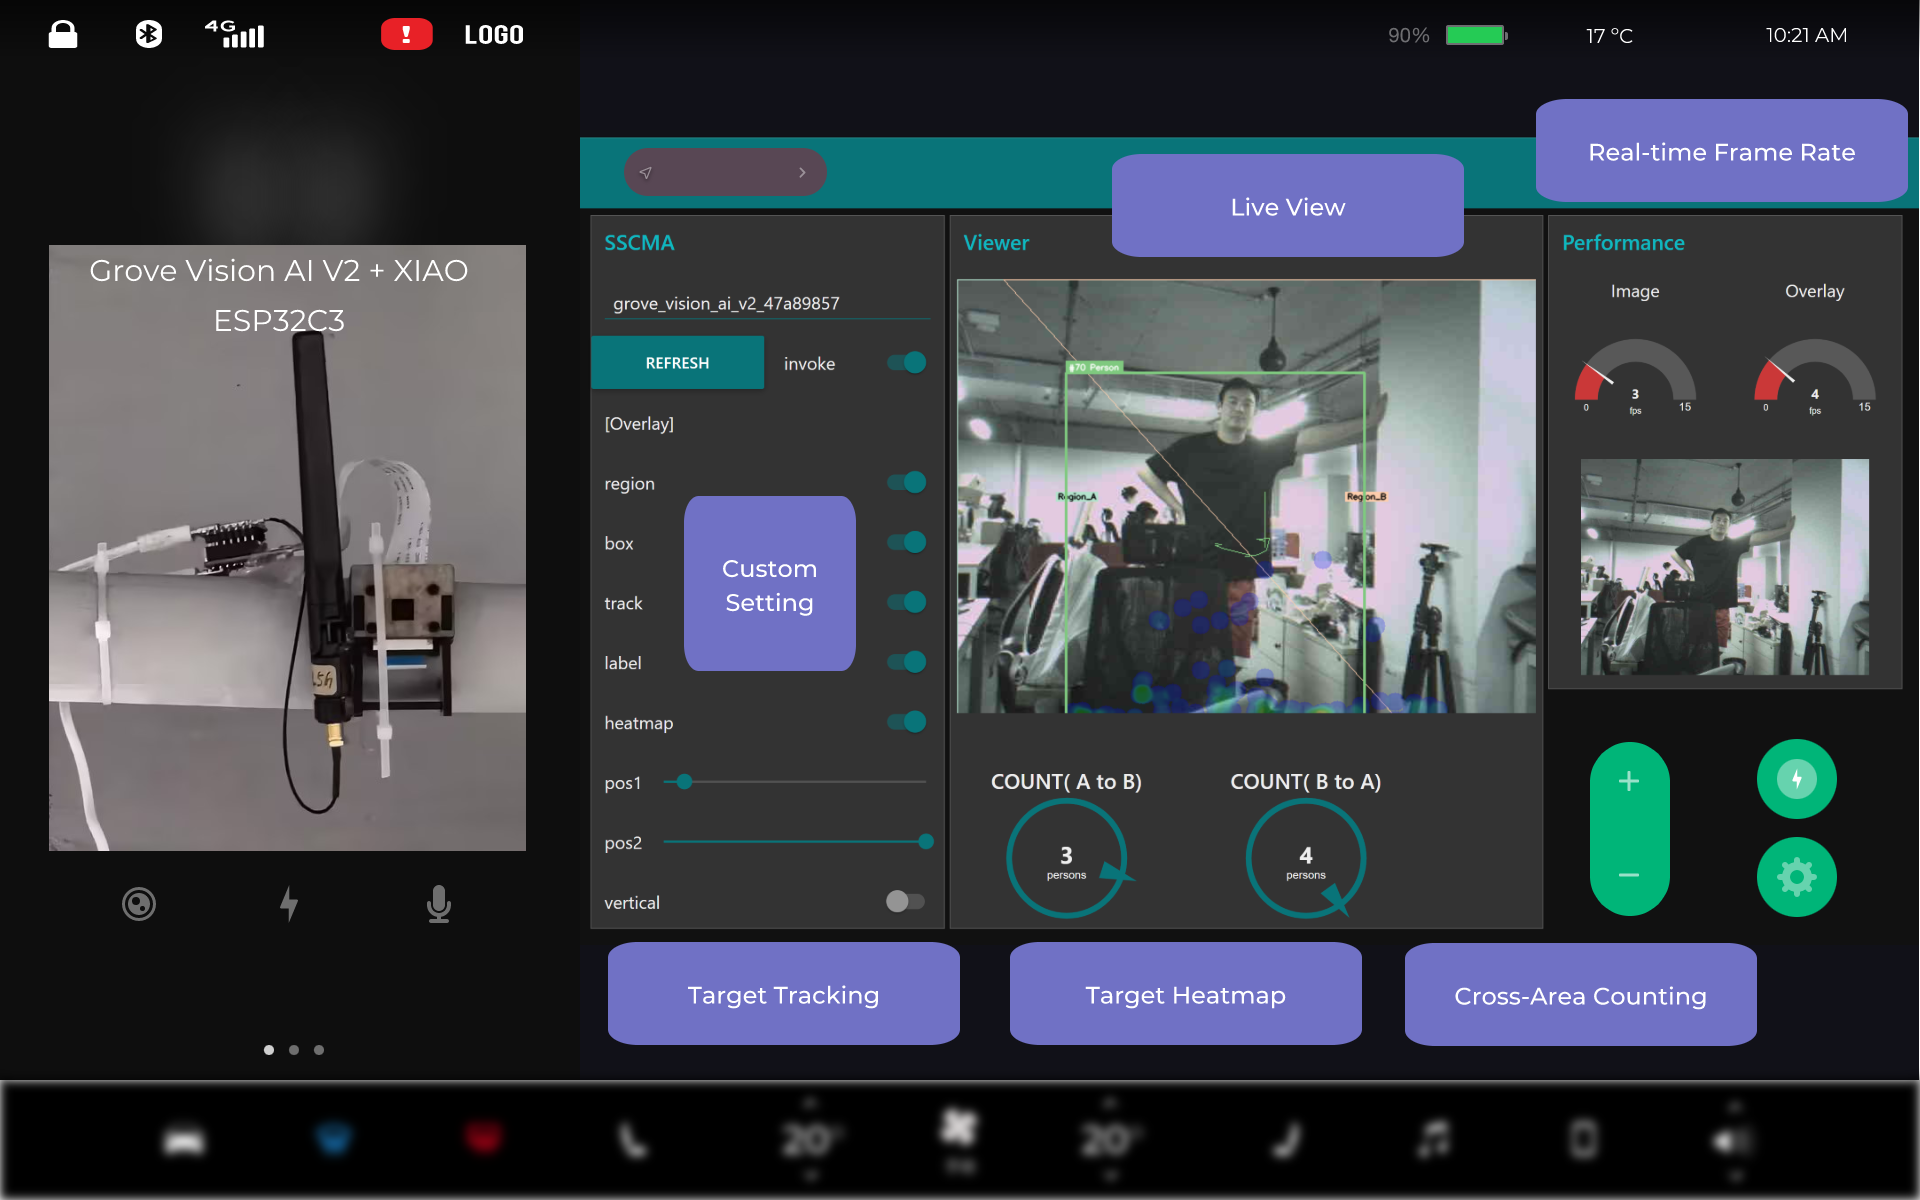
First of all, please enter your clientId in the upper left corner. then click the REFRESH button and start invoke. Then the Grove Vision AI V2 footage is pushed streaming in real time. You can enable or disable the following functions according to your actual needs.
-
region: Enabling this function starts the Cross-Area Counting function. By default, when this function is turned on, the image will be divided into two areas, area A and area B, along the orange line in the middle. When an identification frame travels from area a across the orange line to area b, then the COUNT (A to B) on the left side of the centre is increased by 1. Conversely, the COUNT (B to A) on the right side is increased by 1.
-
pos1: This is used to set the position of the left (upper) endpoint of the line segment that divides the area.
-
pos2: This is used to set the position of the right (lower) endpoint of the line segment that divides the area.
-
vertical: By default, the line segment dividing the area is the horizontal line. When this button is turned on, the line segments become vertical lines.
-
-
box: By default, the recognition box is closed. When the button is turned on, the recognition box is displayed in real time in the centre screen.
-
track: By default, the functionality of Target Tracking is turned off. If the feature is turned on, then the route taken by the recognised object is plotted as a thin green line in the middle image.
-
label: By default, the recognition label is closed. When the button is turned on, the recognition label is displayed in real time in the centre screen.
-
heatmap: By default, Target Heatmap is off. When the button is turned on, the crowd density of the currently detected area is displayed. the redder the colour of an area, the more historical occurrences of monitored objects are detected in that area, and the bluer the less.
Performance on the far right is the real-time frame rate, Image is the frame rate of the screen transfer, and Overlay is the frame rate of the screen with various functions turned on.
The screen in the centre shows the live preview screen with the various functions turned on, and the small window on the right shows the original screen.
Troubleshooting
Q1: What models does this project support?
Currently the project only supports models for target recognition, i.e., the class of models with recognition frames, and does not support, for example, models such as Human Pose Detection and Hand Pose Detection.
Q2: Why is the dashboard unresponsive after I have turned on the buttons for certain functions?
As this page is built on Node-RED, the page may not refresh in real time in some cases due to browser kernel optimisation. You can try refreshing the screen by clicking the REFRESH button and the invoke button, or refreshing the current web page.
Resources
- [GITHUB] Source code for pysscma
Tech Support & Product Discussion
Thank you for choosing our products! We are here to provide you with different support to ensure that your experience with our products is as smooth as possible. We offer several communication channels to cater to different preferences and needs.