How to use VNC remote desktop tools on the reComputer Nvidia Jetson
Introduction
VNC is a remote desktop tool that allows you to remotely control your reComputer Nvidia Jetson form ohter PC devices, with real-time access to the graphical desktop. This wiki describes how to install and use VNC on the reComputer Nvidia Jetson.
Prerequisites
- A Jetson device: suitable for all Seeed Stuido Nvidia devices
If you don't want to connect a monitor, you must use an HDMI Dummy Plug to enable remote desktop control.
-800x800.png)
Getting Started
Insatll VNC
Step 1. Install VNC on Jetson:
 sudo apt update
 sudo apt install vino
Step 2. Enable the VNC server to start each time you log in:
 cd /usr/lib/systemd/user/graphical-session.target.wants
 sudo ln -s ../vino-server.service ./.
Step 3. Configure VNC Server
 gsettings set org.gnome.Vino prompt-enabled false
 gsettings set org.gnome.Vino require-encryption false
Step 4. Set a password to access the VNC server
# Replace thepassword with your desired password
 gsettings set org.gnome.Vino authentication-methods "['vnc']"
 gsettings set org.gnome.Vino vnc-password $(echo -n 'thepassword'|base64)
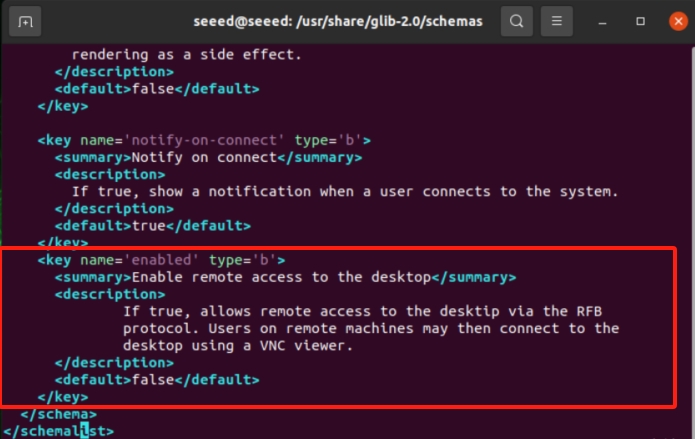
Step 5. Edit org.gnome to add a parameter for the enabled key
 cd /usr/share/glib-2.0/schemas
 sudo cp org.gnome.Vino.gschema.xml org.gnome.Vino.gschema.xml.old
 sudo vi org.gnome.Vino.gschema.xml
Paste the following code into the location below, ensuring the format is the same as below.
<key name='enabled' type='b'>
      <summary>Enable remote access to the desktop</summary>
      <description>
              If true, allows remote access to the desktip via the RFB
              protocol. Users on remote machines may then connect to the
              desktop using a VNC viewer.
      </description>
      <default>false</default>
    </key>
Compile and start
Compile:
 sudo glib-compile-schemas /usr/share/glib-2.0/schemas
 sudo reboot
start:
/usr/lib/vino/vino-server
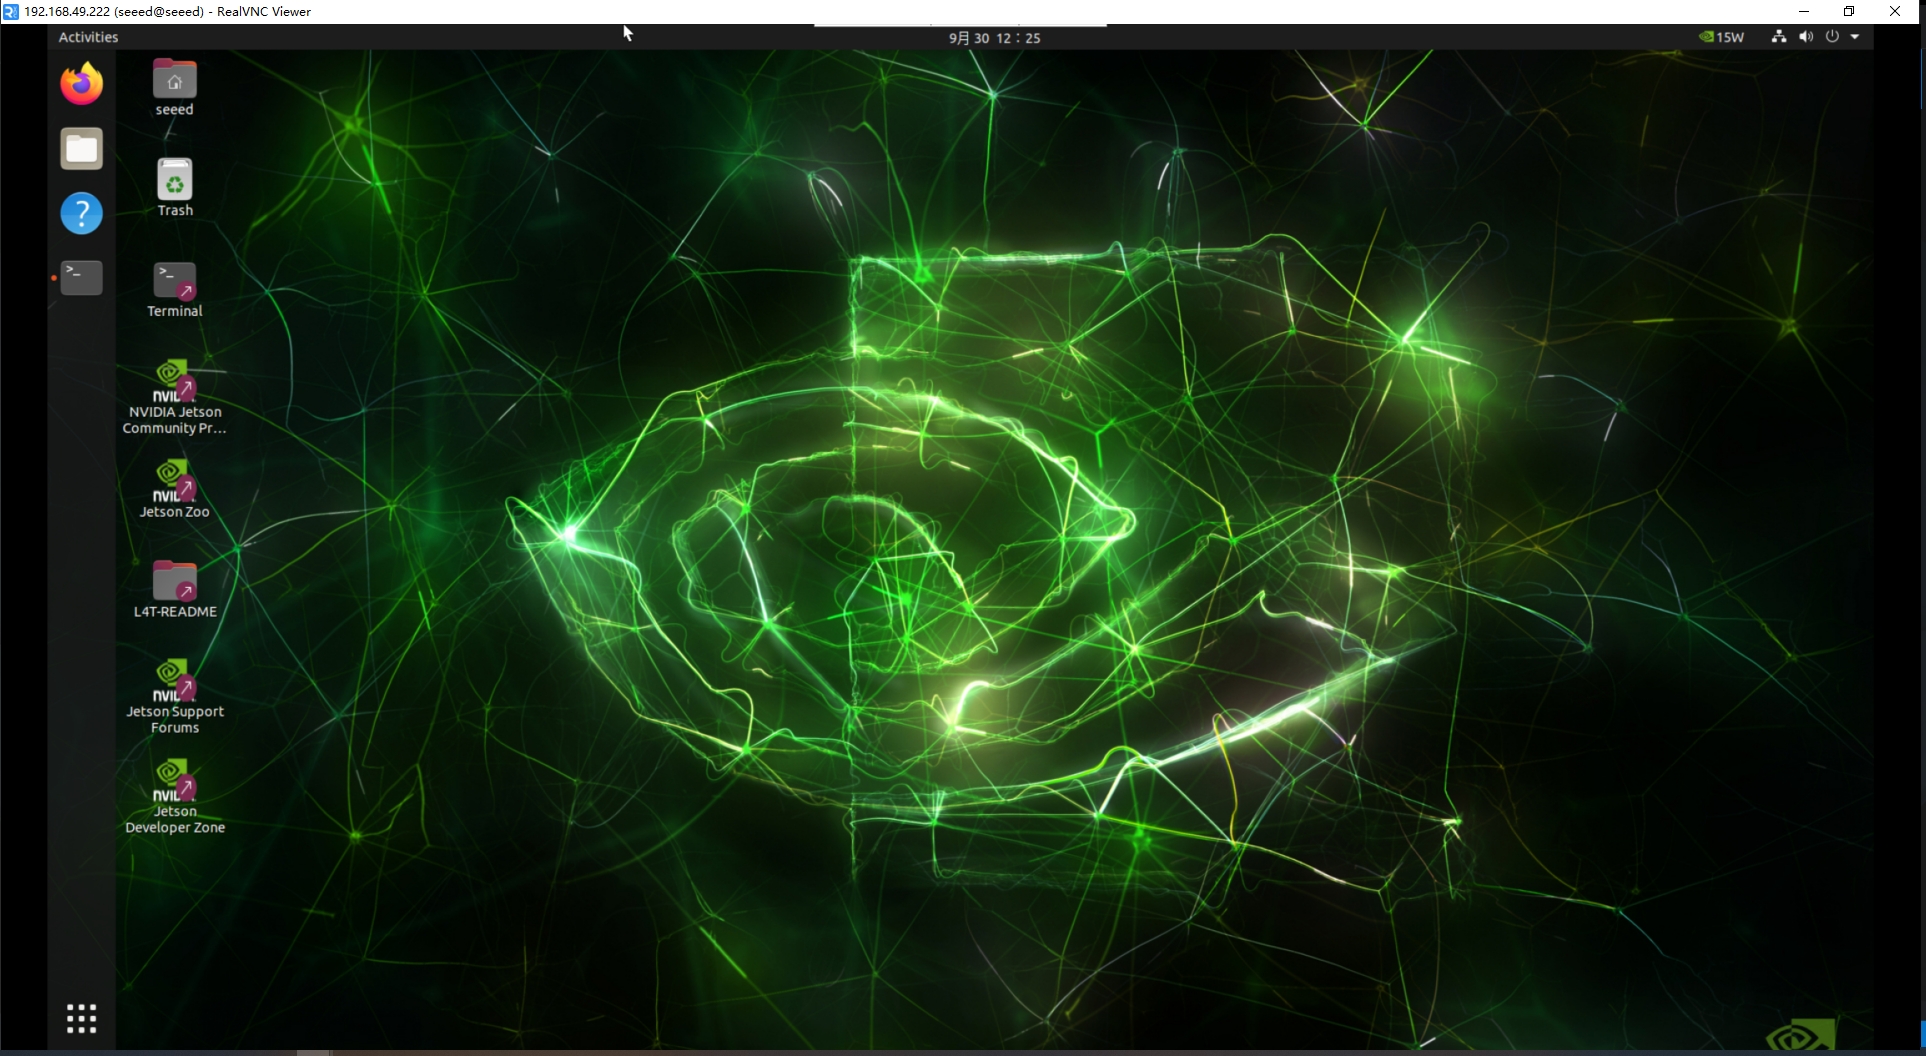
Connecting to VNC service from another computer
You’ll need to know the IP address of your Jetson developer kit to connect from another computer. Run the ifconfig command on your developer kit and note down the IP address assigned to eth0 interface if using ethernet, wlan0 interface if using wireless, or l4tbr0 if using the USB device mode Ethernet connection. Then, you need to connect an HDMI dummy plug to Jetson.
-
Windows:
- Step 1: Download and Install VNC viewer from here.
- Step 2: Launch the VNC viewer and type in the IP address of your developer kit.
- Step 3: If you have configured the VNC server for authentication, provide the VNC password.
-
MacOS:
- Step 1. Open FInder and choose Go | Go to Folder from the menu bar.
- Step 2: Enter “/System/Library/CoreServices/Applications” and click Go.
- Step 3: Open the app named Screen Sharing and enter the connection information. For example: username@.
- Step 4: Click connect.
- Step 5: If you have configured the VNC server for authentication, provide the VNC password.
-
Linux: The example below is using gvncviewer, however any of your favourite vnc clients should work as well. One popular alternative is remmina.
-
Step 1. Install gvncviewer by executing following commands:
sudo apt update
sudo apt install gvncviewer -
Step 2: Launch gvncviewer.
gvncviewer -
Step 3: If you have configured the VNC server for authentication, provide the VNC password.
-
Enable the VNC server to start each time you log in
Step 1. Search for Startup Application Preferences in the application.

Step 2. Click the Add button, and you can fill in Name and Comment fields with any text. In the Command field, add the following instruction:
nohup /usr/lib/vino/vino-server > /dev/null 2>&1 &
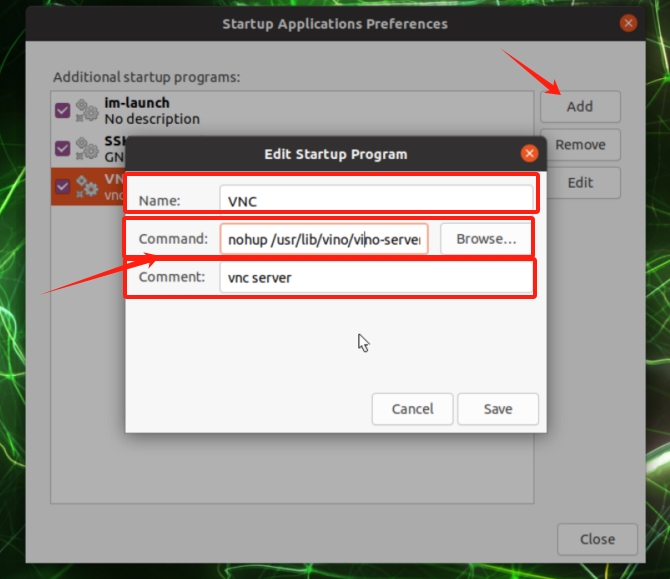
Click Save and restart the reComputer. Disconnect the monitor and connect the HDMI Dummy Plug to the Jetson. Now, You can verify through VNC.
Tech Support & Product Discussion
Thank you for choosing our products! We are here to provide you with different support to ensure that your experience with our products is as smooth as possible. We offer several communication channels to cater to different preferences and needs.