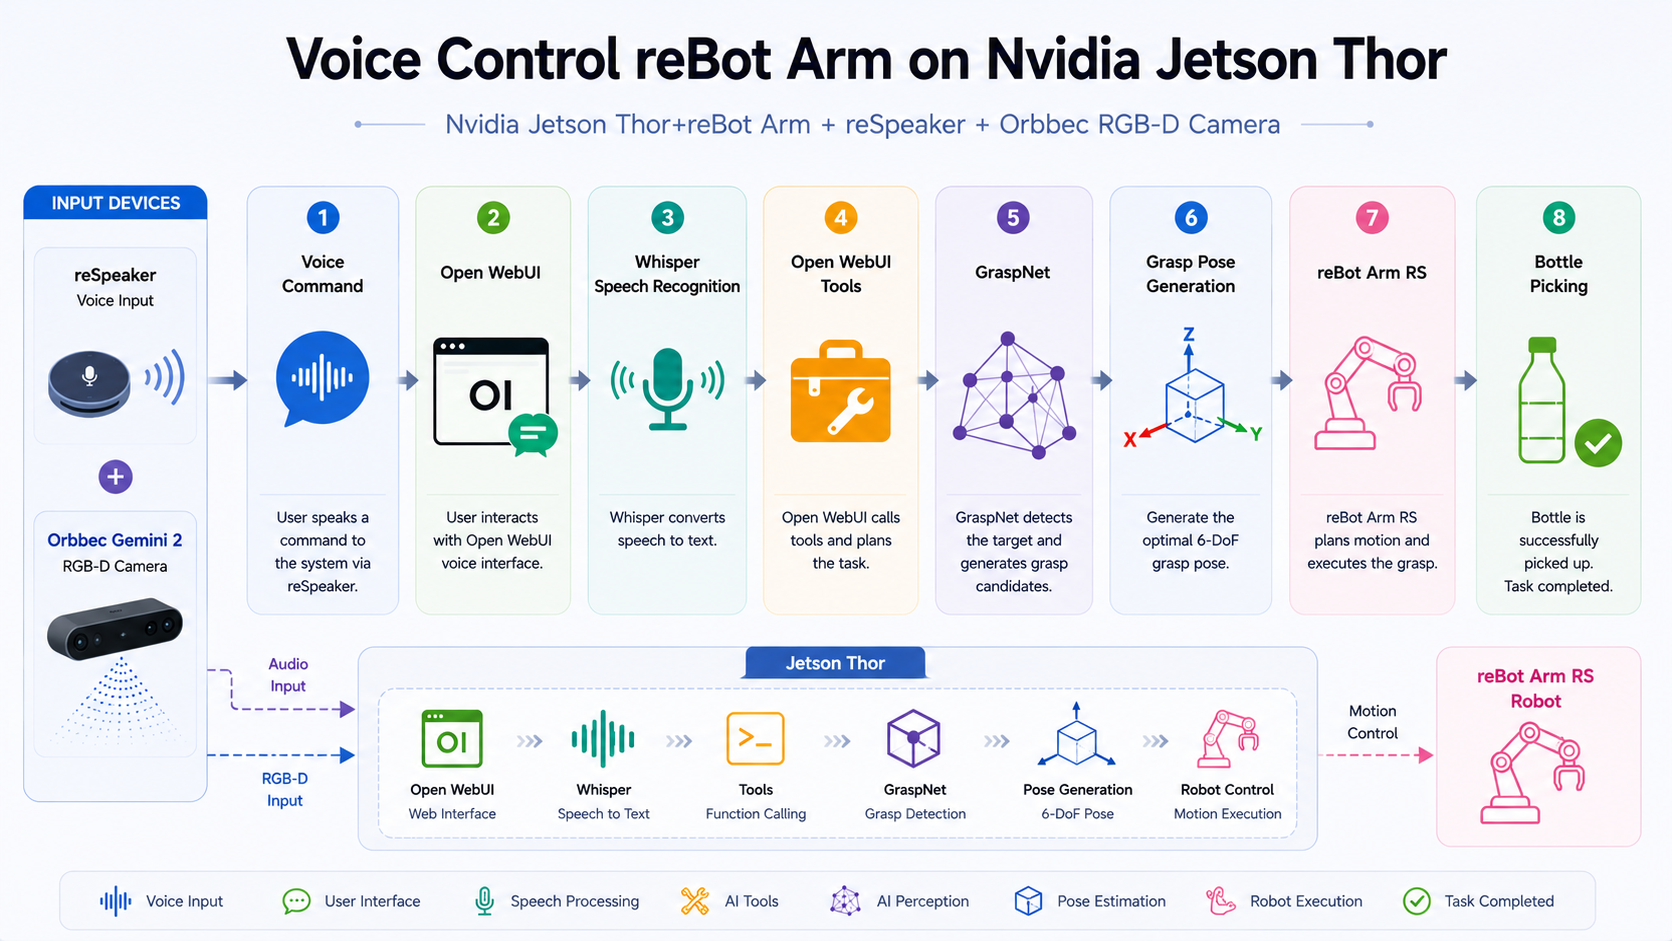
Voice Control reBot Arm B601 by Nvidia Jetson Thor
Introduction
Large Language Models (LLMs) are making robotic systems more intuitive by enabling natural language interaction. Combined with robotic vision and grasp planning, users can control robots using simple voice commands.
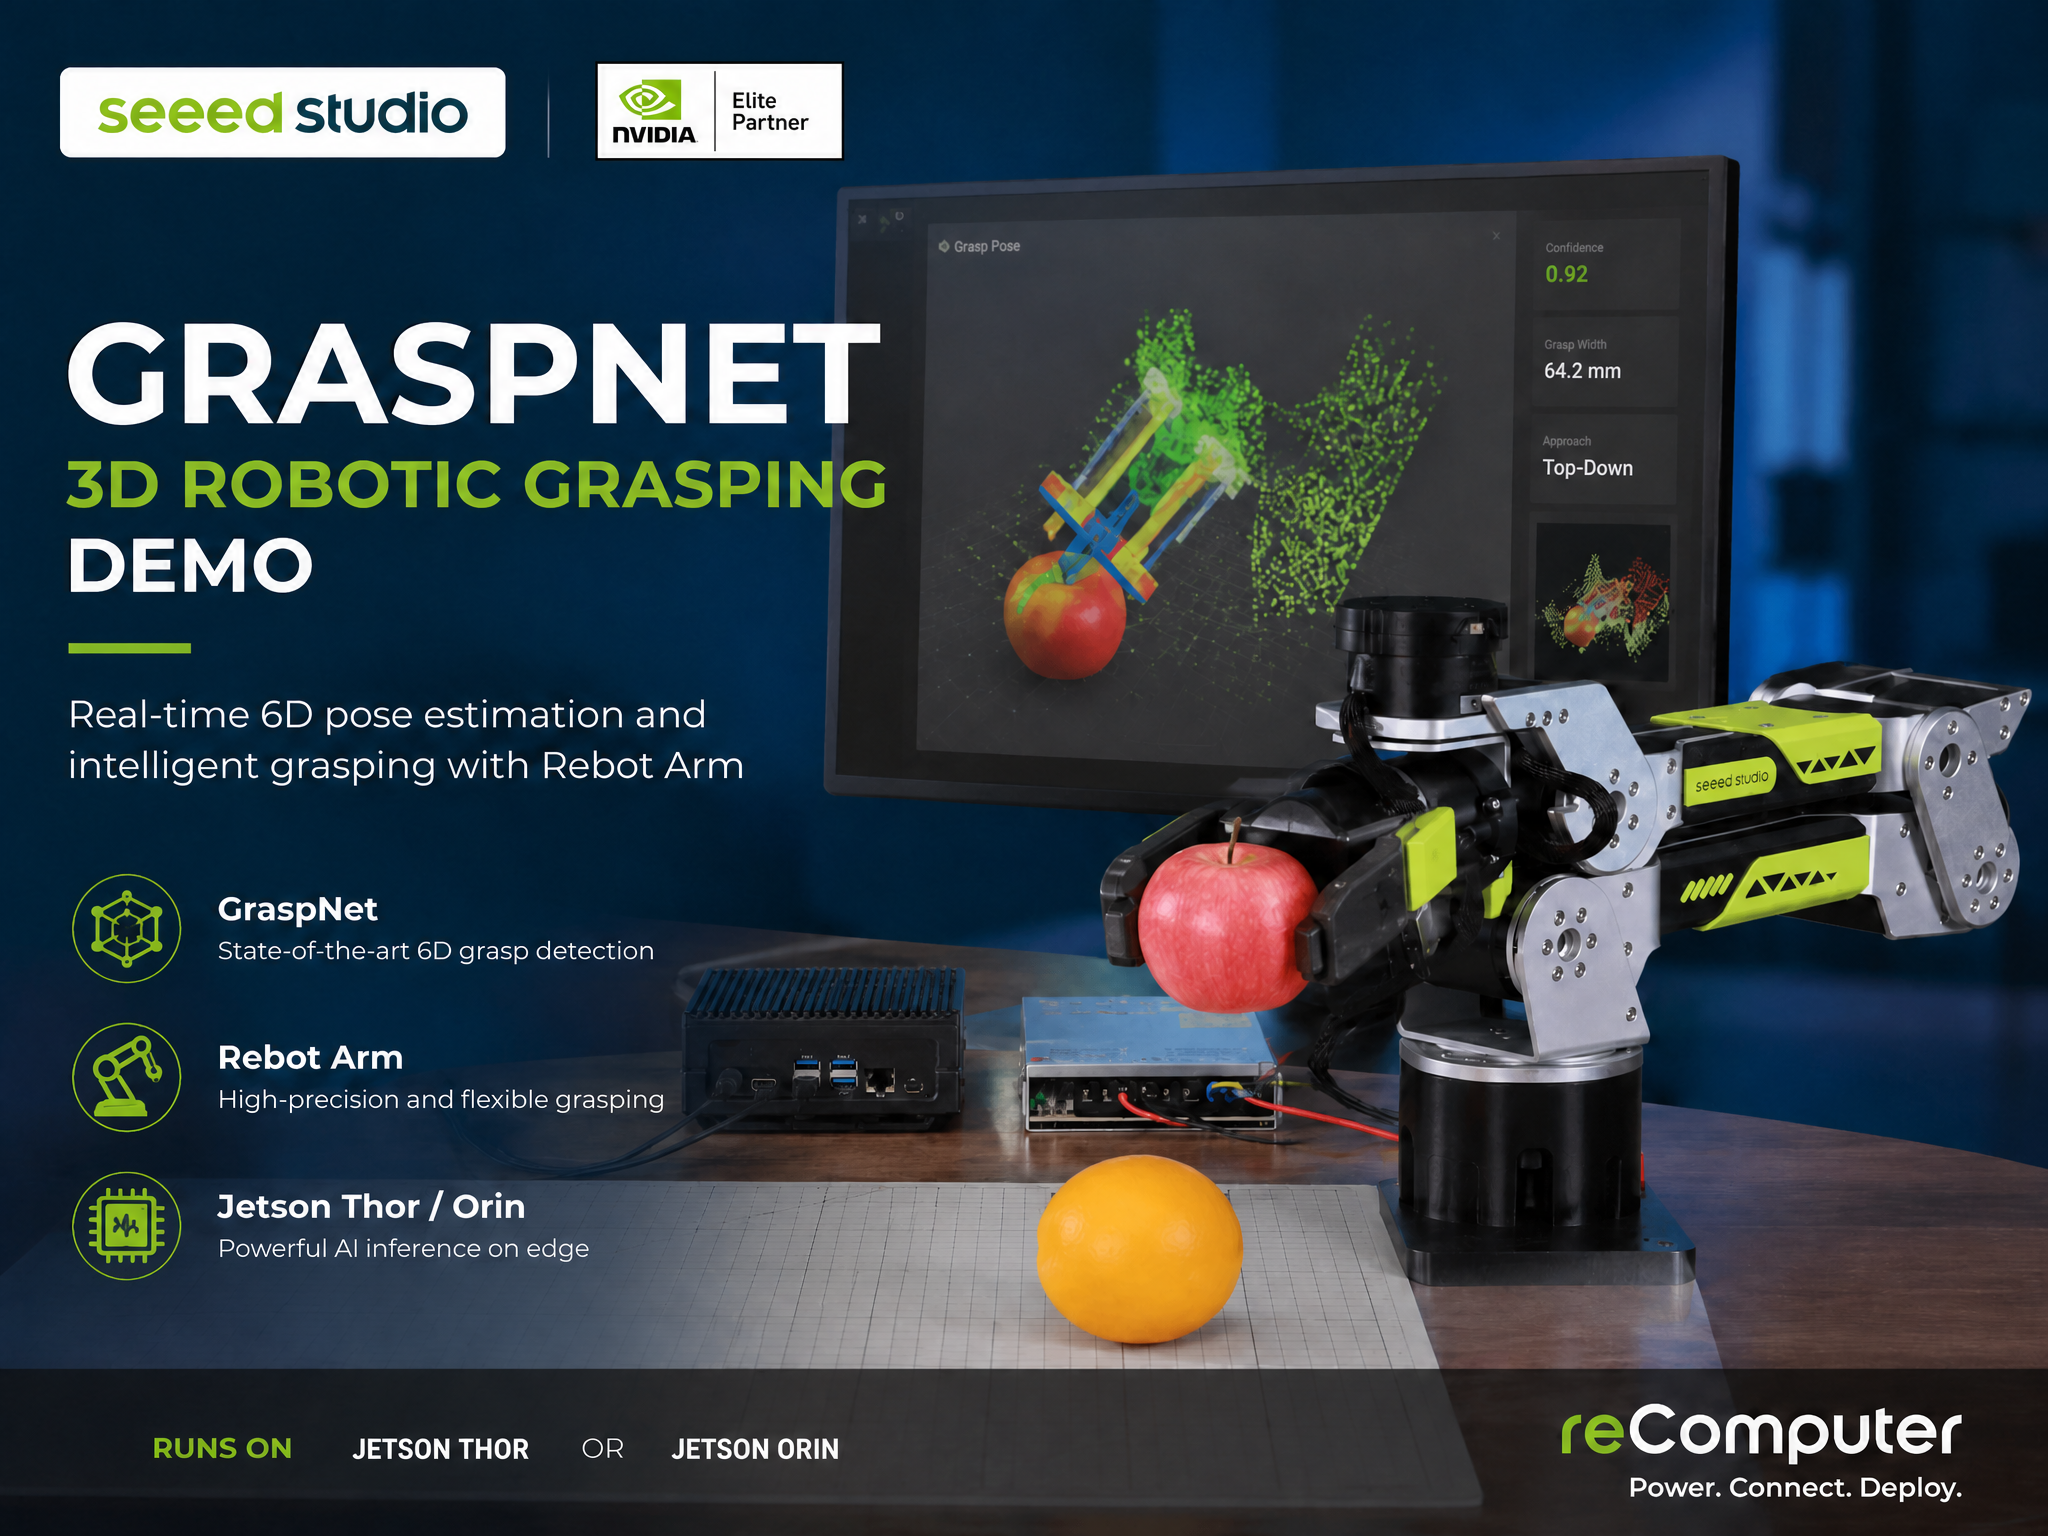
In this tutorial, we will deploy a complete voice-controlled robotic grasping system on the NVIDIA Jetson Thor platform.
Features
- Fully local AI inference on Jetson Thor
- Voice interaction using Whisper
- Local LLM powered by Ollama
- Browser-based OpenWebUI interface
- 6-DoF grasp detection using GraspNet
- Real-time robotic arm control
Workflow
Hardware Preparation
Required Hardware
- Nvidia Jetson Thor (JetPack 7.x installed)
- reBot Arm B601 DM
- USB-to-CAN adapter
- Orbbec Gemini 2 RGBD Camera
- reSpeaker
- Power supply and USB cable for the robotic arm
- USB button (optional)
| reBot Arm B601 | NVIDIA® Jetson AGX Thor™ Developer Kit | Orbbec Gemini 2 RGBD Camera | reSpeaker Flex XVF3800 Linear-4 |
|---|---|---|---|
 |  |  |  |
Hardware Connection
- Connect the camera to the Jetson Thor USB port.
- Connect the reBot Arm RS to Jetson Thor by CAN2USB module.
- Connect the USB microphone to Jetson Thor.
- Power on all devices.
Install Ollama
Step 1. Install Ollama
curl -fsSL https://ollama.com/install.sh | sh
Step 2. Download a Language Model
ollama pull nemotron3:33b
Step 3. Verify Ollama
ollama run nemotron3:33b
Deploy OpenWebUI
Step 1. Start OpenWebUI
docker run -d -p 4000:8080 \
  --add-host=host.docker.internal:host-gateway \
  -e OLLAMA_BASE_URL=http://host.docker.internal:11434 \
  -v open-webui_tt:/app/backend/data   --name open-webui_tt \
  ghcr.io/open-webui/open-webui:main
Note: The official Open WebUI Docker image does not include a push-to-talk (button-triggered voice recording) feature. If you would like to enable push-to-talk functionality, please use the following Docker image instead.
Step 2. Access the Interface
Open your browser and visit:
http://<Jetson-IP>:3000
Step 3. Connect Ollama
Configure the Ollama endpoint inside OpenWebUI.
http://host.docker.internal:11434
If Open WebUI cannot connect to Ollama properly, modify the Ollama systemd service configuration and then restart the Ollama service: /etc/systemd/system/ollama.service
[Unit]
Description=Ollama Service
After=network-online.target

[Service]
ExecStart=/usr/local/bin/ollama serve
User=ollama
Group=ollama
Restart=always
RestartSec=3
Environment="PATH=/home/seeed/.local/bin:/home/seeed/.local/bin:/home/seeed/.nvm/versions/node/v22.22.2/bin:/usr/local/sbin:/usr/local/bin:/usr/sbin:/usr/bin:/sbin:/bin:/usr/games:/usr/local/games:/snap/bin"
Environment="OLLAMA_HOST=0.0.0.0:11434"

[Install]
WantedBy=default.target
Step 4. Config the Tools
Workspace --> Tools --> New Tool
robot arm tools
"""
title: Grasp Web Robot Arm
author: seeedstudio
version: 0.3.0
description: Open WebUI tools for controlling grasp_web.py robot arm HTTP API.
requirements: requests
"""

import os
import requests
from typing import Dict, Any, List, Optional


class Tools:
    def __init__(self):
        self.base_url = os.getenv(
            "GRASP_BASE", "http://host.docker.internal:8090"
        ).rstrip("/")
        self.timeout = float(os.getenv("GRASP_TIMEOUT", "20"))

    def _json_or_text(self, r: requests.Response):
        try:
            return r.json()
        except Exception:
            return r.text

    def _get(self, path: str) -> Dict[str, Any]:
        try:
            r = requests.get(f"{self.base_url}{path}", timeout=self.timeout)
            return {
                "ok": r.ok,
                "status_code": r.status_code,
                "data": self._json_or_text(r),
            }
        except Exception as e:
            return {"ok": False, "error": str(e)}

    def _post(self, path: str, payload: Optional[dict] = None) -> Dict[str, Any]:
        try:
            r = requests.post(
                f"{self.base_url}{path}",
                json=payload or {},
                timeout=self.timeout,
            )
            return {
                "ok": r.ok,
                "status_code": r.status_code,
                "data": self._json_or_text(r),
            }
        except Exception as e:
            return {"ok": False, "error": str(e)}

    # -------------------------
    # 状态查询
    # -------------------------

    def robot_state(self) -> Dict[str, Any]:
        """
        读取机器人状态:关节角度、末端位姿、夹爪状态,包括位置、速度、力矩、是否夹住。
        这是只读操作,不会驱动机械臂。
        """
        return self._get("/robot/state")

    # -------------------------
    # 基础操作
    # -------------------------

    def reset_robot(self) -> Dict[str, Any]:
        """
        复位机器人:停止当前执行、松开夹爪、机械臂回原点。
        注意:这会驱动真实机械臂运动。
        """
        return self._post("/reset", {})

    def move_ready(self) -> Dict[str, Any]:
        """
        移动机械臂到预定义就绪位:张开夹爪并移动到就绪姿态。
        注意:这会驱动真实机械臂运动。
        """
        return self._post("/ready", {})

    # -------------------------
    # 目标类别设置
    # -------------------------

    def set_target_class(self, class_name: str) -> Dict[str, Any]:
        """
        设置目标类别,例如 bottle、cup、apple。
        设置后后端会自动触发推理更新。

        传入空字符串 "" 可以取消类别过滤,扫描全场所有检测到的物体。
        """
        if class_name is None:
            return {"ok": False, "error": "class_name must be a string"}

        return self._post("/target", {"class_name": class_name})

    def clear_target_filter(self) -> Dict[str, Any]:
        """
        取消目标类别过滤,扫描全场所有检测到的物体。
        """
        return self._post("/target", {"class_name": ""})

    # -------------------------
    # 夹爪控制
    # -------------------------

    def gripper_state(self) -> Dict[str, Any]:
        """
        读取夹爪状态:位置、速度、力矩、是否夹住。
        这是只读操作,不会驱动机械臂。
        """
        return self._post("/gripper", {"action": "state"})

    def gripper_open(self, distance_m: float = 0.09) -> Dict[str, Any]:
        """
        张开夹爪到指定距离。

        参数:
        - distance_m: 张开距离,单位米,默认 0.09

        注意:这会驱动真实夹爪。
        """
        if distance_m < 0:
            return {"ok": False, "error": "distance_m must be >= 0"}

        return self._post(
            "/gripper",
            {
                "action": "open",
                "distance_m": distance_m,
            },
        )

    def gripper_close(self) -> Dict[str, Any]:
        """
        闭合夹爪,使用非阻塞力矩模式。
        注意:这会驱动真实夹爪。
        """
        return self._post("/gripper", {"action": "close"})

    def gripper_release(self) -> Dict[str, Any]:
        """
        释放夹爪,松开并解除 HOLDING 状态。
        注意:这会驱动真实夹爪。
        """
        return self._post("/gripper", {"action": "release"})

    # -------------------------
    # 关节控制
    # -------------------------

    def joint_jog(
        self,
        joint: str,
        delta_deg: float,
        duration_s: float = 2.0,
        safety_margin_deg: float = 5.0,
    ) -> Dict[str, Any]:
        """
        单关节点动控制。

        参数:
        - joint: joint1 ~ joint6
        - delta_deg: 相对旋转角度,单位度。正数为正方向,负数为负方向
        - duration_s: 运动时间,单位秒
        - safety_margin_deg: 限位安全边距,单位度

        注意:这会驱动真实机械臂。
        """
        valid_joints = {"joint1", "joint2", "joint3", "joint4", "joint5", "joint6"}

        if joint not in valid_joints:
            return {"ok": False, "error": "joint must be one of joint1 ~ joint6"}

        if duration_s <= 0:
            return {"ok": False, "error": "duration_s must be greater than 0"}

        if safety_margin_deg < 0:
            return {"ok": False, "error": "safety_margin_deg must be >= 0"}

        return self._post(
            "/joint/jog",
            {
                "joint": joint,
                "delta_deg": delta_deg,
                "duration_s": duration_s,
                "safety_margin_deg": safety_margin_deg,
            },
        )

    def move_joints(
        self,
        joints_rad: List[float],
        duration_s: float = 3.0,
    ) -> Dict[str, Any]:
        """
        一次性设置所有 6 个关节的绝对位置。

        参数:
        - joints_rad: 6 个关节角,单位弧度
        - duration_s: 运动时间,单位秒

        关节顺序:
        [joint1, joint2, joint3, joint4, joint5, joint6]

        注意:这会驱动真实机械臂。
        """
        if not isinstance(joints_rad, list) or len(joints_rad) != 6:
            return {"ok": False, "error": "joints_rad must be a list of 6 numbers"}

        if duration_s <= 0:
            return {"ok": False, "error": "duration_s must be greater than 0"}

        return self._post(
            "/joint/move",
            {
                "joints_rad": joints_rad,
                "duration_s": duration_s,
            },
        )

    def move_zero_joints(self) -> Dict[str, Any]:
        """
        将所有关节移动到 0 位。
        注意:这会驱动真实机械臂。
        """
        return self.move_joints(
            joints_rad=[0.0, 0.0, 0.0, 0.0, 0.0, 0.0],
            duration_s=3.0,
        )

    def move_ready_joints(self) -> Dict[str, Any]:
        """
        移动到示例就绪关节位:
        [0.0, -1.0, -1.5, 0.5, 0.0, 0.0]

        注意:这会驱动真实机械臂。
        """
        return self.move_joints(
            joints_rad=[0.0, -1.0, -1.5, 0.5, 0.0, 0.0],
            duration_s=3.0,
        )

    # -------------------------
    # 末端位姿控制
    # -------------------------

    def move_pose(
        self,
        x: float,
        y: float,
        z: float,
        roll: float,
        pitch: float,
        yaw: float,
        duration: float = 3.0,
    ) -> Dict[str, Any]:
        """
        末端位姿控制。服务端会先做 IK 规划,不可达则返回错误。

        参数:
        - x, y, z: 末端位置,单位米
        - roll, pitch, yaw: 末端姿态,单位弧度
        - duration: 运动时间,单位秒

        建议先调用 ready 或 joint/move 到可达位置后,再使用 move_pose。

        注意:这会驱动真实机械臂。
        """
        if duration <= 0:
            return {"ok": False, "error": "duration must be greater than 0"}

        return self._post(
            "/move/pose",
            {
                "x": x,
                "y": y,
                "z": z,
                "roll": roll,
                "pitch": pitch,
                "yaw": yaw,
                "duration": duration,
            },
        )

    def move_ready_pose(self) -> Dict[str, Any]:
        """
        移动到默认末端就绪位:
        x=0.25, y=0.0, z=0.35, roll=0.0, pitch=1.2, yaw=0.0

        注意:这会驱动真实机械臂。
        """
        return self.move_pose(
            x=0.25,
            y=0.0,
            z=0.35,
            roll=0.0,
            pitch=1.2,
            yaw=0.0,
            duration=3.0,
        )

    def move_near_current_pose(self) -> Dict[str, Any]:
        """
        移动到从零位出发通常可达的保守末端位:
        x=0.260, y=0.0, z=0.20, roll=0.0, pitch=0.0, yaw=0.0

        注意:这会驱动真实机械臂。
        """
        return self.move_pose(
            x=0.260,
            y=0.0,
            z=0.20,
            roll=0.0,
            pitch=0.0,
            yaw=0.0,
            duration=2.0,
        )

    # -------------------------
    # 底座点动
    # -------------------------

    def base_jog(
        self,
        delta_deg: float,
        duration_s: float = 2.0,
    ) -> Dict[str, Any]:
        """
        底座点动。

        参数:
        - delta_deg: 底座旋转角度,单位度。正数为正方向,负数为负方向
        - duration_s: 运动时间,单位秒

        注意:这会驱动真实机械臂底座。
        """
        if duration_s <= 0:
            return {"ok": False, "error": "duration_s must be greater than 0"}

        return self._post(
            "/base_jog",
            {
                "delta_deg": delta_deg,
                "duration_s": duration_s,
            },
        )

    # -------------------------
    # 一键自动抓取
    # -------------------------

    def auto_grasp(
        self,
        class_name: str = "bottle",
        max_retries: int = 10,
        retry_interval_s: float = 1.5,
    ) -> Dict[str, Any]:
        """
        一键自动抓取。

        流程:
        1. 设置目标类别
        2. 自动循环推理
        3. 检测到目标后执行夹取

        后端会在后台运行抓取流程。
        可通过 robot_state 查看进度。

        参数:
        - class_name: 目标类别,例如 bottle。空字符串表示扫描全场
        - max_retries: 最大重试次数
        - retry_interval_s: 每次重试间隔,单位秒

        注意:这会驱动真实机械臂。
        """
        if max_retries <= 0:
            return {"ok": False, "error": "max_retries must be greater than 0"}

        if retry_interval_s <= 0:
            return {"ok": False, "error": "retry_interval_s must be greater than 0"}

        return self._post(
            "/auto_grasp",
            {
                "class_name": class_name,
                "max_retries": max_retries,
                "retry_interval_s": retry_interval_s,
            },
        )

    # -------------------------
    # 视频流
    # -------------------------

    def stream_url(self) -> Dict[str, Any]:
        """
        返回 MJPEG 视频流地址。
        不会驱动机械臂。
        """
        return {
            "ok": True,
            "stream_url": f"{self.base_url}/stream.mjpg",
        }
Deploy the reBot Arm Backend Service
Step 1. Install system packages and Miniconda
sudo apt update
sudo apt install -y git wget curl build-essential cmake libusb-1.0-0-dev python3-pip

wget https://repo.anaconda.com/miniconda/Miniconda3-latest-Linux-aarch64.sh
bash Miniconda3-latest-Linux-aarch64.sh
source ~/.bashrc
Step 2. Clone the project
git clone https://github.com/jjjadand/reBot-DevArm-Grasp.git rebot_grasp-jetson
cd rebot_grasp-jetson
If you are using an internal package instead of the public repository, copy that project directory to Jetson and run the remaining commands from the project root.
Step 3. Create the Python environment
Use Python 3.10 on JetPack 6.x. Use Python 3.12 on JetPack 7.x / Thor.
# JetPack 6.x
conda create -y -n graspnet python=3.10

# JetPack 7.x / Thor
# conda create -y -n graspnet python=3.12

conda activate graspnet
python -m pip install -U pip wheel setuptools
Check your JetPack and CUDA versions:
cat /etc/nv_tegra_release
nvcc --version
Step 4. Install Jetson-compatible PyTorch
Do not install the generic PyPI CPU/GPU PyTorch package on Jetson. Install a wheel that matches your JetPack, Python, and CUDA versions. For reComputer users, you can also follow the dedicated guide: Install Pytorch for reComputer Jetson.
Common starting points are:
# JetPack 6.x, CUDA 12.x, Python 3.10
pip install --extra-index-url https://pypi.jetson-ai-lab.io/jp6/cu126 torch torchvision

# JetPack 7.x / Thor, CUDA 13.x, Python 3.12
# pip install --extra-index-url https://pypi.jetson-ai-lab.io/sbsa/cu130 torch torchvision
Verify CUDA from Python:
python - <<'PY'
import torch
print("torch:", torch.__version__)
print("cuda available:", torch.cuda.is_available())
print("device:", torch.cuda.get_device_name(0) if torch.cuda.is_available() else "none")
PY
cuda available must be True before continuing.
Step 5. Install Python dependencies
pip install -r requirements-graspnet-jetson.txt
Step 6. Install robot, GraspNet, and GraspNet API SDKs
mkdir -p sdk

git clone https://github.com/vectorBH6/reBotArm_control_py.git sdk/reBotArm_control_py
pip install -e sdk/reBotArm_control_py

git clone https://github.com/graspnet/graspnet-baseline.git sdk/graspnet-baseline
git clone https://github.com/graspnet/graspnetAPI.git sdk/graspnetAPI
pip install -e sdk/graspnetAPI
Download the GraspNet pretrained checkpoint from the GraspNet download page and place it here:
sdk/graspnet-baseline/checkpoints/checkpoint-rs.tar
Step 7. Set CUDA paths and build GraspNet CUDA operators
Set the CUDA path for your JetPack version:
# JetPack 6.x example
export CUDA_HOME=/usr/local/cuda-12.6

# JetPack 7.x / Thor example
# export CUDA_HOME=/usr/local/cuda-13.0

export PATH="$CUDA_HOME/bin:$PATH"
export LD_LIBRARY_PATH="$CUDA_HOME/lib64:$LD_LIBRARY_PATH"
Build the CUDA extensions used by GraspNet:
bash scripts/install_graspnet_cuda_ops.sh
bash scripts/install_graspnet_cuda_ops.sh --check
If you change JetPack, Python, CUDA, or PyTorch later, rebuild with:
bash scripts/install_graspnet_cuda_ops.sh --force
Step 8. Install the Orbbec camera SDK
The project includes a helper that installs pyorbbecsdk2 into the active Python environment:
bash scripts/install_pyorbbecsdk.sh
If you need to build the SDK locally, clone the source tree first and run the source mode:
git clone https://github.com/orbbec/pyorbbecsdk.git sdk/pyorbbecsdk
bash scripts/install_pyorbbecsdk.sh --from-source
Install Orbbec udev rules when the SDK source tree is available:
sudo bash sdk/pyorbbecsdk/scripts/env_setup/install_udev_rules.sh
sudo udevadm control --reload-rules
sudo udevadm trigger
Step 9. Download YOLO weights and export TensorRT on the target Jetson
TensorRT engine files are device-specific. Always export the .engine on the Jetson that will run the demo.
mkdir -p models
wget https://github.com/ultralytics/assets/releases/download/v8.3.0/yolo11n-seg.pt -O models/yolo11n-seg.pt

yolo export model=models/yolo11n-seg.pt format=engine imgsz=640 half=True device=0 workspace=4
The expected output is:
models/yolo11n-seg.engine
If FP16 export fails on your platform, export without half=True:
yolo export model=models/yolo11n-seg.pt format=engine imgsz=640 device=0 workspace=4
Verify and Calibrate
Run these checks in order before attempting a real grasp.
1. Check the RGB-D camera
conda activate graspnet
cd ~/rebot_grasp-jetson

python scripts/verify_pyorbbec_stream.py
python scripts/verify_pyorbbec_stream.py --preview --seconds 10
The text-only check should report RGB and depth frame information. The preview check should show RGB and depth windows when a desktop display is available.
2. Check the robot connection
Start with read-only mode:
python scripts/verify_rebot_arm_motion.py --read-only
Then run a small joint6 jog after confirming the arm path is clear:
python scripts/verify_rebot_arm_motion.py --deg 5
3. Check the GraspNet stack
python scripts/verify_graspnet_stack.py
If the camera is not connected yet but you only want to check Python, CUDA, GraspNet, and YOLO files:
python scripts/verify_graspnet_stack.py --skip-camera
4. Perform eye-in-hand calibration
This project uses eye-in-hand calibration: the camera is mounted on the end effector, and the ArUco marker is fixed on the table. The default config expects a DICT_4X4_50, ID 0, 0.1 m marker. The repository includes printable marker files such as aruco100x100.pdf.
Automatic collection:
python scripts/collect_handeye_eih.py
Manual collection with gravity compensation:
python scripts/collect_handeye_eih.py --manual
Calibration results are saved under the active camera directory:
config/calibration/orbbec_gemini2/hand_eye.npz
config/calibration/orbbec_gemini2/intrinsics.npz
Verify the saved calibration:
python scripts/verify_handeye_calibration.py
Recalibrate whenever the camera mount, gripper, ArUco board size, or table geometry changes.
Start the applicationnch
The Web UI is the recommended first user interface. It provides live MJPEG video, target selection, grasp preview, real grasp execution, compensation tuning, base jog, gripper control, ready pose, and reset operations.
Start in preview mode first. This does not execute real robot motion:
conda activate graspnet
cd ~/rebot_grasp-jetson

python scripts/grasp_web.py \
  --host 0.0.0.0 \
  --port 8000 \
  --num-point 12000 \
  --cloud-crop-nsample 32
Open the Web UI from a browser:
http://<jetson_ip>:8000
Use preview mode to confirm camera stream, YOLO detections, target filtering, and grasp-point generation. Click the infer or refresh control in the Web UI to update GraspNet preview.
Open the Open WebUI page (http://<jetson_ip>:4000). If you have enabled the Robot Arm Tools in the chat, you can control the robot arm directly using natural language commands.
Feature Demo
References
- https://docs.nvidia.com/jetson/agx-thor-devkit/user-guide/latest/index.html
- https://github.com/Seeed-Projects/reBot-DevArm
- https://github.com/graspnet/graspnet-baseline.git
- https://github.com/vectorBH6/reBotArm_control_py
- https://github.com/orbbec/pyorbbecsdk.git
- https://wiki.seeedstudio.com/install_torch_on_recomputer/
Tech Support & Product Discussion
Thank you for choosing our products! We are here to provide you with different support to ensure that your experience with our products is as smooth as possible. We offer several communication channels to cater to different preferences and needs.