SenseCAP Watcher Hardware Overview
In this section of the Wiki, we will focus on the hardware components of the SenseCAP Watcher, its construction and the use of additional accessories.
Specification
| Hardware | Description |
|---|---|
| MCU | ESP32-S3 @240MHz 8MB PSRAM |
| Built-in AI Processor | Himax HX6538 (Cortex M55 + Ethos-U55) |
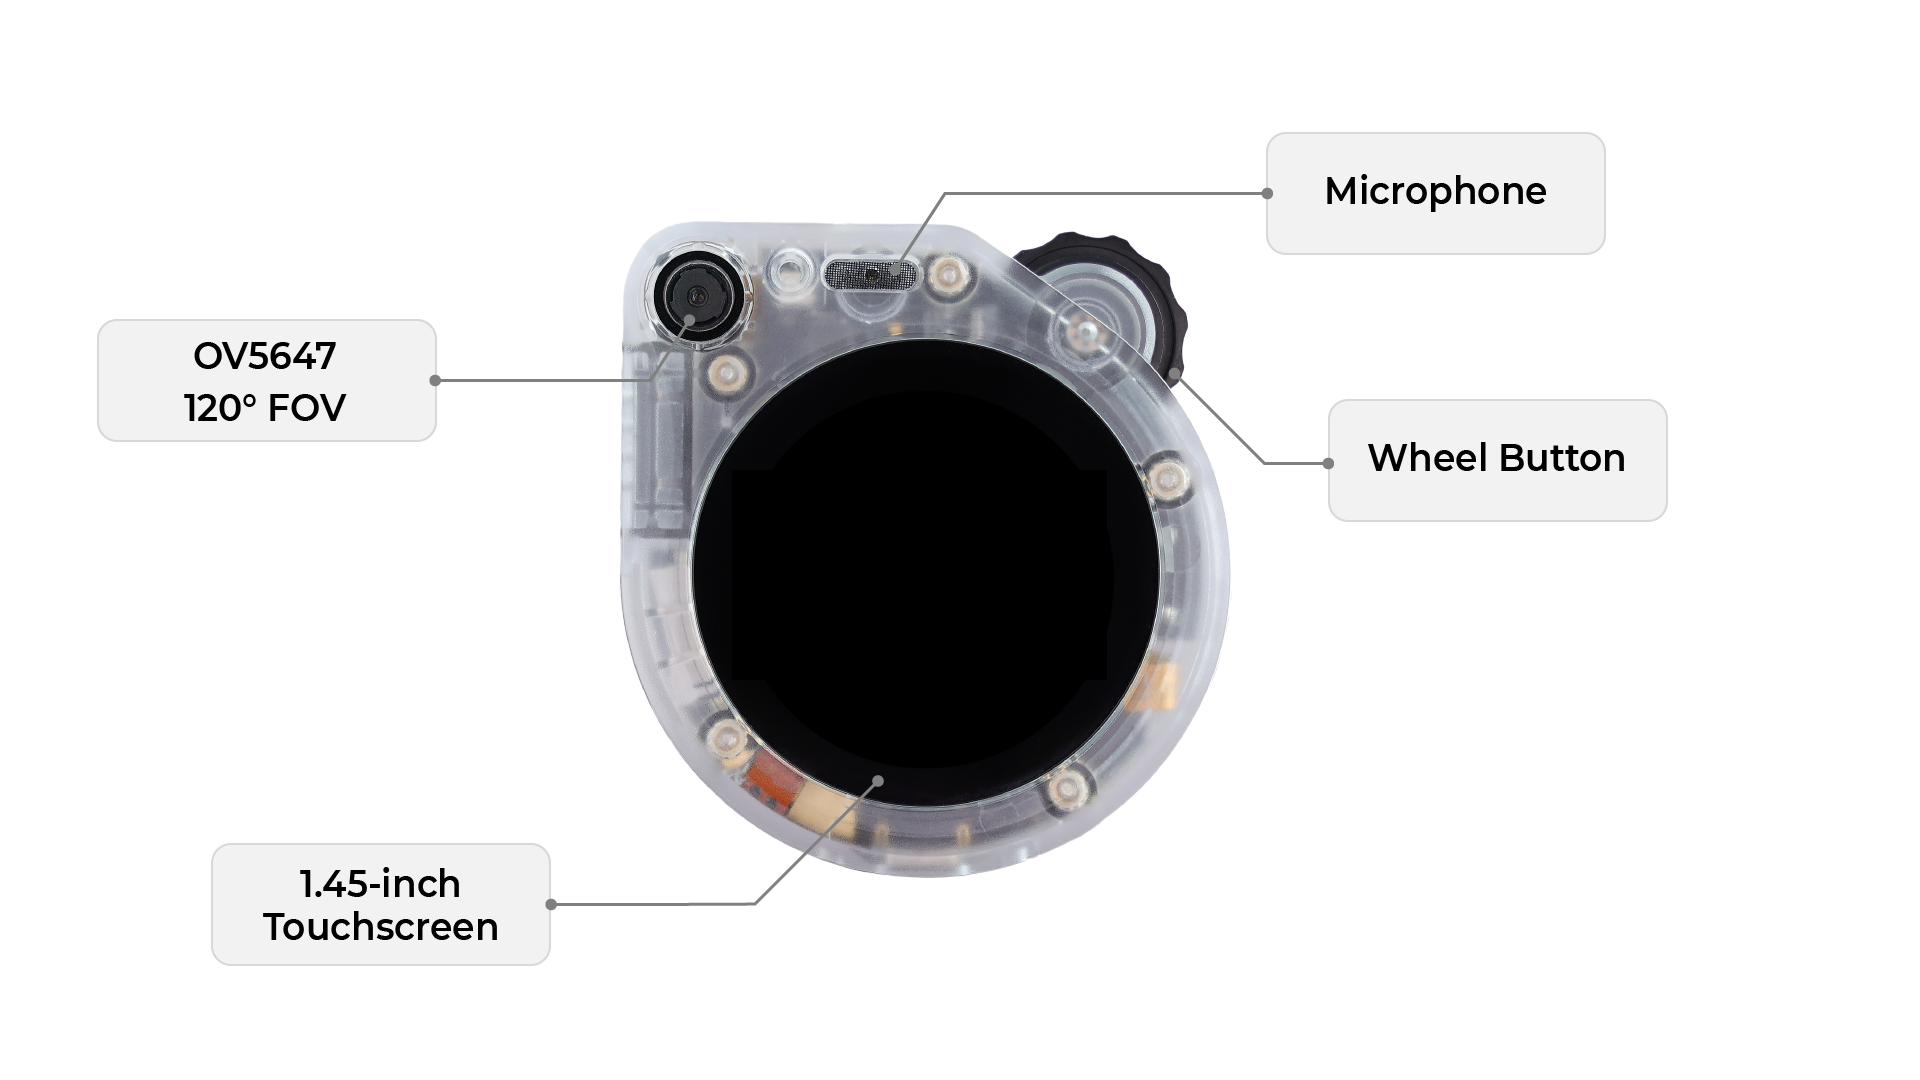
| Camera | OV5647 120° FOV Fixed Focal 3 meters |
| Wi-Fi | IEEE 802.11b/g/n-compliant 2.4GHz Band Wireless Range: Up to 100 meters (open space test) |
| Bluetooth LE | Bluetooth 5 |
| Antenna | Built-in Wi-Fi and BLE antenna |
| Display | Touchscreen with 1.45-inch, 412×412 resolution |
| Microphone | Single microphone |
| Speaker | 1W speaker output |
| Wheel | Supports scrolling up&down and button |
| LED | 1xRGB light for indication |
| microSD Card Slot | Supports up to 32GB FAT32 microSD card |
| Flash | 32MB Flash for ESP32-S3 16MB Flash for Himax HX6538 |
| Extension Interface | 1xGrove IIC interface 2x4 Female header(1xIIC, 2xGPIO, 2xGND, 1x3.3V_OUT, 1x5V_IN) |
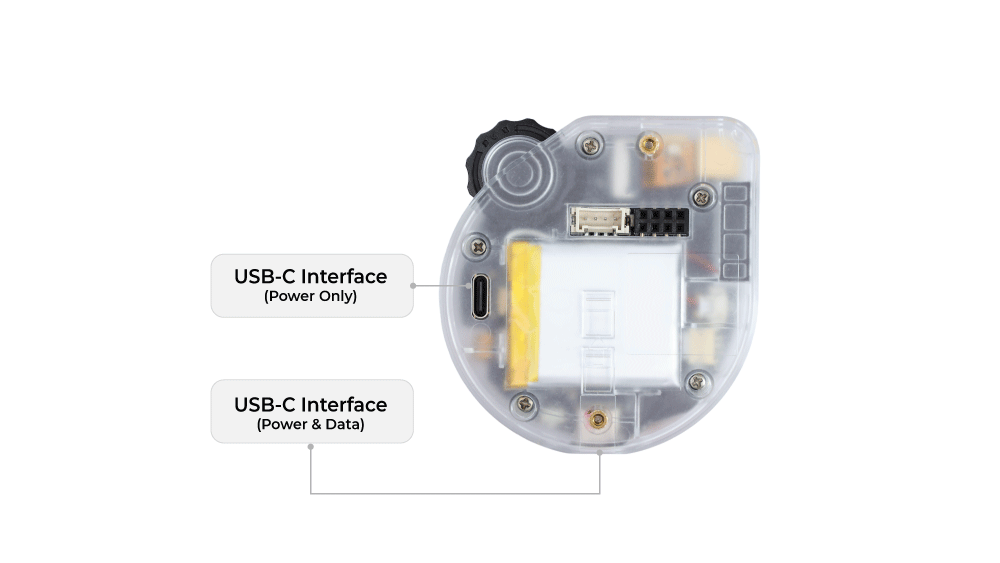
| USB-C | 1x USB-C on the back(power supply only) 1x USB-C on the bottom(power supply and programming) |
| Reset Button | 1xRST button in the bottom hole |
| Power Supply | 5V DC power |
| Battery | 3.7V 400mAh Li-ion battery as backup power |
| Operating Temperature | 0 ~ 45°C |
| Mounting Bracket | Supports wall, desktop and bracket installation 1 x Universal wheel and base plate with adhesive 1 x 1/4" Female adapter set |
Features
- High efficiency architecture with on-device + server AI processing
- Extensive with Infinite Modal
- Ensuring Privacy with Open Source and On-Premise Deployment
- Customizable Emotional Responses
Front View
Back View

Inside

Mounting Interface
On the back of your Watcher device, you will find a Mounting Bracket that allows you to securely attach the device to various surfaces or accessories. Currently, we offer two types of mounting brackets to accommodate different placement needs:
Please note that the Watcher body only comes with the 360° Rotate Bracket. if you require the 1/4 Thread Tripod Bracket, please purchase it separately.
360° Rotate Bracket
- This bracket is designed for easy installation on walls or other vertical surfaces.
- It provides a full 360 degrees of rotation, allowing you to adjust the orientation of your Watcher device to achieve the desired viewing angle.
- The rotate bracket offers flexibility in positioning and ensures a secure attachment to the wall.
1/4 Thread Tripod Bracket
- This bracket is ideal for placing your Watcher on flat surfaces such as desks, tables, or shelves.
- It features a standard 1/4-inch thread, making it compatible with most tripods and other mounting accessories.
- The tripod bracket provides stability and allows you to position your Watcher at various heights and angles, depending on your specific needs.
To use either of these mounting brackets, follow these general steps:
-
Choose the appropriate bracket based on your intended placement location (wall or flat surface).
-
Attach the selected bracket to the Mounting Bracket on the back of your Watcher device. Ensure a secure connection to prevent any accidental detachment.
-
For the 360° Rotate Bracket:
- Identify the desired location on the wall where you want to install your Watcher.
- Use the provided screws and anchors (if necessary) to securely attach the bracket to the wall.
- Adjust the orientation of your Watcher by rotating it to the desired angle.
-
For the 1/4 Thread Tripod Bracket:
- Select a stable flat surface where you want to place your Watcher.
- If using a tripod, attach the tripod to the bracket using the 1/4-inch thread.
- Adjust the height and angle of the tripod to achieve the optimal viewing position for your Watcher.
-
Once your Watcher is securely mounted using either bracket, you can proceed to connect it to power and configure it according to your preferences.
By offering these two mounting bracket options, we aim to provide flexibility and convenience in integrating your Watcher device into various environments. Whether you prefer a wall-mounted setup or a desk-friendly arrangement, our brackets ensure a secure and adjustable installation.
Please note that the Watcher body does not come with any of the stands below, so if you need a stand, please purchase it separately.
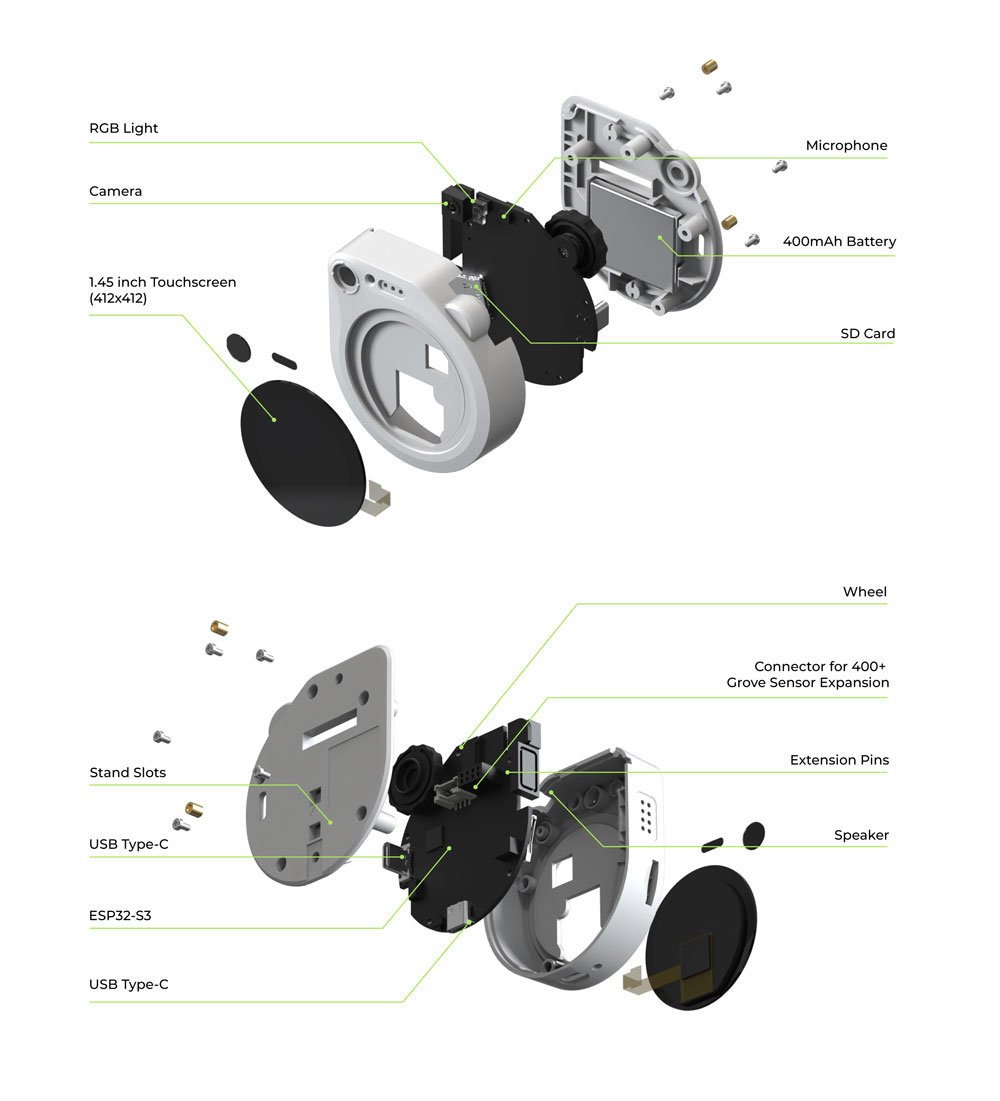
Hardware Diagram
Continuing with the hardware architecture of the Watcher, let's dive into the details provided in the diagram.
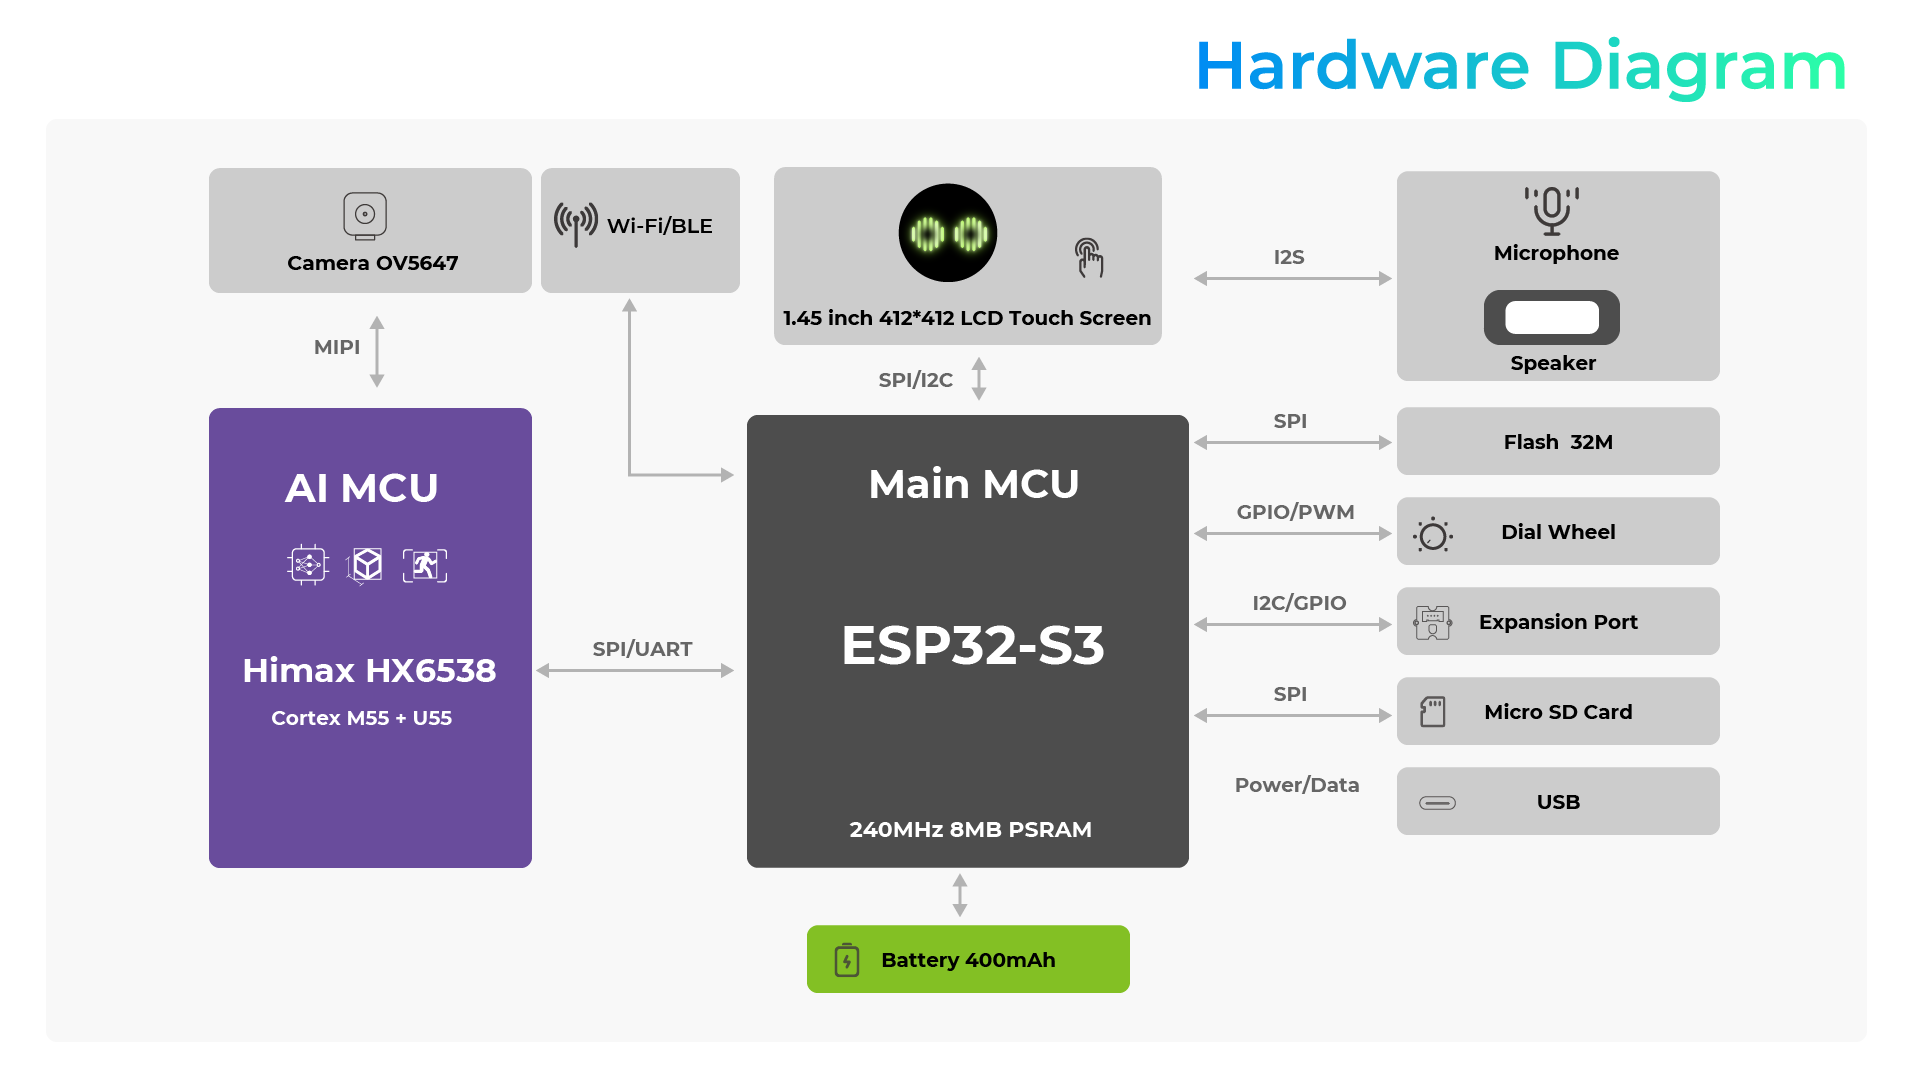
The heart of the Watcher is the Main MCU, which is an ESP32-S3 chip. This powerful microcontroller operates at 240MHz and comes with 8MB of PSRAM for efficient processing and memory management.
The ESP32-S3 communicates with various peripherals and interfaces:
-
Display: It connects to a 1.45-inch 412*412 LCD Touch Screen via the SPI/I2C interface, allowing for intuitive user interaction and vibrant visual output.
-
Audio: The I2S interface enables the ESP32-S3 to communicate with a speaker and a microphone, facilitating audio input and output capabilities.
-
Storage: The Watcher is equipped with a Flash 32M module, connected via the SPI interface, providing ample storage for firmware, data, and user files.
-
Wireless Connectivity: The ESP32-S3 integrates Wi-Fi and BLE functionality, enabling seamless wireless communication with other devices and networks.
-
Expandability: An Expansion Port, connected via the I2C interface, allows for future hardware additions and customization.
-
User Input: A Dial Wheel, connected via GPIO/PWM, offers an intuitive way for users to navigate and control the Watcher's functions.
-
External Storage: A Micro SD Card slot, interfaced via SPI, enables users to extend the storage capacity of the Watcher for additional data and media files.
-
Power and Data: A USB port is available for charging the 400mAh battery and transferring data between the Watcher and other devices.
The AI MCU, a Himax HX6538 chip with Cortex M55 and US5 cores, works alongside the Main MCU to handle AI-related tasks and computations, enhancing the Watcher's intelligent capabilities.
Lastly, the Watcher features a Camera OV5647 module, likely connected via the MIPI interface, enabling computer vision applications and visual sensing.
This comprehensive hardware architecture allows the Watcher to deliver a feature-rich and versatile user experience, combining display, audio, wireless connectivity, storage, and AI capabilities in a compact and efficient design.
Charging the Watcher
There are a total of two USB-C ports on the Watcher, allowing users to find the most appropriate power supply for each of the different Watcher placements.
When charging the Watcher, please make sure to use a regular manufacturer's power adapter, we recommend using a 5V/1A power specification to power the Watcher. If you want to communicate with the Watcher, you may need to use a compliant USB-C cable with a signal cable.
Please use a power plug that is compatible with the Watcher; the Watcher must be powered by a 5V power supply and may burn out if you use a non-compliant power adapter or a power supply with a voltage greater than 5V!
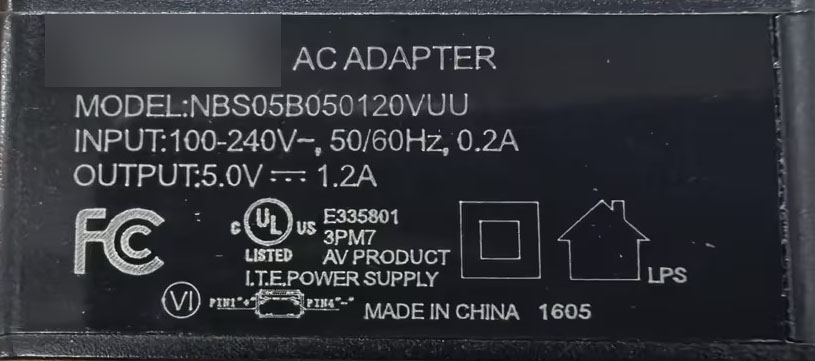
The chart above shows the recommended adapter specifications. If you don't know where you can purchase the right adapter, you can choose to buy it directly at the link below.
Connecting to Serial Console
When you connect your Watcher via USB, Windows registers two new serial ports. In my case, COM23 and COM24. I decided to do an experiment and see what would appear on a serial terminal, because I am a Circuitpython fan, and I love the REPL! For this I used Putty and configured it to use the serial port at 115200 baud rate (I was lucky, the first COM23 port was already the one I needed to discover the command console). But the other one, COM24 is used to upgrade firmware using Xmodem protocol in the same way as Grove Vision AI V2.
Right away, the terminal displays a series of information about the device's memory. If you press enter, a prompt appears and you can type some commands that I list below:
help  [<string>]
Print the summary of all registered commands if no arguments are given, otherwise print summary of given command, where <string> is the name of command

wifi_sta  [-s <ssid>] [-p <password>]
WiFi is station mode, join specified soft-AP
s <ssid> SSID of AP
p <password> password of AP
ota  [-t <int>] [--url=<string>] force ota, ignoring version check
-t, --ota_type=<int> 0: ai model, 1: himax, 2: esp32
-url=<string> url for ai model, himax or esp32 firmware

taskflow  [-iej] [-f <string>]
i, --import import taskflow
e, --export export taskflow
f, --file=<string> File path, import or export taskflow json string by SD, eg: test.json
j, --json import taskflow json string by stdin

Example: Import taskflow by json string or SD file: taskflow -i -f "test.json".
Example: Export taskflow to stdout or SD file: taskflow -e -f "test.json"

factory_info
Get factory infomation

battery
Get battery percent

bsp  subcmd [subcmd args]
Bsp call bsp functions

Example Scan the specified i2c bus: bsp i2cdetect <0|1>

reboot
Reboot the device

factory_reset
Factory reset and reboot the device

record  [-t <int>] [-f <string>]
Record audio and save to SD.
-t, --time=<int> record time, s
-f, --file=<string> File path, Store PCM audio data in SD card

vi_ctrl  [-sec] [-z <int>]
Voice interaction ctrl (Probably will be used with Push to Talk function)
-s, --start start wakeup, and start record
-e, --end end record
-c, --stop stop voice interaction when analyzing or palying, Put it into idle.
-z, --exit=<int> 0: exit vi, 1:exit vi then run new taskflow

iperf  [-suVa] [-c <ip>] [-p <port>] [-l <length>] [-i <interval>] [-t <time>] [-b <bandwidth>]
Check conection performance. Similar to iperf linux command.
-c, --client=<ip> run in client mode, connecting to <host>
-s, --server run in server mode
-u, --udp use UDP rather than TCP
-V, --ipv6_domain use IPV6 address rather than IPV4
-p, --port=<port> server port to listen on/connect to
-l, --len=<length> Set read/write buffer size
-i, --interval=<interval> seconds between periodic bandwidth reports
-t, --time=<time> time in seconds to transmit for (default 10 secs)
-b, --bandwidth=<bandwidth> bandwidth to send at in Mbits/sec
-a, --abort abort running iperf

rgb  [-r <int>] [-g <int>] [-b <int>] [-m <int>] [-v <int>] [-t <int>]
Set the rgb LED value. eg: rgb -r 255 -g 0 -b 0 -m 3
-r, --red=<int> red value, 0~255
-g, --green=<int> green value, 0~255
-b, --blue=<int> blue value, 0~255
-m, --mode=<int> 1: breath, 2: blink, 3:solid, default 3
-v, --step_value=<int> RGB step value, default 3
-t, --step_time_ms=<int> RGB step time(ms), default 5
Tech Support & Product Discussion
Thank you for choosing our products! We are here to provide you with different support to ensure that your experience with our products is as smooth as possible. We offer several communication channels to cater to different preferences and needs.