SenseCAP Watcher Operation Guideline

Inside this section of the Wiki, we will provide you with information on the SenseCAP Watcher's operating logic, tasking, and the use of the device's features.
Basic Operations
Please read here to learn and understand the basic operation of Watcher so that you can successfully master the ideas and methods of using Watcher.
Power On
Please use a power plug that is compatible with the Watcher; the Watcher must be powered by a 5V power supply and may burn out if you use a non-compliant power adapter or a power supply with a voltage greater than 5V!

The chart above shows the recommended adapter specifications. If you don't know where you can purchase the right adapter, you can choose to buy it directly at the link below.
To power on your Watcher device, press and hold the wheel button located on the upper right corner for approximately 3 seconds until the Seeed Studio logo appears on the screen.

Once the logo is displayed, release the button and allow the device to complete its initialization process. After a few moments, the Watcher will display its main menu, indicating that it is ready for use.
If the device won't turn on with a long press, the device may be low on power and you may need to connect a cable to power it up before you can wake up the Watcher.
Power Off
To power off the Watcher, you need to access the Setting menu. Using the wheel button, navigate to the Setting option and press the button to enter the menu. Once inside, scroll down to the Shutdown option and press the wheel button to select it. Finally, swipe the slider from left to right to confirm the shutdown process, and the Watcher will power off.

If your Watcher is connected to a power cord, the device's Shutdown button becomes a Reboot button, at which point the device is not allowed to shut down. Similarly, a device that is switched off will automatically switch on when the power cord is connected.
At the bottom of your Watcher device, you will find a small hole. This hole provides access to the hardware power off button, which allows you to turn off the device when needed.
To power off your Watcher using the hardware button, follow these steps:
-
Locate a thin, pointed object, such as a paperclip or a small needle.
-
Carefully insert the pointed object into the small hole at the bottom of your Watcher.
-
Gently press the power off button inside the hole and your Watcher will power off.

It is important to exercise caution when using a pointed object to press the reset button. Be gentle and avoid applying excessive force to prevent damage to the device.
Please note that performing a hardware reset will not erase any user data stored on your Watcher. The reset operation is designed to restart the device in case of any software-related issues or if the device becomes unresponsive.
If you encounter persistent problems with your Watcher that are not resolved by a hardware reset, you may need to consider performing a factory reset through the device's settings menu. However, keep in mind that a factory reset will erase all user data, so it should only be used as a last resort.
Remember to handle your Watcher with care and only use the hardware reset button when necessary to ensure the longevity and proper functioning of your device.
Operating Logic
The Watcher's operational logic revolves around the wheel button, which serves as the primary means of navigation and selection. Rotating the wheel button counterclockwise allows you to move up or left within menus, while rotating it clockwise enables you to move down or right.

To confirm a selection or enter a submenu, simply press the wheel button.

However, it's important to note that in certain situations where there may be potential for operational ambiguity, the wheel button's selection and confirmation logic may deviate from this standard. In such cases, the touch screen interface provides an alternative means of interaction, allowing you to complete the desired action by tapping on the appropriate on-screen elements.

Throughout the Wiki, specific instructions will be provided for navigating and selecting options within each menu, taking into account any exceptions to the general wheel button logic. By familiarizing yourself with both the wheel button and touch screen controls, you'll be able to efficiently operate your Watcher device and access its various features and settings.
Push to Talk
The Watcher's Push to Talk feature allows you to interact with the device using voice commands from any screen or interface. Simply press and hold the Wheel Button located in the top-right corner of the device to activate the voice input interface. While holding the button, speak your command or message, such as assigning a task or initiating a conversation. Once you release the button, the Watcher will process your voice input and respond accordingly. If further clarification is needed, press and hold the button again to provide additional voice input.

-
Currently the voice dialogue only supports the use of English. Please note that if you use other languages, unexpected situations may occur.
-
If you start a dialogue while Watcher is running a task, then Watcher will first pause the current task, and then re-enter your original task once the dialogue is over.
-
To find out how to assign tasks, read the How to assign tasks to Watcher tutorial first.
Fuction Overview
The Watcher offers four main menu options: Task Templates, Current Task, Extension, and Setting. These menus provide access to various features and functions of the device.
Task Templates
The Task Templates menu contains a selection of pre-configured tasks that are ready for use. These tasks include human detection, pet detection, and gesture detection. By choosing one of these templates, you can quickly set up the Watcher to perform the desired task without the need for extensive configuration.

Current Task
The Current Task menu option provides a convenient way to access and manage the actively running task on the Watcher. If you need to navigate away from the current task to adjust device settings like volume, brightness, or LED light switch, you can easily return to your task by selecting the Current Task option from the main menu, ensuring a seamless and efficient user experience.

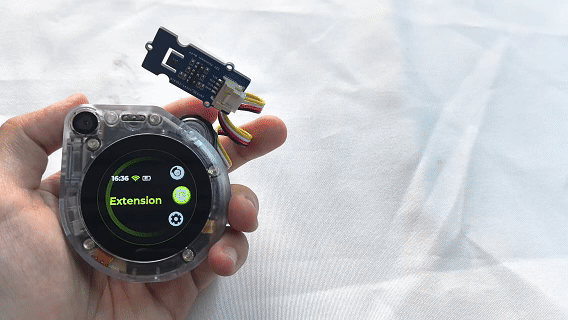
Extension
The Extension menu, currently accessible on the Watcher, serves as a hub for displaying data from a select range of connected Grove sensors, specifically the Grove SHT41, Grove SHT40, and Grove SCD41.
This feature allows users to seamlessly integrate one of these supported Grove sensors at a time with their Watcher device, enabling real-time monitoring and visualization of sensor data. By navigating to the Extension menu, users can view the values and readings from their connected sensor, empowering them to gather insights and make informed decisions based on the collected data.
As the Watcher platform continues to evolve, the Extension menu may expand to include support for a wider array of Grove sensors and additional features and functionalities, further enhancing the device's capabilities and user experience. Stay tuned for updates and announcements regarding future enhancements to the Extension menu.
Setting
Lastly, the Setting menu is where you can access and modify the general settings of the Watcher. This menu provides options for customizing various aspects of the device, such as display brightness, sound volume, connectivity settings, and more. By exploring the Setting menu, you can tailor the Watcher's performance and behavior to your preferences, ensuring a personalized user experience.

Watcher Setting
This guide will walk you through the various settings options available on your Watcher device and explain their functions.
-
Connect App:
- The Connect App setting allows you to establish a connection between your Watcher and a companion mobile application.
- By connecting your Watcher to the app, you can access additional features, remote control capabilities, and receive notifications on your mobile device.
-
Wi-Fi:
- The Wi-Fi setting on the Watcher device displays information about the currently connected wireless network.
- If no network has been configured, the Wi-Fi setting will not display any information.
- Please note that configuring Wi-Fi networks can only be done through the companion mobile app and is not supported on the Watcher device itself.
-
Bluetooth:
- The Bluetooth setting allows you to toggle the Bluetooth functionality on or off.
-
Sound:
- The Sound setting lets you adjust the volume of your Watcher's audio output.
- You can increase or decrease the volume to suit your preferences or environment.

-
Brightness:
- The Brightness setting allows you to control the brightness level of your Watcher's display.
- Adjusting the brightness can help improve visibility in different lighting conditions and conserve battery life.
-
RGB Light:
- The RGB Light setting is a toggle switch that allows you to turn the LED indicator light on or off.
-
About Device:
- The About Device section provides important information about your Watcher, such as the model number, firmware version, and serial number.
- This information can be helpful when troubleshooting issues or checking for available updates.
-
Shutdown/Reboot:
- The Shutdown/Reboot setting allows you to restart or power off your Watcher device, depending on the power source.
- When the Watcher is connected to a power source, the "Reboot" option will be displayed, allowing you to restart the device. Shutting down is not allowed while connected to power.
- When the Watcher is running on battery power, the "Shutdown" option will be available, enabling you to power off the device.
-
Factory Reset:
- The Factory Reset option restores your Watcher to its original factory settings.
- This action will erase all user data, preferences, and configurations, returning the device to its default state.
- Use this option with caution, as it cannot be undone, and you will need to set up your Watcher again after a factory reset.
By familiarizing yourself with these settings options, you can customize and optimize your Watcher experience to best suit your needs. Keep in mind that certain settings, such as Wi-Fi and Bluetooth configuration, can only be accessed and modified through the companion mobile app.
Tech Support & Product Discussion
Thank you for choosing our products! We are here to provide you with different support to ensure that your experience with our products is as smooth as possible. We offer several communication channels to cater to different preferences and needs.