Watcher to Node-RED Quick Start
Node-RED is a programming tool for wiring together hardware devices, APIs and online services in new and interesting ways.
It provides a browser-based editor that makes it easy to wire together flows using the wide range of nodes in the palette that can be deployed to its runtime in a single-click.
To make it easier for our users to connect data from the Watcher to various other Paas platforms for more in-depth data processing. For example. from Watcher to IFTTT, Telegram, Twilio etc. We will do a series of tutorials for Watcher & Node-RED.
This tutorial, the first in a series, will walk you through installing and using Node-red and calling the Watcher API to connect to Node-RED.
Part 1. Install Node.js®
To install Node-RED locally you will need a supported version of Node.js.
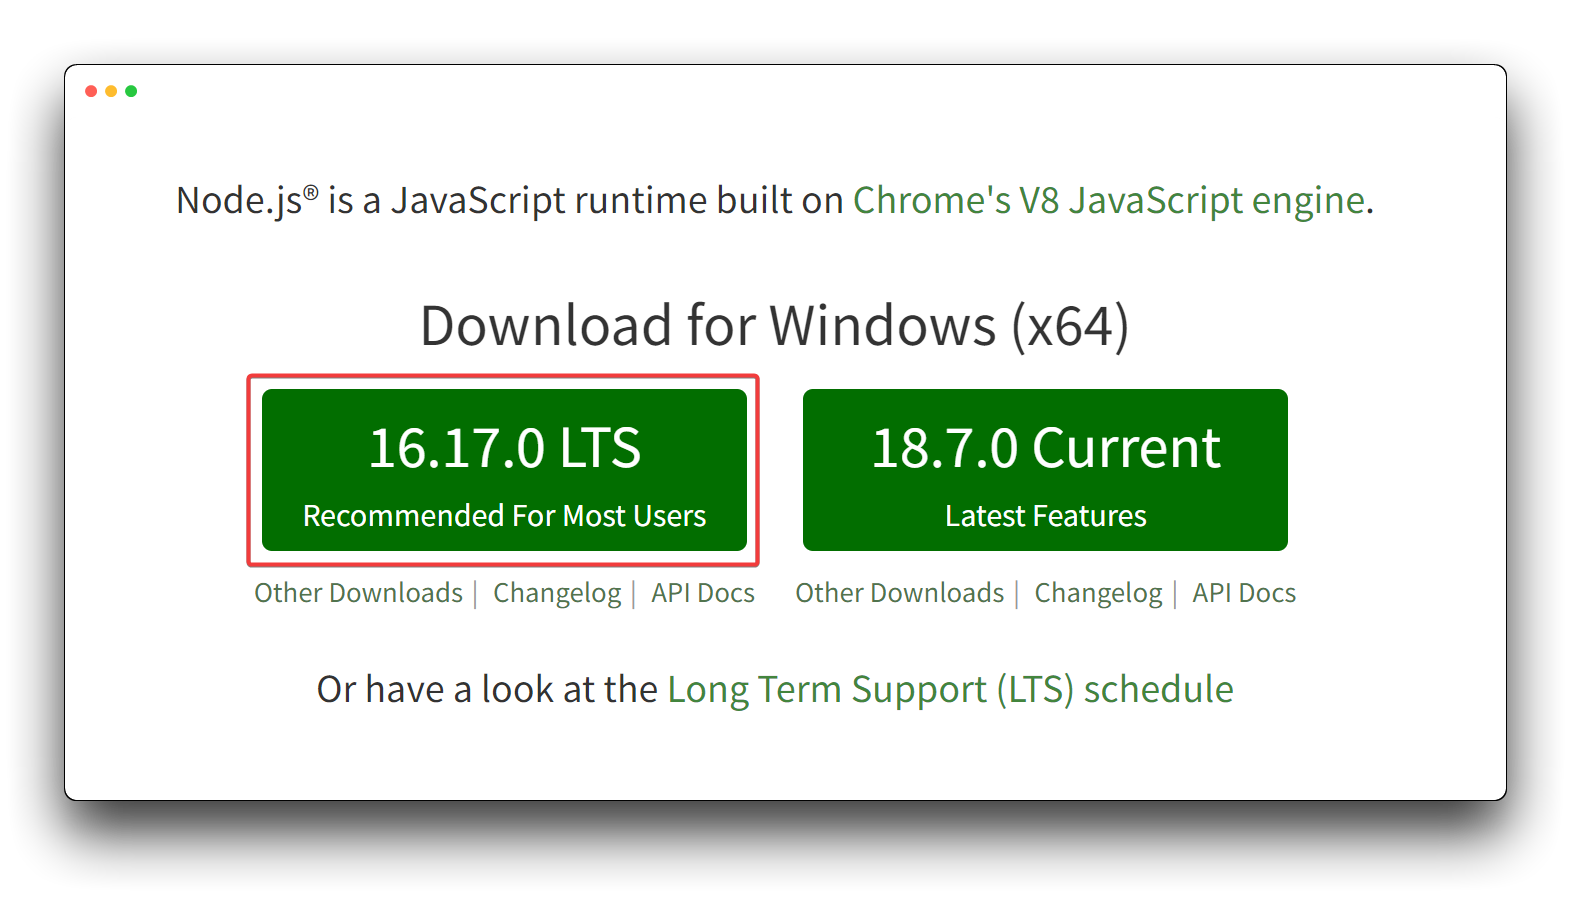
Download the latest 14.x LTS version of Node.js from the official Node.js home page. It will offer you the best version for your system.
Run the downloaded MSI file. Installing Node.js requires local administrator rights; if you are not a local administrator, you will be prompted for an administrator password on install. Accept the defaults when installing. After installation completes, close any open command prompts and re-open to ensure new environment variables are picked up.
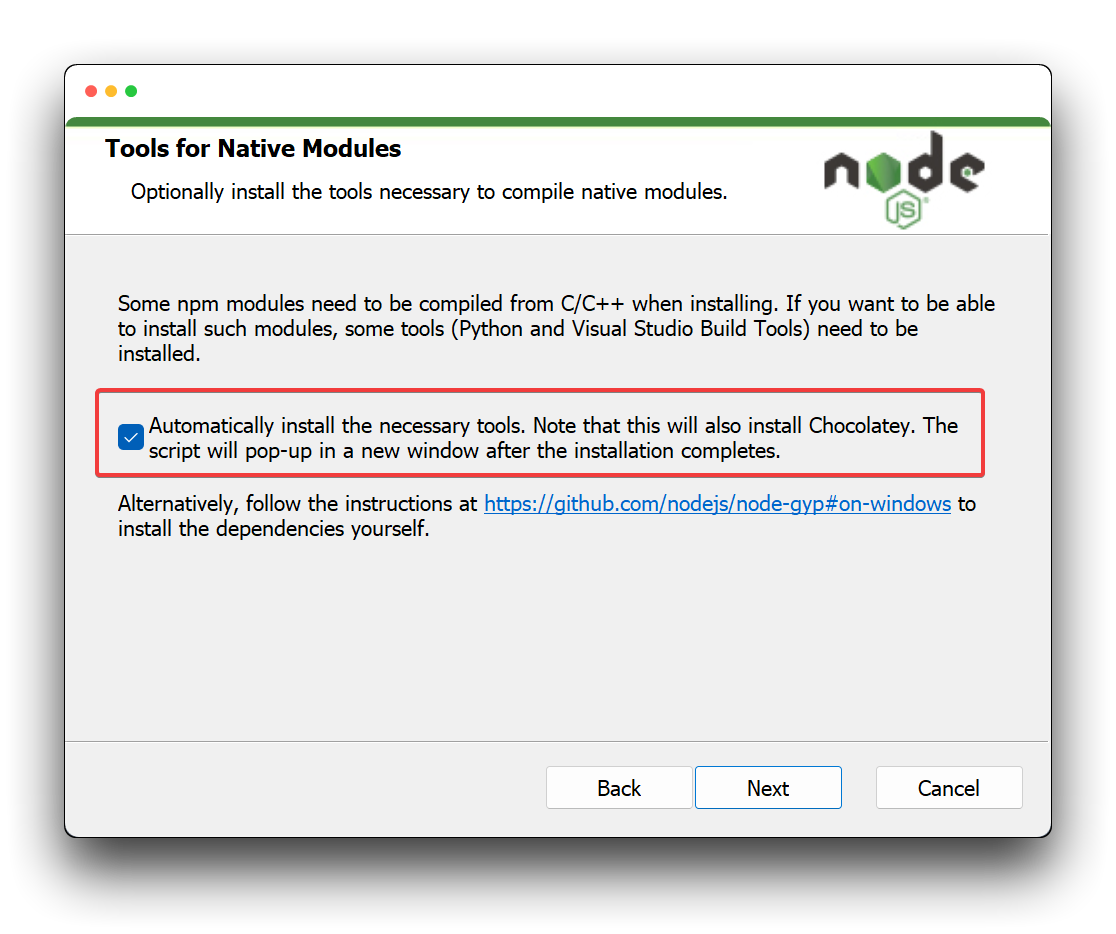
When installing Node.js, if you are using a computer that has not had any programming environment installed, we would recommend that you check the box to install the necessary tools while installing Node.js, which will save you a lot of necessary trouble.
The easiest way to install Node-RED is, using Node's package management tool, npm. However, we do not recommend installing Node-RED with npm 1.x, but rather upgrading it to the latest npm 2.x version.
On Windows (Requires Windows 10 and above), use the Win+R shortcut and type cmd in the pop-up window to bring up the terminal and execute the following command.
If you are using MacOS or Linux, please execute the following command in the terminal and add sudo in front of the command for non-root users.
npm install -g [email protected]
Once installed, open a command prompt and run the following command to ensure Node.js and npm are installed correctly.
node --version && npm --version
You should receive back output that looks similar to:
> v16.17.0
> 2.15.12
Part 2. Install Node-RED
Installing Node-RED as a global module adds the command node-red to your system path. Execute the following at the command prompt:
npm install -g --unsafe-perm node-red
If Node-RED is installed as a global npm package, then execute the command node-red directly:
node-red
This will output the Node-RED log to the terminal. You must keep the terminal open in order to keep Node-RED running.
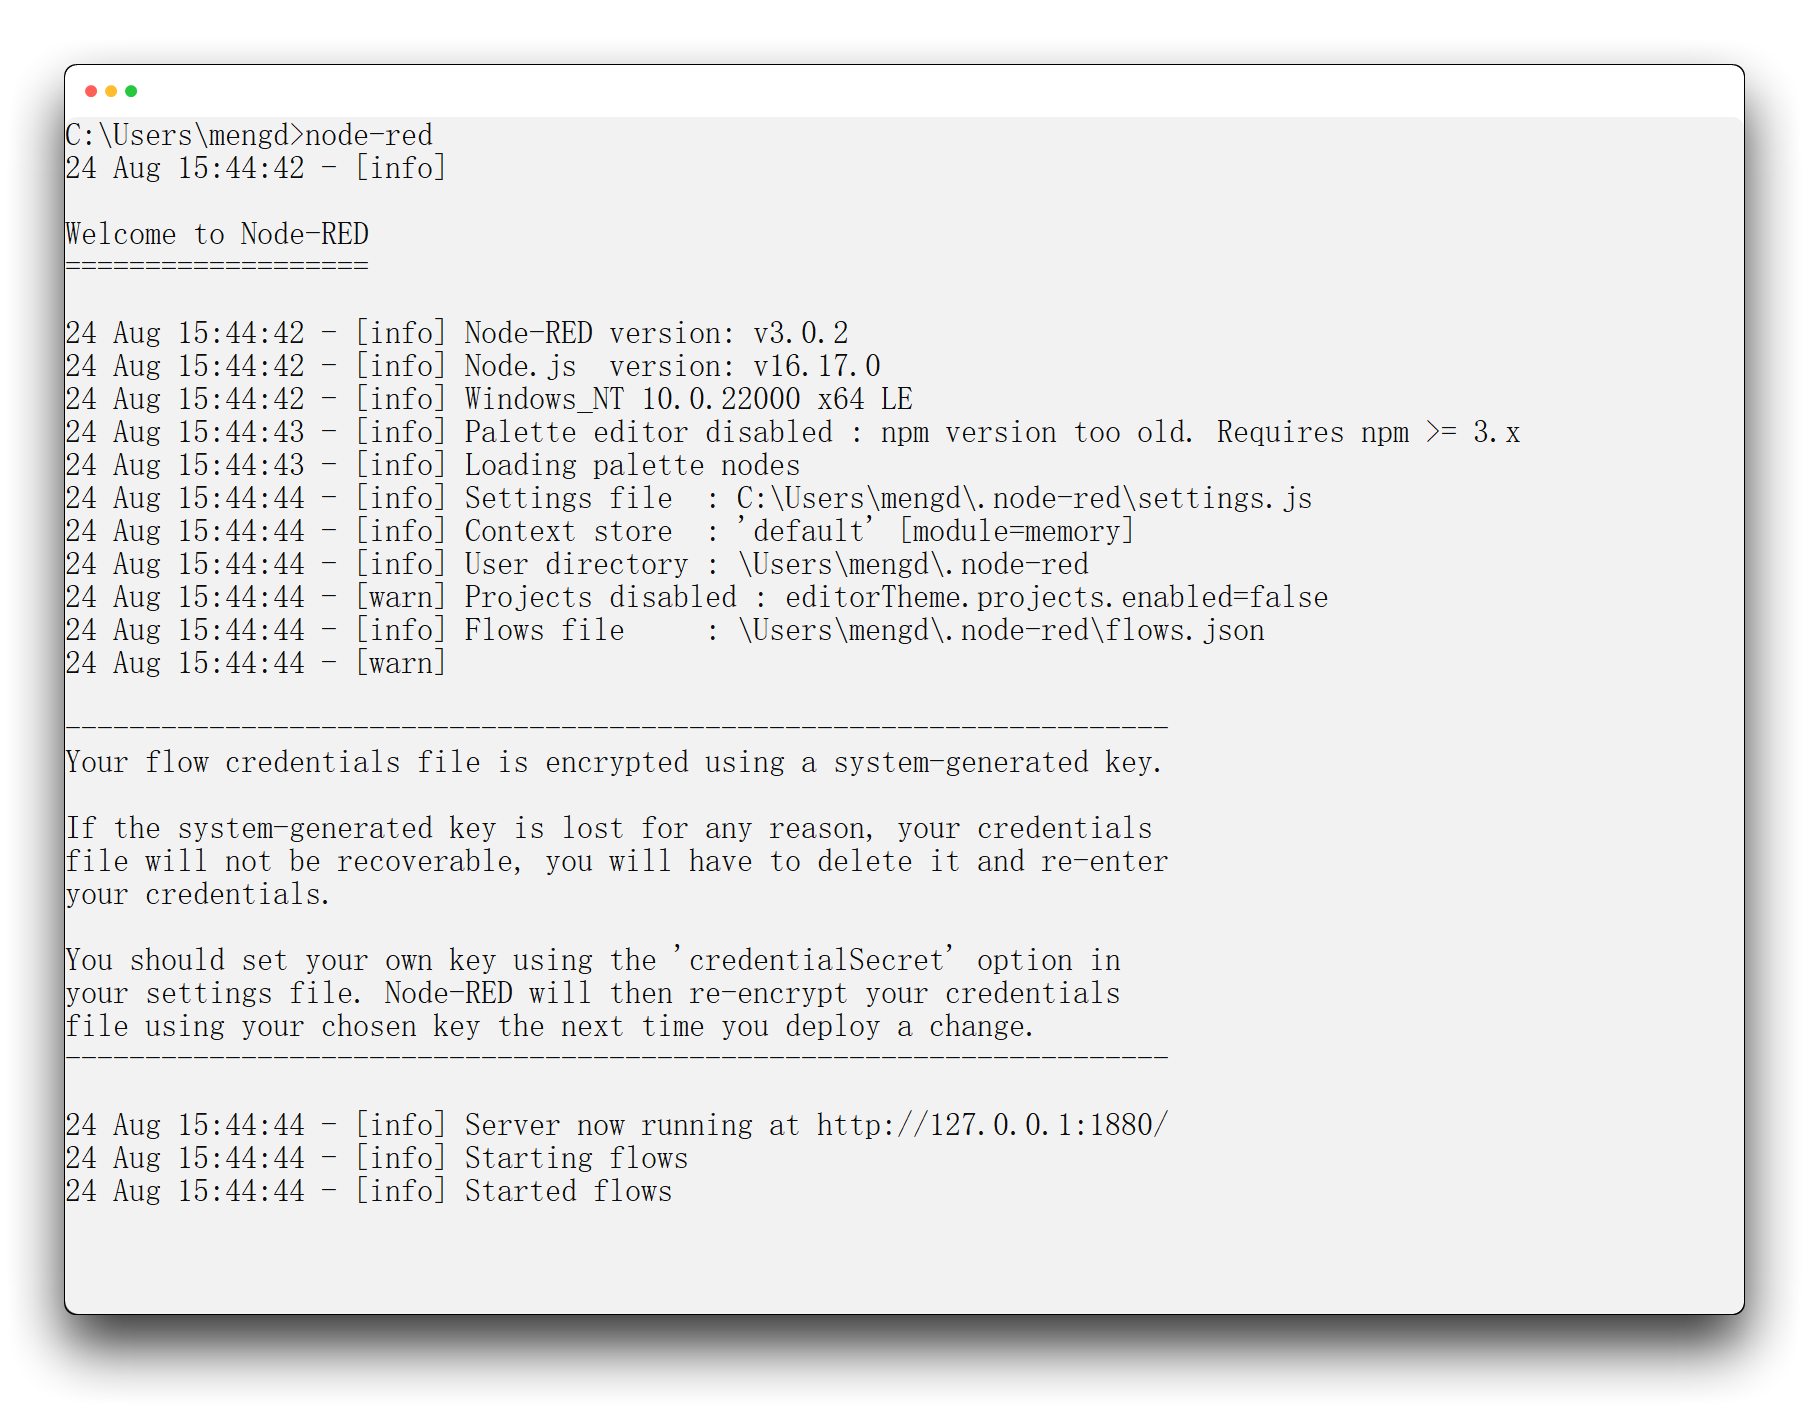
This will allow you to see the Node-RED editor on http://localhost:1880.
Part 3. Run a task in Watcher
Tell Watcher what you want it to help you. You just need to input some commands in the input box. For example, Notify me when detect people or Tell me if there is a fire, etc. If you want to know more, please jump here.
So Watcher will notify you via SenseCraft APP as well as audio alerts and flashing RGB light when it detects a fire.

Part 4. Watcher send message to Node-RED
We provide two methods to send message from watcher to Node-RED, SenseCAP Node and HTTP potocol. You can choose any method you like.
Method 1: Use SenseCAP node
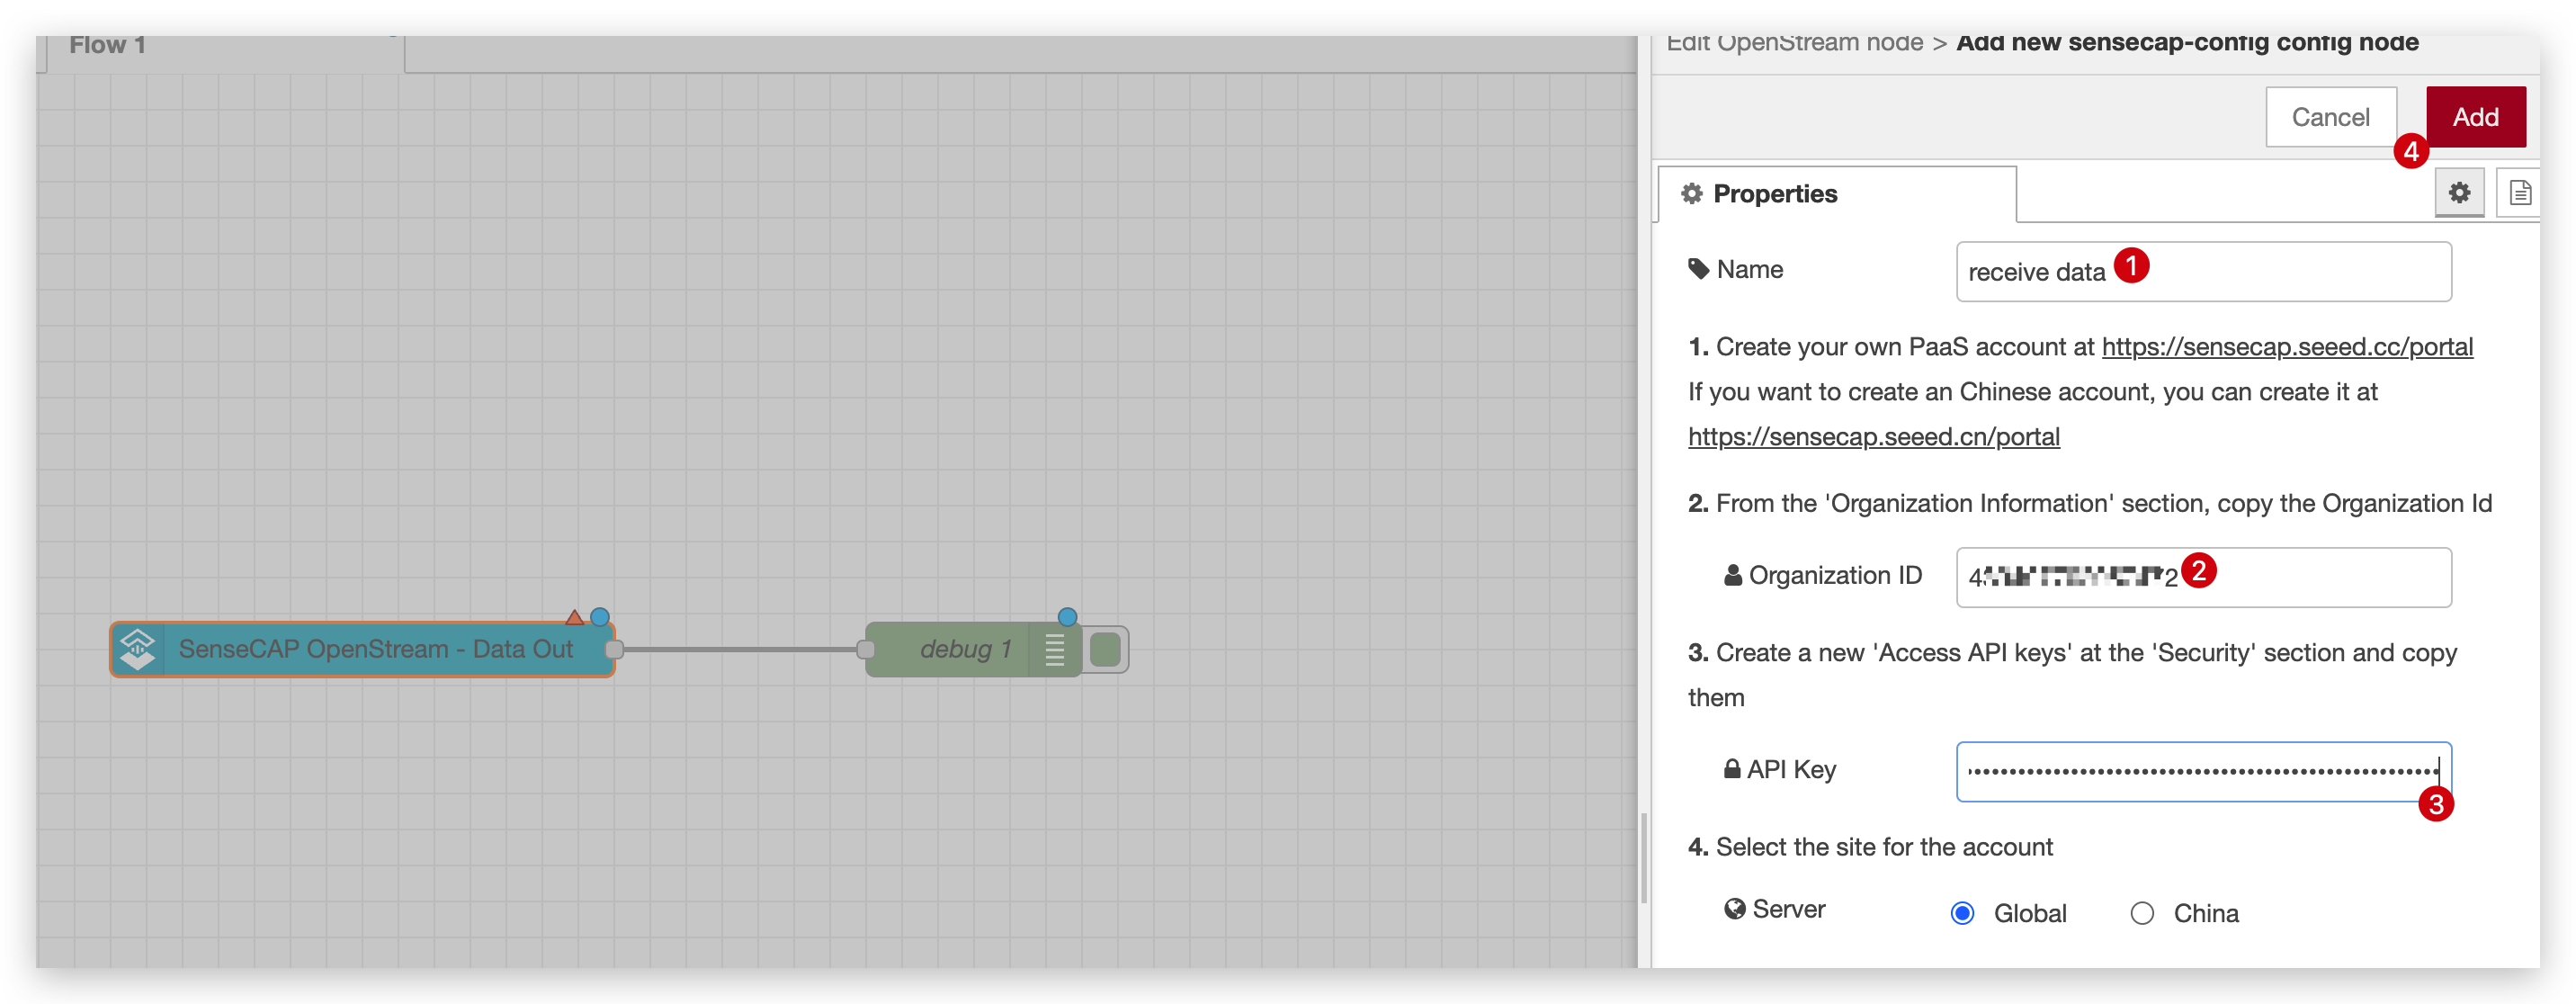
Step 1. Get Watcher API Key
Open your SenseCraft APP and follow the steps below to get Organization ID and API Key. We will use them later.
| Page 1 | Page 2 | Page 3 |
|---|---|---|
 |  |  |
| Page 4 | Page 5 | Page 6 |
 |  |  |
Step 2. Install SenseCAP node
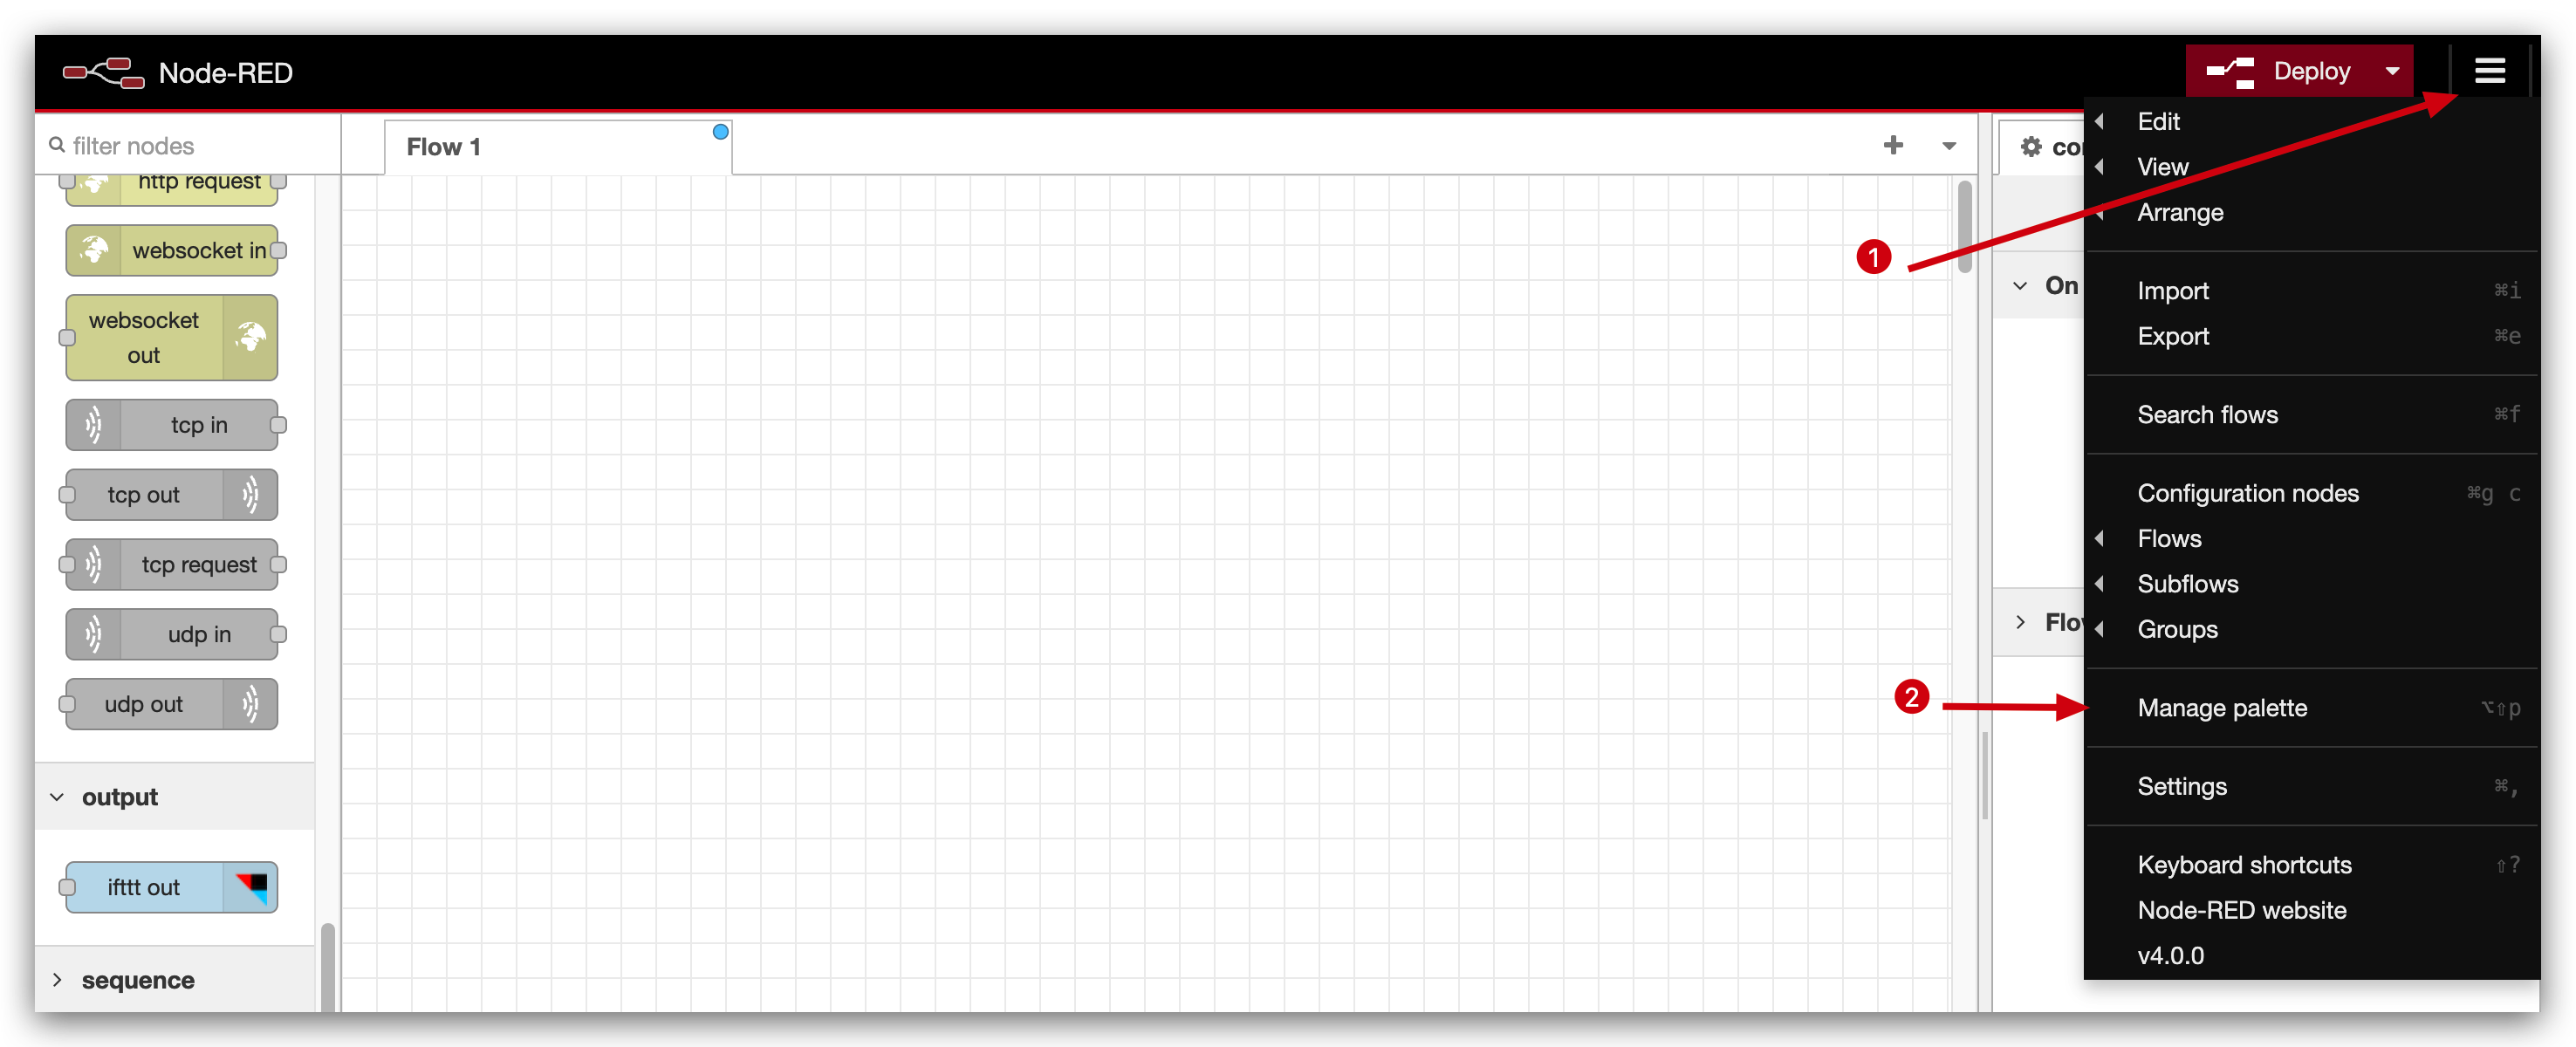
Click the three bars icon and then click Manage palette option.
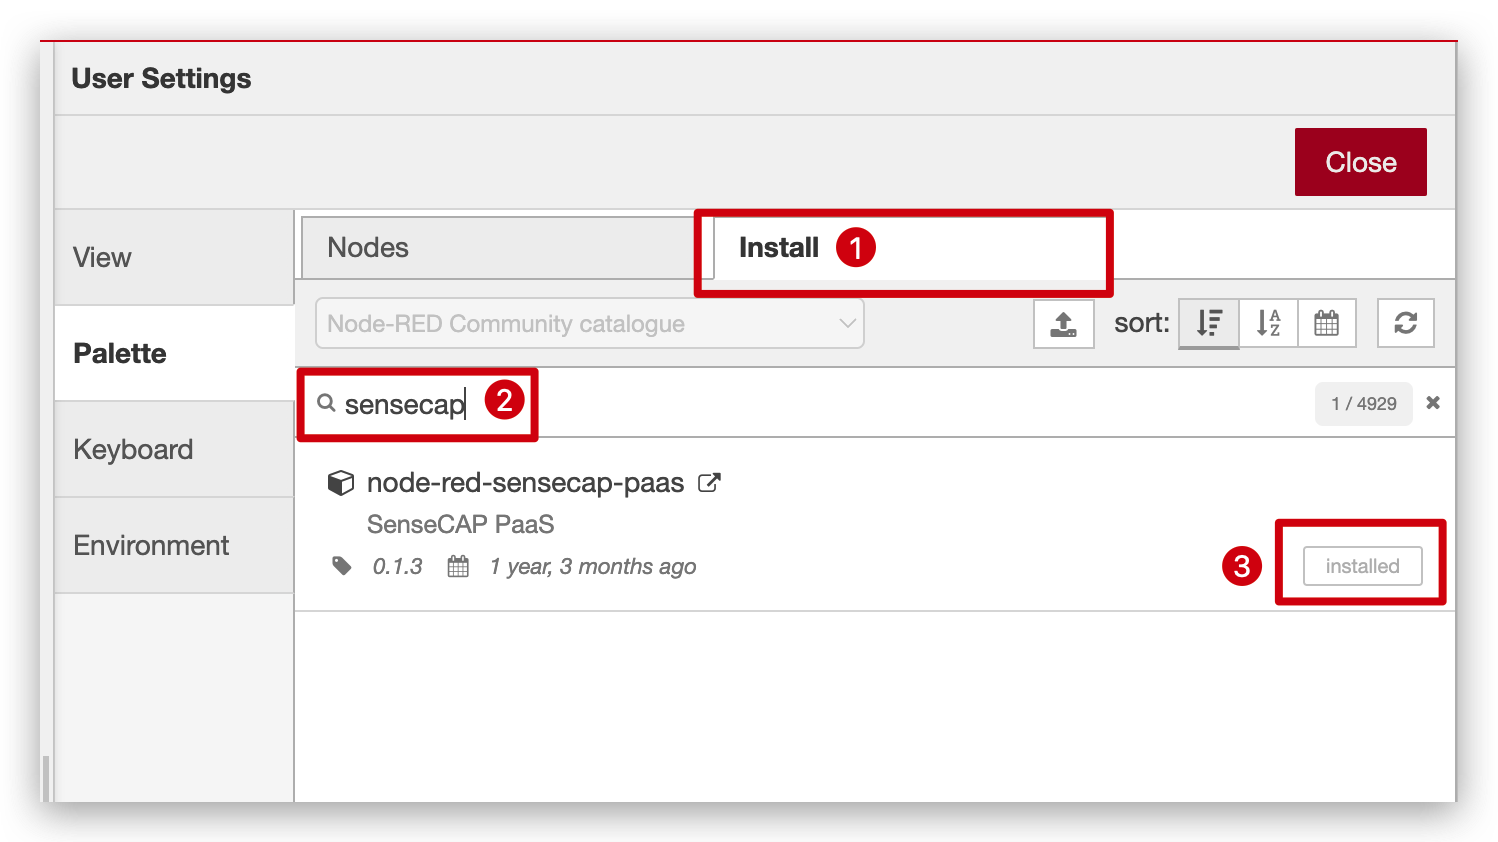
Click Install option, input sensecap to search, and then install it.
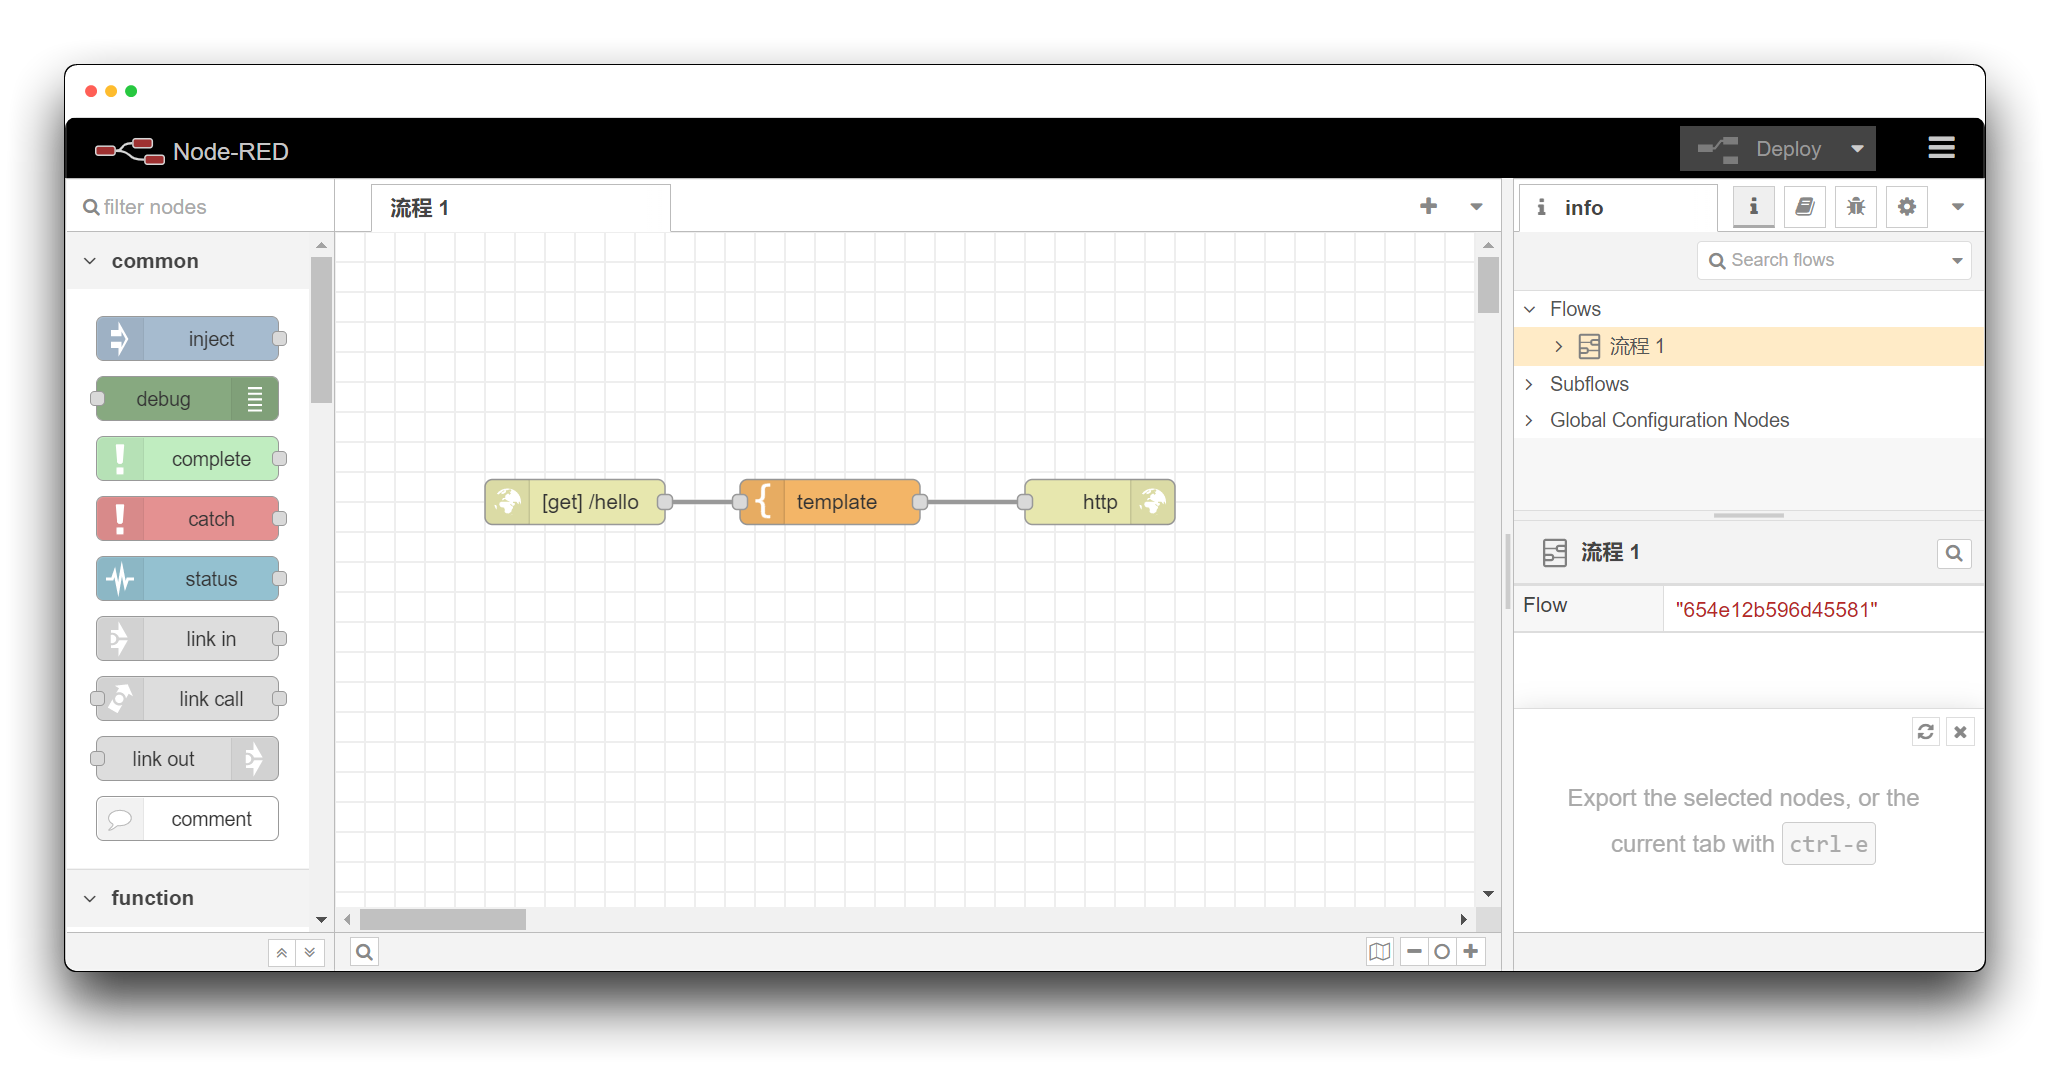
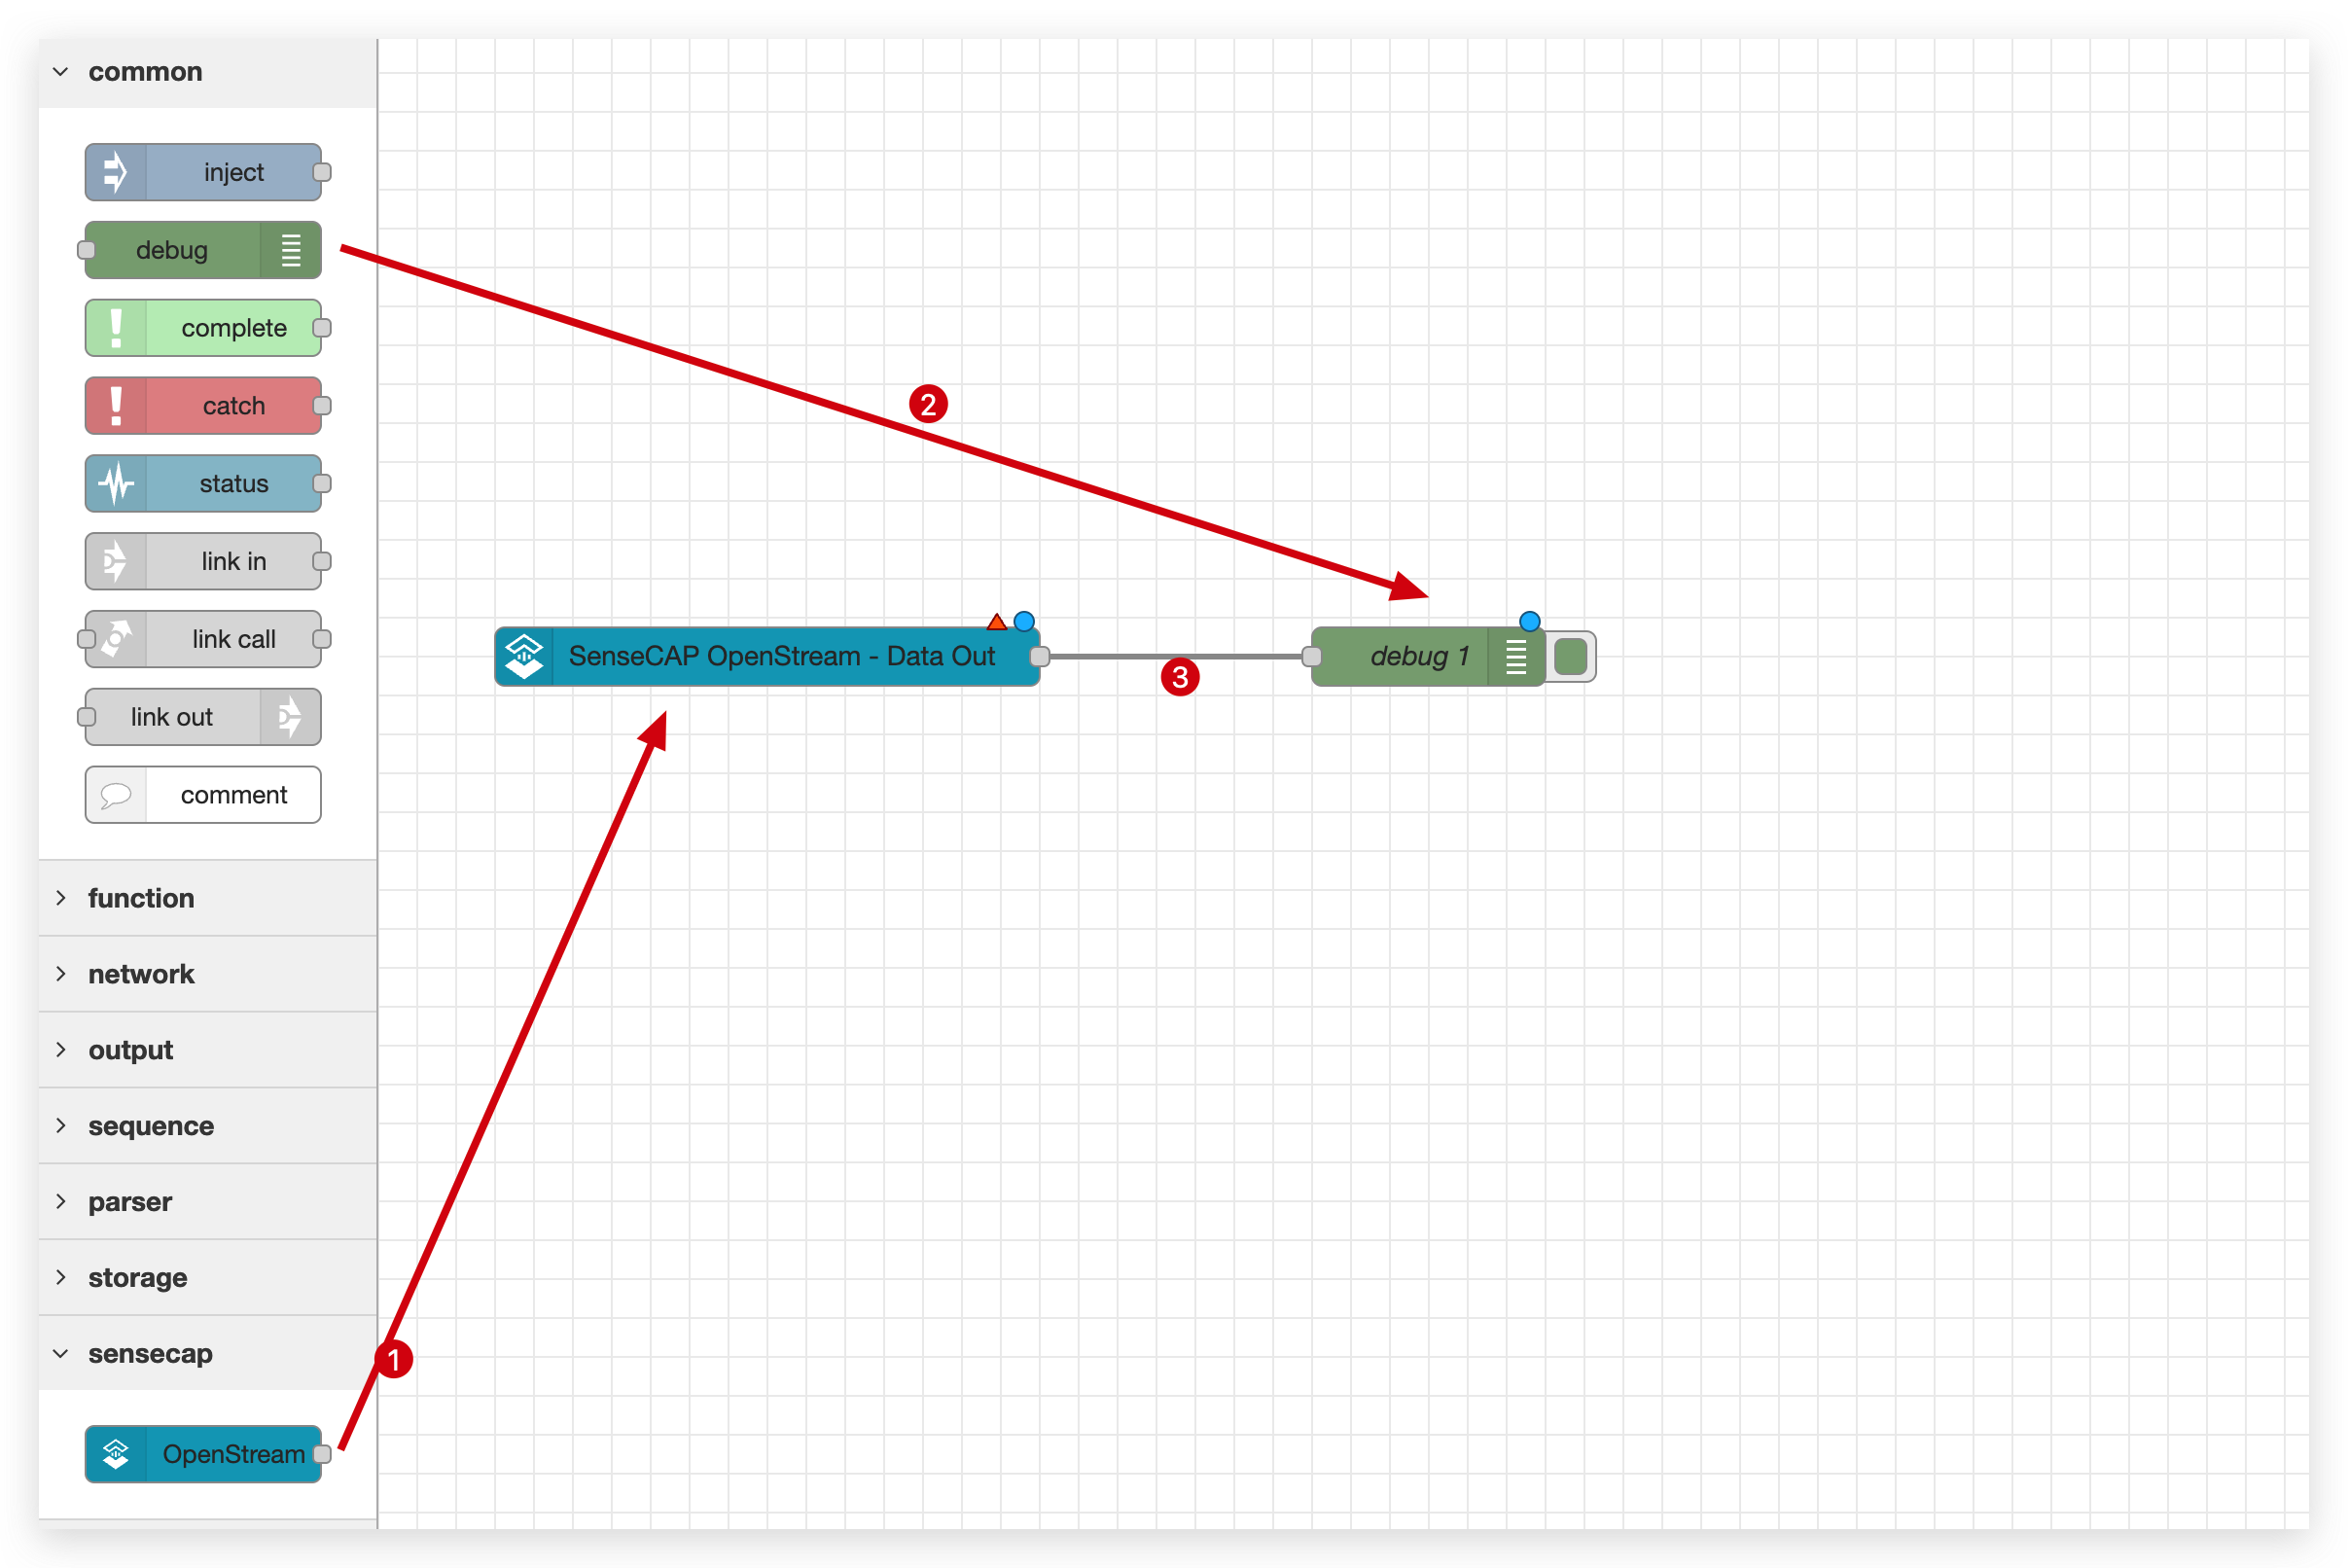
Drag OpenStream and debug module to workspace area and then connect them with line.
Double click OpenStram module and then it will open a side window. Give it a name and create a new account.
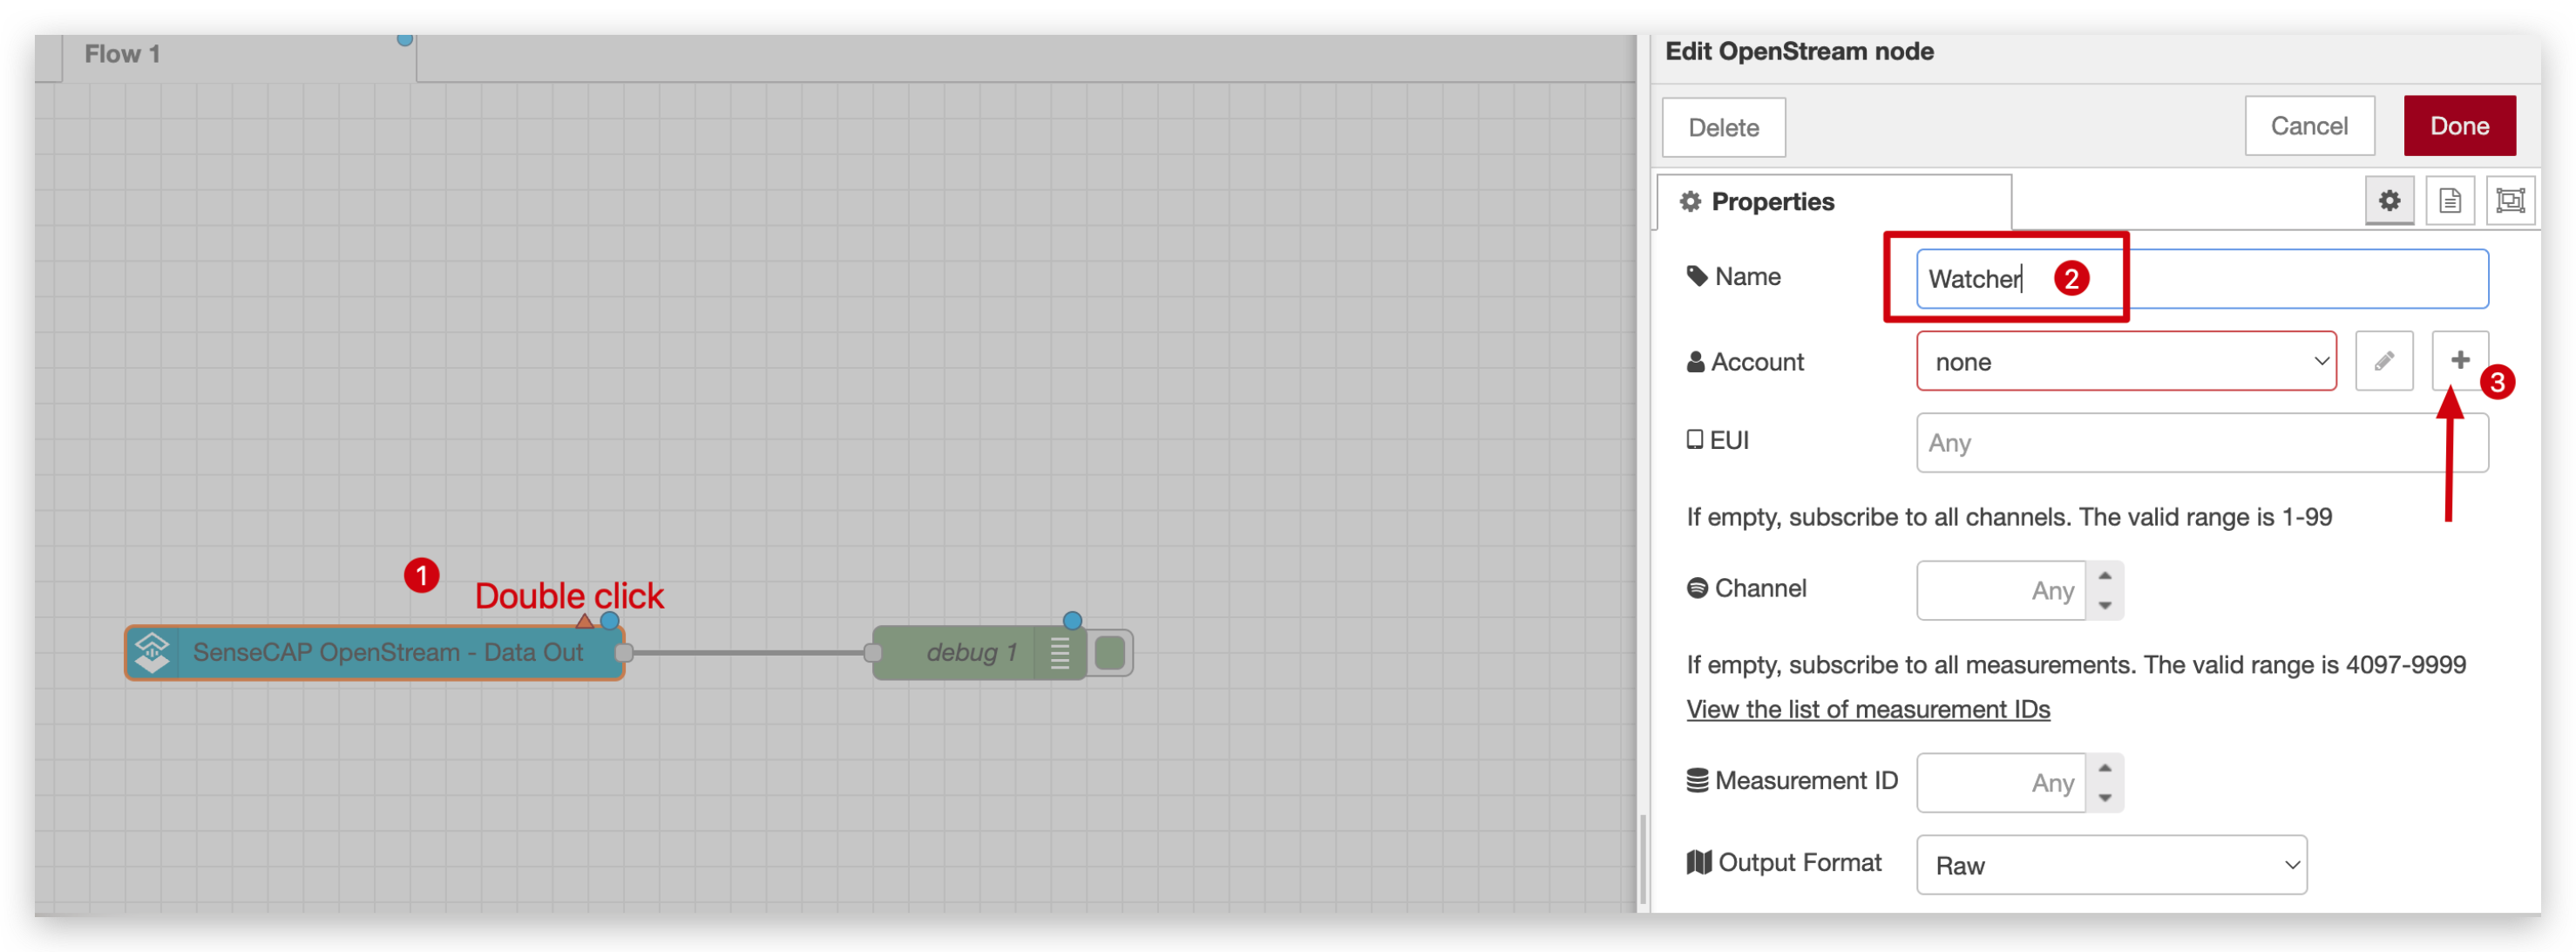
Name your account and input your Organization ID and API key you got just now.
Click the Done button to get all message from platfrom or you can select specified message you want to receive. For example, if you just want to receive your Watcher message, you can fill in the EUI code that can be found in device Setting -> About Device or the message in Step 6.
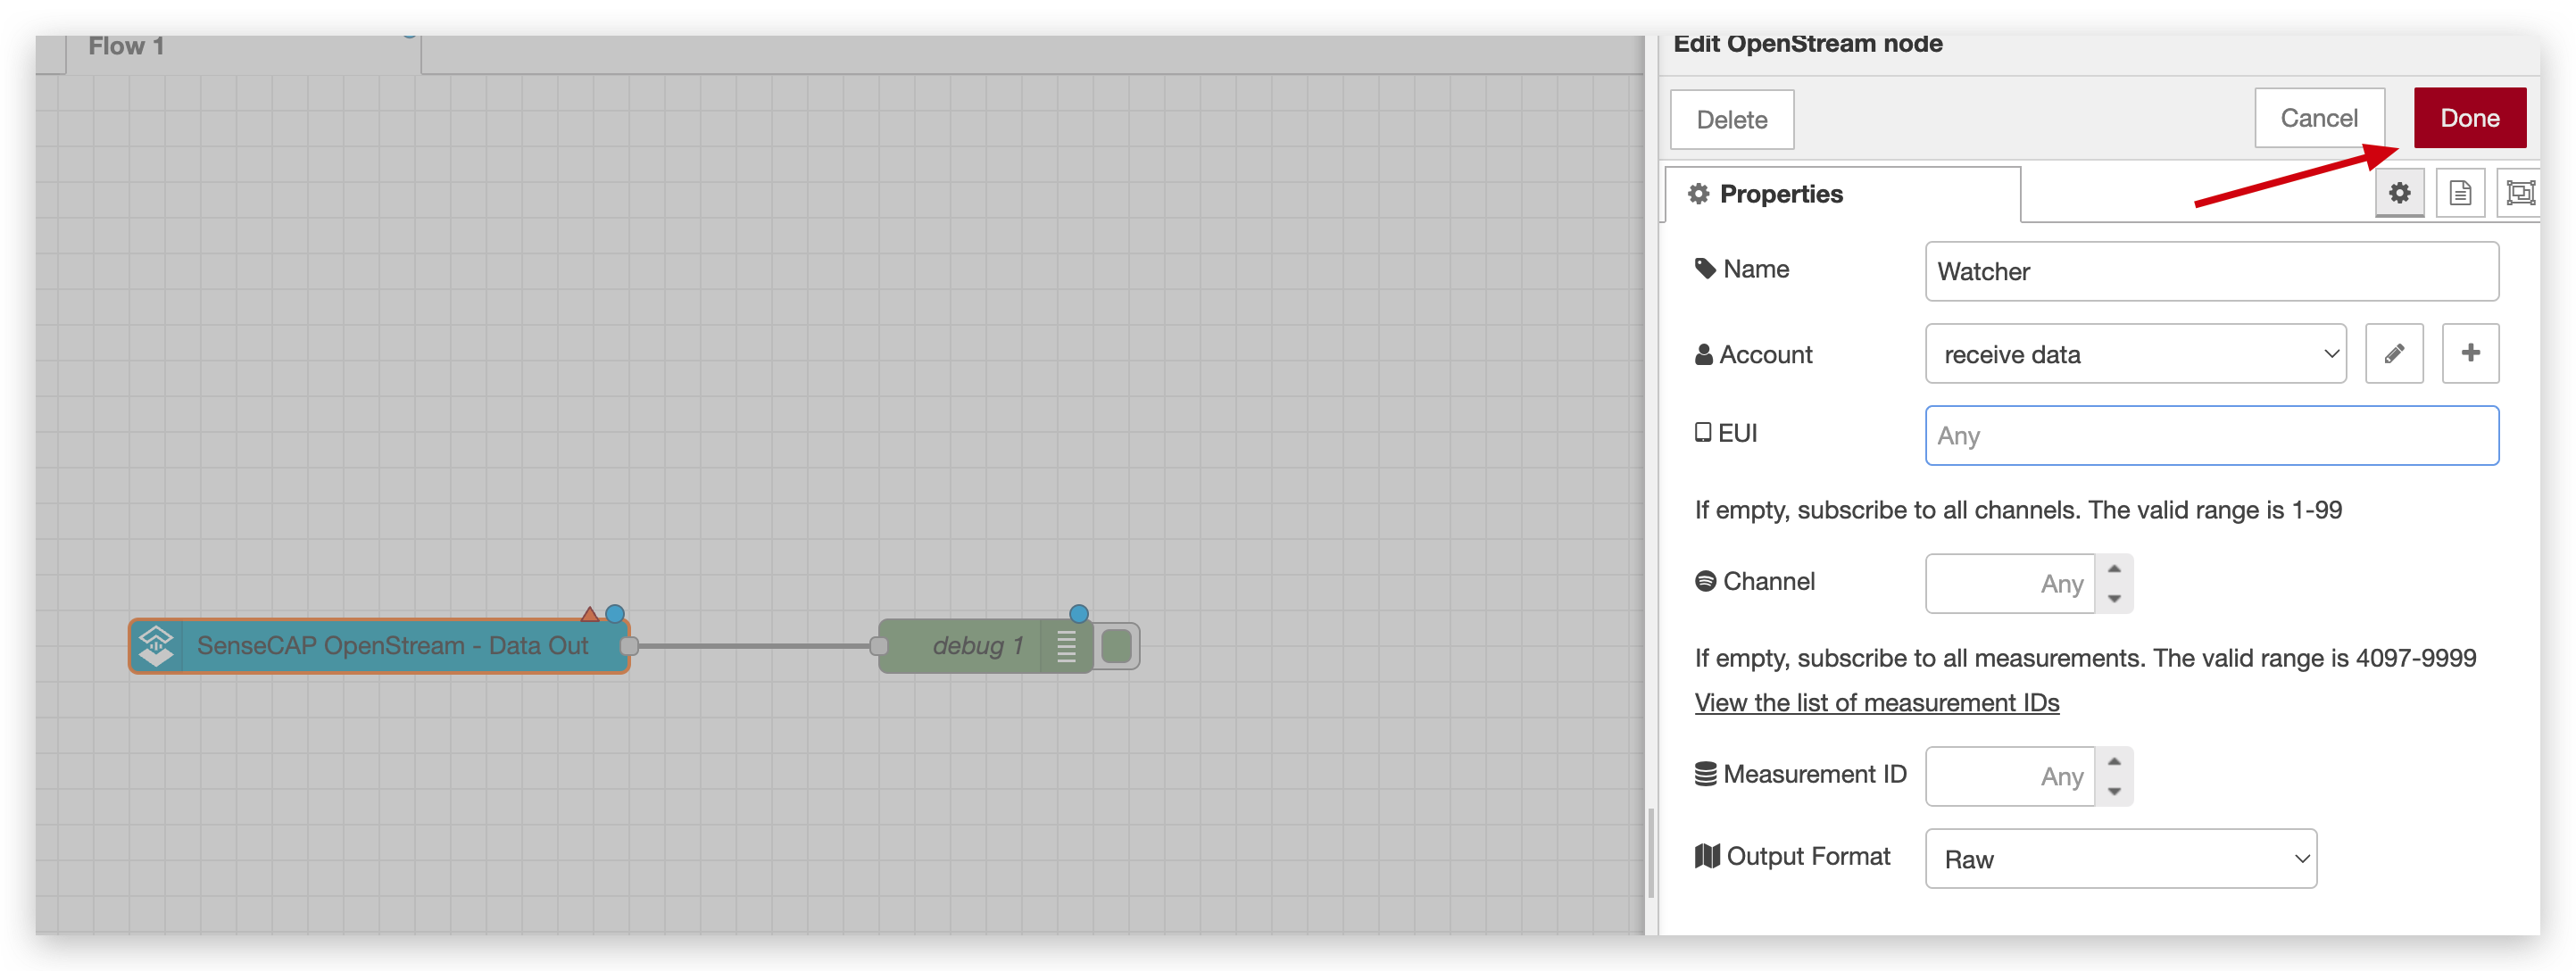
Click the Deploy button. This button just like compile and run button. Whatever you change, you need to click this button.
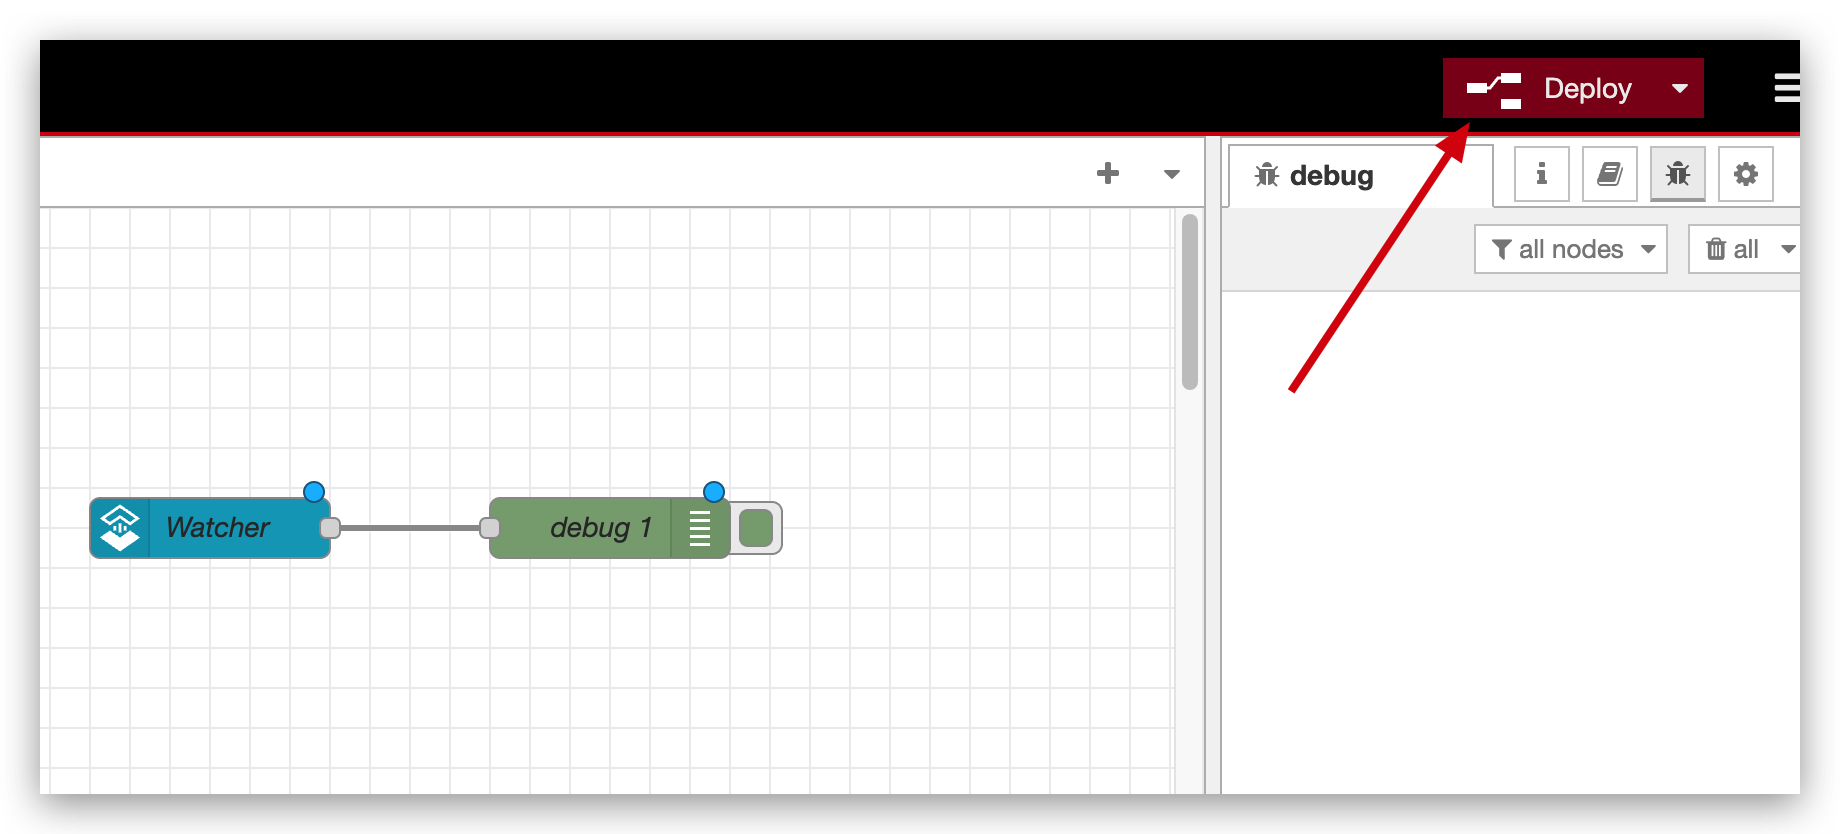
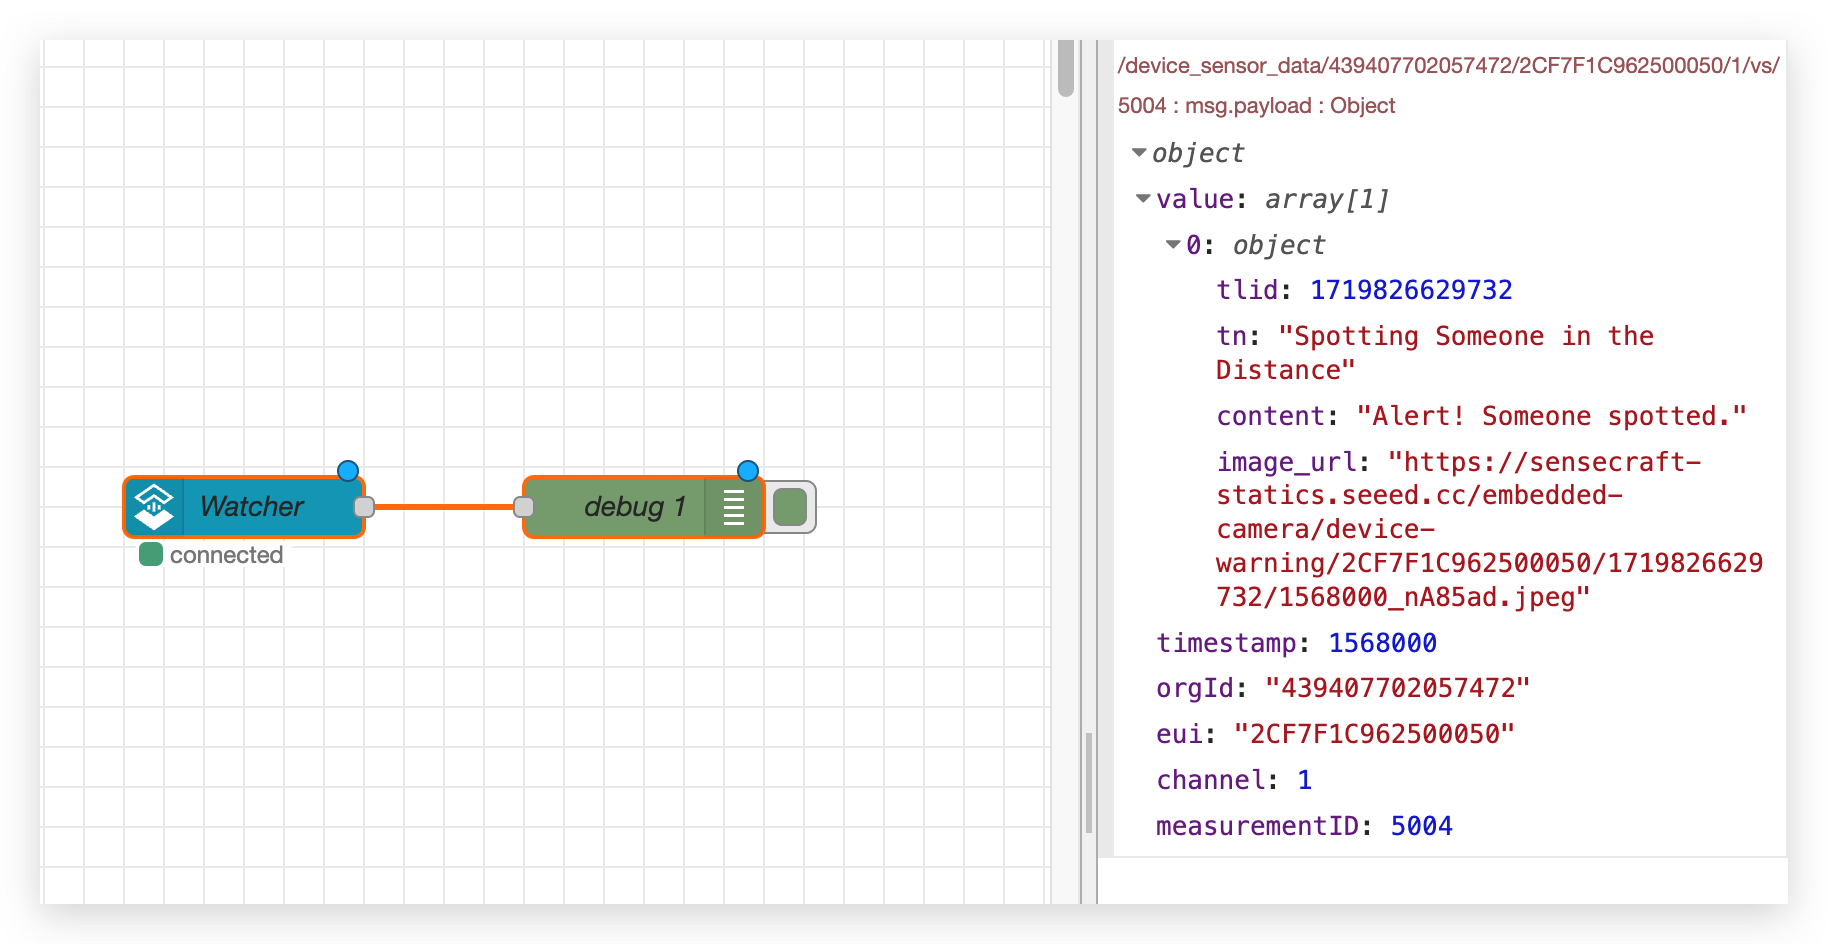
After that, you will see a connected sign, which means it works as expected. When Watcher sends messages you will receive them in Node-RED.
Method 2: Use HTTP potocol
Step 1.Open HTTP block funciton
When you run a task, click Detail Configs button, and then open HTTP Push Notification and click Go Setup. You need to fill in your computer IP address and Node-RED access port(default port is 1880). And then click Update Now and Run Task.
| Page 1 | Page 2 | Page 3 | Page 4 |
|---|---|---|---|
 |  |  |  |
Step 2.Configuration in Node-RED
First, you need to import work flow in your Node-RED.
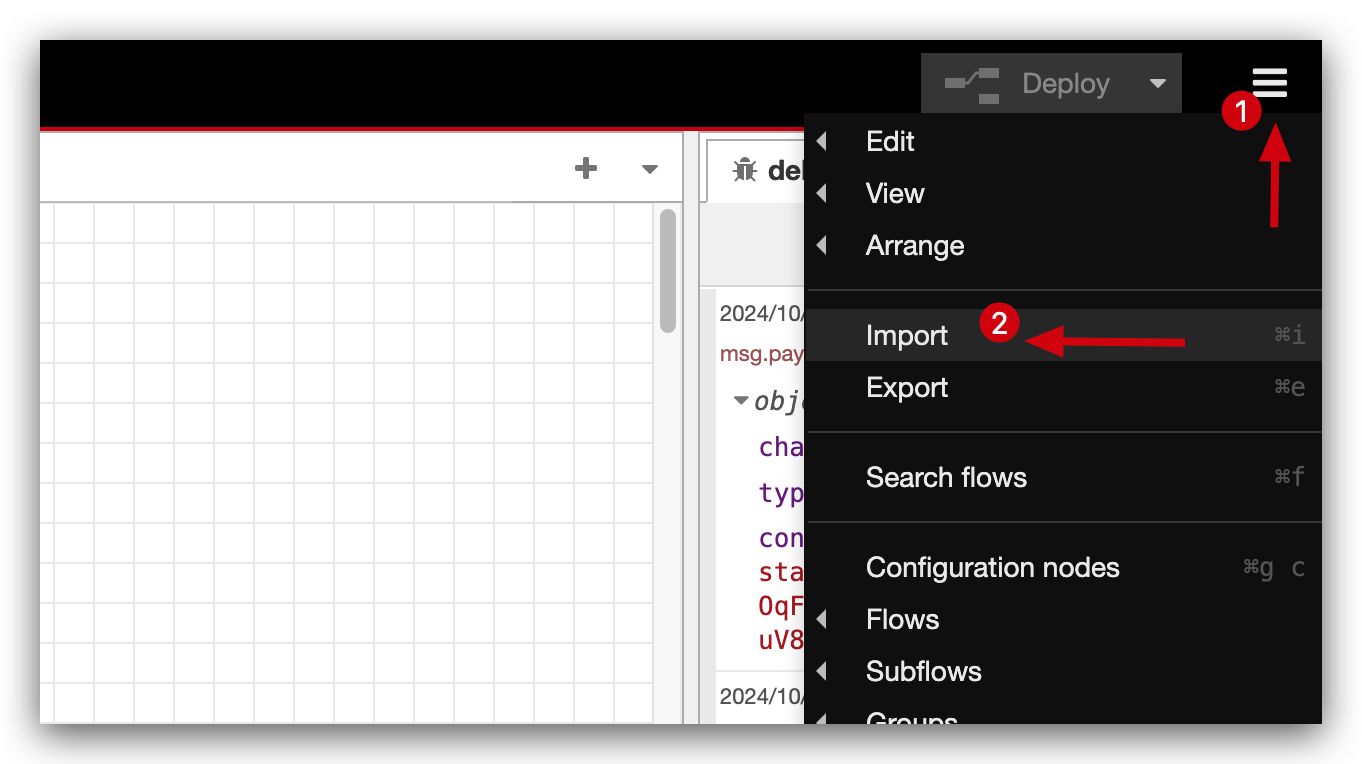
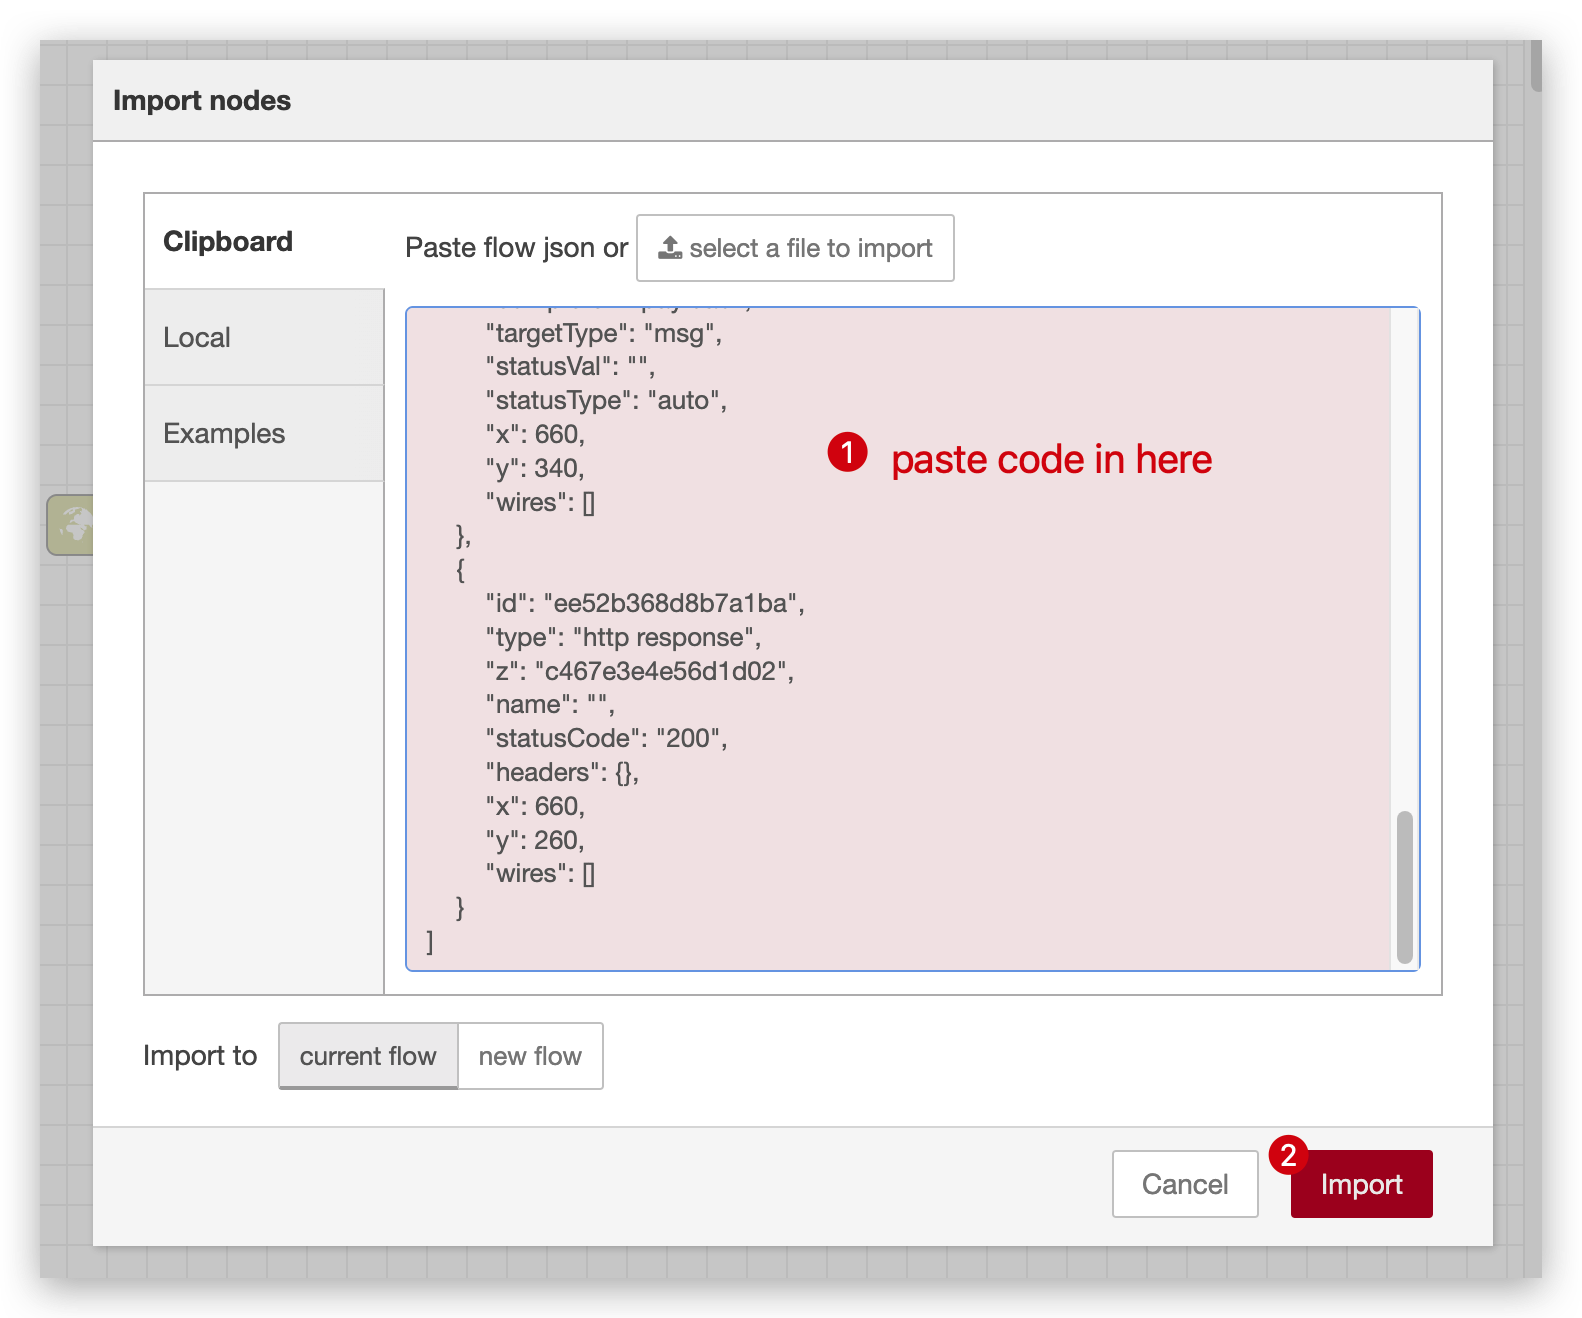
Paste the following code into it and click Import button.
[
    {
        "id": "99b783856e77b41f",
        "type": "tab",
        "label": "Flow 2",
        "disabled": false,
        "info": "",
        "env": []
    },
    {
        "id": "2791b077ca7367c9",
        "type": "http in",
        "z": "99b783856e77b41f",
        "name": "",
        "url": "/v1/notification/event",
        "method": "post",
        "upload": false,
        "swaggerDoc": "",
        "x": 450,
        "y": 460,
        "wires": [
            [
                "5de4e51231d87d00"
            ]
        ]
    },
    {
        "id": "61c50a0666f83a50",
        "type": "http response",
        "z": "99b783856e77b41f",
        "name": "",
        "statusCode": "200",
        "headers": {},
        "x": 830,
        "y": 460,
        "wires": []
    },
    {
        "id": "5de4e51231d87d00",
        "type": "function",
        "z": "99b783856e77b41f",
        "name": "",
        "func": "// here to process data\n// for example, extract alarm info \n// msg.payload = {\n//     alertMsg: msg.payload.events.text\n// }\n msg.payload = {\n    code: 200,\n    msg:\"ok\",\n    data: msg.payload\n}\nreturn msg;",
        "outputs": 1,
        "noerr": 0,
        "initialize": "",
        "finalize": "",
        "libs": [],
        "x": 660,
        "y": 460,
        "wires": [
            [
                "61c50a0666f83a50",
                "852490a1c300cd94"
            ]
        ]
    },
    {
        "id": "852490a1c300cd94",
        "type": "debug",
        "z": "99b783856e77b41f",
        "name": "",
        "active": true,
        "tosidebar": true,
        "console": false,
        "tostatus": false,
        "complete": "false",
        "statusVal": "",
        "statusType": "auto",
        "x": 840,
        "y": 520,
        "wires": []
    }
]
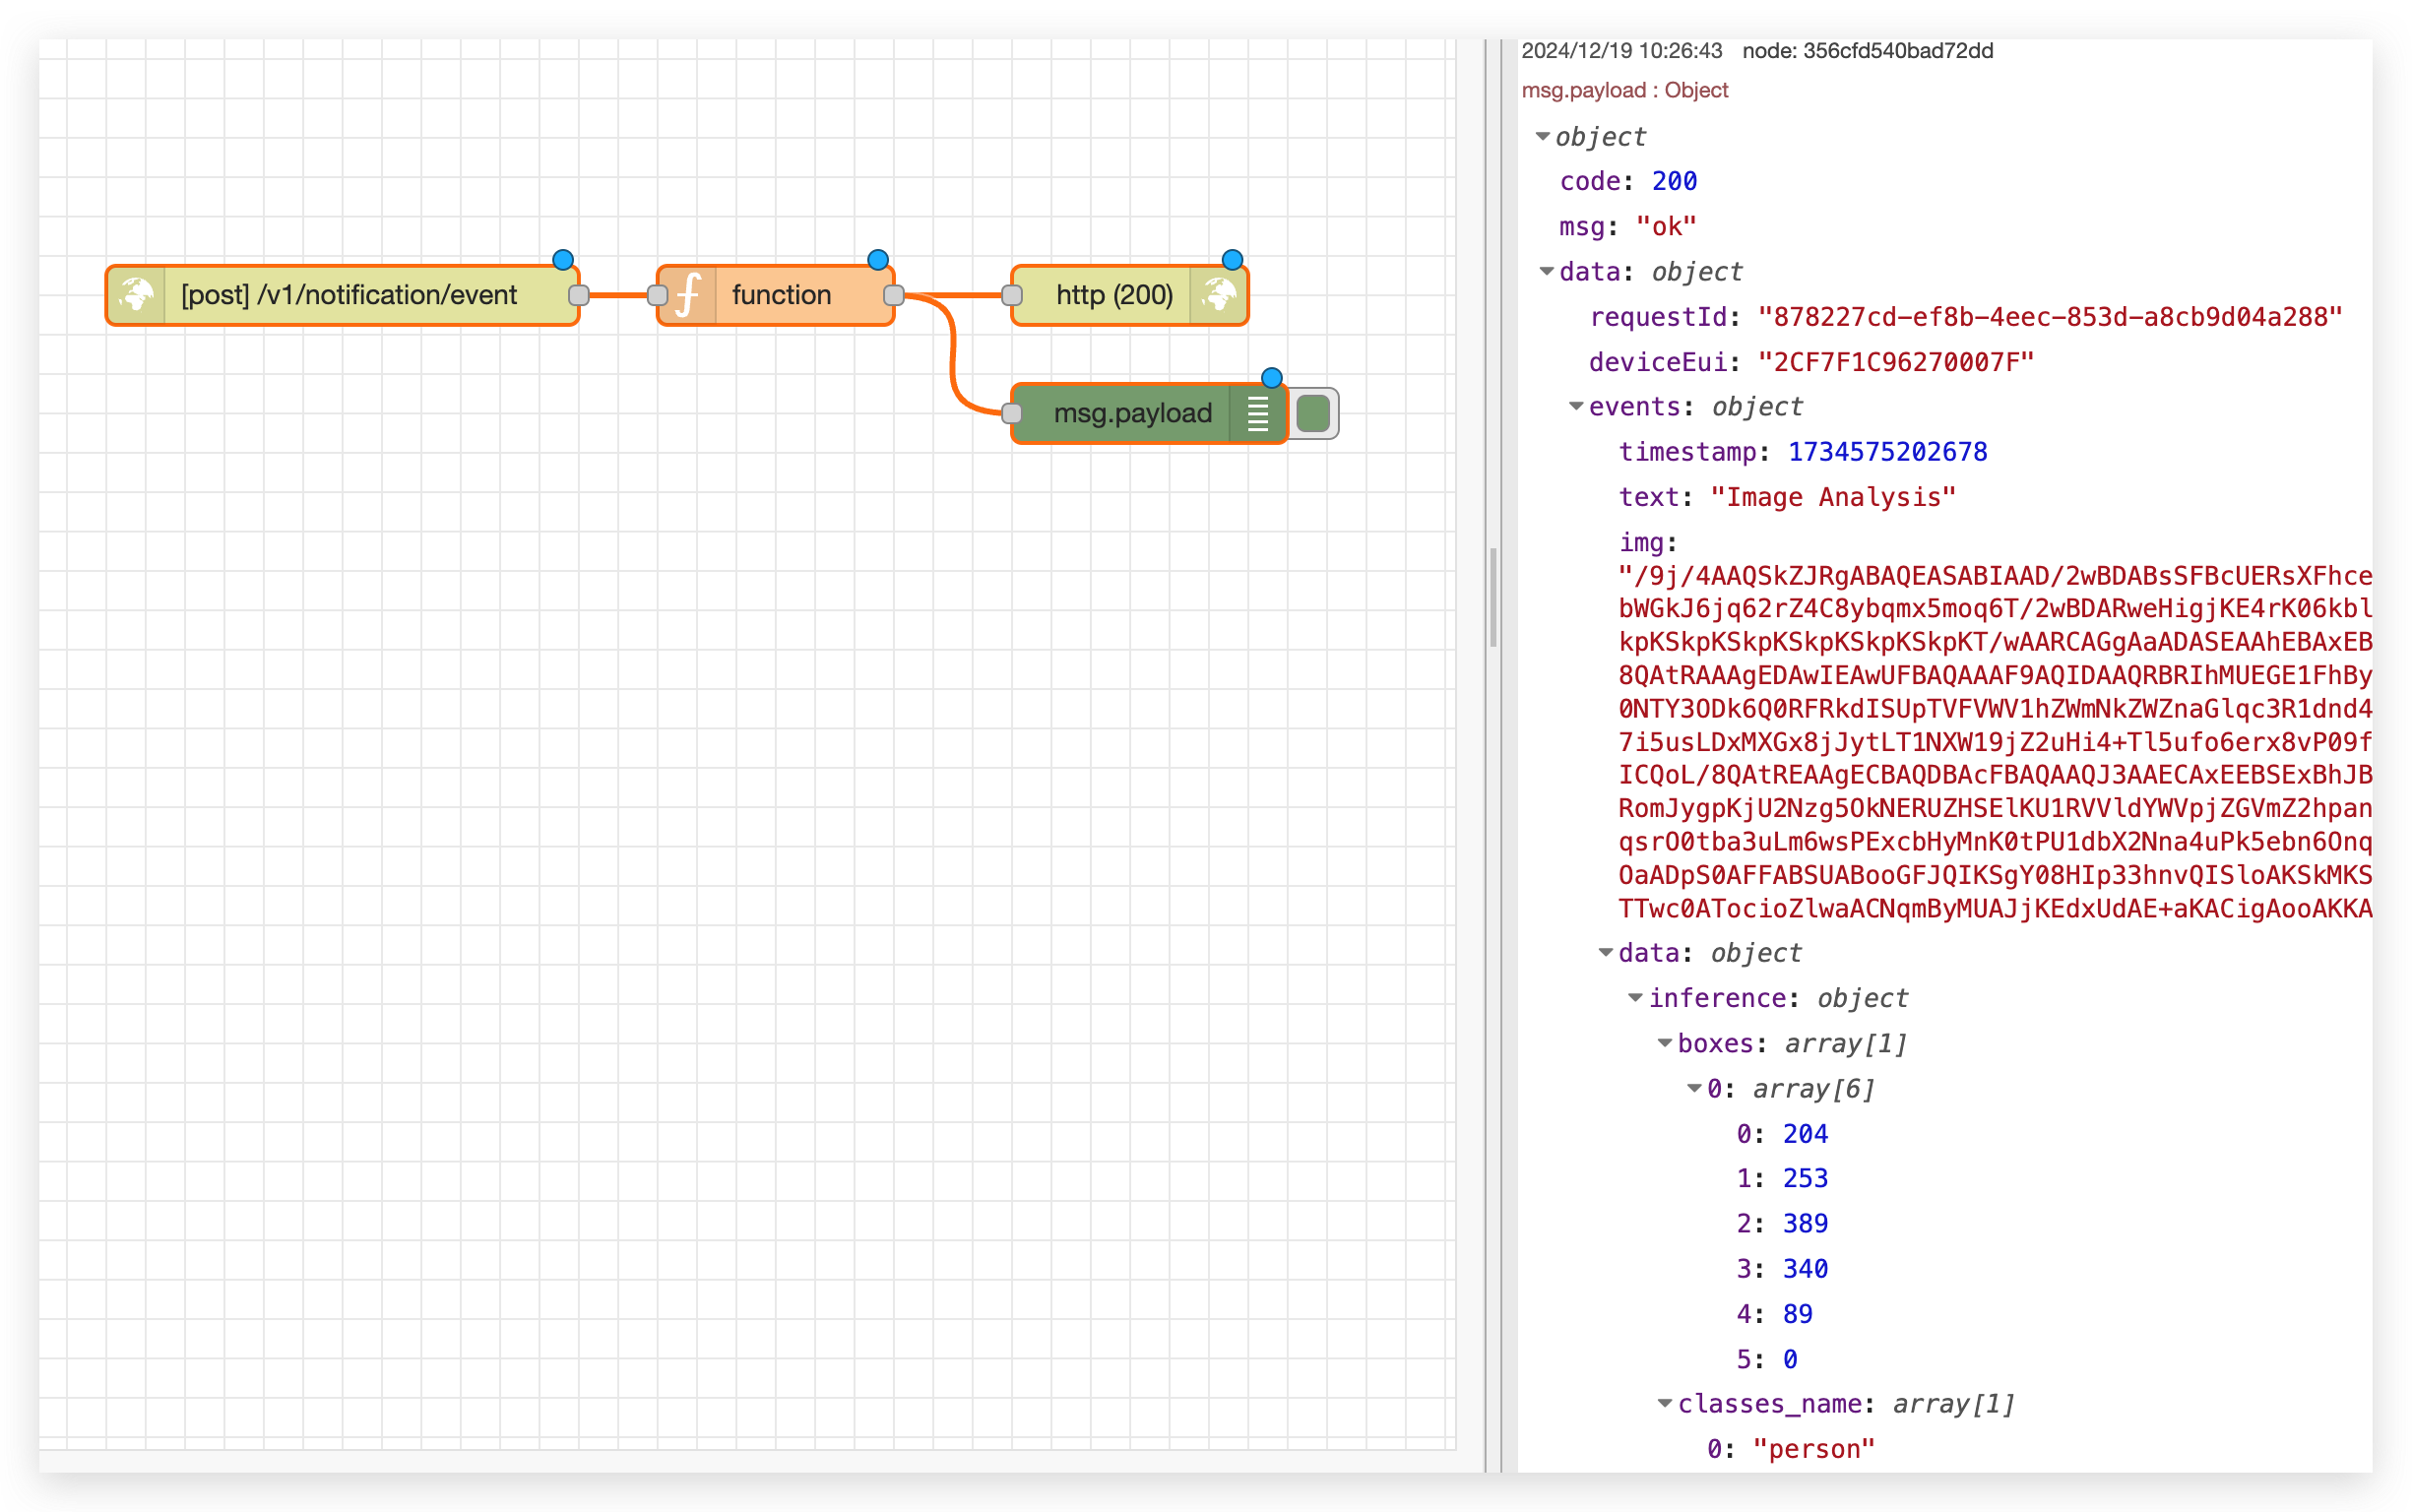
Now, when watcher detect people, it will send message to Node-RED automatically~
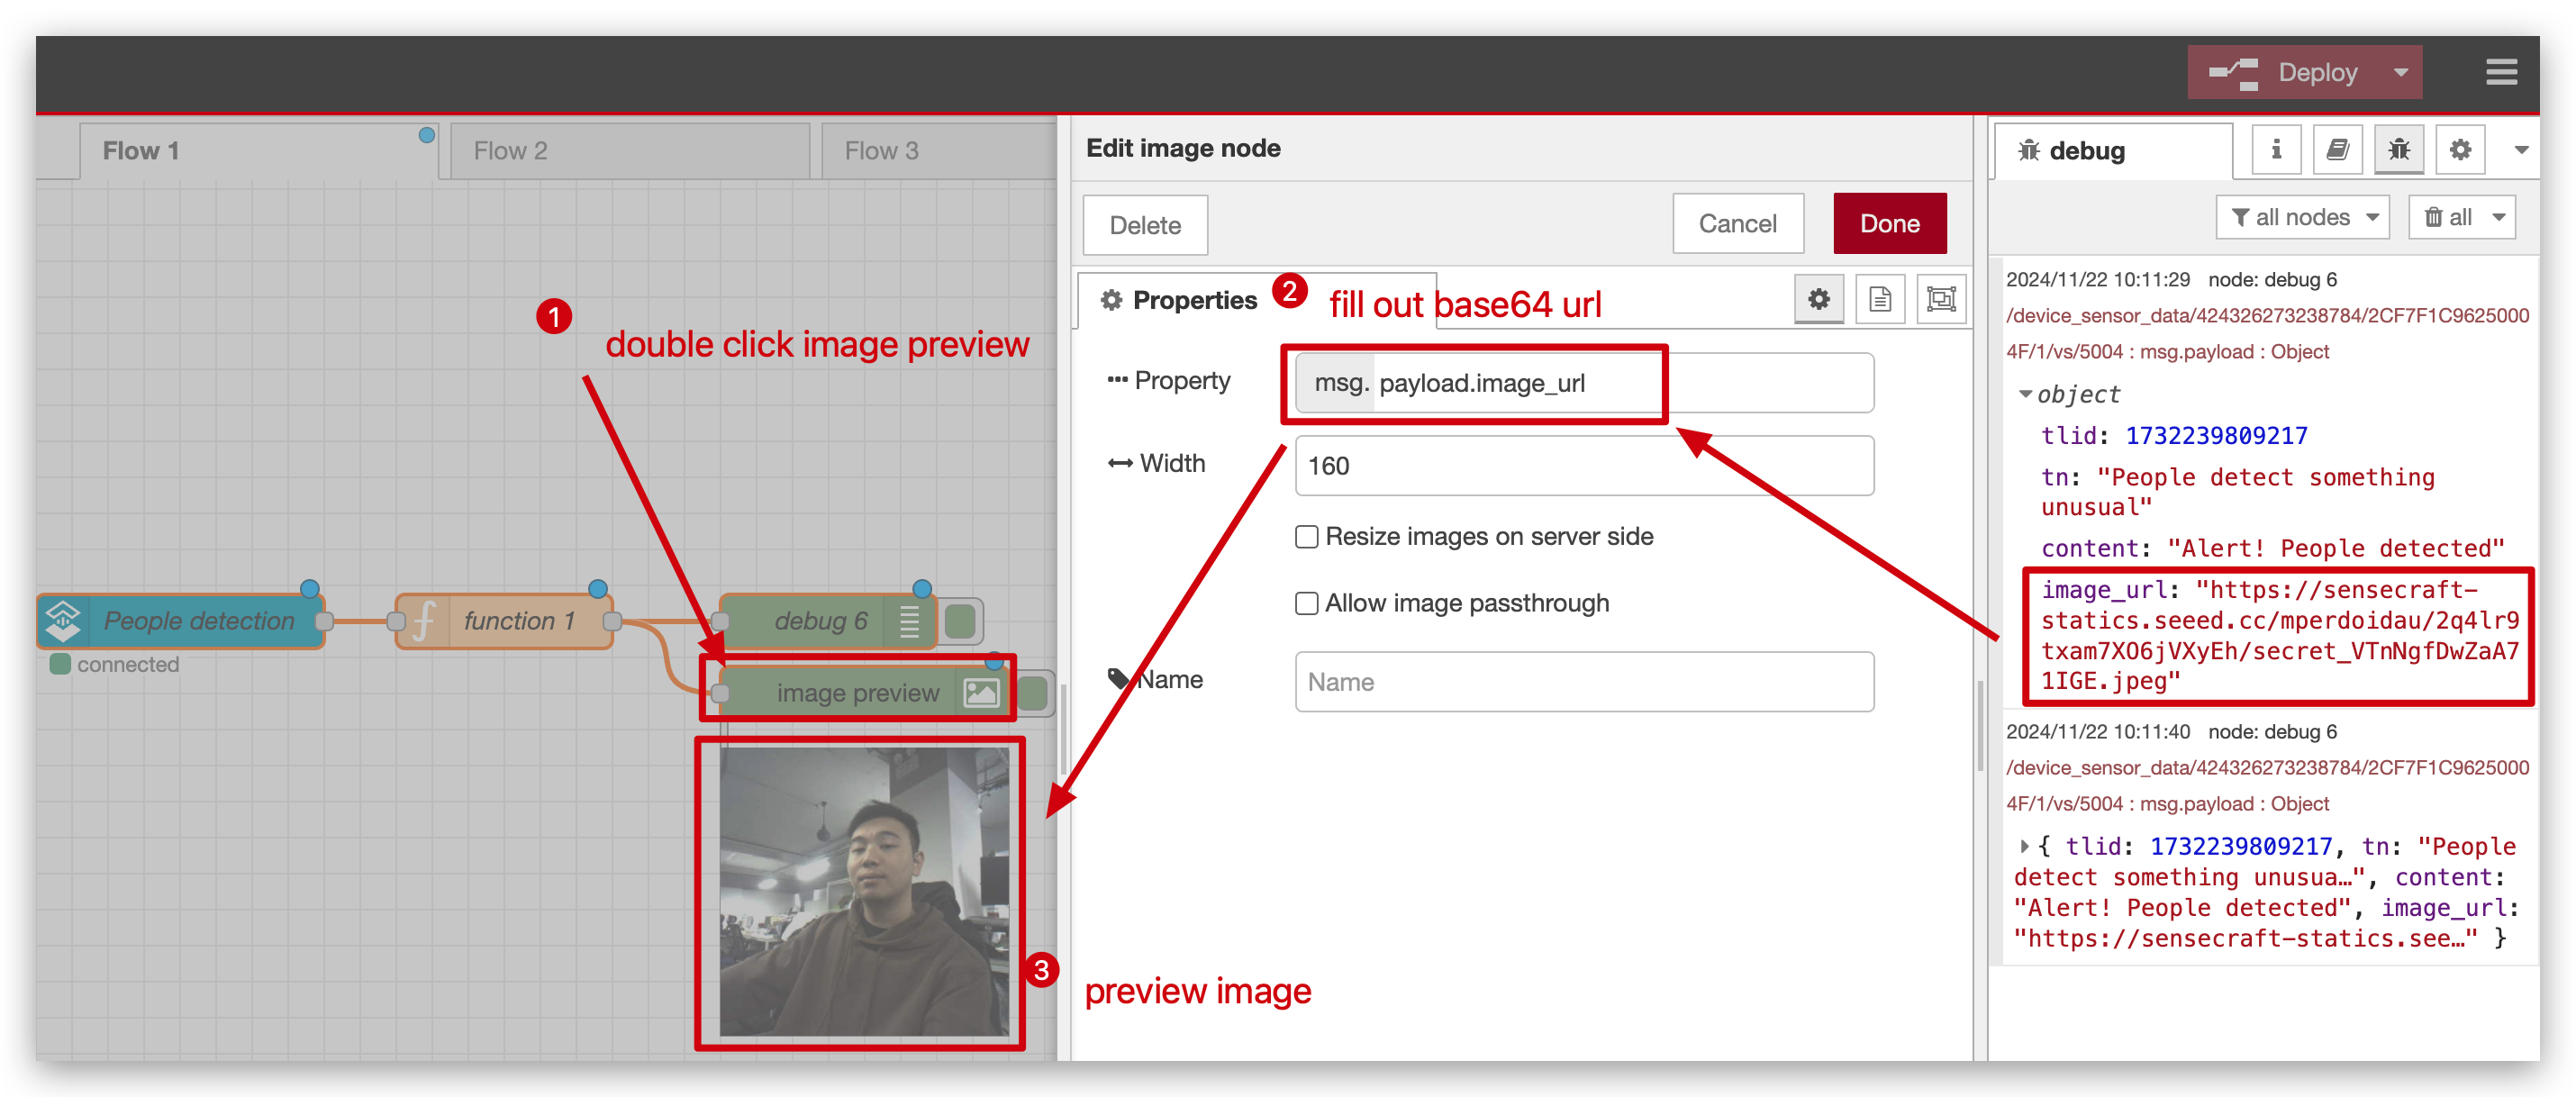
Part 5. Preview image
If you want to preview the image from Watcher, you need to install a library in Node-RED.
If not, you can ignore this part.
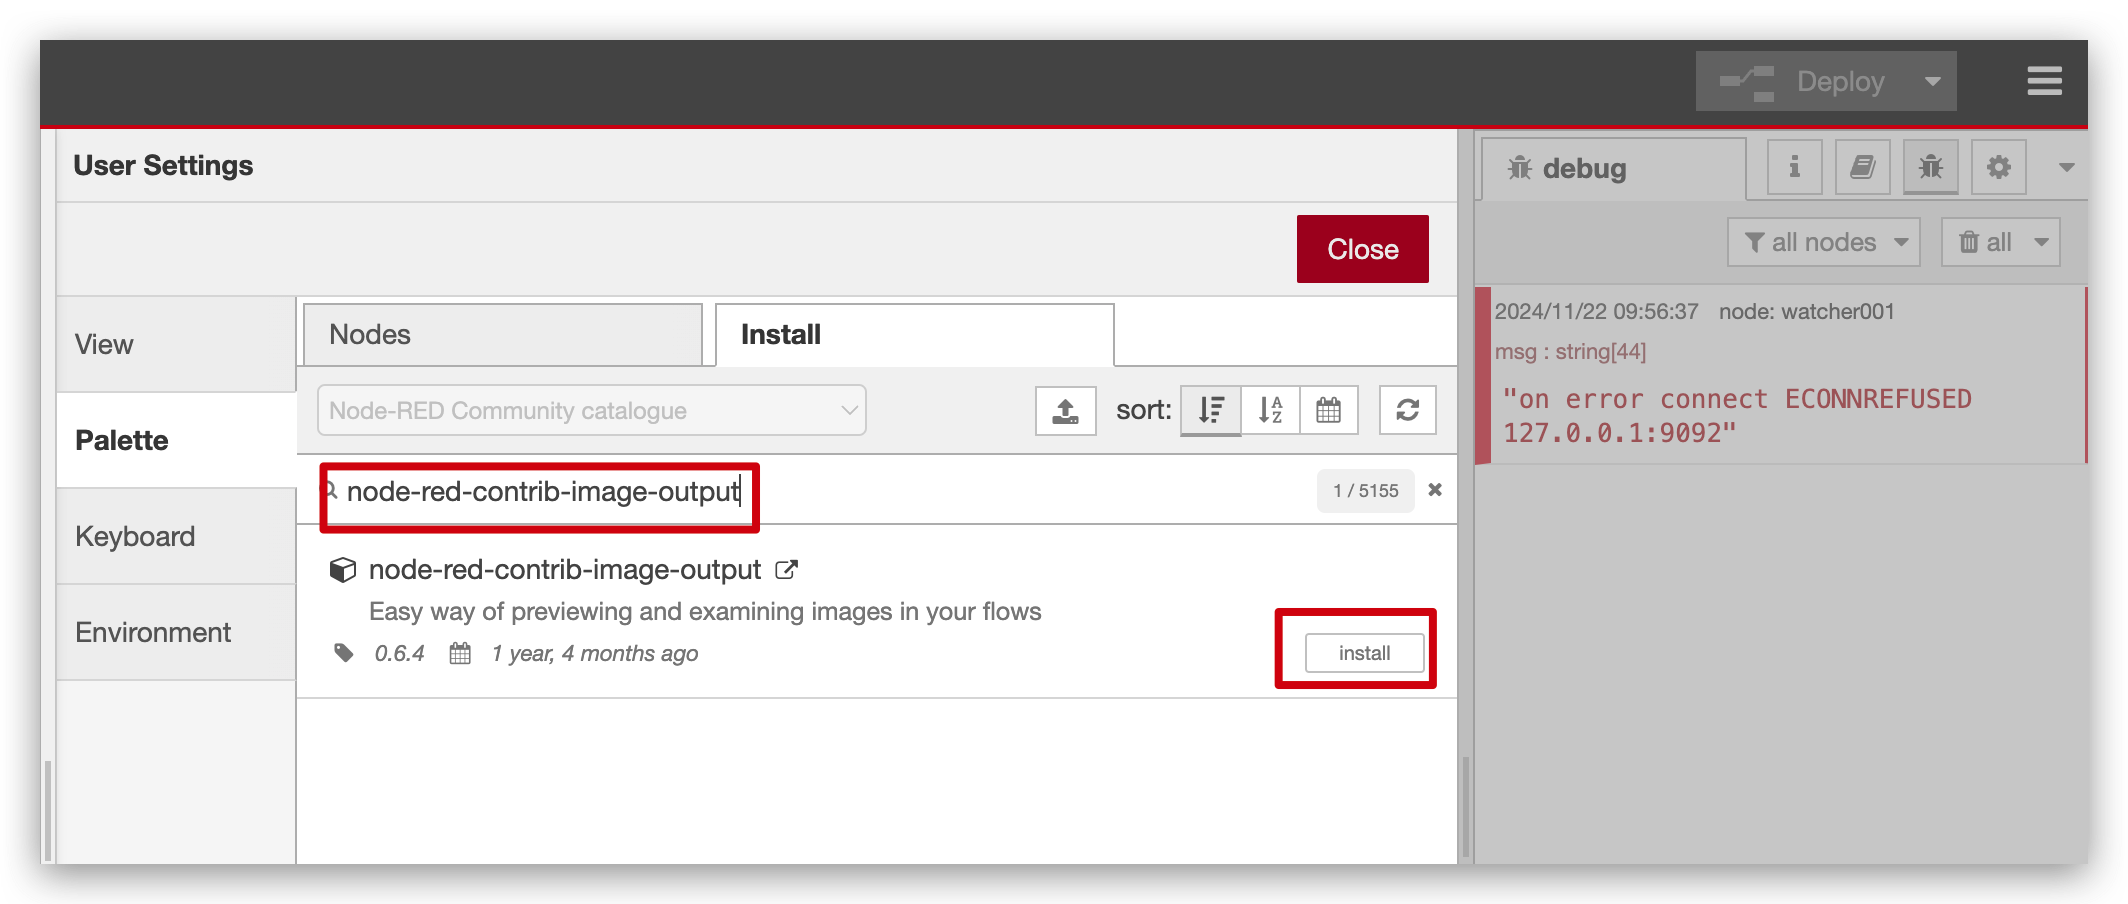
After installation, you can find it in output part, drag it to where you want to preview image and connect.

This step is very important. You need to double click image preview node and fill out base64 url in this node. Don't forget to click Done and Deploy button on right upper corner. After that, we will preview the image when Watcher message come again~
Congratulations!Now the data is transmit from Watcher to Node-RED successfully. Next wiki we will walk you through how the data from Watcher to other platform, welcome to try~
Tech Support & Product Discussion
Thank you for choosing our products! We are here to provide you with different support to ensure that your experience with our products is as smooth as possible. We offer several communication channels to cater to different preferences and needs.