reBot Arm B601-RS Embodied Agent Design Framework





Environment Setup → Model Download → LLM Switching → Hand-Eye Calibration → Demo Running → Troubleshooting
This tutorial is the operation guide for the wrc_demo project. Follow the steps in this guide to go from zero cloning to a running demo in 1-2 hours.
wrc_demo is a visual grasping demo for the reBot Arm B601-RS (RobStride bus), running on Ubuntu 22.04 + Python 3.10 + conda wrc-demo environment. The demo receives natural language instructions (e.g. "pick up the red block"), automatically plans the grasp and executes it.
0. Cheat Sheet
System Requirements
| Item | Requirement |
|---|---|
| Operating System | Ubuntu 22.04+ / Debian 12+ / WSL2 |
| Python | 3.10 (within conda env) |
| Memory | ≥ 16 GB (mock starts at 8 GB) |
| Disk | ≥ 10 GB |
| GPU (Optional) | NVIDIA RTX 5070 / 4090 / H100, etc. |
| VRAM | ≥ 8 GB |
1. Project Objectives and Audience
- Project Objectives: Connect a Vision Language Model (VLM) to the reBot Arm B601-RS, so that natural language instructions are automatically converted into grasping actions — VLM selects objects, Pinocchio solves inverse kinematics (IK),
SafetyHarnessperforms fail-closed verification on each 50 Hz waypoint. - Target Audience: Developers with NVIDIA GPU + Ubuntu 22.04 + Python 3.10 basics, who want to run the demo / modify the detector / add skills.
2. Project Overview
2.1 Project Features
-
Vision Language Model Driven, Three-Level Decision Making
Qwen3-VL-2B-Instruct-AWQ-4bit is used as the default task planning brain, which can run natively on devices with 8 GB of VRAM. Command parsing follows the Reflex → Habit → LLM three-level fast-slow path — common instructions (e.g. "pick up the red block") go directly through the Reflex template syntax without calling the LLM; only new tasks will involve the VLM. -
Hand-Eye Calibration + 6-DoF Grasp Planning (fail-closed)
Built-in hand-eye calibration script (ArUco checkerboard + Pinocchio FK + joint SE(3) LM optimization), supports top (ETH) camera layout. Each streaming trajectory point is verified bySafetyHarness— if any verification fails, the robotic arm stops immediately mid-motion. -
6 TOOL_SPECS + 5 MCP Gateways
The top layer exposes 6 safety-gated tools:pick_and_place/grasp_object/place_at/on/move_t/teach_record/replay+task_done; the MCP gateway additionally exposes 5 tools:camera_snapshot/world_state/live_view_url/emergency_stop/reset_stop. Zero protocol adaptation work is required to add new skills. -
Complete Trace + Episodic Memory
Each skill call is written to an ASPIRE-style multimodal trace (trace.jsonl+ before and after key frame JPEG), with a 15-second event window + object persistence belief, so that the "cup seen 10 seconds ago" can still be manipulated after occlusion. -
Mock-First Development Experience
Full-stack mock (--camera mock --arm mock --llm mock) allows you to run the complete decision pipeline without any hardware. Mock tests and real hardware run the same security code.
2.2 Specifications
| Category | Parameter | Specification |
|---|---|---|
| Hardware | Robotic Arm | reBot Arm B601-RS (RobStride bus, 6-DOF + gripper) |
| Camera | Orbbec Gemini 2 / Intel RealSense D435i / D405 | |
| Communication | CAN Bus via USB2CAN; USB 3.0 camera | |
| Control Host | Ubuntu 22.04+ PC / DGX Spark | |
| Local LLM | Default profile | local_qwen3_vl (Qwen3-VL-2B-Instruct-AWQ-4bit) |
| Inference Framework | vLLM 0.6+ (multimodal inference) | |
| VRAM Requirement | ≥ 8 GB (approximately 30 tokens/s) | |
| Weight Size | ~2.4 GB | |
| Cloud LLM | Anthropic | Claude (vision + tools; ANTHROPIC_API_KEY env) |
| OpenAI Compatible | Any OpenAI-compat endpoint (OPENAI_API_KEY env) | |
| MiniMax | api.minimax.com (MINIMAX_API_KEY env; text-only) | |
| Detector | Default | YOLOE-11s-seg (open vocabulary detection + instance segmentation) |
| Optional | YOLOE-26l-seg (more accurate but 2× slower) | |
| Text Encoding | MobileCLIP2-B torchscript (Apple apple/MobileCLIP2-B → trace by yourself) | |
| Software Stack | Kinematics | Pinocchio 3.x (FK/IK, DLS + random restart) |
| RobStride Driver | motorbridge (SocketCAN) + vendored SDK | |
| Grasp Backend | camera-camera / GraspGen-X (ZMQ) / analytic OBB (three layers) | |
| Python | 3.10 | |
| Skill System | Total TOOL_SPECS | 6 (including 1 task_done terminator + 5 real skills) |
| Arm Motion Skills | 18 string literals in _MOTION_SKILLS | |
| MCP Toolset | TOOL_SPECS - _EXCLUDED_TOOLS + _EXTRA_TOOLS = 6 - 1 + 5 = 10 | |
| Safety | Trajectory Check | Each 50 Hz streaming waypoint passes through SafetyHarness.approve() |
| Failure Mode | fail-closed (any violation → abort mid-motion) | |
| Joint Reserve | IK limit_margin=0.025 > harness joint_margin=0.02 (invariant) |
2.3 Bill of Materials (BOM)
| Component | Quantity | Included |
|---|---|---|
| reBot Arm B601-RS Robotic Arm | 1 | ✅ |
| Gripper (pre-installed) | 1 | ✅ |
| USB2CAN Serial Bridge | 1 | ✅ |
| 48V Power Adapter | 1 | ✅ |
| USB-C / Communication Cable | 1 | ✅ |
| RGB-D Depth Camera (Orbbec Gemini 2 recommended) | 1 | ✅ |
| Camera Connector / Mounting Bracket | 1 | ✅ |
| Ubuntu 22.04+ Control Host (NVIDIA GPU ≥ 8 GB) | 1 | ❌ Self-provided |
Wiring Instructions
- Robotic Arm: 48V power supply → robotic arm; USB2CAN → host USB port (first use requires
sudo ip link set can0 up type can bitrate 1000000) - Camera: Orbbec USB 3.0 → host USB 3.0 port
- Permission Configuration:
# One-time read/write permission for USB devices
sudo chmod a+rw /dev/bus/usb/*/*

# Orbbec udev rules (recommended for first installation)
sudo bash scripts/install_udev_rules.sh
sudo udevadm control --reload-rules
sudo udevadm trigger
# The kit includes PCAN-USB, usually can0 or can1 should appear directly
sudo modprobe peak_usb
ip -br link

# If can0 appears, set the bitrate
sudo ip link set can0 down 2>/dev/null
sudo ip link set can0 type can bitrate 1000000
sudo ip link set can0 up
2.4 Environment Requirements
Hardware
| Item | Requirement |
|---|---|
| CPU | x86_64 (aarch64 not covered by testing) |
| Memory | ≥ 16 GB (mock starts at 8 GB, 16 GB recommended for local LLM) |
| Disk | ≥ 10 GB (model weights + conda env + trace accumulation) |
| GPU (for local LLM inference) | NVIDIA RTX 5070 / 4090 / H100 |
Software
| Item | Requirement |
|---|---|
| Python | 3.10 (within conda env) |
| Conda | miniforge3 / miniconda / anaconda |
| System Packages | libusb-1.0-0-dev, ffmpeg, git, can-utils |
Network
| Resource | Description |
|---|---|
| GitHub | Clone github.com/TheMoonAstronaut/wrc |
| HuggingFace | Download YOLOE / MobileCLIP2 / Qwen3-VL weights |
| PyPI | Install ultralytics / openai / anthropic / pin / motorbridge |
3. Environment Configuration
3.0 Minimal Path: Run Mock in 5 Minutes
If you just want to run the mock to verify the installation (without reading other content), three commands will do:
git clone https://github.com/TheMoonAstronaut/wrc.git
cd wrc
conda env create -f environment.yml && conda activate wrc-demo

# Run mock test (17 passed, 1 skipped ≈ 30 seconds)
pytest tests/test_extrinsics_loader.py \
        tests/test_hand_eye_compensation_per_camera.py \
        tests/test_demo_yaml_llm_profile.py -q
The environment name is fixed as wrc-demo. If you need to customize the name (e.g. team naming convention), please modify the name: field in environment.yml and replace the subsequent commands accordingly.
pyorbbecsdk2 is not included in environment.yml ** — its dependency chain pyorbbecsdk2 → open3d==0.18.0 → dash → plotly → ipywidgets → ... often causes pip to trigger resolution-too-deep. Install Orbbec SDK separately.
torch is also not included in environment.yml ** — ultralytics marks torch as optional, but import ultralytics will trigger import torch.
3.1 Prerequisites
- Completed reBot Arm B601-RS Quick Start (robotic arm assembly, zero point initialization, motor ID configuration) — only required for real hardware
- NVIDIA GPU + CUDA driver installed (only required for local LLM inference)
- miniforge3 or similar conda tool installed
- Ubuntu 22.04+ / Debian 12+ / WSL2
3.2 System Dependencies (required for real hardware)
sudo apt update
sudo apt install -y libusb-1.0-0-dev ffmpeg git can-utils
libusb-1.0-0-dev: Orbbec depth cameraffmpeg: UVC4K / RealSense RGB streamcan-utils: SocketCAN bring-up (robotic arm)
3.3 post-install: Install PyTorch separately (CUDA version)
Working Directory: From this section onwards, all commands assume you are in the root directory of the wrc repository. If you open a new shell, first cd wrc.
# You should have already cd wrc now; if not:
cd /path/to/wrc
conda activate wrc-demo
3.3.1 Install Pytorch and Torchvision
According to the CUDA version of your device, install Pytorch and Torchvision following the official tutorial
If you need to install stable CUDA 12.8, run the following command
PYTHONNOUSERSITE=1 pip install --force-reinstall \
  torch torchvision torchaudio \
  --index-url https://download.pytorch.org/whl/cu128
3.3.2 Load PyTorch in the conda environment
PyTorch places nvidia packages in site-packages/nvidia/lib/, but conda does not automatically add these paths to LD_LIBRARY_PATH. Without this hook, import torch in any new shell will report OSError: libcudart.so.13: cannot open shared object file
Run the following command to install the nvidia LD_LIBRARY_PATH conda hook
bash scripts/install_nvidia_libs_hook.sh
Verify the hook is effective (works in new shells)
source /home/seeed/miniforge3/envs/wrc-demo/etc/conda/activate.d/nvidia_libs.sh
python -c "import torch; print('torch:', torch.__version__, 'cuda:', torch.cuda.is_available())"
# Expected: torch: 2.13.0+cu130 cuda: True
3.4 Install Depth Camera SDK
This project supports Orbbec Gemini 2, RealSense D435i / D405 and other RGB-D depth cameras.
Orbbec Gemini 2
Orbbec Gemini 2 depends on pyorbbecsdk (Python version of Orbbec SDK v2). Method 1 is recommended:
Method 1: Install via pip (recommended)
conda activate wrc-demo
PYTHONNOUSERSITE=1 pip install pyorbbecsdk2
You must add PYTHONNOUSERSITE=1, otherwise pip will install the package to ~/.local/lib/python3.10/site-packages/ (user-level site-packages), and the conda env will still be empty.
Method 2: Install from GitHub source code (when there are network problems or you want the latest version)
sudo apt-get install -y cmake build-essential libusb-1.0-0-dev

# Switch to ~/sdk directory (not the wrc directory)
mkdir -p ~/sdk && cd ~/sdk
git clone https://github.com/orbbec/pyorbbecsdk.git
cd pyorbbecsdk
PYTHONNOUSERSITE=1 pip install -e .

# Return to the wrc directory after installation
cd -
Users in mainland China can use the gitee mirror to accelerate: git clone https://gitee.com/orbbecdeveloper/pyorbbecsdk.git
RealSense D435i / D405
RealSense SDK (pyrealsense2) usually needs to be compiled from source, it is recommended to refer to Intel's official documentation.
4. Model Weight Acquisition
4.1 Install MobileCLIP2 Text Encoder
Apple released PyTorch weights on HuggingFace apple/MobileCLIP2-B, and YOLOE text prompt detection requires the .ts version.
conda activate wrc-demo

# Download MobileCLIP2 .pt
PYTHONNOUSERSITE=1 python scripts/setup_models.py --fetch
Convert format trace .pt → .ts (manual) **
PYTHONNOUSERSITE=1 pip install "open_clip_torch>=2.30"

PYTHONNOUSERSITE=1 python <<'PY'
import torch, open_clip
full = open_clip.create_model_from_pretrained("MobileCLIP2-B", pretrained="models/mobileclip2_b.pt", return_transform=False)
class Wrap(torch.nn.Module):
    def __init__(self, m): super().__init__(); self.m = m
    def forward(self, t):
        f = self.m(t); return f / f.norm(dim=-1, keepdim=True)
torch.jit.trace(Wrap(full.text).eval(), torch.zeros(2, 77, dtype=torch.long), strict=False).save("models/mobileclip2_b.ts")
PY
Manual verification
PYTHONNOUSERSITE=1 python -c "import torch; m=torch.jit.load('models/mobileclip2_b.ts'); o=m(torch.zeros(2,77,dtype=torch.long)); print(o.shape, o.norm(dim=-1).tolist())"
# Expected: torch.Size([2, 512]) [1.0, 1.0]
4.1.1 About the search path of YOLOE text encoder
ultralytics loads mobileclip*.ts only looks at the current working directory (CWD), does not look for it in models/.
If you run python -m wrc_demo.apps.demo ... directly, if the CWD is not under models/, it will report "Download failure for ... mobileclip_*.ts".
You can run the following command to solve the above error problem
# Two processing methods when running python directly (choose one)
ln -sf models/mobileclip2_b.ts mobileclip2_b.ts     # Project root symlink
4.2 Download Qwen3-VL Local LLM Weights
If you plan to use cloud API, you can skip this step:
This tutorial defaults to llm.profile=local_qwen3_vl corresponding to the AWQ-4bit quantized version (runs with 8GB VRAM).
hf download cyankiwi/Qwen3-VL-2B-Instruct-AWQ-4bit \
  --local-dir models/qwen3-vl-2b-awq-4bit
# → https://huggingface.co/cyankiwi/Qwen3-VL-2B-Instruct-AWQ-4bit
If you have network problems using hf download, you can use the github repository to download
git clone https://huggingface.co/cyankiwi/Qwen3-VL-2B-Instruct-AWQ-4bit models/qwen3-vl-2b-awq-4bit
# If it gets stuck for too long, just press ctrl + c to stop
cd models/qwen3-vl-2b-awq-4bit && git lfs pull
4.3 Cheat Sheet
| Asset | Size | Necessity | Acquisition Method |
|---|---|---|---|
qwen3-vl-2b-awq-4bit/ | ~2. | 4 GB | Required for local LLM deployment (8 GB VRAM) |
yoloe-26s-seg.pt | ~31 MB | Open-vocabulary detection (recommended for 2026-09+) | Extract via cp after cloning Seeed-Projects/reBot-DevArm-Grasp; uses existing mobileclip2_b.ts, no blt.ts required |
yoloe-26l-seg.pt | ~75 MB | Optional (higher accuracy, ~2x slower) | Same as above; also uses mobileclip2_b.ts |
yoloe-11s-seg.pt | ~28 MB | Not recommended — requires mobileclip_blt.ts (572 MB, ~1.5h download on first launch) | Only use when legacy model weights are required; to switch back, modify the model: field in configs/demo.yaml |
mobileclip2_b.pt | ~571 MB | YOLOE 26s/l text encoding source (raw PyTorch version) | Automatically pulled from apple/MobileCLIP2-B via python scripts/setup_models.py --fetch |
mobileclip2_b.ts | ~253 MB | YOLOE 26s/l text encoding (actually loaded at runtime) | Manually traced (see §4.1); after download must be placed in models/ or CWD — see §4.1.1 |
mobileclip_blt.ts | ~572 MB | YOLOE 11s text encoding (not recommended, source is hard to download) | Manually traced, source apple/MobileCLIP-B-LT; only required when using 11s model |
pyrealsense2 | Compiled artifact | Only for RealSense users | Compile per Intel official documentation |
5. Hand-Eye Calibration
The purpose of calibration is to let the demo know the transformation between pixel coordinates ↔ robot base coordinate system. data/clip/hand_eye_top.json is a desensitized reference matrix, your camera must be re-calibrated.
5.1 Preparation
1. Print ArUco Checkerboard
Print a checkerboard from the ArUco 4x4 dictionary, ID = 0, side length = 0.10 m (10 cm). Recommended source: ~/wrc/aruco100x100.pdf
After printing, precisely measure the side length (printers may scale the image), use the measured value as the --marker-size parameter.
2. Camera Connection + CAN bus
# Plug Orbbec into USB 3.0, grant camera permissions
sudo chmod a+rw /dev/bus/usb/*/*

# CAN bus (robotic arm)
sudo ip link set can0 down 2>/dev/null
sudo ip link set can0 type can bitrate 1000000
sudo ip link set can0 up
3. List Devices
wrc-calib-top --list
# Expected: lists Orbbec device index + serial number

# Write camera serial number
wrc-calib-top --bind top --serial `xxxx`
# Replace the content in `xxxx` with the listed camera serial number
5.2 Top Camera ETH Calibration
ETH = Eye-To-Hand: Camera is mounted at a fixed position outside the robotic arm. Place the calibration board as shown in the figure.
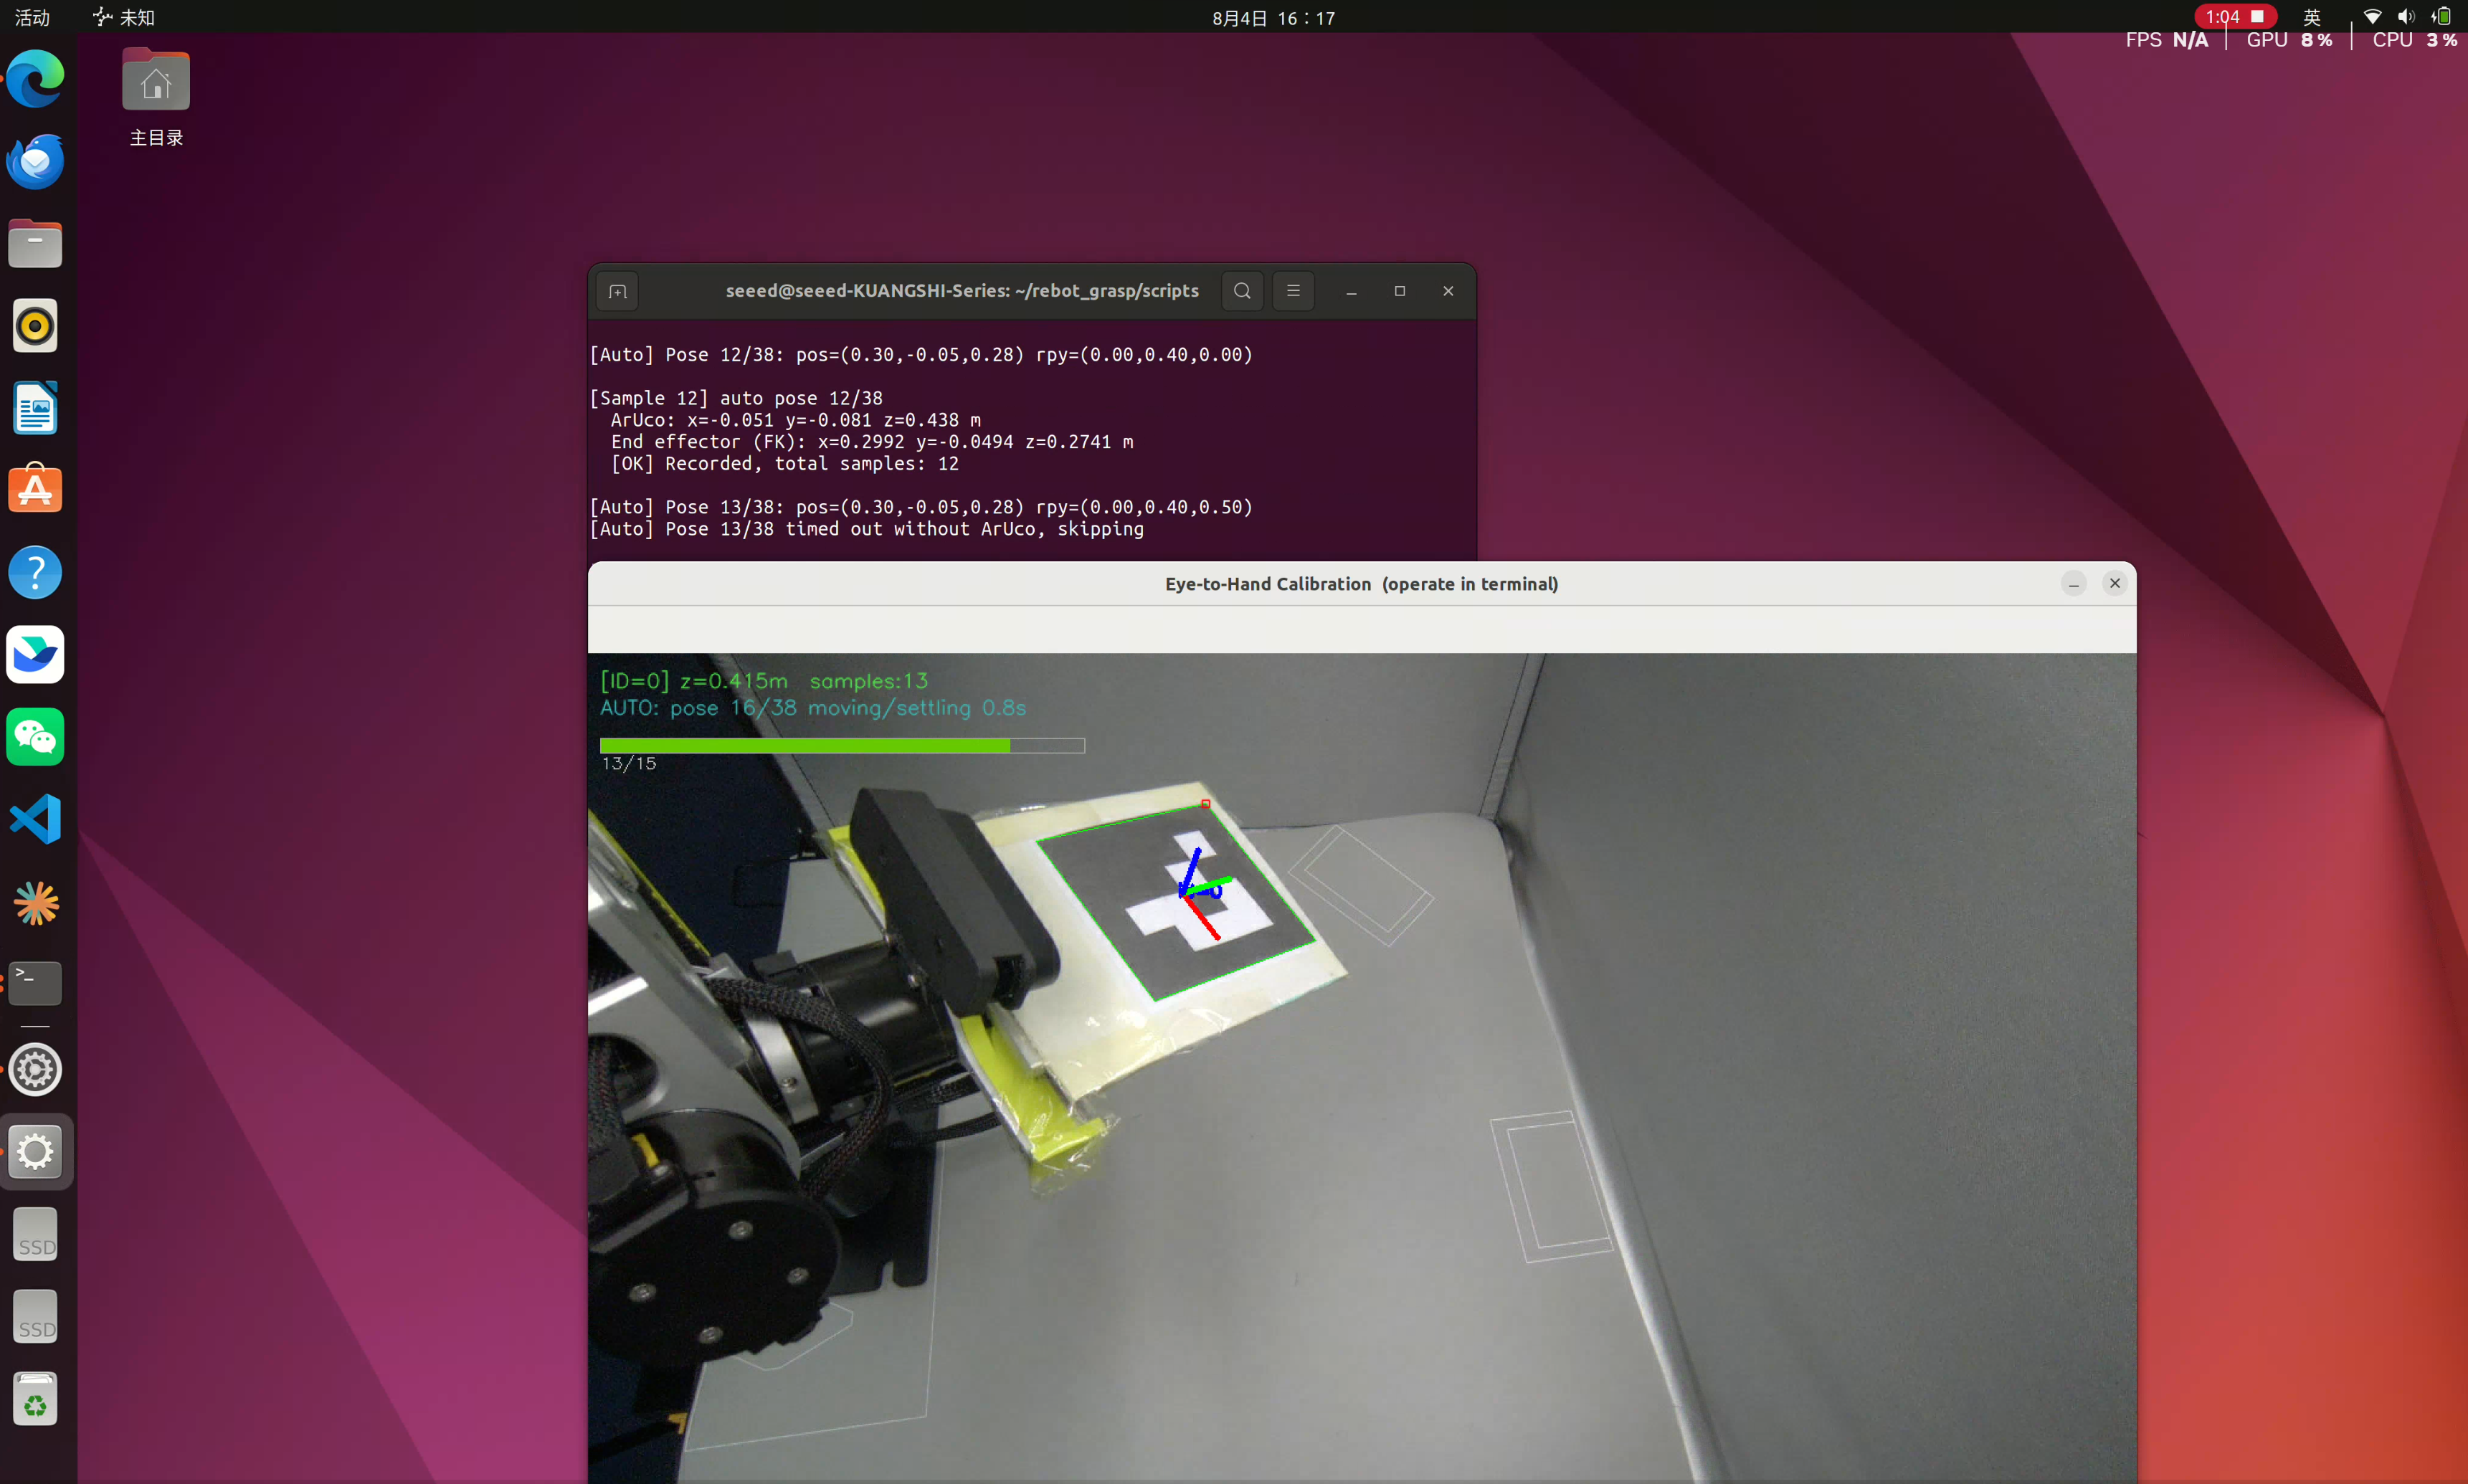
# Automatic mode (automatically runs 25+ sampling points with preset poses)
wrc-calib-top --marker-size 0.10 --n 30 \
  --out data/calibration/hand_eye_top.local.json

# Manual mode (press ENTER to sample each time)
wrc-calib-top --marker-size 0.10 --manual --n 30 \
  --out data/calibration/hand_eye_top.local.json
The hand_eye_top.local.json file is automatically ignored by .gitignore (will not pollute the repository) and is the real device calibration result.
This demo has a pre-defined safe working area for the robotic arm. If IK solving fails during grasping and placement operations in a large area, you need to adjust the fixed position of the camera and re-calibrate (a stable camera position is approximately 36cm * 36cm away from the robotic arm base).
Calibration Principle
The tool runs joint_solve internally (SE(3) LM + Huber + 3*MAD outlier rejection):
- FK from
wrc_demo.control.kinematics.Kinematics(Pinocchio on RS URDF,joint_signs=[-1]*6,ee_frame='gripper_end') - PnP from cv2.aruco + SDK intrinsics
Output:
data/calibration/hand_eye_top.json— Desensitized reference matrix (do not use, serial=REDACTED)data/calibration/hand_eye_top.local.json— Your real device calibration result
5.3 Verify Calibration RMSE
Do not re-calibrate, directly verify with known base coordinate system points:
wrc-calib-top --verify \
  --json data/calibration/hand_eye_top.local.json \
  --known-points "0.30,0.00,0.02;0.25,-0.05,0.02;0.35,0.05,0.02"
# Expected: RMSE < 10 mm (reference set.py:320)
6. LLM Configuration
6.1 Decision Tree
What is your VRAM size?
├─ ≥ 8 GB  → Option A: Local model (local_qwen3_vl)
├─ Have API key → Option B: Cloud API (anthropic / openai / minimax)
└─ Neither → Option C: mock (test only)
6.2 Option A: Local Model (Recommended, 8 GB+ VRAM)
Start vLLM service (in another terminal):
conda activate wrc-demo
bash scripts/start_cosmos3_server.sh --bg    # Start in background
sleep 60                                    # Wait for vLLM to load the model (~60s for first run)

# Health check
bash scripts/start_cosmos3_server.sh --status
# Expected: [status] vllm running, PID <xxx>
vLLM 0.6+ supports multimodal inference for Qwen3-VL. The AWQ-4bit quantized version can run at ~30 tokens/s on 8 GB VRAM.
6.3 Option B: Cloud API (No GPU Required)
Two-layer configuration — YAML profile file + environment variable key:
a. YAML profile file (configs/llm/*.yaml)
| File | Purpose | Key Fields |
|---|---|---|
anthropic.yaml | Claude | type: anthropic, model: claude-sonnet-5 |
openai.yaml | OpenAI / OpenAI compatible | type: openai_compat, base_url, model |
minimax.yaml | MiniMax | type: openai_compat + fixed base_url: https://api.minimax.chat/v1 + env_key: MINIMAX_API_KEY |
local_qwen3_vl.yaml | Local vLLM (default) | No key required |
mock.yaml | scripted mock | For testing |
b. Select which profile to use (configs/demo.yaml)
llm:
  profile: local_qwen3_vl    # ← Modify this line (mock / anthropic / openai / minimax / local_qwen3_vl)
Temporary switch via CLI: wrc-demo --llm anthropic --task "..."
c. API key (environment variable)
| profile | Which env var is read |
|---|---|
anthropic | ANTHROPIC_API_KEY |
openai | OPENAI_API_KEY (modify endpoint via OPENAI_BASE_URL) |
minimax | MINIMAX_API_KEY (read from env_key: field in YAML) |
local_qwen3_vl | Not required |
Run
conda activate wrc-demo

# ⚠ Important: `PUT_KEY_HERE` below is a **placeholder**, must be replaced with your real key

# Claude (Anthropic key format: sk-ant-api03-...)
export ANTHROPIC_API_KEY=PUT_KEY_HERE

# OpenAI (or any OpenAI compatible endpoint; key format: sk-...)
export OPENAI_API_KEY=PUT_KEY_HERE

# MiniMax (key format: sk-cp-...)
export MINIMAX_API_KEY=PUT_KEY_HERE

# Verify env var is set correctly
echo "ANTHROPIC_API_KEY prefix: ${ANTHROPIC_API_KEY:0:10}..."
echo "MINIMAX_API_KEY prefix: ${MINIMAX_API_KEY:0:10}..."
Cloud API_KEY configured with export is only valid in the current terminal. If you want to persist the key to ~/.bashrc (export only works for current shell, new shells need to be reconfigured):
# Replace PUT_KEY_HERE with your real key (one full line)
echo 'export ANTHROPIC_API_KEY=PUT_KEY_HERE' >> ~/.bashrc

# Immediately reload and verify bashrc syntax is correct (will not expose key content)
bash -n ~/.bashrc && echo "✓ bashrc syntax OK"

source ~/.bashrc
# Verify env var is actually set
echo "ANTHROPIC_API_KEY prefix: ${ANTHROPIC_API_KEY:0:10}..."
Alternatively, you can write the key directly in YAML (not recommended):
# configs/llm/minimax.yaml has two writing methods:

# Method A (recommended, key is in env var)
type: openai_compat
base_url: https://api.minimax.chat/v1
model: MiniMax-M3
env_key: MINIMAX_API_KEY          # ← This is the "name of the env var", not the value

# Method B (key written directly in YAML, but will be tracked by git)
type: openai_compat
base_url: https://api.minimax.chat/v1
model: MiniMax-M3
api_key: PUT_KEY_HERE             # ← Write real key here (**not recommended**, will be tracked by git)
6.4 Two Methods to Switch LLM
Method 1: Temporary Override via CLI
# Single run with cloud model, tip: minimax can be replaced with the actual cloud model you use
wrc-demo --llm minimax --task "go to home" --no-view --no-serve

# Single run with local model (overrides default in demo.yaml)
wrc-demo --llm local_qwen3_vl --task "go to home" --no-view --no-serve
The two test scripts above are only used to test whether the model link is connected, and will not actually control the robotic arm.
7. Demo Running
7.1 Start Demo
# Start the project
bash /home/seeed/wrc/scripts/start_all.sh --repl --real
Example terminal output after successful run:
# Output example:
(wrc-demo) seeed@seeed-KUANGSHI-Series:~/wrc$ bash /home/seeed/wrc/scripts/start_all.sh --repl --real
============================================================
  wrc_demo + Qwen3-VL-AWQ-4bit one-shot launcher
============================================================
  mode:    real hardware
  camera:  orbbec_overhead
  arm:     rebot_rs
  task:    <interactive>

[1/3] check vLLM...
  vLLM already running (skipped)

[2/3] start wrc_demo...
[wrc-demo] cameras=['orbbec_overhead'] arm=rebot_rs llm=local_qwen3_vl view=False
[wrc-demo] traces -> /home/seeed/wrc/runs/20260903_153216
load extensions from /home/seeed/miniforge3/envs/wrc-demo/lib/python3.10/site-packages/pyorbbecsdk/extensions
[stream] live view on http://192.168.3.175:8090/
[wrc-demo] LIVESTREAM dashboard: http://192.168.3.175:8090/
Type a task (empty line to quit).
task>
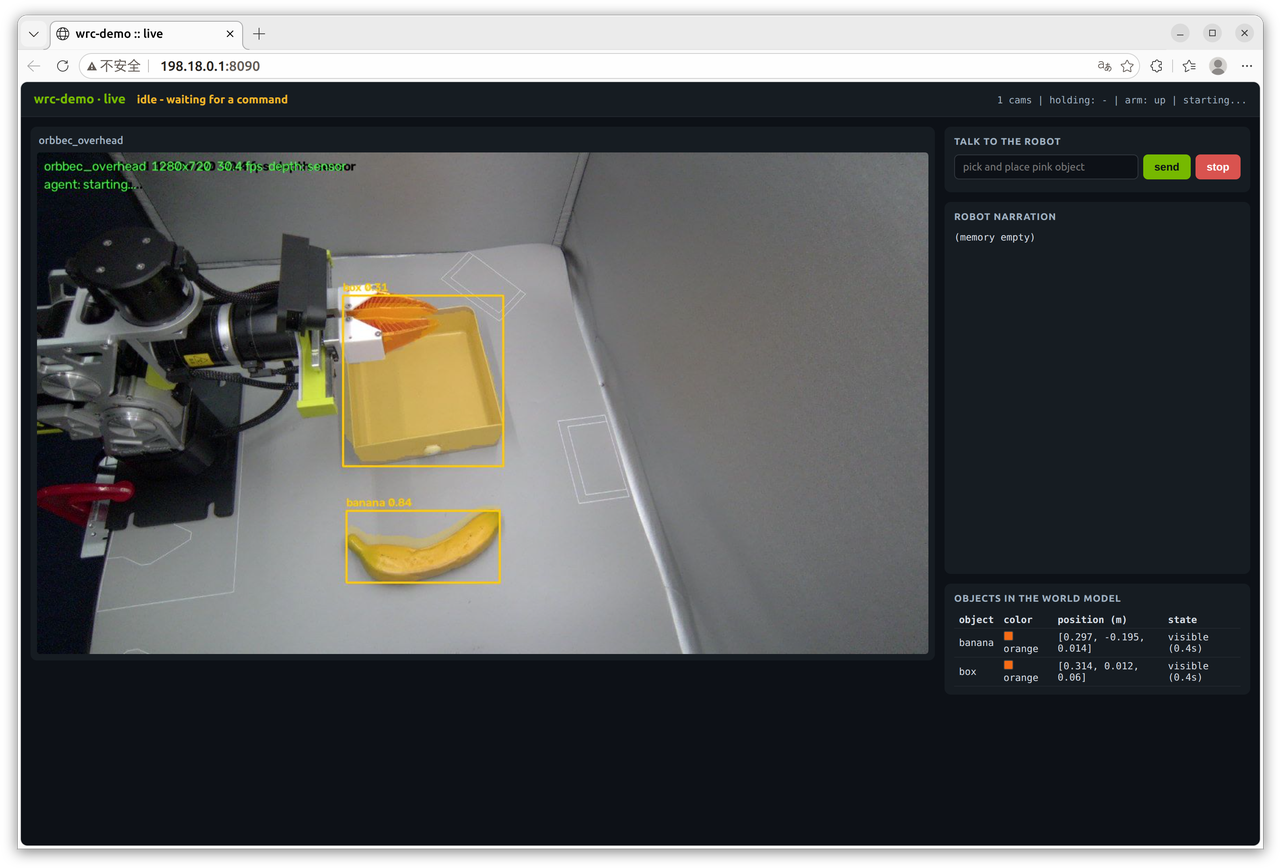
Open the web page, click the [wrc-demo] LIVESTREAM dashboard: http:xxxx link output in the terminal, and you can control the robotic arm through dialogue.
Example terminal output after sending a dialogue command:
=== task report ===
task:    go to home
success: True
path:    reflex (3.08s)
steps:   1
summary: done via reflex path in 3.08s: move_home()

[✓ done] task complete — arm parked at home. Enter a new task or press Enter to quit.

=== task report ===
task:    Wave and say hello
success: True
path:    llm (14.66s)
steps:   3
summary: Robot waved hello three times as requested.
This demo has a pre-defined safe working area for the robotic arm. If IK solving fails during grasping and placement operations in a large area, you need to adjust the fixed position of the camera and re-calibrate (a stable camera position is approximately 36cm * 36cm away from the robotic arm base).
7.2 Executable Tasks
There are two paths for text dialogue control, path: llm & path: reflex
reflex refers to pre-loaded text (mock mode), which ensures that corresponding operations are performed without LLM running, using pre-written fixed text to control rebot to complete different tasks.
Stable reflex commands are as follows:
pick up X and put in Y  # Complete pick+place

open the gripper        # Open the gripper

look around             # List objects recognized by the camera

go home                 # Return to origin
llm refers to analysis by a real connected cloud model or locally deployed model, which can understand language text more flexibly and call corresponding skills.
Skills and corresponding functions are as follows:
skill_get_observation	 # Take photo + recognize
skill_localize_object	 # Single object localization
skill_grasp_object	     # Grasp only
skill_place_at	         # Place to coordinates
skill_place_on_object	 # Place on object
skill_open_gripper	     # Open gripper
skill_close_gripper	     # Close gripper
8. Custom Configuration
8.1 Add New LLM Profile
The LLM backend of wrc-demo is pluggable. If you need to add a new LLM profile, one file configs/llm/<name>.yaml is one profile.
Modify one line profile: <name> in demo.yaml to switch.
Currently built-in 5 profiles:
| profile | Purpose | Required env var |
|---|---|---|
local_qwen3_vl | Default, local Qwen3-VL-2B-AWQ-4bit (vLLM 8080) | Not required |
mock | Offline script, pure test (used in §7.4 troubleshooting) | Not required |
anthropic | Anthropic Claude | ANTHROPIC_API_KEY |
openai | OpenAI / OpenAI compatible protocol | OPENAI_API_KEY |
minimax | MiniMax cloud (migrated to env var) | MINIMAX_API_KEY |
If you need to add a new profile, follow the steps below:
Step 1: Copy yaml as template
(1) Most domestic LLMs (DeepSeek / Moonshot Kimi / DashScope Qwen / Zhipu / SiliconFlow) all follow the OpenAI Chat Completions protocol. Copy from openai.yaml:
cp configs/llm/openai.yaml configs/llm/kimi.yaml
(2) For Anthropic protocol, copy from anthropic.yaml.
Step 2: Modify 4 fields in yaml
Open configs/llm/kimi.yaml, only need to modify 4 fields:
type: openai                # Protocol type (see "How to choose type" below)
model: moonshot-v1-8k       # Model name (check vendor documentation)
base_url: https://api.moonshot.cn/v1   # API endpoint, **do not miss the trailing /v1**
env_key: MOONSHOT_API_KEY   # Which env var to read
supports_vision: false      # Whether it supports images (critical, see below)
temperature: 0.0            # Generally no need to modify
max_tokens: 1024            # Generally no need to modify
timeout_s: 30               # Can be adjusted to 60 for slow networks
Step 3: Switch profile in demo.yaml
Open configs/demo.yaml, find the llm: block, modify only one line:
llm:
  profile: kimi    # ← Change to new profile name (remove .yaml suffix)
Step 4: Set env var + verify
(1) Temporary export (valid for current shell)
export MOONSHOT_API_KEY=sk-...
(2) Verify env var takes effect
echo "${MOONSHOT_API_KEY:0:8}"
(3) Test run with --llm flag, without modifying demo.yaml
conda activate wrc-demo
python -m wrc_demo.apps.demo --llm kimi --task "list the objects" --no-view --no-serve
(4) Check if stdout prints "[wrc-demo] llm=kimi". A response message from LLM counts as success (empty scene is also OK).
8.2 Modify Grasp Accuracy
Edit the grasp.* block in configs/demo.yaml:
grasp:
  backend: obb                          # obb (default fallback) / graspgenx (learning-based)
  pregrasp_offset_m: 0.08              # Hover height (along -approach direction)
  insertion_depth_m: 0.0              # TCP offset along +tool-x
  depth_fraction: 0.35                 # How deep to grasp from the top of the object
  exempt_radius_m: 0.15                # Grasp safety cylinder radius
  move_duration_s: 2.5
  descend_duration_s: 2.0
  release_height_m: 0.05
  air_grasp_frac: 0.04                # Gripper opening below this = empty grasp
  approach_pitch_rad: 1.2             # Angle between approach direction and +z (~69°)
More conservative (more accurate, slower) → increase n_samples (more vLLM thinking time); more aggressive (faster) → decrease.
Hand-eye compensation (hand_eye_compensation_m), edit extrinsics in configs/cameras/orbbec_overhead.yaml.
The grasp pose is converted from camera coordinates to base coordinate system via T_cam2base — deviations in this step will be directly transmitted to the grasp landing point. Fine-tuning the deviation on this link can be done by adjusting the value of hand_eye_compensation_m.
# configs/cameras/orbbec_overhead.yaml
extrinsics:
  source: "${repo}/data/calibration/hand_eye_top.json"
  mode: eye_to_hand
  hand_eye_compensation_m:    # Meters; default [0, 0, 0] = identity (no effect)
    x: 0.00
    y: 0.
```00
    z: 0.00
The three values X, Y, and Z are used to add a manual translation offset on top of the calibrated T_hand_eye to ensure stable grasping of objects.
8.3 Modify detector configuration
# configs/demo.yaml
detector:
  type: yoloe                          # yoloe / yolo-world
  model: ${repo}/models/yoloe-11s-seg.pt
  conf: 0.20                           # Confidence threshold (lower = more detections, but more false positives)

detect_classes: ["banana", "cracker box", "soup can", "cube", "box", "pen", "toy"]
# ↑ This list tells YOLOE which labels to look for in open-vocabulary mode
8.4 Modify safety thresholds
Invariant: The limit_margin=0.025 parameter of Kinematics.ik (in src/wrc_demo/control/kinematics.py) must be strictly greater than the harness's joint_margin=0.02. Adjusting only one of these values will break the boundary between IK and safety verification. Adjust both together!
# configs/demo.yaml
safety:
  workspace:                          # TCP workspace AABB (meters)
    min: [0.10, -0.30, -0.01]
    max: [0.50, 0.30, 0.55]
  table_z: 0.0                        # Table height (base coordinate system)
  table_clearance: 0.02              # TCP table clearance
  max_joint_vel: 1.2                  # rad/s (enforced per waypoint)
  joint_margin: 0.02                  # rad (reserved within URDF limits)
  watchdog_s: 5.0                     # Perception expiration stop time
  keep_out: []                        # List of E-stop AABBs
9. Add new skills
Prerequisites: Familiarity with Python + Pinocchio + ultralytics. This section is a 30-minute quick start; to understand the underlying design, refer to src/wrc_demo/skills/runtime.py.
9.1 5 steps to add a new skill
All skills are added to the SkillRuntime class in src/wrc_demo/skills/runtime.py (no need to create a new .py file).
Step 1: Write the skill_<name>() method
# src/wrc_demo/skills/runtime.py
from ..types import SkillError, SafetyViolation

class SkillRuntime:
    # ... existing methods ...

    def skill_my_skill(self, foo: str, bar: int = 0) -> dict:
        """One-line description. Returns: {...}"""
        if not foo:
            raise SkillError("foo must be non-empty")
        # ... your logic (must use self.arm (SafeArm), do not directly access self.arm.raw) ...
        return {"ok": True, "result": "..."}
Step 2: Add an entry to TOOL_SPECS
# src/wrc_demo/skills/runtime.py
TOOL_SPECS.append({
    "name": "my_skill",
    "description": "...",
    "parameters": {
        "type": "object",
        "properties": {
            "foo": {"type": "string"},
            "bar": {"type": "integer", "default": 0},
        },
        "required": ["foo"],
    },
})
Step 3: Add motion skills to _MOTION_SKILLS
_MOTION_SKILLS = {
    # ... 18 existing entries ...
    "my_skill",
}
This is the only location where WorldWatcher belief fusion is paused — if fusion is not paused during arm movement, held objects will be incorrectly re-fused to their in-air position.
Step 4: Automatic tracing and MCP exposure
SkillRuntime.execute() is the single scheduling entry point; mcp_server.py serves TOOL_SPECS minus _EXCLUDED_TOOLS plus _EXTRA_TOOLS — once added, the skill can be called by LLM/MCP.
Step 5: (Optional) Add regex to _RULES
Enable common commands to use the fast reflex path (no LLM call):
# src/wrc_demo/agent/reflex.py
_RULES.append((
    re.compile(r"^my command pattern\s+(\w+)", re.IGNORECASE),
    "my_skill",
))
9.2 Add a new detector
Implement the new detector class in src/wrc_demo/perception/detector.py:
from .detector import Detector

class MyDetector:
    def __init__(self, model_path: str, **kwargs):
        # Load model
        ...

    def detect(self, frame) -> list[Detection]:
        # Return list of Detection objects
        ...
Add a branch in apps/demo.py::_make_detector():
if dcfg.type == "my_detector":
    from wrc_demo.perception.my_detector import MyDetector
    return MyDetector(dcfg.model)
9.3 Add a new grasp planner
src/wrc_demo/grasping/my_planner.py:
from .selector import Grasp

def plan_my_grasps(fix, cloud, cfg) -> list[Grasp]:
    # Return list of Grasp objects
    ...
Add a layer in SkillRuntime._plan_grasps() (stacked by default on top of the camera-frame, graspgenx, and obb layers).
10. Architecture Overview
This chapter is reference material — a guide to understanding how
wrc_demoorganizes code. Read the process in §9.1 before writing code; to understand the design rationale, refer to §10.3 Key Design Decisions.
10.1 Three-tier decision making (Reflex → Habit → LLM)
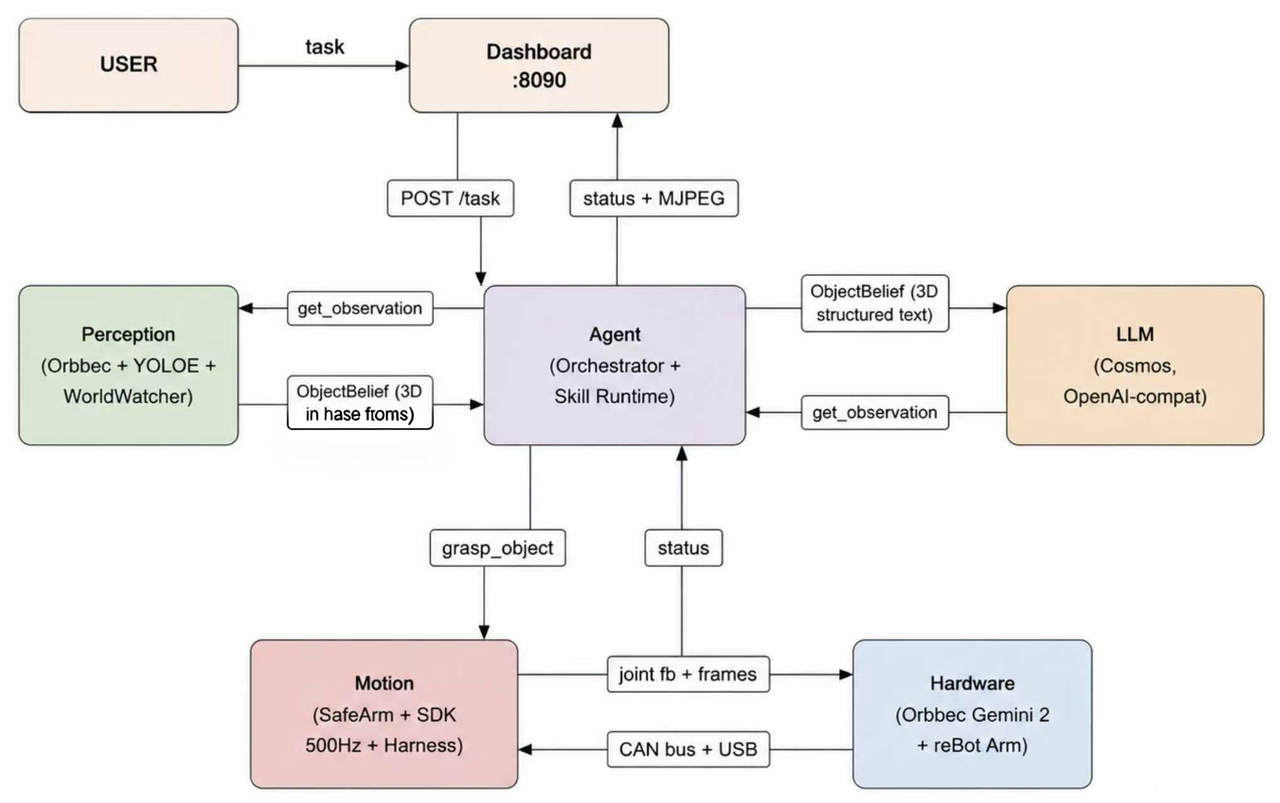
wrc_demo splits decision making into a three-tier fast/slow path system, similar to human fast/slow thinking:
N cameras ──CameraStream (thread each, latest-frame slot, drop-stale)
   │
   ├── WorldWatcher (thread, ~3 Hz): detector + HSV color tag
   │     └─> BeliefStore (thread-safe): label+color+3D+freshness
   └── StreamServer (MJPEG dashboard): camera grid + narration + object table

chat command ("pick and place pink object")
   ├─ tier 1 REFLEX    Template syntax → skill calls                          (~µs)
   ├─ tier 2 HABIT     Experience memory (hashed-BoW cosine ≥ 0.9)              (~ms)
   └─ tier 3 LLM       Raw orchestrator loop (2-15 s/turn)
        All tiers use the same safety-gated SkillRuntime
Key mechanisms:
- Latest-slot streaming: Consumers always receive the most recent frame; sensors never fall behind (
perception/stream.py) - Always-hot world model: WorldWatcher continuously fuses depth and extrinsic parameters from each camera into BeliefStore, turning command parsing into a dictionary lookup instead of an observe→detect round trip. Fusion is paused during movement (to avoid in-air re-fusion) and sends heartbeats to the safety watchdog.
- Color matching without CLIP: Detection results map the median HSV value of masks to color names, which are stored in the belief store and matched against color terms in queries — "pink object" works even with a closed-set COCO detector. VLMs can still be consulted (tier 3/advisor), but are never used in the hot path.
- One-call pick-and-place:
skill_pick_and_place= resolve → grasp → place → home, total execution time = robot arm movement time. - LazyArm: The MCP gateway preheats cameras, detectors, and the world model on startup, but motors are not enabled until the first motion command is received — starting the chat server does not power on the robot.
10.2 Module diagram (simplified)
src/wrc_demo/
├── types.py            Frame / Detection / ObjectFix / Grasp / RobotState
├── config.py           YAML profiles (cameras/, arms/, llm/) merged into Cfg
│
├── perception/         # 4 camera backends + YOLOE detector + depth alignment
├── calibration/        # Hand-eye calibration (ArUco + Pinocchio FK + LM)
├── memory/             # episodic + belief + grasp outcome
├── control/            # Pinocchio FK/IK + mock + lazy + real RS + SafeArm
├── safety/             # fail-closed waypoint verification
├── grasping/           # 3-layer grasp planning
├── agent/              # orchestrator + reflex + advisor + LLM clients + trace
├── skills/              # SkillRuntime + TOOL_SPECS + business logic (teach, master_arm, etc.)
└── apps/                # demo / record / viewer / stream_server / mcp_server
10.3 Key design decisions
| Decision | Rationale |
|---|---|
Frame.rgb is BGR, depth_m is metric float32 | Unit differences between L515 (0.25 mm/unit) and D4xx (1 mm/unit) caused bugs in the baseline; conversion at the camera boundary ensures unit safety for all downstream consumers. |
| Grasp planning in base coordinate system, not camera coordinate system | The baseline derived approach vectors from camera ray direction, making grasp quality dependent on camera pose. Here, mask points are lifted to 3D, transformed to the base coordinate system, and the OBB in the base frame provides yaw, width, and height — camera pose only affects visibility, not grasp geometry. |
| Learned grasping as default, analytical grasping always available | grasp.backend: graspgenx sends the object's base-frame point cloud to the GraspGen-X ZMQ service (scripts/serve_graspgenx.sh, port :5556), prioritizing ranked 6-DoF grasps before analytical OBB candidates. Any server error silently falls back to OBB — the demo will never freeze due to a dead model server. |
| Custom kinematics wrapper | The ReBotArm SDK's kinematics silently reads its own global config file (ignoring the passed hw_yaml), causing the DM installation URDF to be loaded for RS arms (incorrect tool coordinate system). We explicitly load the RS URDF from assets/. |
| Feedback, no sleep | The baseline used sleep(duration + 0.6); the RS motor's motorbridge get_state() never decodes type-0x18 report frames, so actual position is obtained from mechPos (0x7019) parameter reads — verified on this rig. |
| Fail-closed safety | The SDK does not execute anything outside of IK. Our harness gates every streaming waypoint; grasp descent only occurs within an explicit exemption cylinder around the target, allowing "do not touch the table" and "grasp objects on the table" to coexist. |
10.4 Module dependency graph
            ┌──────────────────────────────────────────────────────────────┐
            │                apps/  (entry points)                         │
            │   demo.py (build_runtime)   mcp_server.py   dashboard_runner │
            └────────────┬──────────────────────┬────────────────┬─────────┘
                         │                      │                │
        ┌────────────────▼─────────┐   ┌────────▼────────┐  ┌────▼─────────┐
        │   agent/  (orchestrator) │   │  skills/        │  │  perception/ │
        │   orchestrator.py        │◄──│  runtime.py     │  │  camera_base │
        │   reflex.py (tier1)      │   │   6 skills      │  │  + cameras/  │
        │   advisor.py  (tier3)    │   │  TOOL_SPECS     │  │  detector    │
        │   llm.py                 │   │  trace auto     │  │  depth_prov  │
        └────────┬─────────────────┘   └────────┬─────────┘  └────┬─────────┘
                 │                            │                │
                 ▼                            ▼                ▼
        ┌─────────────────────────────────────────────────────────────────┐
        │              memory/  +  grasping/  +  control/                 │
        │   BeliefStore   GraspMemory   camera_grasp + obb_grasp + graspgenx│
        │   EpisodicMem   (3-layer)        Kinematics + MockArm + SafeArm  │
        └────────────────────────────┬────────────────────────────────────┘
                                     │
                                     ▼
        ┌─────────────────────────────────────────────────────────────────┐
        │                       safety/  (fail-closed)                    │
        │   SafetyHarness.approve(waypoint)  vet_pose()  estop latch   │
        └─────────────────────────────────────────────────────────────────┘
                                     │
                                     ▼
              vendored SDK + pyorbbecsdk + ultralytics + pin + motorbridge
10.5 Trace sequence diagram (one pick_and_place call)
t=0.0s  user  ──→  build_runtime()
                   ├─ Kinematics(urdf, joint_signs)
                   ├─ make_arm(cfg) ── RebotArm.connect()
                   ├─ CameraRig(N) ── Open + warm_up
                   ├─ LockedDetector(YOLOE weights)
                   ├─ EpisodicMemory / BeliefStore / TraceLogger
                   └─ SkillRuntime(...)

t=0.5s  WorldWatcher thread starts (3 Hz detector pass → beliefs)

t=1.0s  user --task "pick up red block"
        AgentOrchestrator.run_task()
        ├─ tier1 REFLEX: regex match ──→ pick_and_place hit?  ──→ execute
        └─ (fallback) tier2 HABIT ──→ tier3 LLM ──→ tool_calls

t=1.1s  SkillRuntime.execute("pick_and_place")
        ├─ tracer.start()
        ├─ belief.find("red block")  ── wait deadline 5s
        ├─ _plan_grasps() ── camera + graspgenx + obb ── re-rank
        ├─ select_grasps() ── IK ── harness pre-vet
        ├─ safe_arm.move_joints() ── each 50Hz waypoint ── SafetyHarness.approve
        ├─ gripper close two-stage ── stall detection
        ├─ lift + place + home
        └─ tracer.finish()  ── trace.jsonl + keyframes + narration

t=N.5s  report.success ── print "✓ done — arm parked at home"
10.6 Comparison of the three grasp planning layers
| Layer | Trigger condition | Data source | Output | Failure behavior |
|---|---|---|---|---|
1. camera-frame planner (camera_grasp.py::plan_grasp_from_mask) | Always — as long as detection has mask + depth | segmentation mask + depth → cv2.minAreaRect → depth-quantile back-project → camera-frame Grasp | Grasp(approach, position, width, height) | Fall back to layer 2 |
2. GraspGen-X ZMQ (graspgenx_backend.py) | grasp.backend == "graspgenx" and server at :5556 is reachable | base-frame point cloud → learned 6-DoF grasp | List of Grasp (top-k=32) | Server timeout / disconnect → silent fallthrough |
3. analytic OBB (obb_grasp.py::plan_grasps_from) | Always | base-frame OBB (yaw, width, height) | List of Grasp | No failure — always returns |
All layers output the same Grasp dataclass; GraspOutcomeMemory re-ranks across layers; select_grasp() performs jaw-width filtering + IK walk + harness pre-vet (including 7 samples along the descent path).
10.7 Verification status (as of 2026-08-28)
- 17 unit + integration tests passed, 1 skipped (mock stack, ~30s)
- Full suite: ~290 unit + integration tests passed (hardware-tagged tests deselected by default)
- 2 adversarial multi-view reviews: 2026-07-16 (4 reviewers × skeptic verification, 29 confirmed defects) + 2026-07-18 livestreaming redesign (45-agent workflow, 33 confirmed findings)
- Real robot verification: L515 streaming, RobStride
mechPosparameter reads (can0 read-only), YOLO inference (CUDA, GB10), GraspGen-X backend (first-light verification) - Not verified: Real robot motion (requires on-site gripper re-verification + hand-eye calibration)