Get Started with Meshtastic
The SenseCAP MeshPager X2 Series uses physical buttons to operate two Meshtastic interfaces: MUI, with graphical pages and maps, and Base UI, with information screens and menus.
For specifications, connectors, and pin assignments, see SenseCAP MeshPager X2 Series Introduction.
Connect a LoRa antenna matched to the operating band. Use the specified X2 battery, rated for 4.4 V charging; a cell rated for a maximum charge voltage of 4.2 V is unsuitable.
Flash Firmware
If firmware is already installed, continue to Get Started.
- Connect X2 to a computer using a USB data cable.
- Open the Meshtastic Web Flasher in a browser that supports Web Serial, such as desktop Chrome or Edge.
- Open Select Target Device and look for Seeed MeshPager X2. If it is available, select it and choose a compatible firmware version.
- Click Flash and follow the prompts to enter download mode and select X2's current USB port. Keep USB connected until programming completes.
X2 was not present in the public Web Flasher's device list when this guide was checked. If you cannot find Seeed MeshPager X2, use the X2 factory image and Manual Firmware Installation. Do not select another device model for X2.
To force X2 into firmware flashing mode, press and hold Power and Return at the same time, then plug in the USB cable. Keep both buttons held for 1 second, then release them.
To flash a downloaded X2 .factory.bin, follow Manual Firmware Installation with esptool.
Use firmware for Seeed MeshPager X2 (seeed_meshpager_x2) and follow the instructions supplied with the image. Enable full erase only when required, and back up your settings first.
Get Started
Power On and Navigate
- Connect a regulated 5 V USB supply to the USB-C port to charge the battery.
- Use the Power key to start X2. To leave the charge-only screen, release Power, then hold it for approximately 5 seconds.
- Wait for Base UI or MUI to load.
With USB connected, shutting down may return X2 to the charge-only screen.
Forced Restart
To force X2 to restart, press Power and plug in a powered USB-C (Type-C) cable at the same time.
Button Controls
| Key | Base UI | MUI |
|---|---|---|
| Up / Down | Browse menu items, nodes, or message threads. From Home, open the message composer. | Highlight navigation icons or controls. |
| Left / Right | Switch information screens or move between keyboard keys. | Right enters a highlighted page. Within a page, switch tabs, adjust sliders, or move between keyboard keys. |
| Confirm (left orange key) | Open a screen's menu or select an item. | Activate the highlighted item. |
| Hold Confirm | Run the selected control's long-press action, where supported. | Run the selected control's long-press action, where supported. |
| Return | Cancel input or close a menu. | Close a keyboard, list, or dialog, or go back one level. |
| Power | Short press: screen off/wake. Hold approximately 4 seconds: shutdown. | Short press: screen off/wake. Hold approximately 4 seconds: shutdown. |
In this guide, select means highlight an item with the direction keys and press Confirm. Confirm is the orange key below the screen on the left, marked with a horizontal line. Left/Right refer to the direction pad.
UI Switching
Choose the switching direction below. Reflashing is not required.
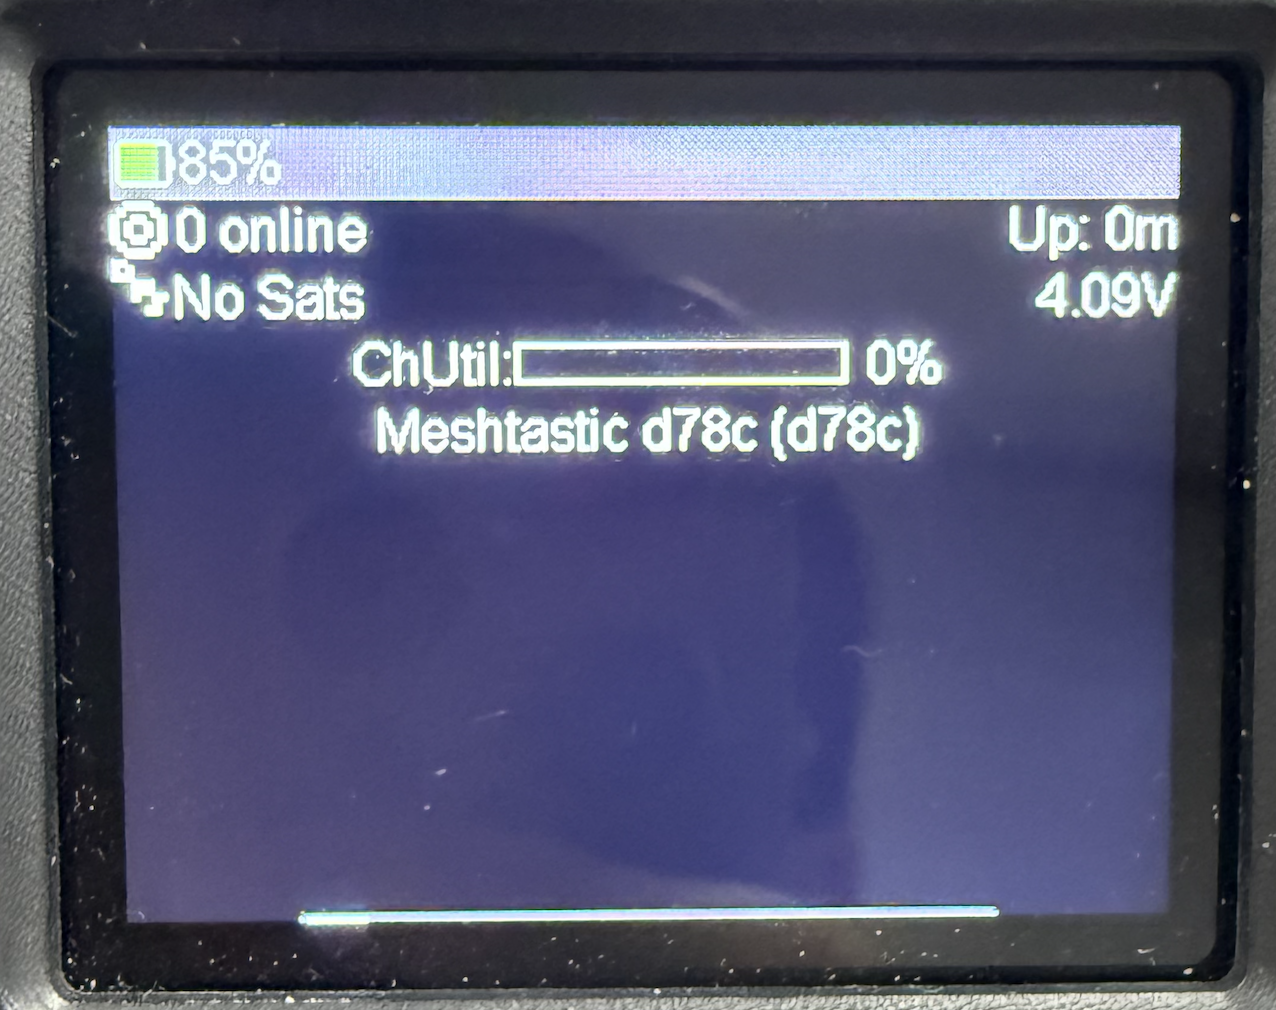
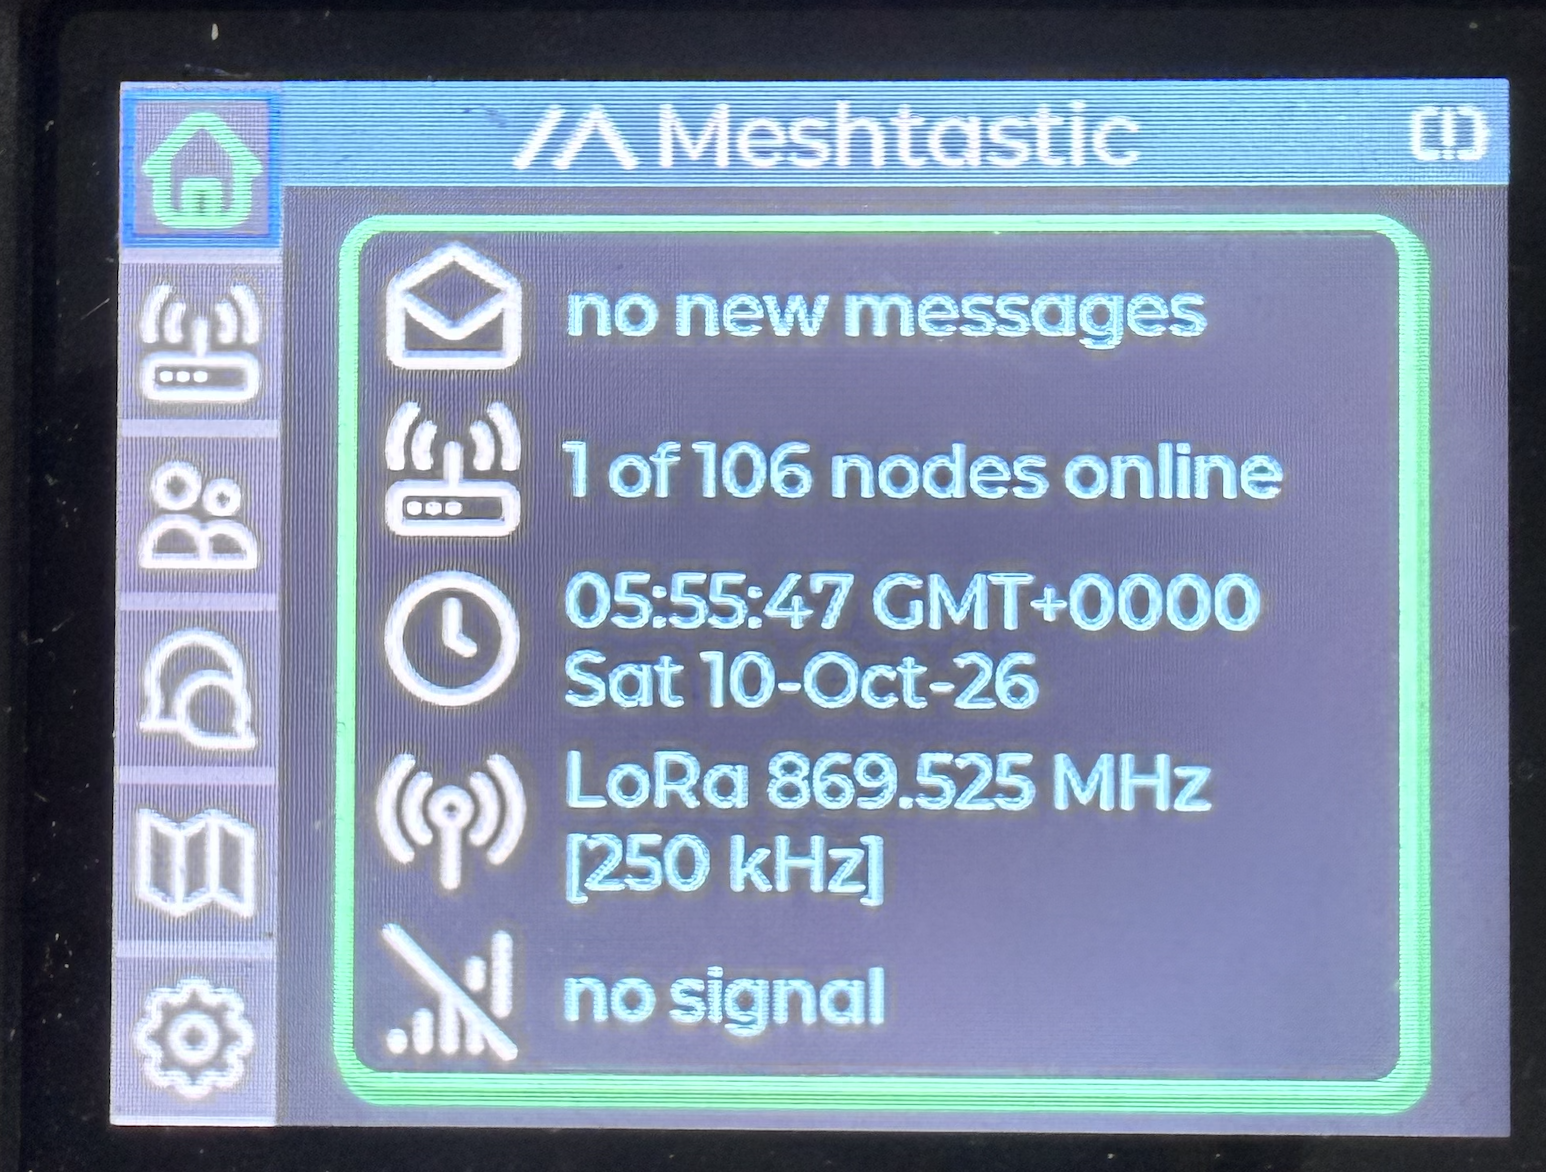
- Base UI to MUI
- MUI to Base UI
- Use Left/Right to reach System, then press Confirm.
- Select Reboot/Shutdown → Switch to MUI → Yes.
- Wait for X2 to restart into MUI.
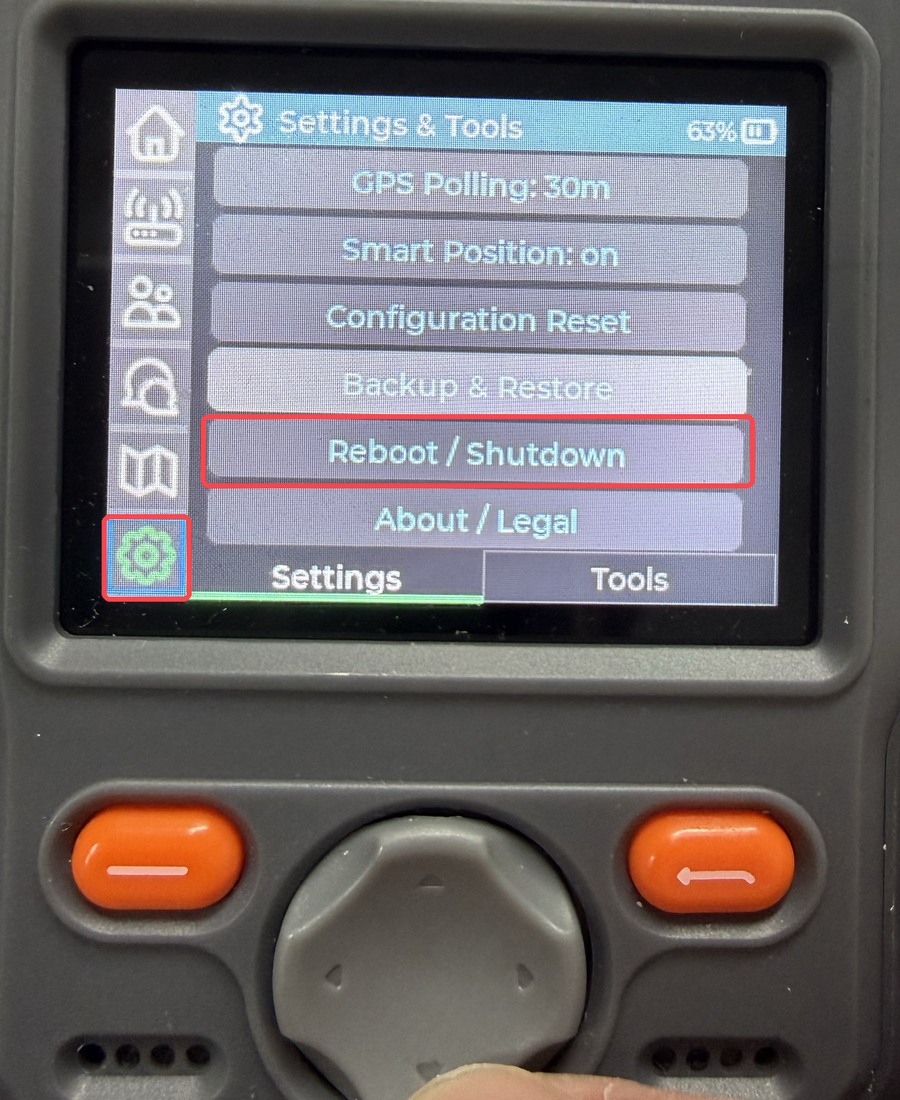
3. Confirm the restart. Select OK and wait for X2 to restart into Base UI.
Phone Connection
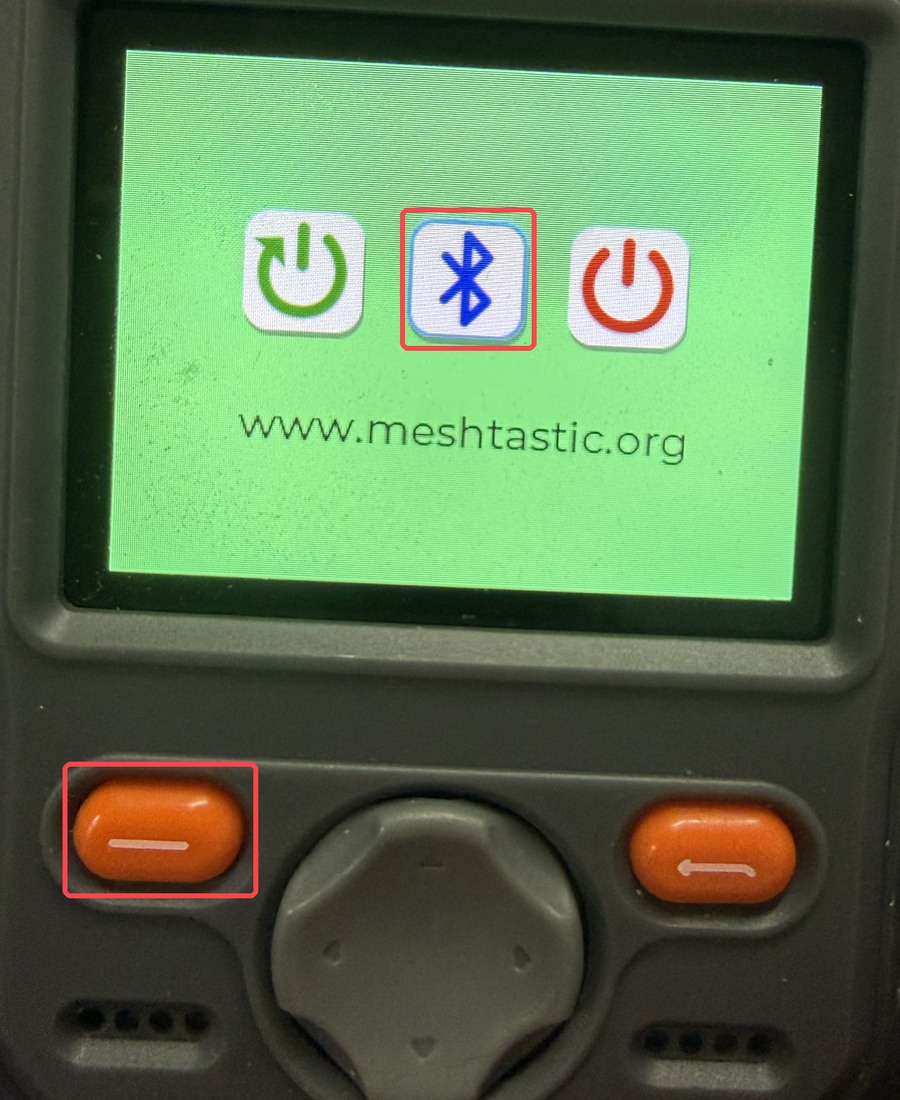
Step 1. Enable Bluetooth on X2.
- Base UI
- MUI
Bluetooth is enabled after switching from MUI. To enable it manually, open System, press Confirm, and select Bluetooth Toggle. Restart if prompted. If Wi-Fi prevents Bluetooth pairing, disable Wi-Fi first.
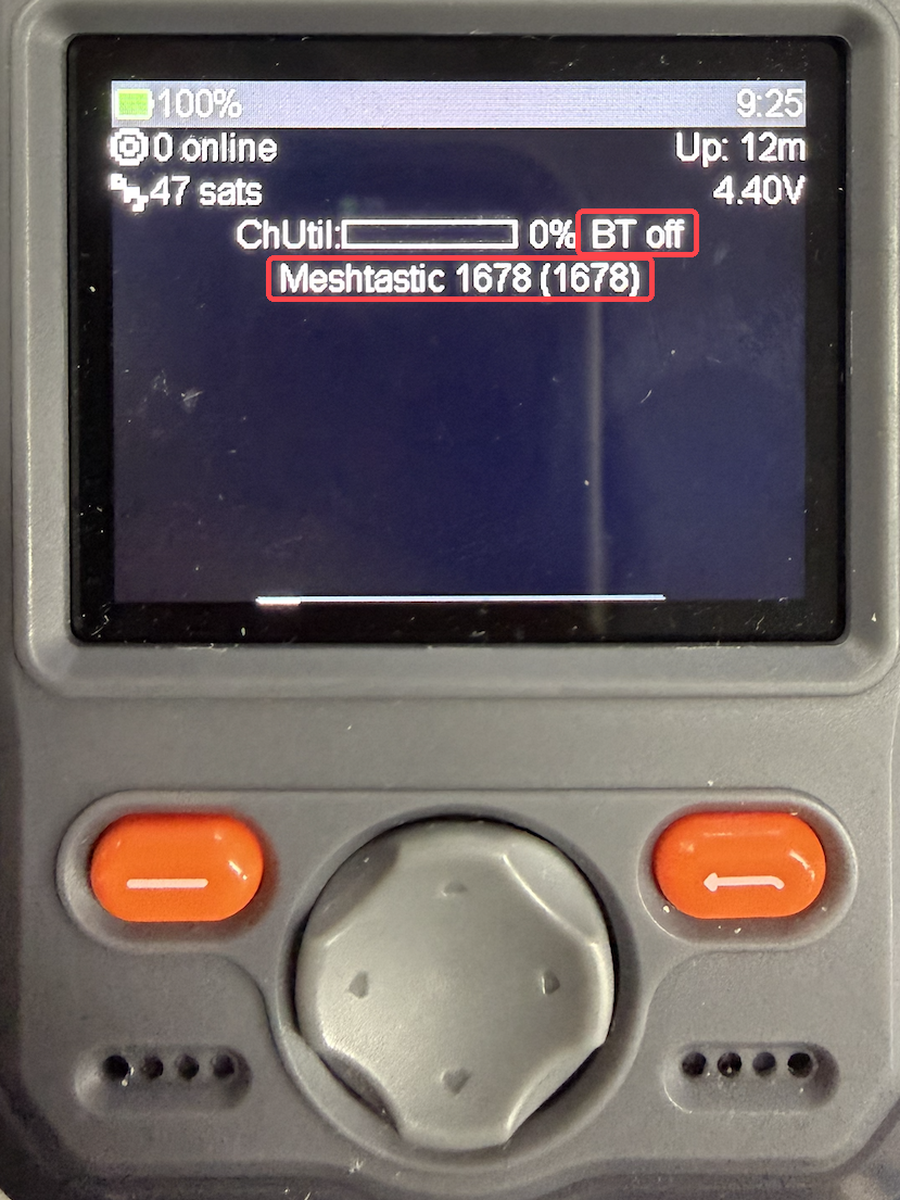
BT off means Bluetooth is disabled. The node name shown here is an example; look for your own X2 in the app.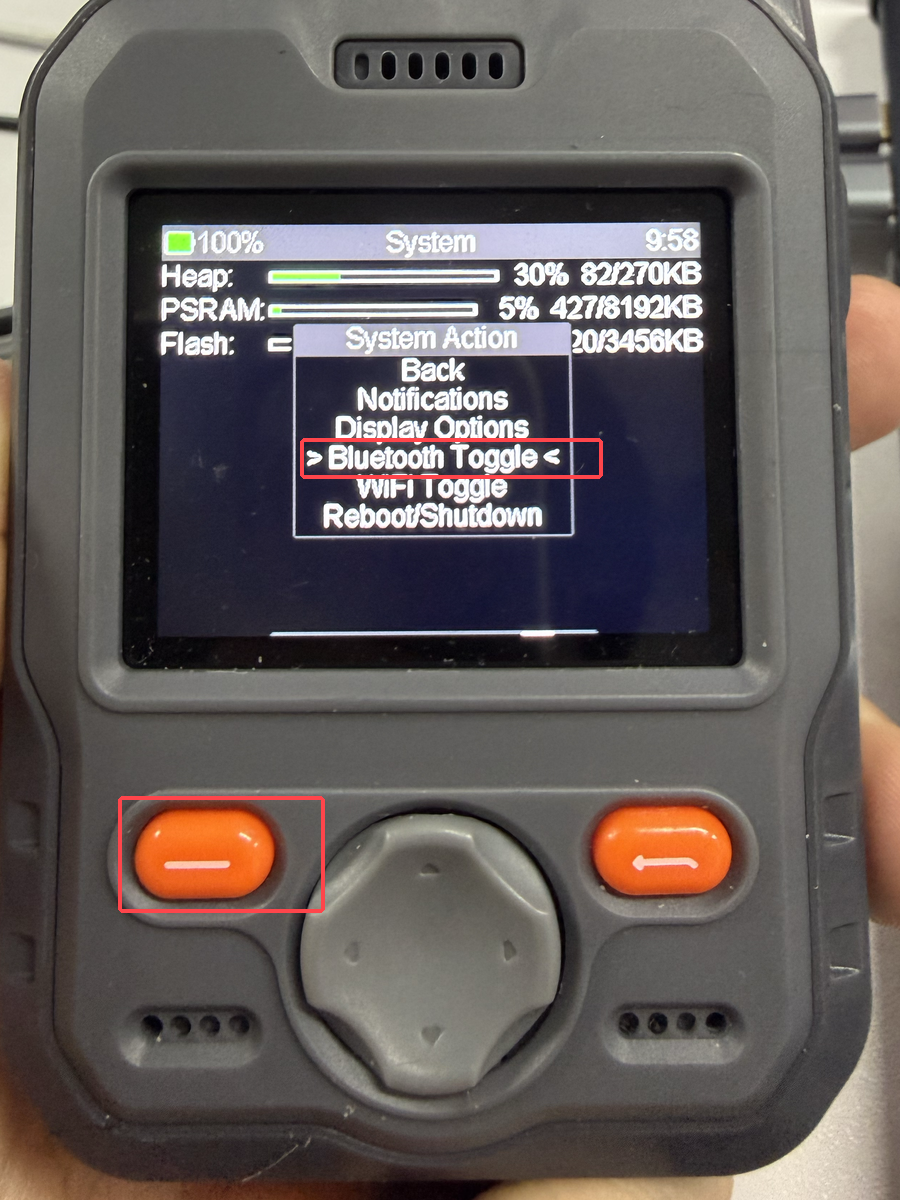
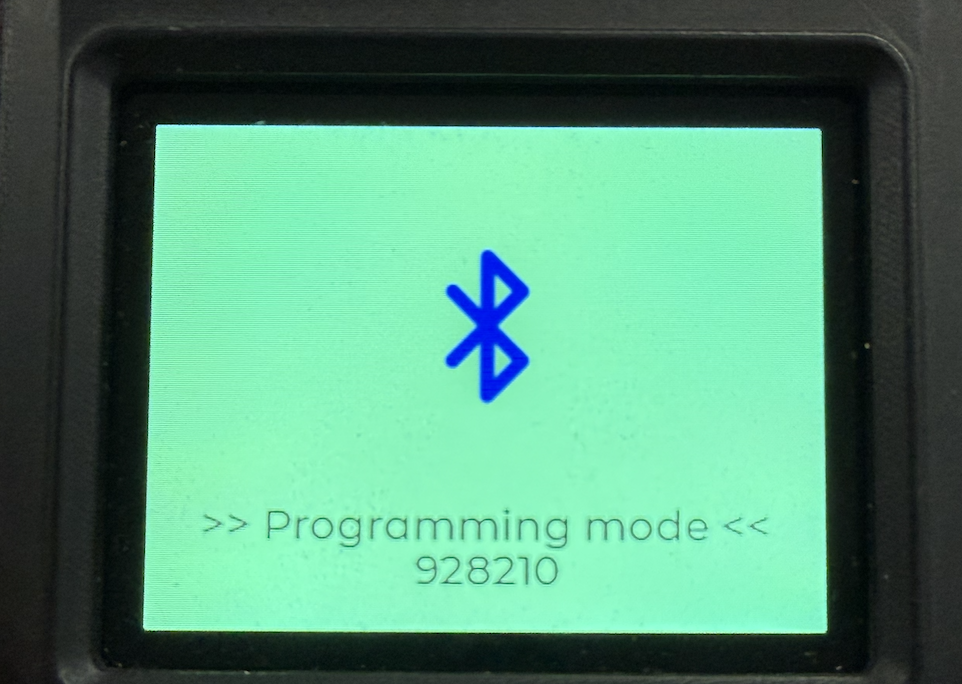
After configuration, press Confirm to return to MUI.
Step 2. Download Meshtastic App
Click here to download the Meshtastic app for iOS or Android.
Step 3. Pair with Device
Enable Bluetooth on your phone, open the Meshtastic app, and grant the requested Bluetooth or Nearby Devices permissions. The screenshots below illustrate the app workflow; select your X2's device name from the list.
- iOS
- Android
- Open the Bluetooth panel in the Meshtastic app and select your X2 under Available Radios.
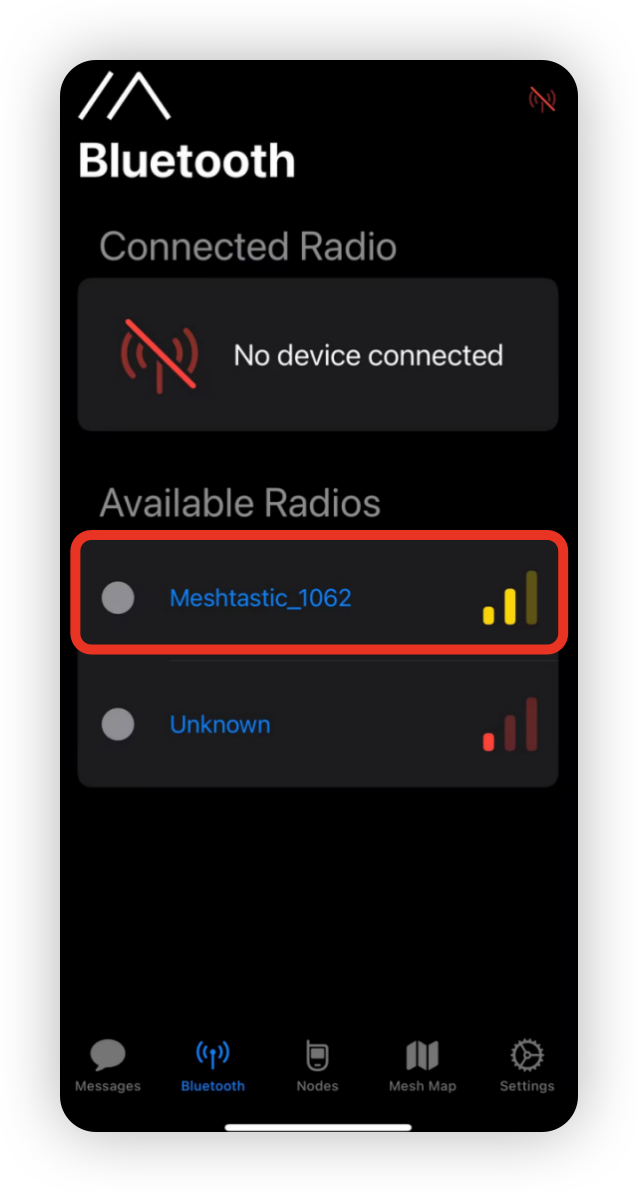
- Enter the code shown on X2's screen, then tap Pair to connect. If you configured a fixed PIN, use that PIN.

- Open the Connection panel in the Meshtastic app, choose BLE, and select your X2 from the device list.
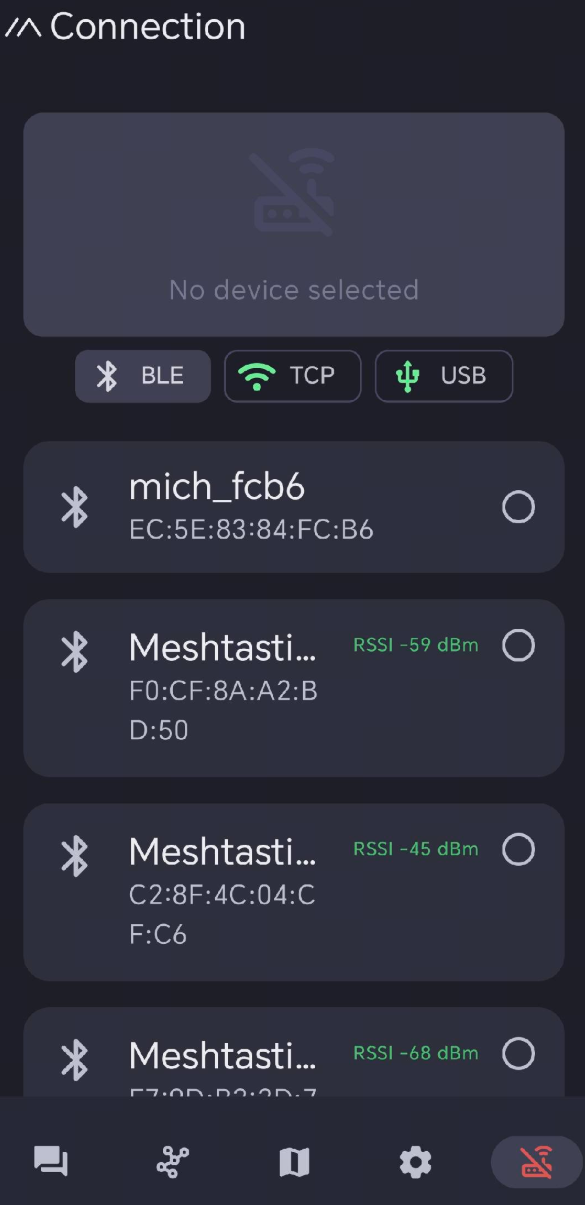
- Enter the code shown on X2's screen, then tap OK to connect. If you configured a fixed PIN, use that PIN.
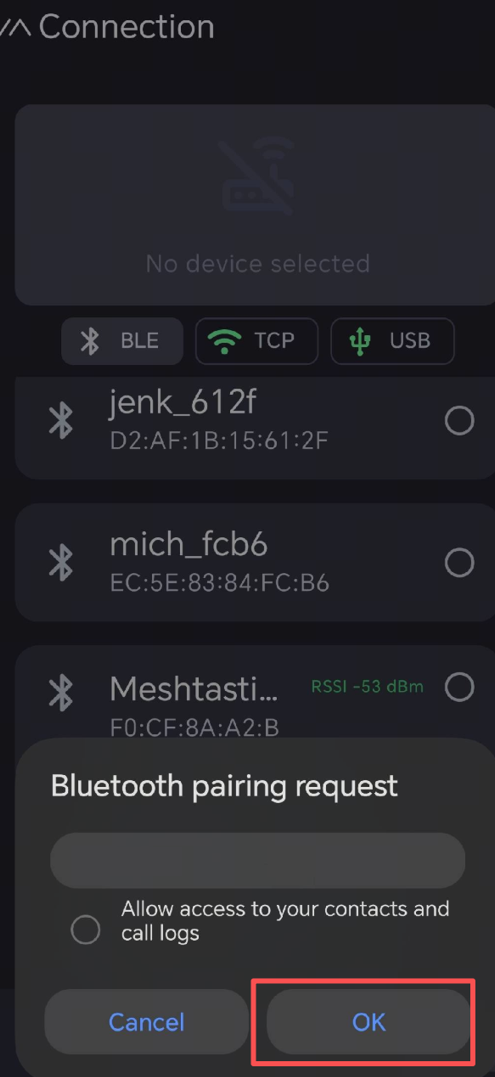
Wait for the device configuration to load before changing settings.
Configure LoRa
Before communicating over the mesh, set your region. This setting controls the frequency range your device uses and should match your location, X2's 863–928 MHz radio hardware, and its antenna.
Region List
| Region Code | Description | Frequency Range (MHz) | Duty Cycle (%) | Power Limit (dBm) |
|---|---|---|---|---|
| UNSET | Unset | N/A | N/A | N/A |
| US | United States | 902.0 - 928.0 | 100 | 30 |
| EU_868 | European Union 868MHz | 869.4 - 869.65 | 10 | 27 |
Refer to LoRa Region by Country for a more comprehensive list. The power limits above are Meshtastic region limits; X2's actual transmit power also depends on its hardware and firmware.
EU_868 has a 10% duty-cycle limit, calculated every minute over a rolling hour. If the device reaches this limit, it stops transmitting until transmission is allowed again.
- Base UI
- MUI
- Configure on Phone
- Use Left/Right to reach LoRa, then press Confirm.
- Select LoRa Region, choose your region, and confirm any prompts.
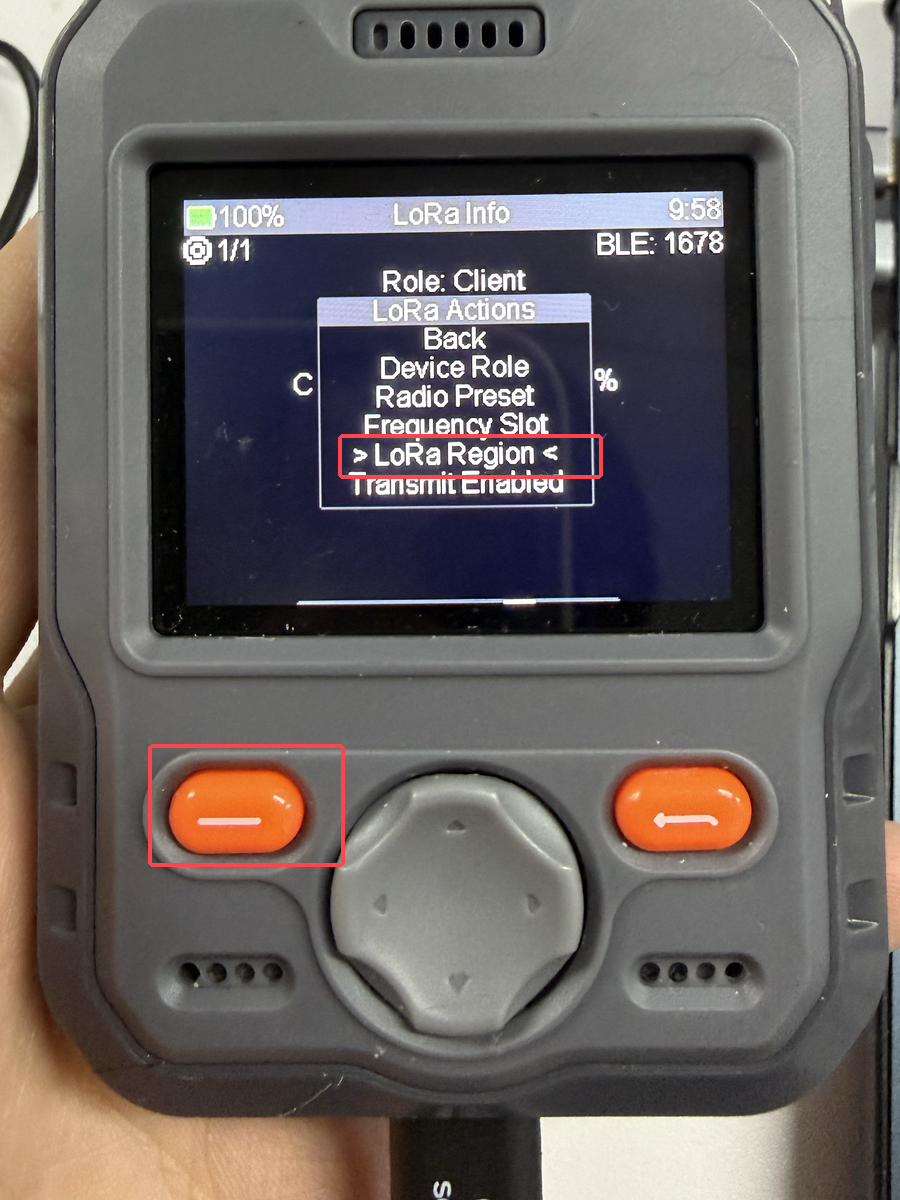
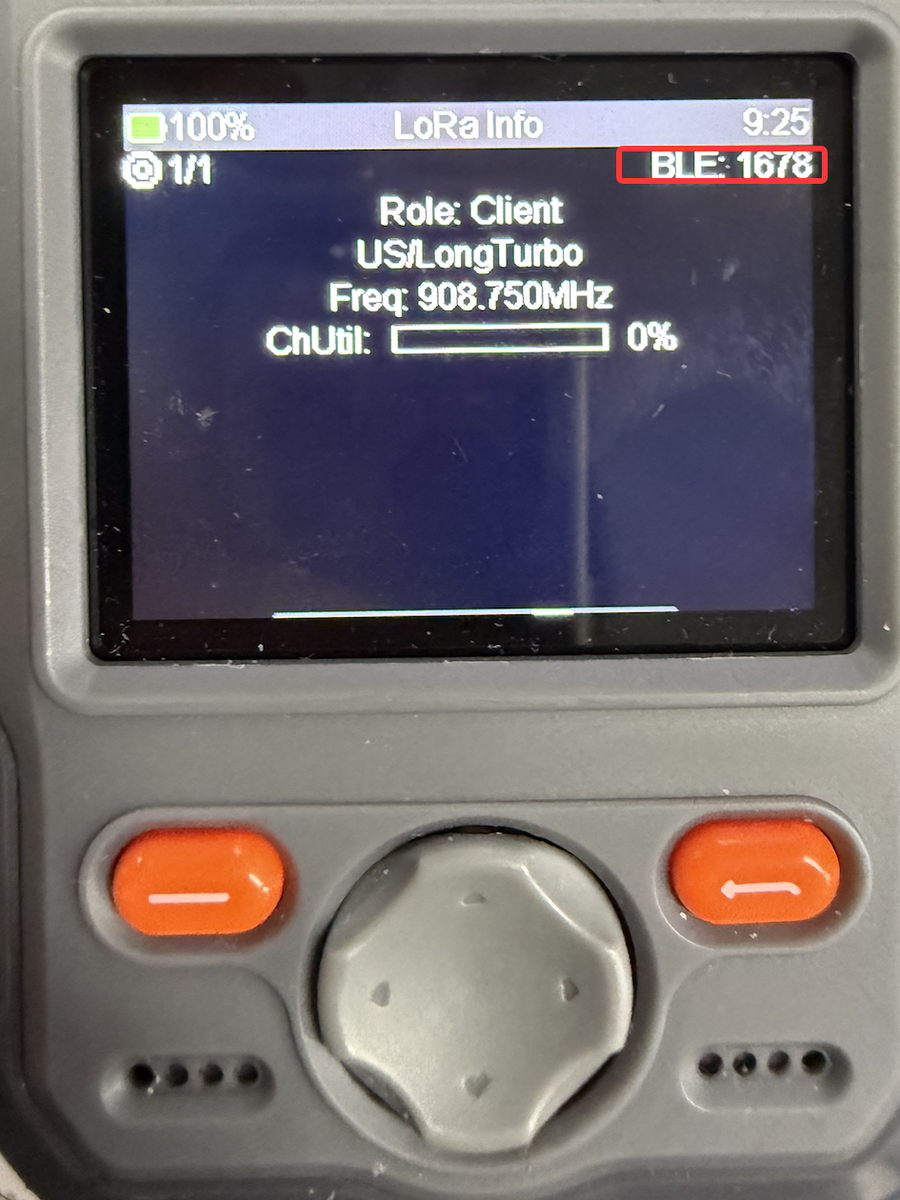
The four-character BLE label on LoRa Info is a device identifier, not the Bluetooth pairing PIN. When pairing, use the PIN displayed by X2's pairing prompt or your configured fixed PIN.
- Enter Settings → Region.
- Choose your region and select OK. Restart if prompted.
Connect the Meshtastic app to X2 and wait for its configuration to load. Choose the instructions for your phone:
- iOS
- Android
- If the app shows Set LoRa Region on the connection page, tap it. Otherwise, open LoRa from the device configuration in Settings.
- Set Region for your location, then save the configuration.
- Reconnect if X2 restarts and check that the region is no longer UNSET.

- Open Radio Configuration → LoRa from the app menu.
- Choose your Region and save the configuration.
- Reconnect if X2 restarts and check the selected region.
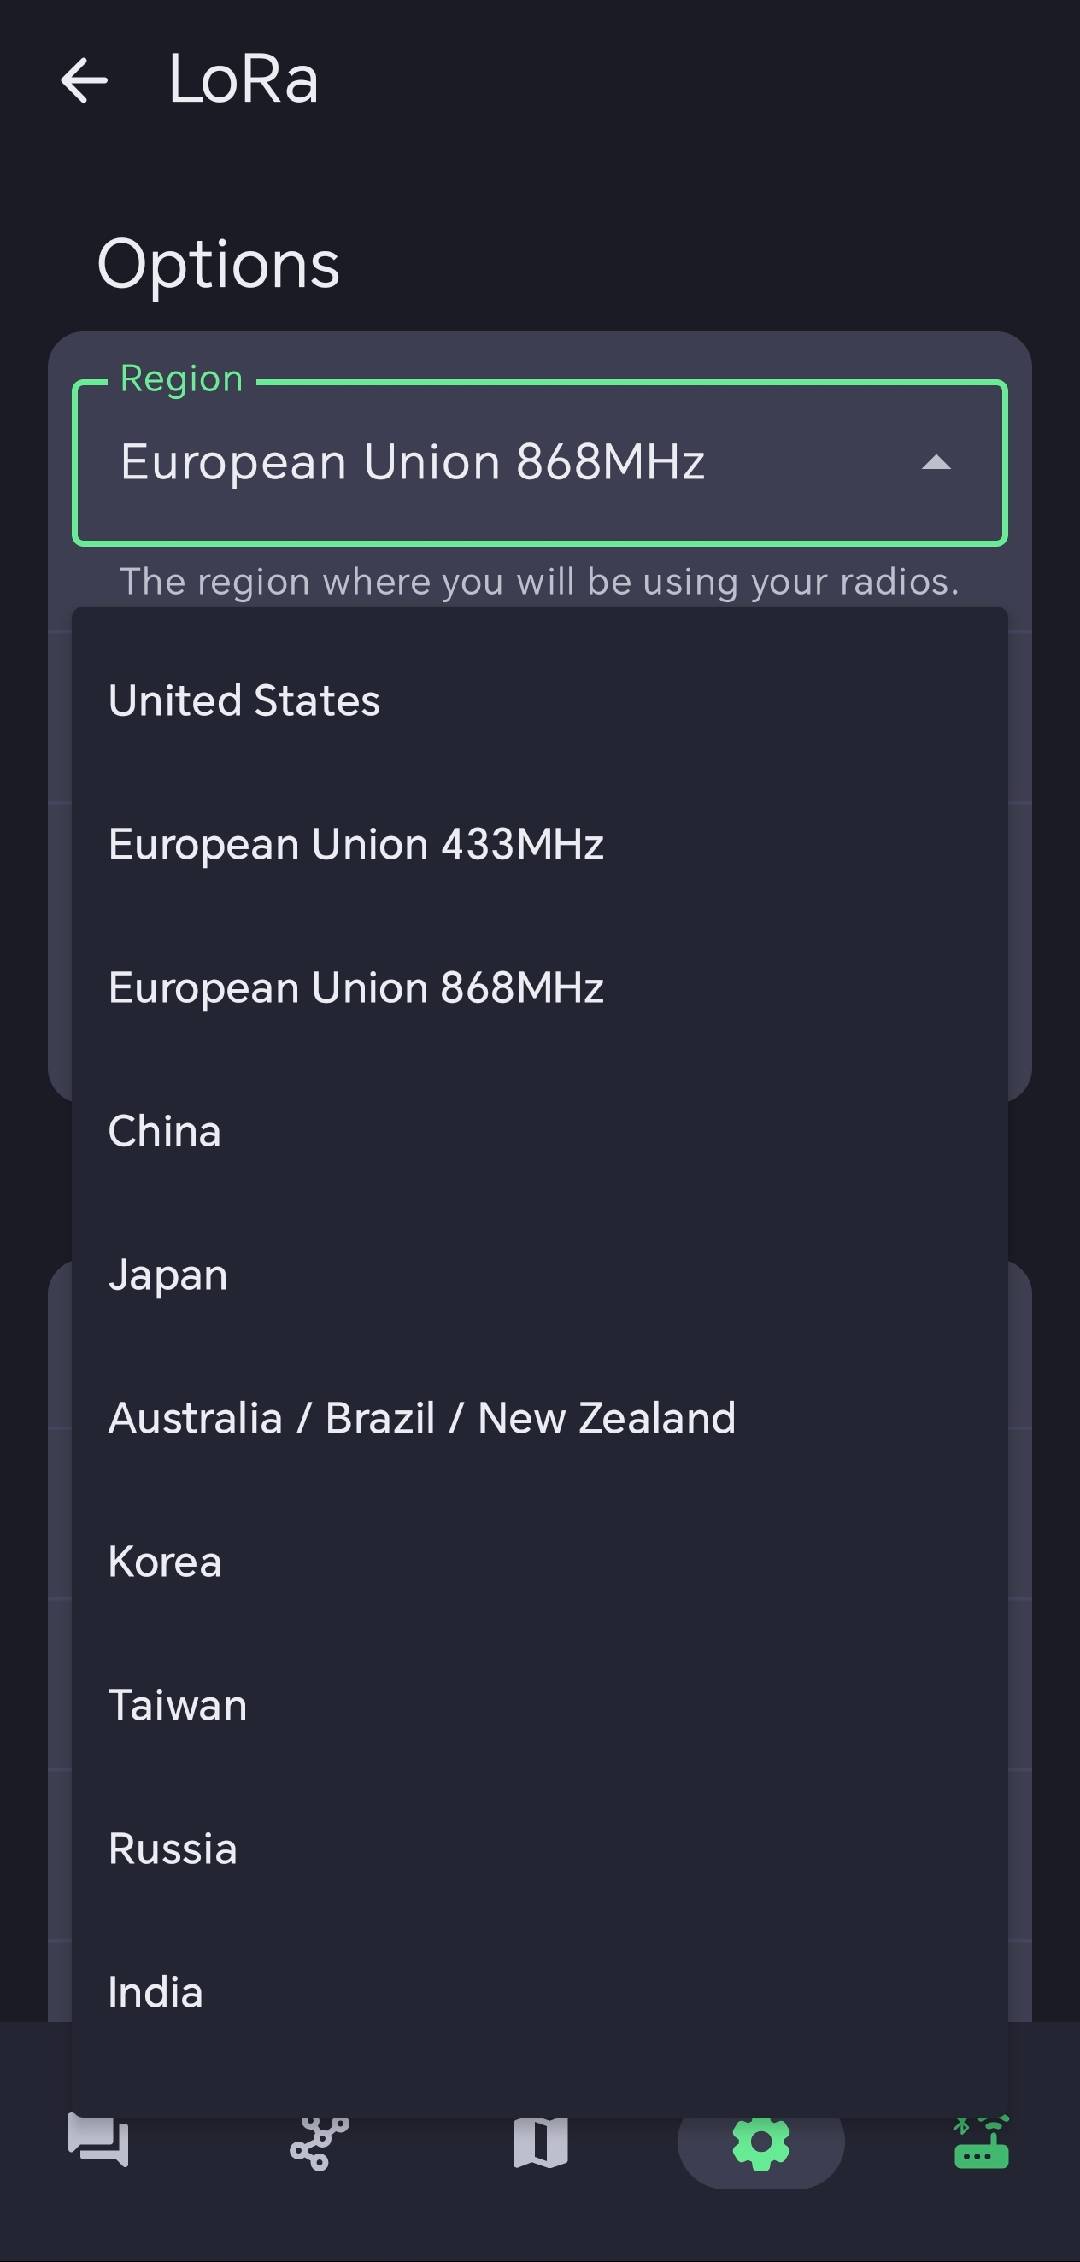
The screenshots illustrate the phone app workflow. Select your connected X2; menu names may vary between app versions.
To communicate with other nodes, match their modem preset, frequency slot, channel name, and pre-shared key. You can configure these settings or import your group's channel configuration in the phone app.
Transmit power and duty-cycle settings must comply with local regulations. See Meshtastic LoRa configuration for details.
Map Usage
Use MUI to view maps. For your current location, enable GPS and wait for a fix outdoors; see Configure GPS.
- Offline Map
- Online Map
Offline maps require MUI and a microSD card.
Step 1. Prepare the card.
- Back up the card before formatting; formatting erases its contents. Prepare the card with MBR partitioning and FAT32.
- Download a style ZIP from the Meshtastic UI map starter kit, such as
osm.ziporatlas.zip. - Extract the archive to the card's root, preserving the folders inside it. Check the resulting path rather than adding another
mapsfolder around the extracted files:
microSD root/
└── maps/
    └── <style>/
        └── <zoom>/
            └── <x>/
                └── <y>.png
For example, a style named osm belongs under /maps/osm/. Avoid an extra folder level such as /maps/maps/osm/.
- Safely eject the card after copying finishes.
The official starter-kit archives contain worldwide tiles at zoom levels 1–6. Zoom out to level 6 or lower to check that the map loads. For street-level detail, download tiles covering your area at higher zoom levels; the starter kit alone does not include those details. See the map download instructions.
Step 2. Insert the card and open the map.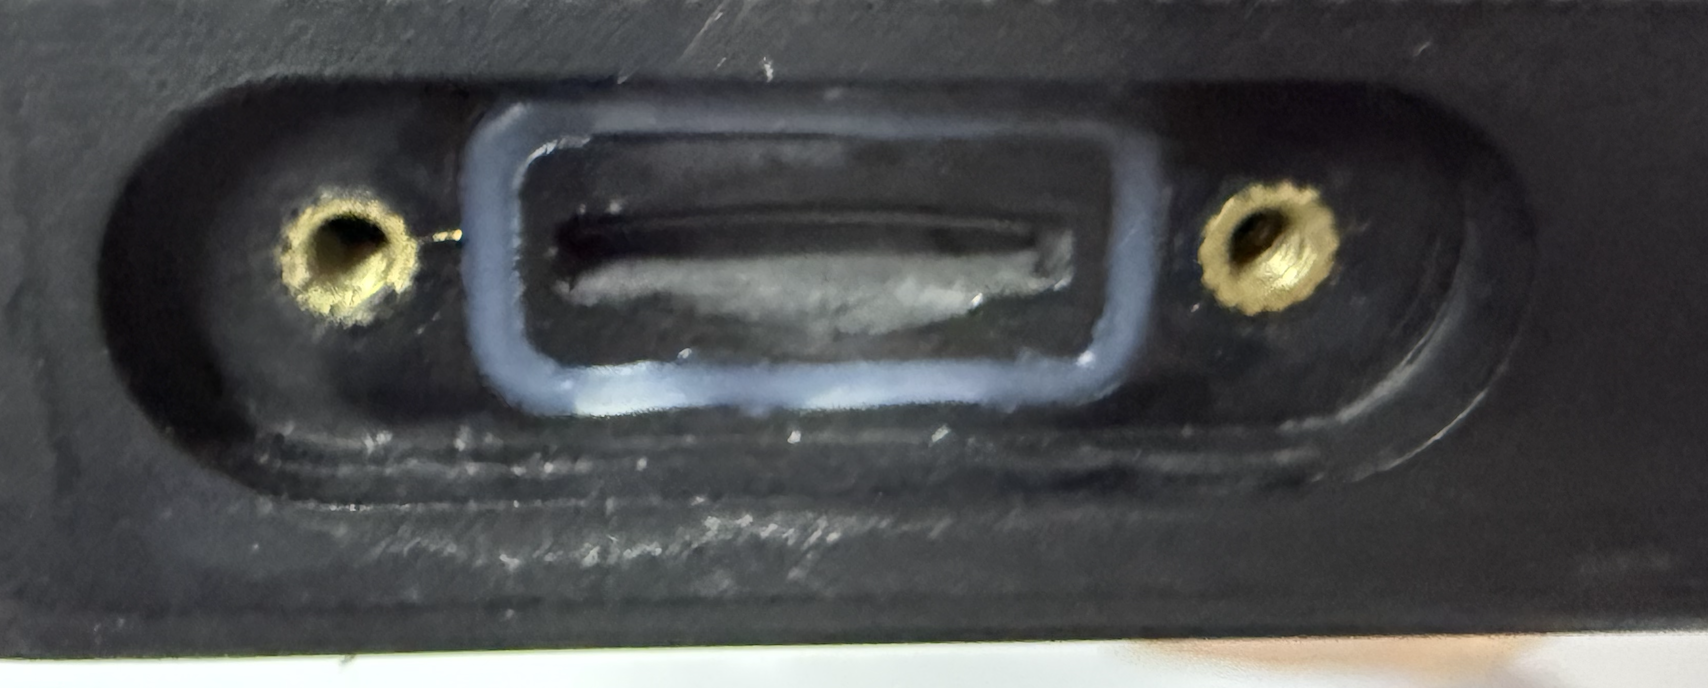
- Shut down X2 and disconnect USB before inserting or removing the card.
- Insert the microSD card fully, then start X2 and enter MUI.
- For your current location, enable GNSS and wait for a fix outdoors.
- Enter Map and select the style matching your tiles.
Downloaded tiles work without Wi-Fi or cellular service.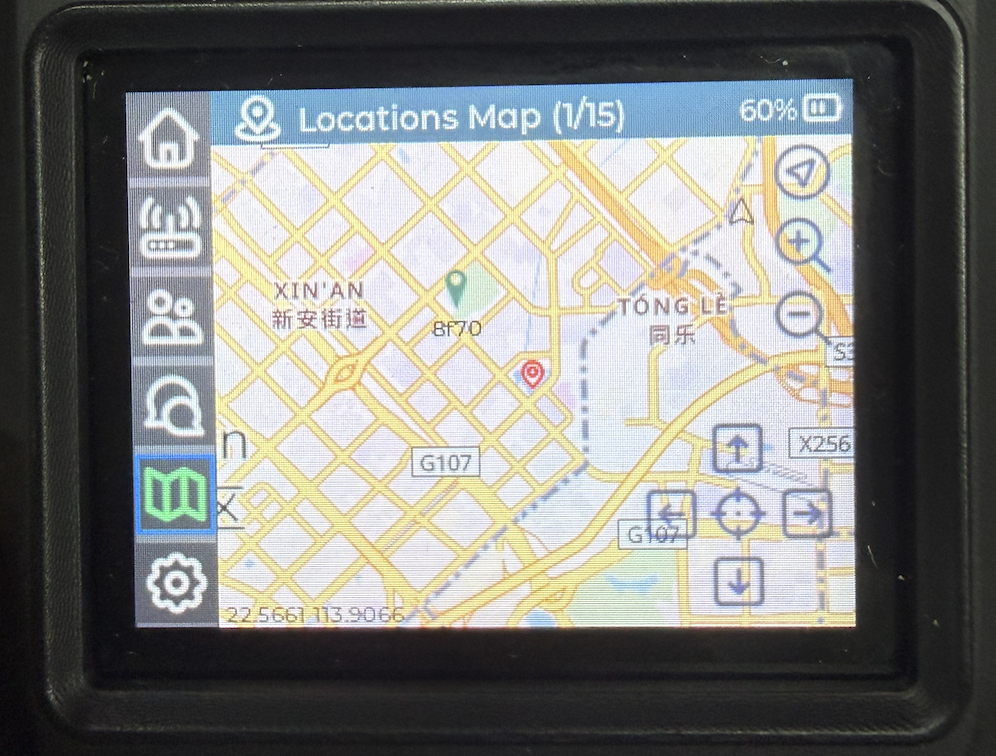
Step 3. Navigate with the buttons.
| Map state | Operation |
|---|---|
| Browse | Use the direction keys to pan. |
| Open controls | Press Confirm. |
| Zoom or position | Use Up/Down to highlight a control, then Confirm. |
| Back to map | Press Return. |
| Back to navigation bar | Press Return again. |
Step 1. Enable GPS.
Open Home, highlight the location/GPS control, and hold Confirm to enable GNSS if it is disabled. Restart if prompted, then wait for a position fix outdoors.
Step 2. Set and Enable Wi-Fi.
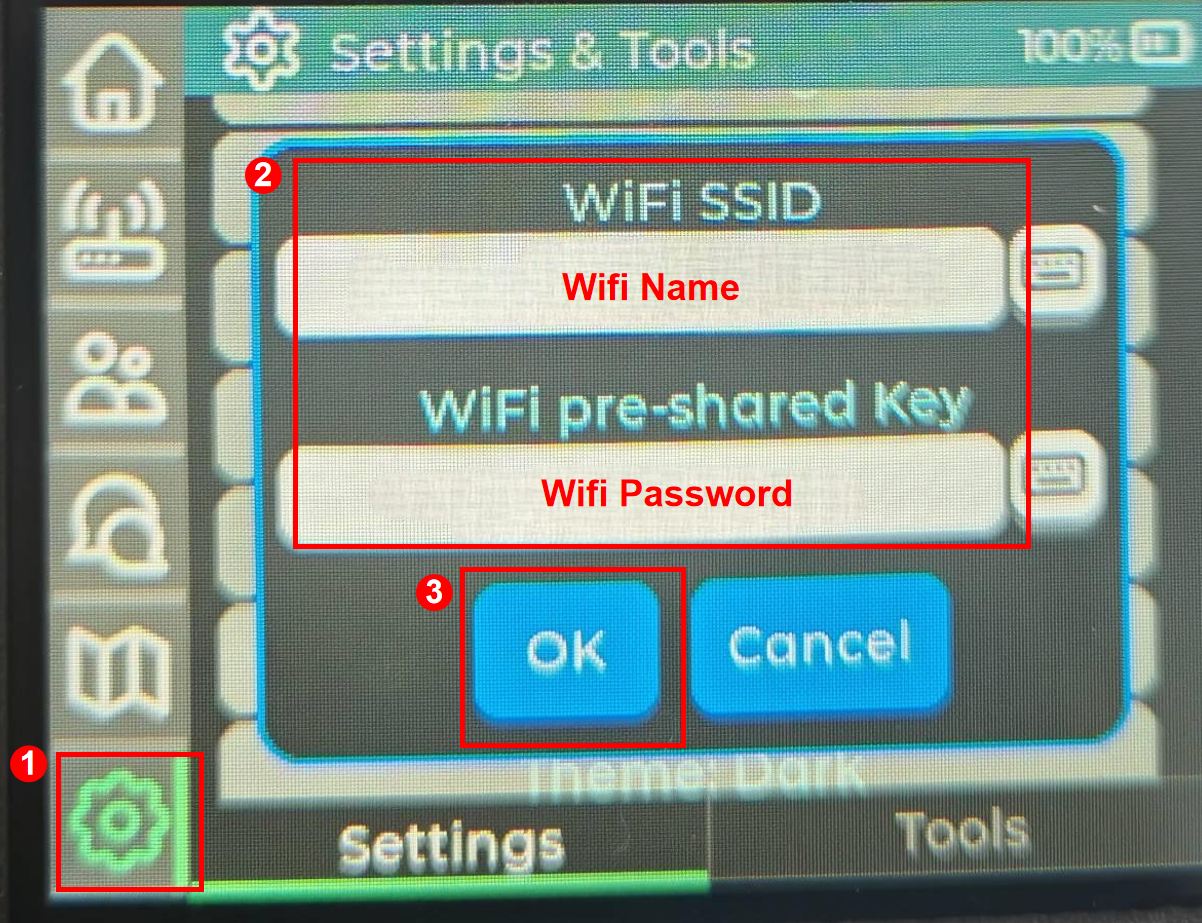
In MUI, open Settings → Wi-Fi, enter the Wi-Fi network name (WiFi SSID) and password (WiFi pre-shared Key), then select OK. You can configure both directly on the device.
Connect to a 2.4 GHz Wi-Fi network. 5 GHz Wi-Fi is not supported.
On Home, a grey Wi-Fi icon with 0.0.0.0 shows the disabled state. A white Wi-Fi icon with an assigned IP address shows the connected state.
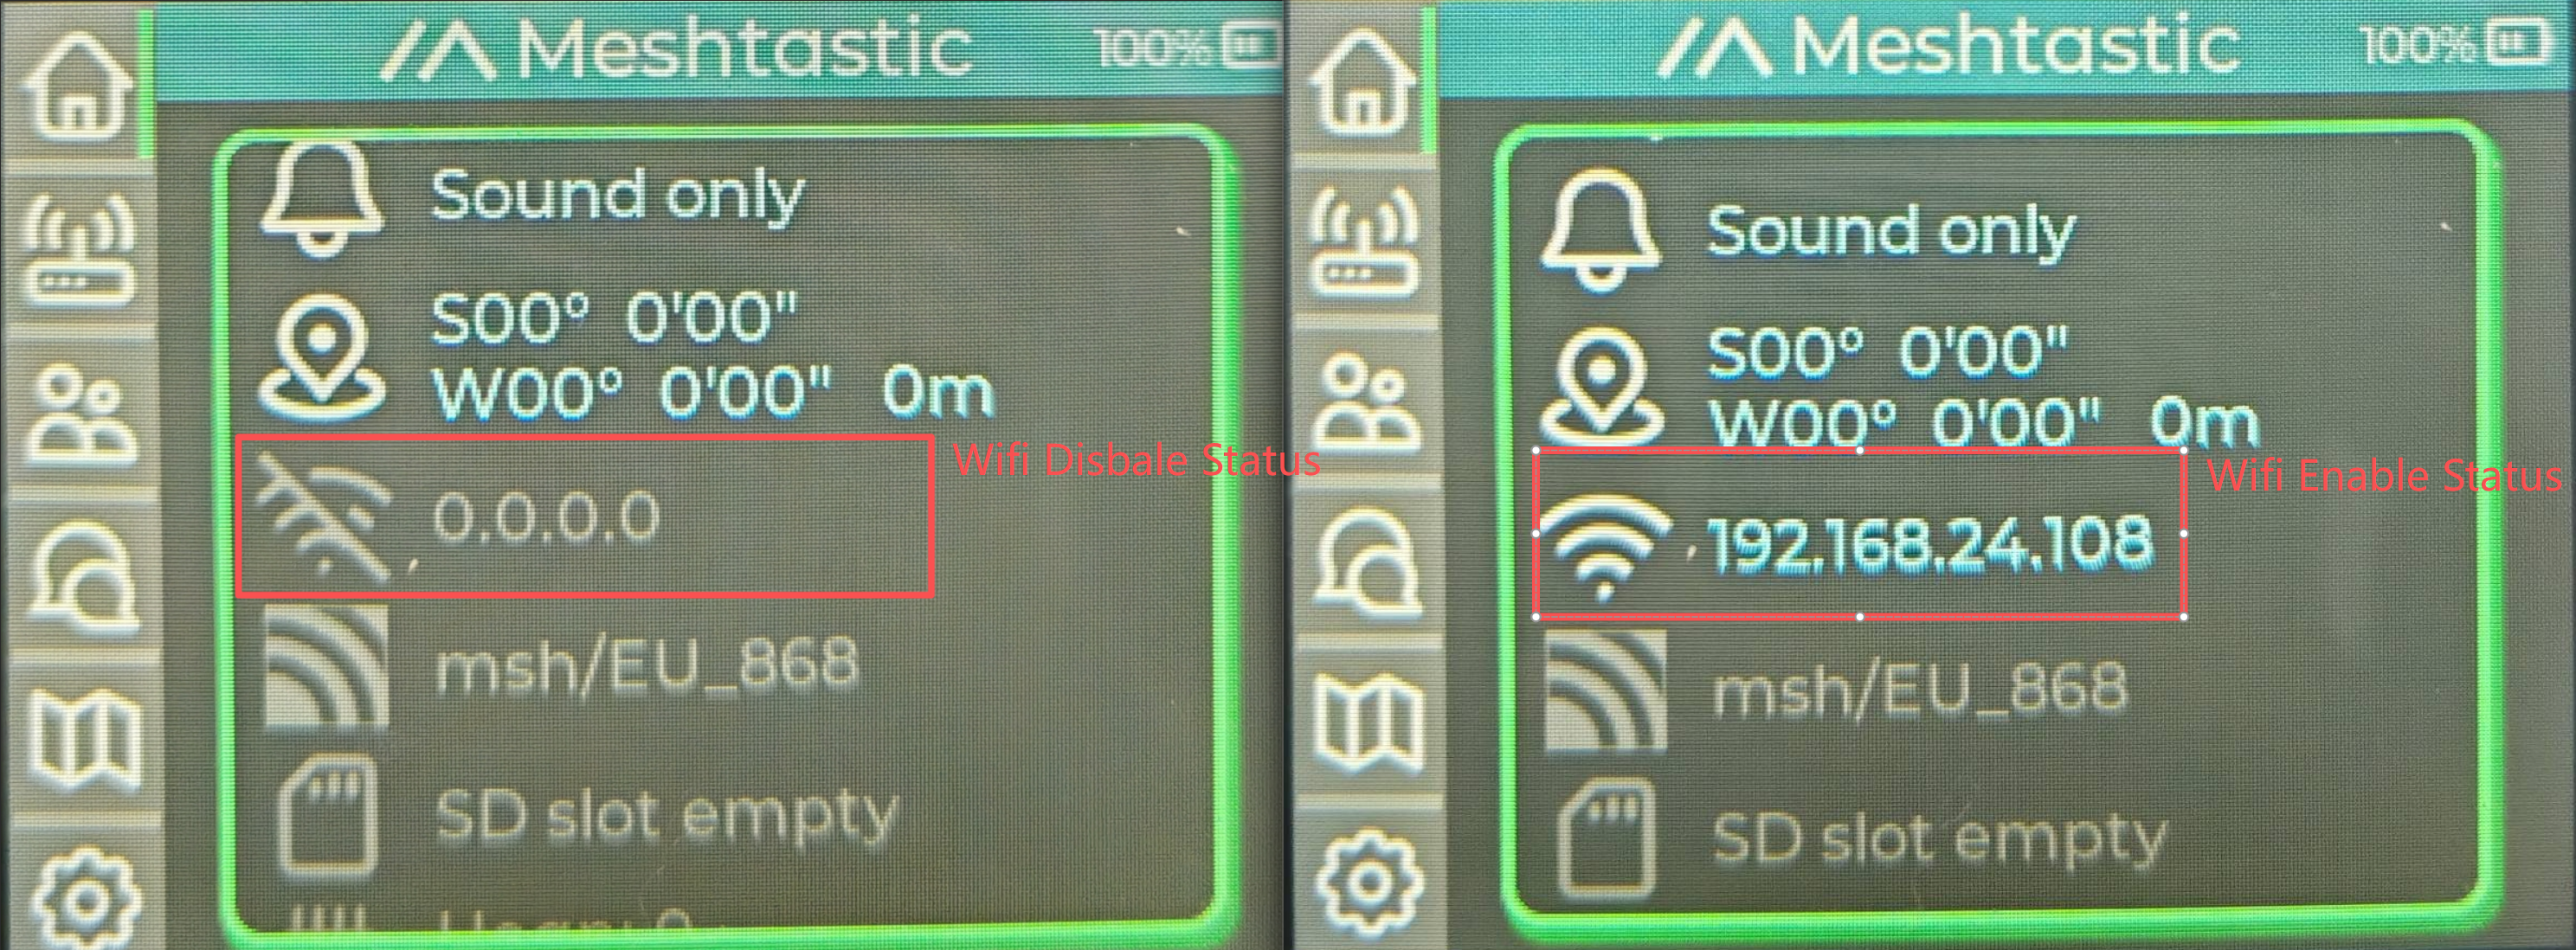
Long-press the Wi-Fi icon to turn Wi-Fi on or off. On X2, highlight the icon with the direction keys, then hold Confirm (the left orange key) to perform the long press.
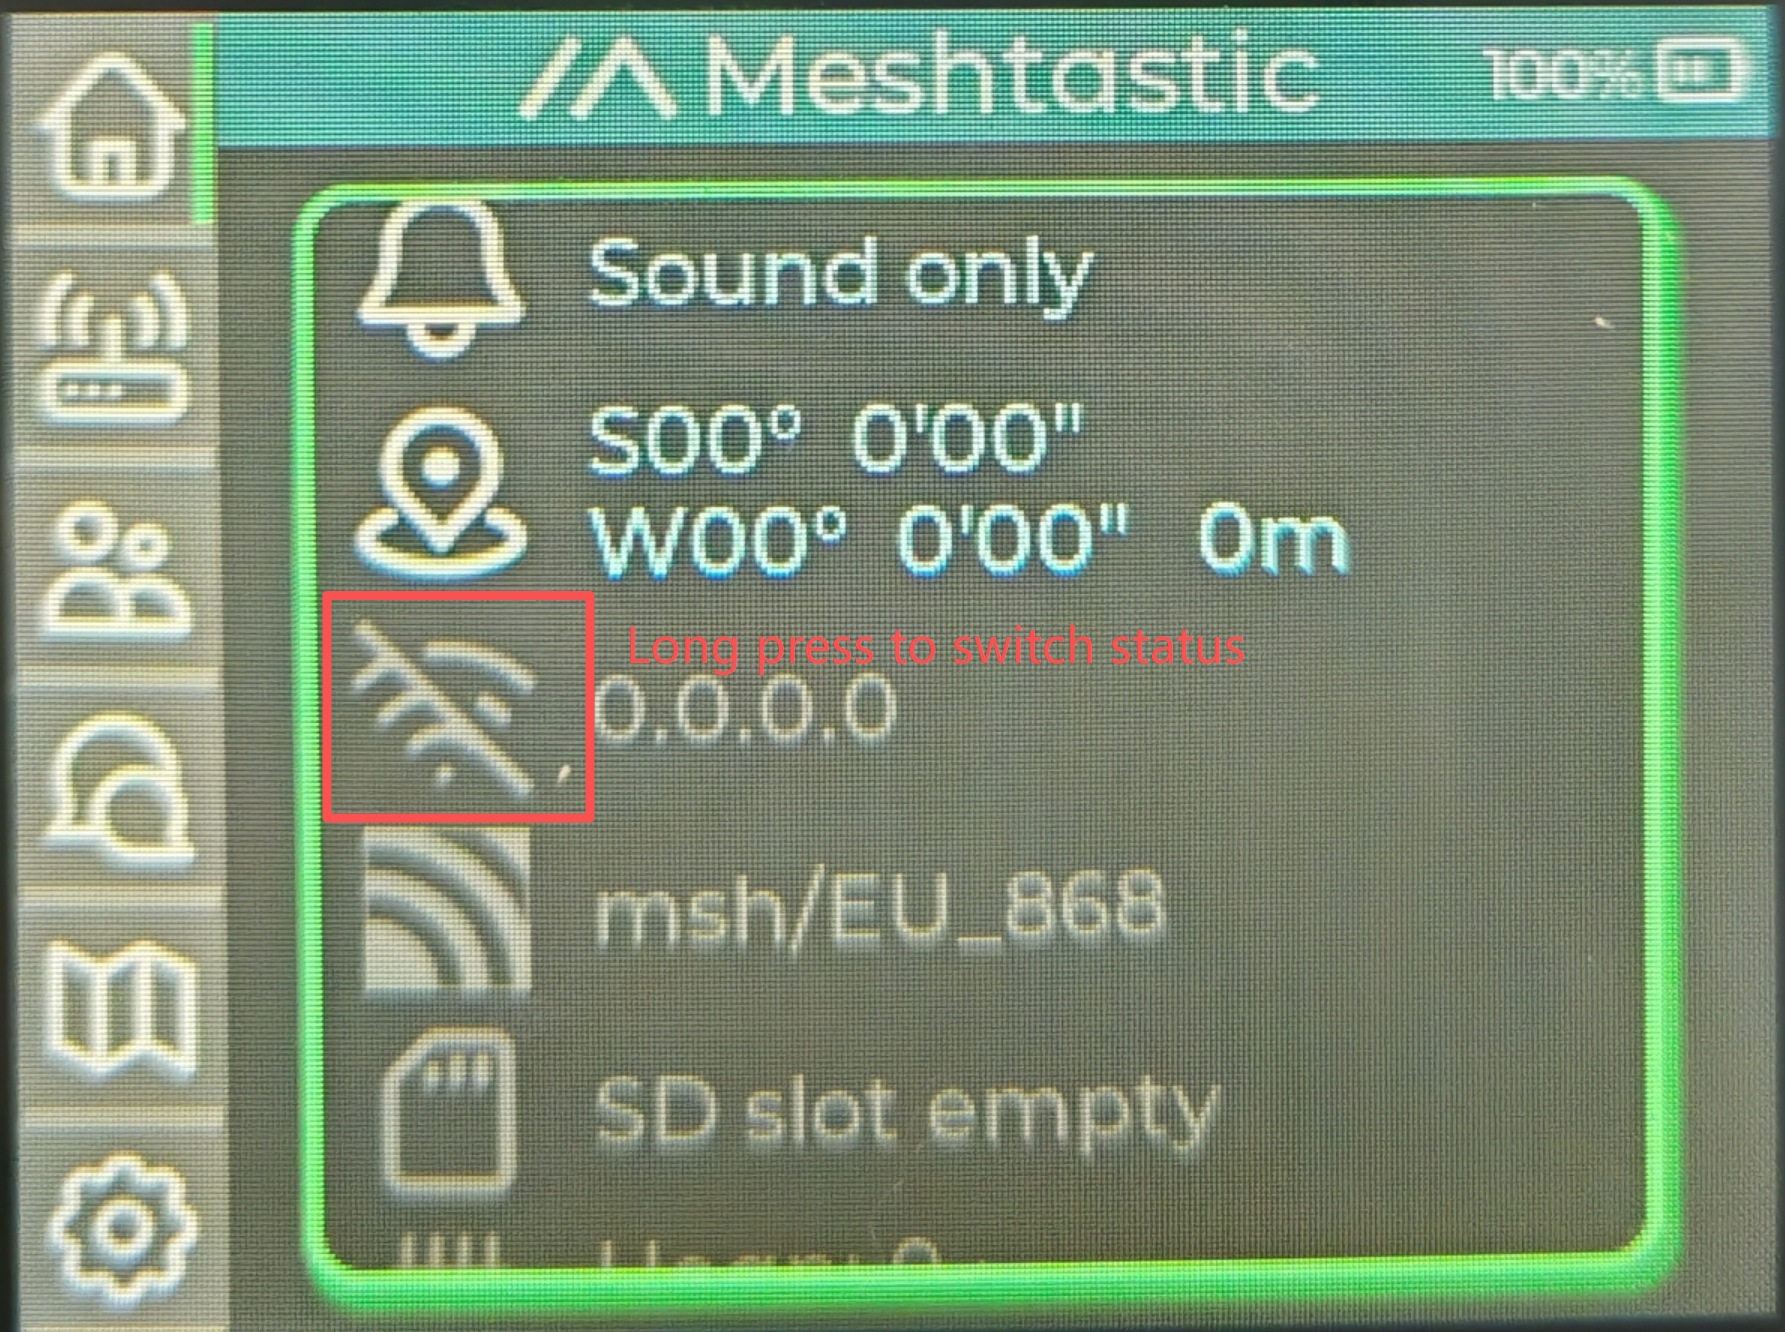
Bluetooth connection mode disables Wi-Fi. Re-enable it after returning to MUI if needed. Online maps require the Wi-Fi network to have internet access.
Step 3. View the map.
Open Map and wait for the map tiles to load. Keep Wi-Fi connected to the internet while loading new areas.
Send and Read Messages
- Base UI
- MUI
Compose a message
- Use Left/Right to reach the Home information screen.
- Press Up or Down to open the message composer.
- Select [Select Destination], then choose a channel or node.
- Select a canned message to send it, or [-- Free Text --] to open the keyboard.
- Use the direction keys and Confirm to enter characters. Use the keyboard's backspace key to delete.
- Select the keyboard's Enter key to send. Return cancels input.
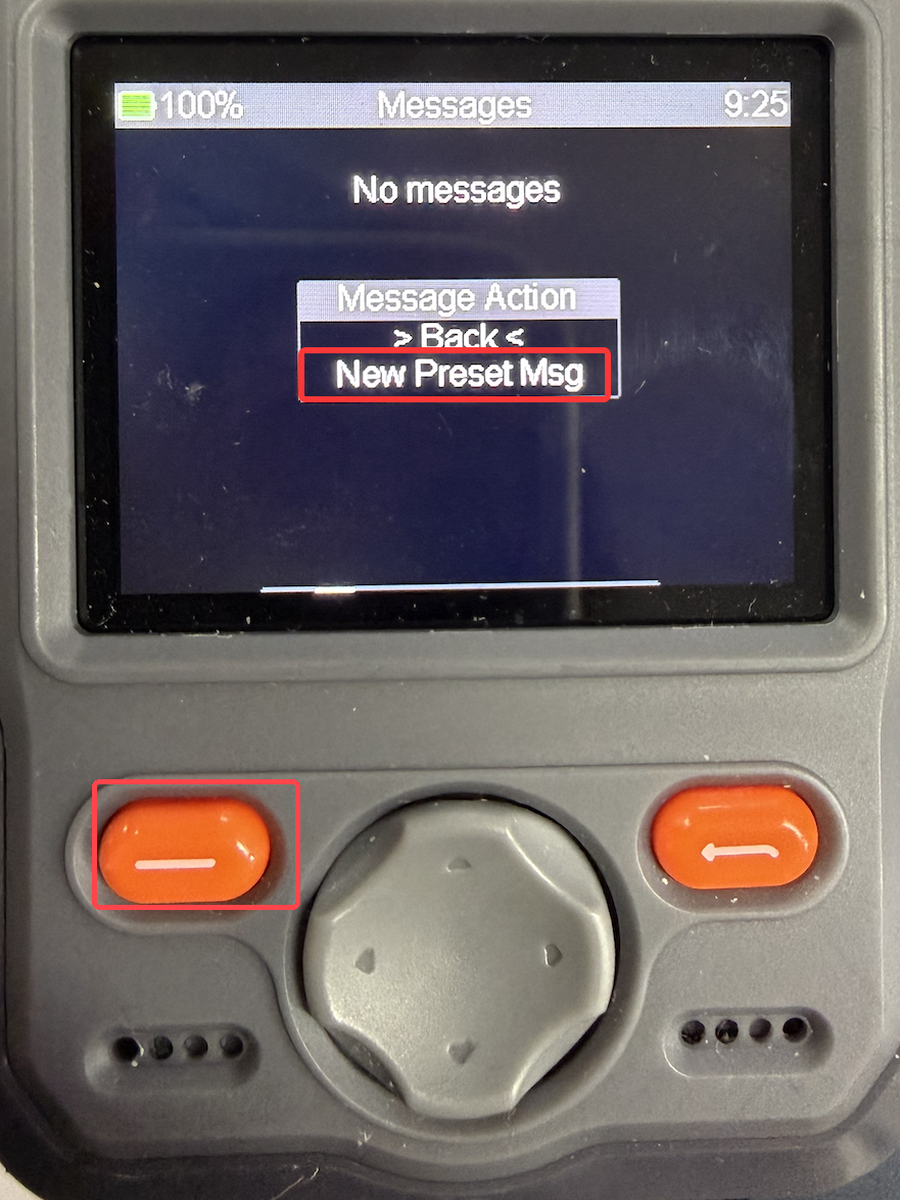
You can also open the composer from the Messages screen: press Confirm and select New Preset Msg in the Message Action menu. Check the destination before choosing a preset or entering free text.
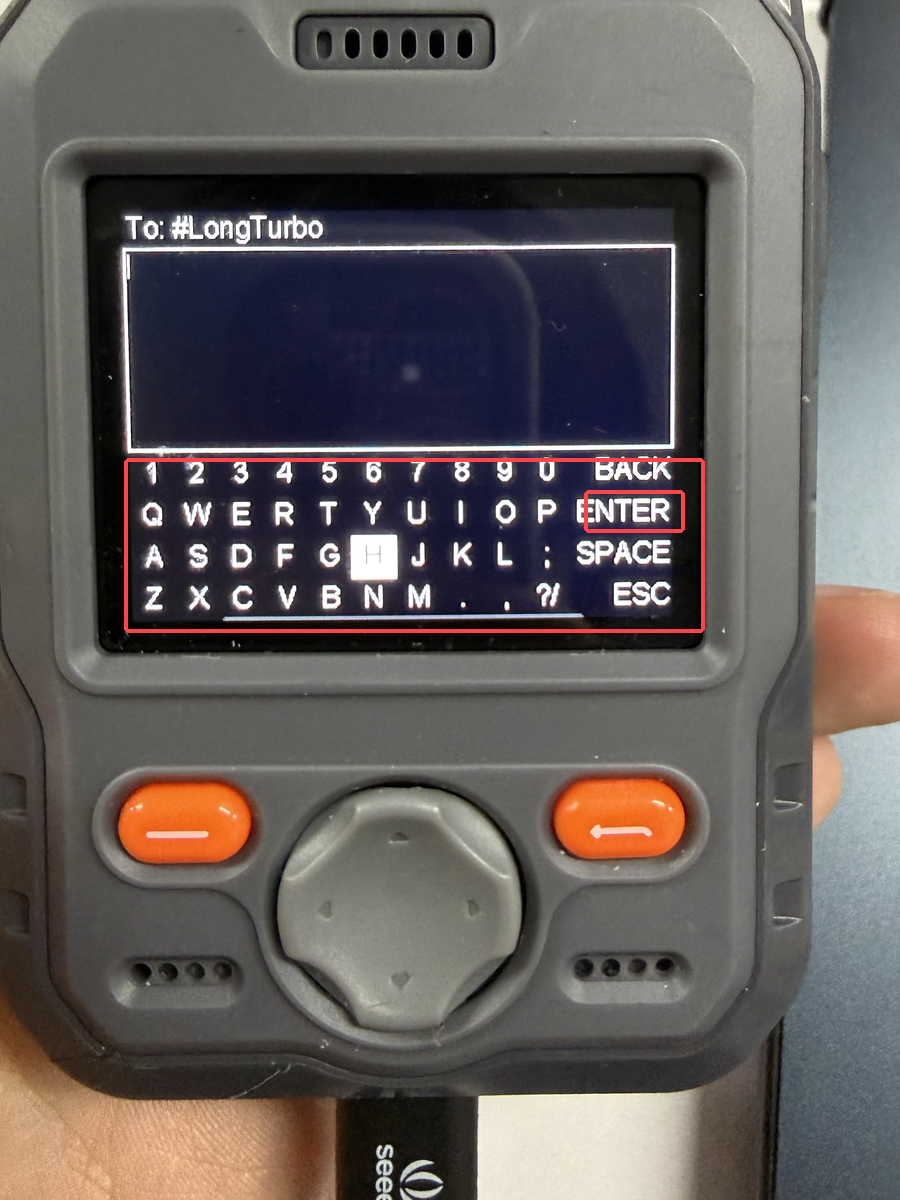
To:, use the direction keys and Confirm to type, then select ENTER to send. LongTurbo is the example destination.If the composer is unavailable, enable the Canned Message module in the phone app and use firmware with on-screen keyboard support.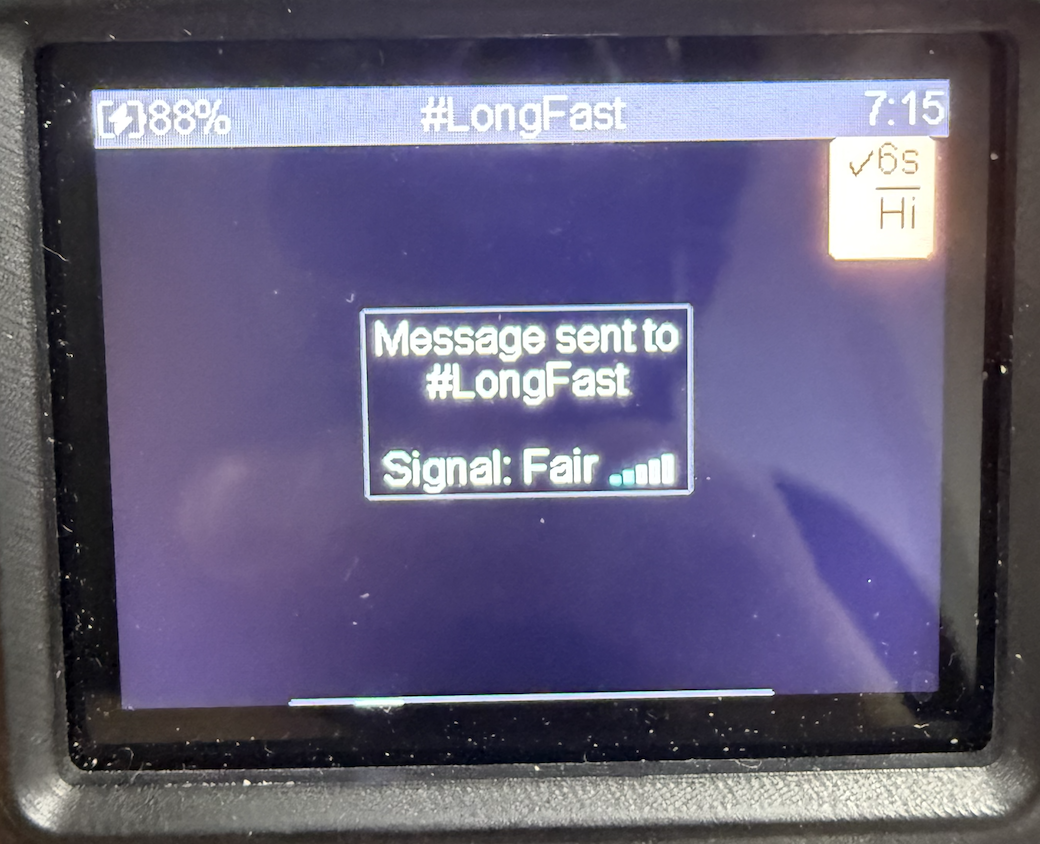
Read messages
Use Left/Right to reach the message screen, Up/Down to browse threads, and Confirm to open conversation actions.
Start a direct message from the node list
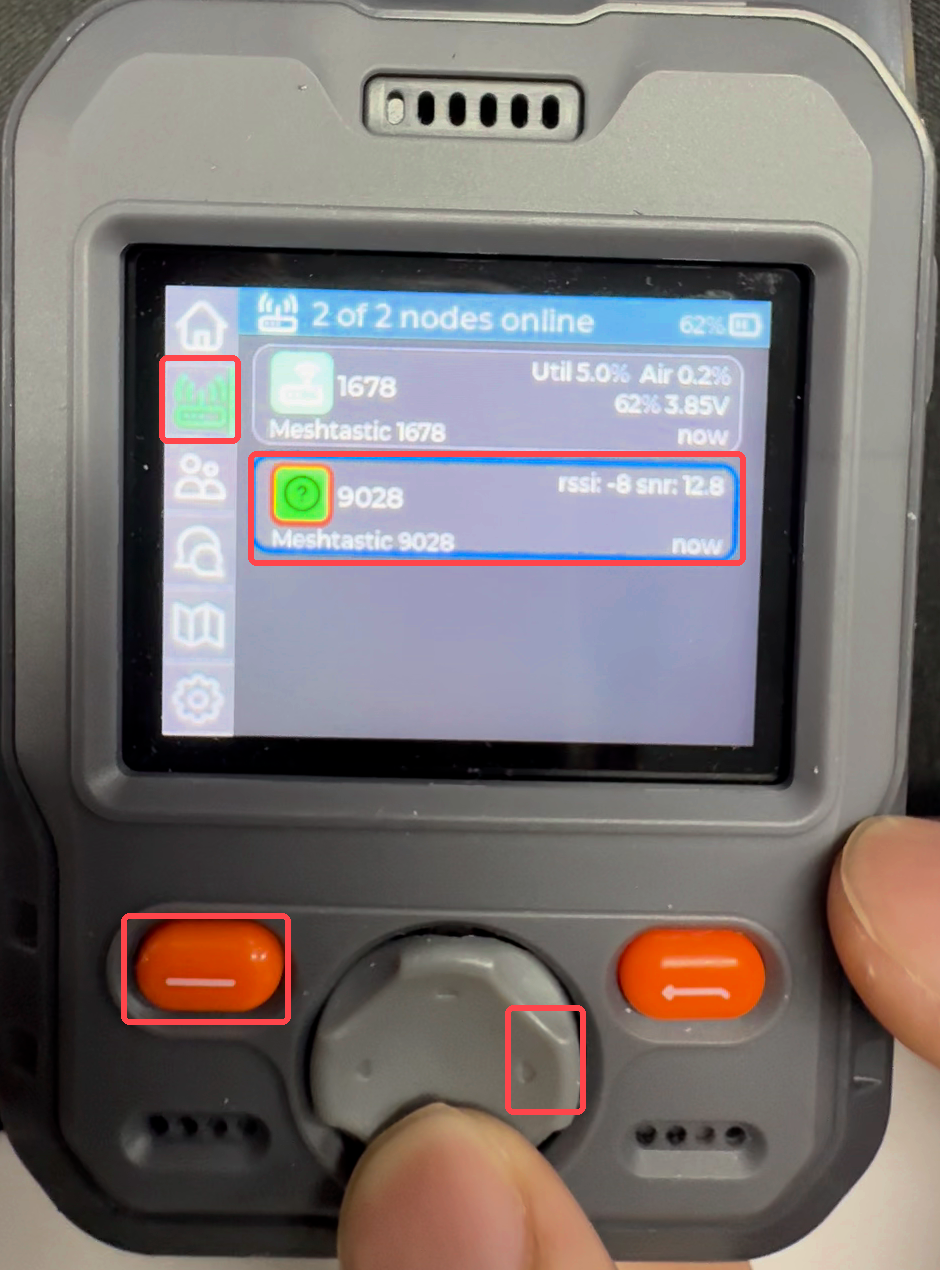
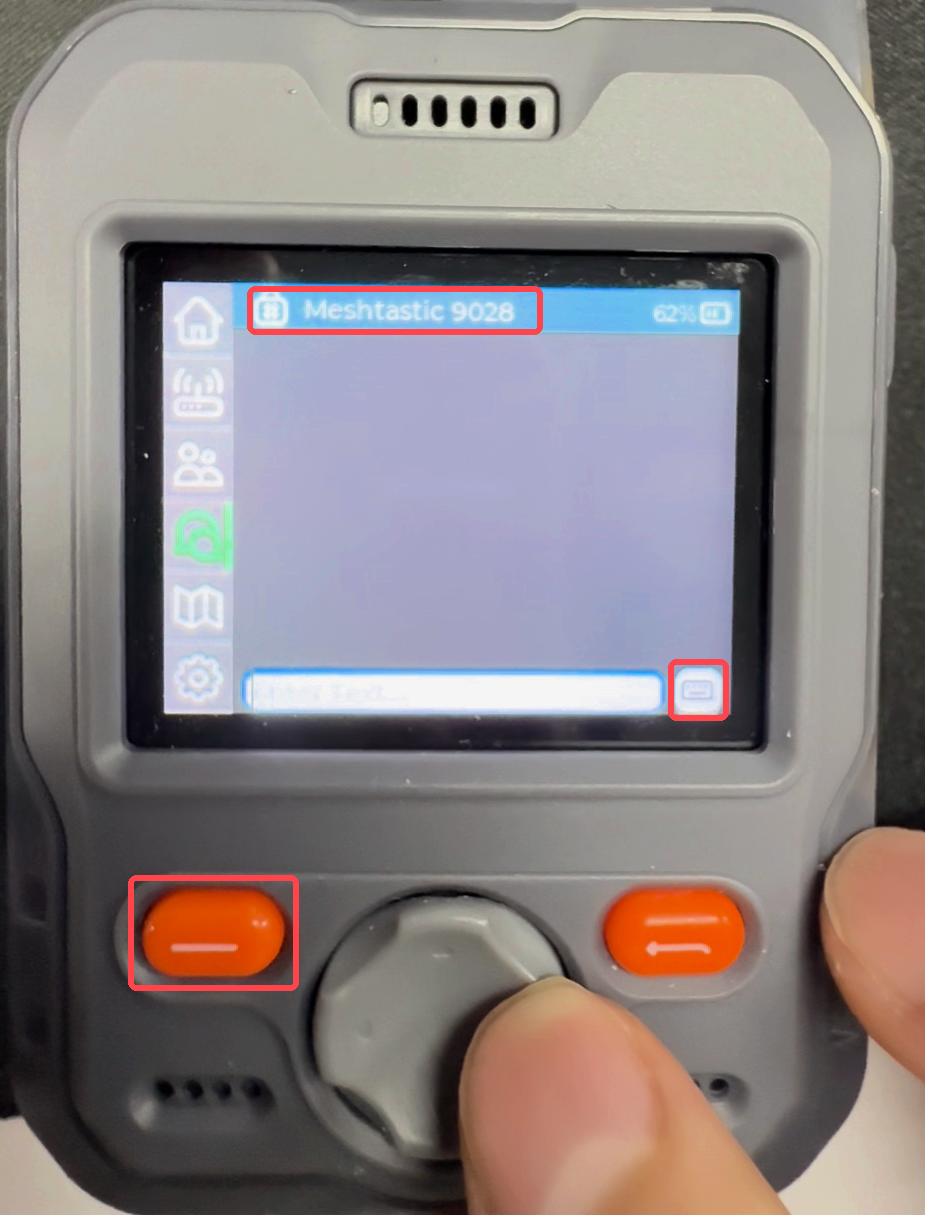
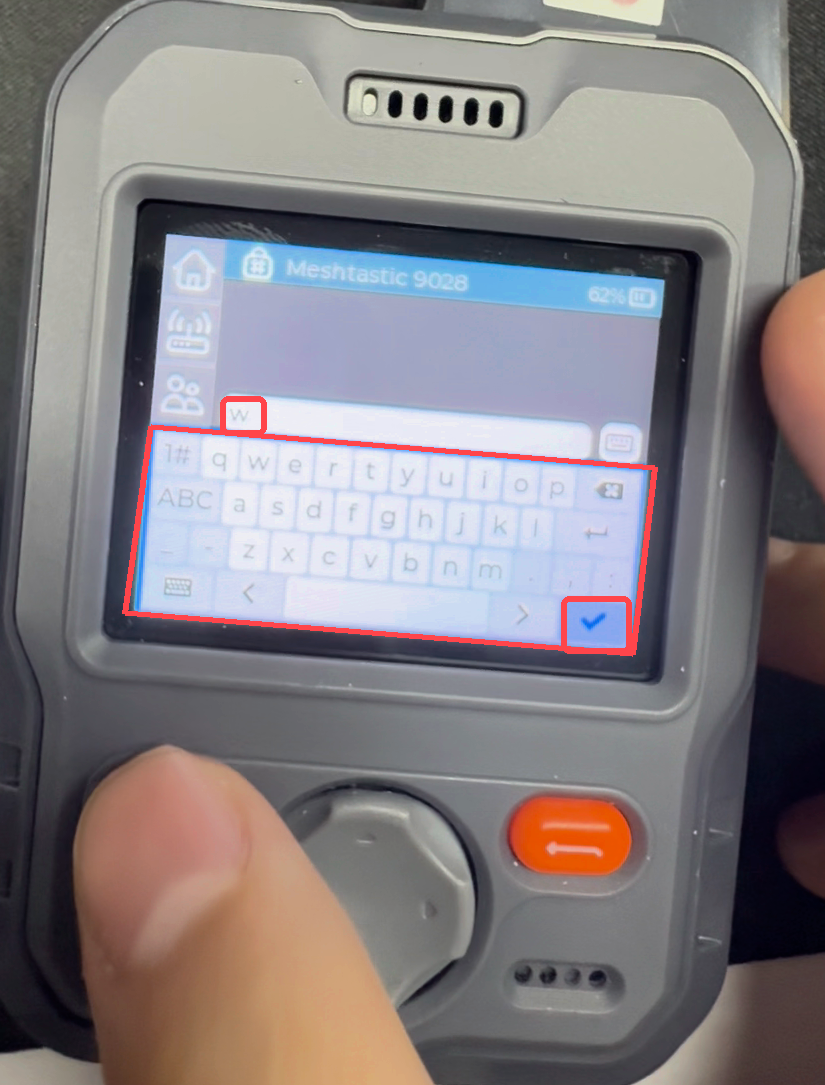
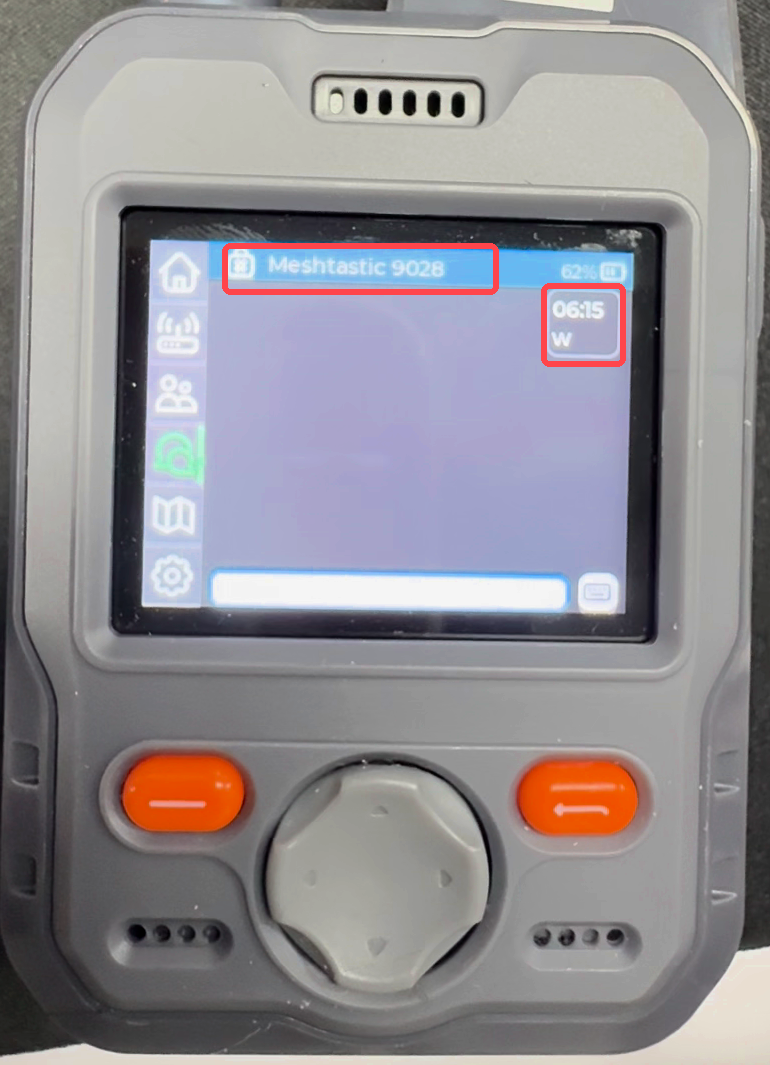
w to Meshtastic 9028.For a channel conversation, open Channels and select a channel. To return to an existing conversation, open Messages and select the chat.
Return closes the keyboard without sending; press it again to return to the chat list.
Mute and Unmute a Channel
- Highlight Channels on the navigation bar and press Right to enter the channel list. Use Up/Down to highlight a configured channel, such as LongTurbo in this example.
- Hold Confirm (the left orange key) until the bell icon changes to an orange crossed-out bell, then release the key. Channel notifications are now muted.
- To unmute the same channel, hold Confirm again until the white bell returns, then release the key.
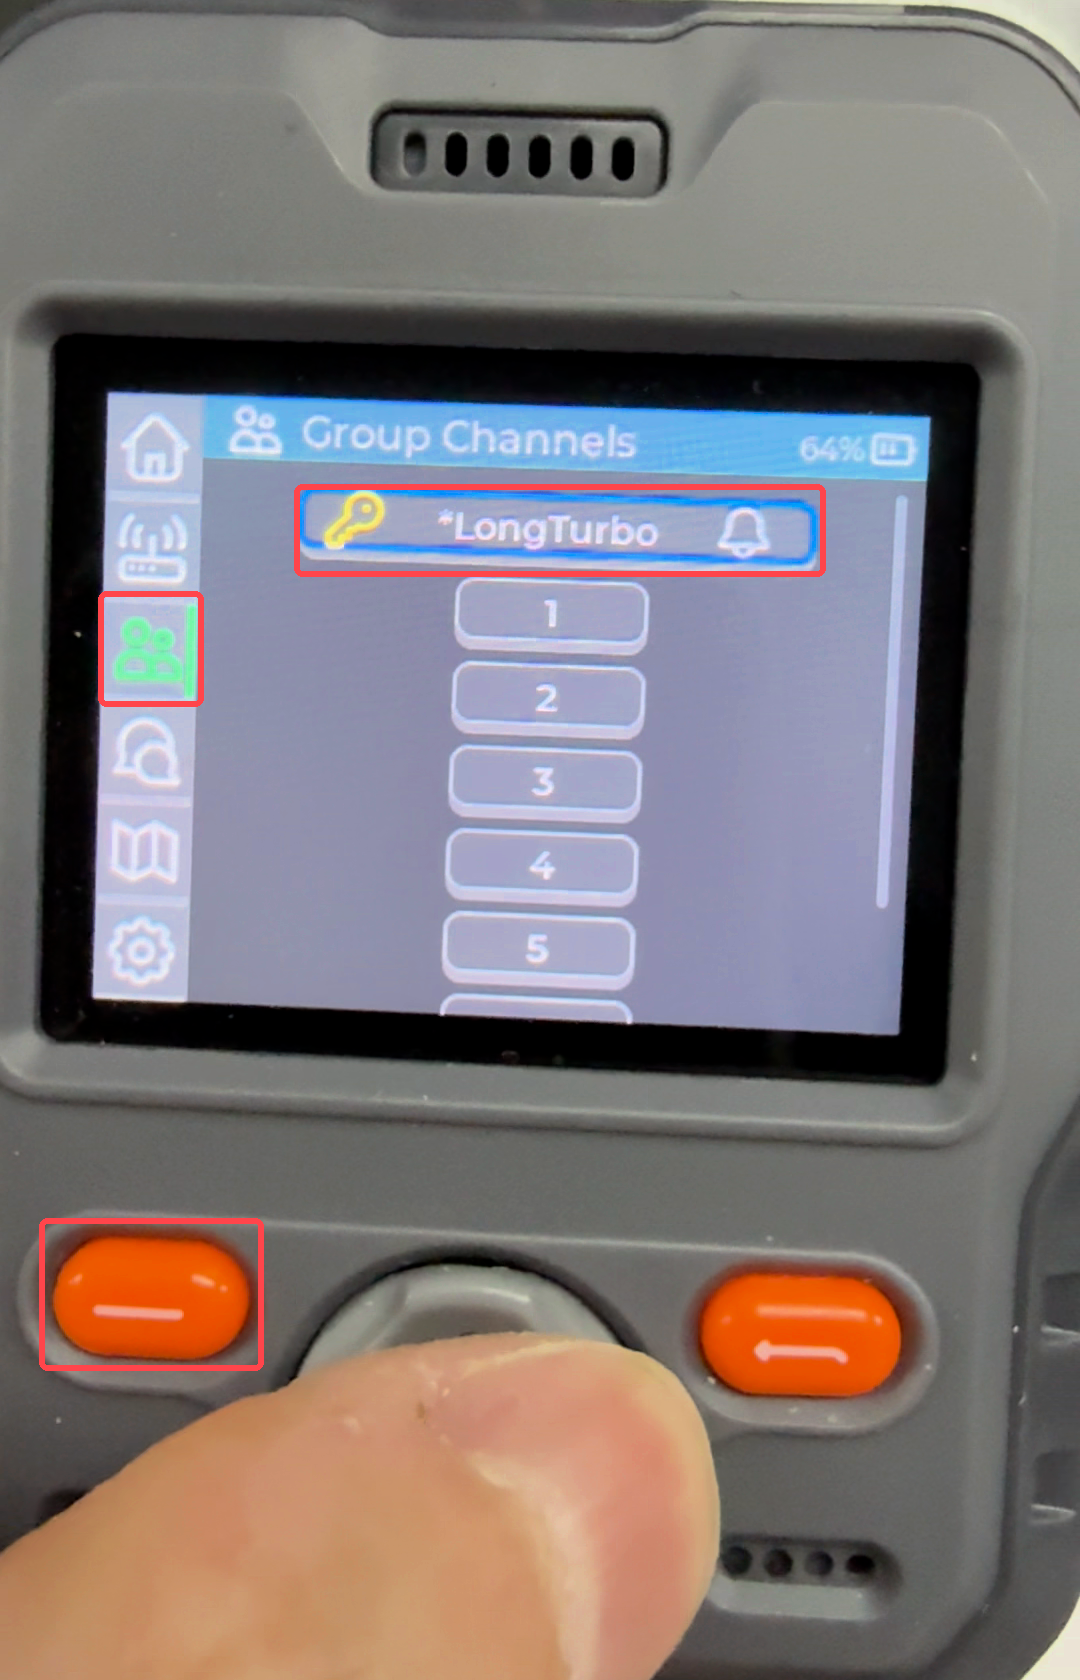
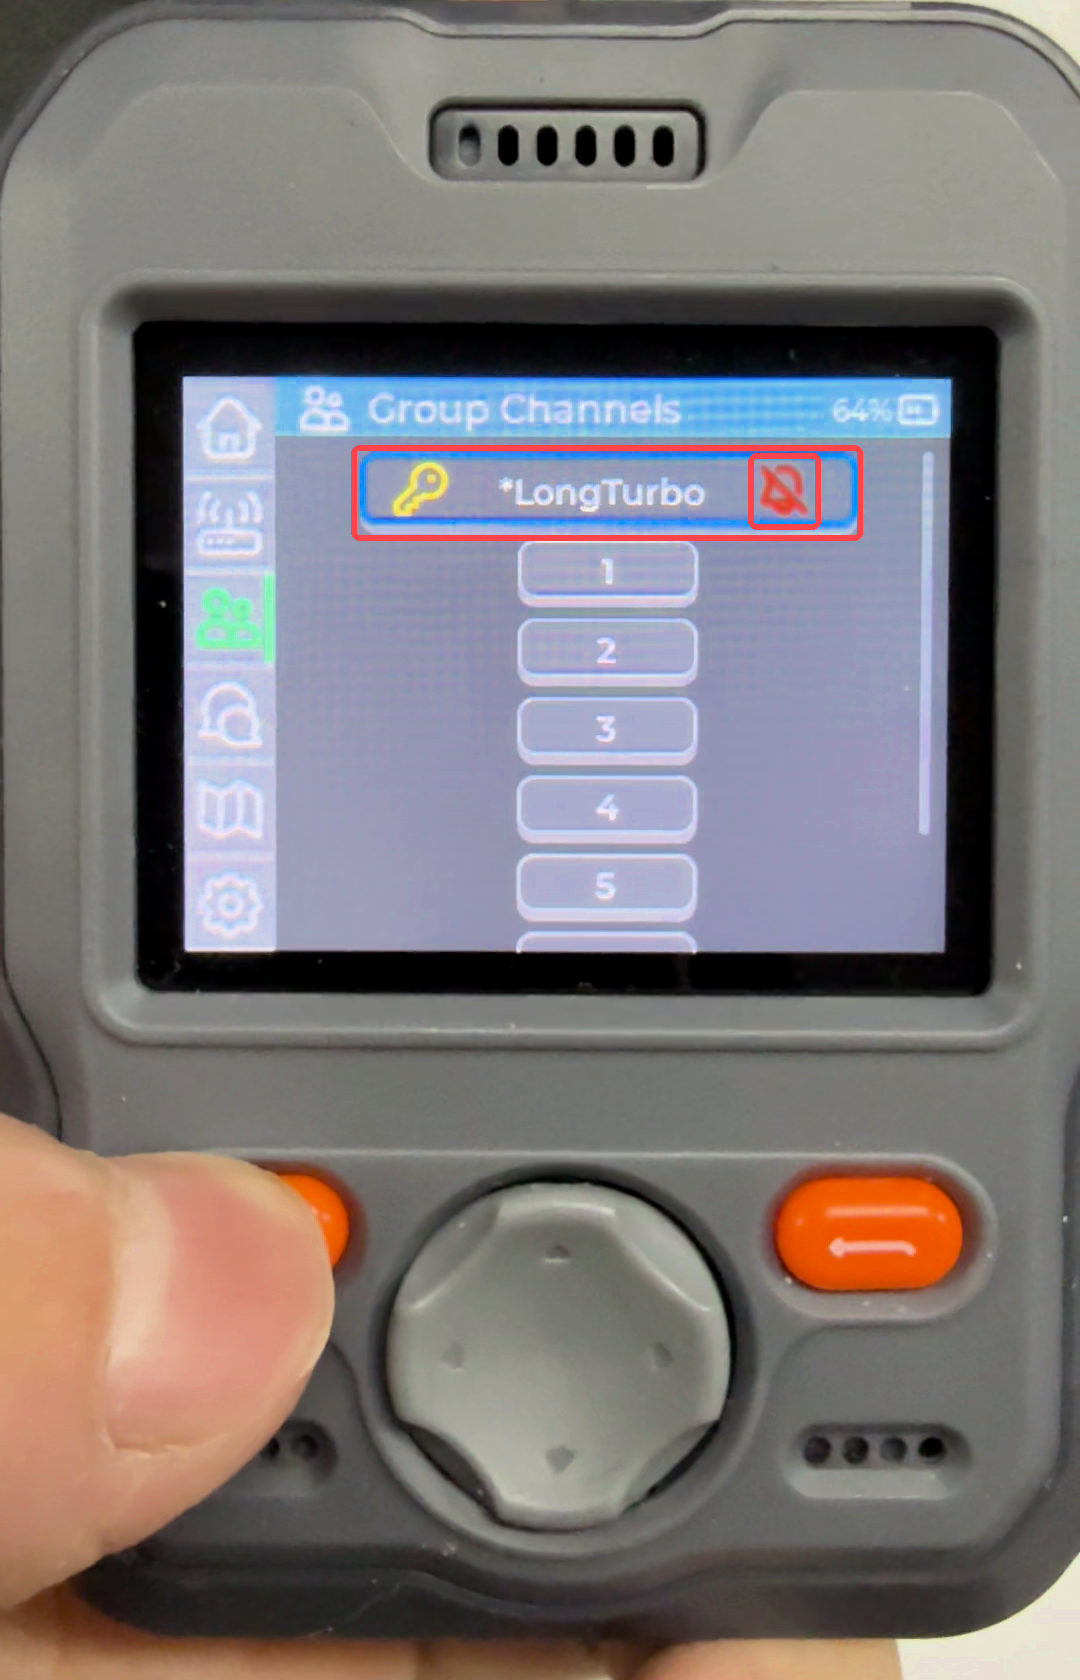
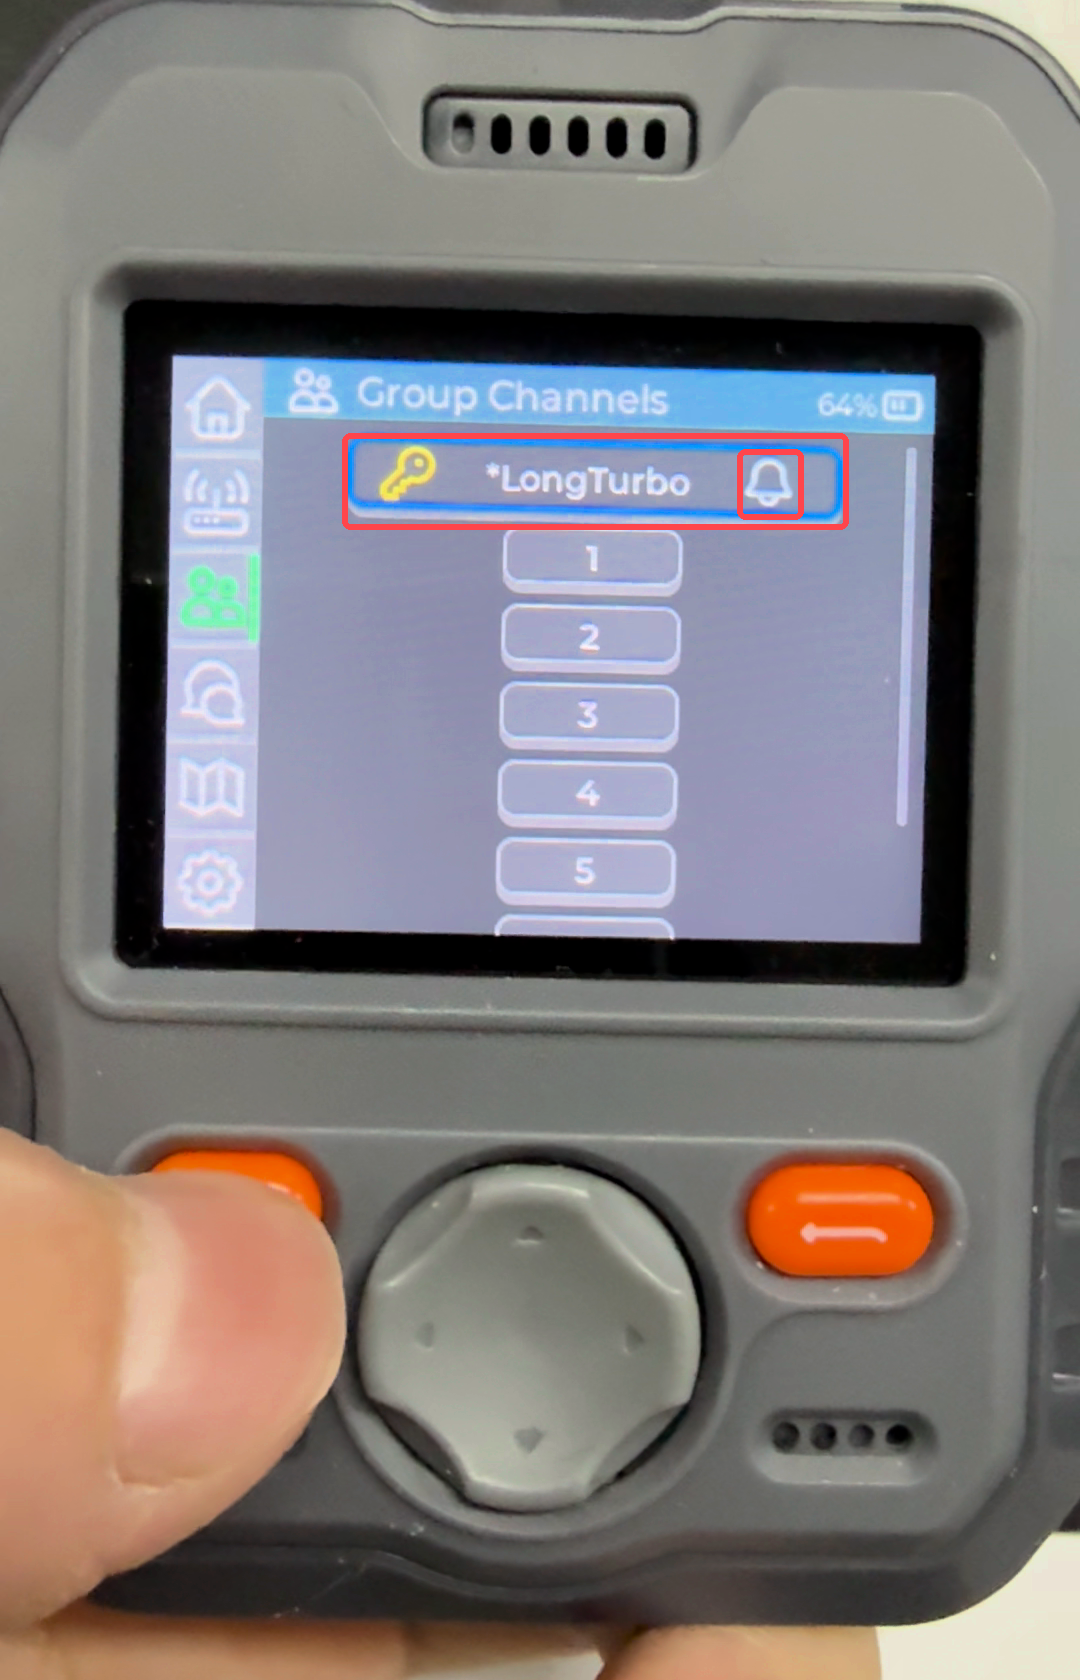
Direct messaging requires the devices to exchange node information and public keys first.
Advanced Usage
Connect via Website
Use the Meshtastic Web Client to read messages, send text, and configure your node from a browser. Use desktop Chrome or Edge with firmware that supports the selected connection method. Browser support varies; see the Web Client compatibility guide.
Step 1. Open the Web Client.

Step 2. Add a connection. Select New Connection. The screenshots illustrate the client workflow; device names and port numbers are examples. Select your own X2 when connecting.

Step 3. Choose a connection method.
- Bluetooth
- USB Serial
- Enable Bluetooth on X2. In MUI, enter the Bluetooth connection mode described in Phone Connection.
- Disconnect the phone app from X2 so the browser can connect.
- Select Bluetooth in the Web Client and choose X2 in the browser's device picker. Complete pairing if prompted.
- Wait for the node configuration to load, then open a channel or conversation.
- Start X2 with Meshtastic running and connect it using a USB data cable. Firmware download mode is for flashing, not for using the Web Client.
- Close the Web Flasher, serial monitors, and other applications using X2's serial port.
- Select Serial in the Web Client, choose New device if prompted, and select X2's USB port in the browser's device picker.
- Wait for the node configuration to load, then open a channel or conversation.

The USB device may appear as USB JTAG/serial debug unit. If you reconnect X2 or change USB sockets, select its current port again.
Step 4. Check the connection. Select the added device to connect if it is not already connected. The client then displays the node's status and loads its configuration. Open the message view to select a channel or a node conversation.

Configure GPS
Use X2 outdoors with a clear view of the sky and wait for a satellite fix.
- Base UI
- MUI
Use Left/Right to reach Position, press Confirm, and select On/Off Toggle → Enabled.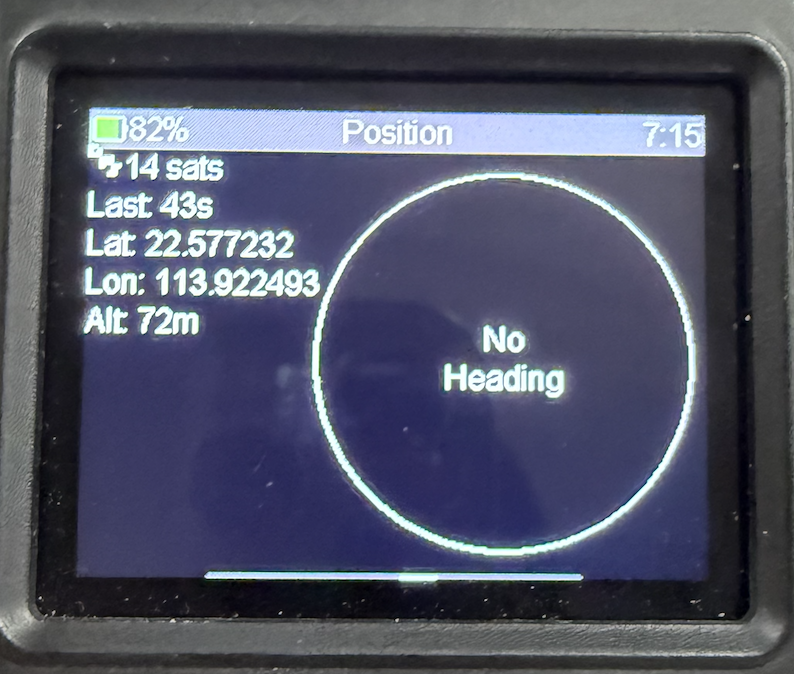
Enter Home and highlight the location/GPS control. If GNSS is disabled, hold Confirm to enable it. Restart if prompted.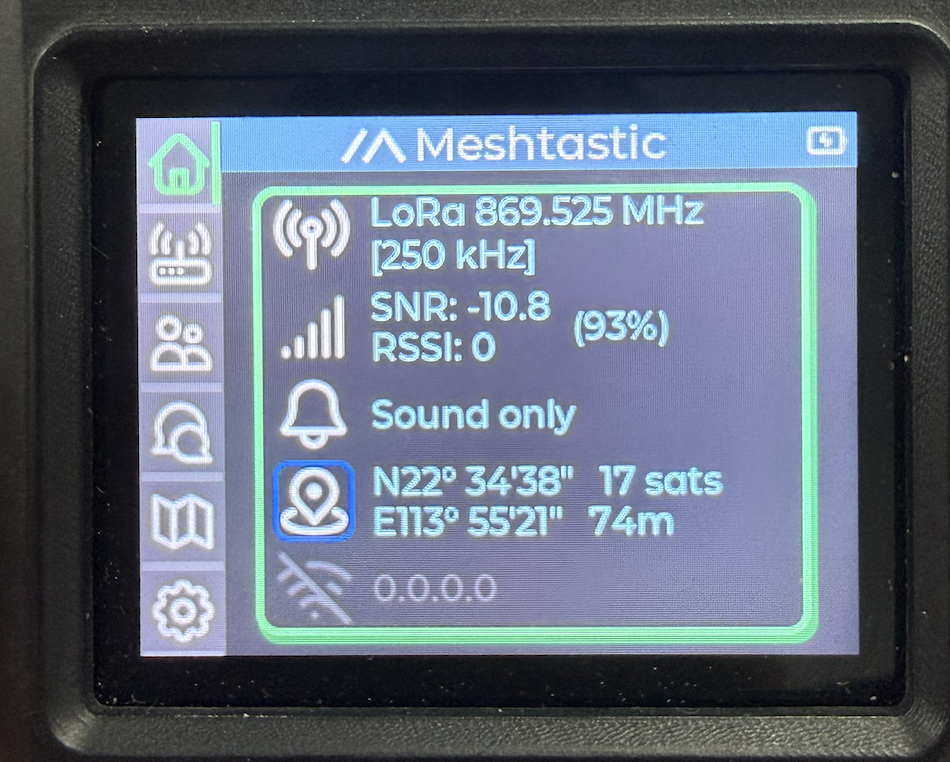
Configure on Phone
Connect the Meshtastic app to X2, open Position under the device's radio configuration, and adjust the settings below. Save your changes and reconnect if the device restarts.
| Setting | What it controls |
|---|---|
| GPS Mode | Enable or disable X2's GNSS receiver. |
| GPS Update Interval | How often the device requests a new GNSS position. |
| Position Broadcast Interval | How often the device broadcasts its position over the mesh. |
| Smart Position | Allow position broadcasts based on movement, subject to the configured thresholds. |
| Fixed Position | Use a fixed location. Disable this when you want the device's location to follow its movement. |

Shorter intervals can provide more frequent updates, but increase power use or mesh traffic. Choose intervals suitable for how often the device moves. See Meshtastic Position configuration.
iOS location permission
If you use the phone's location in the Meshtastic app or share it with a node, allow location access and enable Precise Location for Meshtastic in iOS Settings. This permission controls the location supplied by the phone; X2's built-in GNSS receiver obtains its own fix independently.

Sensor connection
X2 has built-in sensors for environmental readings, compass heading, and motion detection. Configure them according to the function you want to use:
| Sensor | Function | Configuration |
|---|---|---|
| SPA06-003 barometer | Pressure and sensor temperature readings. | Telemetry → Environment in the phone app. |
| BMM350 magnetometer | Compass heading. | Position → Compass and Compass Calibrate in Base UI. |
| Six-axis IMU | Acceleration and angular velocity measurements. | Used by supported firmware features; the environmental Telemetry page does not display raw six-axis readings. |
Enable environmental telemetry
- iOS
- Android
- Connect to X2 and open Settings → Module Configuration → Telemetry.
- Enable Environment Metrics Enabled and set the Environment Metrics interval.
- Enable Show on device screen if you want supported environmental readings on Base UI, then save the settings.
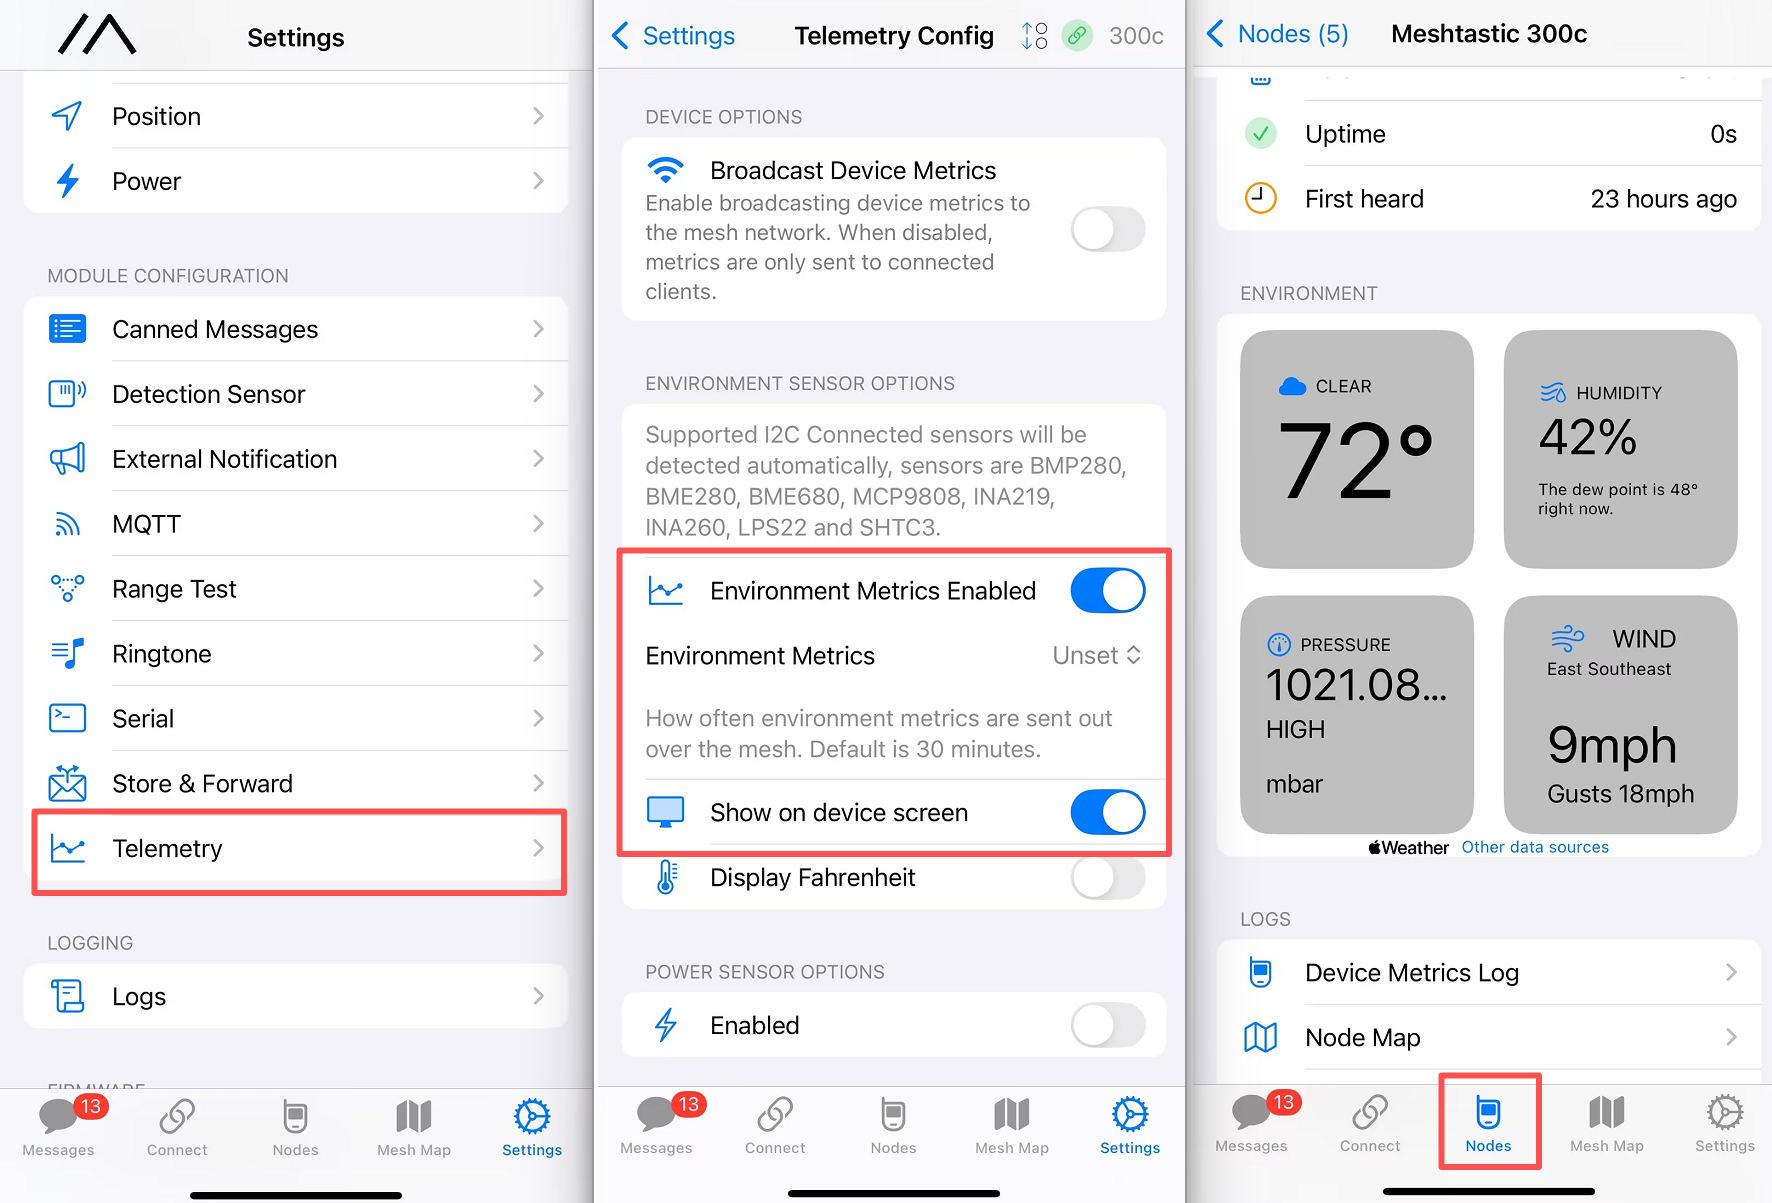
- Connect to X2 and open Module Configuration → Telemetry.
- Enable Environment metrics module enabled and set its update interval.
- Enable Environment metrics on-screen enabled to display supported environmental readings on Base UI, then save the settings.
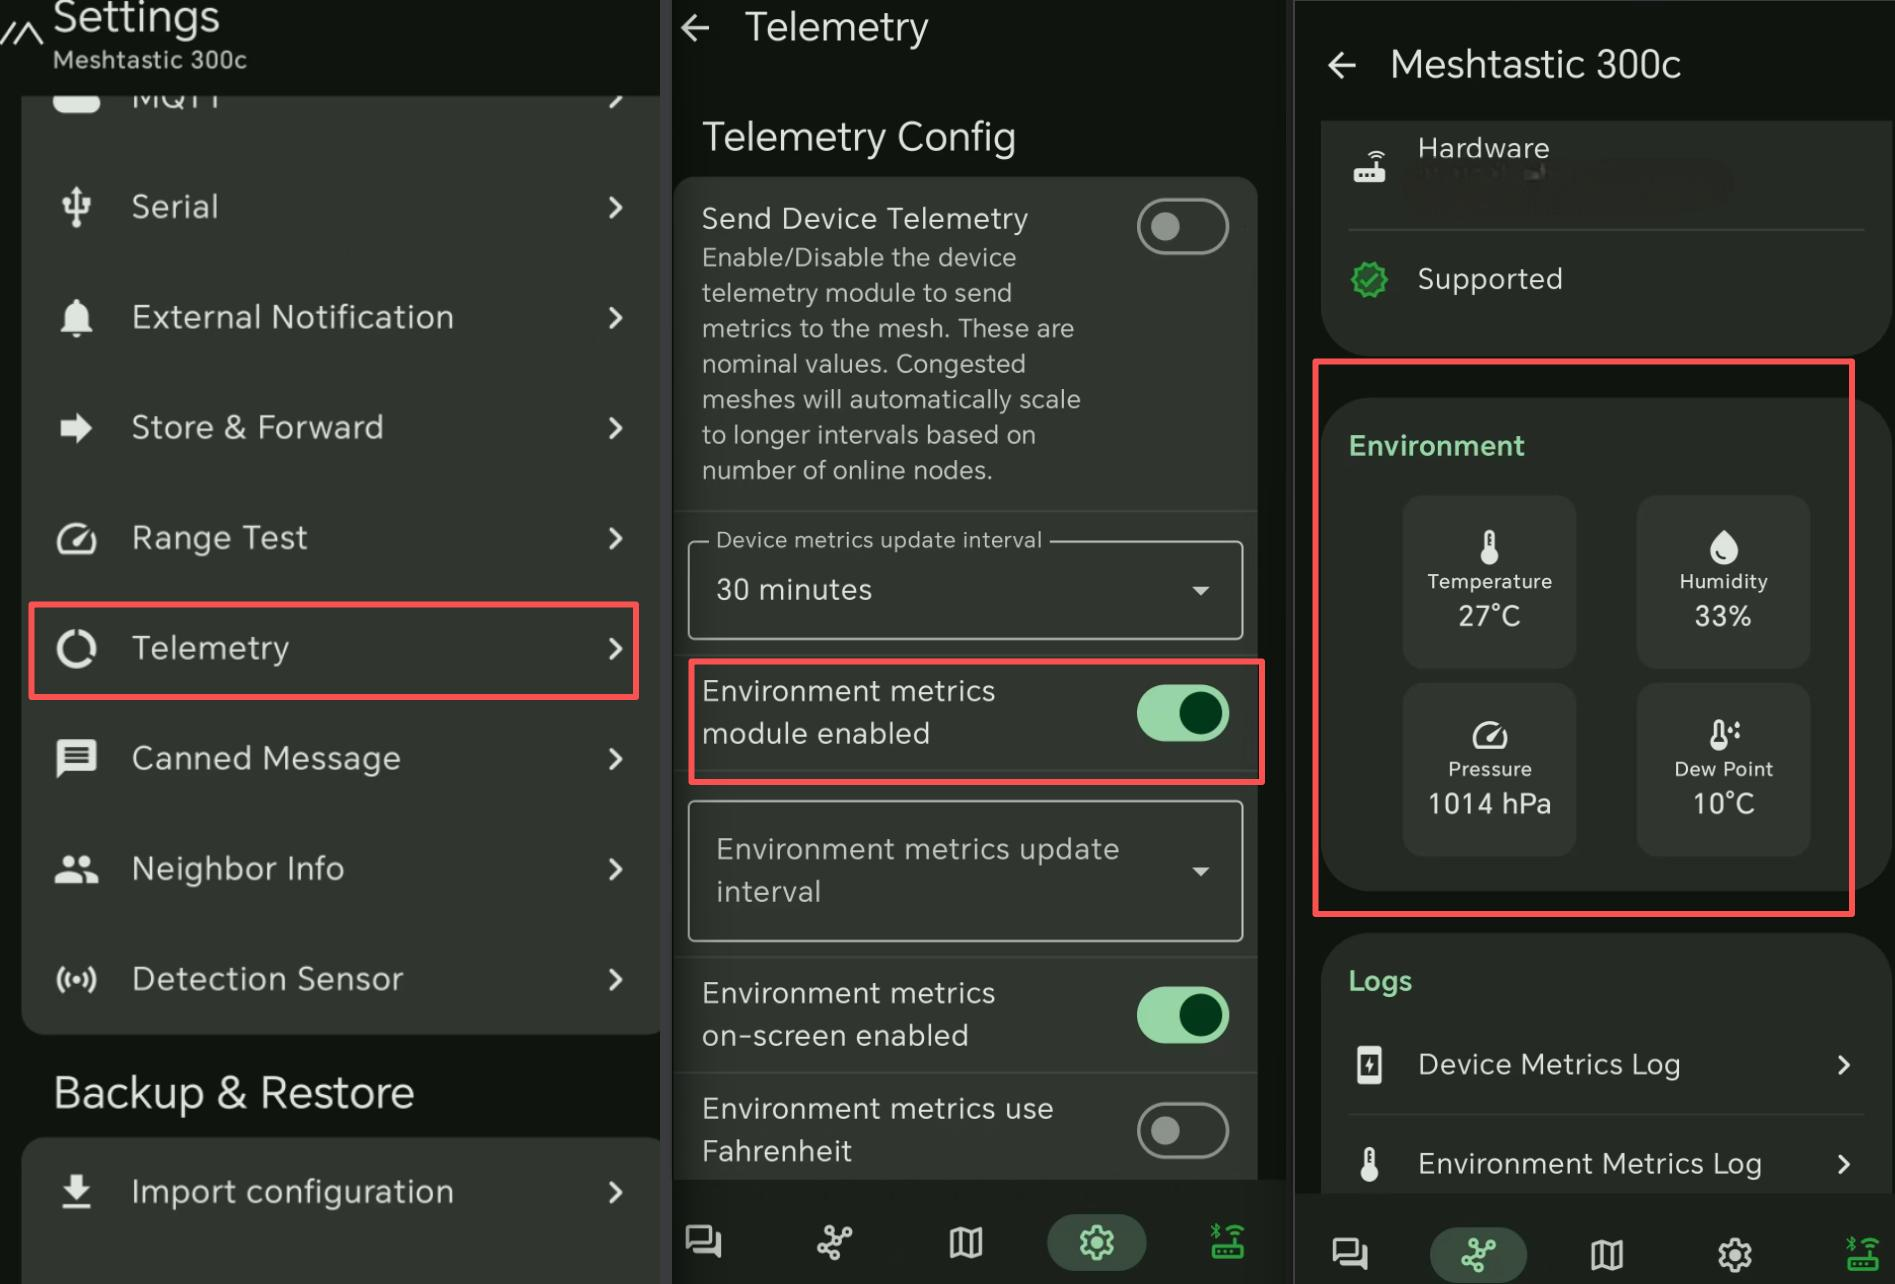
The screenshots use example nodes and readings. X2's environmental telemetry displays readings supported by its detected sensor and installed firmware. It does not enable compass calibration or transmit raw accelerometer and gyroscope readings. For compass operation, use the Position tab under Other Function.
Other Function
Use the direction keys to highlight a control. Press Confirm to select it, or hold Confirm for its long-press action. Press Return to close a dialog or go back. Menu availability depends on the installed firmware and enabled modules.
- MUI
- Base UI
- Menu Bar
- Home Page
- Node Page
- Channel Page
- Message Page
- Setting Page
- Tool
| X2 operation | Effect |
|---|---|
| Hold Confirm on Home | Resynchronize MUI with the node's configuration and data. |
| Hold Confirm on Nodes | Open the node filters. |
| Hold Confirm on Settings | Lock the display. Use Power to wake it and enter the screen PIN if configured. |
| Highlighted control | X2 operation | Effect |
|---|---|---|
| Message icon | Press Confirm | Open the message list. |
| Node icon | Press Confirm | Open the online-node list. |
| Clock | Press Confirm | Switch between date/time and uptime. |
| LoRa icon | Hold Confirm | Enable or disable LoRa transmission. |
| Notification icon | Hold Confirm | Enable or disable notifications. |
| Notification icon | Press Confirm | Cycle between sound, banner, and sound plus banner. |
| GPS icon | Hold Confirm | Enable or disable GNSS. Restart if prompted. |
| Wi-Fi icon | Hold Confirm | Enable or disable Wi-Fi, or open Wi-Fi settings if credentials are missing. |
| MQTT icon | Hold Confirm | Enable or disable the MQTT module. Restart if prompted. |
| QR code icon | Press Confirm | Display the device's QR code. |
Configure the MQTT server and relevant channel uplink/downlink settings in the phone app before using MQTT. The Home shortcut switches the module on or off; see Meshtastic MQTT configuration for setup.
| X2 operation | Effect |
|---|---|
| Highlight a node and press Confirm | Open its details. |
| Highlight a node and hold Confirm | Open its direct-message conversation. |
| Select a node's position control | Show its reported position on the map, when position data is available. |
Use Send and Read Messages for the illustrated X2 keyboard workflow.
Select a channel and press Confirm to open its conversation. Hold Confirm on the channel to mute or unmute its notifications. The bell changes between a white bell and an orange crossed-out bell; see Mute and Unmute a Channel.
Select a conversation and press Confirm to open it. To remove a conversation, hold Confirm on it to reveal the delete button, then select that button. This removes the local conversation history.
Open Settings from the navigation bar, highlight the setting, and press Confirm. Save or confirm the change before leaving its dialog.
| Setting | Effect |
|---|---|
| User Short Name / User Long Name | Change the node's displayed names. |
| Lock: Screen / Settings | Configure the screen and settings PIN locks. |
| Region | Select the LoRa region. |
| Modem Preset | Select the radio modem preset. |
| Channel | Edit channel settings. |
| Device Role | Select the node's role. |
| Wi-Fi | Set the network name and password. |
| Screen Timeout | Set how long the display stays active. |
| Screen Brightness | Adjust the backlight. |
| Theme | Switch between light and dark appearance. |
| Language | Change the displayed language. |
| Configuration Reset → Factory Reset | Restore the default configuration. |
| Configuration Reset → NodeDB Reset | Clear stored node information. |
| Configuration Reset → Clear Chat History | Clear local chat history. |
| Reboot / Shutdown → Green restart icon | Restart X2. |
| Reboot / Shutdown → Red power icon | Shut down X2. With USB connected, it may return to the charging screen. |
For reset instructions and screenshots, see Factory Reset and NodeDB Reset.
Open Settings & Tools, then switch to Tools. Highlight a tool and press Confirm. Select a node when the tool asks for a target.
| Tool | Function |
|---|---|
| Mesh Detector | View recently detected nodes. |
| Signal Scanner | Inspect received signal information, including RSSI and SNR. |
| Trace Route | Request the route to a selected node and view the response. |
| Statistic | View packet and decoding statistics. |
| Packet Log | Inspect mesh packet activity. |
A route or signal result requires traffic from the relevant node. Allow time for replies and check Signal Quality when assessing the link.
Use Left/Right to reach the information screen, press Confirm to open its action menu, then use Up/Down and Confirm to select an item.
- Home
- Node
- Position
- LoRa
- System
| Action | Effect |
|---|---|
| Sleep Screen / Toggle Backlight | Turn off the display or toggle its backlight, depending on the firmware. Use Power to wake X2. |
| Send Position | Broadcast the current position when GNSS is enabled and a valid position is available. |
| Send Node Info | Announce node information; this option is shown when GNSS is disabled. |
Open the selected node's Node Action menu.
| Action | Effect |
|---|---|
| Favorite / Unfavorite | Add or remove the node from favorites. |
| Trace Route | Request the route to the selected node. |
| Mute Notifications / Unmute Notifications | Change notifications for that node. |
| Action | Effect |
|---|---|
| On/Off Toggle | Enable or disable GNSS. |
| Format | Select the coordinate display format. |
| Smart Position | Configure broadcasts based on movement. |
| Update Interval | Set the GNSS update interval. |
| Broadcast Interval | Set the position broadcast interval. |
| Compass | Choose Dynamic, Fixed Ring, or Freeze Heading. |
| Compass Calibrate | Start a 30-second compass calibration. |
For calibration, select Compass Calibrate and follow the on-screen prompt while rotating X2 through different orientations. Keep it away from magnets and large metal objects, and allow the countdown to finish. The calibration option requires the firmware to detect a supported sensor.
| Action | Effect |
|---|---|
| LoRa Region | Select the operating region. |
| Device Role | Select the node role. |
| Radio Preset | Choose a modem preset. |
| Frequency Slot | Choose the frequency slot for the selected region and preset. |
| Transmit Enabled | Enable or disable radio transmission. |
Coordinate changes to the preset and frequency slot with the nodes you want to communicate with.
| Action | Effect |
|---|---|
| Notifications | Configure notification and system sounds. |
| Display Options | Adjust the display settings available in the firmware. |
| Bluetooth Toggle | Enable or disable Bluetooth. |
| WiFi Toggle | Enable or disable Wi-Fi. Configure its network credentials first. |
| Reboot/Shutdown | Restart, shut down, or switch UI. |
The microphone and speaker provide hardware for future voice-messaging updates. Notification sounds can be configured using the controls above.
FAQ
Device can not pair with Phone via BLE
- In MUI, enter Bluetooth pairing mode before searching for X2 in the phone app. Open Settings → Reboot / Shutdown, highlight the Bluetooth icon, and short-press Confirm. Wait for the pairing screen and use the PIN displayed on X2.
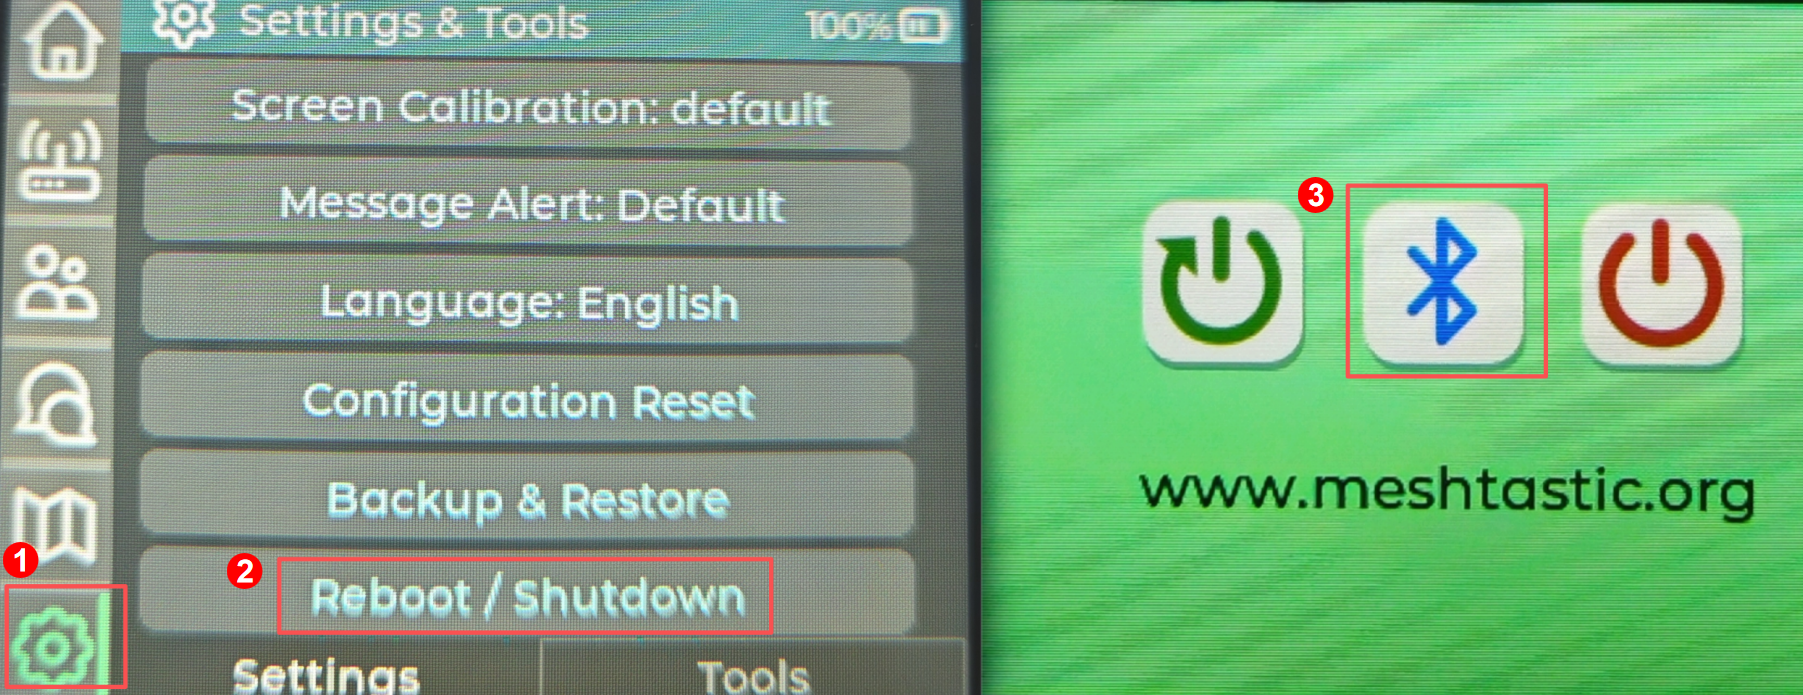
On X2, use the direction keys to highlight controls and press Confirm to select them. For the X2 button illustrations, see Phone Connection.
- In Base UI, enabling Wi-Fi disables Bluetooth. To keep using Wi-Fi, connect the phone to the same network and choose Network in the Meshtastic app, using X2's IP address. To pair over BLE instead, disable Wi-Fi and enable System → Bluetooth Toggle on X2.
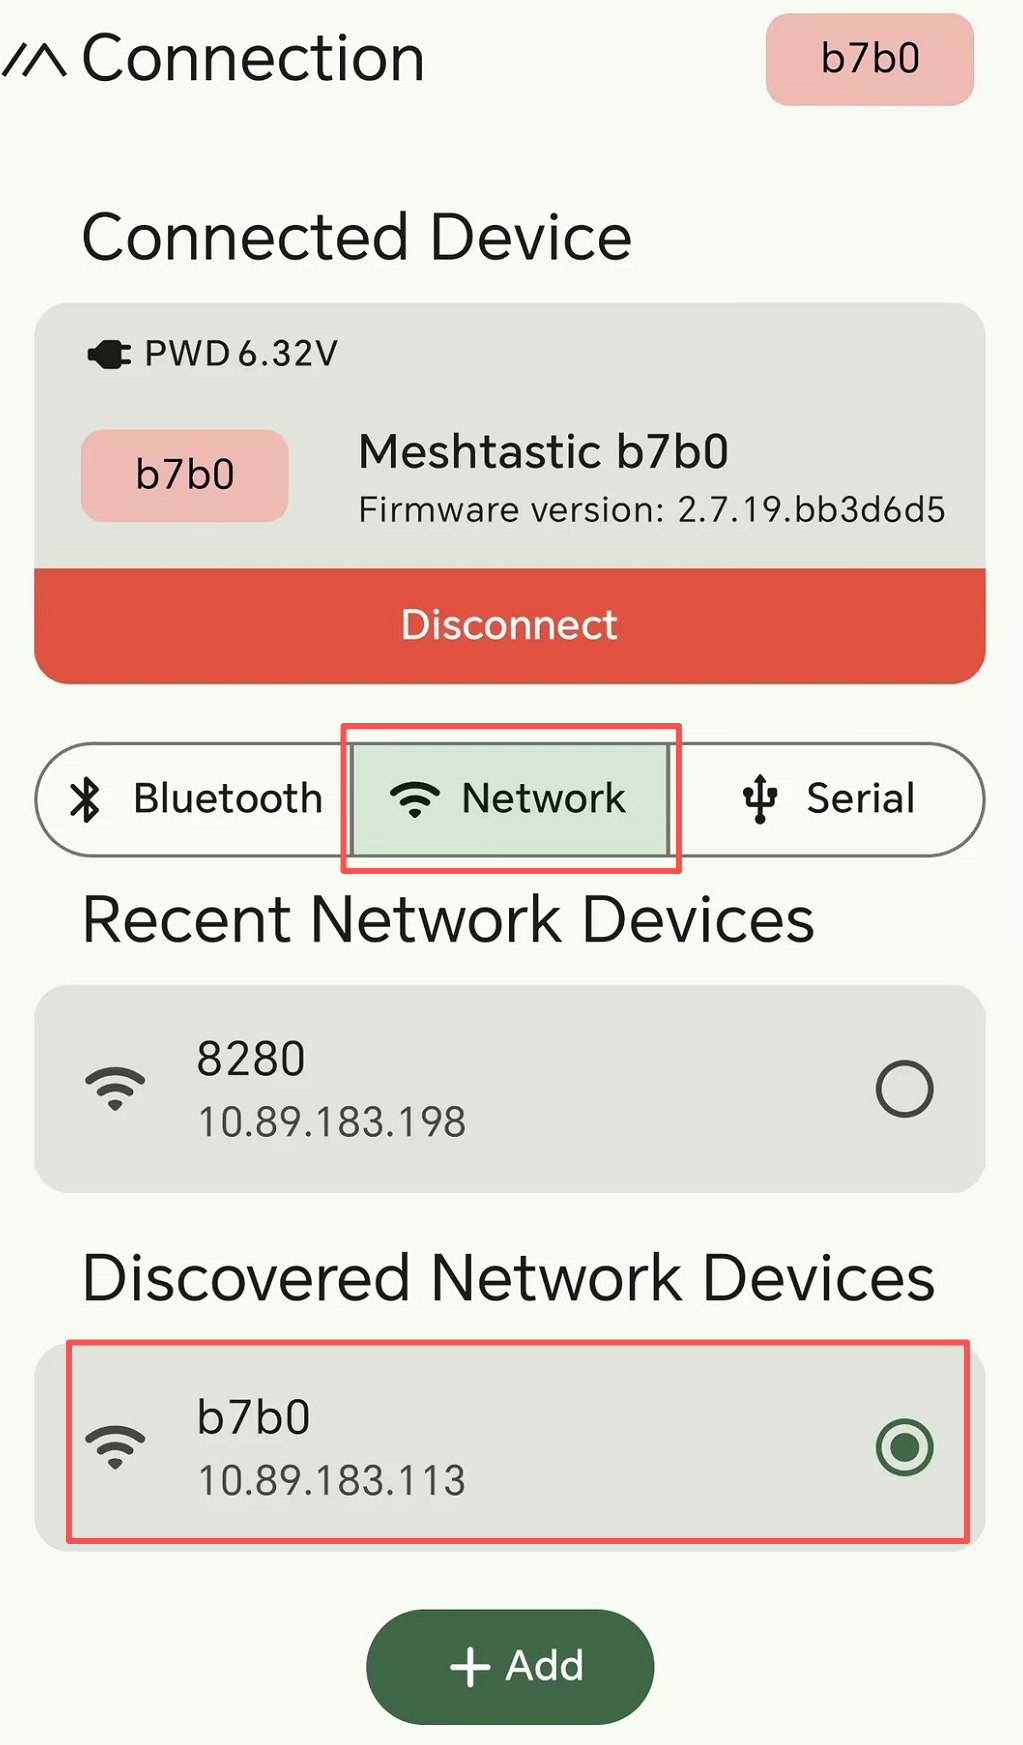
- Enable Bluetooth on the phone and grant the app its Bluetooth / Nearby Devices permissions. Disconnect any other phone or browser already connected to X2, then scan again.
- If pairing still fails, forget the old X2 pairing in the phone's Bluetooth settings and reconnect from the Meshtastic app. Enter the current on-screen PIN or your configured fixed PIN.
Device can not connect with my Wifi
- Use a 2.4 GHz Wi-Fi network. X2 does not support 5 GHz Wi-Fi. To test the connection, try a phone hotspot configured for 2.4 GHz.
- Check the Wi-Fi name and password, including capitalization, then enable Wi-Fi after saving them. Follow the Online Map tab in Map Usage.
- Check the Wi-Fi icon and IP address on the MUI Home page. A grey icon and empty IP field indicate that Wi-Fi is disabled or has not connected. A white icon with an IP address indicates a connection.
Entering Bluetooth connection mode disables Wi-Fi. After returning to MUI, enable Wi-Fi again when you need online maps. The Wi-Fi network must also provide internet access to download map tiles.
Device automatically turn off
Description
- X2 turns off or repeatedly restarts shortly after powering on.
- Serial logging stops and the device becomes unresponsive.
Troubleshoot
- Check the battery charge and USB power connection. If only the screen has gone dark, short-press Power to check whether X2 is still running. Screen timeout is different from a shutdown.
- If X2 shows only the charging screen, release Power, then hold it for approximately 5 seconds to start Meshtastic. Avoid interrupting power while settings are being saved or firmware is being written.
- If the device remains unresponsive, follow Forced Restart. If it repeatedly restarts after that, capture the startup serial log to help identify the cause.
- If the problem persists with a stable power supply, perform a clean installation of compatible X2 firmware. Follow Manual Firmware Installation for the full-erase factory-image procedure.
A full erase removes settings, channels, keys, and saved data. Save anything you need before continuing. After reinstalling, configure the LoRa region and channels again.
Factory Reset
A factory reset restores the default configuration. Save the settings and channel information you want to keep before resetting.
- Configure on MUI
- Configure on Phone
- Open Settings → Configuration Reset.
- Select Factory Reset, then select OK using the direction keys and Confirm.
- Wait for X2 to restart with the default configuration.

Connect to X2 in the Meshtastic app, open its device settings, and select Factory Reset. Confirm the reset and wait for X2 to restart.
Reconnect to X2 after the restart and set the correct LoRa region and channels before using the mesh.
Direct Message Fail
First check that both nodes use compatible LoRa settings and are within range, directly or through the mesh. Try sending a shared-channel message. If channel messages work but direct messages fail, check the stored node information and keys below.
NodeDB Reset
NodeDB stores information about nodes discovered on the mesh. An outdated entry, such as one saved before the other node changed its keys, can prevent direct messaging. Resetting NodeDB clears the local node database so the device can discover nodes again.
- Configure on MUI
- Configure on Phone
Open Settings → Configuration Reset, select NodeDB Reset, and select OK. Use the direction keys and Confirm on X2. The device will restart.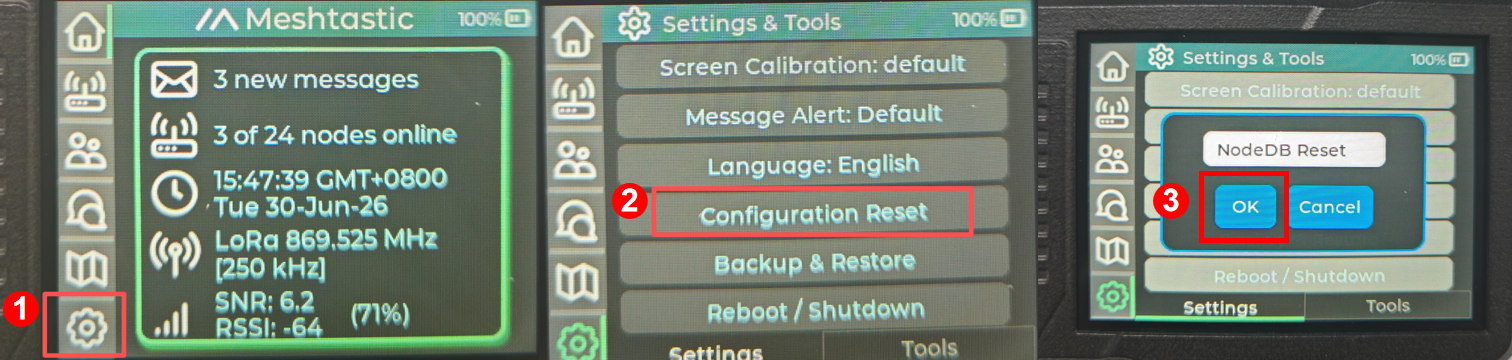
Connect the Meshtastic app to the node whose database you want to reset. Open Settings → Device → Device Config → Reset NodeDB and confirm. Menu names may differ between app versions.
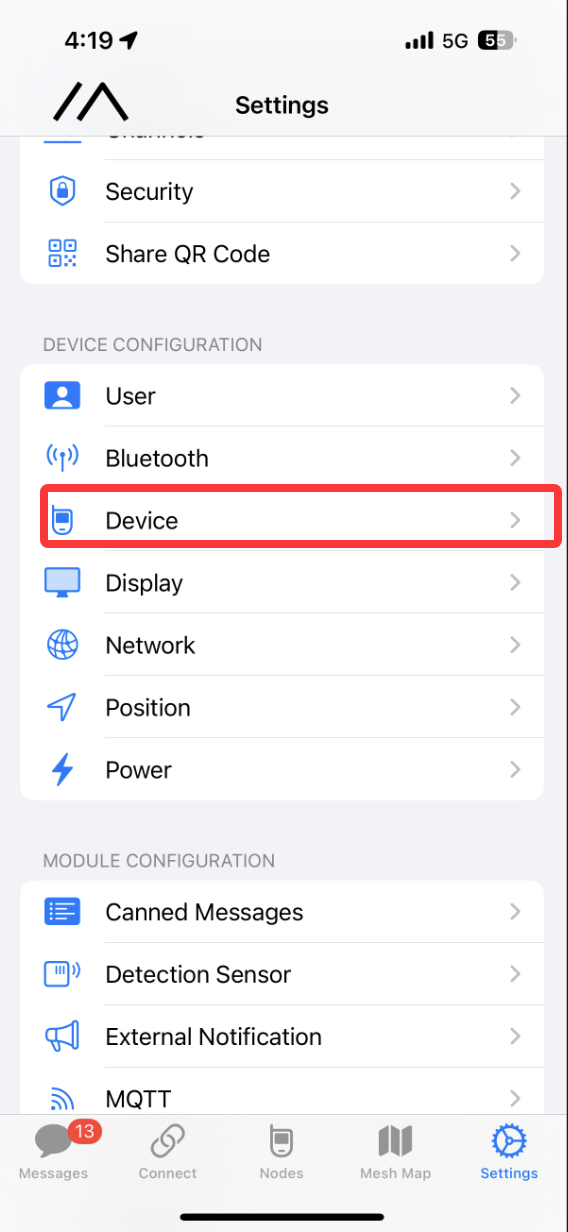
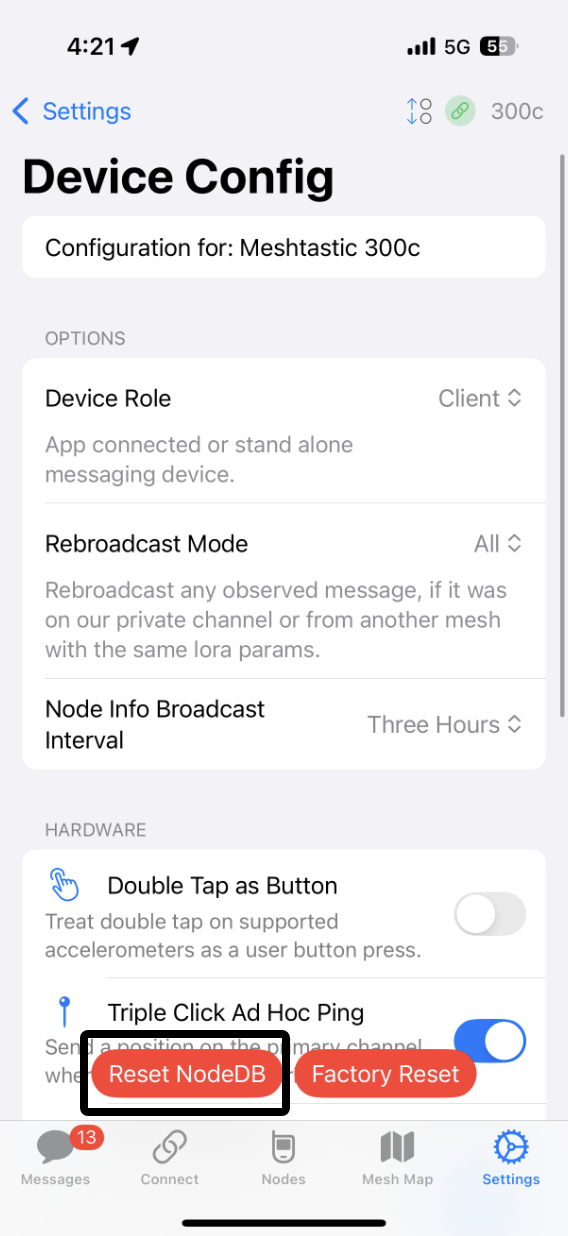
Allow time for the node list to repopulate, then exchange user information before retrying the direct message.
Exchange User Info
Nodes periodically broadcast their user information, including the public key needed for encrypted direct messages. If a node's information is missing or outdated, open its entry in the phone app and select Exchange User Info. Allow the exchange to complete; repeat from the other node if needed.
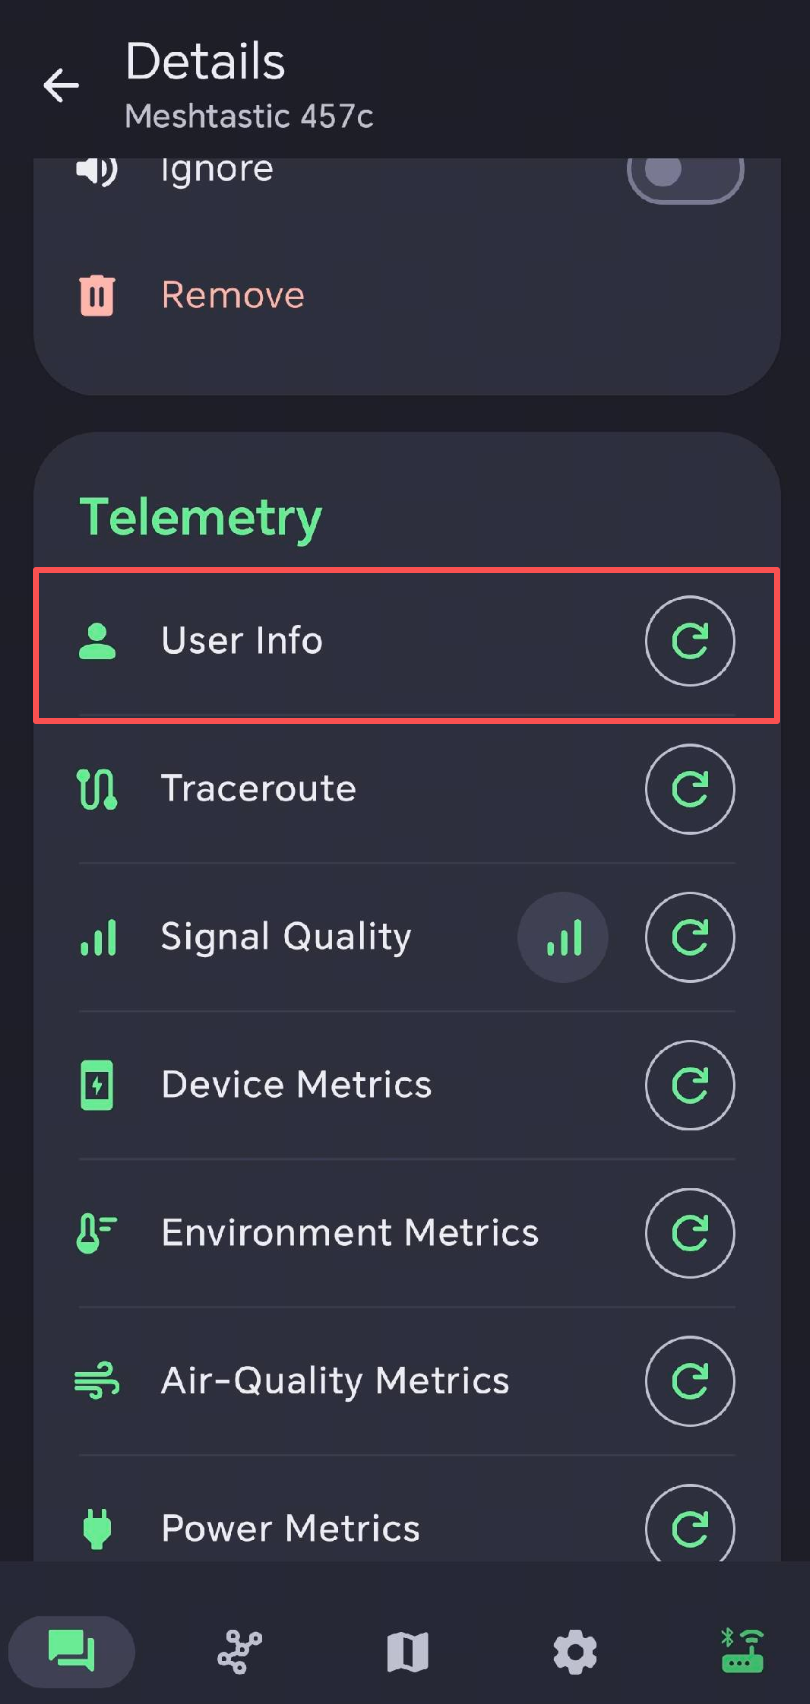
Retry the direct message and check its delivery status. A message appearing in the sender's conversation alone does not confirm receipt.
Regenerate Private Key
If direct messaging still fails after refreshing the node information, you can regenerate the affected node's key pair from the phone app's Security settings. Use Regenerate Private Key, save the change, and restart the device as prompted.
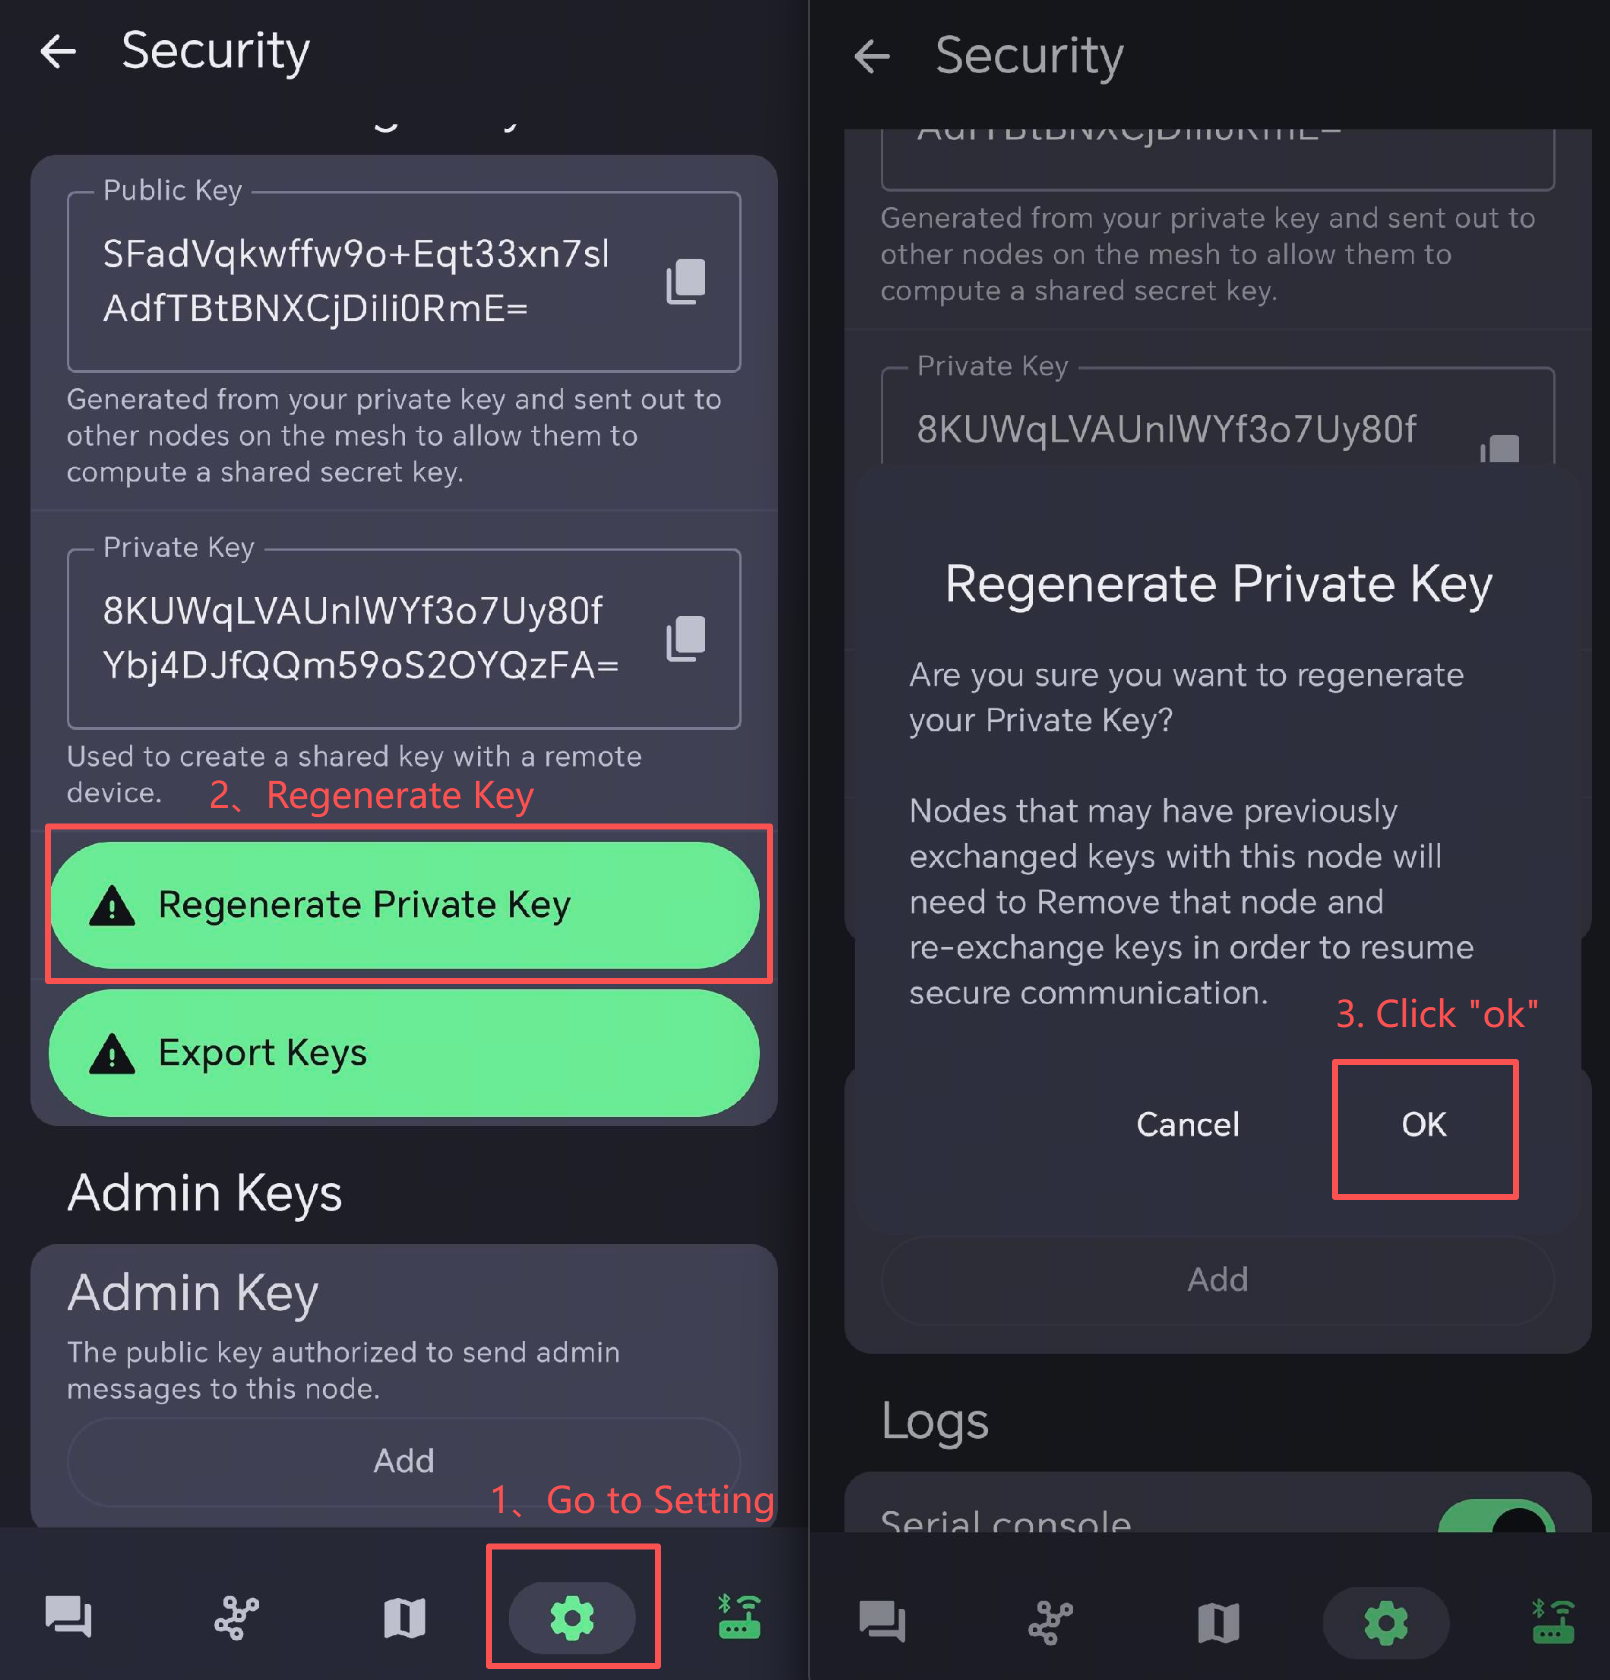
The node's public key changes, so other nodes must learn its new information. Remove the stale entry from the other node's list if necessary, then exchange user information again. Keep the private key confidential; only the public key is shared with other nodes. See Meshtastic Security configuration.
Signal Quality
- SNR (signal-to-noise ratio) measures how strong the received signal is relative to background noise. A higher value generally indicates a clearer link. LoRa can receive signals with a negative SNR; the usable limit depends on the modem preset.
- RSSI (received signal strength indicator) measures received signal power in dBm. A less negative value means a stronger signal: for example, −90 dBm is stronger than −110 dBm.
Check both values together with actual message delivery. A single SNR or RSSI reading does not establish that a device is faulty. To improve the link, use an antenna matched to the operating band, check its connection, and move to a higher, open location away from obstructions and interference.
The Computer Cannot Find X2 or Connect to Its Serial Port
- Use a USB data cable and check the computer's port list before and after connecting X2. A charging screen alone does not confirm a USB data connection.
- Recheck the port after reconnecting X2, changing USB sockets, or entering download mode. On macOS, the
/dev/cu.usbmodem...suffix can change. - Close other flashers, serial monitors, or browser connections using the port. On Linux, also check USB access permissions.
- If the device is absent from the port list, try another data cable or connect directly to the computer to check the USB connection.
- For firmware installation, enter flashing mode as described in Flash Firmware. For the Web Client, run Meshtastic normally.
If a flasher reports No serial data received, it has not established communication with the bootloader. The message alone does not identify a Flash capacity problem or a defective device.
Linux USB Access
Compare the serial ports before and after connecting X2:
ls /dev/ttyACM* /dev/ttyUSB* 2>/dev/null
If access is denied, check the detected port's permissions (replace /dev/ttyACM0 as needed):
ls -l /dev/ttyACM0
On Ubuntu/Debian, if the port belongs to dialout, add your user to that group:
sudo usermod -aG dialout "$USER"
Log out and back in, then retry. Close other applications using the port. Recheck the port name after entering download mode.
GNSS Does Not Show a Position
- Enable GNSS using Configure GPS.
- Move outdoors with a clear view of the sky and allow time to acquire a fix. A first fix after a long period of inactivity can take longer than a subsequent fix.
- Check the satellite and location status on X2 before expecting its position to appear on the map.
- If the position stays fixed while you move, check the phone app's Fixed Position setting and the GNSS update interval. See Meshtastic Position configuration.
The Offline Map Is Blank
- Check the card's MBR/FAT32 format and the
/maps/<style>/<zoom>/<x>/<y>.pngfolder structure. - Select the same style in MUI as the style copied to the card.
- Check that the downloaded tiles cover the location and zoom level being viewed. With only the official starter kit installed, zoom out to level 6 or lower.
- For your current location, wait for a GNSS fix. If the card is not detected, shut down X2 and disconnect USB before reseating it.
See Map Usage for preparation steps.
Manual Firmware Installation
Use esptool to flash the X2 .factory.bin at 0x0. This combined image contains the bootloader, partition table, and application. An application-only .bin is not suitable for this procedure.
The flashing command below erases all internal flash, including settings, channels, and saved data. Back up anything you need before continuing.
- Download the X2 factory firmware 2.8.1.0046b50. Rename the downloaded file from
firmware-seeed_meshpager_x2-2.8.1.0046b50.factory copy.bintox2.factory.binand place it in a folder on your computer. - Install Python 3.10 or later.
- Connect X2 to the computer using a USB data cable. Close the Web Flasher, Web Client, and any serial monitors that may hold the port.
- Open a terminal in the folder containing
x2.factory.binand follow the commands for your system. Send the 1200 bps reset first, then use esptool with--before usb-reset.
The 1200 bps step triggers a reset; esptool performs the firmware write. 1200 bps is not the firmware transfer speed. The USB port may disappear and reappear with a different name after reset, so list the ports again before flashing.
- Windows
- Linux / macOS
In PowerShell, install esptool and list the serial ports:
py -3 -m venv .venv
.\.venv\Scripts\python.exe -m pip install --upgrade "esptool>=5,<6"
.\.venv\Scripts\python.exe -m serial.tools.list_ports
Replace COM5 with X2's current port and send the 1200 bps reset:
.\.venv\Scripts\python.exe -c "import serial,time; s=serial.Serial('COM5',1200,timeout=0.2); s.dtr=True; time.sleep(0.5); s.dtr=False; s.close(); time.sleep(2)"
.\.venv\Scripts\python.exe -m serial.tools.list_ports
Check the port again. Replace COM5 below with the port X2 now uses, then flash:
.\.venv\Scripts\python.exe -m esptool --chip esp32s3 --port COM5 --baud 460800 --before usb-reset write-flash --erase-all 0x0 x2.factory.bin
Install esptool and list the serial ports:
python3 -m venv .venv
./.venv/bin/python -m pip install --upgrade "esptool>=5,<6"
./.venv/bin/python -m serial.tools.list_ports
On Ubuntu/Debian, install python3-venv with sudo apt install python3-venv if the first command reports it is missing.
Replace /dev/ttyACM0 with X2's current port. On macOS, use the matching /dev/cu.usbmodem... port. Send the 1200 bps reset, then list the ports again:
./.venv/bin/python -c "import serial,time; s=serial.Serial('/dev/ttyACM0',1200,timeout=0.2); s.dtr=True; time.sleep(0.5); s.dtr=False; s.close(); time.sleep(2)"
./.venv/bin/python -m serial.tools.list_ports
Replace /dev/ttyACM0 below with the port X2 now uses, then flash:
./.venv/bin/python -m esptool --chip esp32s3 --port /dev/ttyACM0 --baud 460800 --before usb-reset write-flash --erase-all 0x0 x2.factory.bin
If Linux reports a permission error, follow Linux USB Access.
Keep USB connected until esptool reports Hash of data verified and finishes. Restart X2 with both Power and Return released, then configure the LoRa region and channels again.
If esptool reports No serial data received, check for another application holding the port, repeat the 1200 bps reset, and select the newly enumerated port. Lowering the transfer speed alone does not put X2 into download mode.
If the software reset is unavailable, use the X2 button procedure described in Flash Firmware, then recheck the port. The required reset behavior can depend on the installed firmware and hardware revision.
If a connection is established but writing repeatedly fails, retry the write command with --baud 115200.
Tech Support & Product Discussion