Seeed Studio XIAO ESP32-C5 Wi-Fi Throughput Testing Tool
The Seeed Studio XIAO ESP32-C5 features the ESP32-C5 as its core processor.The ESP32-C5 is the industry's first RISC-V microcontroller to support dual-band Wi-Fi 6 (802.11ax) in both the 2.4GHz and 5GHz bands. Boasting exceptional wireless performance, it holds significant potential for applications in smart homes, the Internet of Things (IoT), and various other scenarios.
In practical usage, the actual data throughput of Wi-Fi is one of the most important metrics for measuring transmission capability. Next, we will use a Wi-Fi throughput testing tool to visually demonstrate the powerful data throughput capabilities of the XIAO ESP32-C5 based on Wi-Fi 6, across both the 2.4GHz and 5GHz frequency bands!
This wiki will be developed using ESP-IDF.
Reference: ESP-IDF Programming Guide
Hardware Preparation
You will need to prepare one XIAO ESP32-C5 board.
| Seeed Studio XIAO ESP32-C5 |
|---|
 |
Antenna Installation
Inside the packaging of the Seeed Studio XIAO ESP32-C5, there is a dedicated Wi-Fi/BT Antenna connector. For optimal WiFi/Bluetooth signal strength, you need to take out the antenna included in the package and attach it to the connector.
If you want to achieve a stronger signal gain effect, you can purchase and install 2.4G/5G External Antenna with RP-SMA Male Connector — it delivers much higher gain than the built-in FPC Antenna included in the package!
| 2.4G/5G External Antenna with RP-SMA Male Connector |
|---|
 |
Software Preparation
Install ESP-IDF
This wiki is developed in a Windows development environment. For ESP-IDF operations on Linux / Mac, please refer to Developed on XIAO using Espressif ESP-IDF
For Windows
Step 1. Clicked ESP32-IDF Tools Installer
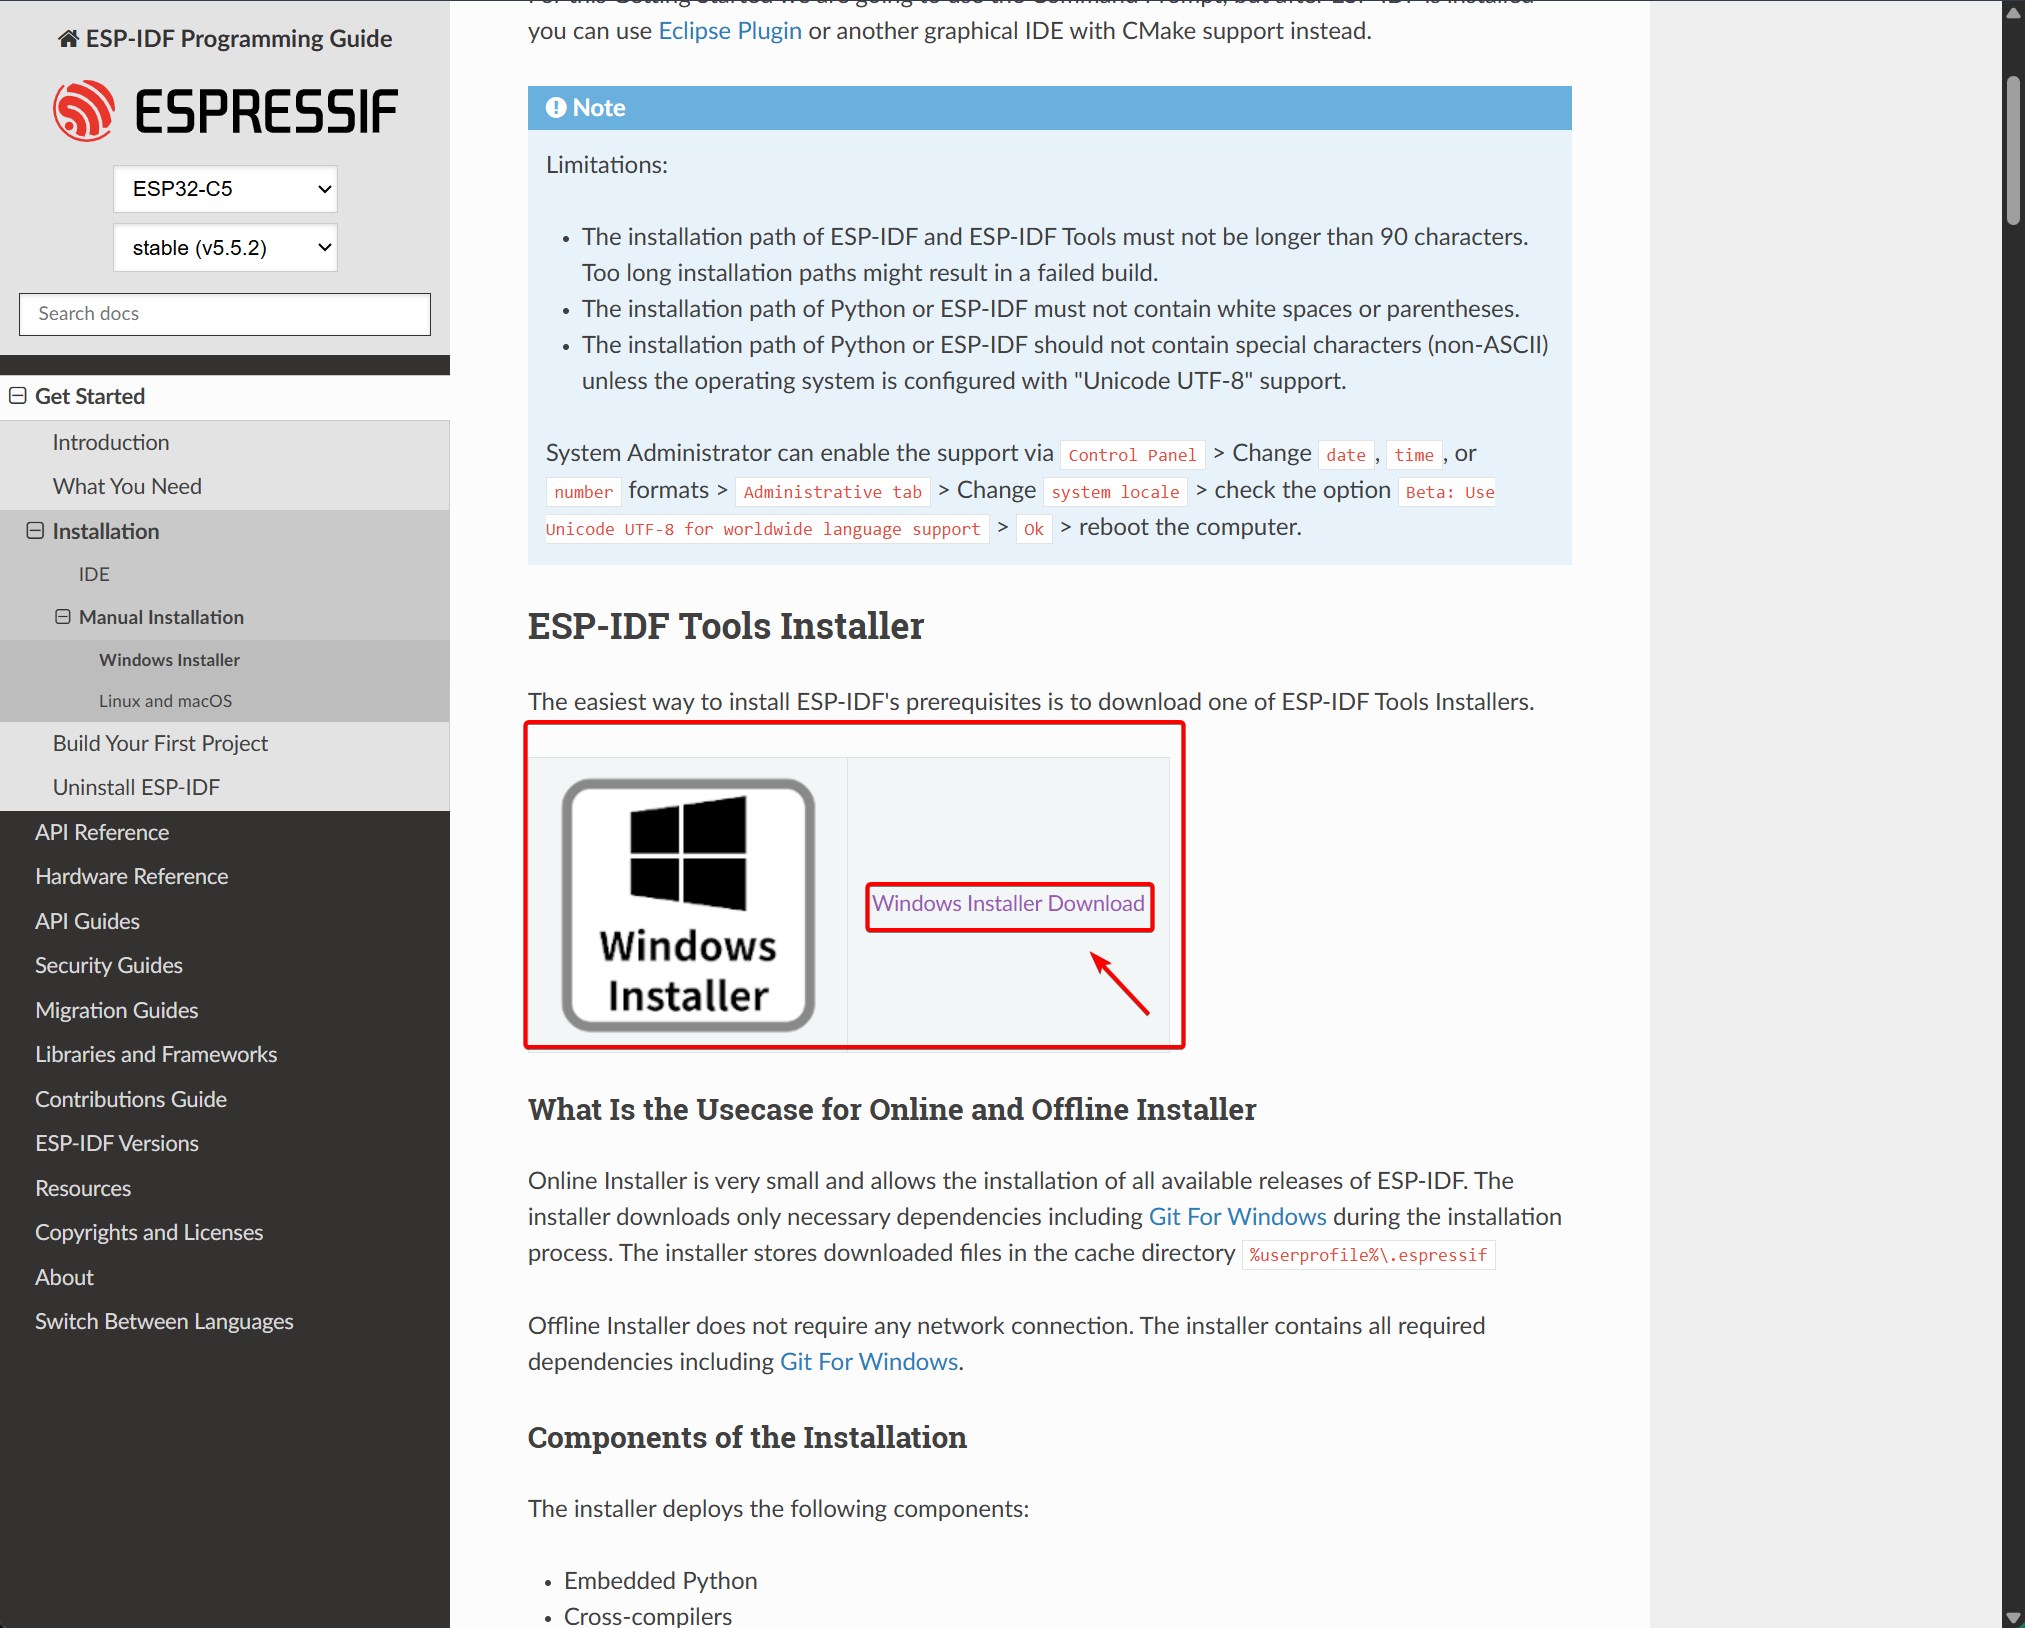
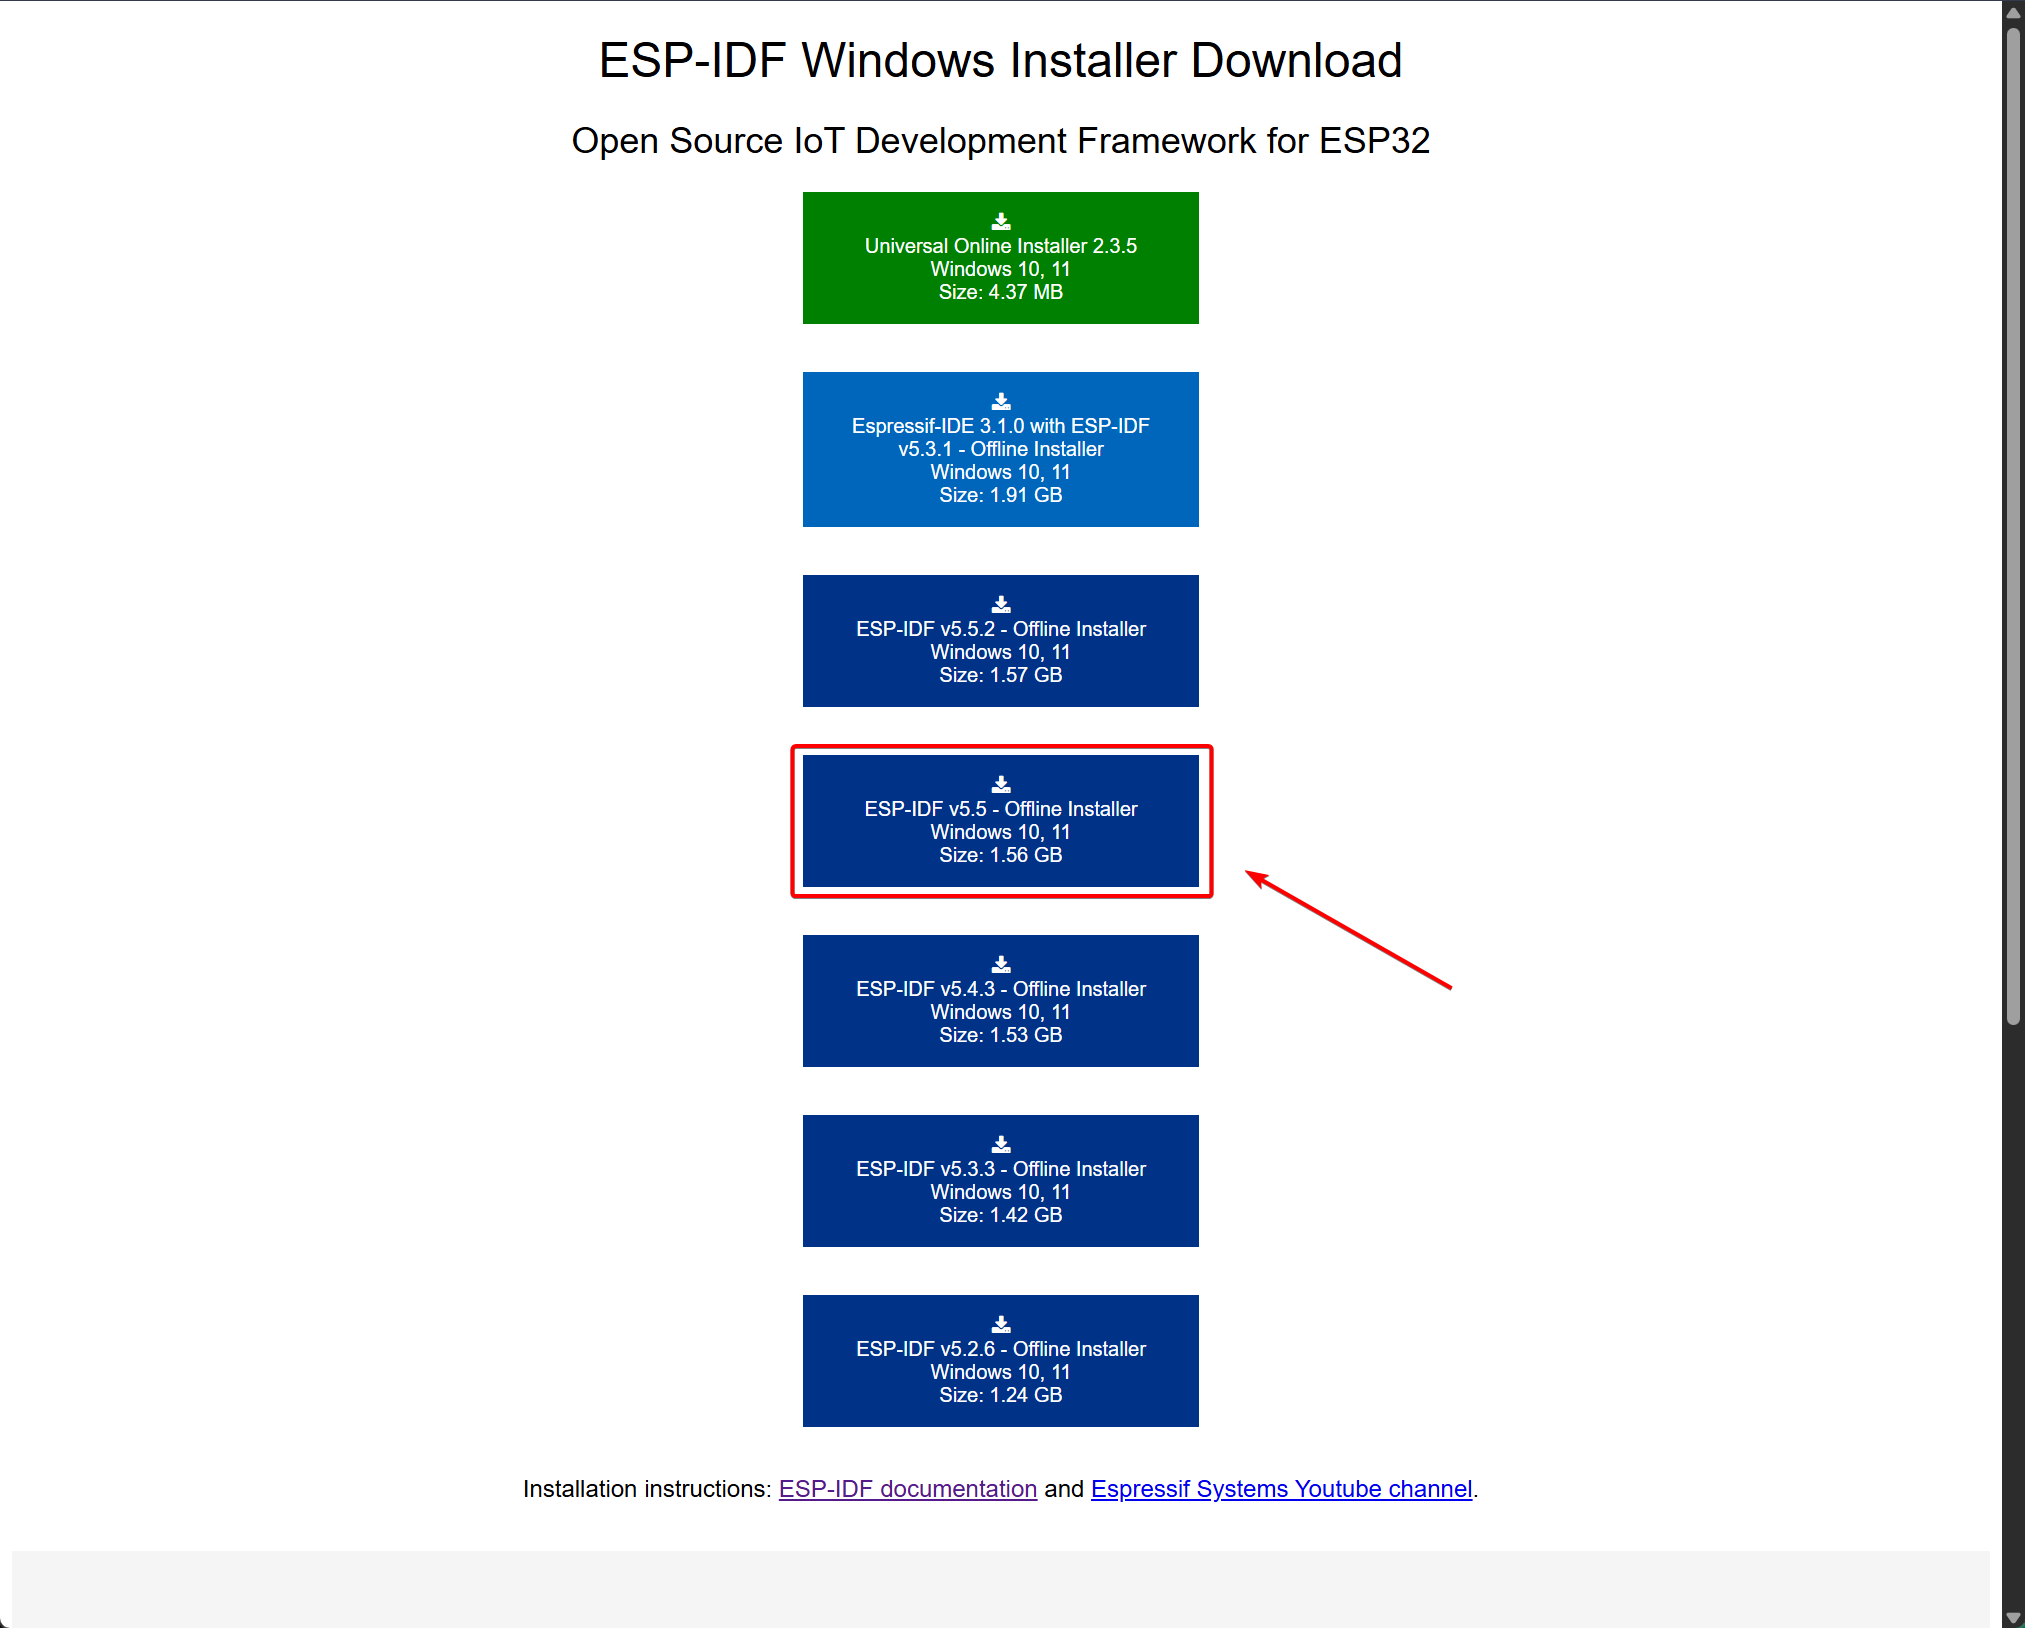
Step 2. Choose an appropriate version to download.
The XIAO ESP32-C5 requires ESP-IDF v5.5 or later.
Step 3. Install
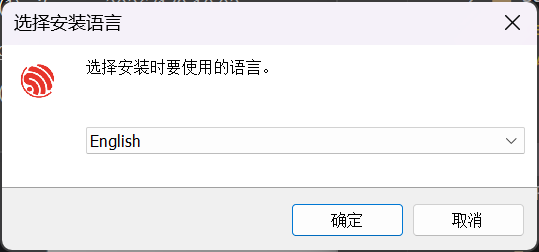
- In the downloaded files, locate
esp-idf-tools-setup-offline-5.5.2.exeand double-click it to start the installation. Select your preferred installation language
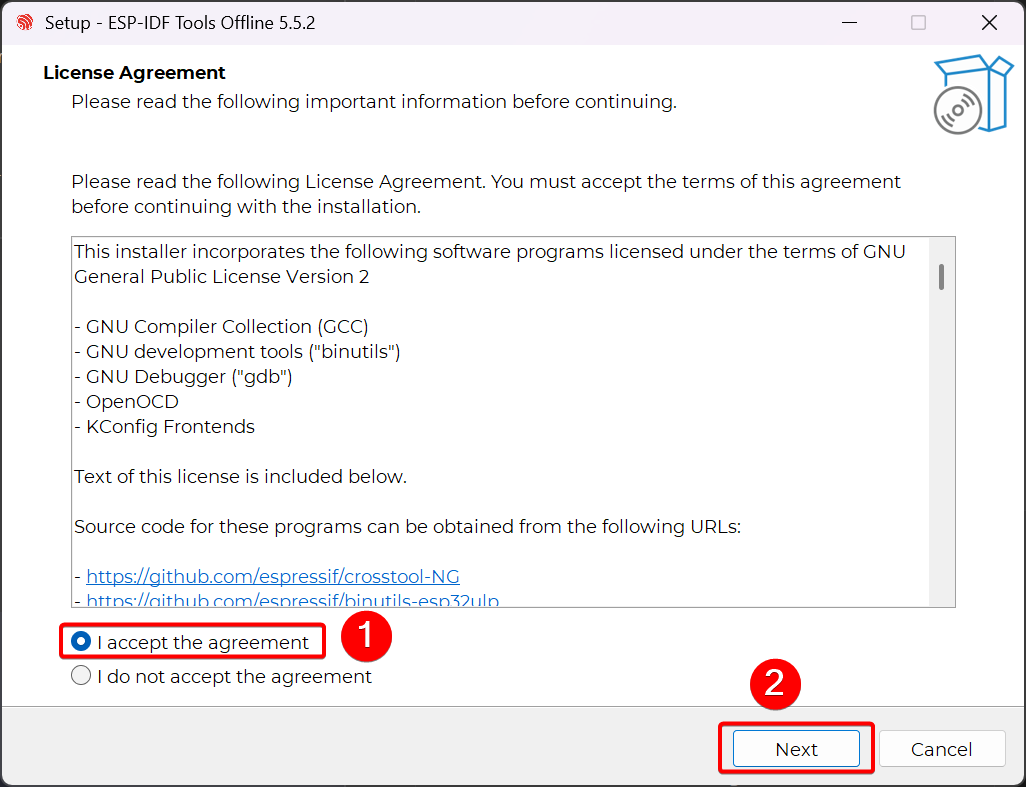
- Choose I accept the agreement, then click Next.
- Click Next.
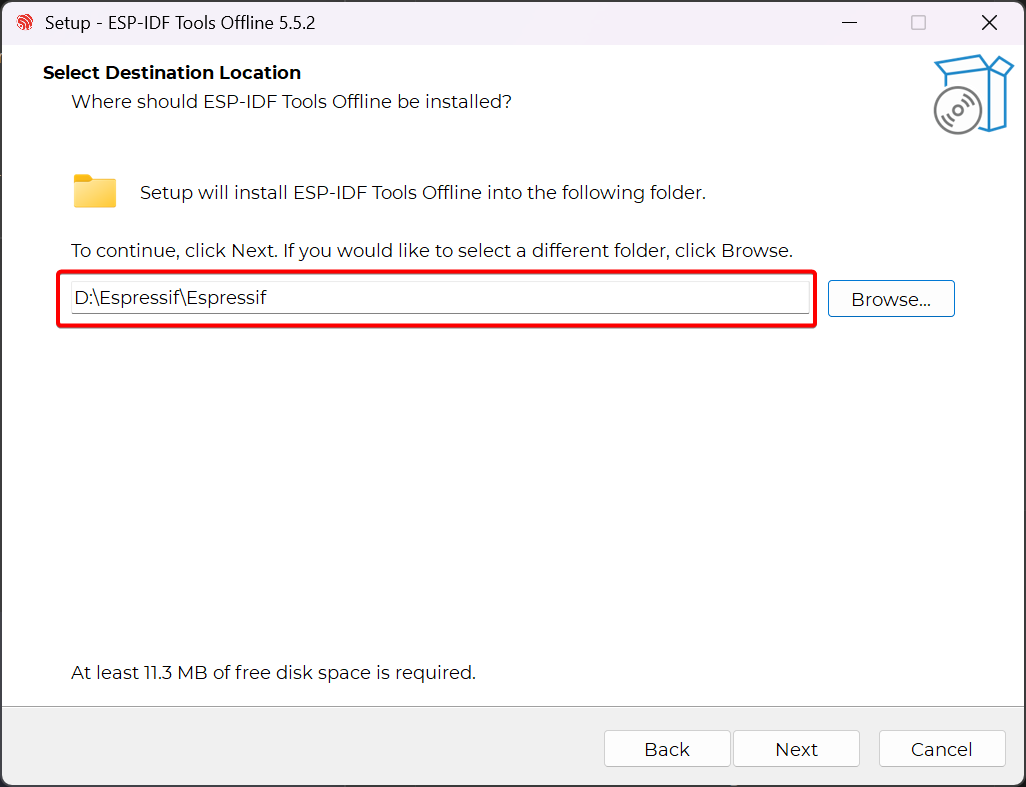
- Choose the installation path. The installation requires a significant amount of storage space, so please select a suitable location.
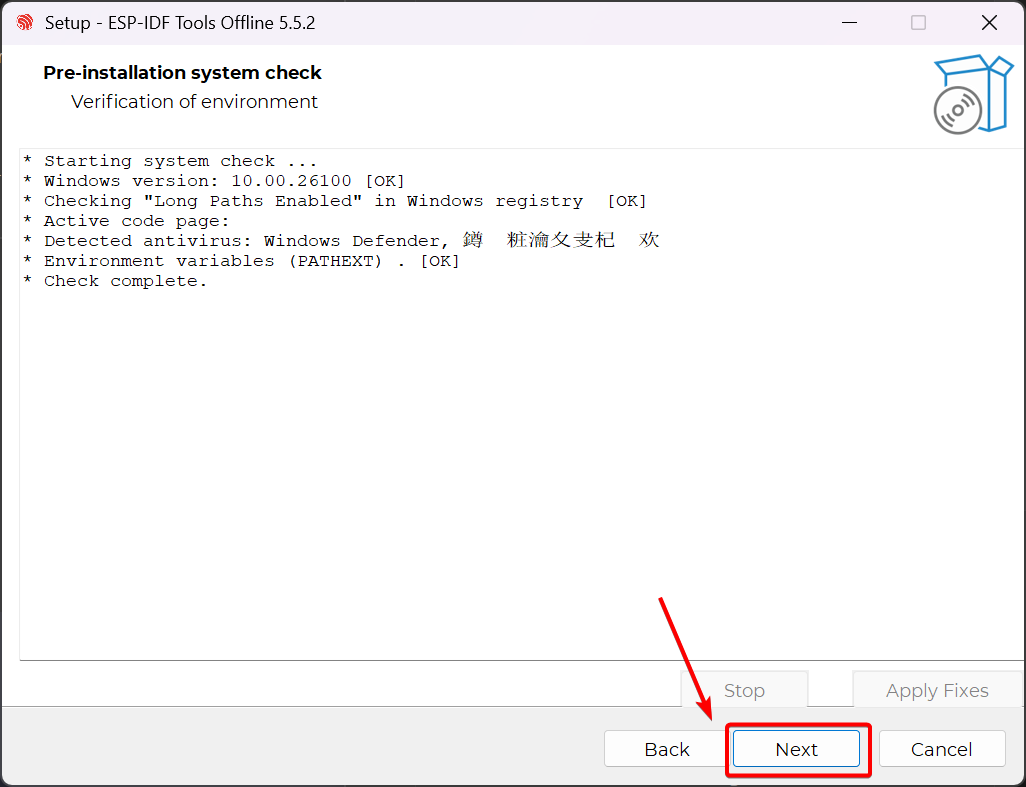
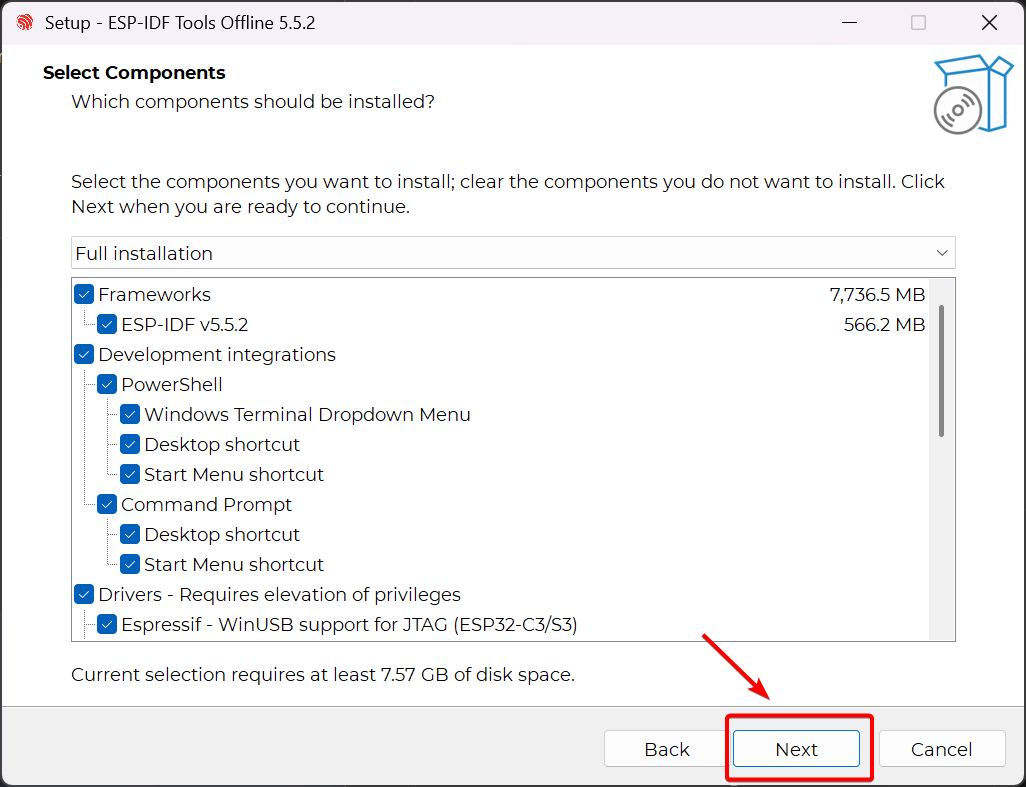
- Keep the default settings; no changes are needed.
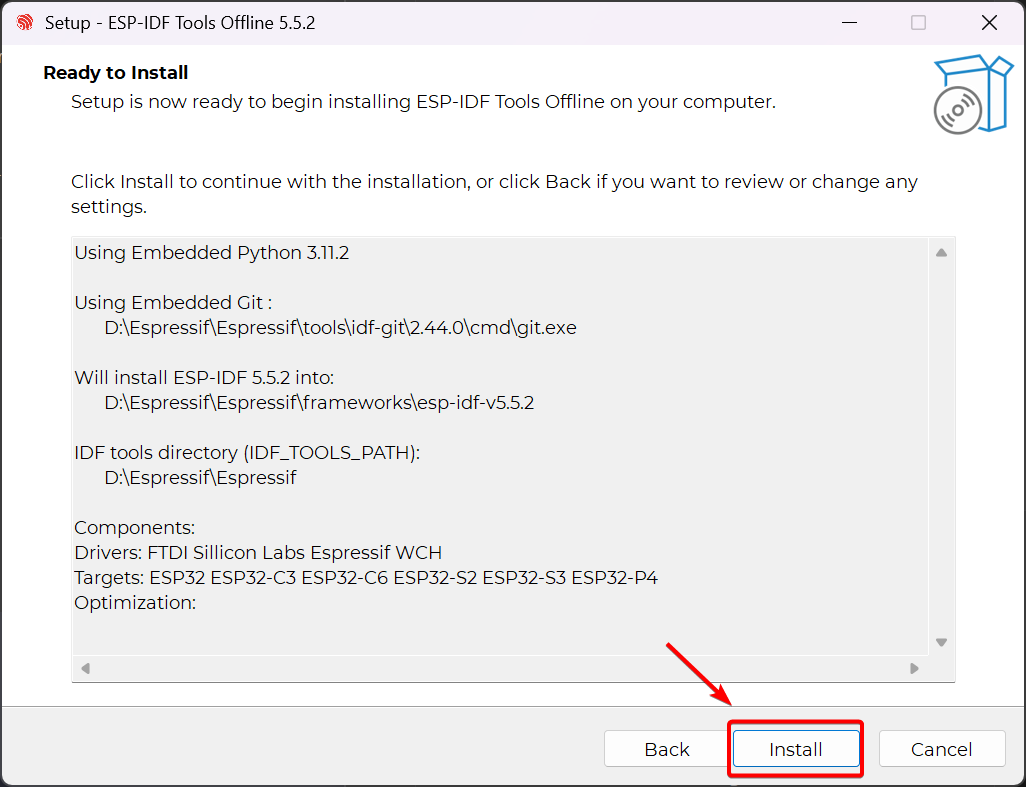
- Click Install and wait for the installation to complete. This may take some time.
- After installation is complete, the following two shortcuts will be displayed on the Windows desktop.

For Linux(Ubuntu/Debian) & macOS
Step 1. Install dependencies
# Linux
sudo apt update && sudo apt install \
    git wget flex bison gperf python3 python3-pip python3-venv \
    cmake ninja-build ccache libffi-dev libssl-dev dfu-util libusb-1.0-0
#macOS
brew install git wget cmake ninja dfu-util ccache python3
pip3 install pyserial
Step 2. Clone the specified version of the repository.
mkdir -p ~/esp
cd ~/esp
git clone --recursive https://github.com/espressif/esp-idf.git -b v5.5.1 esp-idf-v5.5.1
Step 3. Install the toolchain
cd ~/esp/esp-idf-v5.5.1
./install.sh esp32c5
Step 4. Add environment variables
. $HOME/esp/esp-idf-v5.5.1/export.sh
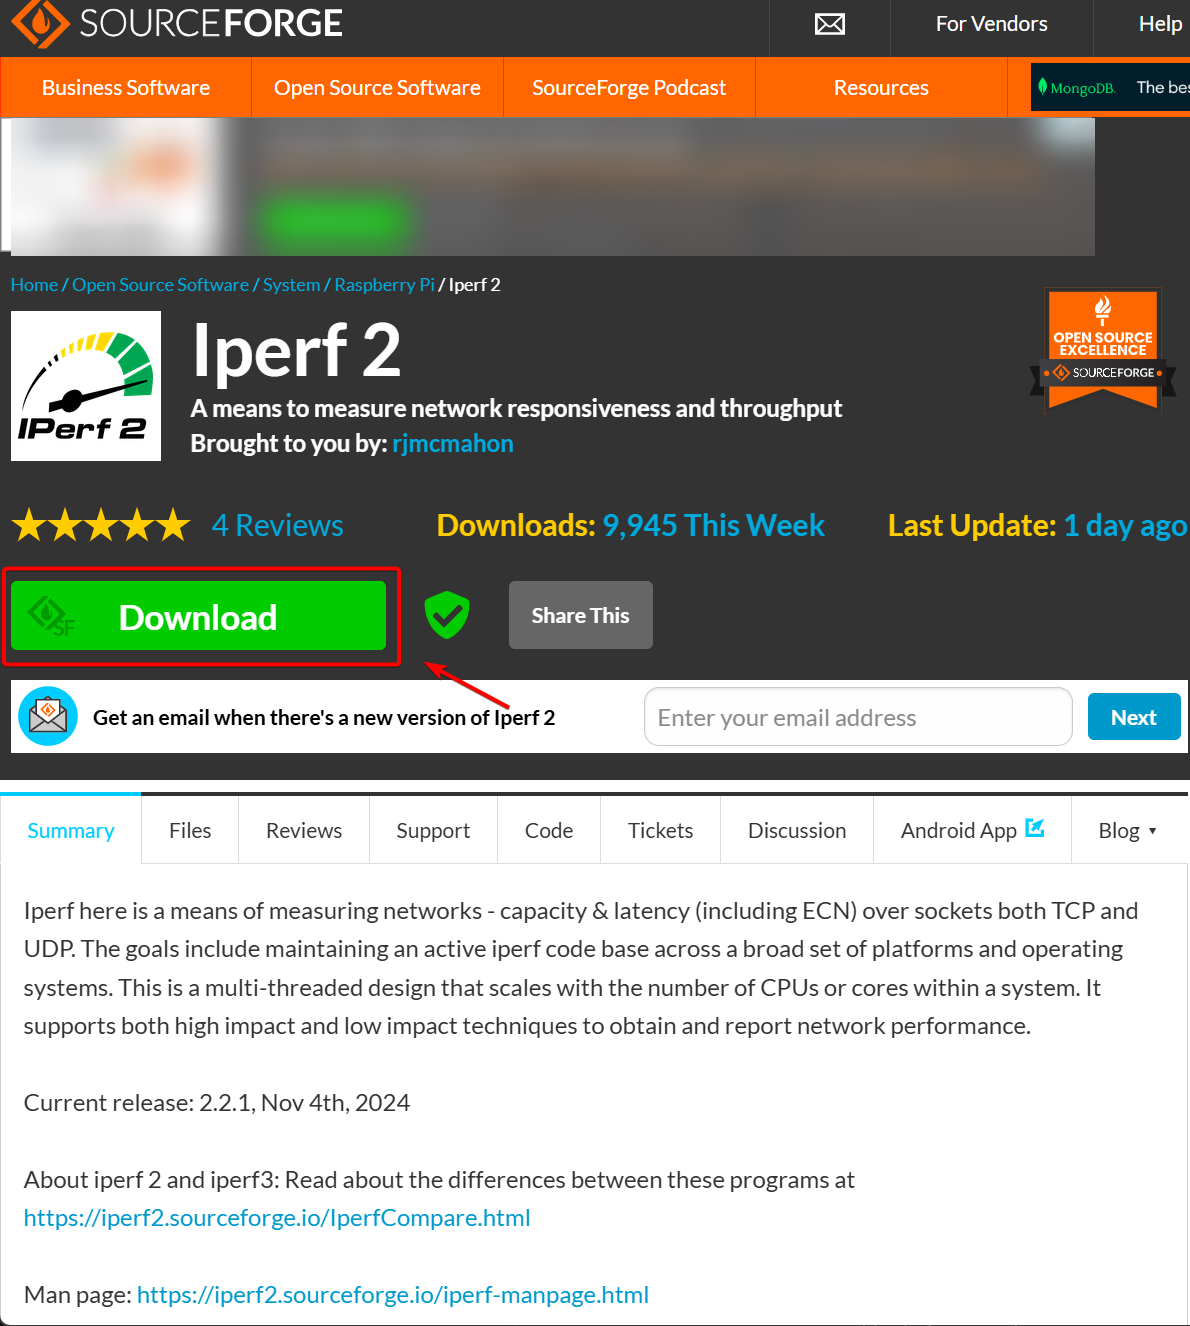
Install iperf
For Windows
Step 1. Click iperf, then download
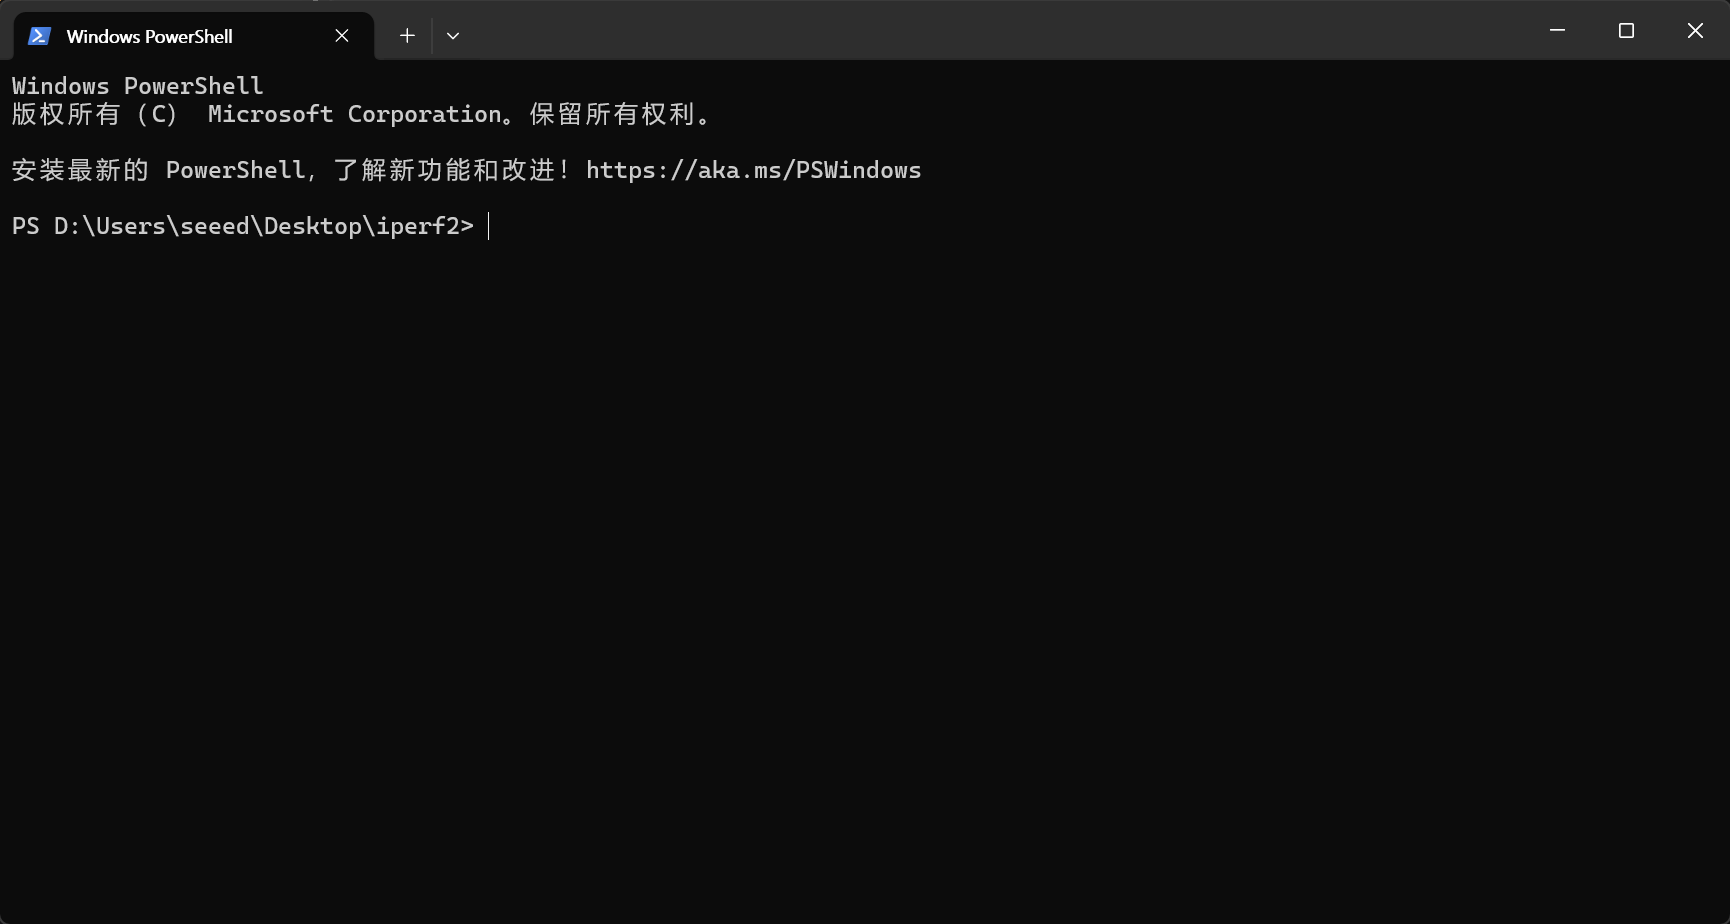
Step 2. Place it in a suitable folder, then right-click and open a terminal there. This step will be used later.
For Linux(Ubuntu/Debian) & macOS
# Ubuntu/Debian
sudo apt install iperf

# macOS
brew install iperf
Clone the test project.
-
Clone the test project into the folder of your choice.
git clone https://github.com/limengdu/XIAO-ESP32C5_iperf_test.git
For Windows
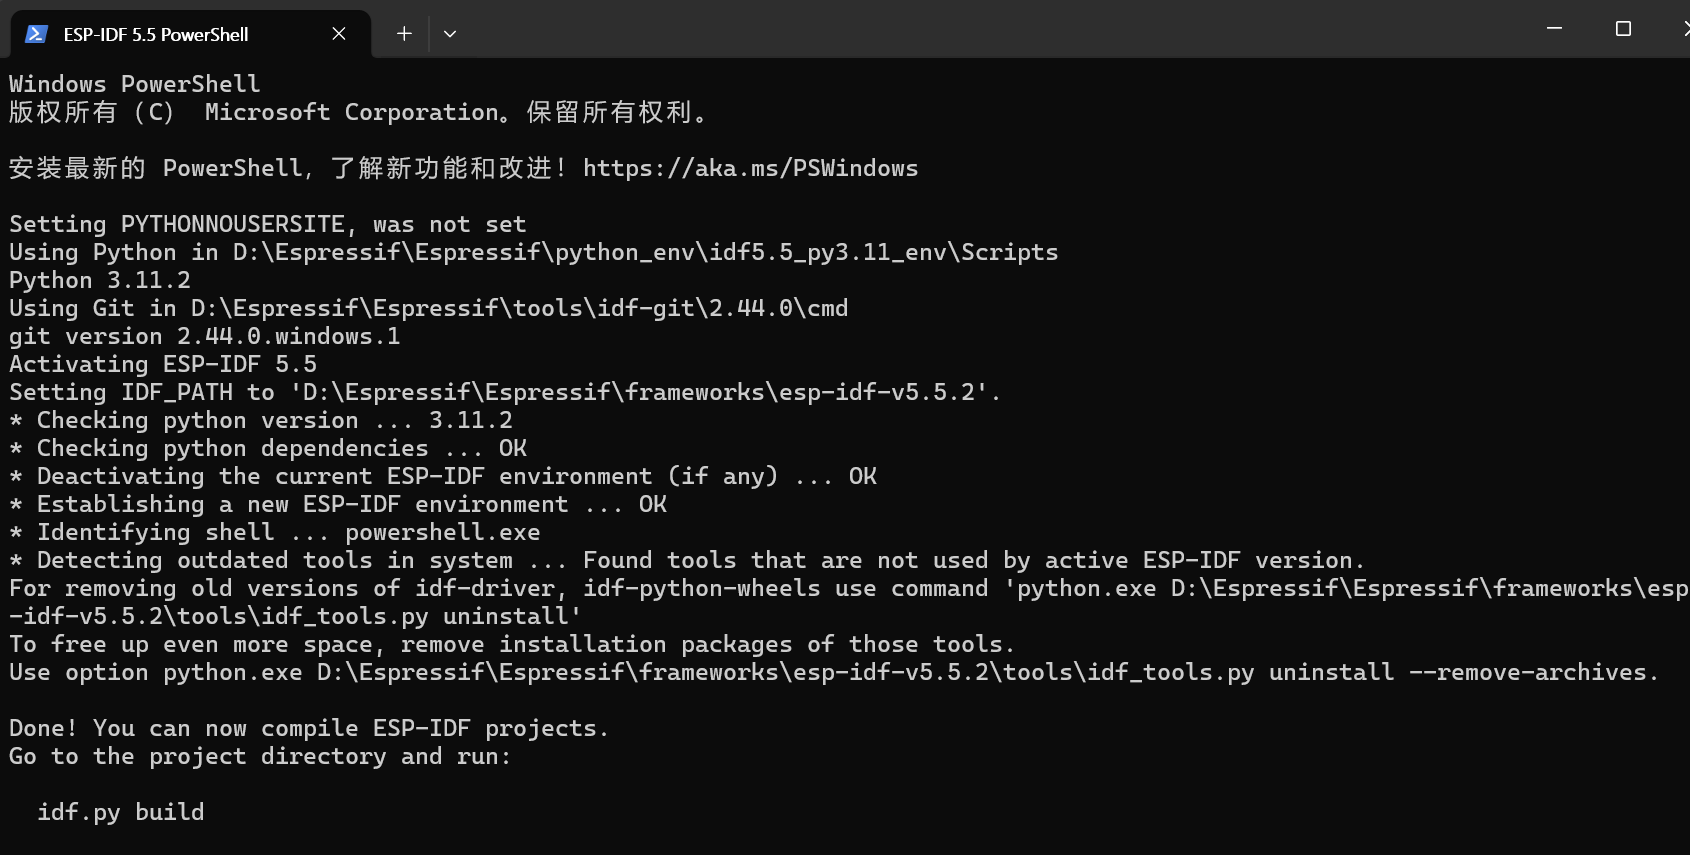
Step 1. Click on ESP-IDF 5.5 PowerShell on the desktop; an environment check will then be performed.
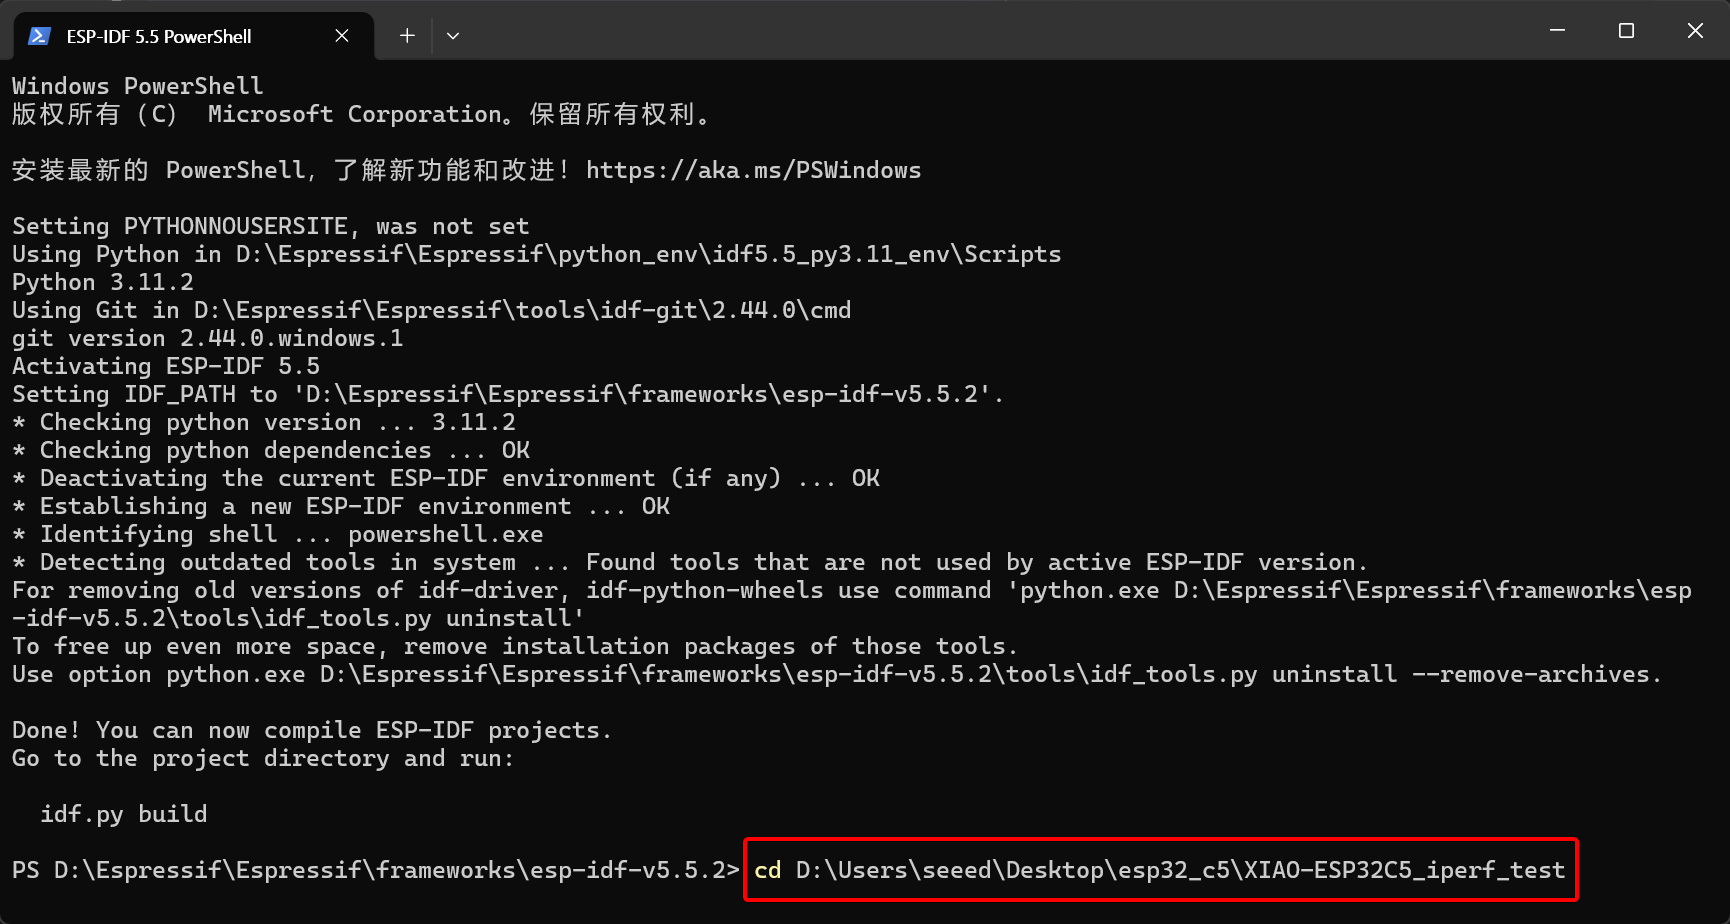
Step 2. Open the cloned test project
cd C:\User\yourname\XIAO-ESP32C5_iperf_test
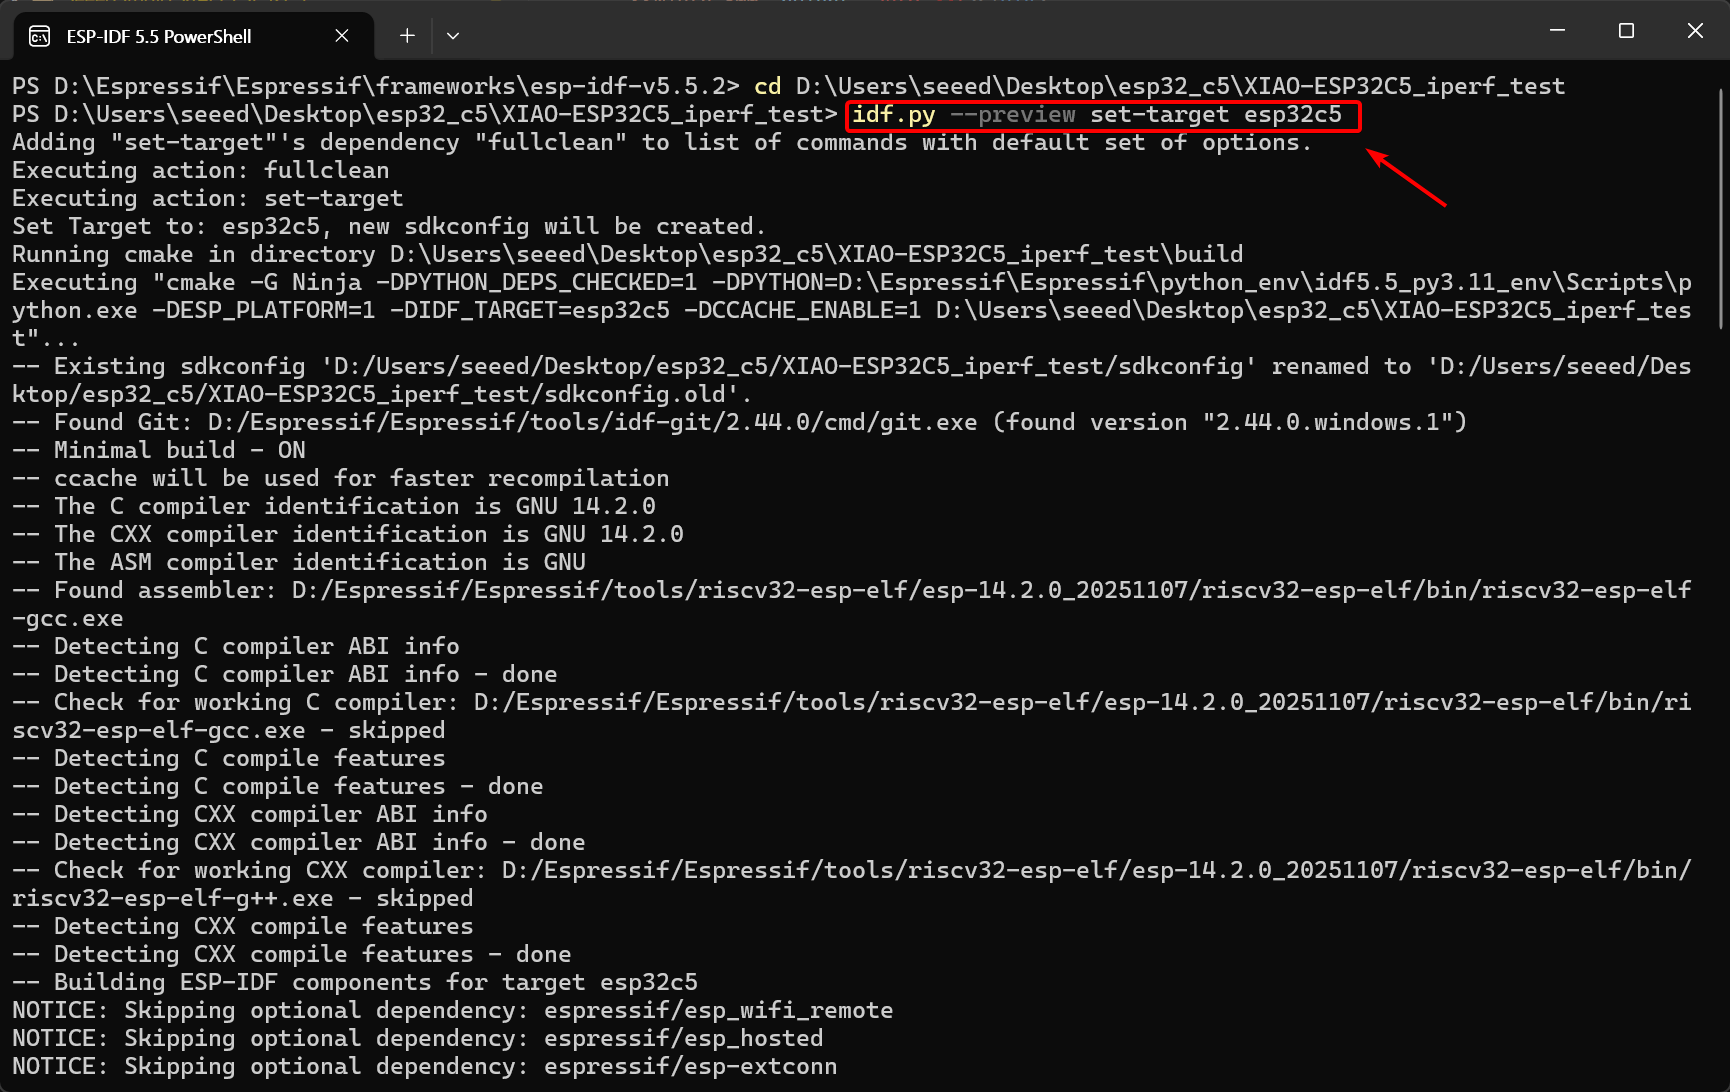
Step 3. Set the target chip to esp32c5
idf.py --preview set-target esp32c5
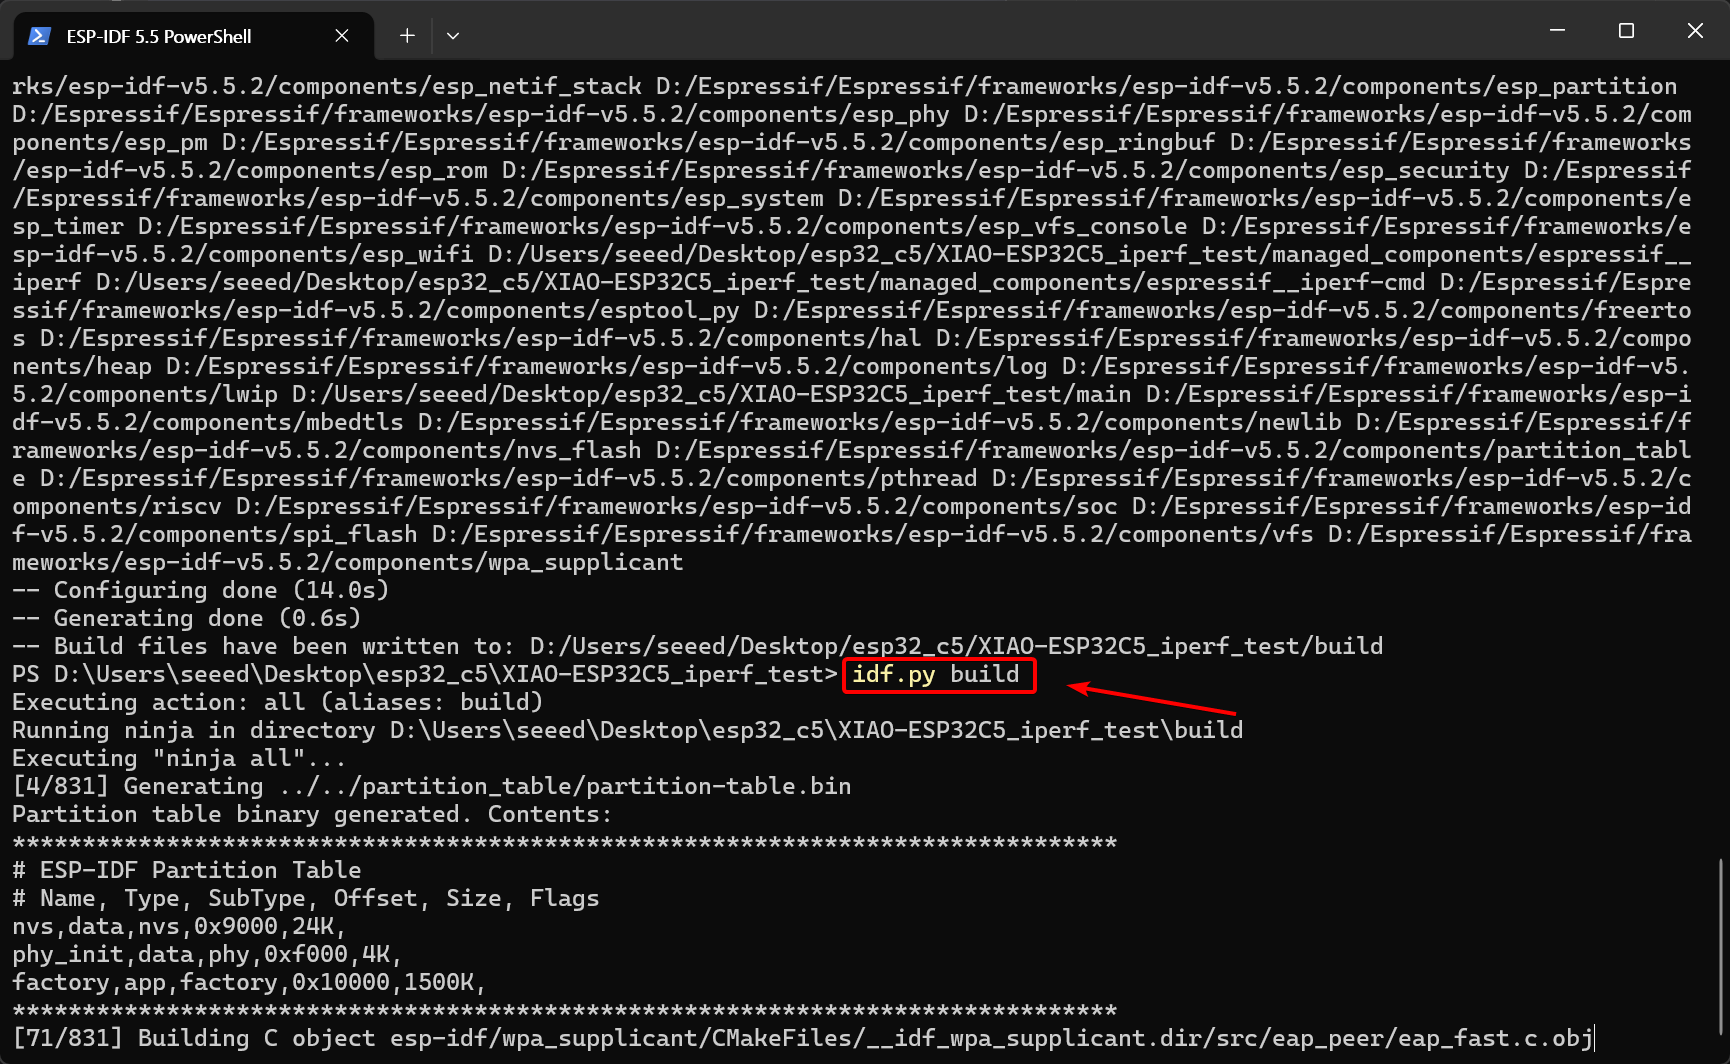
Step 4. Build the project
idf.py build
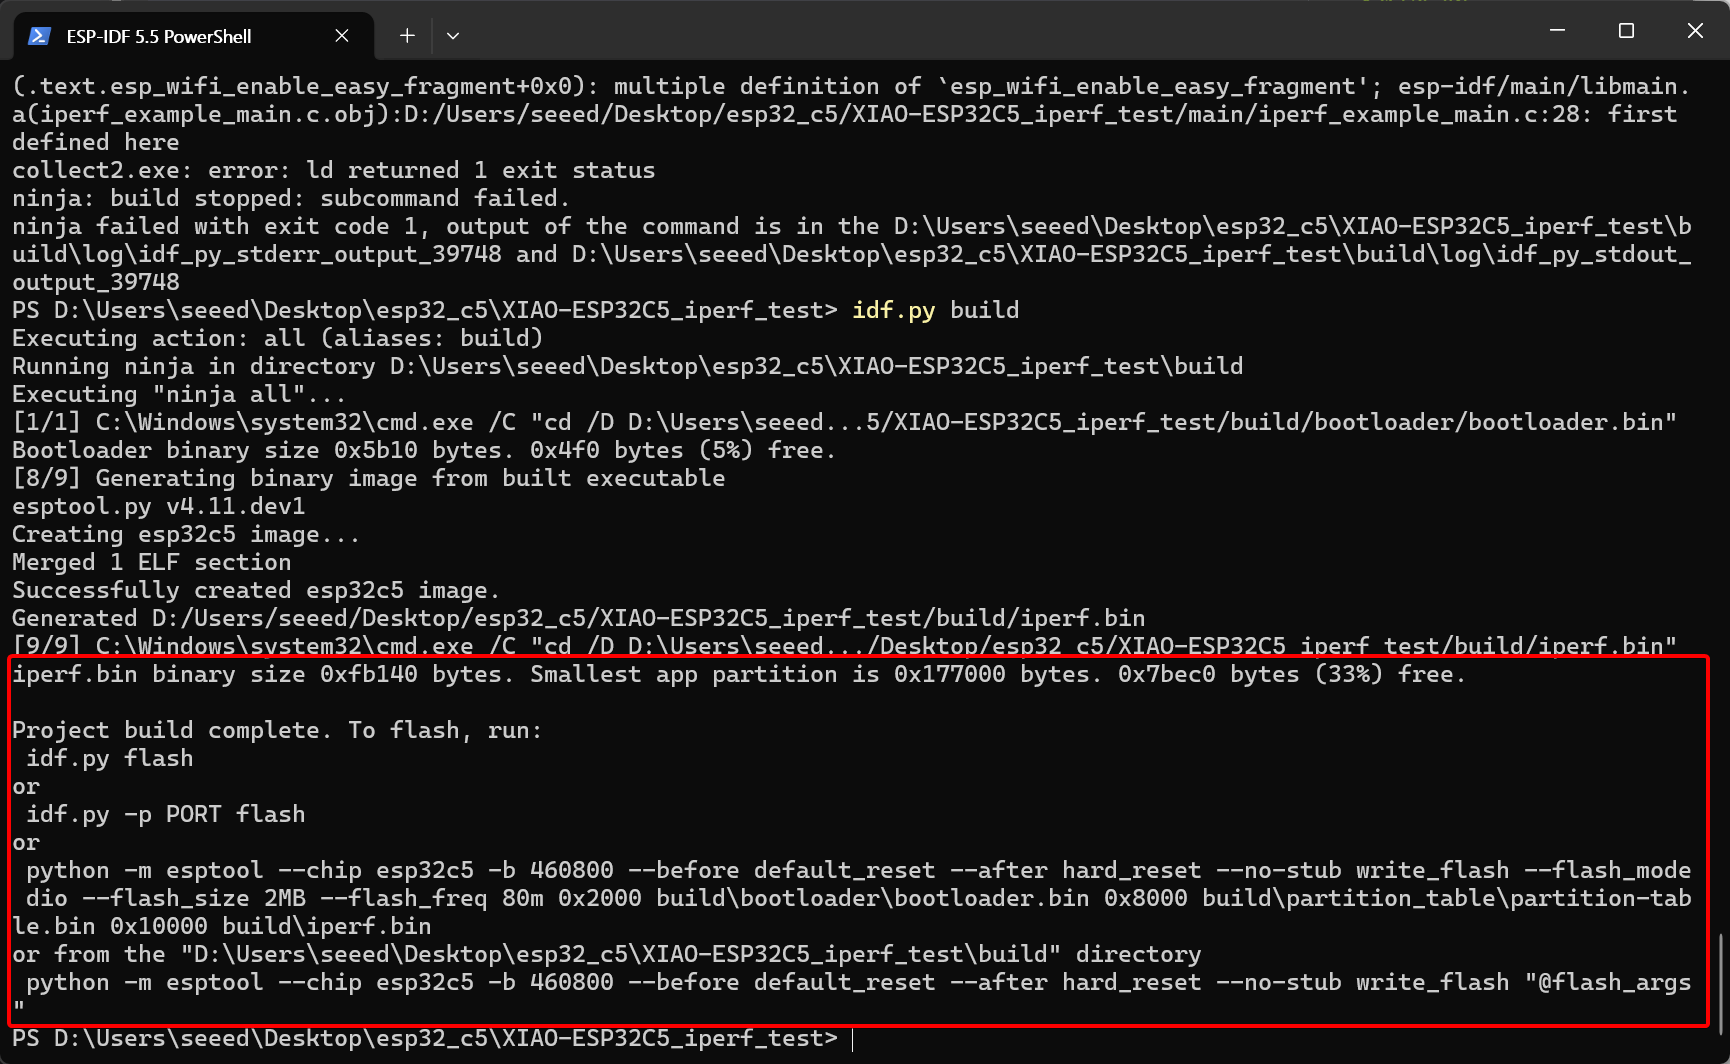
Build completed
Step 5. Flash the code to the XIAO ESP32-C5 and open the serial monitor
You can choose to flash using idf.py flash; the IDF flashing tool will automatically detect your port for flashing, and also specify the port using idf.py -p PORT flash. On Windows, you can open Device Manager to check the port.
 idf.py flash monitor
or
 idf.py -p PORT flash monitor
or
Specify the port for flashing(The specific port number depends on the port of your device.)
idf.py -p COM69 flash monitor
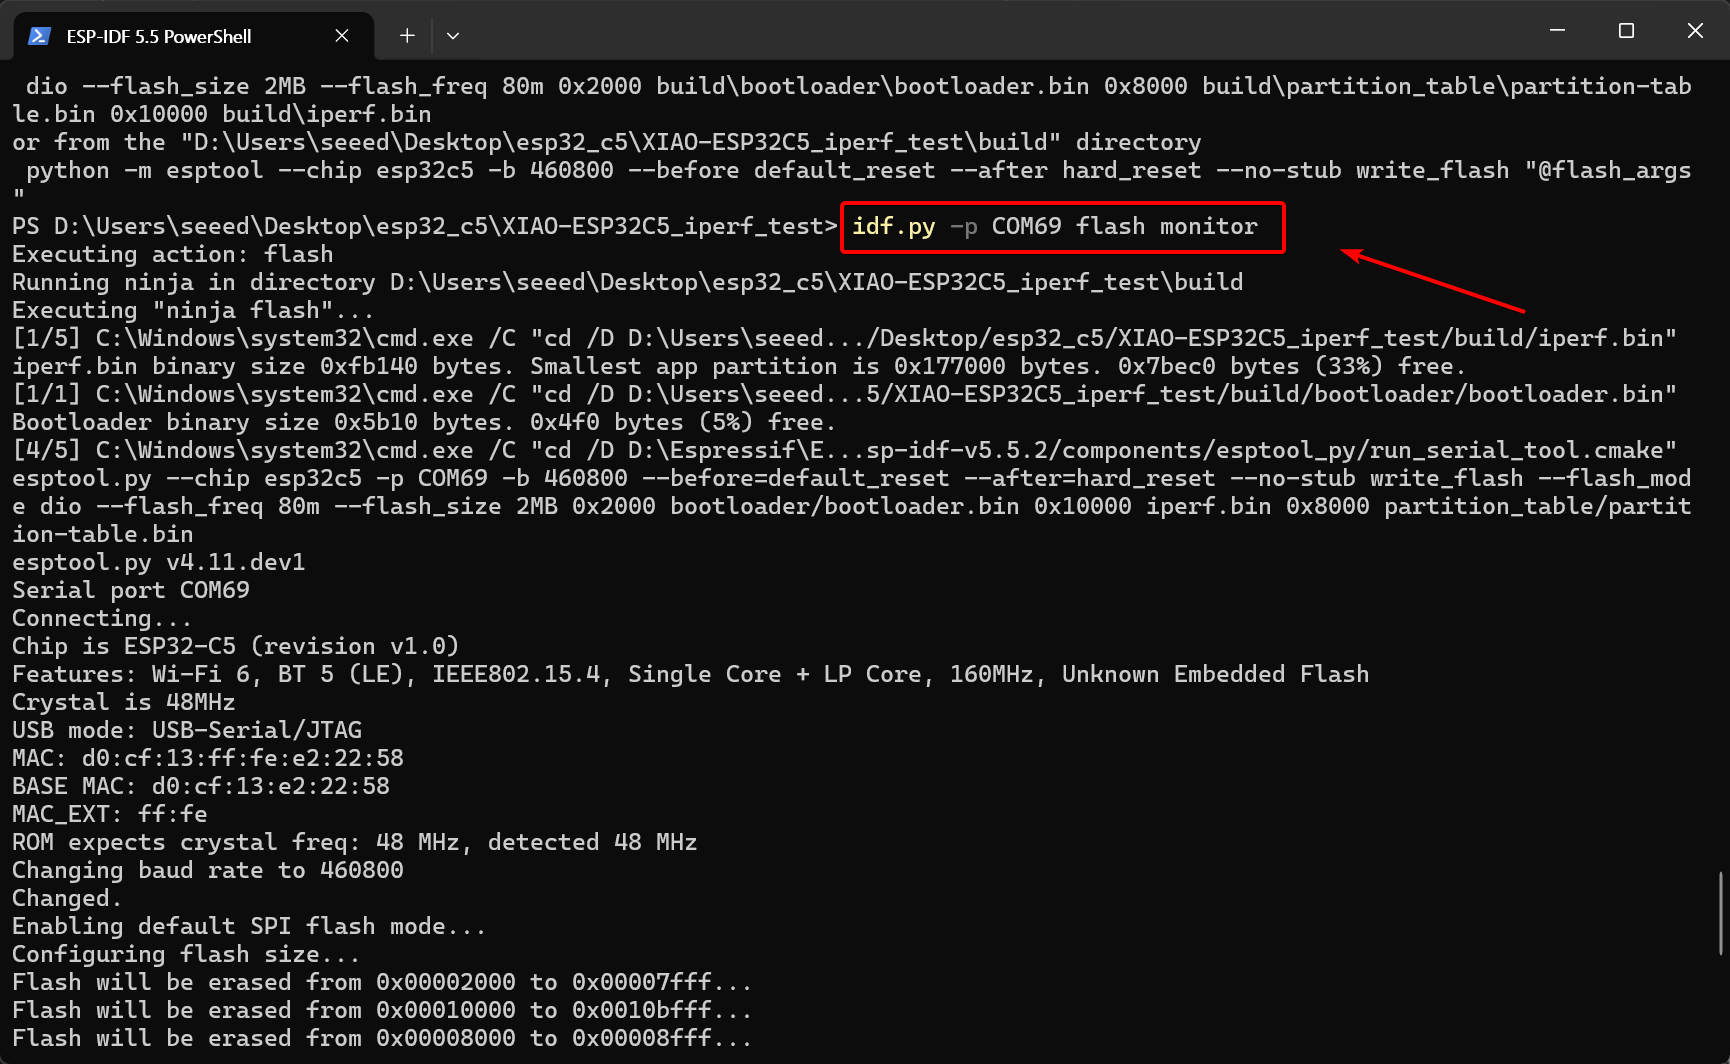
After successful flashing, the terminal will display the iperf> prompt.
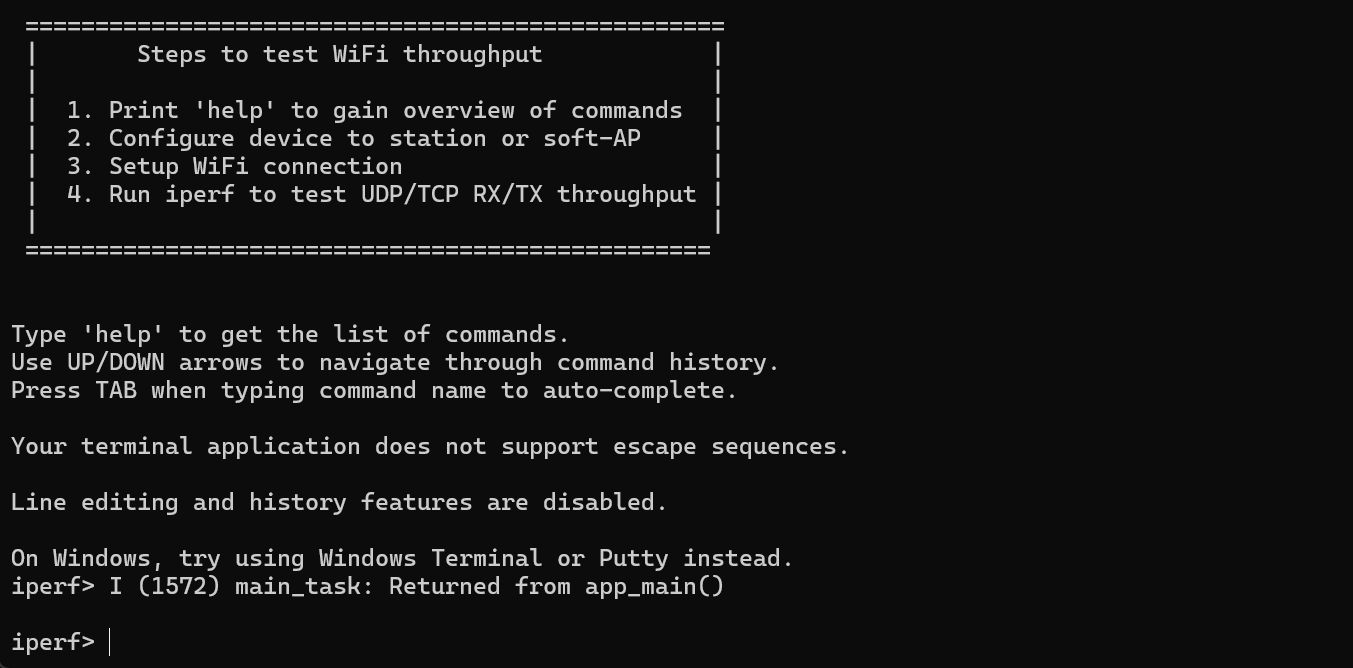
If the iperf> prompt does not appear, please power off the XIAO ESP32-C5 and then press the onboard Reset button to wake it up and reconnect.
For Linux(Ubuntu/Debian) & macOS
# Navigate to the project directory
cd esp32c5_iperf_test

# Set the target chip
idf.py --preview set-target esp32c5

# Compile the project
idf.py build

# Flash the firmware and open the serial monitor
idf.py flash monitor
Wi-Fi data throughput test
We will test the Wi-Fi data throughput of the XIAO ESP32-C5 in both the 2.4 GHz and 5 GHz bands using the TCP and UDP protocols.
Why do we need to test both TCP and UDP?
When evaluating the Wi-Fi RF performance of the XIAO ESP32-C5, TCP and UDP provide two completely different perspectives:
-
TCP Test (Measures Application Experience): TCP is a connection-oriented, reliable protocol that includes handshaking, retransmission, and congestion control mechanisms.
- Purpose: Simulates real-world applications with strict data integrity requirements, such as web browsing, OTA updates, and MQTT control. It reflects the chip’s overall ability to handle complex protocol stacks while ensuring zero data loss (i.e., stability).
-
UDP Test (Measures Hardware Limits): UDP is a connectionless protocol that focuses solely on sending data without guaranteed delivery.
- Purpose: Removes protocol-layer acknowledgment overhead to maximize the physical bandwidth limits of the Wi-Fi radio. Commonly used for audio/video streaming tests, it reveals the chip’s maximum "clean" throughput potential in the 2.4GHz and 5GHz bands (i.e., speed).
Check the IP Address
Check the IP address of the network your computer is connected to, as it will be used in the subsequent steps.
# macOS/Linux
ifconfig | grep "inet " | grep -v 127.0.0.1

# Windows
ipconfig
2.4GHz band throughput test
Actual measurement of the Wi-Fi data throughput of XIAO ESP32-C5 in the 2.4GHz band.
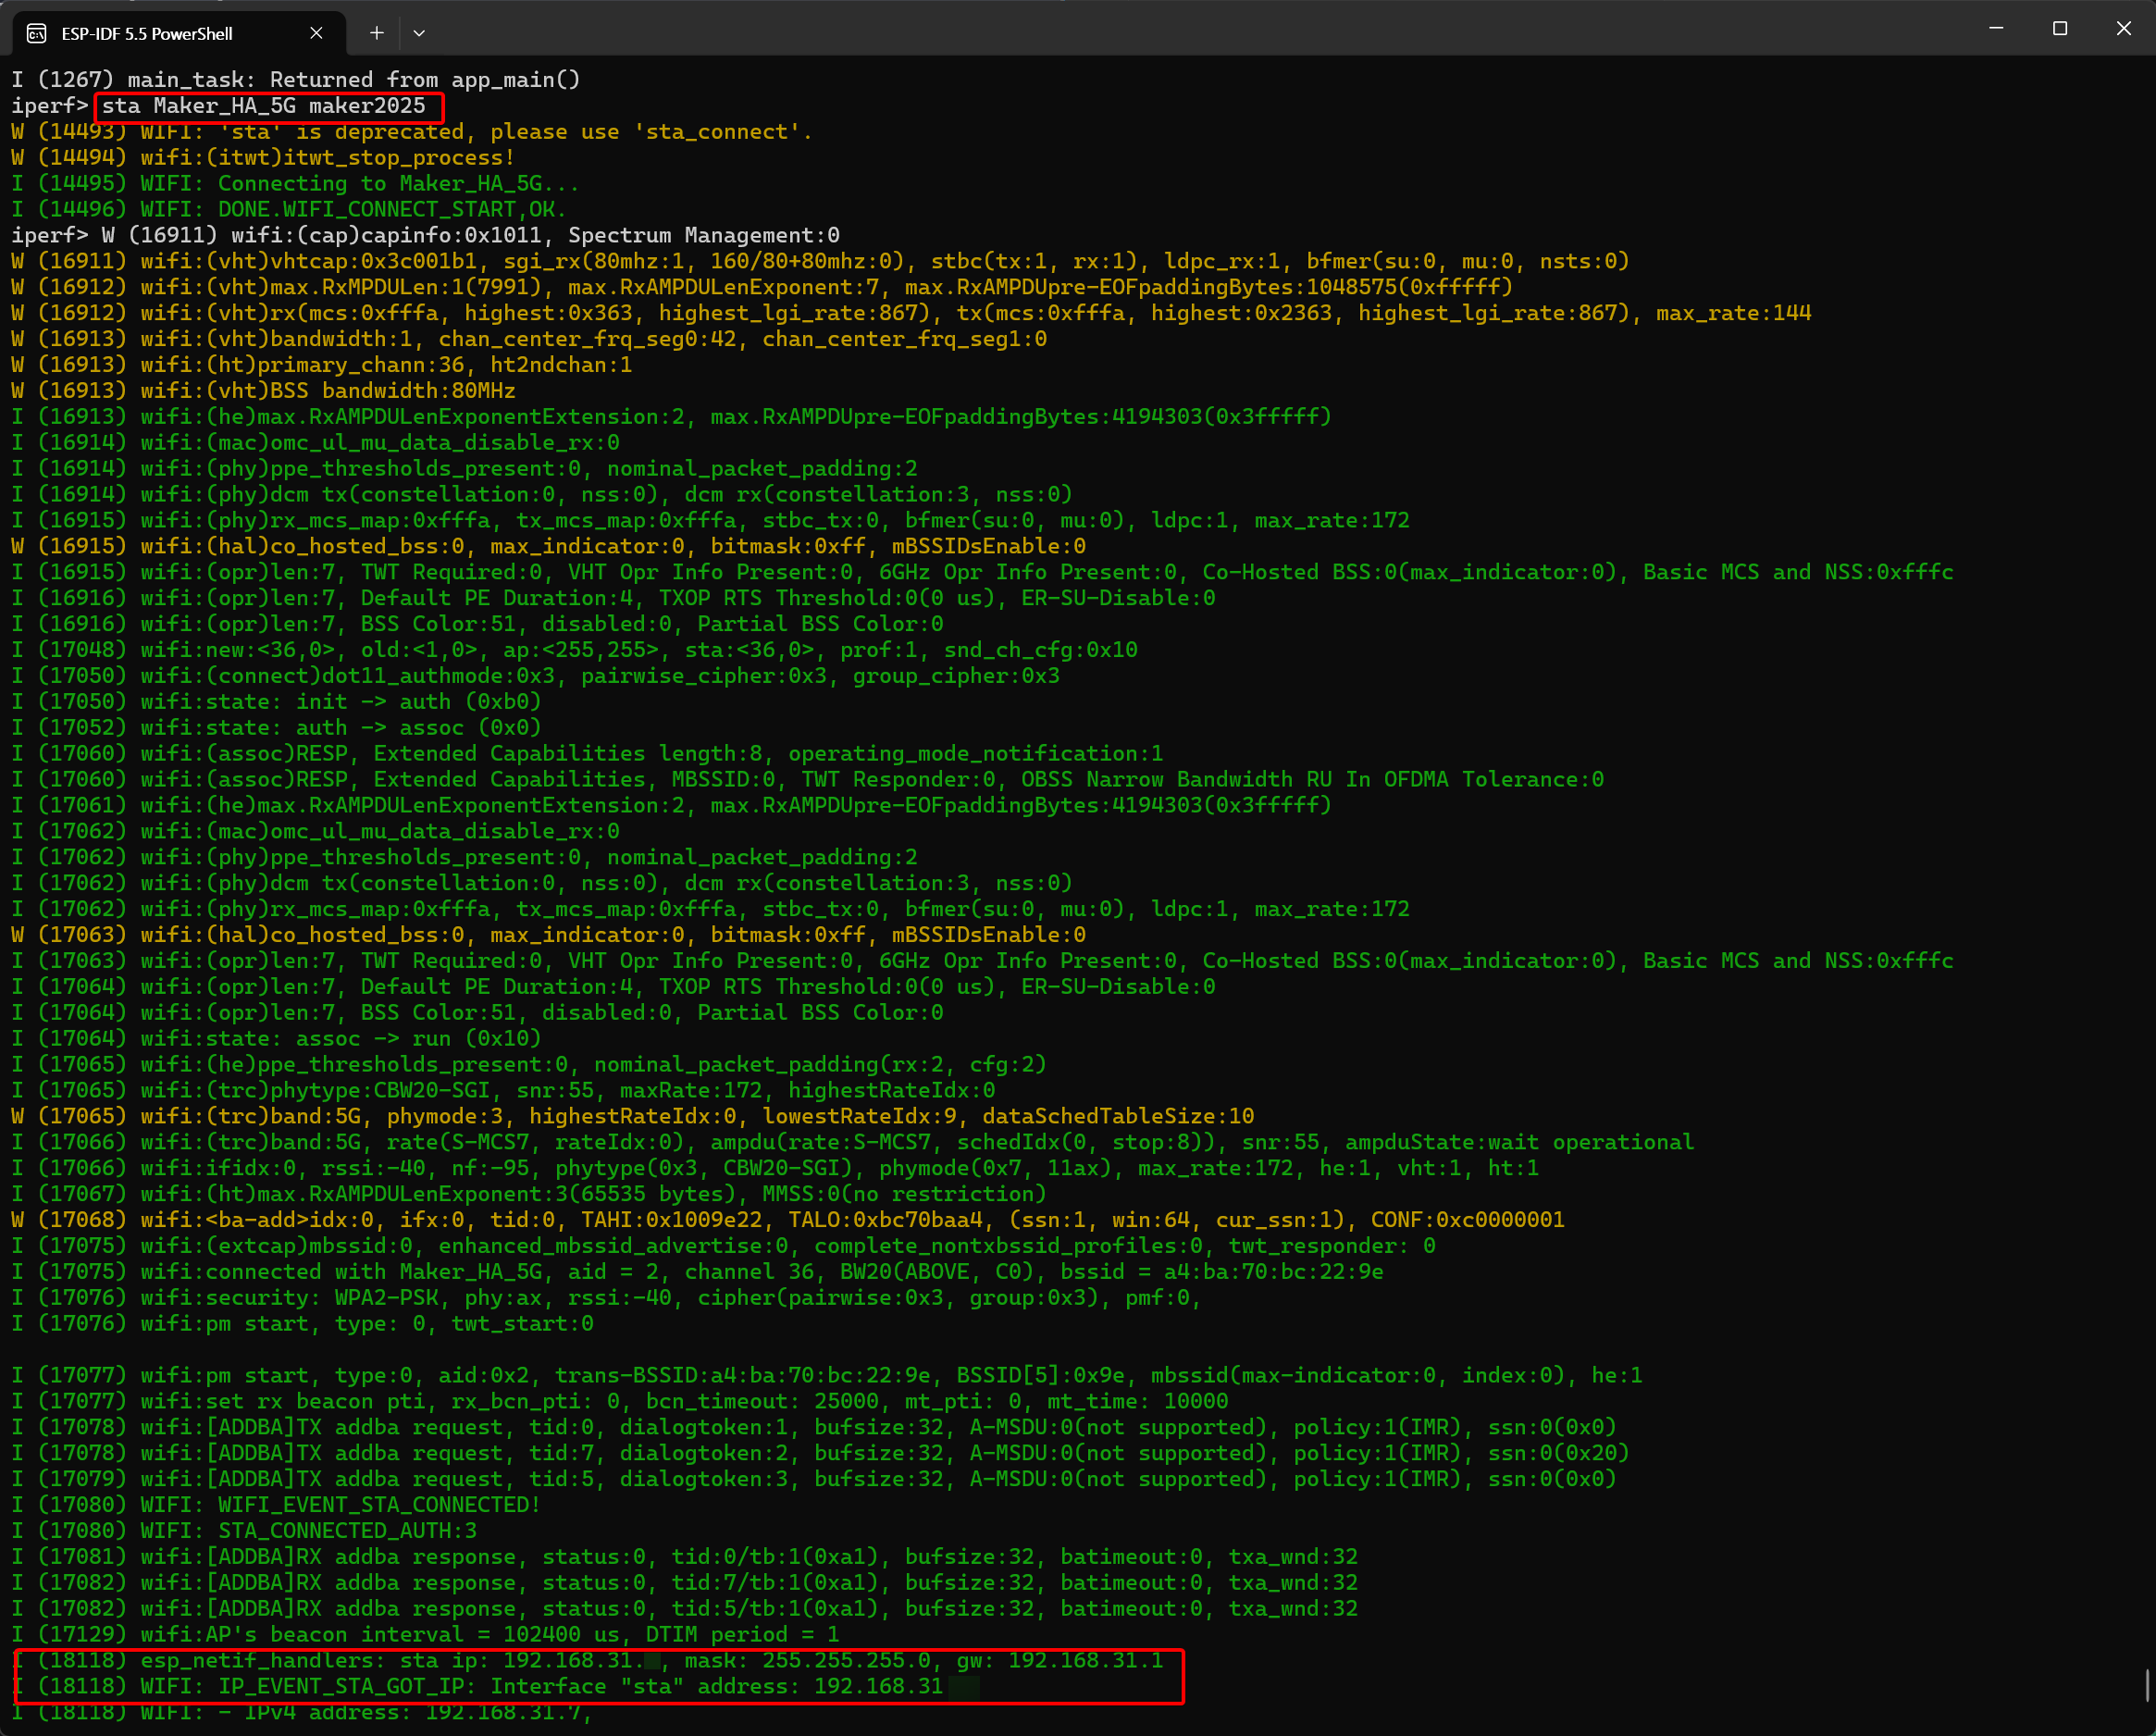
- Connect the XIAO ESP32-C5 to a 2.4G WiFi network
sta <Your WiFi Name> <Your WiFi Password>
The terminal will then print the Wi-Fi connection information. You need to note down the IP address of the XIAO ESP32-C5.
TCP Throughput Test
Please ensure your computer and the XIAO ESP32-C5 are connected to the same WiFi network or router.
-
Download Test (XIAO ESP32-C5 Receiving Data)
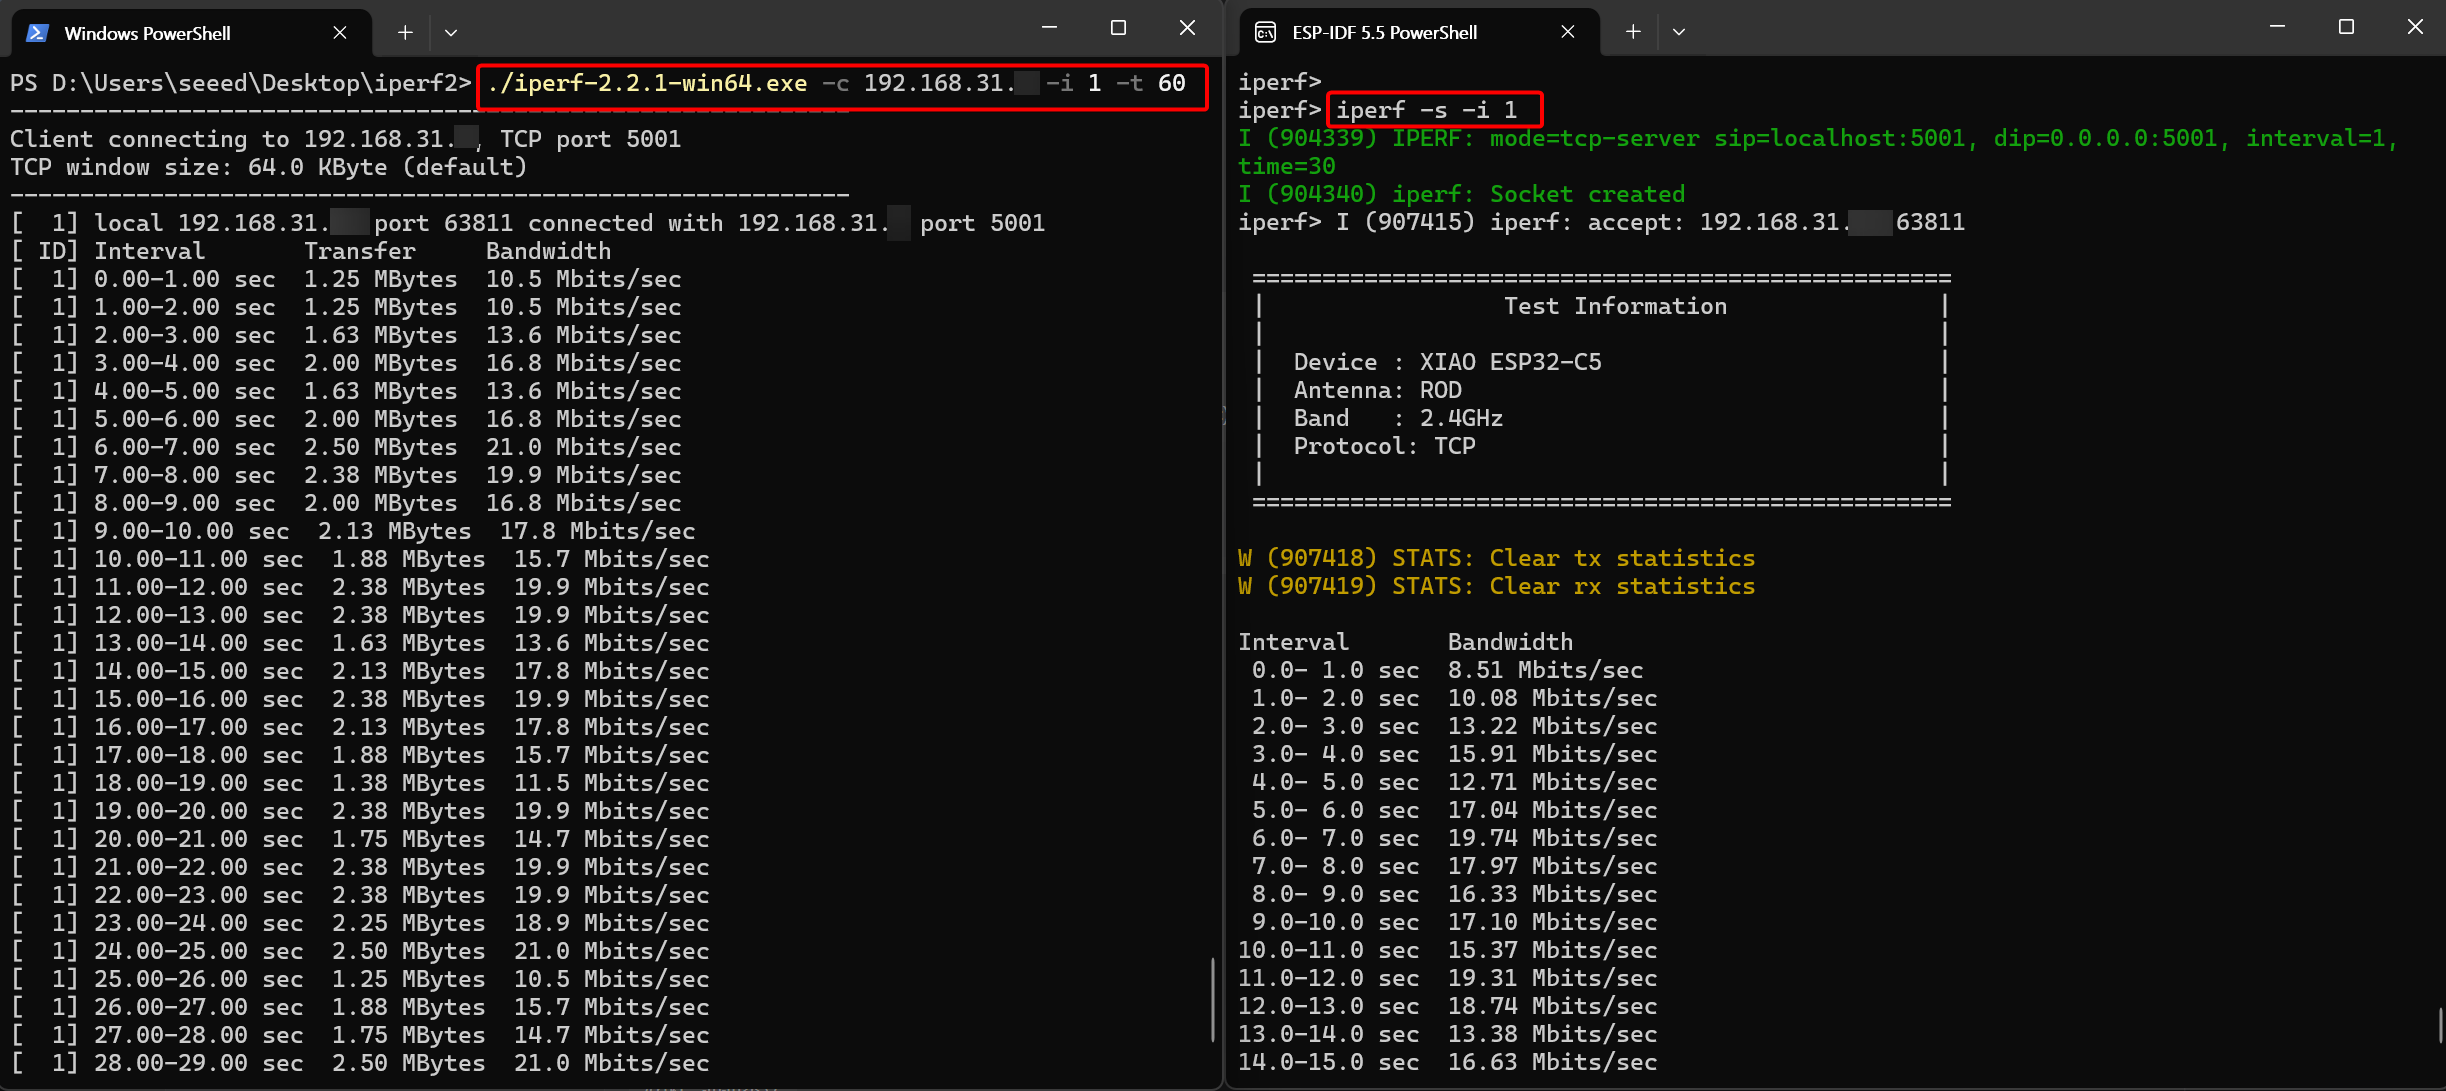
1.1. Execute the command on the XIAO ESP32-C5 side
iperf -s -i 11.2. Execute the command on the PC side
- Windows
./iperf-2.2.1-win64.exe -c <IP address of ESP32> -i 1 -t 60- Linux(Ubuntu/Debian) & macOS
iperf -c <IP address of ESP32> -i 1 -t 60
- Test Results
From the test results, we can see that the average TCP download speed of the XIAO ESP32-C5 on 2.4G WiFi is 15 Mbps
-
Test (XIAO ESP32-C5 Sending Data)
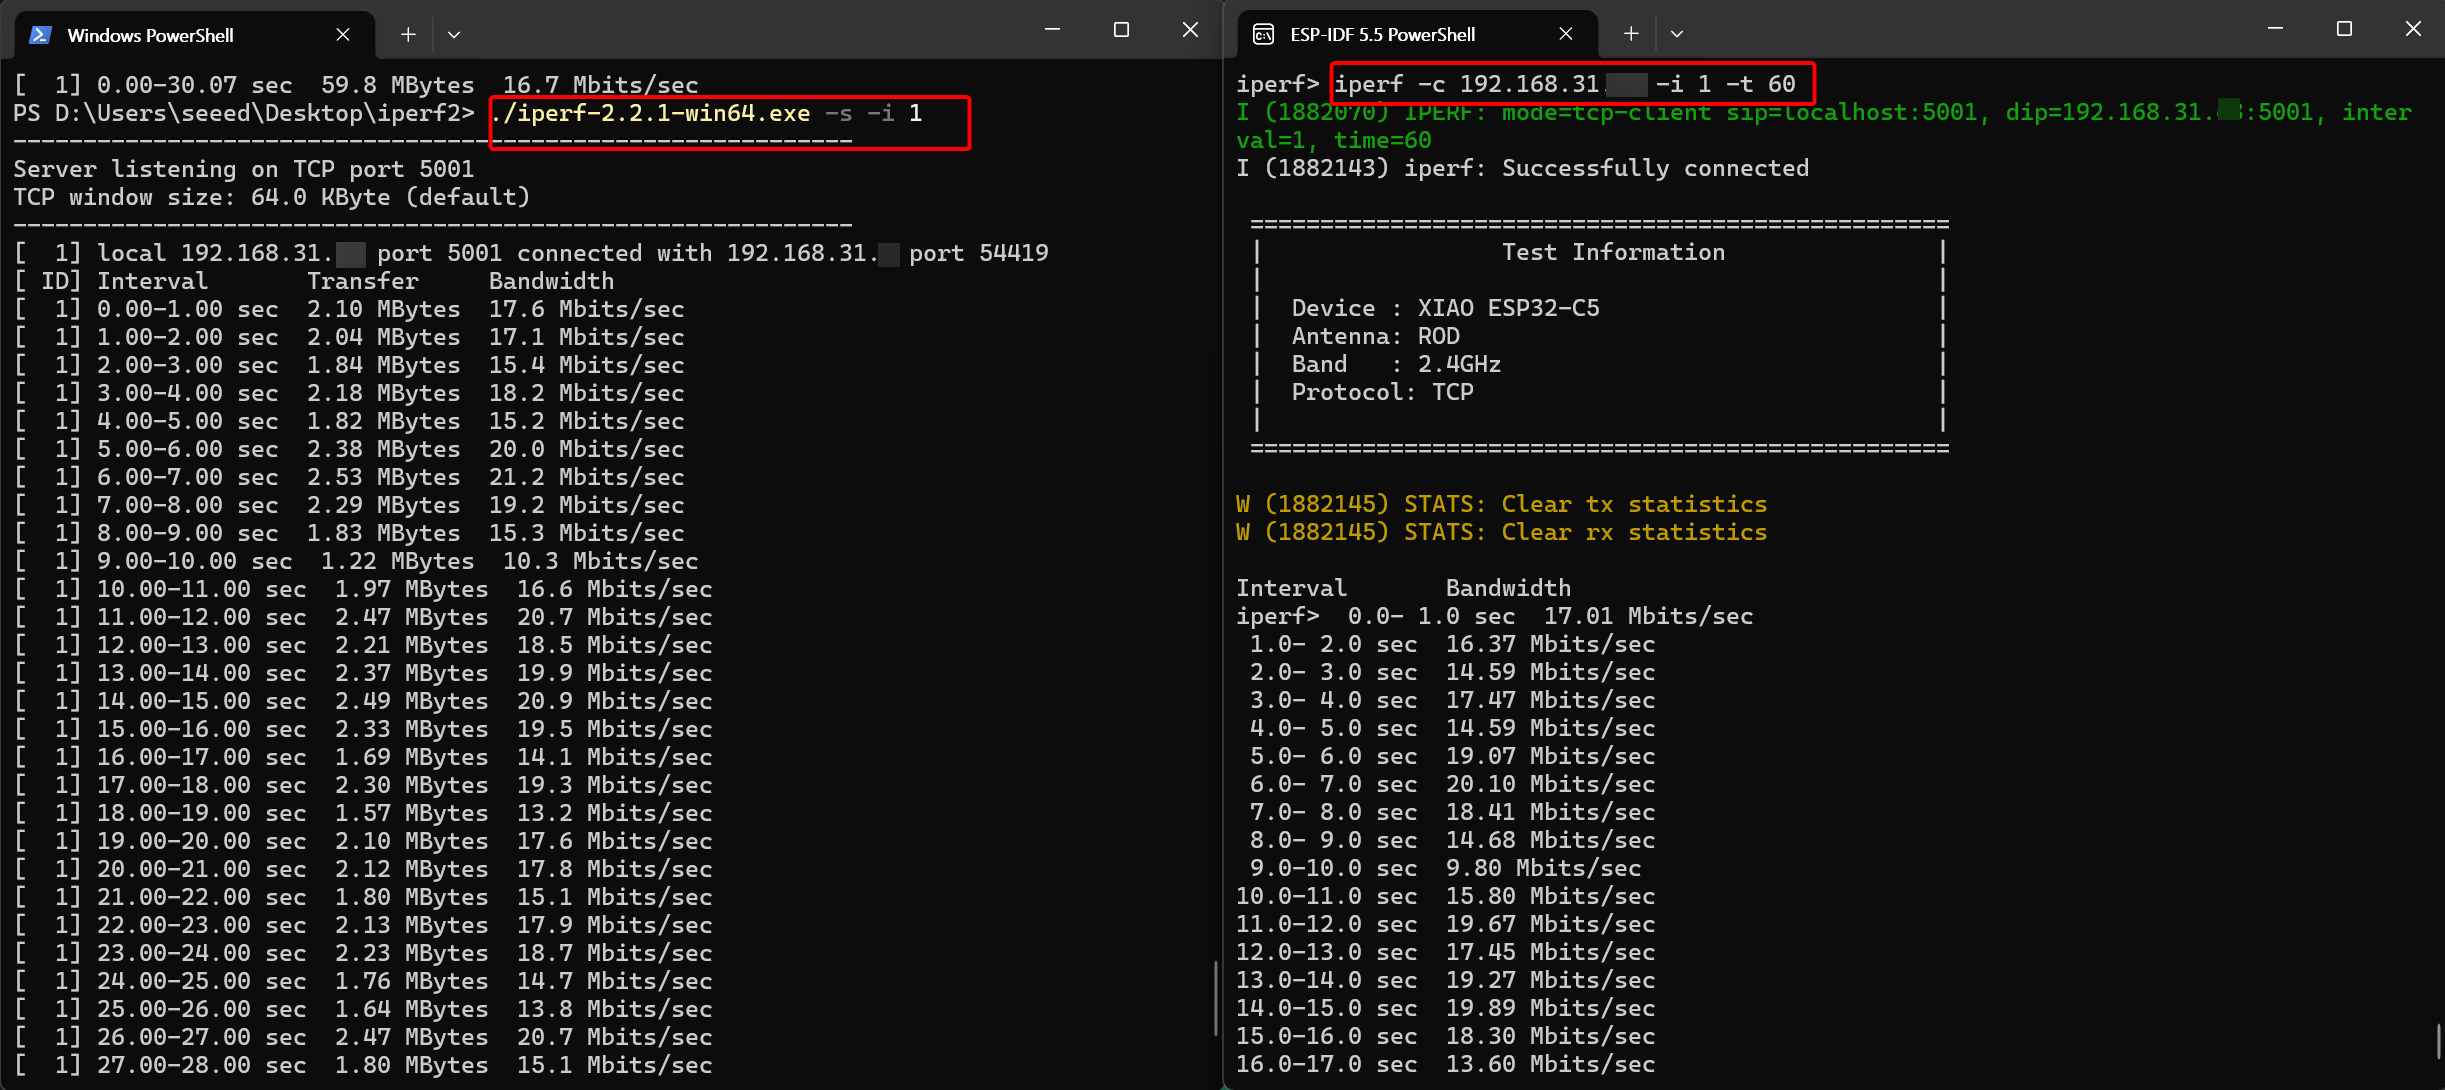
2.1 Execute the command on the XIAO ESP32-C5 side
iperf -c <IP address of PC> -i 1 -t 602.2 Execute the command on the PC side
- Windows
./iperf-2.2.1-win64.exe -s -i 1- Linux(Ubuntu/Debian) & macOS
iperf -s -i 1
- Test Results
From the test results, we can see that the average TCP upload speed of the XIAO ESP32-C5 on 2.4G WiFi is 17 Mbps.
UDP Throughput Test
Please ensure your computer and the XIAO ESP32-C5 are connected to the same WiFi network or router.
-
Download Test (XIAO ESP32-C5 Receiving Data)
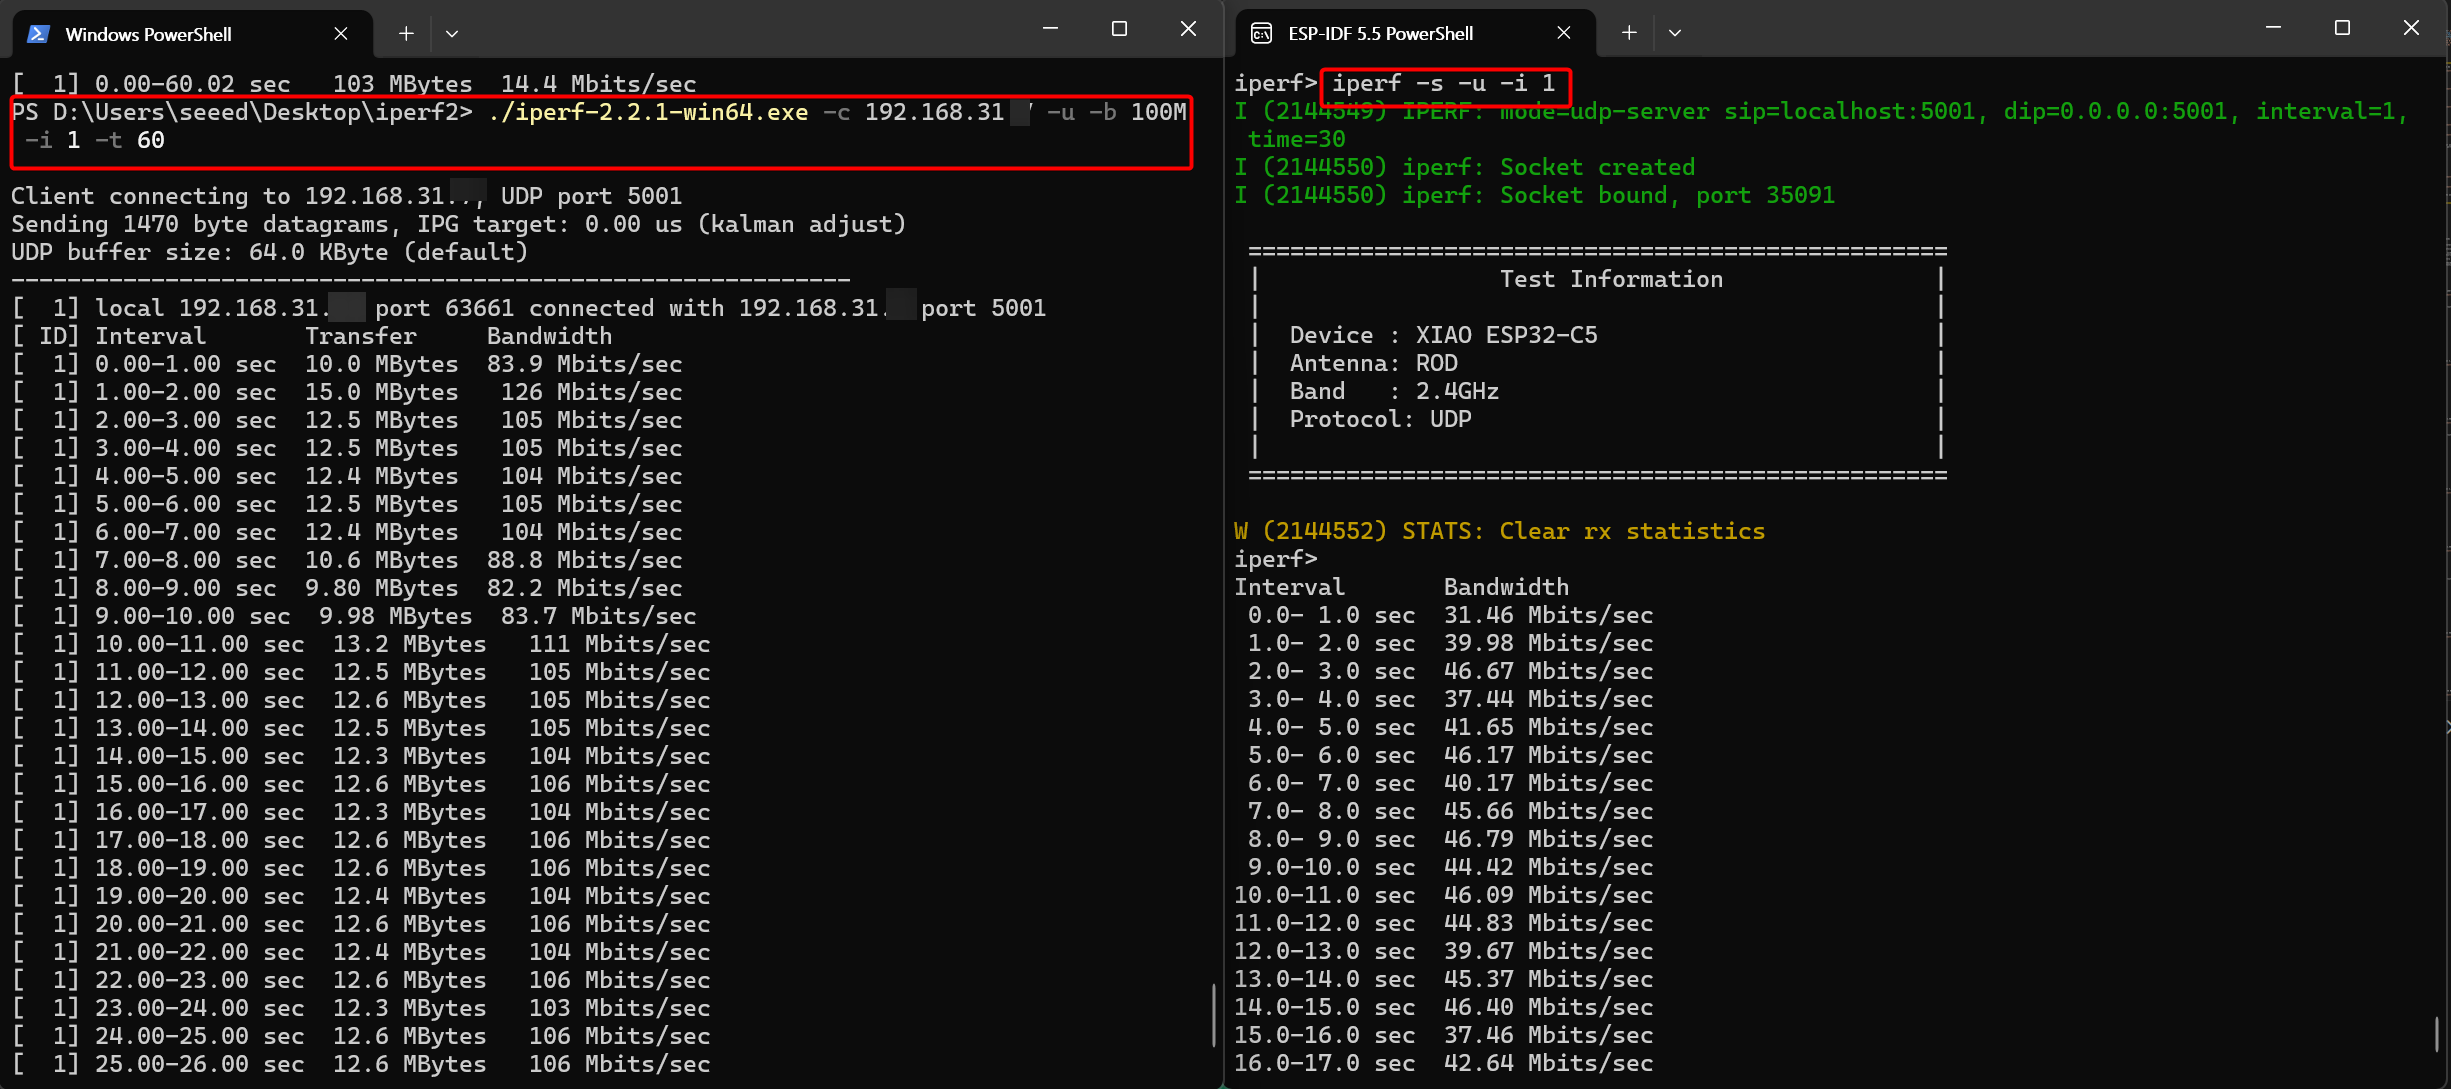
1.1. Execute the command on the XIAO ESP32-C5 side
iperf -s -u -i 11.2. Execute the command on the PC side
- Windows
./iperf-2.2.1-win64.exe -c <IP address of ESP32> -u -b 100M -i 1 -t 60- Linux(Ubuntu/Debian) & macOS
iperf -c <IP address of ESP32> -u -b 100M -i 1 -t 60
- Test Results
From the test results, we can see that the average UDP download speed of the XIAO ESP32-C5 on 2.4G WiFi is 18 Mbps.
-
Test (XIAO ESP32-C5 Sending Data)
2.1 Execute the command on the XIAO ESP32-C5 side
iperf -c <IP address of PC> -u -b 100M -i 1 -t 602.2 Execute the command on the PC side
- Windows
./iperf-2.2.1-win64.exe -s -u -i 1- Linux(Ubuntu/Debian) & macOS
iperf -s -u -i 1
- Test Results
From the test results, we can see that the average UDP upload speed of the XIAO ESP32-C5 on 2.4G WiFi is 27 Mbps.

The above test results are for reference only. Please refer to actual conditions.
5GHz band throughput test
Actual measurement of the Wi-Fi data throughput of XIAO ESP32-C5 in the 5GHz band.
- Connect the XIAO ESP32-C5 to a 5G WiFi network
sta <Your WiFi Name> <Your WiFi Password>
The terminal will then print the Wi-Fi connection information. You need to note down the IP address of the XIAO ESP32-C5.
TCP Throughput Test
Please ensure your computer and the XIAO ESP32-C5 are connected to the same WiFi network or router.
-
Download Test (XIAO ESP32-C5 Receiving Data)
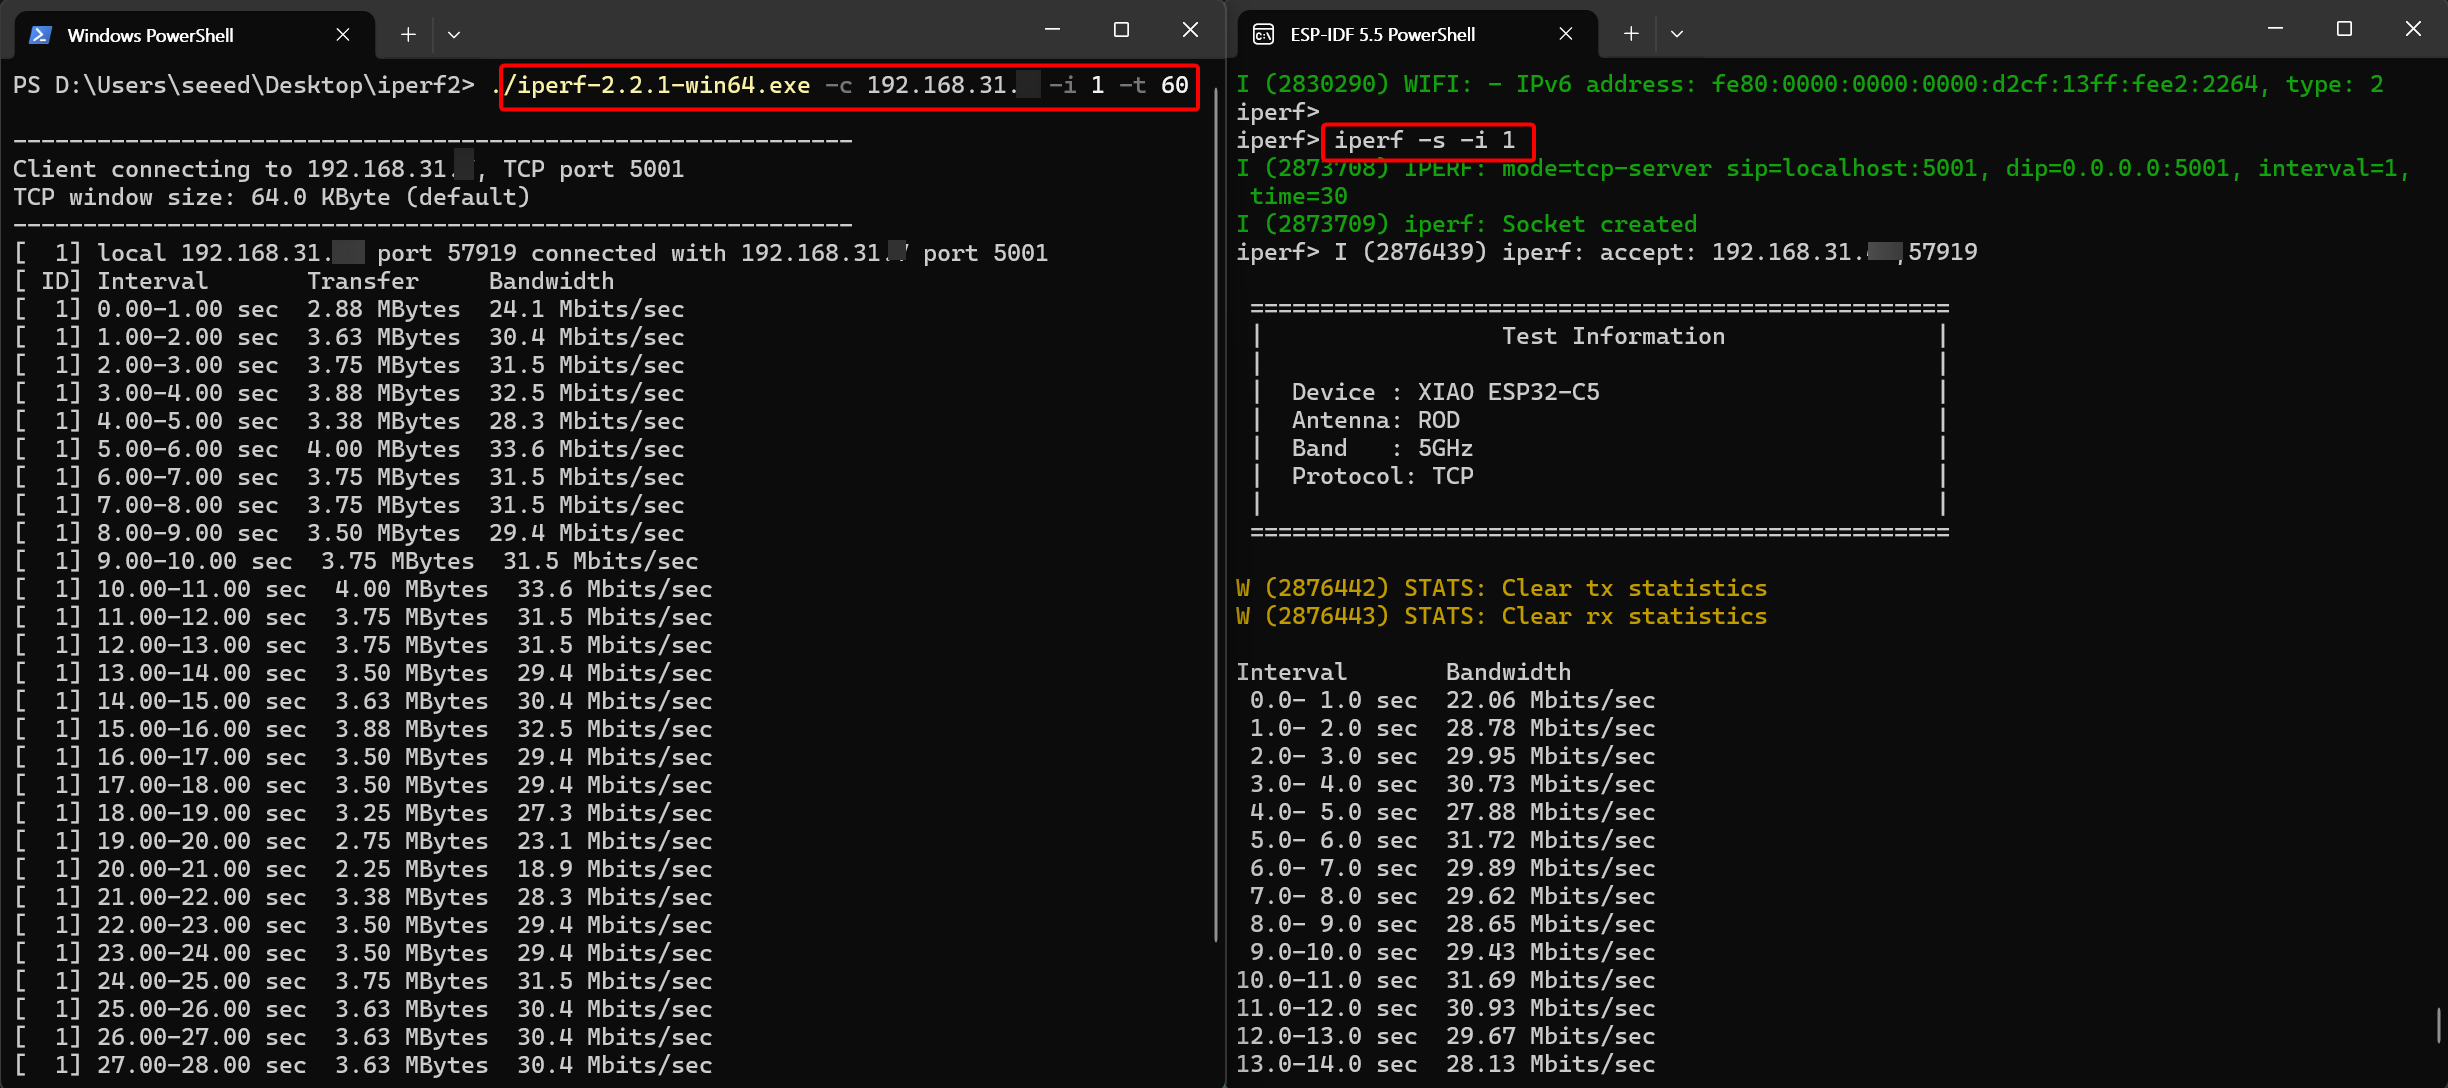
1.1. Execute the command on the XIAO ESP32-C5 side
iperf -s -i 11.2. Execute the command on the PC side
- Windows
./iperf-2.2.1-win64.exe -c <IP address of ESP32> -i 1 -t 60- Linux(Ubuntu/Debian) & macOS
iperf -c <IP address of ESP32> -i 1 -t 60
- Test Results
From the test results, we can see that the average UDP download speed of the XIAO ESP32-C5 on 5G WiFi is 27 Mbps.
-
Test (XIAO ESP32-C5 Sending Data)
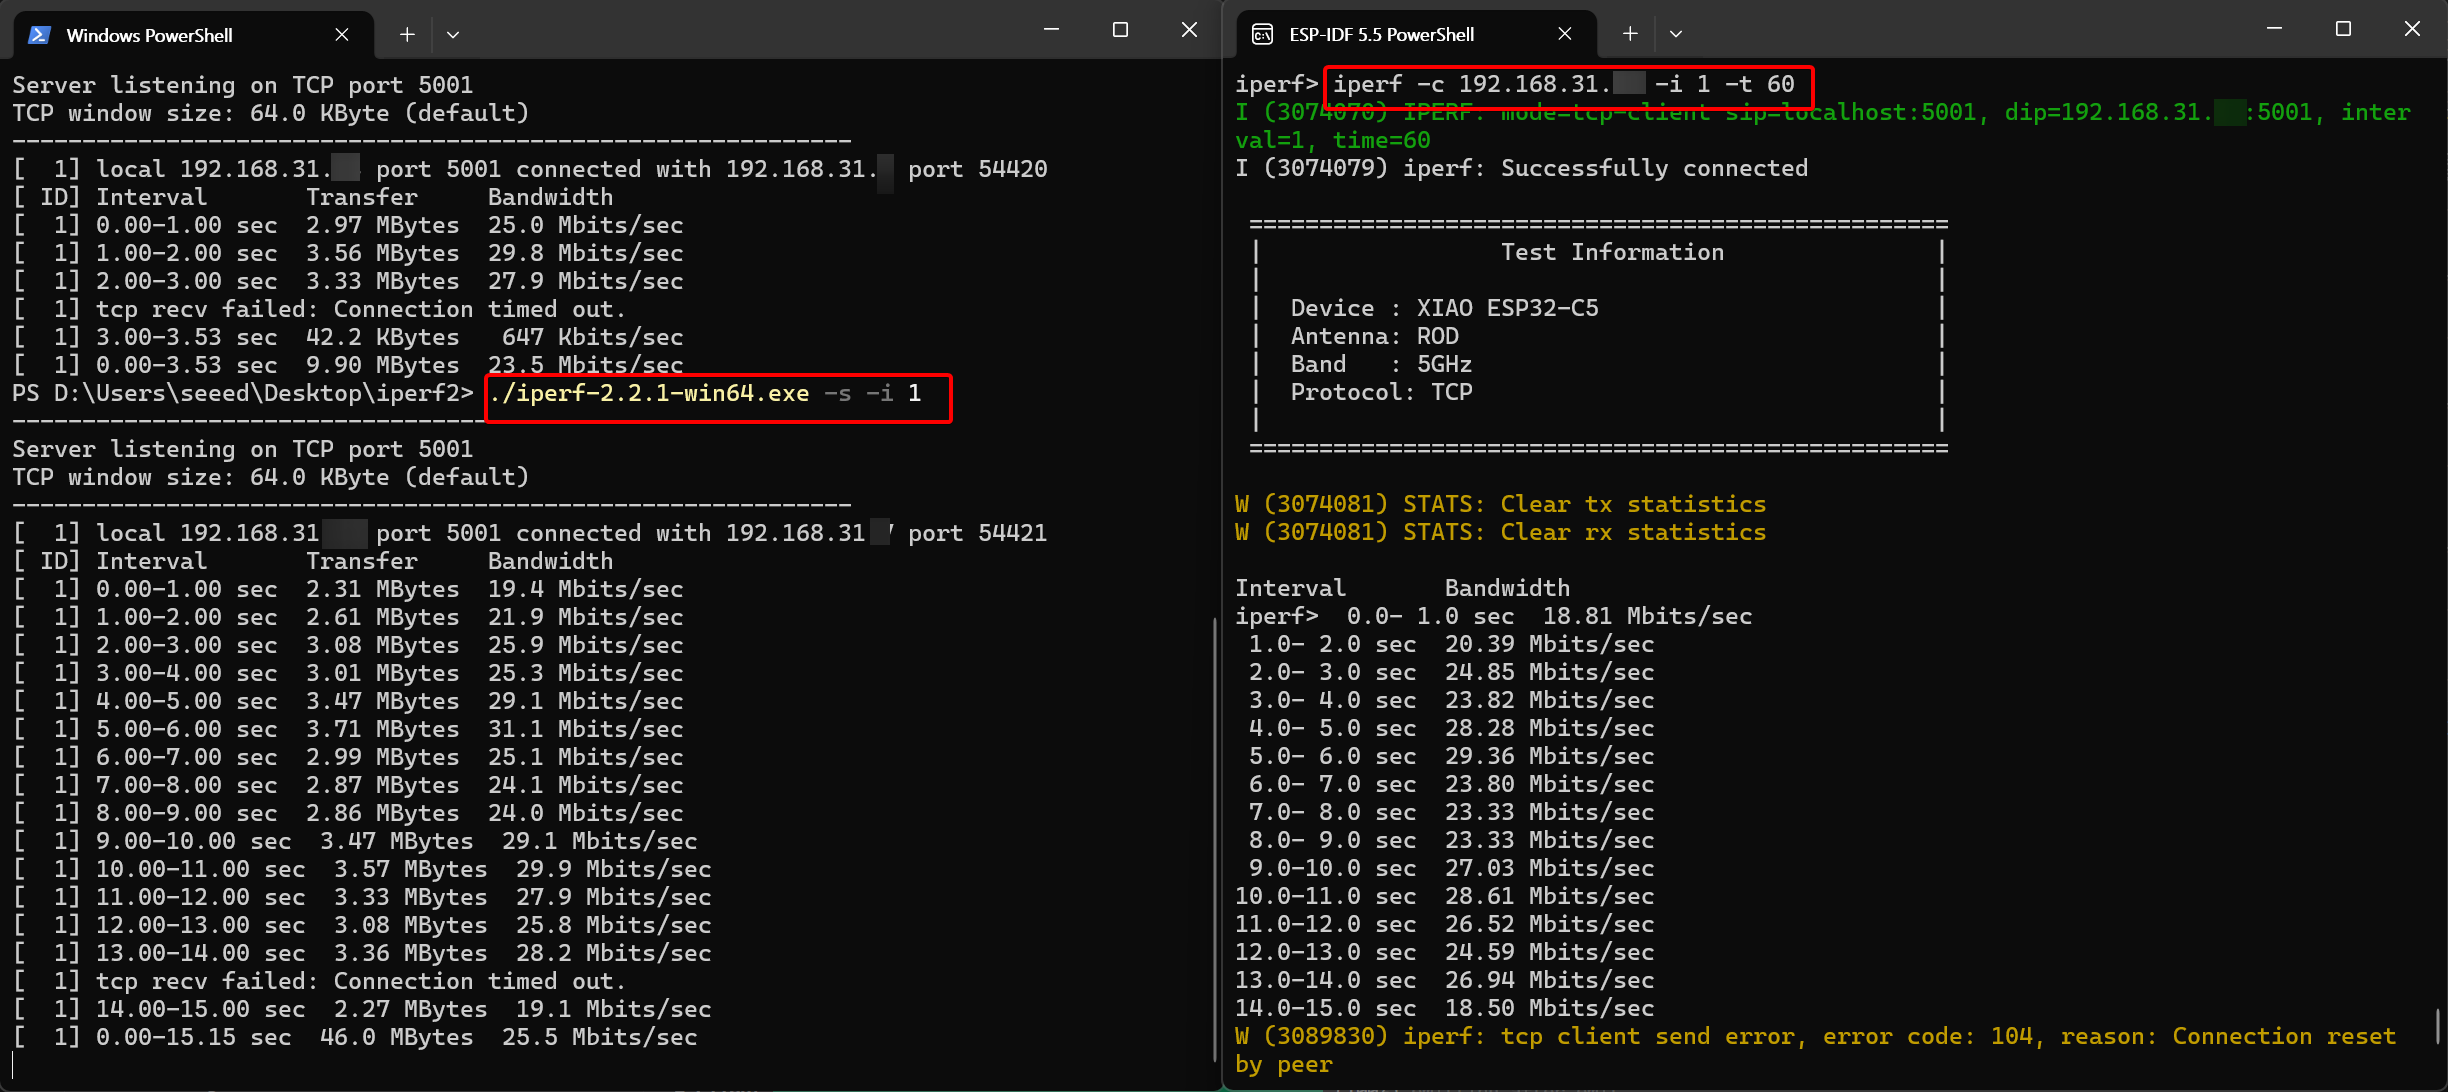
2.1 Execute the command on the XIAO ESP32-C5 side
iperf -c <IP address of PC> -i 1 -t 602.2 Execute the command on the PC side
- Windows
./iperf-2.2.1-win64.exe -s -i 1- Linux(Ubuntu/Debian) & macOS
iperf -s -i 1
- Test Results
From the test results, we can see that the average UDP upload speed of the XIAO ESP32-C5 on 5G WiFi is 29 Mbps.
UDP Throughput Test
Please ensure your computer and the XIAO ESP32-C5 are connected to the same WiFi network or router.
-
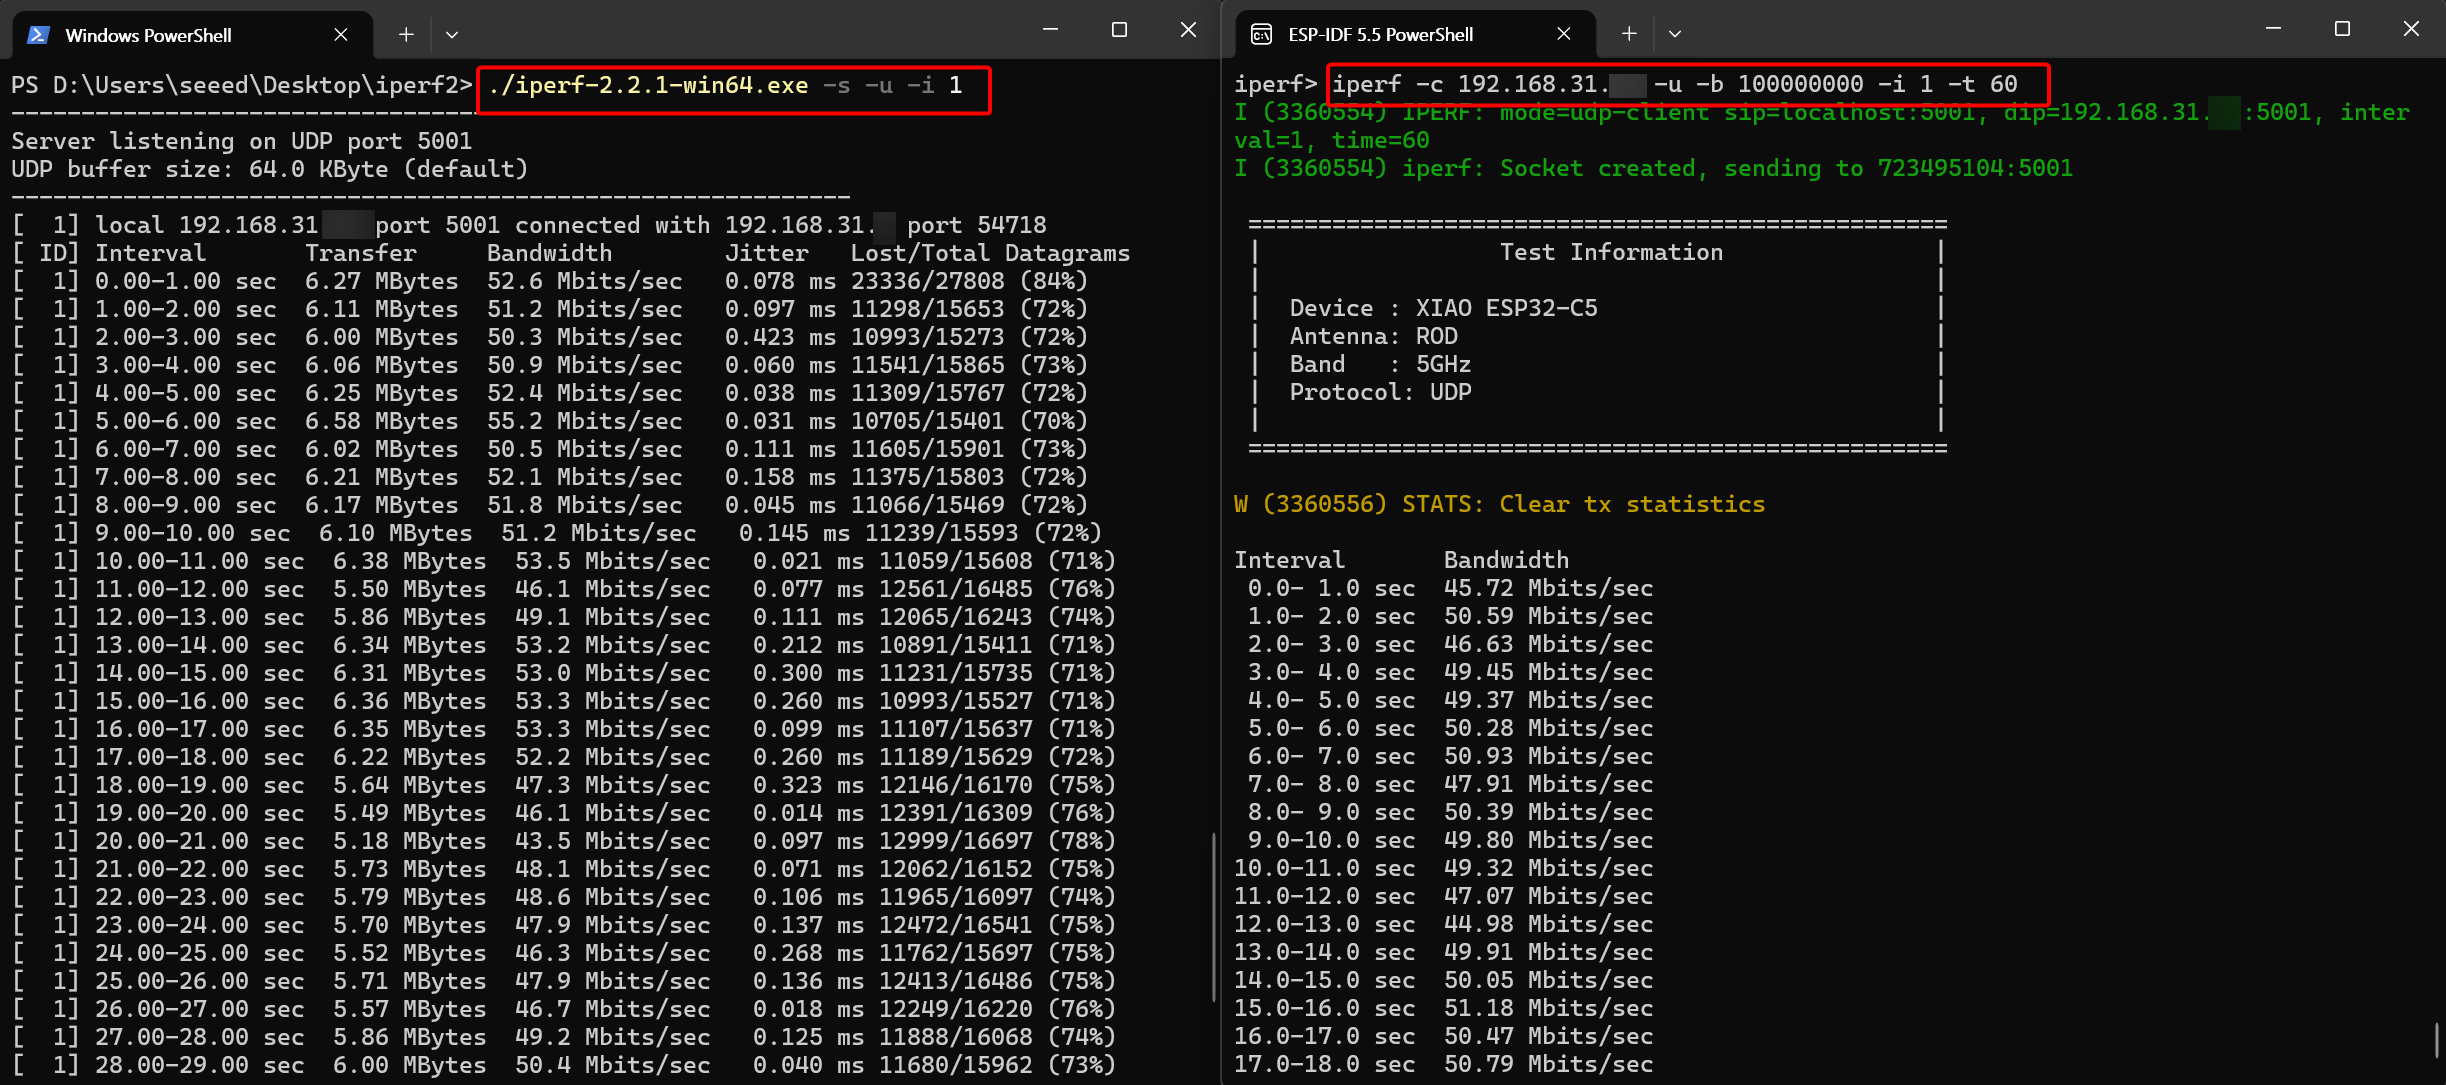
Download Test (XIAO ESP32-C5 Receiving Data)
1.1. Execute the command on the XIAO ESP32-C5 side
iperf -s -u -i 11.2. Execute the command on the PC side
- Windows
./iperf-2.2.1-win64.exe -c <IP address of ESP32> -u -b 100M -i 1 -t 60- Linux(Ubuntu/Debian) & macOS
iperf -c <IP address of ESP32> -u -b 100M -i 1 -t 60
- Test Results
From the test results, we can see that the average TCP upload speed of the XIAO ESP32-C5 on 5G WiFi is 50 Mbps.
-
Test (XIAO ESP32-C5 Sending Data)
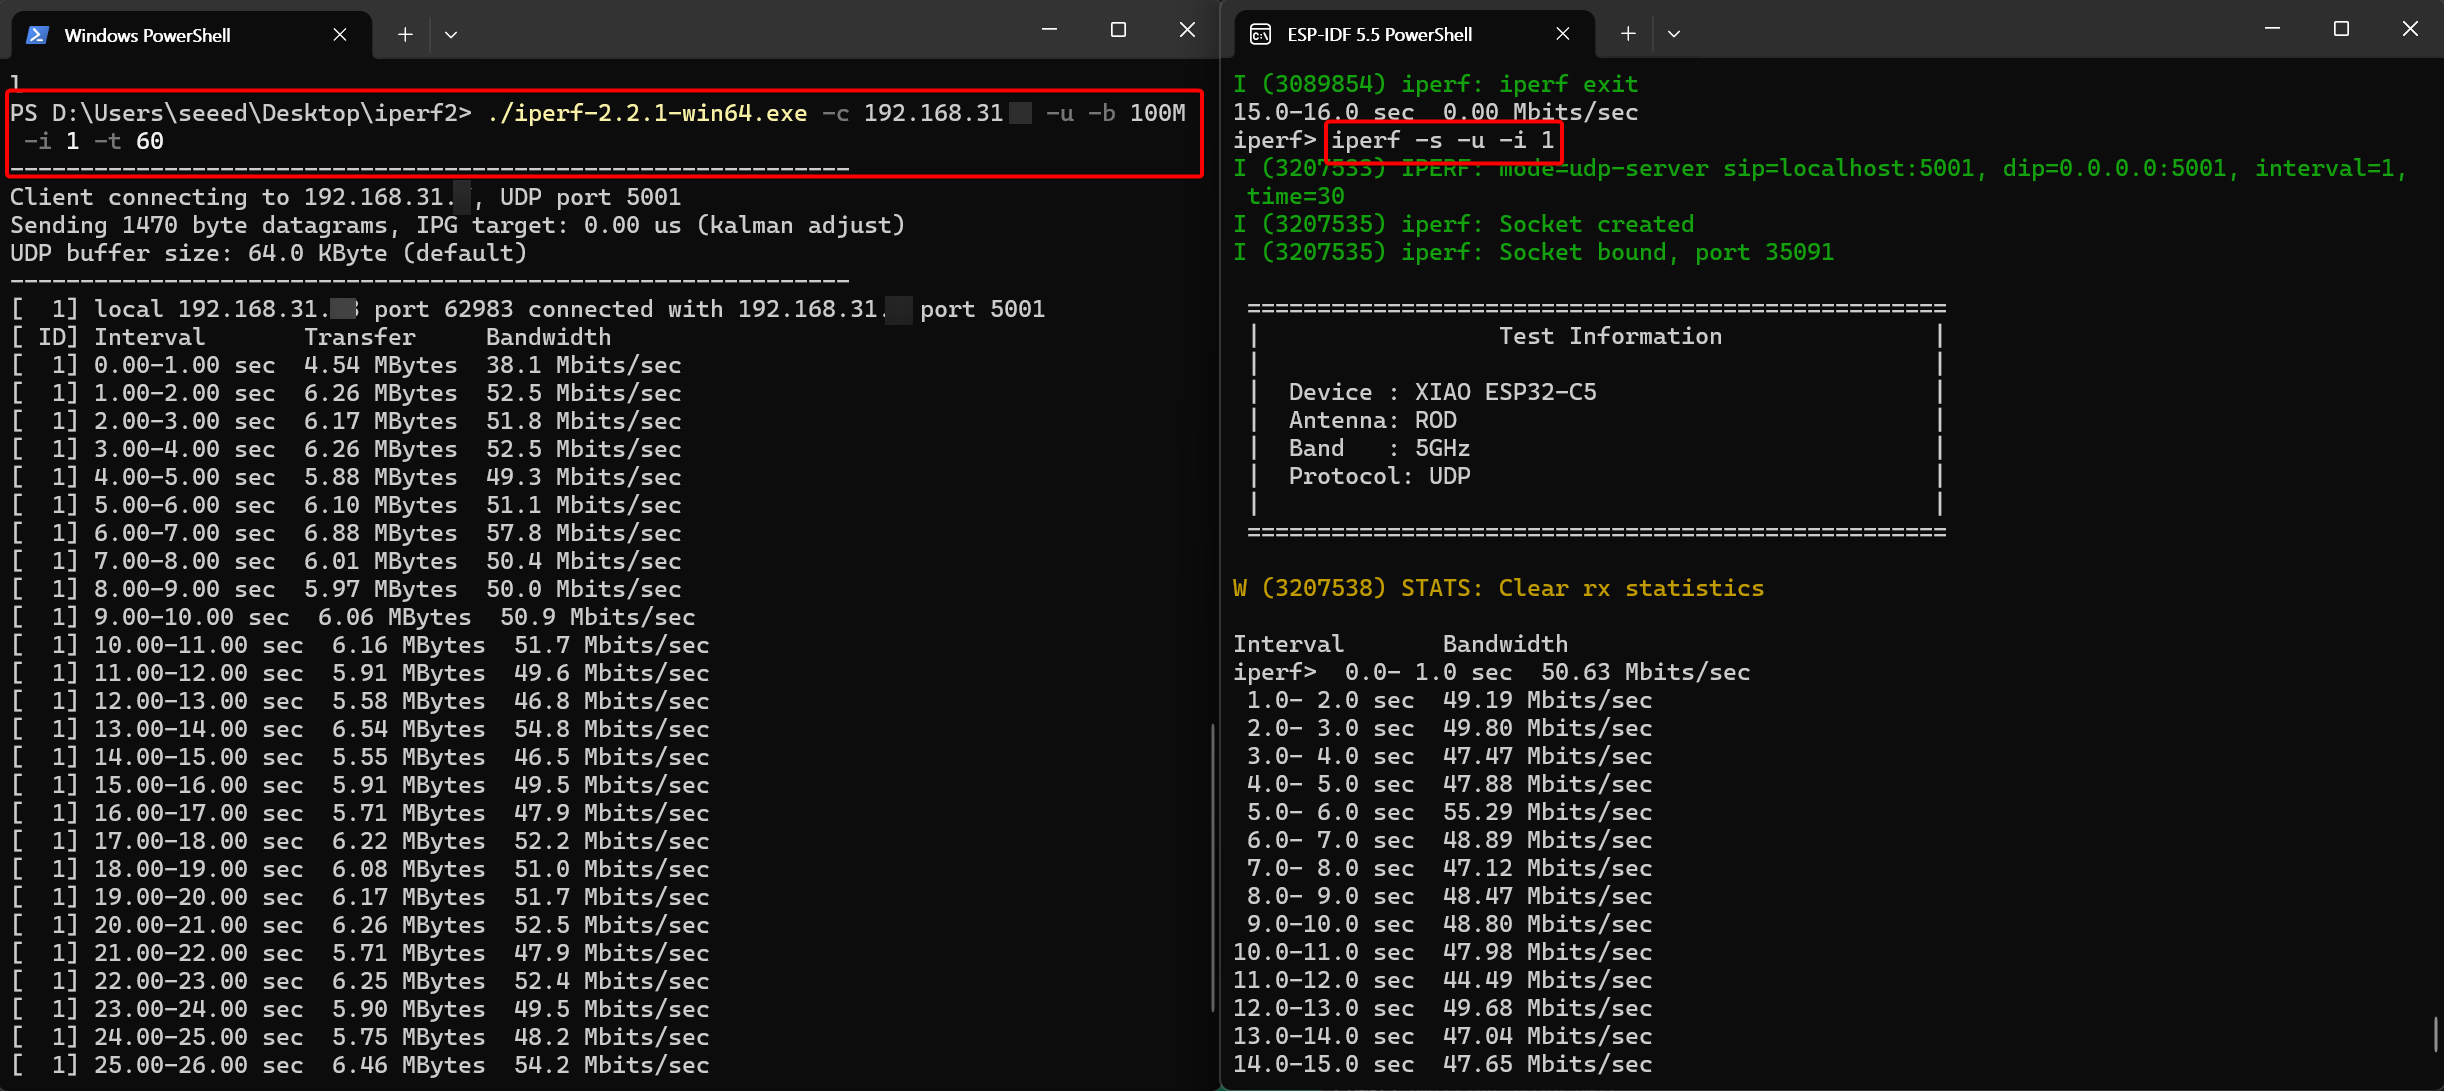
2.1 Execute the command on the XIAO ESP32-C5 side
iperf -c <IP address of PC> -u -b 100M -i 1 -t 602.2 Execute the command on the PC side
- Windows
./iperf-2.2.1-win64.exe -s -u -i 1- Linux(Ubuntu/Debian) & macOS
iperf -s -u -i 1
- Test Results
From the test results, we can see that the average TCP upload speed of the XIAO ESP32-C5 on 5G WiFi is 50 Mbps.
Conclusion
Test results show that the XIAO ESP32-C5 exhibits excellent data transmission performance in both 2.4 GHz and 5 GHz dual-band Wi-Fi 6 environments, making it ideal for high-bandwidth, low-latency wireless applications.
Furthermore, the testing methods in this tutorial are applicable to the entire XIAO ESP series development boards. You can perform the same performance evaluation on other boards by simply referring to the guidelines in this Wiki and adjusting the target chip during compilation. We look forward to you exploring its potential and sharing your findings with the community!
Tech Support & Product Discussion
Thank you for choosing our products! We are here to provide you with different support to ensure that your experience with our products is as smooth as possible. We offer several communication channels to cater to different preferences and needs.