XIAO ESP32-C3 iBeacon with BME680 Sensor Using ESP-IDF
In this tutorial, we'll build a low-power temperature monitoring system that broadcasts environmental data using Bluetooth Low Energy (BLE) in iBeacon format. We'll use the Seeed Studio XIAO ESP32-C3, the XIAO expansion board, and a Grove BME680 environmental sensor. This project demonstrates how to build robust embedded applications using ESP-IDF—Espressif's official development framework.
Overview
Our system will:
- Read temperature, humidity and pressure from the BME680 sensor
- Package this data into BLE advertisement packets
- Periodically wake up, take measurements, advertise data, and go back to sleep to conserve battery power
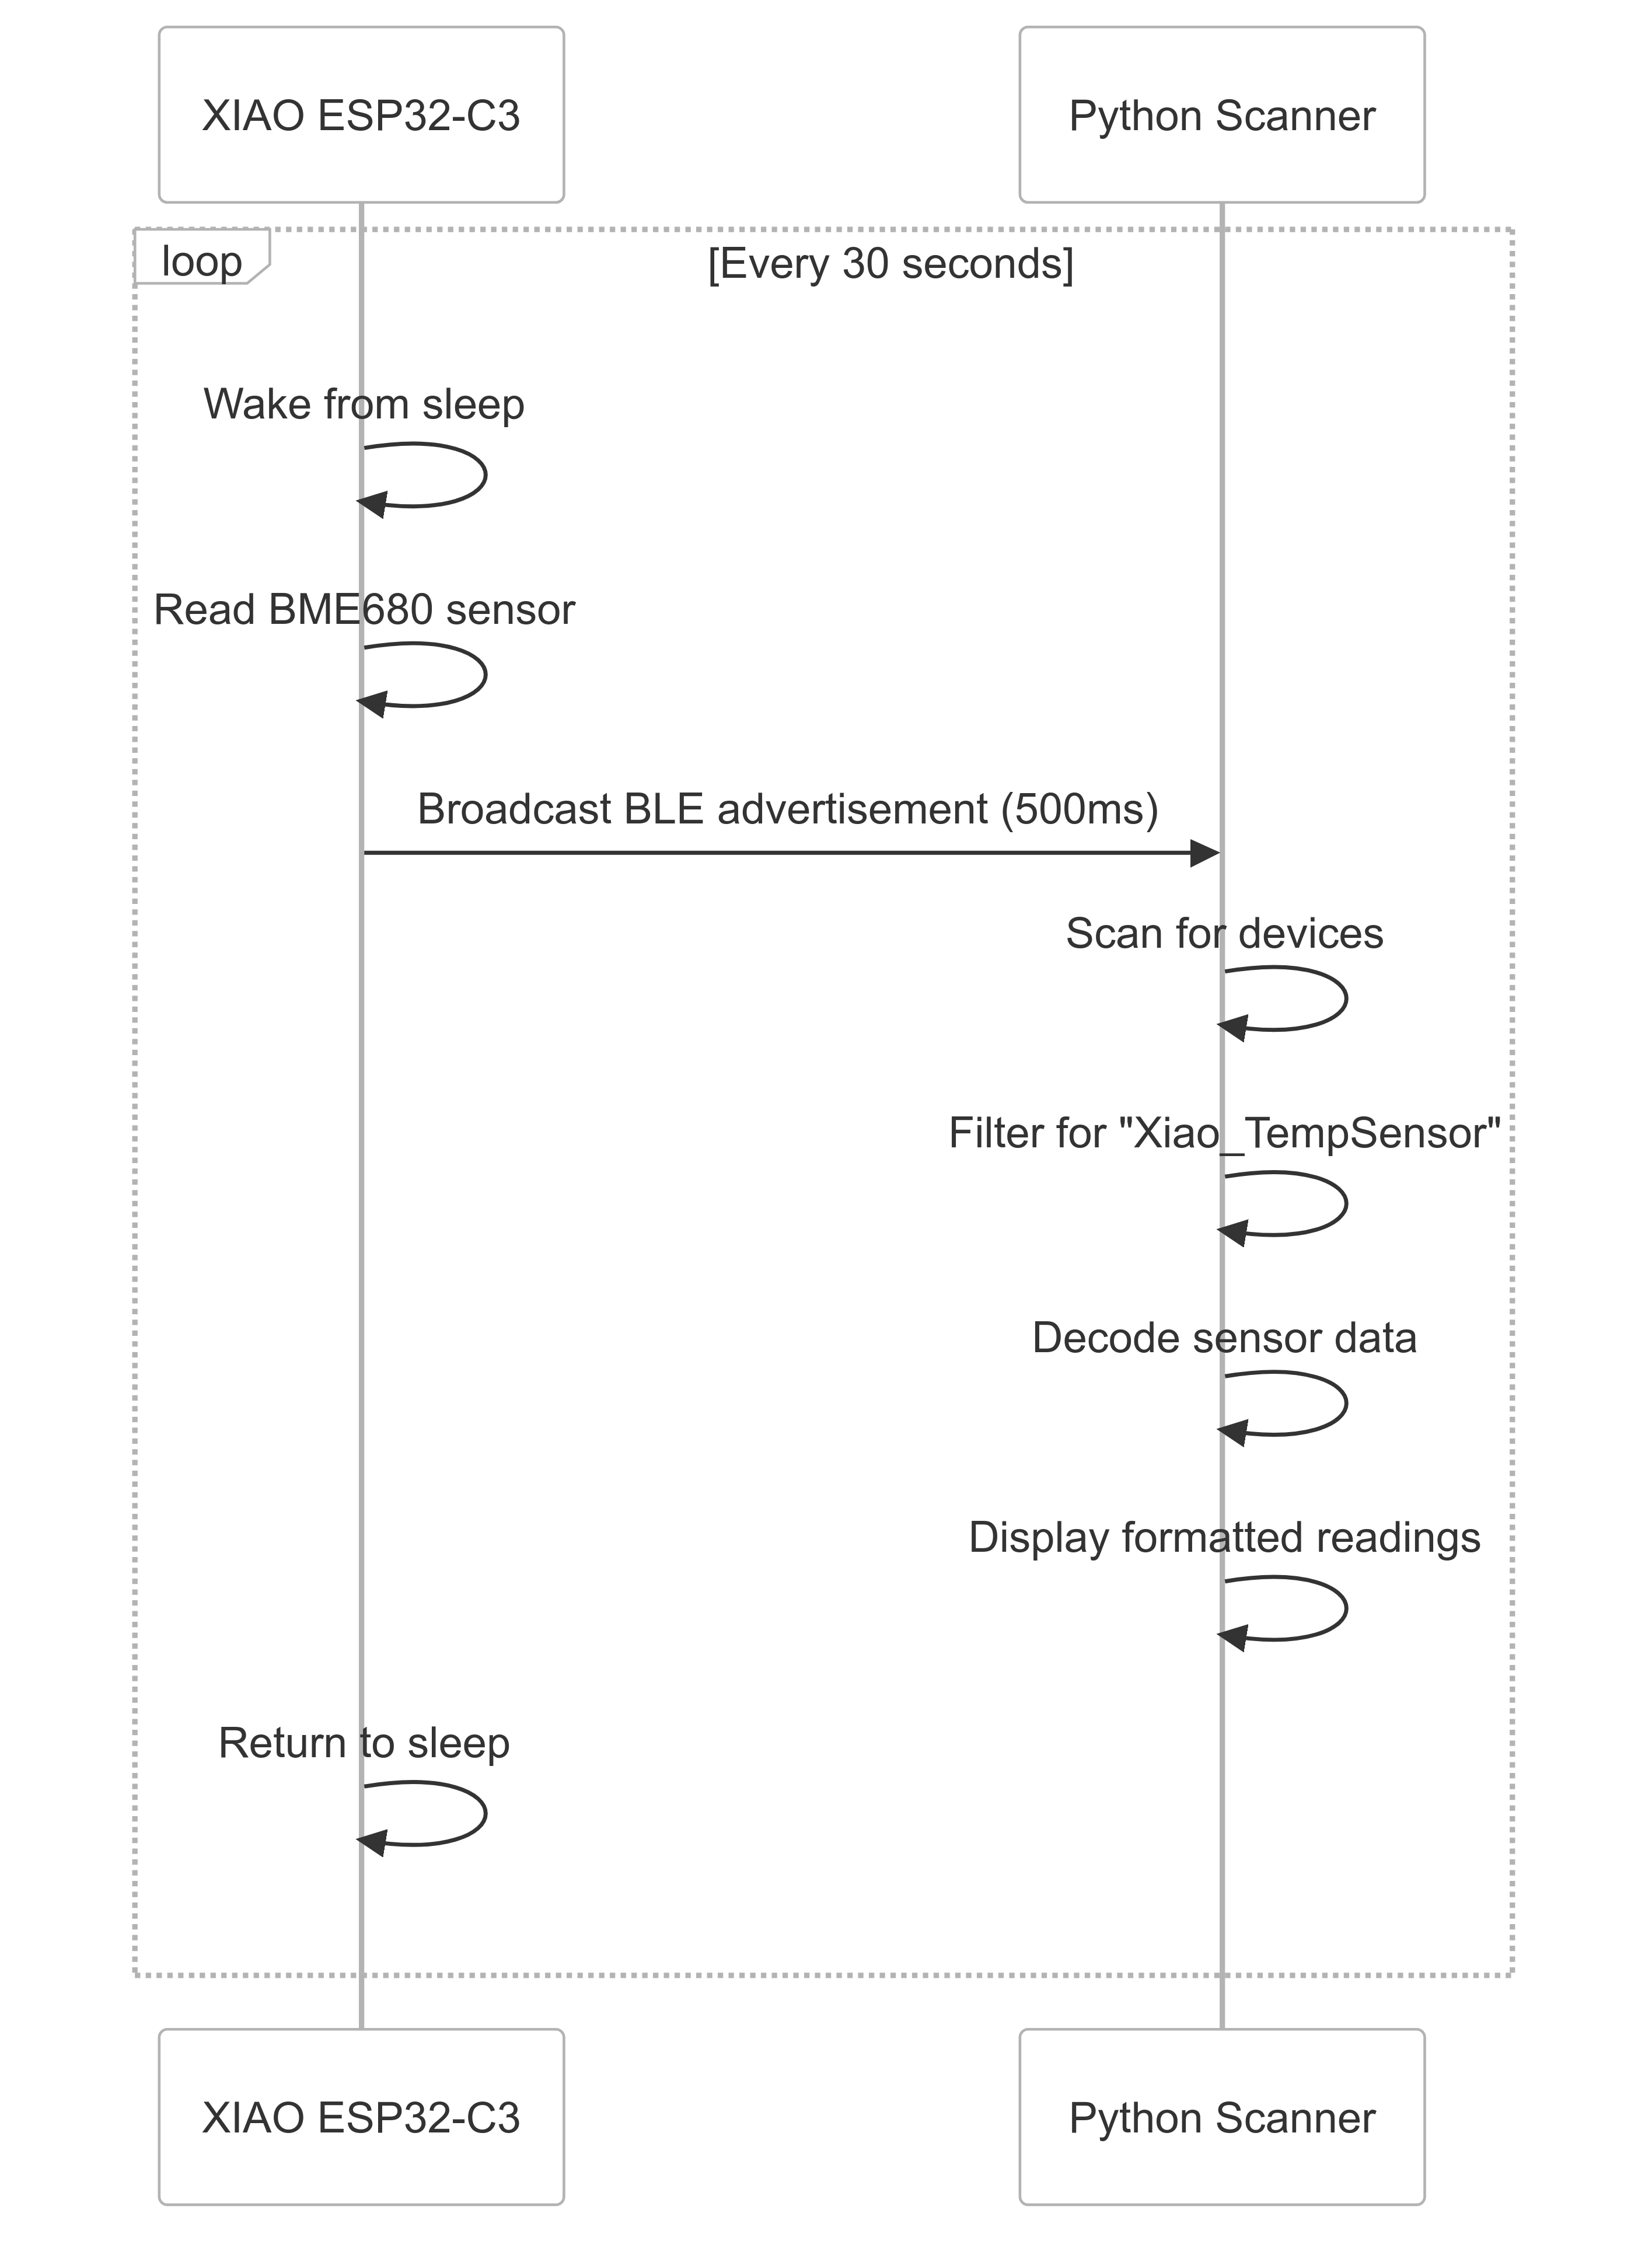
System Flowchart
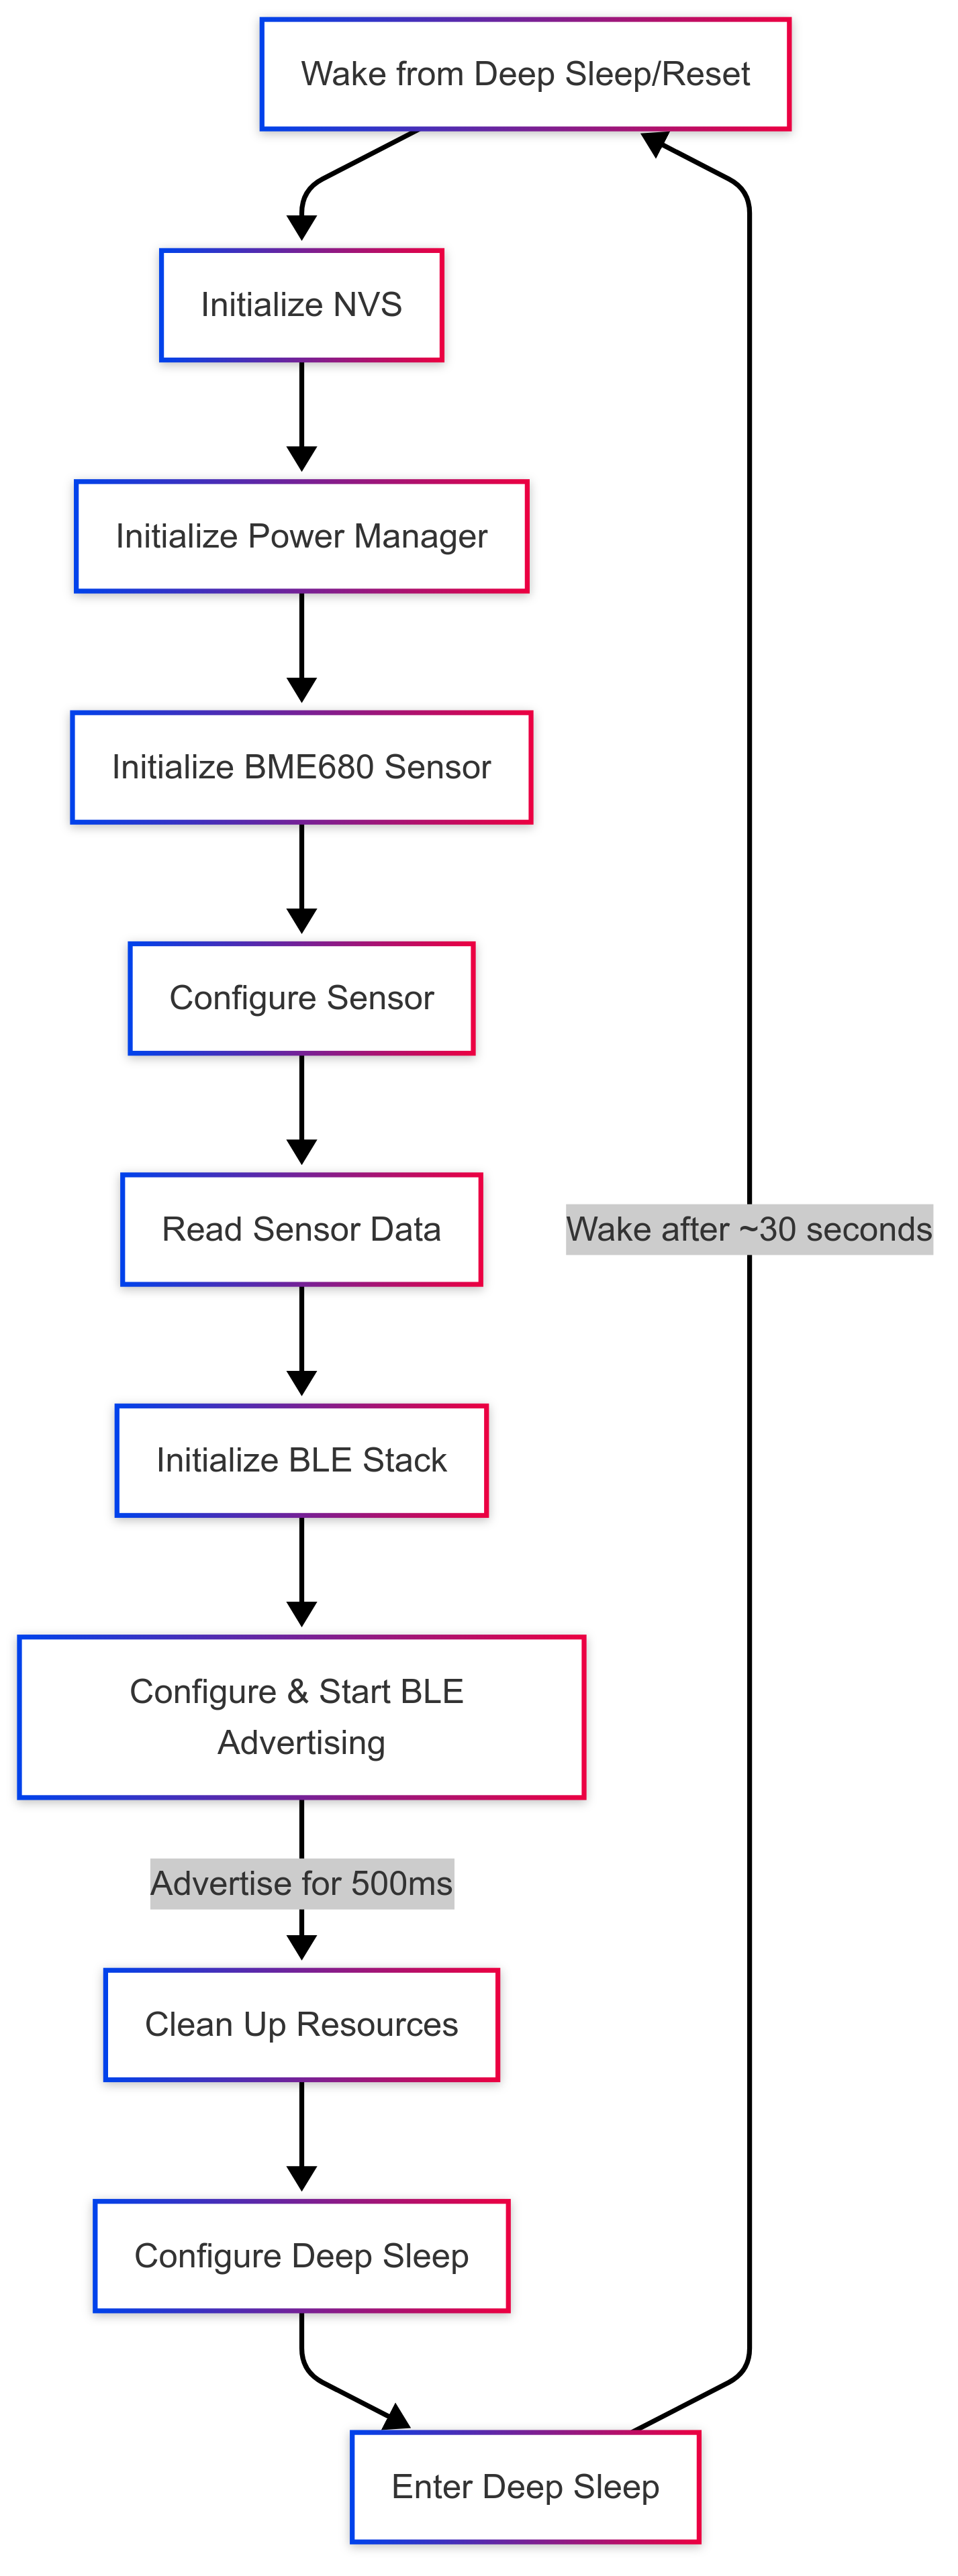
This flowchart illustrates the main operation cycle of our system, from waking up to returning to deep sleep.
Hardware Requirements
| Seeed Studio XIAO ESP32C3 | Seeed Studio Grove Base for XIAO | Grove BME680 Environmental Sensor |
|---|---|---|
 |  | 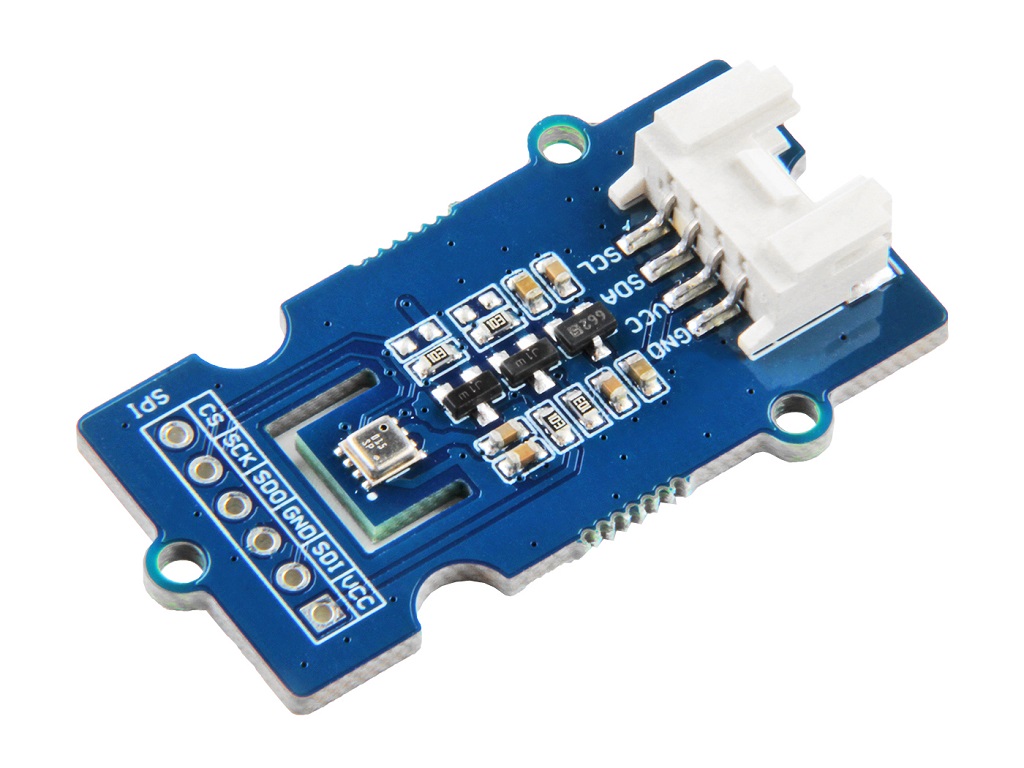 |
- USB Type-C cable
- Computer with ESP-IDF installed
Software Requirements
- ESP-IDF (v5.0 or later)
- Git
- Project GitHub Repository
Step 1: Hardware Setup
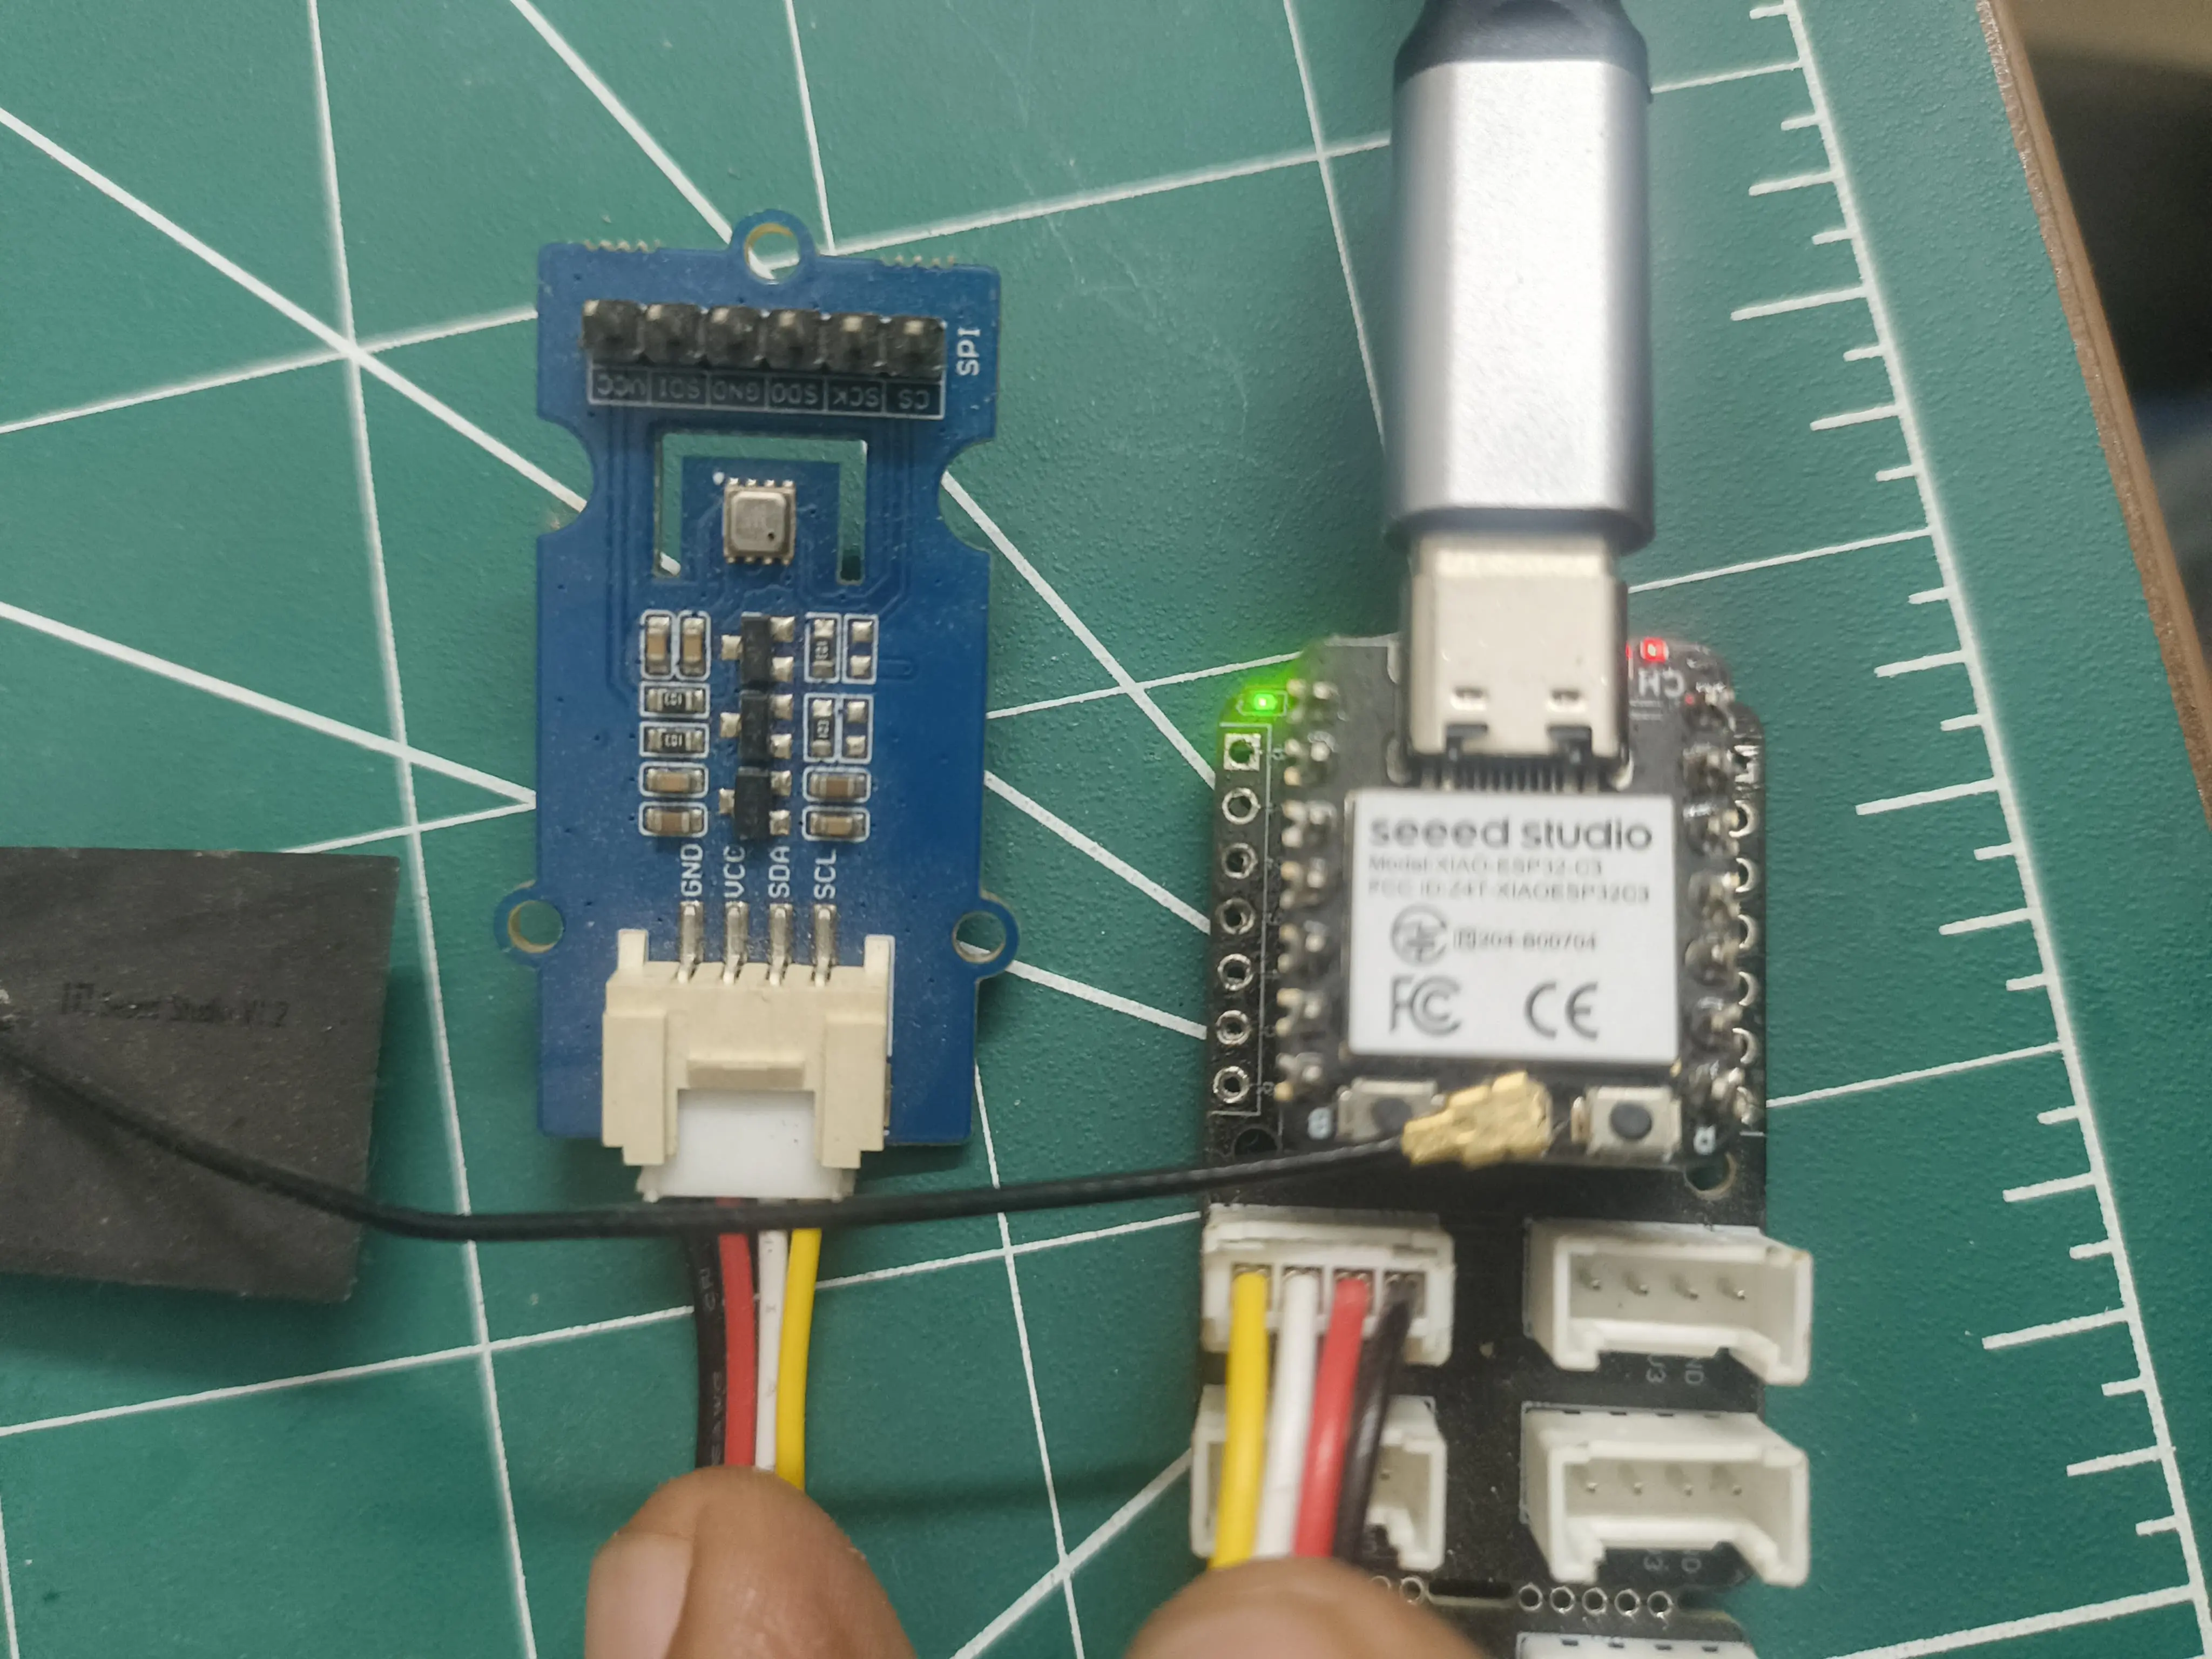
-
Connect the BME680 sensor to the XIAO Expansion Board:
- Connect the Grove BME680 sensor to one of the I2C ports on the XIAO Expansion Board.
- The sensor communicates via I2C, so any I2C-compatible Grove port will work.
-
Mount the XIAO ESP32-C3 on the expansion board:
- Carefully align and insert the XIAO ESP32-C3 module onto the expansion board.
- Ensure the pins are properly aligned and the module is securely seated.
-
Connect to your computer:
- Use a USB Type-C cable to connect the XIAO expansion board to your computer.
Step 2: Setting Up the Development Environment
-
Install ESP-IDF: Follow the official installation instructions for your operating system.
For Linux, you can use:
mkdir -p ~/esp
cd ~/esp
git clone --recursive https://github.com/espressif/esp-idf.git
cd esp-idf
./install.sh
. ./export.sh -
Clone the project repository:
cd ~/Desktop
git clone --recurse-submodules https://github.com/Priyanshu0901/xiao_ibeacon.git
cd xiao_ibeaconcautionThe
--recurse-submodulesflag is critical as the project relies on external libraries included as Git submodules. Without this, compilation will fail.If you've already cloned without submodules, run:
git submodule update --init --recursive
Step 3: Project Structure and Understanding the Components
The project consists of three main components:
-
BME680 Sensor Component (
sensor_t_a_h):- Handles communication with the BME680 sensor
- Manages sensor initialization, reading, and data processing
- Provides temperature, humidity, and pressure data
-
BLE Beacon Component (
ble_beacon):- Configures the BLE stack
- Creates and broadcasts BLE advertisements with sensor data
- Manages BLE initialization and cleanup
-
Power Management Component (
power_manager):- Handles deep sleep functionality
- Manages power-efficient operation
- Controls wake-up sources and sleep duration
Component Interaction
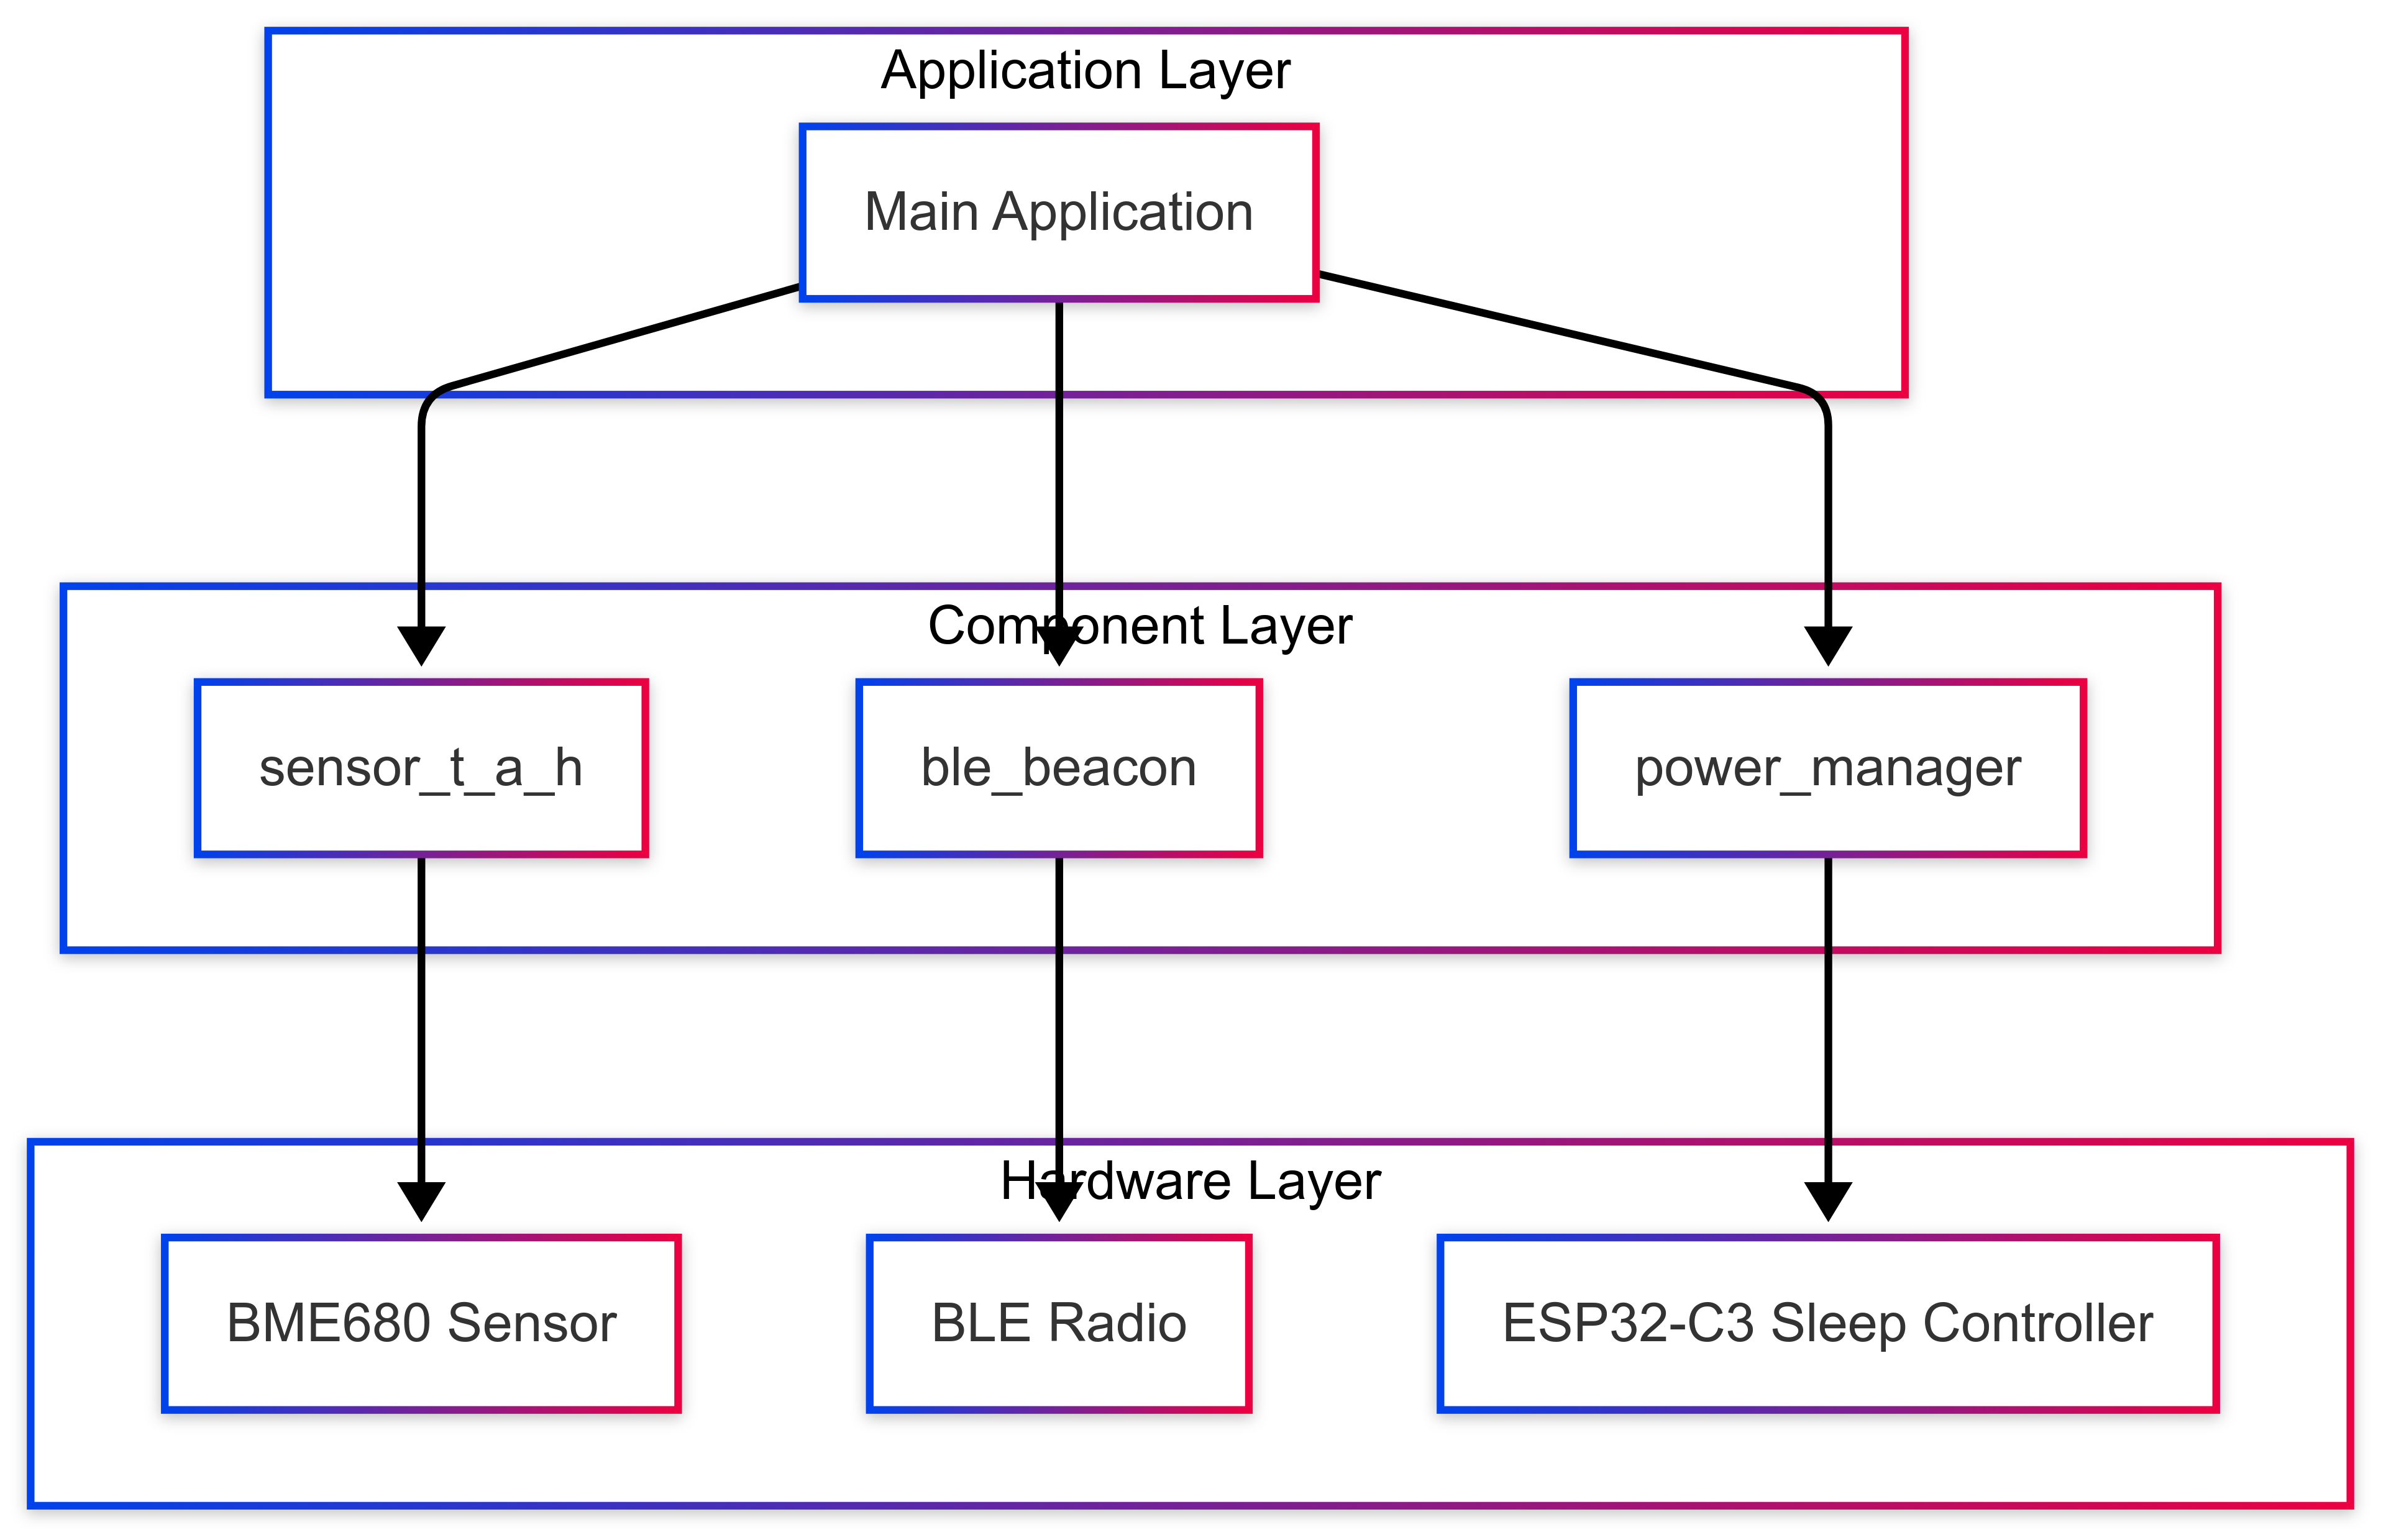
This diagram shows how the different software components interact with the hardware elements of the system.
Step 4: Understanding the Configuration
Before building, let's understand the key configurations:
-
Main Application Settings (in
main.c):ADV_TIME_MS: Duration for BLE advertising (500ms)POLL_INTERVAL_MS: How often to poll the sensor (150ms)TIMEOUT_MS: Maximum time to wait for sensor readings (2000ms)SLEEP_TIME_MS: How long to sleep between measurements (~29.3 seconds)
-
Sensor Configuration (in
components/sensor_t_a_h/Kconfig):menu "BME68X Configuration"
config BME68X_I2C_ADDR
hex "BME68X I2C Address"
default 0x76
help
I2C address of the BME68X sensor. Default is 0x76.
Use 0x77 if SDO pin is pulled high.
choice BME68X_INTERFACE
prompt "BME68X Interface"
default BME68X_USE_I2C
help
Select the interface to use with BME68X sensor.
config BME68X_USE_I2C
bool "I2C Interface"
config BME68X_USE_SPI
bool "SPI Interface"
endchoice
if BME68X_USE_I2C
config BME68X_I2C_PORT
int "I2C Port Number"
range 0 1
default 0
help
I2C port number for BME68X.
config BME68X_I2C_SDA_PIN
int "I2C SDA GPIO"
range 0 48
default 12
help
GPIO pin for I2C SDA.
config BME68X_I2C_SCL_PIN
int "I2C SCL GPIO"
range 0 48
default 13
help
GPIO pin for I2C SCL.
config BME68X_I2C_CLOCK_SPEED
int "I2C Clock Frequency (Hz)"
range 100000 400000
default 100000
help
I2C clock frequency for BME68X. Standard mode (100 KHz) or Fast mode (400 KHz).
endif
endmenu -
BLE Configuration (in
components/ble_beacon/common.h): The BLE device name is defined in thecommon.hfile:#define DEVICE_NAME "Xiao_TempSensor"
Modifying Configuration Parameters
Using ESP-IDF's menuconfig Tool
The ESP-IDF framework provides a powerful configuration tool called menuconfig which offers a text-based UI for modifying project settings. This tool is based on Kconfig, the same configuration system used by the Linux kernel.
To launch the configuration interface:
idf.py menuconfig
This will display a text-based UI with configuration categories:
    Application Configuration  --->
    ESP-IDF Components         --->
    SDK tool configuration     --->
    Compiler options          --->
    Component config          --->
    Bootloader config         --->
    Serial flasher config     --->
Navigation in menuconfig:
- Use
↑and↓arrows to navigate - Press
Enterto enter a submenu - Press
Escto go back - Press
Spaceto toggle options - Press
Yfor 'Yes' andNfor 'No' on boolean options - Press
?for help on the currently selected option - Press
QorEscmultiple times to exit, thenYto save changes
Finding Sensor Configuration:
- Navigate to
Component config - Scroll down to find
BME68X Configuration - Press
Enterto view sensor settings
Finding BLE Configuration:
- Navigate to
Component config - Find and enter
Bluetooth - Select
NimBLE Options - Here you can configure various BLE parameters
Configuring I2C Pins for BME680
To configure the I2C pins for the BME680 sensor:
- In menuconfig, navigate to:
Component config→BME68X Configuration - Select
I2C SDA GPIOto change the SDA pin - Enter the GPIO number for SDA (default is 12, but for XIAO ESP32-C3 with the expansion board, use 6)
- Select
I2C SCL GPIOto change the SCL pin - Enter the GPIO number for SCL (default is 13, but for XIAO ESP32-C3 with the expansion board, use 7)
- If your sensor has a different I2C address, select
BME68X I2C Addressand modify it
Configuring BLE Parameters via menuconfig
While the device name is defined in code, other BLE parameters can be configured via menuconfig:
- Navigate to:
Component config→Bluetooth→NimBLE Options - Here you can modify:
- Maximum number of concurrent connections
- BLE role (Central/Peripheral/Observer/Broadcaster)
- Security settings
- GAP and GATT parameters
- Memory allocations for the BLE stack
Advanced Configuration Options
For advanced users, additional configuration options are available:
-
Power Management:
- Navigate to:
Component config→Power Management - Enable/disable automatic light sleep
- Configure DFS (Dynamic Frequency Scaling)
- Navigate to:
-
Flash Encryption:
- Navigate to:
Security features - Configure flash encryption options for secure deployments
- Navigate to:
-
Partition Table:
- Navigate to:
Partition Table - Modify flash partitioning for different application needs
- Navigate to:
-
Logging:
- Navigate to:
Component config→Log output - Configure debug log levels and output destinations
- Navigate to:
After making your changes, press Q to exit and Y to save changes. Then rebuild the project with:
idf.py build
Changing the BLE Device Name
To change the BLE device name, you need to modify the DEVICE_NAME macro in components/ble_beacon/common.h:
-
Open the file:
nano components/ble_beacon/common.h -
Find the
DEVICE_NAMEdefinition and change it to your desired name:#define DEVICE_NAME "MyCustomSensor" -
Save the file and rebuild the project.
Step 5: Building and Flashing the Project
-
Navigate to the project directory:
cd ~/Desktop/xiao_ibeacon -
Configure the project:
idf.py set-target esp32c3
idf.py menuconfig
Navigate through the menu to check or adjust settings:
- Component Config → BME680 Sensor Settings
- Component Config → BLE Beacon Settings
- Component Config → Power Management
-
Build the project:
idf.py build -
Flash the project to XIAO ESP32-C3:
idf.py -p /dev/ttyUSB0 flashNote: Your port might be different (Windows: COM3, COM4, etc.)
-
Monitor the output (optional):
idf.py -p /dev/ttyUSB0 monitorPress Ctrl+] to exit the monitor.
Step 6: Testing the iBeacon
-
Download a BLE Scanner app on your smartphone:
- iOS: "LightBlue" or "nRF Connect"
- Android: "nRF Connect" or "BLE Scanner"
-
Open the app and scan for BLE devices:
- Look for a device named "Xiao_TempSensor"
- Select the device to view its advertisement data
-
Understand the Advertisement Data: The BLE advertisement contains:
- Temperature (in degrees Celsius, scaled by 100)
- Humidity (in percent)
- Pressure (in hPa, scaled by 10)
-
Expected Behavior:
- The device wakes up approximately every 30 seconds
- It takes readings from the BME680 sensor
- It broadcasts this data for 500ms
- It then enters deep sleep to conserve power
Python Test Scripts
The project includes Python scripts to help test and validate the BLE beacon functionality. Let's explore them:
Setting Up the Python Environment
-
Navigate to the test scripts directory:
cd ~/Desktop/xiao_ibeacon/test_scripts -
Run the setup script to create and configure a virtual environment:
# On Linux/macOS
chmod +x setup_venv.sh
./setup_venv.sh

# On Windows
setup_venv.bat -
Activate the virtual environment:
# On Linux/macOS
source venv/bin/activate

# On Windows
venv\Scripts\activate
The setup script will install the required packages:
bleak: For BLE communicationcolorama: For colored terminal output
Using the BLE Scanner Script
The BLE scanner script (ble_beacon_scanner.py) scans for BLE advertisements and displays sensor data from our beacon.
Key features of the scanner:
- Looks for a device named "Xiao_TempSensor"
- Decodes the manufacturer-specific data to extract temperature, humidity, and pressure
- Displays values in a formatted terminal UI
- Continuously updates as new advertisements are received
To run the scanner:
python ble_beacon_scanner.py
The script will display a nicely formatted output with the latest sensor readings:
╔═══════════════════════════════════════════════╗
║ Xiao Temperature Sensor Beacon Scanner        ║
╠═══════════════════════════════════════════════╣
║ Last Update: 15:42:27                         ║
║ Signal Strength: -63 dBm                      ║
╠═══════════════════════════════════════════════╣
║ Temperature: 23.45 °C                         ║
║ Humidity: 48 %                                ║
║ Pressure: 1013.2 hPa                          ║
╠═══════════════════════════════════════════════╣
║ Press Ctrl+C to exit                          ║
╚═══════════════════════════════════════════════╝
If you enable debug mode in the script by setting DEBUG_MODE = True, you'll see additional information about the BLE advertisements and data parsing.
Beacon Data Format
The beacon transmits data in a compressed format to fit within BLE advertisement limitations:
- Company ID: 0x02E5 (Espressif Systems)
- Temperature: 16-bit signed integer, scaled by 100 (divide by 100 to get °C)
- Humidity: 8-bit unsigned integer (direct percentage value)
- Pressure: 16-bit unsigned integer, scaled by 10 (divide by 10 to get hPa)
The Python script decodes this format and displays the actual values.
Flow of the Test Process
Step 7: How It Works - Deep Dive
Sensor Initialization and Reading
The BME680 sensor is initialized with the following steps:
- I2C Configuration: Sets up I2C communication on the appropriate pins (for XIAO ESP32-C3 with the expansion board, GPIO6/GPIO7 for SDA/SCL)
- Sensor Initialization: Configures the BME680 sensor with settings for temperature, humidity, pressure, and gas measurements
- Reading Process: Initiates a measurement and waits for data to be ready
- Data Processing: Converts raw sensor values to human-readable measurements

BLE Advertisement
The BLE functionality operates as follows:
- BLE Stack Initialization: Sets up the ESP32's BLE stack
- Advertisement Configuration: Configures advertisement parameters (interval, data format)
- Data Packaging: Takes sensor readings and packages them into manufacturer-specific data
- Advertisement Start/Stop: Controls the advertisement timing

Power Management
The power management system uses the ESP32-C3's built-in sleep capabilities:
- Deep Sleep Configuration: Uses ESP-IDF's sleep API (
esp_sleep_enable_timer_wakeup()) to configure the wake-up timer - Wake-up Source: Sets up timer as the only wake-up source (the system will wake after a specified duration)
- Sleep Entry: Safely shuts down active peripherals before entering deep sleep with
esp_deep_sleep_start() - Wake-up Process: When timer expires, the system performs a reset and restarts the application from the beginning

The power management component (power_manager.c) provides a simple interface for handling sleep modes:
// Initialize power manager
power_manager_init();

// Later, when it's time to sleep:
power_manager_enter_deep_sleep(30000); // Sleep for 30 seconds
When the device enters deep sleep, power consumption drops dramatically (to around 10-20 μA), allowing long battery life. The device completely shuts down and will reboot when the timer expires, so any state that needs to be preserved must be stored in RTC memory or non-volatile storage.
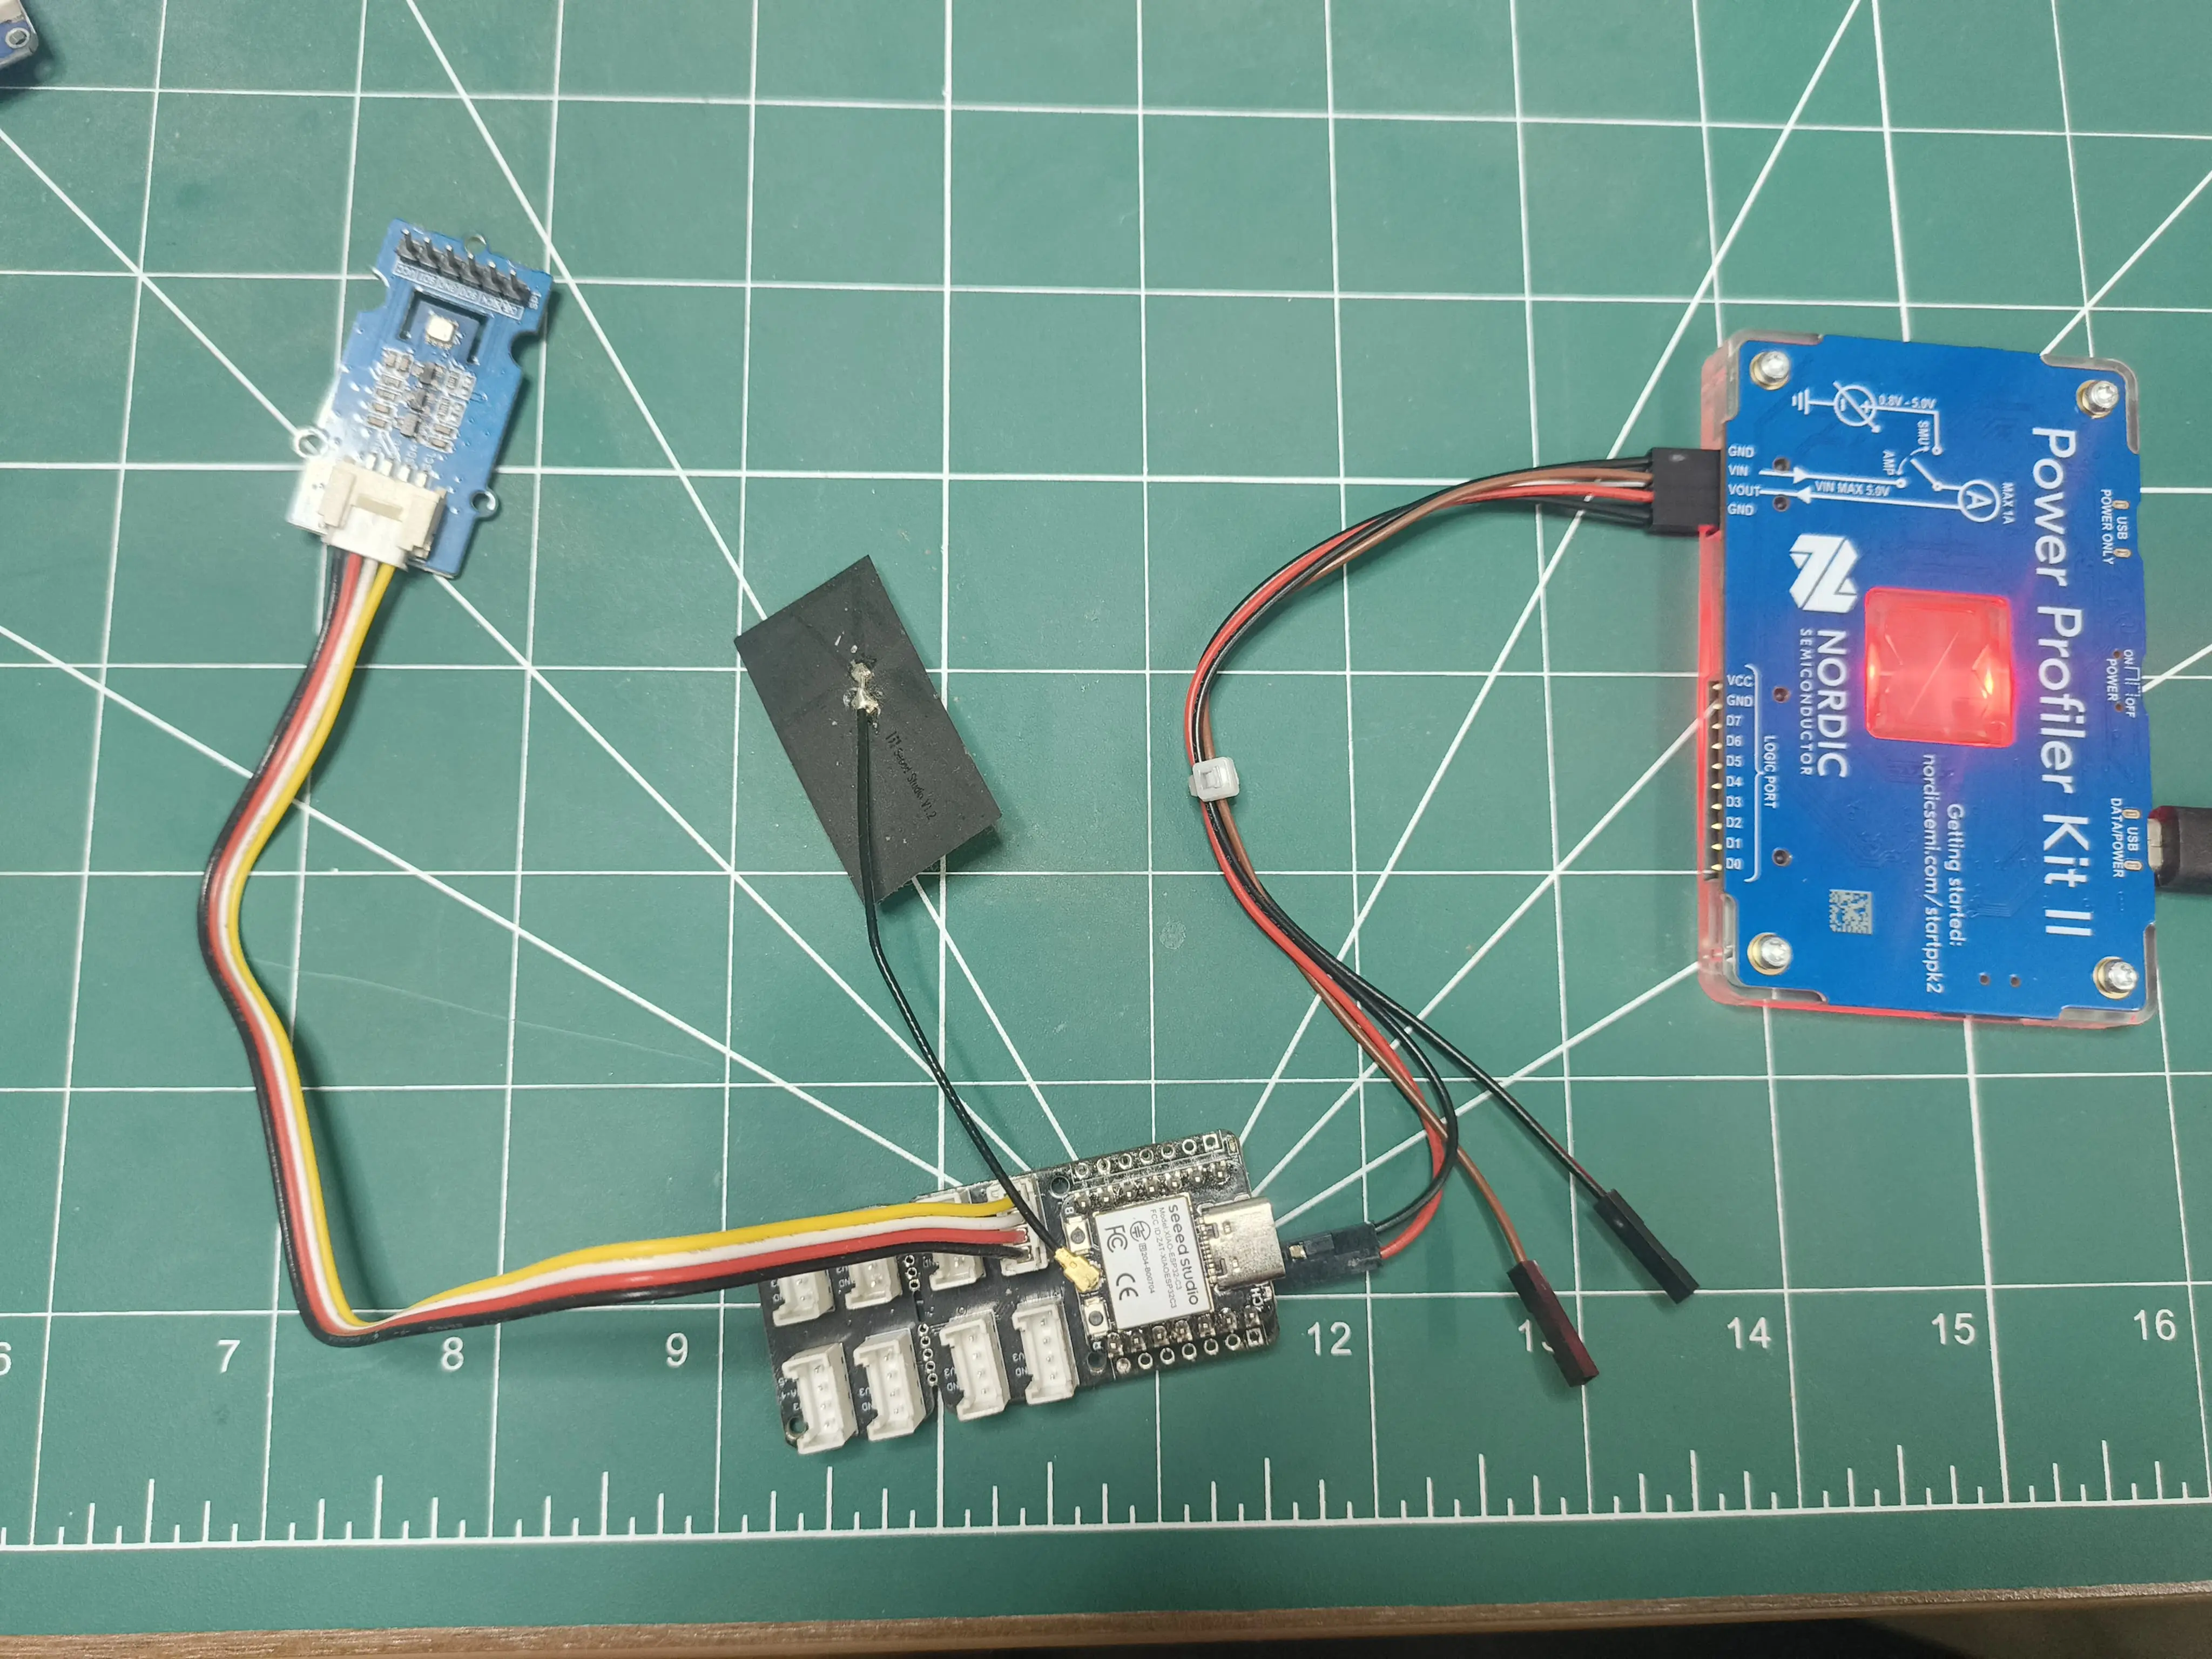
Power Consumption Profile
Power Profiling Setup
Power Profiles
The system has distinct power usage phases as shown in the power profile below:

Power Phases:
- Sleep Phase: ~150μA in deep sleep mode (ESP32-C3 RTC controller active + bme680 sleep)
- Wake & Initialize: ~40mA during startup and sensor initialization
- Active BLE Advertising: ~16mA peak during BLE transmission
- Cleanup & Sleep Entry: ~5mA during resource cleanup before sleep entry
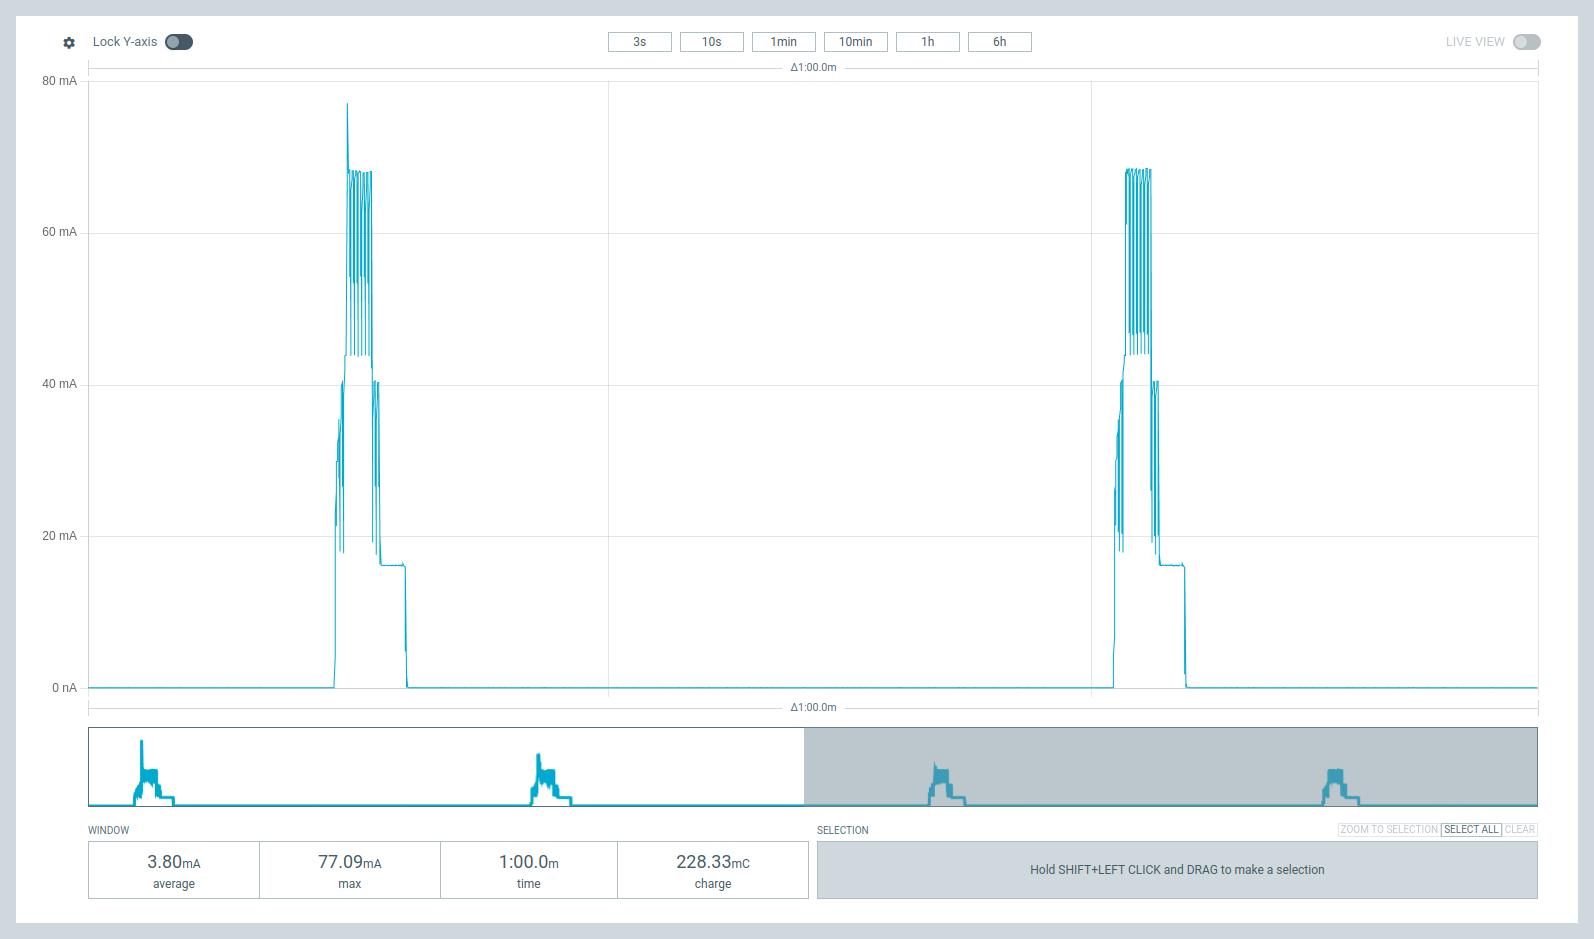
Battery Life Calculation:
- Average current in deep sleep (28 secs): 150μA
- Average current during active phase (2 secs): ~40mA
- Effective average current: 3.92 mA (measured over 1 minute)
- With a typical 1500 mAh Li-Ion battery:
- 1500 mAh ÷ 3.92 mA ≈ 382 hours ≈ 15.9 days
Power Optimization Tips:
- Reduce advertising time to minimize high-current periods
- Use lowest feasible advertising power
- Disable unused peripherals
- Optimize sensor reading process
- Consider extending sleep duration
Step 8: Customizing the Project
You can customize various aspects of the project:
-
Change the Sleep Duration:
- Edit
SLEEP_TIME_MSinmain.cto adjust how often readings are taken
- Edit
-
Modify Sensor Settings:
- Use
idf.py menuconfigto change sensor sampling rates, filters, etc.
- Use
-
Adjust BLE Parameters:
- Change the device name or advertisement interval in the BLE beacon component
-
Add Additional Sensors:
- Extend the sensor component to include other Grove sensors
Adding Your Own Sensor
To integrate a different sensor into this project, follow these steps:
-
Create a New Sensor Component:
# Create component directory structure
mkdir -p components/my_new_sensor/include
touch components/my_new_sensor/CMakeLists.txt
touch components/my_new_sensor/Kconfig
touch components/my_new_sensor/my_new_sensor.c
touch components/my_new_sensor/include/my_new_sensor.h -
Implement the Component Interface:
- Define initialization function
- Create data reading functions
- Set up any necessary configuration
Example header file (
my_new_sensor.h):#pragma once
#include <stdbool.h>
#include "esp_err.h"
typedef struct {
float value1;
float value2;
// Additional sensor values
} my_sensor_data_t;
/**
* @brief Initialize the sensor
* @return ESP_OK on success
*/
esp_err_t my_sensor_init(void);
/**
* @brief Read data from the sensor
* @param data Pointer to structure to store readings
* @return ESP_OK on success
*/
esp_err_t my_sensor_read(my_sensor_data_t *data); -
Configure Build System: Example
CMakeLists.txt:idf_component_register(
SRCS "my_new_sensor.c"
INCLUDE_DIRS "include"
REQUIRES driver
) -
Update Main Application:
- Add your component to the main application's dependencies
- Initialize your sensor in the main application flow
- Include your sensor's readings in the BLE advertisement data
Example integration in
main.c:#include "my_new_sensor.h"
void app_main(void) {
// Initialize other components
// ...
// Initialize your new sensor
ESP_ERROR_CHECK(my_new_sensor_init());
// Read from your sensor
my_sensor_data_t sensor_data;
ESP_ERROR_CHECK(my_sensor_read(&sensor_data));
// Modify BLE data to include your sensor readings
// ...
} -
Extend BLE Advertising Data:
- Update the BLE beacon component to include your sensor data in advertisements
- Assign appropriate data type IDs for your new measurements
-
Update Configuration:
- Add Kconfig options for your sensor in
components/my_new_sensor/Kconfig - This allows users to configure your sensor through menuconfig
- Add Kconfig options for your sensor in
By following this structured approach, you can seamlessly integrate additional sensors while maintaining the project's modular architecture.
Troubleshooting
Important Tips
No Serial Output During Normal Operation
For optimal power efficiency, the device doesn't output debug information through the serial port during normal operation. The LED will also not flash when the device is in deep sleep mode. This is intentional to minimize power consumption.
Reflashing the Device
To reflash the device:
- Press the reset button on the XIAO board when you start the flash process
- Time your flash command to coincide with the brief active period (when the device is not in deep sleep)
- Alternatively, hold the reset button, start the flash command, and release the reset button when the flash begins
Re-enabling Debug Output for Development
When developing your own modules or debugging, you can re-enable serial output:
- Run
idf.py menuconfig - Navigate to
Component config→Log output - Set the default log level to
INFOorDEBUG - Configure the log output destination as
UART0 - Remember to disable verbose logging again before deploying to preserve battery life
Sensor Not Detected
If you encounter issues with sensor detection:
-
Check Connections:
- Ensure the Grove cable is properly connected to both the sensor and the expansion board
- Verify you're using an I2C Grove port
-
I2C Address Issues:
- The default I2C address for BME680 is 0x76. Some modules might use 0x77.
- Edit the I2C address in the configuration if needed
-
Power Issues:
- Ensure the XIAO is getting enough power
- Try a different USB cable or port
BLE Not Advertising
If BLE advertisements aren't detected:
-
Check BLE Scanner App:
- Try a different BLE scanner app
- Ensure Bluetooth is enabled on your phone
-
Monitor Debug Output:
- Use
idf.py monitorto check for error messages
- Use
-
Advertising Duration:
- The default setting only advertises for 500ms. If you miss it, increase
ADV_TIME_MSinmain.c
- The default setting only advertises for 500ms. If you miss it, increase
Build or Flash Failures
If you encounter build or flash issues:
-
ESP-IDF Version:
- Ensure you're using ESP-IDF v5.0 or newer
- Run
. $IDF_PATH/export.sh(Linux/macOS) or%IDF_PATH%\export.bat(Windows) before commands
-
USB Connection:
- Verify the USB connection is stable
- Try pressing the reset button on the XIAO expansion board before flashing
-
Port Issues:
- Identify the correct port with
ls /dev/tty*(Linux/macOS) or Device Manager (Windows) - Use the
-pflag with the correct port
- Identify the correct port with
Conclusion
You've now built a power-efficient environmental monitoring system that uses BLE to broadcast temperature, humidity, pressure, and air quality data. This project demonstrates several important concepts:
- Sensor Integration: Working with I2C sensors in ESP-IDF
- BLE Communication: Creating and managing BLE advertisements
- Power Management: Implementing deep sleep for battery-efficient operation
- ESP-IDF Development: Using Espressif's official framework for ESP32 development
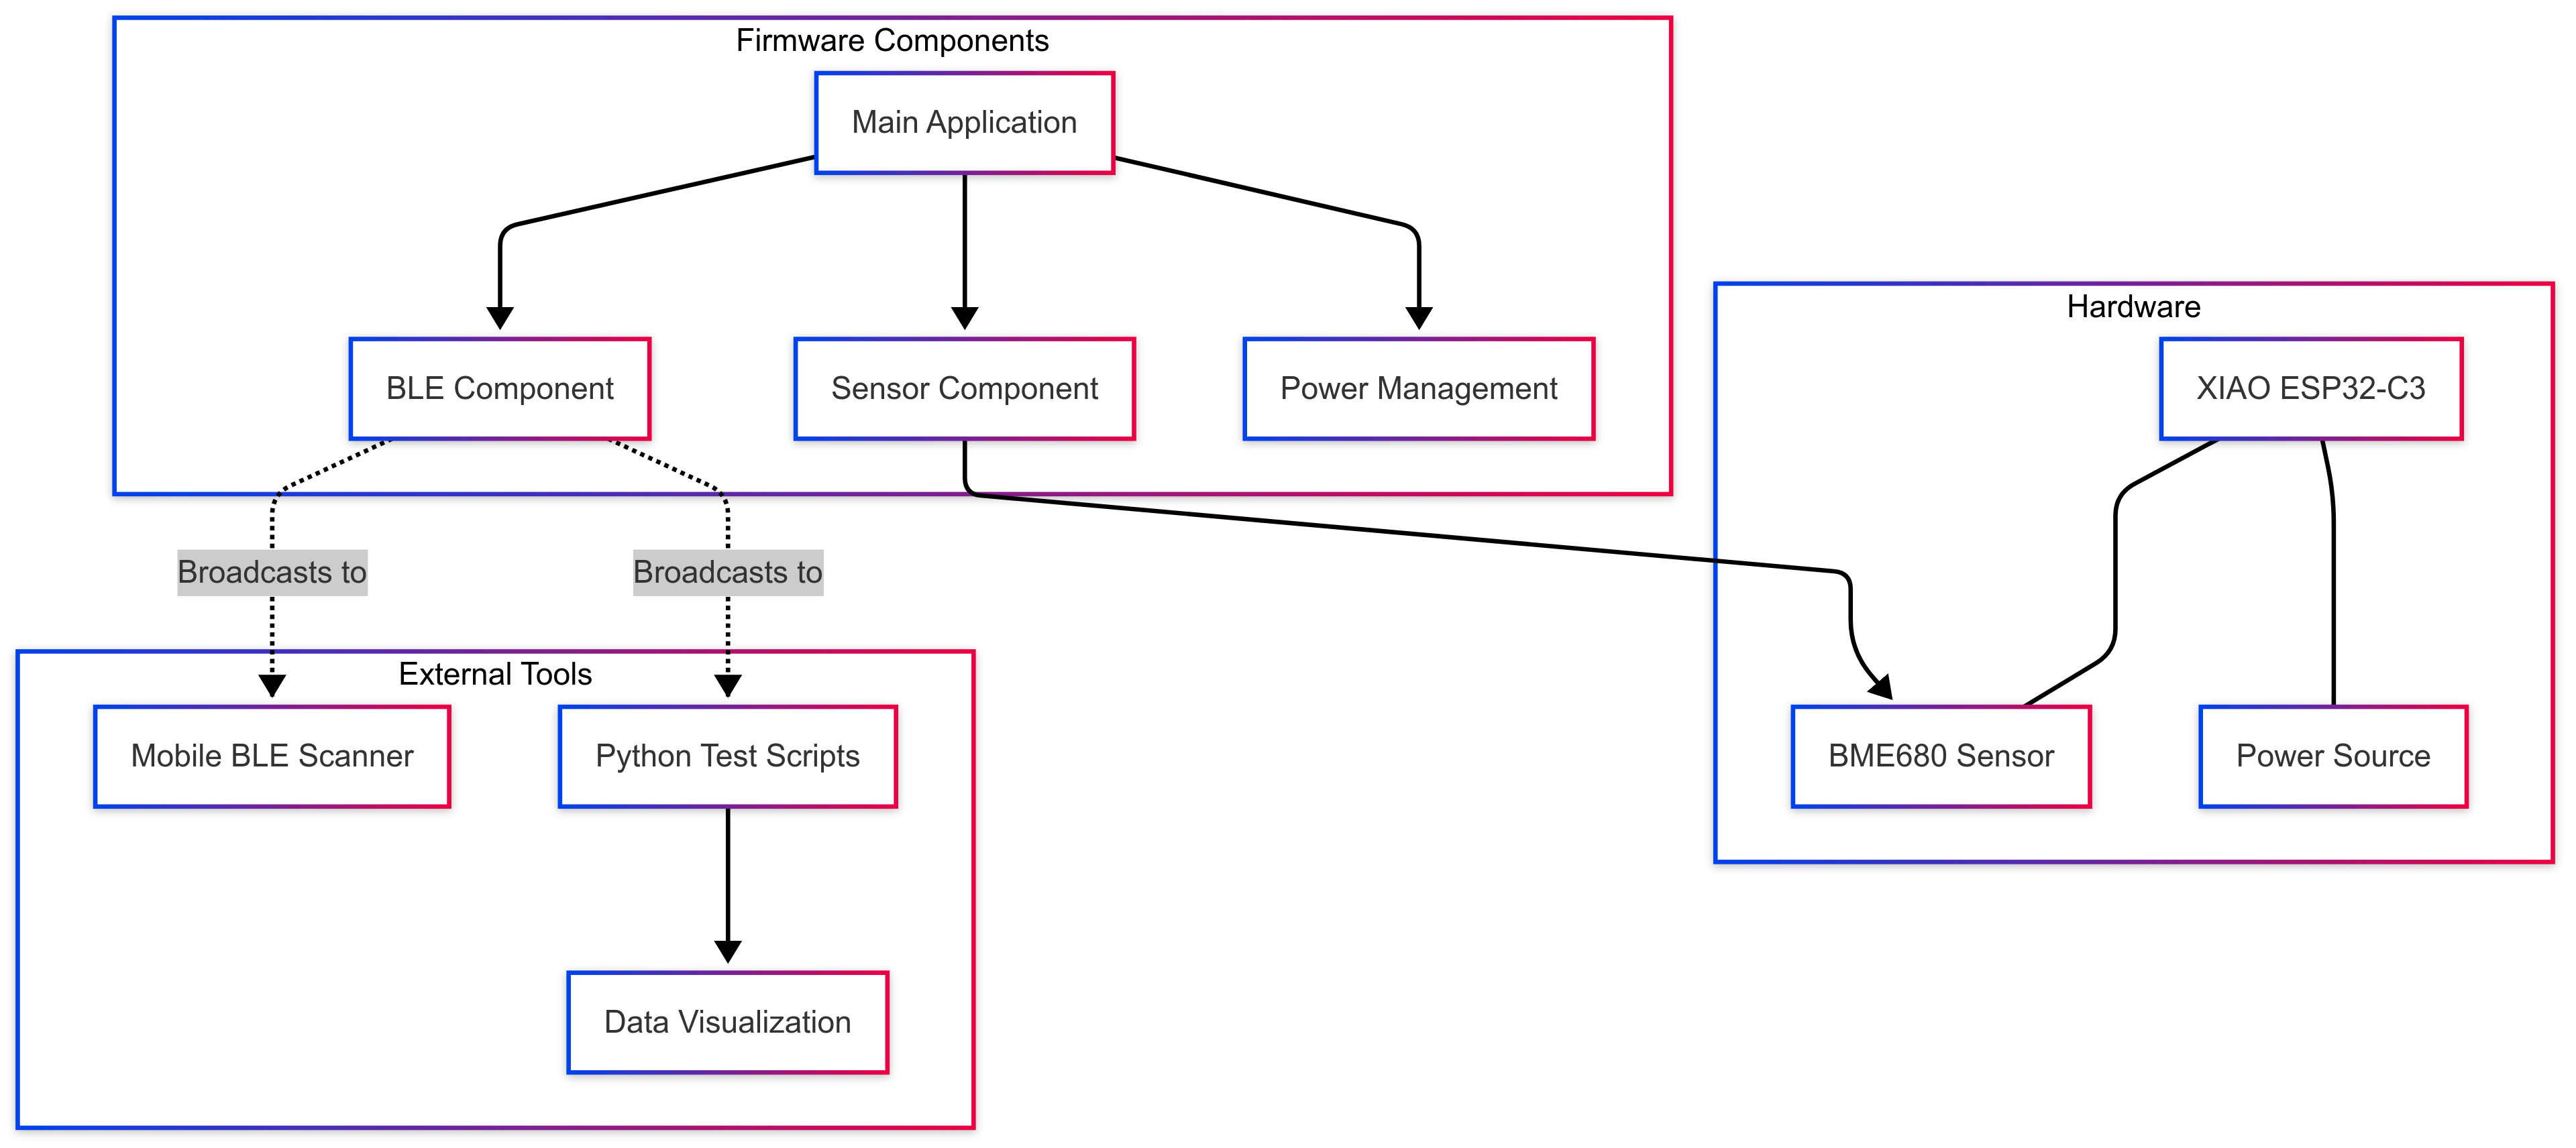
Overall System Architecture
This foundation can be extended to create more complex IoT sensor nodes, environmental monitoring systems, or asset tracking solutions.
Resources
✨ Contributor Project
- This project is supported by the Seeed Studio Contributor Project.
- A special thanks to Priyanshu Roy for his dedicated efforts. Your work will be exhibited.
Tech Support & Product Discussion
Thank you for choosing our products! We are here to provide you with different support to ensure that your experience with our products is as smooth as possible. We offer several communication channels to cater to different preferences and needs.