Seeed Studio XIAO RP2040 with NuttX(RTOS)
Introduction
NuttX is a mature real-time operating system (RTOS) widely recognized for its standards compliance and small footprint. One of NuttX's main features is its scalability, which allows it to be used in environments ranging from 8-bit microcontrollers to 64-bit systems. This flexibility is achieved through adherence to POSIX and ANSI standards, enabling you to experiment with similar NuttX features across a wide range of chips from different architectures, families, and semiconductor vendors.

Additionally, NuttX offers many advanced and useful features, such as USB, Ethernet, Audio, and Graphics subsystems. These characteristics make NuttX an attractive choice for developers seeking a versatile, robust RTOS capable of operating on various types of hardware.
NuttX supports a vast and continually expanding number of boards. The official documentation provides a comprehensive list of supported boards, organized by architecture and System-on-Chip (SoC) series.
For instance, the Seeed Studio Xiao RP2040 page in the NuttX documentation offers detailed descriptions of each supported feature and instructions on how to utilize them.
Tools Setup
The first step to get started with NuttX is to install a series of required tools, a toolchain for the architecture you will be working with and, finally, download NuttX source code itself. The Nuttx provides a guide to different platforms.
After installing and setting up the environment, follow these steps:
- Download Raspberry Pi Pico SDK:
git clone -b 1.1.2 https://github.com/raspberrypi/pico-sdk.git
- Set PICO_SDK_PATH enviroment variable:
export PICO_SDK_PATH=<absolute_path_to_pico-sdk_directory>
- Create a workspace
mkdir nuttxspace
- Clone the repositories
cd nuttxspace
git clone https://github.com/apache/nuttx.git nuttx
git clone https://github.com/apache/nuttx-apps apps
The Apache Nuttx it's divided into two project:
- Nuttx: contains implemented the kernel, driver and subsystems.
- Apps: contains a collection of tools, shells, network utilities, libraries and interpreters.
Applications
To start an application it's necessary to load a configuration on NuttX, calling the command:
./tools/configurate.sh board_name:your_application
Also it's possible to check the list of board-supported a running the command:
./tools/configurate.sh -L
Once the script is run, the NuttX must be compiled. There are two possibilities to do that using: Make or CMake.
Programming
Successful compilation was guaranteed, the next goal it's programming using BOOTSEL. For that, you must follow these steps:
Step 1: Connect the Seed Stduio XIAO RP2040 to USB port while pressing button B (boot). The board will be detected as USB Mass Storage Device RPI-RP2.
Step 2: In the workspace, go to nuttx and copy nuttx.uf2 into the Seed Stduio XIAO RP2040.
Step 3: Search for a new USB device on your computer.
Step 4: Open a serial communication with Seed Stduio XIAO RP2040.
Hands-on
It's time to explore NuttX practically. In this session, four applications are available: USB NSH, GPIO, USERLEDS, and WS2812 driver.
USBNSH
The NuttXShell(NSH) is a shell system to be used in NuttX, similar to bash and other similar options. It supports a rich set of included commands, scripting and the ability to run your own applications as “builtin” (part of the same NuttX binary).
We can start the build process clearing the previous configuration
cd ~/nuttxspace/nuttx
make distclean
Now we select the USBNSH configuration to the seeed-xiao-rp2040 board:
./tools/configurate.sh seeed-xiao-rp2040:usbnsh
Compile the source code.
make -j
After programming and open serial communication
picocom -b 115200 /dev/ttyACM0
You must to press Enter 3 times, and then this message will show in the terminal.
NuttShell (NSH) NuttX-12.5.1
nsh>
Typing ?, you will access the available options for commands and built-in applications.
nsh> ?
help usage: [-v] [<cmd>]

    .           cp          exec        ls          reboot      truncate
    [           cmp         exit        mkdir       rm          uname
    ?           dirname     expr        mkrd        rmdir       umount
    alias       date        false       mount       set         unset
    unalias     dd          fdinfo      mv          sleep       uptime
    basename    df          free        pidof       source      usleep
    break       dmesg       help        printf      test        xd
    cat         echo        hexdump     ps          time
    cd          env         kill        pwd         true

Builtin Apps:
    getprime    hello       nsh         ostest      sh
Let's say hello to NuttX, type hello and then it executes the command:
nsh> hello
Hello, World!!
Congratulations, your first interation with NuttX was completed.
GPIO Driver
The General Purpose Input/Output (GPIO) is a microcontroller's most fundamental part, allowing it to connect to the external world. This way we will use the NSH to access and configure those pins as we wish. But first, let's clear the previous configuration.
cd ~/nuttxspace/nuttx
make distclean
Select the gpio configuration to the seeed-xiao-rp2040 board.
./tools/configurate.sh seeed-xiao-rp2040:gpio
Compile de the source code.
make -j
After programming and open serial communication
picocom -b 115200 /dev/ttyACM0
You must to press Enter 3 times, and then this message will show in the terminal.
NuttShell (NSH) NuttX-12.5.1
nsh>
To check which options are accepted to interact with this application, type gpio -h, and it will return a list of parameters.
NuttShell (NSH) NuttX-12.5.1
nsh> gpio -h
USAGE: gpio [-t <pintype>] [-w <signo>] [-o <value>] <driver-path>
       gpio -h
Where:
 <driver-path>: The full path to the GPIO pin driver.
 -t <pintype>:  Change the pin to this pintype (0-10):
 -w <signo>:    Wait for a signal if this is an interrupt pin.
 -o <value>:    Write this value (0 or 1) if this is an output pin.
mation and exit.
Pintypes:
  0: GPIO_INPUT_PIN
  1: GPIO_INPUT_PIN_PULLUP
IO_INPUT_PIN_PULLDOWN
  3: GPIO_OUTPUT_PIN
  4: GPIO_OUTPUT_PIN_OPENDRAIN
  5: GPIO_INTERRUPT_PIN
  6: GPIO_INTERRUPT_HIGH_PIN
  7: GPIO_INTERRUPT_LOW_PIN
  8: GPIO_INTERRUPT_RISING_PIN
  9: GPIO_INTERRUPT_FALLING_PIN
 10: GPIO_INTERRUPT_BOTH_PIN
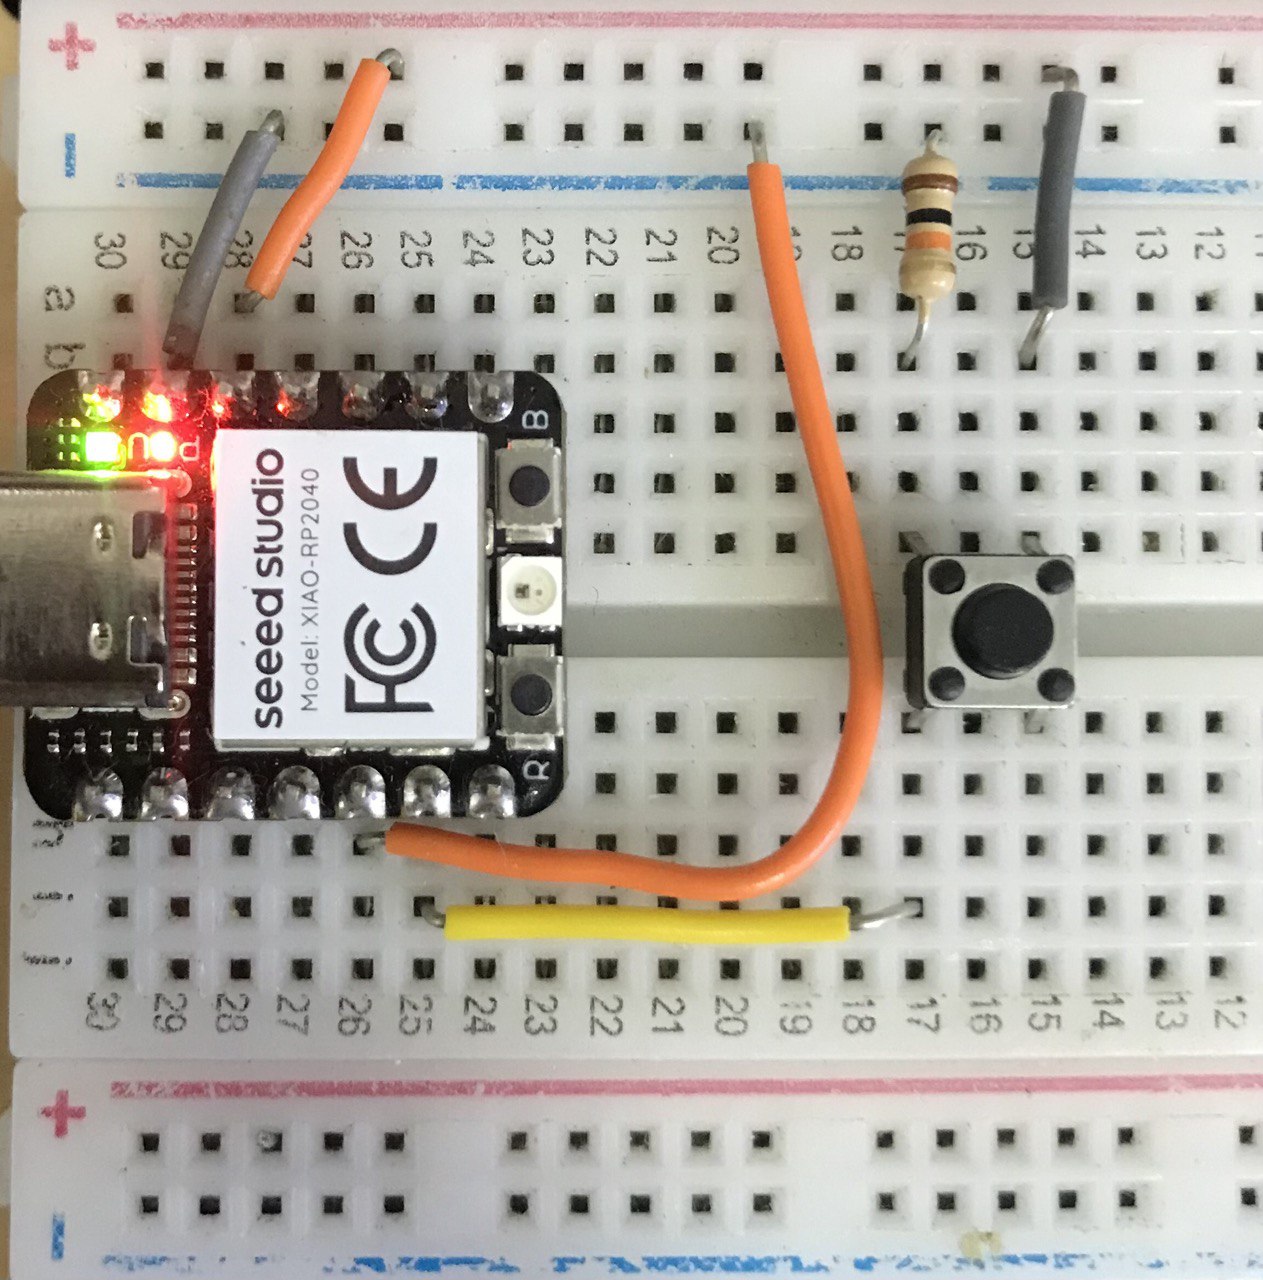
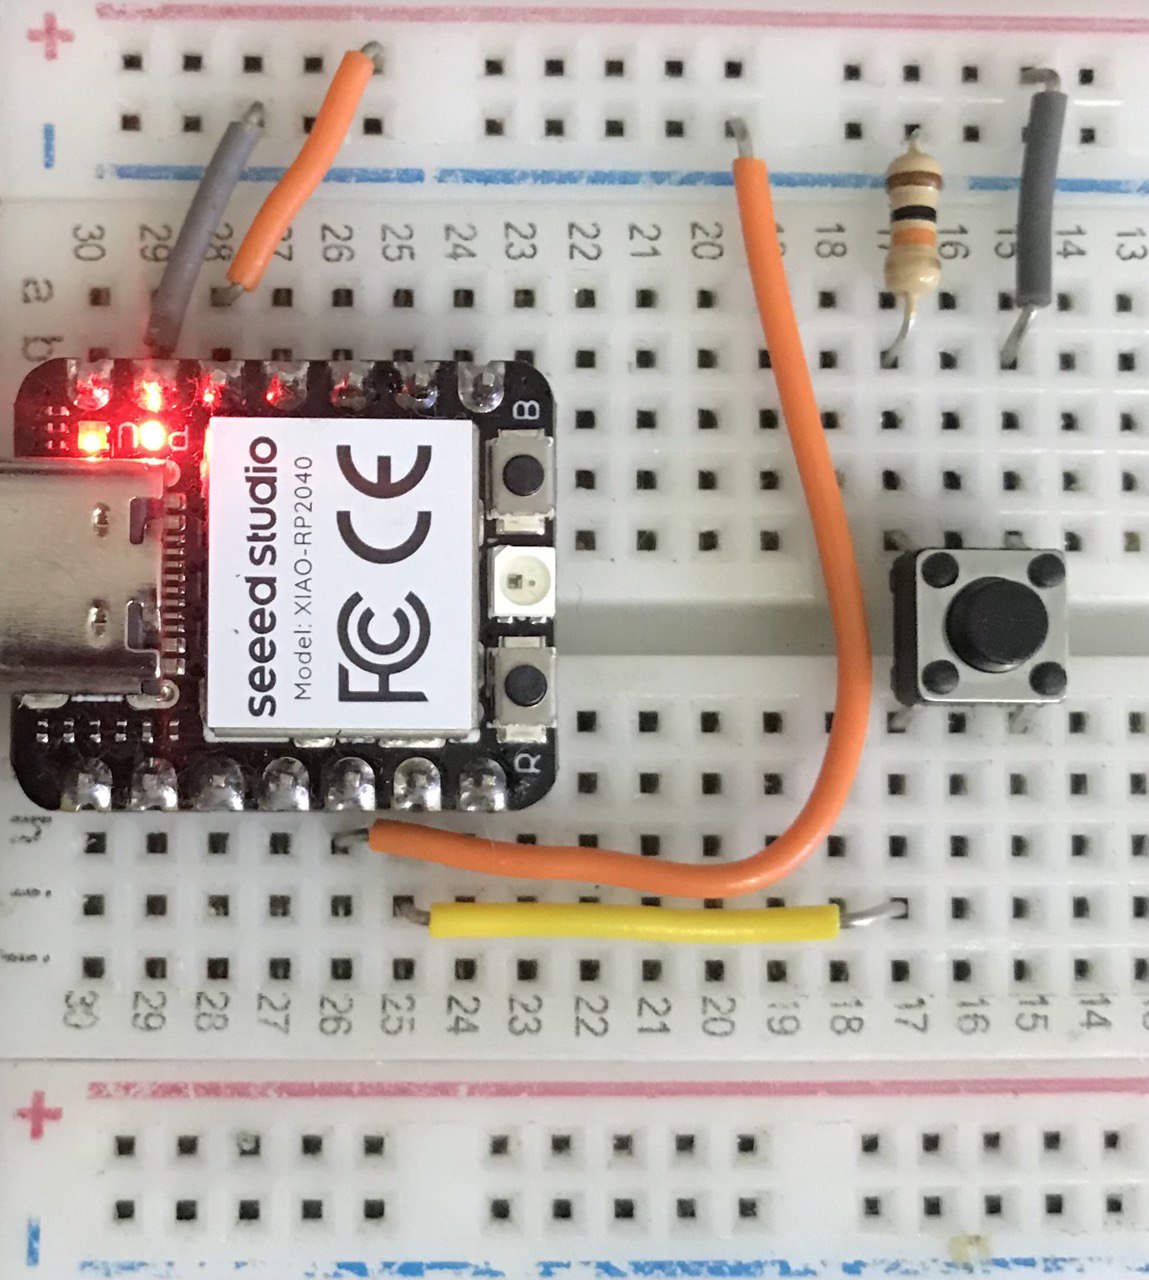
To confirm the GPIO device files were created, type ls/dev. After typing, you can see some gpios were declared define on seed-studio-gpio.c, which represent :
- 3 LED On board (gpio 18, gpio 17 and gpio 16).
- 1 Intput (gpio 6)
- 1 Interrupt Input (gpio 7)
nsh> ls /dev
/dev:
 console
 gpio16
 gpio17
 gpio18
 gpio6
 gpio7
 null
 ttyACM0
According to the Seeed Studio RP2040 schematic, the board's LEDs turn on when the GPIO level is set to zero.
To control the GPIO output, you must pass the parameter —o, a value (zero or one), and the path (/dev/gpio).
Following these two commands you see the yellow LED blinking.
nsh> gpio -o 0 /dev/gpio17
Driver: /dev/gpio17
  Output pin:    Value=1
  Writing:       Value=0
  Verify:        Value=0

nsh> gpio -o 1 /dev/gpio17
Driver: /dev/gpio17
  Output pin:    Value=1
  Writing:       Value=1
  Verify:        Value=1
The same way, you will have the same result to red LED.
nsh> gpio -o 0 /dev/gpio16
Driver: /dev/gpio16
  Output pin:    Value=1
  Writing:       Value=0
  Verify:        Value=0

nsh> gpio -o 1 /dev/gpio16
Driver: /dev/gpio16
  Output pin:    Value=1
  Writing:       Value=1
  Verify:        Value=1
USERLED
The USERLEDS is a subsystem that allows to control of the LEDs with single operation. Also, you can use commands-line like the printf. In this demo we will turn on and turn off the LED on-board each 1 seconds.
First, clear the previous configuration.
cd ~/nuttxspace/nuttx
make distclean
Configure the board for userled application using the command:
./tools/configurate.sh seeed-xiao-rp2040:userleds
Compile de the source code.
make -j
After programming, open serial communication and press Enter 3 times, following the same steps showed previous application.
If you type: ls /dev/, will show a list of devices, and observe userleds file was created.
nsh> ls /dev/
/dev:
 console
 userleds
 null
 ttyACM0
 ttyS0
Typing leds, you observe the LEDs blinky same time.
NuttShell (NSH) NuttX-12.5.1
nsh> leds
leds_main: Starting the led_daemon
leds_main: led_daemon started

led_daemon (pid # 3): Running
led_daemon: Opening /dev/userled
led_daemon: Supported LEDs 0x07
led_daemon: LED set 0x01
led_daemon: LED set 0x00
led_daemon: LED set 0x01
led_daemon: LED set 0x00
WS2812 LED
The WS2812 driver allows control of any smart pixels that use the ws2812 protocol. This application over NSH allows one to call a command to perform the sample.
Clear the previous configuration
cd ~/nuttxspace/nuttx
make distclean
Select the ws2812 configuration to the seeed-xiao-rp2040 board.
./tools/configurate.sh seeed-xiao-rp2040:ws2812
Compile de the source code.
make -j
Compile finished, go to programming the board, open serial communication and press Enter 3 times, following the same steps showed previous application. Typing ?, will see the ws2812 application available.
NuttShell (NSH) NuttX-12.5.1
nsh> ?
help usage:  help [-v] [<cmd>]

    .           cp          exit        mkdir       rm          uname
    [           cmp         expr        mkrd        rmdir       umount
    ?           dirname     false       mount       set         unset
    alias       dd          fdinfo      mv          sleep       uptime
    unalias     df          free        pidof       source      usleep
    basename    dmesg       help        printf      test        xd
    break       echo        hexdump     ps          time
    cat         env         kill        pwd         true
    cd          exec        ls          reboot      truncate

Builtin Apps:
    getprime    hello       nsh         ostest      sh          ws2812
nsh>
Before running the application, it's important to confirm that the folder ls /dev/ was created the leds0 file, which will be used for the ws2812 drive.
nsh> ls /dev/
/dev:
 console
 leds0
 null
 ttyACM0
 ttyS0
Typing ws2812 -h will return a list of parameters that are accepted to interact with this application.
nsh> ws2812 -h
Usage: ws2812 [OPTIONS]

Arguments are "sticky".  For example, once the device path is
specified, that path will be re-used until it is changed.
  [-p path] selects the ws2812 device.  Default: /dev/leds0 Current: /dev/leds0
  [-l leds] selects number of ws2812s in the chain.  Default: 1 Current: 1
  [-r repeat] selects the number change cycles.  Default: 4 Current: 4
  [-d delay] selects delay between updates.  Default: 20000 us Current: 20000 us
Let's start our application, type ws2812 and you see the LEDs changing the color.
nsh> ws2812
Tech Support & Product Discussion
Thank you for choosing our products! We are here to provide you with different support to ensure that your experience with our products is as smooth as possible. We offer several communication channels to cater to different preferences and needs.