DAPLink Debugger
Introducion
Welcome to the official user manual for the XIAO Debug Mate’s DAPLink functionality. This comprehensive guide is designed to help both beginners and advanced users unlock the full potential of their XIAO Debug Mate for professional debugging tasks. Here, you will learn how to connect, configure, and operate the DAPLink debugger, understand essential software tools, and follow best practices to ensure a smooth and productive debugging experience with a wide range of XIAO series development boards. Whether you are troubleshooting complex firmware or streamlining your development workflow, this document provides clear step-by-step instructions, tips, and in-depth technical explanations to support your projects from start to finish.
An Explanation of Some Debugger Concepts
To effectively use the XIAO Debug Mate's DAPLink functionality, it's helpful to understand the key software components and protocols that work together to make debugging possible. Here’s a breakdown of each concept and how they relate to one another.
GDB
GDB, the GNU Project Debugger, is the core engine of the debugging process. It is a powerful command-line tool that runs on your host computer (PC). GDB is responsible for controlling the execution of your program on the target microcontroller. It allows you to:
- Start and stop your program.
- Set breakpoints to pause execution at specific lines of code.
- Step through your code line-by-line.
- Inspect the values of variables and the contents of memory registers.
Most modern Integrated Development Environments (IDEs) like VS Code (with PlatformIO) or Eclipse provide a graphical user interface that acts as a front-end for GDB, translating your clicks into GDB commands.
OpenOCD/PyOCD
OpenOCD (Open On-Chip Debugger) and PyOCD are essential "server" applications that run on your host computer. They act as a bridge or translator between the high-level commands from GDB and the low-level signals required by the physical debug probe (in this case, the XIAO Debug Mate).
When GDB issues a command like "read the value of variable x," OpenOCD receives this command, translates it into a sequence of instructions that the debug probe understands, and sends these instructions to the probe over USB.
DAPLink
DAPLink is the open-source firmware running on the XIAO Debug Mate's ESP32-S3 microcontroller. This firmware turns the Debug Mate into a fully functional debug probe. Its primary job is to implement the CMSIS-DAP protocol, allowing it to receive debugging commands from a host computer via USB and physically interact with the target chip's debug pins (SWD). In essence, DAPLink is the "agent" on the device that executes the orders sent by OpenOCD.
CMSIS-DAP
CMSIS-DAP (Cortex Microcontroller Software Interface Standard - Debug Access Port) is a standardized protocol that defines how a host computer communicates with a debug probe over USB. Because the XIAO Debug Mate's DAPLink firmware adheres to this standard, it is instantly compatible with a wide range of industry-standard tools like OpenOCD, PyOCD, and Keil MDK, without needing any proprietary drivers or software.
Telnet
Telnet is a simple, text-based network protocol. In the context of debugging, OpenOCD often opens a Telnet server on a specific port (commonly port 4444). This provides a direct, human-readable command-line interface to the OpenOCD server itself. While GDB is used for application-level debugging, the Telnet interface is useful for advanced tasks like configuring OpenOCD, inspecting the state of the debug probe, or issuing low-level reset commands.
How They Work Together
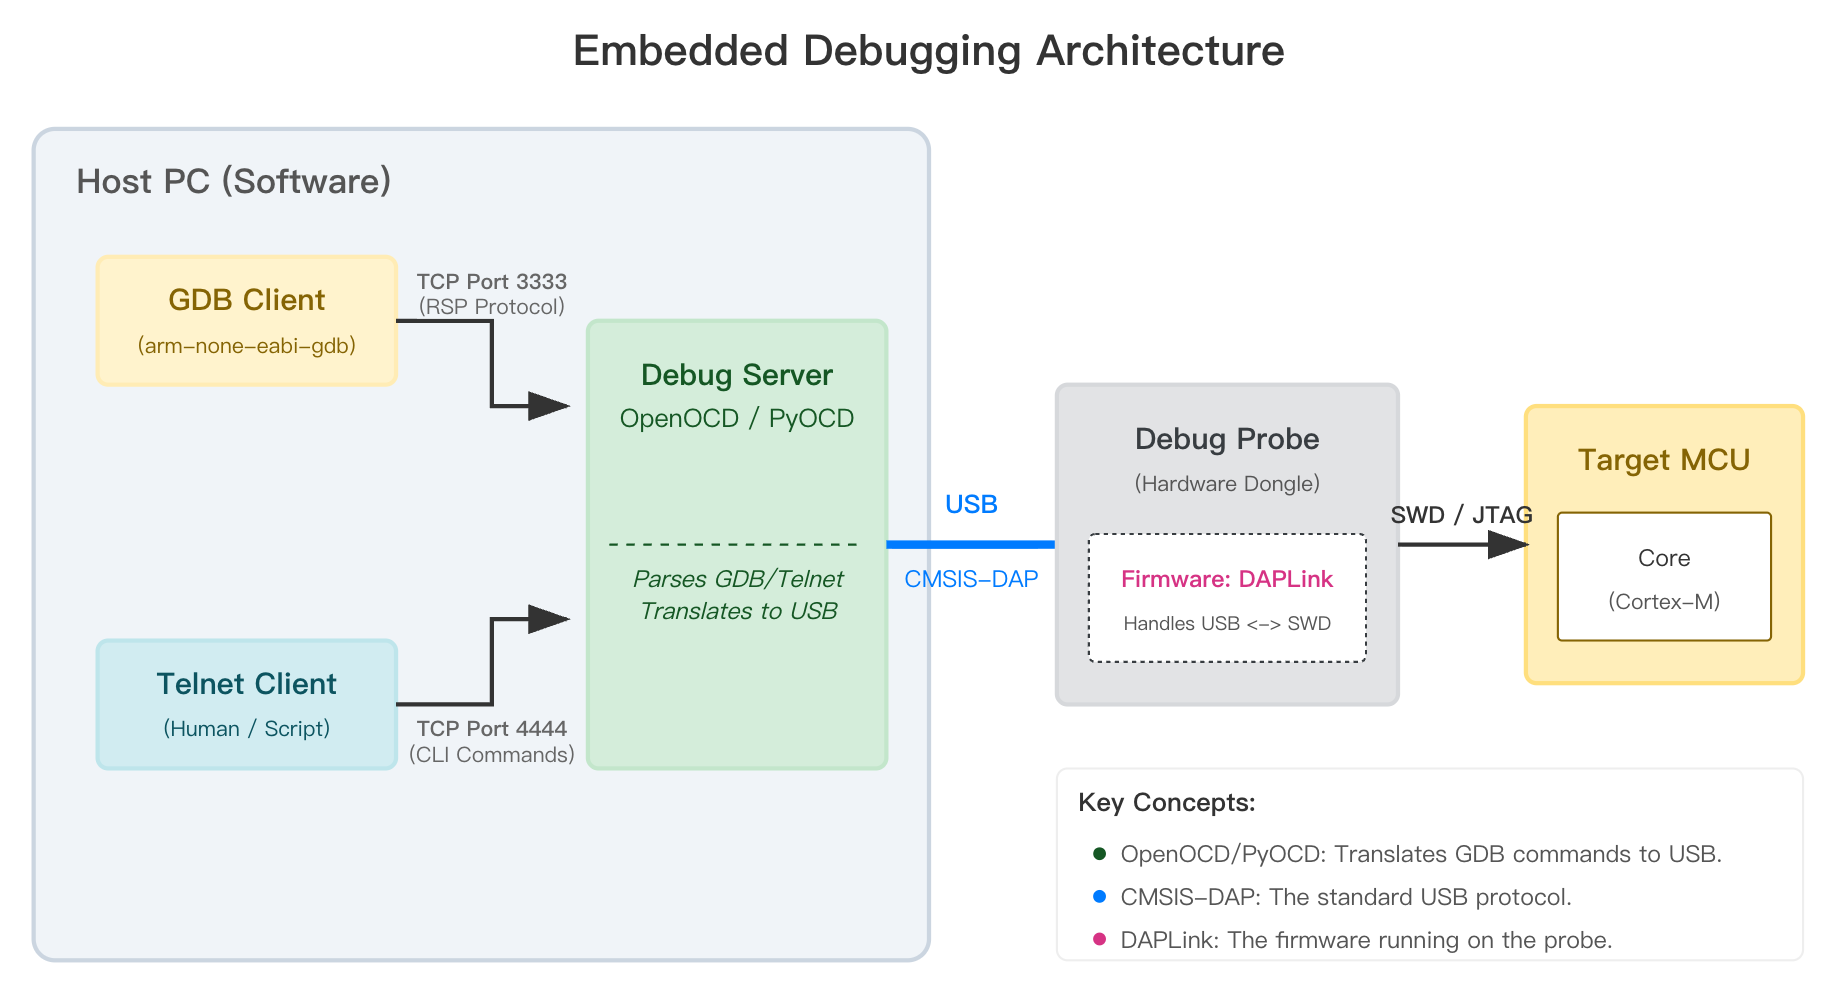
Here is a summary of the entire debug chain, from your IDE to the target XIAO:
- You (in your IDE) click "Start Debugging."
- The IDE launches GDB with the appropriate program file.
- GDB connects to the OpenOCD server running on your PC.
- OpenOCD detects the XIAO Debug Mate connected via USB. It communicates with the device using the CMSIS-DAP protocol.
- The DAPLink firmware on the Debug Mate receives these CMSIS-DAP commands.
- DAPLink translates these commands into electrical signals on the SWD (Serial Wire Debug) pins (SWDIO and SWCLK).
- These SWD signals directly control the ARM Cortex core inside the target XIAO, allowing OpenOCD and GDB to pause the CPU, read memory, and perform all other debugging actions.
In short: GDB is the commander, OpenOCD is the translator, CMSIS-DAP is the language they speak, and DAPLink is the soldier on the ground carrying out the orders.
Getting Started with Debugging
Compatibility Check
The XIAO Debug Mate is designed for the entire XIAO ecosystem, but the DAPLink debug feature is specific to ARM Cortex-M cores. The UART and Power monitoring functions, however, are universally compatible as they are architecture-agnostic. Please refer to the table below for detailed compatibility information.
| XIAO Model | Core Architecture | DAPLink Debug | UART Monitor | Power Analyzer |
|---|---|---|---|---|
| XIAO SAMD21 | ARM Cortex-M0+ | ✅ | ✅ | ✅ |
| XIAO RP2040 | ARM Cortex-M0+ | ✅ | ✅ | ✅ |
| XIAO RP2350 | ARM Cortex-M33 | ✅ | ✅ | ✅ |
| XIAO nRF52840 | ARM Cortex-M4 | ✅ | ✅ | ✅ |
| XIAO RA4M1 | ARM Cortex-M4 | ✅ | ✅ | ✅ |
| XIAO MG24 | ARM Cortex-M33 | ✅ | ✅ | ✅ |
| XIAO nRF54L15 | ARM Cortex-M33 | ❌ | ✅ | ✅ |
| XIAO ESP32-C3 | RISC-V | ❌ | ✅ | ✅ |
| XIAO ESP32-C5 | RISC-V | ❌ | ✅ | ✅ |
| XIAO ESP32-C6 | RISC-V | ❌ | ✅ | ✅ |
| XIAO ESP32-S3 | Xtensa LX7 | ❌ | ✅ | ✅ |
Software Preparation
Before you can start debugging, you need to set up your host computer with the necessary software.
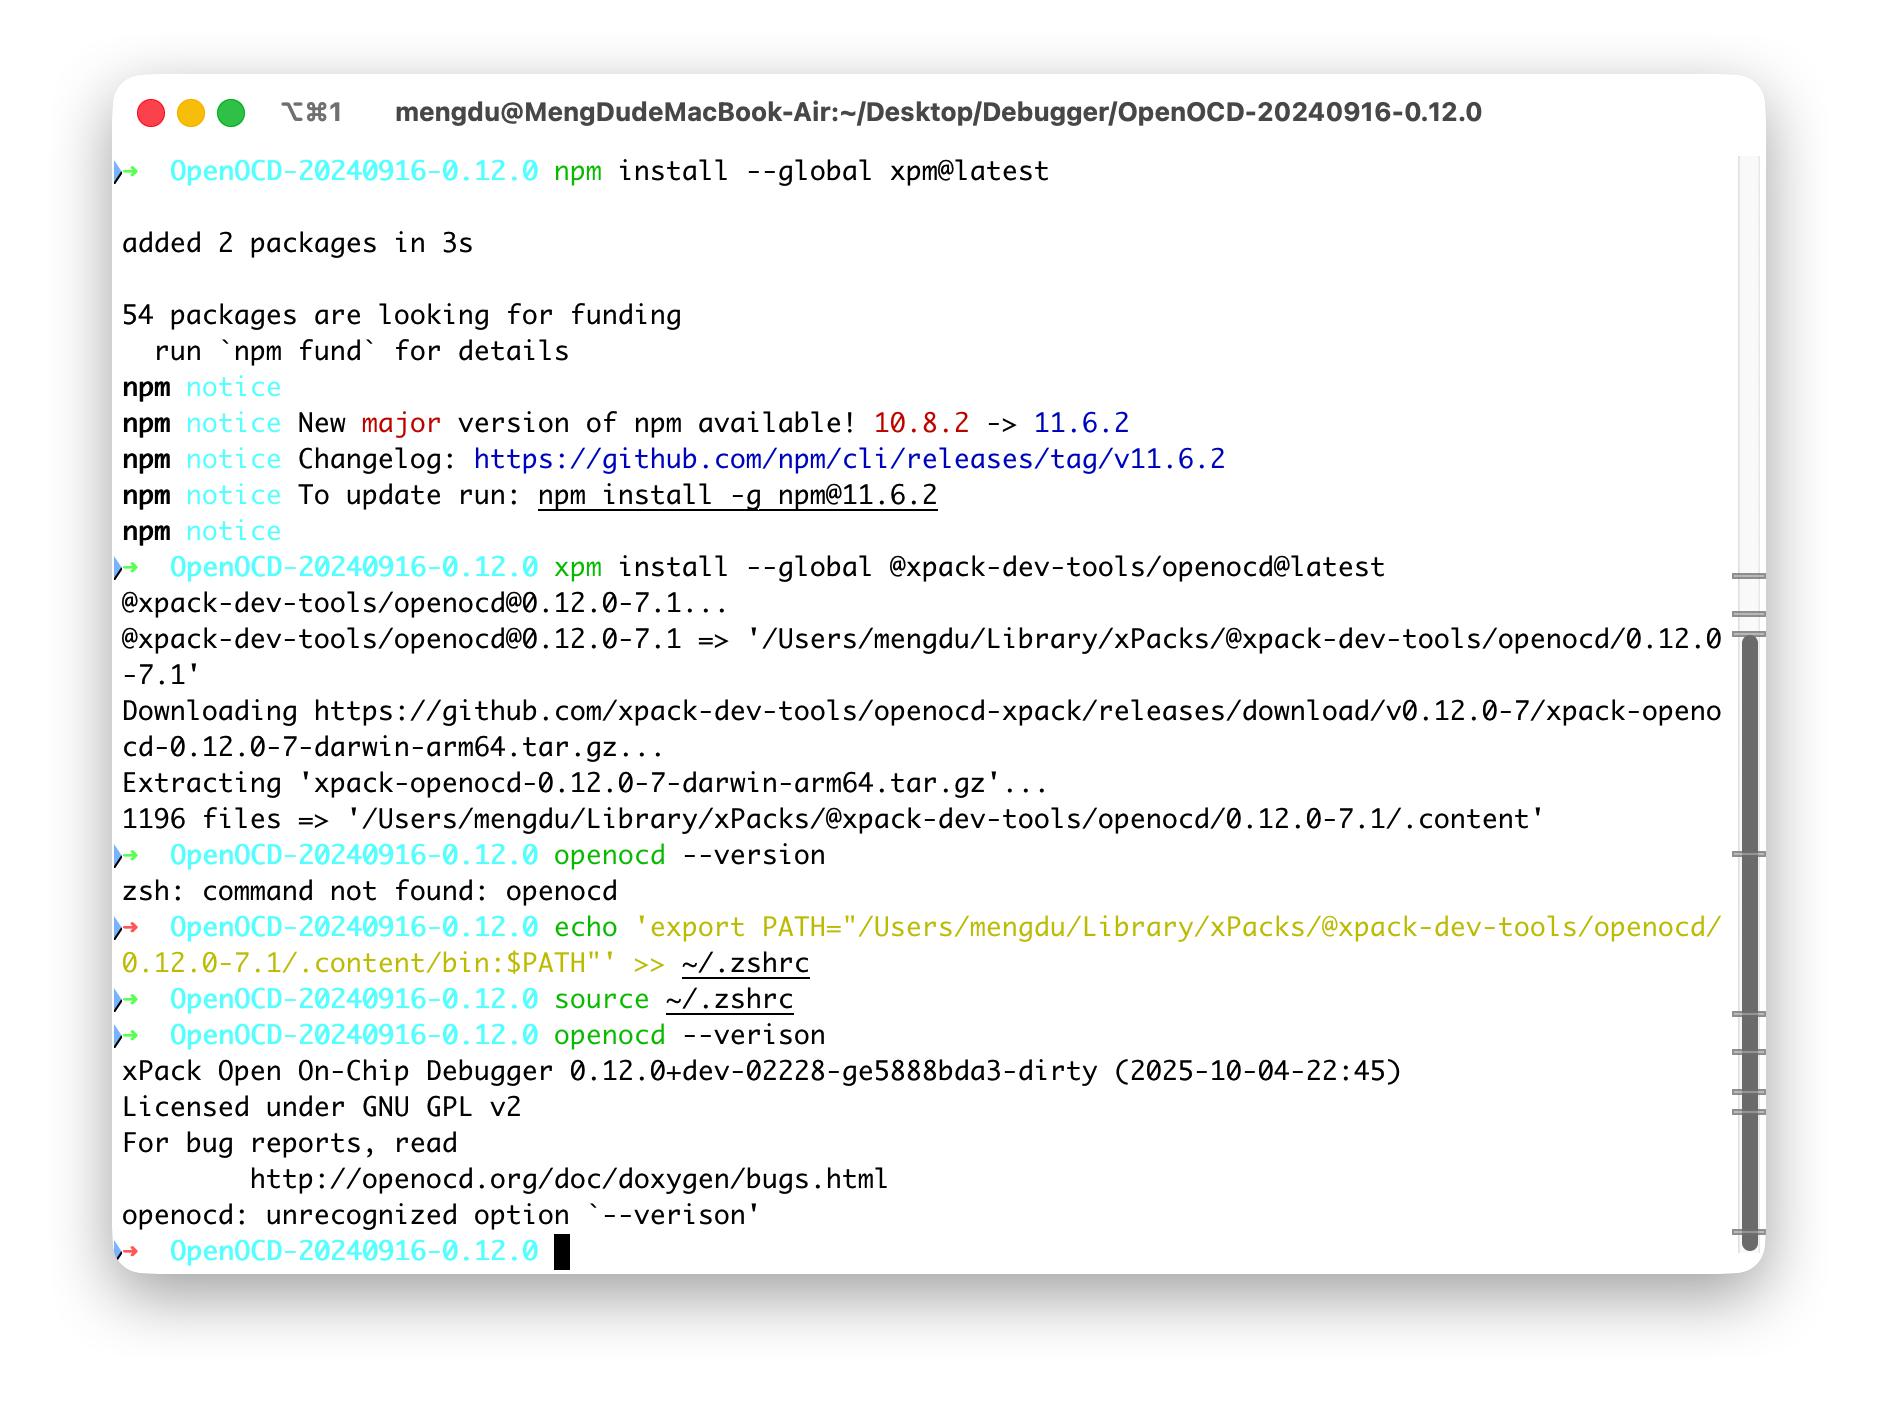
Install OpenOCD
Verified: Please use OpenOCD version 0.12.0-7 or later.
To ensure compatibility and have access to the latest features, we strongly recommend using the xPack version of OpenOCD. System package managers (like Homebrew on macOS or APT on Linux) often provide older, outdated versions which may not work correctly with modern targets.
If you are using VS Code with the PlatformIO extension, PlatformIO will automatically download and configure the correct version of OpenOCD for your project when you start a debug session.
- Windows
- MacOS
- Linux
On Windows, the manual installation method is straightforward.
- Download the OpenOCD package
Go to the xPack OpenOCD releases page. The latest release is always listed at the very top. Find the Windows version (e.g., xpack-openocd-...-win32-x64.zip) in the topmost release and download this file.
- Extract the Files
Right-click the downloaded ZIP file and select "Extract All...". Choose a stable location, such as C:\Users\YourName\AppData\Local\xPacks\OpenOCD. After extraction, you will have a folder like xpack-openocd-0.12.0-7 containing a bin directory.
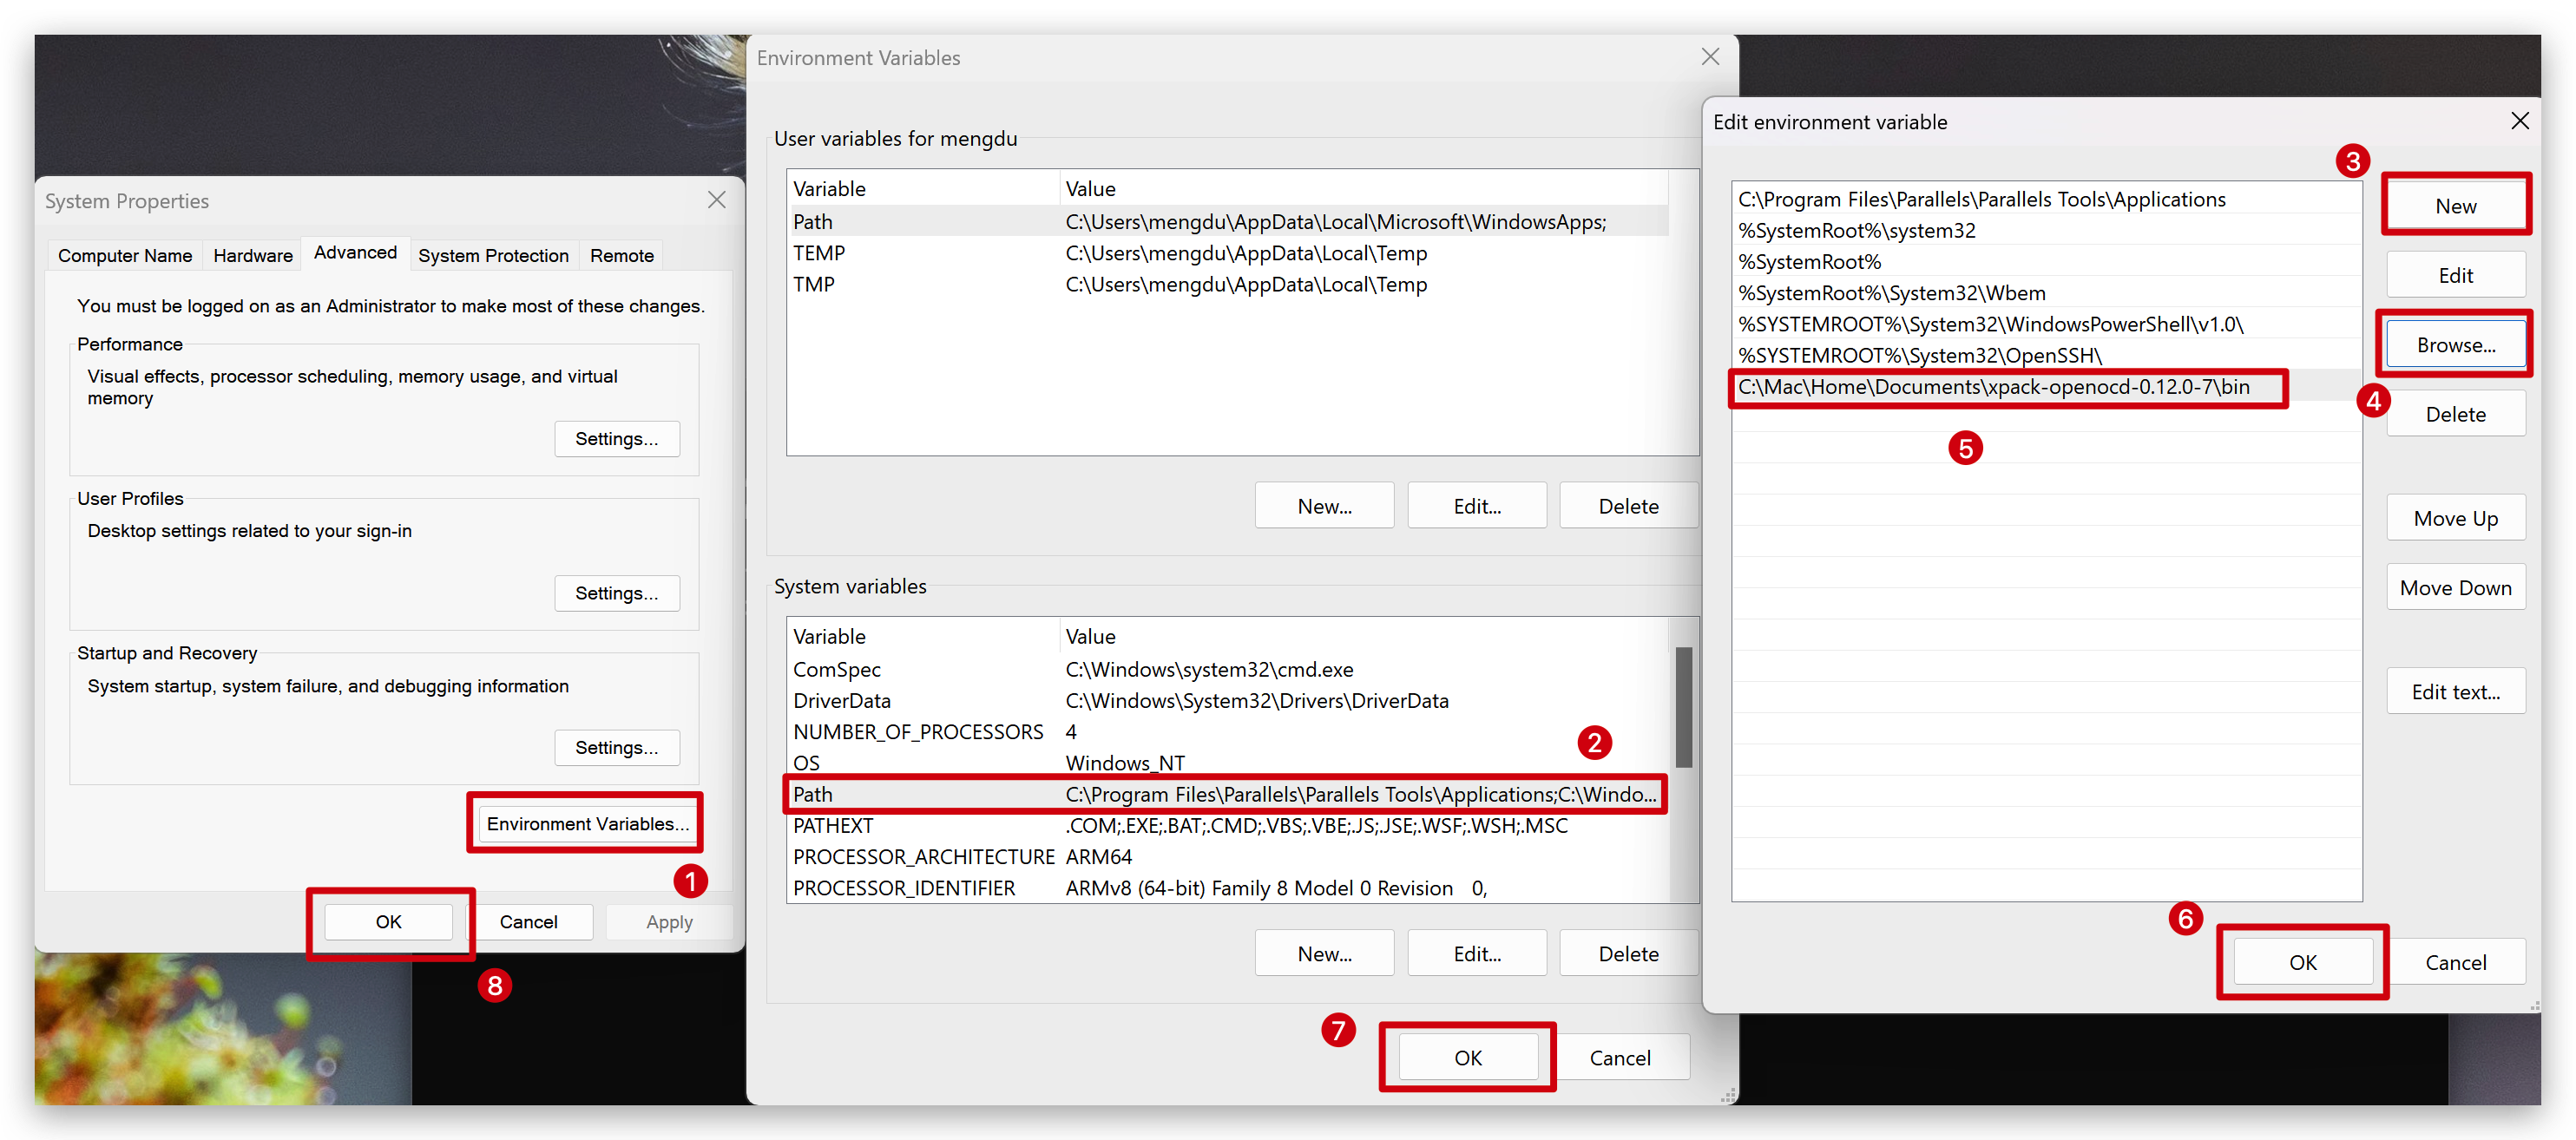
- Add OpenOCD to your System PATH
This allows you to run openocd from any terminal.
- Search for "Environment Variables" in the Start Menu and select "Edit the system environment variables".
- Click "Environment Variables...".
- Under "System variables", select the "Path" variable and click "Edit...".
- Click "New" and paste the full path to the
bindirectory you extracted earlier. For example:
C:\Users\YourName\AppData\Local\xPacks\OpenOCD\xpack-openocd-0.12.0-7\bin - Click OK on all windows to save.
- Verify the Installation
Open a new Command Prompt or PowerShell window and run:
openocd --version
If the installation was successful, you will see the version information printed (e.g., xPack Open On-Chip Debugger 0.12.0+dev-02228).
This process mirrors the Windows manual setup.
- Download the OpenOCD package
Go to the xPack OpenOCD releases page. Find the latest release and download the correct archive for your Mac (e.g., ...-darwin-x64.tar.gz for Intel or ...-darwin-arm64.tar.gz for Apple Silicon).
- Extract the Files
Open a Terminal and run the following commands. We'll create a standard location in your home directory.
# Create a directory for xPack tools if it doesn't exist
mkdir -p ~/opt

# Go to the Downloads folder (or wherever you saved the file)
cd ~/Downloads

# Extract the archive into the opt directory
tar -xvf xpack-openocd-*.tar.gz -C ~/opt
- Add OpenOCD to your PATH
You need to tell your shell where to find the openocd executable. The default shell on modern macOS is Zsh.
# Add the path to your .zshrc file (for Zsh)
echo 'export PATH="$HOME/opt/xpack-openocd-0.12.0-7/bin:$PATH"' >> ~/.zshrc
Make sure to replace xpack-openocd-0.12.0-7 with the actual folder name that was created. If you use Bash, edit ~/.bash_profile instead of ~/.zshrc.
- Apply and Verify
The PATH change you made is not active in your current terminal session until the configuration file is reloaded.
Run the following command in your existing terminal:
# For Zsh (default on modern macOS)
source ~/.zshrc
Now, verify the installation by running:
openocd --version
You should see the correct xPack version information.
This process mirrors the manual setup on other operating systems.
- Download the OpenOCD package
Go to the xPack OpenOCD releases page. Find the latest release and download the Linux archive (...-linux-x64.tar.gz).
- Extract the Files
Open a Terminal and run the following commands.
# Create a directory for xPack tools if it doesn't exist
mkdir -p ~/opt

# Go to the Downloads folder
cd ~/Downloads

# Extract the archive into the opt directory
tar -xvf xpack-openocd-*.tar.gz -C ~/opt
- Add OpenOCD to your PATH
You need to tell your shell where to find the openocd executable. Most Linux distributions use the Bash shell.
# Add the path to your .bashrc file
echo 'export PATH="$HOME/opt/xpack-openocd-0.12.0-7/bin:$PATH"' >> ~/.bashrc
Make sure to replace xpack-openocd-0.12.0-7 with the actual folder name that was created.
- Apply and Verify
The PATH change you made is not active in your current terminal session until the configuration file is reloaded.
Run the following command in your existing terminal:
# For Bash (default on most Linux distros)
source ~/.bashrc
Now, verify the installation by running:
openocd --version
You should see the correct xPack version information.
Install PyOCD
If you intend to use the firmware flashing feature for XIAO RA4M1, you may need to refer to the steps here to additionally download and use PyOCD.
PyOCD is a Python-based tool for programming and debugging Arm Cortex-M microcontrollers.
- Windows
- MacOS
- Linux
-
Prerequisites Ensure you have Python installed on your system. If not, download it from the official python.org website and ensure you check the box "Add Python to PATH" during installation.
-
Install PyOCD Open a Command Prompt or PowerShell window and run the following command:
pip install -U pyocd -
Install XIAO RA4M1 Support Pack The XIAO RA4M1 uses the
R7FA4M1ABchip. You need to install the specific support pack for PyOCD to recognize it.Search for the pack to confirm availability:
pyocd pack find r7fa4m1abInstall the pack:
pyocd pack install r7fa4m1ab -
Verify Targets Check if the target is now recognized:
pyocd list --targetsYou should see
r7fa4m1abin the list.
-
Prerequisites MacOS usually comes with Python, but it is recommended to use Homebrew or the official installer to get the latest version. Open your Terminal.
-
Install PyOCD Run the following command in your Terminal:
pip3 install -U pyocd -
Install XIAO RA4M1 Support Pack The XIAO RA4M1 uses the
R7FA4M1ABchip. You need to install the specific support pack.Search for the pack:
pyocd pack find r7fa4m1abInstall the pack:
pyocd pack install r7fa4m1ab -
Verify Targets Check if the target is recognized:
pyocd list --targets
-
Prerequisites Ensure
python3andpipare installed via your package manager (e.g.,sudo apt install python3-pipon Ubuntu).USB PermissionsOn Linux, you may also need to set up udev rules to allow access to the USB device without using
sudo. -
Install PyOCD Run the following command in your Terminal:
pip3 install -U pyocd -
Install XIAO RA4M1 Support Pack The XIAO RA4M1 uses the
R7FA4M1ABchip.Search for the pack:
pyocd pack find r7fa4m1abInstall the pack:
pyocd pack install r7fa4m1ab -
Verify Targets Check if the target is recognized:
pyocd list --targets
Understanding the XIAO_Debug_Mate_DAPLink_Package Package
Before you can start using the DAPLink Debugger feature, you'll need to download the ZIP file separately. This file contains all the files required for debugging various XIAO boards.
Directory Structure Explanation
After unzipping the file, you will see the following folder structure. Each part has a specific purpose:
XIAO_Debug_Mate_DAPLink_Package/
├── examples/
│   ├── Blink_nrf52840.elf
│   ├── Blink_SAMD21.bin
│   └── ... (other example firmwares)
├── target/
│   ├── XIAO_RA4M1/
│   │   └── ra4m1.cfg
│   └── XIAO_SAMD21/
│       └── at91samd21g18.cfg
├── XIAO_MG24_Mac_Linux_OpenOCD-v0.12.0/
│   ├── bin/
│   │   └── openocd
│   └── share/
│       └── ... (OpenOCD scripts)
└── XIAO_MG24_Win_OpenOCD-v0.12.0/
    ├── bin/
    │   └── openocd.exe
    └── share/
        └── ... (OpenOCD scripts)
-
examples/This folder contains pre-compiled example firmware files (e.g.,.bin,.elf,.hex) for various XIAO boards, which were exported from Arduino. These will be used in later tutorials to demonstrate how to flash and debug the microcontrollers. -
target/This folder contains target configuration (.cfg) files for XIAO boards that might be missing from the official OpenOCD distribution. When you use boards like the XIAO SAMD21 or XIAO RA4M1 with your system's existing OpenOCD installation, you will need to manually add these configuration files to your OpenOCD environment. The specific steps for how to do this will be covered later. -
XIAO_MG24_..._OpenOCD-v0.12.0/This is a special and very important component for the XIAO MG24 board. Currently, support for this chip is not available in the official OpenOCD releases or the standard xPack distributions. To solve this, we provide complete, standalone OpenOCD packages for both Windows (XIAO_MG24_Win_...) and macOS/Linux (XIAO_MG24_Mac_Linux_...). When you are working with the XIAO MG24, you must use theopenocdexecutable provided within these specific folders.
Hardware Preparation
Connecting your hardware for debugging is straightforward.
For XIAO Boards
Generally speaking, all functions of XIAO on Debug Mate do not require additional power supply to XIAO, unless otherwise specified.
The XIAO Debug Mate is designed for a seamless, plug-and-play experience with all Seeed Studio XIAO boards.
- Take your XIAO board and align it with the female headers on the Debug Mate.
- Ensure the USB-C port on the XIAO faces the same direction as the USB-C port on the Debug Mate.
- Firmly press the XIAO straight down into the socket until it is fully seated. This ensures that the pogo pins on the Debug Mate make a solid connection with the SWD pads on the underside of the XIAO.
Some of the earlier XIAO boards, such as the XIAO SAMD21, XIAO RP2040, and XIAO nRF52840, were designed before a unified standard for the back-side pads was established. While the Debug Mate's pogo pins are positioned to be as compatible as possible, slight variations in these older boards may lead to imperfect contact.
If you experience an unstable debug connection, try slightly adjusting the position of the XIAO board within the socket. You may not need to push it all the way down. A small shift can often ensure the pogo pins make solid contact with the SWD pads on the back of the XIAO.
We strongly advise against hot-swapping XIAO and Debug Mate!
For Other Development Boards
You can also use the XIAO Debug Mate as a generic SWD debug probe for other ARM-based development boards.
- You will need four DuPont wires (female-to-male or female-to-female, depending on your target board).
- Locate the SWD debug pins on your target board. These are typically labeled
SWDIO,SWCLK,GND, and sometimesVTreforVCC. - Connect the wires from the XIAO Debug Mate's expansion headers to your target board as follows:
| XIAO Debug Mate Pin | Target Board Pin | Description |
|---|---|---|
SWDIO | SWDIO | Serial Wire Data Input/Output |
SWCLK | SWCLK | Serial Wire Clock |
GND | GND | Common Ground |
VCC | VTref or 3V3 | Target Voltage Reference (Important for level shifting) |
Once connected, you can configure OpenOCD to use the CMSIS-DAP interface and start your debug session as you would with any other probe.
Interacting with OpenOCD via Telnet
While modern IDEs provide a graphical interface for debugging, sometimes you need a more direct, low-level way to interact with the debugger. This is where Telnet comes in. OpenOCD runs a Telnet server that allows you to connect directly and send text-based commands to control the target chip. This is incredibly useful for quick checks, scripting automated tasks, or debugging issues when a full IDE isn't available or necessary.
Enabling the Telnet Client
Before you can use Telnet, you might need to enable it on your operating system, as it is not always installed or enabled by default.
- Windows
- MacOS
- Linux
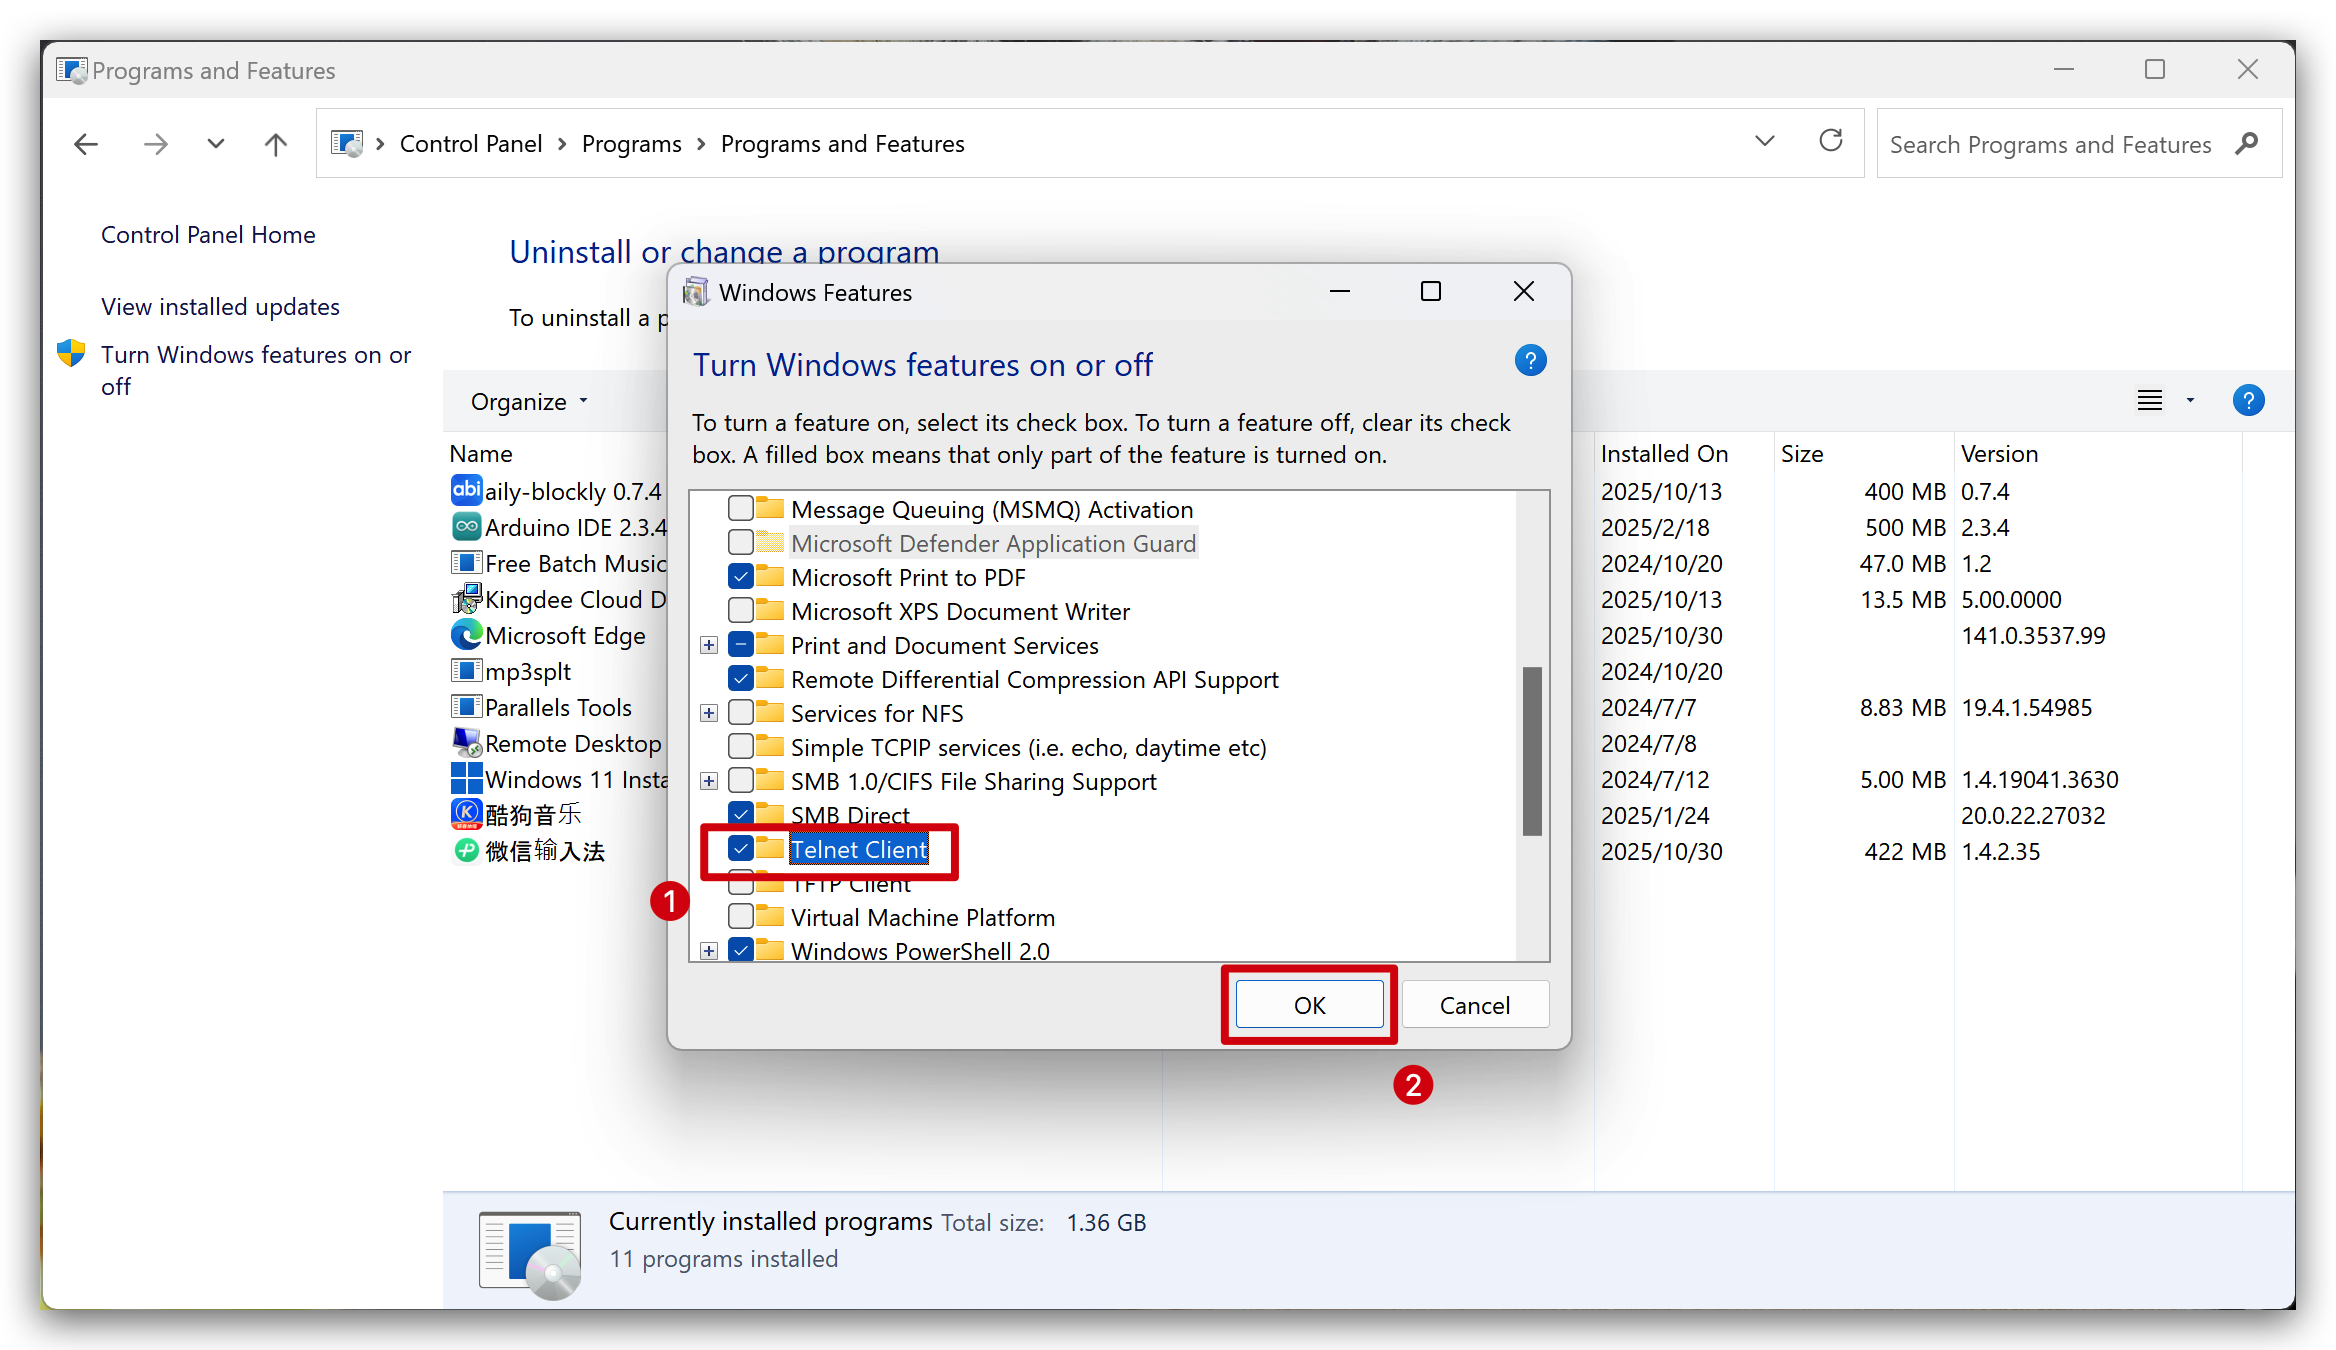
On modern Windows systems, the Telnet client is a legacy feature that needs to be manually enabled.
- Press
Win+Rto open the "Run" dialog, typecontrol panel, and press Enter. - Go to Programs > Programs and Features.
- On the left-hand side, click on Turn Windows features on or off.
- In the new window that appears, scroll down and find Telnet Client.
- Check the box next to it and click OK. Windows will install the feature.
The native Telnet client may have been removed in recent versions of macOS. The easiest way to install it is using [Homebrew]. Open your Terminal and run:
brew install telnet
Most Linux distributions come with a Telnet client. If it's not present, you can easily install it using your package manager. For Debian/Ubuntu-based systems, open a terminal and run:
sudo apt-get update
sudo apt-get install telnet
Step-by-Step Debugging with Telnet
Step 1: Run the OpenOCD Server
Find your XIAO board in the list below and follow the specific instructions for your operating system to start the OpenOCD server. This server process will wait for a connection from a debugger like GDB.
For Seeed Studio XIAO SAMD21
The standard OpenOCD package does not include the configuration file for the XIAO SAMD21. You must manually copy it from our provided package into your system's OpenOCD installation directory.
1. Copy the Configuration File
-
Source File: From the
XIAO_Debug_Mate_DAPLink_Package, find the file:target/XIAO_SAMD21/at91samd21g18.cfg. -
Destination Folder: Copy this file into the
targetscript folder of your xPack OpenOCD installation. The path will vary by OS:- Windows:
C:\Users\YourName\AppData\Local\xPacks\OpenOCD\xpack-openocd-0.12.0-7\openocd\scripts\target\ - macOS / Linux:
~/opt/xpack-openocd-0.12.0-7/share/openocd/scripts/target/
- Windows:
Replace YourName and xpack-openocd-0.12.0-7 with your actual username and the version of OpenOCD you installed.
2. Run the OpenOCD Command
Open a new terminal anywhere on your system and run the corresponding command:
- Windows:
openocd.exe -f interface/cmsis-dap.cfg -f target/at91samd21g18.cfg - macOS / Linux:
openocd -f interface/cmsis-dap.cfg -f target/at91samd21g18.cfg
For Seeed Studio XIAO RP2040
The configuration for RP2040 is included in the standard xPack OpenOCD. Open a terminal and run the command.
- Windows:
openocd.exe -f interface/cmsis-dap.cfg -f target/rp2040.cfg -c "adapter speed 5000" - macOS / Linux:
openocd -f interface/cmsis-dap.cfg -f target/rp2040.cfg -c "adapter speed 5000"
For Seeed Studio XIAO RP2350
The configuration for RP2350 is included in the standard xPack OpenOCD. Open a terminal and run the command.
- Windows:
openocd.exe -f interface/cmsis-dap.cfg -f target/rp2350.cfg -c "adapter speed 5000" - macOS / Linux:
openocd -f interface/cmsis-dap.cfg -f target/rp2350.cfg -c "adapter speed 5000"
For Seeed Studio XIAO nRF52840
The configuration for nRF52 is included in the standard xPack OpenOCD. Open a terminal and run the command.
- Windows:
openocd.exe -f interface/cmsis-dap.cfg -f target/nrf52.cfg - macOS / Linux:
openocd -f interface/cmsis-dap.cfg -f target/nrf52.cfg
For Seeed Studio XIAO RA4M1
Similar to the SAMD21, the standard OpenOCD package does not include the configuration file for the XIAO RA4M1. You must manually copy it.
1. Copy the Configuration File
-
Source File: From the
XIAO_Debug_Mate_DAPLink_Package, find the file:target/XIAO_RA4M1/ra4m1.cfg. -
Destination Folder: Copy this file into the
targetscript folder of your xPack OpenOCD installation.- Windows:
C:\Users\YourName\AppData\Local\xPacks\OpenOCD\xpack-openocd-0.12.0-7\openocd\scripts\target\ - macOS / Linux:
~/opt/xpack-openocd-0.12.0-7/share/openocd/scripts/target/
- Windows:
Replace YourName and xpack-openocd-0.12.0-7 with your actual username and the version of OpenOCD you installed.
2. Run the OpenOCD Command
Open a new terminal anywhere on your system and run the corresponding command:
- Windows:
openocd.exe -f interface/cmsis-dap.cfg -f target/ra4m1.cfg - macOS / Linux:
openocd -f interface/cmsis-dap.cfg -f target/ra4m1.cfg
For Seeed Studio XIAO MG24
The XIAO MG24 requires a special version of OpenOCD that is included in the XIAO_Debug_Mate_DAPLink_Package. Do not use your system-wide OpenOCD installation. You must run the commands from within the specific directory provided in the package.
1. Prepare Your Terminal
Open your command-line tool and navigate into the correct folder for your operating system within the unzipped package.
- Windows:
# Example if you unzipped it on your Desktop:
cd C:\Users\YourName\Desktop\XIAO_Debug_Mate_DAPLink_Package\XIAO_MG24_Win_OpenOCD-v0.12.0 - macOS / Linux:
# Example if you unzipped it on your Desktop:
cd ~/Desktop/XIAO_Debug_Mate_DAPLink_Package/XIAO_MG24_Mac_Linux_OpenOCD-v0.12.0
2. Run the OpenOCD Command
Once you are inside the correct directory, execute the following command:
- Windows:
bin\openocd.exe -s share/openocd/scripts -f interface/cmsis-dap.cfg -f target/efm32s2_g23.cfg -c "reset_config srst_nogate" - macOS / Linux:
bin/openocd -s share/openocd/scripts -f interface/cmsis-dap.cfg -f target/efm32s2_g23.cfg -c "reset_config srst_nogate"
Command Breakdown
Understanding what each part of the command does can help you troubleshoot issues or customize your workflow. Let's break down a typical command:
bin/openocd -s share/openocd/scripts -f interface/cmsis-dap.cfg -f target/rp2040.cfg -c "..."
-
bin/openocd(orbin\openocd.exe): This executes the OpenOCD program. We assume it's located in abinsub-directory, which is a standard convention. The name and extension will vary by OS. -
-s share/openocd/scripts: The-sflag is crucial. It tells OpenOCD where to search for its script library. With this path set, OpenOCD can find the files specified by the-fflags. -
-f interface/cmsis-dap.cfg: The-fflag specifies a configuration file to load. This first one defines the debug adapter we are using (a standard CMSIS-DAP probe). -
-f target/rp2040.cfg: This second-fflag loads the configuration for the target microcontroller (the RP2040 chip on the XIAO board). -
-c "...": The-cflag passes a command to OpenOCD after it starts.adapter speed 5000: (For RP2040/RP2350) Sets the SWD clock speed to 5000 kHz for stable communication.reset_config srst_nogate: (For MG24) A special reset configuration required for this specific target.
After running one of these commands, OpenOCD will initialize the connection and wait for a debugger, such as GDB, to connect (typically on port 3333). You can then use the debugger to load your program (load <path/to/your/firmware.elf>), set breakpoints, and debug your code.
Step 2: Connect to the Telnet Server
Now, open a second, new Command Prompt or Terminal window. Type the following command and press Enter:
telnet localhost 4444
localhostrefers to your own computer.4444is the default port number that OpenOCD uses for Telnet connections.
If the connection is successful, your terminal will display a welcome message from OpenOCD, and you will see a > prompt, ready to accept your commands.
Step 3: Execute Debug Commands
You can now type commands directly into the Telnet session to control the target chip. Here are some of the most common commands:
| Command | Description |
|---|---|
init | Initialize Target. Establishes the connection to the chip. This should always be the first command you run after connecting. |
reset halt | Reset and Halt. Resets the microcontroller and immediately pauses (halts) its execution. This is the primary way to enter a debug-ready state. |
reg | Show Registers. Displays the current values of all CPU registers. |
mdw [address] [count] | Memory Display Word. Reads and displays memory content. For example, mdw 0x20000000 10 will display 10 words (32-bit values) starting from memory address 0x20000000. |
step | Single Step. Executes a single instruction on the CPU. If the instruction is a function call, it will step into the function. |
resume | Resume Execution. Lets the program run freely from its current state. It will continue until it hits a breakpoint (if any are set) or you halt it again. |
exit | Exit Telnet. Closes the Telnet connection and returns you to your command prompt. The OpenOCD server in the other window will remain running. |
A typical manual debug session might follow these steps:
- Type
initto connect to the chip. - Type
reset haltto stop the program at the very beginning. - Type
mdw 0x20000000 10to inspect some RAM values. - Type
stepa few times to walk through the initial startup code. - Type
resumeto let the program run normally. - Type
exitwhen you are finished.
Flash the firmware using OpenOCD/PyOCD
Beyond interactive debugging, the XIAO Debug Mate excels at programming (flashing) firmware directly onto a XIAO's microcontroller using command-line tools. The primary tools for this are OpenOCD (Open On-Chip Debugger) and PyOCD.
This guide will walk you through using these powerful tools to upload pre-compiled firmware files. We use the "OpenOCD/PyOCD" designation because most compatible XIAO boards use OpenOCD, while the XIAO RA4M1 specifically requires PyOCD for flashing.
Flashing Compatibility
This table summarizes which XIAO boards and file types are supported for command-line flashing with the provided tools.
| XIAO Model | .bin | .elf | .hex | Bootloader |
|---|---|---|---|---|
| Seeed Studio XIAO SAMD21 | ✅ (OpenOCD) | ❌ | ✅ (OpenOCD) | ✅ (.bin file with OpenOCD) |
| Seeed Studio XIAO RP2040 | ✅ (OpenOCD) | ✅ (OpenOCD) | ❌ | ❌ |
| Seeed Studio XIAO RP2350 | ✅ (OpenOCD) | ✅ (OpenOCD) | ❌ | ❌ |
| Seeed Studio XIAO nRF52840 | ✅ (OpenOCD) | ✅ (OpenOCD) | ✅ (OpenOCD) | ✅ (.hex file with OpenOCD) |
| Seeed Studio XIAO RA4M1 | ✅ (PyOCD) | ❌ | ✅ (PyOCD) | ✅ (.hex file with PyOCD) |
| Seeed Studio XIAO MG24 | ❌ | ❌ | ✅ (OpenOCD) | ❌ |
- The items marked with an ❌ in this compatibility table are samples that failed testing with OpenOCD v0.12.0. Please use other firmware files to save your time.
- Bootloader files: Only XIAO bootloader files and flashing commands are provided here. If this XIAO model does not ship with bootloader files, it will be marked with ❌.
- The XIAO RA4M1 and XIAO MG24 does not support flashing
.elffiles. Attempting to flash.elffiles to the XIAO RA4M1 or XIAO MG24 will result in bricking the device.
Prerequisites
-
OpenOCD Installation: For all XIAO boards except the XIAO MG24, you need to have OpenOCD installed on your system and accessible from your command line (i.e., added to your system's PATH).
-
XIAO Debug Mate Firmware Package: We have prepared a package containing custom configuration files and example firmware. Please download and extract it. The structure is as follows:
examples/: Contains pre-compiled example firmware (.elf,.hex,.bin) for various XIAO boards and some XIAO bootloader files.target/: Contains custom OpenOCD configuration files (.cfg) required for specific boards like the XIAO SAMD21 and RA4M1.XIAO_MG24_Mac_Linux_OpenOCD-v0.12.0/: A self-contained OpenOCD for flashing the XIAO MG24 on macOS and Linux.XIAO_MG24_Win_OpenOCD-v0.12.0/: A self-contained OpenOCD for flashing the XIAO MG24 on Windows.
-
Terminal/Command Prompt: You will need to be comfortable opening and using a command-line interface (e.g., Command Prompt, PowerShell, or Terminal).
Command Execution Strategy
-
Option A (Recommended): Run from the Package Directory
All commands in this guide assume you have opened your terminal in the root of the extracted
XIAO_Debug_Mate_DAPLink_Packagefolder. This is the simplest method, as relative paths to firmware and configuration files will work directly. -
Option B (Advanced): Run from Any Directory
If you prefer to run commands from your own project folder, you can use the
-sflag to tell OpenOCD where to find our package's custom scripts.-
Action Required: Add
-s <path_to_package_folder>to youropenocdcommand. For example:# Replace <path_to_package_folder> with the actual path
openocd -s <path_to_package_folder> -f interface/cmsis-dap.cfg -f target/XIAO_SAMD21/at91samd21g18.cfg ...
-
Windows vs. macOS/Linux: In all commands, Windows users should use openocd.exe instead of openocd. We recommend using forward slashes (/) in file paths for cross-platform compatibility.
To flash your own custom firmware:
Simply replace the example path (e.g., examples/Blink_RP2040.elf) with the path to your own firmware file.
Understanding Firmware Files (.bin, .hex, .elf)
When you compile a project, the toolchain produces a file to be uploaded to the microcontroller. You'll commonly encounter three formats:
- .bin (Binary): A raw, compact binary file containing only the machine code. It has no extra information about memory addresses, so the programming tool must be told where to place it.
- .hex (Intel HEX): An ASCII-text representation of the binary code. It includes memory addresses, checksums, and metadata, making it a more robust format than
.bin. - .elf (Executable and Linkable Format): The most comprehensive format. It contains the machine code, memory address information, and also debugging information like function names, variable names, and source code line numbers. This is the preferred format for debugging.
- .bootloader (Bootloader File): A bootloader file is a specialized firmware image that resides in a protected region of the microcontroller’s memory and is responsible for facilitating firmware flashing, device recovery, and startup tasks. On XIAO boards, the bootloader allows you to upload new application code to the device (often over USB) without needing a dedicated hardware programmer. If a device becomes unresponsive or the main program fails, re-flashing the bootloader can help recover the board. Only use the official bootloader file for your specific board model, as using an incorrect file may render the device inoperable until it is repaired with special tools.
How to get these files from your project:
- Arduino IDE: After compiling (
Sketch > Verify/Compile), useSketch > Export compiled Binary. This will save a.hexor.binfile into your sketch folder. - PlatformIO: After a successful build, the firmware files (
firmware.bin,firmware.hex,firmware.elf) are located in your project's.pio/build/<environment_name>/directory.
Flashing .bin files
For Seeed Studio XIAO SAMD21
The standard OpenOCD package does not include the configuration file for the XIAO SAMD21. You must manually copy it from our provided package into your system's OpenOCD installation directory.
1. Copy the Configuration File
-
Source File: From the
XIAO_Debug_Mate_DAPLink_Package, find the file:target/XIAO_SAMD21/at91samd21g18.cfg. -
Destination Folder: Copy this file into the
targetscript folder of your xPack OpenOCD installation. The path will vary by OS:- Windows:
C:\Users\YourName\AppData\Local\xPacks\OpenOCD\xpack-openocd-0.12.0-7\openocd\scripts\target\ - macOS / Linux:
~/opt/xpack-openocd-0.12.0-7/share/openocd/scripts/target/
- Windows:
Replace YourName and xpack-openocd-0.12.0-7 with your actual username and the version of OpenOCD you installed.
2. Flash the firmware
Open a new terminal anywhere on your system and run the corresponding command:
-
On Windows:
openocd.exe -f interface/cmsis-dap.cfg -f target/at91samd21g18.cfg -c "telnet_port disabled; init; targets; halt; program examples/Blink_SAMD21.bin 0x00002000 verify reset; shutdown" -
On macOS / Linux:
openocd -f interface/cmsis-dap.cfg -f target/at91samd21g18.cfg -c "telnet_port disabled; init; targets; halt; program examples/Blink_SAMD21.bin 0x00002000 verify reset; shutdown"
For Seeed Studio XIAO RP2040
When using OpenOCD to flash the XIAO RP2040, it is strongly recommended to use .elf files instead of .bin files.
This is because .elf files already contain the program's memory address information (Linker Address) internally. OpenOCD will automatically write it to the correct location (usually 0x10000000), so you don't need to manually calculate or guess the offset address.
If you must use .bin files, you need to manually specify the XIAO RP2040's Flash start address 0x10000000.
On Windows:
openocd.exe -f interface/cmsis-dap.cfg -f target/rp2040.cfg -c "adapter speed 5000" -c "program examples/Blink_RP2040.bin 0x10000000 verify reset exit"
On macOS / Linux:
openocd -f interface/cmsis-dap.cfg -f target/rp2040.cfg -c "adapter speed 5000" -c "program examples/Blink_RP2040.bin 0x10000000 verify reset exit"
For Seeed Studio XIAO RP2350
When using OpenOCD to flash the XIAO RP2350, it is strongly recommended to use .elf files instead of .bin files.
This is because .elf files already contain the program's memory address information (Linker Address) internally. OpenOCD will automatically write it to the correct location (usually 0x10000000), so you don't need to manually calculate or guess the offset address.
If you must use .bin files, you need to manually specify the XIAO RP2350's Flash start address 0x10000000.
On Windows:
openocd.exe -f interface/cmsis-dap.cfg -f target/rp2350.cfg -c "adapter speed 5000" -c "program examples/Blink_RP2350.bin 0x10000000 verify reset exit"
On macOS / Linux:
openocd -f interface/cmsis-dap.cfg -f target/rp2350.cfg -c "adapter speed 5000" -c "program examples/Blink_RP2350.bin 0x10000000 verify reset exit"
For Seeed Studio XIAO nRF52840
The configuration for nRF52 is included in the standard xPack OpenOCD. Open a terminal and run the command.
On Windows:
openocd.exe -f interface/cmsis-dap.cfg -f target/nrf52.cfg -c "program examples/Blink_nRF52840.bin 0x27000 verify reset exit"
On macOS / Linux:
openocd -f interface/cmsis-dap.cfg -f target/nrf52.cfg -c "program examples/Blink_nRF52840.bin 0x27000 verify reset exit"
For Seeed Studio XIAO RA4M1
Currently, standard OpenOCD distributions often lack built-in support for the Renesas RA series, such as dedicated drivers and target configuration files. This makes using OpenOCD for flashing a complex process that requires manual setup.
Therefore, we strongly recommend using PyOCD, which provides out-of-the-box support for the RA4M1.
To flash the firmware (e.g., Blink_RA4M1.hex), use the command corresponding to your operating system.
On Windows:
pyocd flash -t r7fa4m1ab examples\Blink_RA4M1.bin —base-address 0x4000
On macOS / Linux:
pyocd flash -t r7fa4m1ab examples/Blink_RA4M1.bin —base-address 0x4000
Flashing .elf Files
When flashing .elf files, pay close attention to the firmware size. If the file exceeds 2MB, ensure your device has sufficient Flash storage space. Failure to do so may result in bricking your device!
For Seeed Studio XIAO SAMD21
Due to the XIAO SAMD21's limited 256KB Flash memory, it typically cannot burn firmware files larger than 256KB. The Blink example's .elf file already reaches 658KB, making it unburnable. We recommend using smaller .bin or .hex files instead.
For Seeed Studio XIAO RP2040
The configuration for RP2040 is included in the standard xPack OpenOCD. Open a terminal and run the command.
On Windows:
openocd.exe -f interface/cmsis-dap.cfg -f target/rp2040.cfg -c "adapter speed 5000" -c "program examples/Blink_RP2040.elf verify reset exit"
On macOS / Linux:
openocd -f interface/cmsis-dap.cfg -f target/rp2040.cfg -c "adapter speed 5000" -c "program examples/Blink_RP2040.elf verify reset exit"
For Seeed Studio XIAO RP2350
The configuration for RP2350 is included in the standard xPack OpenOCD. Open a terminal and run the command.
On Windows:
openocd.exe -f interface/cmsis-dap.cfg -f target/rp2350.cfg -c "adapter speed 5000" -c "program examples/Blink_RP2350.elf verify reset exit"
On macOS / Linux:
openocd -f interface/cmsis-dap.cfg -f target/rp2350.cfg -c "adapter speed 5000" -c "program examples/Blink_RP2350.elf verify reset exit"
For Seeed Studio XIAO nRF52840
The configuration for nRF52 is included in the standard xPack OpenOCD. Open a terminal and run the command.
On Windows:
openocd.exe -f interface/cmsis-dap.cfg -f target/nrf52.cfg -c "program examples/Blink_nRF52840.elf verify reset exit"
On macOS / Linux:
openocd -f interface/cmsis-dap.cfg -f target/nrf52.cfg -c "program examples/Blink_nRF52840.elf verify reset exit"
Sometimes you may need to flash the firmware twice for it to take effect; this is normal.
For Seeed Studio XIAO RA4M1
XIAO RA4M1 prohibits flashing .elf files, as doing so may brick the device!!!
For Seeed Studio XIAO MG24
XIAO MG24 prohibits flashing .elf files, as doing so may brick the device!!!
Flashing .hex Files
For Seeed Studio XIAO SAMD21
The standard OpenOCD package does not include the configuration file for the XIAO SAMD21. You must manually copy it from our provided package into your system's OpenOCD installation directory.
1. Copy the Configuration File
-
Source File: From the
XIAO_Debug_Mate_DAPLink_Package, find the file:target/XIAO_SAMD21/at91samd21g18.cfg. -
Destination Folder: Copy this file into the
targetscript folder of your xPack OpenOCD installation. The path will vary by OS:- Windows:
C:\Users\YourName\AppData\Local\xPacks\OpenOCD\xpack-openocd-0.12.0-7\openocd\scripts\target\ - macOS / Linux:
~/opt/xpack-openocd-0.12.0-7/share/openocd/scripts/target/
- Windows:
Replace YourName and xpack-openocd-0.12.0-7 with your actual username and the version of OpenOCD you installed.
2. Flash the firmware
Open a new terminal anywhere on your system and run the corresponding command:
-
On Windows:
openocd.exe -f interface/cmsis-dap.cfg -f target/at91samd21g18.cfg -c "telnet_port disabled; init; targets; halt; program examples/Blink_SAMD21.hex verify reset; shutdown" -
On macOS / Linux:
openocd -f interface/cmsis-dap.cfg -f target/at91samd21g18.cfg -c "telnet_port disabled; init; targets; halt; program examples/Blink_SAMD21.hex verify reset; shutdown"
For Seeed Studio XIAO nRF52840
The configuration for nRF52 is included in the standard xPack OpenOCD. Open a terminal and run the command.
On Windows:
openocd.exe -f interface/cmsis-dap.cfg -f target/nrf52.cfg -c "program examples/Blink_nRF52840.hex verify reset exit"
On macOS / Linux:
openocd -f interface/cmsis-dap.cfg -f target/nrf52.cfg -c "program examples/Blink_nRF52840.hex verify reset exit"
For Seeed Studio XIAO RA4M1
Currently, standard OpenOCD distributions often lack built-in support for the Renesas RA series, such as dedicated drivers and target configuration files. This makes using OpenOCD for flashing a complex process that requires manual setup.
Therefore, we strongly recommend using PyOCD, which provides out-of-the-box support for the RA4M1.
To flash the firmware (e.g., Blink_RA4M1.hex), use the command corresponding to your operating system.
On Windows:
pyocd flash -e sector -a 0x0 -t r7fa4m1ab examples\Blink_RA4M1.hex
On macOS / Linux:
pyocd flash -e sector -a 0x0 -t r7fa4m1ab examples/Blink_RA4M1.hex
Command Explanation:
pyocd flash: Executes the flashing operation.-e sector: Erases the necessary sectors of the flash memory before programming.-a 0x0: Specifies the starting address for flashing, which is0x00000000.-t r7fa4m1ab: Specifies the target MCU type.examples\Blink_RA4M1.hexorexamples/Blink_RA4M1.hex: The path to the firmware file you want to flash. Note the use of\on Windows and/on macOS/Linux.
For Seeed Studio XIAO MG24
This board requires its dedicated OpenOCD version from the package. You must navigate into the correct directory before running the command.
-
Navigate to the correct directory:
- On Windows: Open a Command Prompt and run:
cd XIAO_MG24_Win_OpenOCD-v0.12.0 - On macOS/Linux: Open a Terminal and run:
cd XIAO_MG24_Mac_Linux_OpenOCD-v0.12.0
- On Windows: Open a Command Prompt and run:
-
Run the flash command: The path to the firmware is now
../examples/Blink_MG24.hexbecause you are two levels deep inside the package directory.On Windows:
bin\openocd.exe -f interface/cmsis-dap.cfg -f target/efm32s2_g23.cfg -c "init; reset_config srst_nogate; reset halt; program ../examples/Blink_MG24.hex; reset; exit"On macOS / Linux:
bin/openocd -f interface/cmsis-dap.cfg -f target/efm32s2_g23.cfg -c "init; reset_config srst_nogate; reset halt; program ../examples/Blink_MG24.hex; reset; exit"
Flashing Bootloader Files
This is a critical operation that can restore a board.
For Seeed Studio XIAO SAMD21
The standard OpenOCD package does not include the configuration file for the XIAO SAMD21. You must manually copy it from our provided package into your system's OpenOCD installation directory.
1. Copy the Configuration File
-
Source File: From the
XIAO_Debug_Mate_DAPLink_Package, find the file:target/XIAO_SAMD21/at91samd21g18.cfg. -
Destination Folder: Copy this file into the
targetscript folder of your xPack OpenOCD installation. The path will vary by OS:- Windows:
C:\Users\YourName\AppData\Local\xPacks\OpenOCD\xpack-openocd-0.12.0-7\openocd\scripts\target\ - macOS / Linux:
~/opt/xpack-openocd-0.12.0-7/share/openocd/scripts/target/
- Windows:
Replace YourName and xpack-openocd-0.12.0-7 with your actual username and the version of OpenOCD you installed.
2. Flash the firmware
This command uses the custom at91samd21g18.cfg file provided in our package to flash a .bin bootloader.
- On Windows:
openocd.exe -f interface/cmsis-dap.cfg -f target/at91samd21g18.cfg -c "telnet_port disabled; init; targets; halt; program examples/Bootloader_SAMD21.bin verify reset; shutdown"
- On macOS / Linux:
openocd -f interface/cmsis-dap.cfg -f target/at91samd21g18.cfg -c "telnet_port disabled; init; targets; halt; program examples/Bootloader_SAMD21.bin verify reset; shutdown"
For Seeed Studio XIAO nRF52840
This process involves downloading the bootloader, then erasing the chip and flashing the new file.
This command uses the standard nrf52.cfg from your OpenOCD installation.
On Windows:
openocd.exe -f interface/cmsis-dap.cfg -f target/nrf52.cfg -c "init" -c "halt" -c "nrf5 mass_erase" -c "program examples/Bootloader_nRF52840-0.6.1.hex verify" -c "reset" -c "exit"
On macOS / Linux:
openocd -f interface/cmsis-dap.cfg -f target/nrf52.cfg -c "init" -c "halt" -c "nrf5 mass_erase" -c "program examples/Bootloader_nRF52840-0.6.1.hex verify" -c "reset" -c "exit"
After burning the Bootloader using OpenOCD and then burning the firmware bin, the firmware bin cannot run properly. You need to upload a program using Arduino to make the program run normally.
This is because Nordic series chips (such as nRF52832) Bootloaders need to check validity information about the application firmware at a specific memory address (usually called "Bootloader Settings Page") during startup. This "settings page" contains the firmware's CRC checksum, length, and validity flags.
When you use general-purpose programming tools like OpenOCD to directly burn .bin files, they only write the firmware's binary data to the specified application start address, and do not automatically generate or write the "settings page" required by the Bootloader. Therefore, when the device restarts, the Bootloader cannot detect a valid settings page and determines that there is no legitimate application, thus refusing to start the firmware and usually entering DFU (Device Firmware Update) mode, waiting for updates via OTA or serial port.
For Seeed Studio XIAO RA4M1
Currently, standard OpenOCD distributions often lack built-in support for the Renesas RA series, such as dedicated drivers and target configuration files. This makes using OpenOCD for flashing a complex process that requires manual setup.
Therefore, we strongly recommend using PyOCD, which provides out-of-the-box support for the RA4M1.
To flash the Bootloader, use the command corresponding to your operating system.
On Windows:
pyocd flash -t r7fa4m1ab examples\Bootloader_RA4M1.hex —erase chip
On macOS / Linux:
pyocd flash -t r7fa4m1ab examples/Bootloader_RA4M1.hex —erase chip
Using Debugging on PlatformIO
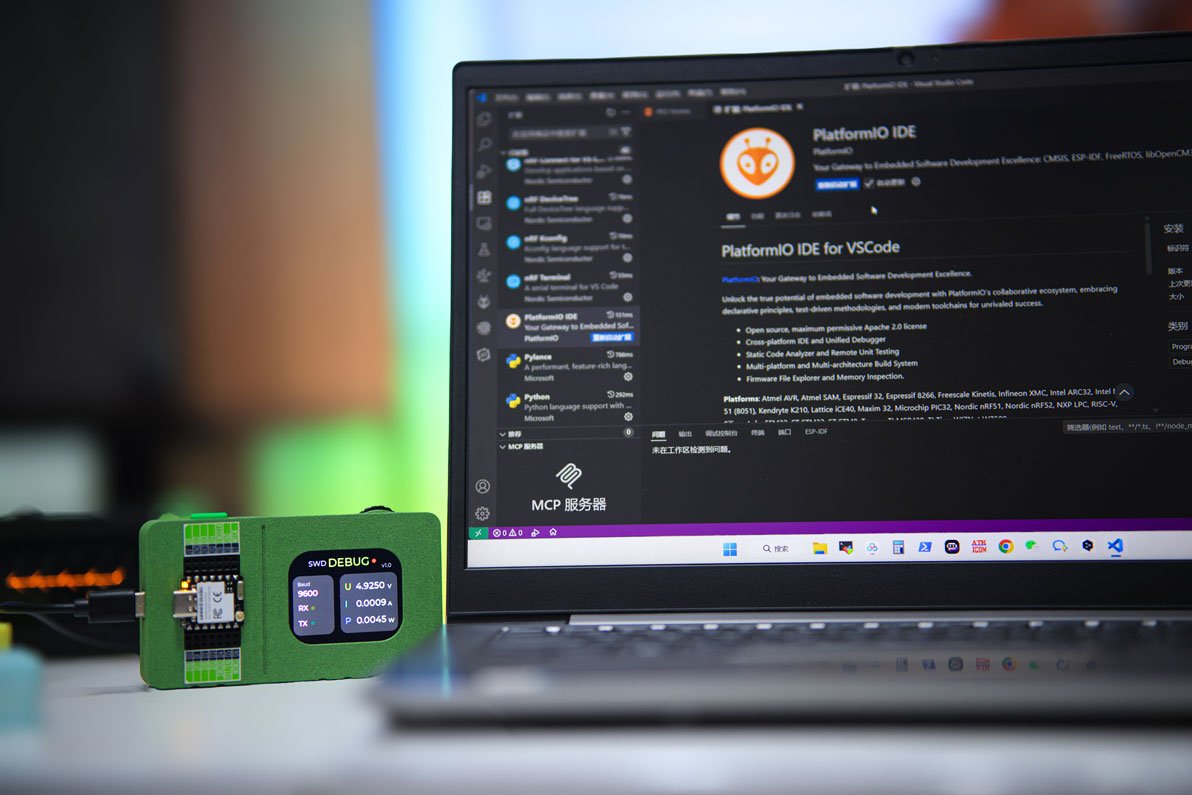
First, ensure you have the PlatformIO IDE extension installed in Visual Studio Code.
- Install VS Code: Download and install Visual Studio Code.
- Install PlatformIO IDE: Open VS Code, navigate to the Extensions view (Ctrl+Shift+X), search for
PlatformIO IDE, and install it.
Creating and Configuring a PlatformIO Project
- Launch PlatformIO: Click the PlatformIO icon in the VS Code Activity Bar and select "Home" to open the PIO Home screen.
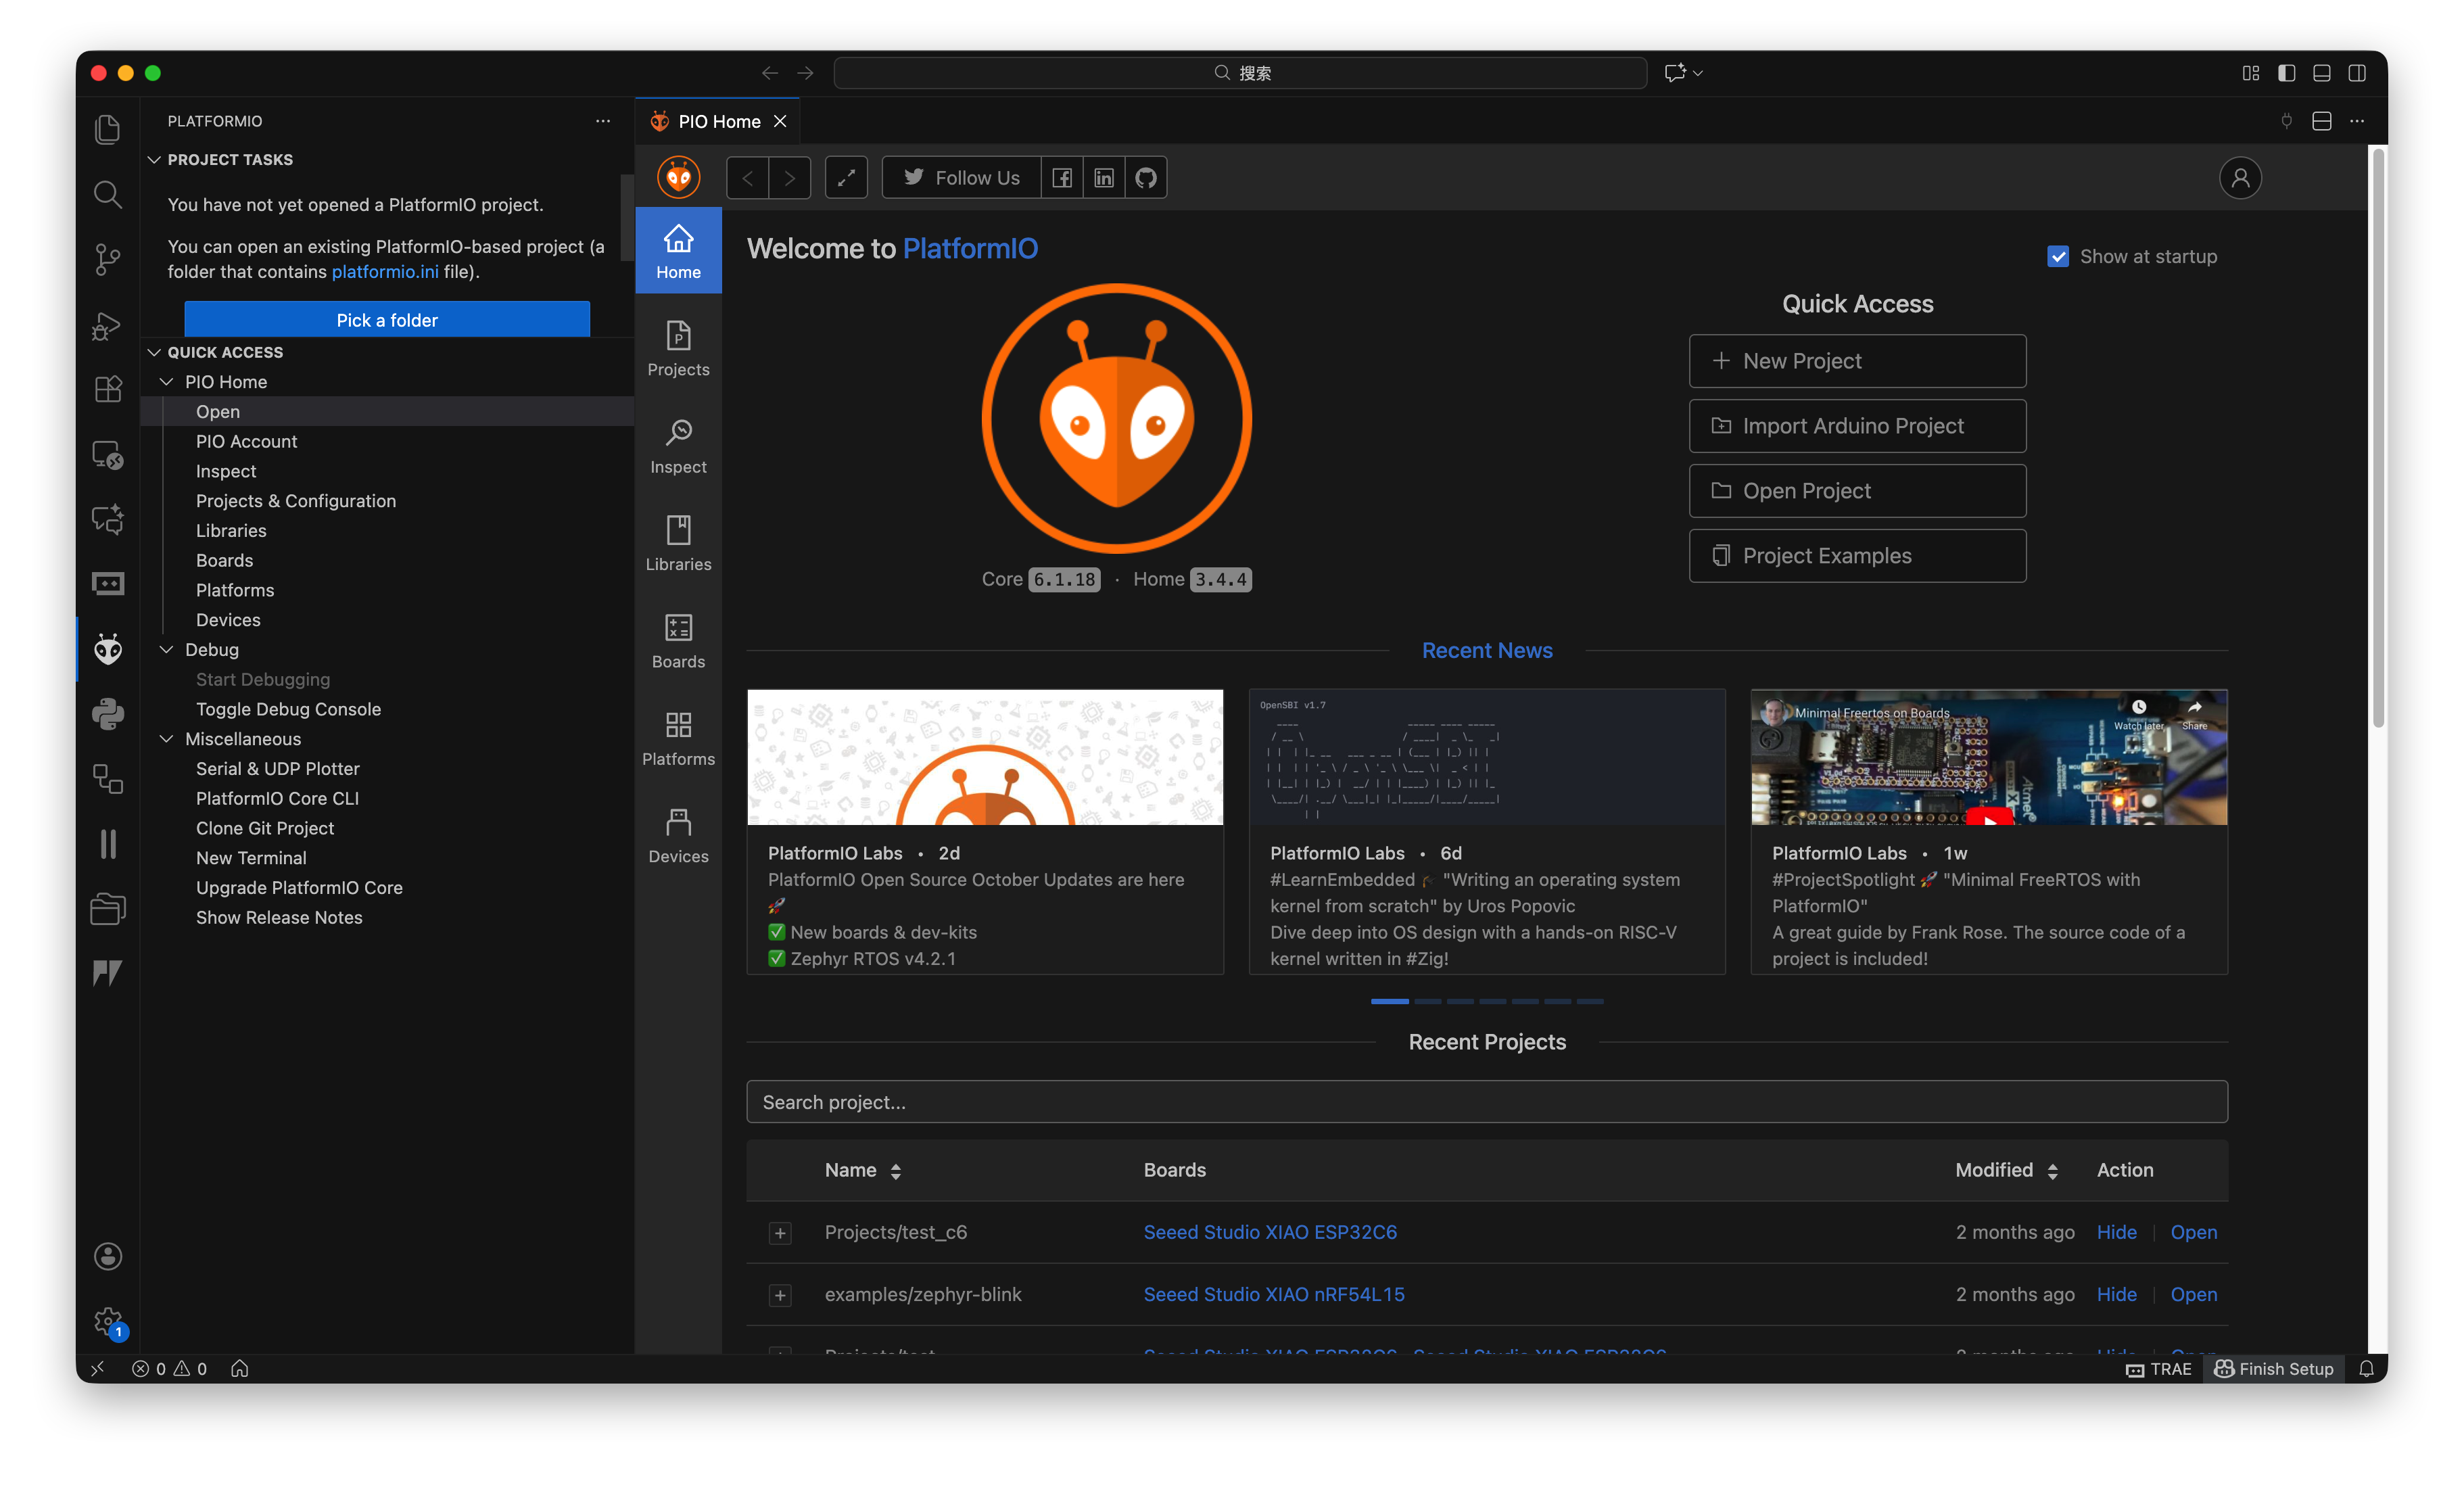
- Create a New Project: Click on "New Project" and give your project a name.
- Select Board: Search for the specific XIAO board you intend to use.
Since Seeed Studio boards are hosted in a third-party repository, your specific board might not appear in the search list by default. If this happens, you can select a generic board (or any available board) to initialize the project, and we will correct it in the next step.
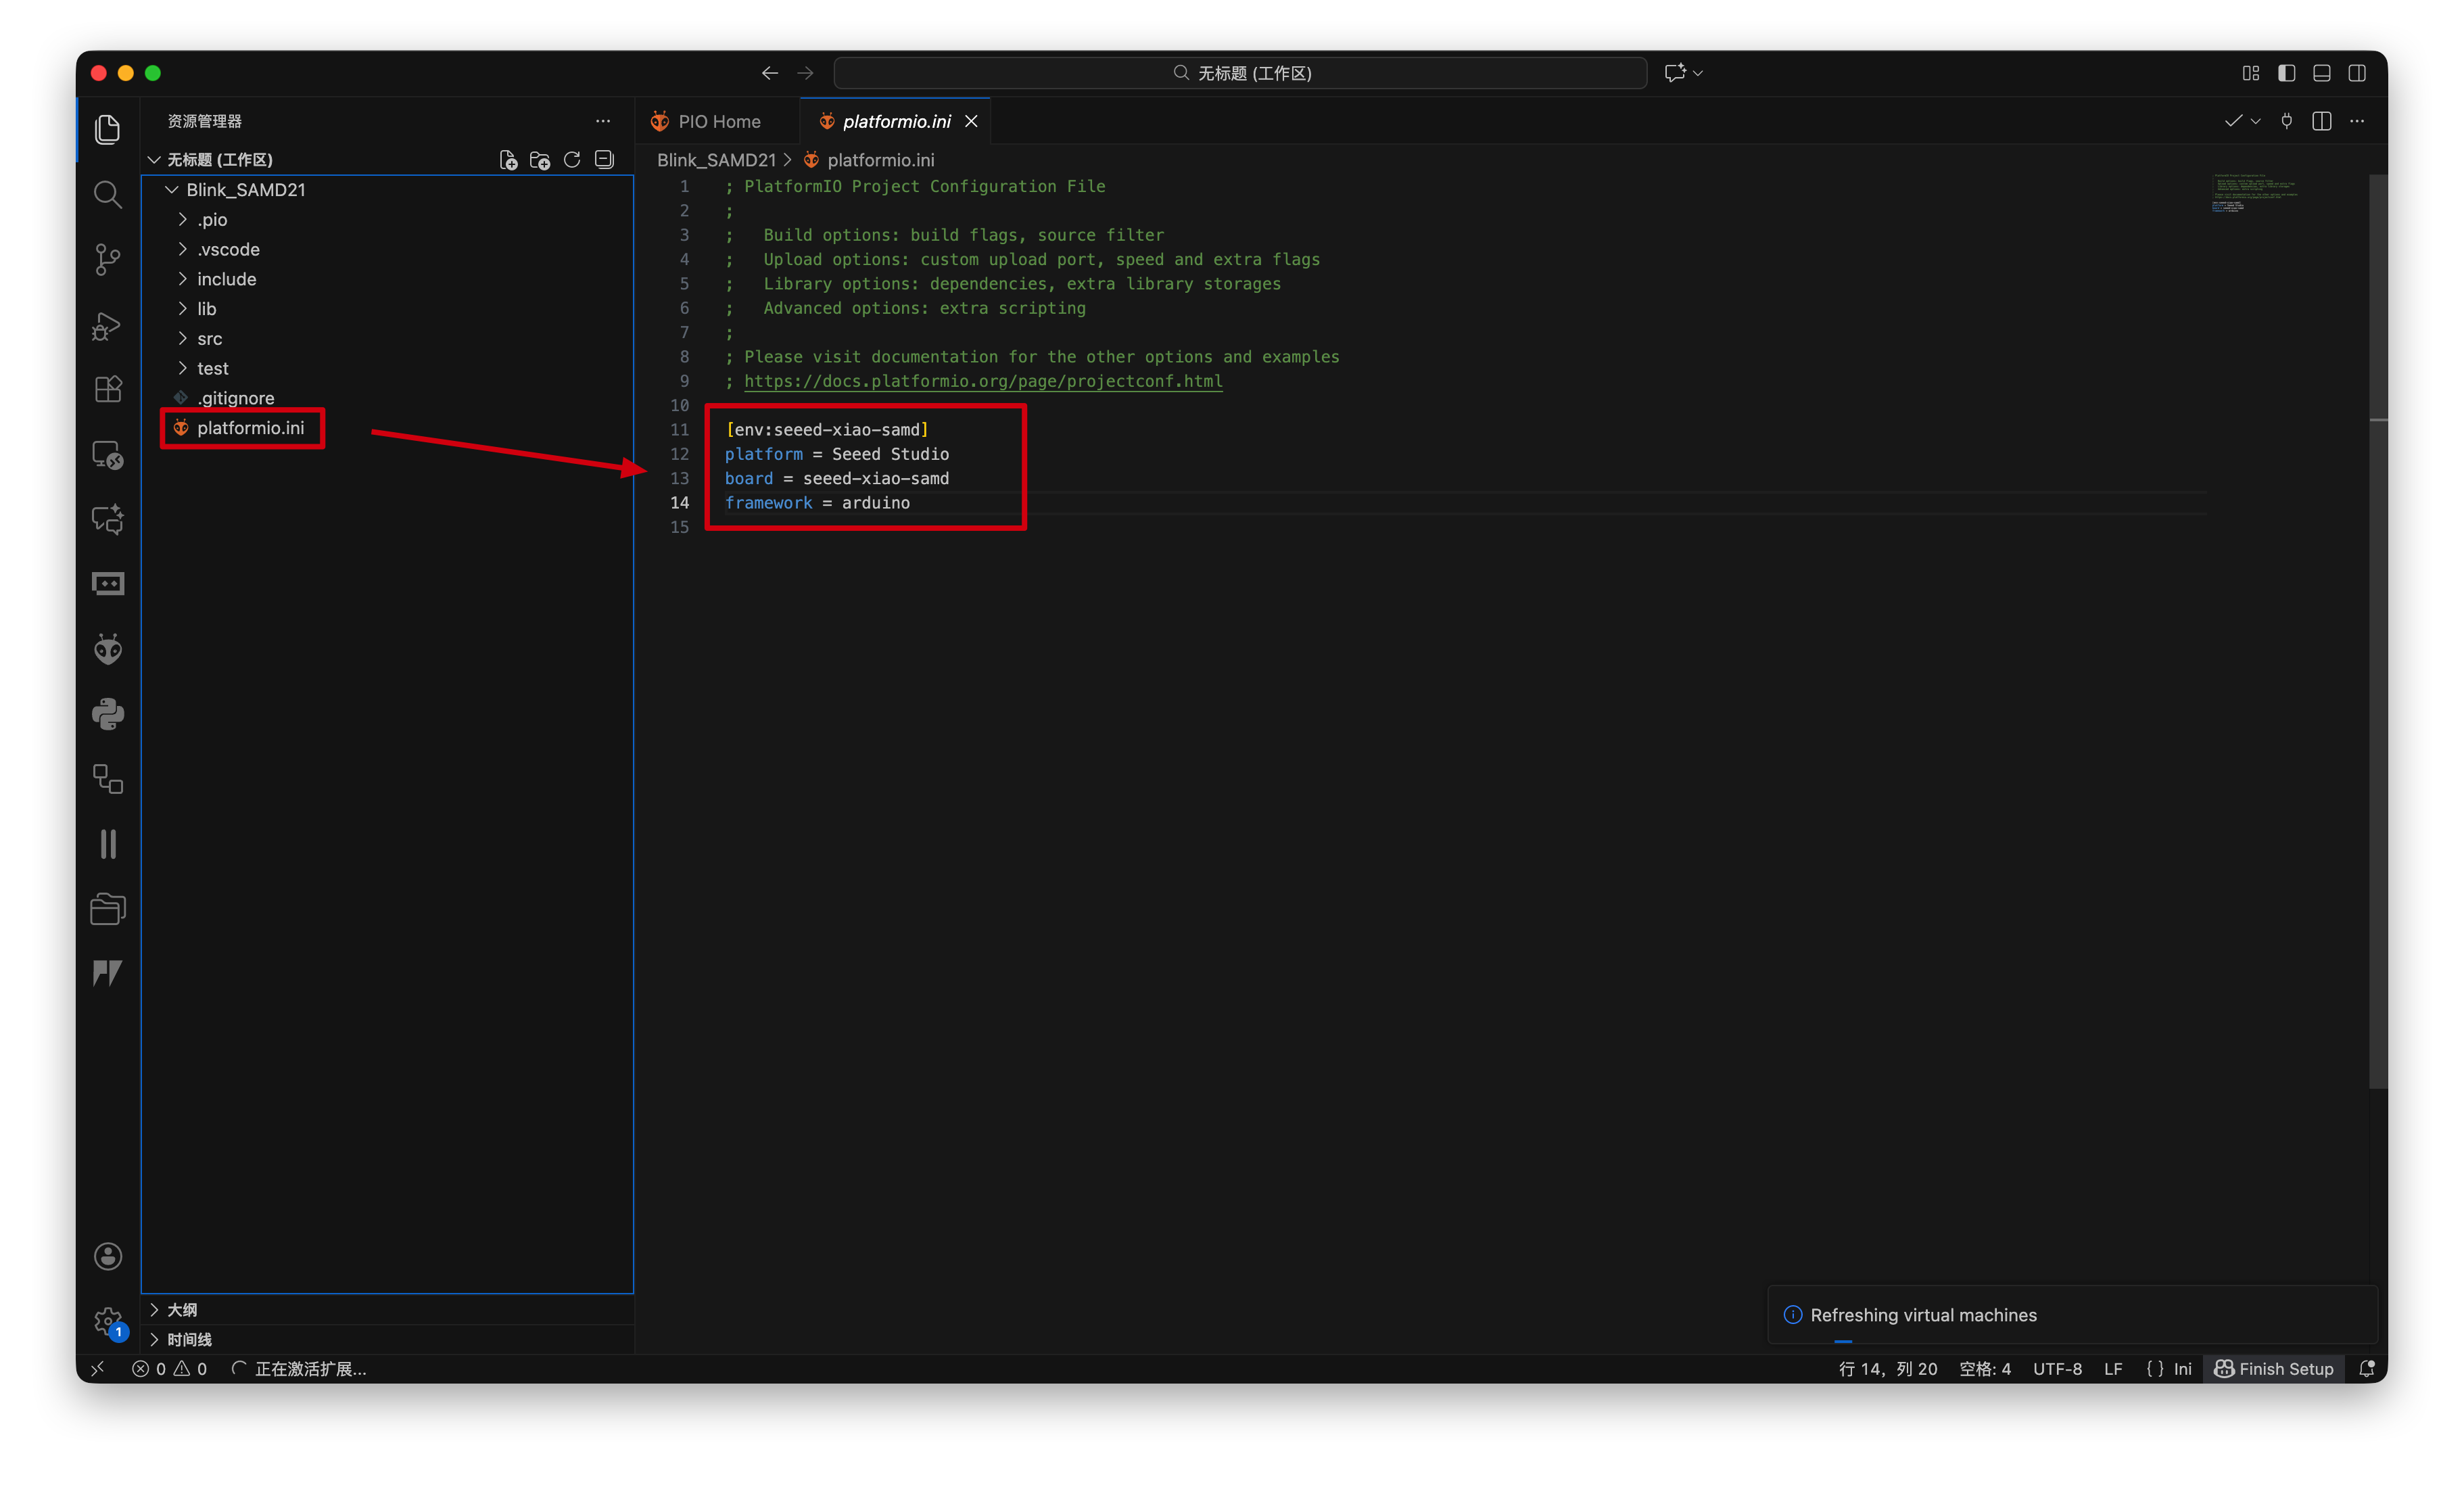
-
Configure
platformio.ini: This is the most critical step. To enable debugging with the XIAO Debug Mate and correctly recognize the board, you must modify theplatformio.inifile located in the root of your project.Adding Seeed Studio Board Support: Seeed Studio development boards are not included in the default PlatformIO registry but are maintained in a third-party repository. To use them, you must specify the repository URL in your configuration.
You need to set the
platformparameter to the following URL:https://github.com/Seeed-Studio/platform-seeedboardsThe configuration file tells PlatformIO to download the board definitions from this custom repository, and specifies what tools to use for uploading and debugging. The XIAO Debug Mate functions as a standard CMSIS-DAP debugger.
Below are the recommended platformio.ini configurations for various XIAO models. Copy the contents corresponding to your board. We are using the development version of the platform from GitHub to ensure you have the latest board support files.
- XIAO RP2350
- XIAO RP2040
- XIAO SAMD21
- XIAO nRF52840
- XIAO RA4M1
- XIAO MG24
[env:seeed_xiao_rp2350]
platform = https://github.com/Seeed-Studio/platform-seeedboards.git
board = seeed-xiao-rp2350
framework = arduino
upload_protocol = cmsis-dap
debug_tool = cmsis-dap
[env:seeed_xiao_rp2040]
platform = https://github.com/Seeed-Studio/platform-seeedboards.git
board = seeed-xiao-rp2040
framework = arduino
upload_protocol = cmsis-dap
debug_tool = cmsis-dap
[env:seeed-xiao-samd]
platform = https://github.com/Seeed-Studio/platform-seeedboards.git
board = seeed-xiao-samd
framework = arduino
upload_protocol = cmsis-dap
debug_tool = cmsis-dap
For the nRF52840, PlatformIO offers two board support packages. Choose the one that fits your project requirements.
Mbed Core:
[env:seeed-xiao-mbed-nrf52840]
platform = https://github.com/Seeed-Studio/platform-seeedboards.git
board = seeed-xiao-mbed-nrf52840
framework = arduino
upload_protocol = cmsis-dap
debug_tool = cmsis-dap
Adafruit Core:
[env:seeed-xiao-afruitnrf52-nrf52840]
platform = https://github.com/Seeed-Studio/platform-seeedboards.git
board = seeed-xiao-afruitnrf52-nrf52840
framework = arduino
upload_protocol = cmsis-dap
debug_tool = cmsis-dap
Note that the RA4M1 is a special case. It uses pyocd for uploading but still uses cmsis-dap for debugging.
[env:seeed-xiao-ra4m1]
platform = https://github.com/Seeed-Studio/platform-seeedboards.git
board = seeed-xiao-ra4m1
framework = arduino
upload_protocol = pyocd
debug_tool = cmsis-dap
[env:seeed-xiao-mg24]
platform = https://github.com/Seeed-Studio/platform-seeedboards.git
board = seeed-xiao-mg24
framework = arduino
upload_protocol = cmsis-dap
debug_tool = cmsis-dap
After saving the platformio.ini file, PlatformIO will automatically download all the necessary toolchains and packages the next time you build or debug.
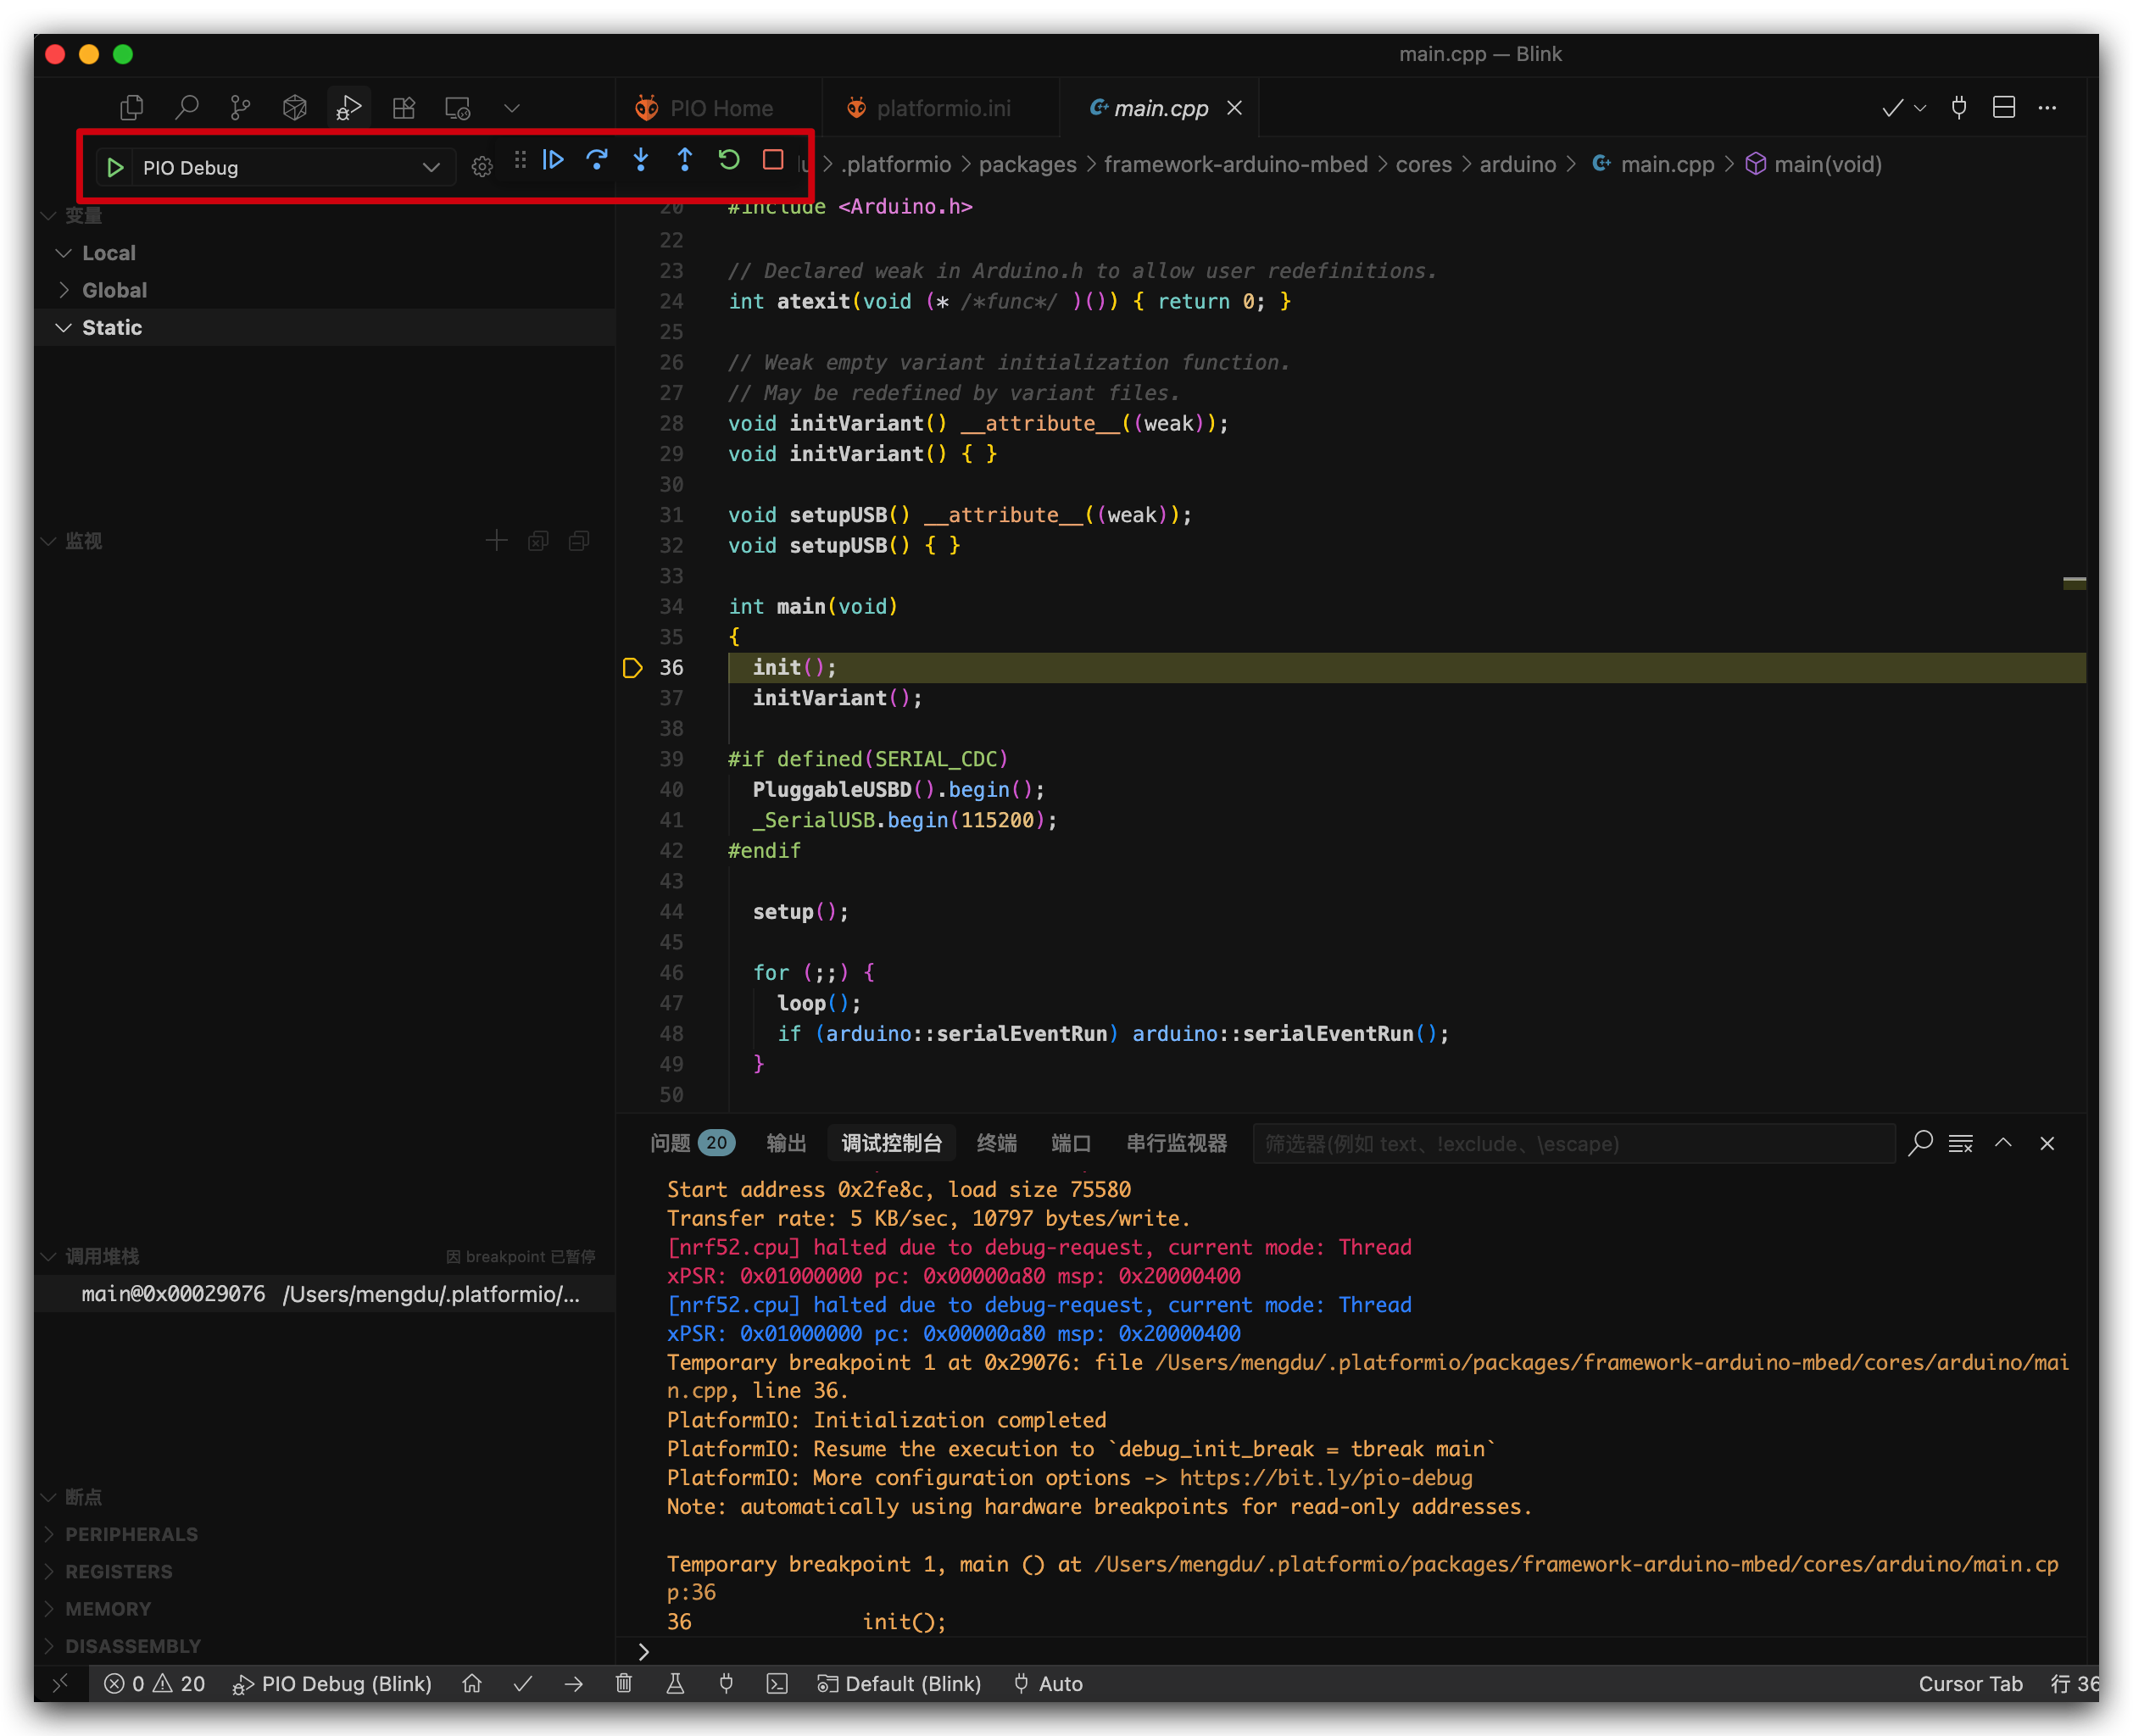
Step-by-step debugging
Step-by-step execution is a core feature for tracing your code's logic and identifying bugs.
- Connect Hardware: Plug your XIAO board into the XIAO Debug Mate. Connect the Debug Mate to your computer using a USB-C cable.
- Start Debugging: You can initiate a debugging session in two ways:
- Press the
F5key. - Navigate to the "Run and Debug" view (bug icon in the Activity Bar) and click the green "Start Debugging" arrow at the top.
- Press the
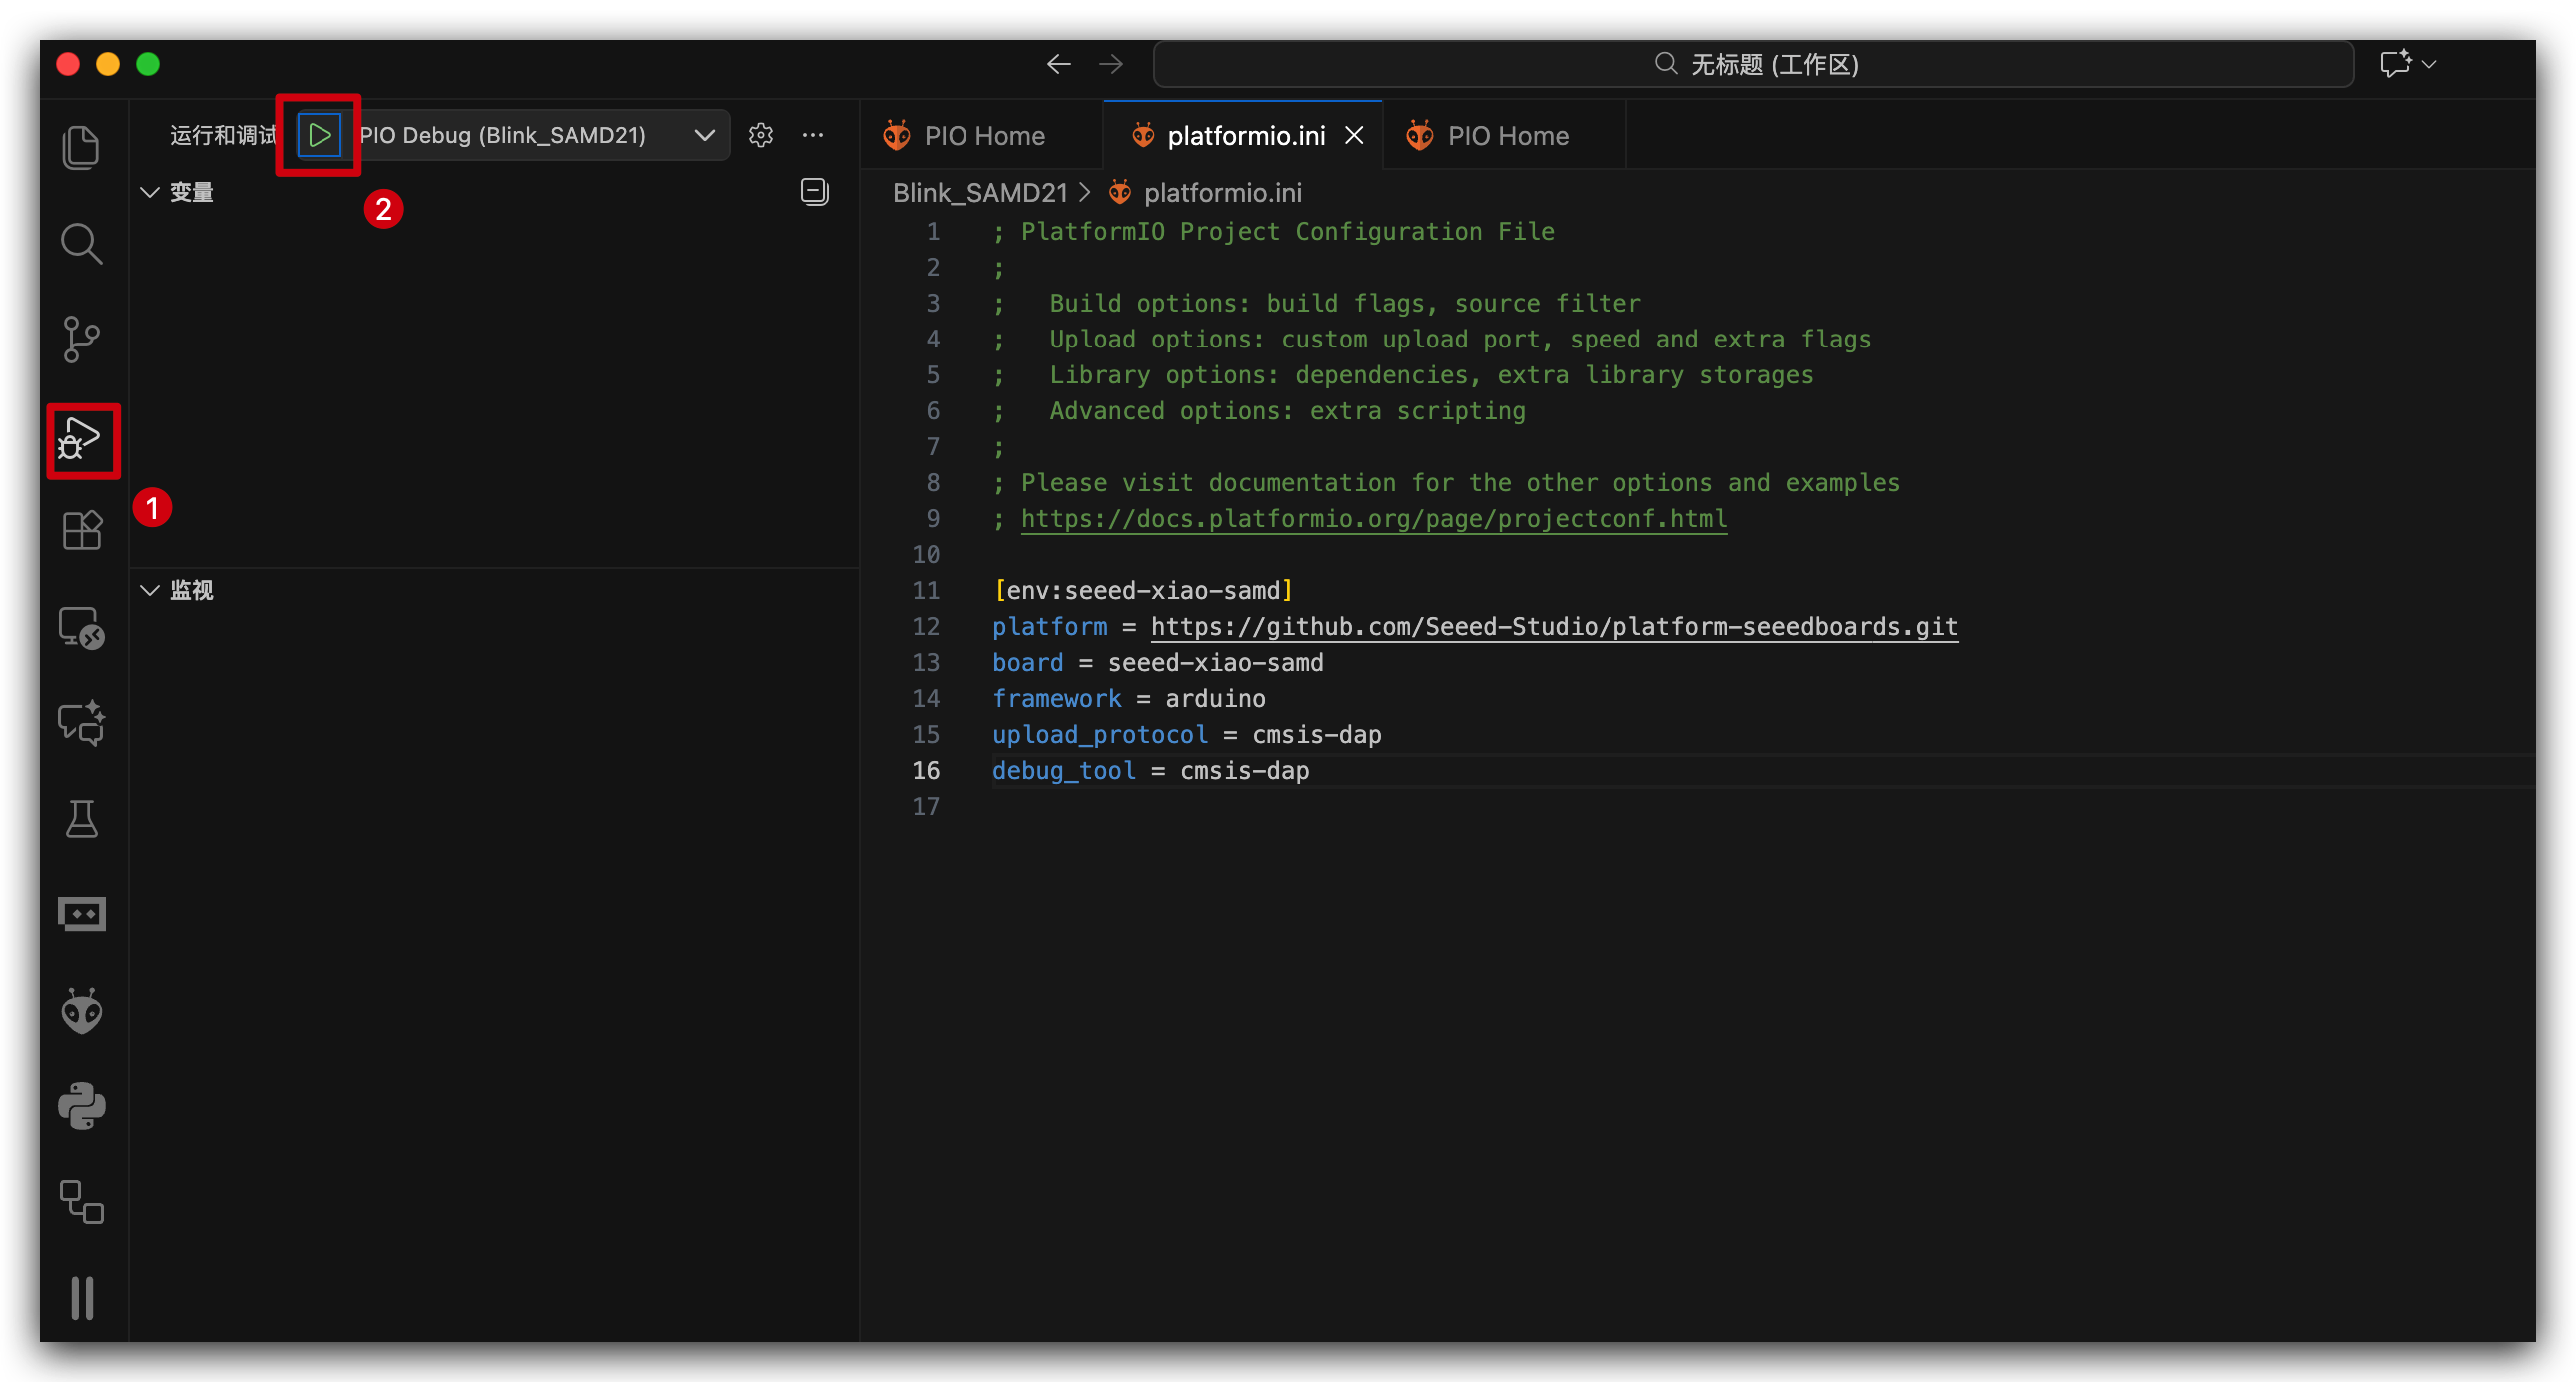
- Debug Controls: PlatformIO will compile your code, upload it to the XIAO via the Debug Mate, and pause execution at the first line of
main()orsetup(). A debug toolbar will appear at the top of the editor, allowing you to control the program flow:- Continue (F5): Resume execution until the next breakpoint is hit or the program finishes.
- Step Over (F10): Execute the current line. If the line contains a function call, it will execute the entire function and stop on the next line.
- Step Into (F11): Execute the current line. If the line contains a function call, the debugger will enter the function and stop at its first line.
- Step Out (Shift+F11): If paused inside a function, this will execute the remainder of the function and return to the line where it was called.
- Restart (Ctrl+Shift+F5): Terminate and restart the current debug session.
- Stop (Shift+F5): Terminate the debug session.

Breakpoint debugging
If you want the program to pause at a specific location, breakpoints are the tool for the job.
- Set a Breakpoint: In the code editor, move your cursor to the left of the line number where you want to pause. A faint red dot will appear. Click it to set a breakpoint (the dot will become bright red).
- Run to Breakpoint: Start a debug session (
F5). The program will run at full speed and automatically pause when it reaches the line with the breakpoint. - Manage Breakpoints: In the "Run and Debug" side panel, the "BREAKPOINTS" section lists all active breakpoints. You can enable, disable, or delete them from here.

RAM Read/Write
While the program is paused at a breakpoint, you can inspect and even modify the state of variables.
- View Variables (Read): In the "Run and Debug" side panel, the "VARIABLES" section displays all local and global variables within the current scope and their current values.
- Watch Variables: If you want to monitor specific variables or expressions, go to the "WATCH" section, click the
+icon, and enter the variable name (e.g.,myVariableor&myVariableto see its memory address).
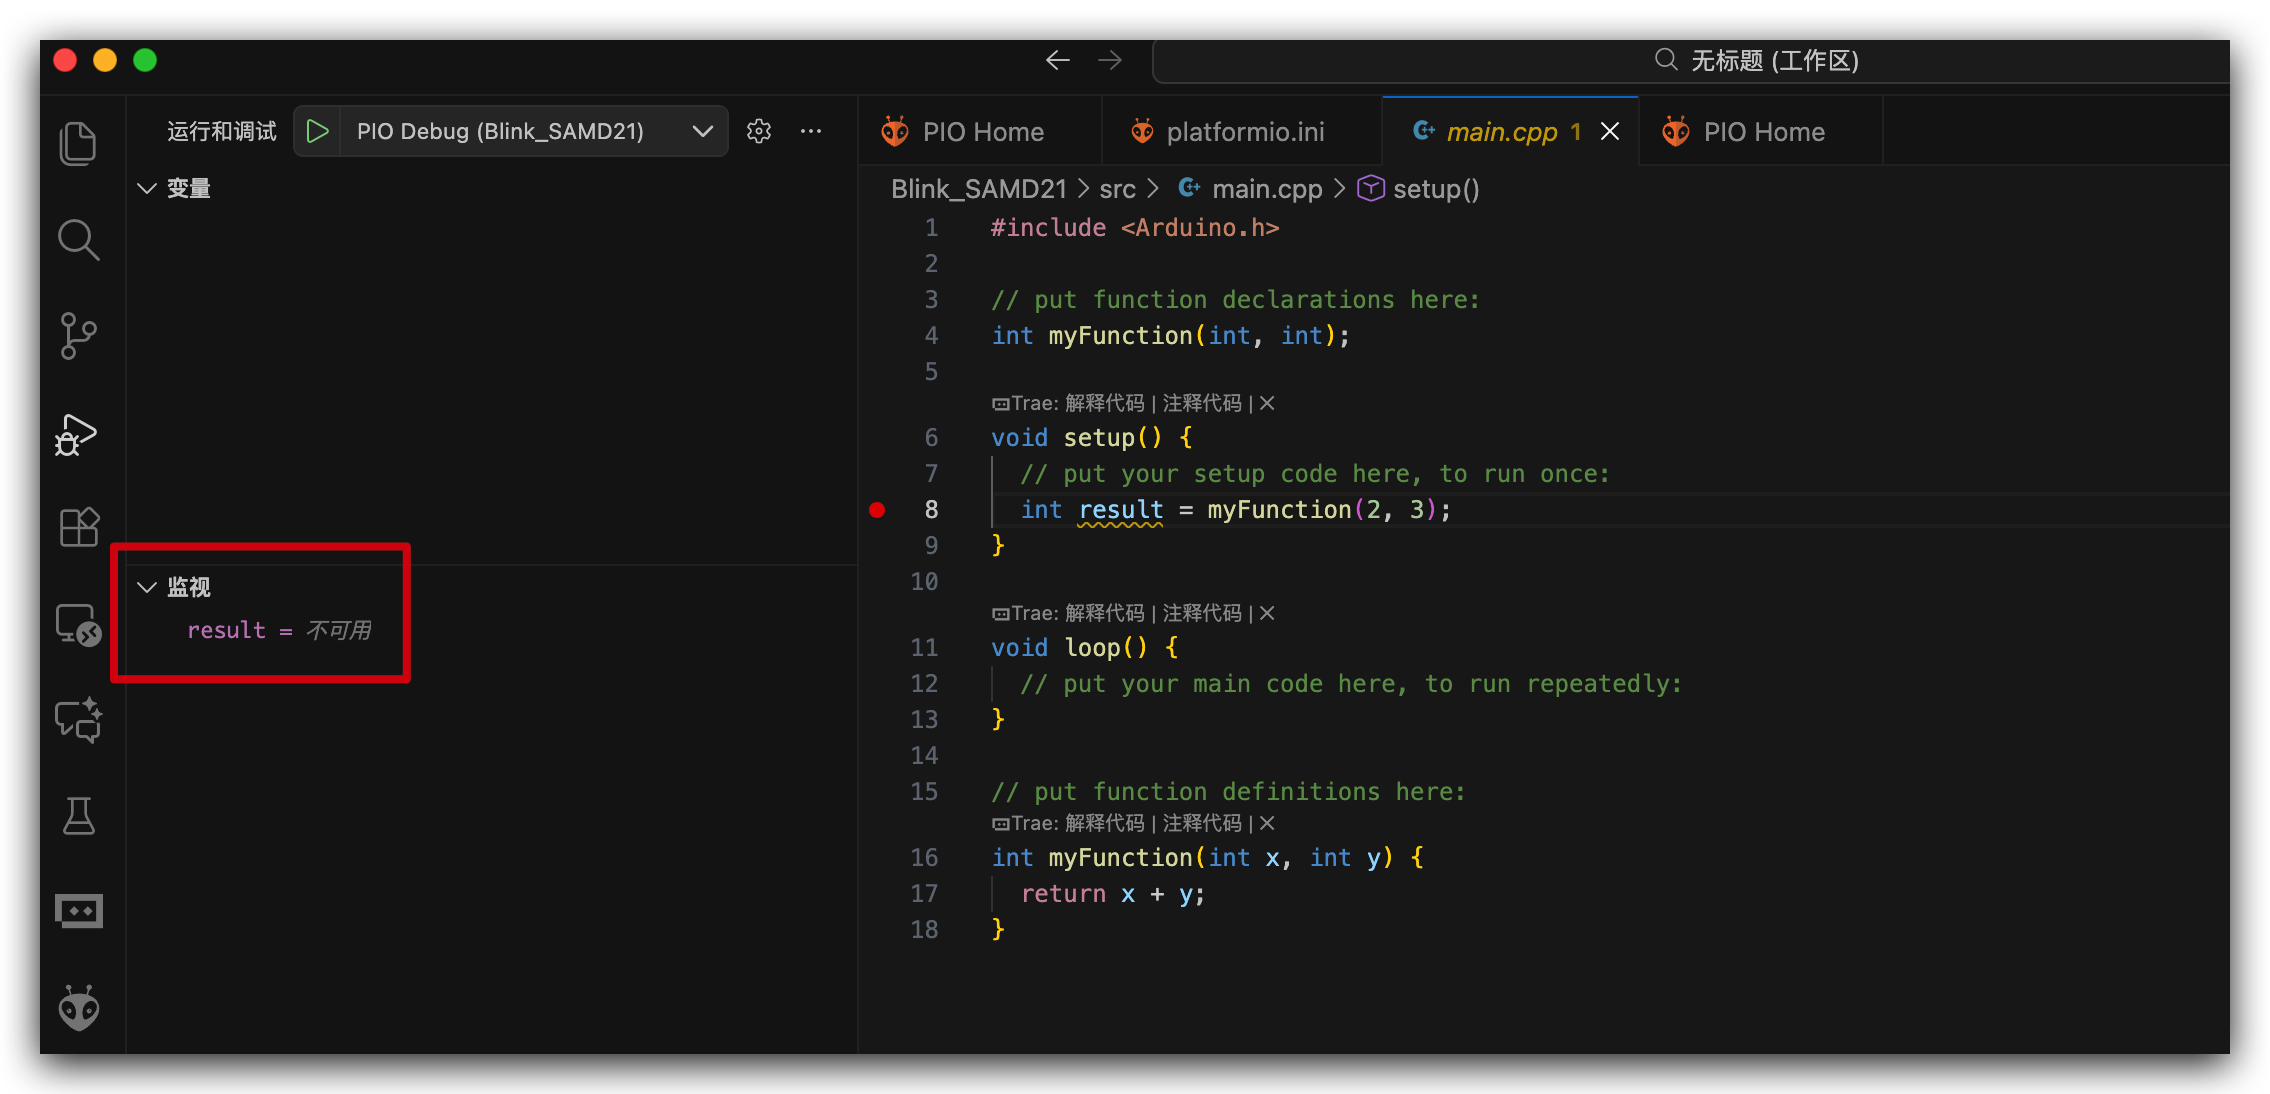
- Modify Variables (Write): In the "VARIABLES" or "WATCH" sections, you can often double-click on a variable's value to enter a new one. Press Enter to apply the change. This is incredibly useful for testing different conditions without restarting your program.
Troubleshooting
Q1: If I brick my XIAO RA4M1, is there any way to fix it?
You can try reflashing the bootloader to restore the device. For the XIAO RA4M1 model, refer to this method for bootloader recovery.
When restoring the Bootloader, if an error occurs, try connecting the XIAO RA4M1 to the XIAO Debug Mate, which is connected to your computer. Hold down the B button on the XIAO RA4M1 while simultaneously clicking the R button once, then release both R and B. Proceed to flash the Bootloader again.
After flashing the Bootloader, attempt to re-update the firmware using software like Arduino. This usually restores functionality. If unsuccessful, the device may be permanently damaged and irreparable. Any actions involving flashing firmware with XIAO Debug Mate may require you to assume full responsibility.
Q2: How can you tell if a device has been bricked?
The most straightforward way to determine if the XIAO device is damaged is that it shows no serial port connection when connected to a computer. If the device still shows no serial port connection after holding down the B button and then plugging it into the computer, the device is damaged.
Q3: Can damaged equipment be repaired? Can I contact technical support to request a replacement?
Damage to XIAO devices is typically caused by issues with partitioning or the Bootloader file. This can usually be resolved by reflashing the Bootloader file. If this fails, there are currently no alternative solutions. Users must assume full responsibility for performing this operation themselves, so please ensure the flashing commands and firmware are verified and valid.
Q4: Does XIAO Debug Mate require a driver?
XIAO Debug Mate has been tested and verified on the latest computer operating systems and functions normally without requiring driver installation. For Windows computers, we recommend using the Windows 11 operating system. During testing, we discovered that if you have installed drivers using Zading, it may cause the device to fail to be recognized.
Q5: My XIAO Debug Mate consistently displays a red light on Windows 11 and cannot be recognized, reporting the error: “unable to find a matching CMSIS-DAP device.”
Regarding the issue where your XIAO Debug Mate shows a red light and reports "unable to find a matching CMSIS-DAP device" on Windows 11, please try the following troubleshooting steps:
1. Verify the USB Cable
First, please ensure that the USB cable you are using supports data transfer and is not just a charging cable. You can verify this by checking if the device appears in a serial monitor software or if you can see any device logs. If the computer does not react at all when plugged in, try swapping the cable.
2. Reinstall the Driver via PowerShell
If the cable is confirmed to be working, the issue is likely caused by an incorrect driver installation. You can resolve this by removing the conflicting driver using PowerShell. Please follow these steps:
-
Right-click the Start button and select Terminal (Admin) or PowerShell (Admin).
-
Run the following command to find the CMSIS-DAP driver details:
dism /online /get-drivers /format:table | findstr /i "cmsis-dap" -
Look for the "Published Name" (usually looks like
oemXX.inf) in the output. -
Run the following command to delete and uninstall the driver (replace
{inf_name}with the actual name you found in the previous step, e.g.,oem10.inf):pnputil /delete-driver {inf_name} /uninstall
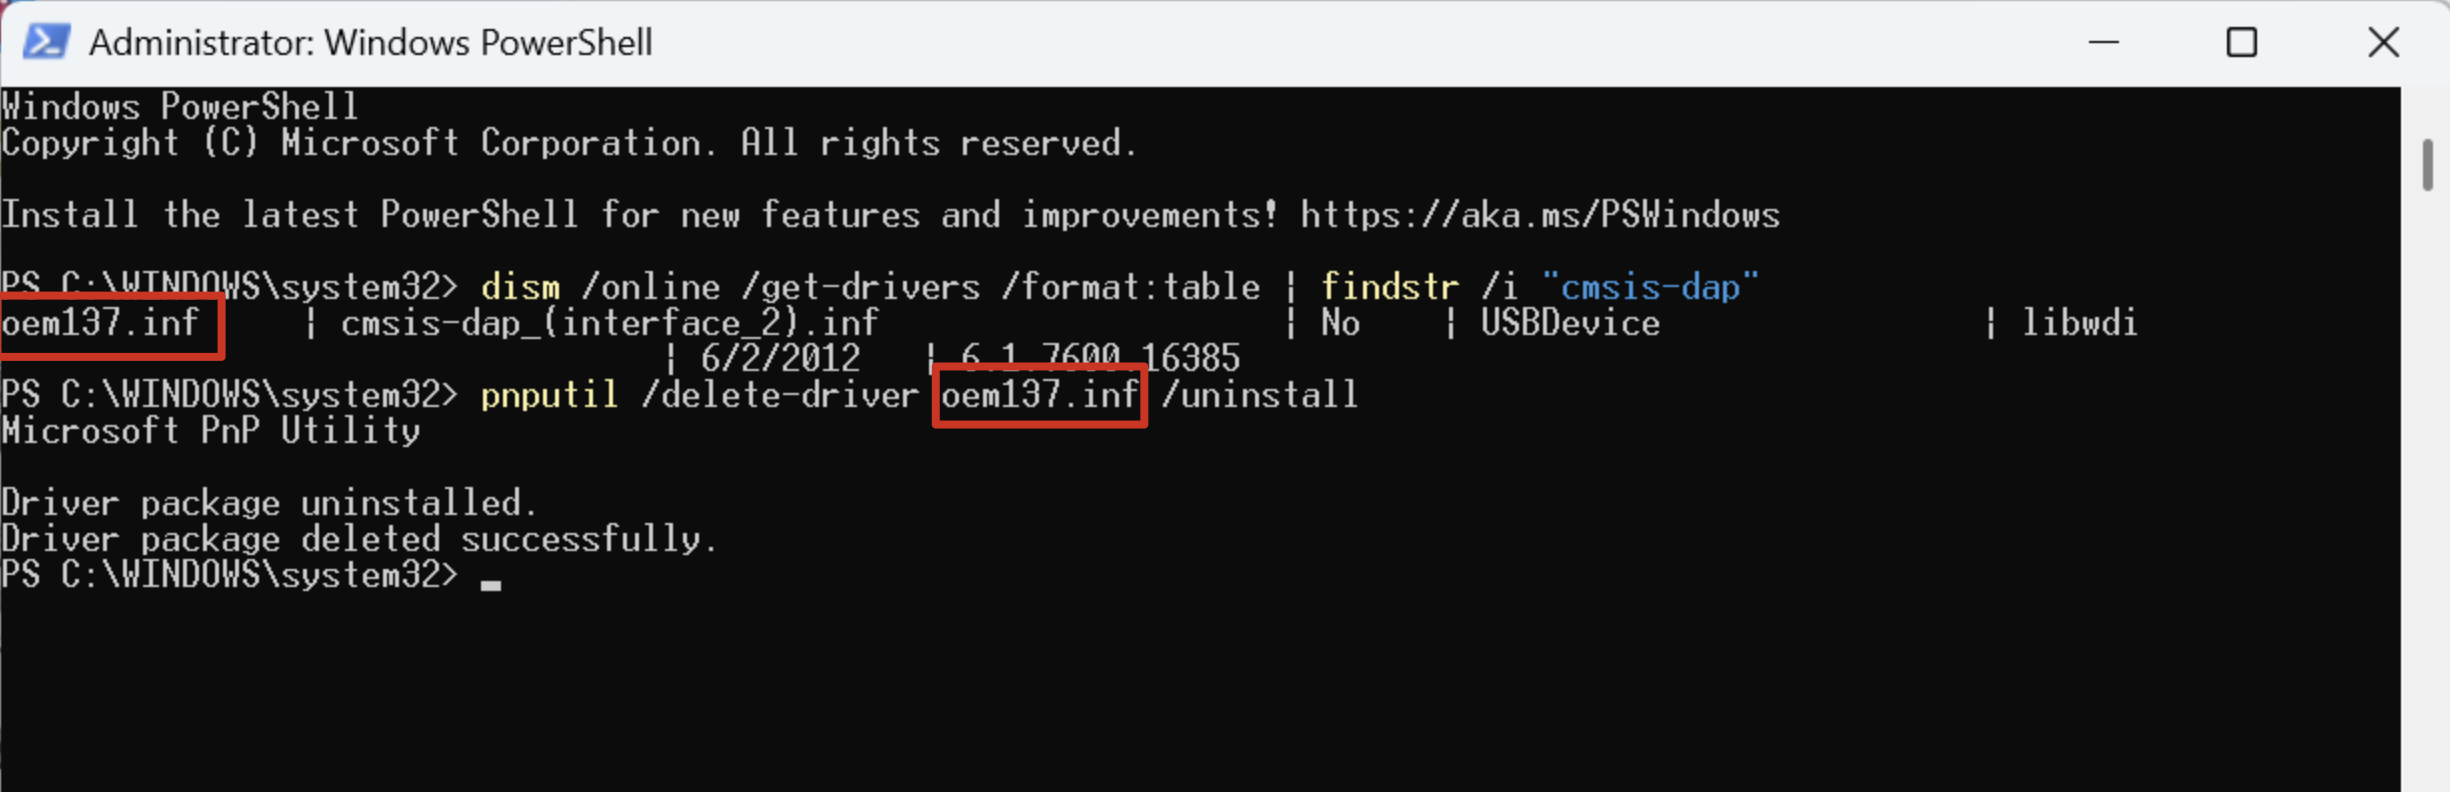
After completing these steps, please reconnect your device and check if it is recognized correctly.
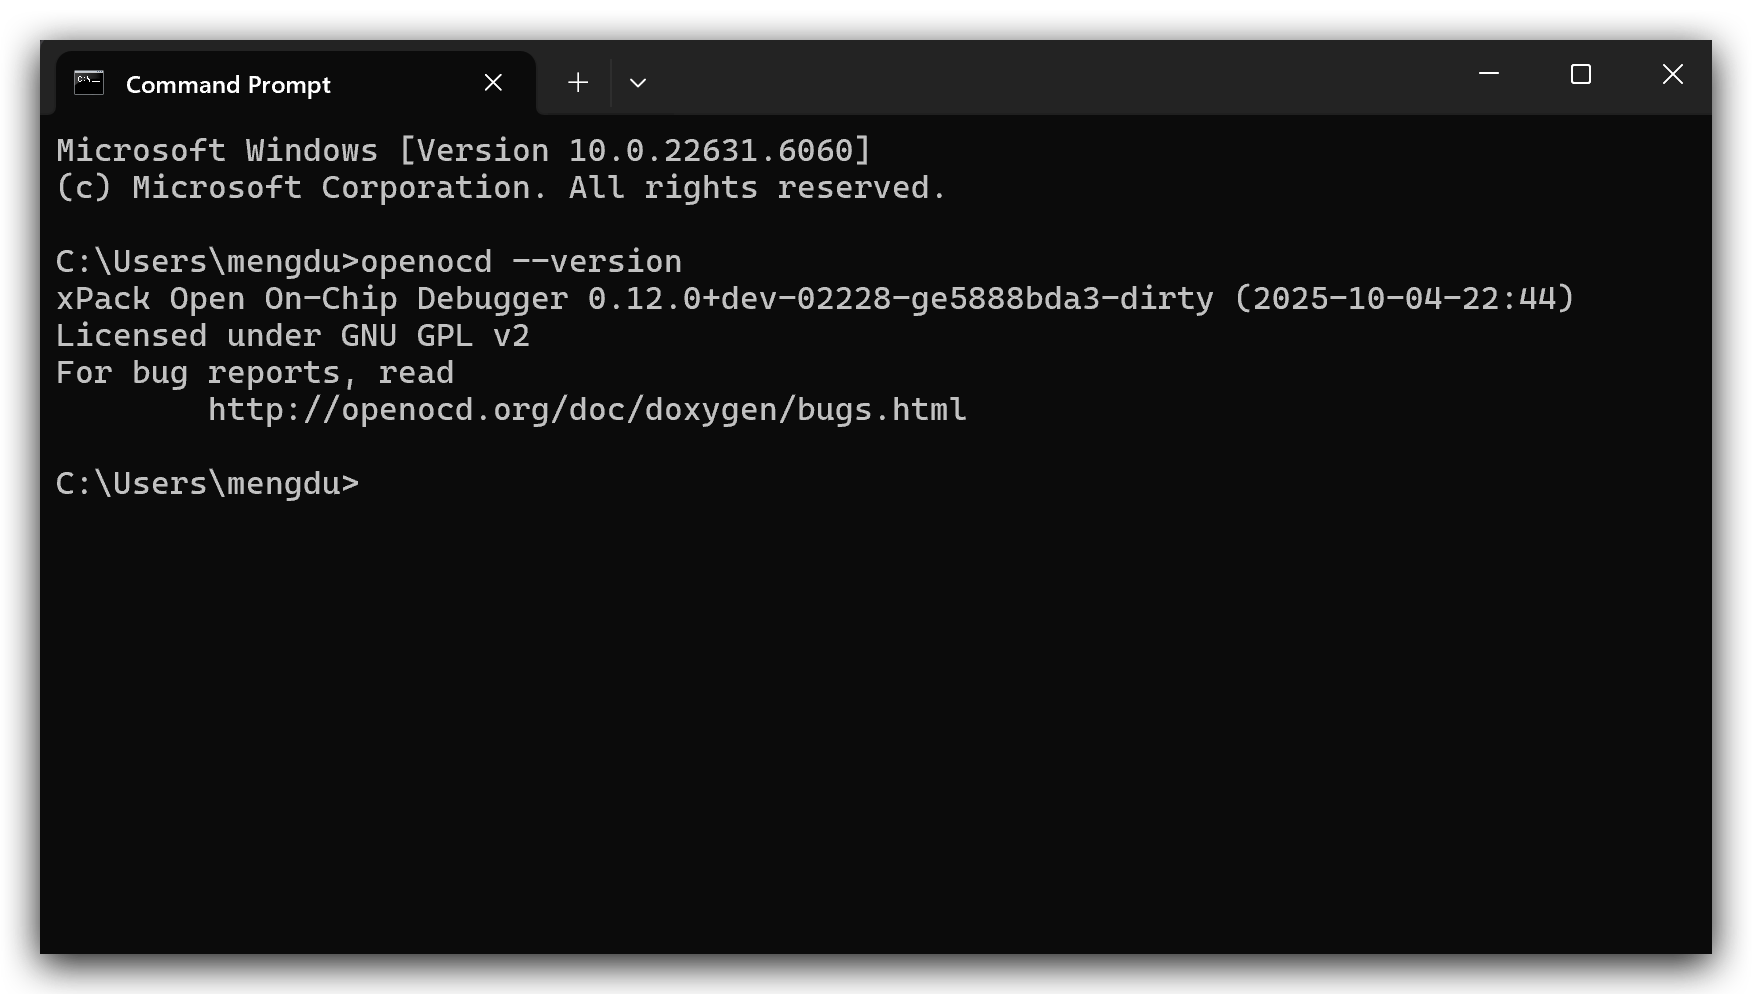
Q6: What should I do if the OpenOCD version shown on my system is different from the screenshot in the Wiki?
If you check the OpenOCD version on your system and the output does not match the recommended version shown in the Wiki screenshots, you may have multiple OpenOCD installations, or your system is using a different version by default.
On Windows computers, open the System Environment Variables and go to the System variables section. Edit the Path variable and move the path for the Wiki-recommended OpenOCD installation (for example, C:\Users\YourName\AppData\Local\xPacks\OpenOCD\xpack-openocd-0.12.0-7\bin) to the very top of the list. This ensures the recommended OpenOCD version will be found and used first by your system. After making this change, open a new terminal and re-run openocd --version to confirm that the correct version is now shown.