Matter Development with XIAO ESP32 Series
This article is the third tutorial in the Seeed Studio XIAO ESP32 Development Matter series. If you have not read the previous tutorials, we recommend that you read them first to check that your device is and has been configured as required.
In the rapidly evolving landscape of the Internet of Things (IoT), a new player has emerged to revolutionize the way smart home devices communicate and interact with each other. Meet Matter, the unifying protocol that promises to bridge the gap between various smart home ecosystems and create a seamless, interoperable experience for users worldwide.
So, what exactly is Matter, and why is it generating so much excitement in the IoT community? Matter is an open-source, standardized protocol that enables smart home devices from different manufacturers to work together effortlessly. It aims to simplify the development and deployment of IoT devices by providing a common language and framework for communication.
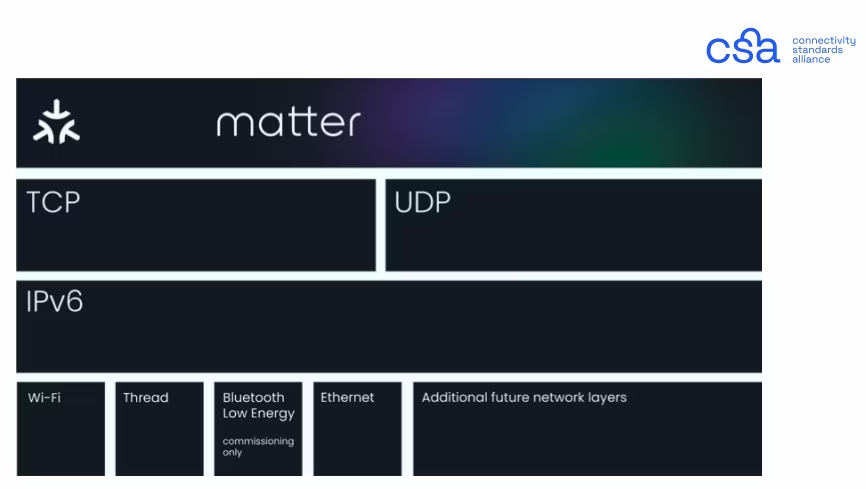
- Communication protocol for smart home devices.
- 1.0 version launched on October 4, 2022, after being postponed twice.
- Standardized set of commands, so devices from different manufacturers can talk to each other.
- Runs on top of IP networks, using either Thread, Wi-Fi, or Ethernet.
- Uses Security by Design and Zero-Trust.
- Runs locally – typically connects to the cloud via a Matter hub.
- Exists alongside other smart home standards like Zigbee, Z-Wave, and 433MHz.
- Battery life and range dependent on wireless networking technology.
- Coordinated by a Matter hub.
The value proposition of Matter is clear: it offers a path to a more connected, user-friendly, and secure smart home experience. By adopting Matter, device manufacturers can ensure that their products are compatible with a wide range of smart home platforms and assistants, such as Amazon Alexa, Google Home, and Apple HomeKit. This interoperability not only benefits consumers but also opens up new opportunities for developers and businesses in the IoT space.
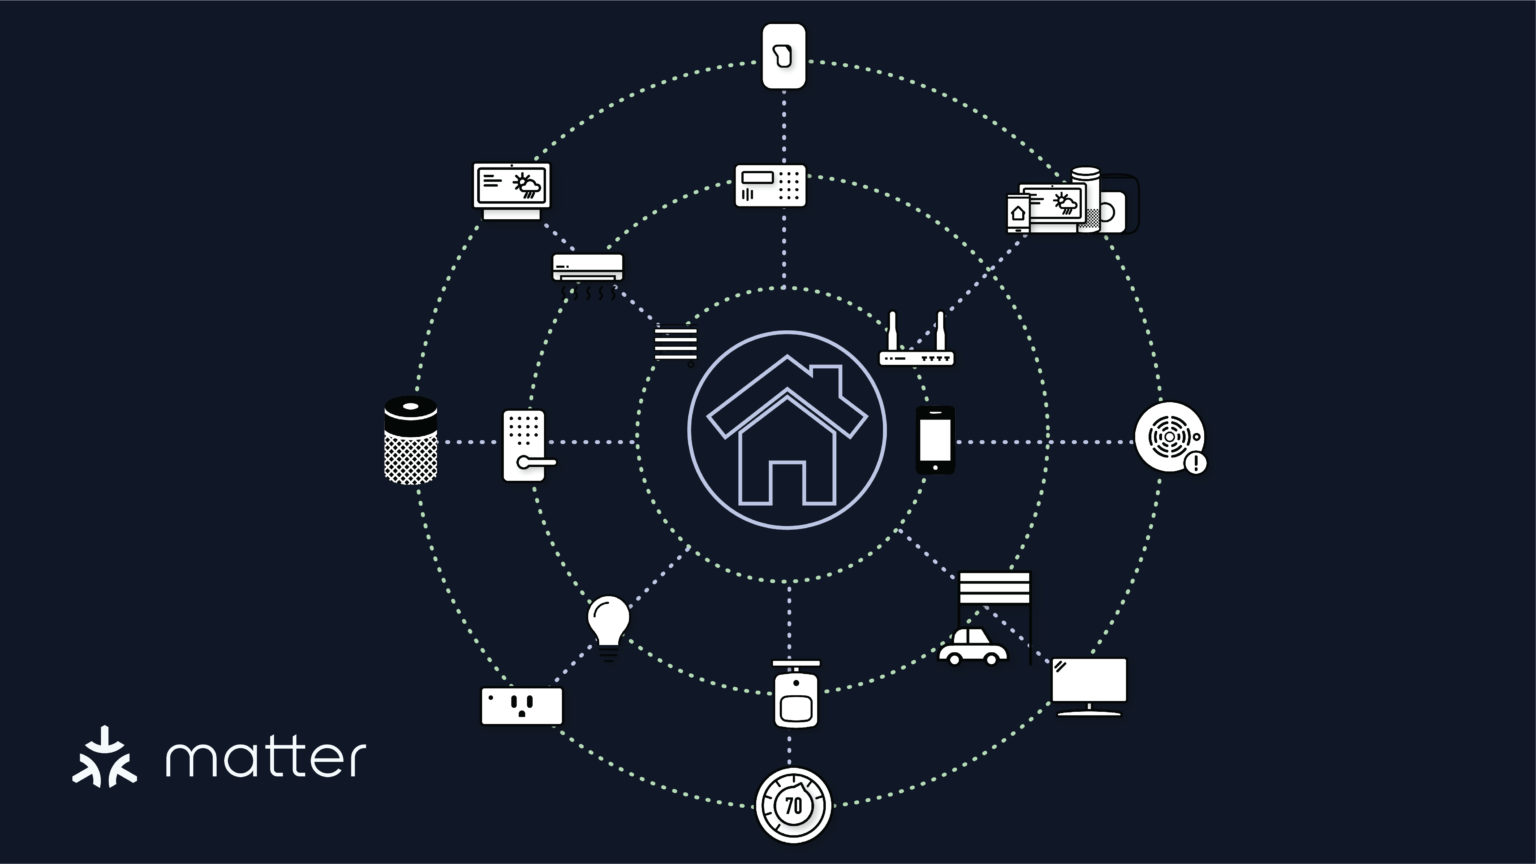
As a developer, embracing Matter means tapping into a vast ecosystem of devices and services, allowing you to create innovative solutions that can seamlessly integrate with existing smart home setups. By leveraging the power of Matter, you can focus on building compelling user experiences and functionalities, rather than worrying about the intricacies of device communication and compatibility.
To embark on your Matter development journey, you'll need the right tools and environment. In this tutorial, we'll guide you through the process of setting up a Matter development environment using the Seeed Studio XIAO ESP32C6, a compact and powerful board specifically designed for IoT applications. With its ESP32-C6 microcontroller and extensive peripheral interfaces, the XIAO ESP32C6 is an ideal choice for developing Matter-compatible devices.
In the following sections, we'll walk you through the steps to configure your Matter development environment, including installing the necessary software, setting up the Seeed Studio XIAO ESP32C6 board, and running your first Matter example program. By the end of this tutorial, you'll have a solid foundation to start building your own Matter devices and contribute to the growing ecosystem of interoperable smart home solutions.
So, let's dive in and unlock the potential of Matter development with the Seeed Studio XIAO ESP32C6!
Prepare the Software
Below I will list the system version, ESP-IDF version, and ESP-Matter version used in this article for reference. This is a stable version that has been tested to work properly.
- Host: Ubuntu 22.04 LTS (Jammy Jellyfish).
- ESP-IDF: Tags v5.2.1.
- ESP-Matter: main branch, as of 10 May 2024, commit bf56832.
- connectedhomeip: currently works with commit 13ab158f10, as of 10 May 2024.
- Git
- Visual Studio Code
Prepare the Hardware
In this section, we will detail how to configure the use of ESP-IDF in Ubuntu's environment and execute the lighting example provided by ESP-IDF. So for this article, you only need to prepare any of the following XIAO ESP32 series.
| XIAO ESP32-C3 | XIAO ESP32-S3 | XIAO ESP32-C5 | XIAO ESP32-C6 |
|---|---|---|---|
 |  |  |  |
In addition to the XIAO, we also need the WS281x model light bar or light bead. Currently the light example provided by Espressif only supports a single bead, so whether you use a strip or a bead, it will only light up one light. We would also recommend that you pick up Grove Base for XIAO for ease of wiring.
| Grove Base for XIAO | Grove - RGB LED Ring (20 - WS2813 Mini) |
|---|---|
 |  |
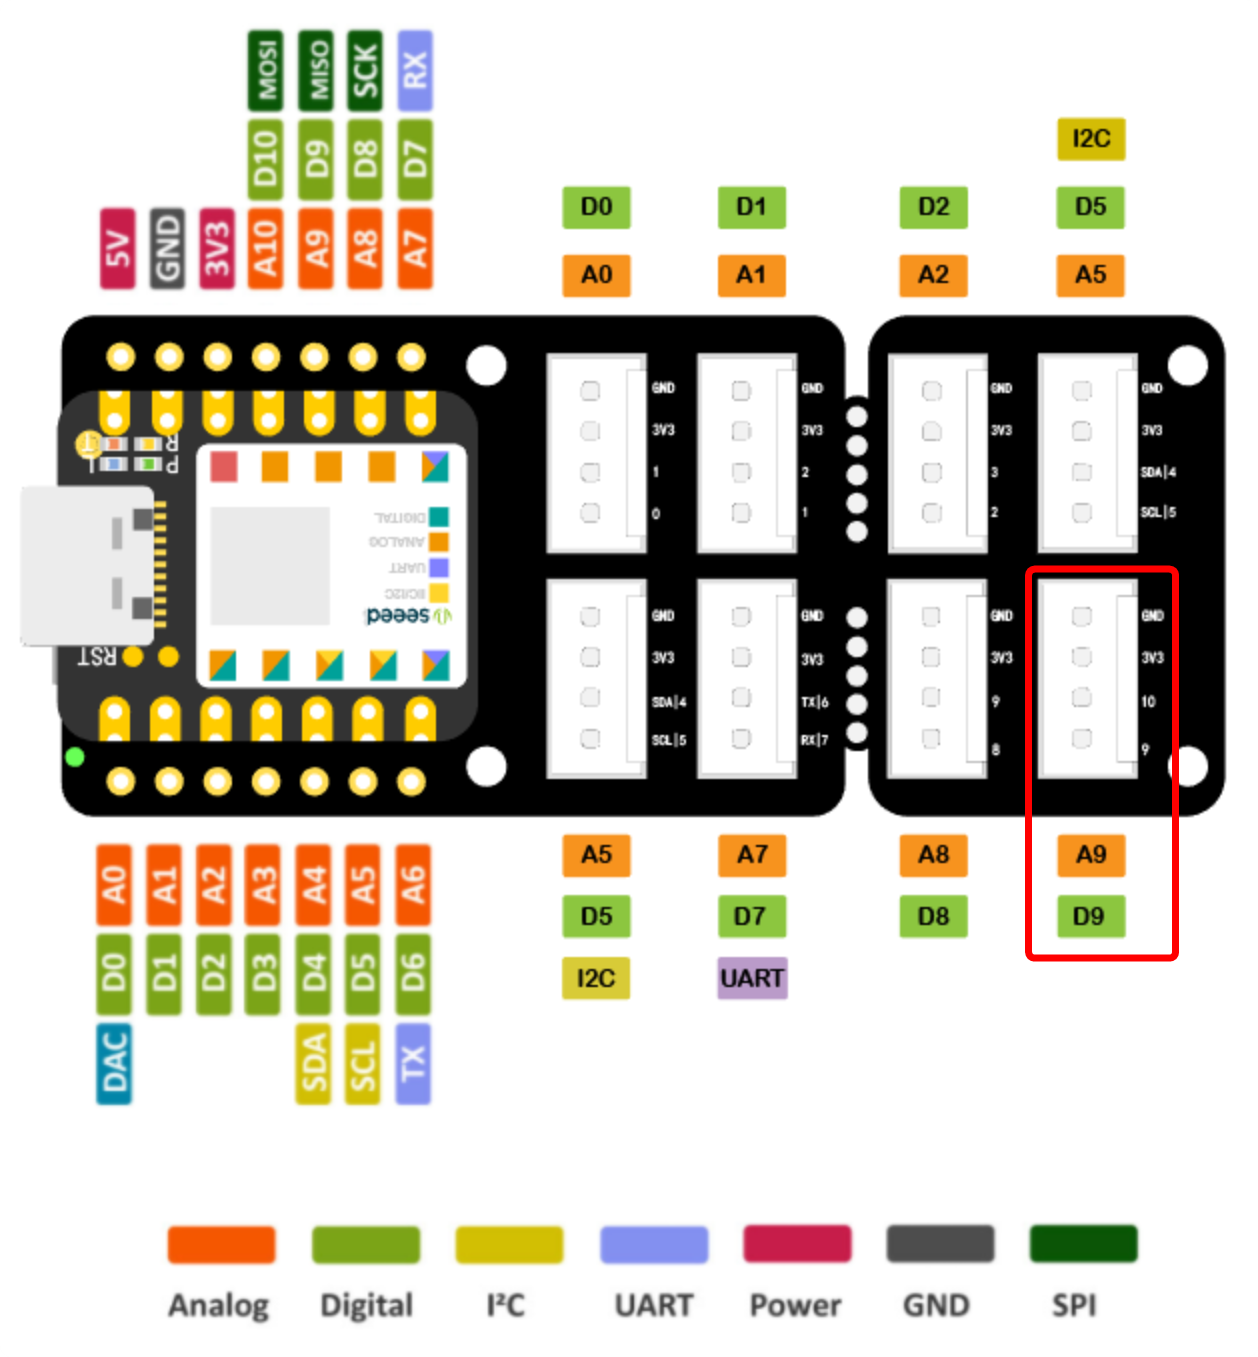
In order to unify the interface, we will use the D9 pin as an example in this case, please connect your LED strip or bead to the D9 pin of XIAO.
Video Tutorials
Installation ESP-Matter Step by Step
Before starting the environment installation for Matter, make sure you have installed and accessed the ESP-IDF programming environment.
When setting up the ESP-IDF environment, you need to ensure that the XIAO board you are using is compatible with the current Matter environment. For example, when using the XIAO ESP32-C5 and XIAO ESP32-C6, the latest supported version at the time of writing this wiki is ESP-IDF v5.5.1. For more details, please visit Supported ESP-IDF and connectedhomeip versions
Step 1. Install Dependencies
First, you need to install the required packages using apt-get. Open your terminal and execute the following command:
sudo apt-get install git gcc g++ pkg-config libssl-dev libdbus-1-dev \
     libglib2.0-dev libavahi-client-dev ninja-build python3-venv python3-dev \
     python3-pip unzip libgirepository1.0-dev libcairo2-dev libreadline-dev
This command installs various packages like git, compilers (gcc, g++), and libraries needed for building and running the Matter SDK.
Step 2. Clone the ESP-Matter Repository
Clone the esp-matter repository from GitHub using the git clone command with a depth of 1 to fetch only the latest snapshot:
cd ~/esp
git clone --depth 1 https://github.com/espressif/esp-matter.git
Change into the esp-matter directory and initialize the required Git submodules:
cd esp-matter
git submodule update --init --depth 1
Navigate to the connectedhomeip directory and run a Python script to manage submodules for specific platforms:
cd ./connectedhomeip/connectedhomeip
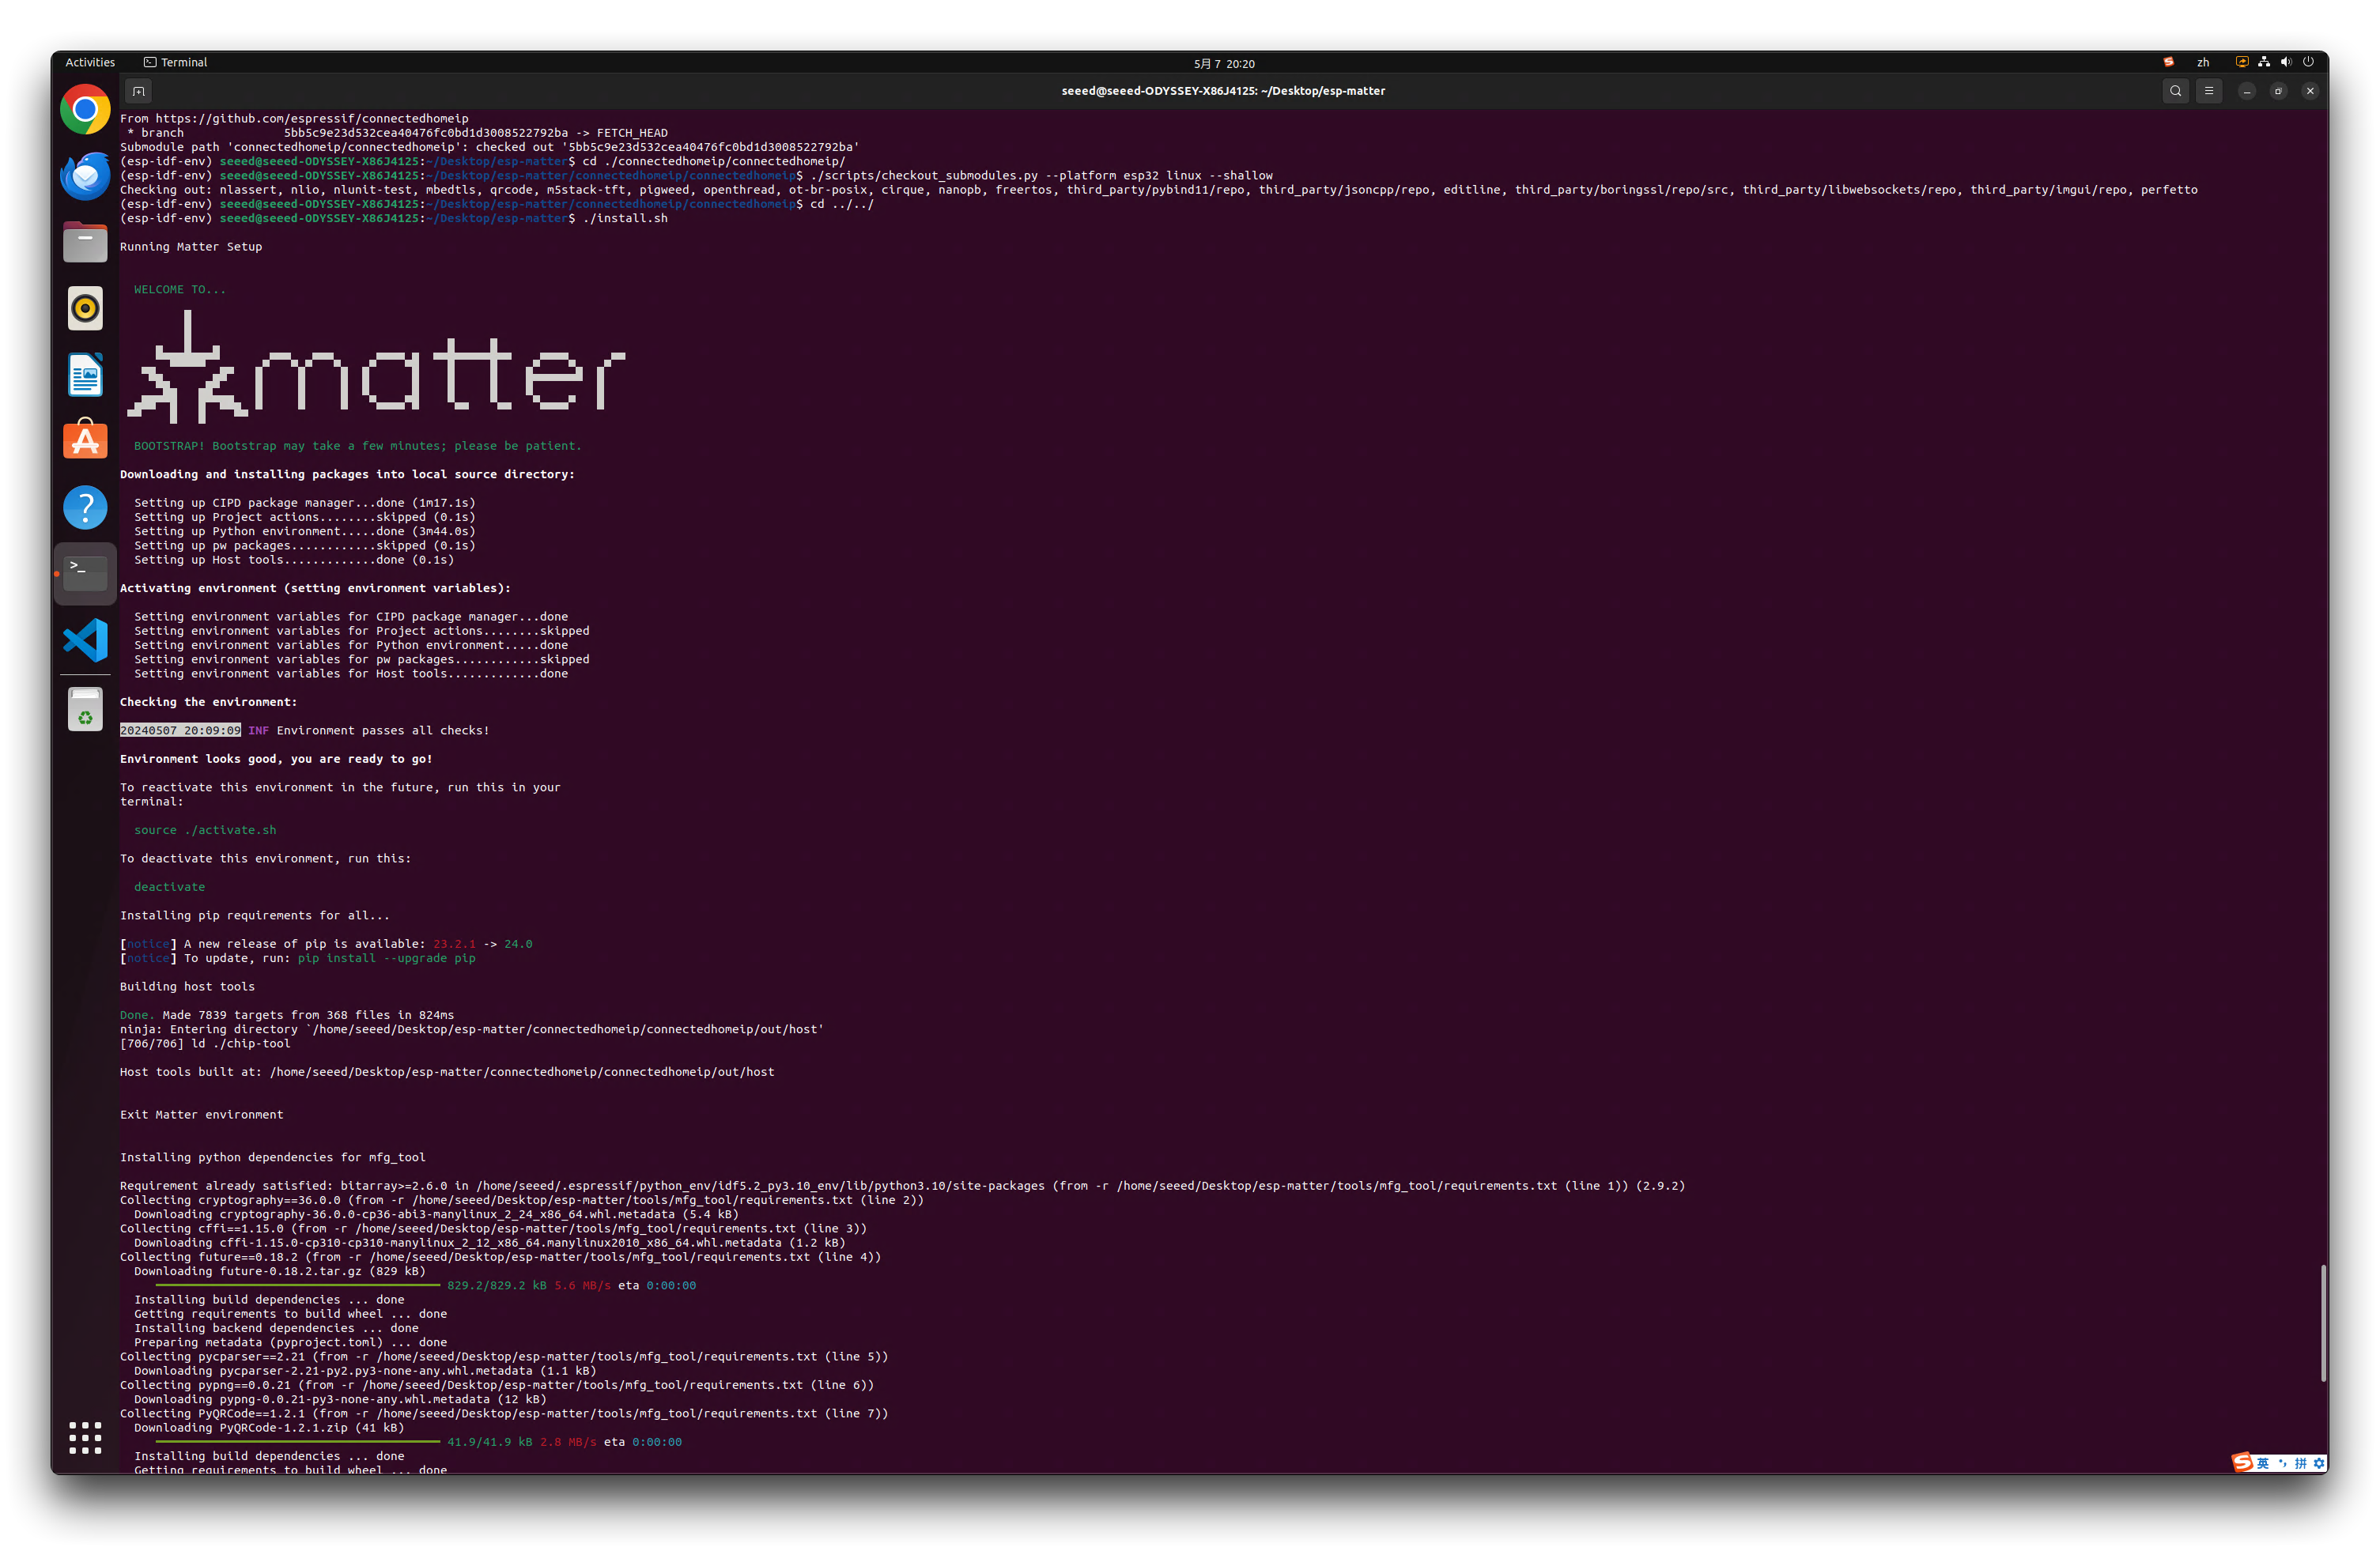
./scripts/checkout_submodules.py --platform esp32 linux --shallow
This script updates submodules for both ESP32 and Linux platforms in a shallow manner (latest commit only).
Step 3. Install ESP-Matter
Return to the esp-matter root directory, then run the installation script:
cd ../..
./install.sh
This script will install additional dependencies specific to the ESP-Matter SDK.
Step 4. Set Environment Variables
Source the export.sh script to set up the environment variables needed for development:
source ./export.sh
This command configures your shell with necessary environment paths and variables.
Step 5 (Optional). Quick access to the ESP-Matter development environment
To add the provided aliases and environment variable settings to your .bashrc file, follow these steps. This will configure your shell environment to easily switch between IDF and Matter development setups, and enable ccache for faster builds.
Open your terminal and use a text editor to open the .bashrc file located in your home directory. You can use nano or any editor you prefer. For example:
nano ~/.bashrc
Scroll to the bottom of the .bashrc file and add the following lines:
# Alias for setting up the ESP-Matter environment
alias get_matter='. ~/esp/esp-matter/export.sh'

# Enable ccache to speed up compilation
alias set_cache='export IDF_CCACHE_ENABLE=1'
After adding the lines, save the file and exit the text editor. If you're using nano, you can save by pressing Ctrl+O, hit Enter to confirm, and then Ctrl+X to exit.
For the changes to take effect, you need to reload the .bashrc file. You can do this by sourcing the .bashrc file or closing and reopening your terminal. To source the .bashrc file, use the following command:
source ~/.bashrc
Now you can run get_matter and set_cache to set up or refresh the esp-matter environment in any terminal session.
get_matter
set_cache
Running the light Example
Once the Matter environment is configured, we can compile and upload the sample application light to check it out.
Step 1. Configure the parameters of the project
Navigate to the examples/light directory.
cd examples/light # Navigate to the light example directory
Perform a clean operation to remove previous build files.
rm -rf build/ # Clean previous build files
Set the target to ESP32-C6.
idf.py set-target esp32c6 # Set the build target to ESP32-C6
Enter the configuration menu and make the necessary configurations.
idf.py menuconfig # Enter the configuration menu
Within menuconfig, you need to locate and enable the Channel for console oputput option. Typically, this option can be found under Component config -> ESP System Settings.
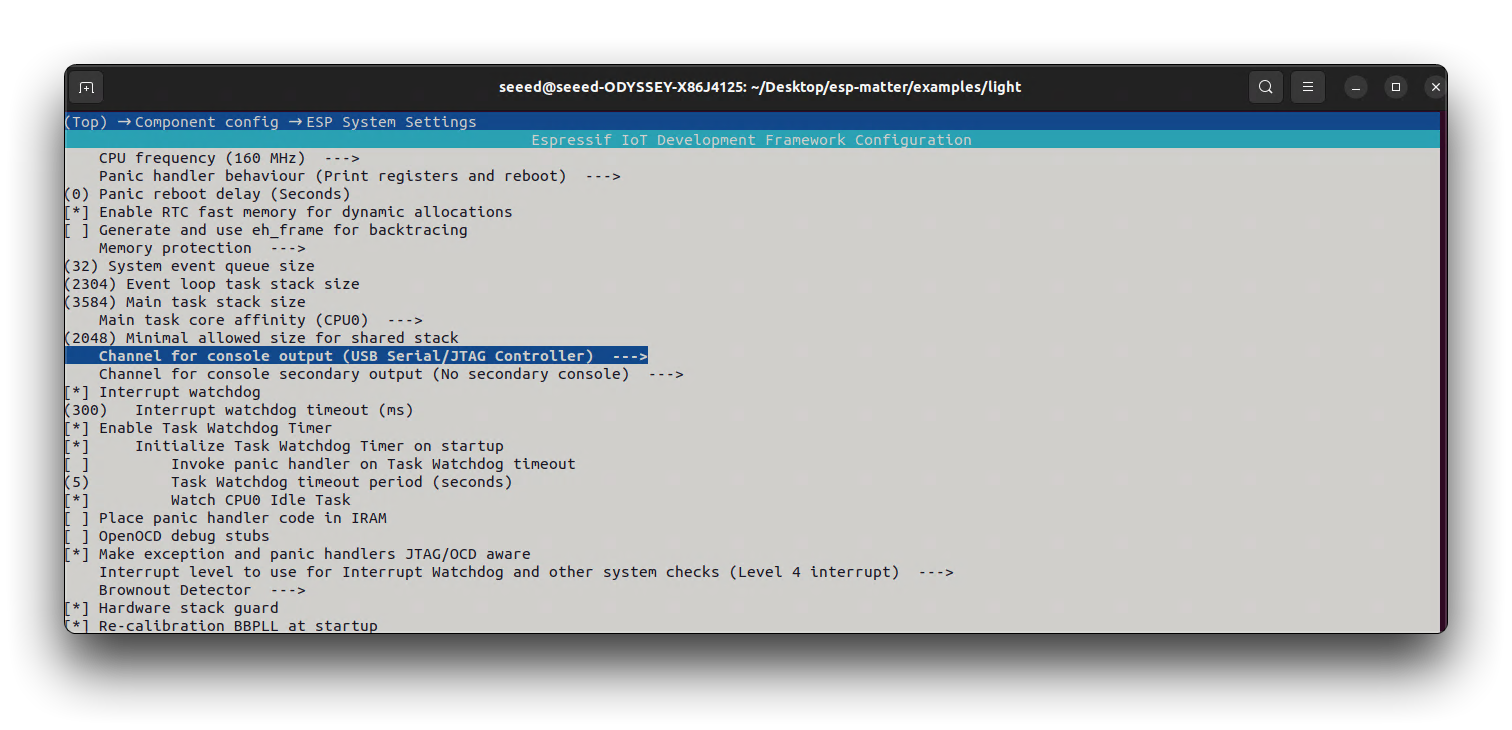
- Use the arrow keys to navigate to the option.
- Press Space or Enter to select the option:
USB Serial/JTAG Controller.
For a different XIAO, we also need to update its GPIO pin number. This option can be found under Component config -> Board Support Package (generic) -> LEDs.
- For XIAO ESP32-C3, the GPIO of D9 is 9.
- For XIAO ESP32-S3, the GPIO of D9 is 8.
- For XIAO ESP32-C5, the GPIO of D9 is 9.
- For XIAO ESP32C6, the GPIO of D9 is 20.
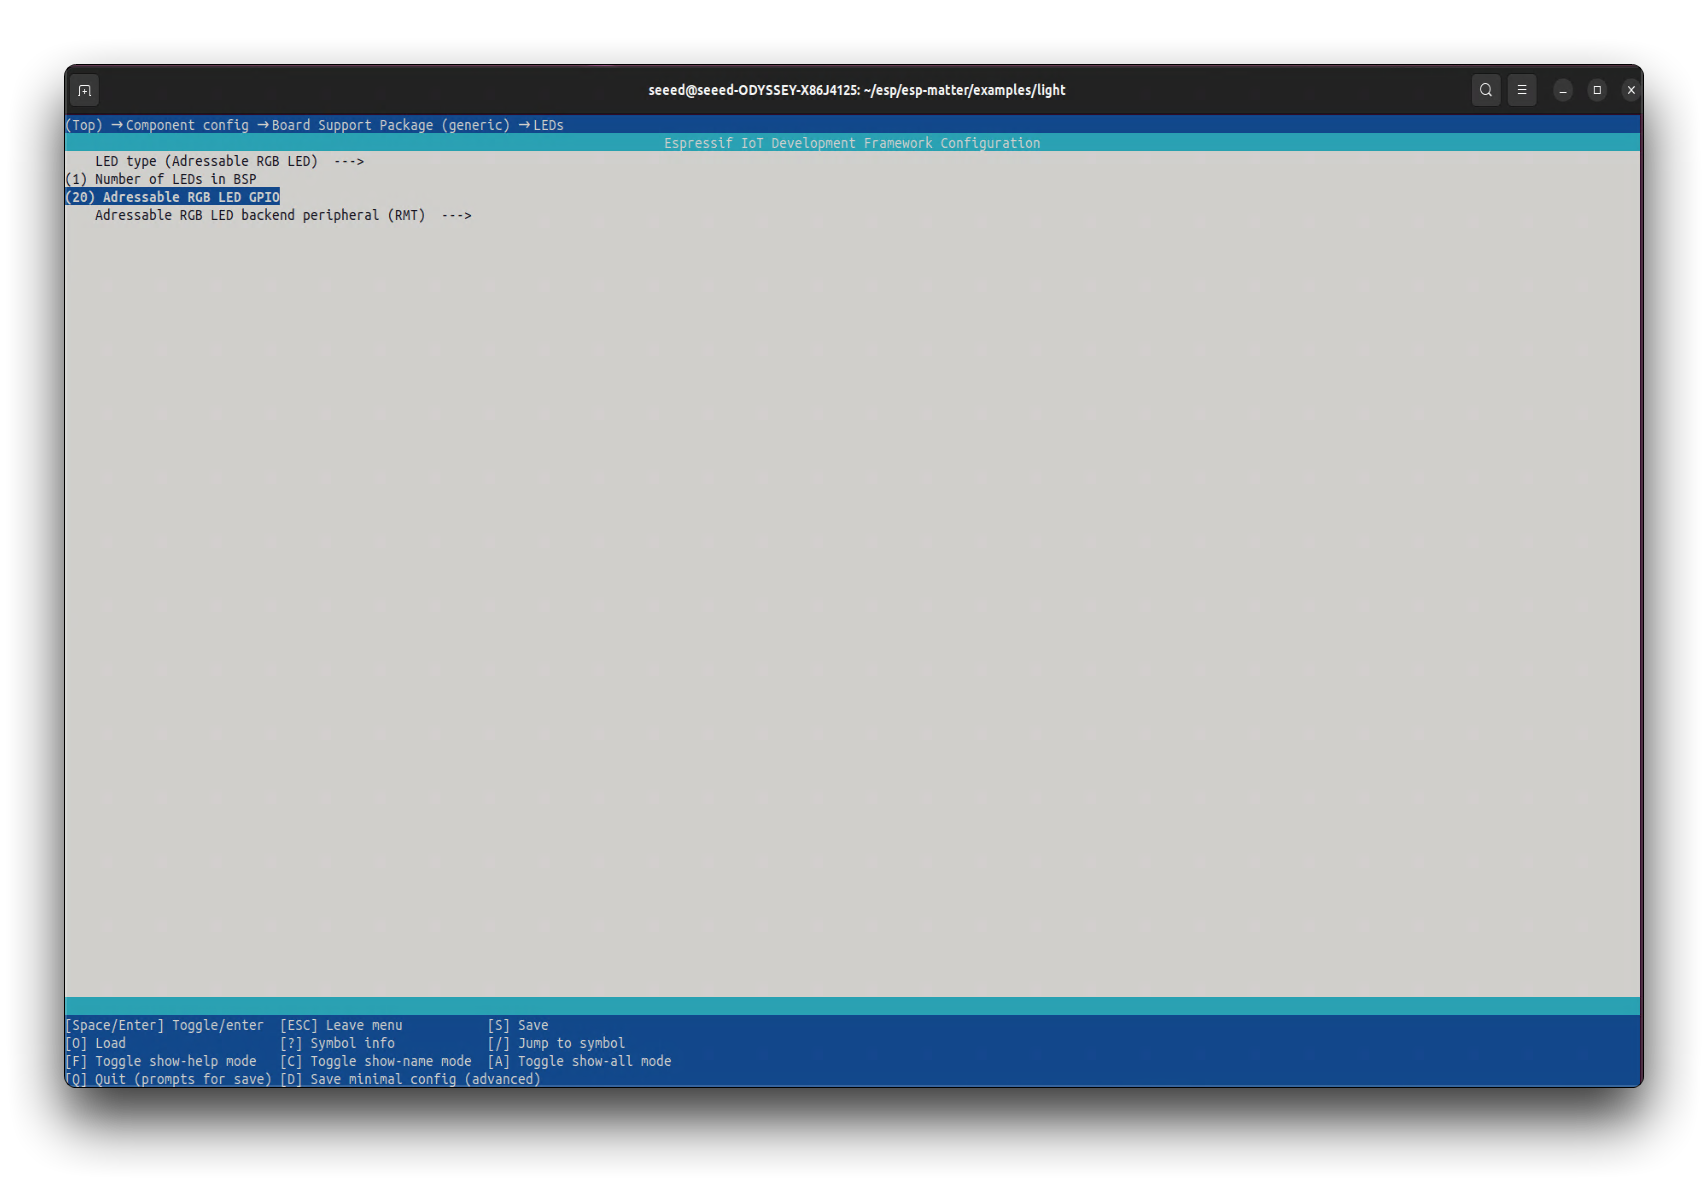
- Use the arrow keys to navigate to the option.
- Press Space or Enter to enter GPIO number.
- After enabling the necessary options, exit
menuconfigby pressingqand then pressy.
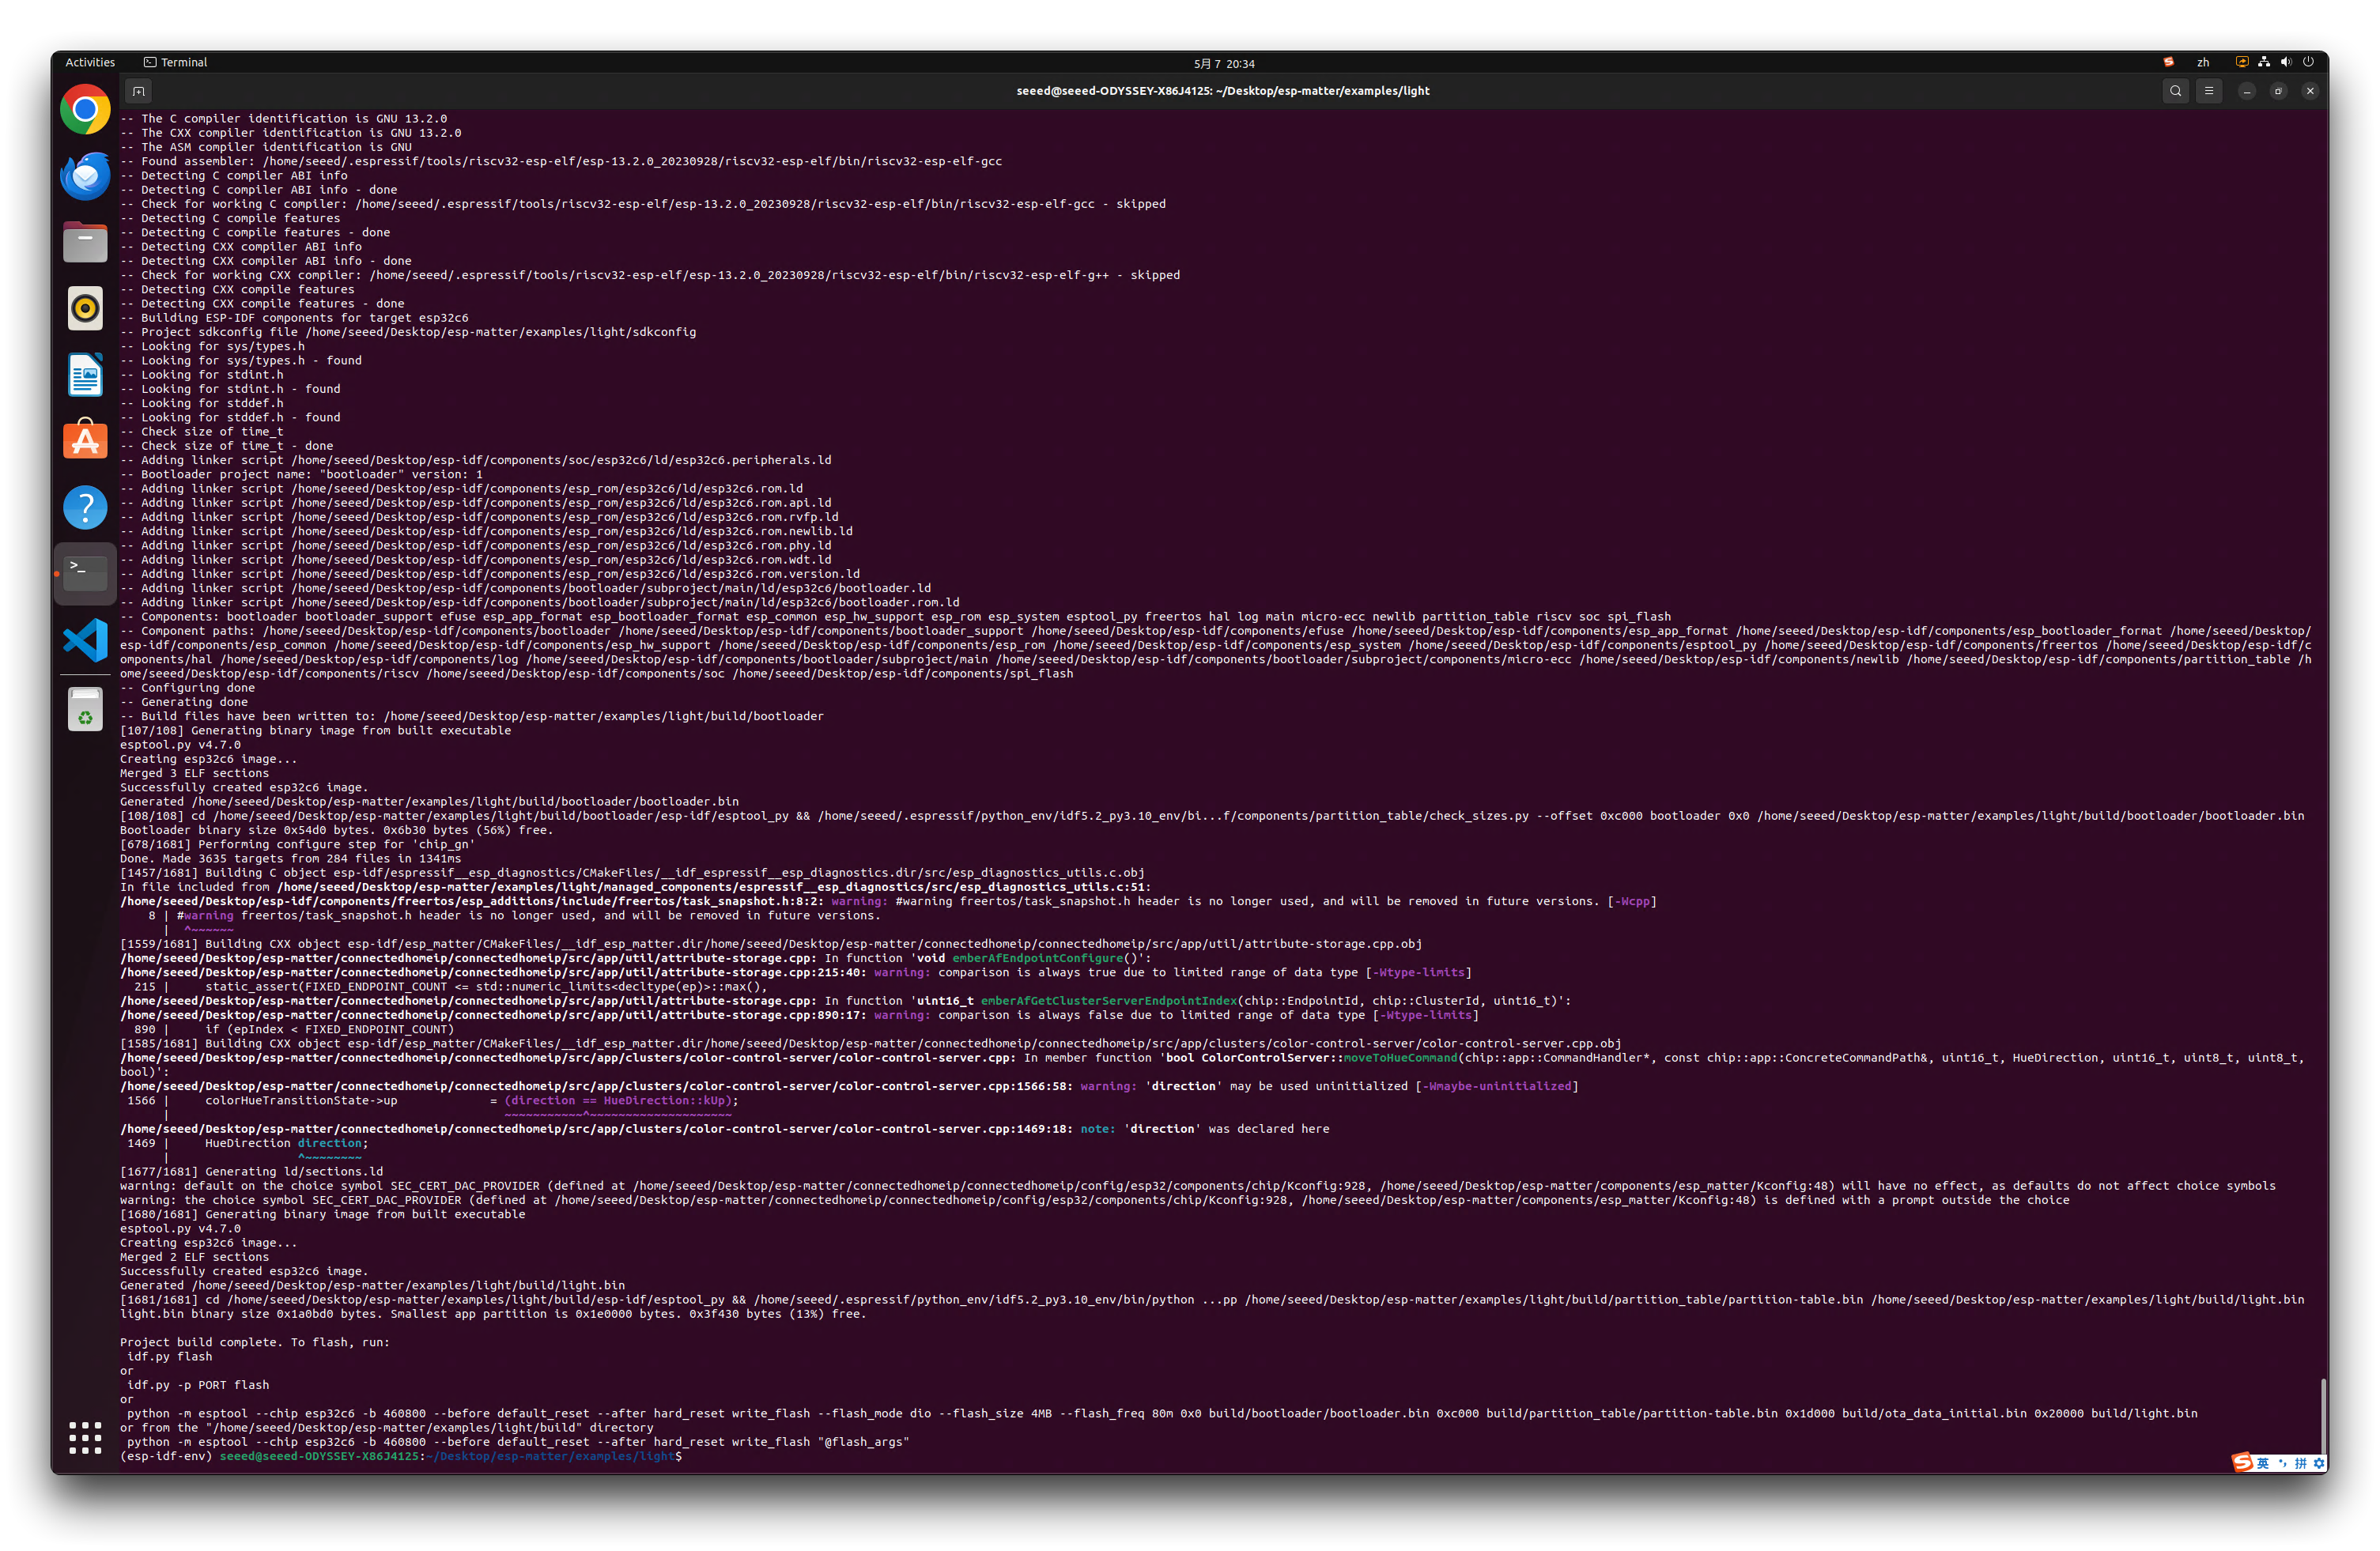
Step 2. Compile and upload the sample application
Continue with the build and flash process:
idf.py build # Build the project
If the compilation goes well, you will see the following result.
Then you can upload the programme.
idf.py -p /dev/ttyACM0 flash monitor # Flash the firmware and monitor the output
Please replace /dev/ttyACM0 with the actual USB device file that corresponds to your XIAO ESP32 if it's different.
Remember to follow all instructions carefully, and make sure that each step completes successfully before moving on to the next. If you encounter any errors, they'll need to be resolved before you can proceed.
During the process of flashing Matter's firmware, you may encounter a situation where you don't have permissions, at this time you can use the following command to give permissions to the device's ports and re-upload the programme again. As the device is plugged in or rebooted, permissions may all need to be given again.
sudo chmod 666 /dev/ttyACM0 # Grant permissions to the USB device file
Please replace /dev/ttyACM0 with the actual USB device file that corresponds to your XIAO ESP32 if it's different.
Then congratulations, if you have successfully flashed the firmware, then in the monitor you will see the debug log output in the terminal.
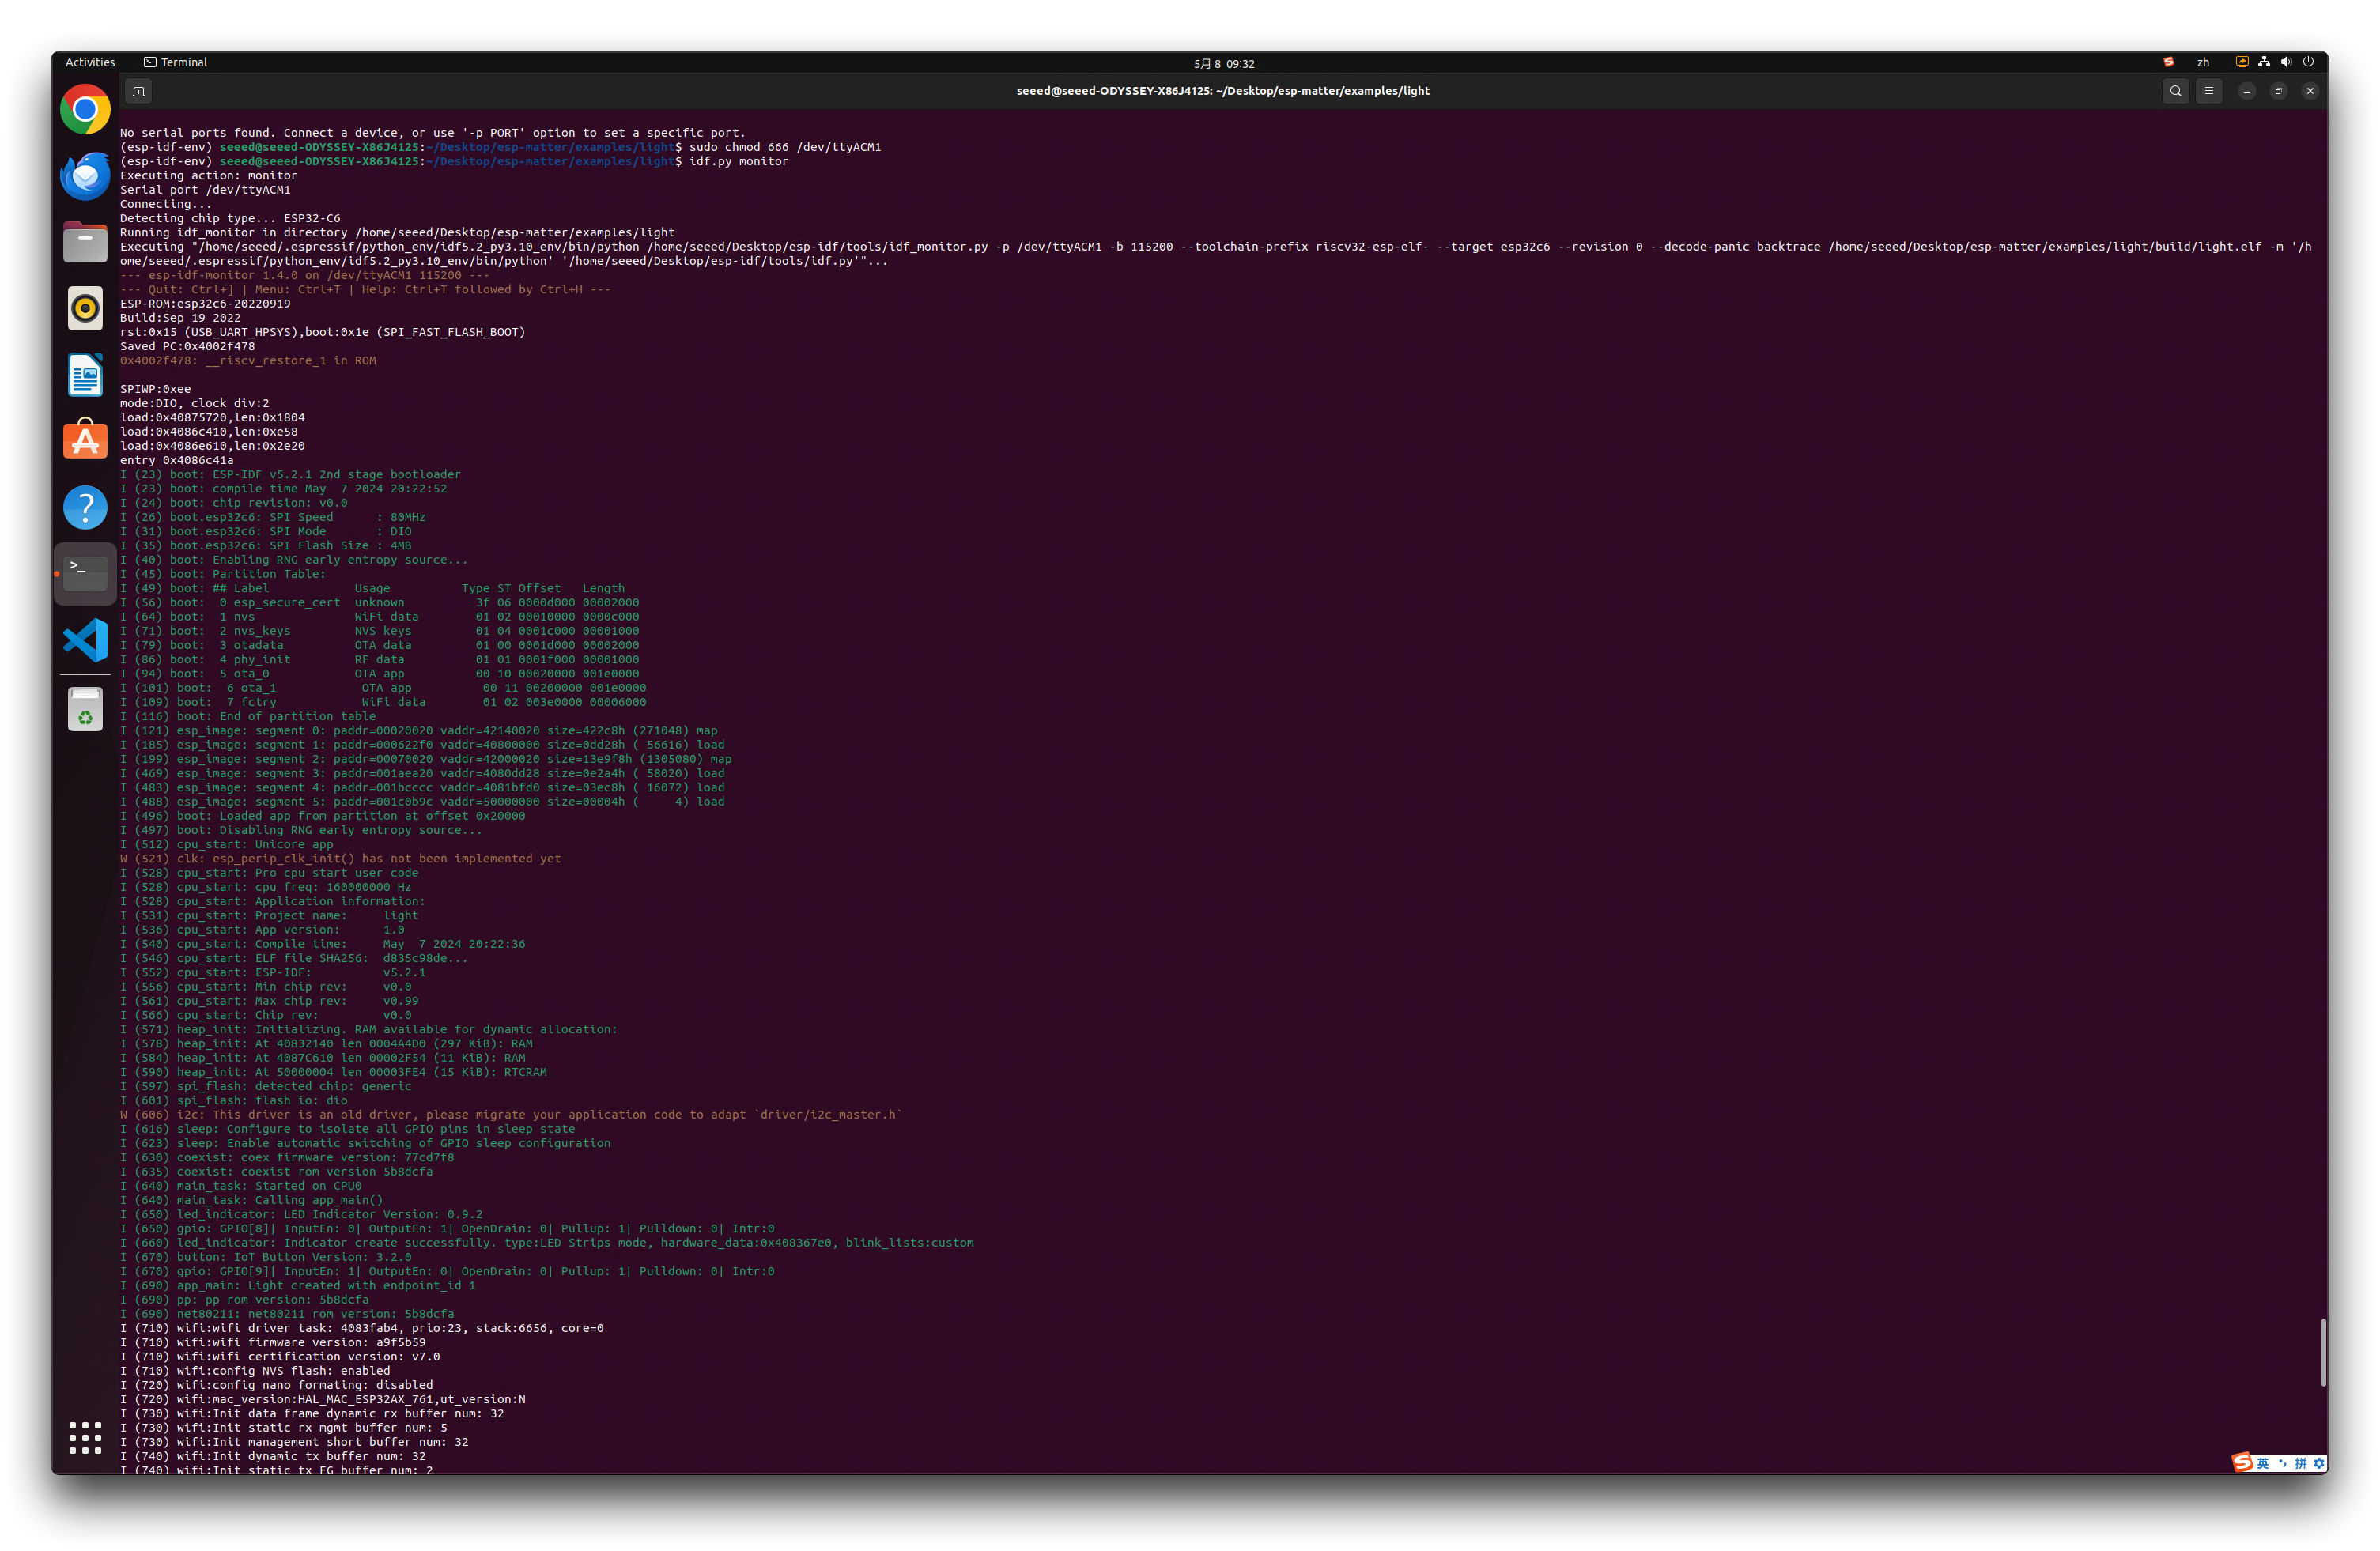
Next, we are going to learn how to use the matter command and chip-tool to configure the Matter device in order to complete the debugging and checking of the Matter device.
Host control and equipment commissioning
We set Channel for console oputput to USB Serial in menuconfig, the purpose is that we can use the USB interface to control the XIAO, configure to join the network or do other debugging. This step is crucial and determines whether or not we can use the serial tool to issue commands to the device.
These are commands that are connected via a cable to directly control a device, usually starting with matter.
Common commands
- BLE commands: Start and stop BLE advertisement:
matter ble [start|stop|state]
- Wi-Fi commands: Set and get the Wi-Fi mode:
matter wifi mode [disable|ap|sta]
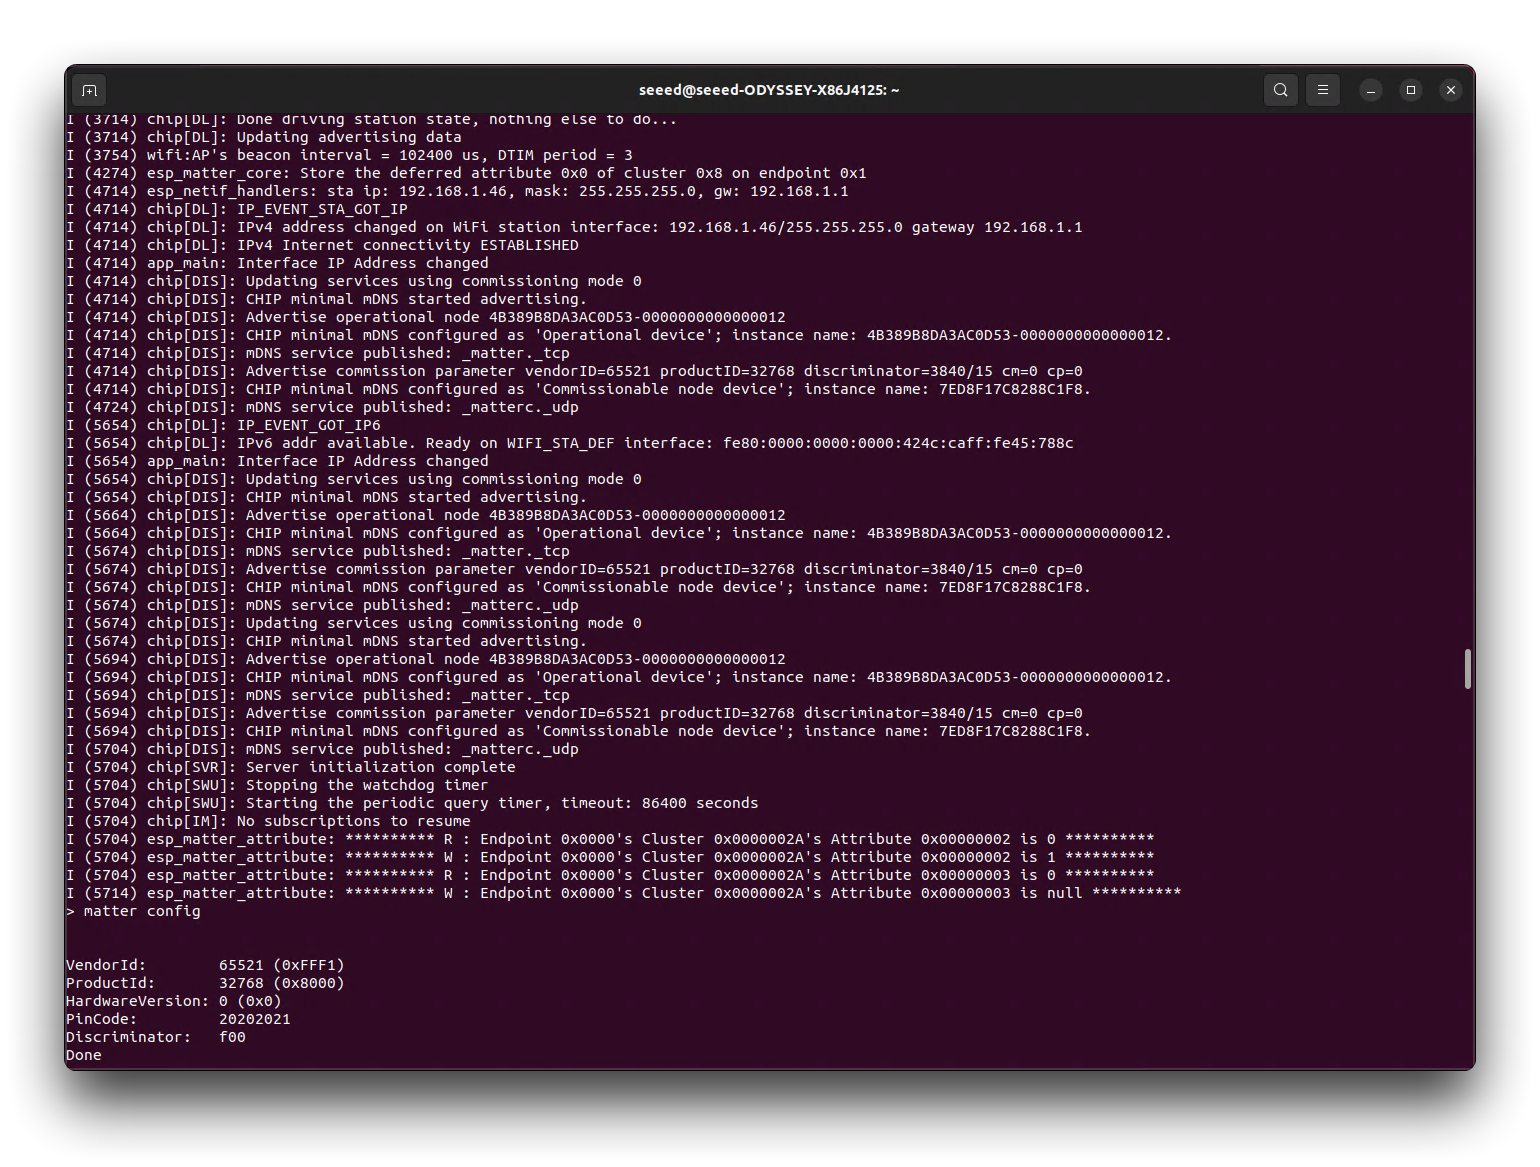
- Device configuration: Dump the device static configuration:
matter config
- Factory reset:
matter device factoryreset
- On-boarding codes: Dump the on-boarding pairing code payloads:
matter onboardingcodes
- Get attribute: (The IDs are in hex):
matter esp attribute get <endpoint_id> <cluster_id> <attribute_id>
- Example: on_off::on_off:
matter esp attribute get 0x1 0x6 0x0
- Set attribute: (The IDs are in hex):
matter esp attribute set <endpoint_id> <cluster_id> <attribute_id> <attribute value>
- Example: on_off::on_off:
matter esp attribute set 0x1 0x6 0x0 1
- Diagnostics:
matter esp diagnostics mem-dump
- Wi-Fi
matter esp wifi connect <ssid> <password>
Usage
Step 1. Install Minicom
Minicom is a text-based modem control and terminal emulation program for Unix-like operating systems. By installing Minicom, we can easily send Matter control commands to XIAO. To install Minicom on Ubuntu, open a terminal and enter the following command:
sudo apt update
sudo apt install minicom
This command updates your package list and installs Minicom.
Step 2. Configure User Permissions
To allow non-root users to access serial ports like ttyACM0, you need to add your user to the dialout group. You can do this with the following command:
sudo usermod -a -G dialout $USER
Replace $USER with your username or omit it to apply to the current logged-in user. After running this command, you must log out and log back in for the group change to take effect.
Step 3. Setup Minicom
Now you need to configure Minicom to use the ttyACM0 port. Run Minicom in setup mode with the following command:
sudo minicom -s
In the setup menu, follow these steps:
- Select Serial port setup.
- Press 'A' to change the Serial Device to
/dev/ttyACM0. - Adjust other settings as necessary. The default settings are usually 9600 8N1 (9600 Baud, No Parity, 8 Data Bits, 1 Stop Bit). We just need to change the baud rate to 115200.
- Press 'Enter' to exit this screen.
Step 4. Save Configuration
After setting up the serial port:
- Select Save setup as dfl to make this the default configuration.
- Exit Minicom setup by selecting Exit from Minicom.
Step 5: Run Minicom
To start Minicom with the default settings, just type:
minicom
If you need to run it with sudo privileges (e.g., if you encounter permission issues), you can use:
sudo minicom
To exit Minicom, press Ctrl-A then press Z to bring up the help menu, and then press X to exit the program.
Step 6. Setting up the XIAO distribution network
Use the following command to get XIAO connected to your network. When selecting a network, you can opt for the 2.4G network connection.
In the tutorial, all XIAO series boards only support 2.4G WiFi except XIAO ESP32-C5, which supports dual-band 2.4G & 5G WiFi.
matter esp wifi connect <ssid> <password>
After successful mating, you can use the following commands to query very important information about the Matter device: VendorID, ProductId, Discriminator, and PinCode. This information helps you pair devices for use when debugging with the Chip-tool tool.
matter config
Finally, use the following command to dump the on-boarding pairing code payloads.
matter onboardingcodes onnetwork
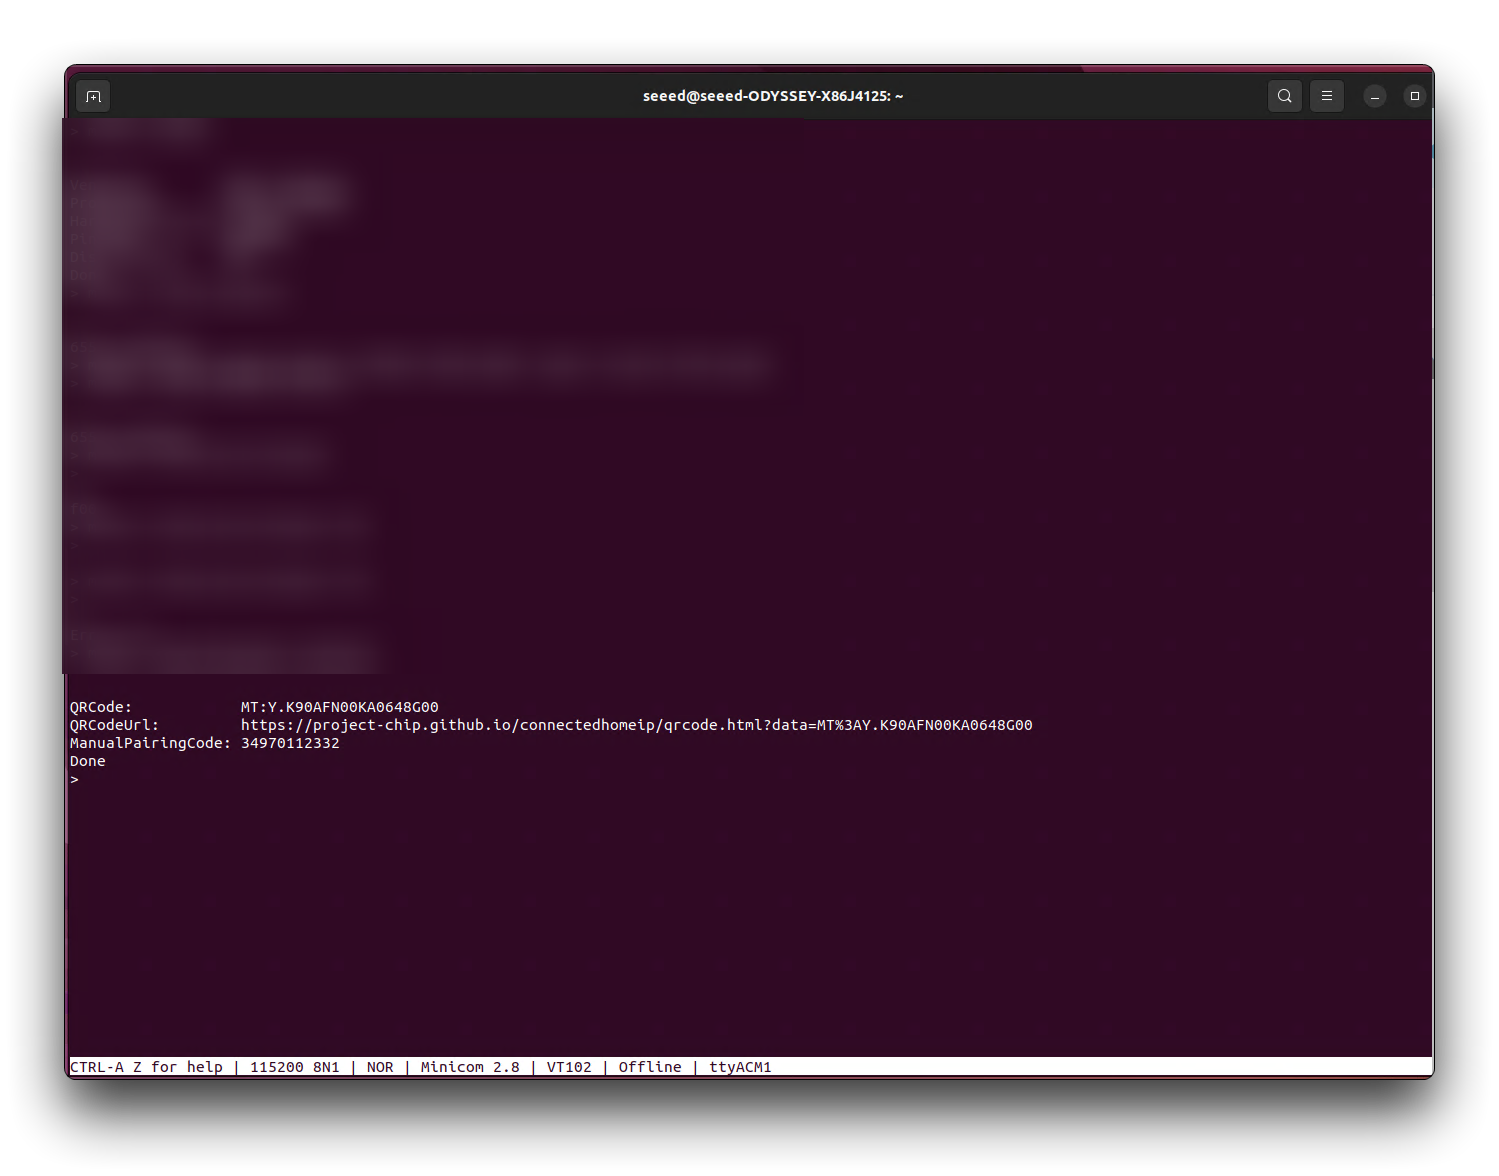
The last thing shown here is the link to the device's pairing QR code. With the QR code, you can scan the code on your mobile phone to bind the Matter device just like the Getting Started steps.
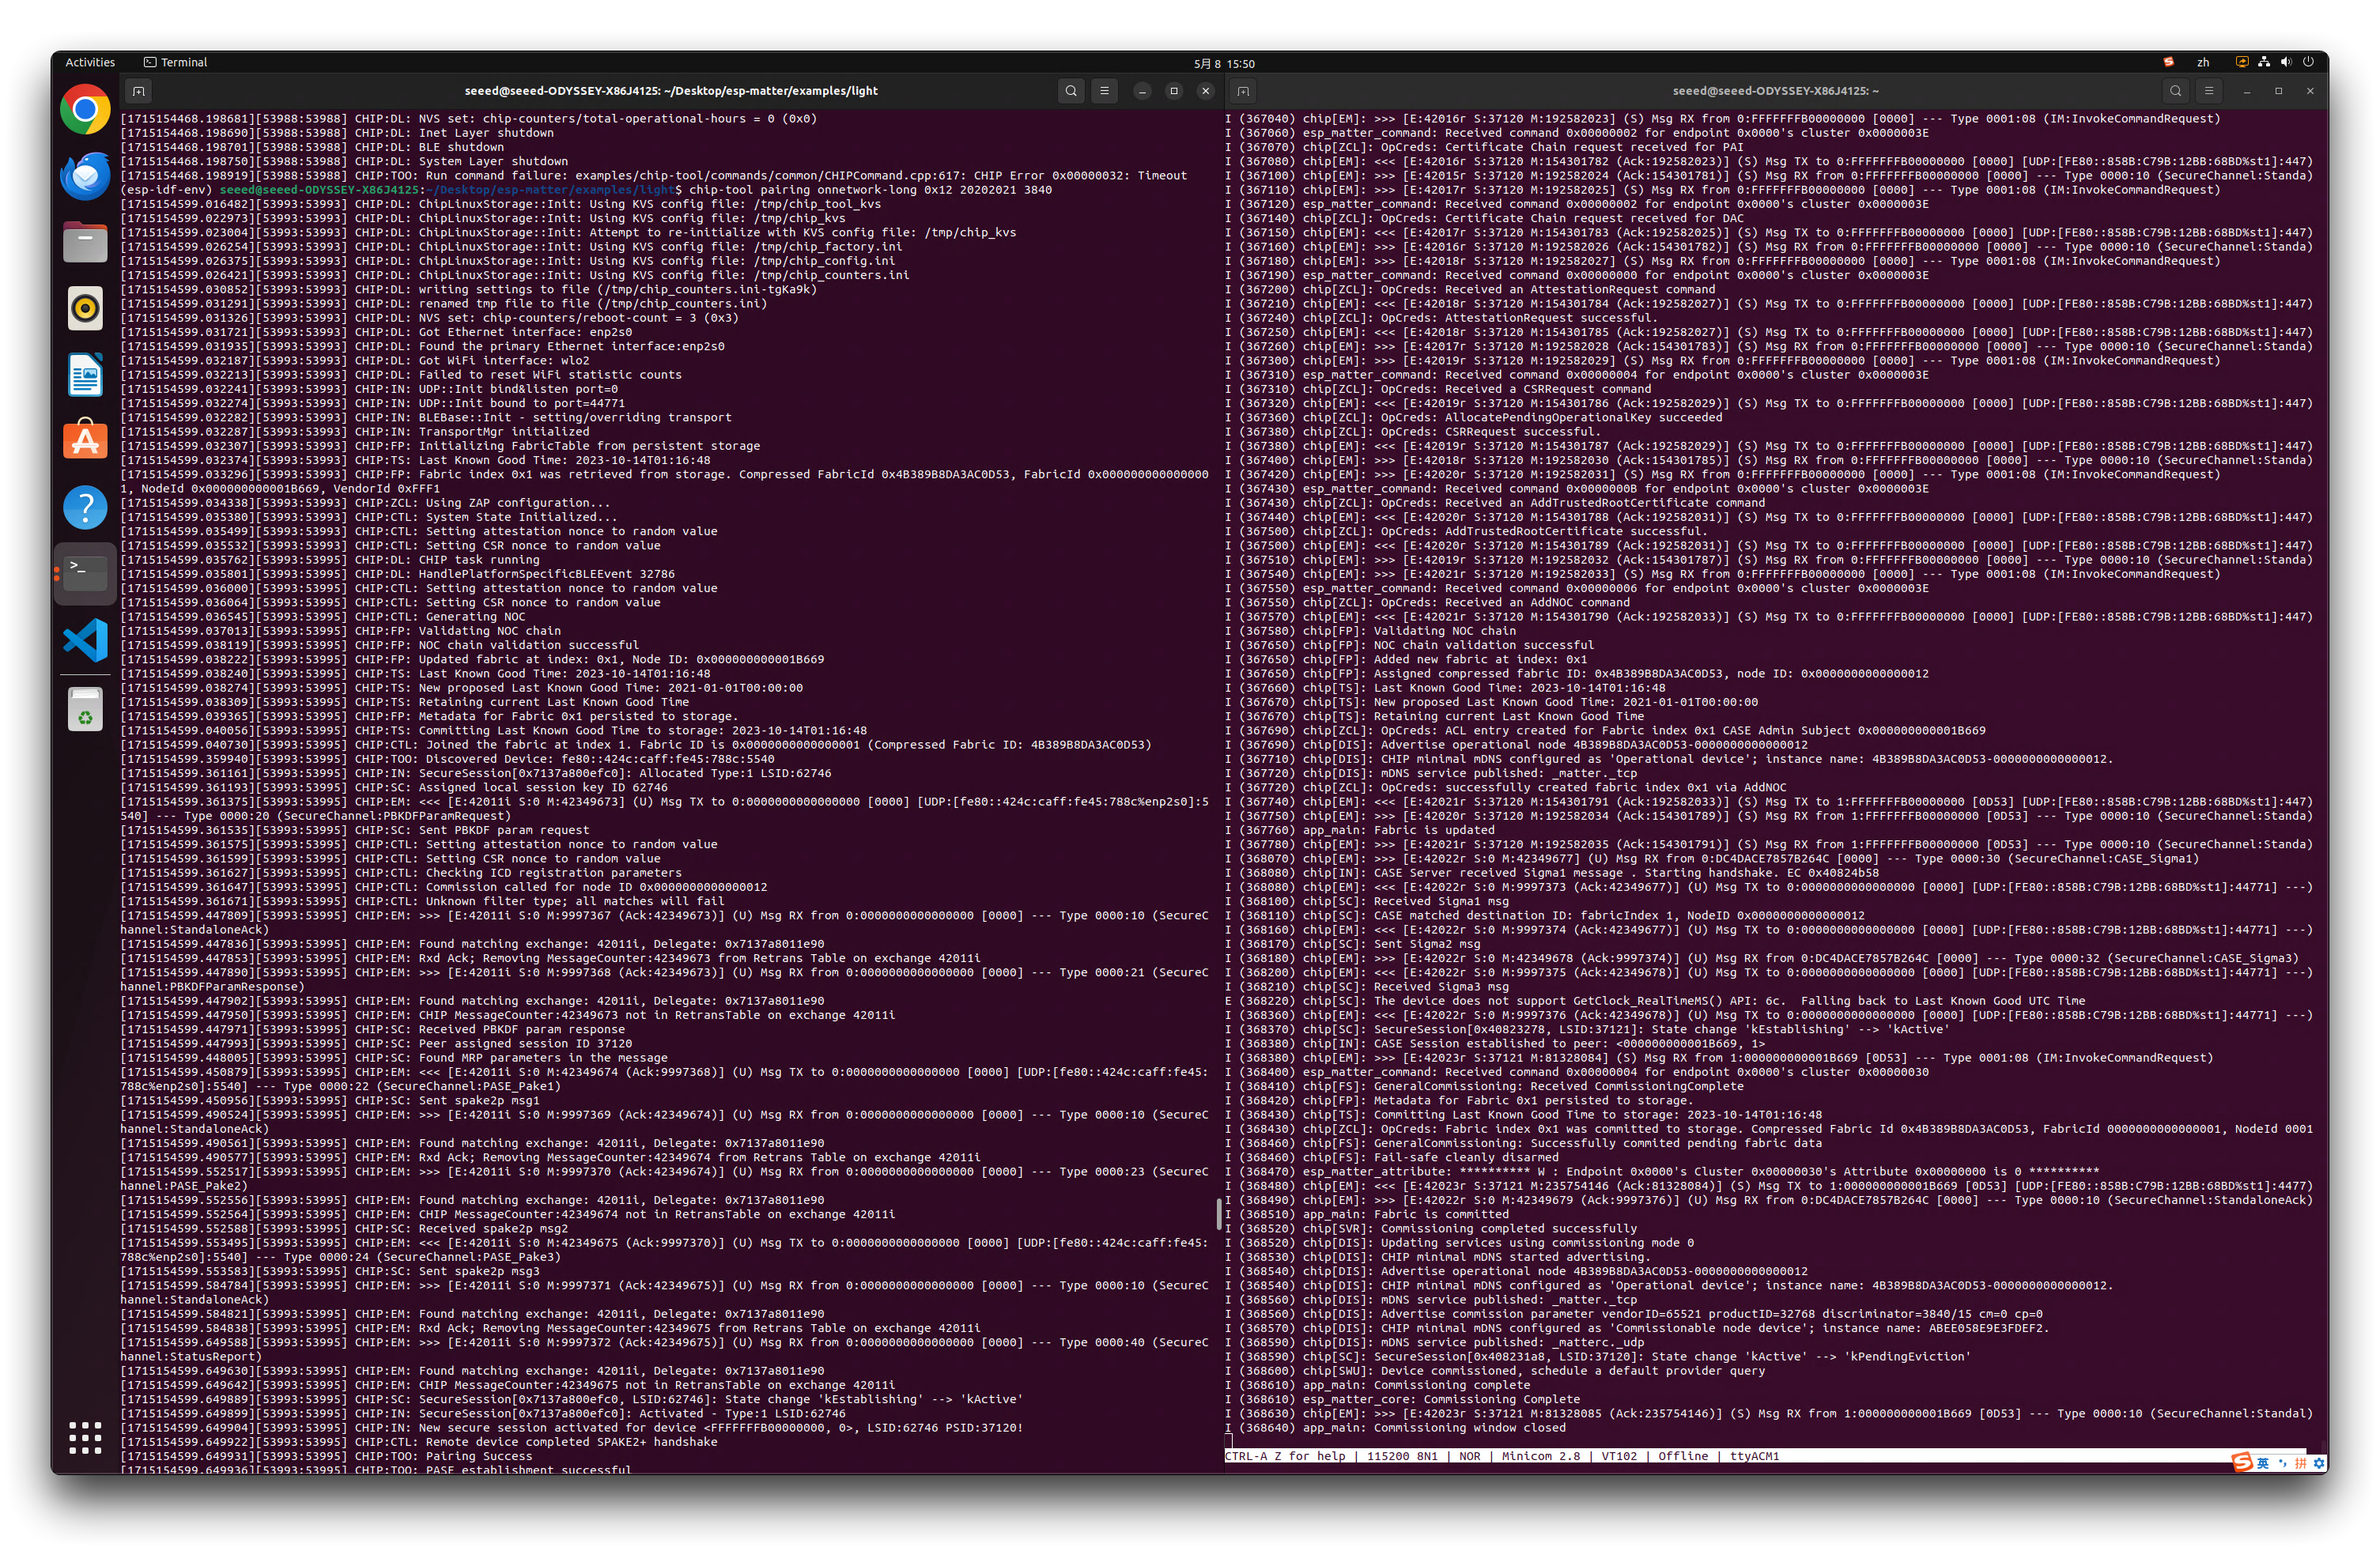
Remote debugging of Matter devices using Chip-tool
Matter devices are an important part of the smart home, and it's impractical to use data cables all the time for debugging and setup. Among Matter debugging tools, the most commonly used is Chip-tool, which helps us to remotely debug our devices when they are connected.
Chip-tool commands usually require a Chip-tool script, so they usually start with chip-tool.
Pair a device over IP
The command below will discover devices and try to pair with the first one it discovers using the provided setup code:
chip-tool pairing onnetwork ${NODE_ID_TO_ASSIGN} 20202021
The command below will discover devices with long discriminator 3840 and try to pair with the first one it discovers using the provided setup code:
chip-tool pairing onnetwork-long ${NODE_ID_TO_ASSIGN} 20202021 3840
The command below will discover devices based on the given QR code (which devices log when they start up) and try to pair with the first one it discovers.
chip-tool pairing code ${NODE_ID_TO_ASSIGN} MT:#######
In all these cases, the device will be assigned node id ${NODE_ID_TO_ASSIGN} (which must be a decimal number or a 0x-prefixed hex number).
Forget the currently-commissioned device
chip-tool pairing unpair
Using the Client to Send Matter Commands
To use the Client to send Matter commands, run the built executable and pass it the target cluster name, the target command name as well as an endpoint id.
The endpoint id must be between 1 and 240.
chip-tool onoff on 1
The client will send a single command packet and then exit.
Usage
When you are ready to debug with Chip-tool, you can disconnect the XIAO from the computer and connect it to a powered source.
As a first step, we need to match the device, which can be done by using any of the methods in the Pair a device over IP section above.
For example, I use the following command.
chip-tool pairing onnetwork-long 0x12 20202021 3840
In this cases, the device will be assigned node id 0x12 (which must be a decimal number or a 0x-prefixed hex number). 20202021 is PinCode and 3840 is Discriminator.
Finally, verify that you can control switching the lights on and off with the following command.
Turn on the light:
chip-tool onoff on 0x12 0x1
Turn off the light:
chip-tool onoff off 0x12 0x1
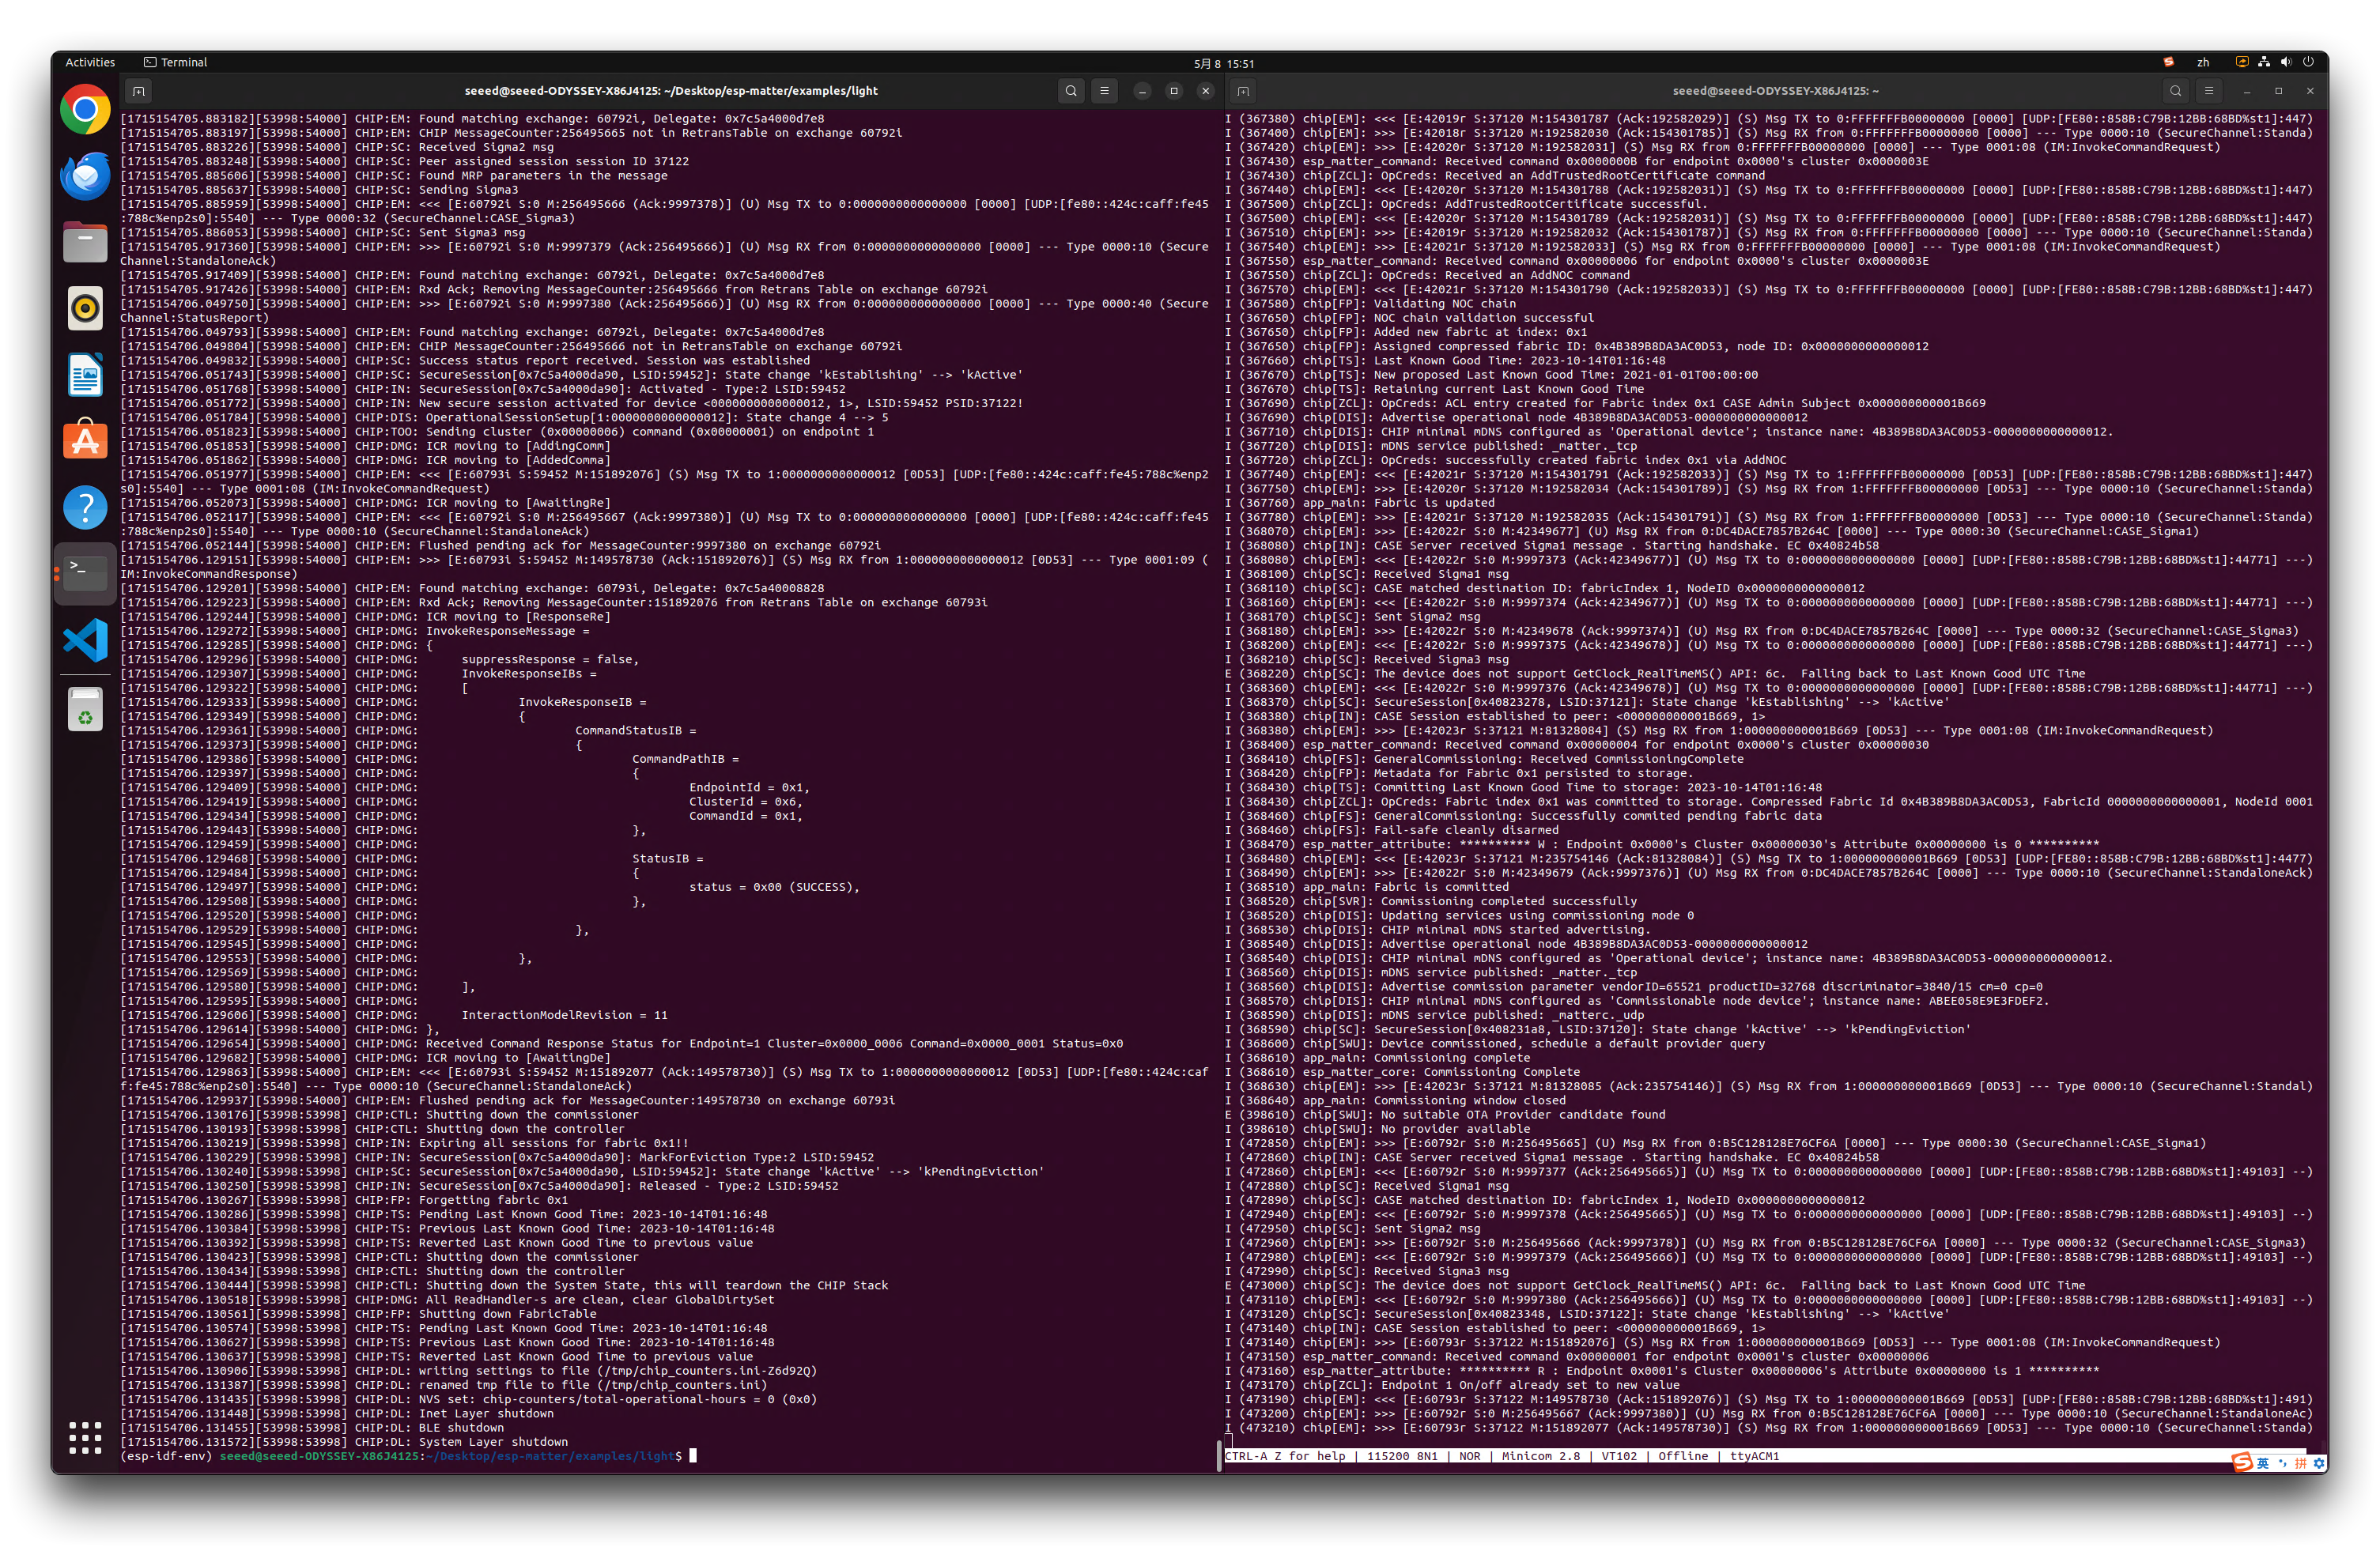
0x12 is the node ID assigned to the device when we match.
Congratulations to everyone, the tutorial steps carried out here, I believe you have a preliminary understanding of the general steps of the development framework of ESP-Matter and the use of debugging tools. If there is still something you do not understand or are not familiar with, we will continue to use and guide you in the following tutorials, so stay tuned!
Troubleshooting
Q1: Why do I get all kinds of errors during the installation of the environment?
ESP-Matter's environment is a bit more demanding, and if you are using an Ubuntu host that is often used for development, it is likely that errors will occur due to different versions of some Python dependencies. Since the Matter framework is not developed by Seeed, there is probably nothing we can do about this part of the problem, so we recommend that you submit an issue to the official ESP-Matter repository for help if you encounter problems with the installation.
Q2: Failed to resolve component
After upgrading from v4.x to v5.0+, many functional modules (such as mqtt, json, esp_https_server, etc.) have been removed from the core framework and converted into independent components. Consequently, component dependency missing errors may occur during compilation. You can add the missing components according to the error messages.
Reference: The ESP Component Registry
Q3: How do I uninstall Matter's environment?
If you are running ./install.sh script and get stuck in the step of configuring your Python environment, then you may need to check that your version of Matter matches the version of connectedhomeip.
The simple way to reset it, is to execute the following command.
rm -r connectedhomeip/connectedhomeip/.environment
Then re-pull the appropriate version of the connectedhomeip branch again.
git submodule update --init --depth 1
If it still doesn't work, delete the entire esp-matter folder and re-run it again following the contents of the Wiki.
Resources
Tech Support & Product Discussion
Thank you for choosing our products! We are here to provide you with different support to ensure that your experience with our products is as smooth as possible. We offer several communication channels to cater to different preferences and needs.