Buletooth usage with Seeed Studio XIAO ESP32-C5
| Seeed Studio XIAO ESP32-C5 |
|---|
 |
The Seeed Studio XIAO ESP32-C5 is a powerful development board that supports Bluetooth 5, BLE, and Mesh networking, making it an ideal choice for a wide range of IoT applications that require wireless connectivity. With its outstanding RF performance, the XIAO ESP32-C5 can provide reliable and high-speed wireless communication over a variety of distances, making it a versatile solution for both short-range and long-range wireless applications. In this tutorial, we will focus on the basic features of the XIAO ESP32-C5's Bluetooth capabilities, such as how to scan for nearby Bluetooth devices, how to establish a Bluetooth connection, and how to transmit and receive data over a Bluetooth connection.
Getting Started
Antenna Installation
Inside the packaging of the Seeed Studio XIAO ESP32-C5, there is a dedicated Wi-Fi/BT Antenna connector. For optimal WiFi/Bluetooth signal strength, you need to take out the antenna included in the package and attach it to the connector.
If you want to achieve a stronger signal gain effect, you can purchase and install 2.4G/5G External Antenna with RP-SMA Male Connector — it delivers much higher gain than the built-in FPC Antenna included in the package!
| 2.4G/5G External Antenna with RP-SMA Male Connector |
|---|
 |
Bluetooth Low Energy (BLE) Usage
Bluetooth Low Energy, BLE for short, is a power-conserving variant of Bluetooth. BLE’s primary application is short distance transmission of small amounts of data (low bandwidth). Unlike Bluetooth that is always on, BLE remains in sleep mode constantly except for when a connection is initiated.
ESP32-C5 only supports BLE and does not support Bluetooth Classic
Due to its properties, BLE is suitable for applications that need to exchange small amounts of data periodically running on a coin cell. For example, BLE is of great use in healthcare, fitness, tracking, beacons, security, and home automation industries.
This makes it consume very low power. BLE consumes approximately 100x less power than Bluetooth (depending on the use case).
About the BLE part of XIAO ESP32-C5, we will introduce its use in the following three sections.
- Some fundamental concepts -- We will first get to know some concepts that may be used frequently in BLE in order to help us understand the execution process and thinking of BLE programs.
- BLE Scanner -- This section will explain how to search for nearby Bluetooth devices and print them out in the serial monitor.
- BLE server/client -- This section will explain how to use XIAO ESP32-C5 as Server and Client to send and receive specified data messages. It will also use to receive or send messages from the phone to XIAO.
Some fundamental concepts
Server and Client
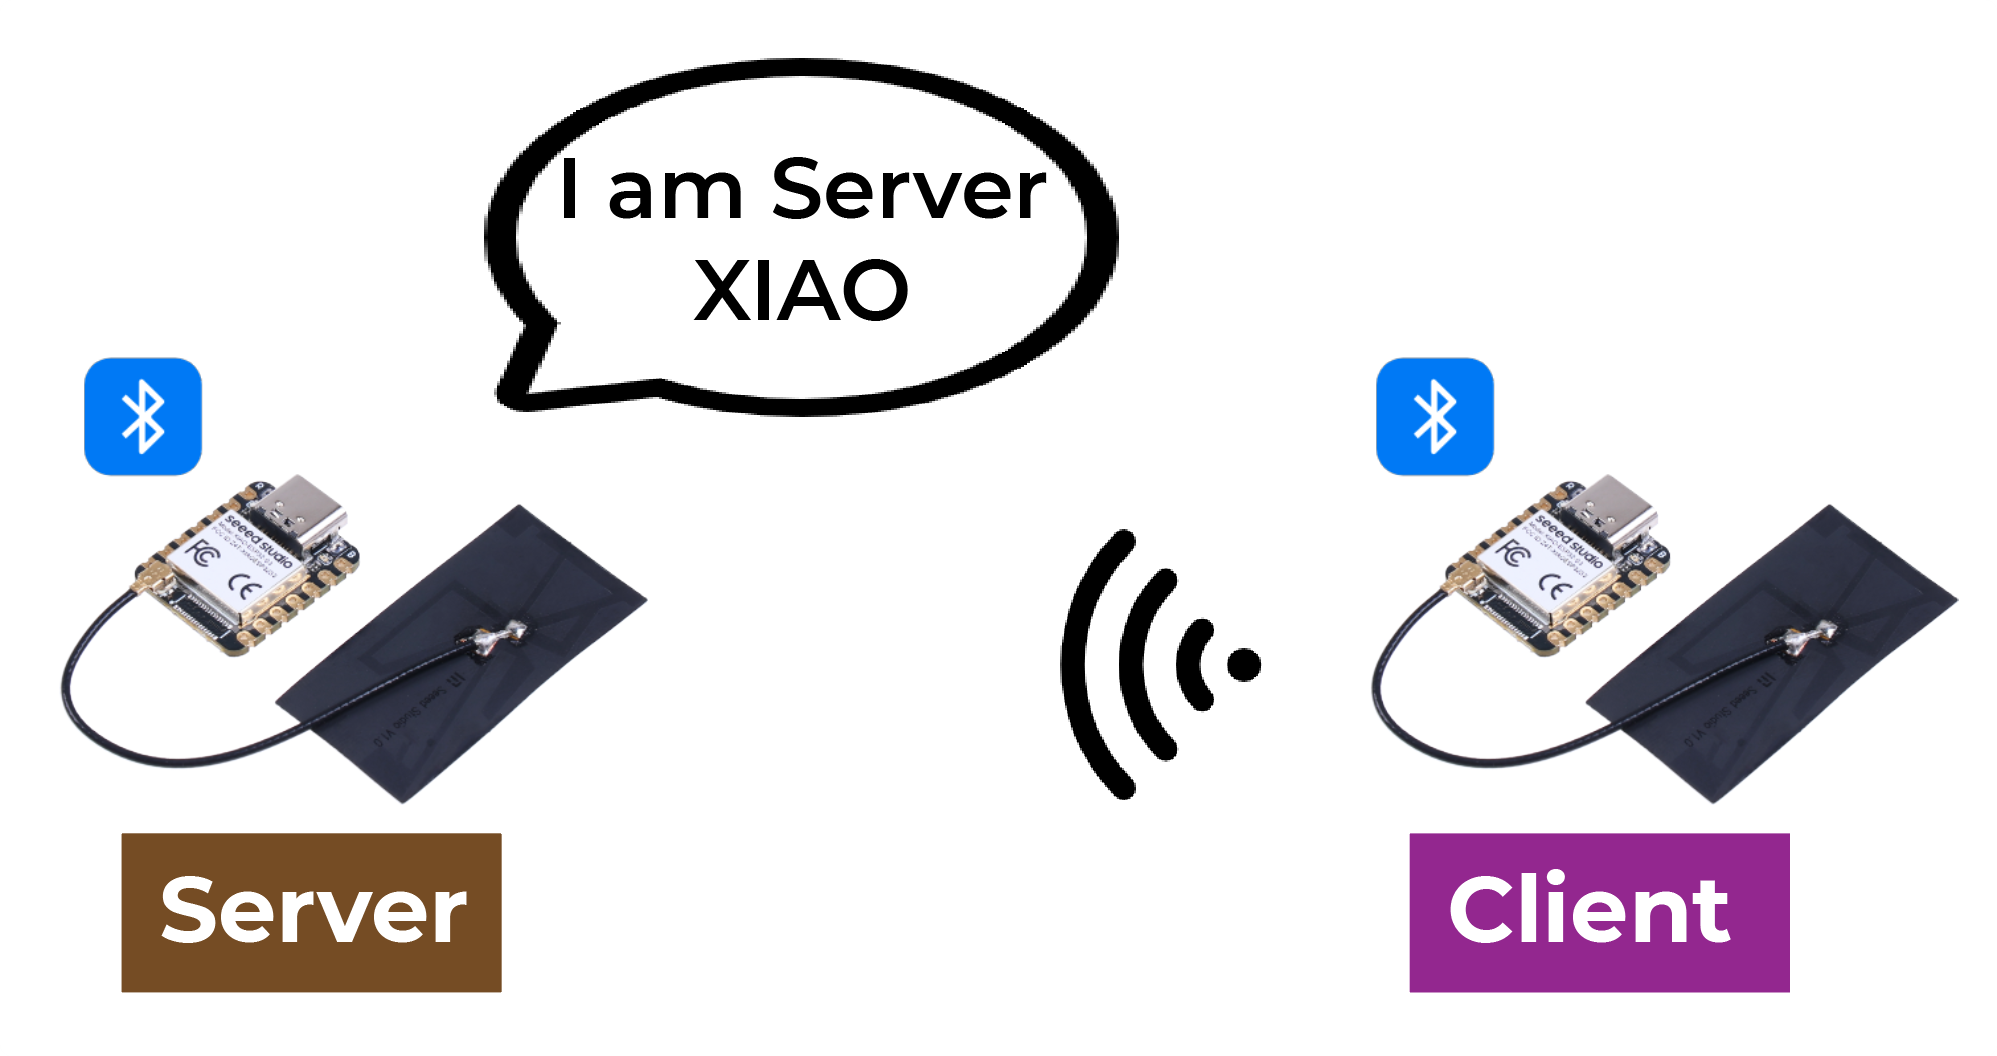
With Bluetooth Low Energy, there are two types of devices: the server and the client. The XIAO ESP32-C5 can act either as a client or as a server.
The server advertises its existence, so it can be found by other devices, and contains the data that the client can read. The client scans the nearby devices, and when it finds the server it is looking for, it establishes a connection and listens for incoming data. This is called point-to-point communication.
Attribute
Attribute is actually a piece of data. Each Bluetooth device is used to provide a service, and the service is a collection of data, the collection can be called a database, each entry in the database is an Attribute, so here I translate Attribute into data entries. You can imagine a Bluetooth device as a table, each row inside the table is an Attribute.

GATT
When two Bluetooth devices establish a connection, they need a protocol to determine how to communicate. GATT (Generic Attribute Profile) is such a protocol that defines how data is transmitted between Bluetooth devices.
In the GATT protocol, the functions and properties of a device are organized into structures called services, characteristics, and descriptors. A service represents a set of related functions and features provided by a device. Each service can include multiple characteristics, which define a certain property or behavior of the service, such as sensor data or control commands. Each characteristic has a unique identifier and a value, which can be read or written to communicate. Descriptors are used to describe metadata of characteristics, such as format and access permission of characteristic values.
By using the GATT protocol, Bluetooth devices can communicate in different application scenarios, such as transmitting sensor data or controlling remote devices.
BLE Characteristic
ATT stands for Attribute Protocol. It is the underlying mechanism for data exchange in BLE. ATT relies on a set of commands, such as Requests, Responses, Notifications, and Indications. In the Bluetooth Protocol Stack, ATT is the layer responsible for transporting data, making it the primary focus when analyzing Bluetooth data packets.
ATT command, formally known as ATT PDU (Protocol Data Unit). It includes 4 categories: read, write, notify and indicate. These commands can be divided into two types: Operations like Write Request and Indication require an acknowledgement from the peer, while Write Command and Notification do not.
Service and Characteristic are defined in the GATT layer. The Service side provides the Service, the Service is the data, and the data is the attribute, and the Service and Characteristic are the logical presentation of the data, or the data that the user can see are eventually transformed into the Service and Characteristic.
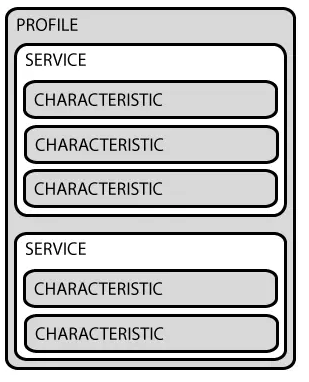
Let's take a look at what the service and characteristic look like from a mobile perspective. nRF Connect is an application that shows us very visually how each packet should look like.
As you can see, in the Bluetooth specification, each specific Bluetooth application is composed of multiple Services, and each Service is composed of multiple Characteristics. A Characteristic consists of a UUID, Properties, and a Value.
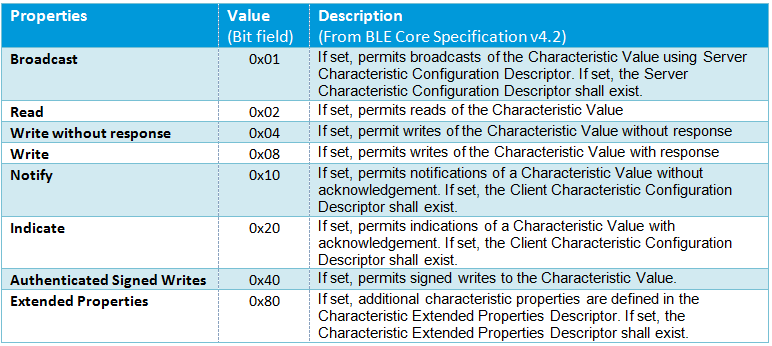
Properties are used to describe the types and permissions of operations on a characteristic, such as whether it supports read, write, notify, and so on. This is similar to the four categories included in an ATT PDU.
UUID
Each service, characteristic and descriptor have an UUID (Universally Unique Identifier). An UUID is a unique 128-bit (16 bytes) number. For example:
ea094cbd-3695-4205-b32d-70c1dea93c35
There are shortened UUIDs for all types, services, and profiles specified in the SIG (Bluetooth Special Interest Group). But if your application needs its own UUID, you can generate it using this UUID generator website.
BLE Usage Examples
Next, we will introduce how to use Bluetooth Low Energy (BLE) on the XIAO ESP32-C5 through several practical examples.
The examples below are implemented based on the Arduino IDE. If you have not used the Arduino IDE before, please visit: Getting Started with Seeed Studio XIAO ESP32-C5
BLE Scanner
In BLE Scanner mode, the XIAO ESP32-C5 acts as either a Central or an Observer. Instead of establishing a connection, it listens for Advertising packets broadcast by other devices in the surrounding area.
Program
- Below is a reference code snippet demonstrating how to use BLE Scanner mode on the XIAO ESP32-C5.
#include <BLEDevice.h>
#include <BLEUtils.h>
#include <BLEScan.h>
#include <BLEAdvertisedDevice.h>

int scanTime = 5; // Scanning duration (seconds)
BLEScan* pBLEScan;

class MyAdvertisedDeviceCallbacks: public BLEAdvertisedDeviceCallbacks {
    void onResult(BLEAdvertisedDevice advertisedDevice) {
      // Callback function when a device is discovered
      Serial.printf("Device found: %s \n", advertisedDevice.toString().c_str());
    }
};

void setup() {
  Serial.begin(115200);
  Serial.println("Initializing BLE Scanner...");

  BLEDevice::init("");
  pBLEScan = BLEDevice::getScan(); // Create scan object
  pBLEScan->setAdvertisedDeviceCallbacks(new MyAdvertisedDeviceCallbacks());
  pBLEScan->setActiveScan(true); // Active scan (consumes more power but gets more complete information)
  pBLEScan->setInterval(100);
  pBLEScan->setWindow(99);
}

void loop() {
  Serial.println("Starting scan...");
  // false here means do not keep duplicate device results, true to keep
  BLEScanResults* foundDevices = pBLEScan->start(scanTime, false);

  Serial.print("Scan finished, number of devices found: ");
  Serial.println(foundDevices->getCount());
  Serial.println("Scan completed, clearing results...");

  pBLEScan->clearResults();   // Clear cache to release memory
  delay(2000);
}
Effect Presentation
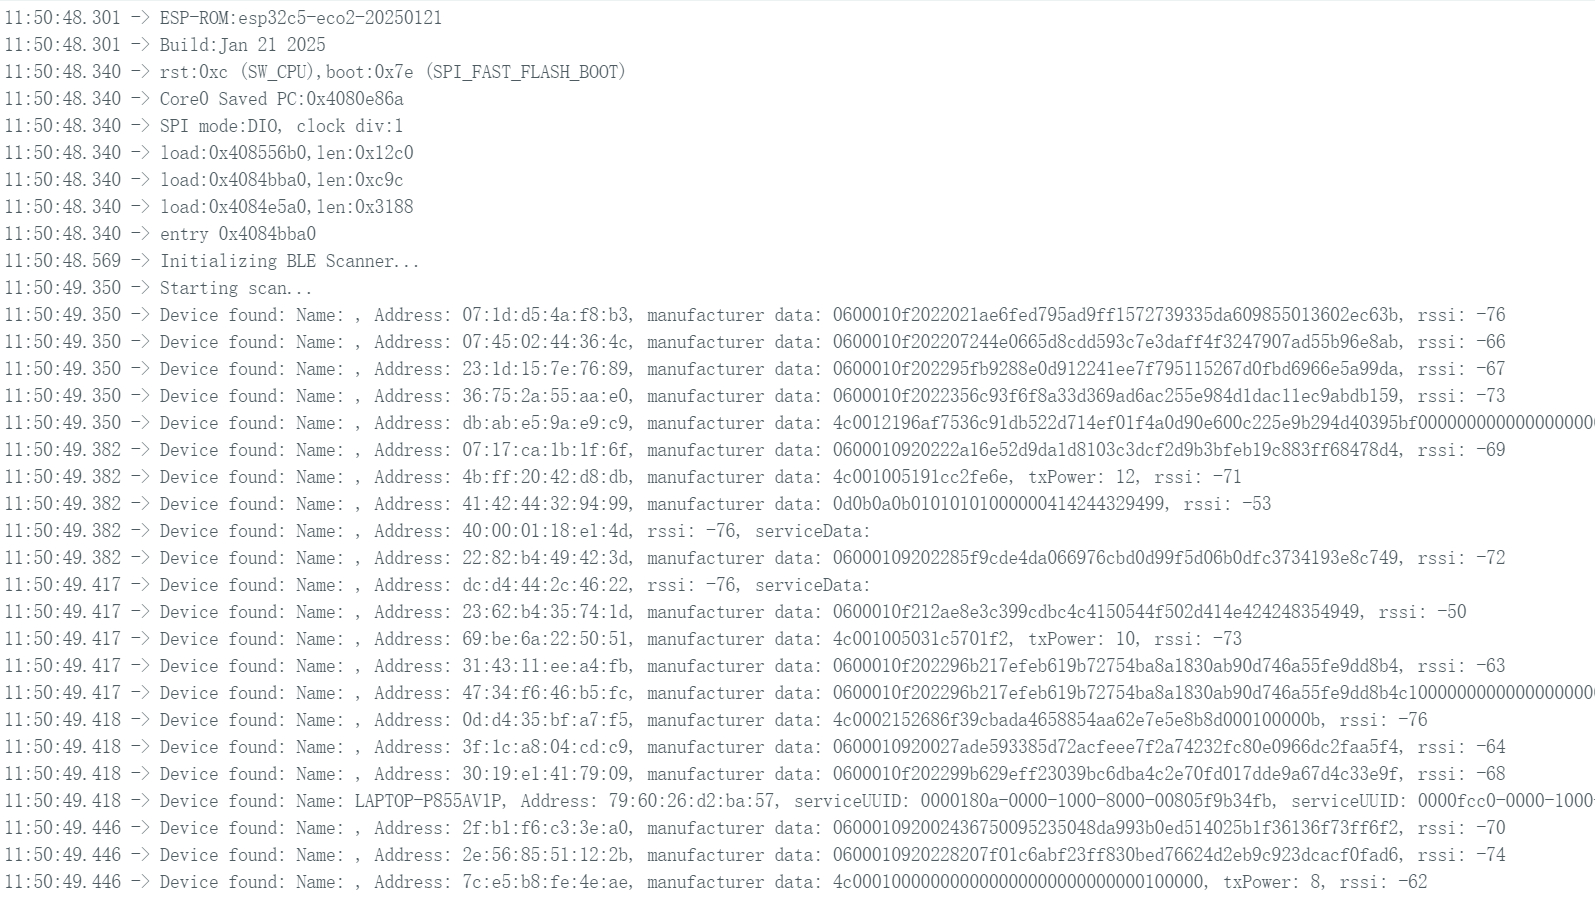
- Upload the code and open the Serial Monitor; the XIAO ESP32-C5 will scan for Bluetooth devices in the surrounding environment and print the relevant information.
BLE Server/Client
In BLE Server mode, create a Service and Characteristic, broadcast its presence, and wait for other devices to connect for reading and writing data.
In BLE Client mode, the Client scans for a specific Service UUID, initiates a connection after finding the Server, and reads or writes the characteristic values of the Server.
BLE Server Progarm
Next, a code example will be used to demonstrate how to set up a BLE Server on the XIAO ESP32-C5.
- Reference Code
#include <BLEDevice.h>
#include <BLEUtils.h>
#include <BLEServer.h>

// Website for generating UUID: uuidgenerator.net
#define SERVICE_UUID        "4fafc201-1fb5-459e-8fcc-c5c9c331914b"
#define CHARACTERISTIC_UUID "beb5483e-36e1-4688-b7f5-ea07361b26a8"

class MyCallbacks: public BLECharacteristicCallbacks {
    void onWrite(BLECharacteristic *pCharacteristic) {
      String value = pCharacteristic->getValue();
      if (value.length() > 0) {
        Serial.print("Data received from Client: ");
        for (int i = 0; i < value.length(); i++)
          Serial.print(value[i]);
        Serial.println();
      }
    }
};

void setup() {
  Serial.begin(115200);

  // 1. Initialize BLE
  BLEDevice::init("XIAO_ESP32C5_Server");

  // 2. Create Server
  BLEServer *pServer = BLEDevice::createServer();

  // 3. Create Service
  BLEService *pService = pServer->createService(SERVICE_UUID);

  // 4. Create Characteristic (set read/write permissions)
  BLECharacteristic *pCharacteristic = pService->createCharacteristic(
                                         CHARACTERISTIC_UUID,
                                         BLECharacteristic::PROPERTY_READ |
                                         BLECharacteristic::PROPERTY_WRITE
                                       );

  pCharacteristic->setCallbacks(new MyCallbacks()); // Set write callback function
  pCharacteristic->setValue("Hello World from XIAO"); // Set initial value

  // 5. Start Service
  pService->start();

  // 6. Start Advertising
  BLEAdvertising *pAdvertising = BLEDevice::getAdvertising();
  pAdvertising->addServiceUUID(SERVICE_UUID);
  pAdvertising->setScanResponse(true);
  pAdvertising->setMinPreferred(0x06);
  BLEDevice::startAdvertising();
}

void loop() {
  delay(2000);
}
Effect Presentation
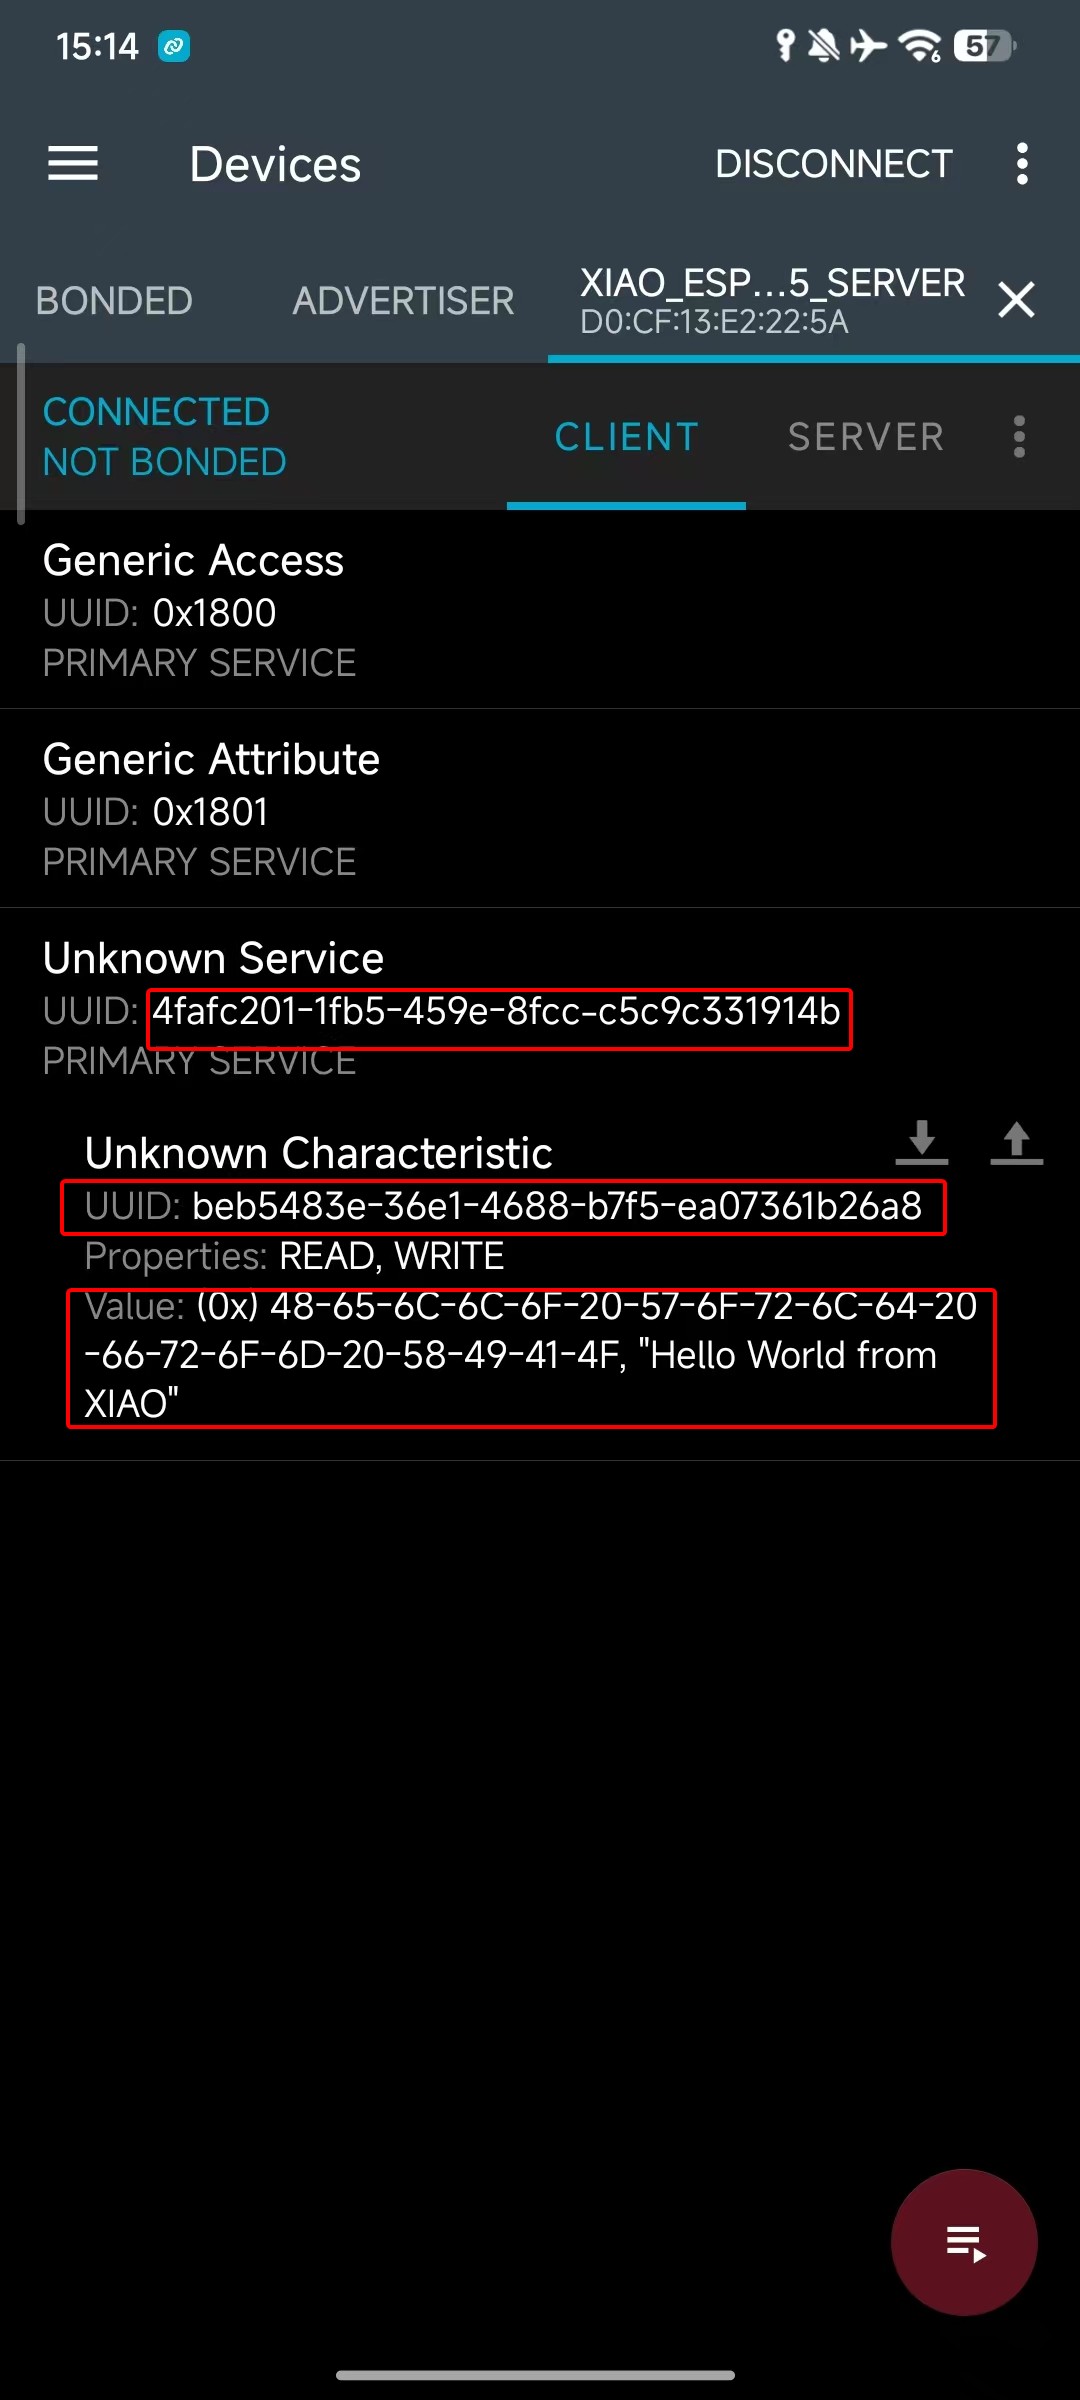
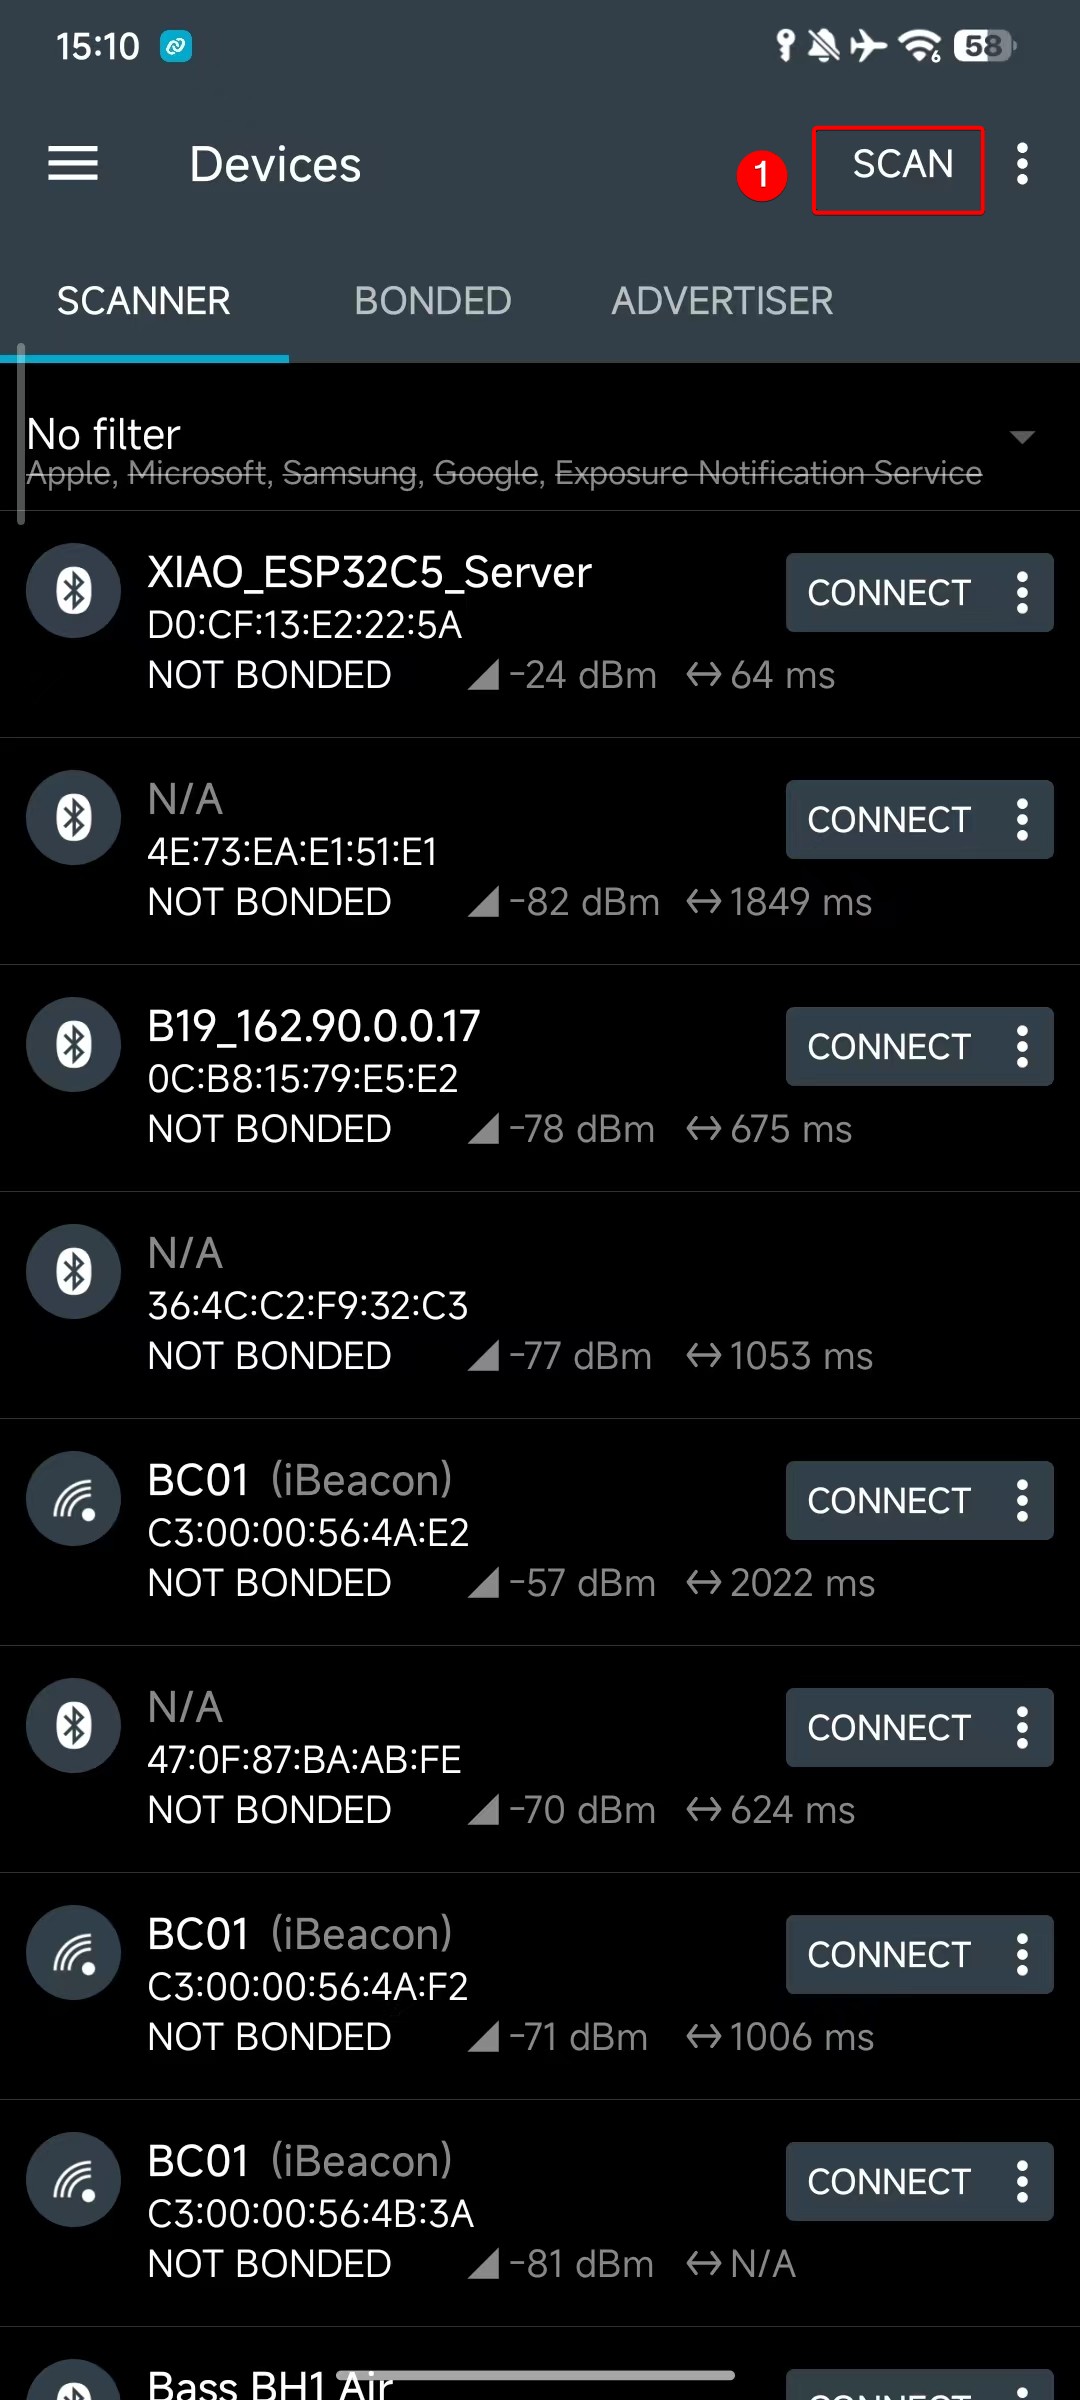
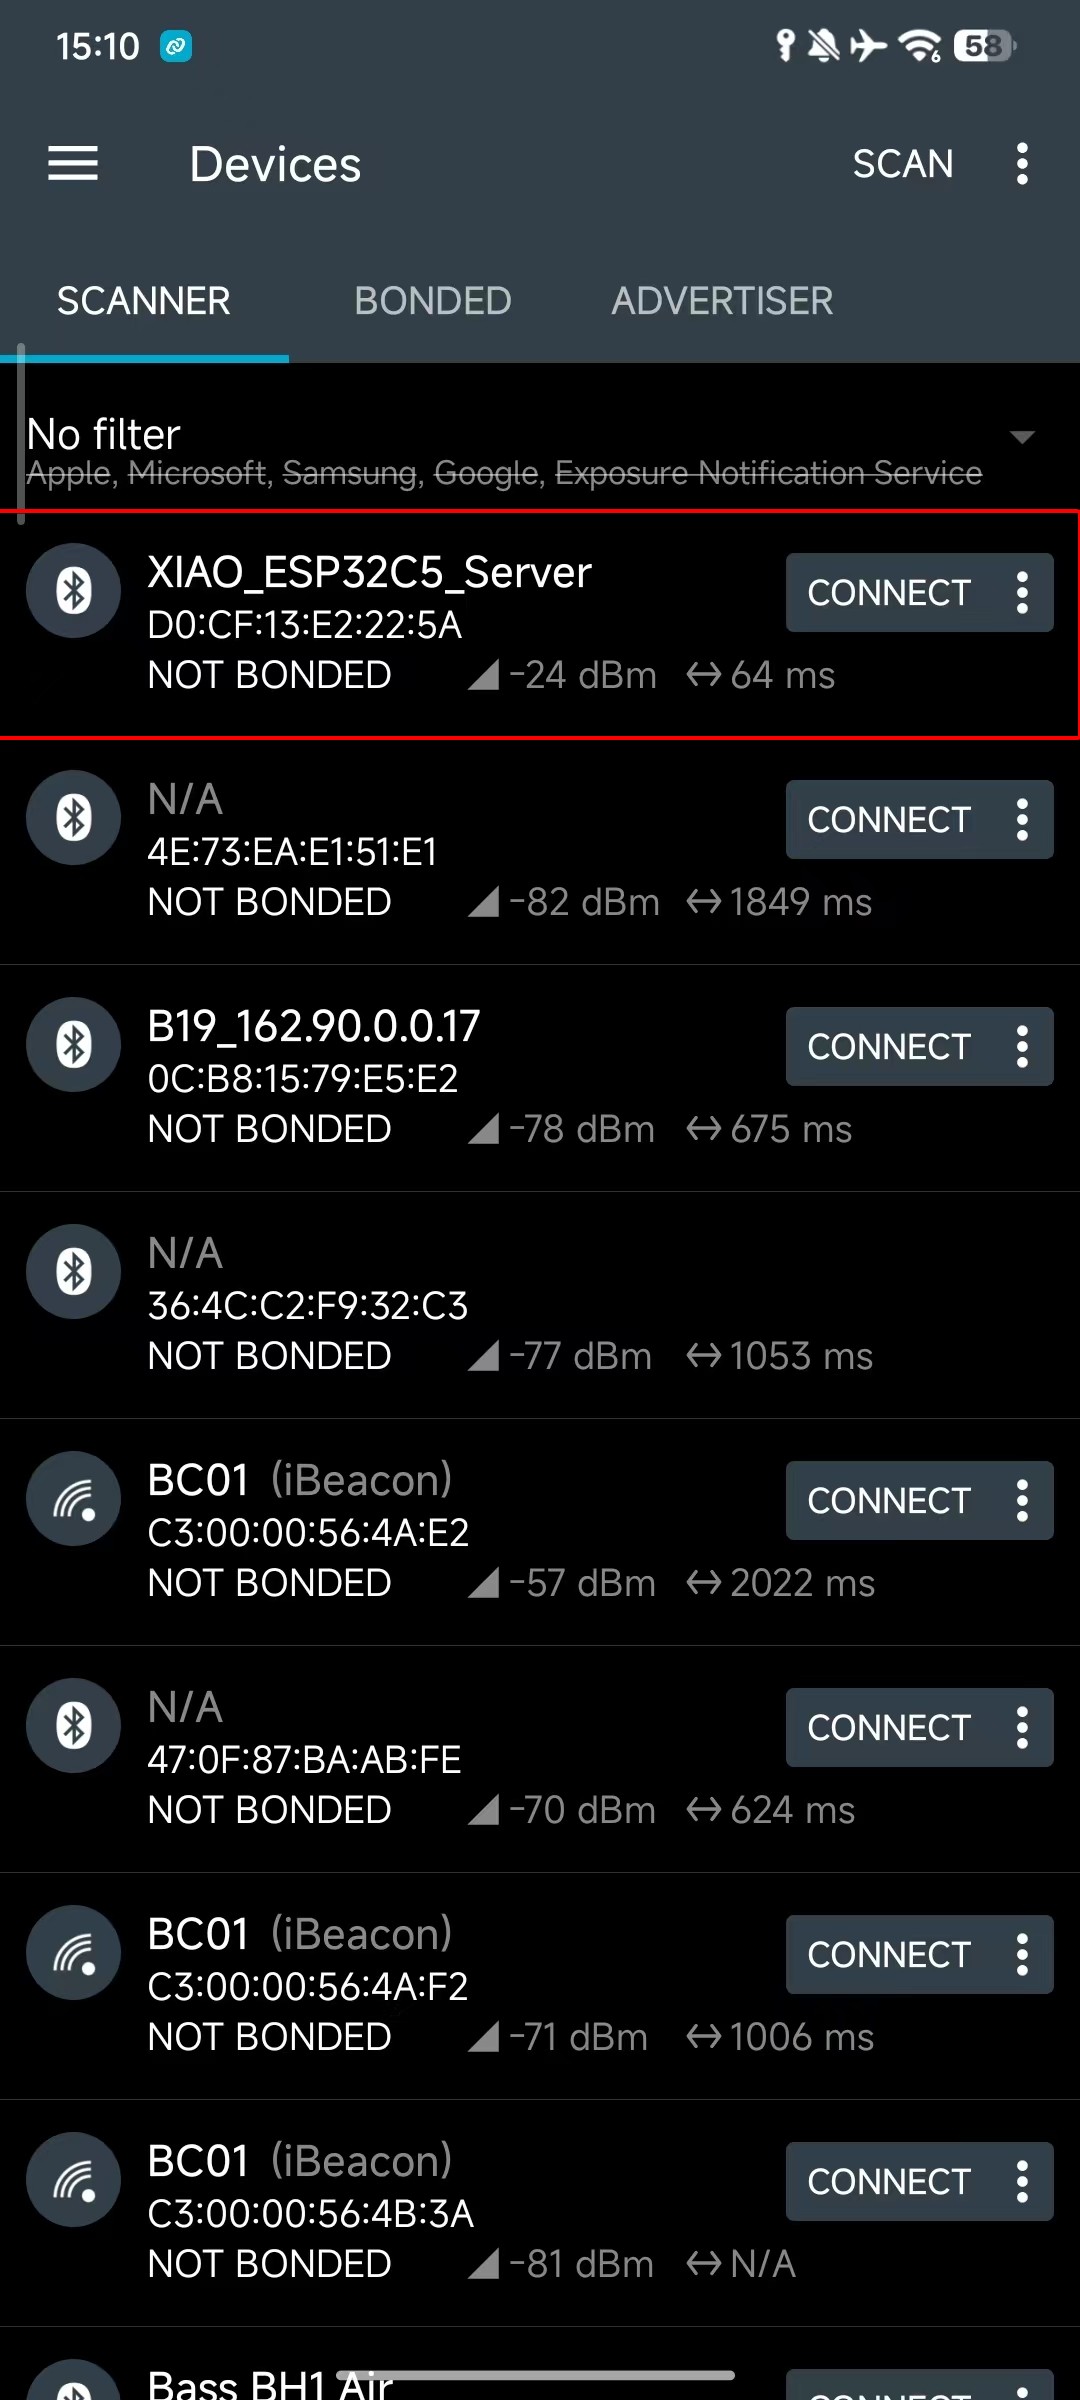
- Upload the code, then download the nRF Connect app, scan for and discover the BLE device (named XIAO_ESP32C5_Server as mentioned above), and select it to establish a connection.
Meanwhile, you can search and download the nRF Connect app in major mobile app stores, which allows your phone to search for and connect to Bluetooth devices.
- Android: nRF Connect
- IOS: nRF Connect
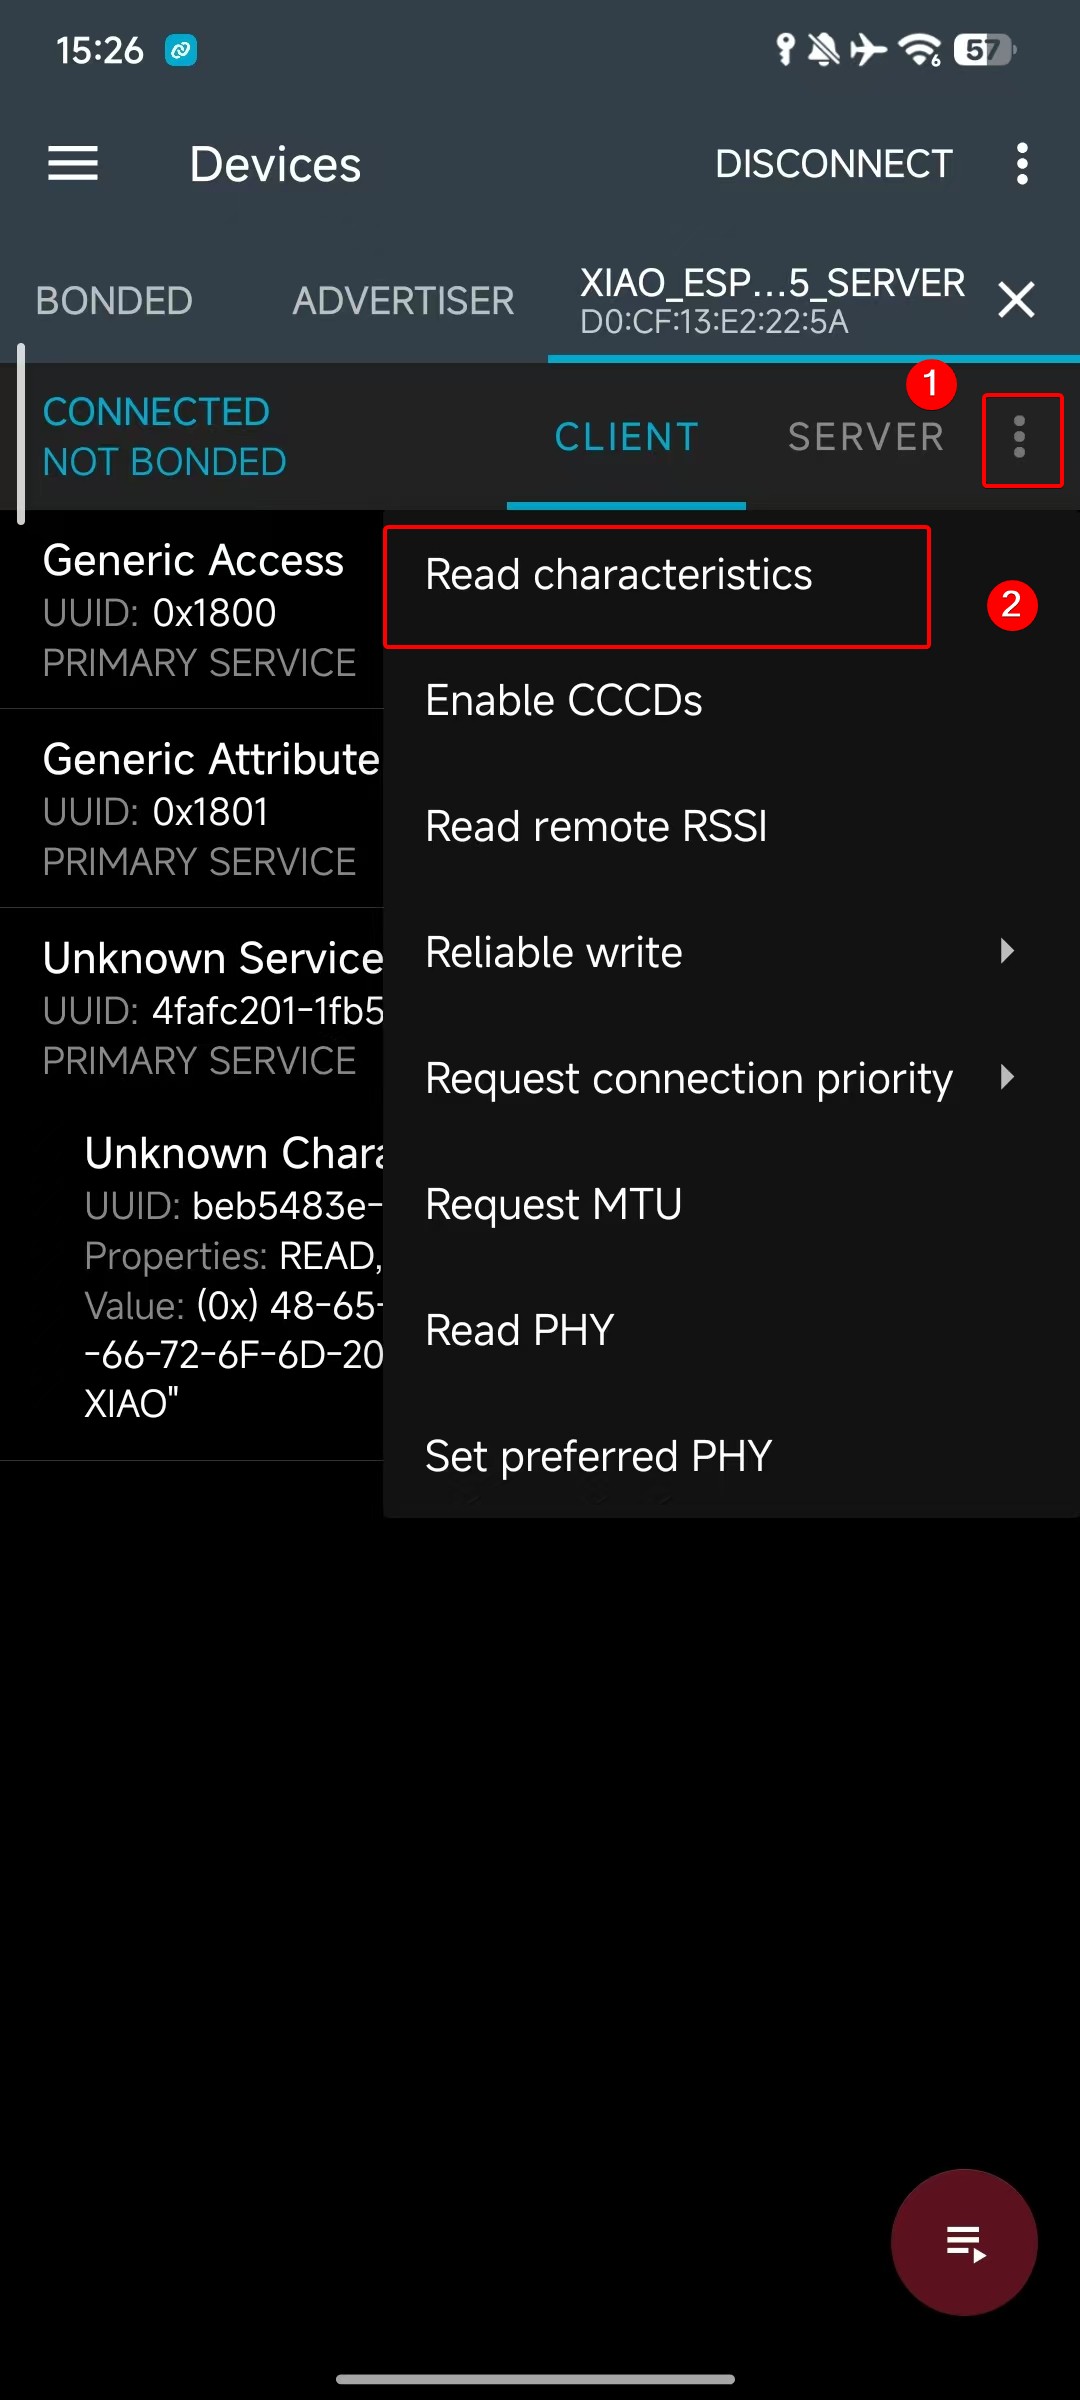
After downloading the software, follow the steps shown below to search for and connect XIAO ESP32-C5, and you will see the advertised Hello World from XIAO.
 |  |  | |
BLE Client Progarm
Next, a code example will be used to demonstrate how to set up a BLE Client on the XIAO ESP32-C5. To use the client functionality, you need at least two XIAO Bluetooth-enabled devices: one acting as the server to send data, and the other as the client to receive data.
Reference Code
#include <BLEDevice.h>
#include <BLEUtils.h>
#include <BLEScan.h>
#include <BLEAdvertisedDevice.h>
#include <BLEClient.h>

// UUID of the Server (must be exactly the same as the Server)
static BLEUUID serviceUUID("4fafc201-1fb5-459e-8fcc-c5c9c331914b");
static BLEUUID charUUID("beb5483e-36e1-4688-b7f5-ea07361b26a8");

// Scanning parameters
const int scanTime = 10; // Scanning duration (seconds)

// Global variables
static BLEAddress serverAddress;        // Address of the found Server
static bool deviceFound = false;        // Whether the target device is found
static BLERemoteCharacteristic* pRemoteCharacteristic = nullptr;
static BLEClient* pClient = nullptr;

// Scan callback: called when a device is discovered
class MyAdvertisedDeviceCallbacks : public BLEAdvertisedDeviceCallbacks {
  void onResult(BLEAdvertisedDevice advertisedDevice) {
    // Check if it contains the service UUID we need
    if (advertisedDevice.haveServiceUUID() && advertisedDevice.isAdvertisingService(serviceUUID)) {
      Serial.print("Found target Server! Name: ");
      Serial.print(advertisedDevice.getName().c_str());
      Serial.print(", Address: ");
      Serial.println(advertisedDevice.getAddress().toString().c_str());

      serverAddress = advertisedDevice.getAddress();
      deviceFound = true;

      // Stop scanning (stop once found)
      BLEDevice::getScan()->stop();
    }
  }
};

// Client connection callback (optional, used to monitor connection status)
class MyClientCallbacks : public BLEClientCallbacks {
  void onConnect(BLEClient* pclient) {
    Serial.println("Connected to Server successfully!");
  }

  void onDisconnect(BLEClient* pclient) {
    Serial.println("Disconnected from Server.");
    deviceFound = false;  // Rescan next time
  }
};

void setup() {
  Serial.begin(115200);
  while (!Serial); // Wait for serial port to open (optional)

  Serial.println("Starting BLE Client...");

  BLEDevice::init("XIAO_Client");  // Client device name

  // Start the first scan
  scanAndConnect();
}

void loop() {
  // If connected successfully, read/write data every 5 seconds
  if (pClient && pClient->isConnected() && pRemoteCharacteristic) {
    // Read characteristic value
    String value = pRemoteCharacteristic->readValue();
    Serial.print("Read value from Server: ");
    Serial.println(value.c_str());

    // Write new data (with response)
    String sendMsg = "Hello from Client @ " + String(millis() / 1000) + "s";
    pRemoteCharacteristic->writeValue(sendMsg.c_str(), true);  // true = require response
    Serial.println("Sent: " + sendMsg);

    delay(5000);
  }
  else {
    // Not connected or disconnected → rescan
    if (!deviceFound || (pClient && !pClient->isConnected())) {
      Serial.println("Server not connected, rescanning...");
      scanAndConnect();
    }
    delay(1000);
  }
}

// Encapsulate scan + connect logic
void scanAndConnect() {
  BLEScan* pBLEScan = BLEDevice::getScan();
  pBLEScan->setAdvertisedDeviceCallbacks(new MyAdvertisedDeviceCallbacks());
  pBLEScan->setActiveScan(true);  // Active scan to get more information
  pBLEScan->setInterval(100);
  pBLEScan->setWindow(99);

  Serial.println("Scanning for Server...");
  deviceFound = false;
  pBLEScan->start(scanTime, false);  // Scan for scanTime seconds

  if (!deviceFound) {
    Serial.println("Target Server not found, will retry later.");
    return;
  }

  // Create client and connect after finding the device
  pClient = BLEDevice::createClient();
  pClient->setClientCallbacks(new MyClientCallbacks());

  Serial.print("Connecting to ");
  Serial.println(serverAddress.toString().c_str());

  if (!pClient->connect(serverAddress)) {
    Serial.println("Connection failed!");
    return;
  }

  // Get remote service
  BLERemoteService* pRemoteService = pClient->getService(serviceUUID);
  if (pRemoteService == nullptr) {
    Serial.println("Failed to find service UUID");
    pClient->disconnect();
    return;
  }
  Serial.println("Service found.");

  // Get remote characteristic
  pRemoteCharacteristic = pRemoteService->getCharacteristic(charUUID);
  if (pRemoteCharacteristic == nullptr) {
    Serial.println("Failed to find characteristic UUID");
    pClient->disconnect();
    return;
  }
  Serial.println("Characteristic found. Ready to communicate!");
}
Effect Presentation
- Upload the code, then open the Serial Monitor to observe — you will receive the Bluetooth data sent by the server.

When verifying the client functionality, you need to flash the server program to another XIAO device in advance; otherwise, the verification will fail.
NimBLE-Arduino
The native Arduino BLEDevice library is based on the Bluedroid protocol stack; it offers full functionality but consumes a significant amount of Flash and RAM. NimBLE is a completely rewritten BLE protocol stack (derived from Apache Mynewt), which features the following advantages:
-
Extremely low memory footprint (RAM usage reduced by over 50%).
-
Faster connection speed.
-
API compatibility: It is designed to be almost fully compatible with the syntax of the native Arduino BLE library, requiring only header file modifications and minor type adjustments.
You can visit the author's GitHub repository: NimBLE-Arduino for more details.
Next, we will implement a Bluetooth scanning function based on the NimBLE-Arduino library.
Program
- Install the NimBLE-Arduino library.

Reference Code
#include <Arduino.h>
#include <NimBLEDevice.h>
#include <NimBLEAdvertisedDevice.h>
#include "NimBLEEddystoneTLM.h"
#include "NimBLEBeacon.h"

#define ENDIAN_CHANGE_U16(x) ((((x) & 0xFF00) >> 8) + (((x) & 0xFF) << 8))

int         scanTime = 5 * 1000; // In milliseconds
NimBLEScan* pBLEScan;

class ScanCallbacks : public NimBLEScanCallbacks {
    void onResult(const NimBLEAdvertisedDevice* advertisedDevice) override {
        if (advertisedDevice->haveName()) {
            Serial.print("Device name: ");
            Serial.println(advertisedDevice->getName().c_str());
            Serial.println("");
        }

        if (advertisedDevice->haveServiceUUID()) {
            NimBLEUUID devUUID = advertisedDevice->getServiceUUID();
            Serial.print("Found ServiceUUID: ");
            Serial.println(devUUID.toString().c_str());
            Serial.println("");
        } else if (advertisedDevice->haveManufacturerData() == true) {
            std::string strManufacturerData = advertisedDevice->getManufacturerData();
            if (strManufacturerData.length() == 25 && strManufacturerData[0] == 0x4C && strManufacturerData[1] == 0x00) {
                Serial.println("Found an iBeacon!");
                NimBLEBeacon oBeacon = NimBLEBeacon();
                oBeacon.setData(reinterpret_cast<const uint8_t*>(strManufacturerData.data()), strManufacturerData.length());
                Serial.printf("iBeacon Frame\n");
                Serial.printf("ID: %04X Major: %d Minor: %d UUID: %s Power: %d\n",
                              oBeacon.getManufacturerId(),
                              ENDIAN_CHANGE_U16(oBeacon.getMajor()),
                              ENDIAN_CHANGE_U16(oBeacon.getMinor()),
                              oBeacon.getProximityUUID().toString().c_str(),
                              oBeacon.getSignalPower());
            } else {
                Serial.println("Found another manufacturers beacon!");
                Serial.printf("strManufacturerData: %d ", strManufacturerData.length());
                for (int i = 0; i < strManufacturerData.length(); i++) {
                    Serial.printf("[%X]", strManufacturerData[i]);
                }
                Serial.printf("\n");
            }
            return;
        }

        NimBLEUUID eddyUUID = (uint16_t)0xfeaa;

        if (advertisedDevice->getServiceUUID().equals(eddyUUID)) {
            std::string serviceData = advertisedDevice->getServiceData(eddyUUID);
            if (serviceData[0] == 0x20) {
                Serial.println("Found an EddystoneTLM beacon!");
                NimBLEEddystoneTLM foundEddyTLM = NimBLEEddystoneTLM();
                foundEddyTLM.setData(reinterpret_cast<const uint8_t*>(serviceData.data()), serviceData.length());

                Serial.printf("Reported battery voltage: %dmV\n", foundEddyTLM.getVolt());
                Serial.printf("Reported temperature from TLM class: %.2fC\n", (double)foundEddyTLM.getTemp());
                int   temp     = (int)serviceData[5] + (int)(serviceData[4] << 8);
                float calcTemp = temp / 256.0f;
                Serial.printf("Reported temperature from data: %.2fC\n", calcTemp);
                Serial.printf("Reported advertise count: %d\n", foundEddyTLM.getCount());
                Serial.printf("Reported time since last reboot: %ds\n", foundEddyTLM.getTime());
                Serial.println("\n");
                Serial.print(foundEddyTLM.toString().c_str());
                Serial.println("\n");
            }
        }
    }
} scanCallbacks;

void setup() {
    Serial.begin(115200);
    Serial.println("Scanning...");

    NimBLEDevice::init("Beacon-scanner");
    pBLEScan = BLEDevice::getScan();
    pBLEScan->setScanCallbacks(&scanCallbacks);
    pBLEScan->setActiveScan(true);
    pBLEScan->setInterval(100);
    pBLEScan->setWindow(100);
}

void loop() {
    NimBLEScanResults foundDevices = pBLEScan->getResults(scanTime, false);
    Serial.print("Devices found: ");
    Serial.println(foundDevices.getCount());
    Serial.println("Scan done!");
    pBLEScan->clearResults(); // delete results scan buffer to release memory
    delay(2000);
}
Effect Presentation
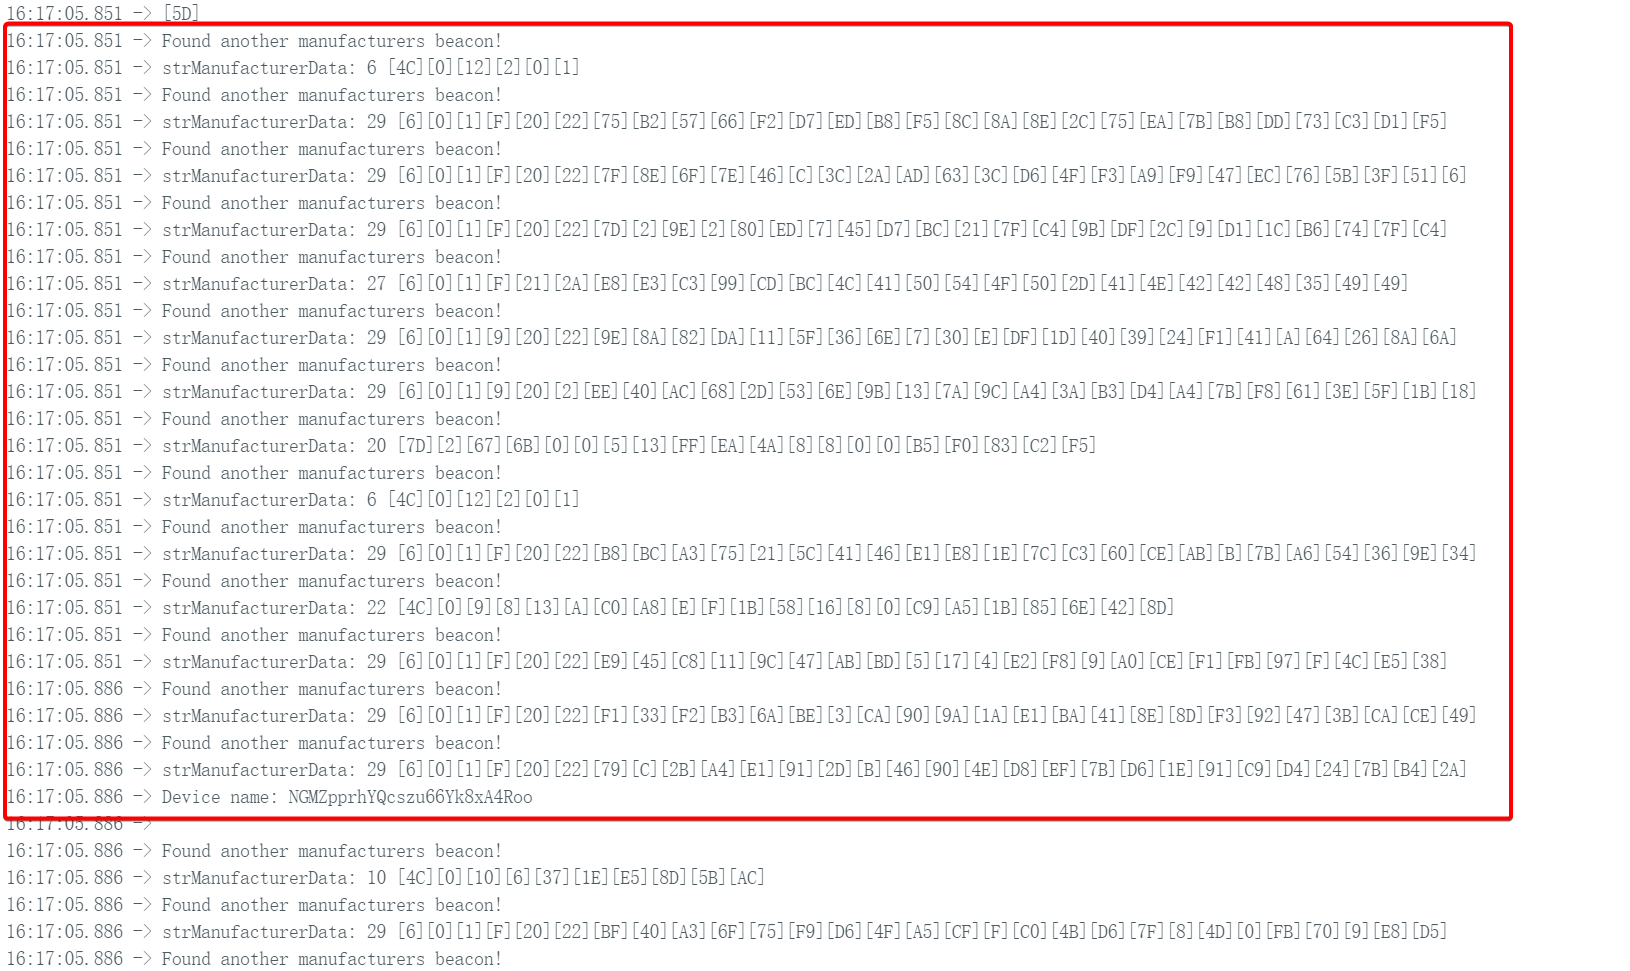
- Upload the code and open the Serial Monitor to observe. It also implements the Bluetooth scanning function, but with a faster scanning speed.
Example: Connecting to Home Assistant
By this point, you should have gained a basic understanding of the BLE modes of the XIAO ESP32-C5.
Next, we can put our hands on a more practical project: make the XIAO ESP32-C5 simulate a temperature and humidity sensor (or a simple button switch), and periodically broadcast sensor data or status via BLE. Home Assistant will automatically discover this BLE device and directly display the current temperature and humidity values (or button status) on the interface, without the need for additional complex integration configurations.
This simple example fully demonstrates the great potential of the ESP32-C5 in the fields of the Internet of Things (IoT) and smart homes: its low power consumption, ease of development, and out-of-the-box support for passive BLE devices enable anyone to quickly build their own smart sensor network.
If you have never used Home Assistant, you can visit: Connecting XIAO ESP32-C5 to Home Assistant
- Reference Code
#include <NimBLEDevice.h>

// Simulated temperature value
float temp = 20.0;

void setup() {
  Serial.begin(115200);

  // 1. Initialize NimBLE
  NimBLEDevice::init("XIAO_BTHome_Sensor");

  // 2. Create advertising object
  NimBLEAdvertising *pAdvertising = NimBLEDevice::getAdvertising();

  // ==========================================
  // Construct BTHome data packet (This is the most critical part)
  // ==========================================
  // Reference: https://bthome.io/format/

  std::string serviceData = "";

  // A. BTHome device information byte (Required)
  // bit 0: Encryption (0=No)
  // bit 1-2: Version (2=v2)
  // Result: 0100 0000 -> 0x40
  serviceData += (char)0x40;

  // B. Temperature data (16-bit, 0.01 factor)
  // ID: 0x02 (Temperature)
  serviceData += (char)0x02;

  // Value: Assume 25.50°C -> 2550 (0x09F6) -> Little-endian: F6 09
  int16_t tempInt = (int16_t)(temp * 100);
  serviceData += (char)(tempInt & 0xFF);        // Low byte
  serviceData += (char)((tempInt >> 8) & 0xFF); // High byte

  // C. Battery level (8-bit, %) - Optional
  // ID: 0x01 (Battery)
  serviceData += (char)0x01;
  serviceData += (char)85; // 85%

  // ==========================================

  // 3. Put the constructed data into Service Data
  // BTHome UUID is 0xFCD2
  NimBLEAdvertisementData oAdvertisementData = NimBLEAdvertisementData();
  oAdvertisementData.setFlags(0x06); // General Discovery Mode
  oAdvertisementData.setServiceData(NimBLEUUID((uint16_t)0xFCD2), serviceData);

  // 4. Set advertising parameters
  pAdvertising->setAdvertisementData(oAdvertisementData);

  // 5. Start advertising (Advertise every 3 seconds, can be set longer to save power in practice)
  pAdvertising->start();

  Serial.println("BTHome advertising started...");
}

void loop() {
  // To update data dynamically: stop advertising -> update data -> restart advertising
  // For simple demonstration, only static advertising logic is used here
  // In actual projects, you will read sensors here, update oAdvertisementData, then enter sleep mode
  delay(10000);
}
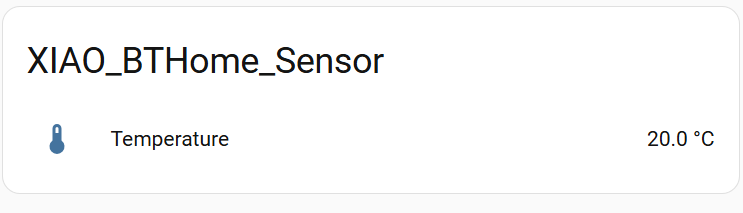
- Upload the code and open the Home Assistant platform. You can find the BTHome device under Settings -> Devices & Services and add it to the dashboard.
Tech Support & Product Discussion
Thank you for choosing our products! We are here to provide you with different support to ensure that your experience with our products is as smooth as possible. We offer several communication channels to cater to different preferences and needs.