XIAO ESP32C5 ESP-Mesh Audio
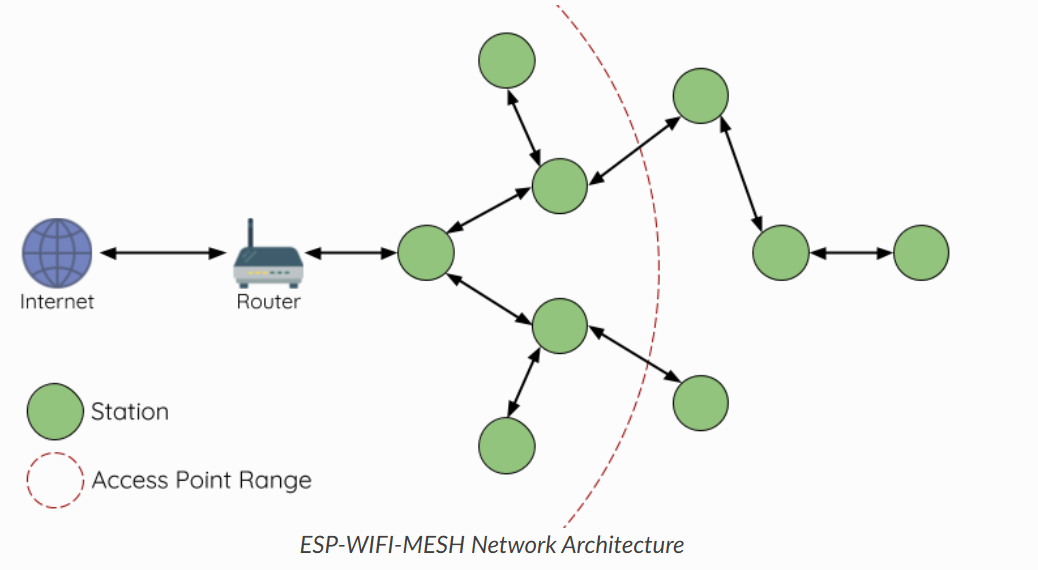
ESP-Wi-Fi-MESH
The following is the official introduction to ESP-WIFI-MESH by Espressif Systems:
ESP-WIFI-MESH is a wireless communication network with nodes organized in a mesh topology using the simultaneous AP-STA feature on Espressif SoCs. It provides a self-forming and self-healing network, with ease of deployment. The network topology of ESP-WIFI-MESH can scale up to 1000 nodes in large areas, without requiring any specific Wi-Fi infrastructure support. ESP-WIFI-MESH can also be used to cover Wi-Fi blind spots in home-deployment scenarios where the Wi-Fi signal cannot be reached.
It features the following characteristics:
- Easy and Secure Setup : Mobile app + Bluetooth LE network configuration is supported, enabling quick addition of new nodes and secure delivery of configurations.
- Self-forming and Self-healing : Nodes will automatically connect/reconnect, and the network can form automatically and self-heal when a node fails.
- No Extra Gateways Required : No additional gateways or infrastructure are required. The Mesh network can scale up to thousands of nodes, making it suitable for large-scale deployments.
- IP Connectivity : All nodes support IP communication, enabling both interconnection among themselves and access to external networks (via root-node NAT or bridging).
- Secure by Design : Based on standard Wi-Fi, communications between nodes can adopt WPA2 encryption to ensure secure data transmission.
- Applications : It is applicable to various scenarios such as smart lighting, smart homes, automation control, and networking in large-scale venues (e.g., parking lots, factories, shared spaces).
For more detailed information, please refer to the official link of Espressif Systems :
ESP-Mesh_Audio
Next, we will use a XIAO ESP32-C5, a router supporting the 5 GHz frequency band, and a computer to simulate 5 GHz band audio transmission in a Mesh node scenario.
Here, your computer acts as a Mesh child node, sending data via a 5 GHz router; the C5 acts as a Mesh root node, receiving data.
| Seeed Studio XIAO ESP32-C5 |
|---|
 |
If you do not have a router supporting the 5 GHz frequency band at home, you can enable your mobile phone's hotspot, set it to the 5 GHz frequency band, and ensure that your computer is connected to this hotspot.
Create an Arduino Project
Copy the following code, and modify the ssid and password to the name and password of the 5 GHz frequency band router you are using.
#include <WiFi.h>
#include <WiFiUdp.h>
const char* ssid = "Your_5G_Router_SSID";
const char* password = "Your_Router_Password";
#define UDP_PORT 4444
WiFiUDP udp;
uint8_t packetBuffer[1024]; // Buffer for storing received UDP packets
void setup() {
Serial.begin(115200);
// Connect to WiFi
WiFi.mode(WIFI_STA);
WiFi.begin(ssid, password);
Serial.print("Connecting to 5GHz WiFi");
while (WiFi.status() != WL_CONNECTED) {
delay(500);
Serial.print(".");
}
Serial.println("\nConnected!");
Serial.print("IP Address: ");
Serial.println(WiFi.localIP());
// Start UDP listening
udp.begin(UDP_PORT);
Serial.printf("Listening on UDP port %d\n", UDP_PORT);
}
void loop() {
int packetSize = udp.parsePacket();
if (packetSize) {
// Read received data
int len = udp.read(packetBuffer, 1024);
// Statistics and print: size of received packet, and signal strength (RSSI)
// Signal strength is crucial for 5GHz audio transmission
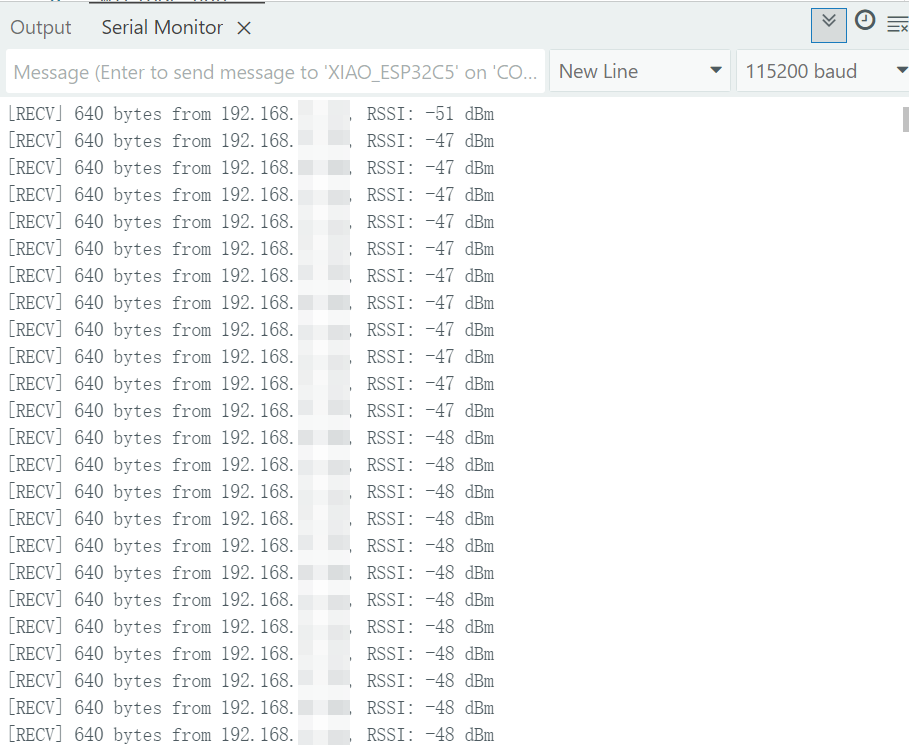
Serial.printf("[RECV] %d bytes from %s, RSSI: %d dBm\n",
len, udp.remoteIP().toString().c_str(), WiFi.RSSI());
// If you have an I2S speaker, you can call i2s_write here for playback
}
}
Get the IP Address
Upload the code to the XIAO ESP32-C5, open the Serial Monitor, and the connected IP address will be printed if it successfully connects to the 5 GHz WiFi router.

Create a Python Script
Before using the Python script, you need to install the Python 3 environment first. You can search for the corresponding installation tutorials online for details.
Create a file named send_audio.py in any folder on Windows, and copy the following Python code into it.
Fill in the IP address printed by the Serial Monitor of the Arduino IDE into the TARGET_IP variable in the code.
import socket
import time
import random

# Set the target IP (View the IP printed out by the serial port of C5)
TARGET_IP = "192.168.x.x" # <--- Modify here!!!
TARGET_PORT = 4444

# Simulated Audio Parameters
# 16kHz sampling, 16-bit, mono -> 32000 bytes per second
# Send one packet every 20ms -> Each packet is 640 bytes
PACKET_SIZE = 640
INTERVAL = 0.02 # 20ms

sock = socket.socket(socket.AF_INET, socket.SOCK_DGRAM)
print(f"Start sending simulated audio to {TARGET_IP}:{TARGET_PORT}...")

sequence = 0

try:
    while True:
        # Generate simulated data (add serial numbers to facilitate packet loss detection)
        # The first 4 bytes are the serial numbers, followed by random noise
        payload = sequence.to_bytes(4, byteorder='big') + random.randbytes(PACKET_SIZE - 4)

        sock.sendto(payload, (TARGET_IP, TARGET_PORT))
        print(f"Sent packet #{sequence}, size: {len(payload)}")

        sequence += 1
        time.sleep(INTERVAL) # Control the transmission frequency

except KeyboardInterrupt:
    print("Stopped.")
    sock.close()
Run the Script File
Right-click in the folder where send_audio.py is stored and open the terminal in this folder.
Enter python send_audio.py to execute the script. After a successful connection, it will send audio data to the XIAO ESP32-C5 every 20 ms.

The monitor window of the Arduino IDE will return the IP address and byte data of your computer, as well as the signal strength of the connected 5 GHz WiFi.
Congratulations! At this point, you have learned how to transmit audio over the 5 GHz WiFi band, and more innovations are waiting for you to realize!
Tech Support & Product Discussion
Thank you for choosing our products! We are here to provide you with different support to ensure that your experience with our products is as smooth as possible. We offer several communication channels to cater to different preferences and needs.