WiFi usage with Seeed Studio XIAO ESP32-C5
| Seeed Studio XIAO ESP32-C5 |
|---|
 |
The Seeed Studio XIAO ESP32-C5 supports dual-band 2.4 GHz & 5 GHz Wi-Fi, featuring a dual-band Wi-Fi 6 (802.11ax) radio with backward compatibility for 802.11a/b/g/n/ac standards. In addition, this development board supports U.FL antenna connectivity, which is designed to enhance the wireless connection performance of the XIAO ESP32-C5. In this tutorial, we will explore how to leverage the Wi-Fi functionality of the XIAO ESP32-C5 to connect to a Wi-Fi network and perform basic network tasks.
The following tutorial uses the Arduino IDE for compilation and uploading. If you don’t have experience with the Arduino IDE yet, please visit Getting Started with Seeed Studio XIAO ESP32-C5.
Getting Started
Antenna Installation
Inside the packaging of the Seeed Studio XIAO ESP32-C5, there is a dedicated Wi-Fi/BT Antenna connector. For optimal WiFi/Bluetooth signal strength, you need to take out the antenna included in the package and attach it to the connector.
If you want to achieve a stronger signal gain effect, you can purchase and install 2.4G/5G External Antenna with RP-SMA Male Connector — it delivers much higher gain than the built-in FPC Antenna included in the package!
| 2.4G/5G External Antenna with RP-SMA Male Connector |
|---|
 |
The commonly interfaces of WiFi library
- XIAO ESP32-C5 provides a wide range of Wi-Fi network functions. Generally, we can see the functions of the WiFi library in the ESP32's built-in package and choose the corresponding function to achieve the desired functionality. Next, we will list some commonly used interfaces and introduce their usage.
If you want to start the Wi-Fi usage tutorial directly, you can jump to WiFi Usage Examples.
Generic WiFi function
-
WiFiGenericClass::getHostname()-- Is a function in the WiFi library for ESP32 that returns the hostname of the device as a string. The hostname is a unique name that identifies the device on the network. This function retrieves the hostname that was previously set usingWiFiGenericClass::setHostname(). If no hostname has been set, the default hostname will be returned. -
WiFiGenericClass::persistent(bool persistent)-- Is a method that is used to enable or disable the persistent mode of the ESP32 WiFi library. When persistent mode is enabled, the Wi-Fi configuration is stored in non-volatile memory (NVM) and is retained even after a power cycle or reset. When persistent mode is disabled, the configuration is stored in RAM and is lost after a power cycle or reset.- Input Parameters
- persistent: If the argument is true, persistent mode is enabled. If the argument is false, persistent mode is disabled.
- Input Parameters
-
WiFiGenericClass::enableLongRange(bool enable)-- The function is used to enable or disable the Long Range (LR) feature of the WiFi module. When enabled, the LR feature allows the module to connect to WiFi networks that are further away than usual, but with lower data rates.- Input Parameters
- enable: The parameter should be set to true to enable the feature and false to disable it.
- Input Parameters
-
WiFiGenericClass::mode(wifi_mode_t m)-- The function is used to set the WiFi mode of the device.- Input Parameters
- m: The m parameter specifies the mode to set, which can be one of the following constants defined in the wifi_mode_t enum:
- WIFI_MODE_NULL: Disables both WiFi station and access point modes.
- WIFI_MODE_STA: Enables WiFi station mode to connect to an existing WiFi network.
- WIFI_MODE_AP: Enables access point mode to create a new WiFi network.
- WIFI_MODE_APSTA: Enables both WiFi station and access point modes.
- m: The m parameter specifies the mode to set, which can be one of the following constants defined in the wifi_mode_t enum:
- Input Parameters
-
WiFiGenericClass::setSleep(wifi_ps_type_t sleepType)-- The function sets the power-saving mode for the WiFi module.- Input Parameters
- sleepType: The sleepType parameter is an enumerated type that specifies the type of power-saving mode to use. There are three possible sleep types:
- WIFI_PS_NONE: This is the default sleep mode, in which the WiFi module does not go into power-saving mode.
- WIFI_PS_MIN_MODEM: In this mode, the WiFi module shuts down its modem while maintaining the connection to the access point (AP).
- WIFI_PS_MAX_MODEM: Enables the most aggressive Wi-Fi power-saving mode. It can significantly increase sleep time, but may introduce higher latency and reduced throughput, and in some networks it may affect connection stability.
- sleepType: The sleepType parameter is an enumerated type that specifies the type of power-saving mode to use. There are three possible sleep types:
- Input Parameters
STA functions
-
WiFiSTAClass::status()-- Return Connection status.- Output: one of the value defined in wl_status_t.
- WL_NO_SHIELD: This status code indicates that the Wi-Fi module is not present.
- WL_IDLE_STATUS: This status code indicates that the Wi-Fi module is not performing any operation.
- WL_NO_SSID_AVAIL: This status code indicates that no Wi-Fi networks were found during the scan.
- WL_SCAN_COMPLETED: This status code indicates that the Wi-Fi scan has completed successfully.
- WL_CONNECTED: This status code indicates that the ESP32 is successfully connected to a Wi-Fi network.
- WL_CONNECT_FAILED: This status code indicates that the connection to the Wi-Fi network failed.
- WL_CONNECTION_LOST: This status code indicates that the connection to the Wi-Fi network was lost.
- WL_DISCONNECTED: This status code indicates that the ESP32 was previously connected to a Wi-Fi network, but is not currently connected to any network.
- Output: one of the value defined in wl_status_t.
-
WiFiSTAClass::begin(const char* wpa2_ssid, wpa2_auth_method_t method, const char* wpa2_identity, const char* wpa2_username, const char *wpa2_password, const char* ca_pem, const char* client_crt, const char* client_key, int32_t channel, const uint8_t* bssid, bool connect)-- Start Wifi connection with a WPA2 Enterprise AP.- Input Parameters (Optional)
- ssid: Pointer to the SSID string.
- method: The authentication method of WPA2 (WPA2_AUTH_TLS, WPA2_AUTH_PEAP, WPA2_AUTH_TTLS)
- wpa2_identity: Pointer to the entity
- wpa2_username: Pointer to the username
- wpa2_password: Pointer to the password.
- ca_pem: Pointer to a string with the contents of a .pem file with CA cert
- client_crt: Pointer to a string with the contents of a .crt file with client cert
- client_key: Pointer to a string with the contants of a .key file with client key
- channel: Optional. Channel of AP
- bssid: Optional. BSSID / MAC of AP
- connect: Optional. call connect
- Input Parameters (Optional)
-
WiFiSTAClass::reconnect()-- Will force a disconnect and then start reconnecting to AP.- Output: True/False.
-
WiFiSTAClass::disconnect(bool wifioff, bool eraseap)-- Disconnect from the network.-
Input Parameters
- wifioff: wifioff
trueto turn the Wi-Fi radio off. - eraseap: eraseap
trueto erase the AP configuration from the NVS memory.
- wifioff: wifioff
-
Output: True/False.
-
-
WiFiSTAClass::config(IPAddress local_ip, IPAddress gateway, IPAddress subnet, IPAddress dns1, IPAddress dns2)-- Change IP configuration settings disabling the dhcp client.- Input Parameters
- local_ip: Static ip configuration.
- gateway: Static gateway configuration.
- subnet: Static Subnet mask.
- dns1: Static DNS server 1.
- dns2: Static DNS server 2.
- Input Parameters
-
WiFiSTAClass::setAutoConnect(bool autoConnect)-- Deprecated. Setting the ESP32 station to connect to the AP (which is recorded) automatically or not when powered on. Enable auto-connect by default.-
Input Parameters
- autoConnect: autoConnect bool.
-
Output: False.
-
-
WiFiSTAClass::waitForConnectResult(unsigned long timeoutLength)-- Wait for WiFi connection to reach a result.-
Input Parameters
- timeoutLength: The parameter specifies the maximum amount of time to wait for a connection to be established, in milliseconds.
-
Output: one of the value defined in wl_status_t.
-
-
WiFiSTAClass::localIP()-- Get the station interface IP address.- Output: IPAddress station IP.
-
WiFiSTAClass::macAddress(uint8_t* mac)-- Get the station interface MAC address.-
Input Parameters
- mac (Optional): Pointer to uint8_t array with length WL_MAC_ADDR_LENGTH.
-
Output: Pointer to uint8_t *.
-
-
WiFiSTAClass::SSID()-- Return the current SSID associated with the network.- Output: SSID.
-
WiFiSTAClass::RSSI(void)-- Return the current network RSSI.- Output: RSSI.
AP functions
-
WiFiAPClass::softAP(const char* ssid, const char* passphrase, int channel, int ssid_hidden, int max_connection, bool ftm_responder)-- This is a function in the WiFi library of XIAO ESP32-C5. It is used to set up a SoftAP (Program access point), which allows other devices to connect to the XIAO ESP32-C5 and access its resources.-
Input Parameters
- ssid: Pointer to the SSID (max 63 char).
-
passphrase: (For WPA2 min 8 char, for open use NULL).
-
channel: WiFi channel number, 1 - 13.
-
ssid_hidden: Network cloaking (0 = broadcast SSID, 1 = hide SSID).
-
max_connection: Max simultaneous connected clients, 1 - 4.
-
Output: True/False.
-
-
WiFiAPClass::softAPgetStationNum()-- Get the count of the Station / client that are connected to the softAP interface.- Output: Stations count.
-
WiFiAPClass::softAPConfig(IPAddress local_ip, IPAddress gateway, IPAddress subnet, IPAddress dhcp_lease_start)-- A function for configuring SoftAP.-
Input Parameters
- local_ip: Access point IP.
- gateway: Gateway IP.
- subnet: Subnet mask.
-
Output: True/False.
-
-
WiFiAPClass::softAPIP()-- Get the softAP interface IP address.- Output: IPAddress softAP IP.
-
WiFiAPClass::softAPmacAddress(uint8_t* mac)-- Get the softAP interface MAC address.-
Input Parameters
- mac (Optional): Pointer to uint8_t array with length WL_MAC_ADDR_LENGTH.
-
Output: Pointer to uint8_t* or String mac.
-
WiFi Scan Function
-
WiFiScanClass::scanNetworks(bool async, bool show_hidden, bool passive, uint32_t max_ms_per_chan, uint8_t channel, const char * ssid, const uint8_t * bssid)-- Start scan WiFi networks available.-
Input Parameters
- async: The parameter is a boolean value that determines if the scan should be performed asynchronously. If set to true, the function returns immediately and the scan results can be obtained later by calling the getScanResults() function. If set to false, the function will block until the scan is complete.
- show_hidden: The parameter is a boolean value that determines if the function should include hidden networks in the scan results.
- passive: The parameter is a boolean value that determines if the function should perform a passive scan. If set to true, the function will not transmit any packets during the scan, which may take longer but can be useful in certain situations.
- max_ms_per_chan: The parameter is the maximum time to spend scanning each channel in milliseconds.
- channel: The parameter is the Wi-Fi channel to scan. If set to 0, the function will scan all available channels.
- ssid: The parameter is a pointer to a null-terminated string containing the SSID of the network to scan for. If set to nullptr, the function will scan for all available networks.
- bssid: The parameter is a pointer to a 6-byte array containing the MAC address of the access point to scan for. If set to nullptr, the function will scan for all access points.
-
Output: The return value of this function is an integer indicating the number of networks scanned.
-
-
WiFiScanClass::getNetworkInfo(uint8_t i, String &ssid, uint8_t &encType, int32_t &rssi, uint8_t* &bssid, int32_t &channel)-- Loads all infos from a scanned wifi in to the ptr parameters.-
Input Parameters
- i: The function is used to retrieve information about a scanned network at a specified index i.
- ssid: The ssid parameter is a reference to a String variable where the function stores the SSID of the network.
- encType: The encType parameter is a reference to a uint8_t variable where the function stores the encryption type of the network (0 = open, 1 = WEP, 2 = WPA_PSK, 3 = WPA2_PSK, 4 = WPA_WPA2_PSK).
- rssi: The rssi parameter is a reference to an int32_t variable where the function stores the received signal strength indication (RSSI) of the network.
- bssid: The bssid parameter is a reference to a uint8_t* pointer where the function stores the BSSID (MAC address) of the network.
- channel: The channel parameter is a reference to an int32_t variable where the function stores the channel number of the network.
-
Output: True/False.
-
-
WiFiScanClass::SSID(uint8_t i)-- Return the SSID discovered during the network scan.-
Input Parameters
- i: Specify from which network item want to get the information.
-
Output: SSID string of the specified item on the networks scanned list.
-
-
WiFiScanClass::RSSI(uint8_t i)-- Return the RSSI of the networks discovered during the scanNetworks.-
Input Parameters
- i: Specify from which network item want to get the information.
-
Output: Signed value of RSSI of the specified item on the networks scanned list.
-
WiFi Client functions
-
WiFiClient::connect(IPAddress ip, uint16_t port, int32_t timeout)-- This function is used in the WiFiClient library to connect to a remote IP address and port with a specified timeout value.- Input Parameters
- ip: The IP address of the server to connect to.
- port: The port number of the server to connect to.
- timeout (Optional): The maximum time to wait for the connection to be established, in milliseconds. If the connection is not established within this time, the function will return an error. If timeout is set to 0, the function will wait indefinitely for the connection to be established.
- Input Parameters
-
WiFiClient::stop()-- The function is used to disconnect the client from the server and release the socket/port used by the client. Once the function is called, the client can no longer send or receive data. -
WiFiClient::setTimeout(uint32_t timeout_ms)-- The function sets the maximum number of milliseconds the client will wait for a connection to be established or data to be received. If the connection or data transfer takes longer than the specified timeout, the connection will be closed.- Input Parameters
- timeout_ms: The number of milliseconds for the timeout.
- Input Parameters
-
WiFiClient::write(uint8_t data)-- Write a single byte of data to the connected server through the WiFiClient instance. OrWiFiClient::write(const uint8_t *buf, size_t size).- Input Parameters
- data: Is a single byte of data that needs to be sent over the established network connection.
- Input Parameters
-
WiFiClient::read()-- The function reads a single byte of incoming data from the connected server. It returns the byte read as an integer value. If no data is available, it returns -1. Orread(uint8_t *buf, size_t size).- Output: An integer value indicating the number of bytes received. If the return value is 0, it means that the server has closed the connection.
-
WiFiClient::peek()-- The function is used to check if there is any data available to be read from the server without actually reading it.- Output: It returns the next byte of incoming data without removing it from the receive buffer. If no data is available, it returns -1.
-
WiFiClient::available()-- The function is used to check how many bytes of data are available to be read from the server.- Output: It returns an integer value representing the number of bytes available to be read.
WiFi Server function
-
WiFiServer::stopAll()-- This function is a method of the WiFiServer class in the Arduino WiFi library. This method stops all server instances that are created using the WiFiServer class. It is useful when you want to stop all servers at once instead of callingstop()method for each instance individually. -
WiFiServer::begin(uint16_t port, int enable)-- The function is used to start a server on the specified port. The server will listen for incoming client connections.- Input Parameters
- port: The port number to listen on.
- enable (Optional): A flag to indicate if the server should be enabled immediately after it is started. This flag is set to true by default.
- Input Parameters
-
WiFiServer::hasClient()-- The function is used to check if there are any incoming client connections available on the server. This function can be used in a loop to continuously check for new connections.- Output: It returns a WiFiClient object if a client has connected or a NULL pointer if there are no clients waiting to connect.
-
WiFiServer::end()-- The function is used to stop the server and release the associated resources. Once called, the server can no longer accept new client connections. Any existing client connections will remain open until they are closed by either the client or the server.WiFiServer::close()andWiFiServer::stop()have the same function.
WiFi Multiple functions
-
WiFiMulti::addAP(const char* ssid, const char *passphrase)-- The is used to add a new access point (AP) to the list of available APs that the WiFiMulti object will attempt to connect to.-
Input Parameters
- ssid: Pointer to the SSID (max 63 char).
- passphrase: (for WPA2 min 8 char, for open use NULL).
-
Output: True/False
-
-
WiFiMulti::run(uint32_t connectTimeout)-- The function attempts to connect to one of the saved access points in a sequential order until it successfully connects to one.-
Input Parameters
- connectTimeout: The parameter specifies the maximum amount of time to wait for a connection in milliseconds. If connectTimeout is set to 0, the function will not time out and will attempt to connect indefinitely.
-
Output: status
-
WiFi Usage Examples
Next, we will use the XIAO ESP32-C5 to demonstrate how to use some basic Wi-Fi functions.
Scan Network
The XIAO ESP32-C5 supports dual-band 2.4 GHz & 5 GHz Wi-Fi, and it can scan for surrounding 2.4 GHz and 5 GHz Wi-Fi networks as well as their signal strengths in scan mode.
Program
Below is an example program to show you how the XIAO ESP32-C5 scans for surrounding Wi-Fi networks.
- Reference Code
WiFiScan.ino
/*
 *  This sketch demonstrates how to scan WiFi networks. For chips that support 5GHz band, separate scans are done for all bands.
 *  The API is based on the Arduino WiFi Shield library, but has significant changes as newer WiFi functions are supported.
 *  E.g. the return value of `encryptionType()` different because more modern encryption is supported.
 */
#include "WiFi.h"

void setup() {
  Serial.begin(115200);
  // Enable Station Interface
  WiFi.STA.begin();
  Serial.println("Setup done");
}

void ScanWiFi() {
  Serial.println("Scan start");
  // WiFi.scanNetworks will return the number of networks found.
  int n = WiFi.scanNetworks();
  Serial.println("Scan done");
  if (n == 0) {
    Serial.println("no networks found");
  } else {
    Serial.print(n);
    Serial.println(" networks found");
    Serial.println("Nr | SSID                             | RSSI | CH | Encryption");
    for (int i = 0; i < n; ++i) {
      // Print SSID and RSSI for each network found
      Serial.printf("%2d", i + 1);
      Serial.print(" | ");
      Serial.printf("%-32.32s", WiFi.SSID(i).c_str());
      Serial.print(" | ");
      Serial.printf("%4ld", WiFi.RSSI(i));
      Serial.print(" | ");
      Serial.printf("%2ld", WiFi.channel(i));
      Serial.print(" | ");
      switch (WiFi.encryptionType(i)) {
        case WIFI_AUTH_OPEN:            Serial.print("open"); break;
        case WIFI_AUTH_WEP:             Serial.print("WEP"); break;
        case WIFI_AUTH_WPA_PSK:         Serial.print("WPA"); break;
        case WIFI_AUTH_WPA2_PSK:        Serial.print("WPA2"); break;
        case WIFI_AUTH_WPA_WPA2_PSK:    Serial.print("WPA+WPA2"); break;
        case WIFI_AUTH_WPA2_ENTERPRISE: Serial.print("WPA2-EAP"); break;
        case WIFI_AUTH_WPA3_PSK:        Serial.print("WPA3"); break;
        case WIFI_AUTH_WPA2_WPA3_PSK:   Serial.print("WPA2+WPA3"); break;
        case WIFI_AUTH_WAPI_PSK:        Serial.print("WAPI"); break;
        default:                        Serial.print("unknown");
      }
      Serial.println();
      delay(10);
    }
  }

  // Delete the scan result to free memory for code below.
  WiFi.scanDelete();
  Serial.println("-------------------------------------");
}
void loop() {
  Serial.println("-------------------------------------");
  Serial.println("Default wifi band mode scan:");
  Serial.println("-------------------------------------");
#if ESP_IDF_VERSION >= ESP_IDF_VERSION_VAL(5, 4, 2)
  WiFi.setBandMode(WIFI_BAND_MODE_AUTO);
#endif
  ScanWiFi();
#if CONFIG_SOC_WIFI_SUPPORT_5G
  // Wait a bit before scanning again.
  delay(1000);
  Serial.println("-------------------------------------");
  Serial.println("2.4 Ghz wifi band mode scan:");
  Serial.println("-------------------------------------");
  WiFi.setBandMode(WIFI_BAND_MODE_2G_ONLY);
  ScanWiFi();
  // Wait a bit before scanning again.
  delay(1000);
  Serial.println("-------------------------------------");
  Serial.println("5 Ghz wifi band mode scan:");
  Serial.println("-------------------------------------");
  WiFi.setBandMode(WIFI_BAND_MODE_5G_ONLY);
  ScanWiFi();
#endif
  // Wait a bit before scanning again.
  delay(10000);
}
Effect Presentation
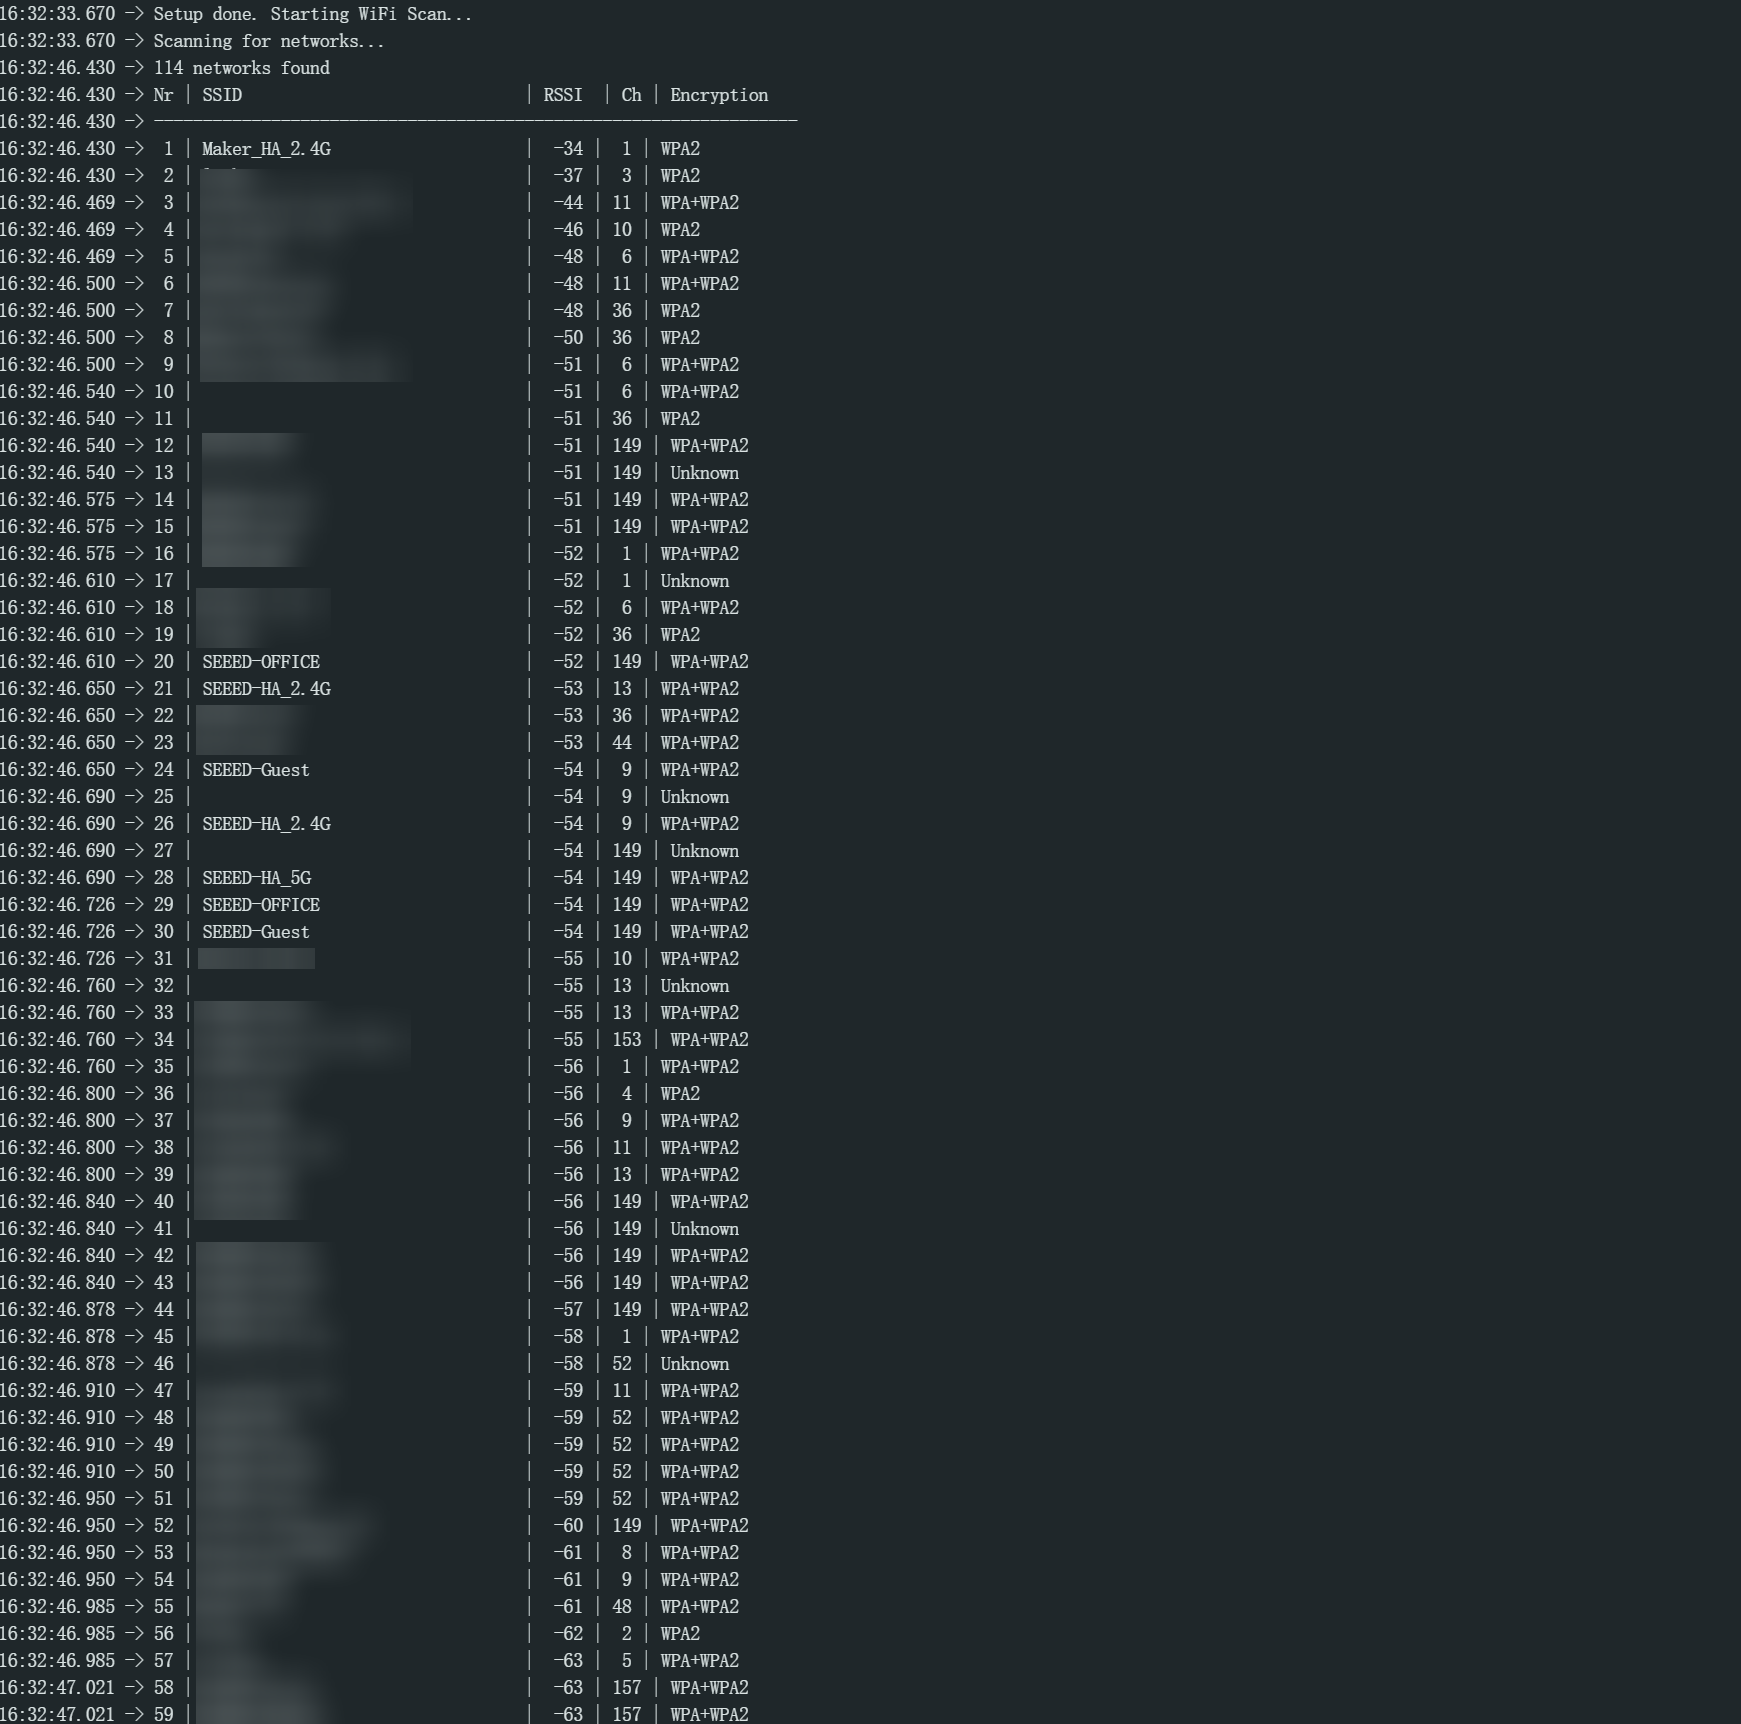
- After uploading the program, open the Serial Monitor of the Arduino IDE, and the scanned Wi-Fi information will be output.
Connecting to a Wi-Fi Network
Within the Wi-Fi coverage, you can connect to a specific Wi-Fi network via the STA mode supported by the XIAO ESP32-C5, provided that you know the SSID and PASSWORD of the target Wi-Fi network.
Program
Next, an example program is provided to show you how the XIAO ESP32-C5 connects to a specified Wi-Fi network.
XIAO ESP32-C5 supports dual-band Wi-Fi (2.4 GHz & 5 GHz), allowing you to choose the connection based on your home network.
- Reference Code
#include <WiFi.h>

// Replace with your network credentials
const char* ssid = "YOUR_WIFI_SSID";
const char* password = "YOUR_WIFI_PASSWORD";

void setup() {
    Serial.begin(115200);

    // Explicitly set mode to Station
    WiFi.mode(WIFI_STA);

    Serial.printf("Connecting to %s ", ssid);
    WiFi.begin(ssid, password);

    // Wait for connection
    while (WiFi.status() != WL_CONNECTED) {
        delay(500);
        Serial.print(".");
    }

    Serial.println("\nCONNECTED!");

    // Print connection details
    Serial.print("IP Address: ");
    Serial.println(WiFi.localIP());
    Serial.print("Subnet Mask: ");
    Serial.println(WiFi.subnetMask());
    Serial.print("Gateway IP: ");
    Serial.println(WiFi.gatewayIP());
    Serial.print("DNS IP: ");
    Serial.println(WiFi.dnsIP());

    // C5 Specific: Check which band and channel we are on
    Serial.print("Channel: ");
    Serial.println(WiFi.channel());
    Serial.print("RSSI (Signal Strength): ");
    Serial.println(WiFi.RSSI());
}

void loop() {
    // Check if WiFi is still connected
    if (WiFi.status() != WL_CONNECTED) {
        Serial.println("WiFi lost. Reconnecting...");
        WiFi.disconnect();
        WiFi.reconnect();
    }
    delay(5000);
}
Effect Presentation
- After uploading the program, open the Serial Monitor of the Arduino IDE, and information such as the IP address of the connected Wi-Fi network will be output.
- I am connected to the 5 GHz network in my environment.

AP Mode
The XIAO ESP32-C5 can work as a hotspot for other devices to connect to. In other words, you can use Wi-Fi-enabled devices to connect to the XIAO ESP32-C5 without connecting to your router.
Simply put, when you configure the XIAO ESP32-C5 as an access point, you create its own independent Wi-Fi network, to which nearby Wi-Fi devices (stations) can connect (such as your smartphone or computer).
Program
Next, an example program is presented to show you how the XIAO ESP32-C5 creates a hotspot and allows other devices to connect to it.
- Reference Code
#include <WiFi.h>

const char* ap_ssid = "XIAO ESP32-C5";
const char* ap_password = "password1234";

int previous_station_count = 0;

void setup() {
    Serial.begin(115200);

    // Initialize built-in LED pin
    pinMode(LED_BUILTIN, OUTPUT);
    digitalWrite(LED_BUILTIN, LOW); // Initial state: LED off

    // Set mode to Access Point
    WiFi.mode(WIFI_AP);

    // Configure AP
    // Arguments: SSID, Password, Channel (1-13 for 2.4G), Hidden (0/1), Max Connections
    // Note: Forcing 5GHz AP usually requires lower-level IDF calls in current Arduino Core,
    // so this will likely default to 2.4GHz.
    bool result = WiFi.softAP(ap_ssid, ap_password, 1, 0, 4);

    if (result) {
        Serial.println("AP Started Successfully");
    } else {
        Serial.println("AP Start Failed");
    }

    // Print IP Address of the AP (Default is usually 192.168.4.1)
    Serial.print("AP IP Address: ");
    Serial.println(WiFi.softAPIP());
}

void loop() {
    // Get current number of connected stations
    int current_station_count = WiFi.softAPgetStationNum();
    Serial.printf("Stations connected: %d\n", current_station_count);

    // Check if any device has connected or disconnected
    if (current_station_count > 0 && previous_station_count == 0) {
        // New device connected, turn on LED
        digitalWrite(LED_BUILTIN, HIGH);
        Serial.println("Device connected - LED ON");
    } else if (current_station_count == 0 && previous_station_count > 0) {
        // All devices disconnected, turn off LED
        digitalWrite(LED_BUILTIN, LOW);
        Serial.println("All devices disconnected - LED OFF");
    }

    previous_station_count = current_station_count;
    delay(2000);
}
Effect Presentation
- After compiling and uploading the program, you can discover the AP hotspot via the WLAN function.

- Upon successful connection, the Serial Monitor will print the IP address, and the onboard USER LED will light up simultaneously.

WiFi & MQTT Usage
The MQTT protocol is widely used in IoT devices, and the XIAO ESP32-C5 supports this protocol — meaning you can use the XIAO ESP32-C5 to develop many interesting IoT projects.
Program
Next, a reference program will be presented to show you how to use the MQTT protocol with the XIAO ESP32-C5.
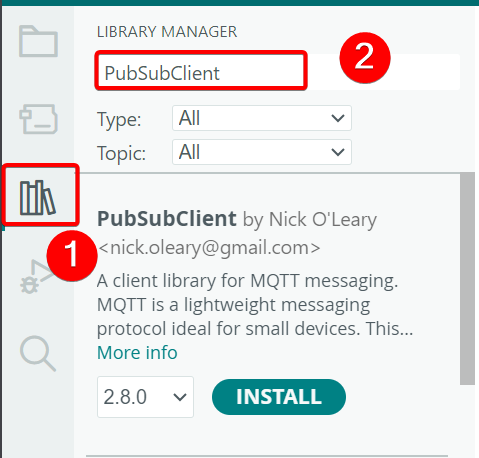
- Install the
PubSubClientlibrary
- Reference Code
#include <WiFi.h>
#include <PubSubClient.h>

const char* ssid = "YOUR_SSID";
const char* password = "YOUR_PASSWORD";

// Using a public MQTT broker for demonstration
const char* mqtt_server = "broker.emqx.io";
const int mqtt_port = 1883;

WiFiClient espClient;
PubSubClient client(espClient);

// Callback function: Executed when a message is received
void callback(char* topic, byte* payload, unsigned int length) {
    Serial.print("Message arrived [");
    Serial.print(topic);
    Serial.print("] ");
    for (int i = 0; i < length; i++) {
        Serial.print((char)payload[i]);
    }
    Serial.println();
}

void reconnect() {
    // Loop until we're reconnected
    while (!client.connected()) {
        Serial.print("Attempting MQTT connection...");
        String clientId = "ESP32C5Client-";
        clientId += String(random(0xffff), HEX);

        // Attempt to connect
        if (client.connect(clientId.c_str())) {
            Serial.println("connected");
            // Once connected, subscribe to a topic
            client.subscribe("esp32c5/test/topic");
        } else {
            Serial.print("failed, rc=");
            Serial.print(client.state());
            Serial.println(" try again in 5 seconds");
            delay(5000);
        }
    }
}

void setup() {
    Serial.begin(115200);
    WiFi.begin(ssid, password);

    while (WiFi.status() != WL_CONNECTED) {
        delay(500);
        Serial.print(".");
    }
    Serial.println("\nWiFi Connected");

    // Configure MQTT Server
    client.setServer(mqtt_server, mqtt_port);
    client.setCallback(callback);
}

void loop() {
    if (!client.connected()) {
        reconnect();
    }
    client.loop();

    // Publish a message every 2 seconds
    static unsigned long lastMsg = 0;
    unsigned long now = millis();
    if (now - lastMsg > 2000) {
        lastMsg = now;
        Serial.println("Publishing message...");
        client.publish("esp32c5/test/topic", "Hello from XIAO ESP32-C5");
    }
}
Effect Presentation
-
Download any software that supports the MQTTX broker client; MQTTX is used here MQTTx
-
Open MQTTX and add the client information. The default client address is used here, so you only need to add the client ID
ESP32C5Clientand set the test client name; the rest of the configurations can be kept as default.

- Upload the code and connect using MQTTX. After a successful connection, click
New Subscriptionon the left side to add a subscription.

- Configure the subscription information: enter
esp32c5/test/topicand select 0 or 1 for QoS.

- After successful configuration, you can see the messages published by the XIAO ESP32-C5 (acting as a client) every 2 seconds. You can also send messages to the client after selecting a topic, and the client will publish them upon receipt.

broker.emqx.io is a public broker shared by all users. Anyone who subscribes to the same topic can view your messages. It is intended only for testing purposes and is not suitable for transmitting sensitive data.
WiFi & HTTP /HTTPS
-
You can refer to the example we wrote for the XIAO ESP32C3 to access ChatGPT, which details how to use WiFiClient and HTTPClient: Learn to use WiFiClient and HTTPClient on XIAO ESP32C3 - XIAO ESP32C3 & ChatGPT in action
-
If you only want to explore the simple usage of HTTP, you can also follow the steps below for testing and verification.
Program
- Install the
HTTPClientlibrary

- ReFerence Code
#include <WiFi.h>
#include <HTTPClient.h>
#include <WiFiClientSecure.h> // Required for HTTPS

const char* ssid = "YOUR_SSID";
const char* password = "YOUR_PASSWORD";

// HTTPS Endpoint
const char* serverUrl = "https://jsonplaceholder.typicode.com/todos/1";

// Root CA Certificate (Optional for simple testing if setInsecure is used)
// To be secure, you should use the actual root CA of the website.
// For this example, we will use setInsecure().

void setup() {
    Serial.begin(115200);
    WiFi.begin(ssid, password);

    while (WiFi.status() != WL_CONNECTED) {
        delay(500);
        Serial.print(".");
    }
    Serial.println("\nConnected");
}

void loop() {
    if ((WiFi.status() == WL_CONNECTED)) {

        // 1. Create WiFiClientSecure object
        WiFiClientSecure client;

        // IGNORE SSL certificate validation (Good for testing, NOT for production)
        client.setInsecure();

        // 2. Create HTTPClient object
        HTTPClient http;

        Serial.print("[HTTPS] begin...\n");

        // 3. Initialize connection
        if (http.begin(client, serverUrl)) {
            Serial.print("[HTTPS] GET...\n");

            // 4. Send GET request
            int httpCode = http.GET();

            // 5. Check return code
            if (httpCode > 0) {
                Serial.printf("[HTTPS] GET... code: %d\n", httpCode);

                if (httpCode == HTTP_CODE_OK || httpCode == 301 || httpCode == 302) {
                    String payload = http.getString();
                    Serial.println(payload);
                }
            } else {
                Serial.printf("[HTTPS] GET... failed, error: %s\n", http.errorToString(httpCode).c_str());
            }

            // 6. Close connection
            http.end();
        } else {
            Serial.printf("[HTTPS] Unable to connect\n");
        }
    }

    delay(10000);
}
Effect Presentation
https://jsonplaceholder.typicode.com is a free mock REST API testing service specifically designed for development and testing purposes. It does not support the permanent modification or persistence of real data.
- Upload the code, then you can open
https://jsonplaceholder.typicode.com/todos/1and the Serial Monitor tool in the Arduino IDE to check if the information is consistent.

WiFi-Mesh
The following is the official introduction to ESP-WIFI-MESH by Espressif Systems:
ESP-WIFI-MESH is a wireless communication network with nodes organized in a mesh topology using the simultaneous AP-STA feature on Espressif SoCs. It provides a self-forming and self-healing network, with ease of deployment. The network topology of ESP-WIFI-MESH can scale up to 1000 nodes in large areas, without requiring any specific Wi-Fi infrastructure support. ESP-WIFI-MESH can also be used to cover Wi-Fi blind spots in home-deployment scenarios where the Wi-Fi signal cannot be reached.
For more detailed information, please refer to the official link of Espressif Systems :
Next, I will show you an example of ESP-Mesh, and for this example, you need to prepare at least two ESP32 devices.
Program
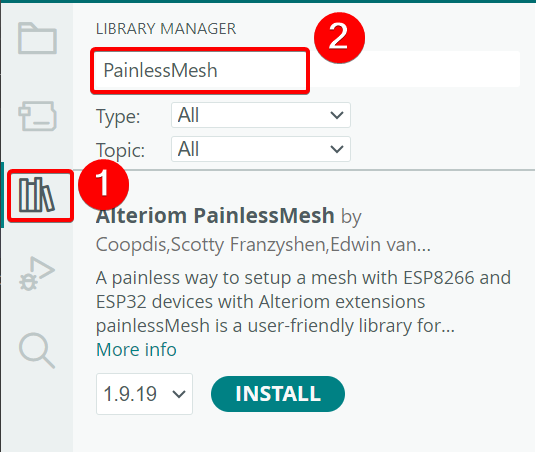
- Install the
Alteriom PainlessMeshlibrary
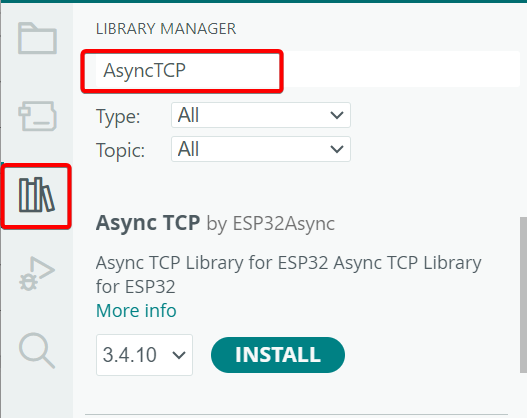
- Install the
AsyncTCPlibrary
- Reference Code
#include "painlessMesh.h"

#define   MESH_PREFIX     "ESP32_C5_MESH"
#define   MESH_PASSWORD   "mesh_password123"
#define   MESH_PORT       5555

painlessMesh  mesh;
Scheduler userScheduler; // to control your personal task

void sendMessage(); // Prototype

// Define a task to send messages every 1 second
Task taskSendMessage(1000, TASK_FOREVER, &sendMessage);

void sendMessage() {
    String msg = "Hello from node ";
    msg += mesh.getNodeId();
    mesh.sendBroadcast(msg);
    Serial.printf("Sent broadcast: %s\n", msg.c_str());
}

// Callback: When a message is received
void receivedCallback( uint32_t from, String &msg ) {
    Serial.printf("Received from %u msg=%s\n", from, msg.c_str());
}

// Callback: When a new connection is established
void newConnectionCallback(uint32_t nodeId) {
    Serial.printf("New Connection, nodeId = %u\n", nodeId);
}

// Callback: When connection changes
void changedConnectionCallback() {
    Serial.printf("Changed connections\n");
}

// Callback: Time adjustment
void nodeTimeAdjustedCallback(int32_t offset) {
    Serial.printf("Adjusted time %u. Offset = %d\n", mesh.getNodeTime(), offset);
}

void setup() {
    Serial.begin(115200);

    // Debug messages
    mesh.setDebugMsgTypes( ERROR | STARTUP );

    // Initialize Mesh
    mesh.init( MESH_PREFIX, MESH_PASSWORD, &userScheduler, MESH_PORT );

    // Register Callbacks
    mesh.onReceive(&receivedCallback);
    mesh.onNewConnection(&newConnectionCallback);
    mesh.onChangedConnections(&changedConnectionCallback);
    mesh.onNodeTimeAdjusted(&nodeTimeAdjustedCallback);

    // Add task to scheduler
    userScheduler.addTask( taskSendMessage );
    taskSendMessage.enable();
}

void loop() {
    // Keep the mesh network running
    mesh.update();
}
Effect Presentation
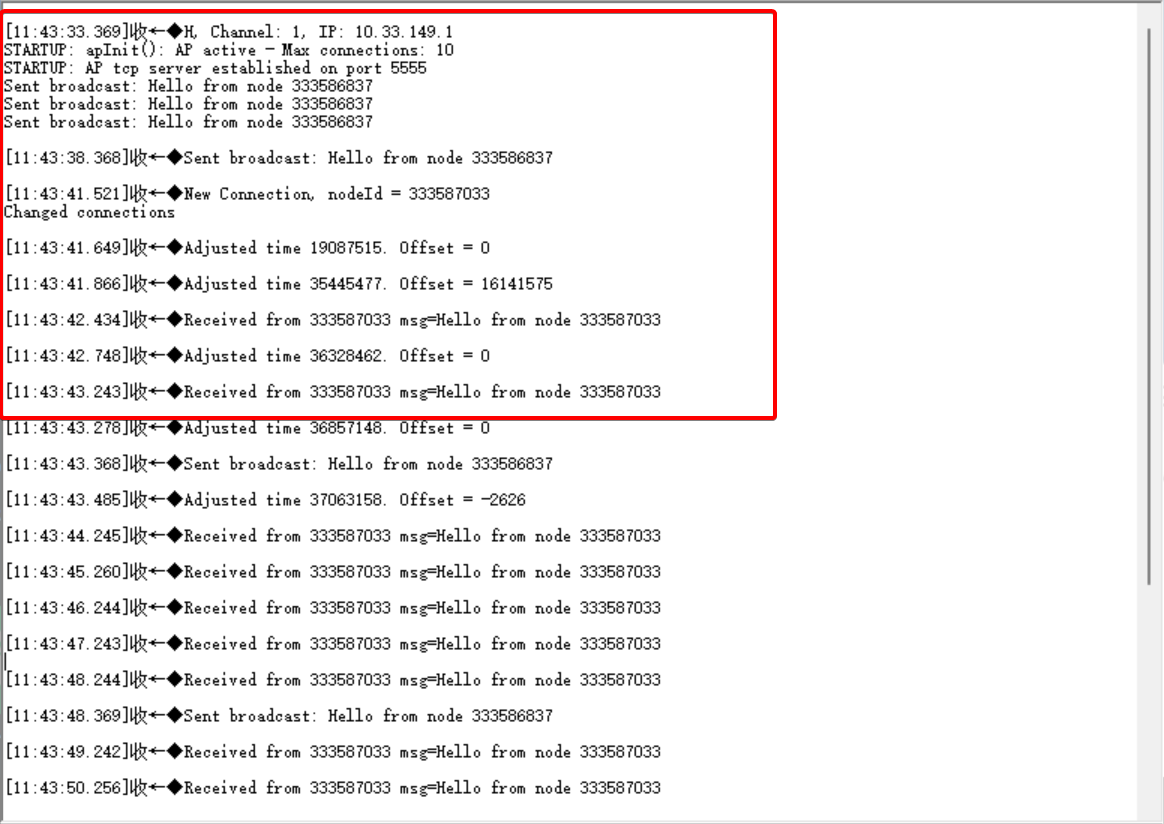
- Upload the code to two XIAO ESP32-C5 devices and open any serial port tool to check the results.
XIAO ESP32-C5 Device 1 starts network formation and sends messages.

XIAO ESP32-C5 Device 2 joins the network and receives messages sent from Device 1.
Example:IoT Smart Home Hub
From the above Wi-Fi examples, you must have mastered how to use Wi-Fi on the XIAO ESP32-C5. Next, an example will be presented to show you how to implement a smart home control hub using Wi-Fi AP mode and HTTP network services — specifically, how to use the XIAO ESP32-C5 as a smart home control hub to monitor the status of your home.
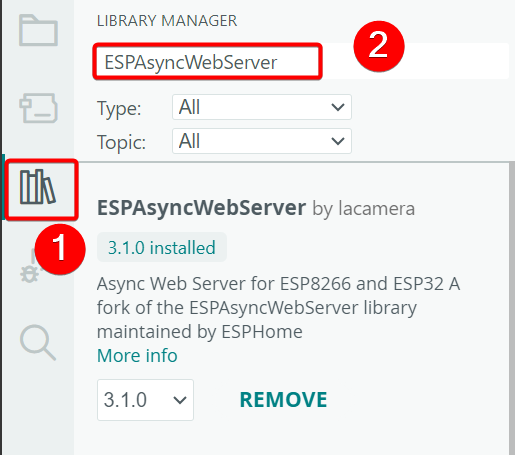
- Install the
ESPAsyncWebServerlibrary
- Upload the code and connect to the
XIAO ESP32-C5hotspot.
Reference Code
#include <WiFi.h>
#include <AsyncTCP.h>
#include <ESPAsyncWebServer.h>
#include <DNSServer.h>

const char* ssid = "XIAO ESP32-C5";  // Hotspot name
const char* password = "12345678";  // Hotspot password (empty for no password, configurable)

DNSServer dnsServer;
AsyncWebServer server(80);

// HTML content for temporary website (You can modify the content here, e.g., add redirect to external website)
// const char index_html[] PROGMEM = R"rawliteral(
// <!DOCTYPE html>
// <html>
// <head>
//     <title>Temporary Website</title>
//     <meta charset="UTF-8">
//     <!-- Optional: Add automatic redirect to external website -->
//     <!-- <meta http-equiv="refresh" content="5;url=https://example.com"> -->
// </head>
// <body>
//     <h1>Welcome to XIAO ESP32-C5 Temporary Website!</h1>
//     <p>You have connected to XIAO-ESP32-C5 hotspot. This is custom content.</p>
//     <form action="/" method="POST">
//         <input type="submit" value="Continue">
//     </form>
// </body>
// </html>
// )rawliteral";

const char index_html[] PROGMEM = R"rawliteral(
<!DOCTYPE html>
<html lang="zh-CN">
<head>
  <meta charset="UTF-8">
  <meta name="viewport" content="width=device-width, initial-scale=1.0, user-scalable=no">
  <title>XIAO ESP32-C5 Control Center</title>
  <style>
    :root {
      --bg-color: #121212;
      --card-bg: #1e1e1e;
      --text-main: #e0e0e0;
      --text-sub: #a0a0a0;
      --accent: #00e5ff; /* Neon Blue */
      --active: #00ff9d; /* Active Green */
      --danger: #ff4081; /* Warning Red */
    }

    body {
      font-family: 'Segoe UI', Roboto, Helvetica, Arial, sans-serif;
      background-color: var(--bg-color);
      color: var(--text-main);
      margin: 0;
      padding: 20px;
      display: flex;
      flex-direction: column;
      align-items: center;
      min-height: 100vh;
    }

    h1 {
      font-weight: 300;
      letter-spacing: 1.5px;
      margin-bottom: 10px;
      text-align: center;
    }

    p.subtitle {
      color: var(--text-sub);
      font-size: 0.9rem;
      margin-top: 0;
      margin-bottom: 30px;
      text-align: center;
    }

    /* Container Layout */
    .container {
      width: 100%;
      max-width: 400px; /* Suitable width for mobile devices */
      display: flex;
      flex-direction: column;
      gap: 20px;
    }

    /* Status Panel */
    .status-grid {
      display: grid;
      grid-template-columns: 1fr 1fr;
      gap: 15px;
    }

    .card {
      background-color: var(--card-bg);
      border-radius: 12px;
      padding: 15px;
      text-align: center;
      box-shadow: 0 4px 6px rgba(0,0,0,0.3);
      border: 1px solid #333;
      transition: transform 0.2s;
    }

    .card:active {
      transform: scale(0.98);
    }

    .card-icon {
      font-size: 24px;
      margin-bottom: 5px;
      display: block;
    }

    .card-value {
      font-size: 1.2rem;
      font-weight: bold;
      color: var(--accent);
    }

    .card-label {
      font-size: 0.8rem;
      color: var(--text-sub);
    }

    /* Control Button Area */
    .control-group {
      background-color: var(--card-bg);
      border-radius: 16px;
      padding: 20px;
      border: 1px solid #333;
    }

    .control-item {
      display: flex;
      justify-content: space-between;
      align-items: center;
      margin-bottom: 15px;
      padding-bottom: 15px;
      border-bottom: 1px solid #333;
    }

    .control-item:last-child {
      border-bottom: none;
      margin-bottom: 0;
      padding-bottom: 0;
    }

    /* Switch Style */
    .switch {
      position: relative;
      display: inline-block;
      width: 50px;
      height: 26px;
    }

    .switch input {
      opacity: 0;
      width: 0;
      height: 0;
    }

    .slider {
      position: absolute;
      cursor: pointer;
      top: 0;
      left: 0;
      right: 0;
      bottom: 0;
      background-color: #333;
      transition: .4s;
      border-radius: 34px;
    }

    .slider:before {
      position: absolute;
      content: "";
      height: 18px;
      width: 18px;
      left: 4px;
      bottom: 4px;
      background-color: white;
      transition: .4s;
      border-radius: 50%;
    }

    input:checked + .slider {
      background-color: var(--accent);
      box-shadow: 0 0 10px var(--accent);
    }

    input:checked + .slider:before {
      transform: translateX(24px);
    }

    /* Main Button */
    .main-btn {
      width: 100%;
      padding: 15px;
      background: linear-gradient(45deg, var(--accent), #00b8d4);
      border: none;
      border-radius: 30px;
      color: #000;
      font-weight: bold;
      font-size: 1rem;
      cursor: pointer;
      margin-top: 20px;
      text-transform: uppercase;
      letter-spacing: 1px;
    }

    .main-btn:active {
      opacity: 0.9;
      transform: scale(0.98);
    }

  </style>
</head>
<body>

  <div class="container">
    <header>
      <h1>XIAO ESP32-C5</h1>
      <p class="subtitle">IoT Smart Home Hub</p>
    </header>

    <div class="status-grid">
      <div class="card">
        <span class="card-icon">📡</span>
        <div class="card-value">Online</div>
        <div class="card-label">System Status</div>
      </div>
      <div class="card">
        <span class="card-icon">🌡️</span>
        <div class="card-value" id="temp-val">26.5°C</div>
        <div class="card-label">Indoor Temperature</div>
      </div>
      <div class="card">
        <span class="card-icon">💧</span>
        <div class="card-value">58%</div>
        <div class="card-label">Air Humidity</div>
      </div>
      <div class="card">
        <span class="card-icon">⏱️</span>
        <div class="card-value">12ms</div>
        <div class="card-label">Latency</div>
      </div>
    </div>

    <div class="control-group">
      <div class="control-item">
        <span>Living Room Main Light</span>
        <label class="switch">
          <input type="checkbox" id="btn-light" onchange="toggleDevice('light', this)">
          <span class="slider"></span>
        </label>
      </div>

      <div class="control-item">
        <span>Air Purifier</span>
        <label class="switch">
          <input type="checkbox" id="btn-fan" onchange="toggleDevice('fan', this)">
          <span class="slider"></span>
        </label>
      </div>

      <div class="control-item">
        <span>Auto Mode</span>
        <label class="switch">
          <input type="checkbox" checked onchange="toggleDevice('auto', this)">
          <span class="slider"></span>
        </label>
      </div>
    </div>

    <form action="/" method="POST">
       <button type="submit" class="main-btn">Enter Advanced Settings</button>
    </form>

  </div>

  <script>
    // Simple JavaScript for demo interaction
    function toggleDevice(device, element) {
      var state = element.checked ? "ON" : "OFF";
      console.log(device + " is now " + state);

      // You can add fetch request to send to ESP32 here
      // fetch('/toggle?device=' + device + '&state=' + state);
    }

    // Simulate dynamic data fluctuation effect
    setInterval(() => {
        const temp = 26 + (Math.random() * 0.5);
        document.getElementById('temp-val').innerText = temp.toFixed(1) + "°C";
    }, 3000);
  </script>
</body>
</html>
)rawliteral";

// Handle all requests and redirect to temporary page
class CaptiveRequestHandler : public AsyncWebHandler {
public:
    CaptiveRequestHandler() {}
    virtual ~CaptiveRequestHandler() {}

    bool canHandle(AsyncWebServerRequest *request) {
        return true;  // Handle all requests
    }

    void handleRequest(AsyncWebServerRequest *request) {
        request->send_P(200, "text/html", index_html);  // Return HTML content
    }
};

void setup() {
    Serial.begin(115200);
    delay(10);

    // Set to AP (Access Point) mode
    WiFi.mode(WIFI_AP);
    WiFi.softAP(ssid, password);

    Serial.println("Hotspot created: " + String(ssid));
    Serial.print("IP Address: ");
    Serial.println(WiFi.softAPIP());

    // Start DNS server, redirect all domains to local IP
    dnsServer.start(53, "*", WiFi.softAPIP());

    // Configure Web Server: redirect all not found requests to temporary page
    server.addHandler(new CaptiveRequestHandler()).setFilter(ON_AP_FILTER);  // Only in AP mode
    server.onNotFound([](AsyncWebServerRequest *request) {
        request->send_P(200, "text/html", index_html);
    });

    server.begin();
    Serial.println("Web Server started");

    server.on("/toggle", HTTP_GET, [](AsyncWebServerRequest *request){
    String device = request->getParam("device")->value();
    String state = request->getParam("state")->value();

    Serial.print("Device: ");
    Serial.print(device);
    Serial.print(" State: ");
    Serial.println(state);

    if(device == "light" && state == "ON") {
        digitalWrite(LED_BUILTIN, LOW); // Assume LOW level turns on the LED
    } else {
        digitalWrite(LED_BUILTIN, HIGH);
    }

    request->send(200, "text/plain", "OK");
});
}

void loop() {
    dnsServer.processNextRequest();  // Process DNS requests
    delay(10);
}

- Enter the IP address to jump to the web page.
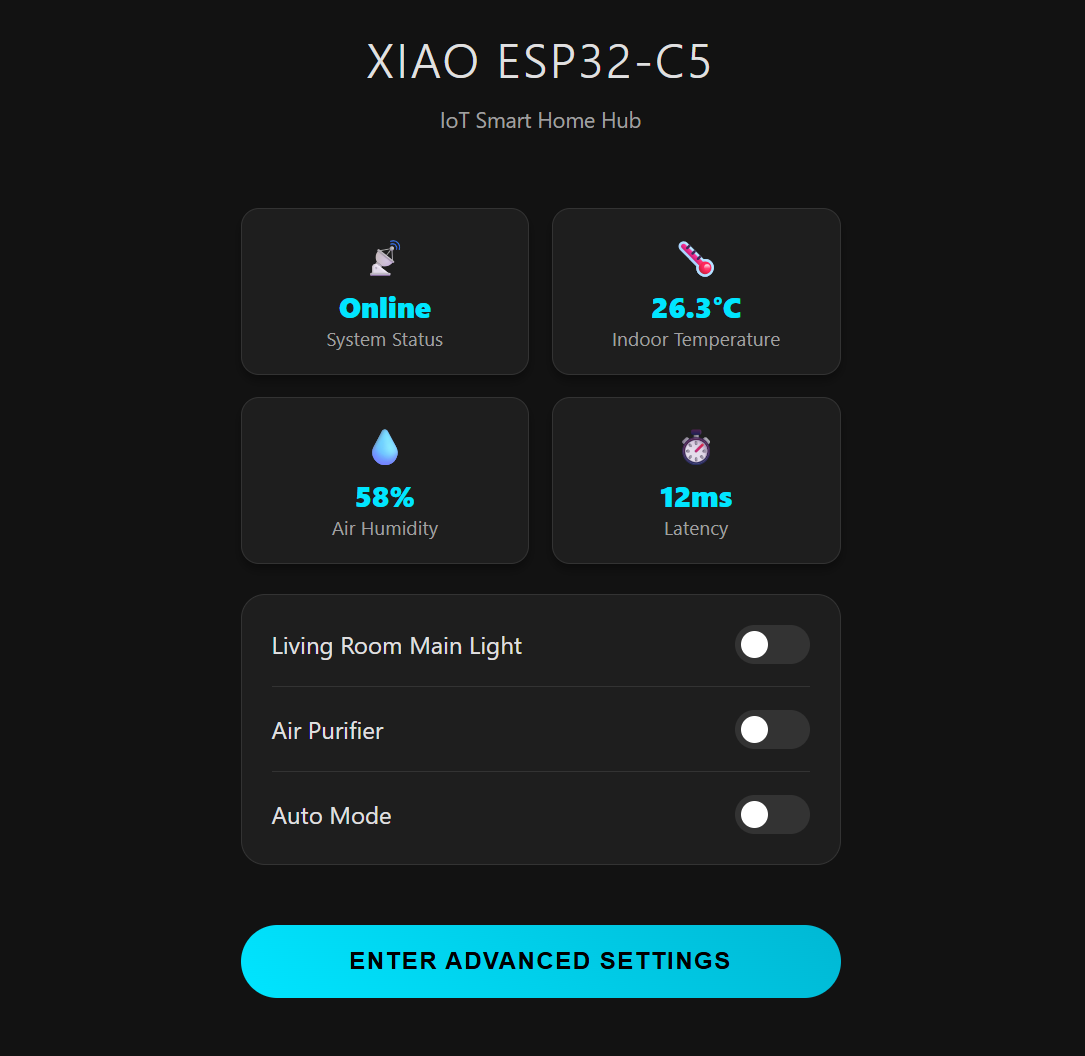
The controls and sensors displayed on the web page are customizable. You can add new ones and modify the generated web page according to your specific needs. For reference: ESPAsyncWebServer
The AP hotspot generated by the XIAO ESP32-C5 cannot connect to the internet by default. If internet connectivity is required, you can adopt either of the following two methods:
Method 1: Connect the XIAO ESP32-C5 to Home Assistant. For reference: Connecting XIAO ESP32-C5 to Home Assistant
Method 2: Use an MQTT service to upload data to a cloud server. Note that this method may require purchasing a certain amount of service credits. For reference: Goole Cloud
Tech Support & Product Discussion
Thank you for choosing our products! We are here to provide you with different support to ensure that your experience with our products is as smooth as possible. We offer several communication channels to cater to different preferences and needs.