XIAO ESP32-C5 With FreeRTOS
OverView
FreeRTOS is a collection of C libraries comprised of a real-time kernel and a set of modular libraries that implement complementary functionality. The FreeRTOS kernel is a real-time kernel (or real-time scheduler) that enables applications built on FreeRTOS to meet their hard real-time requirements. It enables applications to be organized as a collection of independent threads of execution.

Reference : Mastering the FreeRTOS Real Time Kernel
FreeRTOS ports
FreeRTOS is an open source RTOS kernel that is pre-integrated into the Arduino ESP32 Core (which is built upon ESP-IDF). Thus, every Arduino sketch running on an ESP32 is actually utilizing FreeRTOS in the background. The FreeRTOS kernel is ported to all ESP chip architectures, including Xtensa and RISC-V (e.g., XIAO ESP32-C5).
Therefore, this tutorial is written based on the Arduino framework to provide a more accessible development experience.
Hardware Preparation
| Seeed Studio XIAO ESP32-C5 |
|---|
 |
Software Preparation
If you haven't used the Arduino IDE yet, please refer to Getting Started with Seeed Studio XIAO ESP32-C5.
Task Introduction
Tasks are small functions/ jobs that the the processor is requested to perform with a set of settings. Tasks can range from small functions to infinite looping functions.
Tasks are the fundamental units of execution in a FreeRTOS application. They are essentially functions that run concurrently with other tasks. This allows for efficient multitasking and responsiveness.
Task properties
- TaskFunction: This is the function that contains the actual logic of the task. It's the entry point for the task's execution.
- StackSize: This specifies the amount of memory allocated for the task's stack. The stack is used to store local variables, function return addresses, and temporary data.
- TaskPriority: This determines the relative importance of the task compared to other tasks. Higher-priority tasks have a greater chance of being executed before lower-priority ones.
- TaskParameters: These are optional arguments that can be passed to the task function when it's created. They can be used to provide additional context or configuration to the task.
- CoreAffinity: This specifies which CPU core the task should be assigned to. In systems with multiple cores, this can be used to optimize performance or balance the workload.
Create a Task
To create a task in FreeRTOS, the xTaskCreate function is used. This function takes several parameters, including the task function, task name, stack size, parameters, priority, and a handle to the created task.
TaskHandle_t task;
xTaskCreate(
        taskFunction,             /* Function that implements the task. */
        "taskName",               /* Text name for the task. */
        configMINIMAL_STACK_SIZE, /* Stack size in words, or bytes. */
        NULL,                     /* Parameter passed into the task. */
        tskIDLE_PRIORITY,         /* Priority at which the task is created. */
        &task                     /* Used to pass out the created task's handle. */
        );
Task function
The task function is the actual code that will be executed by the task.
void taskFunction(void * pvParameters) {
  /*
  Function definition goes here
  */
}
Visualization of tasks
Create four simple task to visualize how the FreeRTOS works.
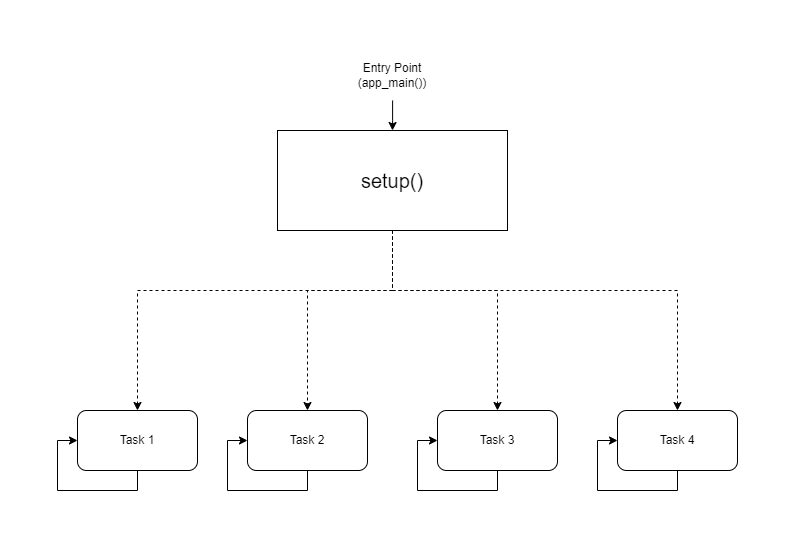
- Visual Representation
taskFunction1 (1000ms delay)
taskFunction2 (500ms delay)
taskFunction3 (500ms delay)
taskFunction4 (500ms delay)
- Reference Code
freertos.ino
#include <Arduino.h>

// Task handles
TaskHandle_t task1, task2, task3, task4;

// ---------------------- Task Function Definitions ----------------------

void taskFunction1(void * pvParameters) {
    for (;;) { // Infinite loop, equivalent to while(true)
        // Print Task 1 and Hello message
        Serial.println("Task 1: Hello from task 1");

        // Delay 1000ms (1 second)
        vTaskDelay(pdMS_TO_TICKS(1000));
    }
}

void taskFunction2(void * pvParameters) {
    for (;;) {
        Serial.println("Task 2: Hello from task 2");
        vTaskDelay(pdMS_TO_TICKS(500)); // Delay 500ms
    }
}

void taskFunction3(void * pvParameters) {
    for (;;) {
        Serial.println("Task 3: Hello from task 3");
        vTaskDelay(pdMS_TO_TICKS(500));
    }
}

void taskFunction4(void * pvParameters) {
    for (;;) {
        Serial.println("Task 4: Hello from task 4");
        vTaskDelay(pdMS_TO_TICKS(500));
    }
}

// ---------------------- Main Program Entry ----------------------

void setup() {
    // 1. Initialize serial port (C5 typically uses USB CDC)
    Serial.begin(115200);

    // Give the serial port some startup time to prevent loss of initial prints
    delay(2000);
    Serial.println("--- ESP32-C5 FreeRTOS Tasks Demo ---");

    // 2. Create tasks
    // Use xTaskCreate, no need to specify core - the system will automatically schedule on the only Core 0
    // Important: Set stack size to 4096 bytes to prevent Stack Overflow

    xTaskCreate(
        taskFunction1,    /* Task function */
        "task_1",         /* Task name */
        4096,             /* Stack size (Bytes) - Do NOT use configMINIMAL_STACK_SIZE */
        NULL,             /* Parameters */
        1,                /* Priority */
        &task1            /* Handle */
    );

    xTaskCreate(
        taskFunction2,
        "task_2",
        4096,
        NULL,
        1,
        &task2
    );

    xTaskCreate(
        taskFunction3,
        "task_3",
        4096,
        NULL,
        1,
        &task3
    );

    xTaskCreate(
        taskFunction4,
        "task_4",
        4096,
        NULL,
        1,
        &task4
    );
}

void loop() {
    // Main loop is idle, reserved for task execution
    // To prove the main loop is still active, you can print occasionally or leave it empty
    delay(1000);
}
configMINIMAL_STACK_SIZE can be changed in sdkconfig.
- Four Tasks: The code defines four tasks: taskFunction1, taskFunction2, taskFunction3, and taskFunction4.
- Task Priorities: All tasks are created with the tskIDLE_PRIORITY. This means they have the same priority.
- Task Delays: taskFunction1 has a delay of 1000ms, while the other three have a delay of 500ms.
The XIAO ESP32-C5 is a high-frequency, single-core RISC-V microcontroller, so core switching is not possible; otherwise, it will cause a stack overflow.
Sensors and FreeRTOS
Next, I will implement a Smart Entrance Welcome System using the XIAO ESP32-C5, FreeRTOS, and various sensors.
This system simulates an entrance scenario in a smart home:
-
Environmental Monitoring: Real-time monitoring of the temperature and humidity at the entrance (using a DHT11 sensor) and displaying the data on the screen.
-
Human Body Sensing: Utilizing an ultrasonic sensor to detect if someone is approaching.
-
Smart Welcome:
-
When no one is present (distance is far): The LED is off, the screen displays environmental data, and the system enters a power-saving/standby UI.
-
When someone approaches (distance is close, e.g., < 30cm): The LED automatically turns on (simulating a porch light), and the screen displays Welcome!.
-
Hardware Preparation
You will need to prepare one XIAO ESP32-C5 board and the following sensors.
| Seeed Studio XIAO ESP32-C5 | Seeed Studio Expansion Board Base for XIAO | Grove - Purple LED | Grove - Temperature & Humidity Sensor (DHT11) | Grove - Ultrasonic Distance Sensor |
|---|---|---|---|---|
|  |  |  |  |
Software
Download the library and place it in your Arduino libraries path.
-
Grove - Temperature & Humidity Sensor (DHT11)
-
Grove - Ultrasonic Distance Sensor
-
Reference Code
Smart_Entrance_Welcome_System.ino
#include <Arduino.h>
#include <Wire.h>
#include <Adafruit_GFX.h>
#include <Adafruit_SSD1306.h>
#include "Ultrasonic.h"
#include "Grove_Temperature_And_Humidity_Sensor.h"
// ---------------- Configuration Area ----------------
// Pin Definitions
#define PIN_DHT D6 // DHT11 connection pin
#define PIN_ULTRASONIC D7 // Ultrasonic sensor connection pin
#define PIN_LED D2 // LED light pin
#define PIN_SDA D4 // OLED SDA pin
#define PIN_SCL D5 // OLED SCL pin
// Sensor Type Definition
#define DHTTYPE DHT11
// OLED Parameters
#define SCREEN_WIDTH 128
#define SCREEN_HEIGHT 64
#define OLED_RESET -1
// Logic Parameters
#define DIST_THRESHOLD 30 // Person detected if within 30cm
#define DHT_READ_INTERVAL 3000 // DHT11 reading interval (milliseconds)
#define DHT_TIMEOUT 250 // DHT11 reading timeout (milliseconds)
// ---------------- Object Initialization ----------------
Ultrasonic ultrasonic(PIN_ULTRASONIC);
DHT dht(PIN_DHT, DHTTYPE);
Adafruit_SSD1306 display(SCREEN_WIDTH, SCREEN_HEIGHT, &Wire, OLED_RESET);
// ---------------- Shared Data Structure ----------------
struct SystemState {
float temperature;
float humidity;
long distanceCm;
bool personDetected;
bool dhtValid; // Whether DHT data is valid
unsigned long lastDHTUpdate; // Last DHT update time
};
// Global State Variable
SystemState currentState = {0.0, 0.0, 0, false, false, 0};
// Mutex: Protect shared data access
SemaphoreHandle_t xMutex;
// I2C Mutex: Protect I2C bus access
SemaphoreHandle_t xI2CMutex;
// Task Handles
TaskHandle_t taskDHTHandle, taskUltraHandle, taskOLEDHandle, taskLogicHandle;
// ---------------- Task Function Implementations ----------------
// Task 1: DHT Temperature & Humidity Reading (Optimized - Non-blocking)
void taskDHT(void *pvParameters) {
dht.begin();
float temp_hum_val[2] = {0};
unsigned long lastReadTime = 0;
for (;;) {
unsigned long currentTime = millis();
// Control reading frequency to avoid frequent reads
if (currentTime - lastReadTime >= DHT_READ_INTERVAL) {
// Release CPU before sensor reading to allow other tasks to run
// Read sensor without holding mutex
bool readSuccess = !dht.readTempAndHumidity(temp_hum_val);
if (readSuccess) {
// Only acquire lock and update data quickly after successful reading
if (xSemaphoreTake(xMutex, pdMS_TO_TICKS(100)) == pdTRUE) {
currentState.humidity = temp_hum_val[0];
currentState.temperature = temp_hum_val[1];
currentState.dhtValid = true;
currentState.lastDHTUpdate = currentTime;
xSemaphoreGive(xMutex);
}
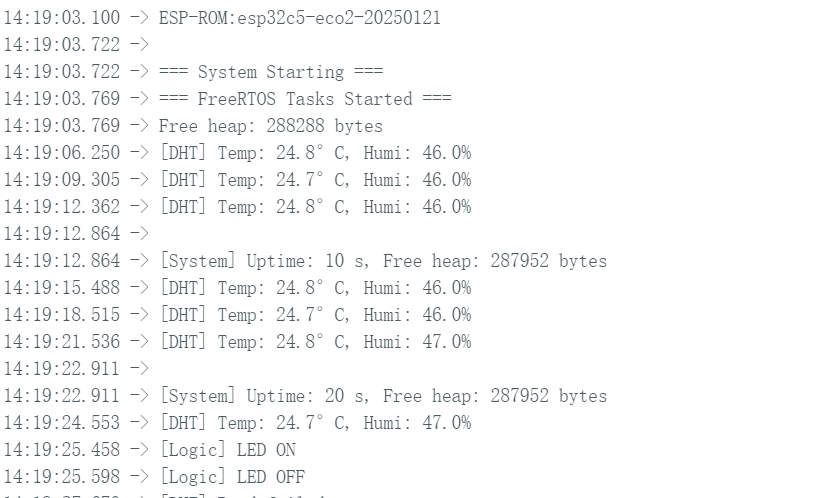
Serial.printf("[DHT] Temp: %.1f°C, Humi: %.1f%%\n",
temp_hum_val[1], temp_hum_val[0]);
} else {
Serial.println("[DHT] Read failed");
// Mark data as invalid
if (xSemaphoreTake(xMutex, pdMS_TO_TICKS(100)) == pdTRUE) {
currentState.dhtValid = false;
xSemaphoreGive(xMutex);
}
}
lastReadTime = currentTime;
}
// Use longer delay to yield CPU time
vTaskDelay(pdMS_TO_TICKS(500));
}
}
// Task 2: Ultrasonic Distance Measurement (Optimized)
void taskUltrasonic(void *pvParameters) {
for (;;) {
// Perform measurement without holding mutex
long RangeInCentimeters = ultrasonic.MeasureInCentimeters();
// Update data quickly
if (xSemaphoreTake(xMutex, pdMS_TO_TICKS(50)) == pdTRUE) {
currentState.distanceCm = RangeInCentimeters;
// Determine if person is present
if (RangeInCentimeters > 0 && RangeInCentimeters < DIST_THRESHOLD) {
currentState.personDetected = true;
} else {
currentState.personDetected = false;
}
xSemaphoreGive(xMutex);
}
// Appropriate delay to avoid excessive frequency
vTaskDelay(pdMS_TO_TICKS(100));
}
}
// Task 3: LED Logic Control (Optimized)
void taskLogic(void *pvParameters) {
pinMode(PIN_LED, OUTPUT);
bool isPerson = false;
bool lastState = false;
for (;;) {
// Read state quickly
if (xSemaphoreTake(xMutex, pdMS_TO_TICKS(10)) == pdTRUE) {
isPerson = currentState.personDetected;
xSemaphoreGive(xMutex);
}
// Perform operation only when state changes
if (isPerson != lastState) {
digitalWrite(PIN_LED, isPerson ? HIGH : LOW);
Serial.printf("[Logic] LED %s\n", isPerson ? "ON" : "OFF");
lastState = isPerson;
}
vTaskDelay(pdMS_TO_TICKS(50));
}
}
// Task 4: OLED Display (Optimized - Using I2C Mutex)
void taskOLED(void *pvParameters) {
// Initialize I2C
Wire.begin(PIN_SDA, PIN_SCL);
Wire.setClock(400000); // Set I2C to fast mode 400kHz
// Protect initialization with I2C mutex
if (xSemaphoreTake(xI2CMutex, portMAX_DELAY) == pdTRUE) {
if(!display.begin(SSD1306_SWITCHCAPVCC, 0x3C)) {
Serial.println(F("[OLED] Init failed"));
xSemaphoreGive(xI2CMutex);
vTaskDelete(NULL);
}
display.clearDisplay();
display.setTextColor(SSD1306_WHITE);
display.display();
xSemaphoreGive(xI2CMutex);
}
SystemState localState;
unsigned long lastUpdate = 0;
const unsigned long UPDATE_INTERVAL = 250; // Reduce refresh rate to 4Hz
for (;;) {
unsigned long currentTime = millis();
// Control refresh rate
if (currentTime - lastUpdate < UPDATE_INTERVAL) {
vTaskDelay(pdMS_TO_TICKS(50));
continue;
}
// Copy data quickly
if (xSemaphoreTake(xMutex, pdMS_TO_TICKS(50)) == pdTRUE) {
localState = currentState;
xSemaphoreGive(xMutex);
} else {
// Skip update if mutex acquisition fails
vTaskDelay(pdMS_TO_TICKS(50));
continue;
}
// Protect display operations with I2C mutex
if (xSemaphoreTake(xI2CMutex, pdMS_TO_TICKS(100)) == pdTRUE) {
display.clearDisplay();
if (localState.personDetected) {
// --- Person Approaching Mode ---
display.setTextSize(2);
display.setCursor(10, 10);
display.println(F("WELCOME!"));
display.setTextSize(1);
display.setCursor(10, 35);
display.print(F("Distance: "));
display.print(localState.distanceCm);
display.println(F(" cm"));
// Display temperature and humidity (if valid)
if (localState.dhtValid) {
display.setCursor(10, 50);
display.print(localState.temperature, 1);
display.print(F("C "));
display.print(localState.humidity, 0);
display.println(F("%"));
}
} else {
// --- Environment Monitoring Mode ---
display.setTextSize(1);
display.setCursor(0, 0);
display.println(F("-- Home Monitor --"));
if (localState.dhtValid) {
display.setCursor(0, 20);
display.print(F("Temperature: "));
display.print(localState.temperature, 1);
display.println(F(" C"));
display.setCursor(0, 35);
display.print(F("Humidity: "));
display.print(localState.humidity, 0);
display.println(F(" %"));
// Display data age
unsigned long dataAge = (millis() - localState.lastDHTUpdate) / 1000;
display.setCursor(0, 50);
display.print(F("Updated: "));
display.print(dataAge);
display.println(F("s ago"));
} else {
display.setCursor(0, 28);
display.println(F("Sensor reading..."));
}
}
display.display();
xSemaphoreGive(xI2CMutex);
}
lastUpdate = currentTime;
vTaskDelay(pdMS_TO_TICKS(50));
}
}
// ---------------- Setup & Loop ----------------
void setup() {
Serial.begin(115200);
delay(1000);
Serial.println("\n=== System Starting ===");
// Create mutexes
xMutex = xSemaphoreCreateMutex();
xI2CMutex = xSemaphoreCreateMutex();
if (xMutex == NULL || xI2CMutex == NULL) {
Serial.println("[ERROR] Failed to create mutex!");
while(1) delay(1000);
}
// Create tasks - adjust priority and stack size
// Priority: Higher number = higher priority
// DHT task: lowest priority (1) - slow reading and non-urgent
xTaskCreate(taskDHT, "DHT_Task", 4096, NULL, 1, &taskDHTHandle);
// Ultrasonic task: medium priority (2) - requires fast response
xTaskCreate(taskUltrasonic, "Ultra_Task", 3072, NULL, 2, &taskUltraHandle);
// Logic task: medium priority (2) - same level as ultrasonic
xTaskCreate(taskLogic, "Logic_Task", 2048, NULL, 2, &taskLogicHandle);
// OLED task: low priority (1) - display does not require real-time performance
xTaskCreate(taskOLED, "OLED_Task", 4096, NULL, 1, &taskOLEDHandle);
Serial.println("=== FreeRTOS Tasks Started ===");
Serial.printf("Free heap: %d bytes\n", ESP.getFreeHeap());
}
void loop() {
// Monitor system status
static unsigned long lastReport = 0;
unsigned long now = millis();
if (now - lastReport > 10000) { // Report every 10 seconds
Serial.printf("\n[System] Uptime: %lu s, Free heap: %d bytes\n",
now / 1000, ESP.getFreeHeap());
lastReport = now;
}
vTaskDelay(pdMS_TO_TICKS(1000));
}
Result
- After uploading the code, you can observe the results through the Serial Monitor.
- Display Screen Effect
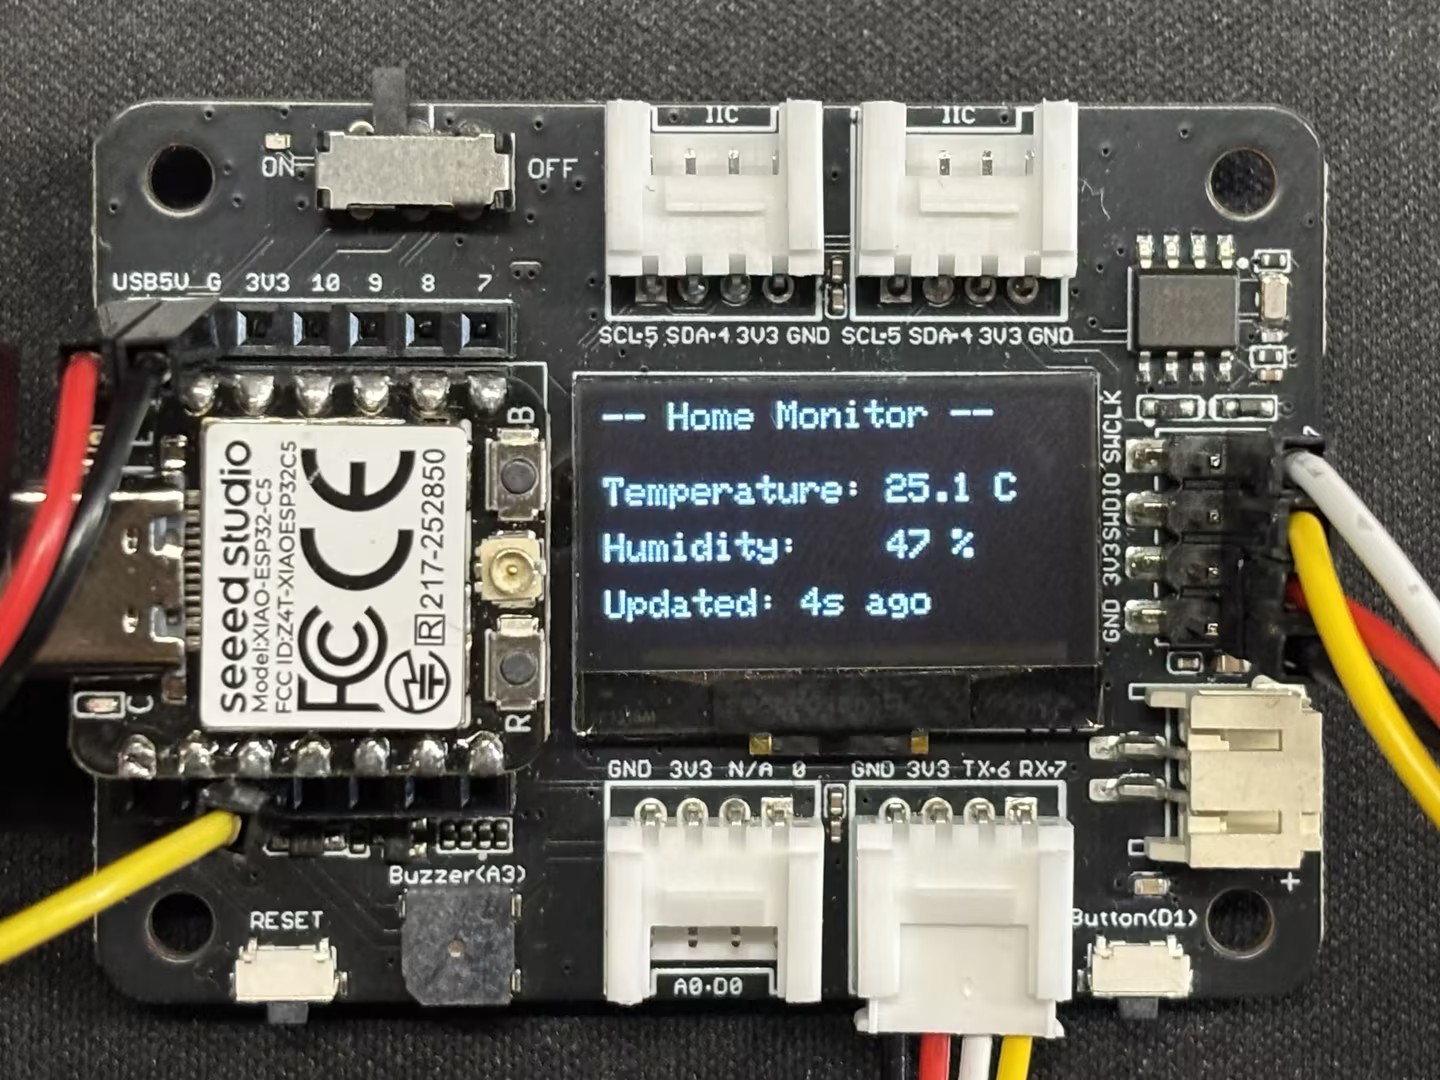 | 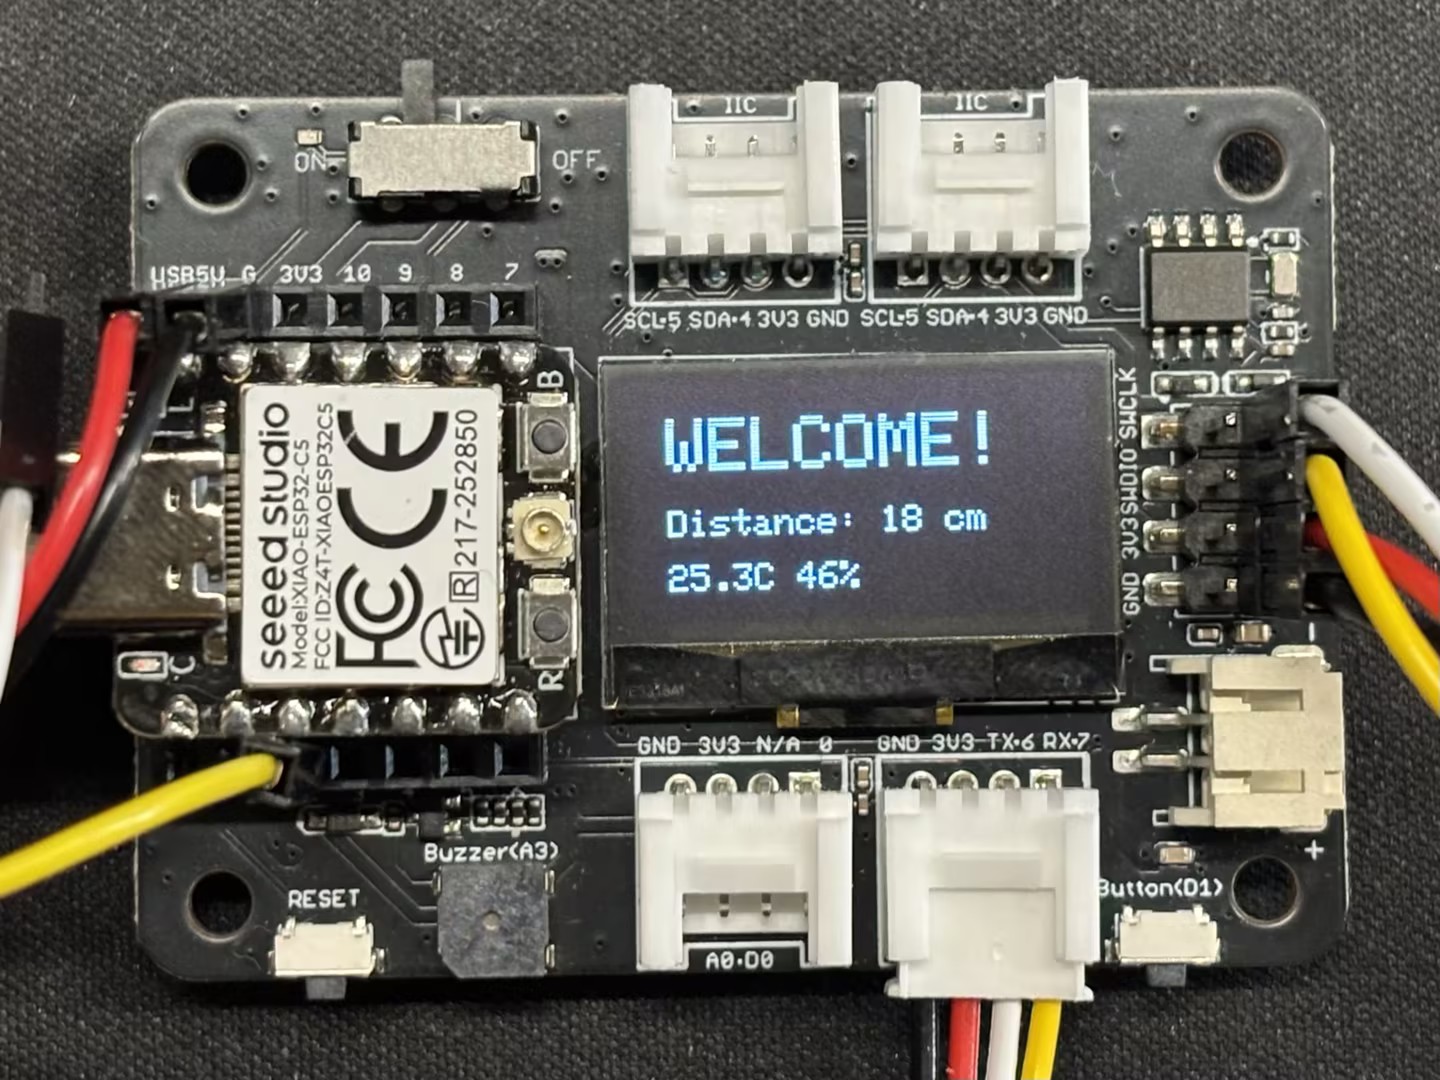 |
- Actual Effect
Conclusion
I trust that through this guide, you have gained a solid command of the XIAO ESP32-C5 and FreeRTOS. I look forward to seeing your innovative creations and inventions across a wide range of applications!
Tech Support & Product Discussion
Thank you for choosing our products! We are here to provide you with different support to ensure that your experience with our products is as smooth as possible. We offer several communication channels to cater to different preferences and needs.