Seeed Studio XIAO ESP32-C5 Zigbee Quick Start Guide (ESP-IDF)
Zigbee is a widely adopted wireless communication protocol that finds extensive use in home automation, smart energy management, and Internet of Things (IoT) applications. Known for its low power consumption, reliable data transmission, and mesh network capabilities, Zigbee is an excellent choice for building scalable and efficient wireless networks.
In this tutorial, we will embark on a journey to explore Zigbee application development using the XIAO ESP32-C5 development board. The XIAOESP32-C5 is a compact yet powerful board that features the ESP32-C5 chip, which offers integrated Wi-Fi and Bluetooth Low Energy (BLE) connectivity. By leveraging the ESP Zigbee SDK, we can harness the full potential of the XIAO ESP32-C5 and extend its capabilities to include Zigbee functionality.
To dive deep into Zigbee development, we will focus on two example programs provided by the ESP Zigbee SDK: HA_on_off_light and HA_on_off_switch. These examples showcase the implementation of a Zigbee light device and a Zigbee switch device, respectively. By thoroughly examining the code structure, data models, and working principles behind these examples, we will gain a comprehensive understanding of Zigbee device development.
Throughout this tutorial, we will cover the following key aspects:
- Setting up the development environment for XIAO ESP32-C5 and ESP Zigbee SDK.
- Analyzing the code structure and organization of the HA_on_off_light and HA_on_off_switch examples.
- Understanding the Zigbee device data models and how they are defined within the code.
- Exploring the initialization process and event handling mechanisms in Zigbee devices.
- Examining the communication patterns and message exchanges between Zigbee devices.
By the end of this tutorial, you will have gained a solid foundation in Zigbee development using the XIAO ESP3-C5 and ESP Zigbee SDK. Armed with this knowledge and practical skills, you will be well-prepared to create your own Zigbee-based projects and contribute to the ever-growing ecosystem of Zigbee devices.
So, let's embark on this exciting journey of Zigbee development with the XIAO ESP32-C5 and unlock the full potential of this powerful wireless communication protocol!
Hardware Preparation
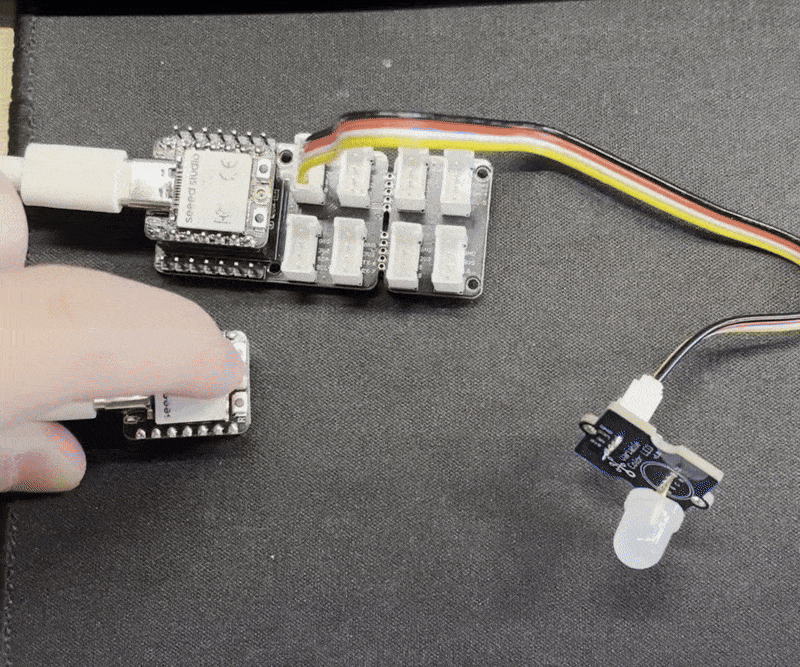
You need to prepare two XIAO ESP32-C5 boards and some accessories.
| Seeed Studio XIAO ESP32-C5 | Seeed Studio Grove Base for XIAO | Grove - Variable Color LED |
|---|---|---|
 |  |  |
Environment Setup
In this tutorial, we will guide you through implementing Zigbee functionality on the Seeed Studio XIAO ESP32C5. You will need to install the ESP-IDF framework and ESP-Zigbee SDK beforehand.
This example is based on the Ubuntu (Linux) system. If you are using a different system, please refer to the official Espressif documentation for adjustments. ESP-IDF Programming Guide
Installing ESP-IDF SDK
To use the Zigbee SDK, you first need to set up the ESP-IDF development environment. Enter the following commands in the Ubuntu system terminal.
mkdir esp
cd ~/esp
git clone --recursive https://github.com/espressif/esp-idf.git
cd esp-idf
git checkout v5.5.1
git submodule update --init --recursive
./install.sh
source ./export.sh
cd ..
If you are using a different system, please click the button below to visit the Espressif website for more information.
We recommend using ESP-IDF v5.3.2 or later for development. This tutorial uses v5.5.1, which has been tested and confirmed to work.
Installing the Zigbee SDK
Clone the esp-zigbee-sdk :
cd ~/esp
git clone https://github.com/espressif/esp-zigbee-sdk.git
Software Programming
We will modify and use two examples from the esp-zigbee-sdk: HA_on_off_light and HA_on_off_switch. Both are located in the esp-zigbee-sdk/examples/esp_zigbee_HA_sample directory.
Modifying HA_on_off_light
Step 1. Open the main folder in the directory of the HA_on_off_light example.
cd ~/esp/esp-zigbee-sdk/examples/esp_zigbee_HA_sample/HA_on_off_light/main
Step 2. Modify the content of esp_zb_light.c under the main folder
In the HA_on_off_light example, the default GPIO pin for controlling the light is GPIO27, which is the same as the pin used to control the USER LED on the XIAO ESP32-C5. For a more intuitive display effect, change it to GPIO1 and make other simple modifications accordingly.
esp_zb_light.c
#include "esp_zb_light.h"
#include "esp_check.h"
#include "esp_log.h"
#include "nvs_flash.h"
#include "freertos/FreeRTOS.h"
#include "freertos/task.h"
#include "ha/esp_zigbee_ha_standard.h"

#if !defined ZB_ED_ROLE
#error Define ZB_ED_ROLE in idf.py menuconfig to compile light (End Device) source code.
#endif

static const char *TAG = "ESP_ZB_ON_OFF_LIGHT";
#define MY_LED_GPIO  GPIO_NUM_1

// modify start
#include "driver/gpio.h"  // Include the GPIO driver header file(Modify)

// Define the default state of the light (off)  (Modify)
void light_driver_init(bool power);
void light_driver_set_power(bool power);

void light_driver_init(bool power)
{
    // Configure GPIO as output mode
    gpio_reset_pin(MY_LED_GPIO);
    gpio_set_direction(MY_LED_GPIO, GPIO_MODE_OUTPUT);
    // Initialization state
    light_driver_set_power(power);
}

// Rewrite the switch control function
void light_driver_set_power(bool power)
{
    // If your LED is on when it receives a high voltage, use: gpio_set_level(MY_LED_GPIO, power);
    // If your LED is on when it receives a low voltage
    //(a common onboard LED), use: gpio_set_level(MY_LED_GPIO, ! power);

    gpio_set_level(MY_LED_GPIO, power);

    ESP_LOGI("USER_DRIVER", "Light physical state changed to: %d", power);
}
// modify end

/********************* Define functions **************************/
static esp_err_t deferred_driver_init(void)
{
    static bool is_inited = false;
    if (!is_inited) {
        light_driver_init(LIGHT_DEFAULT_OFF);
        is_inited = true;
    }
    return is_inited ? ESP_OK : ESP_FAIL;
}

static void bdb_start_top_level_commissioning_cb(uint8_t mode_mask)
{
    ESP_RETURN_ON_FALSE(esp_zb_bdb_start_top_level_commissioning(mode_mask) == ESP_OK, , TAG, "Failed to start Zigbee commissioning");
}

void esp_zb_app_signal_handler(esp_zb_app_signal_t *signal_struct)
{
    uint32_t *p_sg_p       = signal_struct->p_app_signal;
    esp_err_t err_status = signal_struct->esp_err_status;
    esp_zb_app_signal_type_t sig_type = *p_sg_p;
    switch (sig_type) {
    case ESP_ZB_ZDO_SIGNAL_SKIP_STARTUP:
        ESP_LOGI(TAG, "Initialize Zigbee stack");
        esp_zb_bdb_start_top_level_commissioning(ESP_ZB_BDB_MODE_INITIALIZATION);
        break;
    case ESP_ZB_BDB_SIGNAL_DEVICE_FIRST_START:
    case ESP_ZB_BDB_SIGNAL_DEVICE_REBOOT:
        if (err_status == ESP_OK) {
            ESP_LOGI(TAG, "Deferred driver initialization %s", deferred_driver_init() ? "failed" : "successful");
            ESP_LOGI(TAG, "Device started up in%s factory-reset mode", esp_zb_bdb_is_factory_new() ? "" : " non");
            if (esp_zb_bdb_is_factory_new()) {
                ESP_LOGI(TAG, "Start network steering");
                esp_zb_bdb_start_top_level_commissioning(ESP_ZB_BDB_MODE_NETWORK_STEERING);
            } else {
                ESP_LOGI(TAG, "Device rebooted");
            }
        } else {
            ESP_LOGW(TAG, "%s failed with status: %s, retrying", esp_zb_zdo_signal_to_string(sig_type),
                     esp_err_to_name(err_status));
            esp_zb_scheduler_alarm((esp_zb_callback_t)bdb_start_top_level_commissioning_cb,
                                   ESP_ZB_BDB_MODE_INITIALIZATION, 1000);
        }
        break;
    case ESP_ZB_BDB_SIGNAL_STEERING:
        if (err_status == ESP_OK) {
            esp_zb_ieee_addr_t extended_pan_id;
            esp_zb_get_extended_pan_id(extended_pan_id);
            ESP_LOGI(TAG, "Joined network successfully (Extended PAN ID: %02x:%02x:%02x:%02x:%02x:%02x:%02x:%02x, PAN ID: 0x%04hx, Channel:%d, Short Address: 0x%04hx)",
                     extended_pan_id[7], extended_pan_id[6], extended_pan_id[5], extended_pan_id[4],
                     extended_pan_id[3], extended_pan_id[2], extended_pan_id[1], extended_pan_id[0],
                     esp_zb_get_pan_id(), esp_zb_get_current_channel(), esp_zb_get_short_address());
        } else {
            ESP_LOGI(TAG, "Network steering was not successful (status: %s)", esp_err_to_name(err_status));
            esp_zb_scheduler_alarm((esp_zb_callback_t)bdb_start_top_level_commissioning_cb, ESP_ZB_BDB_MODE_NETWORK_STEERING, 1000);
        }
        break;
    default:
        ESP_LOGI(TAG, "ZDO signal: %s (0x%x), status: %s", esp_zb_zdo_signal_to_string(sig_type), sig_type,
                 esp_err_to_name(err_status));
        break;
    }
}

static esp_err_t zb_attribute_handler(const esp_zb_zcl_set_attr_value_message_t *message)
{
    esp_err_t ret = ESP_OK;
    bool light_state = 0;

    ESP_RETURN_ON_FALSE(message, ESP_FAIL, TAG, "Empty message");
    ESP_RETURN_ON_FALSE(message->info.status == ESP_ZB_ZCL_STATUS_SUCCESS, ESP_ERR_INVALID_ARG, TAG, "Received message: error status(%d)",
                        message->info.status);
    ESP_LOGI(TAG, "Received message: endpoint(%d), cluster(0x%x), attribute(0x%x), data size(%d)", message->info.dst_endpoint, message->info.cluster,
             message->attribute.id, message->attribute.data.size);
    if (message->info.dst_endpoint == HA_ESP_LIGHT_ENDPOINT) {
        if (message->info.cluster == ESP_ZB_ZCL_CLUSTER_ID_ON_OFF) {
            if (message->attribute.id == ESP_ZB_ZCL_ATTR_ON_OFF_ON_OFF_ID && message->attribute.data.type == ESP_ZB_ZCL_ATTR_TYPE_BOOL) {
                light_state = message->attribute.data.value ? *(bool *)message->attribute.data.value : light_state;
                ESP_LOGI(TAG, "Light sets to %s", light_state ? "On" : "Off");
                light_driver_set_power(light_state);
            }
        }
    }
    return ret;
}

static esp_err_t zb_action_handler(esp_zb_core_action_callback_id_t callback_id, const void *message)
{
    esp_err_t ret = ESP_OK;
    switch (callback_id) {
    case ESP_ZB_CORE_SET_ATTR_VALUE_CB_ID:
        ret = zb_attribute_handler((esp_zb_zcl_set_attr_value_message_t *)message);
        break;
    default:
        ESP_LOGW(TAG, "Receive Zigbee action(0x%x) callback", callback_id);
        break;
    }
    return ret;
}

static void esp_zb_task(void *pvParameters)
{
    /* initialize Zigbee stack */
    esp_zb_cfg_t zb_nwk_cfg = ESP_ZB_ZED_CONFIG();
    esp_zb_init(&zb_nwk_cfg);
    esp_zb_on_off_light_cfg_t light_cfg = ESP_ZB_DEFAULT_ON_OFF_LIGHT_CONFIG();
    esp_zb_ep_list_t *esp_zb_on_off_light_ep = esp_zb_on_off_light_ep_create(HA_ESP_LIGHT_ENDPOINT, &light_cfg);
    zcl_basic_manufacturer_info_t info = {
        .manufacturer_name = ESP_MANUFACTURER_NAME,
        .model_identifier = ESP_MODEL_IDENTIFIER,
    };

    esp_zcl_utility_add_ep_basic_manufacturer_info(esp_zb_on_off_light_ep, HA_ESP_LIGHT_ENDPOINT, &info);
    esp_zb_device_register(esp_zb_on_off_light_ep);
    esp_zb_core_action_handler_register(zb_action_handler);
    esp_zb_set_primary_network_channel_set(ESP_ZB_PRIMARY_CHANNEL_MASK);
    ESP_ERROR_CHECK(esp_zb_start(false));
    esp_zb_stack_main_loop();
}

void app_main(void)
{
    esp_zb_platform_config_t config = {
        .radio_config = ESP_ZB_DEFAULT_RADIO_CONFIG(),
        .host_config = ESP_ZB_DEFAULT_HOST_CONFIG(),
    };
    ESP_ERROR_CHECK(nvs_flash_init());
    ESP_ERROR_CHECK(esp_zb_platform_config(&config));
    xTaskCreate(esp_zb_task, "Zigbee_main", 4096, NULL, 5, NULL);
}
Step 3. Flashing the HA_on_off_light Program
Return to the HA_on_off_light directory and set the target chip to esp32c5:
cd ../
idf.py set-target esp32c5
Run the following command to build the project:
idf.py build
If the build is successful, it should look like the figure below:

Connect one of the XIAO ESP32-C5 boards to your Ubuntu host. The default serial port is usually /dev/ttyACM0.
You can use the query command to check which ports exist by default when no XIAO is connected.
ls /dev/tty*
In ESP-IDF, the command for flashing is:
idf.py -p PORT flash
Replace PORT with the USB port name of your XIAO ESP32-C5. If PORT is not defined, idf.py will attempt to connect automatically using an available USB port. For this tutorial, the flashing port is /dev/ttyACM0:
idf.py -p /dev/ttyACM0

If there are no issues at the end of the flashing process, the XIAO ESP32-C5 will restart and launch the Zigbee Light application.
Flashing HA_on_off_switch
Similarly, take the other XIAO ESP32-C5 and flash the switch program. The steps are similar to those for flashing HA_on_off_light.
In the HA_on_off_switch example, the switch pin is GPIO28, which is the same as the pin used to control the BOOT button on the XIAO ESP32-C5.
cd ../HA_on_off_switch
idf.py set-target esp32c5
idf.py build
idf.py -p PORT flash
If the flashing is successful, you can control the LED on the other XIAO ESP32-C5 to turn on or off using the BOOT button.
Result
If the program modifications were successful and you have flashed the HA_on_off_switch and HA_on_off_light programs onto the two XIAO ESP32-C5 boards, you can open the serial monitor to view information about Zigbee device networking and control commands.
- The serial port prints configuration information. After they successfully form a Zigbee network, they will print configuration information, as well as control commands and received commands. The left side shows the HA_on_off_switch device, and the right side shows the HA_on_off_light device.
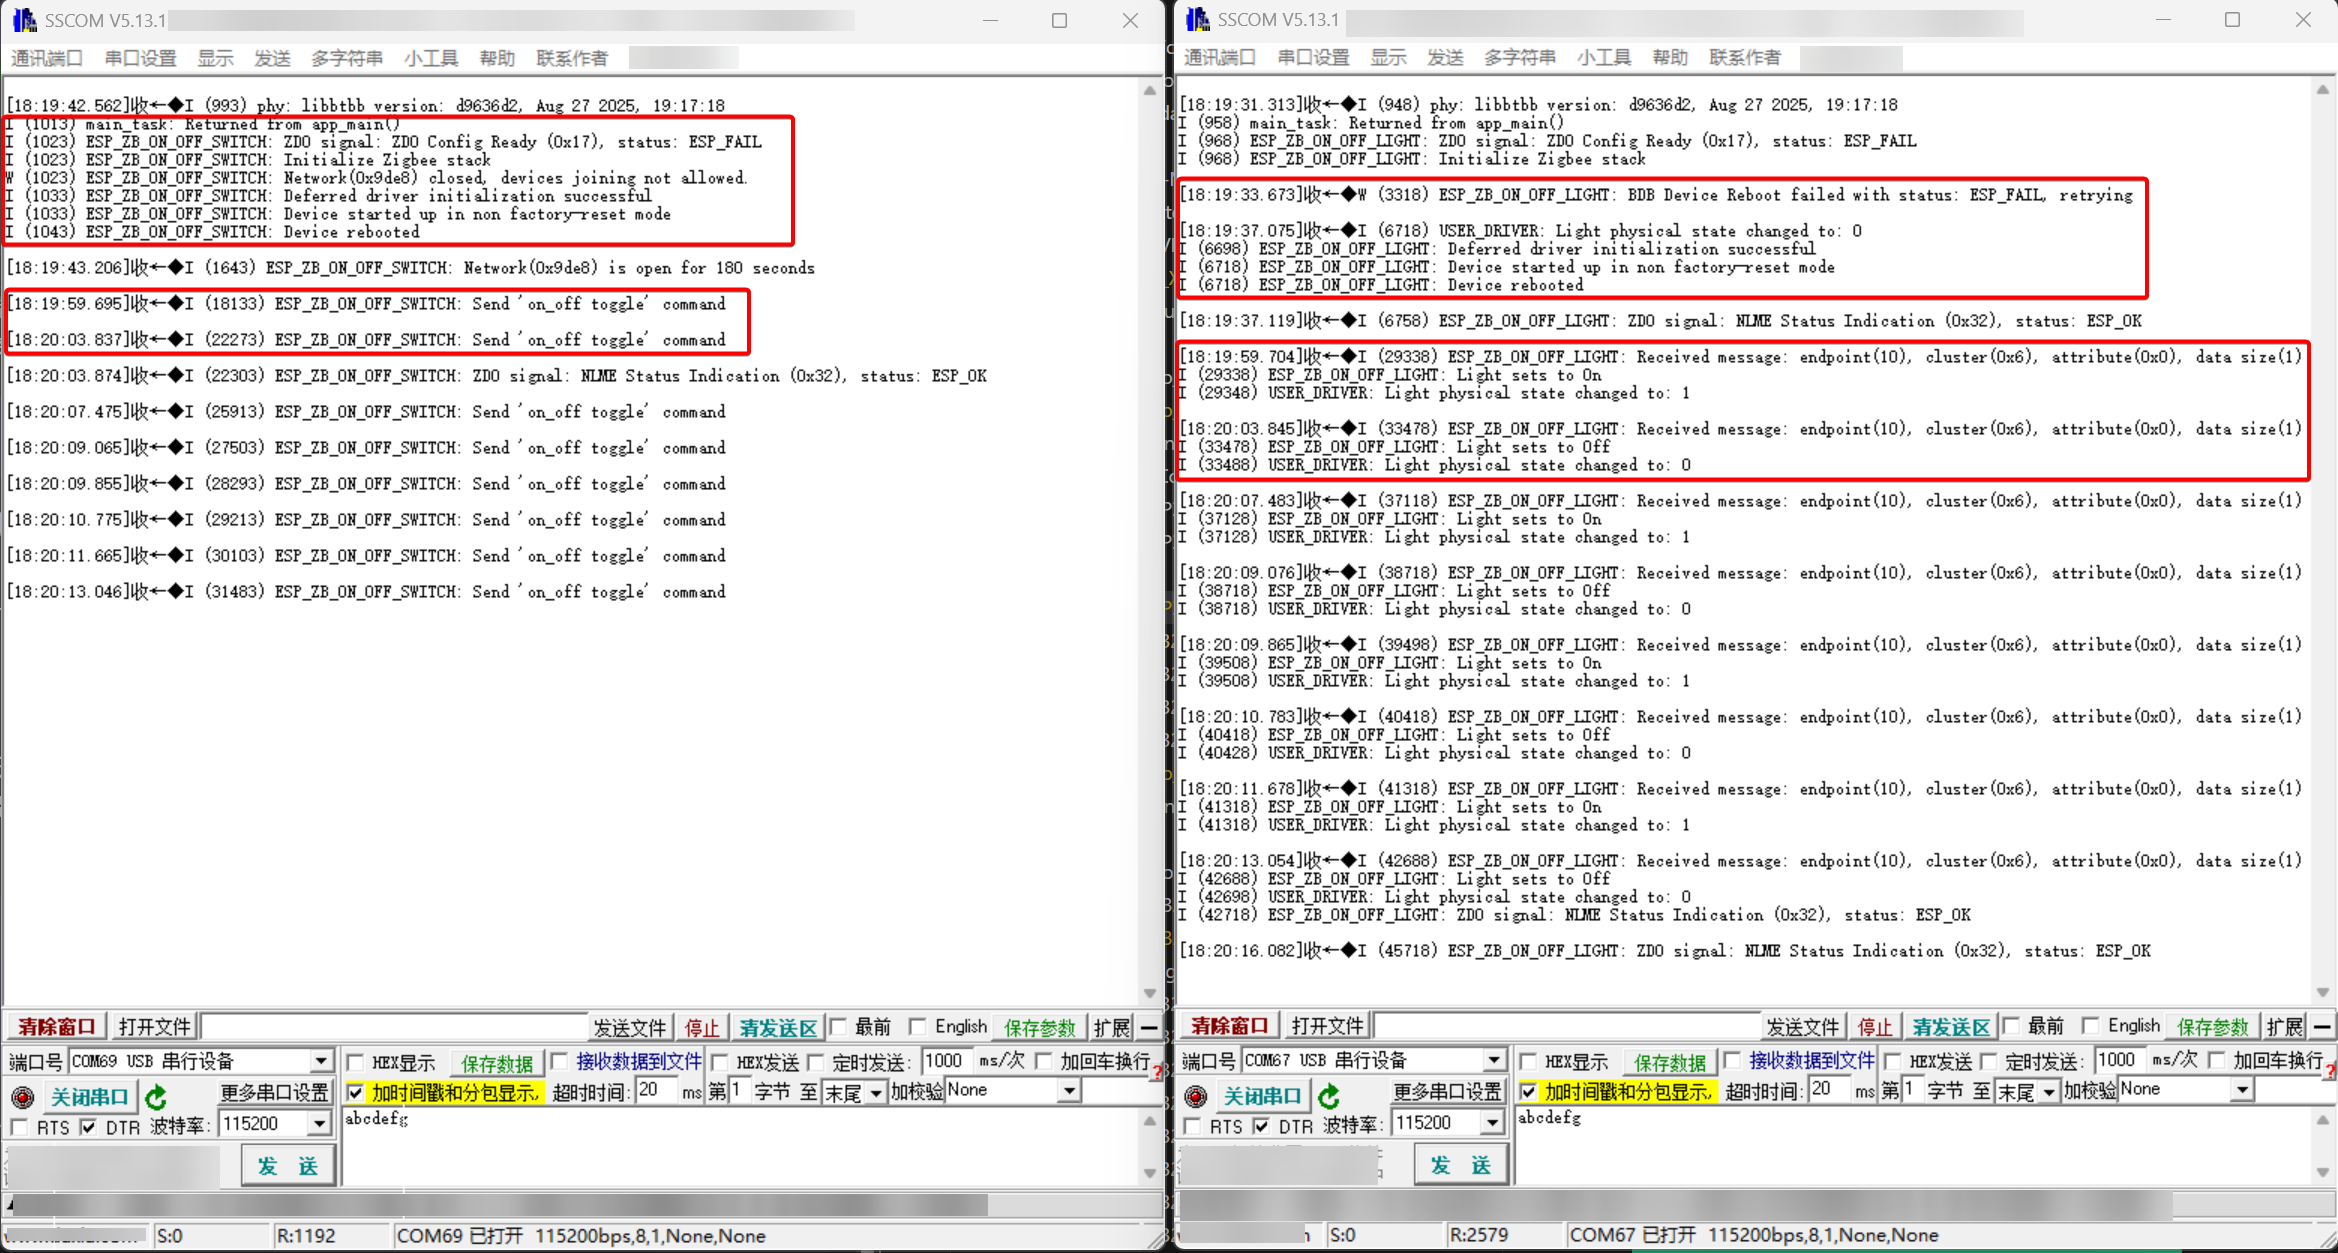
- Pressing and holding the BOOT button can toggle the LED on the other XIAO ESP32-C5.
Program Structure of HA_on_off_light and HA_on_off_switch
The folder contains examples demonstrating Zigbee HA standard device
-
HA_on_off_lightis a standard HA on-off light bulb example demonstrating Zigbee End-device. -
HA_on_off_switchis a standard HA on-off switch example demonstrating Zigbee Coordinator role. It provides an on/off toggle to control a Zigbee HA on off light.
In this tutorial, we will dive deep into two example programs provided by the ESP Zigbee SDK: HA_on_off_light and HA_on_off_switch. By analyzing the code structure and organization of these examples, we will gain a comprehensive understanding of how to develop Zigbee device applications.
- esp_zigbee_HA_sample/
    - HA_on_off_light/
        - main/
          - CMakeLists.txt
          - esp_zb_light.c
          - esp_zb_light.h
          - idf_component.yml
        - CMakeLists.txt
        - partitions.csv
        - sdkconfig.defaults
        ...
    - HA_on_off_switch/
        - main/
          - CMakeLists.txt
          - esp_zb_switch.c
          - esp_zb_switch.h
          - idf_component.yml
        - CMakeLists.txt
        - partitions.csv
        - sdkconfig.defaults
        ...
-
esp_zigbee_HA_sample/: This directory contains the Home Automation (HA) sample projects provided by the ESP Zigbee SDK.
-
HA_on_off_light/: This subdirectory represents the "On/Off Light" example project.
- main/: This directory contains the main source files for the "On/Off Light" example.
- CMakeLists.txt: This file is used by the CMake build system to specify the source files and dependencies for the "On/Off Light" example.
- esp_zb_light.c: This file contains the main implementation code for the Zigbee light device, including initialization, event handling, and communication with other Zigbee devices.
- esp_zb_light.h: This header file contains the necessary function declarations, constants, and data structures for the Zigbee light device.
- idf_component.yml: This file is the ESP-IDF component configuration file, which specifies the component dependencies and build settings for the "On/Off Light" example.
- CMakeLists.txt: This file is the top-level CMakeLists file for the "On/Off Light" example project, which includes the necessary configuration and build targets.
- partitions.csv: This file defines the partition table for the "On/Off Light" example, specifying the memory layout and sizes of various partitions such as the bootloader, application, and storage.
- sdkconfig.defaults: This file contains the default configuration settings for the "On/Off Light" example project, which can be overridden by the user.
- main/: This directory contains the main source files for the "On/Off Light" example.
-
HA_on_off_switch/: This subdirectory represents the "On/Off Switch" example project.
- main/: This directory contains the main source files for the "On/Off Switch" example.
- CMakeLists.txt: Similar to the "On/Off Light" example, this file is used by the CMake build system to specify the source files and dependencies for the "On/Off Switch" example.
- esp_zb_switch.c: This file contains the main implementation code for the Zigbee switch device, including initialization, event handling, and communication with other Zigbee devices.
- esp_zb_switch.h: This header file contains the necessary function declarations, constants, and data structures for the Zigbee switch device.
- idf_component.yml: This file is the ESP-IDF component configuration file for the "On/Off Switch" example.
- CMakeLists.txt: This is the top-level CMakeLists file for the "On/Off Switch" example project.
- partitions.csv: This file defines the partition table for the "On/Off Switch" example.
- sdkconfig.defaults: This file contains the default configuration settings for the "On/Off Switch" example project.
- main/: This directory contains the main source files for the "On/Off Switch" example.
These files work together to provide a complete example implementation of Zigbee devices using the ESP Zigbee SDK. The .c and .h files contain the actual code implementation, while the CMakeLists.txt, partitions.csv, and sdkconfig.defaults files are used for build configuration and memory partitioning.
Zigbee End Device and Zigbee Data Model
In this tutorial, we will explore how the Zigbee HA On/Off Light example code is structured based on the Zigbee data model. By understanding the relationship between the code and the data model, you will gain insights into how to interpret and modify the code according to your specific requirements.
Before diving into the code, it's essential to grasp the key concepts of the Zigbee data model:
-
Node: A node represents a single ESP32-H2 based product and a network node in the Zigbee network. A node can have multiple endpoints.
-
Endpoint: An endpoint, identified by a number between 1 and 240, defines an application running on a Zigbee node. A node can have multiple endpoints, each serving a different purpose or representing a separate device.
-
Cluster: A cluster, identified by a 16-bit number, is an application object that defines the functionality and data associated with an endpoint. Clusters contain attributes and commands.
-
Attribute: An attribute, identified by a 16-bit number, represents the current state or a physical quantity within a cluster.

Now, let's examine the HA On/Off Light example code and see how it maps to the Zigbee data model.
- Creating the Endpoint
In the example code, the esp_zb_on_off_light_ep_create() function is used to create a HA on/off light endpoint. This function defines the endpoint ID, device ID, and the associated clusters.
static void esp_zb_task(void *pvParameters)
{
    /* initialize Zigbee stack */
    esp_zb_cfg_t zb_nwk_cfg = ESP_ZB_ZED_CONFIG();
    esp_zb_init(&zb_nwk_cfg);
    esp_zb_on_off_light_cfg_t light_cfg = ESP_ZB_DEFAULT_ON_OFF_LIGHT_CONFIG();
    esp_zb_ep_list_t *esp_zb_on_off_light_ep = esp_zb_on_off_light_ep_create(HA_ESP_LIGHT_ENDPOINT, &light_cfg);
    zcl_basic_manufacturer_info_t info = {
        .manufacturer_name = ESP_MANUFACTURER_NAME,
        .model_identifier = ESP_MODEL_IDENTIFIER,
    };

    esp_zcl_utility_add_ep_basic_manufacturer_info(esp_zb_on_off_light_ep, HA_ESP_LIGHT_ENDPOINT, &info);
    esp_zb_device_register(esp_zb_on_off_light_ep);
    esp_zb_core_action_handler_register(zb_action_handler);
    esp_zb_set_primary_network_channel_set(ESP_ZB_PRIMARY_CHANNEL_MASK);
    ESP_ERROR_CHECK(esp_zb_start(false));
    esp_zb_stack_main_loop();
}
- Registering the Device
After creating the endpoint, the esp_zb_device_register() function is called to register the Zigbee device with the created endpoint.
esp_zb_device_register(esp_zb_on_off_light_ep);
- Attribute Callback
The example code registers an attribute change callback using esp_zb_core_action_handler_register(). This callback is invoked when certain attributes are modified, allowing you to handle attribute changes based on your application logic.
esp_zb_core_action_handler_register(zb_action_handler);
In the zb_action_handler function, you can implement the desired behavior when the on/off attribute changes, such as controlling the LED light.
- Zigbee Stack Configuration and Starting
The example code configures the Zigbee end-device using ESP_ZB_ZED_CONFIG() and initializes the Zigbee stack using esp_zb_init(). The stack is then started with esp_zb_start(), and the main loop is handled by esp_zb_main_loop_iteration().
esp_zb_cfg_t zb_nwk_cfg = ESP_ZB_ZED_CONFIG();
esp_zb_init(&zb_nwk_cfg);
...
ESP_ERROR_CHECK(esp_zb_start(false));
esp_zb_main_loop_iteration();
The esp_zb_app_signal_handler function is responsible for handling various signals from the Zigbee application layer.
void esp_zb_app_signal_handler(esp_zb_app_signal_t *signal_struct)
{
    uint32_t *p_sg_p       = signal_struct->p_app_signal;
    esp_err_t err_status = signal_struct->esp_err_status;
    esp_zb_app_signal_type_t sig_type = *p_sg_p;
    switch (sig_type) {
    case ESP_ZB_ZDO_SIGNAL_SKIP_STARTUP:
        ESP_LOGI(TAG, "Initialize Zigbee stack");
        esp_zb_bdb_start_top_level_commissioning(ESP_ZB_BDB_MODE_INITIALIZATION);
        break;
    case ESP_ZB_BDB_SIGNAL_DEVICE_FIRST_START:
    case ESP_ZB_BDB_SIGNAL_DEVICE_REBOOT:
        if (err_status == ESP_OK) {
            ESP_LOGI(TAG, "Deferred driver initialization %s", deferred_driver_init() ? "failed" : "successful");
            ESP_LOGI(TAG, "Device started up in%s factory-reset mode", esp_zb_bdb_is_factory_new() ? "" : " non");
            if (esp_zb_bdb_is_factory_new()) {
                ESP_LOGI(TAG, "Start network steering");
                esp_zb_bdb_start_top_level_commissioning(ESP_ZB_BDB_MODE_NETWORK_STEERING);
            } else {
                ESP_LOGI(TAG, "Device rebooted");
            }
        } else {
            ESP_LOGW(TAG, "%s failed with status: %s, retrying", esp_zb_zdo_signal_to_string(sig_type),
                     esp_err_to_name(err_status));
            esp_zb_scheduler_alarm((esp_zb_callback_t)bdb_start_top_level_commissioning_cb,
                                   ESP_ZB_BDB_MODE_INITIALIZATION, 1000);
        }
        break;
    case ESP_ZB_BDB_SIGNAL_STEERING:
        if (err_status == ESP_OK) {
            esp_zb_ieee_addr_t extended_pan_id;
            esp_zb_get_extended_pan_id(extended_pan_id);
            ESP_LOGI(TAG, "Joined network successfully (Extended PAN ID: %02x:%02x:%02x:%02x:%02x:%02x:%02x:%02x, PAN ID: 0x%04hx, Channel:%d, Short Address: 0x%04hx)",
                     extended_pan_id[7], extended_pan_id[6], extended_pan_id[5], extended_pan_id[4],
                     extended_pan_id[3], extended_pan_id[2], extended_pan_id[1], extended_pan_id[0],
                     esp_zb_get_pan_id(), esp_zb_get_current_channel(), esp_zb_get_short_address());
        } else {
            ESP_LOGI(TAG, "Network steering was not successful (status: %s)", esp_err_to_name(err_status));
            esp_zb_scheduler_alarm((esp_zb_callback_t)bdb_start_top_level_commissioning_cb, ESP_ZB_BDB_MODE_NETWORK_STEERING, 1000);
        }
        break;
    default:
        ESP_LOGI(TAG, "ZDO signal: %s (0x%x), status: %s", esp_zb_zdo_signal_to_string(sig_type), sig_type,
                 esp_err_to_name(err_status));
        break;
    }
}
-
First, the function retrieves the signal type
sig_typeand error statuserr_statusfrom the passedesp_zb_app_signal_tstructure. -
Then, it uses a switch statement to perform different actions based on the signal type:
-
ESP_ZB_ZDO_SIGNAL_SKIP_STARTUP: This signal indicates skipping the startup of the Zigbee stack. In this case, we initialize the Zigbee stack and then call theesp_zb_bdb_start_top_level_commissioningfunction to start the top-level commissioning process with the mode set toESP_ZB_BDB_MODE_INITIALIZATION. -
ESP_ZB_BDB_SIGNAL_DEVICE_FIRST_STARTandESP_ZB_BDB_SIGNAL_DEVICE_REBOOT: These signals indicate the first start or reboot of the device. If the error status isESP_OK, we perform some initialization tasks, such as deferred driver initialization. Then, we check if the device is in the factory new state. If it is, we start the network steering process; otherwise, we output a message indicating that the device has rebooted. If the error status is notESP_OK, we output a message indicating that the Zigbee stack initialization failed. -
ESP_ZB_BDB_SIGNAL_STEERING: This signal indicates the result of the network steering process. If the error status isESP_OK, it means the device successfully joined the network. In this case, we output some network information, such as the PAN ID, channel number, and short address. If the error status is notESP_OK, it means the network steering failed, and we output an error message. Then, we use theesp_zb_scheduler_alarmfunction to set a timer to restart the network steering process after a 1-second delay. -
Other signals: We simply output the signal name, type, and error status.
-
The purpose of this function is to perform appropriate actions based on different Zigbee application layer signals. It is one of the core parts of a Zigbee application. It handles critical processes such as device startup, initialization, and network joining.
Zigbee Coordinator
For the Zigbee Coordinator device, its initialisation and RTOS tasks are similar to the End Device, except that in the RTOS tasks, there is less step of registering the callback function.
So for Zigbee Coordinator, the most critical part is to search and match the corresponding device, and issue control commands to the device.
void esp_zb_app_signal_handler(esp_zb_app_signal_t *signal_struct)
{
    uint32_t *p_sg_p       = signal_struct->p_app_signal;
    esp_err_t err_status = signal_struct->esp_err_status;
    esp_zb_app_signal_type_t sig_type = *p_sg_p;
    switch (sig_type) {
    case ESP_ZB_ZDO_SIGNAL_SKIP_STARTUP:
        ESP_LOGI(TAG, "Initialize Zigbee stack");
        esp_zb_bdb_start_top_level_commissioning(ESP_ZB_BDB_MODE_INITIALIZATION);
        break;
    case ESP_ZB_BDB_SIGNAL_DEVICE_FIRST_START:
    case ESP_ZB_BDB_SIGNAL_DEVICE_REBOOT:
        if (err_status == ESP_OK) {
            ESP_LOGI(TAG, "Deferred driver initialization %s", deferred_driver_init() ? "failed" : "successful");
            ESP_LOGI(TAG, "Device started up in%s factory-reset mode", esp_zb_bdb_is_factory_new() ? "" : " non");
            if (esp_zb_bdb_is_factory_new()) {
                ESP_LOGI(TAG, "Start network steering");
                esp_zb_bdb_start_top_level_commissioning(ESP_ZB_BDB_MODE_NETWORK_STEERING);
            } else {
                ESP_LOGI(TAG, "Device rebooted");
            }
        } else {
            ESP_LOGW(TAG, "%s failed with status: %s, retrying", esp_zb_zdo_signal_to_string(sig_type),
                     esp_err_to_name(err_status));
            esp_zb_scheduler_alarm((esp_zb_callback_t)bdb_start_top_level_commissioning_cb,
                                   ESP_ZB_BDB_MODE_INITIALIZATION, 1000);
        }
        break;
    case ESP_ZB_BDB_SIGNAL_STEERING:
        if (err_status == ESP_OK) {
            esp_zb_ieee_addr_t extended_pan_id;
            esp_zb_get_extended_pan_id(extended_pan_id);
            ESP_LOGI(TAG, "Joined network successfully (Extended PAN ID: %02x:%02x:%02x:%02x:%02x:%02x:%02x:%02x, PAN ID: 0x%04hx, Channel:%d, Short Address: 0x%04hx)",
                     extended_pan_id[7], extended_pan_id[6], extended_pan_id[5], extended_pan_id[4],
                     extended_pan_id[3], extended_pan_id[2], extended_pan_id[1], extended_pan_id[0],
                     esp_zb_get_pan_id(), esp_zb_get_current_channel(), esp_zb_get_short_address());
        } else {
            ESP_LOGI(TAG, "Network steering was not successful (status: %s)", esp_err_to_name(err_status));
            esp_zb_scheduler_alarm((esp_zb_callback_t)bdb_start_top_level_commissioning_cb, ESP_ZB_BDB_MODE_NETWORK_STEERING, 1000);
        }
        break;
    default:
        ESP_LOGI(TAG, "ZDO signal: %s (0x%x), status: %s", esp_zb_zdo_signal_to_string(sig_type), sig_type,
                 esp_err_to_name(err_status));
        break;
    }
}
Let's go through the different cases and their functionalities:
-
ESP_ZB_ZDO_SIGNAL_SKIP_STARTUP:- This signal indicates that the Zigbee stack initialization step is being handled.
- It logs a message indicating the initialization of the Zigbee stack.
- It manually starts the top-level commissioning process with the mode set to
ESP_ZB_BDB_MODE_INITIALIZATION.
-
ESP_ZB_BDB_SIGNAL_DEVICE_FIRST_STARTandESP_ZB_BDB_SIGNAL_DEVICE_REBOOT:- These signals indicate that the device has finished its BDB initialization (started up for the first time or rebooted).
- If the error status is
ESP_OK:- It logs messages about the deferred driver initialization status and checks if the device is in factory-reset mode.
- If the device is factory-new: It logs Start network steering and begins the network steering process (attempting to join an existing network) by calling
esp_zb_bdb_start_top_level_commissioningwithESP_ZB_BDB_MODE_NETWORK_STEERING. - If the device is not factory-new: It logs that the device has rebooted (implying it retains previous network credentials).
- If the error status is not
ESP_OK:- It logs a warning message and schedules a retry of the BDB initialization after 1000 milliseconds.
-
ESP_ZB_BDB_SIGNAL_STEERING:- This signal indicates the result of the network steering process.
- If the error status is
ESP_OK:- It indicates the device has successfully joined a network.
- It retrieves the extended PAN ID and logs detailed network information: "Joined network successfully" (including PAN ID, Channel, and Short Address).
- If the error status is not
ESP_OK:- It logs that network steering was not successful.
- It schedules a retry of the steering process (
ESP_ZB_BDB_MODE_NETWORK_STEERING) after 1000 milliseconds.
-
Default case:- For any other signal types not explicitly handled above, it logs a general message with the signal name and error status for debugging.
Overall, this code handles various Zigbee-related events and performs actions such as initializing the Zigbee stack, forming a network, steering the network, handling device announcements, and finding color dimmable light devices.
The rest of the example is addressing the logic for keystroke stabilisation and keystroke interrupts. If you are interested, you can read and understand it by yourself.
Tech Support & Product Discussion
Thank you for choosing our products! We are here to provide you with different support to ensure that your experience with our products is as smooth as possible. We offer several communication channels to cater to different preferences and needs.