Camera Usage in Seeed Studio XIAO ESP32S3 Sense
The content of this tutorial is only applicable to Seeed Studio XIAO ESP32S3 Sense.
In this tutorial, we will walk you through using the camera module on the XIAO ESP32S3 Sense. This tutorial is divided into the following parts, first, we will explain the camera function provided by ESP32 and its functions. Secondly, we will bring you how to use the camera in two dimensions: taking pictures and recording videos, and finally, we will create some interesting projects around taking pictures and recording videos.
| Seeed Studio XIAO ESP32S3 Sense |
|---|
 |
Getting Started
This tutorial may involve the use of microSD card, camera, antenna, etc. Please prepare the following materials and install them correctly according to your project needs.
Installation of antenna
On the bottom left of the front of XIAO ESP32S3, there is a separate "WiFi/BT Antenna Connector". In order to get better WiFi/Bluetooth signal, you need to take out the antenna inside the package and install it on the connector.
There is a little trick to the installation of the antenna, if you press down hard on it directly, you will find it very difficult to press and your fingers will hurt! The correct way to install the antenna is to put one side of the antenna connector into the connector block first, then press down a little on the other side, and the antenna will be installed.
Installation of expansion boards (for Sense)
Installing the expansion board is very simple, you just need to align the connector on the expansion board with the B2B connector on the XIAO ESP32S3, press it hard and hear a "click", the installation is complete.
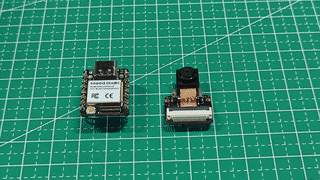
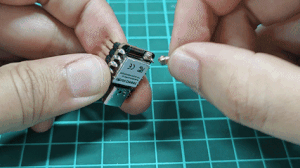
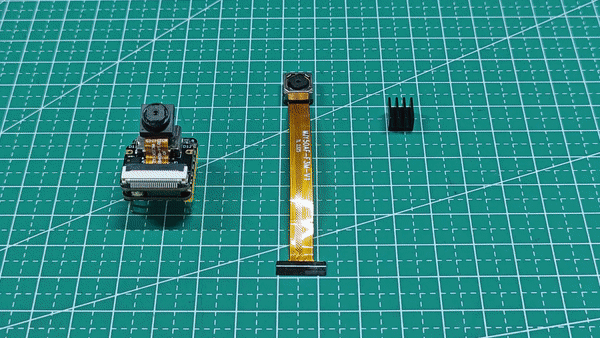
We now have a new fully XIAO ESP32S3 Sense-compatible powerful camera, the OV5640, on our shelves, and if you purchase it, you can replace the camera to use it.
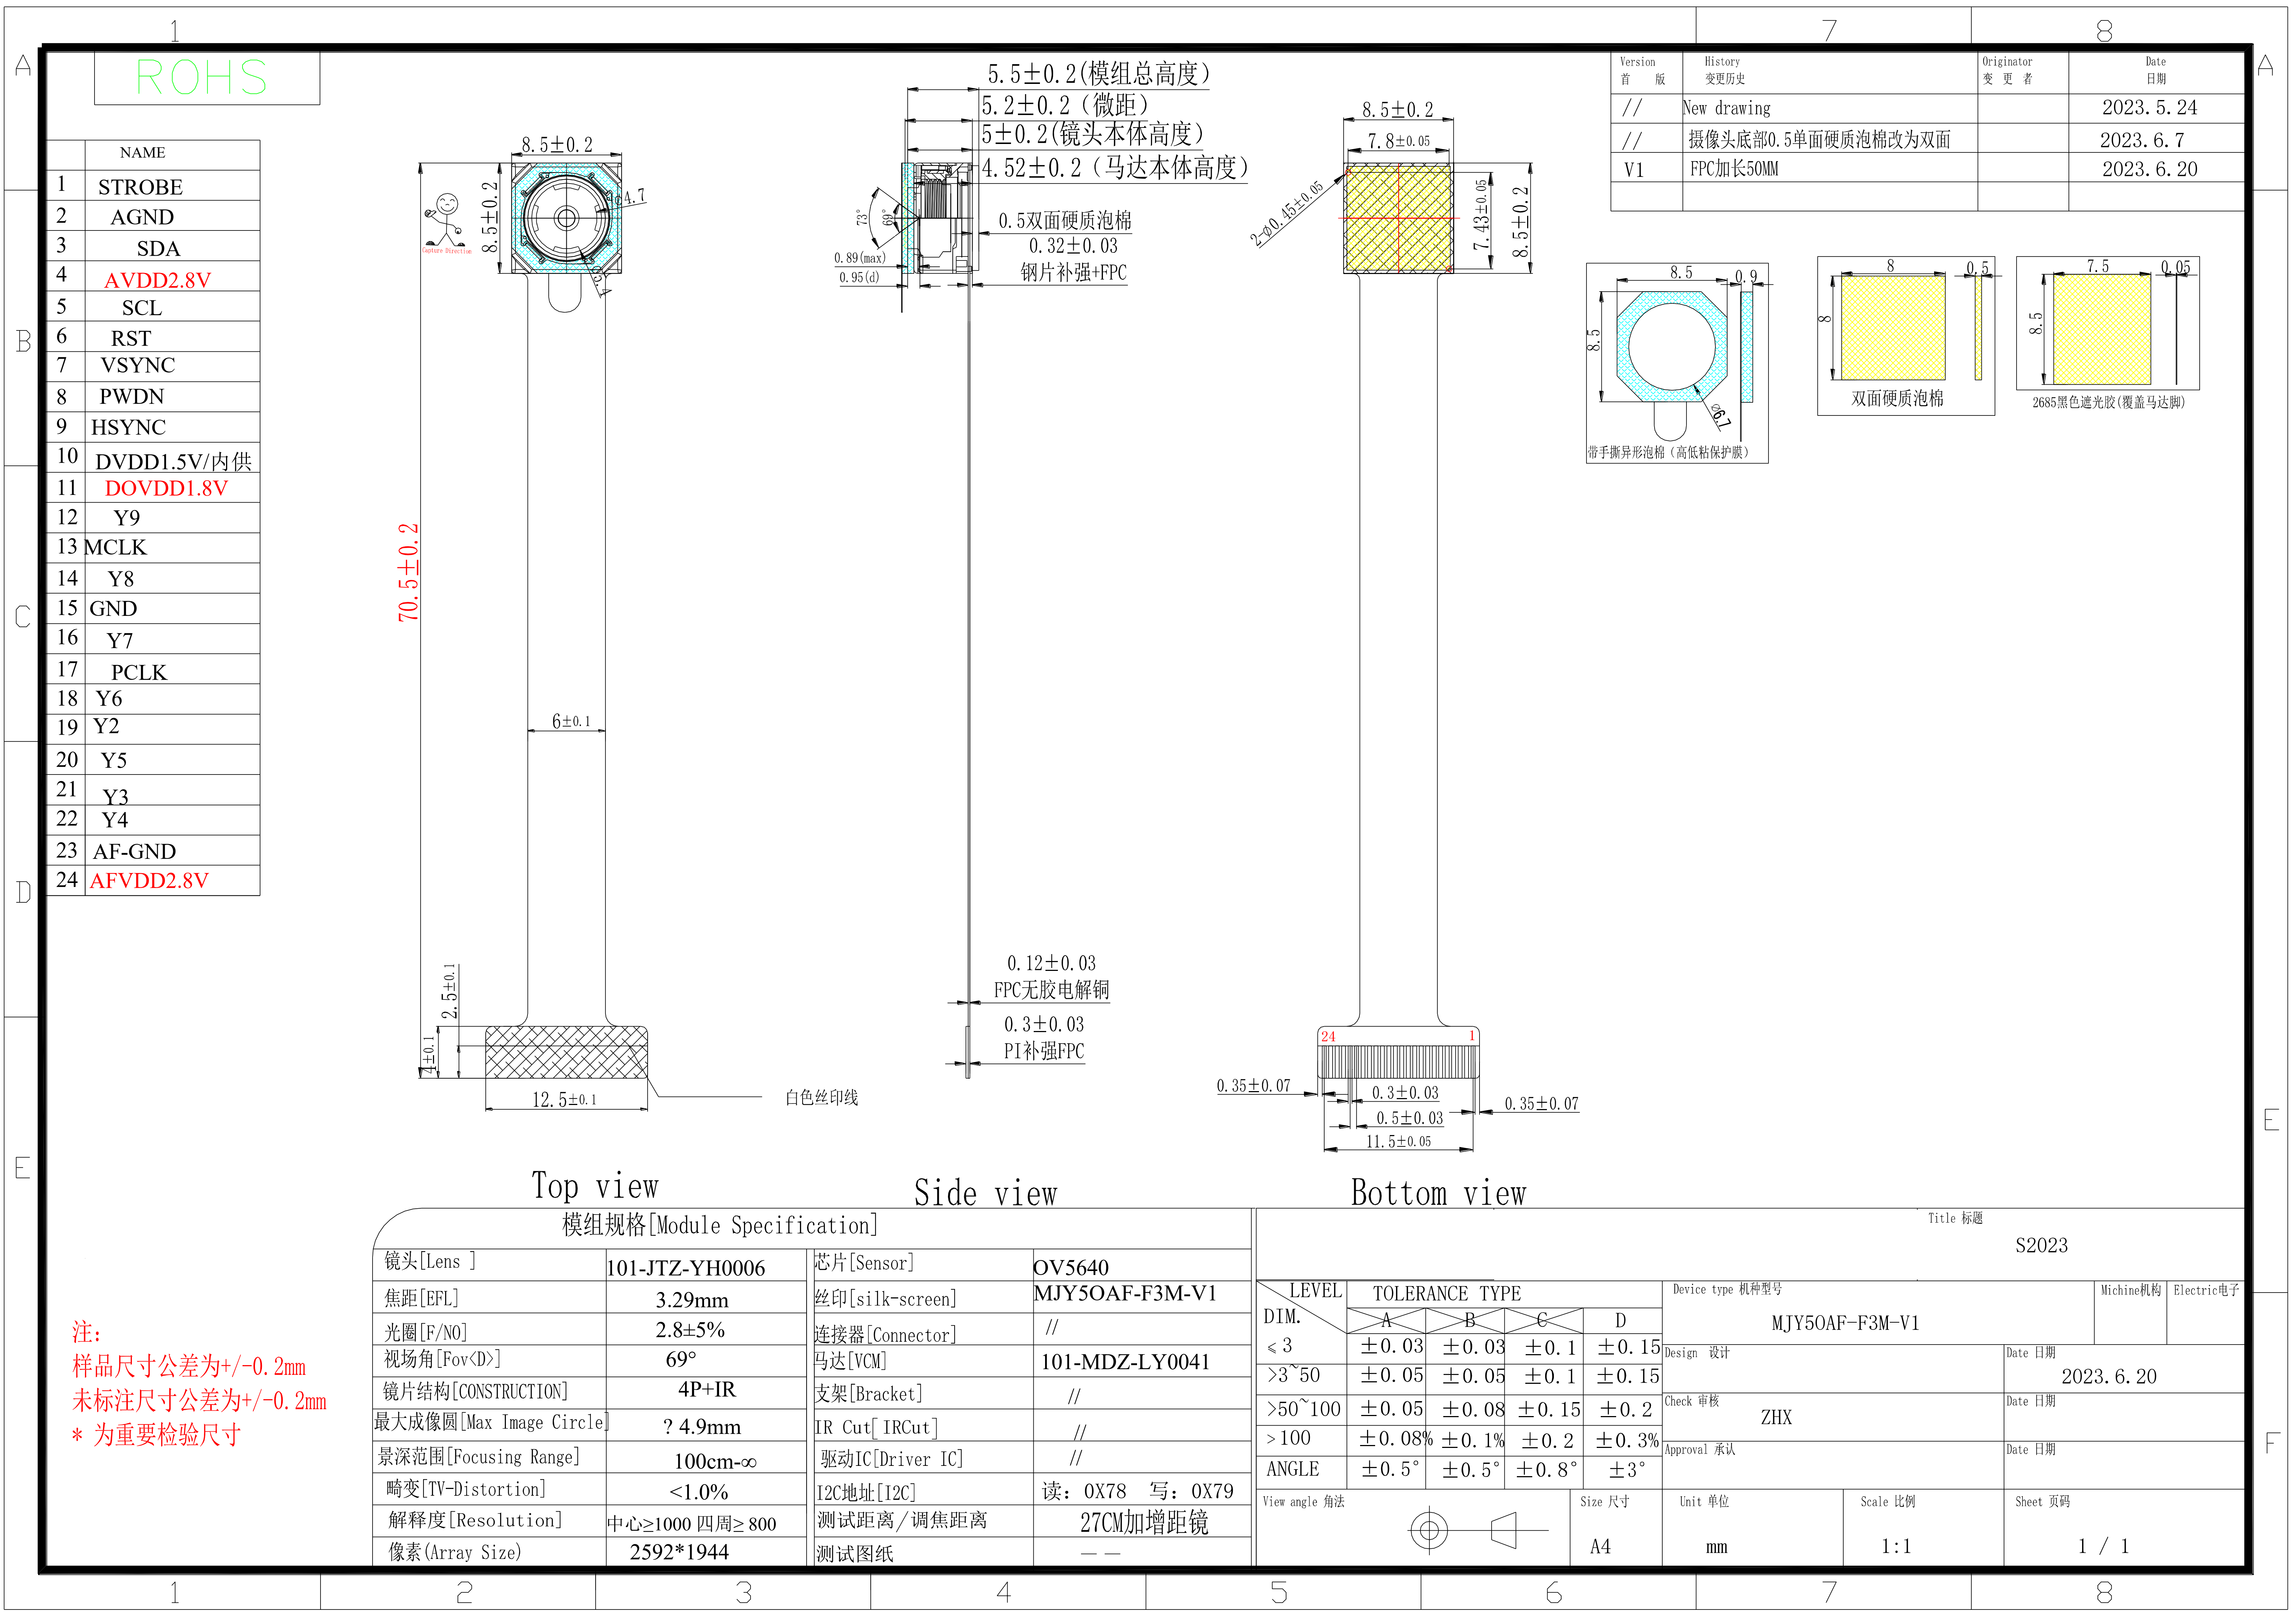
If you need to know the detailed parameter information of ov5640, you can refer to the following chart.
All the programs about cameras in the Wiki are compatible with both OV5640 and OV2640 cameras.
Prepare the microSD card
XIAO ESP32S3 Sense supports microSD cards up to 32GB, so if you are ready to buy a microSD card for XIAO, please refer to this specification. And format the microSD card to FAT32 format before using the microSD card.
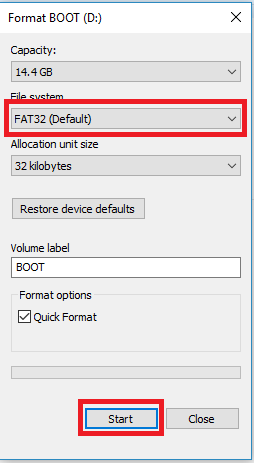
After formatting, you can insert the microSD card into the microSD card slot. Please note the direction of insertion, the side with the gold finger should face inward.

Camera slot circuit design for expansion boards
The XIAO ESP32S3 Sense card slot occupies 14 GPIOs of the ESP32-S3, and the pin details of the occupancy are shown in the table below.
| ESP32-S3 GPIO | Camera | ESP32-S3 GPIO | Camera |
|---|---|---|---|
| GPIO10 | XMCLK | GPIO11 | DVP_Y8 |
| GPIO12 | DVP_Y7 | GPIO13 | DVP_PCLK |
| GPIO14 | DVP_Y6 | GPIO15 | DVP_Y2 |
| GPIO16 | DVP_Y5 | GPIO17 | DVP_Y3 |
| GPIO18 | DVP_Y4 | GPIO38 | DVP_VSYNC |
| GPIO39 | CAM_SCL | GPIO40 | CAM_SDA |
| GPIO47 | DVP_HREF | GPIO48 | DVP_Y9 |
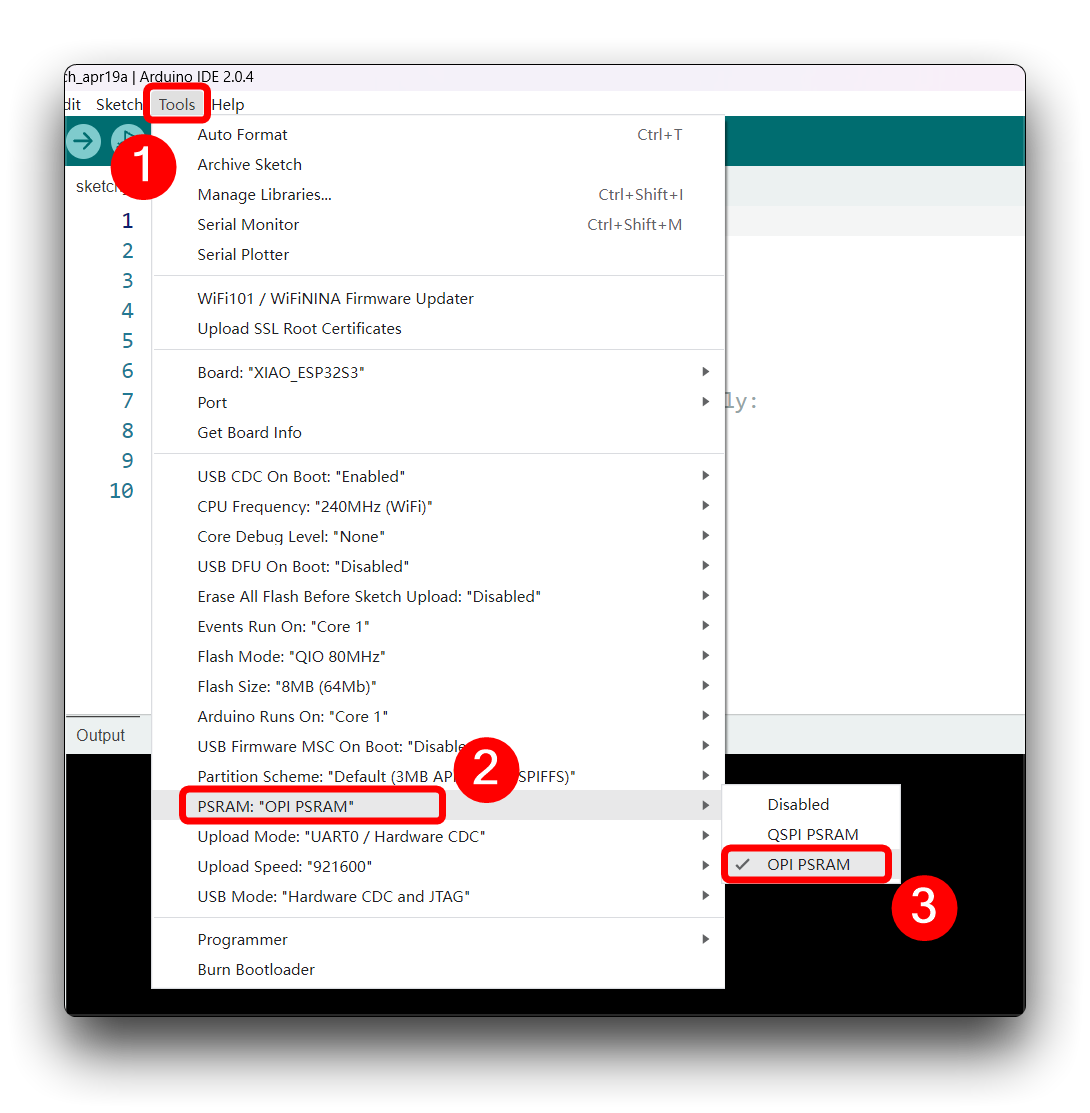
Turn on the PSRAM option
The PSRAM of ESP32 refers to the external PSRAM (Pseudo Static Random Access Memory) on the ESP32 chip, which provides additional memory space to increase the available memory of the ESP32 system. In the ESP32 system, PSRAM has the following main uses:
-
Extending the available RAM: The built-in RAM of ESP32 is limited, especially for some applications that need a lot of memory, such as image processing, audio processing, etc., the built-in RAM may not be enough. By using PSRAM, the available RAM of ESP32 can be extended to meet the needs of these applications.
-
Accelerated memory access: Since PSRAM is external memory, the access speed is slower than the internal RAM, however it can be used as a cache or temporary memory to accelerate memory access and data processing.
-
Storage buffers: For applications that require large buffers, such as network buffers, audio buffers, etc., PSRAM can provide enough storage space to avoid out-of-memory situations.
For the content of this tutorial, you need to turn on the PSRAM function of the Arduino IDE to ensure that the camera works properly.
Camera Library Overview
Before we start, we recommend you to read this chapter to understand the common camera functions. So that you can use these functions to complete your own project development or be able to read the program more easily.
Part I: esp_camera.h
- Configuration structure for camera initialization.
The following is an example of the configuration, just fill in according to the actual pin situation.
static camera_config_t camera_example_config = {
        .pin_pwdn       = PWDN_GPIO_NUM,
        .pin_reset      = RESET_GPIO_NUM,
        .pin_xclk       = XCLK_GPIO_NUM,
        .pin_sccb_sda   = SIOD_GPIO_NUM,
        .pin_sccb_scl   = SIOC_GPIO_NUM,
        .pin_d7         = Y9_GPIO_NUM,
        .pin_d6         = Y8_GPIO_NUM,
        .pin_d5         = Y7_GPIO_NUM,
        .pin_d4         = Y6_GPIO_NUM,
        .pin_d3         = Y5_GPIO_NUM,
        .pin_d2         = Y4_GPIO_NUM,
        .pin_d1         = Y3_GPIO_NUM,
        .pin_d0         = Y2_GPIO_NUM,
        .pin_vsync      = VSYNC_GPIO_NUM,
        .pin_href       = HREF_GPIO_NUM,
        .pin_pclk       = PCLK_GPIO_NUM,

        .xclk_freq_hz   = 20000000, // The clock frequency of the image sensor
        .fb_location = CAMERA_FB_IN_PSRAM; // Set the frame buffer storage location
        .pixel_format   = PIXFORMAT_JPEG, // The pixel format of the image: PIXFORMAT_ + YUV422|GRAYSCALE|RGB565|JPEG
        .frame_size     = FRAMESIZE_UXGA, // The resolution size of the image: FRAMESIZE_ + QVGA|CIF|VGA|SVGA|XGA|SXGA|UXGA
        .jpeg_quality   = 12, // The quality of the JPEG image, ranging from 0 to 63.
        .fb_count       = 2, // The number of frame buffers to use.
        .grab_mode      = CAMERA_GRAB_WHEN_EMPTY //  The image capture mode.
    };
- Initialize the camera driver.
After configuring camera_example_config in the above format, we need to use this function to initialize the camera driver.
esp_err_t esp_camera_init(const camera_config_t* config);
-
Input Parameters: Camera configuration parameters
-
Output: ESP_OK on success
Currently this function can only be called once and there is no way to de-initialize this module.
- Obtain pointer to a frame buffer.
camera_fb_t* esp_camera_fb_get();
Data structure of camera frame buffer:
typedef struct {
    uint8_t * buf;              /*!< Pointer to the pixel data */
    size_t len;                 /*!< Length of the buffer in bytes */
    size_t width;               /*!< Width of the buffer in pixels */
    size_t height;              /*!< Height of the buffer in pixels */
    pixformat_t format;         /*!< Format of the pixel data */
    struct timeval timestamp;   /*!< Timestamp since boot of the first DMA buffer of the frame */
} camera_fb_t;
- Return the frame buffer to be reused again.
void esp_camera_fb_return(camera_fb_t * fb);
- Input Parameters: Pointer to the frame buffer
- Get a pointer to the image sensor control structure.
sensor_t * esp_camera_sensor_get();
- Output: pointer to the sensor
- Save camera settings to non-volatile-storage (NVS).
esp_err_t esp_camera_save_to_nvs(const char *key);
- Input Parameters: A unique nvs key name for the camera settings
- Load camera settings from non-volatile-storage (NVS).
esp_err_t esp_camera_load_from_nvs(const char *key);
- Input Parameters: A unique nvs key name for the camera settings
Part II: img_converters.h
- Convert image buffer to JPEG.
bool fmt2jpg_cb(uint8_t *src, size_t src_len, uint16_t width, uint16_t height, pixformat_t format, uint8_t quality, jpg_out_cb cb, void * arg);
-
Input Parameters:
- src: Source buffer in RGB565, RGB888, YUYV or GRAYSCALE format
- src_len: Length in bytes of the source buffer
- width: Width in pixels of the source image
- height: Height in pixels of the source image
- format: Format of the source image
- quality: JPEG quality of the resulting image
- cp: Callback to be called to write the bytes of the output JPEG
- arg: Pointer to be passed to the callback
-
Output: true on success
- Convert camera frame buffer to JPEG.
bool frame2jpg_cb(camera_fb_t * fb, uint8_t quality, jpg_out_cb cb, void * arg);
-
Input Parameters:
- fb: Source camera frame buffer
- quality: JPEG quality of the resulting image
- cp: Callback to be called to write the bytes of the output JPEG
- arg: Pointer to be passed to the callback
-
Output: true on success
- Convert image buffer to JPEG buffer.
bool fmt2jpg(uint8_t *src, size_t src_len, uint16_t width, uint16_t height, pixformat_t format, uint8_t quality, uint8_t ** out, size_t * out_len);
-
Input Parameters:
- src: Source buffer in RGB565, RGB888, YUYV or GRAYSCALE format
- src_len: Length in bytes of the source buffer
- width: Width in pixels of the source image
- height: Height in pixels of the source image
- format: Format of the source image
- quality: JPEG quality of the resulting image
- out: Pointer to be populated with the address of the resulting buffer. You MUST free the pointer once you are done with it.
- out_len: Pointer to be populated with the length of the output buffer
-
Output: true on success
- Convert camera frame buffer to JPEG buffer.
bool frame2jpg(camera_fb_t * fb, uint8_t quality, uint8_t ** out, size_t * out_len);
-
Input Parameters:
- fb: Source camera frame buffer
- quality: JPEG quality of the resulting image
- out: Pointer to be populated with the address of the resulting buffer
- out_len: Pointer to be populated with the length of the output buffer
-
Output: true on success
- Convert image buffer to BMP buffer.
bool fmt2bmp(uint8_t *src, size_t src_len, uint16_t width, uint16_t height, pixformat_t format, uint8_t ** out, size_t * out_len);
-
Input Parameters:
- src: Source buffer in RGB565, RGB888, YUYV or GRAYSCALE format
- src_len: Length in bytes of the source buffer
- width: Width in pixels of the source image
- height: Height in pixels of the source image
- format: Format of the source image
- quality: JPEG quality of the resulting image
- out: Pointer to be populated with the address of the resulting buffer.
- out_len: Pointer to be populated with the length of the output buffer
-
Output: true on success
- Convert camera frame buffer to BMP buffer.
bool frame2bmp(camera_fb_t * fb, uint8_t ** out, size_t * out_len);
-
Input Parameters:
- fb: Source camera frame buffer
- quality: JPEG quality of the resulting image
- cp: Callback to be called to write the bytes of the output JPEG
- arg: Pointer to be passed to the callback
-
Output: true on success
Part III: app_httpd.cpp
This part of the library introduction is based on the Create a video preservation terminal -- Based WebServer section. This library is mainly used to perform image acquisition and face recognition functions for the web server. It is not directly included in the onboard package of ESP.
- Face recognition function.
static int run_face_recognition(fb_data_t *fb, std::list<dl::detect::result_t> *results)
- Input Parameters:
- fb: a pointer to a struct representing a frame buffer containing image data.
- results: a pointer to a list of detected face results.
- Handles HTTP requests for BMP image files.
static esp_err_t bmp_handler(httpd_req_t *req)
- Input Parameters: a pointer to a struct representing the HTTP request.
- Encodes JPEG image data in a streaming fashion.
static size_t jpg_encode_stream(void *arg, size_t index, const void *data, size_t len)
- Input Parameters:
- arg: a pointer to a user-defined argument that is passed to the function.
- index: an index value indicating the current position within the image data.
- data: a pointer to a buffer containing the image data to be encoded.
- len: the length of the data buffer.
- Handles HTTP requests for capturing and streaming images from camera.
static esp_err_t capture_handler(httpd_req_t *req)
- Input Parameters: a pointer to a struct representing the HTTP request.
- Handles HTTP requests for streaming video from a camera.
static esp_err_t stream_handler(httpd_req_t *req)
- Input Parameters: a pointer to a struct representing the HTTP request.
- Initializes and starts a camera server that captures and streams video over HTTP.
void startCameraServer()
Taking photos with the camera
Next we start with the most basic usage of the camera, for example, we will first use the camera to complete the image acquisition. The first project we will use the microSD card, the main task of this program is to get the camera footage every minute and then save the footage to the microSD card.
Before you start, do what I did and install the microSD card and the camera.

You can find the complete program code and the required dependency files below this link.
Here is the Arduino program for this project.
#include "esp_camera.h"
#include "FS.h"
#include "SD.h"
#include "SPI.h"

#define CAMERA_MODEL_XIAO_ESP32S3 // Has PSRAM

#include "camera_pins.h"

unsigned long lastCaptureTime = 0; // Last shooting time
int imageCount = 1;                // File Counter
bool camera_sign = false;          // Check camera status
bool sd_sign = false;              // Check sd status

// Save pictures to SD card
void photo_save(const char * fileName) {
  // Take a photo
  camera_fb_t *fb = esp_camera_fb_get();
  if (!fb) {
    Serial.println("Failed to get camera frame buffer");
    return;
  }
  // Save photo to file
  writeFile(SD, fileName, fb->buf, fb->len);

  // Release image buffer
  esp_camera_fb_return(fb);

  Serial.println("Photo saved to file");
}

// SD card write file
void writeFile(fs::FS &fs, const char * path, uint8_t * data, size_t len){
    Serial.printf("Writing file: %s\n", path);

    File file = fs.open(path, FILE_WRITE);
    if(!file){
        Serial.println("Failed to open file for writing");
        return;
    }
    if(file.write(data, len) == len){
        Serial.println("File written");
    } else {
        Serial.println("Write failed");
    }
    file.close();
}

void setup() {
  Serial.begin(115200);
  while(!Serial); // When the serial monitor is turned on, the program starts to execute

  camera_config_t config;
  config.ledc_channel = LEDC_CHANNEL_0;
  config.ledc_timer = LEDC_TIMER_0;
  config.pin_d0 = Y2_GPIO_NUM;
  config.pin_d1 = Y3_GPIO_NUM;
  config.pin_d2 = Y4_GPIO_NUM;
  config.pin_d3 = Y5_GPIO_NUM;
  config.pin_d4 = Y6_GPIO_NUM;
  config.pin_d5 = Y7_GPIO_NUM;
  config.pin_d6 = Y8_GPIO_NUM;
  config.pin_d7 = Y9_GPIO_NUM;
  config.pin_xclk = XCLK_GPIO_NUM;
  config.pin_pclk = PCLK_GPIO_NUM;
  config.pin_vsync = VSYNC_GPIO_NUM;
  config.pin_href = HREF_GPIO_NUM;
  config.pin_sscb_sda = SIOD_GPIO_NUM;
  config.pin_sscb_scl = SIOC_GPIO_NUM;
  config.pin_pwdn = PWDN_GPIO_NUM;
  config.pin_reset = RESET_GPIO_NUM;
  config.xclk_freq_hz = 20000000;
  config.frame_size = FRAMESIZE_UXGA;
  config.pixel_format = PIXFORMAT_JPEG; // for streaming
  config.grab_mode = CAMERA_GRAB_WHEN_EMPTY;
  config.fb_location = CAMERA_FB_IN_PSRAM;
  config.jpeg_quality = 12;
  config.fb_count = 1;

  // if PSRAM IC present, init with UXGA resolution and higher JPEG quality
  //                      for larger pre-allocated frame buffer.
  if(config.pixel_format == PIXFORMAT_JPEG){
    if(psramFound()){
      config.jpeg_quality = 10;
      config.fb_count = 2;
      config.grab_mode = CAMERA_GRAB_LATEST;
    } else {
      // Limit the frame size when PSRAM is not available
      config.frame_size = FRAMESIZE_SVGA;
      config.fb_location = CAMERA_FB_IN_DRAM;
    }
  } else {
    // Best option for face detection/recognition
    config.frame_size = FRAMESIZE_240X240;
#if CONFIG_IDF_TARGET_ESP32S3
    config.fb_count = 2;
#endif
  }

  // camera init
  esp_err_t err = esp_camera_init(&config);
  if (err != ESP_OK) {
    Serial.printf("Camera init failed with error 0x%x", err);
    return;
  }

  camera_sign = true; // Camera initialization check passes

  // Initialize SD card
  if(!SD.begin(21)){
    Serial.println("Card Mount Failed");
    return;
  }
  uint8_t cardType = SD.cardType();

  // Determine if the type of SD card is available
  if(cardType == CARD_NONE){
    Serial.println("No SD card attached");
    return;
  }

  Serial.print("SD Card Type: ");
  if(cardType == CARD_MMC){
    Serial.println("MMC");
  } else if(cardType == CARD_SD){
    Serial.println("SDSC");
  } else if(cardType == CARD_SDHC){
    Serial.println("SDHC");
  } else {
    Serial.println("UNKNOWN");
  }

  sd_sign = true; // sd initialization check passes

  Serial.println("Photos will begin in one minute, please be ready.");
}

void loop() {
  // Camera & SD available, start taking pictures
  if(camera_sign && sd_sign){
    // Get the current time
    unsigned long now = millis();

    //If it has been more than 1 minute since the last shot, take a picture and save it to the SD card
    if ((now - lastCaptureTime) >= 60000) {
      char filename[32];
      sprintf(filename, "/image%d.jpg", imageCount);
      photo_save(filename);
      Serial.printf("Saved picture:%s\n", filename);
      Serial.println("Photos will begin in one minute, please be ready.");
      imageCount++;
      lastCaptureTime = now;
    }
  }
}
The compilation and upload of this program requires two other dependencies, please go to GitHub and download them in full.
Please upload the program for XIAO ESP32S3, after the program is uploaded successfully, please turn on the serial monitor, adjust the camera to face the object you want to shoot, wait for one minute, the shot will be saved to the SD card. Next, XIAO will take a photo every minute.

Remove the microSD card and with the help of the card reader, you can see the photos saved inside the card.
Program annotation
The program starts with the camera and SD card libraries we need to use, and the import of some pin dependency files we defined for the XIAO ESP32S3.
Then for easy reading, we define two functions one after another, one is the function photo_save() that saves the captured image to the SD card, and the other is the function writeFile() that writes the file.
// Save pictures to SD card
void photo_save(const char * fileName) {
  // Take a photo
  camera_fb_t *fb = esp_camera_fb_get();
  if (!fb) {
    Serial.println("Failed to get camera frame buffer");
    return;
  }
  // Save photo to file
  writeFile(SD, fileName, fb->buf, fb->len);

  // Release image buffer
  esp_camera_fb_return(fb);

  Serial.println("Photo saved to file");
}
In the function that saves the image to the microSD card, two main tasks are accomplished. The first one is the acquisition of the picture and the second one is the call to the function that writes the file.
Getting the image can be done with esp_camera_fb_get(), the image information will be saved in the pointer fb, and then we can write the buf of fb to the SD card.
In the Setup() function, a large segment of the program is configuring the camera pins and camera initialization, we can just apply it directly by default. If you have requirements for the camera's pixels or quality, you can adjust the values inside according to the functions described in the Camera Library Overview chapter.
The last thing to do in the loop() function is to control the photos to be taken every minute and follow the incremental number as the file name suffix of the taken photos.
if(camera_sign && sd_sign){
    // Get the current time
    unsigned long now = millis();

    //If it has been more than 1 minute since the last shot, take a picture and save it to the SD card
    if ((now - lastCaptureTime) >= 60000) {
      char filename[32];
      sprintf(filename, "/image%d.jpg", imageCount);
      photo_save(filename);
      Serial.printf("Saved picture:%s\n", filename);
      Serial.println("Photos will begin in one minute, please be ready.");
      imageCount++;
      lastCaptureTime = now;
    }
  }
Before executing the loop(), we configure two flag checks camera_sign and sd_sign. This ensures that the task of taking and saving pictures must be run after the camera and SD card checks have been successfully executed in Setup().
Project I: Making a handheld camera
Next, we use the above theoretical knowledge to create a super small photo artifact. The end result of this project is that the live camera feed is displayed on the Seeed Studio Round Display for XIAO, and when you lock the object you want to photograph, touch the screen and take a picture to record on the microSD card.
Preliminary Preparation
Before starting this project, you will need to prepare the following hardware in advance.
| Seeed Studio XIAO ESP32S3 Sense | Seeed Studio Round Display for XIAO |
|---|---|
|  |
Since this project will use Round Display for XIAO, please read the contents of the Wiki environment configuration of the display expansion board, install the necessary libraries and configure the TFT environment before you run the routines of this project.
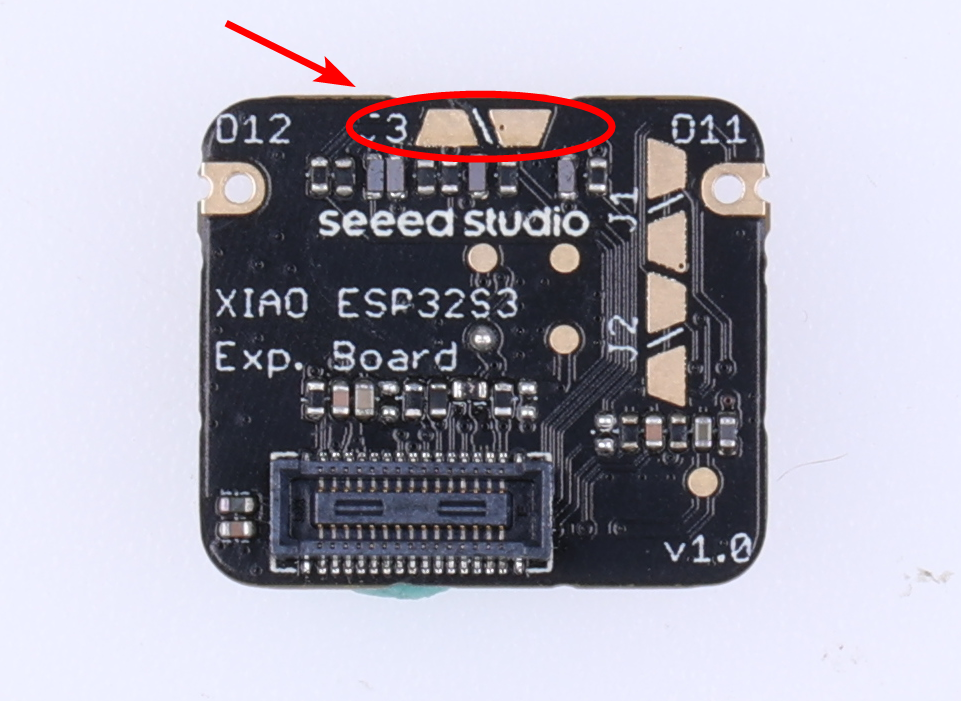
Since the XIAO EPS32S3 Sense is designed with three pull-up resistors R4~R6 connected to the SD card slot, and the round display also has pull-up resistors, the SD card cannot be read when both are used at the same time. To solve this problem, we need to cut off J3 on the XIAO ESP32S3 Sense expansion board.
However, we need to thank engineer Mjrovai for the new method of using the microSD card slot on the XIAO ESP32S3 Sense at the same time, which is also possible at software level. We can refer to his methods and procedures.
After disconnecting J3, the SD card slot on XIAO ESP32S3 Sense will not work properly, so you need to insert a microSD card into the SD card slot on the Round Display.
Next, please install the microSD card, XIAO ESP32S3 Sense and Round Display in order.
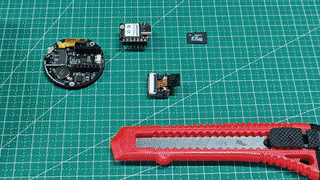
We recommend that you remove the camera module first to avoid scratching the camera when you cut the J3 connection with the blade.
Specific operation
You can find the complete program code and the required dependency files below this link.
Here is the Arduino program for this project.
#include <Arduino.h>
#include <TFT_eSPI.h>
#include <SPI.h>
#include "esp_camera.h"
#include "FS.h"
#include "SD.h"
#include "SPI.h"

#define CAMERA_MODEL_XIAO_ESP32S3 // Has PSRAM
#define TOUCH_INT D7

#include "camera_pins.h"

// Width and height of round display
const int camera_width = 240;
const int camera_height = 240;

// File Counter
int imageCount = 1;
bool camera_sign = false;          // Check camera status
bool sd_sign = false;              // Check sd status

TFT_eSPI tft = TFT_eSPI();

// SD card write file
void writeFile(fs::FS &fs, const char * path, uint8_t * data, size_t len){
    Serial.printf("Writing file: %s\n", path);

    File file = fs.open(path, FILE_WRITE);
    if(!file){
        Serial.println("Failed to open file for writing");
        return;
    }
    if(file.write(data, len) == len){
        Serial.println("File written");
    } else {
        Serial.println("Write failed");
    }
    file.close();
}

bool display_is_pressed(void)
{
    if(digitalRead(TOUCH_INT) != LOW) {
        delay(3);
        if(digitalRead(TOUCH_INT) != LOW)
        return false;
    }
    return true;
}

void setup() {
  // put your setup code here, to run once:
  Serial.begin(115200);
//  while(!Serial);

  // Camera pinout
  camera_config_t config;
  config.ledc_channel = LEDC_CHANNEL_0;
  config.ledc_timer = LEDC_TIMER_0;
  config.pin_d0 = Y2_GPIO_NUM;
  config.pin_d1 = Y3_GPIO_NUM;
  config.pin_d2 = Y4_GPIO_NUM;
  config.pin_d3 = Y5_GPIO_NUM;
  config.pin_d4 = Y6_GPIO_NUM;
  config.pin_d5 = Y7_GPIO_NUM;
  config.pin_d6 = Y8_GPIO_NUM;
  config.pin_d7 = Y9_GPIO_NUM;
  config.pin_xclk = XCLK_GPIO_NUM;
  config.pin_pclk = PCLK_GPIO_NUM;
  config.pin_vsync = VSYNC_GPIO_NUM;
  config.pin_href = HREF_GPIO_NUM;
  config.pin_sscb_sda = SIOD_GPIO_NUM;
  config.pin_sscb_scl = SIOC_GPIO_NUM;
  config.pin_pwdn = PWDN_GPIO_NUM;
  config.pin_reset = RESET_GPIO_NUM;
  config.xclk_freq_hz = 20000000;
//  config.frame_size = FRAMESIZE_UXGA;
  config.frame_size = FRAMESIZE_240X240;
//  config.pixel_format = PIXFORMAT_JPEG; // for streaming
  config.pixel_format = PIXFORMAT_RGB565;
  config.grab_mode = CAMERA_GRAB_WHEN_EMPTY;
  config.fb_location = CAMERA_FB_IN_PSRAM;
  config.jpeg_quality = 12;
  config.fb_count = 1;

  // if PSRAM IC present, init with UXGA resolution and higher JPEG quality
  //                      for larger pre-allocated frame buffer.
  if(config.pixel_format == PIXFORMAT_JPEG){
    if(psramFound()){
      config.jpeg_quality = 10;
      config.fb_count = 2;
      config.grab_mode = CAMERA_GRAB_LATEST;
    } else {
      // Limit the frame size when PSRAM is not available
      config.frame_size = FRAMESIZE_SVGA;
      config.fb_location = CAMERA_FB_IN_DRAM;
    }
  } else {
    // Best option for face detection/recognition
    config.frame_size = FRAMESIZE_240X240;
#if CONFIG_IDF_TARGET_ESP32S3
    config.fb_count = 2;
#endif
  }

  // camera init
  esp_err_t err = esp_camera_init(&config);
  if (err != ESP_OK) {
    Serial.printf("Camera init failed with error 0x%x", err);
    return;
  }
  Serial.println("Camera ready");
  camera_sign = true; // Camera initialization check passes

  // Display initialization
  tft.init();
  tft.setRotation(1);
  tft.fillScreen(TFT_WHITE);

  // Initialize SD card
  if(!SD.begin(D2)){
    Serial.println("Card Mount Failed");
    return;
  }
  uint8_t cardType = SD.cardType();

  // Determine if the type of SD card is available
  if(cardType == CARD_NONE){
    Serial.println("No SD card attached");
    return;
  }

  Serial.print("SD Card Type: ");
  if(cardType == CARD_MMC){
    Serial.println("MMC");
  } else if(cardType == CARD_SD){
    Serial.println("SDSC");
  } else if(cardType == CARD_SDHC){
    Serial.println("SDHC");
  } else {
    Serial.println("UNKNOWN");
  }

  sd_sign = true; // sd initialization check passes

}

void loop() {
  if( sd_sign && camera_sign){

    // Take a photo
    camera_fb_t *fb = esp_camera_fb_get();
    if (!fb) {
      Serial.println("Failed to get camera frame buffer");
      return;
    }

    if(display_is_pressed()){
      Serial.println("display is touched");
      char filename[32];
      sprintf(filename, "/image%d.jpg", imageCount);
      // Save photo to file
      writeFile(SD, filename, fb->buf, fb->len);
      Serial.printf("Saved picture:%s\n", filename);
      imageCount++;
    }

    // Decode JPEG images
    uint8_t* buf = fb->buf;
    uint32_t len = fb->len;
    tft.startWrite();
    tft.setAddrWindow(0, 0, camera_width, camera_height);
    tft.pushColors(buf, len);
    tft.endWrite();

    // Release image buffer
    esp_camera_fb_return(fb);

    delay(10);
  }
}
Upload the program to XIAO ESP32S3 Sense, if the screen does not light up after successful upload, you may need to click the Reset button on XIAO, then you will see the monitoring screen displayed on the Round Display in real time. Click anywhere on the screen, the image will be recorded and saved in the microSD card.
Program annotation
The configuration of the camera and the microSD card are the previous contents, so we will not repeat them here. For the use of microSD card, you can refer to the XIAO ESP32S3 Sense file system Wiki to learn how to use it.
// Take a photo
camera_fb_t *fb = esp_camera_fb_get();
if (!fb) {
  Serial.println("Failed to get camera frame buffer");
  return;
}

...

// Release image buffer
esp_camera_fb_return(fb);

delay(10);
The above program, which is the basic block of code for calling the camera, is divided into three parts: screen capture, exception exit, and releasing the photo buffer.
if(display_is_pressed()){
  Serial.println("display is touched");
  char filename[32];
  sprintf(filename, "/image%d.jpg", imageCount);
  // Save photo to file
  writeFile(SD, filename, fb->buf, fb->len);
  Serial.printf("Saved picture:%s\n", filename);
  imageCount++;
}
The above program is used to checks if the screen is touched. If it is, the code saves the captured image to a file on an microSD card.
// Decode JPEG images
uint8_t* buf = fb->buf;
uint32_t len = fb->len;
tft.startWrite();
tft.setAddrWindow(0, 0, camera_width, camera_height);
tft.pushColors(buf, len);
tft.endWrite();
This part of the code displays the captured image on a screen. It first retrieves the image buffer and its length from the camera_fb_t structure. Then, it sets up the screen to receive the image data and displays the image on the screen using the pushColors() function.
Record short videos and save to microSD card
We do not recommend video encoding export on top of MCU because the current supported encoding library resources are too small and the operation is very complicated and tedious.
This example does not involve video encoding, and the exported video is an MJPG composite of AVI per frame, so the video recording may not be particularly good and satisfying. The purpose of this tutorial is to provide you with simple methods and ideas for recording short videos, and we welcome partners who have better solutions to submit PR to us.
In the previous chapters, we mastered how to use the camera to capture images. We know that a single image is stitched together to make a moving video picture. Based on this theory, our project in this chapter will guide you how to write a program to record a 10-second video every 1 minute and save it in a microSD card.
You can find the complete program code and the required dependency files below this link.
Here is the Arduino program for this project.
#include "esp_camera.h"
#include "FS.h"
#include "SD.h"
#include "SPI.h"
#include "esp_timer.h"

#define CAMERA_MODEL_XIAO_ESP32S3 // Has PSRAM

#include "camera_pins.h"

const int SD_PIN_CS = 21;

File videoFile;
bool camera_sign = false;
bool sd_sign = false;
unsigned long lastCaptureTime = 0;
unsigned long captureDuration = 10000; // 10 seconds
int imageCount = 0;

void setup() {
  Serial.begin(115200);
  while(!Serial);

  // Initialize the camera
  camera_config_t config;
  config.ledc_channel = LEDC_CHANNEL_0;
  config.ledc_timer = LEDC_TIMER_0;
  config.pin_d0 = Y2_GPIO_NUM;
  config.pin_d1 = Y3_GPIO_NUM;
  config.pin_d2 = Y4_GPIO_NUM;
  config.pin_d3 = Y5_GPIO_NUM;
  config.pin_d4 = Y6_GPIO_NUM;
  config.pin_d5 = Y7_GPIO_NUM;
  config.pin_d6 = Y8_GPIO_NUM;
  config.pin_d7 = Y9_GPIO_NUM;
  config.pin_xclk = XCLK_GPIO_NUM;
  config.pin_pclk = PCLK_GPIO_NUM;
  config.pin_vsync = VSYNC_GPIO_NUM;
  config.pin_href = HREF_GPIO_NUM;
  config.pin_sscb_sda = SIOD_GPIO_NUM;
  config.pin_sscb_scl = SIOC_GPIO_NUM;
  config.pin_pwdn = PWDN_GPIO_NUM;
  config.pin_reset = RESET_GPIO_NUM;
  config.xclk_freq_hz = 20000000;
  config.pixel_format = PIXFORMAT_JPEG;
  config.frame_size = FRAMESIZE_SVGA;
  config.grab_mode = CAMERA_GRAB_WHEN_EMPTY;
  config.fb_location = CAMERA_FB_IN_PSRAM;
  config.jpeg_quality = 12;
  config.fb_count = 1;

  // camera init
  esp_err_t err = esp_camera_init(&config);
  if (err != ESP_OK) {
    Serial.printf("Camera init failed with error 0x%x", err);
    return;
  }

  camera_sign = true;

  // Initialize the SD card
  if (!SD.begin(SD_PIN_CS)) {
    Serial.println("SD card initialization failed!");
    return;
  }

  uint8_t cardType = SD.cardType();

  // Determine if the type of SD card is available
  if(cardType == CARD_NONE){
    Serial.println("No SD card attached");
    return;
  }

  Serial.print("SD Card Type: ");
  if(cardType == CARD_MMC){
    Serial.println("MMC");
  } else if(cardType == CARD_SD){
    Serial.println("SDSC");
  } else if(cardType == CARD_SDHC){
    Serial.println("SDHC");
  } else {
    Serial.println("UNKNOWN");
  }

  sd_sign = true;

  Serial.println("Video will begin in one minute, please be ready.");
}

void loop() {
  // Camera & SD available, start taking video
  if (camera_sign && sd_sign) {
    // Get the current time
    unsigned long now = millis();

    //If it has been more than 1 minute since the last video capture, start capturing a new video
    if ((now - lastCaptureTime) >= 60000) {
      char filename[32];
      sprintf(filename, "/video%d.avi", imageCount);
      videoFile = SD.open(filename, FILE_WRITE);
      if (!videoFile) {
        Serial.println("Error opening video file!");
        return;
      }
      Serial.printf("Recording video:%s\n", filename);
      lastCaptureTime = now;

      // Start capturing video frames
      while ((millis() - lastCaptureTime) < captureDuration) {
        camera_fb_t *fb = esp_camera_fb_get();
        if (!fb) {
          Serial.println("Error getting framebuffer!");
          break;
        }
        videoFile.write(fb->buf, fb->len);
        esp_camera_fb_return(fb);
      }

      // Close the video file
      videoFile.close();
      Serial.printf("Video saved: %s\n", filename);
      imageCount++;

      Serial.println("Video will begin in one minute, please be ready.");

      // Wait for the remaining time of the minute
      delay(60000 - (millis() - lastCaptureTime));
    }
  }
}
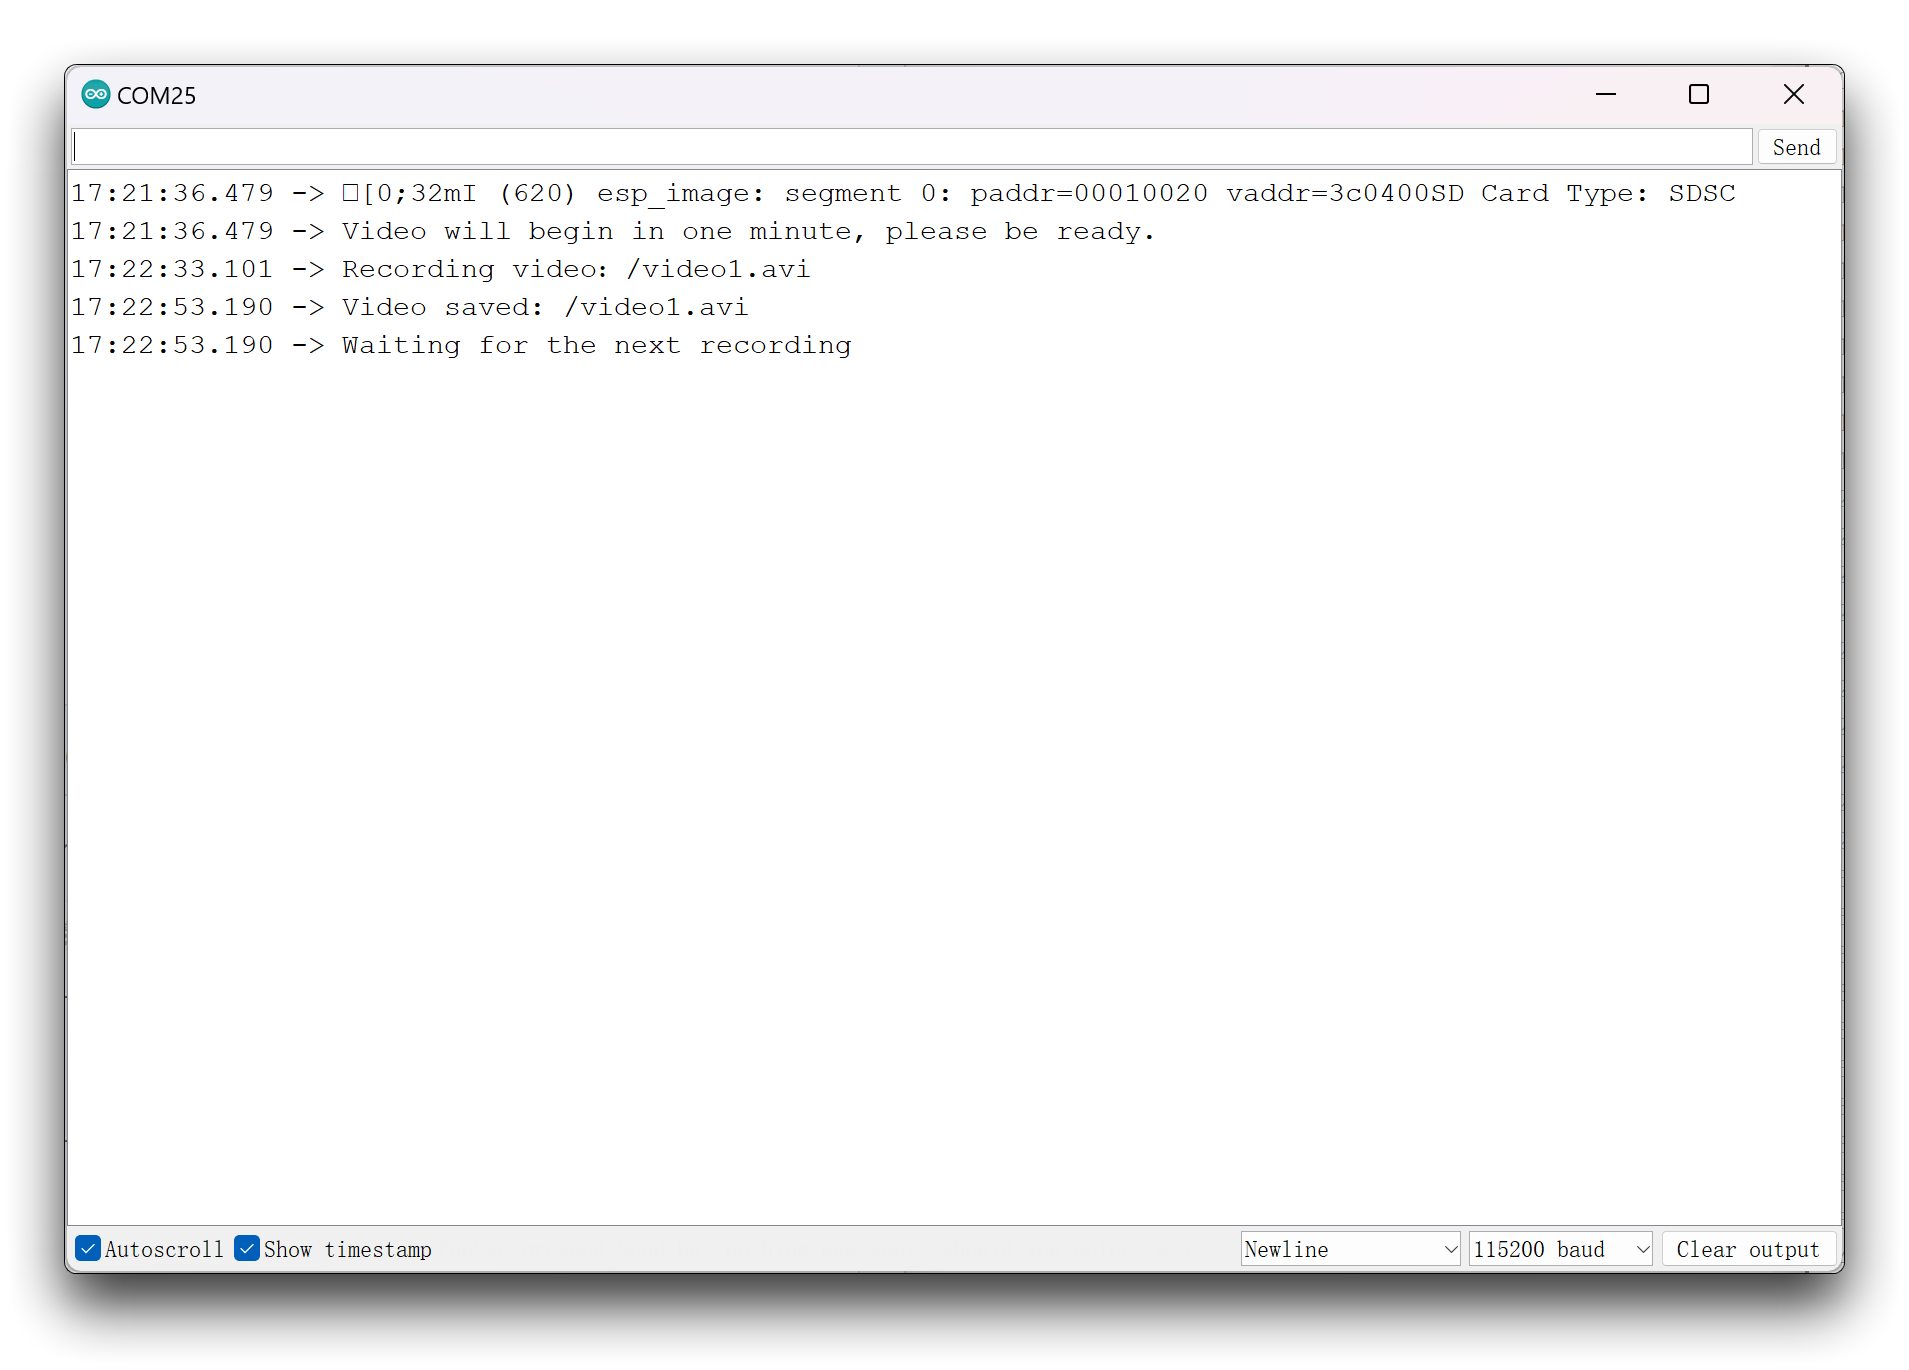
Upload the code to XIAO ESP32S3 Sense, turn on the serial monitor, at this time please adjust the camera position to the object you want to record, after one minute, the orange LED on XIAO will start flashing and the recording will start and save to the microSD card.
Since the program does not involve settings such as encoding and frame rate, the video may open for only one second if there is no change in each frame of the recorded footage.
Program annotation
The core and key in the procedure of recording video is to keep acquiring the photo stream for a continuous period of 10 seconds and write it to the microSD card continuously.
// Start capturing video frames
while ((millis() - lastCaptureTime) < captureDuration) {
  camera_fb_t *fb = esp_camera_fb_get();
  if (!fb) {
    Serial.println("Error getting framebuffer!");
    break;
  }
  videoFile.write(fb->buf, fb->len);
  esp_camera_fb_return(fb);
}
On top of that, we nest a layer of 1-minute wait judgments on the outside to ensure that the video starts every 1 minute.
//If it has been more than 1 minute since the last video capture, start capturing a new video
if ((now - lastCaptureTime) >= 60000) {

  ...

  delay(60000 - (millis() - lastCaptureTime));
}
Project II: Video Streaming
At the end of this tutorial, let's show a video streaming project. This project allows you to see a live video stream on a web page created by XIAO ESP32S3 Sense, and you can change the display of the screen by setting some parameters.
You can find the complete program code and the required dependency files below this link.
If you are using the esp32 boards package with 2.0.x version on Arduino. Please download with:
If you are using the esp32 boards package with 3.0.x version on Arduino. Please download with:
Here is the Arduino program for this project.
#include "esp_camera.h"
#include <WiFi.h>

#define CAMERA_MODEL_XIAO_ESP32S3 // Has PSRAM

#include "camera_pins.h"

// ===========================
// Enter your WiFi credentials
// ===========================
const char* ssid = "**********";
const char* password = "**********";

void startCameraServer();
void setupLedFlash(int pin);

void setup() {
  Serial.begin(115200);
  while(!Serial);
  Serial.setDebugOutput(true);
  Serial.println();

  camera_config_t config;
  config.ledc_channel = LEDC_CHANNEL_0;
  config.ledc_timer = LEDC_TIMER_0;
  config.pin_d0 = Y2_GPIO_NUM;
  config.pin_d1 = Y3_GPIO_NUM;
  config.pin_d2 = Y4_GPIO_NUM;
  config.pin_d3 = Y5_GPIO_NUM;
  config.pin_d4 = Y6_GPIO_NUM;
  config.pin_d5 = Y7_GPIO_NUM;
  config.pin_d6 = Y8_GPIO_NUM;
  config.pin_d7 = Y9_GPIO_NUM;
  config.pin_xclk = XCLK_GPIO_NUM;
  config.pin_pclk = PCLK_GPIO_NUM;
  config.pin_vsync = VSYNC_GPIO_NUM;
  config.pin_href = HREF_GPIO_NUM;
  config.pin_sscb_sda = SIOD_GPIO_NUM;
  config.pin_sscb_scl = SIOC_GPIO_NUM;
  config.pin_pwdn = PWDN_GPIO_NUM;
  config.pin_reset = RESET_GPIO_NUM;
  config.xclk_freq_hz = 20000000;
  config.frame_size = FRAMESIZE_UXGA;
  config.pixel_format = PIXFORMAT_JPEG; // for streaming
  //config.pixel_format = PIXFORMAT_RGB565; // for face detection/recognition
  config.grab_mode = CAMERA_GRAB_WHEN_EMPTY;
  config.fb_location = CAMERA_FB_IN_PSRAM;
  config.jpeg_quality = 12;
  config.fb_count = 1;

  // if PSRAM IC present, init with UXGA resolution and higher JPEG quality
  //                      for larger pre-allocated frame buffer.
  if(config.pixel_format == PIXFORMAT_JPEG){
    if(psramFound()){
      config.jpeg_quality = 10;
      config.fb_count = 2;
      config.grab_mode = CAMERA_GRAB_LATEST;
    } else {
      // Limit the frame size when PSRAM is not available
      config.frame_size = FRAMESIZE_SVGA;
      config.fb_location = CAMERA_FB_IN_DRAM;
    }
  } else {
    // Best option for face detection/recognition
    config.frame_size = FRAMESIZE_240X240;
#if CONFIG_IDF_TARGET_ESP32S3
    config.fb_count = 2;
#endif
  }

  // camera init
  esp_err_t err = esp_camera_init(&config);
  if (err != ESP_OK) {
    Serial.printf("Camera init failed with error 0x%x", err);
    return;
  }

  sensor_t * s = esp_camera_sensor_get();
  // initial sensors are flipped vertically and colors are a bit saturated
  if (s->id.PID == OV3660_PID) {
    s->set_vflip(s, 1); // flip it back
    s->set_brightness(s, 1); // up the brightness just a bit
    s->set_saturation(s, -2); // lower the saturation
  }
  // drop down frame size for higher initial frame rate
  if(config.pixel_format == PIXFORMAT_JPEG){
    s->set_framesize(s, FRAMESIZE_QVGA);
  }

// Setup LED FLash if LED pin is defined in camera_pins.h
#if defined(LED_GPIO_NUM)
  setupLedFlash(LED_GPIO_NUM);
#endif

  WiFi.begin(ssid, password);
  WiFi.setSleep(false);

  while (WiFi.status() != WL_CONNECTED) {
    delay(500);
    Serial.print(".");
  }
  Serial.println("");
  Serial.println("WiFi connected");

  startCameraServer();

  Serial.print("Camera Ready! Use 'http://");
  Serial.print(WiFi.localIP());
  Serial.println("' to connect");
}

void loop() {
  // Do nothing. Everything is done in another task by the web server
  delay(10000);
}
Before uploading the program, you need to change the WiFi name and password in the code to your own. After uploading the program, if the XIAO ESP32C3 successfully connects to your WiFi, its IP address will be printed out.
XIAO ESP32S3 If you perform this project for a long time, please pay attention to heat dissipation, XIAO will become very hot, please be careful of burns!

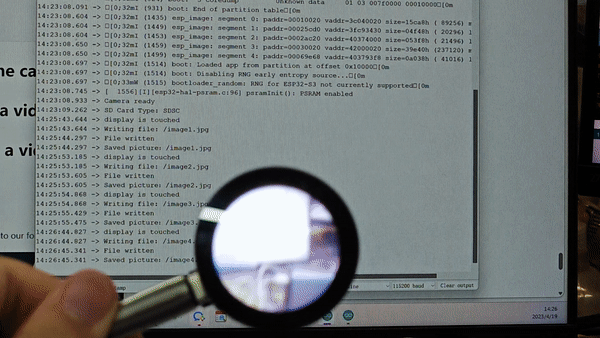
As you can see in the above figure, if you turn on the output of debug information, then you may see some of the chip kernel's debug information printed out in the serial monitor. For example [0;31mE (2947) MFN: Partition Not found[0m, please don't worry about it, it doesn't affect the running of the program.
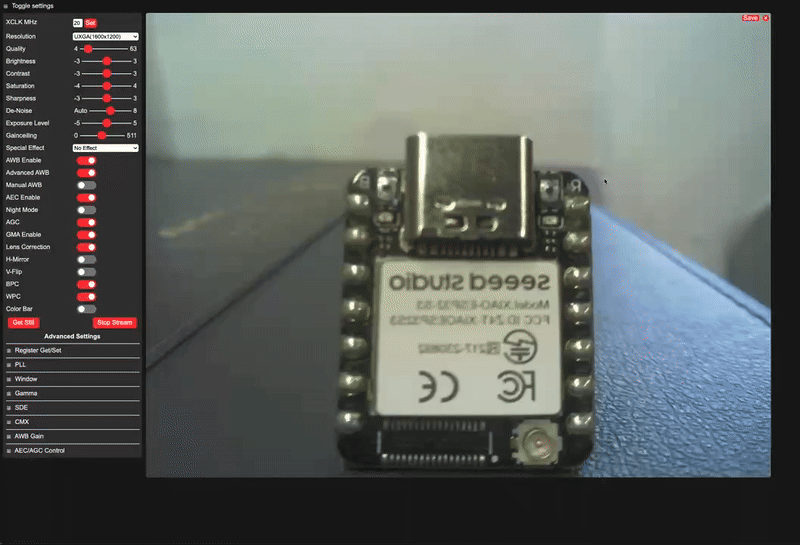
Please open your browser, we recommend Edge or Google Chrome, and enter that IP address and you will see the configuration page for the video.
Please note that the device you are using the browser on needs to be on the same LAN as XIAO.
After configuring the video stream specifications you want to set up, click Start Stream at the bottom of the left toolbar and you will see the live feed of the camera.
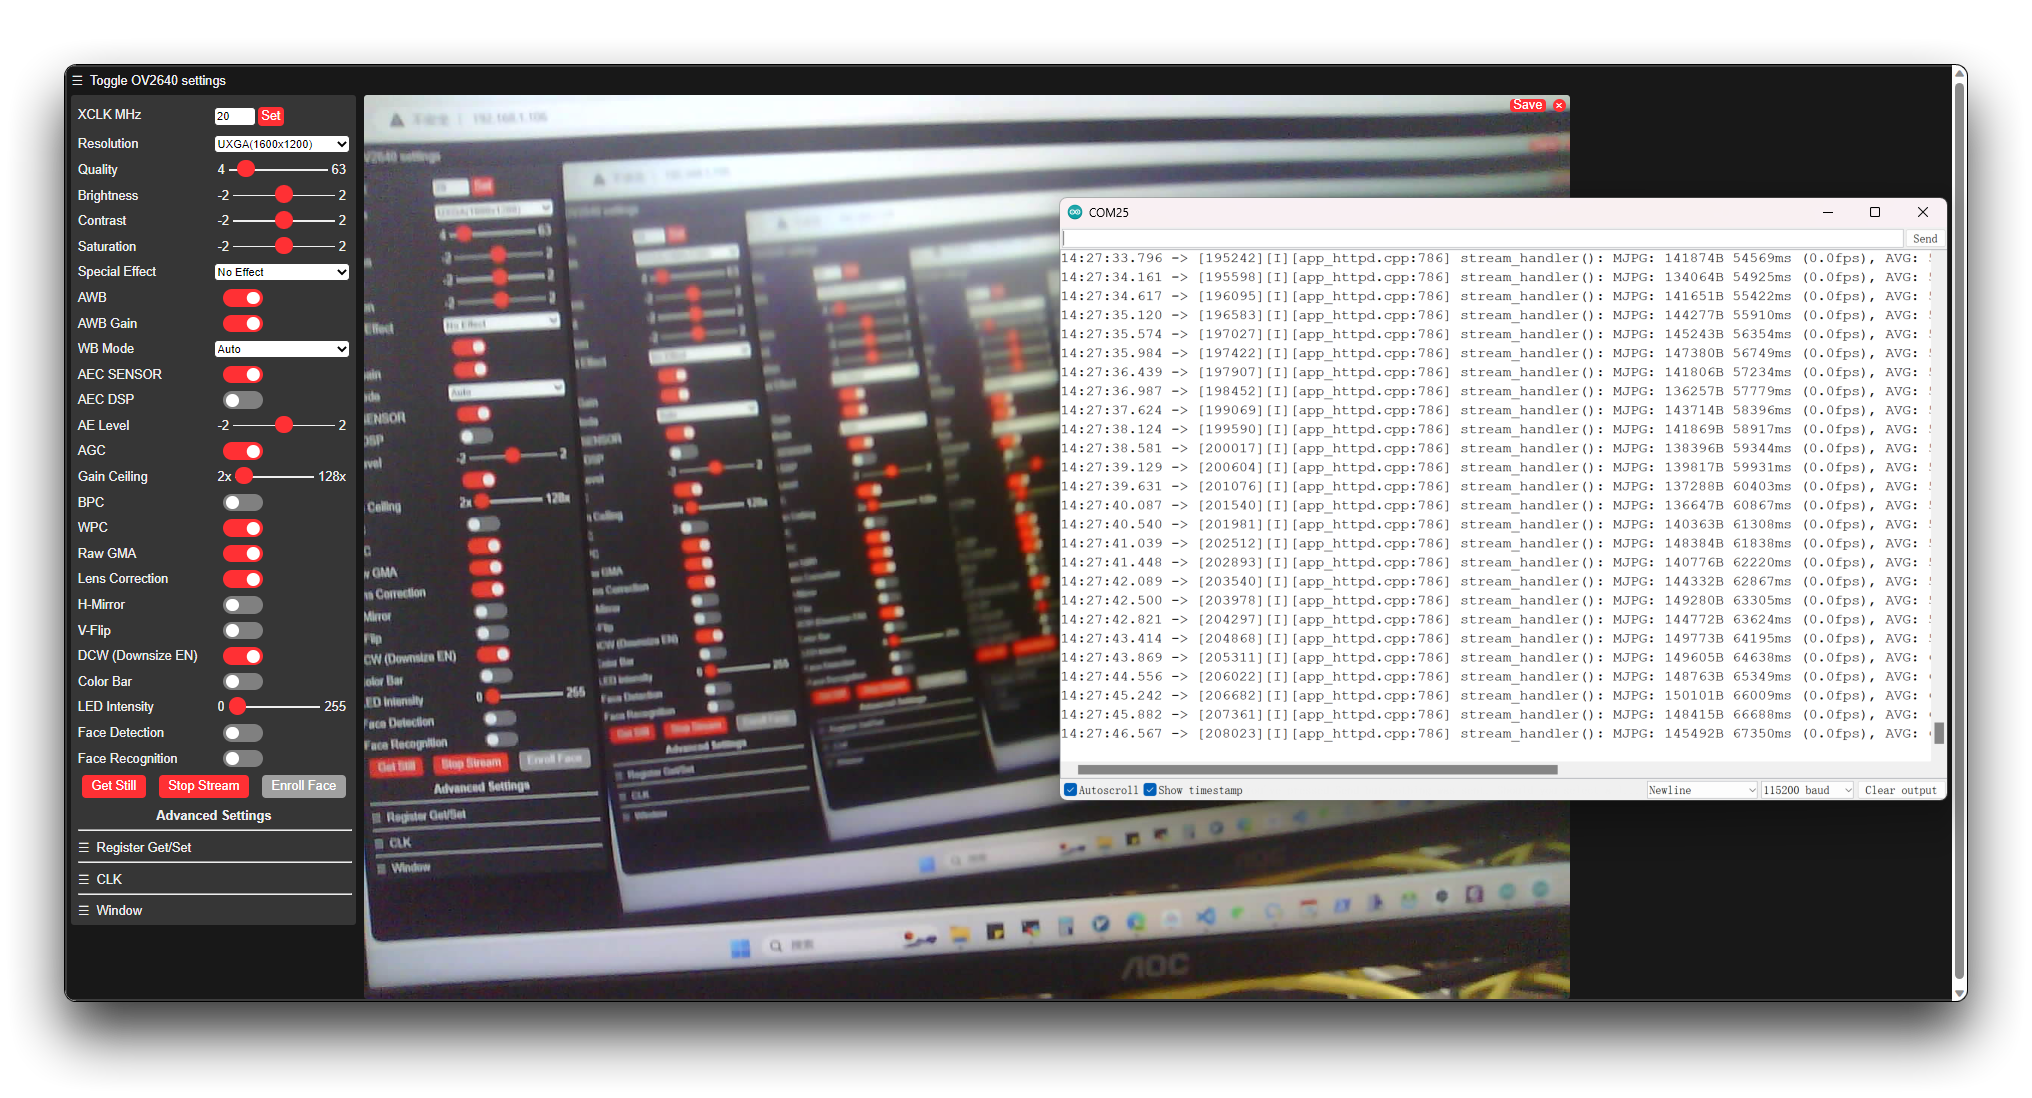
Fortunately, ESP32 has also officially added face recognition to the program. You can experience the feature by turning on the button switch for face recognition with reduced picture quality.
For performance reasons, the quality of the screen cannot be higher than CIF, otherwise the web page will pop up with an error when you turn on the switch for face recognition.
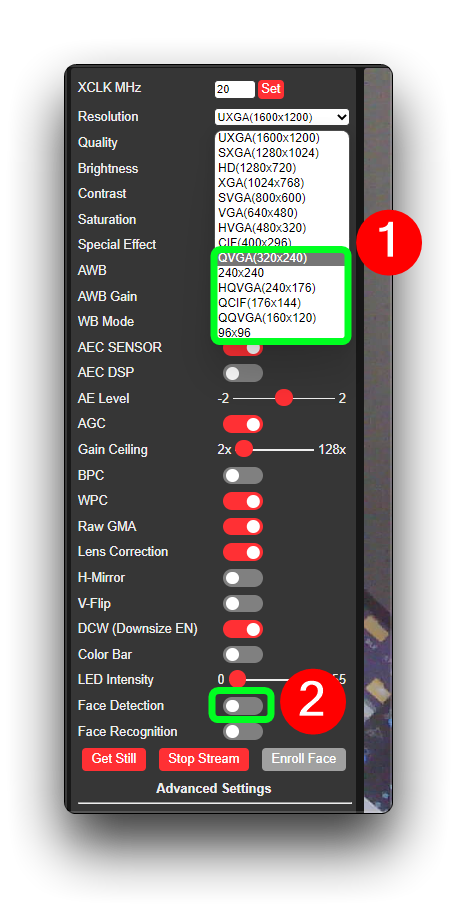
Oh, my big face is circled.

OV5640 AutoFocus
Hadware Preparation
| OV5640 Camera for XIAO ESP32S3 Sense |
|---|
 |
Software Preparation
Method 1
Special thanks to @Eric for providing the open source code
Code Example
#include "esp_camera.h"
#include <WiFi.h>
#include "ESP32_OV5640_AF.h"

#define CAMERA_MODEL_XIAO_ESP32S3 // Has PSRAM

#include "camera_pins.h"

const char* ssid = "";
const char* password = "";

void startCameraServer();
void setupLedFlash(int pin);
OV5640 ov5640 = OV5640();

void setup() {
  Serial.begin(115200);
  while(!Serial);
  Serial.setDebugOutput(true);
  Serial.println();

  camera_config_t config;
  config.ledc_channel = LEDC_CHANNEL_0;
  config.ledc_timer = LEDC_TIMER_0;
  config.pin_d0 = Y2_GPIO_NUM;
  config.pin_d1 = Y3_GPIO_NUM;
  config.pin_d2 = Y4_GPIO_NUM;
  config.pin_d3 = Y5_GPIO_NUM;
  config.pin_d4 = Y6_GPIO_NUM;
  config.pin_d5 = Y7_GPIO_NUM;
  config.pin_d6 = Y8_GPIO_NUM;
  config.pin_d7 = Y9_GPIO_NUM;
  config.pin_xclk = XCLK_GPIO_NUM;
  config.pin_pclk = PCLK_GPIO_NUM;
  config.pin_vsync = VSYNC_GPIO_NUM;
  config.pin_href = HREF_GPIO_NUM;
  config.pin_sscb_sda = SIOD_GPIO_NUM;
  config.pin_sscb_scl = SIOC_GPIO_NUM;
  config.pin_pwdn = PWDN_GPIO_NUM;
  config.pin_reset = RESET_GPIO_NUM;
  config.xclk_freq_hz = 20000000;
  config.frame_size = FRAMESIZE_UXGA;
  config.pixel_format = PIXFORMAT_JPEG; // for streaming
  //config.pixel_format = PIXFORMAT_RGB565; // for face detection/recognition
  config.grab_mode = CAMERA_GRAB_WHEN_EMPTY;
  config.fb_location = CAMERA_FB_IN_PSRAM;
  config.jpeg_quality = 12;
  config.fb_count = 1;

  // if PSRAM IC present, init with UXGA resolution and higher JPEG quality
  //                      for larger pre-allocated frame buffer.
  if(config.pixel_format == PIXFORMAT_JPEG){
    if(psramFound()){
      config.jpeg_quality = 10;
      config.fb_count = 2;
      config.grab_mode = CAMERA_GRAB_LATEST;
    } else {
      // Limit the frame size when PSRAM is not available
      config.frame_size = FRAMESIZE_SVGA;
      config.fb_location = CAMERA_FB_IN_DRAM;
    }
  } else {
    // Best option for face detection/recognition
    config.frame_size = FRAMESIZE_240X240;
#if CONFIG_IDF_TARGET_ESP32S3
    config.fb_count = 2;
#endif
  }

  // camera init
  esp_err_t err = esp_camera_init(&config);
  if (err != ESP_OK) {
    Serial.printf("Camera init failed with error 0x%x", err);
    return;
  }

  sensor_t * s = esp_camera_sensor_get();
  ov5640.start(s);

    if (ov5640.focusInit() == 0) {
    Serial.println("OV5640_Focus_Init Successful!");
  }

  if (ov5640.autoFocusMode() == 0) {
    Serial.println("OV5640_Auto_Focus Successful!");
  }

// Setup LED FLash if LED pin is defined in camera_pins.h
#if defined(LED_GPIO_NUM)
  setupLedFlash(LED_GPIO_NUM);
#endif

  WiFi.begin(ssid, password);
  WiFi.setSleep(false);

  while (WiFi.status() != WL_CONNECTED) {
    delay(500);
    Serial.print(".");
  }
  Serial.println("");
  Serial.println("WiFi connected");

  startCameraServer();

  Serial.print("Camera Ready! Use 'http://");
  Serial.print(WiFi.localIP());
  Serial.println("' to connect");
}

void loop() {
  uint8_t rc = ov5640.getFWStatus();
  Serial.printf("FW_STATUS = 0x%x\n", rc);

  if (rc == -1) {
    Serial.println("Check your OV5640");
  } else if (rc == FW_STATUS_S_FOCUSED) {
    Serial.println("Focused!");
  } else if (rc == FW_STATUS_S_FOCUSING) {
    Serial.println("Focusing!");
  }
}
Results Chart
The resolution needs to be above 1280*1024 to see the focusing effect, the screen will lag and you need to wait for the screen for a while when focusing.
Method 2
The resolution needs to be above 1600*1200 to see the focusing effect, the screen will lag and you need to wait for the screen for a while when focusing.
Download the following zip file and add it to Arudino
- [ZIP] OV5640 Auto
The OV5640 in the libraries of method 1 and method 2 cannot exist at the same time
#include "esp_camera.h"
#include <WiFi.h>
#include "ESP32_OV5640_AF.h"

#define CAMERA_MODEL_XIAO_ESP32S3 // Has PSRAM

#include "camera_pins.h"

const char *ssid = "";
const char *password = "";

void startCameraServer();
void setupLedFlash(int pin);
OV5640 ov5640 = OV5640();

void setup() {
  Serial.begin(115200);

  camera_config_t config;
  config.ledc_channel = LEDC_CHANNEL_0;
  config.ledc_timer = LEDC_TIMER_0;
  config.pin_d0 = Y2_GPIO_NUM;
  config.pin_d1 = Y3_GPIO_NUM;
  config.pin_d2 = Y4_GPIO_NUM;
  config.pin_d3 = Y5_GPIO_NUM;
  config.pin_d4 = Y6_GPIO_NUM;
  config.pin_d5 = Y7_GPIO_NUM;
  config.pin_d6 = Y8_GPIO_NUM;
  config.pin_d7 = Y9_GPIO_NUM;
  config.pin_xclk = XCLK_GPIO_NUM;
  config.pin_pclk = PCLK_GPIO_NUM;
  config.pin_vsync = VSYNC_GPIO_NUM;
  config.pin_href = HREF_GPIO_NUM;
  config.pin_sscb_sda = SIOD_GPIO_NUM;
  config.pin_sscb_scl = SIOC_GPIO_NUM;
  config.pin_pwdn = PWDN_GPIO_NUM;
  config.pin_reset = RESET_GPIO_NUM;
  config.xclk_freq_hz = 20000000;
  config.frame_size = FRAMESIZE_UXGA;
  config.pixel_format = PIXFORMAT_JPEG;
  config.grab_mode = CAMERA_GRAB_LATEST;
  config.fb_location = CAMERA_FB_IN_PSRAM;
  config.jpeg_quality = 10;
  config.fb_count = 2;

  if(psramFound()){
    config.jpeg_quality = 10;
    config.fb_count = 2;
    config.grab_mode = CAMERA_GRAB_LATEST;
  } else {
    // Limit the frame size when PSRAM is not available
    config.frame_size = FRAMESIZE_SVGA;
    config.fb_location = CAMERA_FB_IN_DRAM;
  }

  esp_err_t err = esp_camera_init(&config);
  if (err != ESP_OK) {
    Serial.printf("Camera init failed with error 0x%x", err);
    return;
  }

  // auto focus
#if 1
  sensor_t* sensor = esp_camera_sensor_get();
  int ret = 0;
  ov5640.start(sensor);

  if (ov5640.focusInit() == 0) {
      Serial.println("OV5640_Focus_Init Successful!");
  } else {
      Serial.println("OV5640_Focus_Init Failed!");
  }

  ret = ov5640.autoFocusMode(false);
  if (ret == 0) {
    Serial.println("OV5640_Auto_Focus Successful!");
  } else {
    Serial.printf("OV5640_Auto_Focus Failed! - [%d]\n", ret);
  }
#endif

  WiFi.begin(ssid, password);
  WiFi.setSleep(false);

  while (WiFi.status() != WL_CONNECTED) {
    delay(500);
    Serial.print(".");
  }
  Serial.println("\nWiFi connected");

  startCameraServer();

  Serial.printf("Camera Ready! Use 'http://%s' to connect\n", WiFi.localIP().toString().c_str());
}

void loop() {
  if (Serial.available()) {
    sensor_t* sensor = esp_camera_sensor_get();
    int ret = 0;

    switch (Serial.read()) {
      case 'b':
        ret = sensor->set_reg(sensor, 0x3022, 0xff, 0x03);
        Serial.printf("begin to auto focus - %d\n", ret);
        break;
      case 's':
        ret = sensor->set_reg(sensor, 0x3022, 0xff, 0x06);
        Serial.printf("focus stop here - %d\n", ret);
        break;
    }
  }

  uint8_t rc = ov5640.getFWStatus();
  Serial.printf("FW_STATUS = 0x%x\n", rc);

  if (rc == -1) {
    Serial.println("Check your OV5640");
  } else if (rc == FW_STATUS_S_FOCUSED) {
    Serial.println("Focused!");
  } else if (rc == FW_STATUS_S_FOCUSING) {
    Serial.println("Focusing!");
  } else {
  }

  delay(1000);
}
Mode 1 is recommended because it has a more pronounced focusing effect than Mode 2 and provides a sharper image.
Troubleshooting
Q1: When XIAO ESP32S3 Sense and Round Display are used together, do I have to cut the J3 pin? Which SD card slot can be used?
A: In principle, you need to cut the J3 pin when XIAO ESP32S3 Sense is used together with Round Display to use microSD card. The reason is that there are pull-up resistors in the design of the circuit of both expansion boards, so theoretically, if two pull-up resistors work at the same time, then the SD card slot will not work properly. An error message of SD card mount failure will appear. Since the pull-up resistor on the Round Display cannot be blocked, you need to cut J3 on the sense expansion board to make sure only one pull-up resistor is working when the two are used together. This also determines that when both are used together, there is and only the SD card slot on the Round Display is active.
However, we need to thank engineer Mjrovai for the new method of using the microSD card slot on the XIAO ESP32S3 Sense at the same time, which is also possible at software level. We can refer to his methods and procedures.
Tech Support & Product Discussion
Thank you for choosing our products! We are here to provide you with different support to ensure that your experience with our products is as smooth as possible. We offer several communication channels to cater to different preferences and needs.