File System and XIAO ESP32S3 Sense
In this tutorial, we will focus on the use of the file system of XIAO ESP32S3, mainly on the use of the microSD card slot for the Sense version. At the same time, we will introduce the official ESP file system SPIFFS, the chip's built-in Flash, etc.
The microSD card part of this tutorial only applies to the XIAO ESP32S3 Sense, the rest of the content applies to the ESP32-S3 chip, so you can run the examples on the XIAO ESP32S3 except for the microSD card.
| Seeed Studio XIAO ESP32S3 | Seeed Studio XIAO ESP32S3 Sense |
|---|---|
 |  |
Getting Started
Since the microSD card will be used in this tutorial, we need to install the Sense expansion board and prepare the microSD card in advance.
Installation of expansion boards (for Sense)
Installing the expansion board is very simple, you just need to align the connector on the expansion board with the B2B connector on the XIAO ESP32S3, press it hard and hear a "click", the installation is complete.
Prepare the microSD card
XIAO ESP32S3 Sense supports microSD cards up to 32GB, so if you are ready to buy a microSD card for XIAO, please refer to this specification. And format the microSD card to FAT32 format before using the microSD card.
After formatting, you can insert the microSD card into the microSD card slot. Please note the direction of insertion, the side with the gold finger should face inward.

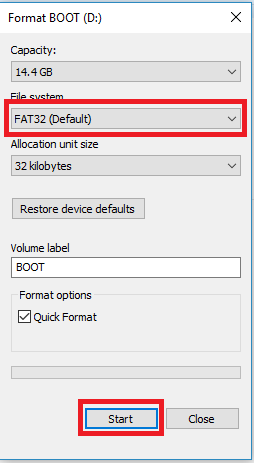
If the microSD card is not being recognized by ESP32S3 but being recognized by your computer and error looks like :
[  7273][E][sd_diskio.cpp:200] sdCommand(): Card Failed! cmd: 0x00
[  7274][E][sd_diskio.cpp:759] sdcard_mount(): f_mount failed: (3) The physical drive cannot work
[  7588][E][sd_diskio.cpp:200] sdCommand(): Card Failed! cmd: 0x00
Card Mount Failed
Do the following steps :
- Using Windows Formatter
- Using SD Card Formatter (third-Party software)
Note :
-
This process will take significantly longer time than Quick Format.
-
These cases arises if you are reusing microSD card which has been previously used for other purposes (i.e. when microSD card containing Linux OS being reused).
Card slot circuit design for expansion boards
The XIAO ESP32S3 Sense card slot occupies 4 GPIOs of the ESP32-S3, and the pin details of the occupancy are shown in the table below.
| ESP32-S3 GPIO | microSD Card Slot |
|---|---|
| GPIO21 | CS |
| D8 / A8 / Qt7 / GPIO7 | SCK |
| D9 / A9 / Qt8 / GPIO8 | MISO |
| D10 / A10 / Qt9 / GPIO9 | MOSI |
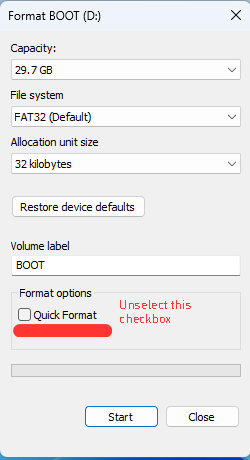
This also means that if you choose to use the microSD card function of the expansion board, you cannot also use the SPI function of the XIAO ESP32S3. You can turn on/off the microSD card function by connecting/cutting the pads of J3.
| If you want to use the SPI Pins / Disable the SD card of the expansion board | If you want to enable the SD card on the expansion board / Disable the SPI Pins |
|---|---|
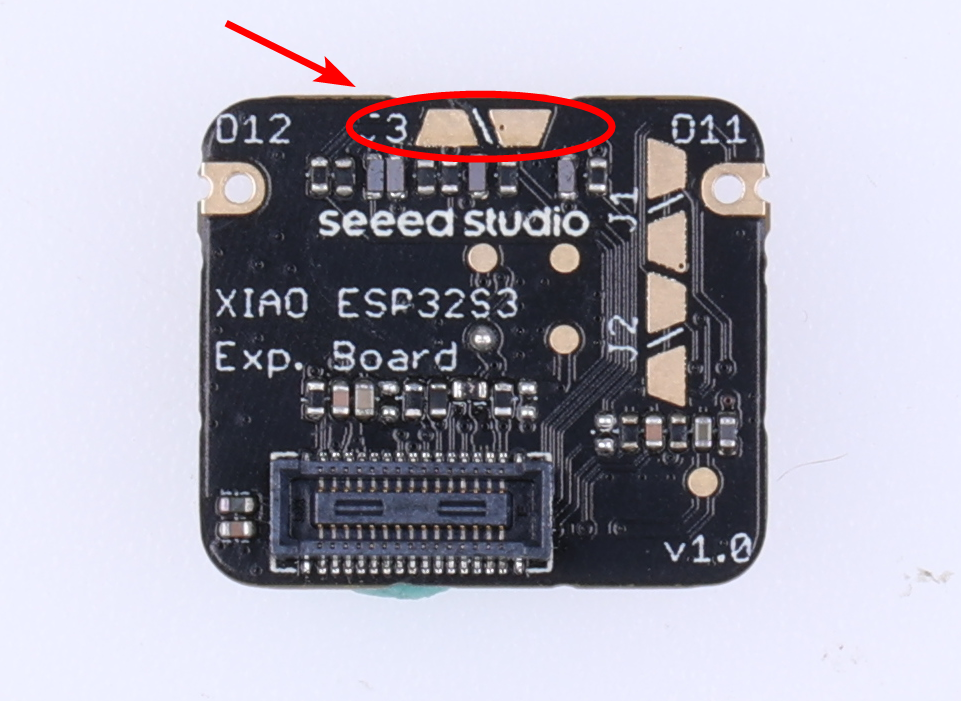 |  |
| Cut along the white thin line to disconnect the solder pad connection. | Solder the two solder pads together. |
By default, the microSD card function is enabled after the expansion board is installed.
Modify the files in the microSD card
This section applies to XIAO ESP32S3 Sense only.
There are several examples in Arduino IDE that show how to handle files on the microSD card using the XIAO ESP32S3. In the Arduino IDE, go to File > Examples > SD > SD_Test, or copy the following code.

#include "FS.h"
#include "SD.h"
#include "SPI.h"

void listDir(fs::FS &fs, const char * dirname, uint8_t levels){
    Serial.printf("Listing directory: %s\n", dirname);

    File root = fs.open(dirname);
    if(!root){
        Serial.println("Failed to open directory");
        return;
    }
    if(!root.isDirectory()){
        Serial.println("Not a directory");
        return;
    }

    File file = root.openNextFile();
    while(file){
        if(file.isDirectory()){
            Serial.print("  DIR : ");
            Serial.println(file.name());
            if(levels){
                listDir(fs, file.path(), levels -1);
            }
        } else {
            Serial.print("  FILE: ");
            Serial.print(file.name());
            Serial.print("  SIZE: ");
            Serial.println(file.size());
        }
        file = root.openNextFile();
    }
}

void createDir(fs::FS &fs, const char * path){
    Serial.printf("Creating Dir: %s\n", path);
    if(fs.mkdir(path)){
        Serial.println("Dir created");
    } else {
        Serial.println("mkdir failed");
    }
}

void removeDir(fs::FS &fs, const char * path){
    Serial.printf("Removing Dir: %s\n", path);
    if(fs.rmdir(path)){
        Serial.println("Dir removed");
    } else {
        Serial.println("rmdir failed");
    }
}

void readFile(fs::FS &fs, const char * path){
    Serial.printf("Reading file: %s\n", path);

    File file = fs.open(path);
    if(!file){
        Serial.println("Failed to open file for reading");
        return;
    }

    Serial.print("Read from file: ");
    while(file.available()){
        Serial.write(file.read());
    }
    file.close();
}

void writeFile(fs::FS &fs, const char * path, const char * message){
    Serial.printf("Writing file: %s\n", path);

    File file = fs.open(path, FILE_WRITE);
    if(!file){
        Serial.println("Failed to open file for writing");
        return;
    }
    if(file.print(message)){
        Serial.println("File written");
    } else {
        Serial.println("Write failed");
    }
    file.close();
}

void appendFile(fs::FS &fs, const char * path, const char * message){
    Serial.printf("Appending to file: %s\n", path);

    File file = fs.open(path, FILE_APPEND);
    if(!file){
        Serial.println("Failed to open file for appending");
        return;
    }
    if(file.print(message)){
        Serial.println("Message appended");
    } else {
        Serial.println("Append failed");
    }
    file.close();
}

void renameFile(fs::FS &fs, const char * path1, const char * path2){
    Serial.printf("Renaming file %s to %s\n", path1, path2);
    if (fs.rename(path1, path2)) {
        Serial.println("File renamed");
    } else {
        Serial.println("Rename failed");
    }
}

void deleteFile(fs::FS &fs, const char * path){
    Serial.printf("Deleting file: %s\n", path);
    if(fs.remove(path)){
        Serial.println("File deleted");
    } else {
        Serial.println("Delete failed");
    }
}

void testFileIO(fs::FS &fs, const char * path){
    File file = fs.open(path);
    static uint8_t buf[512];
    size_t len = 0;
    uint32_t start = millis();
    uint32_t end = start;
    if(file){
        len = file.size();
        size_t flen = len;
        start = millis();
        while(len){
            size_t toRead = len;
            if(toRead > 512){
                toRead = 512;
            }
            file.read(buf, toRead);
            len -= toRead;
        }
        end = millis() - start;
        Serial.printf("%u bytes read for %u ms\n", flen, end);
        file.close();
    } else {
        Serial.println("Failed to open file for reading");
    }


    file = fs.open(path, FILE_WRITE);
    if(!file){
        Serial.println("Failed to open file for writing");
        return;
    }

    size_t i;
    start = millis();
    for(i=0; i<2048; i++){
        file.write(buf, 512);
    }
    end = millis() - start;
    Serial.printf("%u bytes written for %u ms\n", 2048 * 512, end);
    file.close();
}

void setup(){
    Serial.begin(115200);
    while(!Serial);
    if(!SD.begin(21)){
        Serial.println("Card Mount Failed");
        return;
    }
    uint8_t cardType = SD.cardType();

    if(cardType == CARD_NONE){
        Serial.println("No SD card attached");
        return;
    }

    Serial.print("SD Card Type: ");
    if(cardType == CARD_MMC){
        Serial.println("MMC");
    } else if(cardType == CARD_SD){
        Serial.println("SDSC");
    } else if(cardType == CARD_SDHC){
        Serial.println("SDHC");
    } else {
        Serial.println("UNKNOWN");
    }

    uint64_t cardSize = SD.cardSize() / (1024 * 1024);
    Serial.printf("SD Card Size: %lluMB\n", cardSize);

    listDir(SD, "/", 0);
    createDir(SD, "/mydir");
    listDir(SD, "/", 0);
    removeDir(SD, "/mydir");
    listDir(SD, "/", 2);
    writeFile(SD, "/hello.txt", "Hello ");
    appendFile(SD, "/hello.txt", "World!\n");
    readFile(SD, "/hello.txt");
    deleteFile(SD, "/foo.txt");
    renameFile(SD, "/hello.txt", "/foo.txt");
    readFile(SD, "/foo.txt");
    testFileIO(SD, "/test.txt");
    Serial.printf("Total space: %lluMB\n", SD.totalBytes() / (1024 * 1024));
    Serial.printf("Used space: %lluMB\n", SD.usedBytes() / (1024 * 1024));
}

void loop(){

}
Note that you cannot use the sample program directly, you will need to make minor modifications to the program to ensure that it works. The modification is to change the original code from SD.begin() to SD.begin(21) in the Setup() function. Specify the pin number for initialization.
Upload the program to XIAO ESP32S3 Sense, open the serial monitor, and you will see the file creation process and the writing process. You can also use microSD to USB to access the newly created files and contents through your computer.
 |  |
Program annotation
First, you need to include the following libraries: FS.h to handle files, SD.h to interface with the microSDcard and SPI.h to use SPI communication protocol.
-
In the
setup(), the following lines initialize the microSDcard withSD.begin(21). Here, we need to pass a parameter forSD.begin(), which is the CS pin. And for the microSD card design of the expansion board, the CS pin is connected to GPIO 21. If you are using Round Display for XIAO, then the parameter passed in should be D2. -
The following lines print the microSDcard type on the Serial Monitor.
uint8_t cardType = SD.cardType();

if(cardType == CARD_NONE){
    Serial.println("No SD card attached");
    return;
}

Serial.print("SD Card Type: ");
if(cardType == CARD_MMC){
    Serial.println("MMC");
} else if(cardType == CARD_SD){
    Serial.println("SDSC");
} else if(cardType == CARD_SDHC){
    Serial.println("SDHC");
} else {
    Serial.println("UNKNOWN");
}
- You can get the microSDcard size by calling the
cardSize()method:
uint64_t cardSize = SD.cardSize() / (1024 * 1024);
Serial.printf("SD Card Size: %lluMB\n", cardSize);
The example provides several functions to handle files on the microSDcard.
-
The
listDir()function lists the directories on the SD card. This function accepts as arguments the filesystem (SD), the main directory’s name, and the levels to go into the directory.Here’s an example of how to call this function. The
/corresponds to the microSDcard root directory.
listDir(SD, "/", 0);
- The
createDir()function creates a new directory. Pass as an argument theSDfilesystem and the directory name path. For example, the following command creates a new directory on the root calledmydir.
createDir(SD, "/mydir");
- To remove a directory from the microSDcard, use the
removeDir()function and pass as an argument the SD filesystem and the directory name path.
removeDir(SD, "/mydir");
- The
readFile()function reads the content of a file and prints the content in the Serial Monitor. As with previous functions, pass as an argument theSDfilesystem and the file path. For example, the following line reads the content of thehello.txtfile.
readFile(SD, "/hello.txt")
- To write content to a file, you can use the
writeFile()function. Pass as an argument, theSDfilesystem, the file path and the message. The following line writesHelloin thehello.txtfile.
writeFile(SD, "/hello.txt", "Hello ");
- Similarly, you can append content to a file (without overwriting previous content) using the
appendFile()function. The following line appends the messageWorld!\nin thehello.txtfile. The\nmeans that the next time you write something to the file, it will be written in a new line.
appendFile(SD, "/hello.txt", "World!\n");
- You can rename a file using the
renameFile()function. Pass as arguments the SD filesystem, the original filename, and the new filename. The following line renames thehello.txtfile tofoo.txt.
renameFile(SD, "/hello.txt", "/foo.txt");
- Use the
deleteFile()function to delete a file. Pass as an argument the SD filesystem and the file path of the file you want to delete. The following line deletes thefoo.txtfile from the microSDcard.
deleteFile(SD, "/foo.txt");
- The
testFileIO()functions shows how long it takes to read the content of a file. The following function tests the test.txt file.
testFileIO(SD, "/test.txt");
MicroSD card application based on gas data logging
This section applies to XIAO ESP32S3 Sense only.
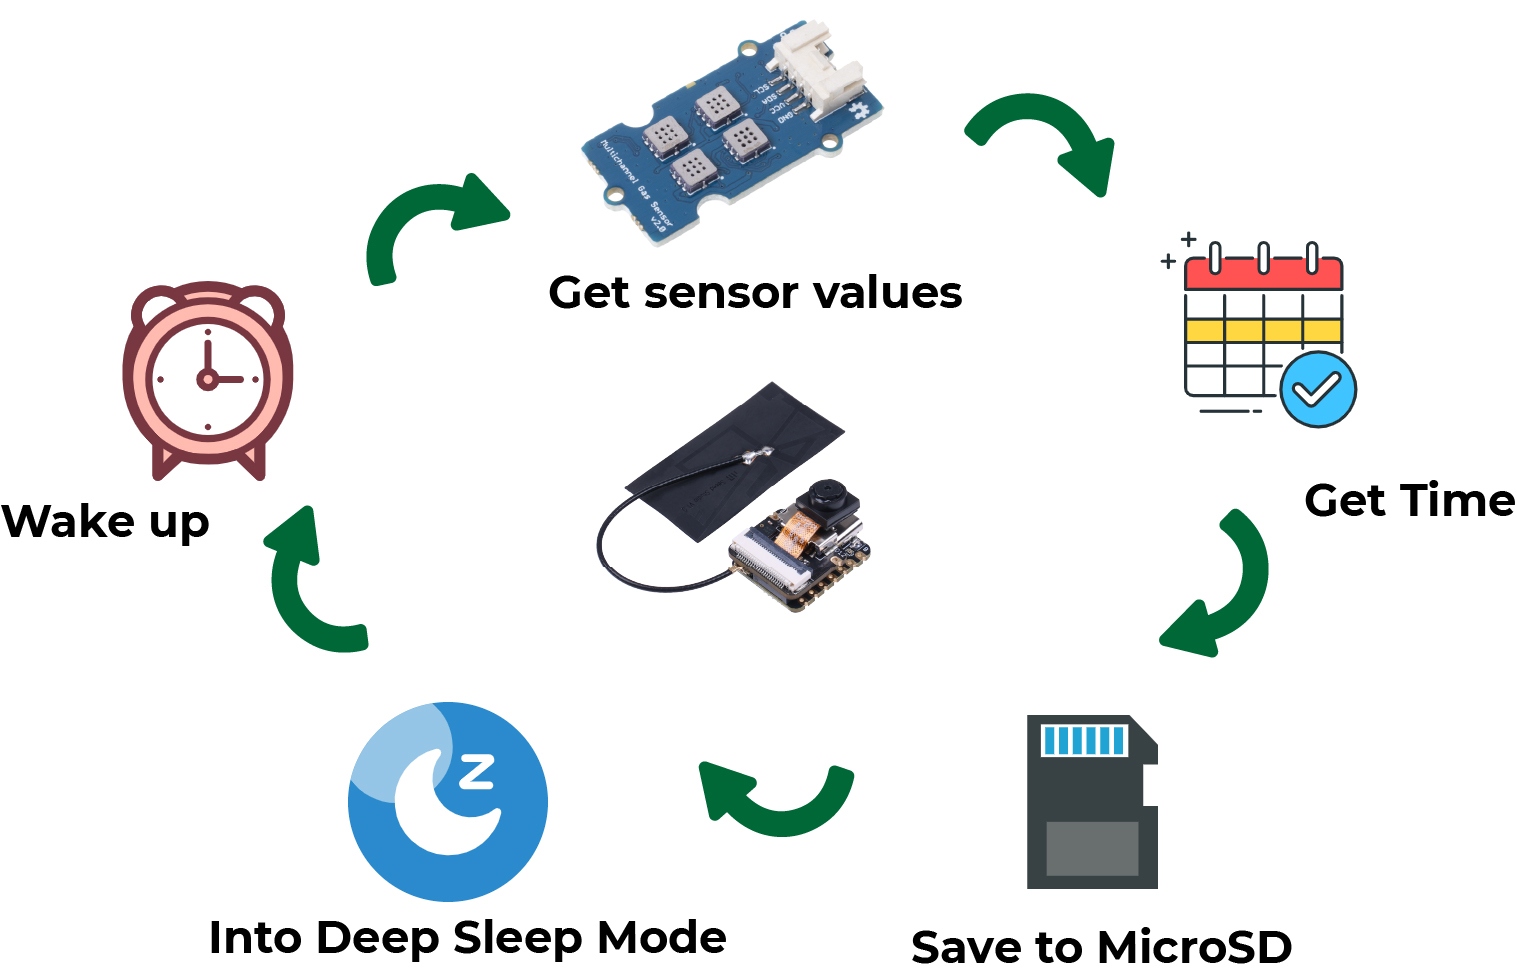
This project shows how to log data with timestamps to a TF card using the XIAO ESP32S3 Sense. As an example, we’ll log temperature readings from the Multichannel Gas Sensor every 10 minutes. The XIAO ESP32S3 will be in deep sleep mode between each reading, and it will request the date and time using Network Time Protocol (NTP).
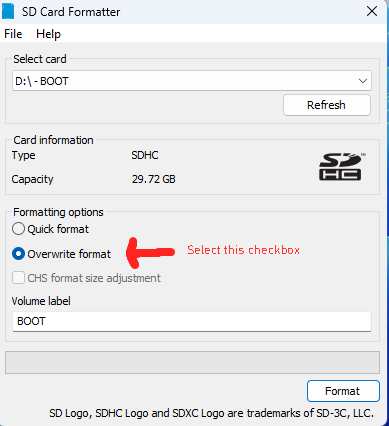
To complete this project, you will need to prepare the following hardware in advance.
| Seeed Studio XIAO ESP32S3 Sense | Seeed Studio Expansion Base for XIAO with Grove OLED | Grove - Multichannel Gas Sensor v2 |
|---|---|---|
|  |  |
For the software, you need to install the following libraries for the Arduino IDE in advance.
- NTPClient library forked by Taranais
- Multichannel Gas Sensor library
Here is the complete sample program. In the program we will need to use the network pairing time, so you need to change the WiFi name and password in the program to yours.
#include "FS.h"
#include "SD.h"
#include <SPI.h>

//multichannel gas libraries
#include <Multichannel_Gas_GMXXX.h>
#include <Wire.h>

// Libraries to get time from NTP Server
#include <NTPClient.h>
#include <WiFiUdp.h>

#include "WiFi.h"

// Define deep sleep options
uint64_t uS_TO_S_FACTOR = 1000000;  // Conversion factor for micro seconds to seconds
// Sleep for 10 minutes = 600 seconds
uint64_t TIME_TO_SLEEP = 600;

// Replace with your network credentials
const char* ssid     = "REPLACE_WITH_YOUR_SSID";
const char* password = "REPLACE_WITH_YOUR_PASSWORD";

// Define CS pin for the SD card module
#define SD_CS 21

// Save reading number on RTC memory
RTC_DATA_ATTR int readingID = 0;

String dataMessage;

// Gas Sensor variables
int NO2_val, C2H5CH_val, VOC_val, CO_val;
GAS_GMXXX<TwoWire> gas;

// Define NTP Client to get time
WiFiUDP ntpUDP;
NTPClient timeClient(ntpUDP);

// Variables to save date and time
String formattedDate;
String dayStamp;
String timeStamp;

void setup() {
  // Start serial communication for debugging purposes
  Serial.begin(115200);

  // Connect to Wi-Fi network with SSID and password
  Serial.print("Connecting to ");
  Serial.println(ssid);
  WiFi.begin(ssid, password);
  while (WiFi.status() != WL_CONNECTED) {
    delay(500);
    Serial.print(".");
  }
  Serial.println("");
  Serial.println("WiFi connected.");

  // Initialize a NTPClient to get time
  timeClient.begin();
  // Set offset time in seconds to adjust for your timezone, for example:
  // GMT +1 = 3600
  // GMT +8 = 28800
  // GMT -1 = -3600
  // GMT 0 = 0
  timeClient.setTimeOffset(3600);

  // Initialize SD card
  SD.begin(SD_CS);
  if(!SD.begin(SD_CS)) {
    Serial.println("Card Mount Failed");
    return;
  }
  uint8_t cardType = SD.cardType();
  if(cardType == CARD_NONE) {
    Serial.println("No SD card attached");
    return;
  }
  Serial.println("Initializing SD card...");
  if (!SD.begin(SD_CS)) {
    Serial.println("ERROR - SD card initialization failed!");
    return;    // init failed
  }

  // If the data.txt file doesn't exist
  // Create a file on the SD card and write the data labels
  File file = SD.open("/data.txt");
  if(!file) {
    Serial.println("File doens't exist");
    Serial.println("Creating file...");
    writeFile(SD, "/data.txt", "Reading ID, Date, Hour, NO2, C2H5CH, VOC, CO \r\n");
  }
  else {
    Serial.println("File already exists");
  }
  file.close();

  // Start the gas sensor
  gas.begin(Wire, 0x08); // use the hardware I2C

  getReadings();
  getTimeStamp();
  logSDCard();

  // Increment readingID on every new reading
  readingID++;

  // Start deep sleep
  Serial.println("DONE! Going to sleep now.");

  // Enable Timer wake_up
  esp_sleep_enable_timer_wakeup(TIME_TO_SLEEP * uS_TO_S_FACTOR);
  esp_deep_sleep_start();
}

void loop() {
  // The ESP32 will be in deep sleep
  // it never reaches the loop()
}

// Function to get temperature
void getReadings(){
  // GM102B NO2 sensor ppm
  NO2_val = gas.getGM102B();
  // GM302B C2H5CH sensor ppm
  C2H5CH_val = gas.getGM302B();
  // GM502B VOC sensor
  VOC_val = gas.getGM502B();
  // GM702B CO sensor
  CO_val = gas.getGM702B();

  Serial.print("NO2 Value is: ");
  Serial.println(NO2_val);

  Serial.print("C2H5CH Value is: ");
  Serial.println(C2H5CH_val);

  Serial.print("VOC Value is: ");
  Serial.println(VOC_val);

  Serial.print("CO Value is: ");
  Serial.println(CO_val);
}

// Function to get date and time from NTPClient
void getTimeStamp() {
  while(!timeClient.update()) {
    timeClient.forceUpdate();
  }
  // The formattedDate comes with the following format:
  // 2018-05-28T16:00:13Z
  // We need to extract date and time
  formattedDate = timeClient.getFormattedDate();
  Serial.println(formattedDate);

  // Extract date
  int splitT = formattedDate.indexOf("T");
  dayStamp = formattedDate.substring(0, splitT);
  Serial.println(dayStamp);
  // Extract time
  timeStamp = formattedDate.substring(splitT+1, formattedDate.length()-1);
  Serial.println(timeStamp);
}

// Write the sensor readings on the SD card
void logSDCard() {
  dataMessage = String(readingID) + "," + String(dayStamp) + "," + String(timeStamp) + "," +
                String(NO2_val) + "," + String(C2H5CH_val) + "," + String(VOC_val) + "," +
                String(CO_val) + "\r\n";
  Serial.print("Save data: ");
  Serial.println(dataMessage);
  appendFile(SD, "/data.txt", dataMessage.c_str());
}

// Write to the SD card (DON'T MODIFY THIS FUNCTION)
void writeFile(fs::FS &fs, const char * path, const char * message) {
  Serial.printf("Writing file: %s\n", path);

  File file = fs.open(path, FILE_WRITE);
  if(!file) {
    Serial.println("Failed to open file for writing");
    return;
  }
  if(file.print(message)) {
    Serial.println("File written");
  } else {
    Serial.println("Write failed");
  }
  file.close();
}

// Append data to the SD card (DON'T MODIFY THIS FUNCTION)
void appendFile(fs::FS &fs, const char * path, const char * message) {
  Serial.printf("Appending to file: %s\n", path);

  File file = fs.open(path, FILE_APPEND);
  if(!file) {
    Serial.println("Failed to open file for appending");
    return;
  }
  if(file.print(message)) {
    Serial.println("Message appended");
  } else {
    Serial.println("Append failed");
  }
  file.close();
}
Compile and upload the program, and open the serial port monitor. If the program runs smoothly, you will see the following message output from the serial monitor.
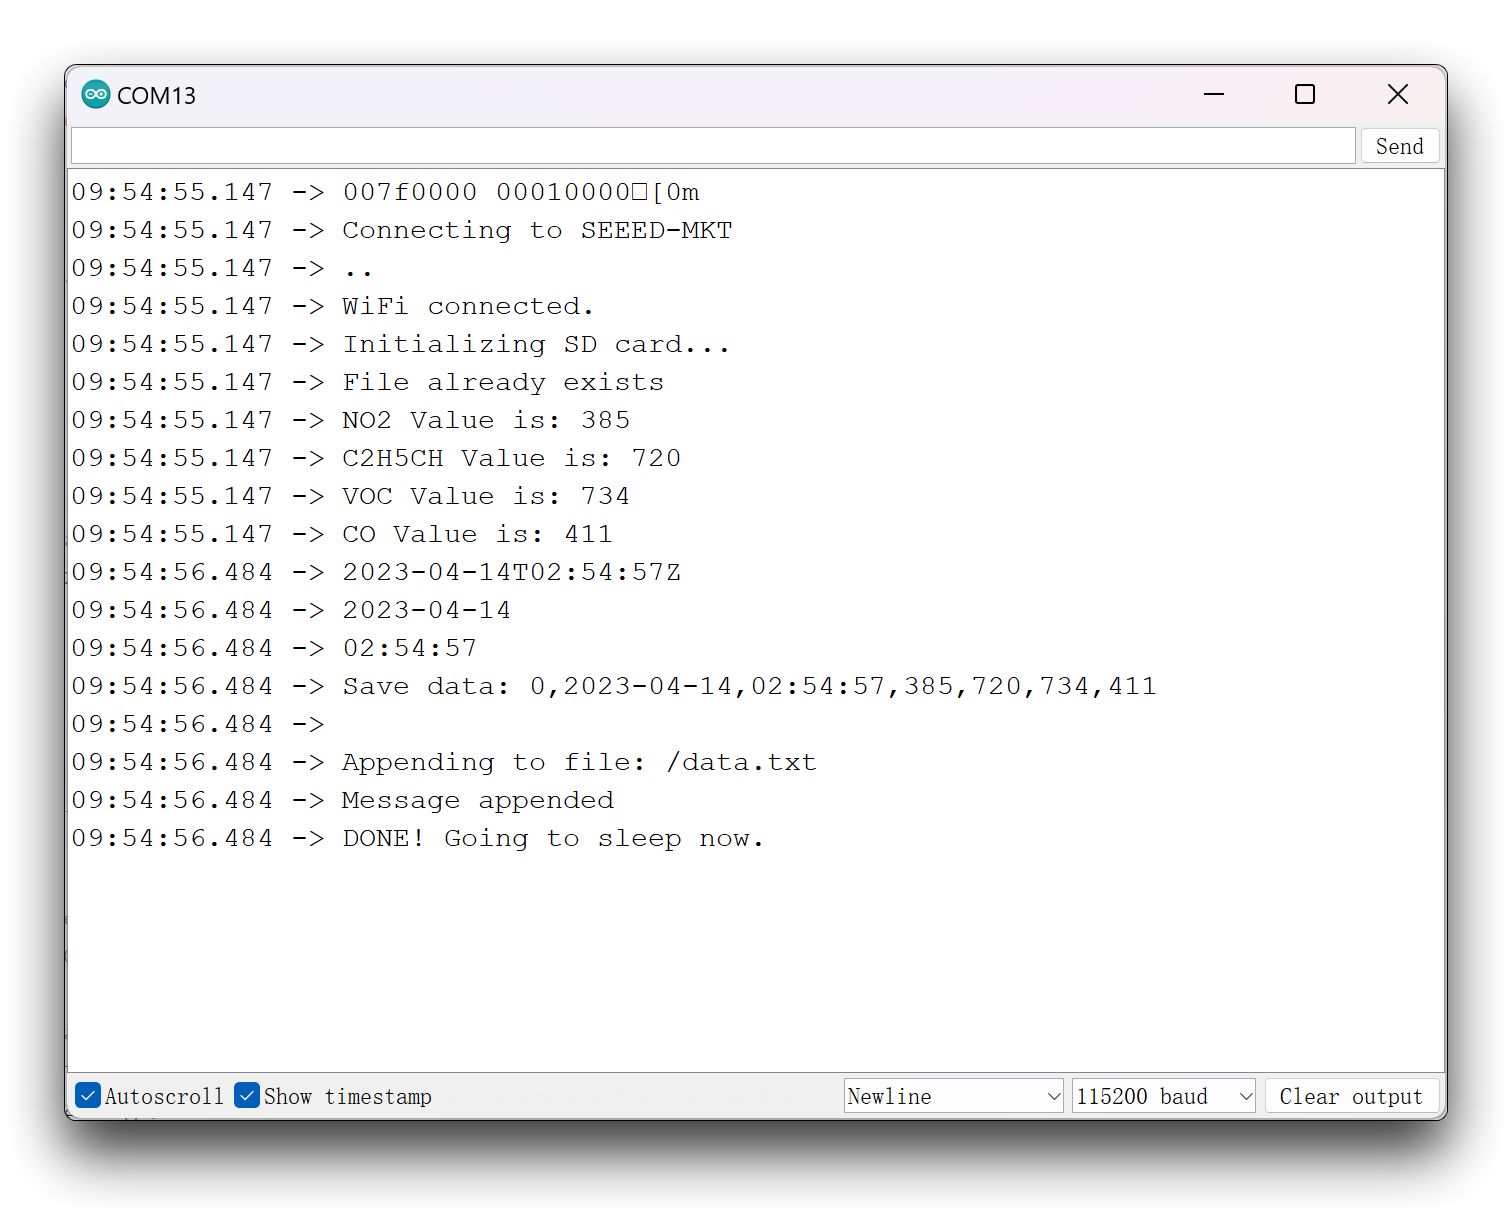
You can always remove the microSD card at your convenience and access the saved sensor data via the card reader.

In order to facilitate testing, the effect is shown every minute to save data, the actual sample code provided is ten minutes to save data once.
There are the following things to note about this project:
- The Multichannel Gas Sensor needs a period of warm-up before the values obtained are accurate. So the first few sets of data recorded can be considered to be discarded if the error is large.
- The serial monitor will only output the saved information once, because this example uses the deep sleep function, it is equivalent to reset after waking up, that is, you need to reopen the serial port of Arduino to see the next debug information. But rest assured, if there is no problem with the card, the sensor data will be collected on time at the time you set.
Program annotation
In this example, the XIAO ESP32S3 is in deep sleep mode between each reading. In deep sleep mode, all your code should go in the setup() function, because the XIAO ESP32S3 never reaches the loop().
This example uses a conversion factor from microseconds to seconds, so that you can set the sleep time in the TIME_TO_SLEEP variable in seconds. In this case, we’re setting the XIAO ESP32S3 to go to sleep for 10 minutes (600 seconds). If you want the XIAO ESP32S3 to sleep for a different period of time, you just need to enter the number of seconds for deep sleep in the TIME_TO_SLEEP variable.
// Define deep sleep options
uint64_t uS_TO_S_FACTOR = 1000000; // Conversion factor for micro seconds to seconds
// Sleep for 10 minutes = 600 seconds
uint64_t TIME_TO_SLEEP = 600;
Next, define the microSD card CS pin. In this case, it is set to GPIO 21.
#define SD_CS 21
Create a variable called readingID to hold the reading ID. This is a way to get your readings organized. To save a variable value during deep sleep, we can save it in the RTC memory. To save data on the RTC memory, you just need to add RTC_DATA_ATTR before the variable definition.
Create a String variable to hold the data to be saved on the microSD card.
The following two lines define an NTPClient to request date and time from an NTP server.
WiFiUDP ntpUDP;
NTPClient timeClient(ntpUDP);
Next, initialize the NTP client in the Setup() function to get the date and time from the NTP server. You can use the setTimeOffset(<time>) method to adjust the time for your timezone.
After having everything initialized, we can get the readings, timestamp, and log everything into the microSD card.
To make the code easier to understand, we’ve created the following functions:
getReadings(): reads the gas value from the Multichannel Gas Sensor;getTimeStamp(): gets date and time from the NTP server;logSDcard(): logs the preceding data to the microSD card.
Finally, the ESP32 starts the deep sleep.
esp_sleep_enable_timer_wakeup(TIME_TO_SLEEP * uS_TO_S_FACTOR);
esp_deep_sleep_start();
We recommend that you use these two functions together. Make sure that XIAO can enter deep sleep mode as soon as possible after setting the wake-up time.
Serial Peripheral Interface Flash File System (SPIFFS)
This section applies to the XIAO ESP32C3, XIAO ESP32S3, or XIAO ESP32S3 Sense, but this section does not support Arduino IDE 2.X.
The ESP32 contains a Serial Peripheral Interface Flash File System (SPIFFS). SPIFFS is a lightweight filesystem created for microcontrollers with a flash chip, which is connected by SPI bus, like the ESP32 flash memory. In this article we’re going to show how to easily upload files to the ESP32 filesystem using a plugin for Arduino IDE.
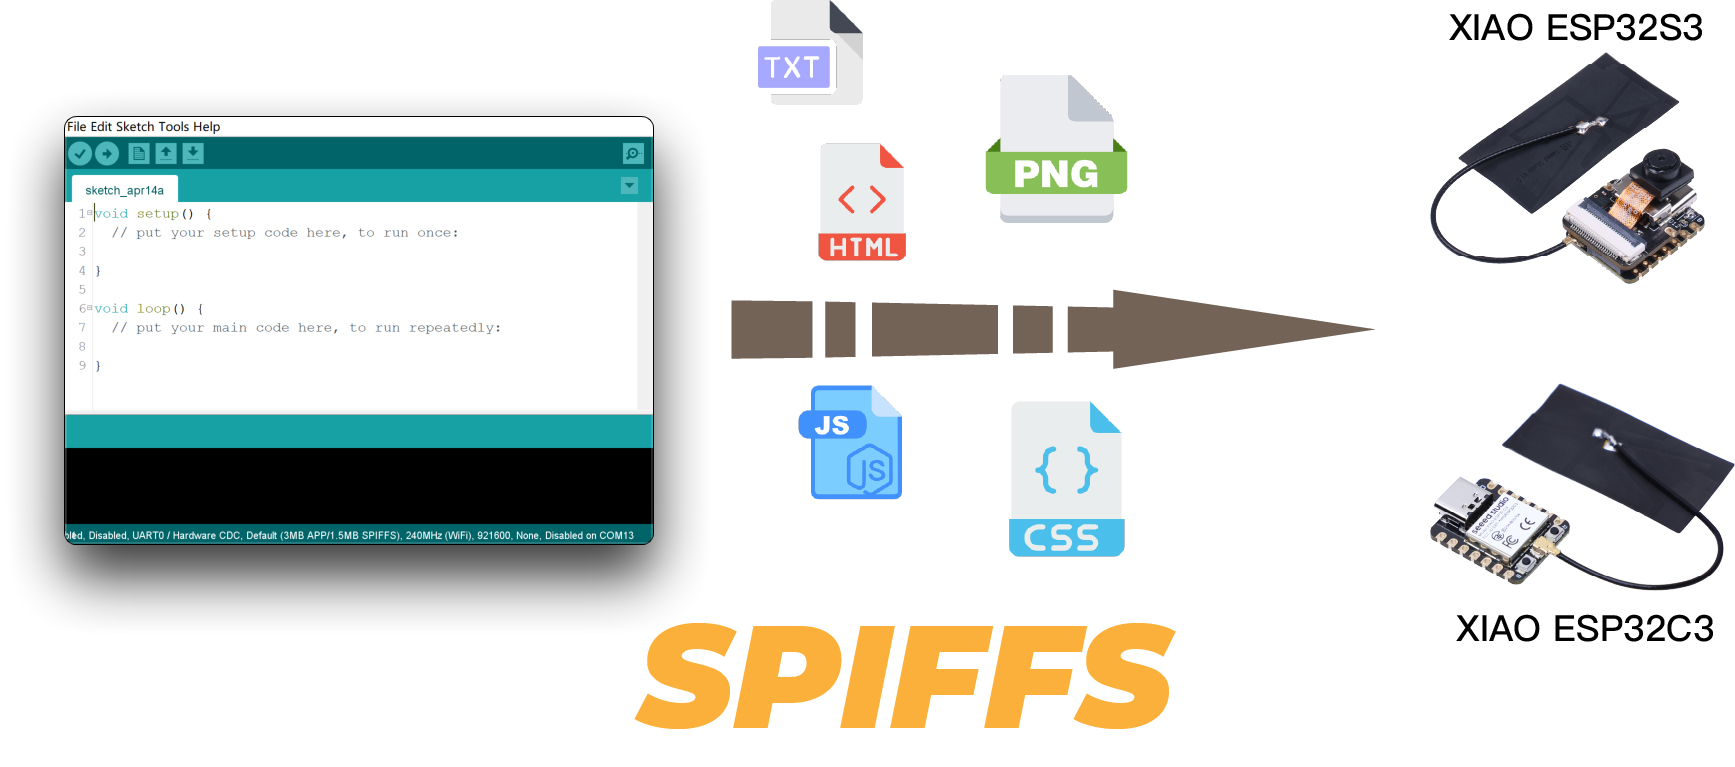
SPIFFS lets you access the flash memory like you would do in a normal filesystem in your computer, but simpler and more limited. You can read, write, close, and delete files. At the time of writing this post, SPIFFS doesn’t support directories, so everything is saved on a flat structure.
Using SPIFFS with the XIAO ESP32 is especially useful to:
- Create configuration files with settings
- Save data permanently
- Create files to save small amounts of data instead of using a microSD card
- Save HTML and CSS files to build a web server
- Save images, figures, and icons
Installing the Arduino ESP32 Filesystem Uploader
You can create, save and write files to the ESP32 filesystem by writing the code yourself on the Arduino IDE. This is not very useful, because you’d have to type the content of your files in the Arduino sketch.
Fortunately, there is a plugin for the Arduino IDE that allows you to upload files directly to the ESP32 filesystem from a folder on your computer. This makes it really easy and simple to work with files. Let’s install it.
Note: at the time of writing this post, the ESP32 Filesystem Uploader plugin is not supported on Arduino 2.0.
Windows
Step 1. Go to the releases page and click the ESP32FS-1.1.zip file to download.
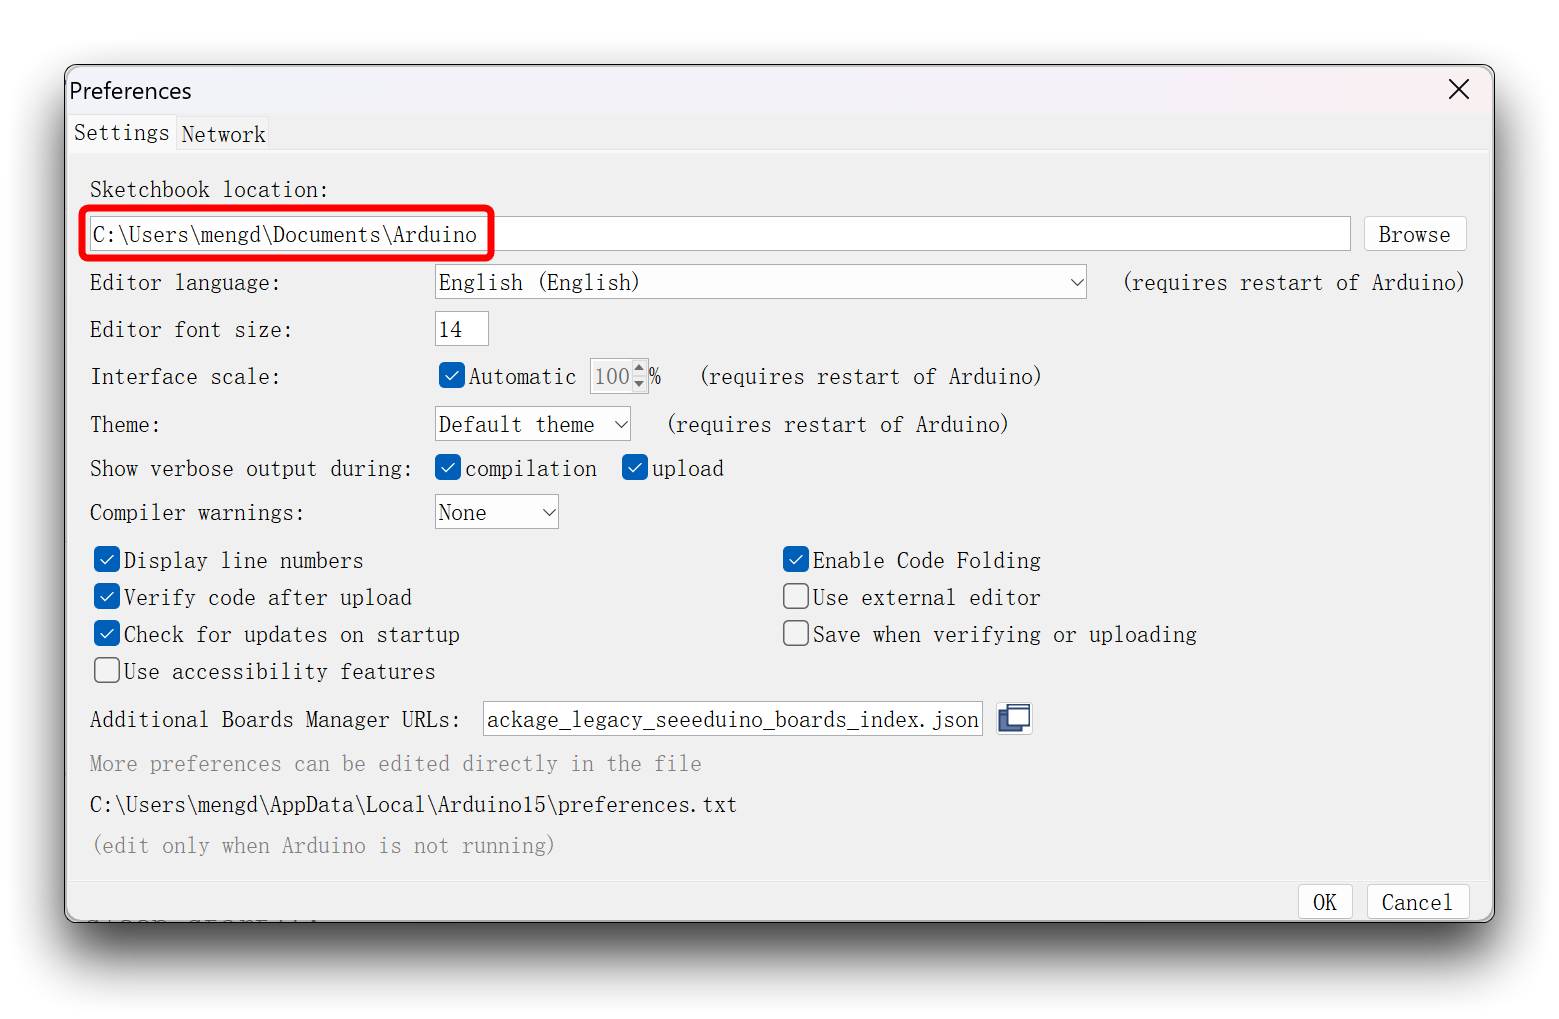
Step 2. Find your Sketchbook location. In your Arduino IDE, go to File > Preferences and check your Sketchbook location. In my case, it’s in the following path: C:\Users\mengd\Documents\Arduino.
Step 3. Go to the sketchbook location, and create a tools folder.
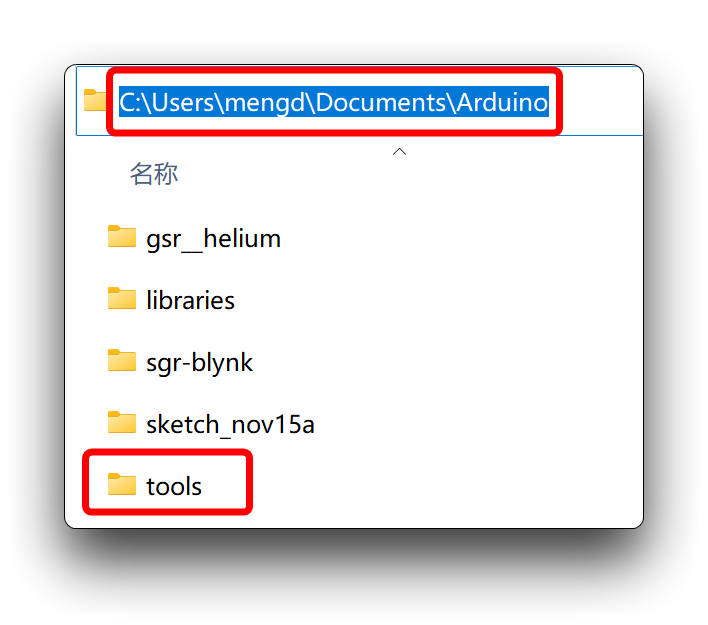
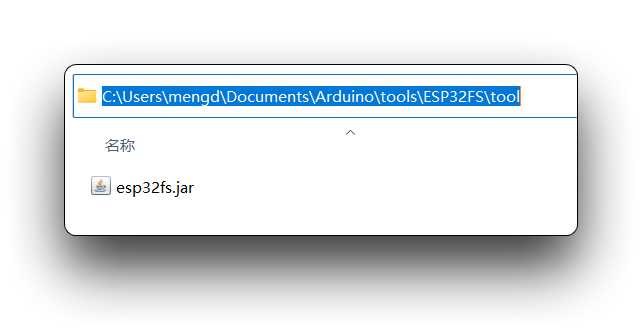
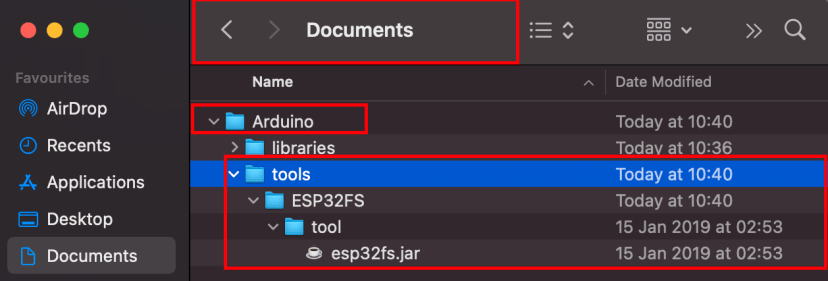
Step 4. Unzip the downloaded .zip folder. Open it and copy the ESP32FS folder to the tools folder you created in the previous step. You should have a similar folder structure:
<Sketchbook-location>/tools/ESP32FS/tool/esp32fs.jar
Step 5. Finally, restart your Arduino IDE.
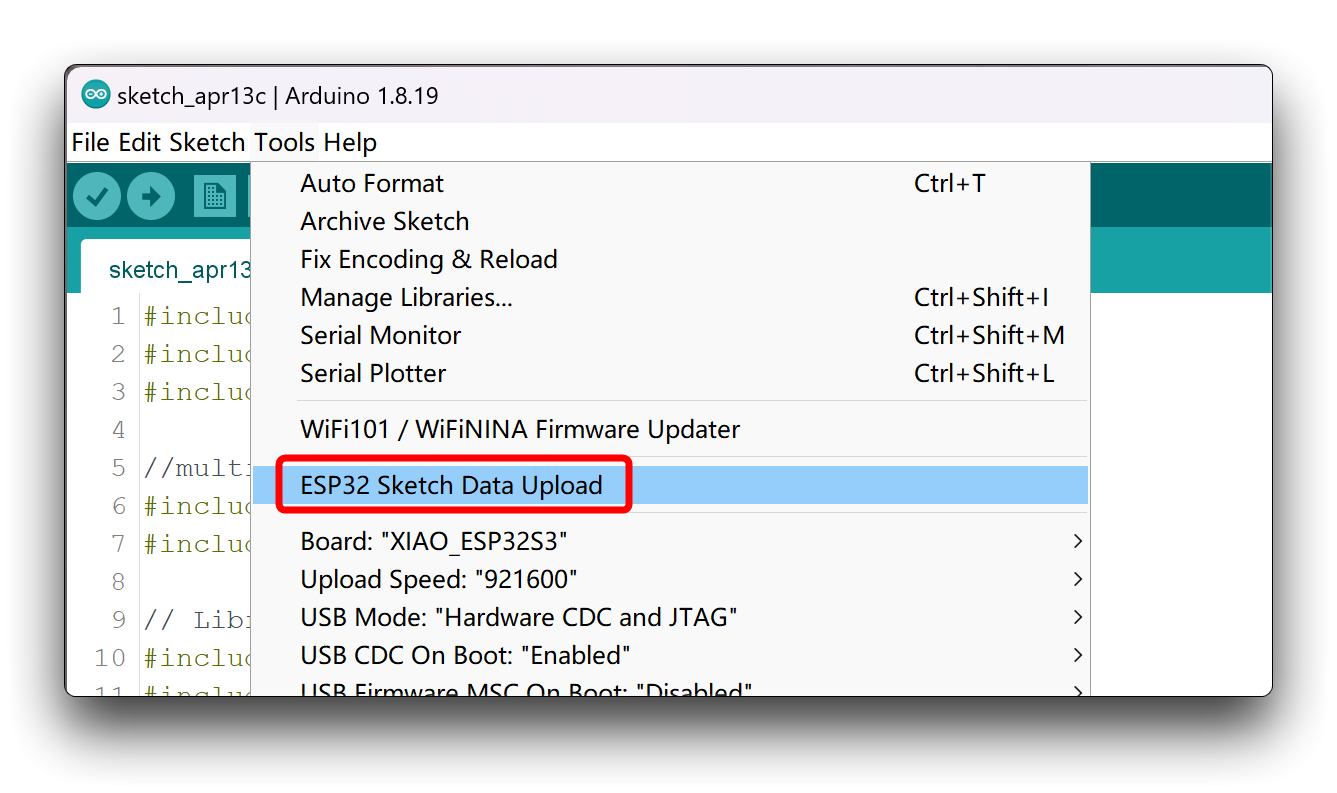
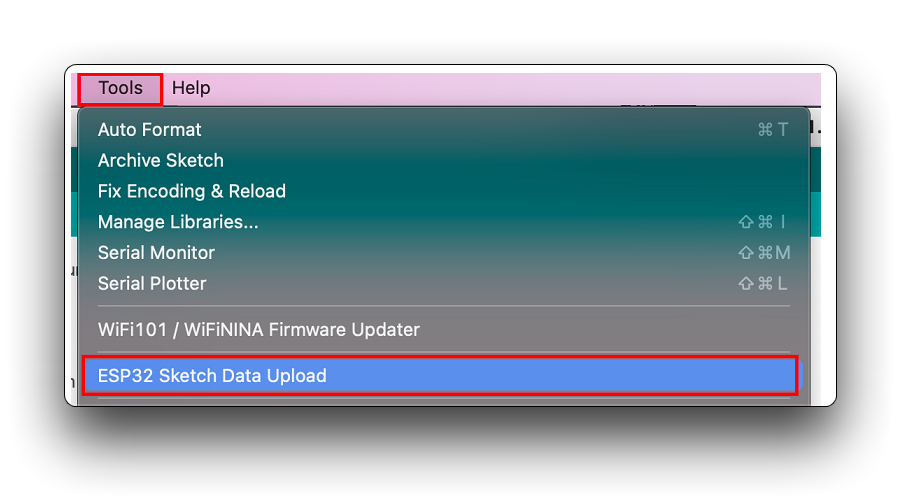
To check if the plugin was successfully installed, open your Arduino IDE. Select XIAO ESP32S3 or XIAO ESP32C3, go to Tools and check that you have the option ESP32 Sketch Data Upload.
MacOS
Step 1. Go to the releases page and click the ESP32FS-1.1.zip file to download.
Step 2. Unpack the files.
Step 3. Create a folder called tools in /Documents/Arduino/.
Step 4. Copy the unpacked ESP32FS folder to the tools directory. You should have a similar folder structure.
~Documents/Arduino/tools/ESP32FS/tool/esp32fs.jar
Step 5. Finally, restart your Arduino IDE.
To check if the plugin was successfully installed, open your Arduino IDE. Select XIAO ESP32S3 or XIAO ESP32C3, go to Tools and check that you have the option ESP32 Sketch Data Upload.
Uploading Files using the Filesystem Uploader
To upload files to the ESP32 filesystem follow the next instructions.
Step 6. Create an Arduino sketch and save it. For demonstration purposes, you can save an empty sketch.
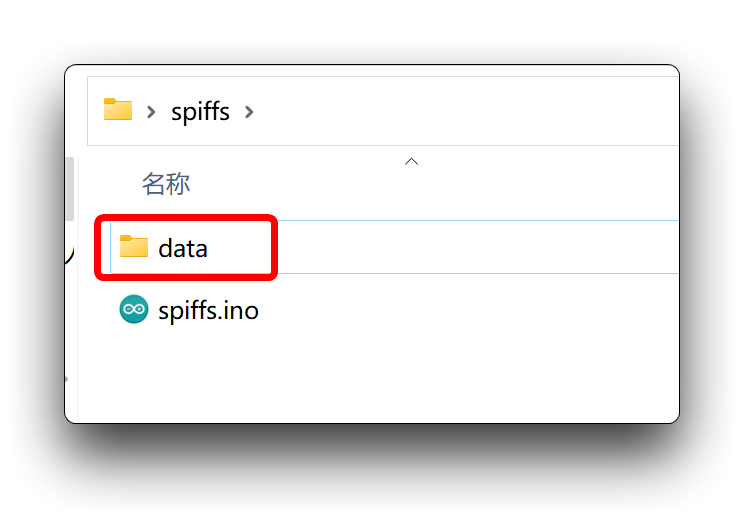
Step 7. Then, open the sketch folder. You can go to Sketch > Show Sketch Folder. The folder where your sketch is saved should open.
Step 8. Inside that folder, create a new folder called data.
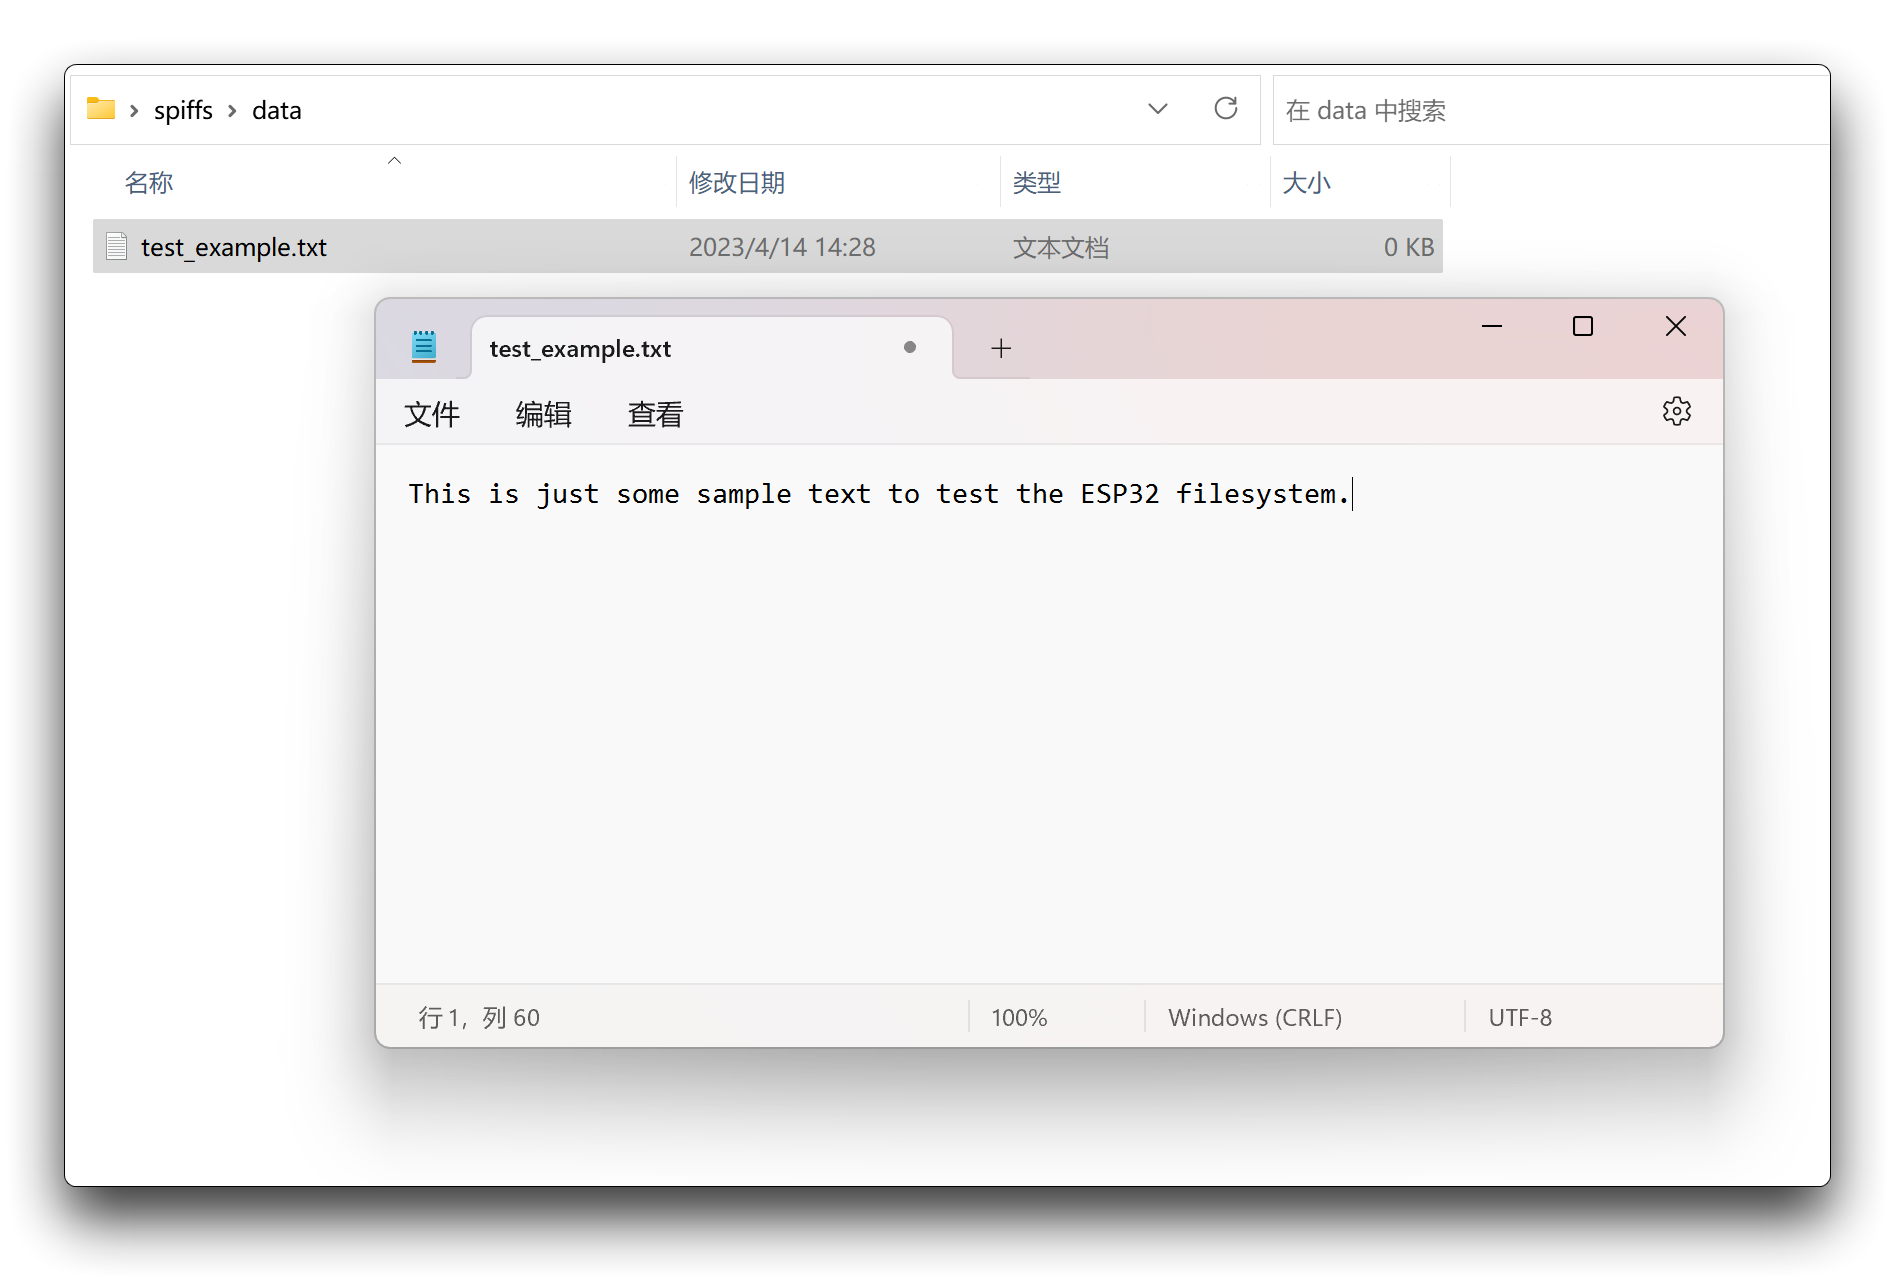
Step 9. Inside the data folder is where you should put the files you want to save into the ESP32 filesystem. As an example, create a .txt file with some text called test_example.
Step 10. Then, to upload the files, in the Arduino IDE, you just need to go to Tools > ESP32 Sketch Data Upload.
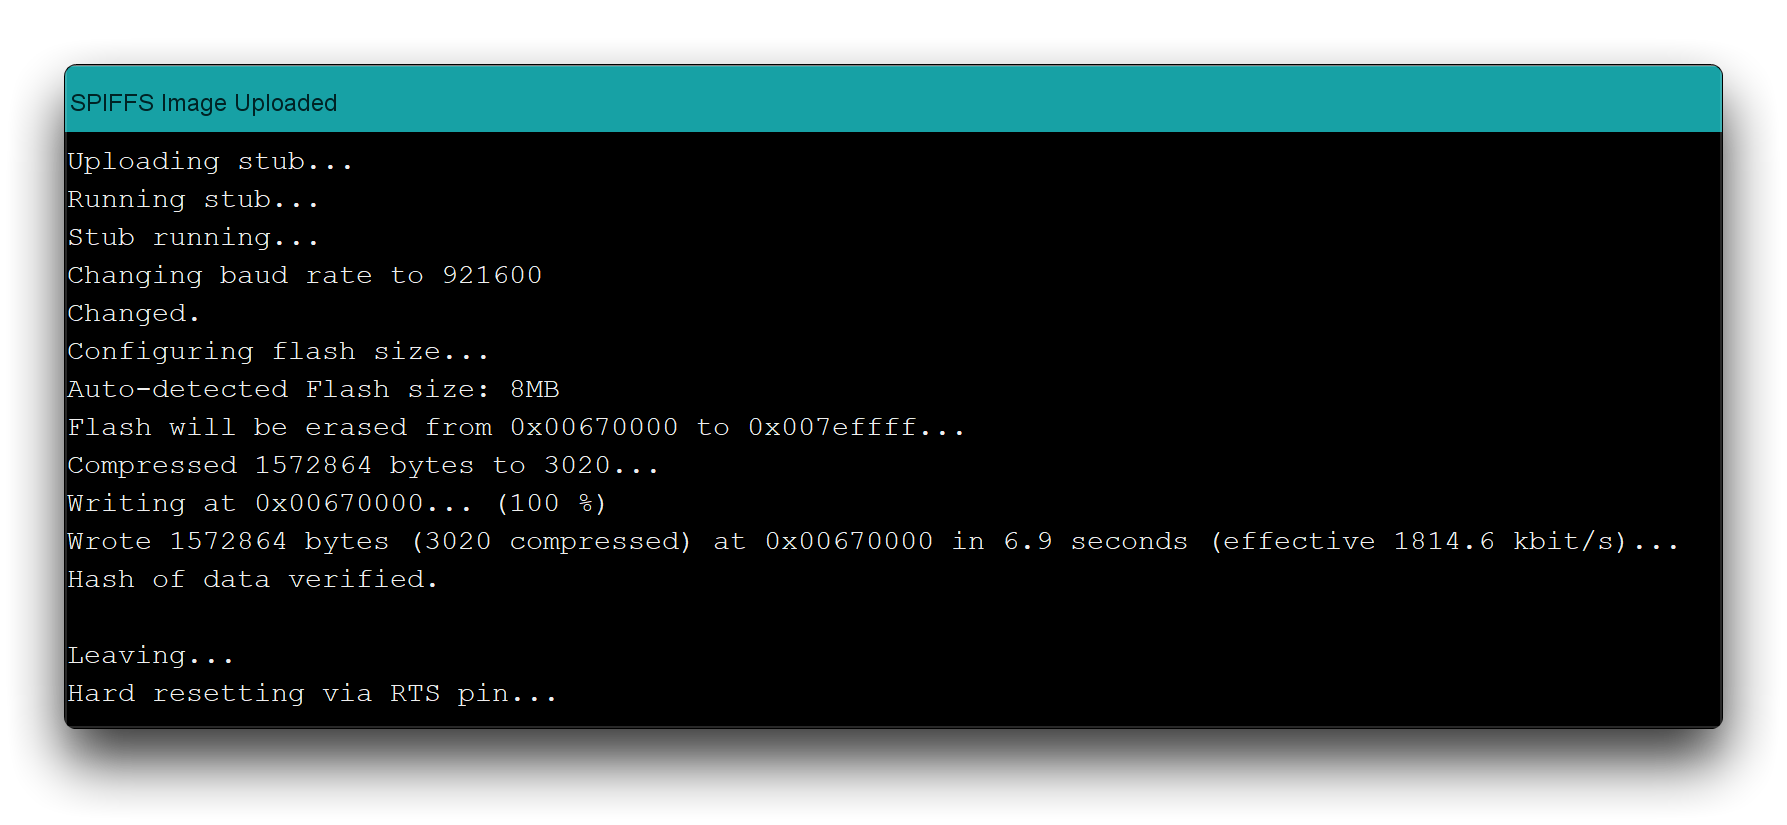
The uploader will overwrite anything you had already saved in the filesystem.
The files were successfully uploaded to the ESP32 filesystem when you see the message SPIFFS Image Uploaded.
Testing the Uploader
Now, let’s just check if the file was actually saved into the ESP32 filesystem. Simply upload the following code to your ESP32 board.
#include "SPIFFS.h"

void setup() {
  Serial.begin(115200);
  while(!Serial);

  if(!SPIFFS.begin(true)){
    Serial.println("An Error has occurred while mounting SPIFFS");
    return;
  }

  File file = SPIFFS.open("/test_example.txt");
  if(!file){
    Serial.println("Failed to open file for reading");
    return;
  }

  Serial.println("File Content:");
  while(file.available()){
    Serial.write(file.read());
  }
  file.close();

}

void loop() {

}
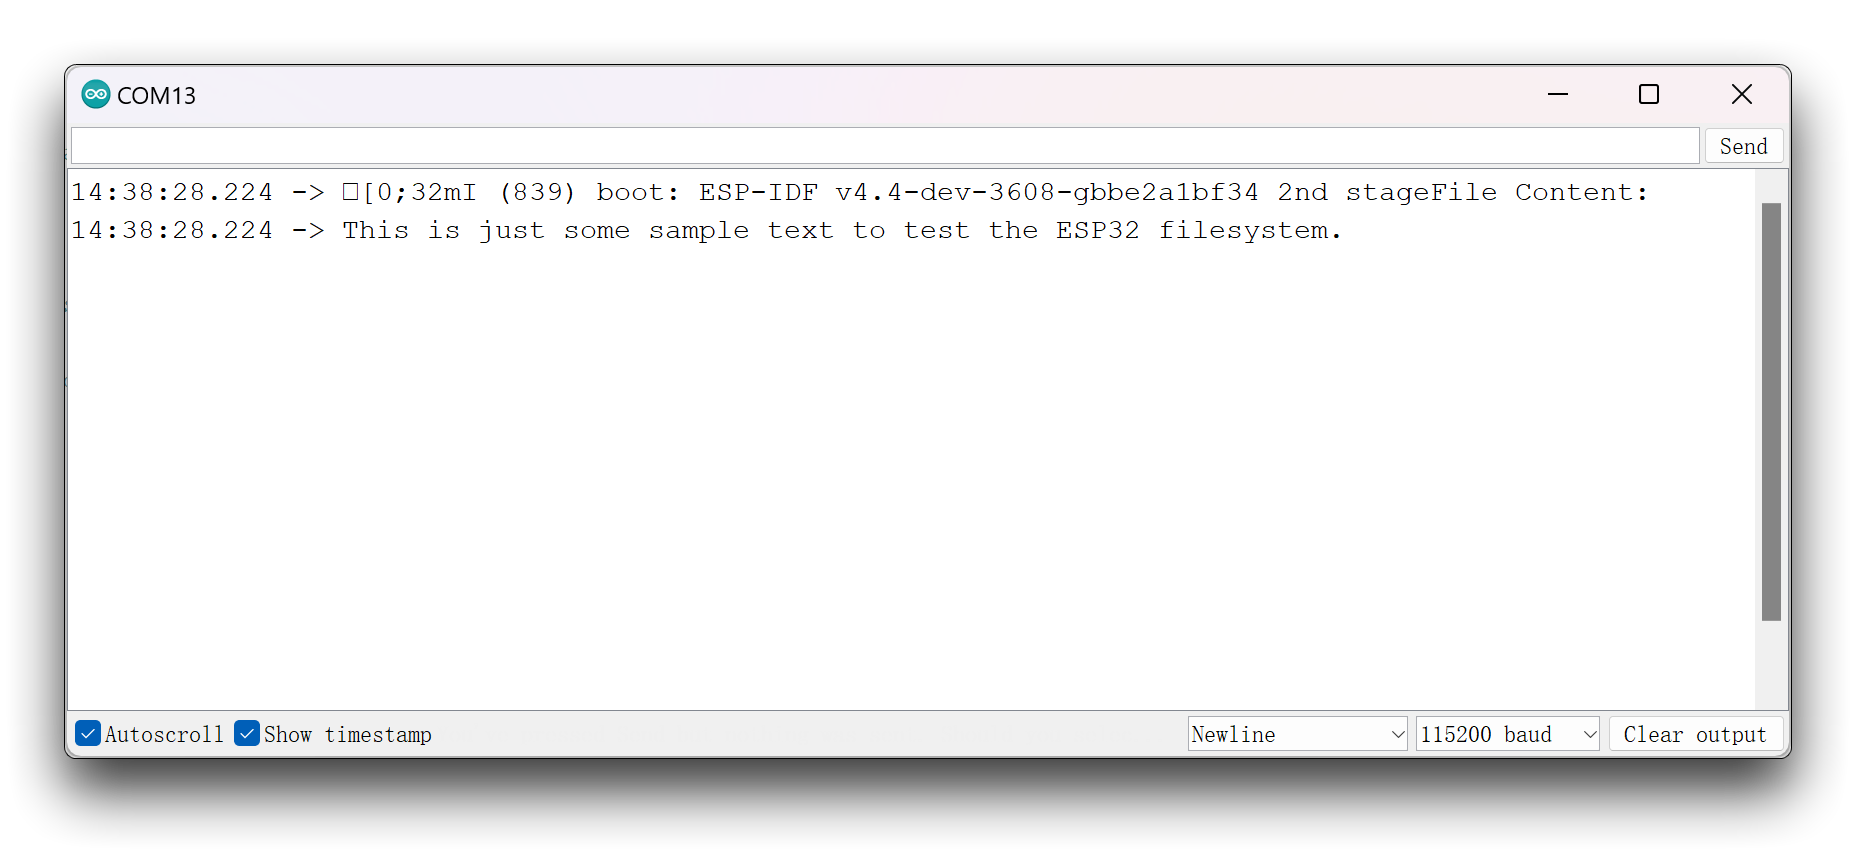
After uploading, open the Serial Monitor at a baud rate of 115200. It should print the content of your .txt file on the Serial Monitor.
Flash Data Storage
This section applies to the XIAO ESP32C3, XIAO ESP32S3, or XIAO ESP32S3 Sense.
When we use development boards, many of us will want to be able to use the flash memory on the chip to store some important data. This requires a storage method that ensures that no data is lost even in the event of an abnormal development board.
This tutorial will introduce how to store important data on the XIAO ESP32 flash memory from two different storage methods as follows:
-
First guide shows how to save data permanently on the ESP32 flash memory using the Preferences.h library. The data held in the flash memory persists across resets or power failures. Using the Preferences.h library is useful to save data like network credentials, API keys, threshold values, or even the last state of a GPIO. You’ll learn how to save and read data from flash memory.
-
Second guid explains what is the XIAO ESP32C3 EEPROM and what it is useful for. We’re also going to show you how to write and read from the EEPROM and build a project example to put the concepts learned into practice.
This section has been written for the XIAO ESP32C3 and is fully compatible with the new XIAO ESP32S3, so you can use the routines here directly, so we won't go over it again here.
Troubleshooting
Citations & References
This article draws on the files system content Random Nerd Tutorials' on ESP32 and uses it verified on the Seeed Studio XIAO ESP32S3 Sense.
Special thanks to the authors of Random Nerd Tutorials for their hard work!
The following is the reference link to the original article, you are welcome to learn more about ESP32 files system through the following link to the original article.
- ESP32: Guide for MicroSD Card Module using Arduino IDE
- ESP32 Data Logging Temperature to MicroSD Card
- Install ESP32 Filesystem Uploader in Arduino IDE
For more information about using the ESP32 development board, please read the official website of Random Nerd Tutorials.
Tech Support & Product Discussion
Thank you for choosing our products! We are here to provide you with different support to ensure that your experience with our products is as smooth as possible. We offer several communication channels to cater to different preferences and needs.