Developed on XIAO using Espressif ESP-IDF
This article is the first tutorial in the Seeed Studio XIAO ESP32 Development Matter series. If you want to start your Matter device development journey with the XIAO ESP32 Series, start here.
This tutorial applies to the XIAO ESP32C3, XIAO ESP32S3 and XIAO ESP32C6.
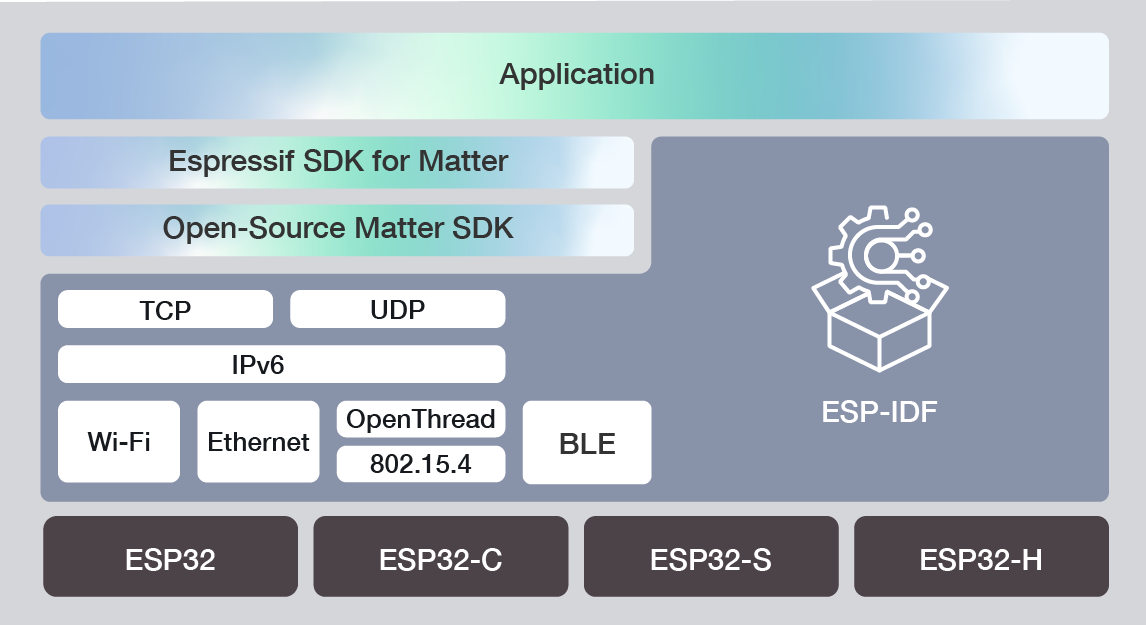
In the world of IoT development, the ESP-IDF (Espressif IoT Development Framework) has gained significant popularity due to its powerful features and extensive support for ESP32 series microcontrollers. With the emergence of the Matter protocol, which aims to provide a unified standard for smart home devices, developers are eager to explore this new frontier. However, Matter development currently does not support the Arduino framework, leaving ESP-IDF as the primary choice for development. In this tutorial, we will guide you through the process of installing ESP-IDF on an Ubuntu system, enabling you to kickstart your Matter development journey on XIAO ESP32 Series.
Base on Ubuntu 22.04
When it comes to Matter development, the choice of operating system is an important consideration. While Windows does not provide native support for Matter development, developers can still use Windows Subsystem for Linux (WSL) to create a compatible environment. WSL allows running a Linux distribution, such as Ubuntu, directly on Windows, providing access to the necessary tools and libraries for Matter development.
On the other hand, macOS is a popular choice among developers due to its Unix-based foundation and comprehensive development tools.
Ultimately, the choice of operating system depends on your personal preferences and the specific requirements of your Matter project. Ubuntu, being a Linux distribution, offers a native and streamlined experience for Matter development. However, if you are more comfortable with Windows or macOS, you can still set up a suitable development environment using tools like WSL on Windows or the built-in terminal on macOS.
We do not recommend developing ESP-Matter for Windows, even with WSL. Windows does not support exposing COM ports to WSL distros. You may need to switch terminals frequently or install usbipd-win for port issues, including the use of chip-tool is also a crushing point.
In summary, we will be using Ubuntu for the next development steps, and will be using the latest Ubuntu 22.04 currently supported by Matter. If you want to use an operating system other than this article for Matter development, you can refer to read the official documentation of Lexin. This article will not repeat.
Prepare the Software
Below I will list the system version and ESP-IDF version used in this article for reference. This is a stable version that has been tested to work properly.
- Host: Ubuntu 22.04 LTS (Jammy Jellyfish).
- ESP-IDF: Tags v5.2.1.
- Git
- Visual Studio Code
Prepare the Hardware
In this section, we will detail how to configure the use of ESP-IDF in Ubuntu's environment and execute the lighting example provided by ESP-IDF. So for this article, you only need to prepare any of the following XIAO ESP32 series.
| XIAO ESP32C3 | XIAO ESP32S3 | XIAO ESP32C6 |
|---|---|---|
 |  |  |
The XIAO ESP32C3 does not have an on-board LED, so if you are using the XIAO ESP32C3, you may need to have an additional LED.
Video Tutorials
Since the ESP-IDF development framework is aimed at more professional software developers, the threshold for using it is higher than that of Arduino. The related documents and information will be less than Arduino. In order to let XIAO users start using ESP-IDF as soon as possible, and reduce the possibility of encountering problems in the configuration of the development environment, we will present the configuration of the environment in the form of video and graphics. This section is the video part, if you want to follow along with the video, you can refer to this video to install and configure the ESP-IDF environment and finally light up the on-board LEDs of the XIAO ESP32C6.
Installation ESP-IDF Step by Step
This section is the graphical tutorial portion of the ESP-IDF environment configuration.
Step 1. Install Prerequisites
Begin by updating and upgrading your Ubuntu system to ensure you have the latest packages and dependencies. Open a terminal and run the following commands:
sudo apt update
sudo apt upgrade
Install the necessary prerequisites for ESP-IDF by running the following command, if you are sure that the following packages have already been installed, you can skip this step, but we still recommend that you run this command to check it again.
sudo apt-get install git wget flex bison gperf python3 python3-pip python3-venv cmake ninja-build ccache libffi-dev libssl-dev dfu-util libusb-1.0-0
CMake version 3.16 or newer is required for use with ESP-IDF. Run "tools/idf_tools.py install cmake" to install a suitable version if your OS versions does not have one.
Step 2. Installing Python3
Typically, the full version of Ubuntu 22.04 LTS installs Python 3.12 by default. If you're not sure, you can check as follows. If it is not installed or ever you uninstalled it, you can also reinstall it as below. If you're pretty sure you have Python 3 installed, you can skip this step.
Check what Python you currently have:
python --version
If the output is like Python 2.7.17, your default interpreter is Python 2.7. If so, also check if Python 3 is not already installed on your computer:
python3 --version
If the above command returns an error, it means Python 3 is not installed.
Below is an overview of the steps to install Python 3.
-
Installing with HomeBrew can be done as follows:
brew install python3 -
If you have MacPorts, you can run:
sudo port install python38
Step 3. Get ESP-IDF
To get ESP-IDF, navigate to your installation directory and clone the repository with git clone, following instructions below specific to your operating system. Open Terminal, and run the following commands:
mkdir -p ~/esp
cd ~/esp
git clone -b v5.2.1 --recursive https://github.com/espressif/esp-idf.git
By executing the above command, ESP-IDF will be downloaded to ~/esp/esp-idf.
Step 4. Set up the Tools
Aside from the ESP-IDF, you also need to install the tools used by ESP-IDF, such as the compiler, debugger, Python packages, etc, for projects supporting ESP32.
cd esp-idf/
./install.sh
Step 5. Set up Environment Variables
The installed tools are not yet added to the PATH environment variable. To make the tools usable from the command line, some environment variables must be set. ESP-IDF provides another script which does that.
In the terminal where you are going to use ESP-IDF, run:
source ./export.sh
cd ..
At this point, the entire ESP-IDF environment is actually configured. To verify that ESP-IDF is installed correctly, run the following command:
idf.py --version
If the installation is successful, you should see the version information of ESP-IDF.
Step 6 (Optional). Quick access to the ESP-IDF development environment
As described in the above steps, every time we start the terminal or reboot the computer, we need to import the environment variables of ESP-IDF in the new terminal, which brings us a great inconvenience, especially if we need to develop ESP32 frequently. We can modify the configuration file of Shell by the following steps to start the environment of ESP-IDF by the command of get_idf.
Open the .bashrc file by typing the following command in the terminal.
nano ~/.bashrc
Add the following to the end of the .bashrc file.
alias get_idf='. ~/esp/esp-idf/export.sh'
Refresh the configuration by restarting the terminal session or by running source [path to profile], for example, source ~/.bashrc.
Now you can run get_idf to set up or refresh the esp-idf environment in any terminal session.
Technically, you can add export.sh to your shell's profile directly; however, it is not recommended. Doing so activates IDF virtual environment in every terminal session (including those where IDF is not needed), defeating the purpose of the virtual environment and likely affecting other software.
Running the LED Example Program
To ensure that your ESP-IDF environment is set up correctly, let's run a simple LED example program.
Step 1. Connect XIAO ESP32C6 to PC
Now connect your XIAO ESP32 Series board to the computer and check under which serial port the board is visible. We will use the XIAO ESP32C6 as an example.
Serial ports have the following naming patterns: /dev/tty. In general, your computer may have many ports that begin with tty.
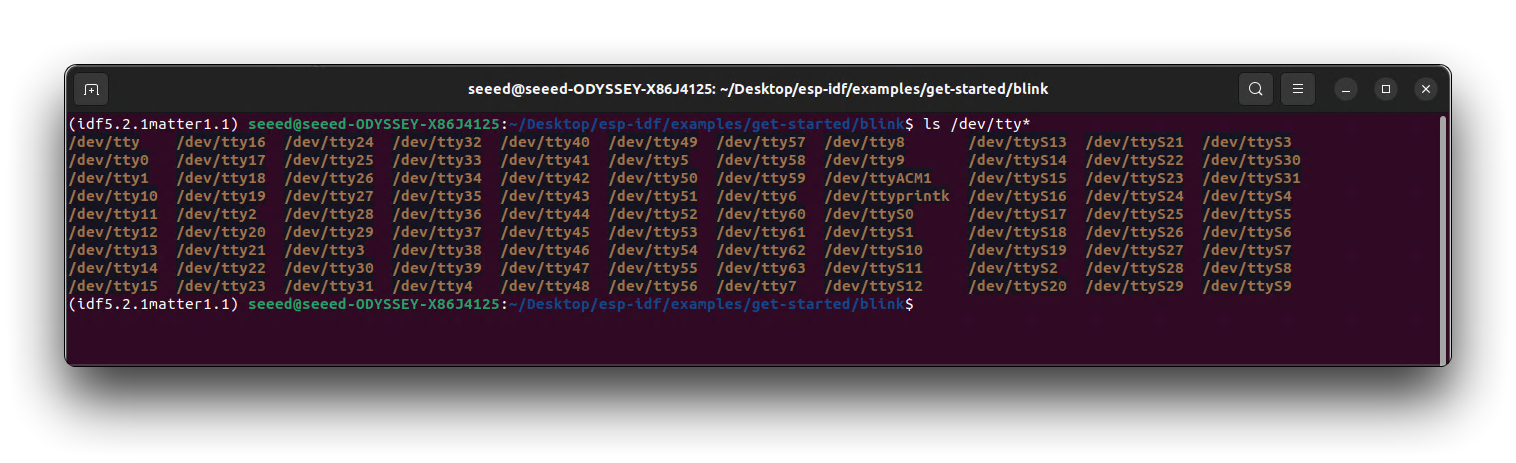
Determining the ports is also easy, you can use the query command to see which ports are present by default when you are not connected to XIAO.
ls /dev/tty*
Then, after connecting the XIAO to the computer and querying it again, the extra serial port name is the port number of the XIAO.
Keep the port name handy as it is needed in the next steps.
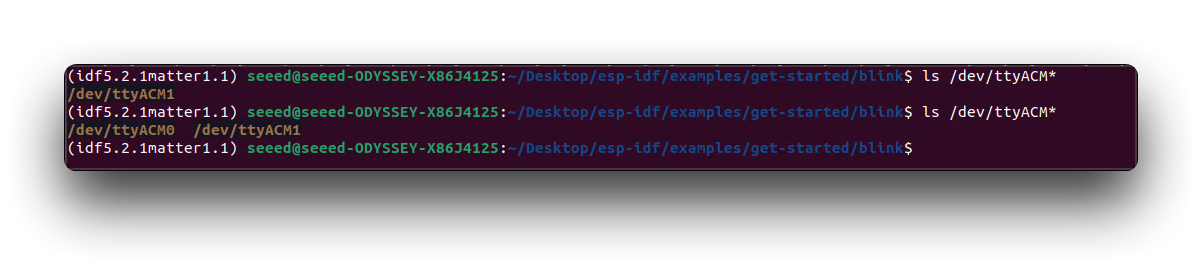
As you can see above, my XIAO port number on my computer should be ttyACM0.
Step 2. Start a Project
Navigate to the examples directory
cd ~/esp/esp-idf/examples/get-started/blink
Set the target device.
idf.py set-target esp32c6
- If you are using XIAO ESP32C3, then the command you need to use is
idf.py set-target esp32c3. - If you are using XIAO ESP32S3, then the command you need to use is
idf.py set-target esp32s3.
Since the main effect of this sample project is to make the on-board LEDs blink, we need to configure the GPIO where the LEDs are located and the blinking time and other parameters. ESP-IDF provides the menuconfig command to set some adjustable parameters of the project.
idf.py menuconfig
This command opens a configuration menu where you can modify various settings.
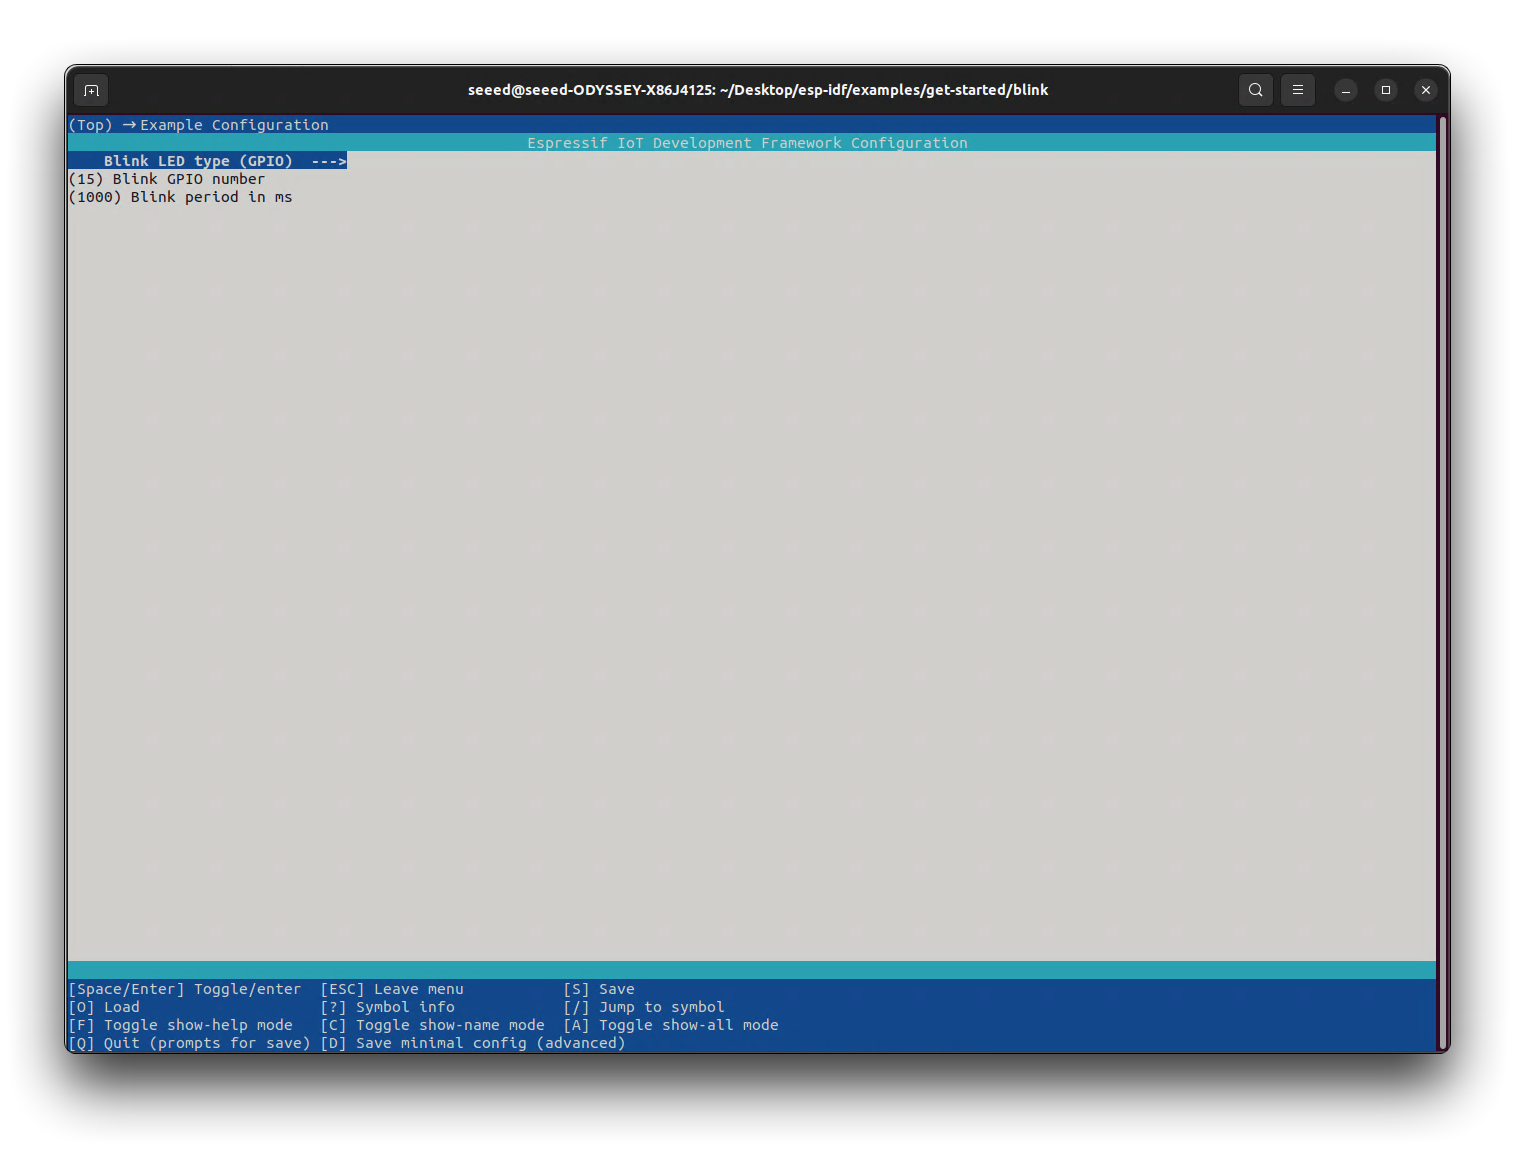
Taking the blink project as an example, there are three parameters that can be adjusted.
-
Blink LED type: Set the type of LED to use, in this case we set it to GPIO.
-
Blink GPIO number: The GPIO pin number where the LED is located is set to 15 here. The LED of XIAO ESP32C6 is connected to GPIO15.
-
Blink period in ms: The time interval between light flashes. The default is 1000 milliseconds, or 1 second.
Once the setting is complete, press q to exit the setup menu and then y to confirm the changes.
Step 3. Build and Flash the Example
Build the project by running:
idf.py build
This command compiles the application and all ESP-IDF components, then it generates the bootloader, partition table, and application binaries. If there are no errors, the build finishes by generating the firmware binary .bin files.
To flash the binaries that you just built for the ESP32 in the previous step, you need to run the following command:
idf.py -p PORT flash
Replace PORT with your XIAO ESP32 board's USB port name. If the PORT is not defined, the idf.py will try to connect automatically using the available USB ports. According to the device port number we queried in the first step, for me, I should enter the following command to flash the programme.
idf.py -p /dev/ttyACM0 flash
If there are no issues by the end of the flash process, the XIAO will reboot and start up the "blink" application.
To view the output of the LED example program, run the following command
idf.py monitor
You should see the LED on your XIAO blinking, indicating that the example program is running successfully.
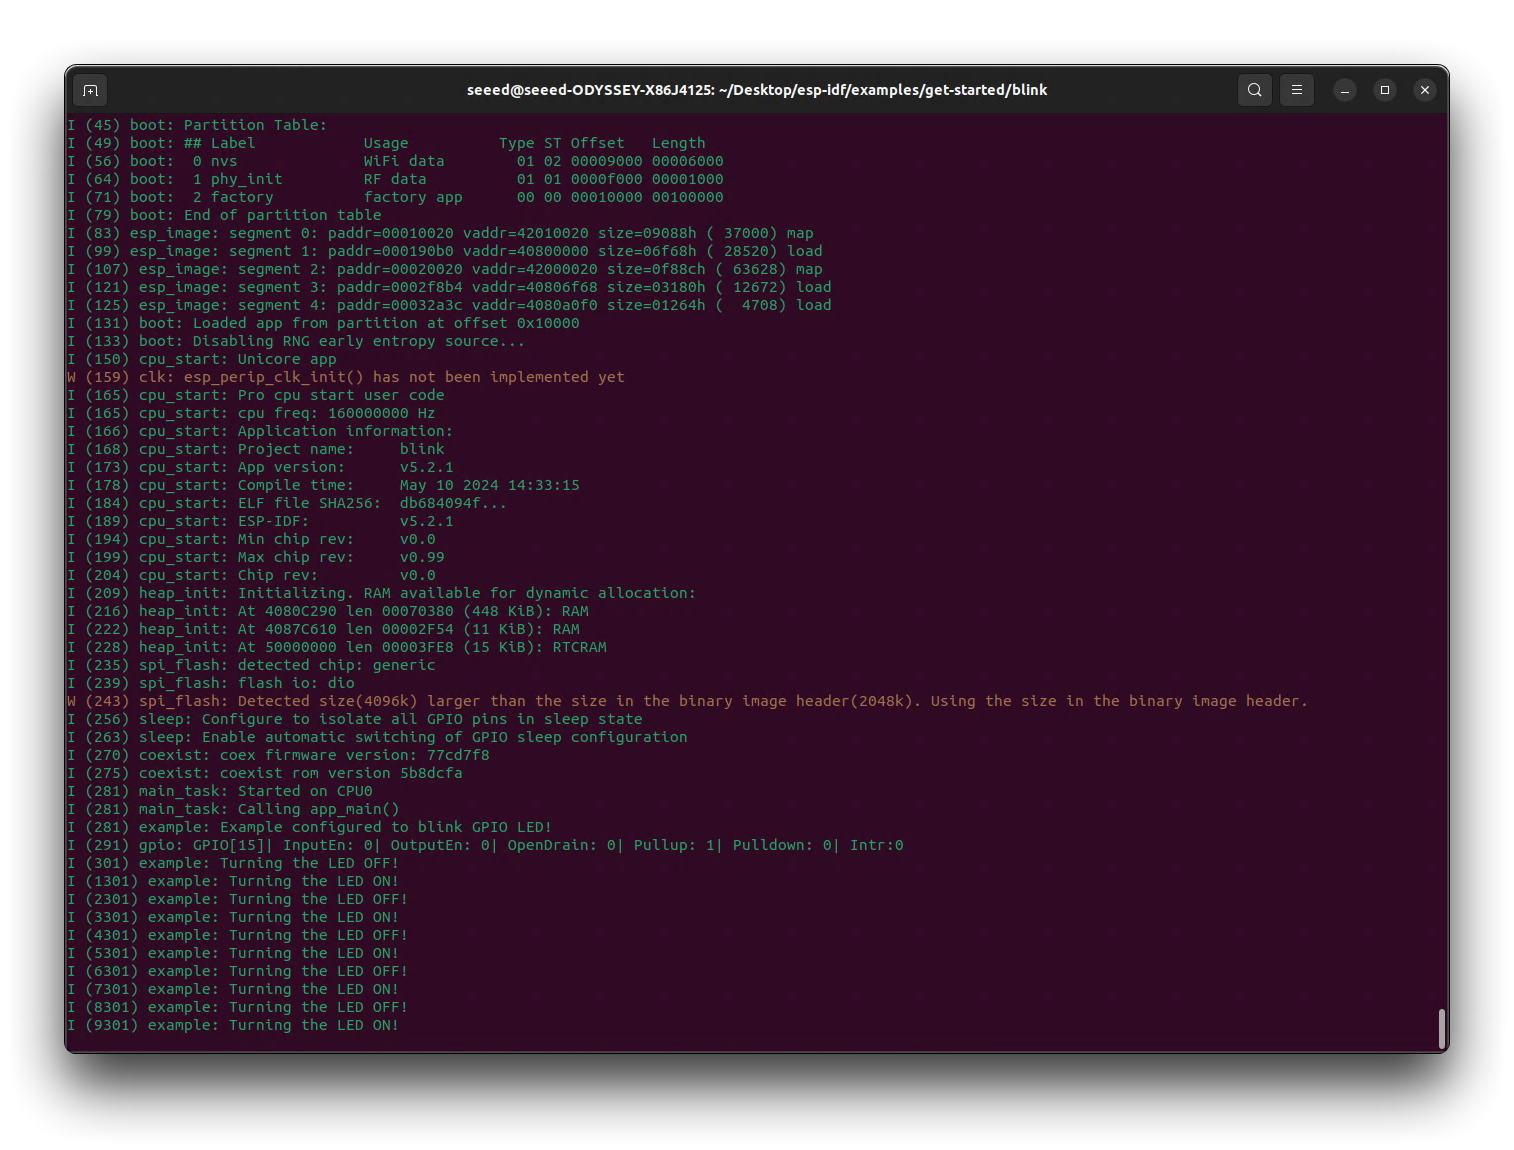
If you wish to exit the serial monitor, you can use the shortcut Ctrl+].
Here are some commonly used commands in the ESP-IDF environment:
idf.py menuconfig: Opens the project configuration menu.idf.py build: Builds the project.idf.py flash: Flashes the built firmware to the connected device.idf.py monitor: Starts the serial monitor to view the output from the device.idf.py clean: Cleans the build directory.idf.py fullclean: Performs a full clean, including the downloaded dependencies.idf.py set-target: Sets the target chip for the project.idf.py size: Displays the size information of the built firmware.idf.py app: Manages applications in the project.idf.py component: Manages components in the project.
Congratulations! You have successfully installed ESP-IDF on your Ubuntu system, laying the foundation for your Matter development journey. Seeed Studio will continue to enhance and expand the development documentation for the XIAO ESP32 series in the context of Matter. With the completion of the ESP-IDF setup and configuration, you are now ready to proceed with the Matter development part of your journey.
Seeed Studio is committed to providing comprehensive resources and support to facilitate your Matter development experience. Keep an eye out for the upcoming Matter-specific documentation and tutorials tailored to the XIAO ESP32 series. These resources will guide you through the process of utilizing the ESP-IDF framework to build cutting-edge smart home devices that adhere to the Matter protocol.
As you delve deeper into Matter development, make sure to refer to the official ESP-IDF documentation for in-depth information on the framework's capabilities and best practices. Engage with the vibrant community of developers and enthusiasts to exchange knowledge, seek guidance, and collaborate on innovative projects.
With the power of ESP-IDF and the upcoming Matter development resources from Seeed Studio, you are well-equipped to create remarkable smart home solutions that push the boundaries of interoperability and user experience. Embrace the exciting possibilities that lie ahead and embark on your Matter development journey with confidence. Happy coding!
Troubleshooting
Why do I get all kinds of errors during the installation of the environment?
ESP-IDF's environment is a bit more demanding, and if you are using an Ubuntu host that is often used for development, it is likely that errors will occur due to different versions of some Python dependencies. Since the Matter framework is not developed by Seeed, there is probably nothing we can do about this part of the problem, so we recommend that you submit an issue to the official ESP-IDF repository for help if you encounter problems with the installation.
Resources
Tech Support & Product Discussion
Thank you for choosing our products! We are here to provide you with different support to ensure that your experience with our products is as smooth as possible. We offer several communication channels to cater to different preferences and needs.