
Getting Started with Seeed Studio XIAO MG24(Sense)
| Seeed Studio XIAO MG24 | Seeed Studio XIAO MG24 Sense |
|---|---|
 |  |
Introduction
Seeed Studio XIAO MG24 is a mini development board based on Silicon Labs' MG24. XIAO MG24 is based on ARM Cortex-M33 core, 32-bit RISC architecture with a maximum clock speed of 78MHz, supporting DSP instructions and FPU floating-point operations, possessing powerful computing power, and built-in AL/ML hardware accelerator MVP, which can efficiently process AI/machine learning algorithms. Secondly, it has excellent RF performance, with a transmission power of up to+19.5 dBm and a reception sensitivity as low as -105.4 dBm. It supports multiple IoT and wireless transmission protocols such as Matter, Thread, Zigbee, Bluetooth LE 5.3,Bluetooth mesh etc.
Specification
| Product | XIAO MG24 | XIAO MG24 Sense |
|---|---|---|
| Processor | Silicon Labs EFR32MG24 ARM Cortex-M33 @ 78MHz | |
| RAM | 256kB | |
| Flash | 1536KB + 4MB Onboard | |
| LEDs | 1x User LED 1x Power LED | |
| Sensors | - | 1x Onboard Analog Microphone 1x Onboard 6-Axis IMU |
| Interface | 22 Pins (All PWM): 19x Analog 19x Digital 1x I²C 2x UART 2x SPI | |
| Button | 1x RESET Button | |
| Security | Hardware Cryptographic Acceleration, True Random Number Generator, ARM® TrustZone®, Secure Boot, Secure Debug Unlock etc. | |
| Low Power (Typ.) | 1.95μA | |
| Normal (Typ.) | 6.71mA | |
| Sleep (Typ.) | 1.91mA | |
| Software Compatibility | Arduino IDE | |
| Supported Antenna | MAX 2.4GHz Ceramic Antenna: 4.97dBi | |
| Working Temperature | -20°C~70°C | |
| Dimensions | 21×17.8 mm | |
Features
- Powerful CPU:ARM Cortex-M33 core, with a maximum clock speed of 78MHz, supporting DSP instructions and FPU floating-point operations, 32-bit RISC architecture.
- Ultra-Low Power:RX current 4.6mA/TX current 5mA (0dBm), multiple low-power sleep modes
- Powerful AI:Built in AI/ML hardware accelerator MVP, capable of efficiently processing AI/machine learning algorithms.
- Multi style wireless transmission:Integrated 2.4GHz multi protocol wireless transceiver, supporting multiple IoT protocols such as Matter, OpenThread, Zigbee, Bluetooth LE 5.3, Bluetooth mesh, etc.
- Better RF Performance:Excellent RF performance, with a transmission power of up to+19.5 dBm and a reception sensitivity as low as -105.4 dBm (250kbps DSSS)
- Powerful security:Powerful security features of Secure Vault, including secure boot, encryption, random number generation, tamper proof, secure debugging, etc.
- Ultra-small size:21 x 17.8mm.
- Rich on-chip resources:Maximum 1536KB Flash and 256KB RAM, with ample storage space.
- Rich interfaces:Integrated with 12 bit 1Msps ADC, temperature sensor, analog comparator, DCDC and other rich peripherals, and up to 22 Pin, 2 USART, 2 low-power UART, 1 IIC and other interfaces.
Hardware overview
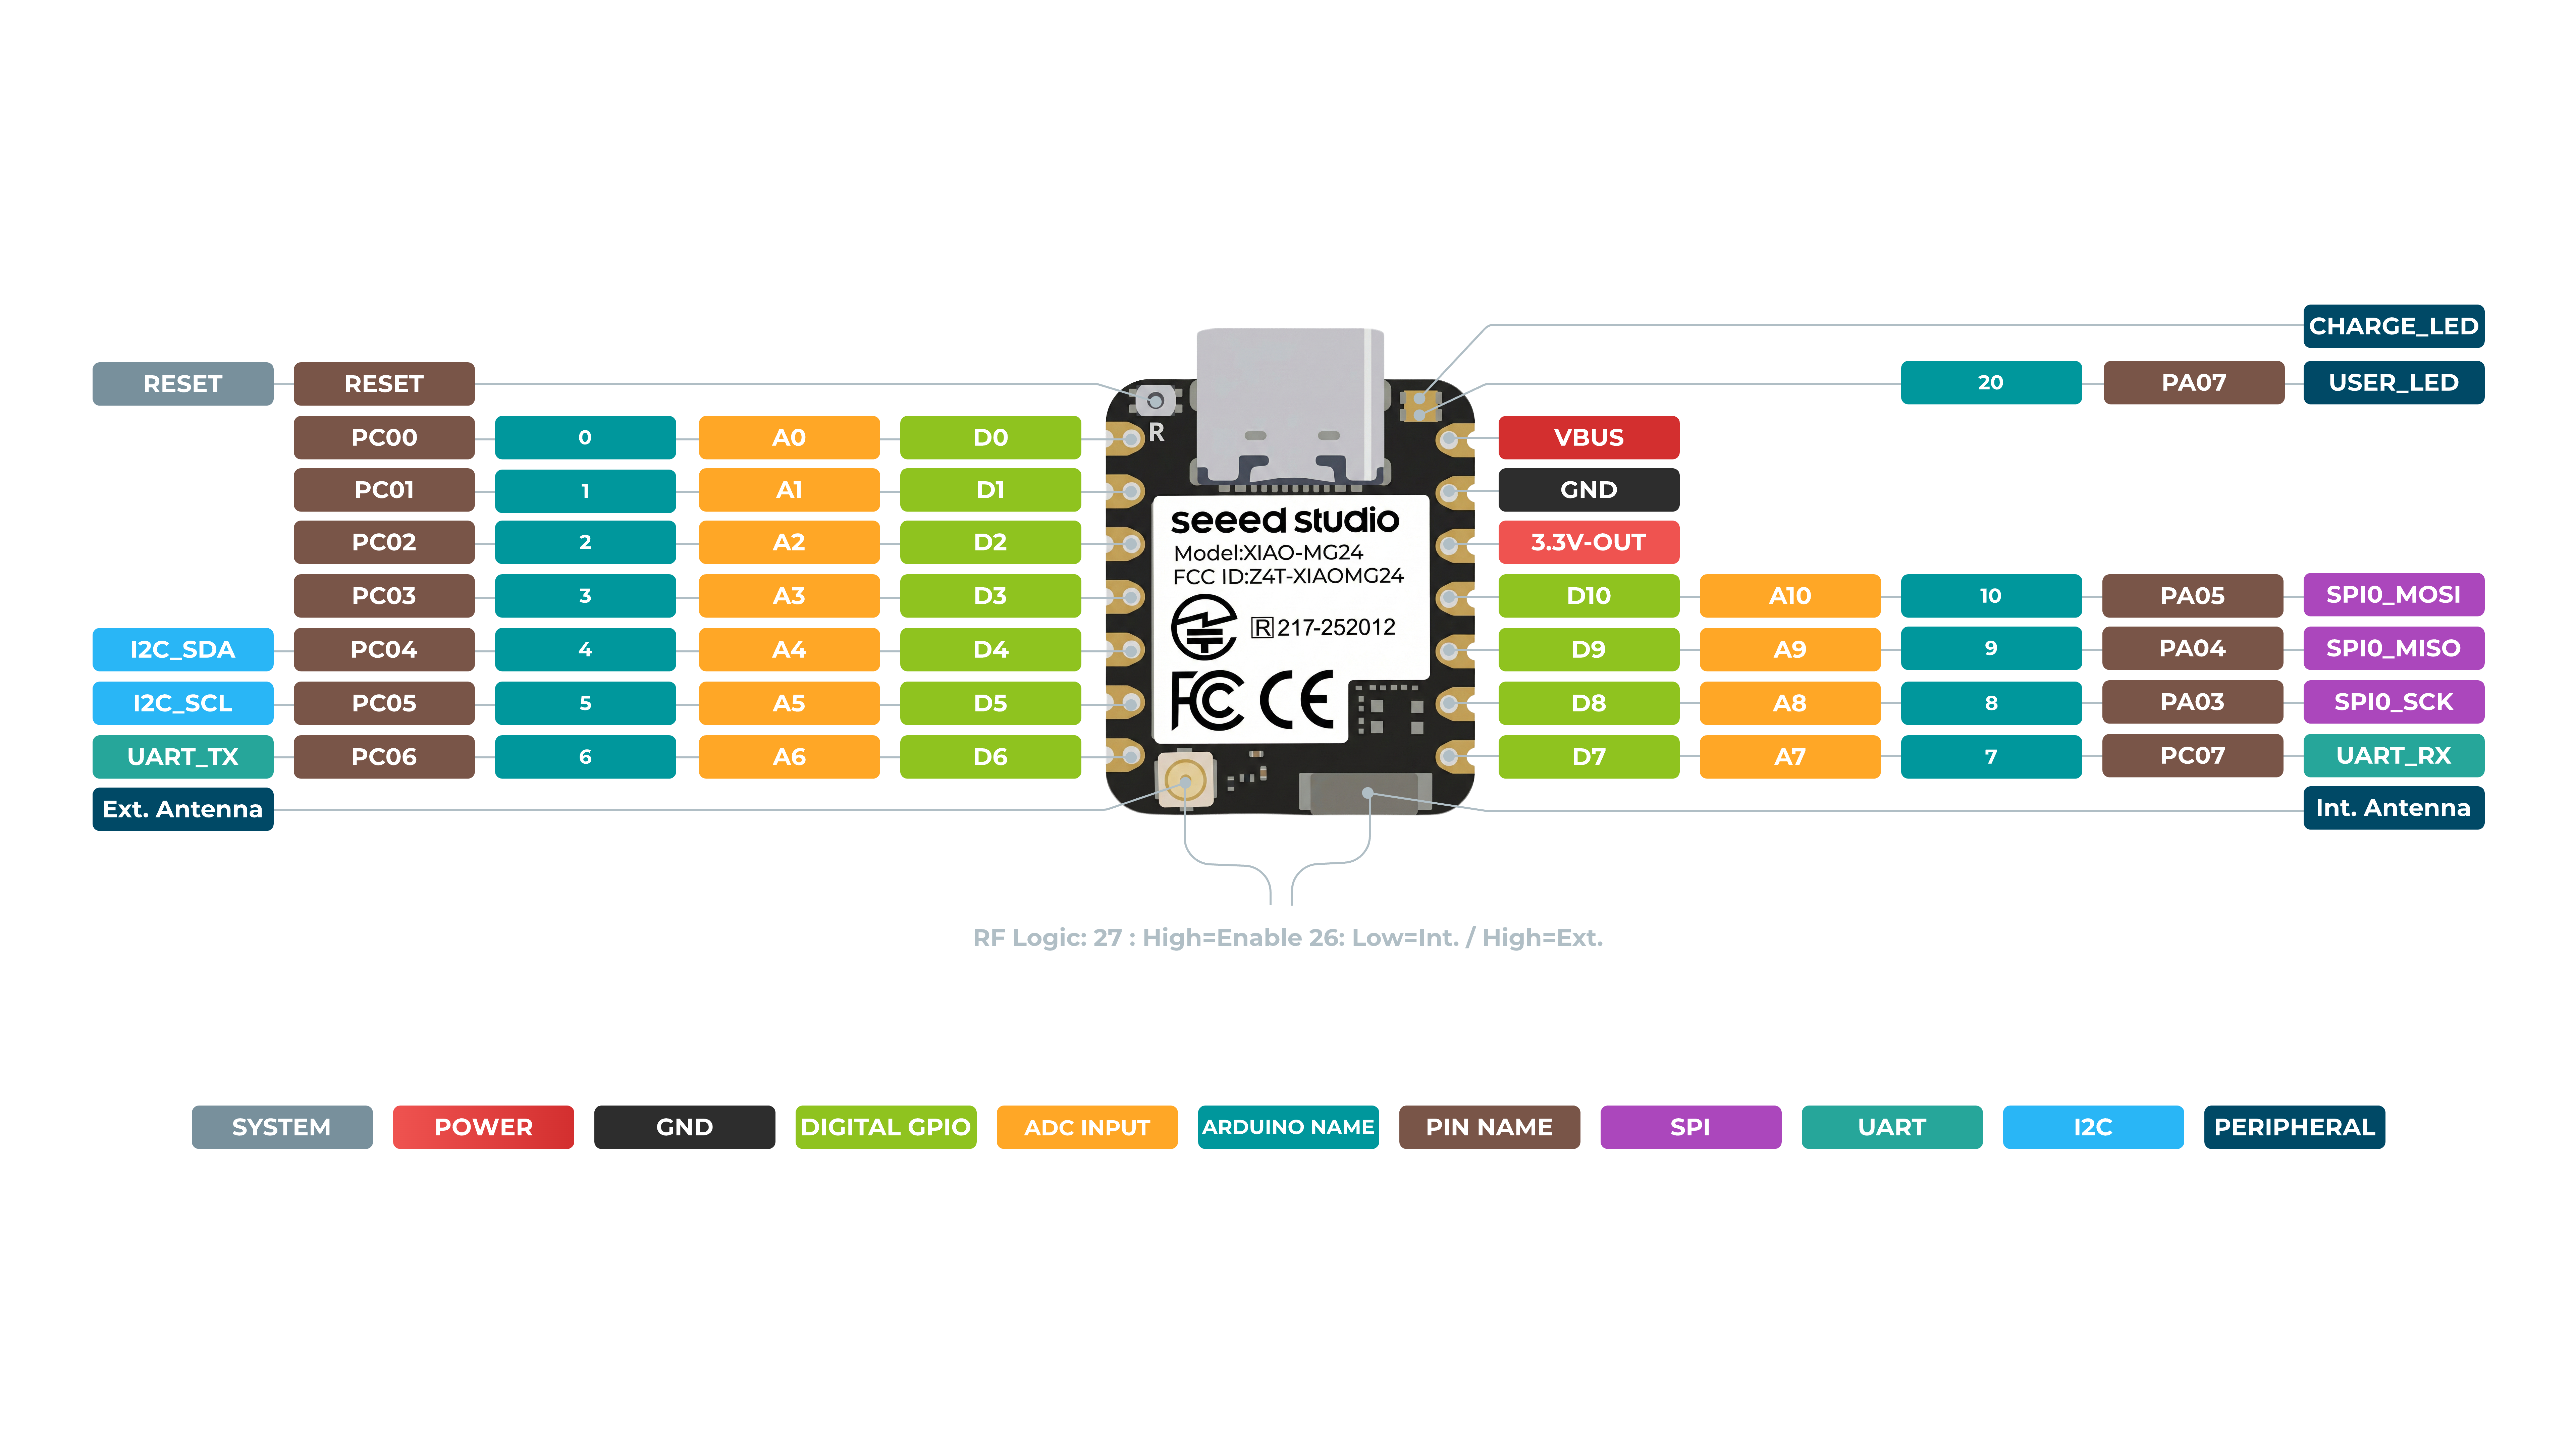
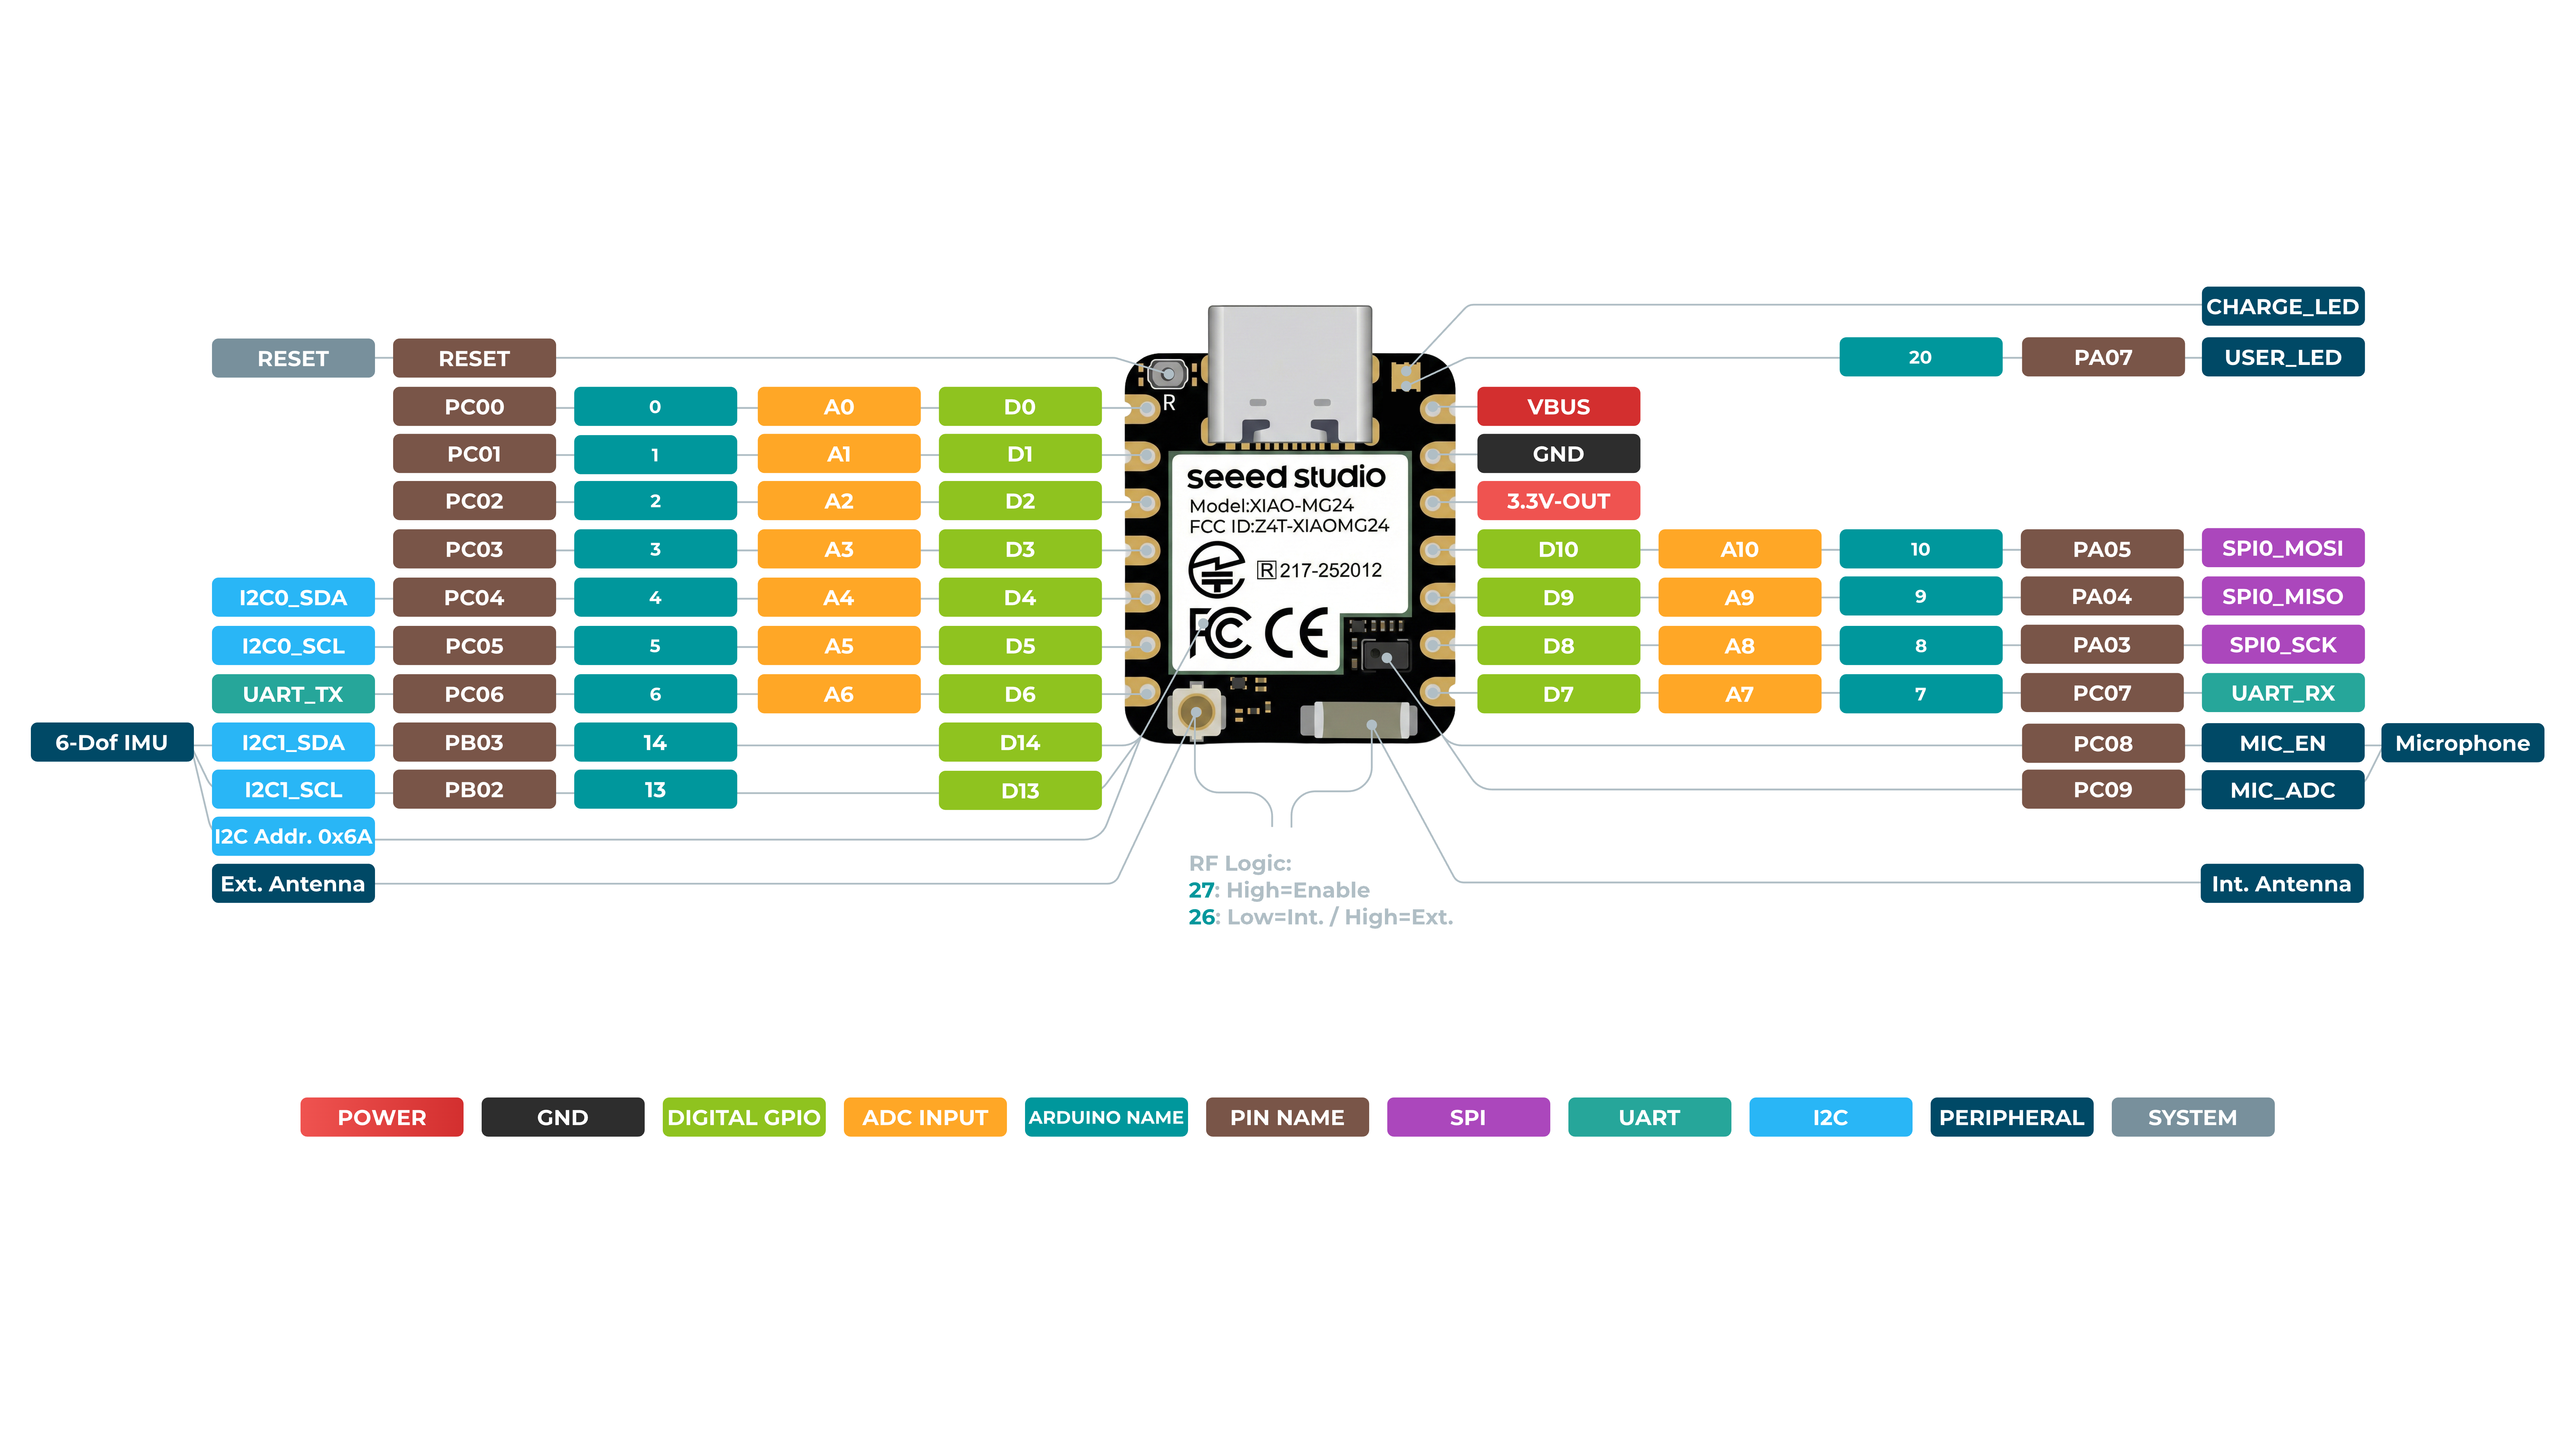

The difference between the two development boards is that MG24 Sense has a microphone sensor and a six axis acceleration sensor, while MG24 does not have one.
- 5V - This is 5v out from the USB port. You can also use this as a voltage input but you must have some sort of diode (schottky, signal, power) between your external power source and this pin with anode to battery, cathode to 5V pin.
- 3V3 - This is the regulated output from the onboard regulator.
- GND - Power/data/signal ground
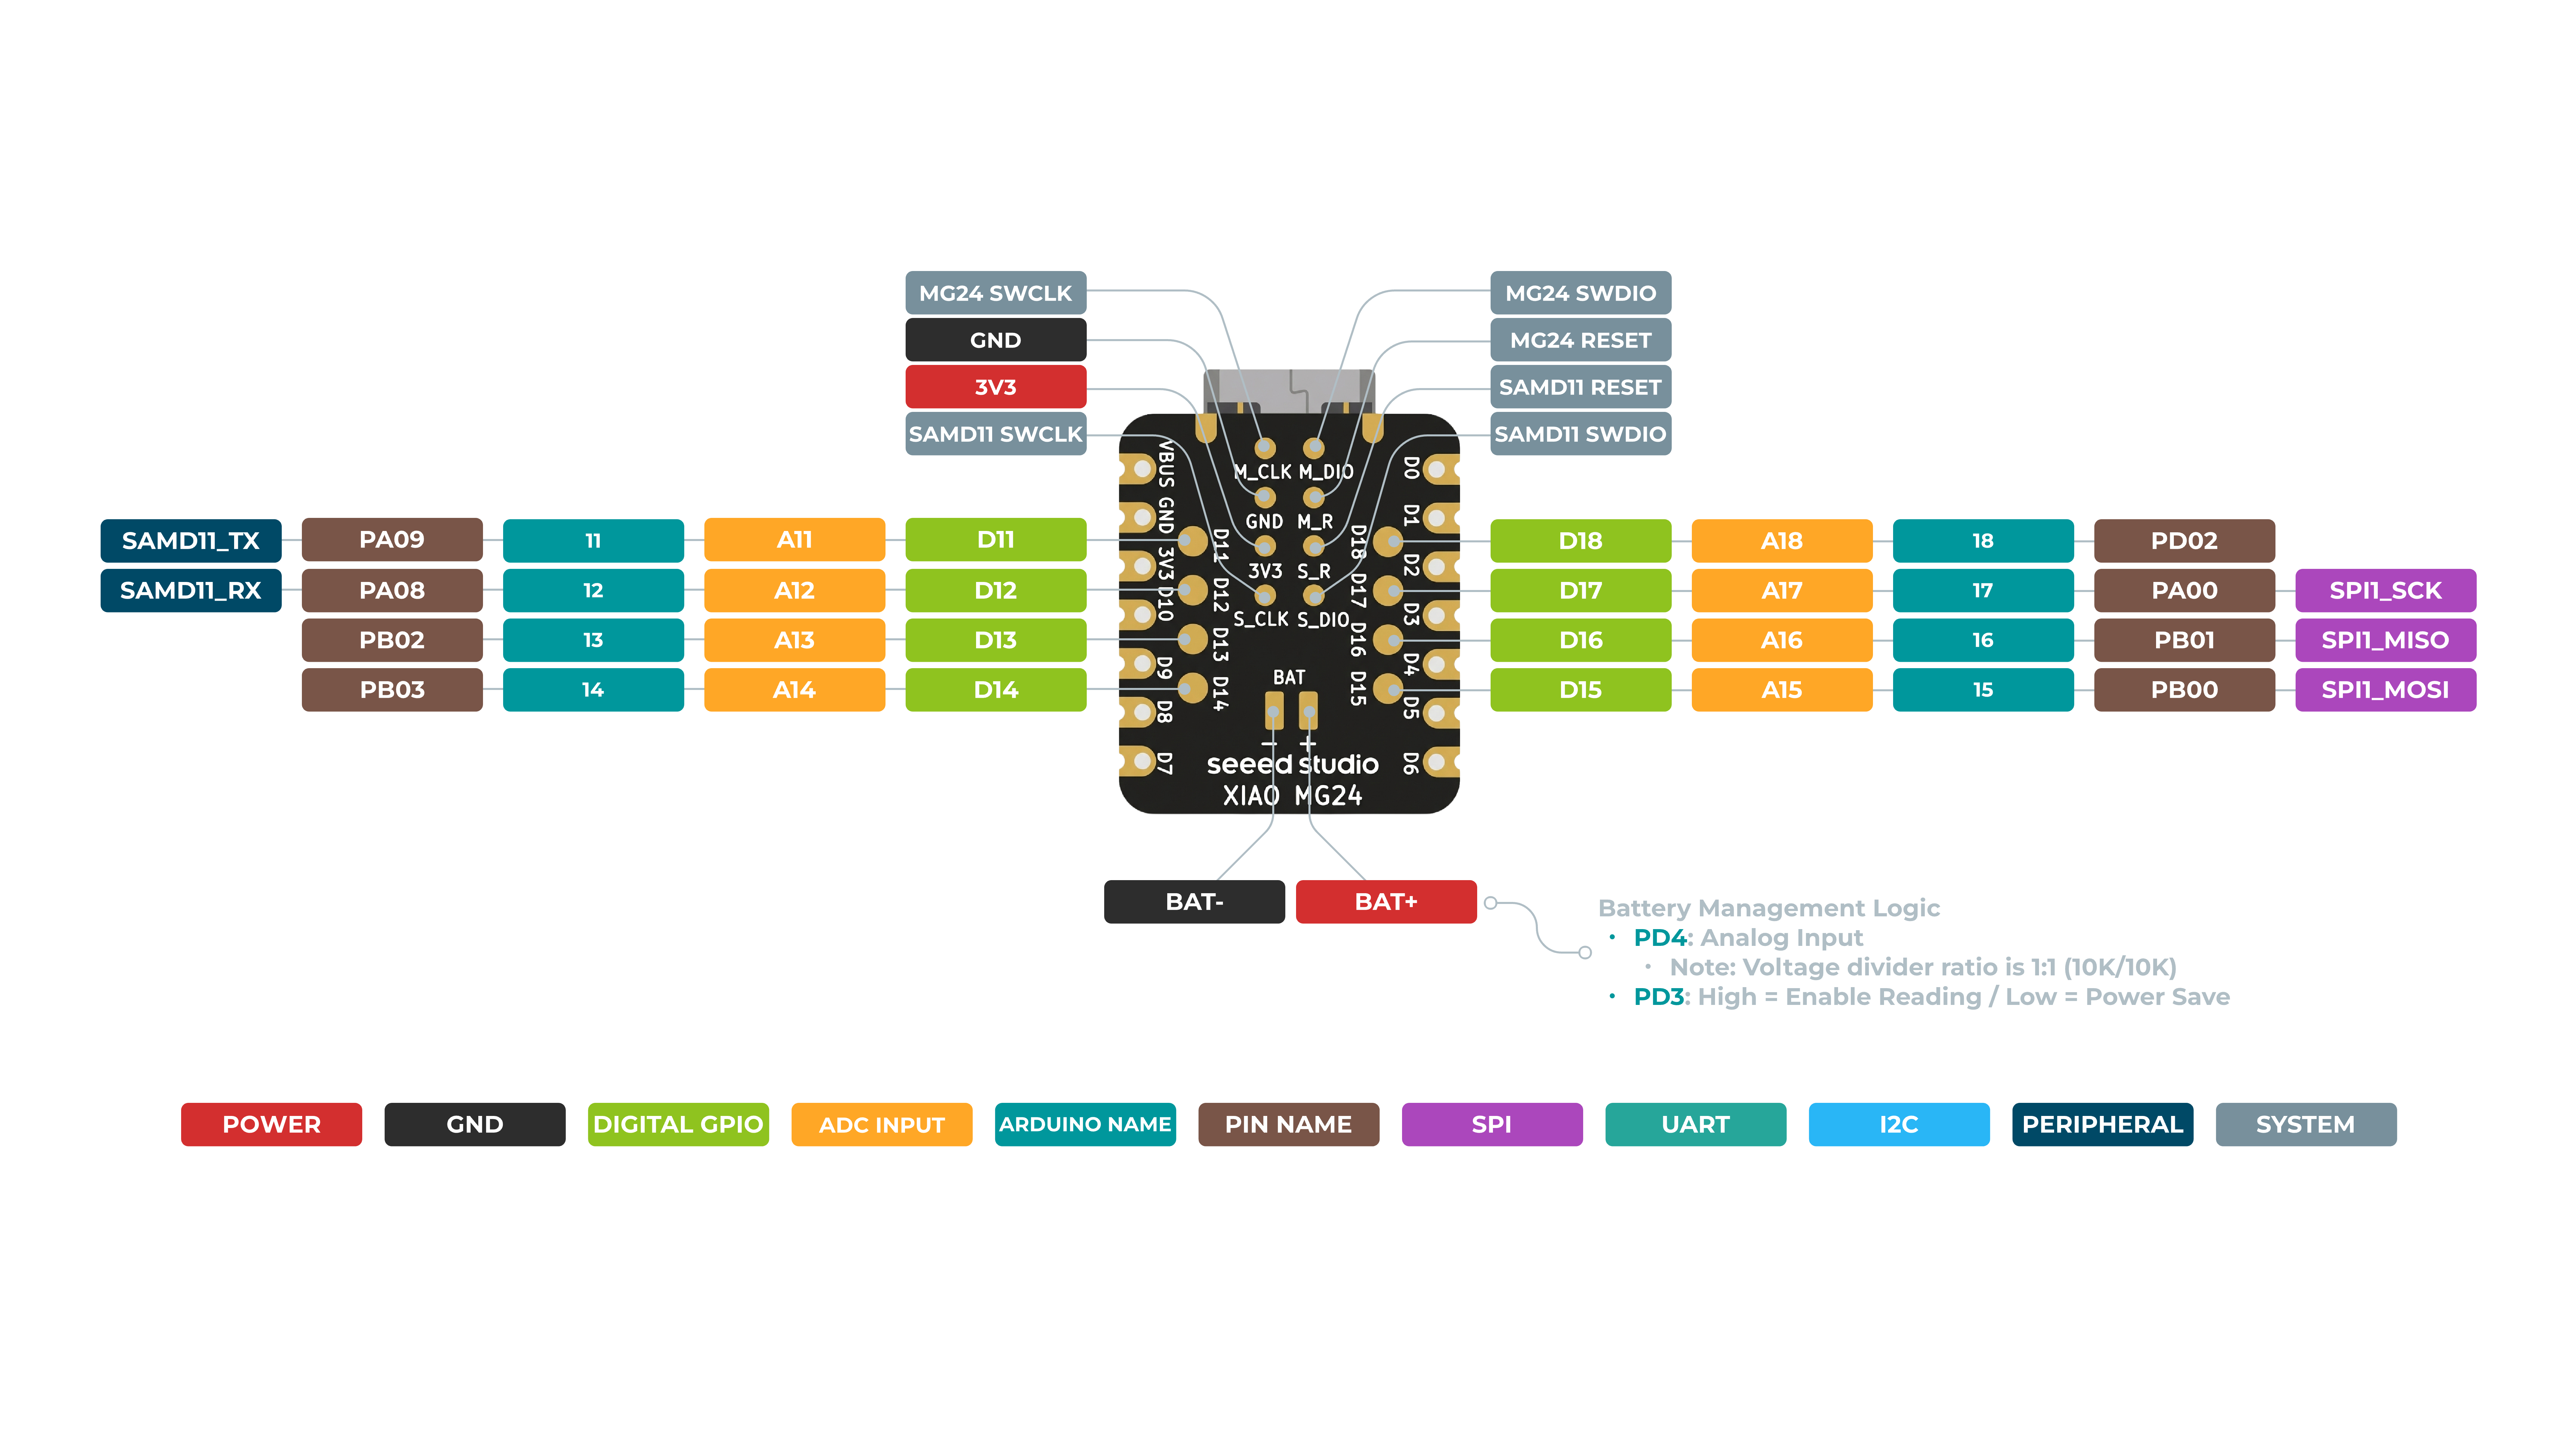
Pin Map
| XIAO Pin | Function | Chip Pin | Alternate Functions | Description |
|---|---|---|---|---|
| 5V | VBUS | Power Input/Output | ||
| GND | ||||
| 3V3 | 3V3_OUT | Power Output | ||
| D0 | Analog | PC00 | GPIO, ADC | |
| D1 | Analog | PC01 | GPIO, ADC | |
| D2 | Analog | PC02 | GPIO, ADC | |
| D3 | Analog | PC03 | GPIO, SPI, ADC | |
| D4 | Analog,SDA | PC04 | GPIO, I2C Data, ADC | |
| D5 | Analog,SCL | PC05 | GPIO, I2C Clock, ADC | |
| D6 | Analog,TX0 | PC06 | GPIO, UART Transmit, ADC | |
| D7 | Analog,RX0 | PC07 | GPIO, UART Receive, ADC | |
| D8 | Analog,SCK0 | PA03 | GPIO, SPI Clock, ADC | |
| D9 | Analog,MISO0 | PA04 | GPIO, SPI Data, ADC | |
| D10 | Analog,MOSI0 | PA05 | GPIO, SPI Data, ADC | |
| D11 | Analog | PA09 | SAMD11_TX | GPIO, UART Receive, ADC |
| D12 | Analog | PA08 | SAMD11_RX | GPIO, UART Transmit, ADC |
| D13 | Analog | PB02 | GPIO, I2C Clock, ADC | |
| D14 | Analog | PB03 | GPIO, I2C Data, ADC | |
| D15 | Analog,MOSI1 | PB00 | GPIO, SPI Data, ADC | |
| D16 | Analog,MISO1 | PB01 | GPIO, SPI Data, ADC | |
| D17 | Analog,SCK1 | PA00 | GPIO, SPI Clock, ADC | |
| D18 | Analog,CS | PD02 | Csn | GPIO, Csn, ADC |
| ADC_BAT | PD04 | Read the BAT voltage value | ||
| RF Switch Port Select | PB04 | Switch onboard antenna and the UFL antenna | ||
| RF Switch Power | PB05 | RF Power | ||
| Reset | RESET | RESET | ||
| CHARGE_LED | VBUS | CHG-LED_Red | ||
| USER_LED | PA07 | User Light_Yellow |
Getting started
To enable you to get started with the XIAO MG24 faster, please read the hardware and software preparation below to prepare the XIAO.
Factory procedure
We pre-program each new XIAO MG24 and XIAO MG24 Sense with a simple factory program.
- XIAO MG24
The factory program preset in the regular version is Blink Light. When you power up the XIAO,the orange user indicator will light up.

- XIAO MG24 Sense
The factory program preset in the regular version is The louder you shout, the brighter the light will be.

Hardware Preparation
You need to prepare the following:
- 1 x Seeed Studio XIAO MG24
- 1 x Computer
- 1 x USB Type-C cable
Some USB cables can only supply power and cannot transfer data. If you don't have a USB cable or don't know if your USB cable can transmit data, you can check Seeed USB Type-C support USB 3.1.
Software Preparation
The recommended programming tool for the XIAO MG24 is the Arduino IDE, so you need to complete the Arduino installation as part of the software preparation.
If this is your first time using Arduino, we highly recommend you to refer to Getting Started with Arduino.
- Step 1. Download and Install the stable version of Arduino IDE according to your operating system.
- Step 2. Launch the Arduino application.
- Step 3. Add the XIAO MG24 on-board package to the Arduino IDE and click
OK. - Step 4. Close the Arduino IDE and reopen it.
Add the XIAO MG24 Board
To install the XIAO MG24 board, follow these steps:
https://siliconlabs.github.io/arduino/package_arduinosilabs_index.json
- Add the above board manager URL to the preferences of your Arduino IDE.
.png)
- Download the XIAO MG24 board package.
.png)
If you cannot find it after entering, please reopen the Arduino IDE.
- Opt for
XIAO_MG24variant.

Now enjoy coding ✨.
Run your first Blink program
-
Step 1. Launch the Arduino application.
-
Step 2. Navigate to File > Examples > 01.Basics > Blink, open the program.
.png)
- Step 3. Select the board model to XIAO MG24, and select the correct port number to upload the program.

Once the program is successfully uploaded, you will see the following output message and you can observe that the orange LED on the right side of the XIAO MG24 is blinking.
| MG24 BLink Code | LED BLink DisPlay |
|---|---|
 |  |
Battery Usage
The XIAO MG24 has a built-in power management chip that allows the XIAO MG24 to be powered independently by using a battery or to charge the battery through the XIAO MG24's USB port.
If you want to connect the battery for XIAO, we recommend you to purchase qualified rechargeable 3.7V lithium battery. When soldering the battery, please be careful to distinguish between the positive and negative terminals. The negative terminal of the power supply should be the side closest to the USB port, and the positive terminal of the power supply is the side away from the USB port.

Please be careful not to short-circuit the positive and negative terminals and burn the battery and equipment when soldering.
Instructions on the use of batteries:
- Please use qualified batteries that meet the specifications.
- XIAO can be connected to your computer device via data cable while using the battery, rest assured that XIAO has a built-in circuit protection chip, which is safe.
- The XIAO MG24 will not have any LED on when it is battery powered (unless you have written a specific program), please do not judge whether the XIAO MG24 is working or not by the condition of the LED, please judge it reasonably by your program.
- Sorry, we currently have no way to help you check the remaining battery level through software (because there are no more chip pins available), you need to charge the battery regularly or use a multimeter to check the battery level.
At the same time, we designed a red indicator light for battery charging, through the indicator light display to inform the user of the current state of the battery in the charge.
- When XIAO MG24 is not connected to the battery, the red light comes on when the Type-C cable is connected and goes off after 30 seconds.
- The red light flashes when the battery is connected and the Type-C cable is connected for charging.
- When connecting Type-C to charge the battery fully, the red light turns off.

Reading Battery Voltage
Software code
/*
  AnalogReadSerial

  Reads an analog input on pin 0, prints the result to the Serial Monitor.
  Graphical representation is available using Serial Plotter (Tools > Serial Plotter menu).
  Attach the center pin of a potentiometer to pin A0, and the outside pins to +5V and ground.

  This example code is in the public domain.

  https://www.arduino.cc/en/Tutorial/BuiltInExamples/AnalogReadSerial
*/

// the setup routine runs once when you press reset:
void setup() {
  Serial.begin(115200);
  pinMode(PD3, OUTPUT);
  digitalWrite(PD3, HIGH);
}

void loop() {
  int voltageValue = analogRead(PD4);
  float voltage = voltageValue * (2 * 3.3 / 4095.0);

  Serial.print("Voltage: ");
  Serial.print(voltage, 2);
  Serial.println(" V");
  delay(1000);  // delay in between reads for stability
}
Display Result

Deep Sleep and Sleep Example
Demo1 : Sleep Mode and wake-up
/*
   ArduinoLowPower timed sleep example

   The example shows the basic usage of the Arduino Low Power library by putting the device to sleep for a period of time.
   The device will enter sleep mode for 2000ms. During sleep the CPU is stopped but the RAM retains its contents.

   This example is compatible with all Silicon Labs Arduino boards.

   Author: Tamas Jozsi (Silicon Labs)
 */

#include "ArduinoLowPower.h"

void setup()
{
  Serial.begin(115200);
  pinMode(LED_BUILTIN, OUTPUT);
  digitalWrite(LED_BUILTIN, LED_BUILTIN_INACTIVE);
  Serial.println("Sleep with timed wakeup");
}

void loop()
{
  digitalWrite(LED_BUILTIN, LED_BUILTIN_ACTIVE);
  delay(500);
  digitalWrite(LED_BUILTIN, LED_BUILTIN_INACTIVE);
  delay(500);

  Serial.printf("Going to sleep at %lu\n", millis());
  LowPower.sleep(2000);
  Serial.printf("Woke up at %lu\n", millis());
}
Demo2 : Deep Sleep Mode and wake-up
/*
   ArduinoLowPower deep sleep example with external or timed wakeup

   The example shows the basic usage of the Arduino Low Power library by putting the device into deep sleep.
   The device will remain in deep sleep until the sleep timer expires.
   During deep sleep the whole device is powered down except for a minimal set of peripherals (like the Back-up RAM and RTC).
   This means that the CPU is stopped and the RAM contents are lost - the device will start from the beginning of the sketch after waking up.

   This example is compatible with all Silicon Labs Arduino boards.

   Author: Tamas Jozsi (Silicon Labs)
 */

#include "ArduinoLowPower.h"

void setup()
{
  Serial.begin(115200);
  pinMode(LED_BUILTIN, OUTPUT);
  digitalWrite(LED_BUILTIN, LED_BUILTIN_INACTIVE);
  Serial.println("Deep sleep timed wakeup");
}

void loop()
{
  digitalWrite(LED_BUILTIN, LED_BUILTIN_ACTIVE);
  delay(500);
  digitalWrite(LED_BUILTIN, LED_BUILTIN_INACTIVE);
  delay(500);

  Serial.printf("Going to deep sleep for 10s at %lu\n", millis());
  LowPower.deepSleep(10000);
}
Demo3 : Deep Sleep Mode with flash and wake-up
If you want to set flash to deep sleep, you need to enable the 0xb9 register
/*
   ArduinoLowPower deep sleep example with external or timed wakeup

   The example shows the basic usage of the Arduino Low Power library by putting the device into deep sleep.
   The device will remain in deep sleep until the sleep timer expires.
   During deep sleep the whole device is powered down except for a minimal set of peripherals (like the Back-up RAM and RTC).
   This means that the CPU is stopped and the RAM contents are lost - the device will start from the beginning of the sketch after waking up.

   This example is compatible with all Silicon Labs Arduino boards.

   Author: Tamas Jozsi (Silicon Labs)
 */
#include <Arduino.h>
#include "ArduinoLowPower.h"

#define CS_PIN PA6
#define CLK_PIN PA3
#define MOSI_PIN PA5
#define MISO_PIN PA4

#define READ_DATA 0x03
#define WRITE_ENABLE 0x06
#define PAGE_PROGRAM 0x02
#define SECTOR_ERASE 0x20

void sendSPI(byte data) {
  for (int i = 0; i < 8; i++) {
    digitalWrite(MOSI_PIN, data & 0x80);
    data <<= 1;
    digitalWrite(CLK_PIN, HIGH);
    delayMicroseconds(1);
    digitalWrite(CLK_PIN, LOW);
    delayMicroseconds(1);
  }
}

void writeEnable() {
  digitalWrite(CS_PIN, LOW);
  sendSPI(WRITE_ENABLE);
  digitalWrite(CS_PIN, HIGH);
}

void setup()
{
  //Serial.begin(115200);
  pinMode(PA7, OUTPUT);
  digitalWrite(PA7, LOW);

  pinMode(CS_PIN, OUTPUT);
  pinMode(CLK_PIN, OUTPUT);
  pinMode(MOSI_PIN, OUTPUT);
  pinMode(MISO_PIN, INPUT);


  //SW
  pinMode(PD3, OUTPUT);
  pinMode(PB5, OUTPUT);
  pinMode(PB1, OUTPUT);
  pinMode(PB0, OUTPUT);
  pinMode(PA6, OUTPUT);
  digitalWrite(PD3, LOW); //VBAT
  digitalWrite(PB5, LOW); //RF_SW
  digitalWrite(PB1, LOW); //IMU
  digitalWrite(PB0, LOW); //MIC
  digitalWrite(PA6, HIGH);  //FLASH

  //Serial.println("Deep sleep timed wakeup");
  writeEnable();
  digitalWrite(CS_PIN, LOW);
  sendSPI(0xB9);
  digitalWrite(CS_PIN, HIGH);
}

void loop()
{
  delay(12000);
  digitalWrite(PA7, HIGH);
  delay(500);

  //Serial.printf("Going to deep sleep for 10s at %lu\n", millis());
  LowPower.deepSleep(600000);
}

Preventing XIAO MG24 from Bricking During Deep Sleep
The XIAO MG24 is a powerful microcontroller board from Seeed Studio, but users have reported issues where the device becomes unresponsive ("bricked") after entering Deep Sleep mode. This tutorial explains the cause of the problem, provides a detailed recovery method, and offers preventive measures to avoid bricking your XIAO MG24.
The XIAO MG24 enters a Deep Sleep mode (EM4) to conserve power, but in some cases, it fails to wake up properly, preventing new sketches from being uploaded. Unlike other XIAO boards, the MG24 does not have a dedicated BOOT button or a documented method to enter boot mode, making recovery challenging.
Preventive Measures
To avoid bricking your XIAO MG24 while using Deep Sleep mode, follow these steps:
- Use the Escape Pin (PC1)
The XIAO MG24 has a built-in escape mechanism to prevent bricking. If PC1 is pulled LOW during reset, the device enters an infinite loop, allowing you to upload a new sketch.
- Connect PC1 to GND before resetting the device.
- After resetting, upload your sketch while the device is in the loop.
- Modify Your Sketch Add the following code to your sketch to detect a user switch and enter an infinite loop if pressed. This allows you to upload a new sketch while the device is looping:
#define USER_SW  PC3   // Example pin for user switch

void setup() {
  // Other setup code...

  pinMode(USER_SW, INPUT_PULLUP);
  if (digitalRead(USER_SW) == LOW) {
    Serial.println("Enable to upload new sketch");
    while (true) {
      digitalWrite(LED_BUILTIN, LOW);
      delay(50);
      digitalWrite(LED_BUILTIN, HIGH);
      delay(50);
    }
  }
}
- Avoid Unnecessary Flash Sleep
Ensure that your sketch does not put the flash memory into sleep mode (Deep Power Down) unless absolutely necessary. This can prevent issues with uploading new sketches.
Acknowledgments
Special thanks to the Seeed Studio community for their valuable contributions and solutions to this issue. The recovery methods and preventive measures discussed in this tutorial were developed based on insights from community members like msfujino and PJ_Glasso.
For more details and discussions, visit the original forum thread:
DeepSleep bricks XIAO_MG24 - Seeed Studio Forum
Unbricking
The XIAO MG24 is currently the only XIAO model equipped with a serial port chip. Unlike other XIAO models, it does not have a BOOT button or a BOOT recovery method. This design oversight can cause issues when the device enters sleep mode or encounters software anomalies, making it impossible to upload a program via the serial port. To address this, we’ve provided a method to wake up the serial port and restore functionality.
Solution for Windows
- Download and Extract the Package
- Download the provided ZIP file.
- Extract the contents to a folder on your computer.
-
Connect the XIAO MG24
- Use a USB cable to connect the unresponsive XIAO MG24 to your computer.
-
Run the Script
- Open the extracted folder and locate the script
flash_erase.bat. - Double-click the script to run it.
- The script will erase the flash memory and reset the device.
- Open the extracted folder and locate the script
-
Verify Recovery
- After the script completes, the XIAO MG24 should be restored and ready for use.
Solution for macOS
- Download and Extract the Package
- Download the provided ZIP file (link will be added here).
- Extract the contents to a folder on your computer.
-
Connect the XIAO MG24
- Use a USB cable to connect the unresponsive XIAO MG24 to your computer.
-
Allow Terminal Access
- Open System Preferences > Security & Privacy > Privacy.
- Under Accessibility, ensure that Terminal is allowed to control your computer.
- If Terminal is not listed, click the + button to add it manually.
-
Run the Script
-
Open Terminal.
-
Navigate to the extracted folder using the
cdcommand. For example:cd /path/to/extracted/folder -
Run the script
xiao_mg24_erase.shusing the following command:./xiao_mg24_erase.sh -
The script will use OpenOCD to erase the flash memory and reset the device.
-
-
Verify Recovery
- After the script completes, the XIAO MG24 should be restored and ready for use.
- If macOS fails to recognize OpenOCD, ensure OpenOCD is installed and the correct path is used in the script.
- The scripts provided are designed specifically for the XIAO MG24 and should not be used with other XIAO models.
Resources
For Seeed Studio XIAO MG24
Hardware Design
- 📄[Datasheet] Silicon Labs EFR32MG24 Datasheet
- 📄[Reference Manual] Silicon Labs EFR32MG24 Reference Manual
- 📄[Schematic] XIAO MG24 Schematic
- 🗃️[PCB Design Files] XIAO MG24 KiCad Project
- 🗃️[PCB Design Libraries]
For Seeed Studio XIAO MG24 Sense
Hardware Design
- 📄[Datasheet] Silicon Labs EFR32MG24 Datasheet
- 📄[Reference Manual] Silicon Labs EFR32MG24 Reference Manual
- 📄[Schematic] XIAO MG24 Sense Schematic
- 🗃️[PCB Design Files] XIAO MG24 Sense KiCad Project
- 🗃️[PCB Design Libraries]
Tech Support & Product Discussion
Thank you for choosing our products! We are here to provide you with different support to ensure that your experience with our products is as smooth as possible. We offer several communication channels to cater to different preferences and needs.