Getting Started with XIAO MIDI Synthesizer

Introduction
The XIAO MIDI Synthesizer is a compact, all-in-one music creation gadget powered by the XIAO ESP32-C3 and the professional-grade SAM2695 MIDI chip. Despite its small size, it delivers rich, expressive sound, supports up to 64-voice polyphony, and offers hundreds of instrument timbres. Whether you're a developer experimenting with sound or a musician composing new tunes, this synthesizer is designed to make music creation smooth and inspiring.
Features
- Zero-Barrier Creation, Perfect for Music Beginners
- All-in-One MIDI + Metronome -- Smarter, Smoother Workflow
- Pro-Grade Performance for Advanced Players
- Ultra-Portable & Fully Hackable
Hardware Overview
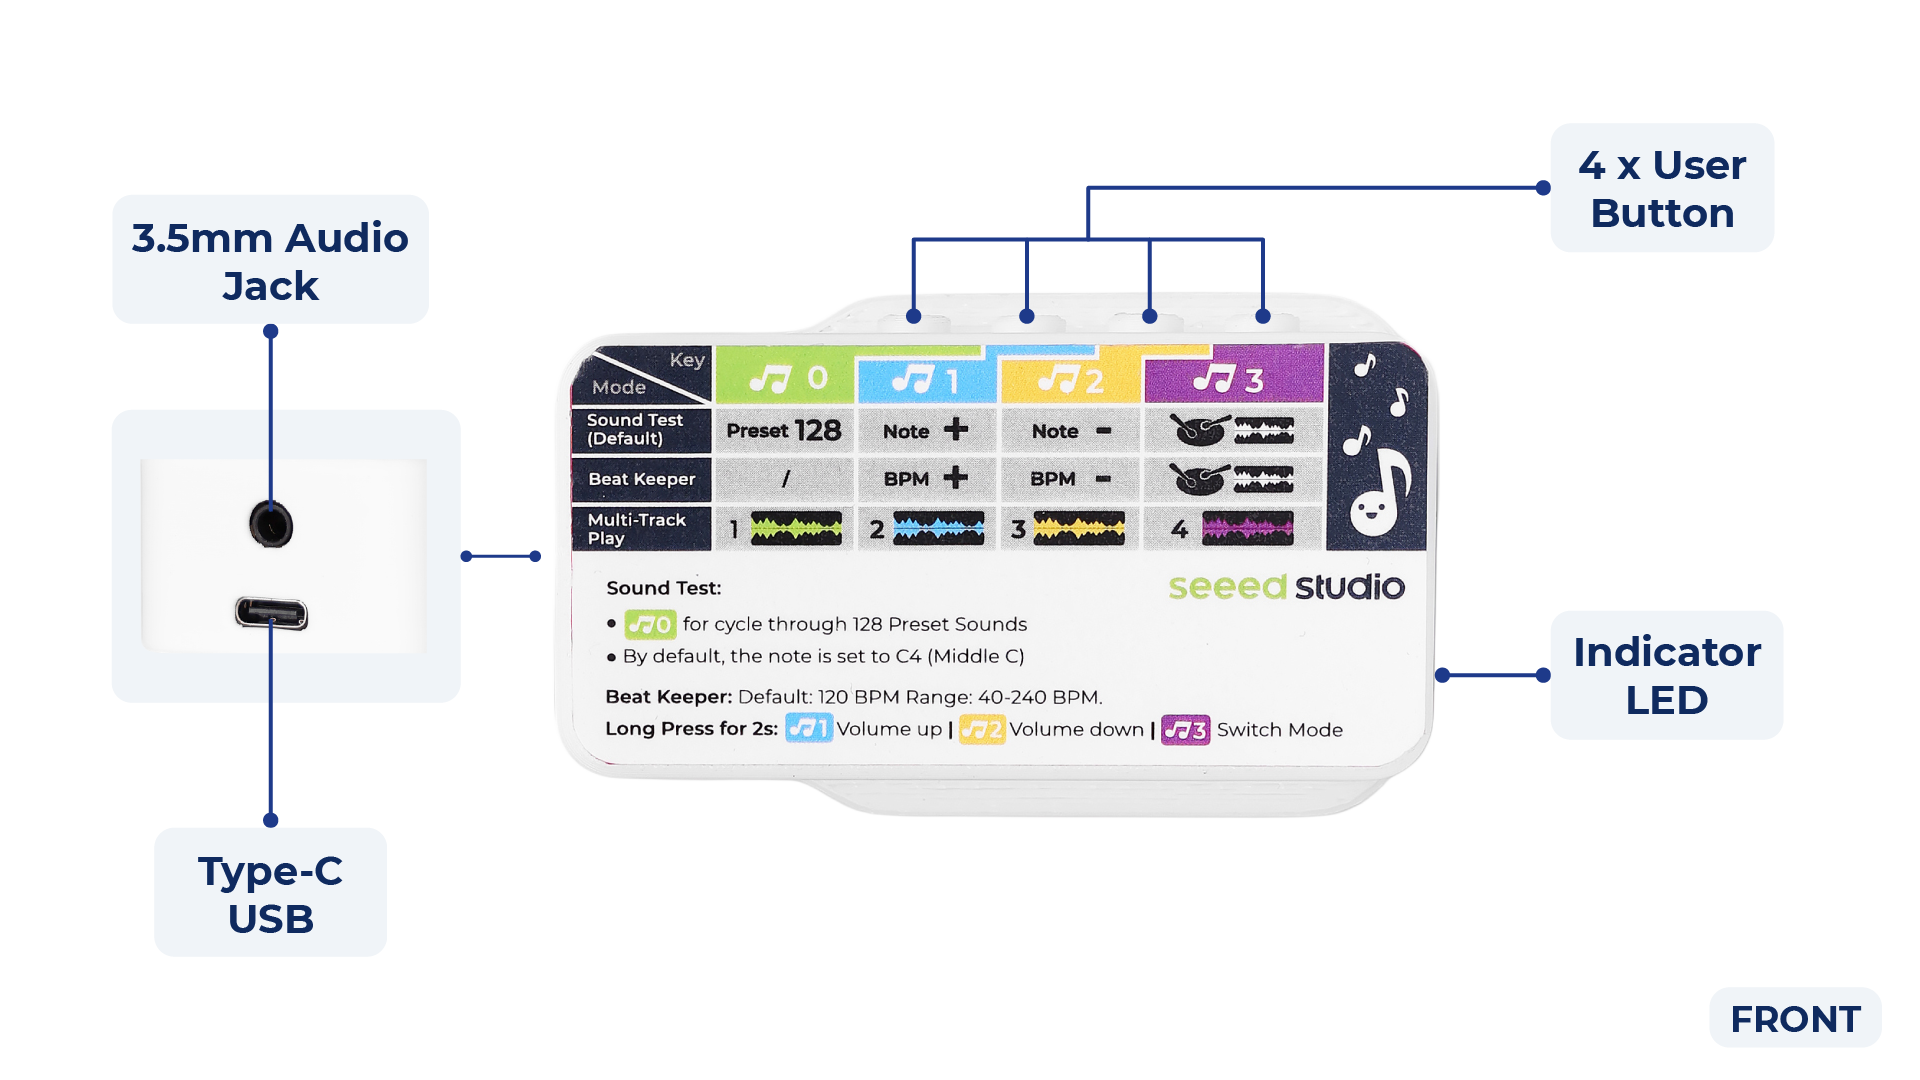
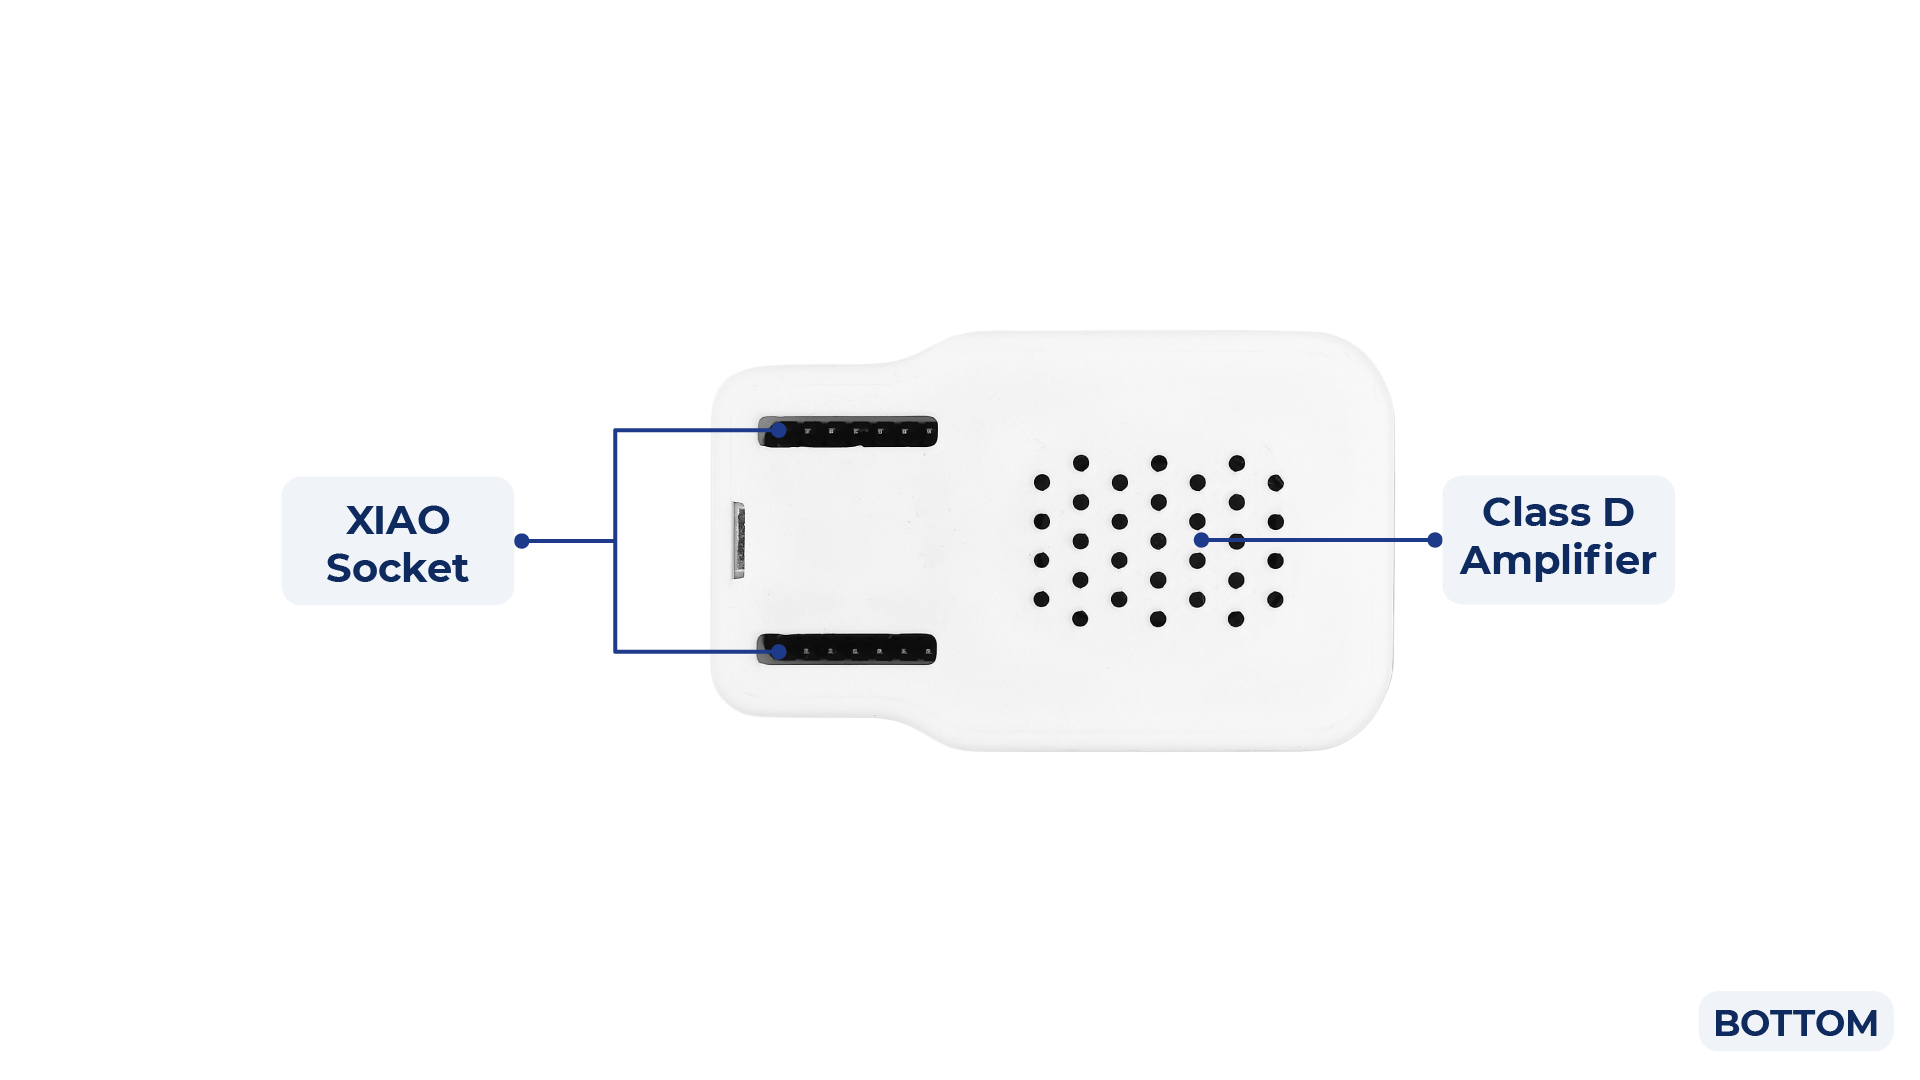
The XIAO MIDI Synthesizer integrates the following components:
| Core Module | |
|---|---|
| MCU | XIAO ESP32-C3 |
| Sound Generation | |
| MIDI Chip | SAM2695 |
| Polyphony | Up to 64 voices |
| Instrument Presets | Over 100 different instrument sounds available |
| Interfaces and Connectivity | |
| 3.5mm Audio Jack | Used to connect external audio devices (e.g., speakers or headphones) Features auto-disabling of the Class D amplifier when a cable is inserted and re-enabling when removed |
| Physical Buttons | Four side-mounted physical buttons for user interaction |
| XIAO Socket | A dedicated socket designed for the XIAO module, with expansion capability via additional side connectors |
| D-Class Amplifier | Build-in Speaker |
| Power and Indicators | |
| Power Supply | 5V Type-C |
| Indicator LED | A single-color LED used to indicate power status and provide user feedback |
Getting Started
This section will guide you through setting up your XIAO MIDI Synthesizer for the first time.
Factory Firmware Usage
The XIAO MIDI Synthesizer comes pre-flashed with a versatile factory firmware, allowing you to explore multiple sound and rhythm features right out of the box. Below is a quick guide to the default functions and key operations.
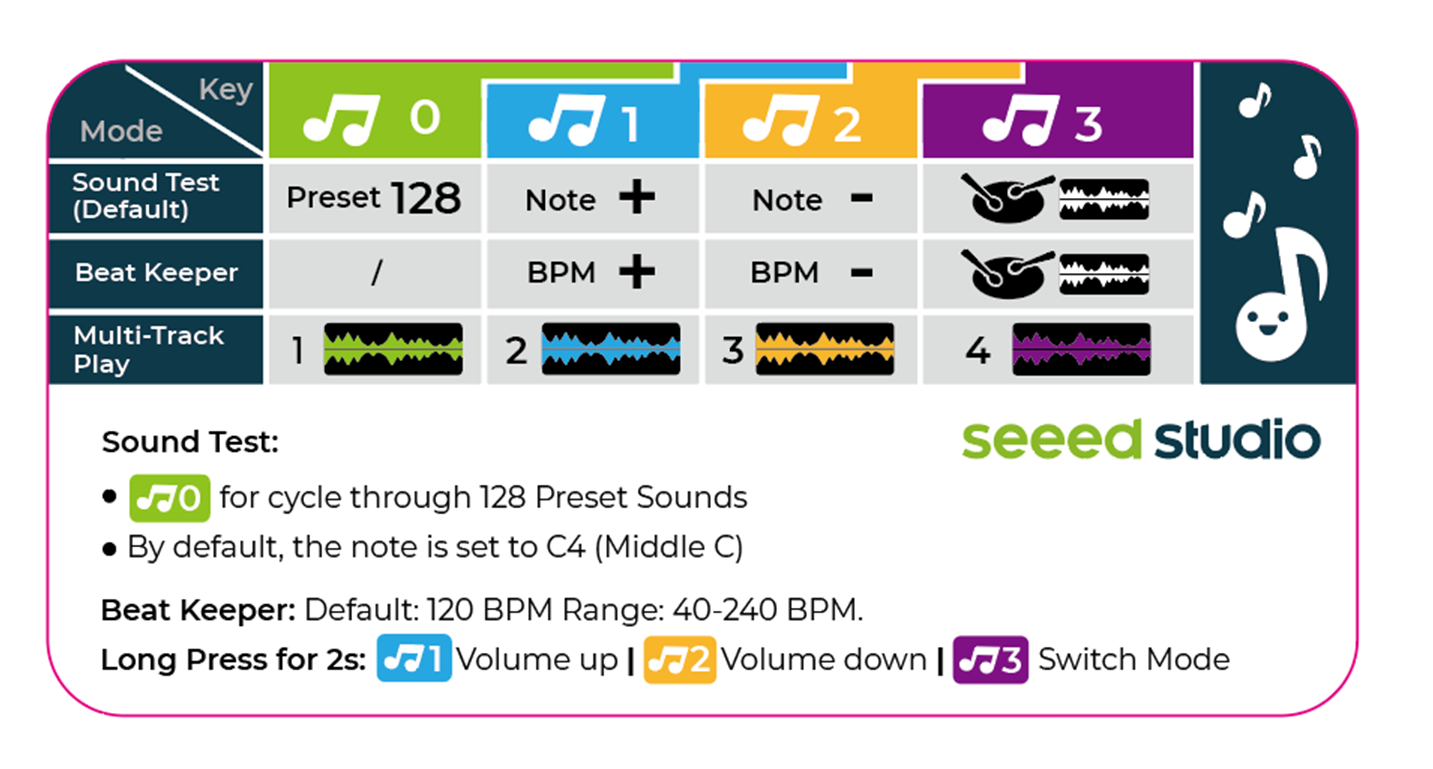
Detailed Key Functions
-
Sound Test (Default Mode):
- 🎵0: Cycle through 128 preset instrument sounds. Each press switches to the next sound.
- 🎵1: Increase the note pitch (e.g., from C4 to D4).
- 🎵2: Decrease the note pitch (e.g., from C4 to B3).
- 🎵3: Click to start/stop the metronome.
-
Beat Keeper Mode:
- 🎵0: (No function in this mode)
- 🎵1: Increase BPM (tempo) by 1 step (only works when metronome is active).
- 🎵2: Decrease BPM (tempo) by 1 step (only works when metronome is active).
- 🎵3: Click to start/stop the metronome (default: 120 BPM, range: 40–240 BPM).
-
Multi-Track Play Mode:
- 🎵0: Play Track 1 (preloaded sound or sequence)
- 🎵1: Play Track 2
- 🎵2: Play Track 3
- 🎵3: Play Track 4
Long Press Functions (Any Mode):
- 🎵1 (hold 2s): Volume up
- 🎵2 (hold 2s): Volume down
- 🎵3 (hold 2s): Switch to the next mode (cycles through Sound Test → Beat Keeper → Multi-Track Play → ...)
You can experiment with all features without any additional setup. For advanced customization or to re-flash the firmware, see the StateMachine example code.
BootLoader Mode
In some cases, you may find that the XIAO MIDI Synthesizer cannot be programmed via the serial port (for example, if the device is not recognized or the upload fails). In these situations, you need to enter Bootloader (BOOT) mode to re-flash the firmware.
Why Enter BOOT Mode?
- To recover the device when it cannot be programmed normally via USB/serial
- To re-flash firmware after a failed upload or firmware corruption
How to Enter BOOT Mode
First, open the mini synthesizer's back cover to access the BOOT and RESET buttons on the XIAO ESP32-C3 module. There are two methods:

-
Method 1: Button Sequence
- With the device powered on, press and hold the BOOT button (do not release).
- While holding BOOT, press the RESET button once.
- Release the BOOT button.
-
Method 2: Power Cycle
- Disconnect the power (unplug the USB-C cable).
- Press and hold the BOOT button.
- While holding BOOT, reconnect the power (plug in the USB-C cable).
- Release the BOOT button.
After entering BOOT mode, the device will be ready for firmware upload via the Arduino IDE or other tools.
Reset
To reset the device, simply press the RESET button on the XIAO ESP32-C3 module. The device will reboot.
Arduino Library Overview
If this is your first time using Arduino, we highly recommend you to refer to Getting Started with Arduino.
The XIAO MIDI Synthesizer is supported by the Seeed_Arduino_MIDIMaster library, which provides comprehensive MIDI control and sound synthesis capabilities.
Function
Before we get started developing a sketch, let's look at the available functions of the library.
static SAM2695Synth& getInstance() – Returns the singleton instance of the SAM2695Synth class.
- Input parameters: None.
- Return value: Reference to the singleton SAM2695Synth object.
void begin(T& serial, int baud) – Initializes the synthesizer with the specified serial interface and baud rate.
- Input parameters:
T& serial: The serial port object (hardware or software serial) used for MIDI communication.int baud: The baud rate for MIDI communication (typically 31250 for standard MIDI).
- Return value: None.
void setInstrument(uint8_t bank, uint8_t channel, uint8_t value) – Sets the instrument (timbre) for a specific MIDI channel and bank.
- Input parameters:
uint8_t bank: The instrument bank number (0–127).uint8_t channel: The MIDI channel number (0–15).uint8_t value: The instrument (program) number (0–127).
- Return value: None.
void setNoteOn(uint8_t channel, uint8_t pitch, uint8_t velocity) – Triggers a note-on event on the specified channel with given pitch and velocity.
- Input parameters:
uint8_t channel: The MIDI channel number (0–15).uint8_t pitch: The MIDI note number (0–127).uint8_t velocity: The velocity (loudness) of the note (0–127).
- Return value: None.
void setNoteOff(uint8_t channel, uint8_t pitch) – Triggers a note-off event on the specified channel for the given pitch.
- Input parameters:
uint8_t channel: The MIDI channel number (0–15).uint8_t pitch: The MIDI note number (0–127).
- Return value: None.
void setAllNotesOff(uint8_t channel) – Turns off all notes currently playing on the specified channel.
- Input parameters:
uint8_t channel: The MIDI channel number (0–15).
- Return value: None.
void playChord(const musicData& chord) – Plays a chord by sending note-on events for all notes in the provided chord structure.
- Input parameters:
const musicData& chord: A structure containing channel, notes, velocity, and timing information for the chord.
- Return value: None.
void setPitch(uint8_t pitch) – Sets the default pitch value for subsequent note events.
- Input parameters:
uint8_t pitch: The MIDI note number (0–127) to set as the default pitch.
- Return value: None.
uint8_t getPitch() const – Retrieves the current default pitch value.
- Input parameters: None.
- Return value: The current default MIDI note number (0–127).
void setVolume(uint8_t channel, uint8_t level) – Sets the volume for a specific MIDI channel.
- Input parameters:
uint8_t channel: The MIDI channel number (0–15).uint8_t level: The volume level (0–127).
- Return value: None.
void increasePitch() – Increases the default pitch value by one semitone.
- Input parameters: None.
- Return value: None.
void decreasePitch() – Decreases the default pitch value by one semitone.
- Input parameters: None.
- Return value: None.
void increaseVelocity() – Increases the default velocity (volume) for note events.
- Input parameters: None.
- Return value: None.
void decreaseVelocity() – Decreases the default velocity (volume) for note events.
- Input parameters: None.
- Return value: None.
void increaseBpm() – Increases the current tempo (beats per minute) by a predefined step.
- Input parameters: None.
- Return value: None.
void decreaseBpm() – Decreases the current tempo (beats per minute) by a predefined step.
- Input parameters: None.
- Return value: None.
void setBpm(uint8_t bpm) – Sets the tempo (beats per minute) to the specified value.
- Input parameters:
uint8_t bpm: The desired tempo in beats per minute (typically 40–240).
- Return value: None.
uint8_t getBpm() const – Retrieves the current tempo (beats per minute).
- Input parameters: None.
- Return value: The current BPM value.
Default Variables
The following code shows some of the values predefined in the library, such as instrument type, note, etc., to be queried.
Click here to preview the full code
#define MIDI_SERIAL_BAUD_RATE           31250   //MIDI serial baud rate
#define USB_SERIAL_BAUD_RATE            115200  //USB  serial baud rate
#define MIDI_COMMAND_ON                 0x90    //MIDI Control Switch - On
#define MIDI_COMMAND_OFF                0x80    //MIDI Control Switch - Off
#define BPM_DEFAULT                     120     //default bpm
#define BPM_MIN                         40      //min bpm
#define BPM_MAX                         240     //max bpm
#define BPM_STEP                        10      //step of bpm
#define MIDI_CMD_CONTROL_CHANGE \
0xB0                              // Control Change (or Channel Mode
                                      // Message)
#define MIDI_CMD_PROGRAM_CHANGE 0xC0  // Program Change

#define VELOCITY_MIN                    0       //min velocity(0~127) 0
#define VELOCITY_MAX                    127     //max velocity(0~127) 127
#define VELOCITY_STEP                   10      //step velocity
#define VELOCITY_DEFAULT                64      //default velocity(0~127) 64
#define BASIC_TIME                      60000   //The number of milliseconds corresponding to 1 minute
#define QUATER_NOTE                     0       //Quarter note
#define EIGHTH_NOTE                     1       //Eighth note
#define SIXTEENTH_NOTE                  2       //sixteenth note
#define BEATS_BAR_DEFAULT               4       //default beat - 4/4 beat
#define BEATES_BAR_2                    2       //2/4 beat
#define BEATS_BAR_3                     3       //3/4 beat
#define BEATS_BAR_4                     4       //4/4 beat
#define NOTE_COUNT_DEFAULT              4       //default note count
#define NOTE_COUNT_MIN                  1       //min note count
#define NOTE_COUNT_MAX                  16      //max note count


/* define channel begin */
#define CHANNEL_0                       0
#define CHANNEL_1                       1
#define CHANNEL_2                       2
#define CHANNEL_3                       3
#define CHANNEL_4                       4
#define CHANNEL_5                       5
#define CHANNEL_6                       6
#define CHANNEL_7                       7
#define CHANNEL_8                       8
#define CHANNEL_9                       9
#define CHANNEL_10                      10
#define CHANNEL_11                      11
#define CHANNEL_12                      12
#define CHANNEL_13                      13
#define CHANNEL_14                      14
#define CHANNEL_15                      15


#define NOTE_B0                         23
#define NOTE_C1                         24
#define NOTE_CS1                        25
#define NOTE_D1                         26
#define NOTE_DS1                        27
#define NOTE_E1                         28
#define NOTE_F1                         29
#define NOTE_FS1                        30
#define NOTE_G1                         31
#define NOTE_GS1                        32
#define NOTE_A1                         33
#define NOTE_AS1                        34
#define NOTE_B1                         35
#define NOTE_C2                         36
#define NOTE_CS2                        37
#define NOTE_D2                         38
#define NOTE_DS2                        39
#define NOTE_E2                         40
#define NOTE_F2                         41
#define NOTE_FS2                        42
#define NOTE_G2                         43
#define NOTE_GS2                        44
#define NOTE_A2                         45
#define NOTE_AS2                        46
#define NOTE_B2                         47
#define NOTE_C3                         48
#define NOTE_CS3                        49
#define NOTE_D3                         50
#define NOTE_DS3                        51
#define NOTE_E3                         52
#define NOTE_F3                         53
#define NOTE_FS3                        54
#define NOTE_G3                         55
#define NOTE_GS3                        56
#define NOTE_A3                         57
#define NOTE_AS3                        58
#define NOTE_B3                         59
#define NOTE_C4                         60
#define NOTE_CS4                        61
#define NOTE_D4                         62
#define NOTE_DS4                        63
#define NOTE_E4                         64
#define NOTE_F4                         65
#define NOTE_FS4                        66
#define NOTE_G4                         67
#define NOTE_GS4                        68
#define NOTE_A4                         69
#define NOTE_AS4                        70
#define NOTE_B4                         71
#define NOTE_C5                         72
#define NOTE_CS5                        73
#define NOTE_D5                         74
#define NOTE_DS5                        75
#define NOTE_E5                         76
#define NOTE_F5                         77
#define NOTE_FS5                        78
#define NOTE_G5                         79
#define NOTE_GS5                        80
#define NOTE_A5                         81
#define NOTE_AS5                        82
#define NOTE_B5                         83
#define NOTE_C6                         84
#define NOTE_CS6                        85
#define NOTE_D6                         86
#define NOTE_DS6                        87
#define NOTE_E6                         88
#define NOTE_F6                         89
#define NOTE_FS6                        90
#define NOTE_G6                         91
#define NOTE_GS6                        92
#define NOTE_A6                         93
#define NOTE_AS6                        94
#define NOTE_B6                         95
#define NOTE_C7                         96
#define NOTE_CS7                        97
#define NOTE_D7                         98
#define NOTE_DS7                        99
#define NOTE_E7                         100
#define NOTE_F7                         101
#define NOTE_FS7                        102
#define NOTE_G7                         103
#define NOTE_GS7                        104
#define NOTE_A7                         105
#define NOTE_AS7                        106
#define NOTE_B7                         107
#define NOTE_C8                         108
#define NOTE_CS8                        109
#define NOTE_D8                         110
#define NOTE_DS8                        111
#define REST                            0


typedef enum {
    GrandPiano_1 = 0,
    BrightPiano_2,
    ElGrdPiano_3,
    HonkyTonkPiano,
    ElPiano1,
    ElPiano2,
    Harpsichord,
    Clavi,
    Celesta,
    Glockenspiel,
    MusicBox,
    Vibraphone,
    Marimba,
    Xylophone,
    TubularBells,
    Santur,
    DrawbarOrgan,
    PercussiveOrgan,
    RockOrgan,
    ChurchOrgan,
    ReedOrgan,
    AccordionFrench,
    Harmonica,
    TangoAccordion,
    AcGuitarNylon,
    AcGuitarSteel,
    AcGuitarJazz,
    AcGuitarClean,
    AcGuitarMuted,
    OverdrivenGuitar,
    DistortionGuitar,
    GuitarHarmonics,
    AcousticBass,
    FingerBass,
    PickedBass,
    FretlessBass,
    SlapBass1,
    SlapBass2,
    SynthBass1,
    SynthBass2,
    Violin,
    Viola,
    Cello,
    Contrabass,
    TremoloStrings,
    PizzicatoStrings,
    OrchestralHarp,
    Timpani,
    StringEnsemble1,
    StringEnsemble2,
    SynthStrings1,
    SynthStrings2,
    ChoirAahs,
    VoiceOohs,
    SynthVoice,
    OrchestraHit,
    Trumpet,
    Trombone,
    Tuba,
    MutedTrumpet,
    FrenchHorn,
    BrassSection,
    SynthBrass1,
    SynthBrass2,
    SopranoSax,
    AltoSax,
    TenorSax,
    BaritoneSax,
    Oboe,
    EnglishHorn,
    Bassoon,
    Clarinet,
    Piccolo,
    Flute,
    Recorder,
    PanFlute,
    BlownBottle,
    Shakuhachi,
    Whistle,
    Ocarina,
    Lead1Square,
    Lead2Sawtooth,
    Lead3Calliope,
    Lead4Chiff,
    Lead5Charang,
    Lead6Voice,
    Lead7Fifths,
    Lead8BassLead,
    Pad1Fantasia,
    Pad2Warm,
    Pad3PolySynth,
    Pad4Choir,
    Pad5Bowed,
    Pad6Metallic,
    Pad7Halo,
    Pad8Sweep,
    FX1Rain,
    FX2Soundtrack,
    FX3Crystal,
    FX4Atmosphere,
    FX5Brightness,
    FX6Goblins,
    FX7Echoes,
    FX8SciFi,
    Sitar,
    Banjo,
    Shamisen,
    Koto,
    Kalimba,
    BagPipe,
    Fiddle,
    Shanai,
    TinkleBell,
    Agogo,
    SteelDrums,
    Woodblock,
    TaikoDrum,
    MelodicTom,
    SynthDrum,
    ReverseCymbal,
    GtFretNoise,
    BreathNoise,
    Seashore,
    BirdTweet,
    TelephRing,
    Helicopter,
    Applause,
    Gunshot,
} unit_synth_instrument_t;
Installation
Step 1. Download the Seeed_Arduino_MIDIMaster library as a ZIP file.
Step 2. In Arduino IDE, click Sketch > Include Library > Add .ZIP Library and select the downloaded ZIP file.

XIAO MIDI Synthesizer Example
Now that we have our library installed and we understand the basic functions, let's run some examples for our XIAO MIDI Synthesizer to see how it behaves.
Step 1. Launch the Arduino application.
Step 2. Select your development board model and add it to the Arduino IDE.
- XIAO MIDI Synthesizer is built-in with XIAO ESP32-C3, please refer to this tutorial to finish adding.
Demo 1: Basic MIDI Note Playing
This demo shows how to play a single note using the XIAO MIDI Synthesizer.
Materials Required
| XIAO MIDI Synthesizer |
|---|
 |
Reference Programme
#include <Arduino.h>
#include "SAM2695Synth.h"

#ifdef __AVR__
    #include <SoftwareSerial.h>
    SoftwareSerial SSerial(2, 3); // RX, TX
    #define COM_SERIAL SSerial
    #define SHOW_SERIAL Serial
    SAM2695Synth<SoftwareSerial> synth = SAM2695Synth<SoftwareSerial>::getInstance();
#endif

#if defined(ARDUINO_ARCH_RP2040) || defined(ARDUINO_ARCH_RP2350) ||  defined(ARDUINO_XIAO_RA4M1)
    #include <SoftwareSerial.h>
    SoftwareSerial SSerial(D7, D6); // RX, TX
    #define COM_SERIAL SSerial
    #define SHOW_SERIAL Serial
    SAM2695Synth<SoftwareSerial> synth = SAM2695Synth<SoftwareSerial>::getInstance();
#endif

#if  defined(CONFIG_IDF_TARGET_ESP32C3) || defined(CONFIG_IDF_TARGET_ESP32C6) || defined(CONFIG_IDF_TARGET_ESP32S3)
    #define COM_SERIAL Serial0
    #define SHOW_SERIAL Serial
    SAM2695Synth<HardwareSerial> synth = SAM2695Synth<HardwareSerial>::getInstance();
#endif

#ifdef SEEED_XIAO_M0
    #define COM_SERIAL Serial1
    #define SHOW_SERIAL Serial
    SAM2695Synth<Uart> synth = SAM2695Synth<Uart>::getInstance();
#elif defined(ARDUINO_SAMD_VARIANT_COMPLIANCE)
    #define COM_SERIAL Serial1
    #define SHOW_SERIAL SerialUSB
    SAM2695Synth<Uart> synth = SAM2695Synth<Uart>::getInstance();
#endif

#if defined(NRF52840_XXAA)
    #ifdef USE_TINYUSB
    #include <Adafruit_TinyUSB.h>
    #endif
    #define COM_SERIAL Serial1
    #define SHOW_SERIAL Serial

    SAM2695Synth<Uart> synth = SAM2695Synth<Uart>::getInstance();
#endif


void setup()
{
  //serial init to usb
  SHOW_SERIAL.begin(USB_SERIAL_BAUD_RATE);
  // Synth initialization. Since a hardware serial port is used here, the software serial port is commented out.
  synth.begin(COM_SERIAL, MIDI_SERIAL_BAUD_RATE);
  synth.setInstrument(0,CHANNEL_0,unit_synth_instrument_t::GrandPiano_1);
  delay(1000);
}

void loop()
{
  synth.setNoteOn(CHANNEL_0,NOTE_E4,VELOCITY_DEFAULT);
  delay(1000);
  synth.setNoteOff(CHANNEL_0,NOTE_E4);
  delay(1000);
}
This code will play the E4 note on the built-in synthesizer, alternating on and off every second. You can change the note, instrument, or timing as needed.
Program annotation
This code represents the core functionality of the XIAO MIDI Synthesizer, a compact audio synthesis solution based on the SAM2695 synthesizer chip. The software implementation demonstrates how the synthesizer interfaces with various XIAO platform variants through different serial communication methods.
The XIAO MIDI Synthesizer supports multiple microcontroller platforms in the XIAO ecosystem through conditional compilation:
- AVR-based boards: Utilizes SoftwareSerial for communication with the synthesizer chip
- RP2040/RP2350 and XIAO RA4M1: Implements SoftwareSerial on designated pins (D7, D6)
- ESP32 variants: Leverages native Hardware Serial capabilities via Serial0
- SAMD-based boards (including XIAO M0): Uses the hardware UART interface
- nRF52840: Implements UART communication with optional TinyUSB support
This versatile approach ensures the synthesizer module works consistently across the entire XIAO product family.
The synthesizer implementation establishes two communication pathways:
  SHOW_SERIAL.begin(USB_SERIAL_BAUD_RATE);
  synth.begin(COM_SERIAL, MIDI_SERIAL_BAUD_RATE);
- A dedicated serial connection to the SAM2695 chip for MIDI commands
- A separate debug/user interface serial connection for monitoring and control
During startup, the XIAO MIDI Synthesizer:
- Establishes serial communication at the appropriate baud rate
- Initializes the SAM2695 synthesizer engine
- Configures the default instrument (Grand Piano) on Channel 0
synth.setInstrument(0,CHANNEL_0,unit_synth_instrument_t::GrandPiano_1);
- Allows for stabilization with a timing delay
The demonstration loop showcases the fundamental sound generation capability by:
void loop()
{
  synth.setNoteOn(CHANNEL_0,NOTE_E4,VELOCITY_DEFAULT);
  delay(1000);
  synth.setNoteOff(CHANNEL_0,NOTE_E4);
  delay(1000);
}
- Triggering note E4 with standard velocity
- Maintaining the note for one second
- Releasing the note
- Pausing before the next cycle
This implementation represents the foundation upon which more complex musical applications can be built using the XIAO MIDI Synthesizer platform, whether for educational purposes, musical prototyping, or embedded audio projects.
Demo 2: Rhythm Sequencer with Button Control
This demo shows how to use the XIAO MIDI Synthesizer's physical buttons to control a simple rhythm sequencer. You can start/stop the rhythm, and adjust the tempo in real time using the buttons.
Materials Required
| XIAO MIDI Synthesizer |
|---|
|
Reference Programme
#include <Arduino.h>
#include "SAM2695Synth.h"
#include "Button.h"

#ifdef __AVR__
    #include <SoftwareSerial.h>
    SoftwareSerial SSerial(2, 3); // RX, TX
    #define COM_SERIAL SSerial
    #define SHOW_SERIAL Serial
    SAM2695Synth<SoftwareSerial> synth = SAM2695Synth<SoftwareSerial>::getInstance();
#endif

#if defined(ARDUINO_ARCH_RP2040) || defined(ARDUINO_ARCH_RP2350) ||  defined(ARDUINO_XIAO_RA4M1)
    #include <SoftwareSerial.h>
    SoftwareSerial SSerial(D7, D6); // RX, TX
    #define COM_SERIAL SSerial
    #define SHOW_SERIAL Serial
    SAM2695Synth<SoftwareSerial> synth = SAM2695Synth<SoftwareSerial>::getInstance();
#endif

#if  defined(CONFIG_IDF_TARGET_ESP32C3) || defined(CONFIG_IDF_TARGET_ESP32C6) || defined(CONFIG_IDF_TARGET_ESP32S3)
    #define COM_SERIAL Serial0
    #define SHOW_SERIAL Serial
    SAM2695Synth<HardwareSerial> synth = SAM2695Synth<HardwareSerial>::getInstance();
#endif

#ifdef SEEED_XIAO_M0
    #define COM_SERIAL Serial1
    #define SHOW_SERIAL Serial
    SAM2695Synth<Uart> synth = SAM2695Synth<Uart>::getInstance();
#elif defined(ARDUINO_SAMD_VARIANT_COMPLIANCE)
    #define COM_SERIAL Serial1
    #define SHOW_SERIAL SerialUSB
    SAM2695Synth<Uart> synth = SAM2695Synth<Uart>::getInstance();
#endif


#if defined(NRF52840_XXAA)
    #ifdef USE_TINYUSB
    #include <Adafruit_TinyUSB.h>
    #endif
    #define COM_SERIAL Serial1
    #define SHOW_SERIAL Serial

    SAM2695Synth<Uart> synth = SAM2695Synth<Uart>::getInstance();
#endif

#if defined(CONFIG_IDF_TARGET_ESP32S3)
    #define BUTTON_A_PIN 4
    #define BUTTON_B_PIN 3
    #define BUTTON_C_PIN 2
    #define BUTTON_D_PIN 1
#elif defined(CONFIG_IDF_TARGET_ESP32C3)
    #define BUTTON_A_PIN 5
    #define BUTTON_B_PIN 4
    #define BUTTON_C_PIN 3
    #define BUTTON_D_PIN 2
#elif defined(CONFIG_IDF_TARGET_ESP32C6)
    #define BUTTON_A_PIN 21
    #define BUTTON_B_PIN 2
    #define BUTTON_C_PIN 1
    #define BUTTON_D_PIN 0
#else //You need to refer to the corresponding manual...
    #define BUTTON_A_PIN 0 //You need to refer to the corresponding manual...
    #define BUTTON_B_PIN 1 //You need to refer to the corresponding manual...
    #define BUTTON_C_PIN 2 //You need to refer to the corresponding manual...
    #define BUTTON_D_PIN 3 //You need to refer to the corresponding manual...
#endif

//Define the structure needed for the button
BtnState btnA = {HIGH, HIGH, 0, 0, false};
BtnState btnB = {HIGH, HIGH, 0, 0, false};
BtnState btnC = {HIGH, HIGH, 0, 0, false};


bool music_on_off_flag = false;
int bpm = BPM_DEFAULT;                            // init BPM,BPM_DEFAULT = 120
int beatsPerBar = BEATS_BAR_DEFAULT;              // Beats per measure, which can be 2, 3, or 4
int noteType = QUATER_NOTE;                       // Note type selection: 0 (quarter note), 1 (eighth note), 2 (sixteenth note)
int beatCount = 0;                                // Beat counter
unsigned long previousMillis = 0;                 // Record the time of the last MIDI signal sent


void setup()
{
    //serial init to usb
    SHOW_SERIAL.begin(USB_SERIAL_BAUD_RATE);
    // Synth initialization. Since a hardware serial port is used here, the software serial port is commented out.
    synth.begin(COM_SERIAL, MIDI_SERIAL_BAUD_RATE);
    synth.setInstrument(0,CHANNEL_0,unit_synth_instrument_t::GrandPiano_1);
    initButtons(BUTTON_A_PIN);
    initButtons(BUTTON_B_PIN);
    initButtons(BUTTON_C_PIN);

    delay(1000);
}

void loop()
{
    detectButtonEvents(BUTTON_A_PIN, btnA, shortPressFlag_A, longPressFlag_A, releaseFlag_A);
    detectButtonEvents(BUTTON_B_PIN, btnB, shortPressFlag_B, longPressFlag_B, releaseFlag_B);
    detectButtonEvents(BUTTON_C_PIN, btnC, shortPressFlag_C, longPressFlag_C, releaseFlag_C);
    if(shortPressFlag_A){
        shortPressFlag_A = false;
        music_on_off_flag = !music_on_off_flag;
    }
    if(shortPressFlag_B){
        shortPressFlag_B = false;
        synth.increaseBpm();
    }
    if(shortPressFlag_C){
        shortPressFlag_C = false;
        synth.decreaseBpm();
    }
    play();
}

void play()
{
    // Calculate the interval between each beat (quarter note) in milliseconds
    // 60,000 milliseconds equals 1 minute
    // Adjust interval based on note type
    unsigned long interval = (BASIC_TIME / synth.getBpm()) / (noteType + 1);

    if(music_on_off_flag)
    {
        unsigned long currentMillis = millis();
        if (currentMillis - previousMillis >= interval)
        {
            previousMillis = currentMillis;
            if (beatCount == 0)
                synth.setNoteOn(CHANNEL_9, NOTE_D2, VELOCITY_DEFAULT);
            else
                synth.setNoteOn(CHANNEL_9, NOTE_C2, VELOCITY_DEFAULT);

            // Increment beat count
            beatCount++;

            // Every four beats, indicating the end of a measure
            if (beatCount >= beatsPerBar)
            {
                // Reset count
                beatCount = 0;
            }
        }
    }
}
This code demonstrates a simple rhythm sequencer. Button A toggles the rhythm on/off, Button B increases the tempo (BPM), and Button C decreases the tempo. The sequencer plays a basic drum pattern using MIDI notes on Channel 9. You can expand this example to add more complex rhythms or additional button functions.
Program annotation
This program expands on the basic MIDI note demo by introducing real-time user interaction through physical buttons. The code uses three buttons:
- Button A: Start/stop the rhythm sequence
- Button B: Increase the tempo (BPM)
- Button C: Decrease the tempo (BPM)
The play() function calculates the interval between beats based on the current BPM and note type, and triggers drum sounds (using MIDI notes D2 and C2 on Channel 9) in a repeating pattern. The beat count resets every measure, creating a simple metronome or drum machine effect.
This example demonstrates how to:
- Integrate button input for real-time control
- Dynamically adjust tempo and playback state
- Use the XIAO MIDI Synthesizer as a programmable rhythm generator
You can further enhance this demo by adding more buttons, supporting different drum sounds, or implementing more advanced sequencer logic.
Demo 3: Multi-Track Chord Playback with Button Control
This demo shows how to use the XIAO MIDI Synthesizer to play multi-track chords, with each chord triggered by a button. You can independently start/stop two different chord patterns using two physical buttons.
Materials Required
| XIAO MIDI Synthesizer |
|---|
|
Reference Programme
#include <Arduino.h>
#include "SAM2695Synth.h"
#include "Button.h"

#ifdef __AVR__
    #include <SoftwareSerial.h>
    SoftwareSerial SSerial(2, 3); // RX, TX
    #define COM_SERIAL SSerial
    #define SHOW_SERIAL Serial
    SAM2695Synth<SoftwareSerial> synth = SAM2695Synth<SoftwareSerial>::getInstance();
#endif

#if defined(ARDUINO_ARCH_RP2040) || defined(ARDUINO_ARCH_RP2350) ||  defined(ARDUINO_XIAO_RA4M1)
    #include <SoftwareSerial.h>
    SoftwareSerial SSerial(D7, D6); // RX, TX
    #define COM_SERIAL SSerial
    #define SHOW_SERIAL Serial
    SAM2695Synth<SoftwareSerial> synth = SAM2695Synth<SoftwareSerial>::getInstance();
#endif

#if  defined(CONFIG_IDF_TARGET_ESP32C3) || defined(CONFIG_IDF_TARGET_ESP32C6) || defined(CONFIG_IDF_TARGET_ESP32S3)
    #define COM_SERIAL Serial0
    #define SHOW_SERIAL Serial
    SAM2695Synth<HardwareSerial> synth = SAM2695Synth<HardwareSerial>::getInstance();
#endif

#ifdef SEEED_XIAO_M0
    #define COM_SERIAL Serial1
    #define SHOW_SERIAL Serial
    SAM2695Synth<Uart> synth = SAM2695Synth<Uart>::getInstance();
#elif defined(ARDUINO_SAMD_VARIANT_COMPLIANCE)
    #define COM_SERIAL Serial1
    #define SHOW_SERIAL SerialUSB
    SAM2695Synth<Uart> synth = SAM2695Synth<Uart>::getInstance();
#endif

#if defined(NRF52840_XXAA)
    #ifdef USE_TINYUSB
    #include <Adafruit_TinyUSB.h>
    #endif
    #define COM_SERIAL Serial1
    #define SHOW_SERIAL Serial

    SAM2695Synth<Uart> synth = SAM2695Synth<Uart>::getInstance();
#endif

#if defined(CONFIG_IDF_TARGET_ESP32S3)
    #define BUTTON_A_PIN 4
    #define BUTTON_B_PIN 3
    #define BUTTON_C_PIN 2
    #define BUTTON_D_PIN 1
#elif defined(CONFIG_IDF_TARGET_ESP32C3)
    #define BUTTON_A_PIN 5
    #define BUTTON_B_PIN 4
    #define BUTTON_C_PIN 3
    #define BUTTON_D_PIN 2
#elif defined(CONFIG_IDF_TARGET_ESP32C6)
    #define BUTTON_A_PIN 21
    #define BUTTON_B_PIN 2
    #define BUTTON_C_PIN 1
    #define BUTTON_D_PIN 0
#else //You need to refer to the corresponding manual...
    #define BUTTON_A_PIN 0 //You need to refer to the corresponding manual...
    #define BUTTON_B_PIN 1 //You need to refer to the corresponding manual...
    #define BUTTON_C_PIN 2 //You need to refer to the corresponding manual...
    #define BUTTON_D_PIN 3 //You need to refer to the corresponding manual...
#endif

//Define the structure needed for the button
BtnState btnA = {HIGH, HIGH, 0, 0, false};
BtnState btnB = {HIGH, HIGH, 0, 0, false};

//Example of multi-track chord data definition
// This structure controls playback on channel 9, with only two notes being played.
// The sound is set to the default sound, and the duration can be adjusted as needed.
const musicData chordTwoNotes =
{
    CHANNEL_1,                          //play on channel 9
    {
        {NOTE_C2, true},                //NOTE_C2 on
        {NOTE_FS2, true},               //NOTE_FS2 on
        {NOTE_E6, false},               //NOTE_E6 off
        {NOTE_CS5, false},              //NOTE_CS5 off
    },
    VELOCITY_DEFAULT ,                  //default velocity(64)
    0,                                  // index Not used here
    BPM_DEFAULT*8,                      //interval time
};

const musicData chordFourNotes =
{
    CHANNEL_2,                          // play on channel 0
    {
        {NOTE_F2, true},                // NOTE_F2 on
        {NOTE_B2, true},                // NOTE_B2 on
        {NOTE_E6, true},                // NOTE_E6 on
        {NOTE_CS5, true},               // NOTE_CS5 on
    },
    VELOCITY_DEFAULT ,                  // default velocity(64)
    0,                                  // index Not used here
    BPM_DEFAULT*4,                      // interval time
};

bool chordTwoNotesFlag = false;         // on or off chord_twoNotes
bool chordFourNotesFlag = false;        // on or off chord_fourNotes
unsigned long preMillisTwoNotes = 0;    // Record the time of the last MIDI signal sent on chord_twoNotes
unsigned long preMillisFourNotes= 0;    // Record the time of the last MIDI signal sent on const musicData chord_fourNotes =


void setup()
{
    //serial init to usb
    SHOW_SERIAL.begin(USB_SERIAL_BAUD_RATE);
    // Synth initialization. Since a hardware serial port is used here, the software serial port is commented out.
    synth.begin(COM_SERIAL, MIDI_SERIAL_BAUD_RATE);
    synth.setInstrument(0,CHANNEL_0,unit_synth_instrument_t::GrandPiano_1);
    // Initialize the buttons you are using.
    initButtons(BUTTON_A_PIN);
    initButtons(BUTTON_B_PIN);

    delay(1000);
}

void loop()
{
    detectButtonEvents(BUTTON_A_PIN, btnA, shortPressFlag_A, longPressFlag_A, releaseFlag_A);
    detectButtonEvents(BUTTON_B_PIN, btnB, shortPressFlag_B, longPressFlag_B, releaseFlag_B);
    if(shortPressFlag_A)
    {
        shortPressFlag_A = false;
        chordTwoNotesFlag = !chordTwoNotesFlag;
    }
    if(shortPressFlag_B)
    {
        shortPressFlag_B = false;
        chordFourNotesFlag = !chordFourNotesFlag;
    }
    play();
}

void play()
{
    unsigned long currentMillis = millis();
    if(chordTwoNotesFlag)
    {
        if (currentMillis - preMillisTwoNotes >= chordTwoNotes.delay)
        {
            preMillisTwoNotes = currentMillis;
            synth.playChord(chordTwoNotes);
        }
    }

    if(chordFourNotesFlag)
    {
        if (currentMillis - preMillisFourNotes >= chordFourNotes.delay)
        {
            preMillisFourNotes = currentMillis;
            synth.playChord(chordFourNotes);
        }
    }
}
This code demonstrates how to trigger two different multi-note chords using two buttons. Button A toggles the playback of a two-note chord, and Button B toggles the playback of a four-note chord. Each chord plays on a different MIDI channel and with its own timing.
Program annotation
This program demonstrates multi-track chord playback with real-time button control. The code defines two chord patterns (chordTwoNotes and chordFourNotes), each with its own MIDI channel, notes, and timing. Two buttons are used:
- Button A: Start/stop the two-note chord sequence
- Button B: Start/stop the four-note chord sequence
The play() function checks the timing for each chord and triggers playback if the corresponding flag is enabled. This allows for independent, overlapping playback of different chord patterns, simulating a simple multi-track sequencer.
This example demonstrates how to:
- Define and play custom chord structures
- Use multiple buttons for independent musical control
- Build more complex, layered musical performances with the XIAO MIDI Synthesizer
You can expand this demo by adding more chord patterns, supporting additional buttons, or synchronizing playback for more advanced musical effects.
Demo 4: Playing a Complete Melody Sequence
This demo shows how to use the XIAO MIDI Synthesizer to play a full melody sequence (such as a song) by storing note, duration, and delay data in an array. The example demonstrates how to play a pre-programmed melody using the built-in Violin instrument.
Materials Required
| XIAO MIDI Synthesizer |
|---|
|
Reference Programme
#include <SAM2695Synth.h>

#ifdef __AVR__
    #include <SoftwareSerial.h>
    SoftwareSerial SSerial(2, 3); // RX, TX
    #define COM_SERIAL SSerial
    #define SHOW_SERIAL Serial
    SAM2695Synth<SoftwareSerial> synth = SAM2695Synth<SoftwareSerial>::getInstance();
#endif

#if defined(ARDUINO_ARCH_RP2040) || defined(ARDUINO_ARCH_RP2350) ||  defined(ARDUINO_XIAO_RA4M1)
    #include <SoftwareSerial.h>
    SoftwareSerial SSerial(D7, D6); // RX, TX
    #define COM_SERIAL SSerial
    #define SHOW_SERIAL Serial
    SAM2695Synth<SoftwareSerial> synth = SAM2695Synth<SoftwareSerial>::getInstance();
#endif

#if  defined(CONFIG_IDF_TARGET_ESP32C3) || defined(CONFIG_IDF_TARGET_ESP32C6) || defined(CONFIG_IDF_TARGET_ESP32S3)
    #define COM_SERIAL Serial0
    #define SHOW_SERIAL Serial
    SAM2695Synth<HardwareSerial> synth = SAM2695Synth<HardwareSerial>::getInstance();
#endif

#ifdef SEEED_XIAO_M0
    #define COM_SERIAL Serial1
    #define SHOW_SERIAL Serial
    SAM2695Synth<Uart> synth = SAM2695Synth<Uart>::getInstance();
#elif defined(ARDUINO_SAMD_VARIANT_COMPLIANCE)
    #define COM_SERIAL Serial1
    #define SHOW_SERIAL SerialUSB
    SAM2695Synth<Uart> synth = SAM2695Synth<Uart>::getInstance();
#endif


#if defined(NRF52840_XXAA)
    #ifdef USE_TINYUSB
    #include <Adafruit_TinyUSB.h>
    #endif
    #define COM_SERIAL Serial1
    #define SHOW_SERIAL Serial

    SAM2695Synth<Uart> synth = SAM2695Synth<Uart>::getInstance();
#endif

// Can be moved in header file i.e notes.h
#define ARRAY_LEN(array) (sizeof(array) / sizeof(array[0]))

const int midi1[453][3] = {
 {NOTE_D4, 300, 0},
 {NOTE_C4, 300, 0},
 {NOTE_F4, 600, 0},
 {NOTE_F4, 600, 0},
 {NOTE_G4, 600, 0},
 {NOTE_G4, 600, 0},
 {NOTE_A4, 600, 0},
 {NOTE_F4, 600, 0},
 {NOTE_C4, 600, 0},
 {NOTE_D4, 300, 0},
 {NOTE_C4, 300, 0},
 {NOTE_F4, 600, 0},
 {NOTE_F4, 600, 0},
 {NOTE_G4, 600, 0},
 {NOTE_G4, 600, 0},
 {NOTE_A4, 600, 0},
 {NOTE_F4, 1500, 0},
 {NOTE_D4, 300, 0},
 {NOTE_C4, 300, 0},
 {NOTE_F4, 600, 0},
 {NOTE_F4, 600, 0},
 {NOTE_G4, 600, 0},
 {NOTE_G4, 600, 0},
 {NOTE_A4, 600, 0},
 {NOTE_F4, 600, 0},
 {NOTE_C4, 600, 0},
 {NOTE_D4, 300, 0},
 {NOTE_C4, 300, 0},
 {NOTE_F4, 600, 0},
 {NOTE_F4, 600, 0},
 {NOTE_G4, 600, 0},
 {NOTE_F4, 2000, 500},


 {NOTE_F4, 300, 0},
 {NOTE_E4, 300, 0},
 {NOTE_C4, 300, 0},
 {NOTE_A3, 300, 0},
 {NOTE_D4, 300, 0},
 {NOTE_C4, 300, 0},
 {NOTE_F4, 600, 0},
 {NOTE_F4, 600, 0},
 {NOTE_G4, 600, 0},
 {NOTE_G4, 600, 0},
 {NOTE_A4, 600, 0},
 {NOTE_F4, 600, 0},
 {NOTE_E4, 600, 0},
 {NOTE_D4, 1200, 0},
 {NOTE_E4, 600, 0},
 {NOTE_F4, 300, 0},
 {NOTE_E4, 600, 0},
 {NOTE_F4, 2000, 500},


 {NOTE_C4, 1200, 0},
 {NOTE_E4, 400, 0},
 {NOTE_F4, 2000, 500},
 {NOTE_C4, 1500, 0},
 {NOTE_F4, 600, 0},
 {NOTE_G4, 1600, 0},
 {NOTE_G4, 300, 0},
 {NOTE_A4, 300, 0},
 {NOTE_AS4, 600, 0},
 {NOTE_A4, 1200, 0},
 {NOTE_G4, 500, 0},
 {NOTE_F4, 300, 0},
 {NOTE_G4, 1000, 500},
 {NOTE_F4, 400, 0},
 {NOTE_E4, 300, 0},
 {NOTE_F4, 3000, 0},
 {NOTE_C4, 1200, 0},
 {NOTE_E4, 400, 0},
 {NOTE_F4, 2000, 500},
 {NOTE_C4, 1500, 0},
 {NOTE_F4, 600, 0},
 {NOTE_G4, 1600, 0},
 {NOTE_G4, 300, 0},
 {NOTE_A4, 300, 0},
 {NOTE_AS4, 600, 0},
 {NOTE_A4, 1200, 0},
 {NOTE_G4, 500, 0},
 {NOTE_F4, 800, 0},
 {NOTE_G4, 800, 0},
 {NOTE_AS4, 400, 0},
 {NOTE_A4, 300, 0},
 {NOTE_F4, 3000, 0},

 {NOTE_AS4, 1200, 0},
 {NOTE_F4, 600, 0},
 {NOTE_G4, 300, 0},
 {NOTE_A4, 2000, 500},
 {NOTE_AS4, 1200, 0},
 {NOTE_F4, 600, 0},
 {NOTE_G4, 300, 0},
 {NOTE_A4, 2000, 500},
 {NOTE_G4, 300, 0},
 {NOTE_F4, 300, 0},
 {NOTE_D4, 600, 0},
 {NOTE_E4, 600, 0},
 {NOTE_F4, 600, 0},
 {NOTE_F4, 600, 0},
 {NOTE_C4, 600, 0},
 {NOTE_C4, 300, 0},
 {NOTE_F4, 1100, 500},
 {NOTE_F4, 300, 0},
 {NOTE_AS4, 300, 0},
 {NOTE_A4, 600, 0},
 {NOTE_G4, 600, 0},
 {NOTE_F4, 300, 0},
 {NOTE_G4, 1800, 500},
 {NOTE_C4, 300, 0},
 {NOTE_E4, 300, 0},
 {NOTE_F4, 300, 0},
 {NOTE_G4, 300, 0},
 {NOTE_F4, 1000, 500},


 {NOTE_G4, 400, 0},
 {NOTE_G4, 600, 0},
 {NOTE_F4, 300, 0},
 {NOTE_D4, 600, 0},
 {NOTE_F4, 300, 0},
 {NOTE_G4, 300, 0},
 {NOTE_A4, 300, 0},
 {NOTE_B4, 300, 0},
 {NOTE_G4, 300, 0},
 {NOTE_A4, 700, 0},
 {NOTE_F4, 300, 0},
 {NOTE_C4, 300, 0},
 {NOTE_F4, 300, 0},
 {NOTE_G4, 300, 0},
 {NOTE_G4, 600, 0},
 {NOTE_F4, 300, 0},
 {NOTE_D4, 600, 0},
 {NOTE_G4, 300, 0},
 {NOTE_F4, 300, 0},
 {NOTE_B4, 300, 0},
 {NOTE_A4, 1500, 500},


 {NOTE_C4, 300, 0},
 {NOTE_F4, 300, 0},
 {NOTE_G4, 300, 0},
 {NOTE_G4, 600, 0},
 {NOTE_F4, 300, 0},
 {NOTE_D4, 600, 0},
 {NOTE_F4, 300, 0},
 {NOTE_G4, 300, 0},
 {NOTE_A4, 300, 0},
 {NOTE_B4, 300, 0},
 {NOTE_G4, 300, 0},
 {NOTE_A4, 600, 0},
 {NOTE_F4, 600, 0},
 {NOTE_E4, 600, 0},
 {NOTE_D4, 1200, 0},
 {NOTE_E4, 600, 0},
 {NOTE_F4, 300, 0},
 {NOTE_E4, 600, 0},
 {NOTE_F4, 1200, 500},


 {NOTE_G4, 300, 0},
 {NOTE_G4, 600, 0},
 {NOTE_F4, 300, 0},
 {NOTE_D4, 600, 0},
 {NOTE_F4, 300, 0},
 {NOTE_G4, 300, 0},
 {NOTE_A4, 300, 0},
 {NOTE_B4, 300, 0},
 {NOTE_G4, 300, 0},
 {NOTE_A4, 600, 0},
 {NOTE_F4, 300, 0},
 {NOTE_C4, 300, 0},
 {NOTE_F4, 300, 0},
 {NOTE_G4, 300, 0},
 {NOTE_G4, 600, 0},
 {NOTE_F4, 300, 0},
 {NOTE_D4, 600, 0},
 {NOTE_G4, 300, 0},
 {NOTE_F4, 300, 0},
 {NOTE_B4, 300, 57},
 {NOTE_A4, 1000, 0},

 {NOTE_G3, 300, 0},
 {NOTE_C4, 300, 0},
 {NOTE_F4, 300, 0},
 {NOTE_G4, 300, 0},
 {NOTE_G4, 600, 0},
 {NOTE_F4, 300, 0},
 {NOTE_D4, 600, 0},
 {NOTE_F4, 300, 0},
 {NOTE_G4, 300, 0},
 {NOTE_A4, 300, 0},
 {NOTE_B4, 300, 0},
 {NOTE_G4, 300, 0},
 {NOTE_A4, 600, 0},
 {NOTE_F4, 600, 0},
 {NOTE_E4, 600, 0},
 {NOTE_D4, 1000, 0},
 {NOTE_E4, 600, 0},
 {NOTE_F4, 300, 0},
 {NOTE_E4, 600, 0},
 {NOTE_F4, 1000, 0},


 {NOTE_G3, 300, 0},
 {NOTE_C4, 300, 0},
 {NOTE_F4, 300, 0},
 {NOTE_G4, 300, 0},
 {NOTE_G4, 600, 0},
 {NOTE_F4, 300, 0},
 {NOTE_D4, 600, 0},
 {NOTE_F4, 300, 0},
 {NOTE_G4, 300, 0},
 {NOTE_A4, 300, 0},
 {NOTE_B4, 300, 0},
 {NOTE_G4, 300, 0},
 {NOTE_A4, 600, 0},
 {NOTE_F4, 300, 0},
 {NOTE_C4, 300, 0},
 {NOTE_F4, 300, 0},
 {NOTE_G4, 300, 0},
 {NOTE_G4, 600, 0},
 {NOTE_F4, 300, 0},
 {NOTE_D4, 600, 0},
 {NOTE_G4, 300, 0},
 {NOTE_F4, 300, 0},
 {NOTE_B4, 300, 26},
 {NOTE_A4, 1200, 0},


 {NOTE_G3, 300, 0},
 {NOTE_C4, 300, 0},
 {NOTE_F4, 300, 0},
 {NOTE_G4, 300, 0},
 {NOTE_G4, 600, 0},
 {NOTE_F4, 300, 0},
 {NOTE_D4, 600, 0},
 {NOTE_F4, 300, 0},
 {NOTE_G4, 300, 0},
 {NOTE_A4, 300, 0},
 {NOTE_B4, 300, 0},
 {NOTE_G4, 300, 0},
 {NOTE_A4, 600, 0},
 {NOTE_F4, 600, 0},
 {NOTE_E4, 600, 0},
 {NOTE_D4, 1000, 0},
 {NOTE_E4, 1000, 0},
 {NOTE_F4, 300, 0},
 {NOTE_E4, 600, 0},


 {NOTE_C4, 800, 0},
 {NOTE_C4, 300, 0},
 {NOTE_C4, 300, 0},
 {NOTE_DS4, 300, 0},
 {NOTE_D4, 300, 0},
 {NOTE_C4, 600, 0},
 {NOTE_AS3, 600, 0},
 {NOTE_C4, 2000, 0},
 {NOTE_C4, 800, 0},
 {NOTE_C4, 800, 0},
 {NOTE_DS4, 300, 0},
 {NOTE_F4, 300, 0},
 {NOTE_G4, 600, 0},
 {NOTE_F4, 600, 0},
 {NOTE_GS4, 600, 0},
 {NOTE_G4, 1200, 0},
 {NOTE_C4, 800, 0},
 {NOTE_C4, 800, 0},
 {NOTE_DS4, 300, 0},
 {NOTE_D4, 300, 0},
 {NOTE_C4, 300, 0},
 {NOTE_C4, 300, 0},
 {NOTE_AS3, 600, 0},
 {NOTE_C4, 1200, 0},
 {NOTE_C4, 300, 0},
 {NOTE_F4, 300, 0},
 {NOTE_G4, 600, 0},
 {NOTE_F4, 600, 0},
 {NOTE_F4, 600, 0},
 {NOTE_GS4, 300, 0},
 {NOTE_G4, 300, 0},
 {NOTE_F4, 300, 0},
 {NOTE_F4, 300, 0},
 {NOTE_DS4, 600, 1200},


 {NOTE_G3, 300, 0},
 {NOTE_C4, 300, 0},
 {NOTE_F4, 500, 100},
 {NOTE_G4, 500, 0},
 {NOTE_F4, 300, 0},
 {NOTE_D4, 600, 0},
 {NOTE_F4, 300, 0},
 {NOTE_G4, 300, 0},
 {NOTE_A4, 300, 0},
 {NOTE_B4, 300, 0},
 {NOTE_G4, 300, 0},
 {NOTE_A4, 500, 0},
 {NOTE_F4, 300, 0},
 {NOTE_C4, 300, 0},
 {NOTE_F4, 300, 0},
 {NOTE_G4, 300, 0},
 {NOTE_G4, 600, 0},
 {NOTE_F4, 300, 0},
 {NOTE_D4, 500, 100},
 {NOTE_G4, 300, 0},
 {NOTE_F4, 300, 0},
 {NOTE_B4, 300, 57},
 {NOTE_A4, 1000, 0},


 {NOTE_G3, 300, 0},
 {NOTE_C4, 300, 0},
 {NOTE_F4, 300, 0},
 {NOTE_G4, 300, 0},
 {NOTE_G4, 600, 0},
 {NOTE_F4, 300, 0},
 {NOTE_D4, 600, 0},
 {NOTE_F4, 300, 0},
 {NOTE_G4, 300, 0},
 {NOTE_A4, 300, 0},
 {NOTE_B4, 300, 0},
 {NOTE_G4, 300, 0},
 {NOTE_A4, 600, 0},
 {NOTE_F4, 600, 0},
 {NOTE_E4, 600, 0},
 {NOTE_D4, 1000, 0},
 {NOTE_E4, 600, 0},
 {NOTE_F4, 300, 0},
 {NOTE_E4, 600, 0},
 {NOTE_F4, 1500, 0},


 {NOTE_G3, 300, 0},
 {NOTE_C4, 300, 0},
 {NOTE_F4, 300, 0},
 {NOTE_G4, 300, 0},
 {NOTE_G4, 600, 0},
 {NOTE_F4, 300, 0},
 {NOTE_D4, 600, 0},
 {NOTE_F4, 300, 0},
 {NOTE_G4, 300, 0},
 {NOTE_A4, 300, 0},
 {NOTE_B4, 300, 0},
 {NOTE_G4, 300, 0},
 {NOTE_A4, 600, 0},
 {NOTE_F4, 300, 0},
 {NOTE_C4, 300, 0},
 {NOTE_F4, 300, 0},
 {NOTE_G4, 300, 0},
 {NOTE_G4, 600, 0},
 {NOTE_F4, 300, 0},
 {NOTE_D4, 600, 0},
 {NOTE_G4, 300, 0},
 {NOTE_F4, 300, 10},
 {NOTE_B4, 300, 10},
 {NOTE_A4, 1500, 0},
 {NOTE_G3, 300, 0},
 {NOTE_C4, 300, 0},
 {NOTE_F4, 300, 0},
 {NOTE_G4, 300, 0},
 {NOTE_G4, 600, 0},
 {NOTE_F4, 300, 0},
 {NOTE_D4, 600, 0},
 {NOTE_F4, 300, 0},
 {NOTE_G4, 300, 0},
 {NOTE_A4, 300, 0},
 {NOTE_B4, 300, 0},
 {NOTE_G4, 300, 0},
 {NOTE_A4, 600, 0},
 {NOTE_F4, 600, 0},
 {NOTE_E4, 600, 0},
 {NOTE_D4, 1200, 0},
 {NOTE_E4, 600, 0},
 {NOTE_F4, 300, 0},
 {NOTE_E4, 600, 0},
 {NOTE_F4, 1500, 0},


 {NOTE_G3, 300, 0},
 {NOTE_C4, 300, 0},
 {NOTE_F4, 300, 0},
 {NOTE_G4, 300, 0},
 {NOTE_G4, 600, 0},
 {NOTE_F4, 300, 0},
 {NOTE_D4, 600, 0},
 {NOTE_F4, 300, 0},
 {NOTE_G4, 300, 0},
 {NOTE_A4, 300, 0},
 {NOTE_B4, 300, 0},
 {NOTE_G4, 300, 0},
 {NOTE_A4, 600, 0},
 {NOTE_F4, 300, 0},
 {NOTE_C4, 300, 0},
 {NOTE_F4, 300, 0},
 {NOTE_G4, 300, 0},
 {NOTE_G4, 600, 0},
 {NOTE_F4, 300, 0},
 {NOTE_D4, 600, 0},
 {NOTE_G4, 300, 0},
 {NOTE_F4, 300, 0},
 {NOTE_B4, 300, 57},
 {NOTE_A4, 1200, 0},
 {NOTE_G3, 300, 0},
 {NOTE_C4, 300, 0},
 {NOTE_F4, 300, 0},
 {NOTE_G4, 300, 0},
 {NOTE_G4, 600, 0},
 {NOTE_F4, 300, 0},
 {NOTE_D4, 600, 0},
 {NOTE_F4, 300, 0},
 {NOTE_G4, 300, 0},
 {NOTE_A4, 300, 0},
 {NOTE_B4, 300, 0},
 {NOTE_G4, 300, 0},
 {NOTE_A4, 600, 0},
 {NOTE_F4, 600, 0},
 {NOTE_E4, 600, 0},
 {NOTE_D4, 1200, 0},
 {NOTE_E4, 600, 0},
 {NOTE_F4, 300, 0},
 {NOTE_E4, 600, 0},
 {NOTE_F4, 2000, 0},


 {NOTE_G4, 600, 0},
 {NOTE_F4, 300, 0},
 {NOTE_D4, 600, 0},
 {NOTE_F4, 300, 0},
 {NOTE_G4, 300, 0},
 {NOTE_A4, 300, 0},
 {NOTE_B4, 300, 0},
 {NOTE_G4, 300, 0},
 {NOTE_A4, 600, 0},
 {NOTE_F4, 300, 0},
 {NOTE_C4, 300, 0},
 {NOTE_F4, 300, 0},
 {NOTE_G4, 300, 0},
 {NOTE_G4, 600, 0},
 {NOTE_F4, 300, 0},
 {NOTE_D4, 600, 0},
 {NOTE_G4, 300, 0},
 {NOTE_F4, 300, 0},
 {NOTE_B4, 300, 0},
 {NOTE_A4, 1200, 0},
 {NOTE_G3, 300, 0},
 {NOTE_C4, 300, 0},
 {NOTE_F4, 300, 0},
 {NOTE_G4, 300, 0},
 {NOTE_G4, 600, 0},
 {NOTE_F4, 300, 0},
 {NOTE_D4, 600, 0},
 {NOTE_F4, 300, 0},
 {NOTE_G4, 300, 0},
 {NOTE_A4, 300, 0},
 {NOTE_B4, 300, 0},
 {NOTE_G4, 300, 0},
 {NOTE_A4, 600, 0},
 {NOTE_F4, 600, 0},
 {NOTE_E4, 600, 0},
 {NOTE_D4, 1200, 0},
 {NOTE_E4, 600, 0},
 {NOTE_F4, 300, 0},
 {NOTE_E4, 600, 0},
 {NOTE_F4, 1500, 0},
};

void playMidi(const int notes[][3], size_t len) {
    for (int i = 0; i < len; i++) {
        // Play note
        synth.setNoteOn(CHANNEL_0, notes[i][0], 110);
        delay(notes[i][1]);
        // Stop note
        synth.setNoteOff(CHANNEL_0, notes[i][0]);
        delay(notes[i][2]);
    }
}

void setup() {
    // Initialize USB serial port
    SHOW_SERIAL.begin(USB_SERIAL_BAUD_RATE);
    // Initialize MIDI synthesizer
    synth.begin(COM_SERIAL, MIDI_SERIAL_BAUD_RATE);
    // Set instrument sound to Violin
    synth.setInstrument(0, CHANNEL_0, unit_synth_instrument_t::Violin);
    delay(1000);

    // Play MIDI notes
    playMidi(midi1, ARRAY_LEN(midi1));
}

void loop() {
    // Main loop is empty because the music only plays once
}
This code demonstrates how to play a complete melody sequence by iterating through a large array of notes, durations, and delays. The melody will play once after power-up or reset. You can modify the array to play different songs or add more complex arrangements.
Program annotation
This program demonstrates how to:
- Store a full melody as an array of note, duration, and delay values
- Use a helper function (
playMidi) to iterate through the melody and play each note in sequence - Select a specific instrument (Violin) for playback
- Play a song automatically on startup
You can expand this demo by:
- Changing the instrument or note data to play different songs
- Adding button controls to start/stop or repeat playback
- Implementing multi-track or polyphonic playback for more advanced musical effects
For those looking to convert MIDI files to Arduino code, you can try tools like Midi2ArduinoTone. However, please note that the note values generated by such tools may need to be modified to work with the XIAO MIDI Synthesizer, as they use different note mappings. These tools can still be helpful as a starting point for converting MIDI files into a format you can adapt for this synthesizer.
Resources
- [PDF] XIAO MIDI Synthesizer SCH
- [ZIP] XIAO MIDI Synthesizer SCH&PCB
- [GitHub] Seeed_Arduino_MIDIMaster Library
Troubleshooting
Q1: How can I convert a MIDI file into Arduino code for the XIAO MIDI Synthesizer?
To convert a MIDI file into Arduino code that can be used with the XIAO MIDI Synthesizer, you can follow these steps:
-
Obtain a MIDI File
You can download free MIDI files from the following websites:
-
Convert the MIDI File to Text
Use the open-source tool midicomp to convert your MIDI file into a human-readable text format.
-
Convert the MIDI Text to Playable Code
After converting your MIDI file to a text format using
midicomp, you need to process this text into a C/C++ array that the XIAO MIDI Synthesizer can play. Seeed provides Python scripts to automate this conversion:- Fast rhythm, single track (each note start as interval):
change_fast.py - Slower rhythm, single track (each note end as interval):
change_shuqing.py - Multi-track processing:
change_mutich.py
Example usage:
- Place your MIDI text file (e.g.,
1.txt) in the same directory as the script. - Run the script in your terminal:
python change_fast.pyThis will generate a header file (e.g.,
track_from_miditext.h) containing the note array.- Copy the generated array into your Arduino sketch, replacing the melody data.
tip- The scripts map MIDI note numbers to the XIAO MIDI Synthesizer's note definitions automatically.
- You can adjust the script or the generated array for custom arrangements or to fit memory constraints.
- Integrate the Generated Code
- Open the generated
.hfile and copy themusicDataarray. - Paste it into your Arduino project, replacing the existing melody array.
- Update your playback logic if needed to match the new array structure.
- Fast rhythm, single track (each note start as interval):
Q2: Why is it sometimes impossible to upload programs to the XIAO MIDI Synthesizer?
Since the ESP32-C3's program is flashed via UART, occasional program crashes may result in errors preventing program uploads to XIAO. Additionally, because XIAO and the MIDI board communicate directly through UART, traditional boot methods may not work directly with XIAO. You can try the following approach:
- Power on the XIAO MIDI Synthesizer and remove the XIAO ESP32-C3 development board.
- Disconnect the USB cable.
- Press and hold the B button on the XIAO ESP32-C3 board without releasing it.
- Reconnect the USB cable, then release the B button.
- Upload the program.
This procedure should enable successful program upload.
Tech Support & Product Discussion
Thank you for choosing our products! We are here to provide you with different support to ensure that your experience with our products is as smooth as possible. We offer several communication channels to cater to different preferences and needs.